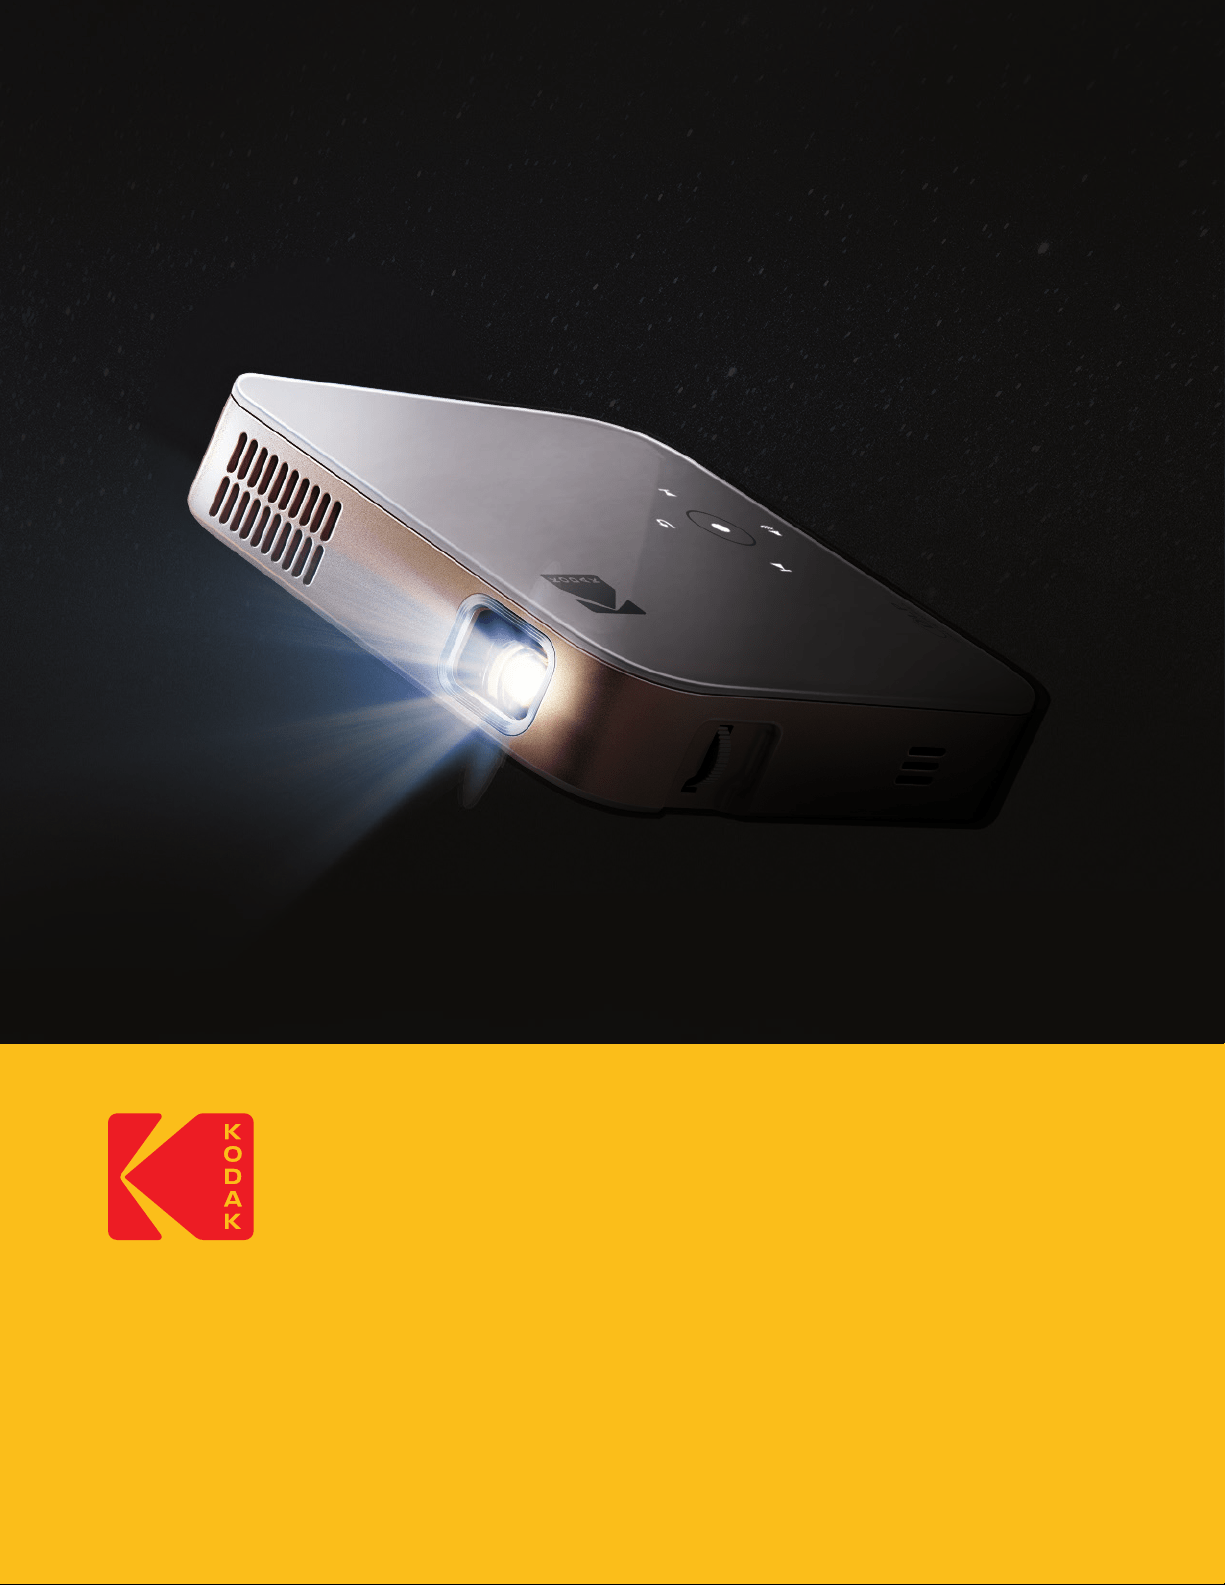
KODAK LUMA 350
PORTABLE SMART PROJECTOR
User Manual
4.4"H | 4.4"W | 0.87"D (11.2 cm | 11.2 cm | 2.2 cm)
Please read all directions before using the product and retain this guide for reference.

CONTENTS
INTRODUCTION
SPECIFICATIONS
BOX CONTENTS
SAFETY PRECAUTIONS
PRODUCT OVERVIEW
REMOTE CONTROL OVERVIEW
USING YOUR PHONE
USING A MOUSE
CHARGING THE PROJECTOR
USING THE PROJECTOR TO CHARGE DEVICES
USING THE AUDIO OUT JACK
POWERING THE PROJECTOR ON/OFF
PHOTO PLAYBACK CONTROLS
VIDEO PLAYBACK CONTROLS
ADJUSTING FOCUS
ADJUSTING VOLUME
CONNECTING TO WIRELESS NETWORKS
ADJUSTING BRIGHTNESS
SET THE SCREEN ORIENTATION
SETTING DATE AND TIME
RESETTING THE PROJECTOR
CONNECTING EXTERNAL DEVICES
SCREEN MIRRORING ANDROIDWINDOWS MIRACAST®
SCREEN MIRRORING IOS
PRELOADED APPS
USING THE APP STORE
UPDATING YOUR SOFTWARE
INSTALLING AN ONLINE FIRMWARE UPDATE
CUSTOMER SERVICE
WARRANTY
1
2
3
4
5
6
7
8
9
10
11
12
13
14
15
16
17
18
19
20
21
22
23
24
25
26
27
28
29
30
3
3
3
34
4
5
5
6
6
7
7
7
8
8
8
9
910
10
1011
11
1112
12
13
1314
14
14
15
1516
16
1618

3
Thank you for purchasing the KODAK LUMA 350 PORTABLE SMART PROJECTOR. This User Guide is
intended to provide you with guidelines to ensure that operation of this product is safe and does not
pose risk to the user. Any use that does not conform to the guidelines described in this User Guide may
void the limited warranty.
Please read all directions before using the product and retain this guide for reference. This product is
intended for household use only.
This product is covered by a limited one-year warranty. Coverage is subject to limits and exclusions.
See warranty for details.
1. INTRODUCTION
Rated Input: 15V, 1.5A
Rated Output: 5V, 1.0A
ANSI Lumens: 150
Native Resolution: 854 x 480
KODAK LUMA 350
Remote Control
HDMI®-to-HDMI® Cable
Charging Cable
User Guide
2. SPECIFICATIONS
• Do not attempt to disassemble this device for any reason.
• Do not store the projector in areas where it will be exposed to high temperatures, humidity, or direct
sunlight. Exposure to any or all of these could permanently damage the projector.
• Never handle the projector with damp or wet hands. This could damage the projector or create the
risk of electric shock.
• Keep the projector out of the reach of children.
• Never point the projector at someone else’s face or look directly into the projector light. The light is
bright and could cause damage.
• Do not use products such as alcohol, gasoline, diluent, or any other organic solvent when cleaning or
attempting to clean this product.
• Do not use this device in an environment where it will be exposed to heavy dust or humidity/moisture.
• Never drop or shake the projector, as this could cause it to malfunction or permanently damage the
inside parts.
• Do not use the projector while bathing or in a shower.
• Do not place or store the projector where it can fall or be pulled into a tub or sink.
3. BOX CONTENTS
4. SAFETY PRECAUTIONS
4
• Do not place, drop, or submerge the projector in water or any other liquid.
• If the projector somehow falls into water despite you taking all of the above precautions, please do not
reach into the water to retrieve it. Unplug it immediately and then retrieve it.
• Take care that objects do not fall and liquids are not spilled onto the projector.
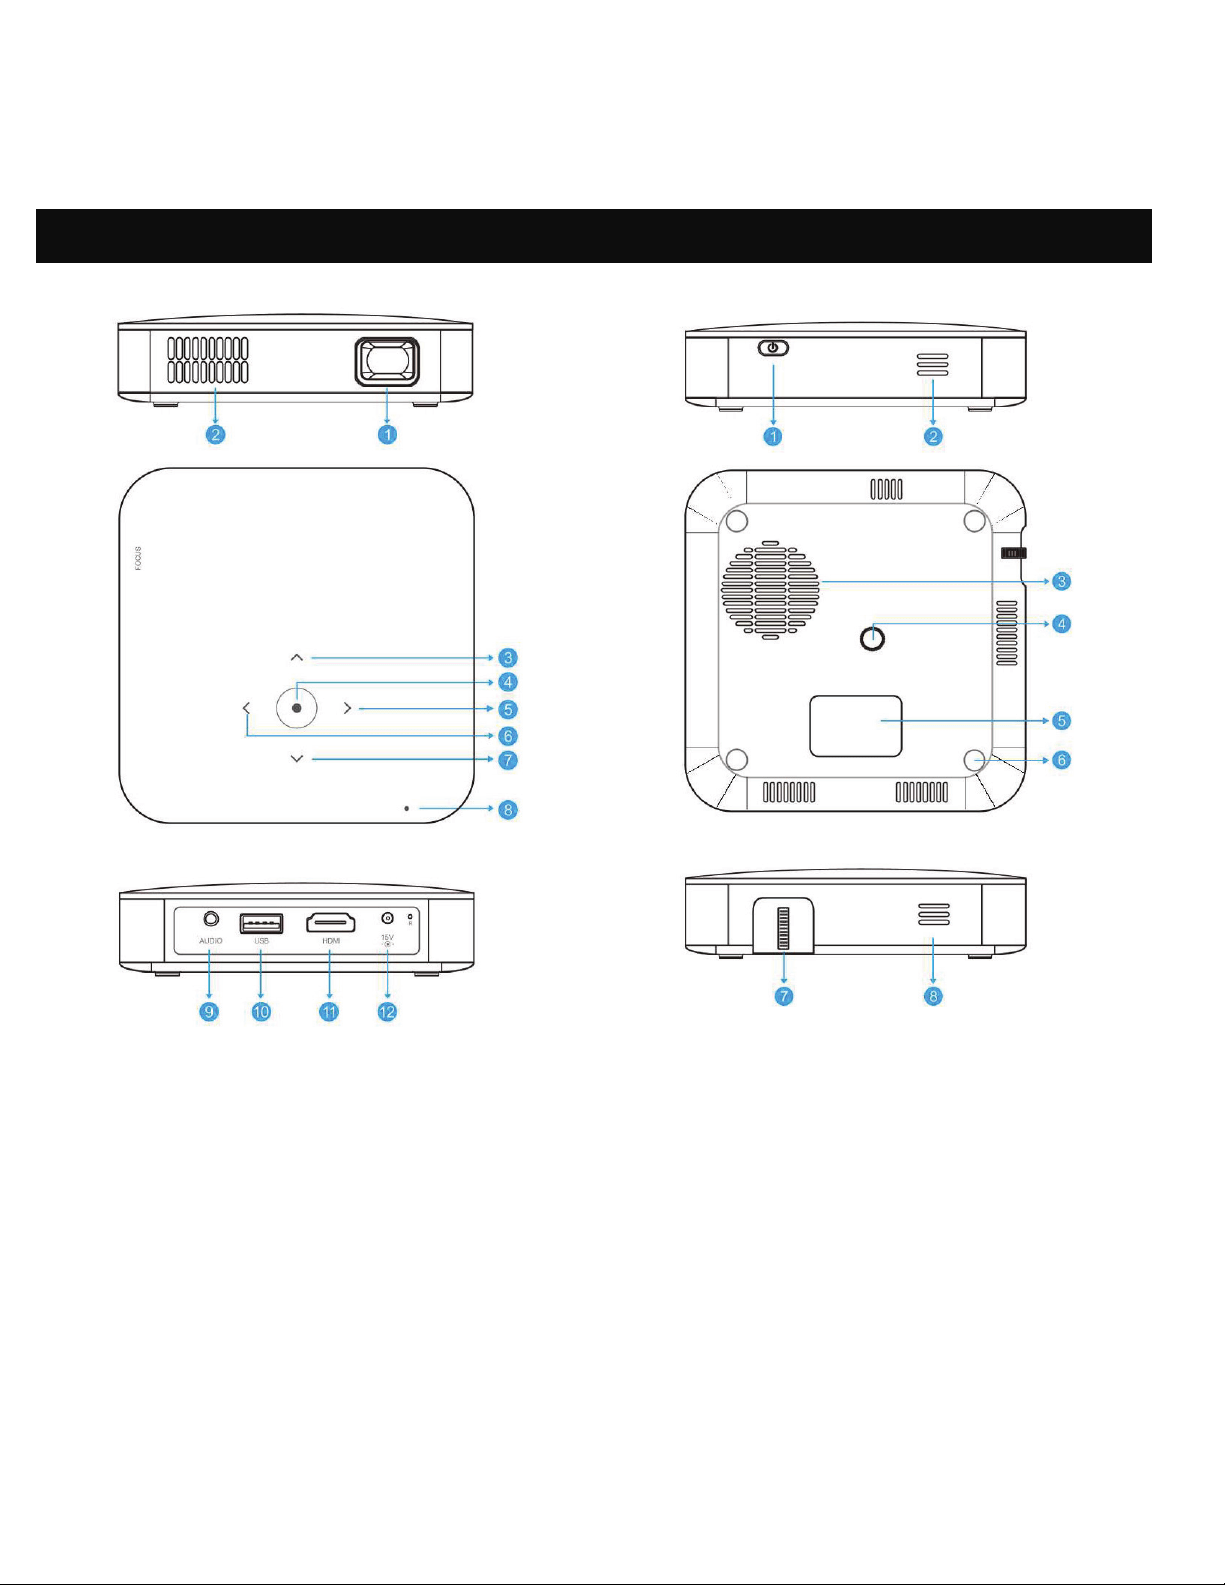
5. PRODUCT OVERVIEW
1. Lens
2. Air Outlet
3. Up
4. Conirm / Back (press more than 2 seconds)
5. Right
6. Left
7. Down
8. Power Indicator
9. Audio Output (3.5mm)
10. USB Input / Power Out
11. HDMI Input
12. DC Input (15V/1.5A)
1. Power
2. Speaker
3. Air Inlet
4. Tripod Dock
5. Rating Label
6. Non-slip Mat
7. Focus Wheel
8. Speaker
5
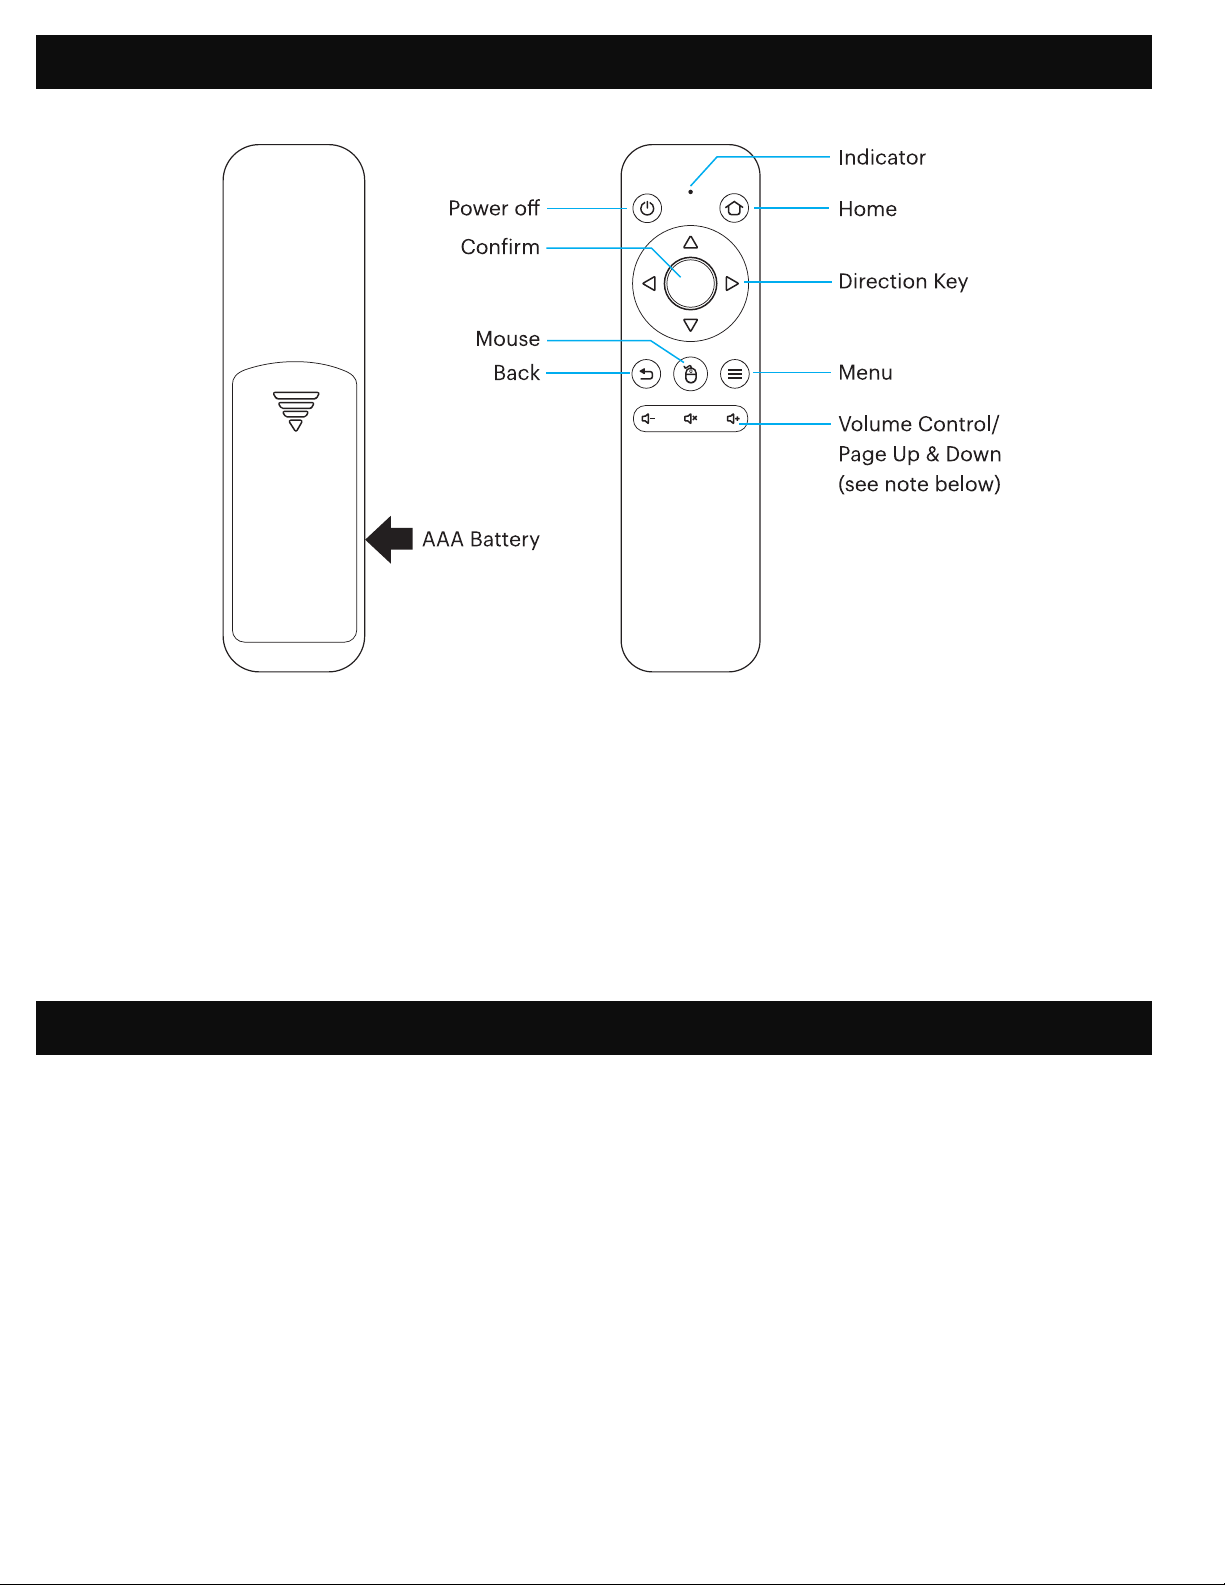
6. REMOTE CONTROL OVERVIEW
7. USING YOUR PHONE
You will need to pair the remote control with the projector before using it. Follow these instructions to
pair the 2.4G wireless remote with your projector.
1. Within two (2) minutes of turning on the projector, press and hold both the Vol + and Vol – keys for
approximately three seconds.
2. The indicator light in the remote will lash quickly during this time and then stop. When the
lashing stops, this indicates that the remote has successfully paired with the projector.
NOTE: While the mouse button is activated, the Volume + or Volume - keys will function as page up
and down.
For greater ease of use and a more intuitive experience, you can control the projector with the KODAK
LUMA Companion App from the Apple App Store or the Google Play store.
Once installed, you can use your phone as a remote to navigate through menus, mirror your screen,
easily input login information for apps, and control media volume. Make sure to try out the reverse
screen mirroring feature, which allows you to view the LUMA interface directly on your phone, and
navigate that way!
1. Search for the KODAK LUMA in your phone’s app store.
2. Download the app, and make sure that your phone is connected to the same Wi-Fi network as
the projector.
3. Open the app and follow the instructions to pair it with the projector to enable remote
functionality.
6
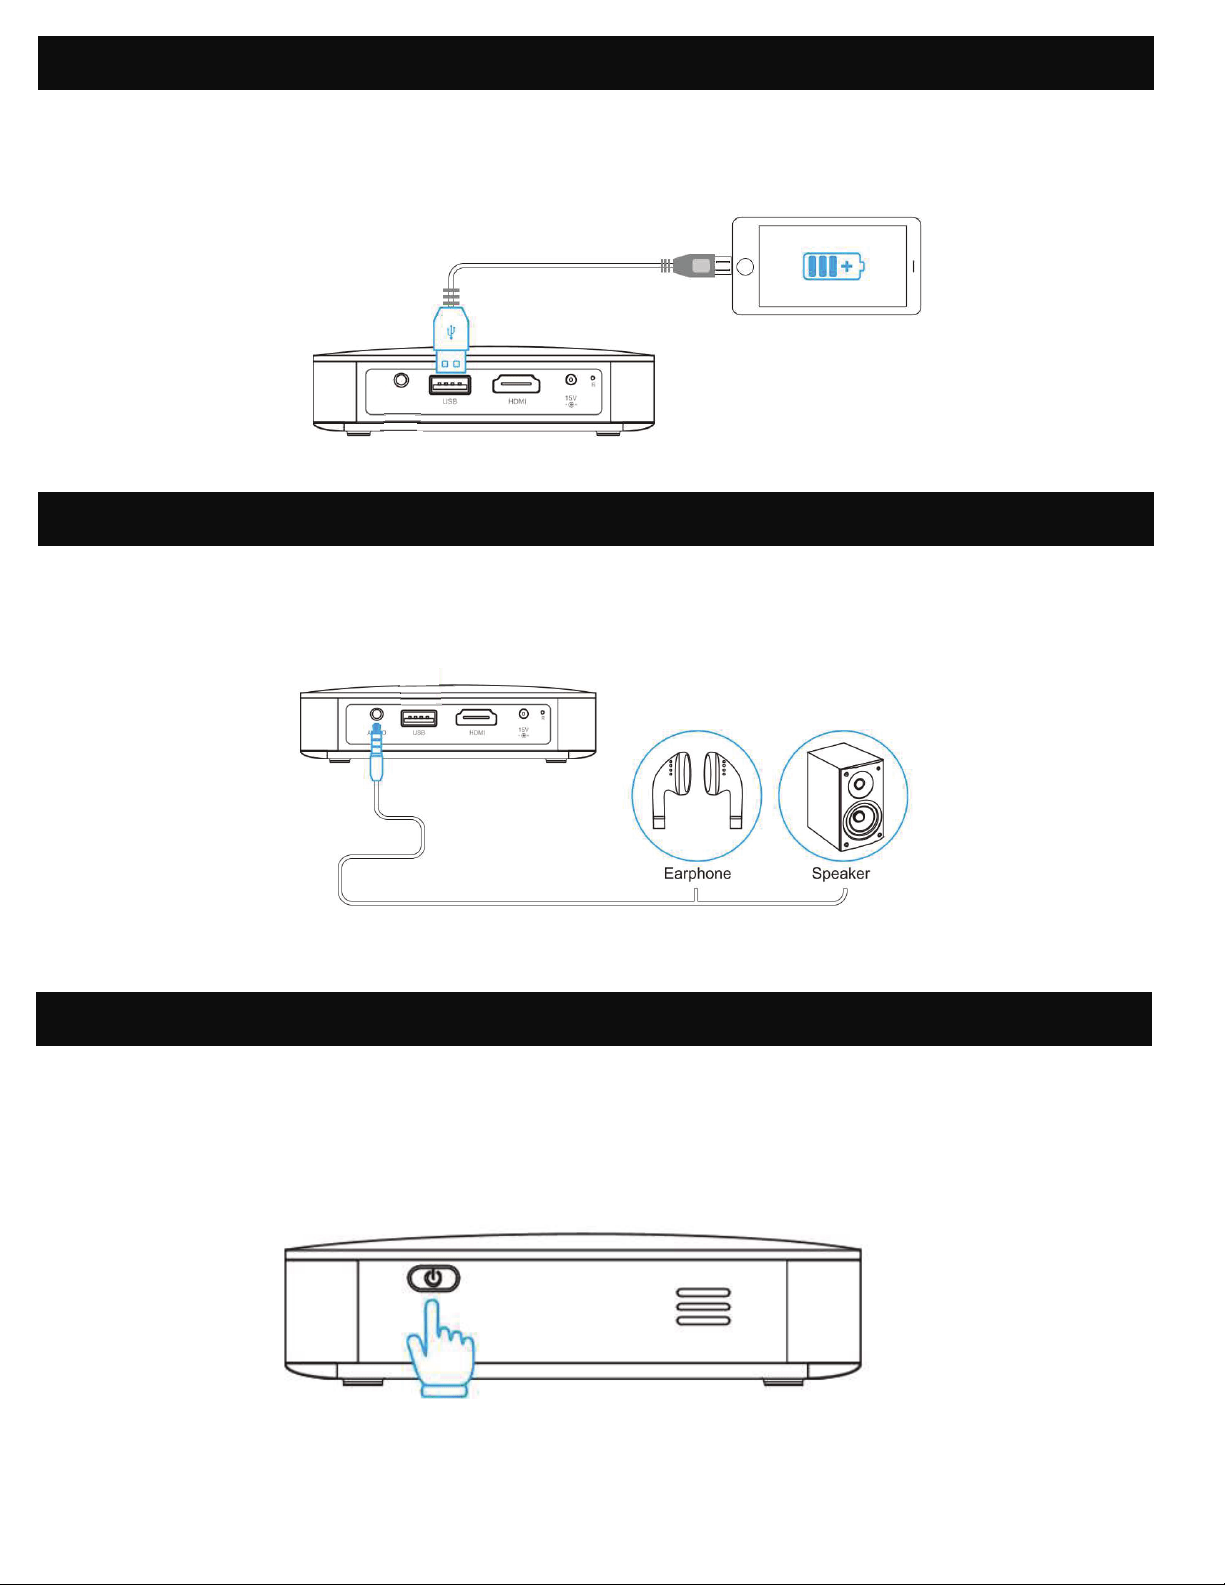
Before using the projector, connect it to the charger and allow it to fully charge. Always use the original
charger that was provided to ensure proper charging.
If the red indicator LED light is lashing, this means that the battery is low and you should plug the
projector in for it to recharge. While the projector is charging, the indicator LED will be a solid red light.
Once the process has completed, the indicator LED will change to a solid white light.
9. CHARGING THE PROJECTOR
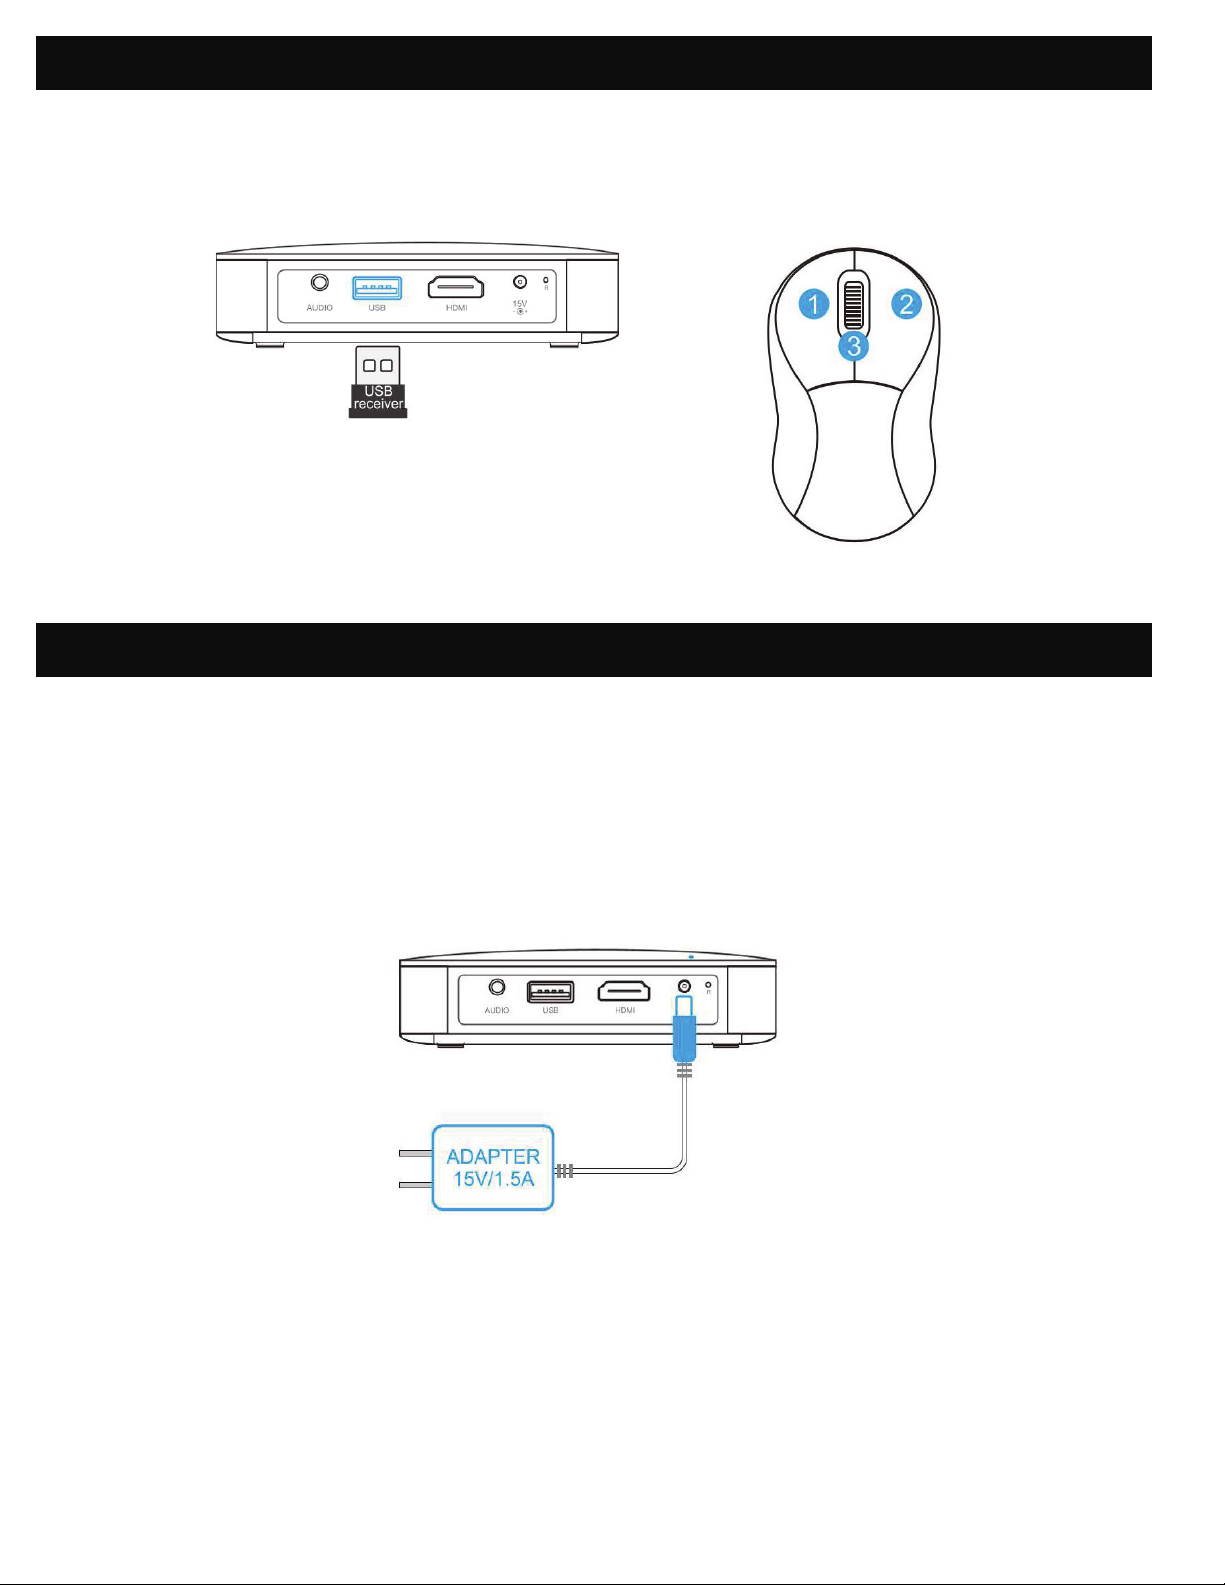
8. USING A MOUSE
If you’d rather use a mouse instead of the provided remote control, this projector supports USB and
wireless mice, as well as USB and wireless keyboards.
1. Left: Conirm
2. Right: Return
3. Wheel: Page up/down
7
To turn the projector on or o, hold the power button on the side for three (3) seconds. Once powered
on, tap the power button lightly to display the remaining battery percentage on the screen.
12. POWERING THE PROJECTOR ON/OFF
10. USING THE PROJECTOR TO CHARGE DEVICES
While the projector does include two (2) built-in speakers for regular use, you can also connect either
headphones or a portable speaker to the 3.5mm AUDIO OUT jack as shown in the below image.
11. USING THE AUDIO OUT JACK
AUDIO
When the projector is powered on, you can connect the charging cable of your device to the USB port
of the projector, and it will operate as a mobile power bank to charge your electronic devices.
The power output is 5V/1A.

8
If the image on the screen appears fuzzy or unfocused when you turn the projector on, use the focus
wheel on the side to correct the image. Turn the wheel up or down until the image appears sharp and
clear.
NOTE: If a speciic image or video remains fuzzy after adjusting the focus wheel, try pressing and
holding the conirm button to return to the home screen. If the home screen graphics appear clear
and the image is still fuzzy, the problem may be the image or video quality.
15. ADJUSTING FOCUS
To access your photos, from the home screen, navigate to Source > File Browser. From there you can
view individual photos or a slideshow of all photos stored either on your removable storage, or on the
projector itself (if you’ve downloaded anything). In slideshow mode, each photo will automatically
display in the order they are stored.
To access the controls during playback, you will irst need to tap the center circle button on top of the
projector to bring up the control menu. Then you may perform the following actions:
1. Pause the slideshow: tap the center circle button. Tap it again to resume.
2. Play next image: tap the > button.
3. Return to previous image: tap the < button.
To access the controls during your video’s playback, you will irst need to tap the center circle button
on top of the projector to bring up the control menu. Then you may perform the following actions:
1. Pause video: tap the center circle button. Tap it again to resume.
2. Fast forward: tap the > button. To increase the fast forward speed, tap the button again. Each press
will increase the speed in this order: 2x, 4x, 8x, 16x.
3. Rewind: tap the < button. To increase the rewind speed, tap the button again. Each press will
increase the speed in this order: 2x, 4x, 8x, 16x.
4. Exit video playback: Press and hold the center circle button for two seconds.
13. PHOTO PLAYBACK CONTROLS
14. VIDEO PLAYBACK CONTROLS

9
To adjust the device volume during playback, use the + and - buttons on the remote control.
To adjust the volume without using the remote control, follow these instructions:
1. From the home screen, select Settings.
2. From the Settings menu, select Sounds.
3. From the Sounds menu, you can adjust the volume of video playback as well as the volume level
of system sounds.
16. ADJUSTING VOLUME
17. CONNECTING TO WIRELESS NETWORKS
1. From the home screen, select Settings.
2. From the Settings menu, select Wi-Fi.
3. Select the correct network from the list and use the arrows on top of the projector, your phone, or
the remote to navigate the keyboard and enter the password.
10
19. SET THE SCREEN ORIENTATION
Depending on the placement of your projector, you can adjust the rotation and orientation of the
screen display accordingly.
1. From the home screen, select Settings.
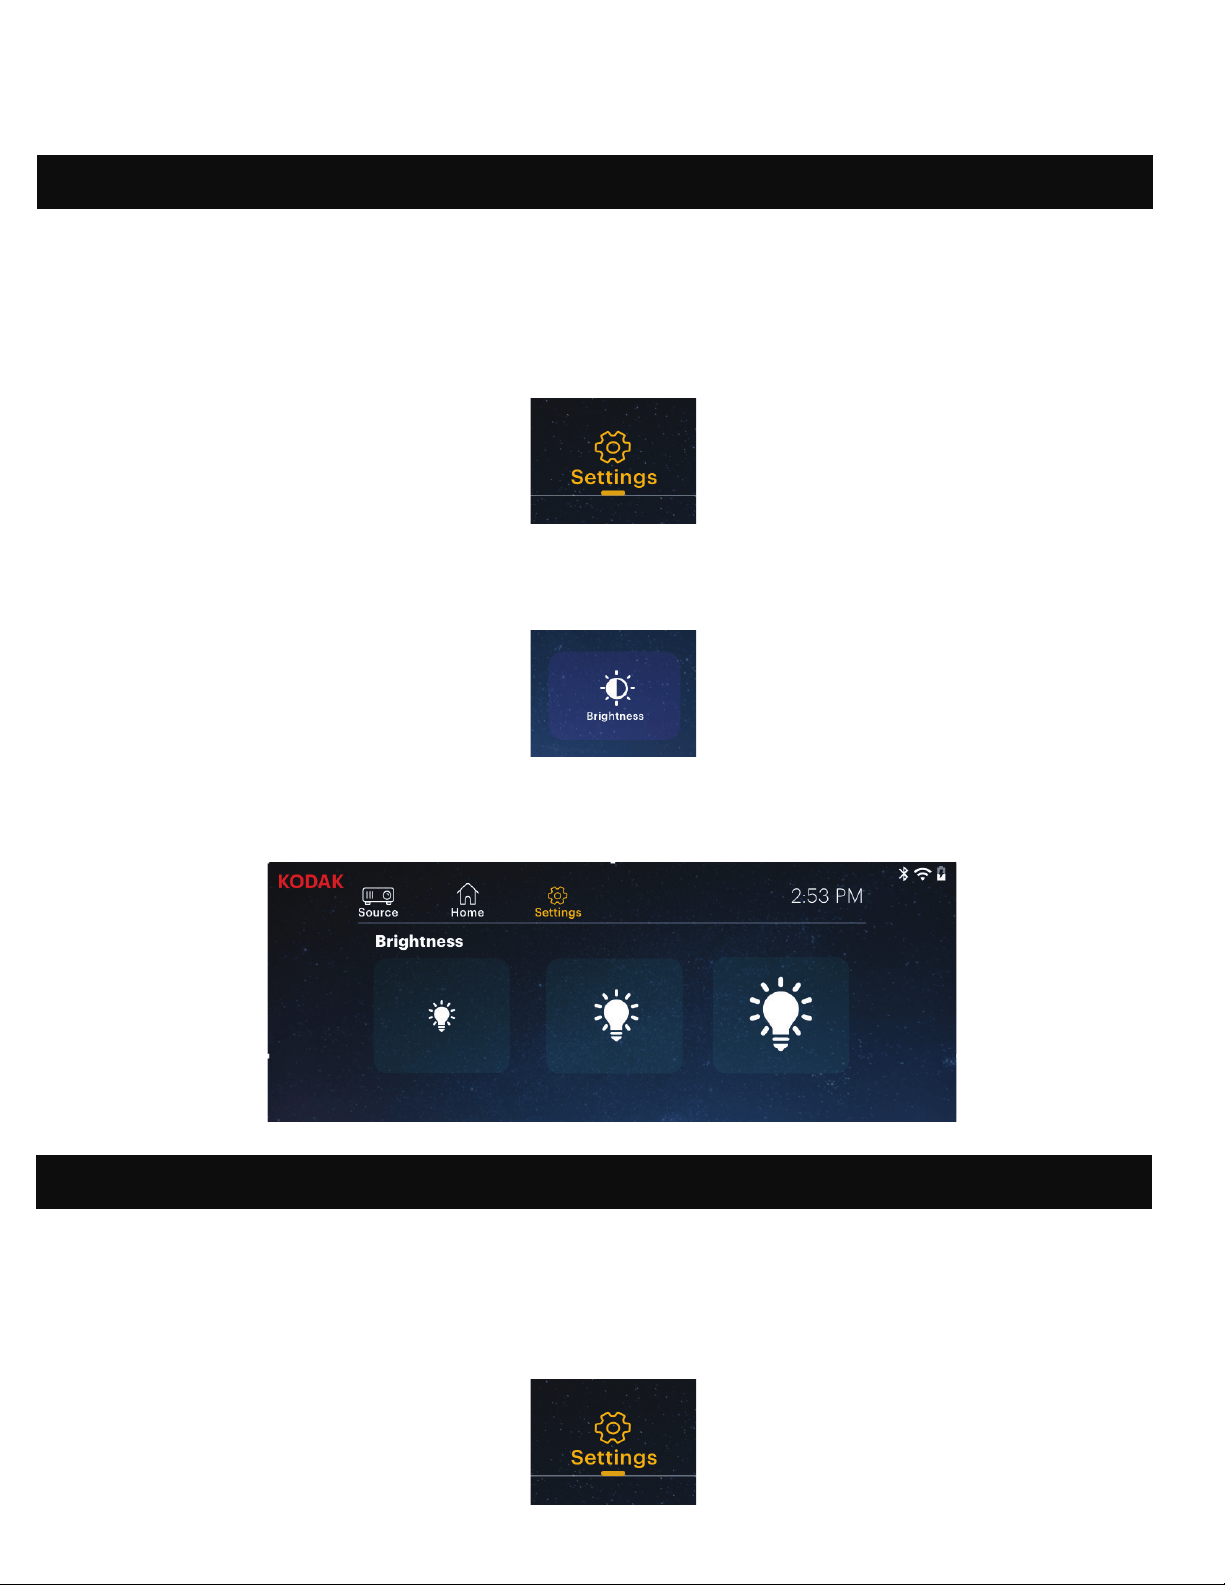
3. Choose between three settings of brightness: low, medium, and high.
18. ADJUSTING BRIGHTNESS
If you’d like to adjust the brightness of your projector to conserve electricity and energy usage, follow
these steps:
1. From the home screen, select Settings.
2. From the Settings menu, select Brightness.
4. The projector should connect to that network whenever it is in range.
NOTE: It is necessary to connect to a wireless network if you want to take advantage of the Android
functionality on your projector.

11
2. From the Settings menu, select Projector Mode.
3. Select the image that most closely resembles the positioning of your projector and it will adjust
the display accordingly.
20. SETTING DATE AND TIME
21. RESETTING THE PROJECTOR
Your projector should automatically update to the correct date and time once you connect to a
wireless network. If you need to manually adjust the date and time, follow these instructions:
1. From the home screen, select Settings
2. Scroll down to select Date and Time
3. Either enable automatic date and time, or adjust the date and time manually.
If something goes wrong, you may need to perform a factory reset on your projector. Please note,
this will reset all your settings and delete your saved data, such as app login information. Follow these
instructions to reset your projector:
1. From the home screen, select Settings
2. Scroll down to Factory Reset
3. If you want to back up your data, select the irst option, and connect an associated account.

12
A. USB Drives
To access photos or videos stored on any USB drive, simply insert the drive into the corresponding port
on the side. The projector will read the iles directly from the drive. You can access them from the home
screen by selecting Source > File Browser.
B. HDMI® Compatible Devices
If you’re using an HDMI compatible device, such as a laptop, personal computer, smartphone, tablet,
or video game console, connect an HDMI cable from the device to your projector to access and view
images and pictures. An HDMI-to-HDMI cable is included, but if your device requires an adapter, you
will need to purchase it separately. To make things a little easier, we’ve compiled this table of devices
and adapters for your convenience.
1 Devices with HDMI port
2 Devices with mini HDMI port
3 Devices with micro HDMI port
4 iOS devices with lightning port
5
Devices with USBC
(USB type C) port
6
Devices with USBC
(USB type C) port
HDMI to HDMI cable (included)
Mini HDMI to HDMI adapter HDMI to HDMI cable (included)
Mini HDMI to HDMI adapter HDMI to HDMI cable
Lightning digital AV adapter
HDMI to HDMI cable
USBC to HDMI adapter
HDMI to HDMI cable
USB type C to HDMI cable
22. CONNECTING EXTERNAL DEVICES
Please note, if you connect an HDMI device as well as a USB drive, the HDMI device will take
precedence over the USB drive and you will need to disconnect it or press the back button on the
remote to access the other connected sources.
4. When you’ve inished backing up your data (or not), select the bottom option, “Factory
Data Reset”.

13
1. From the projector home screen, select “Source,” select “Screen Mirroring,” and then select
“Miracast®”. The name of the projector will be displayed on the screen so that you can accurately
identify it when attempting to connect.
2. Make sure your device is connected to the same network as your projector.
3. Activate the screen mirroring software on your device.
a. To activate screen mirroring on your Android™ device:
i. On Samsung devices, swipe down from the top notiication bar to the expanded view,
and then swipe left (if necessary) and touch the “SmartView” icon to activate screen
sharing.
NOTE: Check your device settings for the screen casting/screen mirroring options. The name of the
function may vary by device model and service carrier. Other names used may include, “Cast,” or
“Screen Mirroring,” as well as “Smart View”. All devices must be running at least Android version 4.1.2.
b. To activate screen mirroring on your Windows® 10 device:
i. From the start menu, select “Settings.”
ii. In the Settings menu, select “Devices.”
iii. On the left side of the Devices menu, select “Connected Devices,” and then click
“Add a Device.”
4. Select the projector from the list of devices and select “Connect.” A dialog box will pop up on the
projector screen for you to conirm the connection; use the arrows or the remote to highlight
“Accept” and press the conirm button.
5. Your screen will now be mirrored to the projector.
6. When inished, select Disconnect on your device.
23. SCREEN MIRRORING (ANDROID/WINDOWS - MIRACAST®)
24. SCREEN MIRRORING (IOS)
2. Make sure your device is connected to the same network as your projector.
1. From the projector home screen, select “Source,” select “Screen Mirroring,” and then select
“AirPlay”. The name of the projector will be displayed on the screen so that you can accurately
identify it when attempting to connect.
14
3. Activate the screen mirroring software on your device.
a. To activate screen mirroring on your iOS device:
i. Swipe down to reveal the Control Center and tap the “Screen Mirroring” button.
4. Select the projector from the list of devices and select “Connect.” A dialog box will pop up on the
projector screen for you to conirm the connection; use the arrows or the remote to highlight
“Accept” and press the conirm button.
5. Your screen will now be mirrored to the projector.
6. When inished, select Disconnect on your device.
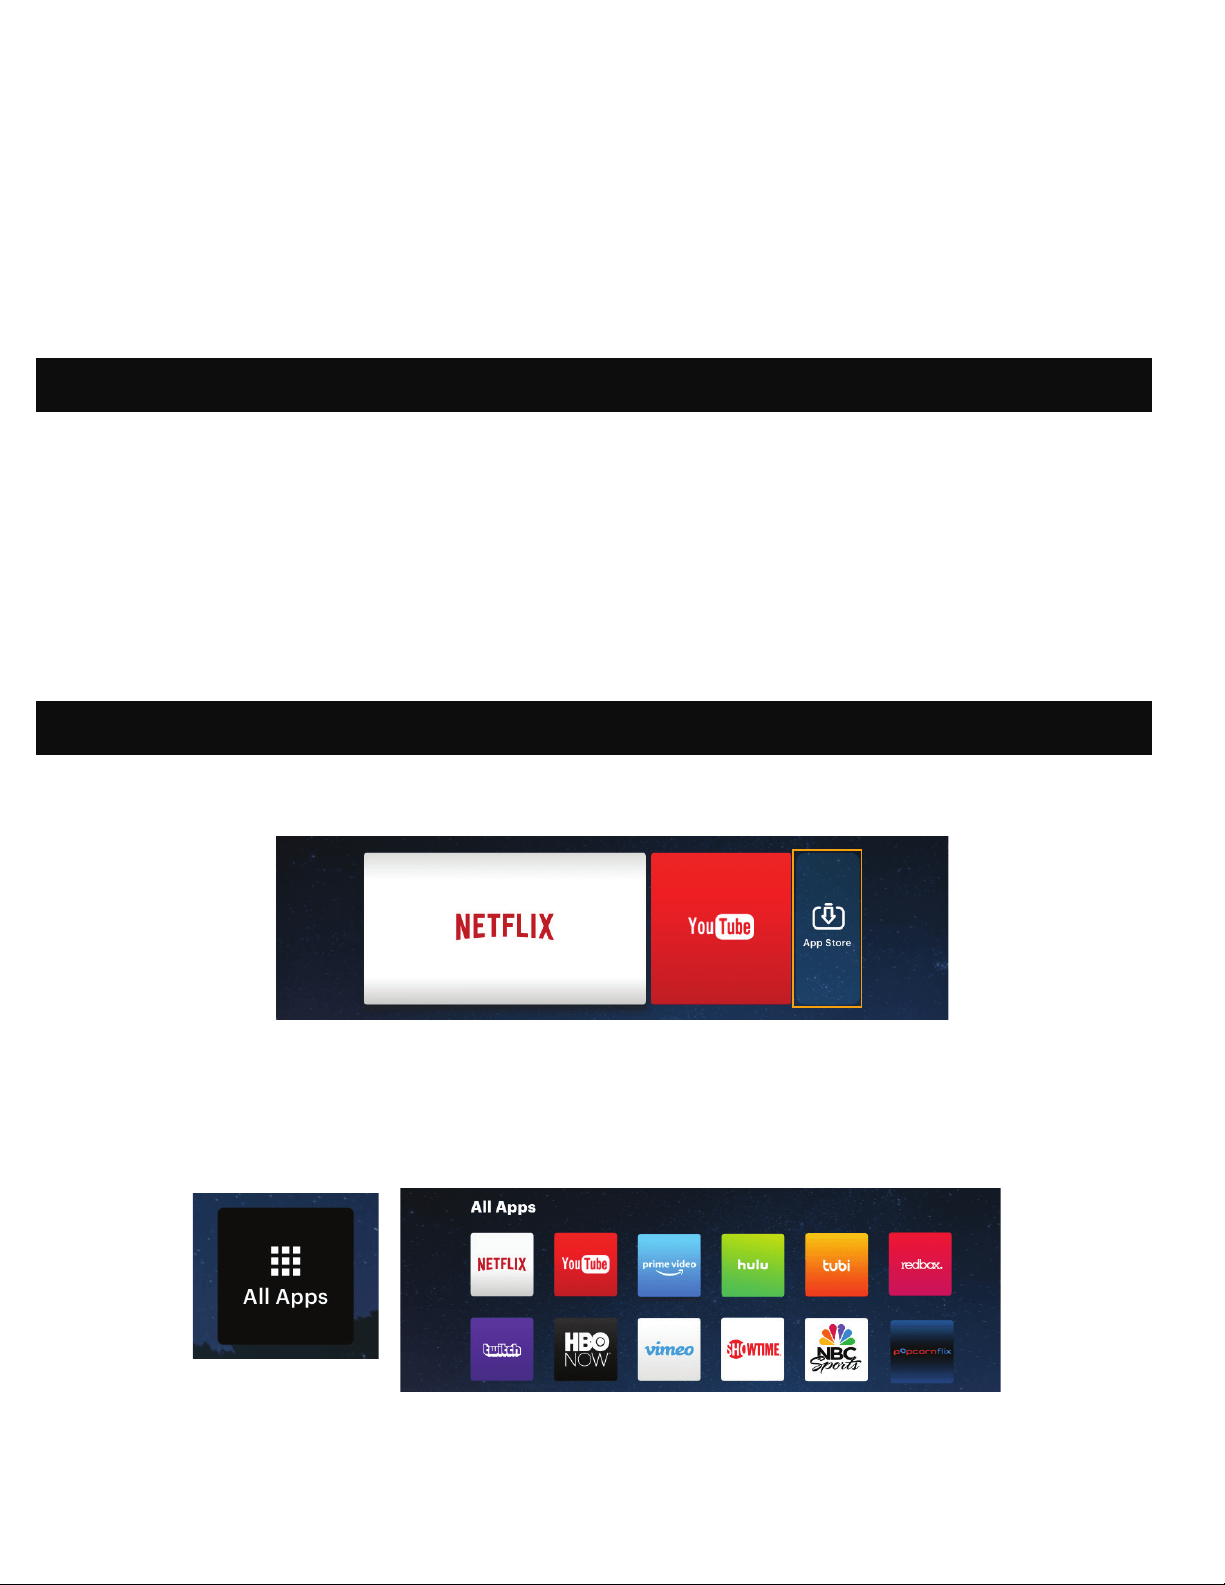
1. From the home screen, choose App Store.
2. Use the arrows or the cursor to navigate through the available apps or search for the ones you want
to download.
3. Once your apps are downloaded, you may access them directly from the home screen, or by
selecting the All Apps option on the home screen.
NOTE: Some of your favorite apps may look dierent when installed, due to the fact that the LUMA 350
utilizes the TV versions of these applications to accommodate the screen size and navigation.
26. USING THE APP STORE
25. PRE-LOADED APPS
Your KODAK LUMA 350 Portable Smart Projector comes with a variety of entertainment apps pre-
loaded for your convenience and enjoyment. You can access these apps from the home screen, and
simply need to sign in to your associated account to use them.

15
Visit https://www.kodakphotoplus.com/pages/luma-350-portable-smart-projector-support to download
major software updates for your KODAK LUMA 350 projector, then follow the steps below to install and
apply the update. You will need a FAT32 formatted USB drive.
1. Download the zip ile to an empty USB lash drive (do not unzip the ile). Please make sure that your
USB drive has no other iles on it, and that it has been formatted to FAT32.
2. Insert the USB lash drive into the USB port on the KODAK LUMA 350 projector. Please make sure the
projector is powered o.
3. Power on the projector by pressing the power button on the side. Please do not remove the USB
lash drive until the update process is completed.
4. After a few moments (in some cases, 1 to 2 minutes), the projector will automatically start updating
itself with the new irmware.
5. Remove USB lash drive and enjoy the updated KODAK LUMA 350 projector.
Instructions for Older Projectors
You will know that your projector is older if it fails to start automatically updating itself, and you will
need to activate the update manually. Once you have followed Steps 1 through 3 above, please
continue with the following next steps:
28. INSTALLING AN ONLINE FIRMWARE UPDATE
1. From the home screen, select Settings.
2. From the Settings menu, select Update.
3. The system will then check for a software update and download it if necessary.
NOTE: You need to be connected to a wireless network to download a software update.
4. When the software update inishes, your projector will restart. You shouldn’t lose any data in
the process.
27. UPDATING YOUR SOFTWARE

16
Should you experience any problems with your product, please contact us before returning the item to
the place of purchase. We’re here to help!
U.S. Support: kodak@camarketing.com
8445161539
International Support: kodakintl@camarketing.com
8445161540
29. CUSTOMER SERVICE
LIMITED WARRANTY TO ORIGINAL CONSUMER
This KODAK LUMA 350 Projector (“Product”), including any accessories included in the original
packaging, as supplied and distributed new by an authorized retailer is warranted by C&A Marketing,
Inc. (the “Company”) to the original consumer purchaser only, against certain defects in material and
workmanship (“Warranty”) as follows:
To receive Warranty service, the original consumer purchaser must contact the Company or its
authorized service provider for problem determination and service procedures. Proof of purchase
in the form of a bill of sale or receipted invoice, evidencing that the Product is within the applicable
Warranty period(s), MUST be presented to the Company or its authorized service provider in order to
obtain the requested service.
Service options, parts availability, and response times may vary and may change at any time. In
accordance with applicable law, the Company may require that you furnish additional documents
and/or comply with registration requirements before receiving warranty service. Please contact our
customer service for details on obtaining warranty service:
USA: kodak@camarketing.com, 8445161539
International: kodakintl@camarketing.com, +18445161540
30. WARRANTY
1. Go to the Settings page on your projector and select the More button.
2. On the More page, select Update. This will open the Update page.
3. On the Update page, select the Select button. This will display the path and ilename of the zip ile.
4. Select the zip ile. This will bring you to the previous screen, which should now display the zip ile.
5. Select Update. A dialogue box should pop up.
6. Select Update on the dialogue box, and the projector will begin the update process. This should only
take a few minutes.
7. The projector should now boot up with the most current version of the irmware.
8. Remove the USB drive and enjoy your updated KODAK LUMA 350 projector.

17
Shipping expenses to the Company’s Return Facility are not covered by this warranty, and must be paid
by the consumer. The consumer likewise bears all risk of loss or further damage to the Product until
delivery to said facility.
EXCLUSIONS AND LIMITATIONS The Company warrants the Product against defects in materials
and workmanship under normal use for a period of ONE (1) YEAR from the date of retail purchase by
the original end-user purchaser (“Warranty Period”). If a hardware defect arises and a valid claim is
received within the Warranty Period, the Company, at its sole option and to the extent permitted by
law, will either (1) repair the Product defect at no charge, using new or refurbished replacement parts,
(2) exchange the Product with a Product that is new or which has been manufactured from new or
serviceable used parts and is at least functionally equivalent to the original device, or (3) refund the
purchase price of the Product.
A replacement Product or part thereof shall enjoy the warranty of the original Product for the remainder
of the Warranty Period, or ninety (90) days from the date of replacement or repair, whichever provides
you longer protection. When a Product or part is exchanged, any replacement item becomes your
property, while the replaced item becomes the Company’s property. Refunds can only be given if the
original Product is returned.
This Warranty does not apply to:
(a) Any non-KODAK LUMA 350 Projector product, hardware or software, even if packaged or sold with
the Product;
(b) Damage caused by use with non-KODAK LUMA 350 Projector products;
(c) Damage caused by accident, abuse, misuse, lood, ire, earthquake, or other external causes;
(d) Damage caused by operating the Product outside the permitted or intended uses described by the
Company;
(e) Damage caused by third party services;
(f) A Product or part that has been modiied to alter functionality or capability without the written
permission of the Company;
(g) Consumable parts, such as batteries, fuses and bulbs;
(h) Cosmetic damage; or
(i) If any KODAK LUMA 350 Projector serial number has been removed or defaced.
This Warranty is valid only in the country where the consumer purchased the Product, and only applies
to Products purchased and serviced in that country.
The Company does not warrant that the operation of the Product will be uninterrupted or error-free.
The Company is not responsible for damage arising from your failure to follow instructions relating to
its use.
NOTWITHSTANDING ANYTHING TO THE CONTRARY AND TO THE MAXIMUM EXTENT PERMITTED BY
APPLICABLE LAW, THE COMPANY PROVIDES THE PRODUCT “ASIS” AND “ASAVAILABLE” FOR YOUR
CONVENIENCE AND THE COMPANY AND ITS LICENSORS AND SUPPLIERS EXPRESSLY DISCLAIM
ALL WARRANTIES AND CONDITIONS, WHETHER EXPRESSED, IMPLIED, OR STATUTORY, INCLUDING
THE WARRANTIES OF MERCHANTABILITY, FITNESS FOR A PARTICULAR PURPOSE, TITLE, QUIET
ENJOYMENT, ACCURACY, AND NONINFRINGEMENT OF THIRDPARTY RIGHTS. THE COMPANY DOES
NOT GUARANTEE ANY SPECIFIC RESULTS FROM THE USE OF THE PRODUCT, OR THAT THE COMPANY
WILL CONTINUE TO OFFER OR MAKE AVAILABLE THE PRODUCT FOR ANY PARTICULAR LENGTH
OF TIME. THE COMPANY FURTHER DISCLAIMS ALL WARRANTIES AFTER THE EXPRESS WARRANTY
PERIOD STATED ABOVE.

18
YOU USE THE PRODUCT AT YOUR OWN DISCRETION AND RISK. YOU WILL BE SOLELY RESPONSIBLE
FOR (AND THE COMPANY DISCLAIMS) ANY AND ALL LOSS, LIABILITY, OR DAMAGES RESULTING FROM
YOUR USE OF THE PRODUCT.
NO ADVICE OR INFORMATION, WHETHER ORAL OR WRITTEN, OBTAINED BY YOU FROM THE
COMPANY OR THROUGH ITS AUTHORIZED SERVICE PROVIDERS SHALL CREATE ANY WARRANTY.
IN NO EVENT WILL THE COMPANY’S TOTAL CUMULATIVE LIABILITY ARISING FROM OR RELATED TO
THE PRODUCT, WHETHER IN CONTRACT OR TORT OR OTHERWISE EXCEED THE FEES ACTUALLY PAID
BY YOU TO THE COMPANY OR ANY OF ITS AUTHORIZED RESELLERS FOR THE PRODUCT AT ISSUE
IN THE LAST YEAR FROM YOUR PURCHASE. THIS LIMITATION IS CUMULATIVE AND WILL NOT BE
INCREASED BY THE EXISTENCE OF MORE THAN ONE INCIDENT OR CLAIM. THE COMPANY DISCLAIMS
ALL LIABILITY OF ANY KIND OF ITS LICENSORS AND SUPPLIERS. IN NO EVENT WILL THE COMPANY
OR ITS LICENSORS, MANUFACTURERS AND SUPPLIERS BE LIABLE FOR ANY INCIDENTAL, DIRECT,
INDIRECT, SPECIAL, PUNITIVE OR CONSEQUENTIAL 29 DAMAGES (SUCH AS, BUT NOT LIMITED TO,
DAMAGES FOR LOSS OF PROFITS, BUSINESS, SAVINGS, DATA OR RECORDS) CAUSED BY THE USE,
MISUSE OR INABILITY TO USE THE PRODUCT.
Nothing in these terms shall attempt to exclude liability that cannot be excluded under applicable
law. Some countries, states or provinces do not allow the exclusion or limitation of incidental or
consequential damages or allow limitations on warranties, so certain limitations or exclusions may not
apply to you. This warranty gives you speciic legal rights, and you may have other rights that vary from
state to state or province to province. Contact your authorized retailer to determine if another warranty
applies.
Kodak does NOT manufacture this Product or provide any Warranty or support.

www.kodakphotoplus.com
The Kodak trademark, logo, and trade dress are used under license from Eastman Kodak Company.
Android is a trademark of Google, LLC.
Bluetooth is a trademark of Bluetooth SIG, Inc. USA.
DLP® and the DLP logo are registered trademarks of Texas Instruments.
HDMI, the HDMI logo, and High-Deinition Multimedia Interface are trademarks or registered trademarks of HDMI Licensing, LLC in the United States and/or
other countries.
Lightning, Mac, and AirPlay are trademarks of Apple Inc. in the U.S. and other countries.
iOS is a trademark of Cisco in the U.S. and other countries and is used under license.
Wi-Fi and Miracast are trademarks of Wi-Fi Alliance in the U.S. and/or other countries.
Windows is a trademark of Microsoft Corporation and other countries.
All other products, brand names, company names, and logos are trademarks of their respective owners, used merely to identify their respective products, and are
not meant to connote any sponsorship, endorsement or approval.
Distributed by: C&A Marketing, Inc., 114 Tived Lane East, Edison, NJ 08837, USA
C&A Marketing UK LTD, 167 Hermitage Road, Crusader Industrial Estate, London N4 1LZ, UK
© 2019 C&A IP Holdings, LLC. All Rights Reserved. Made in China.