1
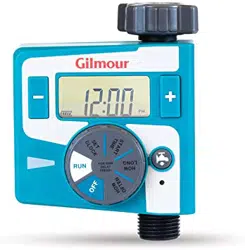
Programmable Electronic Single Outlet
Water Timer Instructions
Model 830134 Specifications
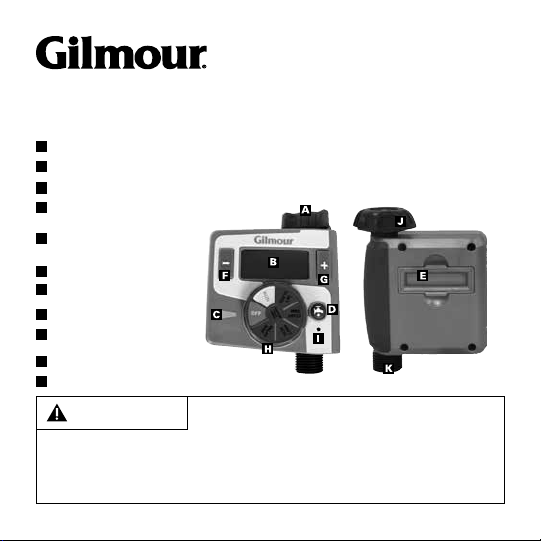
Easy swivel coupling | Acoplamiento giratorio fácil
LCD Display | Pantalla de LCD
Dial position indicator | Indicador de la posición del dial
Manual on/o button |
Botón de encendido y apagado manual
Battery tray |
Bandeja de las baterías
– Button | Botón -
+ Button | Botón +
Dial | Dial I
RESET button |
Botón de RESTABLECIMIENTO
Inlet | Salida
Outlet | Entrada
A
B
C
D
E
F
G
H
I
J
K
For non-commercial use only - commercial use
will void guarantee. For watering use with outdoor home
water faucet only. Not for indoor or appliance use. Use only with pressures of 60 PSI (4
BAR) max. Do not use with water exceeding 100°F (38°C). Not for use on outlet end of ‘Y’
connectors or other hose accessories. Detach and drain before freezing weather. Replace
battery every year, when low battery icon flashes or before long unattended use.
WARNING

2
INSTALLING THE BATTERIES
• Remove the tray from back of the Timer by sliding it out.
• Insert two AA (1.5V) alkaline batteries (not included)
and replace the tray. (Be sure battery is completely secured)
• Replace battery every year, when low battery icon flashes
or before long unattended use.
PROGRAMMING THE TIMER
• Rotate the dial to positions indicated for setup.
NOTE: The dial should be in the RUN position for the Timer
to operate (programmed mode or Manual mode)
SET CLOCK
• Rotate the dial to SET CLOCK.
• Clock display will be in AM or PM.
• Press the + or - button to advance or reverse clock time
(hold button for quick advance).
Solo para uso no comercial. El uso comercial
anulará la garantía. Solo para riego con grifos
de agua ubicados en el exterior del hogar. No apto para usar en interiores ni con
electrodomésticos. Utilizar solo con presiones máximas de 4 BARES (60 PSI). No utilizar con
agua que supere los 38°C (100° F). No apto para utilizar en el terminal de tomacorrientes
de conectores en “Y” ni en otros accesorios de mangueras. Desarmar la unidad y drenar
antes de épocas de temperaturas muy bajas. Reemplazar la batería una vez al año, cuando
el ícono de la batería titile o antes de utilizar por un largo período sin supervisión.

3
START TIME
• Rotate the dial to START TIME
• Press the + or - button to set the start time
(hold button for quick advance).
HOW LONG
• Rotate the dial to HOW LONG
• Press the + or - button to set the length of watering time
(1 minute up to 360 minutes)
HOW OFTEN
• Allows you to set the program to repeat every 6 hours,
12 hours, or from 1 to 7 days
• Rotate the dial to HOW OFTEN
• Press the + or - button to set the frequency
RUN
• Rotate the dial to RUN
• Timer waters according to programmed time, duration,
and frequency.
• The start times and cycle duration are maintained during
OFF or RUN mode.
• The dial must remain in RUN position for the cycle to run.
If the dial is turned to any other position, watering will stop.
• Rain drops will be shown when the watering is on.

4
SET RAIN DELAY (WATERING DELAY):
• With the dial in the RUN position, pressing (+) will cause
a 24 hour delay to the program.
• Delays of 0, 24, 48 hours, and 72 hours are possible.
Delay time can be changed by pushing + or - at any time.
• Display will flash between clock and hours remaining
before programmed cycle resumes.
• To remove Watering delay, turn dial to OFF and then
back to RUN or reduce the delay time to 0.
MANUAL (INSTANT) WATERING
• To water instantly without interrupting the set cycle, press
the button to start watering.
• This mode will function only when the dial is on RUN position
• Press the + or - button to adjust from 0 to 240 minutes at
any time.
• To resume programmed cycle, press the button again
or rotate the knob to OFF and back to RUN.
OFF
• Turning the dial to the OFF position from any other
position will stop the Manual or programmed watering
immediately.

5
RESET
• Pressing the reset button for 2 seconds will erase all
the programs and the Timer will return to factory
shipped condition.
INSTALLATION
• Attach Timer to an outdoor hose faucet and turn faucet
on after programming.
• Not for use on outlet end of ‘Y’ connectors or other
hose accessories.
TROUBLESHOOTING
PROBLEM: There is no display
Check if -
• Batteries are installed properly
• Batteries are very low
PROBLEM: Timer does not water or does not come on
at desired time
Check if –
• The dial position is at RUN
• Faucet is on
• Clock is set to correct time including AM and PM
• Batteries are low

6
• Rain delay is on
• Start time is set to desired time including AM and PM
PROBLEM: Water won’t turn o
Check if –
• Watering duration is set to desired time
• The Manual mode is on
• No power/batteries are drained
For further troubleshooting tips, please call 1-866-348-5661.

7
Two-year Limited Warranty
This product is warranted to be free of defects in material and
workmanship for two years after the original consumer purchases
the product. At Gilmour Division’s option, defective product will be
repaired, replaced, or substituted with a product of equal value.
For warranty service, call 1-866-348-5661 or contact Gilmour
Division at included address. Gilmour Division shall in no event
be liable for any incidental or consequential damages.

8
Electrónico programable con salida sencilla Instrucciones
Especificaciones del modelo 300GTS
INSTALACIÓN DE LAS BATERÍAS
• Retire la bandeja de la parte trasera del temporizador
deslizándola hacia fuera.
• Inserte dos baterías alcalinas AA (1,5 V) (no incluidas) y
reinstale la bandeja. (Asegúrese de que la batería
esté completamente asegurada)
• Reemplace las baterías cuando el icono de batería con
poca carga parpadee.
PROGRAMACIÓN DEL TEMPORIZADOR
• Gire el dial hasta las posiciones indicadas para la
configuración.
NOTA: El dial debe estar en la posición de funcionamiento RUN
para que el temporizador funcione (modo programado o modo
Manual)
AJUSTE DEL RELOJ (SET CLOCK)
• Gire el dial AJUSTE EL RELOJ
• El reloj mostrará la hora AM o PM.
• Presione el botón + o – para hacer avanzar o retroceder
la hora del reloj (mantenga presionado el botón para
avanzar rápidamente).

9
HORA DE COMIENZO (START TIME)
• Gire el dial hasta la hora de comienzo START TIME
• Presione el botón + o – para ajustar la hora de comienzo
(mantenga presionado el botón para avanzar rápidamente).
CUÁNTO TIEMPO (HOW LONG)
• Gire el dial hasta CUÁNTO TIEMPO (HOW LONG)
• Presione el botón + o – para ajustar la duración del
tiempo de riego (1 minuto hasta 360 minutos)
CON QUÉ FRECUENCIA (HOW OFTEN)
• Gire el dial hasta CON QUÉ FRECUENCIA (HOW OFTEN)
• Le permite configurar el programa para repetir cada 6
horas, 12 horas o de 1 a 7 días
• Presione el botón + o – para ajustar la frecuencia
FUNCIONAMIENTO (RUN)
• Gire el dial hasta RUN
• El temporizador riega de acuerdo con la hora, la
duración y la frecuencia programadas.
• Las horas de comienzo y la duración del ciclo se
mantienen durante el modo de apagado OFF o de
funcionamiento RUN.
• El dial debe permanecer en la posición de funcionamiento
RUN para que el ciclo se ejecute. Si se gira el dial hasta
cualquier otra posición, el riego se detendrá.

10
• Se mostrarán gotas de lluvia cuando el riego esté activado.
AJUSTE DE LA DEMORA POR LLUVIA (DEMORA DE RIEGO):
• Con el dial en la posición de funcionamiento RUN,
al presionar (+) se causará una demora de 24 horas en
el programa.
• Son posibles demoras de 0, 24, 48 y 72 horas.
Se puede cambiar el tiempo de demora presionando
+ o – en cualquier momento.
• La pantalla parpadeará entre el reloj y las horas que
queden antes de que el ciclo programado se reanude.
• Para cancelar la demora de riego, gire el dial hasta la
posición de apagado OFF y luego de vuelta a la posición de
funcionamiento RUN o reduzca el tiempo de demora a 0.
RIEGO MANUAL (INSTANTÁNEO)
• Para regar instantáneamente sin interrumpir el ciclo
ajustado, presione el botón para comenzar a regar.
• Este modo funcionará sólo cuando el dial esté en la
posición de funcionamiento RUN.
• Utilice los botones + o – para ajustar de 0 a 240 minutos
en cualquier momento.
• Para reanudar el ciclo programado, presione de nuevo el
botón o gire el pomo hasta la posición deapagado
OFF y de vuelta a la posición de funcionamiento RUN.

11
APAGADO (OFF)
• Al girar el dial hasta la posición de apagado OFF desde
cualquier otra posición, se detendrá de inmediato el
riego Manual o programado.
RESTABLECIMIENTO
• Al presionar el botón de restablecimiento durante 2
segundos, se borrarán todos los programas y el
temporizador regresará al estado en que se envió
desde la fábrica.
INSTALACIÓN
• Conecte el temporizador a un grifo de manguera al aire
libre y abra el grifo después de realizar la programación.
• No se diseñó para utilizarse en el
extremo de salida de conectores en ‘Y’ ni en otros
accesorios de manguera.
RESOLUCIÓN DE PROBLEMAS
PROBLEMA: No se muestra nada en la pantalla
Compruebe si:
• Las baterías están instaladas correctamente
• Las baterías tienen muy poca carga

12
PROBLEMA: El temporizador no riega o no se enciende a la hora
deseada
Compruebe si:
• El dial está en la posición de funcionamiento RUN
• El grifo está abierto
• El reloj está ajustado a la hora correcta, incluyendo AM y PM
• Las baterías tienen poca carga
• La demora por lluvia está activada
• La hora de comienzo está ajustada a la hora deseada,
incluyendo AM y PM
PROBLEMA: El agua no se cierra
Compruebe si:
• La duración del riego está ajustada al tiempo deseado
• El modo Manual está activado
• Ningún poder / agotado las pilas
Para obtener consejos adicionales sobre resolución de
problemas, sírvase llamar al 1-866-348-5661.

13
Garantía limitada de dos años Este producto tiene garantía contra
defectos en los materiales y en la fabricación, y es válida por dos
años luego de que el consumidor original compre el producto.
Si el producto fuera defectuoso, será reparado, reemplazado
o sustituido con un producto de igual valor, según lo decida la
división de Gilmour. Para obtener servicio de garantía, llame al
18663485661 o póngase en contacto con la división de Gilmour
en la dirección que se indica. Bajo ninguna circunstancia, la
división de Gilmour se hará responsable por daños eventuales
o resultantes.

Date of Purchase
Fecha de compra
_________________________
Contact Us
|
Contáctenos
:
Gilmour
7800 Discovery Drive
Middleton, WI 53562
Customer Service
|
Servicio al Cliente :
1-866-348-5661
discover more at:
descubra más en:
gilmour.com
© 2016 Gilmour Division 03-039587