Remove all packaging materials, such as plastic bags and foam inserts.
Read and remove all stickers on unit.
Check to ensure that all parts and accessories are accounted for.
Wipe down the exterior with a damp cloth.
Wash the fry basket, wire roating rack, stirring attachment, wire racks and drip tray with warm, soapy water. Dry thoroughly.
NOTE: On first use, unit may emit a slight odor, which is normal and will dissipate with use.
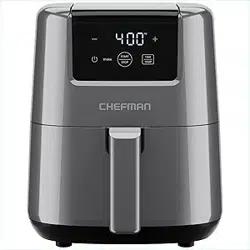
WHAT’S IN THE BOX
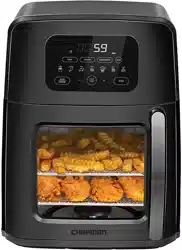
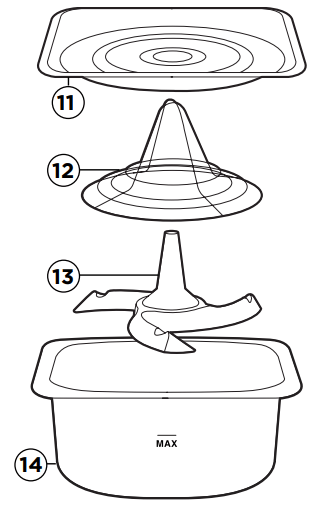
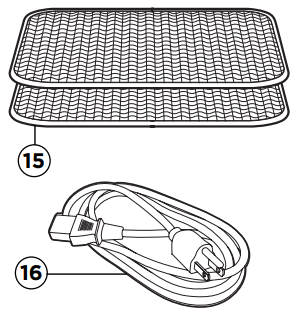
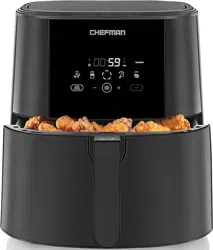
1. Unit 2. Control Panel 3. Viewing Window 4. Rack Slots 5. Fan and Infrared Heating Housing 6. Handle 7. Rotator 8. Bottom Heating Coil 9. Venting Fan 10. Plug Outlet 11. Nonstick Drip Tray 12. Wire Chicken Roasting Rack 13. Stir Attachment 14. Fry Basket (5.5L) 15. Wire Racks (2) 16. Power Cord
GETTING STARTED
STEP 1
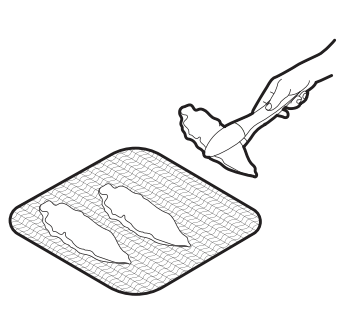
Put food on wire racks, pan or in fry basket.
STEP 2
Insert racks or basket into the Air Fryer Oven + and shut the door. If using the fry basket with the stir attachment, insert the basket into the lowest possible position so that its base will connect to the rotator.
STEP 3
Select the cooking function you would like to use and use the TIME/TEMP controls to adjust the parameters if desired.
STEP 4
Press Start.
STEP 5
When cooking time expires, carefully remove food and enjoy!
CLEANING AND MAINTENANCE
Before cleaning, ensure the Air Fryer Oven + is unplugged and cool. Once cool, remove any accessories, if necessary.
The fry basket, stir attachment, wire racks and drip tray are all top-rack dishwasher safe.
Never use harsh cleaning products, which could damage the surfaces.
Never immerse the Air Fryer Oven +, or its plug, in water or any other liquid.
Dry all parts thoroughly before storage and store the Air Fryer Oven+ in a cool, dry place.
FEATURES
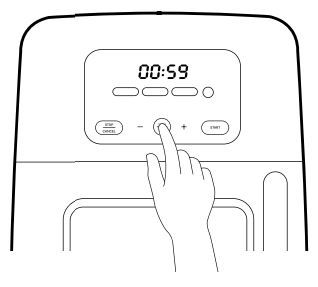
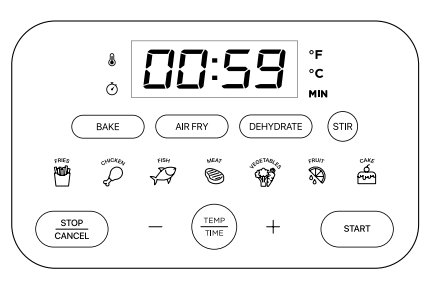
CONTROL PANEL:
Temperature/Time Display – Automatically alternates. Hold Temp/Time button for 5 seconds to choose between Fahrenheit and Celsius.
Bake, Air Fry, Dehydrate – Sets cooking function
Stir – Initiates rotator when using fry basket with stir attachment
Food Pre-Set Icons – Sets suggested time and temperature for favorite foods
Stop/Cancel – Stops heating and fan
Minus Sign – Reduces time and lowers temperature setting
Temp/Time Set – Sets time and temperature (press to toggle between the two)
Plus Sign – Adds time and increases temperature setting
OPERATING INSTRUCTIONS
The multi-functional Air Fryer Oven + requires no preheating and cooks faster than a traditional oven, which means you can enjoy your favorite hot foods in mere minutes. The touch-screen control panel is intuitive, and customized accessories help guarantee delicious results.
BEFORE FIRST USE
For best results, follow these steps before using your Air Fryer Oven + for the first time.
Remove all packaging materials, such as plastic bags and foam inserts.
Read and remove all stickers on unit.
Check to ensure that all parts and accessories are accounted for.
Wipe down the interior and exterior with a damp cloth.
Wash the fry basket, stirring attachment, and drip tray with warm, soapy water. Dry thoroughly.
NOTE: On first use, unit may emit a slight odor, which is normal and will dissipate with use
HOW TO AIR FRY IN THE AIR FRYER OVEN +
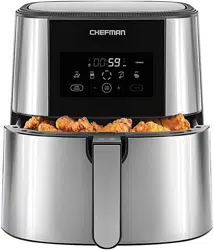
The Air Fryer Oven + works by moving hot air around to create a crisp exterior just like you get from deep frying but with little to no oil required. The Air Fryer Oven + offers more capacity than many conventional air fryers, but thanks to its high-speed fan and two heat sources, it still cooks foods quickly.
With the Air Fryer Oven +, you have two options for air frying: on wire racks that allow air to circulate around the foods (perfect for fried chicken!) or in a metal fry basket with an auto-stir function that gently tosses foods during cooking so all pieces turn out uniformly cooked and crisped with no need to manually shake the basket. (Hello French fries!)
CAUTION: Never fill the fry basket with oil. Unlike deep fryers, air fryers require little to no oil to produce crispy results. If you choose to use oil, toss foods with just a little in a separate bowl before cooking in the Air Fryer Oven +.
Prepare food for air-frying.
If using wire racks: Position drip tray in bottom slot of Air Fryer Oven + just above the heating element. If using fry basket with auto-stir option: Insert stir attachment into fry basket.
Plug in the Air Fryer Oven +. The control panel will illuminate. (If the unit was already plugged in, the control panel may only show Start; press Start to illuminate control panel.)
Put food on wire racks or in fry basket, then insert racks or basket into the Air Fryer Oven + and shut the door. If using the fry basket with the stir attachment, insert the basket into the lowest possible position so that its base will connect to the rotator.
5a. If air frying with pre-set cooking parameters: Press Air Fry then choose the icon that best represents the food you’re cooking and press the icon. This will set the pre-programmed time and temperature as well as the auto-stir function if applicable. The settings will illuminate blue. If you would like to turn off the auto-stir function, press Stir until white.
5b. If air frying with custom cooking parameters: Press Air Fry. Adjust the time and temperature by pressing Time/Temp. Press Stir if using the fry basket with auto-stir function. The chosen settings will illuminate blue.
Press Start; it will illuminate red. Air frying will begin immediately. (No need to preheat unit.) The fan will begin blowing, the heating element on top will alight, and the clock will begin to count down.
Attend to foods as necessary. To check on cooking, simply open the door. The until will turn off. With protective mitts, switch rack position or flip foods as desired. When door is shut, air frying, timing, and auto-stir, if using, will continue.
Finish cooking and check for doneness. When the timer reaches 0, the unit will beep, and the word End will appear on the control panel; the heater will turn off, but the fan will continue to run for about 30 seconds. With protective mitts, remove the racks or the basket and check food for doneness. Return the food to the unit for additional cooking if necessary.
Serve and enjoy!
CAUTION: The basket, racks, drip tray, and contents will be HOT after cooking.
Place hot basket or rack(s) on a wire rack or trivet to cool.
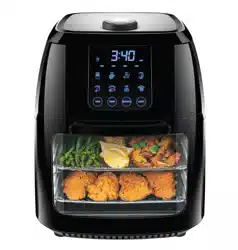
HOW TO BAKE IN THE AIR OVEN FRYER +
With its larger interior capacity, the Air Fryer Oven + can be used just like an oven to bake and roast. For most baking, use the wire baking racks, either on their own, lined with parchment, or with oven-safe bakeware. (For how to roast a whole chicken on the wire chicken roasting rack, see p. 17.)
Prepare food for baking.
If necessary, position a drip tray in the bottom slot in Air Fryer Oven + so that it sits just above the heating element. (Use drip tray if there’s a danger of fillings leaking or batter overflowing or if roasting on wire racks.)
Plug in Air Fryer Oven +. The control panel will illuminate. (If the Air Fryer Oven + was already plugged in, the control panel may only show Start; press Start to illuminate control panel.)
Put food on wire rack(s) or in baking dish on wire rack. Put into Air Fryer Oven +, then shut door.
5a. If baking with pre-set cooking parameters: Press Bake, then choose the icon that best represents the food you’re baking and press the icon. This will set the pre-programmed time and temperature. The auto-stir function will not come on. The chosen settings will illuminate blue.
5b. If baking with custom cooking parameters: Press Bake. Adjust the time and temperature by pressing Time/Temp. The chosen settings will illuminate blue.
Press Start; it will illuminate red. Baking will begin immediately. (No need to preheat unit.) The fan will begin blowing, the heating element on top will alight, and the clock will begin to count down.
Attend to foods as necessary. To check on cooking, simply open the door. The until will turn off. With protective mitts, switch rack positions or flip or turn foods as desired. When door is shut, baking and timing will continue.
Finish cooking and check for doneness. When the timer reaches 0, the unit will beep, and the word End will appear on the control panel; the heater will turn off, but the fan will continue to run for about 30 seconds. With protective mitts, remove the rack(s) and check food for doneness. Return the food to the unit for additional cooking if necessary.
Serve and enjoy!
CAUTION: The racks, drip tray, and contents will be HOT after cooking. Place hot racks(s) on a wire rack or trivet to cool.
HOW TO DEHYDRATE WITH THE AIR-FRY OVEN +
With its fan, wire racks, and a lower temperature setting than found on most conventional ovens, the Air Fryer Oven + makes a great dehydrator, perfect for drying herbs, creating healthy veggie and fruit chips, and making foods lighter for backpacking. When dehydrating, use the wire baking racks to allow air to flow around the food.
Prepare food for dehydrating.
Position drip tray in the bottom slot of Air Fryer Oven + so that it sits above heating element.
Plug in Air Fryer Oven +. The control panel will illuminate. (If Air Fryer Oven + was already plugged in, the control panel may only show Start; press Start to illuminate control panel.)
Put food on wire rack(s). Put into Air Fryer Oven +, then shut door.
5a. If dehydrating pre-set cooking parameters: Press Dehydrate, then choose the icon that best represents the food you’re dehydrating. This will set the pre-programmed time and temperature; the auto-stir function will not come on. The chosen settings will illuminate blue.
5b. If dehydrating with custom cooking parameters: Press Dehydrate. Adjust the time and temperature by pressing Time/Temp. The chosen settings will illuminate blue.
Press Start; it will illuminate red. Dehydrating will begin immediately. (No need to preheat unit.) The fan will begin blowing, the heating element on top will alight, and the clock will begin to count down.
Attend to foods as necessary. To check on cooking, simply open the door. The until will turn off. With protective mitts, switch rack positions or flip or turn foods as desired. When door is shut, dehydrating and timing will continue.
Finish cooking and check for doneness. When the timer reaches 0, the unit will beep, and the word End will appear on the control panel; the heater will turn off, but the fan will continue to run for about 30 seconds. Open door. With protective mitts, remove the rack(s) and check food for doneness. Return the food to the unit for additional cooking if necessary.
Serve and enjoy!
CAUTION: The racks, baking dishes or pans, drip tray, and contents will be HOT after cooking. Place hot racks(s) on a wire rack or trivet to cool.
HOW TO ROAST A WHOLE CHICKEN IN THE AIR OVEN FRYER +
With its even heating, auto-stir function, and unique wire chicken roasting rack, the Air Fryer Oven + can roast a chicken to crisp, juicy perfection with a method that’s part rotisserie, part “beer can,” and totally delicious. You’ll get best results with a chicken between 3½ and 4 lb. and can go as high as 5 lb. (Any larger will be too big to spin.)
Insert stir attachment into fry basket. Fit wire chicken roasting rack over stir attachment; its outer ring should align with grooves on stir attachment blades.
Prepare the chicken. Remove any giblets and season chicken inside and out with salt and pepper plus whatever other seasonings you desire.
Position chicken on rack. Holding the chicken neck up, lower the cavity of the chicken over the roasting rack. Position legs to stabilize the chicken.
Insert the fry basket with chicken in the Air Fryer Oven + in the lowest position possible so that it connects with the rotator.
Plug in Air Fryer Oven +. The control panel will illuminate. (If Air Fryer Oven + was already plugged in, the control panel may only show Start; press Start to illuminate control panel.)
Press Air Fry. The temperature will be set to 400˚F. Press Time/Temp to adjust the time to 1 hour. Press Stir. The chosen settings will illuminate blue.
Finish cooking and check for doneness. When the timer reaches 0, the unit will beep, and the word End will appear on the control panel; the heater will turn off, but the fan will continue to run for about 30 seconds. Open door. With protective mitts, remove the rack and check chicken for doneness (165˚F in thickest part of the thigh). Return the chicken to the unit for additional cooking if necessary.
Use protective mitts to transfer basket to heat-proof surface and let chicken rest for 15 minutes.
Transfer chicken to cutting board, carve, and serve.
COOKING TIPS
Unless you’re using the fry basket, which fits into the bottom of the unit, use the drip tray when cooking with the Air Fryer Oven + to keep the heating coil and the area around it clean.
For easiest clean-up, wrap the drip tray in foil before using.
For best results, bake cake layers, brownies, and muffins positioned as far as possible from the high-speed fan, which can inhibit rising. Bake cake layers one at a time. Smaller items, such as cookies, biscuits, and turnovers, may be baked on two racks at one time; for best results, alternate the position of the racks halfway through baking.
Any oven-safe cooking vessel than can fit in the Air Fryer Oven + may be used with it.
When baking on two wire racks at one time, switch positions halfway through baking for most even results.
Depending on the size of the food, two racks may not fit at one time; if this is the case, cook in batches.
Though you can see foods through the unit’s window, the interior light cycles on and off with the heating element during cooking. To check on foods, you may need to open the door. Cooking and time countdown will recommence when door is shut.
Do not rely on pre-set times for doneness as variables in food size and temperature will affect cooking times; follow proper food safety guidelines for doneness, especially with meat, chicken, and fish.
When removing the fry basket, lift it up before pulling it out to disengage it from the rotator
CLEANING AND MAINTENANCE
Cleaning the Air Fryer Oven + between uses is important to keep it running well.
Before cleaning, ensure the Air Fryer Oven + is unplugged and cool. Once cool, remove any accessories, if necessary.
The fry basket, stir attachment, and drip tray are all top-rack dishwasher safe. Their nonstick surface means they’ll also come clean easily with a sponge and soapy water. Do not use abrasive cleaners on these accessories, however, or you may damage the nonstick surface.
The wire racks are also top-rack dishwasher safe. Alternatively, wash racks with a sponge or a nylon brush and hot soapy water. To remove stubborn stuck-on foods, soak racks in hot soapy water. Be sure to dry promptly and thoroughly to prevent rusting.
The wire chicken roasting rack may be hand washed and is top-rack dishwasher safe.
Prevent grease buildup by regularly wiping the entire interior of the Air Fryer Oven + clean with a damp cloth and a mild soap solution. Never use harsh cleaning products, which could damage the surfaces.
Gently wipe down exterior of the unit with a damp cloth or paper towel and dry. Do not use abrasive cleaners on exterior or finish may be damaged.
Never immerse the Air Fryer Oven +, or its plug, in water or any other liquid.
Dry all parts thoroughly before storage and store the Air Fryer Oven + in a cool, dry place.
Yes I got rid of my toaster bc I love how this works so much. I use it for making toast, bagels, crisping or warming up rolls for sandwiches, etc. And absolutely love love it for this use. You'd just want to play with your temp and time cooking to suit your desired level of toasting.
#2 Can you use the basket and a rack at the same time? Like cook fries in the basket but chicken above on a rack at the same time?
Yes you can! However, using both the basket and the rack at the same time means whatever is on the rack is sitting closer to the heating element in the top. So you will need to keep an eye on that food to make sure it doesn't burn or overcook.
#3 I don't want to unplug the air fryer to turn it off (inconvenient), is their another way?
It turns off when you open the door. If you hit cancel, it runs for a moment to cool off and then shuts down. After a few minutes it goes to sleep and the screen goes back to blank/off.
#4 Are both the air frying and dehydrating functions loud or quiet?
All the cooking functions on this Chefman air fryer are very quiet.
It opens on the the front side where the clear window shows. You can make short ribs, chicken wings, tator tots, or roasted tators on the trays. The rotisserie is awesome for both whole chicken or pork roast.