Power-Pak
®
445 Adjustable Dumbbell System
This product is compliant with the
applicable CE requirements.
Assembly / Owner’s Manual
®
®

To validate warranty support, keep the original proof of purchase and record the following information:
Serial Number ___________________________ Serial Number __________________________
Serial Number ___________________________ Date of Purchase ________________________
To register your product warranty, contact your local distributor.
If you have questions or problems with your product, please contact your local Bowflex
®
distributor
To find your local distributor, go to: www.bowflexinternational.com
Nautilus, Inc., (800) NAUTILUS / (800) 628-8458, www.NautilusInc.com - Customer Service: North America (800) 605-3369, [email protected] | outside U.S. +01-360-859-5180, technics-APLA@
nautilus.com | Printed in China | © 2012 Nautilus, Inc.
Important Safety Instructions
This icon means a potentially hazardous situation which, if not avoided, could result in death or serious injury.
Before using this equipment, obey the following warnings:
• ReadandunderstandthecompleteManual.KeeptheManualforfuturereference.
• Readandunderstandallwarningsonthisequipment.IfatanytimetheWarningstickersbecomeloose,unreadableor
dislodged, contact your local Bowflex
®
distributororvendorforreplacementstickers.
• Keepbystandersandchildrenawayfromtheproductyouareassemblingatalltimes.
• Childrenmustnotbeletonorneartothisequipment.Movingpartsandotherfeaturesoftheequipmentcanbedan-
gerous to children.
• Notintendedforusebyanyoneunder14yearsofage.
• Consultaphysicianbeforestartinganexerciseprogram.Stopexercisingifyoufeelpainortightnessinyourchest,
become short of breath, or feel faint. Contact your doctor before you use the equipment again.
• Donotassembleequipmentinawetormoistlocation.
• Somecomponentsoftheequipmentcanbeheavyorawkward.Useasecondpersonwhendoingtheassemblysteps
involvingtheseparts.Donotdostepsthatinvolveheavyliftingorawkwardmovementsonyourown.
• Setupthisequipmentonasolid,level,horizontalsurface.
• Thisequipmentisforhomeuseonly.
• Donottrytochangethedesignorfunctionalityofthisequipment.Thiscouldcompromisethesafetyandwillvoidthe
warranty
• Ifreplacementpartsarenecessary,useonlygenuinereplacementpartsandhardwaresuppliedbyNautilus.Failure
tousegenuinereplacementpartscancausearisktousers,keepthemachinefromoperatingcorrectlyandvoidthe
warranty.
• Donotuseuntiltheequipmenthasbeenfullyassembledandinspectedforcorrectperformanceinaccordancewith
theOwner’sManualforyourPower-Pak
®
dumbbells.
• Beforeeachuse,examinethisequipmentforloosepartsorsignsofwear.ContactyourlocalBowex
®
distributor or
vendor for repair information.
• Periodicallyinspectandtestthelockingmechanismforcorrectfunction.Followthetestproceduresincludedinthis
manual.
• Donotoperatethismachineoutdoorsorinmoistorwetlocations.
• Beforeyoustartyourworkout,makesurethatyoursurroundingsarefreefrompossibleinterferenceandthirdparties.
Yourworkoutfreespaceshouldbe0.6m(24“)morethanthemaximumreachoftheexerciseinalldirections.
• Donotoverexertyourselfduringexercise.Operatetheequipmentinthemannerdescribedinthismanual.
• DonottrytoforcetheAdjustmentKnobtoturnwhentheDumbbellhasbeenremovedfromtheDumbbellbase.
• DonotlettheDumbbellsfallfreelytotheground.Damagetotheproductandpossiblepersonalinjurycanoccur.
2
Important Safety Instructions
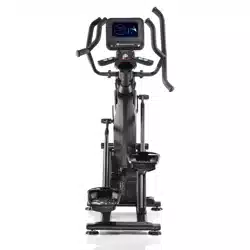
Safety Warning Labels and Serial Number
Type Description
A
WARNING
•Readandunderstandthecompleteuser
manual.Keepmanualforfuturereference.
•Readandunderstandallwarningsonthis
device.Ifatanytimethewarningstickers
become loose, unreadable or dislodged,
contact Nautilus Customer Service for
replacementstickers.
•Childrenmustnotbeallowedonornearto
this device.
•Thisdeviceisforhomeuseonly.
•Setupandoperatethisdeviceonasolid,
level, horizontal surface.
•Makesurethatyougiveusersenoughfree
space around the device for safe operation.
Keepthirdpartiesoutofthisareawhenthe
device is in use.
•Donotstandorclimbonthisdevice.
B
Product Specifi-
cation and Serial
Number
RecordtheserialnumbersintheSe-
rial Number fields at the beginning of this
manual.
C
WARNING
•DonotallowChildrentousethisproduct.
•Inspectproductbeforeuse.
•Donotuseifanypartsareinneedof
repair.
•UseCautionwhenusingthisequipment.
•InjuryordeathispossibleifCautionisnot
used.
•ReadandunderstandtheOwnersManual
prior to use.
•ReplacethisorotherCAUTION,
WARNING,orDANGERLabelsifthey
become damaged or illegible or removed.
•ThisproductisforResidentialuseonly.
• DonotlettheDumbbellsforcefullyhittogetherduringoperation.Damagetotheproductandpossiblepersonalinjury
can occur.
• DonotleanontheDumbbellhandlesorusethemtosupportyourbodyweight,suchasusingthemasabasetoper-
formapushup.Damagetotheproductandpossiblepersonalinjurycanoccur.
• DonottrytodisassembleyourDumbbellhandles,orbaseassembly.Theproductisnotdesignedtobeservicedbythe
customer. Contact your local Bowflex
®
distributor or vendor for service.
• TheDumbbellsareveryheavy.IfyouarenotusingtheDumbbellStand,puttheDumbbellassemblydirectlyonthe
floor for best support.
A
B
C
C
B
MM/YY
MM/YY
3
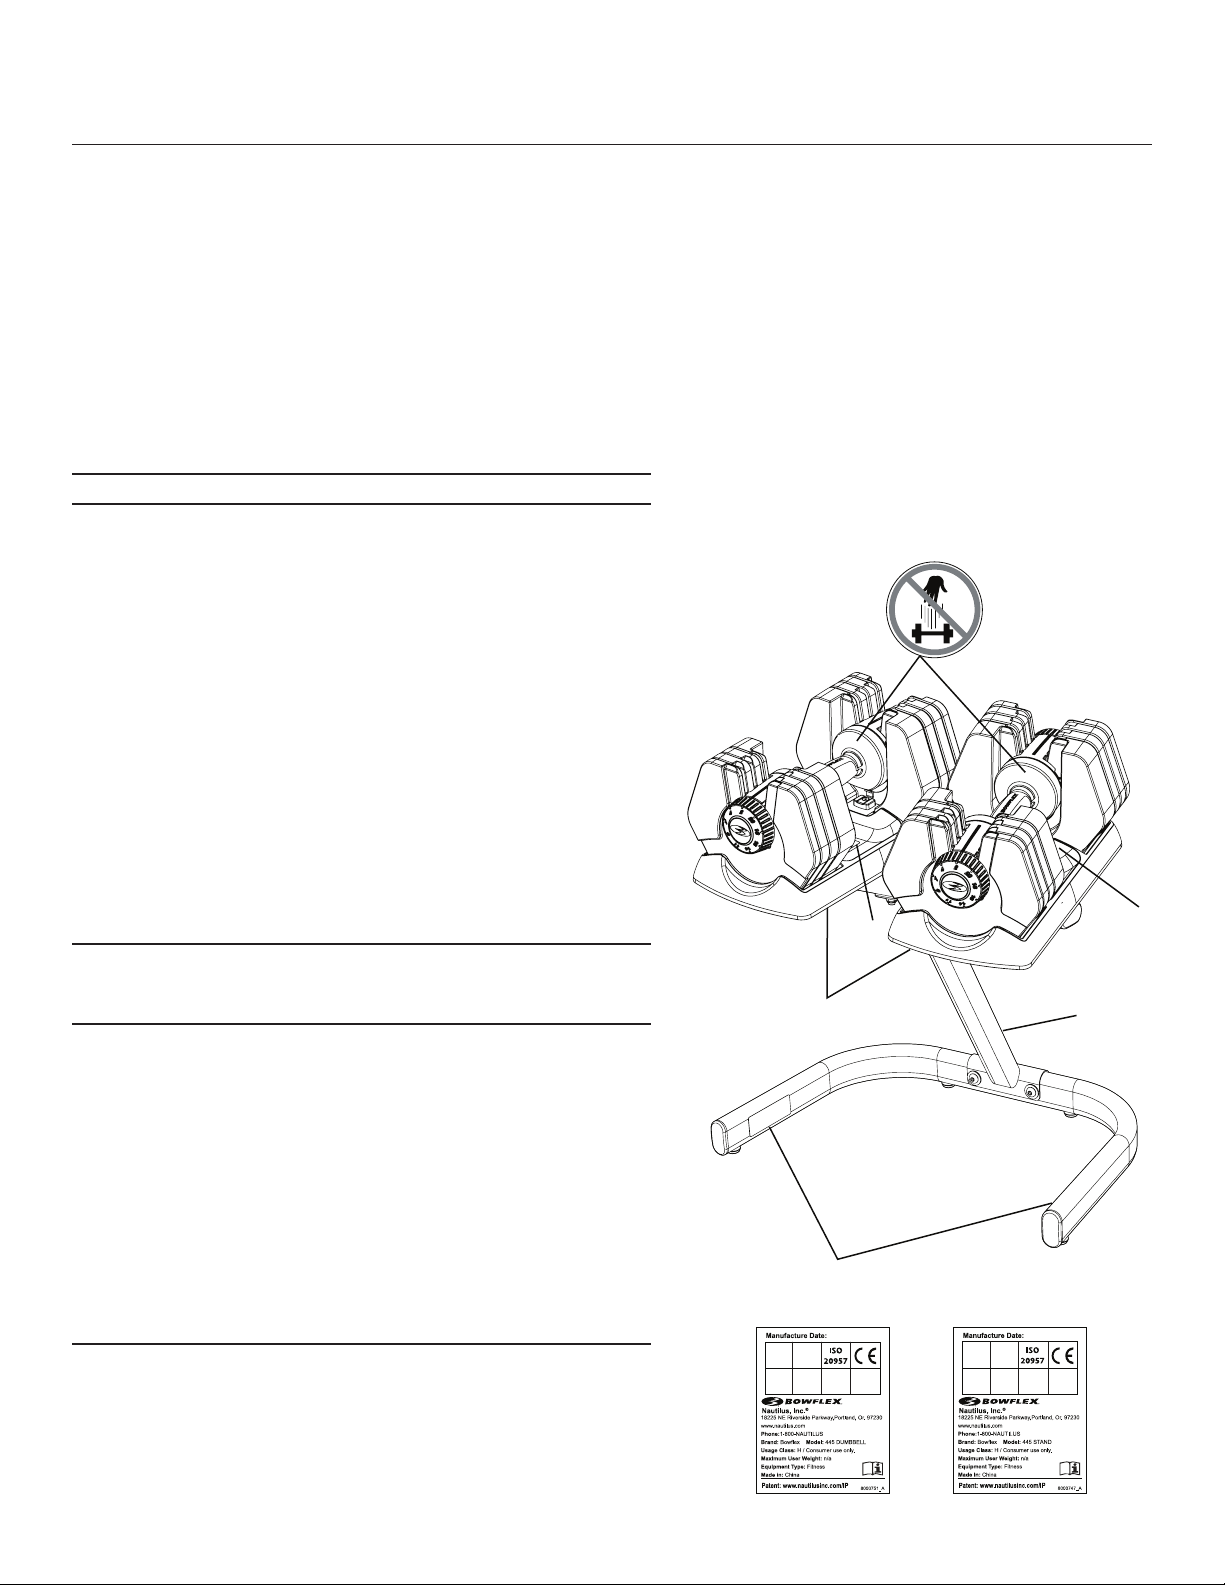
Specifications
Dumbbell Assembled Weight Approximately22.7kg(50lbs)
Stand Assembled Weight Approximately5.4kg(12lbs)
Features
A Handle grip
B Adjustmentknob
C,D,E Weightplates
F Failsafehook
G Base
B
A
G
F
C
D
E
F
4
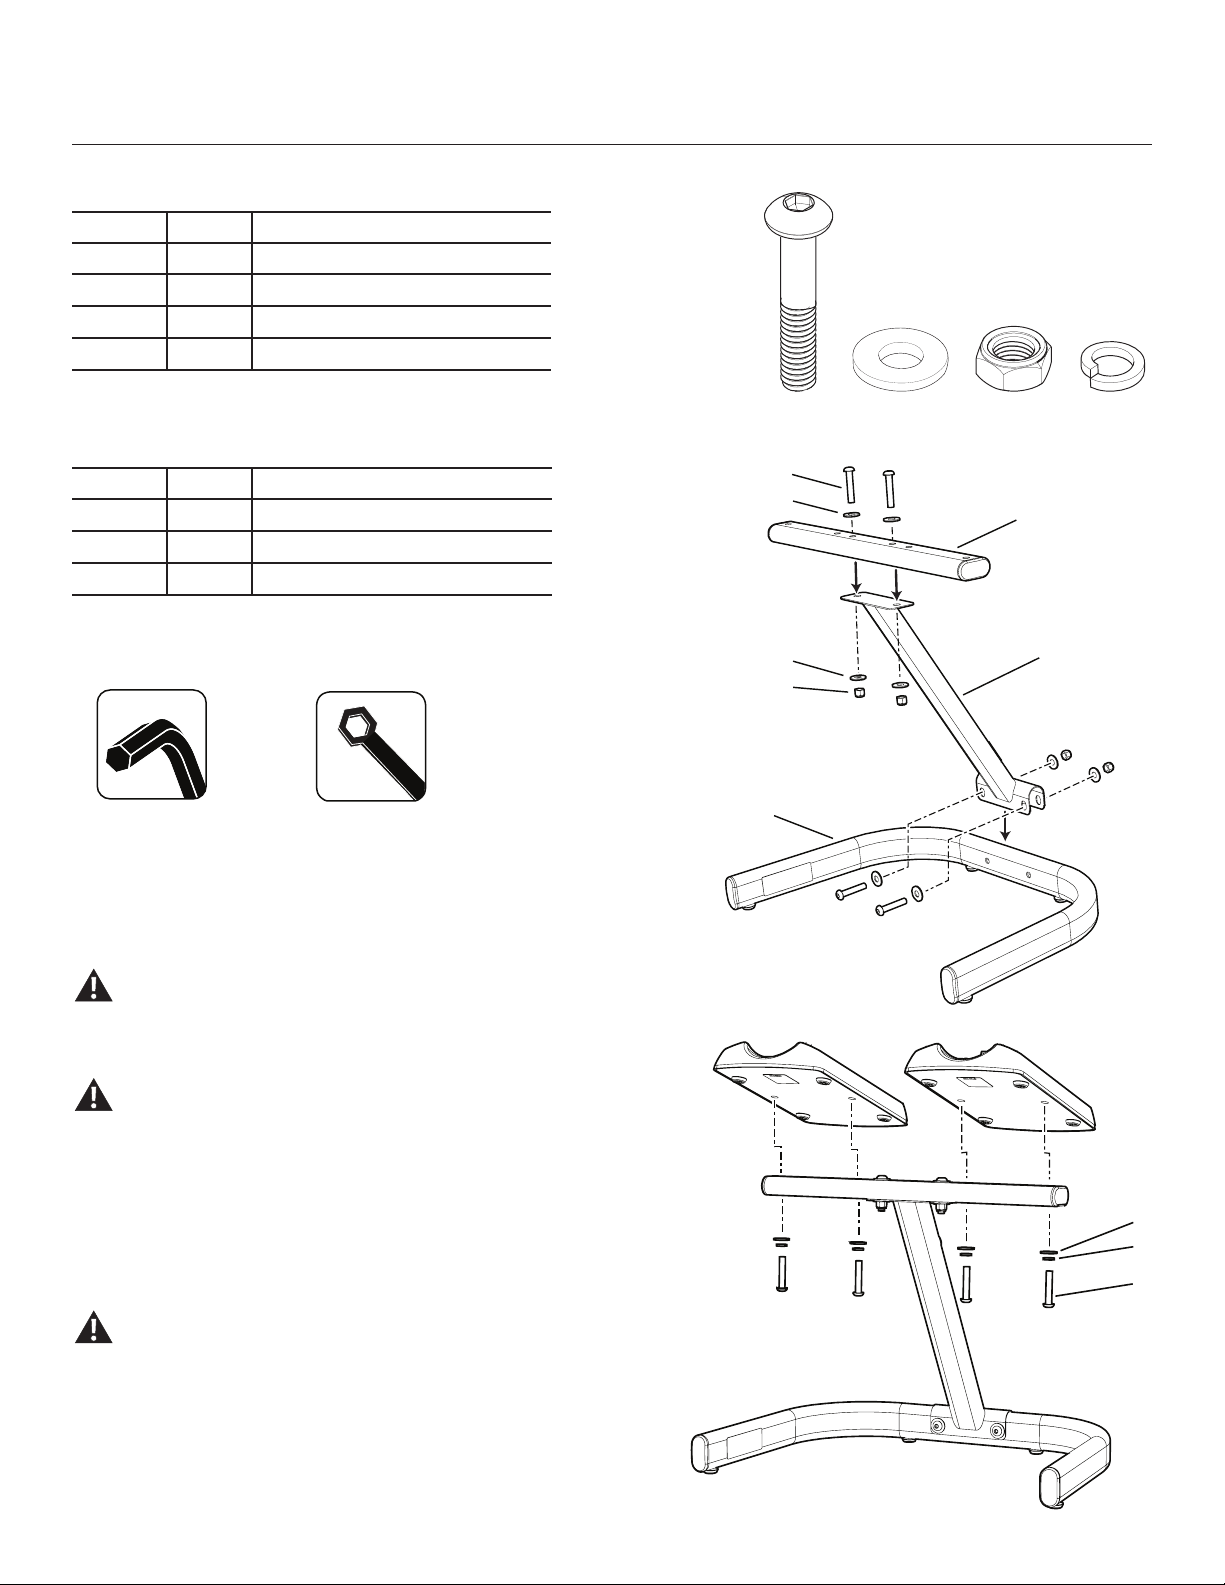
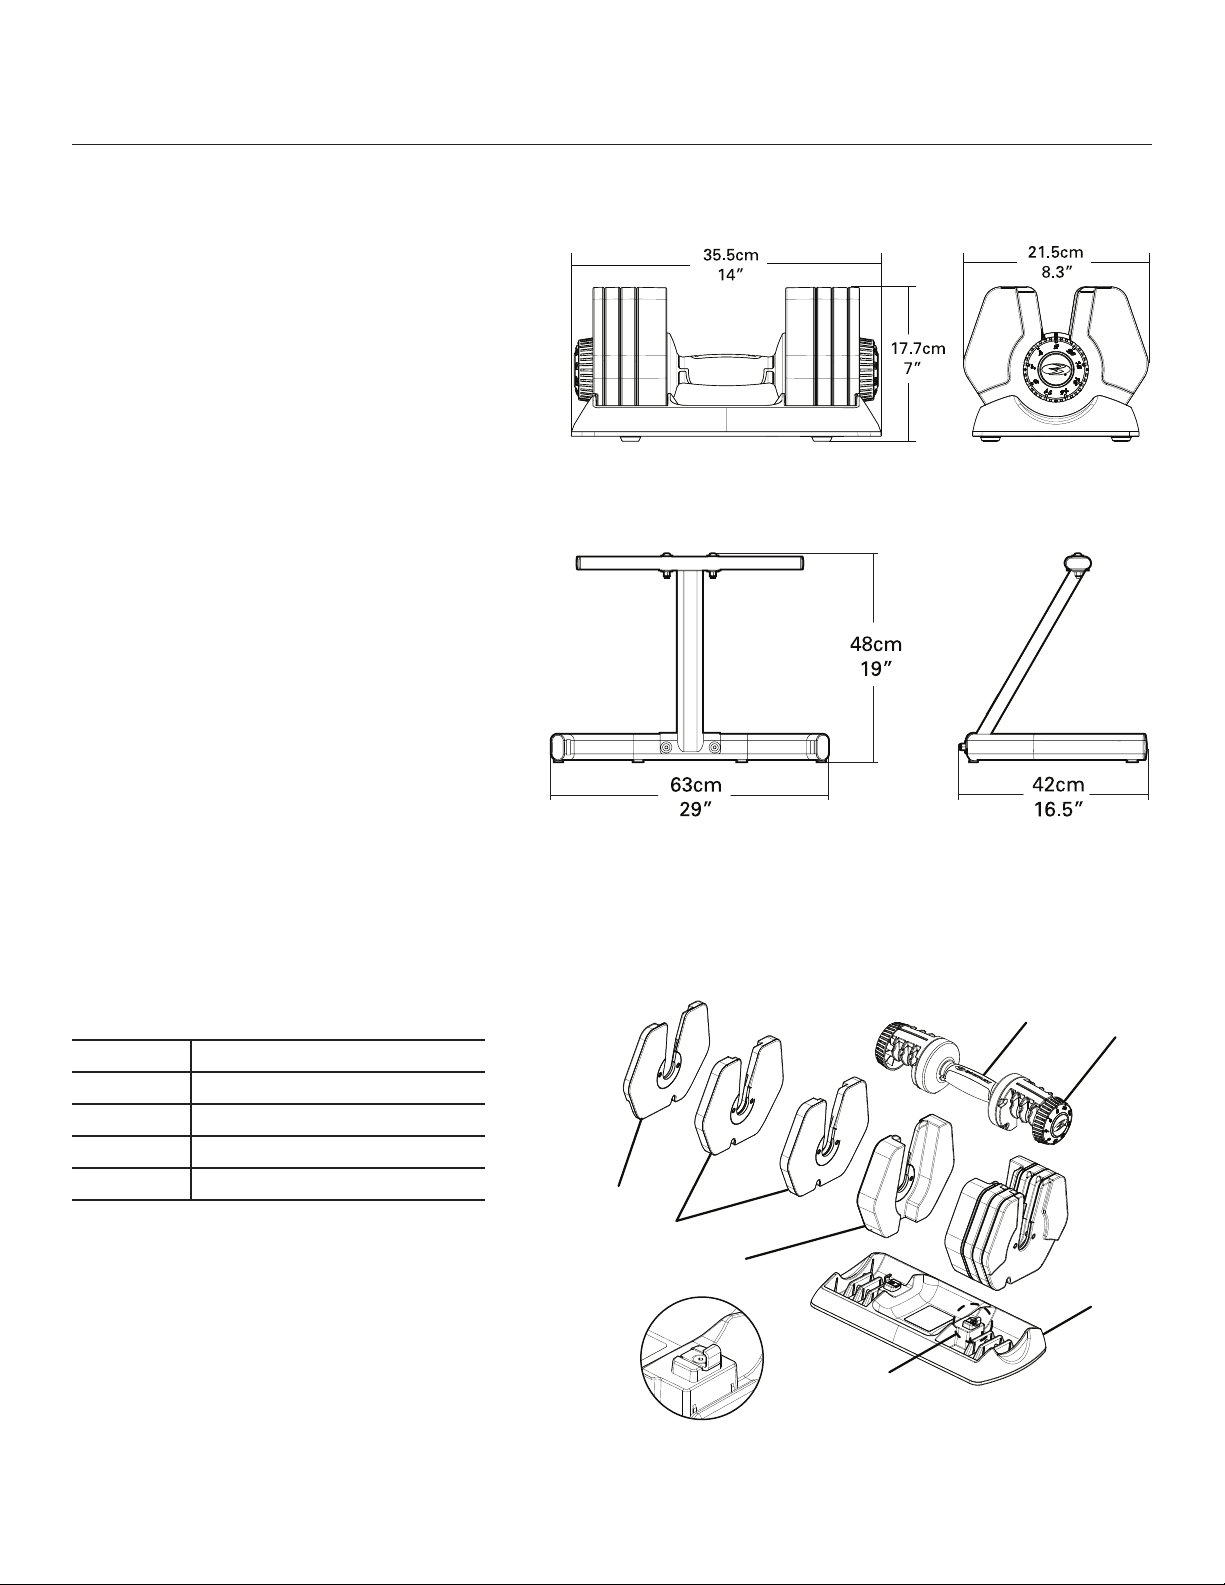
Assembly
B
D
A
1
A
B
B
C
3
2
A B C D
Hardware
Item Qty Description
A 8 Button Head Cap Screw M10 X 2
B 12 Flat Washer M10
C 4 Nut M10
D 4 Lock Washer M10
Parts
Item Qty Description
1 1 Base Assembly
2 1 Upright
3 1 Cross Tube
Tools (included)
8mm 14mm
17mm
Installing the Dumbbells on the Stand
Removethedumbbellfromitsbasebeforeyouattachthe
dumbbellbasetothestandtomakesurethatthedumbbelldoes
not fall during installation.
Fullytightenthehardwarebeforeyouputthedumbbellsintothe
installed dumbbell bases on the stand.
Final Inspection
Inspect your machine to ensure that all fasteners are tight and compo-
nents are properly assembled.
Donotuseuntilthemachinehasbeenfullyassembledand
inspected for correct performance in accordance with the
Owner’sManual.
Note:RecordserialnumberintheSerialNumbereldatthebeginning
of this manual.
5
Donotleanonthedumbbellhandlesorusethemtosupportyourbodyweight,suchasusingthemasabasetoperformapush
up.Doingsowilldamagetheweightplatesand/orthelockingmechanisms,andcancausetheweightplatestodisengage(drop)
from the handle without warning. This can cause serious injury, and will void the warranty.
Inspectthedumbbellspriortoeachuse.Donotuseadumbbellwithwornordamagedparts.ContactyourlocalBowex
®
distributor or vendor for service.
Weight Increments
There are 9 weight increments:
2kg 4kg 7kg 9kg 11kg 14kg 16kg 18kg 20kg
(4 lbs) (10 lbs) (15 lbs) (20 lbs) (25 lbs) (30 lbs) (35 lbs) (40 lbs) (45 lbs)
Note:Weightincrementsrepresentestimatedvaluesonly.Exactvaluescanvaryduetomanufacturingvariances.
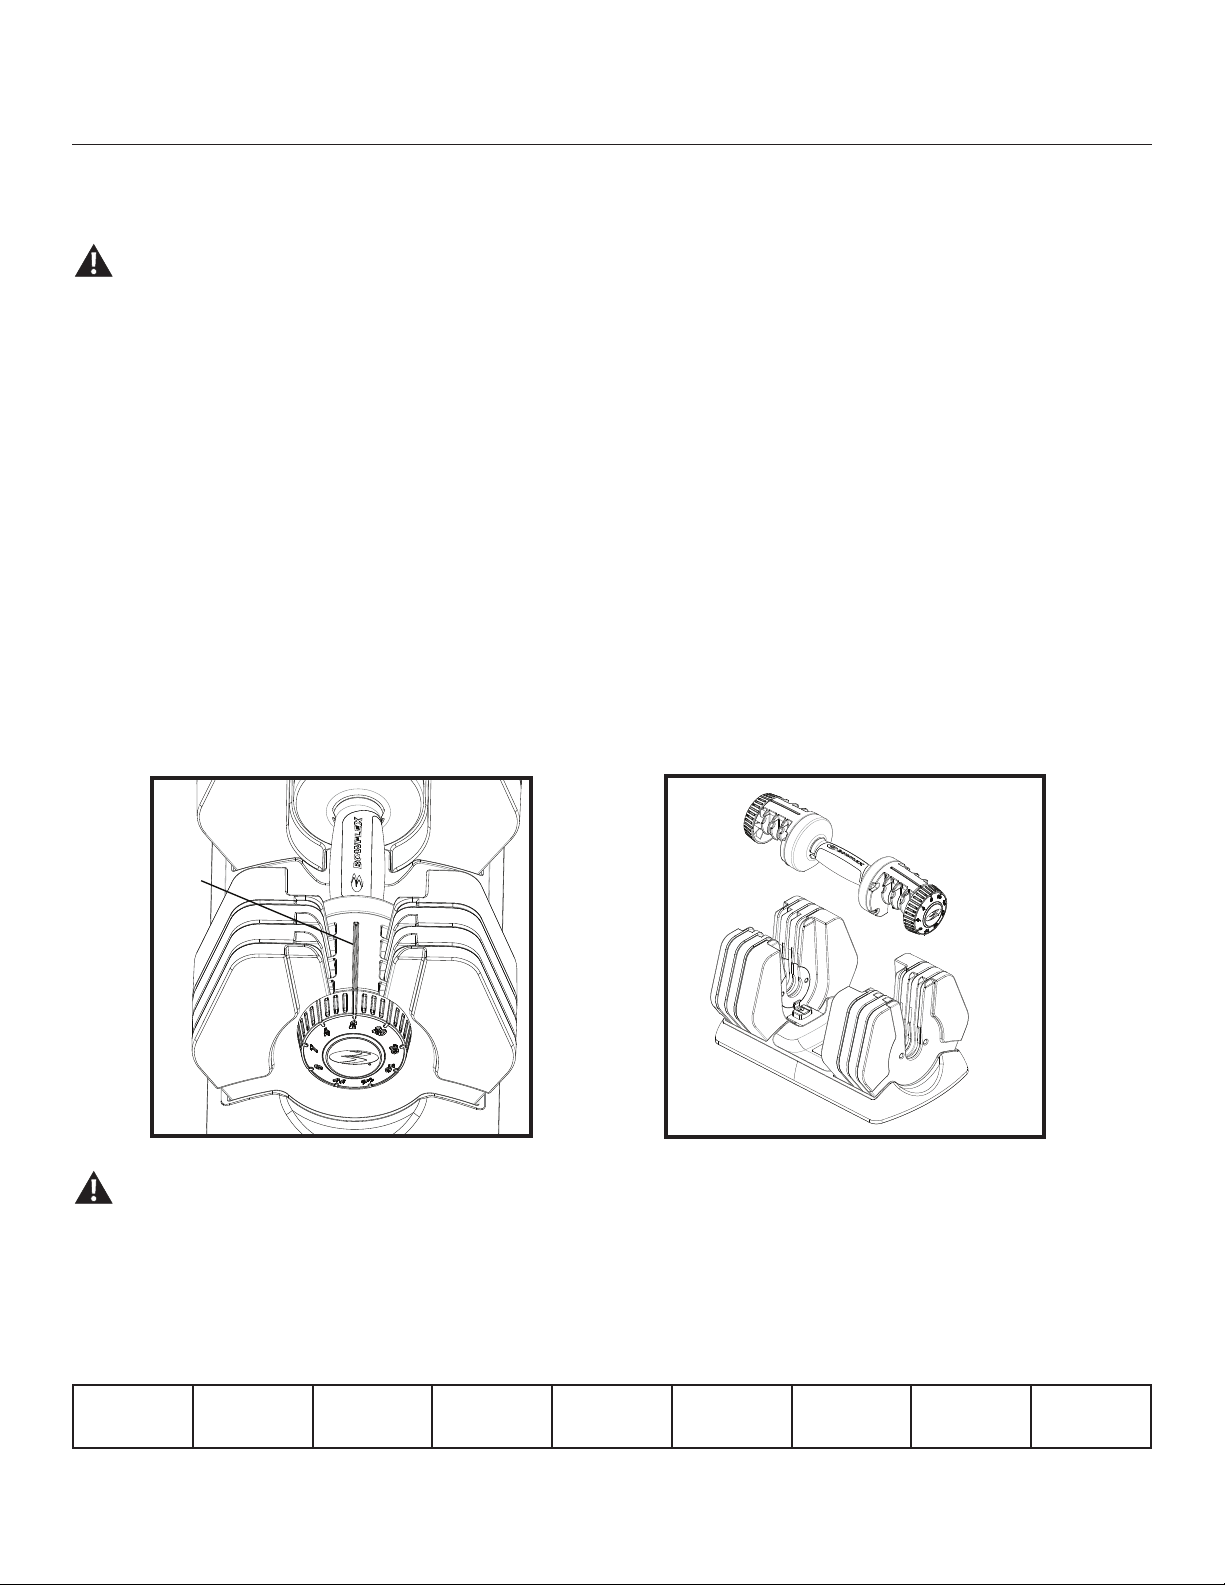
L1
Fig. 1 Fig. 2
Before You Start
The dumbbells are shipped fully assembled. After carefully removing the dumbbell from its box, there are some initial steps that should
betakentofamiliarizeyouwiththefunctionoftheproduct,andtomakesurethatallfeaturesofthedumbbelloperatecorrectly.
Donotdropthedumbbell.Droppingthedumbbellwilldamagetheweightplatesand/orthelockingmechanisms,andcancause
the weight plates to disengage (drop) from the handle without warning. This can cause serious injury, and will void the warranty.
1. Afteryouremovethedumbbellfromitsprotectivepackaging,inspecttheproductsandpackagingmaterialfordamage.
2. Pushdownslightlyonthehandleassemblytomakesureitisfullyseatedinthebase.Rotatetheadjustmentknobseveralfull
rotationstomakesureitturnsfreelyinbothdirections.Makesurethereisaclickateachweightincrementoftheadjustment
knob.Thisclickwillhelpyoualigntheknobcorrectlytomakeaweightselection.
Note:Theweightincrementsrangefrom2to20kg(~4to45lbs)ontheadjustmentknobs.
Tomakeaweightselection,turntheadjustmentknobsuntilthatnumberisalignedwiththeline(L1)onthetopsurfacesofthe
handle(Fig.1).Forexample,tosettheweightto2kg(~4lbs),alignthenumber2withthelineonthehandle.
3. Afteryoumakesurethattheadjustmentknobturnscorrectly,turntheknobsothatthenumber2isalignedwiththelineonthe
handle(Fig.1).
4. Withtheadjustmentknobssetto2,pullthehandlestraightupfromthedumbbell.Thiswillremoveonlythehandlefromthebase,
andletalloftheweightplatesstayinthebase(Fig.2).Thehandlewithoutplatesgivestheinitialweightof2kg(~4lbs).
NOTICE:Whenyouremovethedumbbellfromthebaseorreturnittothebase,useaverticalmotion,perpendiculartothebase.
Donottiltthedumbbellormoveitlaterally(paralleltothebase)untilitisfullyclearoftheunselectedweightplates.
Note:Thedumbbellhandleandweightplatesaresymmetrical.Whenyouputthedumbbellbackintothebase,theendsofthe
handle can point in either direction.
Operation
6
Understanding the Locking Mechanism Function
The dumbbell features SelectTech
®
technology.Thishasalockingmechanismdesignedtomakesureofcorrectselectionoftheweight
platesandtoholdtheweightplatessafelyduringtheworkout.
Fullyunderstandthefunctionofthismechanismanddotestsofthemechanismregularlytomakesureitoperatescorrectly.
Thelockingmechanismsuppliestwokeyfunctions:
1. Themechanismwillonlylettheadjustmentknobsturnwhenthedumbbellhandlefullyengagesthedumbbellbase.Themecha-
nism prevents deselecting (dropping) weight plates from the dumbbell when it is NOT in the dumbbell base.
2. Themechanismwilllockthedumbbellhandletothebaseiftheadjustmentknobsdonotfullyengagetheweightplateselection.
Themechanismpreventspartialselectionoftheweightplatesinwhichthelockingpinisnotfullyengagedanddoesnotfullyhold
the plates.
Testing the Locking Mechanism Function
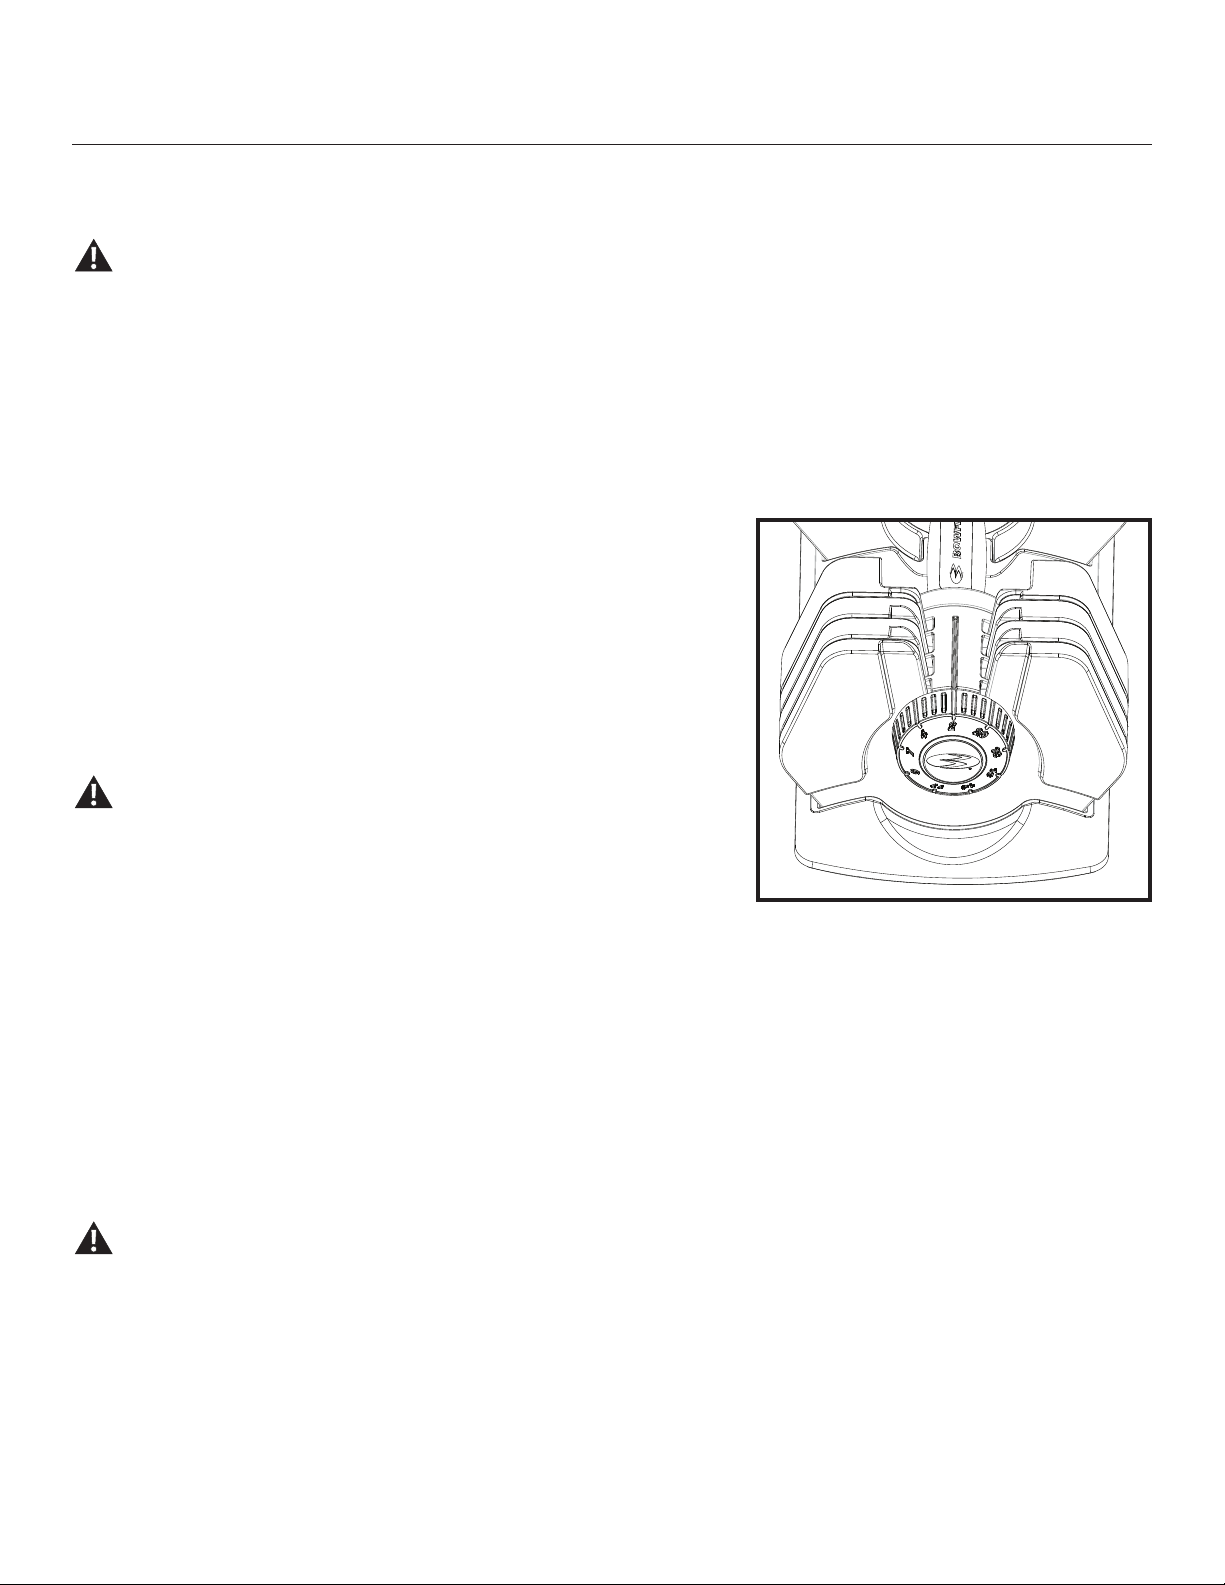
1. Withthedumbbellhandlesetinthedumbbellbase,turntheadjustmentknobs
tothenumber2.Whenyoufullyandcorrectlymakethenumberselection,you
canfeeltheadjustmentknobmoveintoanotch(knownasadetent).Youwill
alsohearasmall,butaudible,clickatthedetentlocationforeachnumber.
2. Pull the handle vertically from the base and all the weight plates will stay in
the base.
3. Withthehandleremovedfromthebase,holdoneadjustmentknobwithyour
otherhandandcarefullytrytoturntheknob.Theknobshouldnotturn.A
lockingpininthemechanismengagestherotationalassemblywhentheunit
isremovedfromthebase.Dothistestwithalladjustmentknobs.
Donotusetoomuchforcetotrytoturnthelockedadjustmentknob.Too
muchforcecandamagethelockingmechanism.
4. Afteryoumakesurethatthelockingmechanismoperatescorrectly,putthe
dumbbellhandlebackandsetitfullyintothebaseassembly.
5. Withthehandlebackinthebase,turntheadjustmentknobtoapositionthat
is between the numbers 2 and 20. This is an incomplete weight selection
wheretheadjustmentknobhasnotfullymadeaweightselectionandtheknobisbetweentheselectiondetents(clicks).
6. Withtheselectionknobinthisincorrectposition,carefullytrytoliftthehandletoremoveitfromthebase.Youshouldndthatthe
handleislockedtothebaseandcannotberemovedwithlightpressure,asitusuallycan.
7. Changetheadjustmentknobtoafullandcorrectweightselectionandmakesurethatthedumbbellhandlecanagainberemoved.
8. Repeatthistestforalladjustmentknobs.
9. Makesurethedumbbellhandleassemblyisproperlytightened.Todothis,settheadjustmentknobsto4poundsandremovethe
handleassemblyfromthebase.Holdtheadjustmentknobs,andpushandpulltheknobstoandawayfromthehandlegrip.The
knobsshouldnotmovefreelyandalloftheselectiondiscsshouldfeeltightlyconnected.
10. Thetestofthelockingmechanismfunctionisnowcomplete.Wesuggestthatyourepeatthistestmonthlytomakesurethatthe
lockingmechanismoperatescorrectly.
Donotengagethelockingmechanismandusethehandletotrytoliftthedumbbellandbasetogether.Toliftthedumbbelland
basetogether,engagethelockingmechanismandholdthebaseassembly.
Ifthedumbbelllockingmechanismoperatesunsatisfactorilyinthetestprocedureabove,dothefollowing:
1. Stop use of the product immediately until approved service is available.
2. Contact your local Bowflex
®
distributor or vendor for service.
Operation
7
Equipmentmustberegularlyexaminedfordamageandrepairs.Theownerisresponsibletomakesurethatregularmaintenance
isdone.Wornordamagedcomponentsmustbereplacedimmediatelyortheequipmentremovedfromserviceuntiltherepairis
made. Only manufacturer supplied components can be used to maintain and repair the equipment.
Adjustable Dumbbell Maintenance:
1. If your dumbbell handle assembly, plates or base become dirty, you can clean them with a cloth lightly dampened with warm water
andasmallamountofmildsoap.Wipedrywithaseparatecloth.
2. The adjustable dumbbell is internally lubricated and will not require more internal lubrication. The contact between weight plates
and selection discs is not lubricated but has naturally low friction. Lubrication is usually not necessary. If you feel it is necessary to
lubricatetheweightplatesand/orselectiondiscs,useonlya“foodgrade”siliconlubricant.
Donotuseanysolvents,harshdetergents,chemicalsorbleachonthisproduct-thiscandamagethematerials,resultingin
degradation of the product’s performance or strength.
Neverattempttodisassemblethedumbbellhandleorbaseassembly–theproductisnotdesignedtobeuserserviced.Doingso
will void the manufacturers warranty. Contact your local Bowflex
®
distributor or vendor for service.
Daily / Before Each Use:
Examine equipment. Make sure it looks in good condition and operates smoothly. If you find damage, DO NOT
USE.
Daily / After Each Use:
Clean equipment with a clean, dry cloth. Do not use cleansers containing enzymes.
Weekly:
Clean equipment fully with a clean cloth lightly dampened with warm water and a small amount of mild soap.
Wipe dry with a separate cloth.
Touch up any scratches with touch-up paint to prevent rust, if necessary.
Monthly:
Examine the frame for signs of cracking or permanent bending. Do not use the equipment if you see this.
Contact your local Bowflex
®
distributor or vendor for service.
Troubleshooting
Problem Solution
Dumbbell handle does not fully go into base
when no plates are attached.
1. Make sure that the adjustment knobs are set directly to the number 4.
2. Make sure that the weight plates are seated correctly in the base assembly.
Dumbbell handle does not fully go into base
when plates are attached.
Make sure that the plates that are still in the dumbbell base are in their correct spots and not
moved to different support slots. This may be blocking the dumbbell from fitting back into the
base.
Adjustment knob will not turn while handle is
in base.
1. Make sure that the dumbbell handle is fully pushed into the dumbbell base. If not fully set into
the base, the locking mechanism will not be released and will prevent the adjustment knobs from
turning.
2. Make sure that the weight plates are seated correctly in the base assembly.
3. Inspect the dumbbell base for dirt, debris or other unwanted material. If necessary, remove
the weight plates from the base to do this check. Remember to put each weight plate back in its
correct location.
Plates are not attached safely to the handle
and drop out.
Make sure that the plates that are still in the dumbbell base are in their correct spots and not
moved to different support slots.
Maintenance / Troubleshooting
EN
8000773.100112.A
8