Documents: Go to download!
User Manual
- Owner's manual - (English, Spanish, Korean)
- Specification - (English)
User Manual Dryer
PRODUCT FEATURES
Easy-to-Use Control Panel
An entire selection of user-friendly functions make operating the dryer easy.
Two-Way Easy-Access Reversing Door
The LG EasyLoad™ can be tilted open from the top, hamper-style, allowing you to easily load the dryer without items falling on the floor. The door still swings open to provide easy access for unloading or loading of bulkier items. The door hinge can be reversed to adjust to the installation location.
Steam Functions (Steam Models)
LG's steam technology allows you to inject fabrics with a swirling jet of steam to refresh clothes, reduce static, and make ironing easier. Simply select the Steam Fresh™ cycle or Wrinkle Care cycle.
Flow Sense™ Duct Blockage Sensing System Indicator
The Flow Sense™ duct blockage sensing system detects and alerts you to restrictions in the installed household ductwork that reduce exhaust airflow through the dryer. If you see the alert: Clean or repair the ducts to remove the restrictions. Keep your ducts free of blockage to help increase efficiency and reduce long drying times caused by blocked ducts.
Smart Diagnosis™
Should you experience any technical difficulty with your dryer, it has the capability of transmitting data via your telephone to the Customer Information Center. The call center agent records the data transmitted from your machine and uses it to analyze the issue, providing a fast and effective diagnosis.
SmartThinQ™
Download the new LG smart phone app to set options, self-diagnose and troubleshoot problems with the appliance, and other useful features. This function uses Wi-Fi.
PRODUCT OVERVIEW
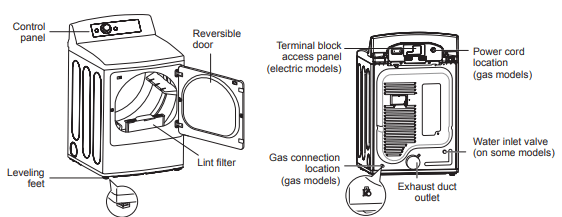
Parts
Accessories
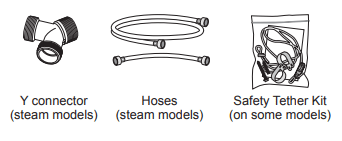
Included Accessories
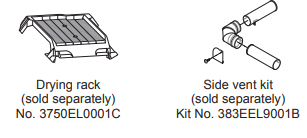
Optional accessories
Two-Way Reversible Door (on some models)
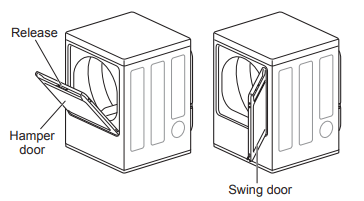
The LG EasyLoad™ feature allows you to open the dryer door from the top, hamper-style, when loading the dryer to help guide clothes into the drum and prevent them from falling onto the floor. When unloading the dryer or loading bulkier items, use the swing door for easy access to the drum.
Safety Tether Kit
This optional kit helps prevent the dryer tipping if children climb on the door or if someone should fall onto the door. It is recommended that you install this kit, depending on your situation, but it is not required. Follow the customer installation instructions included with the kit to properly install the kit. If you do not install the kit, store it out of reach of children.
OPERATION
Using the Dryer
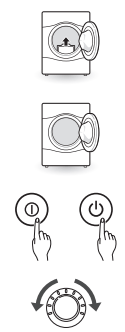
1 Clean the Lint Filter
If the lint filter has not already been cleaned, lift out the filter and remove the lint from the last load. This will help ensure the fastest and most efficient drying performance. Make sure to reinstall the filter, pressing down until it clicks firmly into place. The dryer will not operate without the lint filter in place.
2 Load the Dryer
Load the dryer with the wet laundry from the washer. If the load is extra large, you may need to divide it into smaller loads for proper performance and fabric care.
3 Turn on The Dryer
Press the POWER button to turn ON the dryer. The cycle LEDs will illuminate and a chime will sound.
4 Select a Cycle
Turn the cycle selector knob either direction until the LED for the desired cycle is on. The preset temperature, dry level, and option settings for that cycle will be shown. Refer to page 37. Default settings for the selected cycle can now be changed if desired. This can be done using the cycle modifier buttons as shown on page 37. Cycle options can be added using the option buttons as shown on page 38-41.
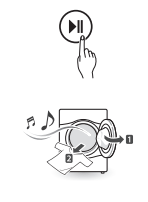
5 Begin the Cycle
Press the START/PAUSE button to begin the cycle. The cycle can be paused at any time either by opening the door or by pressing the START/PAUSE button. If the cycle is not restarted within 4 minutes of being paused, the dryer will shut off and the settings will be lost.
6 End of Cycle
When the cycle is finished, the chime will sound. Immediately remove your clothing from the dryer to reduce wrinkling. If Wrinkle Care is selected, the dryer will tumble briefly every few minutes to help prevent wrinkles from setting in the clothes.
Check the Lint Filter Before Every Load
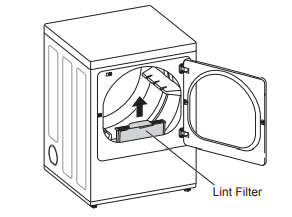
Always make sure the lint filter is clean before starting a new load; a clogged lint filter will increase drying time. To clean, pull the lint filter straight up and roll any lint off the filter with your fingers. Do not rinse or wash the filter to remove lint. Push the lint filter firmly back into place. See Regular Cleaning for more information.
Always ensure the lint filter is properly installed before running the dryer. Running the dryer with a loose or missing lint filter will damage the dryer and articles in the dryer.
Sorting Loads
Fabric Care Labels
Most articles of clothing feature fabric care labels that include instructions for proper care.
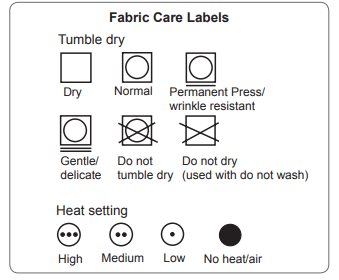
Group Similar Items
For best results, sort clothes into loads that can be dried with the same drying cycle. Different fabrics have different care requirements, and some fabrics will dry more quickly than others. For best fabric care results, always dry fabrics with similar care requirements together.
Loading the Dryer
Warning :To reduce the risk of fire, electric shock, or injury to persons when using this appliance, follow basic precautions, including the following:
• Check all pockets to make sure that they are empty. Items such as clips, pens, coins, and keys can damage both your dryer and your clothes. Flammable objects such as lighters or matches could ignite, causing a fire. Failure to do so may result in fire, explosion, or death.
• Never dry clothes that have been exposed to oil, gasoline, or other flammable substances. Washing clothes will not completely remove oil residues. Failure to obey this warning may result in fire, explosion, or death
NOTE: Loading Tips
• Combine large and small items in the same load.
• Damp clothes will expand as they dry. Do not overload the dryer; clothes require room to tumble and dry properly.
• Close zippers, hooks, and drawstrings to prevent these items from snagging or tangling on other clothes.
Using the LG EasyLoadTM
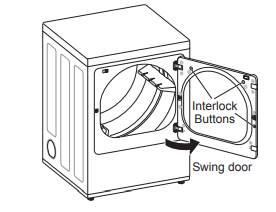
Swing Door
Use the swing door when unloading, or when loading bulkier items, for easy access to the drum. To open the swing door, grasp the top of the door on the side opposite the hinge and pull.
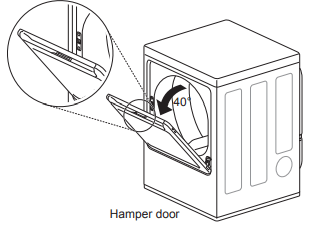
Hamper Door (on some models)
Use the hamper door when loading. The hamper door opens about 40 degrees and acts as a chute to help guide items into the drum and help prevent items from falling onto the floor. It also comes in handy when unloading a few small items, helping prevent the rest of the laundry from being pulled onto the floor. To open the hamper door, press the release on the top of the door and pull the door forward. Make sure laundry is fully inserted in the drum before closing the door.
Control Panel
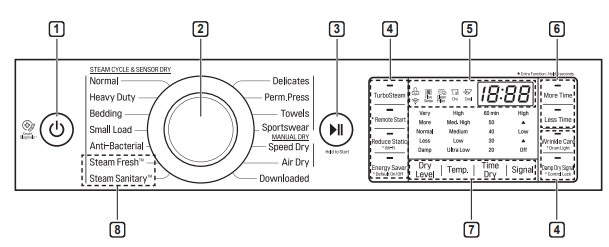
1 POWER Button
Press to turn the dryer ON. Press again to turn the dryer OFF
2 Cycle Selector Knob
Turn this knob to select the desired cycle. Once the desired cycle has been selected, the standard presets are shown in the display. On Manual Dry cycles, these settings can be adjusted using the cycle modifier buttons any time before starting the cycle.
3 START/PAUSE Button
Press this button to start the selected cycle. If the dryer is running, use this button to pause the cycle without losing the current settings.
4 Cycle option Buttons
The option buttons allow you to select additional cycle options. Certain buttons also allow you to activate special functions by pressing and holding the button for 3 seconds.
5 Time and Status Display
The display shows the settings, estimated time remaining, options, and status messages for your dryer.
6 MORE TIME/LESS TIME Buttons
Use these buttons with the Time Dry and other MANUAL DRY cycles to adjust the drying time. Press the More Time button to increase the selected manual cycle time by 5 minutes; press the Less Time button to decrease the cycle time by 5 minutes.
7 Cycle Modifier Buttons
Use these buttons to select the desired cycle settings for the selected cycle. The current settings are shown in the display. Press the button for that option to select other settings
8 Steam Functions
LG’s steam technology allows you to inject fabrics with a swirling jet of steam to refresh clothes, reduce static, and make ironing easier. Simply select the Steam Fresh™ cycle or Steam Sanitary ™ cycle or you can add a Steam option to selected cycles.
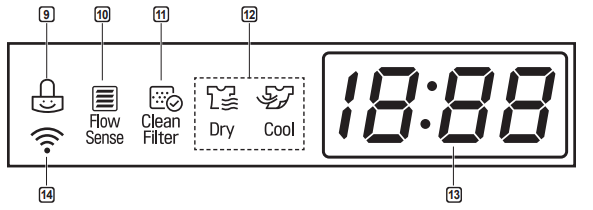
9 Control Lock Indicator
When Control Lock is set, the Control Lock indicator appears and all buttons are disabled except the POWER button. This prevents children from changing settings while the dryer is operating.
10 Flow Sense™ Duct Blockage Sensing System Indicator
The Flow Sense™ duct blockage sensing system detects and alerts you to blockages in the ductwork that reduce exhaust flow from the dryer. Maintaining a clean exhaust system improves operating efficiency and helps minimize service calls, saving you money.
11 Clean Filter Reminder
The display will show Clean Filter when the dryer is turned on as a reminder to check the filter. It turns off when the START/PAUSE button is pressed.
12 Cycle Completion Indicator
This portion of the display shows which stage of the drying cycle is currently underway (Dry, Cool).
13 Estimated Time Remaining
This display shows the estimated time remaining for SENSOR DRY cycles or the actual time remaining for Time Dry or MANUAL DRY cycles.
14 Wi-Fi Indicator
When the appliance is connected to the internet through a home Wi-Fi network, this indicator appears.
Cycle Guide
 default setting
 allowable option
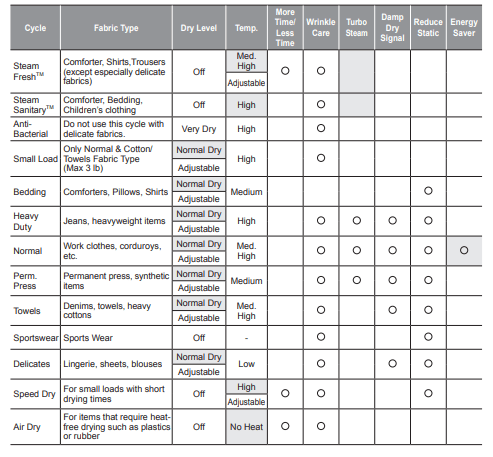
Sensor Dry Cycles
Sensor dry cycles utilize LG’s unique dual sensor system to detect and compare the moisture level in clothes and in the air and adjust the drying time as needed to ensure superior results. The dryer automatically sets the dryness level and temperature at the recommended setting for each cycle. The estimated time remaining will be shown in the display
Manual Dry Cycles
Use manual dry cycles to select a specific amount of drying time and a drying temperature. When a manual dry cycle is selected, the Estimated Time Remainng display shows the actual time remaining in your cycle. You can change the actual time in the cycle by pressing More Time or Less Time.
CERTIFIED BY NSF/P154
NSF International (formerly the National Sanitation Foundation), certifies that the Anti-Bacterial cycle reduces 99.9% of bacteria on laundry, and none of the bacteria will carry over onto the next laundry load.
• The default settings for the Anti-Bacterial cycle are High temperature and Very Dry. These default settings cannot be changed.
• Do NOT use this cycle with delicate items or fabrics.
Cycle Settings and Options
Cycle Modifier Buttons
SENSOR DRY cycles have preset settings that are selected automatically. MANUAL DRY cycles have default settings, but you may also customize the settings using the cycle modifier buttons. Press the button for that option to view and select other settings.
Dry Level
Selects the level of dryness for the cycle. Press the Dry Level button repeatedly to scroll through available settings.
• This option is only available with SENSOR DRY cycles.
• The dryer will automatically adjust the cycle time. Selecting More or Very will increase the cycle time, while Less or Damp will decrease the cycle time.
• Use a Less Dry or Damp Dry setting for items that you wish to iron.
Temp.
Adjusts the temperature setting. This allows precise care of your fabrics and garments. Press the Temp. button repeatedly to scroll through available settings.
Time Dry
Allows you to manually select the drying time, from 20 to 60 minutes, in 10-minute increments. Use this for small loads or to remove wrinkles.
Signal
Press the Signal button repeatedly to change the volume or turn on/off the button tones and the end of cycle melod
Cycle Option Buttons
The dryer features several additional cycle options to customize cycles to meet individual needs. Certain option buttons also feature a special function that can be activated by pressing and holding that option button for 3 seconds. (See Special Functions on the following page for details.)
Adding Cycle Options to a Cycle:
1 Turn on the dryer and turn the Cycle Selector Knob to select the desired cycle.
2 Use the cycle modifier buttons to adjust the settings for that cycle.
3 Press the cycle option button(s) for the option you would like to add. A confirmation message is shown in the display.
4 Press the START/PAUSE button to start the cycle. The dryer starts automatically.
Wrinkle Care
Selecting this option will tumble the load periodically for up to 3 hours after the selected cycle, or until the door is opened. This is helpful in preventing wrinkles when you are unable to remove items from the dryer immediately.
Damp Dry Signal
With this option, the dryer will signal when the load is approximately 80% dry. This allows you to remove faster- drying lightweight items or items that you would like to iron or hang while still slightly damp.
Energy Saver (on some models)
This option helps to reduce energy consumption in the Normal cycle, depending on the load size. When the Energy Saver option is selected, the cycle begins with an air dry section and the drying time is increased.
Special Functions
Some cycle option buttons also activate secondary functions. These special functions are marked with an asterisk (*). Press and hold the option button marked with the special function to activate it.
* Drum Light
The drum is equipped with a blue LED that illuminates when the dryer is turned on. This light automatically turns off when the door is closed and the cycle starts. To turn on the light during a cycle, press and hold the TurboSteam button for three seconds. The drum light will illuminate and then turn off automatically after four minutes.
* Control Lock
Use this option to prevent unwanted use of the dryer or to keep cycle settings from being changed while the dryer is operating. Press and hold the button marked Control Lock for 3 seconds to activate or deactivate the Control Lock function. The Control Lock icon will be shown in the display, and all controls will be disabled except the POWER button.
* Default On/Off
This option allows the Energy Saver settings to be changed. To run a Normal cycle without the Energy Saver option, press and hold the Energy Saver button for three seconds. ON or OFF appears in the display
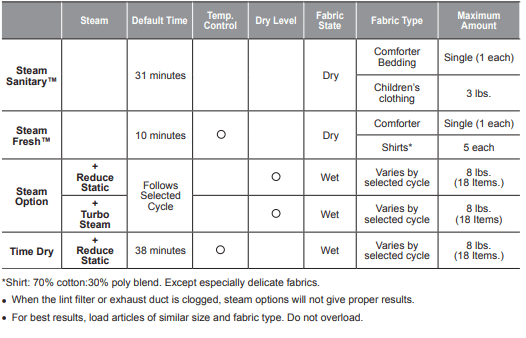
Steam Functions
LG’s new steam technology allows you to inject fabrics with a swirling jet of hot steam to refresh clothes and reduce static, or sanitize clothes. Simply select the Steam Fresh™ cycle or the Steam Sanitary™ cycle. Or you can add a steam option to selected cycles.
Using the Steam Fresh™ cycle
Steam Fresh™ uses the power of steam alone to quickly reduce wrinkles and odors in fabrics. It brings new life to wrinkled clothes that have been stored for an extended time. Steam Fresh™ can also be used to help reduce odors and remove the hanger creases in fabrics
To use the Steam Fresh™ cycle:
1 Turn on the dryer and turn the cycle selector knob to select the Steam Fresh™ cycle.
2 To add an option function, select Wrinkle Care.
3 Depending on the load (quantity of items), steam time can be changed by pressing the More Time or Less Time buttons.
4 Press Start/Pause button to start the cycle.
Using the Steam Sanitary™ cycle
The new Steam Sanitary™ cycle is ideal for sanitizing non-washable items quickly and easily using the power of steam alone. This cycle is recommended for use with cotton and polyester materials. (Do NOT use for urethane foam, down feathers or delicate items.)
Using the Steam Option
The Reduce Static option injects steam late in the drying cycle to reduce the static electricity caused by dry fabrics rubbing together. Change the amount of time for the cycle by pressing the More Time or Less Time button, depending on the load (quantity of items). The display will show the recommended number of items, such as 7, 9, 11, 14, 16, or 18. TurboSteam helps prevent the overdrying of clothes by injecting steam during the drying process.
To add steam to a standard cycle:
1 Turn on the dryer and turn the cycle selector knob to select the desired cycle.
2 Use the cycle setting buttons to adjust the settings for that cycle.
3 Press the steam option button for the steam option you would like to add. Then adjust for the load size using the More Time or Less Time buttons.
4 Press Start/Pause to start the cycle.
Steam Cycle Guide
SMART FUNCTIONS
LG SmartThinQ Application
The LG SmartThinQ application allows you to communicate with the appliance using a smartphone.
Before Using LG SmartThinQ
- For appliances with the
 or
or  logo.
logo.
1. Use a smartphone to check the strength of the wireless router (Wi-Fi network) near the appliance.
• If the distance between the appliance and the wireless router is too far, the signal strength becomes weak. It may take a long time to register or installation may fail.
2. Turn off the Mobile data or Cellular Data on your smartphone
3. Connect your smartphone to the wireless router.
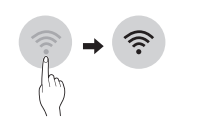
Installing the LG SmartThinQ Application
Search for the LG SmartThinQ application from the Google Play Store or Apple App Store on a smart phone. Follow instructions to download and install the application.
LG SmartThinQ Application Features
For appliances with the  or
or  logo.
logo.
Dryer Cycle
Download new and specialized cycles that are not included in the standard cycles on the appliance. Appliances that have been successfully registered can download a variety of specialty cycles specific to the appliance. Only one cycle can be stored on the appliance at a time. Once cycle download is completed in the appliance, the appliance keeps the downloaded cycle until a new cycle is downloaded
Venting Tips
Provides venting tips.
Smart Diagnosis™
This function provides useful information for diagnosing and solving issues with the appliance based on the pattern of use.
Energy Monitoring
The dryer energy usage is affected by the cycles and options so you may see some changes in energy usage from one cycle to another.
Push Alerts
When the cycle is complete or the appliance has problems, you have the option of receiving push notifications on a smart phone.
Settings
Set the product nickname and delete product.
Using Remote Start
Use a smart phone to control the appliance remotely or check to see how much time is left in the cycle.
1 Press the Power button.
2 Load the laundry.
3 Press and hold the Remote Start button for 3 seconds to enable the Remote Start function.
4 Start a cycle from the LG Smart ThinQ application on your smart phone
Disabling Remote Start
When the Remote Start is activated, press and hold the Remote Start button for 3 seconds.
Wireless LAN Module Specifications

FCC Notice (For transmitter module contained in this product)
This equipment has been tested and found to comply with the limits for a Class B digital device, pursuant to Part 15 of the FCC Rules. These limits are designed to provide reasonable protection against harmful interference in a residential installation. This equipment generates, uses, and can radiate radio frequency energy and, if not installed and used in accordance with the instructions, may cause harmful interference to radio communications. However, there is no guarantee that interference will not occur in a particular installation. If this equipment does cause harmful interference to radio or television reception, which can be determined by turning the equipment off and on, the user is encouraged to try to correct the interference by one or more of the following measures:
• Reorient or relocate the receiving antenna.
• Increase the separation between the equipment and the receiver.
• Connect the equipment to an outlet on a circuit different from that to which the receiver is connected.
• Consult the dealer or an experienced radio/TV technician for help.
This device complies with part 15 of the FCC Rules. Operation is subject to the following two conditions:
1) This device may not cause harmful interference and
2) This device must accept any interference received, including interference that may cause undesired operation of the device.
Any changes or modifications in construction of this device which are not expressly approved by the party responsible for compliance could void the user’s authority to operate the equipment.
FCC RF Radiation Exposure Statement
This equipment complies with FCC radiation exposure limits set forth for an uncontrolled environment. This transmitter must not be co-located or operating in conjunction with any other antenna or transmitter. This equipment should be installed and operated with a minimum distance of 20 cm (7.8 inches) between the antenna and your body. Users must follow the specific operating instructions for satisfying RF exposure compliance.
Open Source Software Notice Information
To obtain the source code under GPL, LGPL, MPL, and other open source licenses, that is contained in this product, please visit http://opensource.lge.com. In addition to the source code, all referred license terms, warranty disclaimers and copyright notices are available for download. LG Electronics will also provide open source code to you on CD-ROM for a charge covering the cost of performing such distribution (such as the cost of media, shipping, and handling) upon email request to [email protected]. This offer is valid for three (3) years from the date on which you purchased the product.
Smart Diagnosis™ Function
Should you experience any problems with the appliance, it has the capability of transmitting data via your telephone to the LG Customer Information Center. NFC or Wi-Fi equipped models can also transmit data to a smartphone using the LG SmartThinQ application.
Smart Diagnosis™ through the Customer Information Center
• For appliances with the  or
or  logo.
logo.
This gives you the capability of speaking directly to our trained specialists. The specialist records the data transmitted from the appliance and uses it to analyze the issue, providing a fast and effective diagnosis.
1 Call the LG Electronics Customer Information Center at: (LG U.S.A.) 1-800-243-0000 (LG Canada) 1-888-542-2623
2 When instructed to do so by the call center, place the mouthpiece of the phone close to the Smart Diagnosis™ icon. Do not press any other buttons.
3 Press and hold the Temp. button for 3 seconds.
4 Keep the phone in place until the tone transmission has finished.
5 Once the countdown is over and the tones have stopped, resume your conversation with the call center agent, who will then be able to assist you using the information transmitted for analysis.
SmartThinQ Smart Diagnosis™
• For appliances with the  or
or  logo.
logo.
Use the Smart Diagnosis feature in the SmartThinQ application for help diagnosing issues with the appliance without the assistance of the LG Customer Information Center.
Follow the instructions in the SmartThinQ application to perform a Smart Diagnosis using your smartphone.
MAINTENANCE
Regular Cleaning
Cleaning the Exterior
Proper care of your dryer can extend its life. The outside of the machine can be cleaned with warm water and a mild, nonabrasive household detergent. Immediately wipe off any spills with a soft, damp cloth.
Cleaning the Interior
Wipe around the door opening and seal with a soft, damp cloth to prevent lint and dust buildup that could damage the door seal. Clean the window with a soft cloth dampened with warm water and a mild, nonabrasive household detergent, then wipe dry. The stainless steel drum can be cleaned with a conventional stainless steel cleaner, used according to the manufacturer’s specifications. Never use steel wool or abrasive cleansers; they may scratch or damage the surface.
Cleaning Around and Under the Dryer
Vacuum lint and dust from around the dryer and underneath it regularly. Vent ductwork should be checked for lint buildup and cleaned at least once per year. If any noticeable reduction in airflow or drying performance occurs, immediately check ductwork for obstructions and blockages.
Maintaining Ductwork
Vent ductwork should be checked for lint buildup once per month and cleaned at least once per year. If any noticeable reduction in airflow or drying performance occurs, immediately check ductwork for obstructions and blockages. Contact a qualified technician or service provider.
Cleaning the Lint Filter
Always clean the lint from the filter after every cycle.
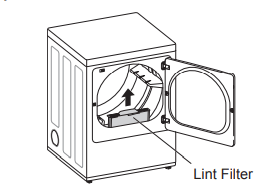
To clean, open the dryer door and pull the lint filter straight up. Then:
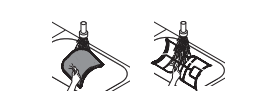
1 For everyday cleaning, roll any lint off the filter with your fingers, or
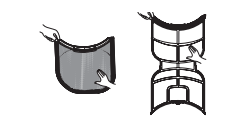
2 Vacuum the lint filter.
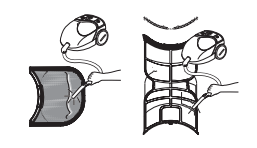
3 If the lint filter has become very dirty or clogged with fabric softener, wash the lint filter in warm, soapy water and allow it to dry thoroughly before reinstalling.
TROUBLESHOOTING
Operation
| Problem | Possible Cause | Solutions |
| The Flow SenseTM indicator remains active after clearing the restriction in the venting. | After clearing the restriction, the Flow SenseTM system requires multiple, consecutive cycles to determine that the performance value has improved before the Flow SenseTM indicator is reset. | If the Flow SenseTM indicator remains active for more than five cycles after the restriction has been cleared, call for service. |
| Dryer will not turn on | Dryer will not turn on | Make sure that the plug is securely plugged into a grounded outlet matching the dryer’s rating plate. |
| House fuse is blown, circuit breaker has tripped, or power outage has occurred. | Reset circuit breaker or replace fuse. Do not increase fuse capacity. If the problem is a circuit overload, have it corrected by a qualified electrician. | |
| Dryer does not heat | House fuse is blown, circuit breaker has tripped, or power outage has occurred. |
Reset circuit breaker or replace fuse. Do not increase fuse capacity. If the problem is a circuit overload, have it corrected by a qualified electrician. NOTE Due to the design of electric dryers, it is possible for a circuit problem to allow an electric dryer to run without heat. |
| Gas supply or service is turned off (gas models only) | Confirm that the house gas shutoff and the dryer gas shutoff valves are both fully open. Even if gas is not supplied to the dryer, it will run and display error code. Verify that other gas appliances in the home are working normally | |
| Energy Saver option selected (on some models) | If using the Cotton/Normal cycle, deselect the energy saver option. The Energy Saver option is selected by default. This option reduces energy use by adding an air dry section to the beginning of the cycle. It is normal to feel no heat at the beginning of the cycle while in Energy Saver mode. | |
| Display show error code nP | Electric dryer power cord is not connected correctly, or house power supply is incorrect. | Check the power supply or the connection of the power cord to the terminal block. |
| Display show error code gAS | Gas supply or service turned off(Gas models only). | Confirm that house gas shutoff and the dryer gas shutoff are both fully open. |
| Clothes take too long to dry | Exhaust ducts are blocked, dirty, or duct run is too long. | Confirm that the exhaust duct is properly configured and free of debris, lint, and obstructions. Make sure that outside wall dampers can open properly and are not blocked, jammed, or damaged. |
| Load is not properly sorted. | Separate heavy items from lightweight items. Larger and heavier items take longer to dry. Light items in a load with heavy items can fool the sensor because the light items dry faster. | |
| Clothes take too long to dry | Large load of heavy fabrics. | Heavy fabrics take longer to dry because they tend to retain more moisture. To help reduce and maintain more consistent drying times for large and heavy fabrics, separate these items into smaller loads of a consistent size. |
| Dryer controls are not set properly. | Use the appropriate control settings for the type of load you are drying. Some loads may require an adjustment of the dry level setting for proper drying. | |
| Lint filter needs to be cleaned. | Remove the lint from the filter before every load. With the lint removed, hold the filter up to a light to see if it is dirty or clogged. With some loads that produce high amounts of lint, such as new bath towels, it may be necessary to pause the cycle and clean the filter during the cycle. | |
| House fuse is blown, circuit breaker has tripped, or power outage has occurred. |
Reset circuit breaker or replace fuse. Do not increase fuse capacity. If the problem is a circuit overload, have it corrected by a qualified electrician. NOTE: Due to the design of electric dryers, it is possible for a circuit problem to allow an electric dryer to run without heat. |
|
| Dryer is overloaded | Divide extra large loads into smaller loads for better drying performance and efficiency | |
| Dryer is underloaded. | If you are drying a very small load, add a few extra items to ensure proper tumbling action. If the load is very small and you are using SENSOR DRY cycles, the electronic control cannot properly sense the dryness of the load and may shut off too soon. Use TIME DRY or add some extra wet clothes to the load. | |
| Clothes take too long to dry | Energy Saver option selected (on some models) | If using the Cotton/Normal cycle, deselect the Energy Saver option. This option reduces energy use by adding an air dry section to the beginning of the cycle. |
| Drying time is not consistent | Heat settings, load size, or dampness of clothing is not consistent. | The drying time for a load will vary depending on the type of heat used (electric, natural gas, or LP gas), the size of the load, the type of fabrics, the wetness of the clothes, and the condition of the exhaust duct and lint filter. Even an unbalanced load in the washer can cause poor spinning, resulting in wetter clothes which will take longer to dry. |
Performance
| Problem | Possible Cause | Solutions |
| Greasy or dirty spots on clothes | Fabric softener used incorrectly. | Confirm and follow the instructions provided with your fabric softener. |
| Clean and dirty clothes are being dried together. | Use your dryer to dry only clean items. Soil from dirty clothes can transfer to the clean clothes in the same or later loads. | |
| Clothes were not properly cleaned or rinsed before being placed in the dryer. | Stains on dried clothes could be stains that were not removed during the washing process. Make sure that clothes are being completely cleaned or rinsed according to the instructions for your washer and detergent. Some difficult soils may require pre-treating prior to washing. | |
| Clothes are wrinkled | Clothes dried too long (over dried). | Over drying a load of laundry can lead to wrinkled clothes. Try a shorter drying time or LESS DRY setting and remove items while they still retain a slight amount of moisture. |
| Clothes left in dryer too long after cycle ends. | Use the WRINKLE CARE option. This feature will tumble the clothes briefly every few minutes for up to 3 hours to help prevent wrinkling. | |
| Clothes are shrinking | Garment care instructions are not being followed | To avoid shrinking your clothes, always consult and follow fabric care instructions. Some fabrics will naturally shrink when washed. Other fabrics can be washed but will shrink when dried in a dryer. Use a low or no heat setting. |
| Lint on clothes | Lint filter not cleaned properly | Remove the lint from the filter before every load. With the lint removed, hold the filter up to a light to see if it is dirty or clogged. If it looks dirty, follow the cleaning instructions. With some loads that produce high amounts of lint, it may be necessary to clean the filter during the cycle. |
| Laundry not sorted properly | Some fabrics are lint producers (i.e., a fuzzy white cotton towel) and should be dried separately from clothes that are lint trappers (i.e., a pair of black linen pants). | |
| Excess static in clothes. | Use a fabric softener to reduce static electricity. Be sure to follow the manufacturer’s instructions. Overdrying a load of laundry can cause a buildup of static electricity. Adjust settings and use a shorter drying time, or use SENSOR DRY cycles. | |
| Dryer is overloaded. | Divide extra large loads into smaller loads for drying. | |
| Tissue, paper, etc., left in pockets. | Check pockets thoroughly before washing and drying clothes. | |
| Excess static in clothes after drying | Fabric softener is not used or used incorrectly | Use a fabric softener or the STATIC SHIELD option, if equipped, to reduce static electricity. Be sure to follow the manufacturer’s instructions. |
| Clothes dried too long (overdried). | Overdrying a load of laundry can cause a buildup of static electricity. Adjust settings and use a shorter drying time, or use AUTO DRY cycles. Select a LESS DRY setting on SENSOR DRY cycles, if necessary | |
| Drying synthetics, permanent press, or synthetic blends. | These fabrics are naturally more prone to static buildup. Try using fabric softener, or use LESS DRY and/or shorter TIME DRY time settings | |
| Clothes have damp spots after a SENSOR DRY cycle. | Very large load or very small load. Single large item such as a blanket or comforter. | If items are too tightly packed or too sparse the sensor may have trouble reading the dryness level of the load. Use a Time Dry cycle for very small loads. Large, bulky items such as blankets or comforters can sometimes wrap themselves into a tight ball of fabric. The outside layers will dry and register on the sensors, while the inner core remains damp. When drying a single bulky item, it may help to pause the cycle once or twice and rearrange the item to unwrap and expose any damp areas. To dry a few remaining damp items from a very large load or a few damp spots on a large item after a sensor cycle has completed, empty the lint trap, then set a Time Dry cycle to finish drying the item(s). |
Steam Functions (Steam Models)
| Problem | Possible Cause | Solutions |
| Water drips from nozzle when STEAM CYCLE starts | This is normal. | This is steam condensation. The dripping water will stop after a short time. |
| Garments still wrinkled after Steam FreshTM | Too many or overly different types of garments in dryer. | Small loads of 1 to 5 items work best. Load fewer garments. Load similar types of garments |
| Creases or pleats are gone from garments after Steam FreshTM | The function of this cycle is to remove wrinkles from fabric. | Use an iron to replace creases and pleats in garments. |
| Garments have static after using the Reduce Static option | This is normal. | The amount of static experienced will depend on the individual moisture level in the skin. |
| Garments are too damp or too dry after using the Reduce Static option | Correct drying options not selected. | Select the load weight manually before starting the Reduce Static option. |
| Garments are not uniformly damp after using the Easy Iron option | Number of garments or load size not properly selected at the beginning of the cycle. | Select the correct number of garments or load size before starting the cycle. |
| Steam does not generate, but no error code is shown | Water level error. | Unplug dryer and call for service |
| Water drips from door during STEAM CYCLE | This is normal. | Condensation will normally form on the inside of the dryer door during steam operation. Some condensation may drip out the bottom of the door. |
| Steam is not visible during STEAM CYCLE | This is normal. | Steam vapor is difficult to see when the door is closed. However, condensation will normally form on the inside of the dryer door if the steam system is operating normally. |
| Drum does not turn during STEAM CYCLE | This is normal. | The drum is turned off so that the steam vapor remains in the drum. The drum will normally turn for about 2 seconds once a minute. |
| Cannot see steam vapor at the beginning of cycle | of cycle This is normal. | Steam is released at different stages of the cycle for each option. |
| Odors remain in clothing after Steam Fresh | Steam FreshTM did not remove odor completely | Fabrics containing strong odors should be washed in a normal cycle. |
Error Codes
| Problem | Possible Cause | Solutions |
| Error code: tE1 through tE7 | Temperature sensor failure. | Turn off the dryer and call for service. |
| Display shows error code: PS (electric dryers only) | Power cord is connected incorrectly. | Check the connection of the power cord to the terminal block. |
| *Flow SenseTM indicator shows four bars during the drying cycle or the display shows "d80" after drying | Exhaust system is too long or has too many turns/restrictions. | Install a shorter or straighter duct run. See the Installation Instructions for details. |
| Partial blockage of the ductwork due to lint buildup or other foreign object. | Ductwork should be checked/cleaned immediately. Dryer can be used in this condition, but drying times will be longer and energy consumption will increase. | |
| * This warning light is not a dryer failure and is not covered by the dryer warranty. Contact a duct cleaning service to set up an appointment to have your exhaust system cleaned and inspected | The appliance has detected a restriction in the external dryer venting | If exhaust restrictions are sensed by the Flow SenseTM system, the indicator will remain on for 2 hours after the end of the cycle. Opening the door or pressing the POWER button will turn off the display. |
| The Flow SenseTM indicator remains active after clearing the restriction in the venting | After clearing the restriction, the Flow SenseTM system requires multiple, consecutive cycles to determine that the performance value has improved before the Flow SenseTM indicator is reset. | If the Flow SenseTM indicator remains active for more than five cycles after the restriction has been cleared, call for service. |
|
indicator light is on during the drying cycle |
Water supply error. |
Check steam feeder drawer: (1) Make sure the steam feeder is filled with water to the MAX line. (2) Make sure the steam feeder is seated properly and the drawer is fully closed. (3) Turn the dryer off then restart the STEAM CYCLE. Do not use distilled water; the water level sensor in the steam generator will not work. Pump not working. Unplug dryer and call for service. |
|
The display shows
|
More Time button was pressed. | This display indicates that the steam option has been set for a “big” item such as a comforter. Press the Less Time button to reduce the indicated load size. |
|
indicator light is on during the drying cycle |
Lint filter not cleaned properly. | Remove the lint from the filter before every load. With the lint removed, hold the filter up to a light to see if it is dirty or clogged. If it looks dirty, follow the cleaning instructions. With some loads that produce high amounts of lint, it may be necessary to clean the filter during the cycle. |
|
indicator light is on during the drying cycle |
Water supply error. |
Check steam feeder drawer: (1) Make sure the steam feeder is filled with water to the MAX line. (2) Make sure the steam feeder is seated properly and the drawer is fully closed. (3) Turn the dryer off then restart the STEAM CYCLE. Do not use distilled water; the water level sensor in the steam generator will not work. |
| Pump not working. | Unplug dryer and call for service. | |
|
The display shows d80, d90, d95
|
The duct work is about 80%-95% blocked.(“d80”,“d90” or “d95” error code is displayed for 2 hours only) House exhaust system blocked. |
Do not use the dryer until the exhaust system has been cleaned and/or repaired. Using the dryer with a severely restricted exhaust is dangerous and could result in a fire or other property damage. Check the outside dryer vent while the dryer is operating to make sure there is strong airflow. If the exhaust system is extremely long, have it repaired or rerouted. Keep the area around the dryer clean and free of clutter. Check vent hood for damage or lint clogging. Make sure the area around the vent hood is clear. |
See other models: 34UM95-P 47LA7400 LTNS16121V LG236C NB3532A


