Loading ...
Loading ...
Loading ...
10
ENGLISH INSTRUCTIONS
CLEANING INSTRUCTIONS
1. ALWAYS disconnect the appliance from the
power source before cleaning.
2. Never immerse the Motor Assembly of this
appliance in water or other liquid.
3. The Blade, Food Presser, and Food Tray can
all be hand washed in hot soapy water. Because
these parts come in contact with food, they
should be sanitized by being dipped in a solution
of 2 ounces (0.06 L) of unscented non-chlorine
bleach mixed with 5 gallons (19 L) of water.
Allow sanitized parts to air dry. Do not use harsh
abrasives to clean any part of the Meat Slicer. Use extreme caution when
handling or cleaning the Blade, as it is extremely sharp! Do not leave Blade
underwater; trying to handle sharp objects in water can be hazardous. It is
highly recommended to wear cut-resistant Kevlar Gloves when removing,
cleaning and re-installing the Blade.
4. Set the Thickness Adjustment Knob to “0”.
5. Remove Food Presser and rotate the Sliding Food Carriage out of the way
in order to allow for easy access to the Blade.
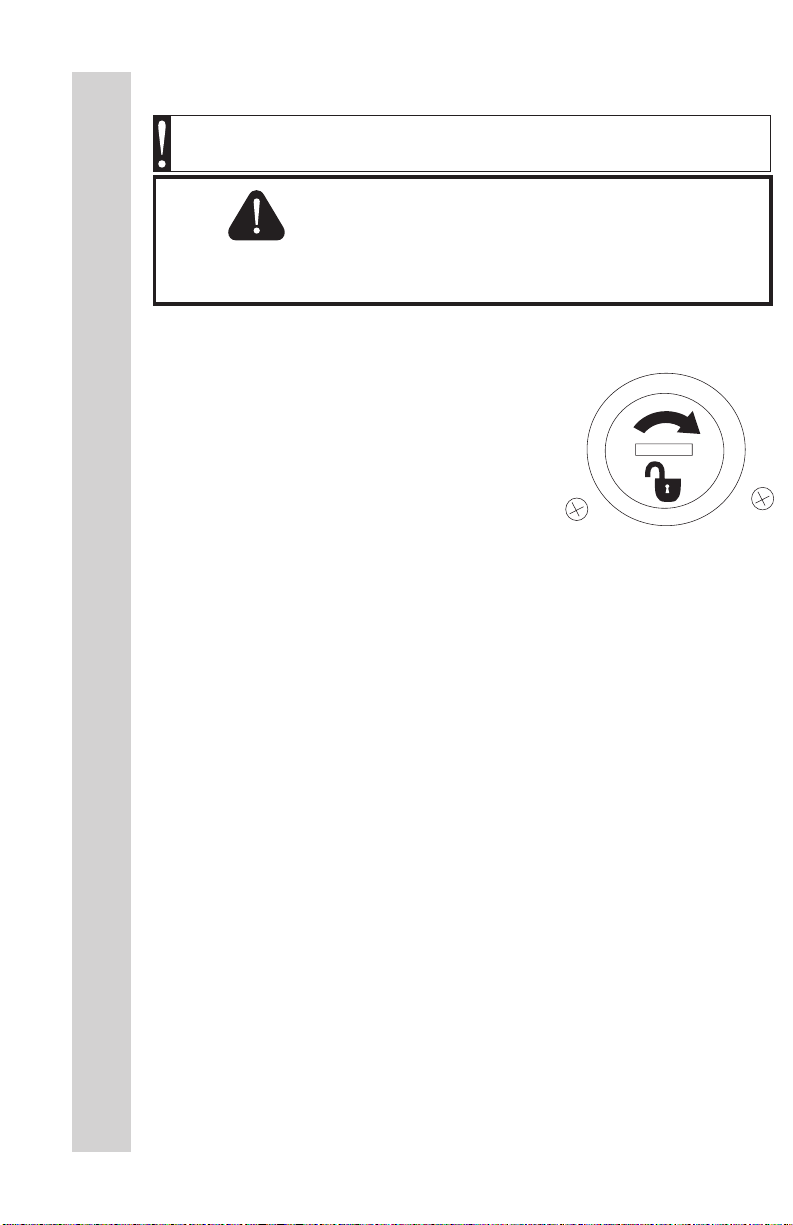
6. To remove the Blade hold the Blade with one hand and use a coin to
unlock the Blade Locking Screw by turning it clockwise Figure 5. Carefully
pull the Blade off and hold it by using the hole in the center of the Blade.
7. Clean the outer surface of the Meat Slicer Body & Base with a damp cloth.
Mild detergent or water can be used to dampen the cloth. Wipe away from
the Blade, NEVER wipe toward the Blade. Never immerse Motor Assembly
in water or any other liquid. Do not use steel wool, abrasive cleaners, or
sharp utensils to clean.
8. To allow for easier cleaning, the Thickness Adjustment Knob can be turned
past “0” to allow the Gauge Plate to slide back. NOTE: Use this feature
only with Blade removed. (After cleaning and before reassembly, reset the
Thickness Adjustment Knob to “0”.)
9. After cleaning and drying, install the Blade and Blade Screw to the Motor
Assembly in reverse order of step 6. Make sure the Blade Locking Screw is
properly engaged and tightened. Rotate the Sliding Food Carriage back to its
proper position and re-install the Food Presser.
FIGURE 5
Rotate clockwise to remove.
WARNING! Before cleaning, assembling or disassembling the Meat
Slicer, make sure the Meat Slicer Motor is OFF and the PLUG IS REMOVED
FROM THE OUTLET/POWER SOURCE!
HANDLE CAREFULLY!
KEEP FINGERS AWAY FROM THE BLADE!
NEVER FEED FOOD BY HAND.
ALWAYS USE THE FOOD PUSHER!
Always use completely assembled Meat Slicer
with Food Carriage and Food Pusher.
Protective/cut-resistant Kevlar gloves are recommended
whenever handling the Blade!
WARNING!
SHARP BLADE
Loading ...
Loading ...
Loading ...