Loading ...
Loading ...
Loading ...
S
S
c
c
o
o
p
p
e
e
S
S
e
e
t
t
u
u
p
p
F
F
e
e
a
a
t
t
u
u
r
r
e
e
s
s
Setup Time-Site
- Allows the user to customize the NexStar display by changing time and location parameters (such as time
zone and daylight savings).
Anti-backlash – All mechanical gears have a certain amount of backlash or play between the gears. This play is evident by how
long it takes for a star to move in the eyepiece when the hand control arrow buttons are pressed (especially when changing
directions). The NexStar's anti-backlash features allows the user to compensate for backlash by inputting a value which quickly
rewinds the motors just enough to eliminate the play between gears. The amount of compensation needed depends on the
slewing rate selected; the slower the slewing rate the longer it will take for the star to appear to move in the eyepiece. Therefore,
the anti-backlash compensation will have to be set higher. You will need to experiment with different values; a value between
20 and 50 is usually best for most visual observing, whereas a higher value may be necessary for photographic guiding. Positive
backlash compensation is applied when the mount changes its direction of movement from backwards to forwards. Similarly,
negative backlash compensation is applied when the mount changes its direction of movement from forwards to backwards.
When tracking is enabled, the mount will be moving in one or both axes in either the positive or negative direction, so backlash
compensation will always be applied when a direction button is released and the direction moved is opposite to the direction of
travel.
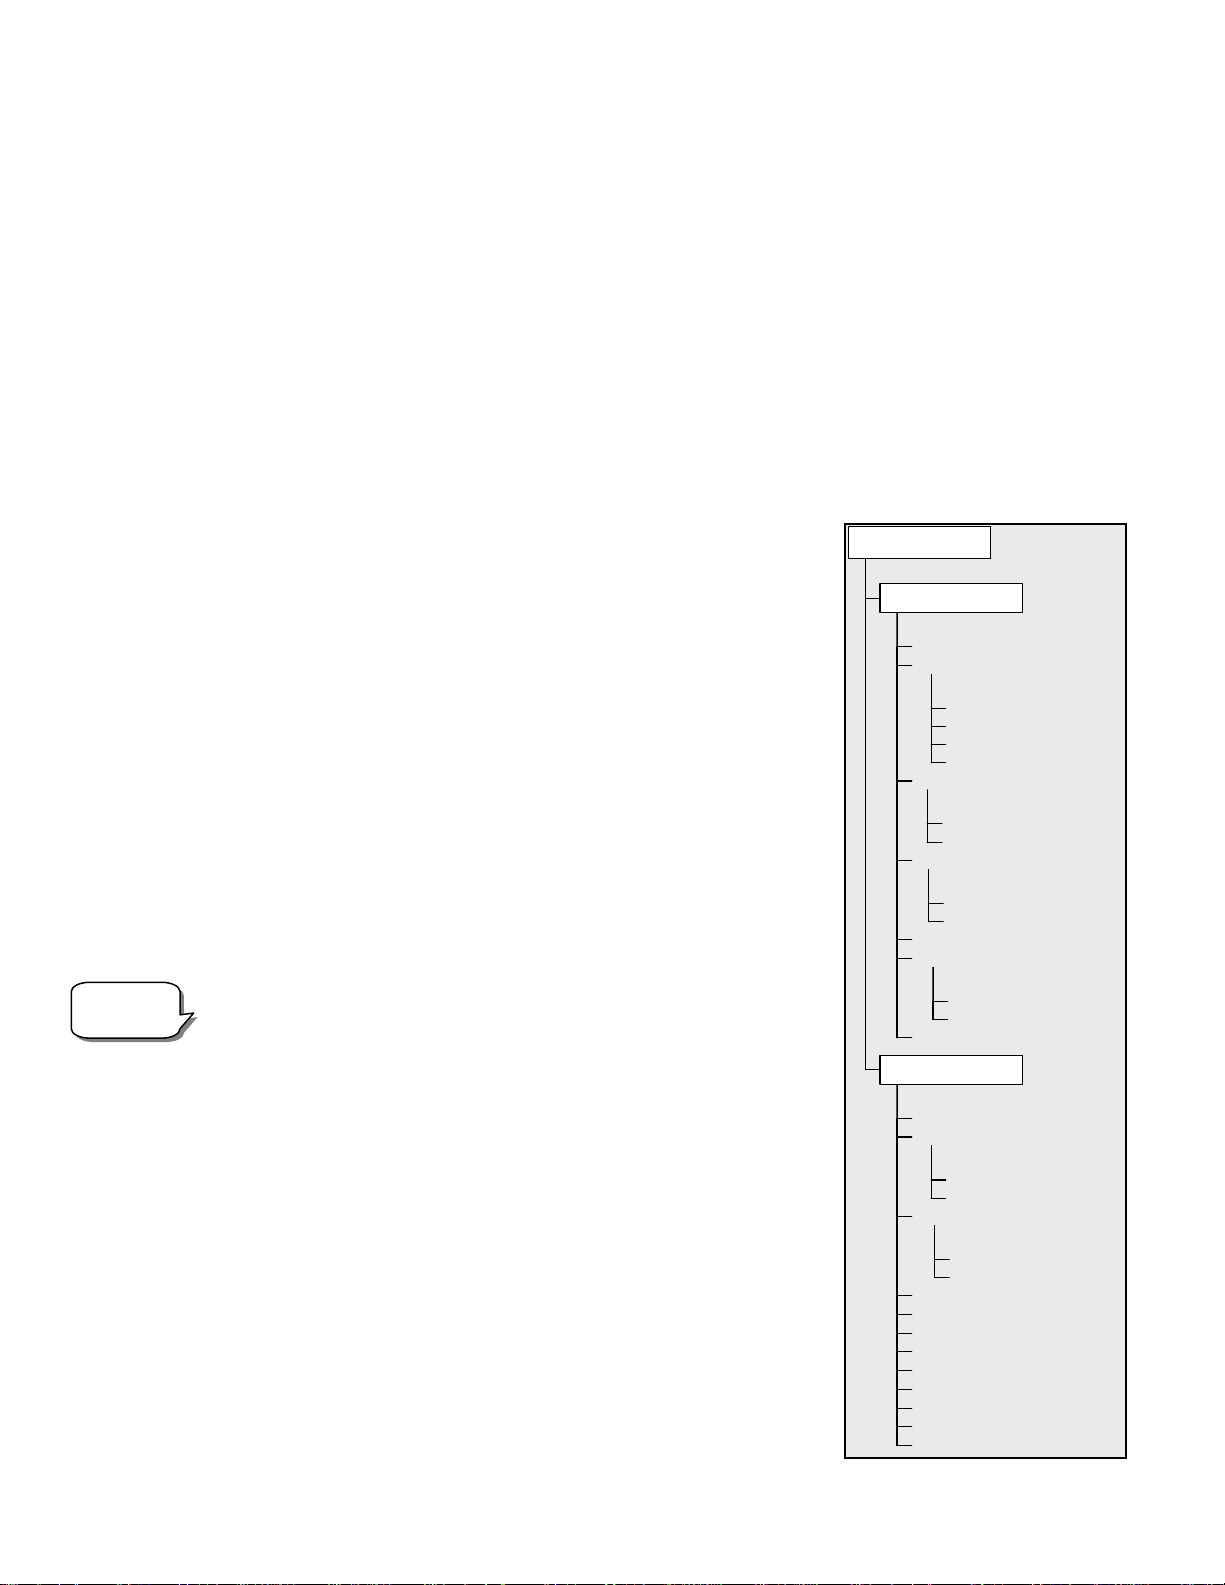
SETUP TIME-SITE
AZM POSITIV
E
AZM NEGATIVE
ALT POSITIVE
ALT NEGATIVE
ANTI-BACKLASH
SLEW ALT MAX
SLEW ALT MIN
SLEW LIMITS
ALTMAX IN LIST
ALTMIN IN LIST
FILTER LIMITS
DIRECTION BUTTONS
AZM APPROACH
ALT APPROACH
GOTO APPROACH
CORDWRAP
SCOPE SETUP
GPS ON/OFF
KEYPAD
DISPLAY
LIGHT CONTROL
PRESS UNDO
PRESS "0
"
FACTORY SETTING
V
ERSION
GET AXIS POSITION
GOTO AXIS POSITION
HIBERNATE
SUN MENU
SCROLLING MENU
CALIBRATE GOTO
SET MOUNT POSITION
WEDGE ALIGN
UTILITIES
MENU
To set the anti-backlash value, scroll down to the anti-backlash option and press ENTER.
Enter a value from 0-99 for both azimuth and altitude directions and press ENTER after
each one to save these values. NexStar will remember these values and use them each time
it is turned on until they are changed.
Slew Limits – Sets the limits in altitude that the telescope can slew without displaying a
warning message. The slew limits prevent the telescope tube from slewing to an object
below the horizon. The slew limits can be customized depending on your needs. For
example, if you would like to slew to an object that is close to the zenith but you have a
camera attached that prevents it from pointing straight up, you can set the maximum altitude
to 80 or 85 degrees to prevent the tube from ever pointing straight up.
Filter Limits – When an alignment is complete, the NexStar automatically knows which
celestial objects are above the horizon. As a result, when scrolling through the database lists
(or selecting the Tour function), the NexStar hand control will display only those objects that
are known to be above the horizon when you are observing. You can customize the object
database by selecting altitude limits that are appropriate for your location and situation. For
example, if you are observing from a mountainous location where the horizon is partially
obscured, you can set your minimum altitude limit to read +20º. This will make sure that the
hand control only displays objects that are higher in altitude than 20º.
Observing
Tip!
If you want to explore the entire object database, set the maximum altitude limit
to 90º and the minimum limit to –90º. This will display every object in the
database lists regardless of whether it is visible in the sky from your location or
not.
Direction Buttons –The direction a star moves in the eyepiece varies depending on the
accessories being used. This can create confusion when guiding on a star using an off-axis
guider versus a straight through guide scope. To compensate for this, the direction of the
drive control keys can be changed. To reverse the button logic of the hand control, press the
MENU button and select Direction Buttons from the Utilities menu. Use the Up/Down
arrow keys (10) to select either the Azimuth buttons (left and right) or Altitude buttons (up
and down) and press ENTER. Pressing ENTER again will reverse the direction of the hand
control buttons from their current state. Direction Buttons will only change the eyepiece
rates (rate 1-6) and will not affect the slew rates (rate 7-9).
Goto Approach
- lets the user define the direction that the telescope will approach when
slewing to an object. This allows the user the ability to minimize the affects of backlash
For example, if your telescope is back heavy from using heavy optical or photographic
accessories attached to the back, you would want to set your altitude approach to the
negative direction. This would ensure that the telescope always approaches an object from
the opposite direction as the load pulling on the scope. Similarly, if using the telescope
23
Loading ...
Loading ...
Loading ...