Loading ...
Loading ...
Loading ...
37
1
2
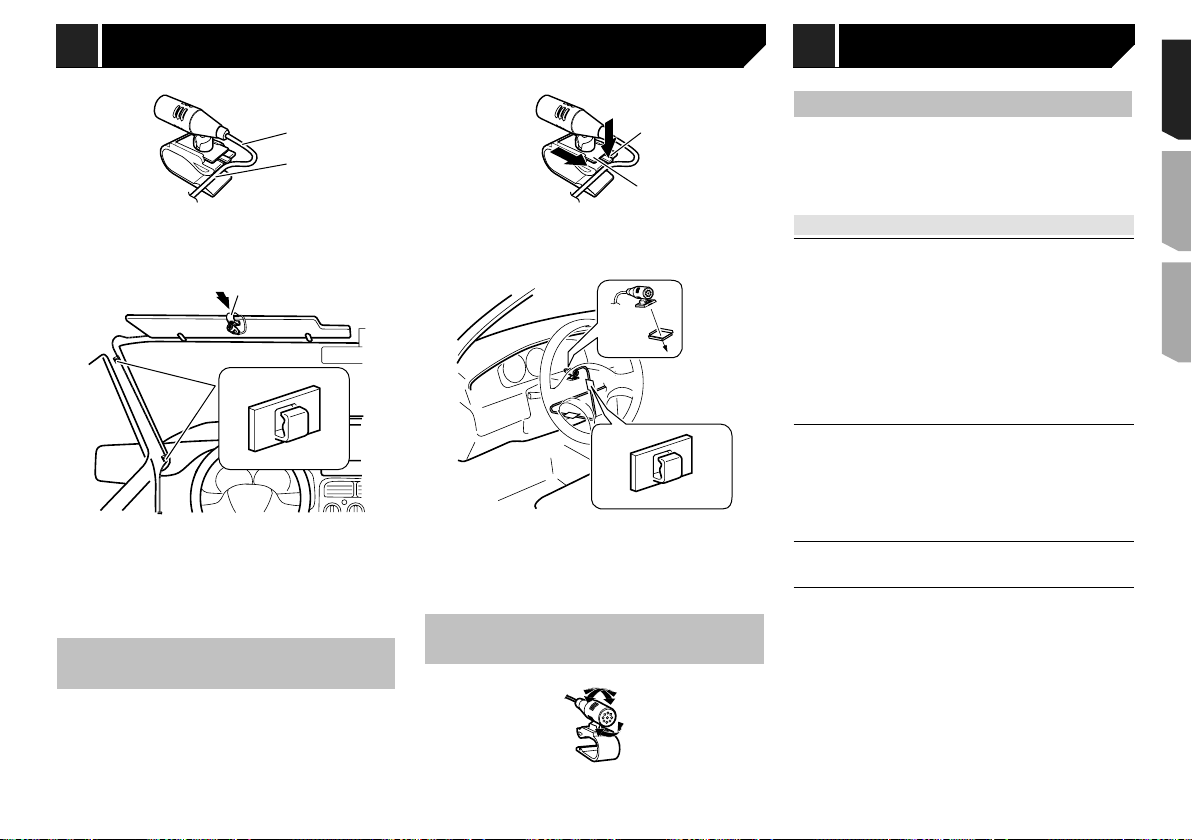
1 Microphone lead
2 Groove
2 Attach the microphone clip to the sun visor.
1
2
1 Microphone clip
2 Clamps
Use separately sold clamps to secure the lead where neces-
sary inside the vehicle.
Install the microphone on the sun visor when it is in the up
position. It cannot recognize the driver’s voice if the sun visor is
in the down position.
Installation on the steering
column
1 Detach the microphone base from the micro-
phone clip by sliding the microphone base
while pressing the tab.
1
2
1 Tab
2 Microphone base
2 Mount the microphone on the steering column.
2
1
1 Double-sided tape
2 Clamps
Use separately sold clamps to secure the lead where neces-
sary inside the vehicle.
3 Keeping it away from the steering wheel.
Adjusting the microphone
angle
Troubleshooting
If you have problems operating this product, refer to this sec-
tion. The most common problems are listed below, along with
likely causes and solutions. If a solution to your problem cannot
be found here, contact your dealer or the nearest authorized
Pioneer service facility.
Problems with the AV screen
CD or DVD playback is not possible.
The disc is inserted upside down.
— Insert the disc with the label upward.
The disc is dirty.
— Clean the disc.
The disc is cracked or otherwise damaged.
— Insert a normal, round disc.
The files on the disc are in an irregular file format.
— Check the file format.
The disc format cannot be played back.
— Replace the disc.
The loaded disc is a type this product cannot play.
— Check what type of disc it is.
The screen is covered by a caution message and the video
cannot be shown.
The parking brake lead is not connected or applied.
— Connect the parking brake lead correctly, and apply the
parking brake.
The parking brake interlock is activated.
— Park your vehicle in a safe place and apply the parking
brake.
The audio or video skips.
This product is not firmly secured.
— Secure this product firmly.
No sounds are produced. The volume level will not rise.
Cables are not connected correctly.
— Connect the cables correctly.
The system is performing still, slow motion, or frame-by-
frame playback with DVD-Video.
— There is no sound during still, slow motion, or frame-by-
frame playback with DVD-Video.
The system is paused or performing, fast reverse or forward
during the disc playback.
— For the media other than music CD (CD-DA), there is no
sound on fast reverse or forward.
Appendix
1
3
4
2
1 Factory radio-mounting bracket
2 If the pawl interferes with installation, you may bend it down
out of the way.
3
Dashboard or console
4 Truss head screw or flush surface screw
Be sure to use the screws supplied with this product.
Installing the microphone
280BT
Install the microphone in a place where its direction and dis-
tance from the driver make it easiest to pick up the driver’s
voice.
Be sure to turn off (ACC OFF) the product before connecting
the microphone.
Mounting on the sun visor
1 Fit the microphone lead into the groove.
37
< QRD3356-A >
Installation Installation Appendix
Loading ...
Loading ...
Loading ...