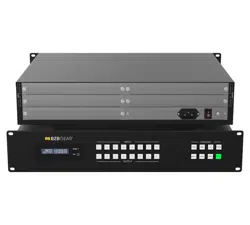
BG-UMV-HA41
4X1 4K UHD HDMI Seamless Multiviewer/Switcher/Scaler with
Audio and RS-232 Support
User Manual

BZBGEAR BG-UMV-HA41 PRODUCT MANUAL
Address: 830 National Drive #140, Sacramento, CA 95834, USA · Tel: +1(888)499-9906 · Email: support@bzbgear.com 2

BZBGEAR BG-UMV-HA41 PRODUCT MANUAL
TABLE OF CONTENTS
Statement 3
Safety Precaution 4
Introduction 5
Features 5
Packing List 5
Specifications 6
Operation Controls and Functions 7
System Connection 9
Front Panel Control 10
IR Remote 12
GUI Control 13
RS-232 Control 22
Firmware Upgrade 30
Tech Support 31
Limited Product Warranty Terms 31
Mission Statement 32
Copyright 32
Address: 830 National Drive #140, Sacramento, CA 95834, USA · Tel: +1(888)499-9906 · Email: support@bzbgear.com 3

BZBGEAR BG-UMV-HA41 PRODUCT MANUAL
Statement
Please read these instructions carefully before connecting, operating, or configuring this
product. Please save this manual for future reference.
Safety Precaution
● To avoid falling or damage, please do not place this unit on an unstable cart, stand, or
table.
● Operate unit only on the specified supply voltage.
● Disconnect power cord by connector only. Do not pull on the cable portion.
● Do not place or drop heavy or sharp-edged objects on the power cord. A damaged cord
can cause fire or electrical shock hazards. Regularly check power cord for excessive
wear or damage to avoid possible fire / electrical hazards.
● Ensure the unit is properly grounded at all times to prevent electrical shock hazard.
● Do not operate the unit in hazardous or potentially explosive atmospheres. Doing so
could result in fire, explosion, or other dangerous results.
● Do not use this unit in or near water.
● Do not allow liquids, metal pieces, or other foreign materials to enter the unit.
● Handle with care to avoid shocks in transit. Shocks may cause malfunction. When you
need to transport the unit, use the original packing materials or alternate adequate
packing.
● This product does not contain parts that can be maintained or repaired by users.
Damage caused by dismantling the product without authorization from BZBGEAR is not
covered under the warranty policy.
● Installation and use of this product must strictly comply with local electrical safety
standards.
Address: 830 National Drive #140, Sacramento, CA 95834, USA · Tel: +1(888)499-9906 · Email: support@bzbgear.com 4

BZBGEAR BG-UMV-HA41 PRODUCT MANUAL
Introduction
The BG-UMV-HA41 is a 4K multiviewer and seamless video switcher with scaling
functionality designed to be compatible with 4K displays. The switcher features four HDMI
inputs and one HDMI output which allows you to display four video sources on one display
simultaneously. It also provides a line input, 1 mix input, 1 SPDIF output and 1 analog
output for audio processing.
Control is quick and comprehensive, whether you are using the front panel, the remote
control, RS232 commands, or the fully featured web GUI.
Features
● 4 HDMI inputs, 1 HDMI output.
● 4K@30Hz 4:4:4, HDCP 2.2.
● Seamless switching between 4 input ports.
● Auto Scaler in each source input.
● Audio embedding mixing, and audio de-embedding.
● Auto-switching for a single window.
● Cycles through the windows from A to D via the swap button.
● Layout and size of the windows can be customized.
● Resizes the windows in 3 different sizes.
● 16 predefined layouts for multi-view.
● Multiple control methods, including an assignable front panel, IR remote, web GUI
and RS232 port.
Packing List
● 1x 4K 4x1 Seamless Switcher
● 4x Plastic Cushions
● 4x Mounting Screws
● 1x RS232 Cable (3-pin to DB9)
● 1x User Manual
● 1x IR Remote
● 2x Surface Mounting Ears
● 2x 3-pin Terminal Block
● 1x Power Adapter (24V DC 1.25A)
Address: 830 National Drive #140, Sacramento, CA 95834, USA · Tel: +1(888)499-9906 · Email: support@bzbgear.com 5
BZBGEAR BG-UMV-HA41 PRODUCT MANUAL
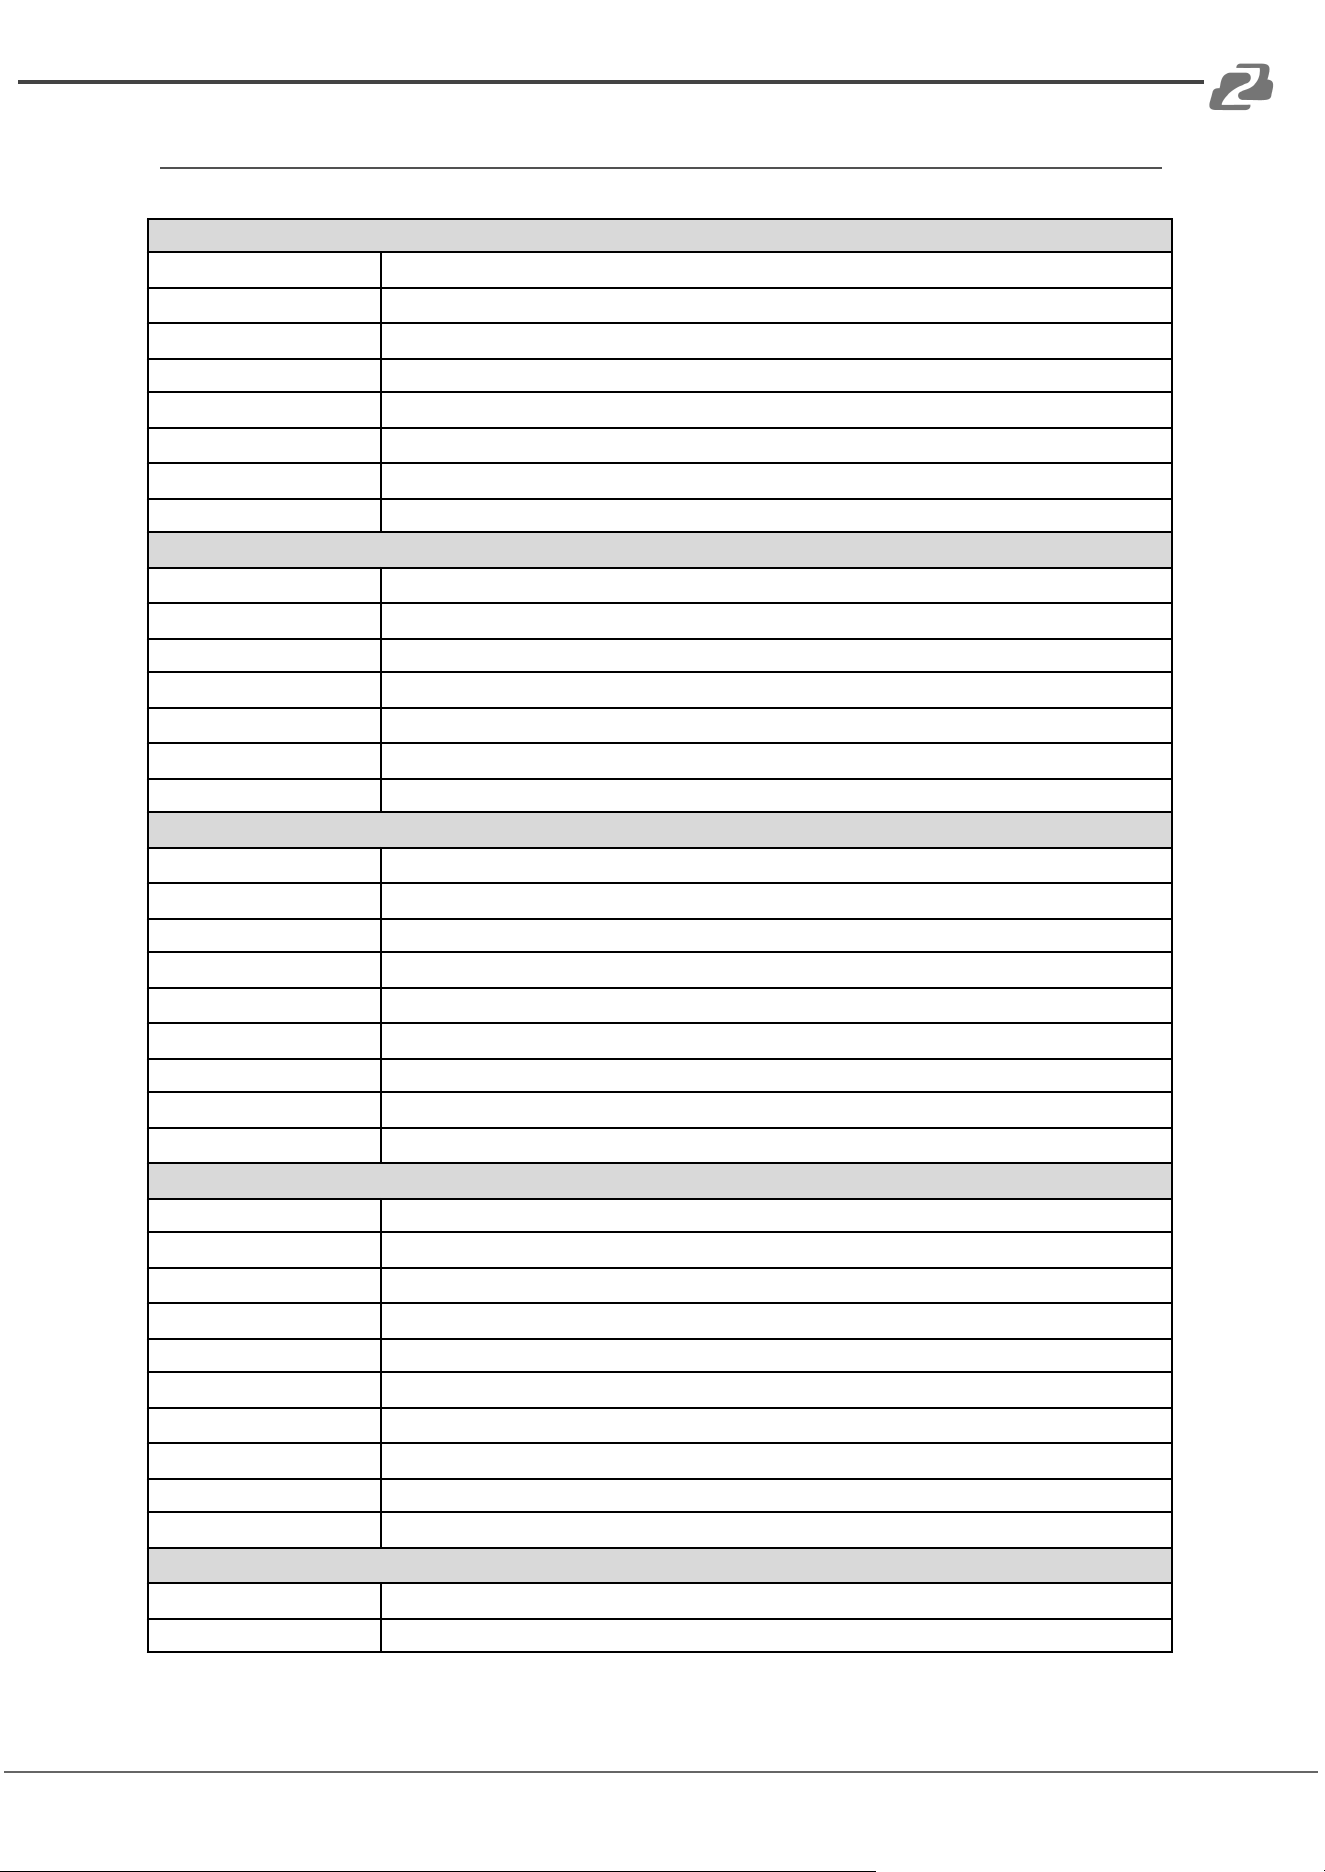
Specifications
Video
Video Input
(4) HDMI IN (1~4)
Video Input Connector
(4) Type-A female HDMI
HDMI Input Resolution
Up to 4K@30Hz 4:4:4
Video Output
(1) HDMI
Video Output Connector
(1) Type-A female HDMI
HDMI Output Resolution
Up to 4K@30Hz RGB
HDMI Standard
HDMI 1.4
HDCP Version
Up to HDCP 2.2
Audio IN
Audio In
(1) LINE IN, (1) MIX IN.
Audio In Connector
(2) 3-pin terminal connectors
Frequency Response
20Hz to 20kHz, ±3dB
Max Input Level
2.0Vrms ± 0.5 dB. 2V=16 B headroom above -10dBV (316 mV) nominal consumer line level signal.
L-R level deviation
< 0.3dB, 1kHz sine at 0dBFS level (or max level before clipping)
Input Impedance
> 10kohm
Audio Format
PCM 2CH
SPDIF OUT
SPDIF Out
(1) SPDIF
Audio Out Connector
(1) Toslink
Max Output level
±0.05dBFS
Frequency Response
20Hz ~ 20kHz, ±1dB
THD+N
< 0.05%, 20Hz ~ 20kHz bandwidth, 1kHz sine at 0 dBFS level (or max level)
Signal-to-Noise Ratio
> 90dB, 20Hz-20 kHz bandwidth
Crosstalk isolation
< -70dB, 10kHz sine at 0dBFS level (or max level before clipping)
Noise
-90dB
Audio Format
PCM 2CH
AUDIO OUT
Audio Out
(1) AUDIO
Audio Out Connector
(1) 3.5mm mini jack
Frequency Response
20Hz ~ 20kHz, ±1dB
Max Output Level
2.0Vrms ± 0.5dB. 2V=16dB headroom above -10dBV (316 mV) nominal consumer line level signal
THD+N
< 0.05%, 20Hz ~ 20kHz bandwidth, 1kHz sine at 0dBFS level (or max level)
Signal-to-Noise Ratio
> 80dB, 20Hz ~ 20kHz bandwidth
Crosstalk Isolation
< -80dB, 10kHz sine at 0dBFS level (or max level before clipping)
L-R Level Deviation
< 0.05dB, 1kHz sine at 0dBFS level (or max level before clipping)
Output Load Capability
1k ohm and higher (supports 10x paralleled 10k ohm loads)
Noise
-80dB
Control
Control port
(1) RS232, (1) TCP/IP
Control Connector
(1) 3-pin terminal connector, (1) RJ45.
Address: 830 National Drive #140, Sacramento, CA 95834, USA · Tel: +1(888)499-9906 · Email: support@bzbgear.com 6
BZBGEAR BG-UMV-HA41 PRODUCT MANUAL
General
Operation Temperature
-5℃ ~ +55℃
Storage Temperature
-25℃ ~ +70℃
Relative Humidity
10% ~ 90%
External Power Supply
Input: AC 100~240V, 50/60Hz; Output: 24V DC 1.25A.
Power Consumption
13w(Max)
Dimension (W*H*D)
285mm x 27mm x 172.5mm
Net Weight
1.24Kg
Note: The resolution 1080i 60Hz and HDR are not supported.
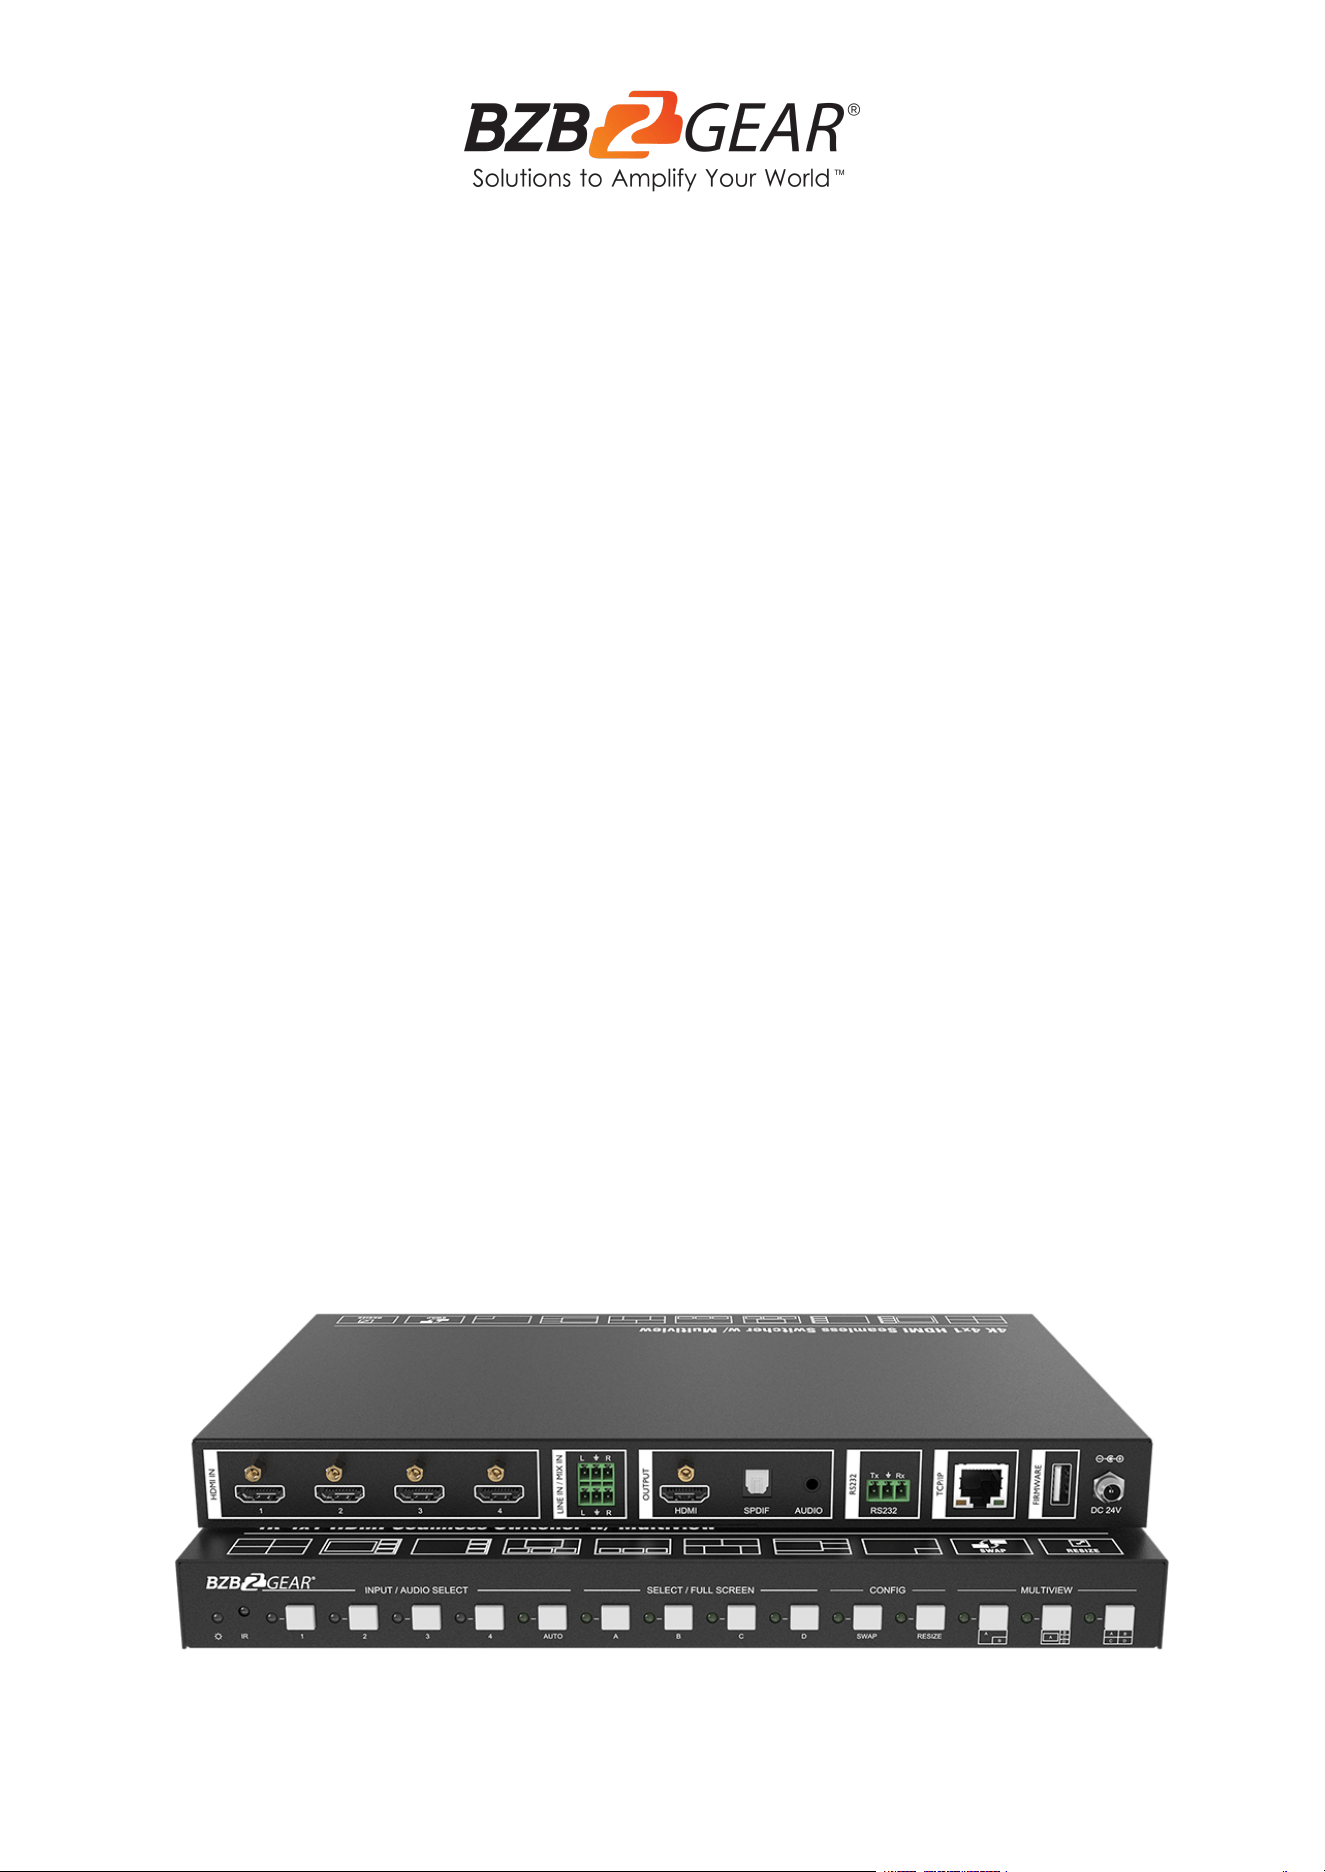
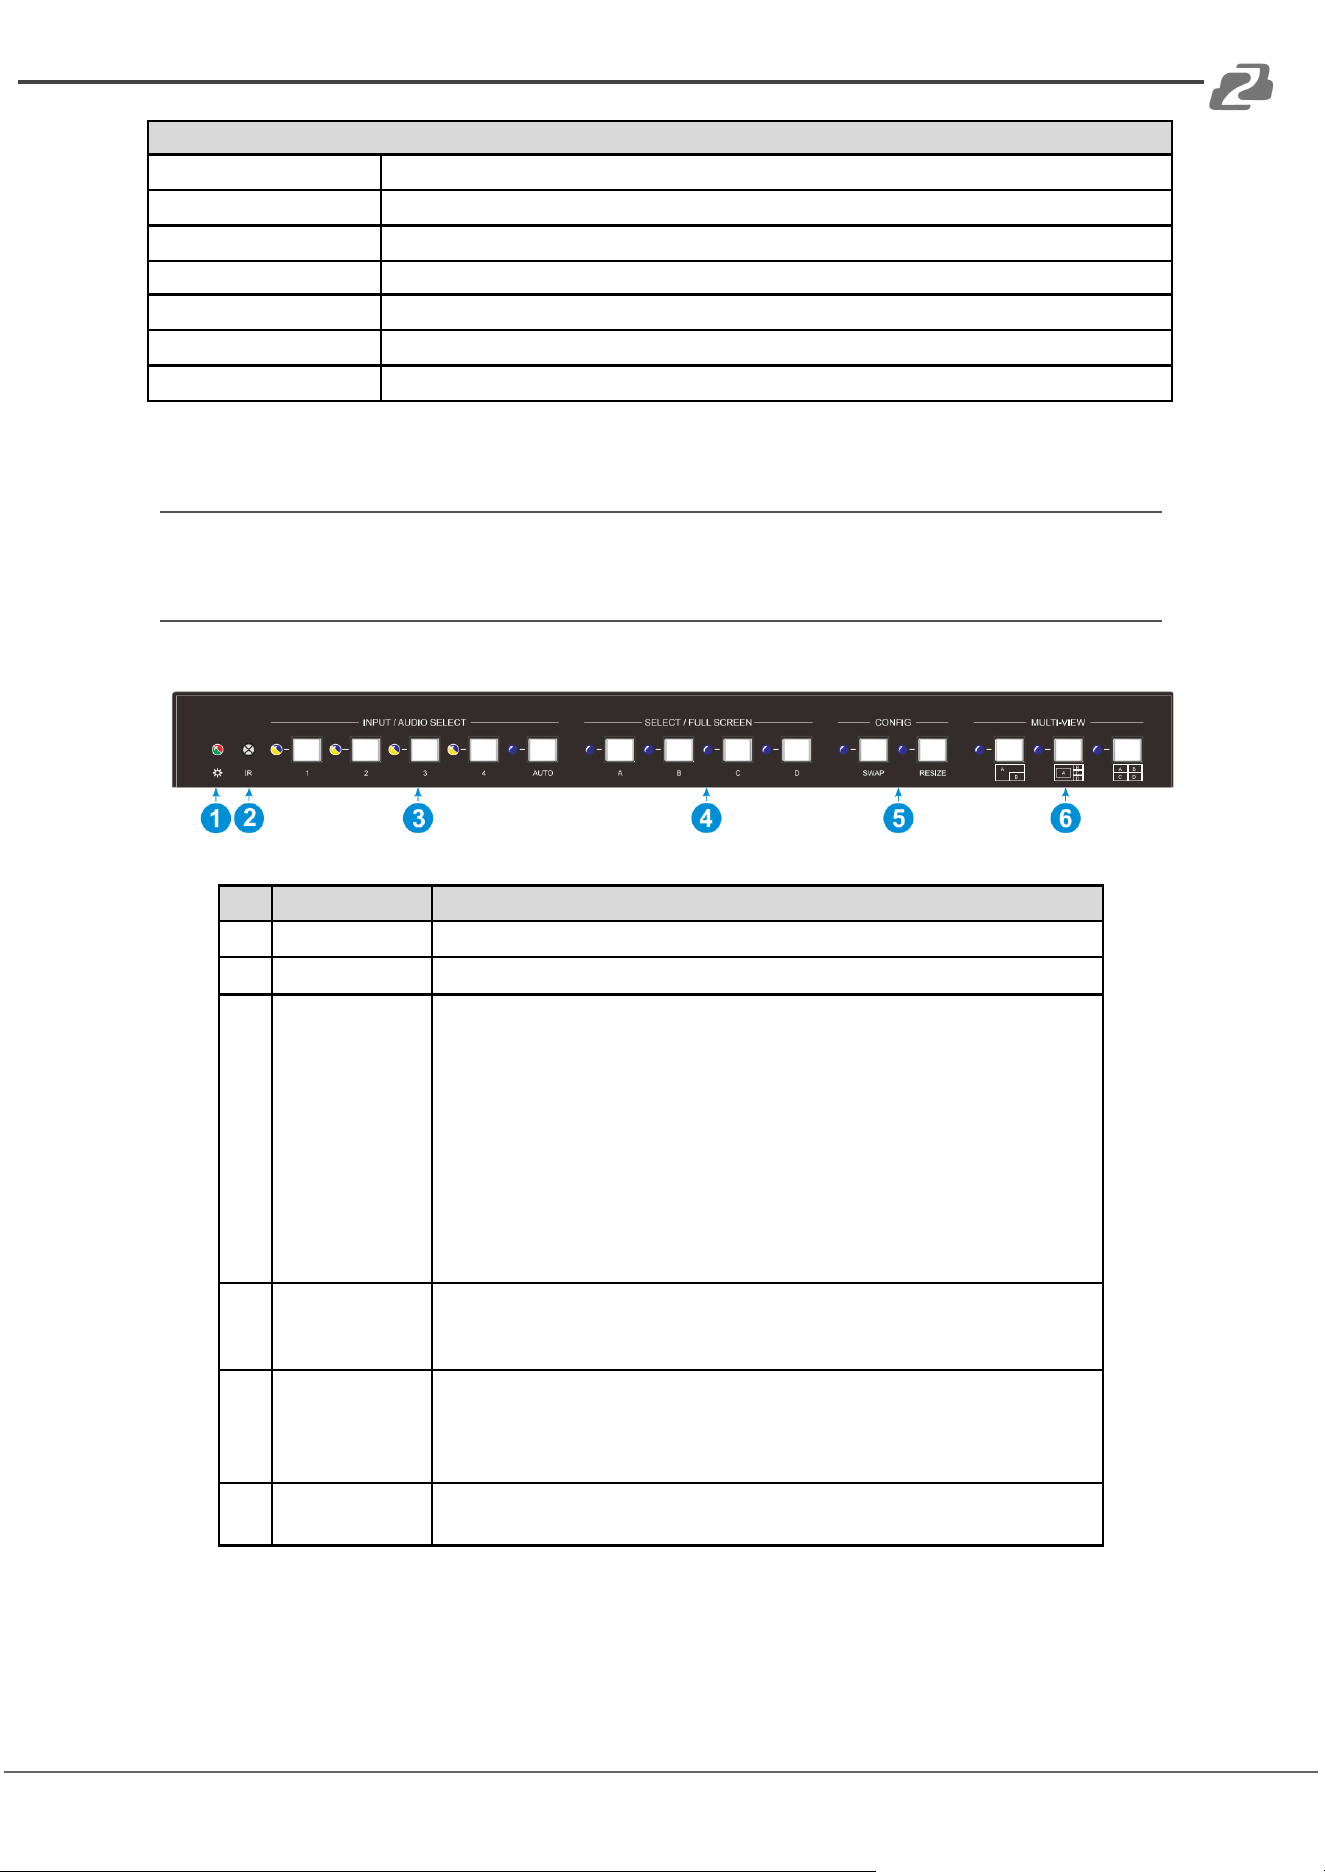
Operation Controls and Functions
Front Panel
No.
Name
Function Description
1
POWER LED
The LED illuminates green when the unit is on and red when it is standby.
2
IR LED
Built-in IR sensor, receives IR signal sent from IR remote.
3
INPUT/AUDIO
SELECT
● Press 1~4 button to select the corresponding HDMI input and its LED
illuminates yellow when there is a video signal and blue when the video
signal is chosen as the input source.
● In multiview mode, press and hold a 1~4 button for at least 3 seconds
to select the corresponding HDMI audio source for output and its LED
will illuminate blue, and then it will go out when there is no operation
within 3 seconds.
● Press AUTO button to enable auto switching and the LED will illuminate
blue.
● In multiview mode, press and hold the AUTO button for at least 3
seconds to select LINE audio for output.
4
FOUR
SELECT/FULL
SCREENS
Press the buttons to select the corresponding input source as Full Screen,
its LED illuminates blue when it is selected.
5
CONFIG
Press the SWAP button to select the window display screen in a
counterclockwise directionThe LED illuminates blue when it is selected.
Press the RESIZE button to readjust the windows size, its LED illuminates
blue when it is pressed.
6
THREE
MULTI-VIEWS
Press the buttons to choose different available Multi-view modes, its LED
illuminates blue when it is selected.
Address: 830 National Drive #140, Sacramento, CA 95834, USA · Tel: +1(888)499-9906 · Email: support@bzbgear.com 7
BZBGEAR BG-UMV-HA41 PRODUCT MANUAL
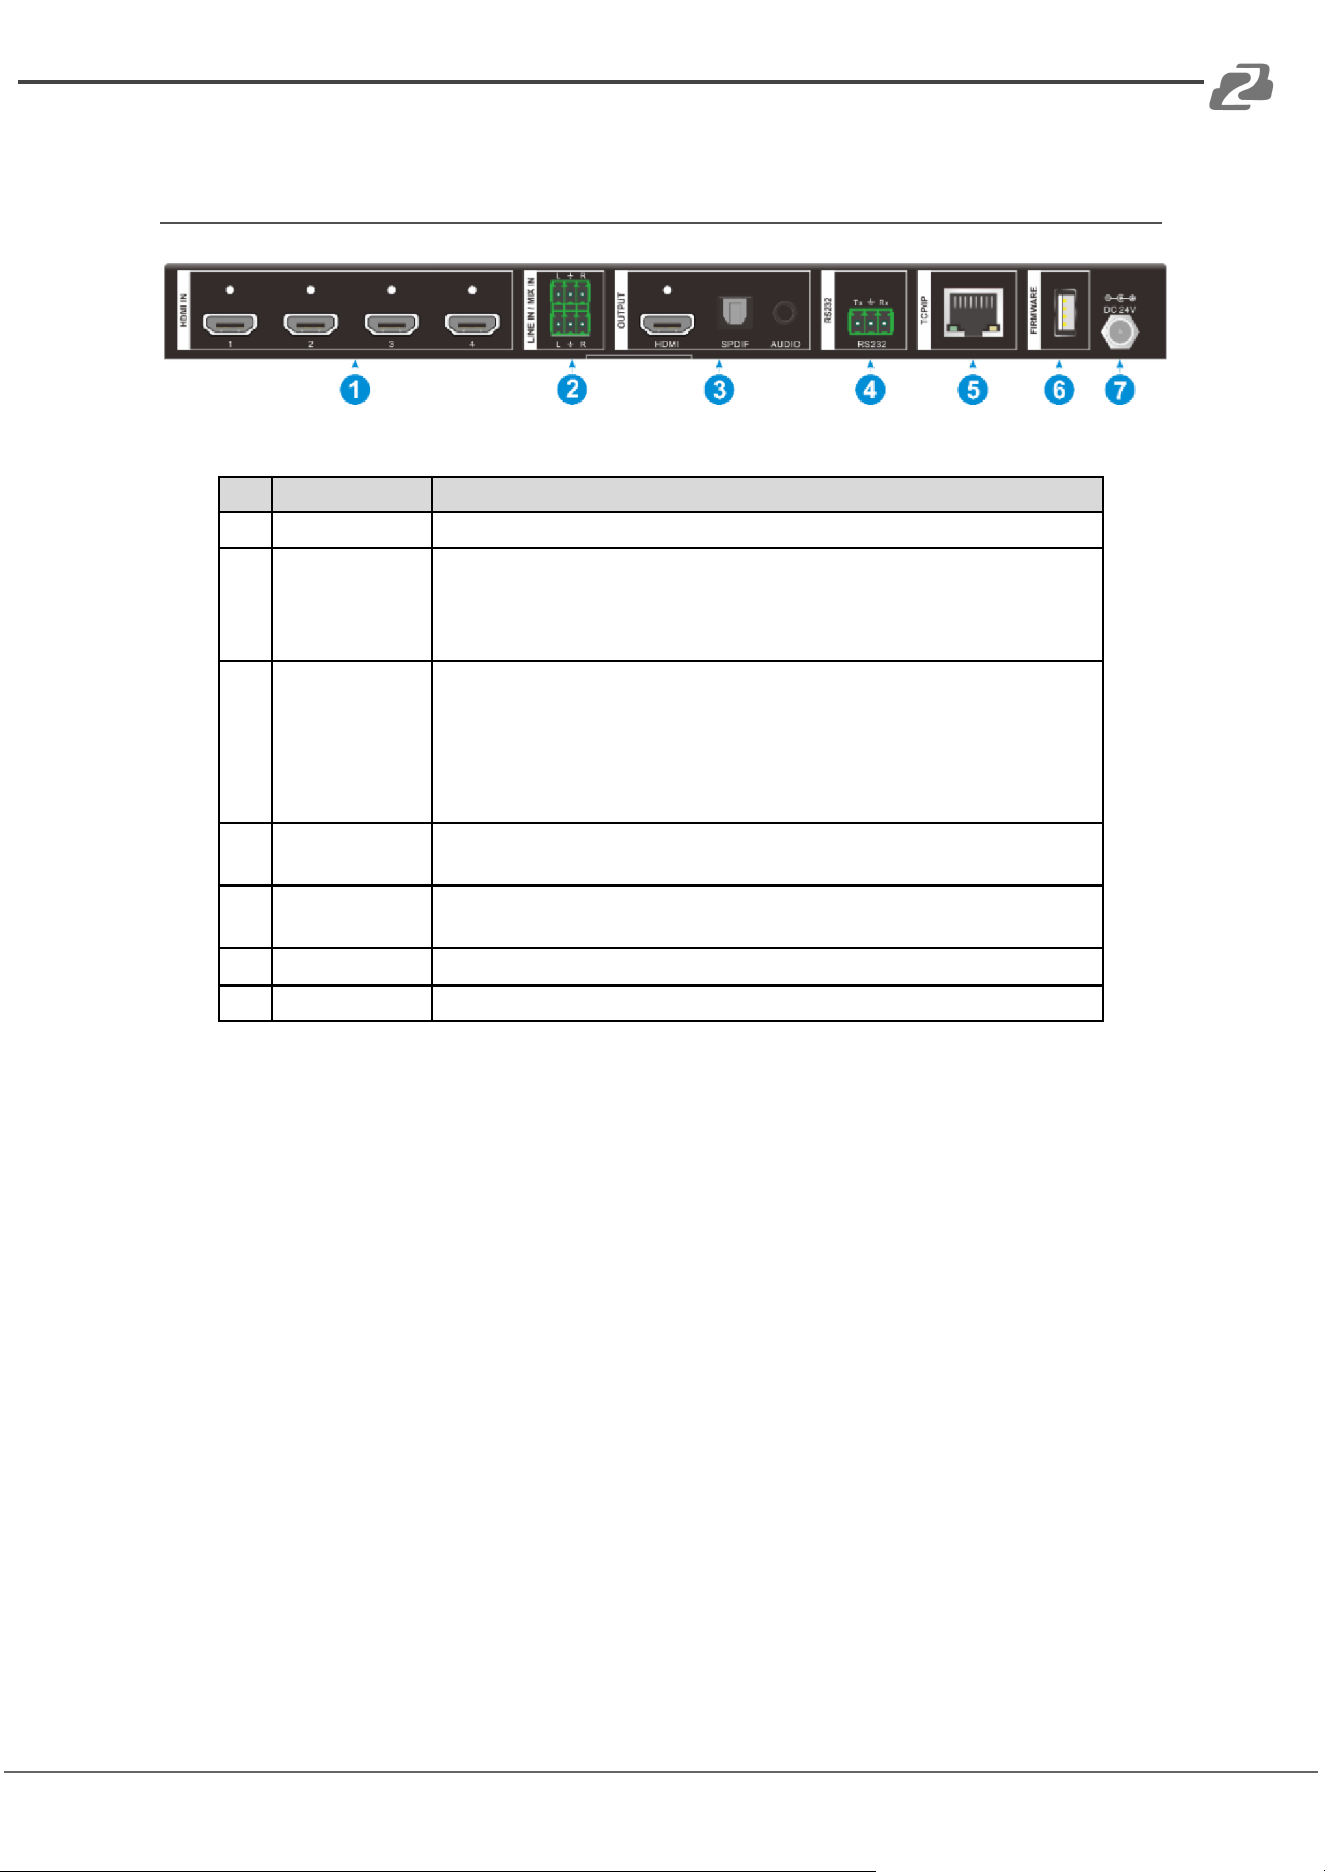
Rear Panel
No.
Name
Function Description
1
HDMI IN
Four type-A female HDMI input ports to connect HDMI source devices
2
LINE IN
MIX IN
3-pin terminal block to connect audio source devices to embed into HDMI
audio sources.
3-pin terminal block to connect audio source to mix HDMI audio sources.
3
HDMI OUTPUT
SPDIF OUTPUT
AUDIO
OUTPUT
Type-A female HDMI output port to connect display device.
Toslink for audio extraction from HDMI output.
3.5mm mini jack for audio extraction from HDMI output.
4
RS232
3-pin terminal block to connect the RS232 control device (e.g. PC) or a
third-party device to be controlled by RS232 commands.
5
TCP/IP
RJ45 port to connect the control device (e.g. PC) to control the switcher
by GUI.
6
FIRMWARE
Type-A USB port for firmware upgrade.
7
DC 24V
DC connector for power adapter connection
Address: 830 National Drive #140, Sacramento, CA 95834, USA · Tel: +1(888)499-9906 · Email: support@bzbgear.com 8
BZBGEAR BG-UMV-HA41 PRODUCT MANUAL
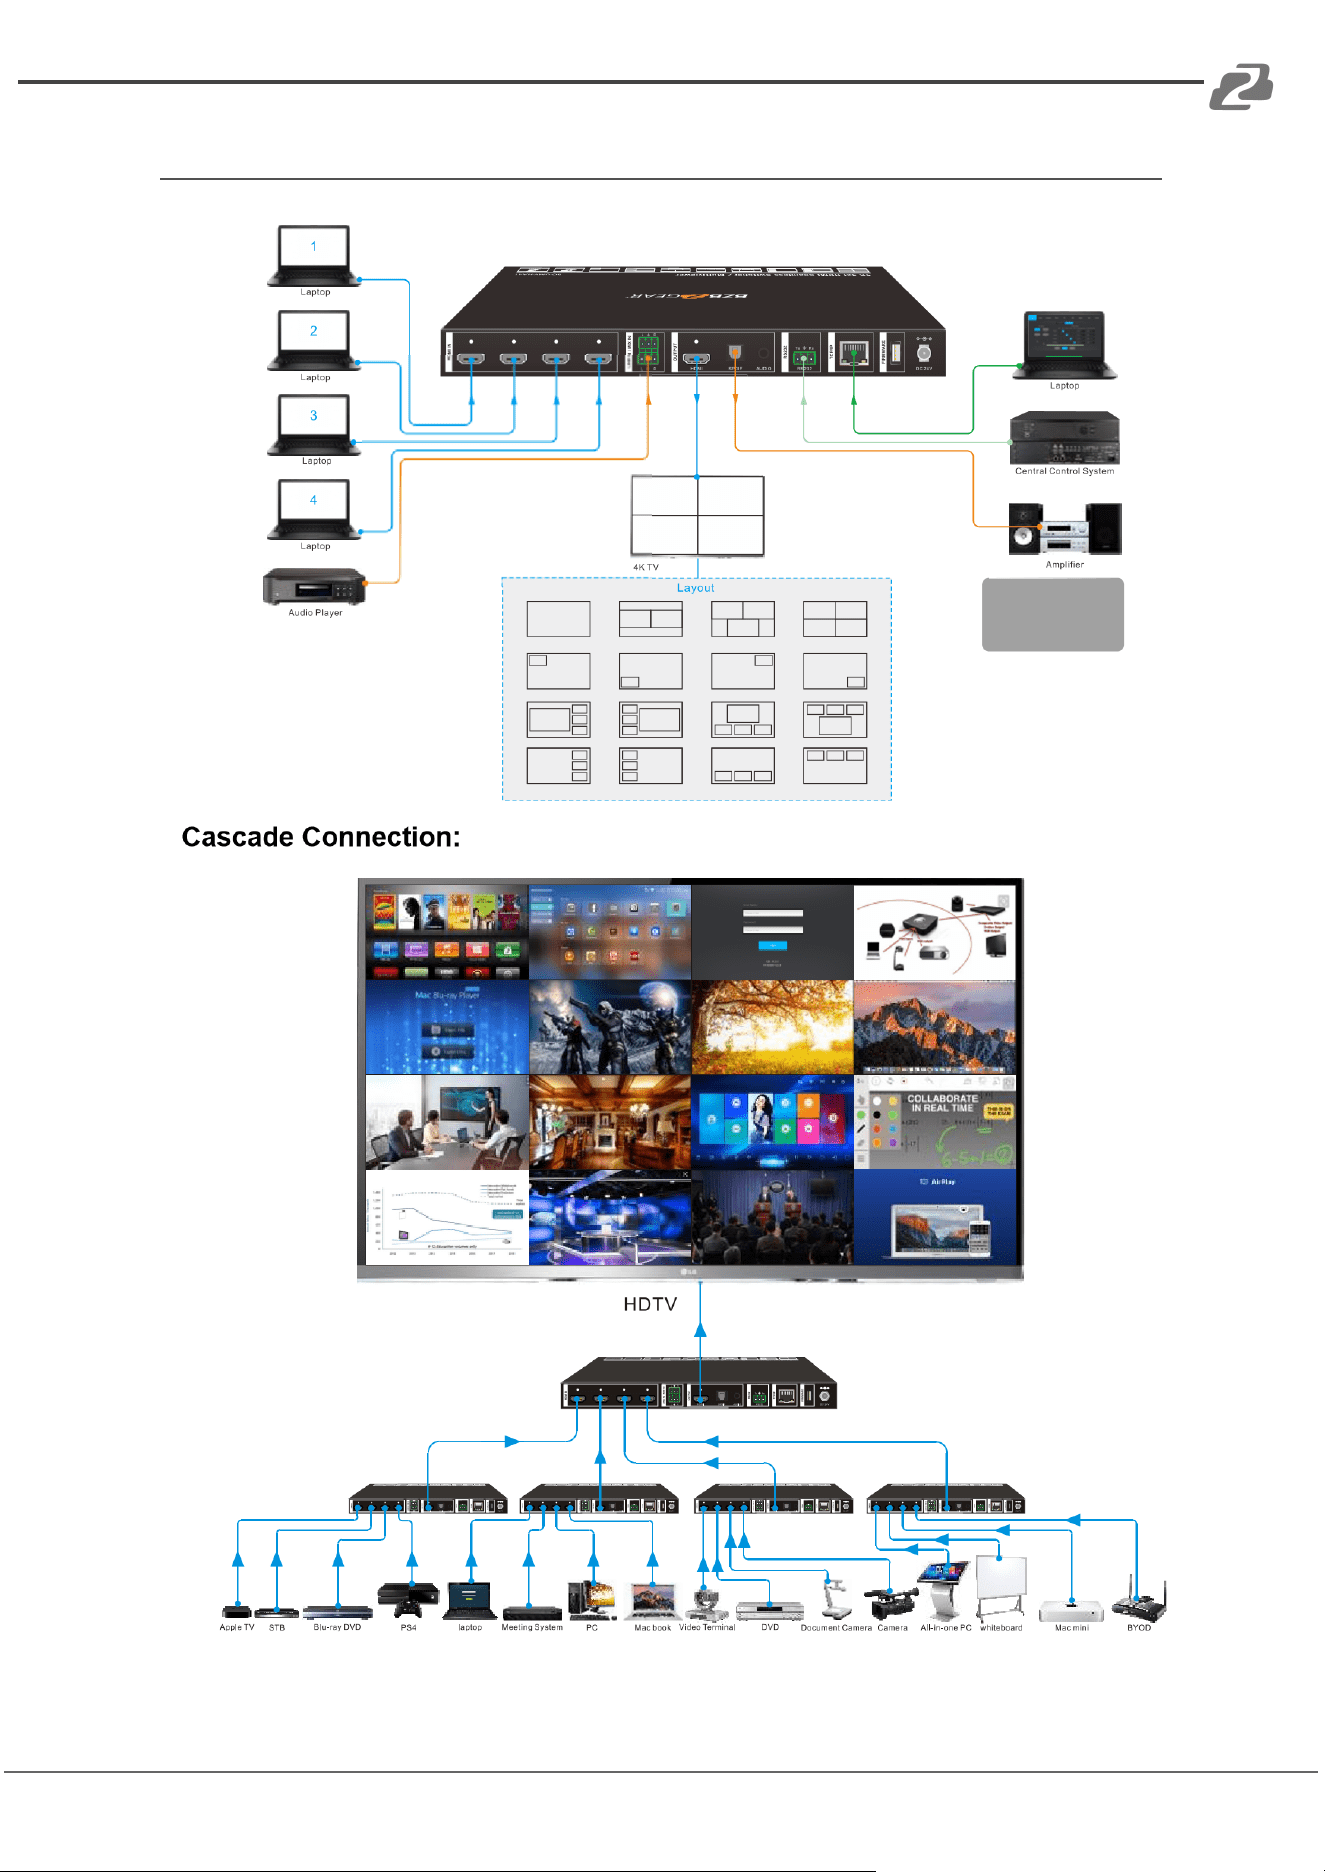
System Connection
Address: 830 National Drive #140, Sacramento, CA 95834, USA · Tel: +1(888)499-9906 · Email: support@bzbgear.com 9

BZBGEAR BG-UMV-HA41 PRODUCT MANUAL
Front Panel Control
Multiview Selection
Factory default is four quarter views and default input and output is as follows: input1 ->
window A, input2 -> window B, input3 -> window C, input 4-> window D. Press one of the
other two multi-view buttons to change the layout and the selected multiview mode LED will
illuminate blue.
Full Screen mode: Press Windows A~D button to select the corresponding window to
display in full-screen. Meanwhile, the corresponding input source button LED and window
button A LED illuminate blue, other window buttons and previous multi-view mode button
LED will turn off.
Video Signal Switching
● In the Multi-view mode
Operation: Input# + Window#
Example: Switch Input 1 to Window B:
Press INPUT 1(The input 1 LED illuminates blue, the windows A-D LEDs flash.)
Press Window B (The window A, C and D LEDs go out, then input 1 and windows B LED
flash three times, last, input 1 LED goes out and windows A-D LEDs illuminate blue.)
● In the Full Screen mode
1. Manual Switching
Operation: Input# + Window#
Example: Switch Input 2 to Window A:
Press INPUT 2 (The input 2 LED illuminates blue.) Press Windows A (The input 2 and
windows A LEDs illuminate blue).
2. Auto Switching
Press AUTO button to enter auto-switching mode, and the corresponding LED illuminates
blue.
When in the AUTO mode, signal switching complies with the following principles:
● Input sources priority: HDMI 1 > HDMI 2 > HDMI 3 > HDMI 4. When input source
and output window are connected, the corresponding LEDs illuminate blue.
● When a new input signal is detected the unit will automatically switch to the input.
● The switcher will retain the last input source when powered off.
● Manual switching is available in the auto switching mode.
● When AUTO mode changes to multiview mode AUTO mode will not be turned off.
Address: 830 National Drive #140, Sacramento, CA 95834, USA · Tel: +1(888)499-9906 · Email: support@bzbgear.com 10
BZBGEAR BG-UMV-HA41 PRODUCT MANUAL
Video Switching Status Inquiry
In the Multi-view mode (Window A, B, C or D LED can illuminate blue).
Operation: Window#
Example: Long press Window B button for more than 3s (Window A, C and D LEDs will turn
off and then the corresponding input source LED will illuminate blue). After 3 seconds,
Window A, B, C and D LEDs will illuminate blue.
Audio Select
Factory default is HDMI IN1 audio source. In the Multi-view mode, long press any INPUT
buttons for more than 3s to replace all output audios with corresponding input audio
source, meanwhile, the input LED illuminates blue. If there is no operation within 3 seconds
the input LED will go out.
Long press AUTO button for 3s to replace all output audios with LINE IN audio source.
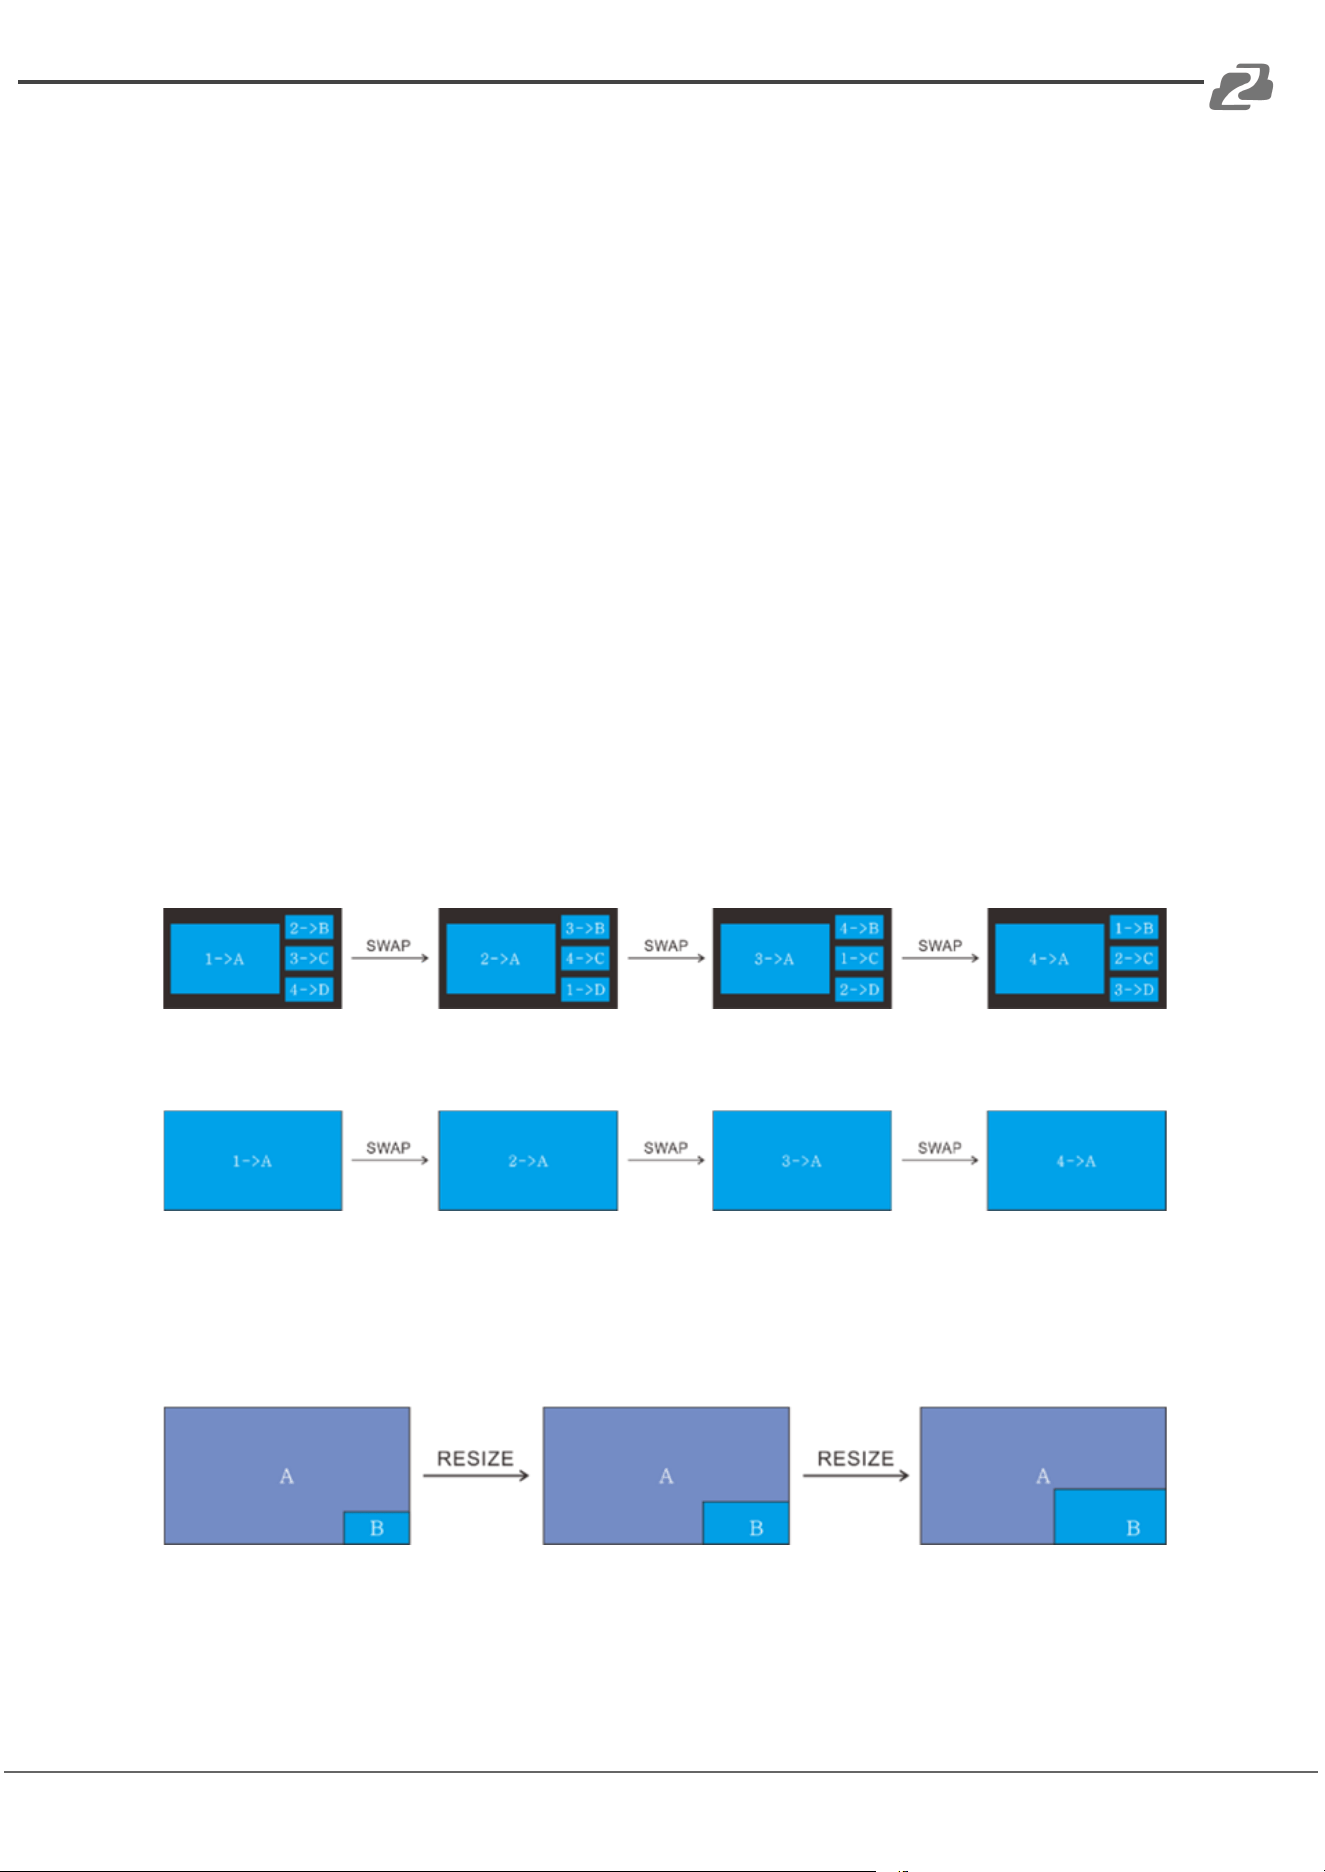
Config Buttons
SWAP: Press Swap button to cycle display windows in a counterclockwise direction in
multiview mode. The SWAP LED will blink once on button press.
Example: In the Multi-view mode
Example: In the Full Screen mode
RESIZE: Press RESIZE button to readjust the window sizes. Please refer to the “GUI
Multiview Tab” section of this manual for more details.
Example: In PIP mode
Address: 830 National Drive #140, Sacramento, CA 95834, USA · Tel: +1(888)499-9906 · Email: support@bzbgear.com 11
BZBGEAR BG-UMV-HA41 PRODUCT MANUAL
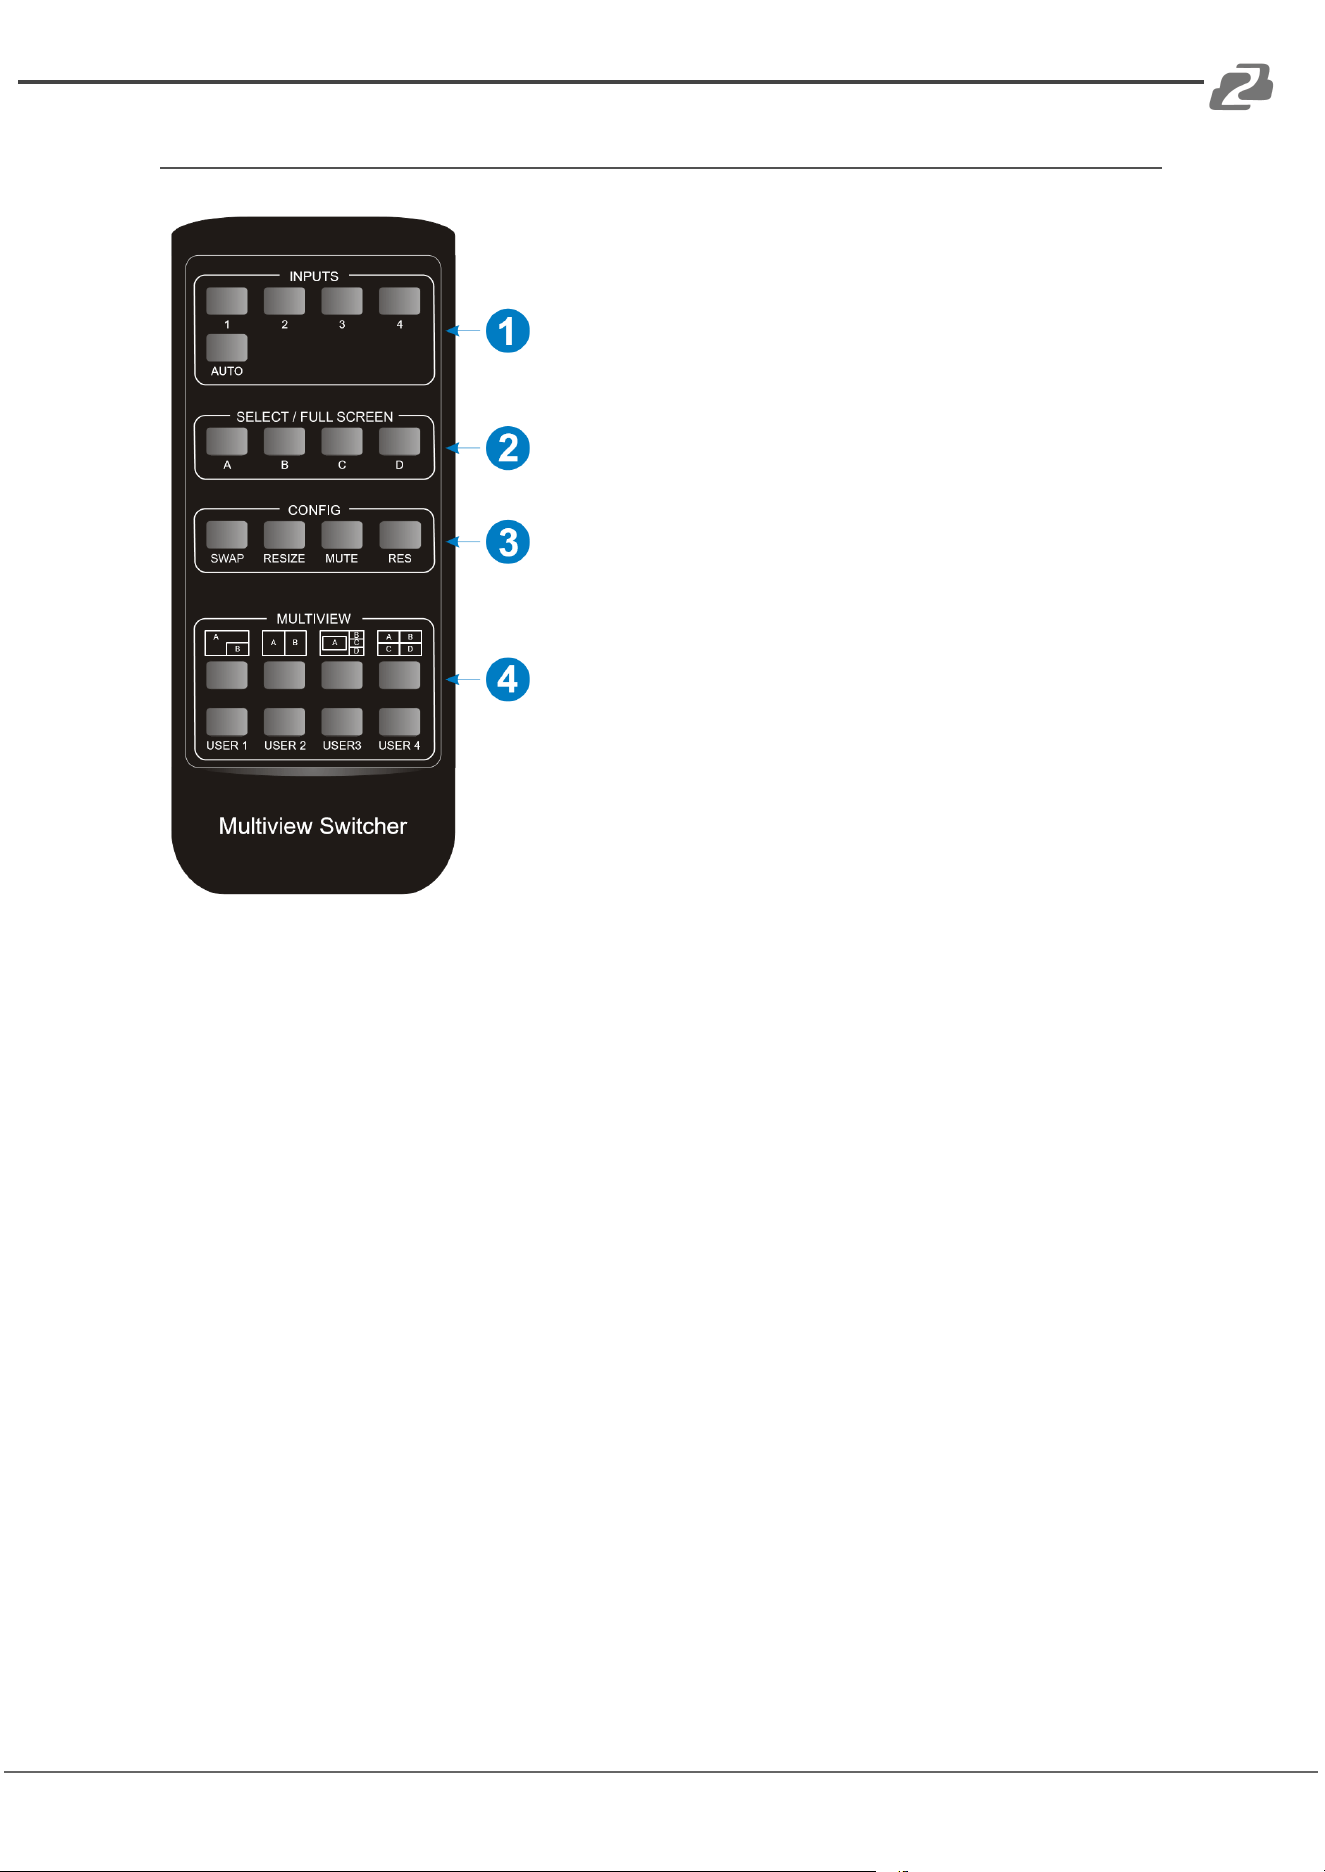
IR Remote
1. INPUTS: Press buttons 1-4 to select an input
source. Press the AUTO button to automatically detect
the input source.
2. SELECT / FULL SCREEN: Press the A-D buttons
to display the corresponding input in full-screen mode.
3. CONFIG: Press the SWAP button to cycle the
display screen in a counterclockwise direction. Press
the RESIZE button to adjust the window size. Press the
MUTE button to mute audio. Press the RES button to
adjust the output resolution.
4. MULTIVIEW: Multiview includes eight buttons, the
first four buttons are used to choose different multiview
modes and the USER1-4 buttons are used to enter
user-defined multiview presets created in the web
interface..
Note: There is no long press functionality on this IR remote but otherwise its button
functions are the same as the front panel buttons.
Address: 830 National Drive #140, Sacramento, CA 95834, USA · Tel: +1(888)499-9906 · Email: support@bzbgear.com 12
BZBGEAR BG-UMV-HA41 PRODUCT MANUAL
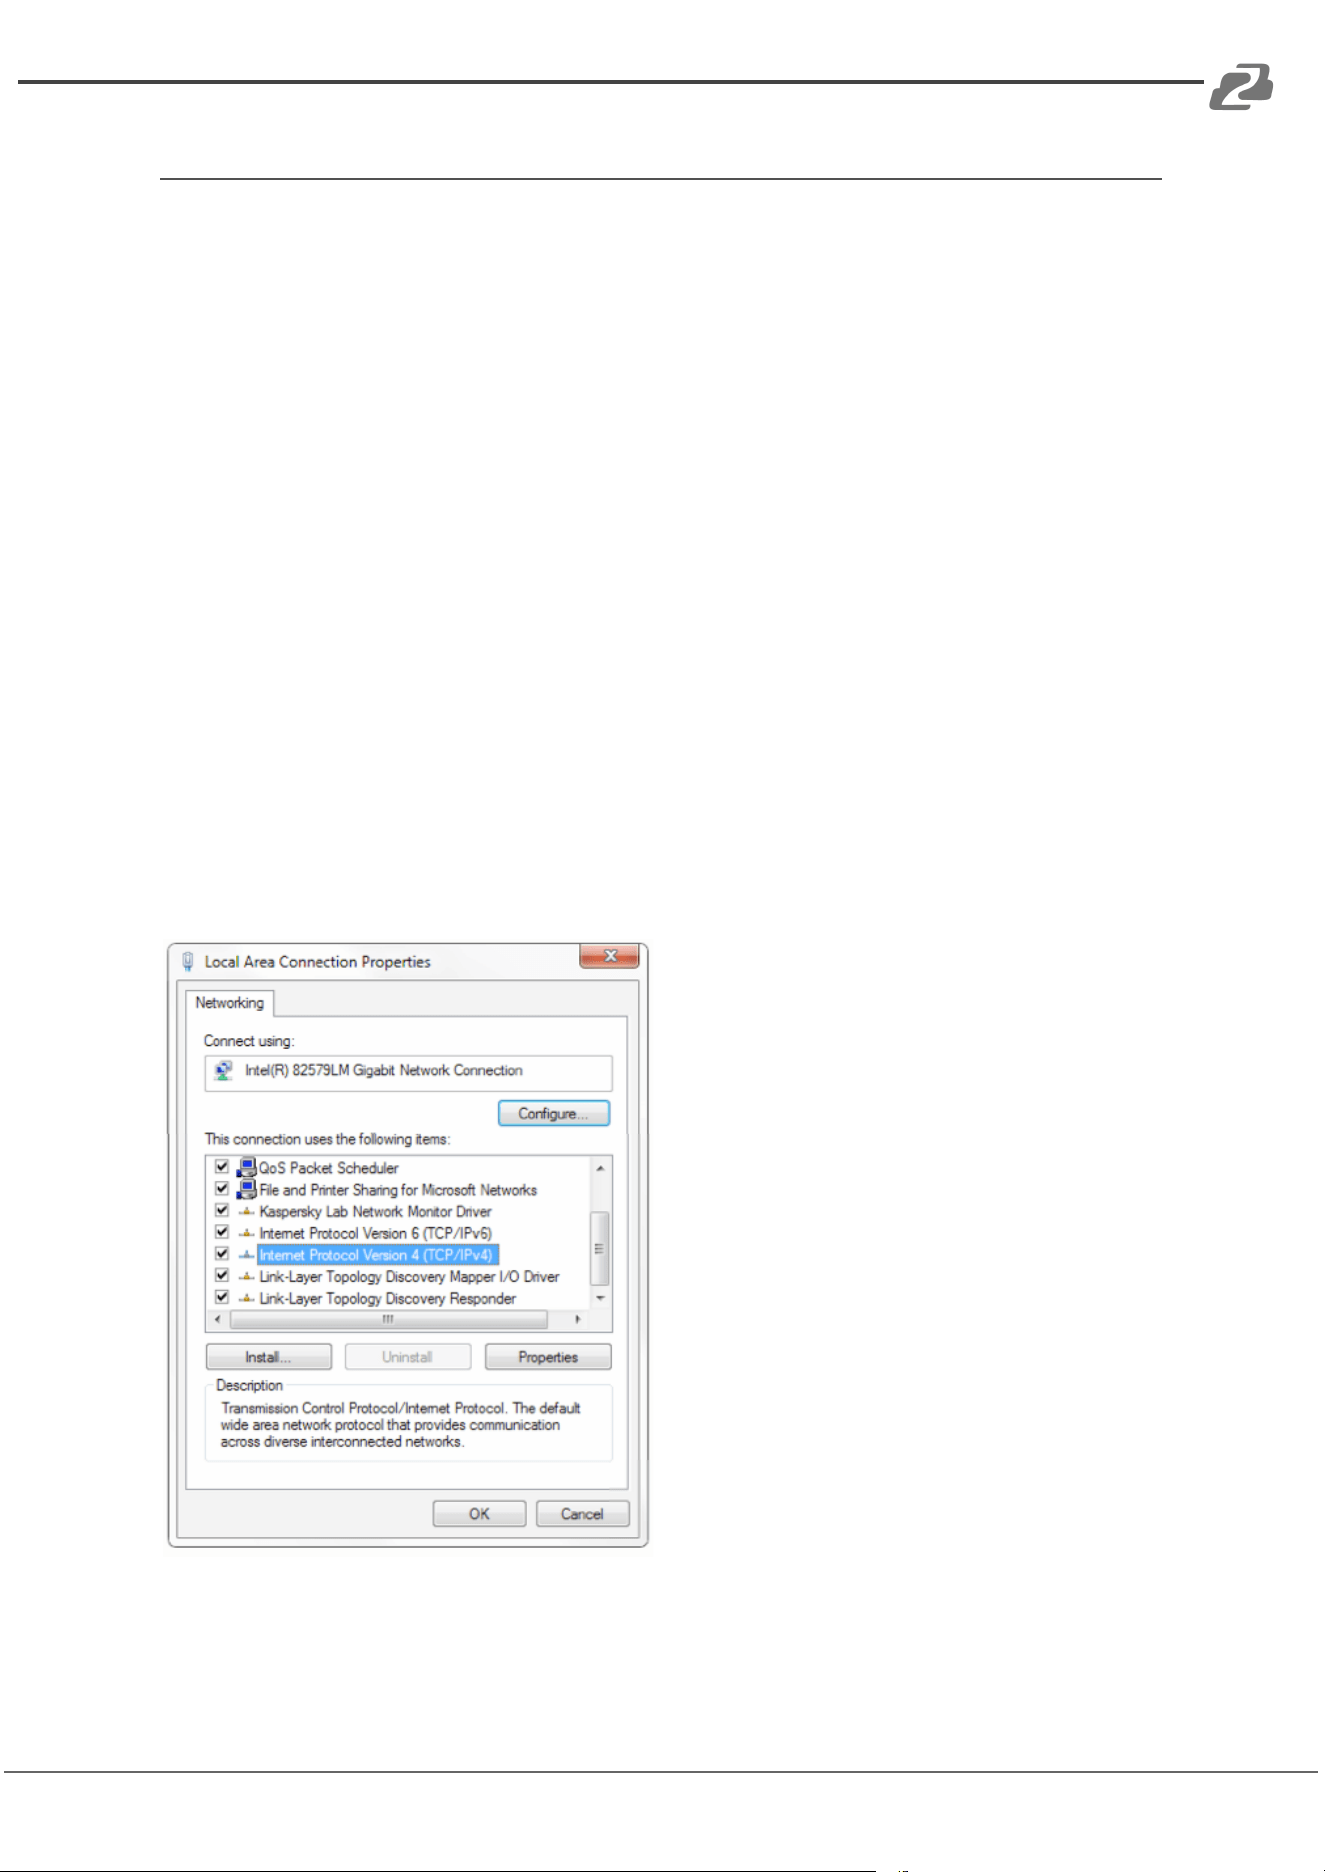
GUI Control
The switcher can be controlled via a web user interface. The default IP settings are:
IP Address: 192.168.0.178
Subnet Mask: 255.255.255.0
The computer must be on the same subnet as the BG-UMV-HA41 to connect successfully.
Therefore, the computer must be connected to the 192.168.0.# subnet where # is any
number from 2-254 except 178.
To adjust your computer's network, open the Local Area Connection Properties on the
computer.
For Windows users right-click on the internet connection in the lower right corner of the
desktop.
Select “Open Network & Internet Settings”.
Select “Change Adapter Options”.
Right-click on your connection (Wi-Fi or Ethernet) and select “Properties”.
Select “Internet Protocol Version 4 (TCP/IPv4) as shown below and click “Properties”.
Address: 830 National Drive #140, Sacramento, CA 95834, USA · Tel: +1(888)499-9906 · Email: support@bzbgear.com 13

BZBGEAR BG-UMV-HA41 PRODUCT MANUAL
Click on the bubble for “Use the following IP address”
In the IP address field enter a non-conflicting IP address on the same subnet as the unit. If
there is another device with the same IP address you will not be able to connect.
In the Subnet mask field enter 255.255.255.0
In the Default gateway field type 192.168.0.1
You can leave the DNS fields blank.
Click OK to apply your settings.
NOTE: When you are finished configuring the device you will need to return to this screen
and click the bubbles for “Obtain an IP address automatically” and “Obtain DNS server
automatically” to restore internet connectivity to your computer. Also make sure to
reconnect any ethernet cables you may have unplugged.
Type 192.168.0.178 in your internet browser and it will display the login web page below:
Username: admin
Password: admin
Type the username and password, and then click Login to enter the section for video
switching.
Address: 830 National Drive #140, Sacramento, CA 95834, USA · Tel: +1(888)499-9906 · Email: support@bzbgear.com 14
BZBGEAR BG-UMV-HA41 PRODUCT MANUAL
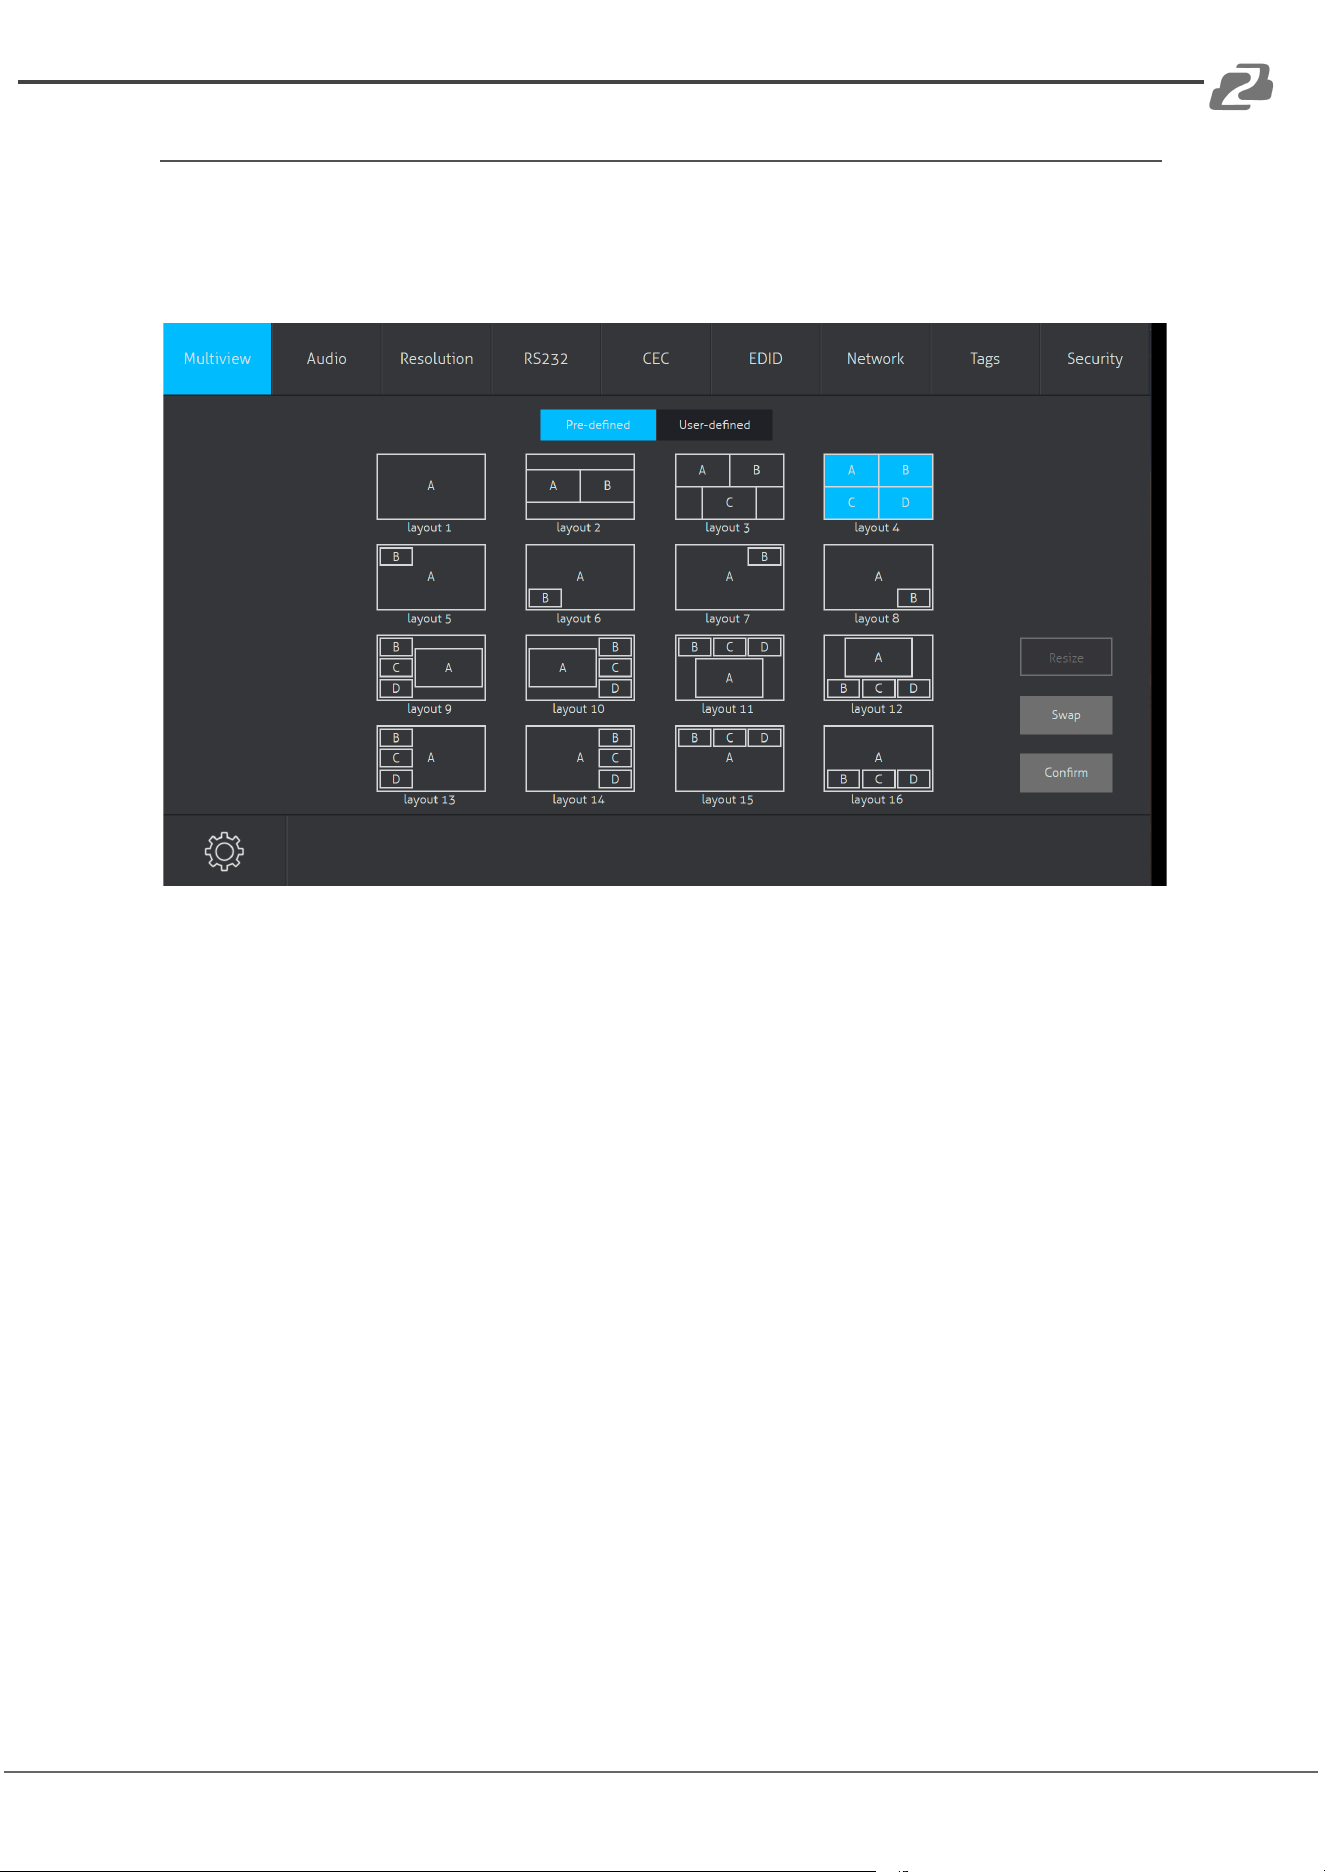
Multiview Tab
Once logged in the unit will enter the Multiview Tab shown below:
1. Pre-defined:
➢ Click the corresponding layout (layout 1~16) to select a display mode.
➢ Click Layout 2 and Layout 5~12 to enable the Resize function.
➢ Press the SWAP button to cycle the displays in a counterclockwise direction.
➢ Click the Confirm button to complete the selection.
Address: 830 National Drive #140, Sacramento, CA 95834, USA · Tel: +1(888)499-9906 · Email: support@bzbgear.com 15
BZBGEAR BG-UMV-HA41 PRODUCT MANUAL
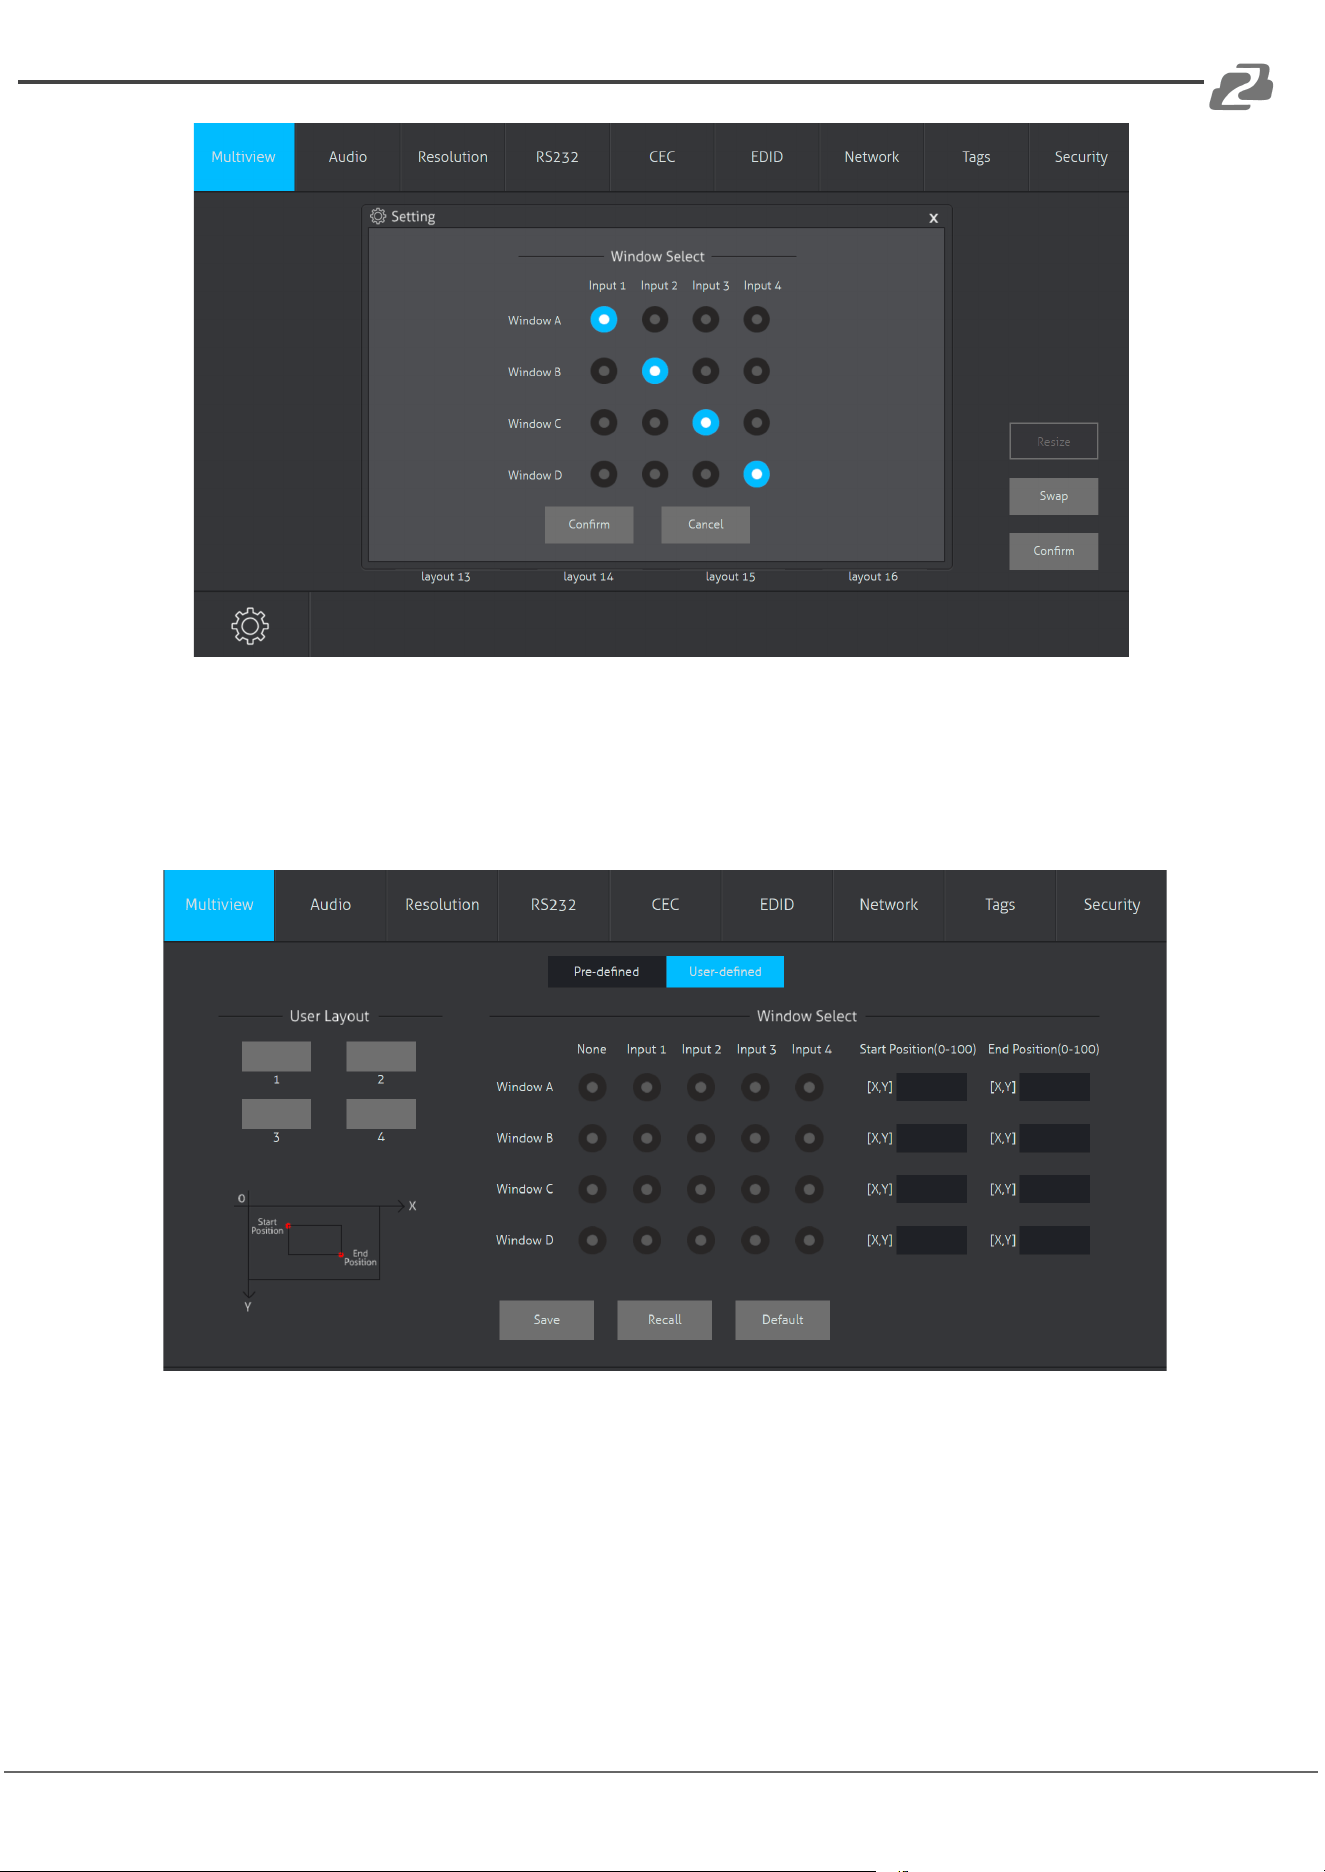
➢ Click Settings gear in the bottom left to enter Window Select to modify the input for
a window.
2. User-defined
➢ Click 1, 2, 3, or 4 buttons to choose User Layout.
➢ Select the corresponding input to set the size and position for each window that you
want to display on the layout.
➢ Click Save button to save the preset and display the results from the modifications.
➢ “User-defined if the Bandwidth limit exceeded” will display if the parameters entered
are not appropriate/functional.
Address: 830 National Drive #140, Sacramento, CA 95834, USA · Tel: +1(888)499-9906 · Email: support@bzbgear.com 16
BZBGEAR BG-UMV-HA41 PRODUCT MANUAL
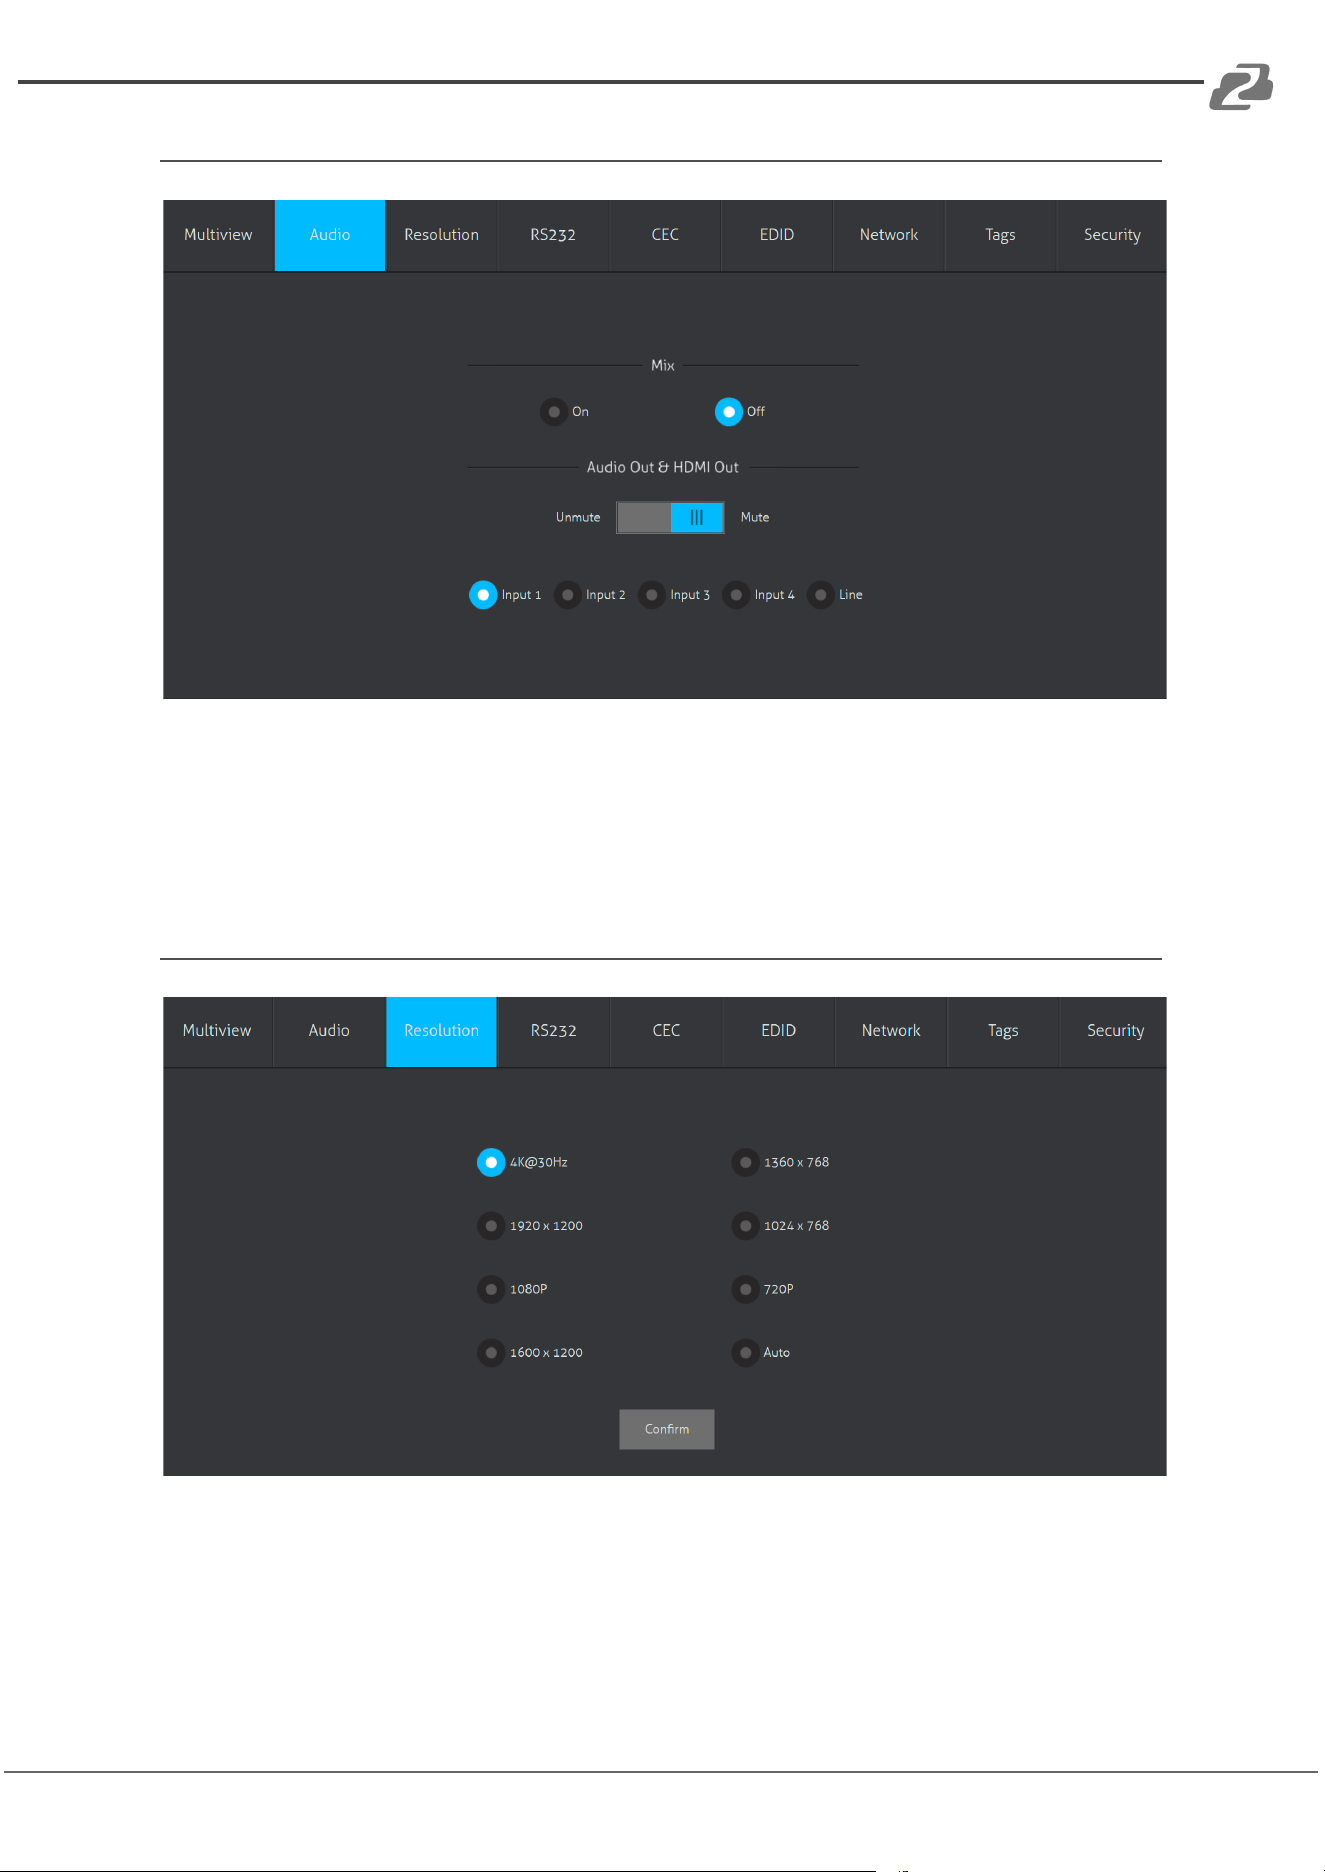
Audio Tab
➢ Click the On button to enter Mix mode, Click the Off button to exit Mix mode.
➢ Click the Unmute or Mute button to enable/disable audio output.
➢ Select one audio input from inputs 1-4 or line audio to set as the audio source.
Resolution Tab
➢ Click any of the resolutions to be output to the display device or click the Auto
button to have the unit try and pick the best resolution for the display automatically.
➢ Click the Confirm button to apply changes.
Address: 830 National Drive #140, Sacramento, CA 95834, USA · Tel: +1(888)499-9906 · Email: support@bzbgear.com 17
BZBGEAR BG-UMV-HA41 PRODUCT MANUAL
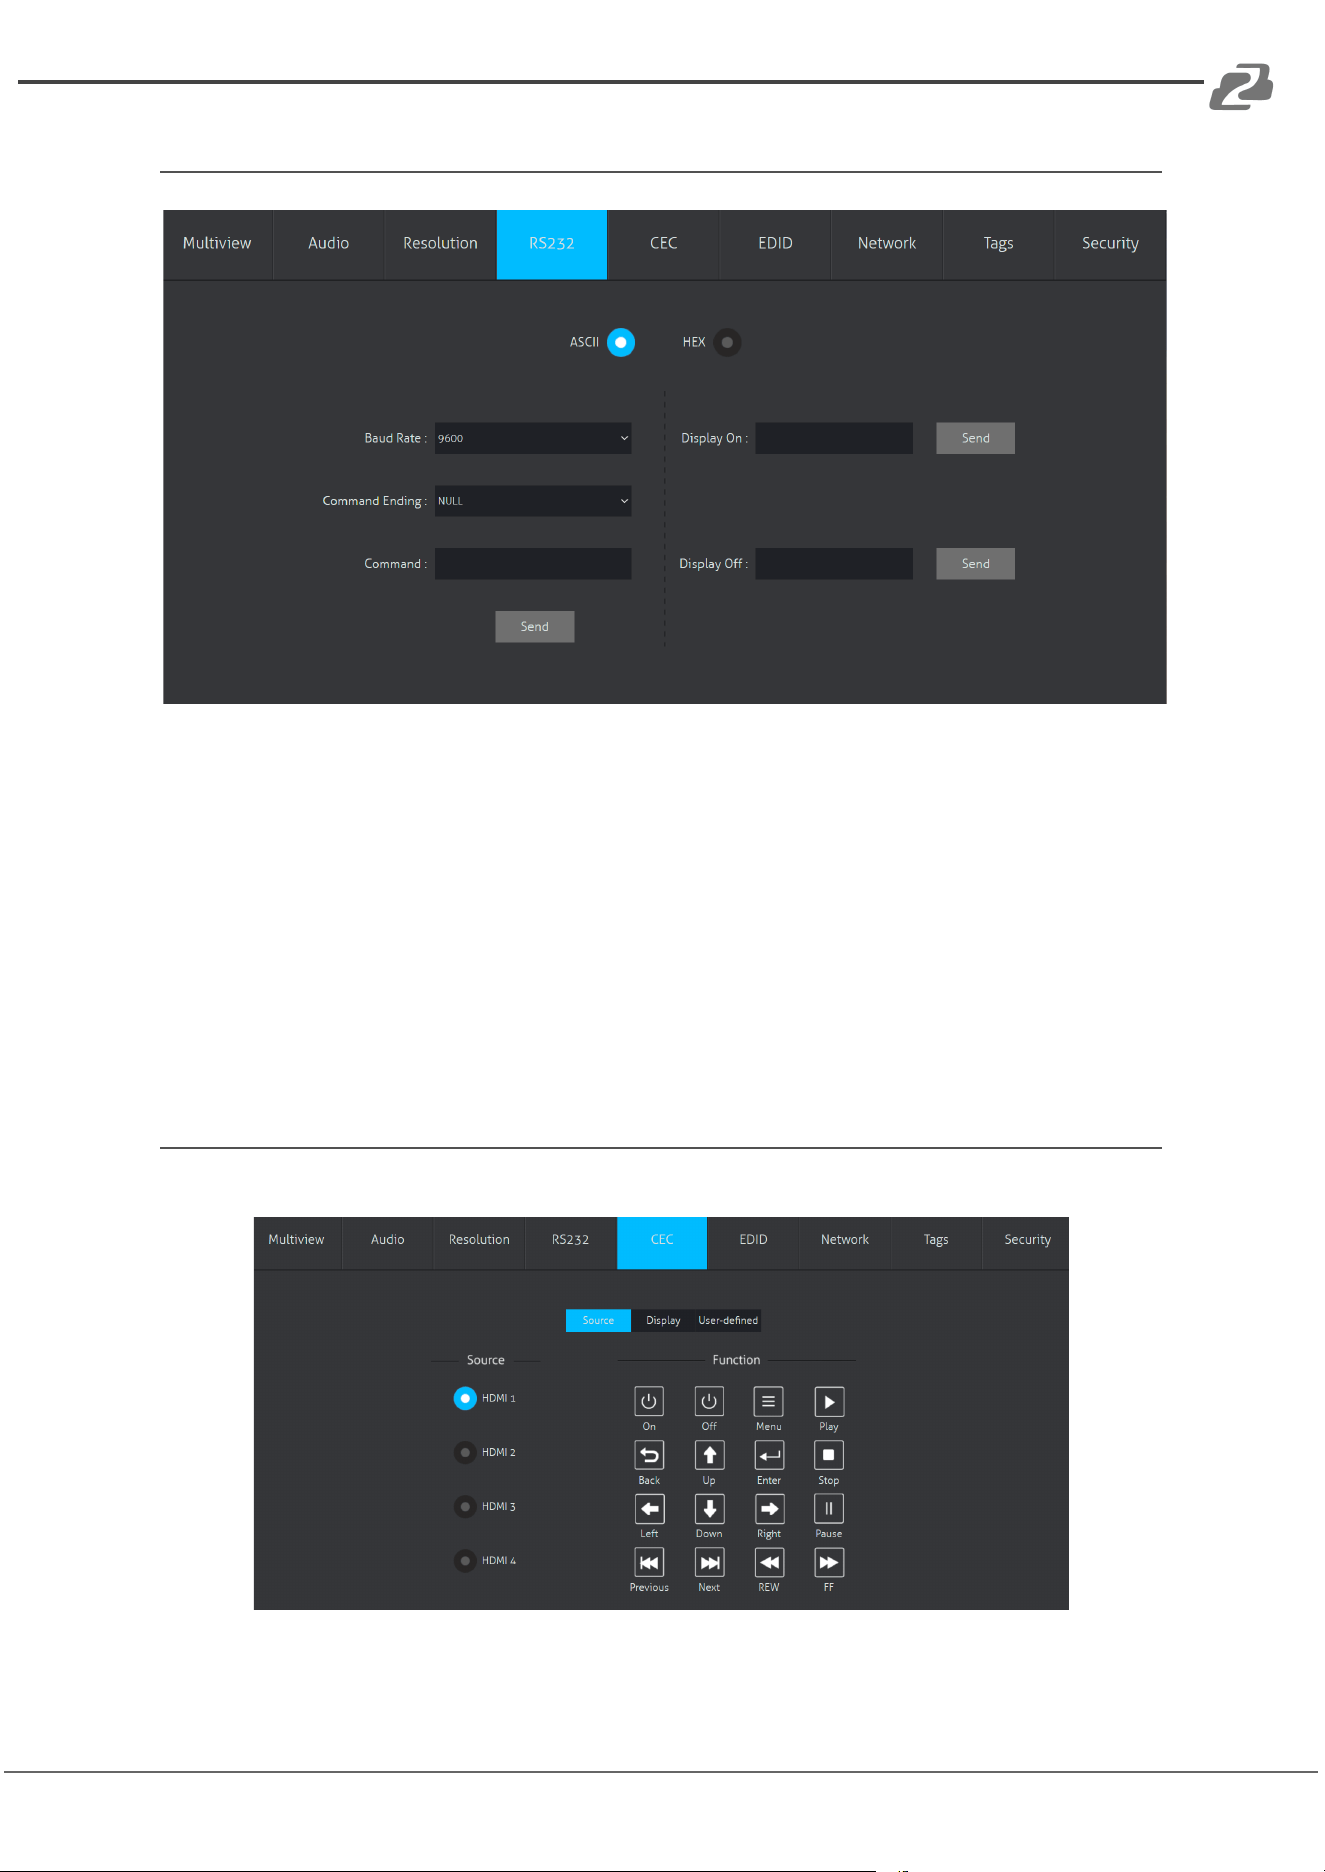
RS232 Tab
➢ ASCII or HEX command formats can be selected.
➢ Baud Rate: Supports 2400, 4800, 9600, 19200, 38400, 57600 or 115200.
➢ Command Ending: NULL, CR, LF or CR+LF can be chosen.
➢ Command: Type a command in this box to control a third-party device which is
connected to the RS232 port of the switcher.
➢ Display On: Send the Display ON via RS232 command.
➢ Display Off: Send the Display OFF via RS232 command.
CEC Tab
1. Source
➢ Click a Source button to select an HDMI input source and then click a Function to
send a command.
Address: 830 National Drive #140, Sacramento, CA 95834, USA · Tel: +1(888)499-9906 · Email: support@bzbgear.com 18
BZBGEAR BG-UMV-HA41 PRODUCT MANUAL
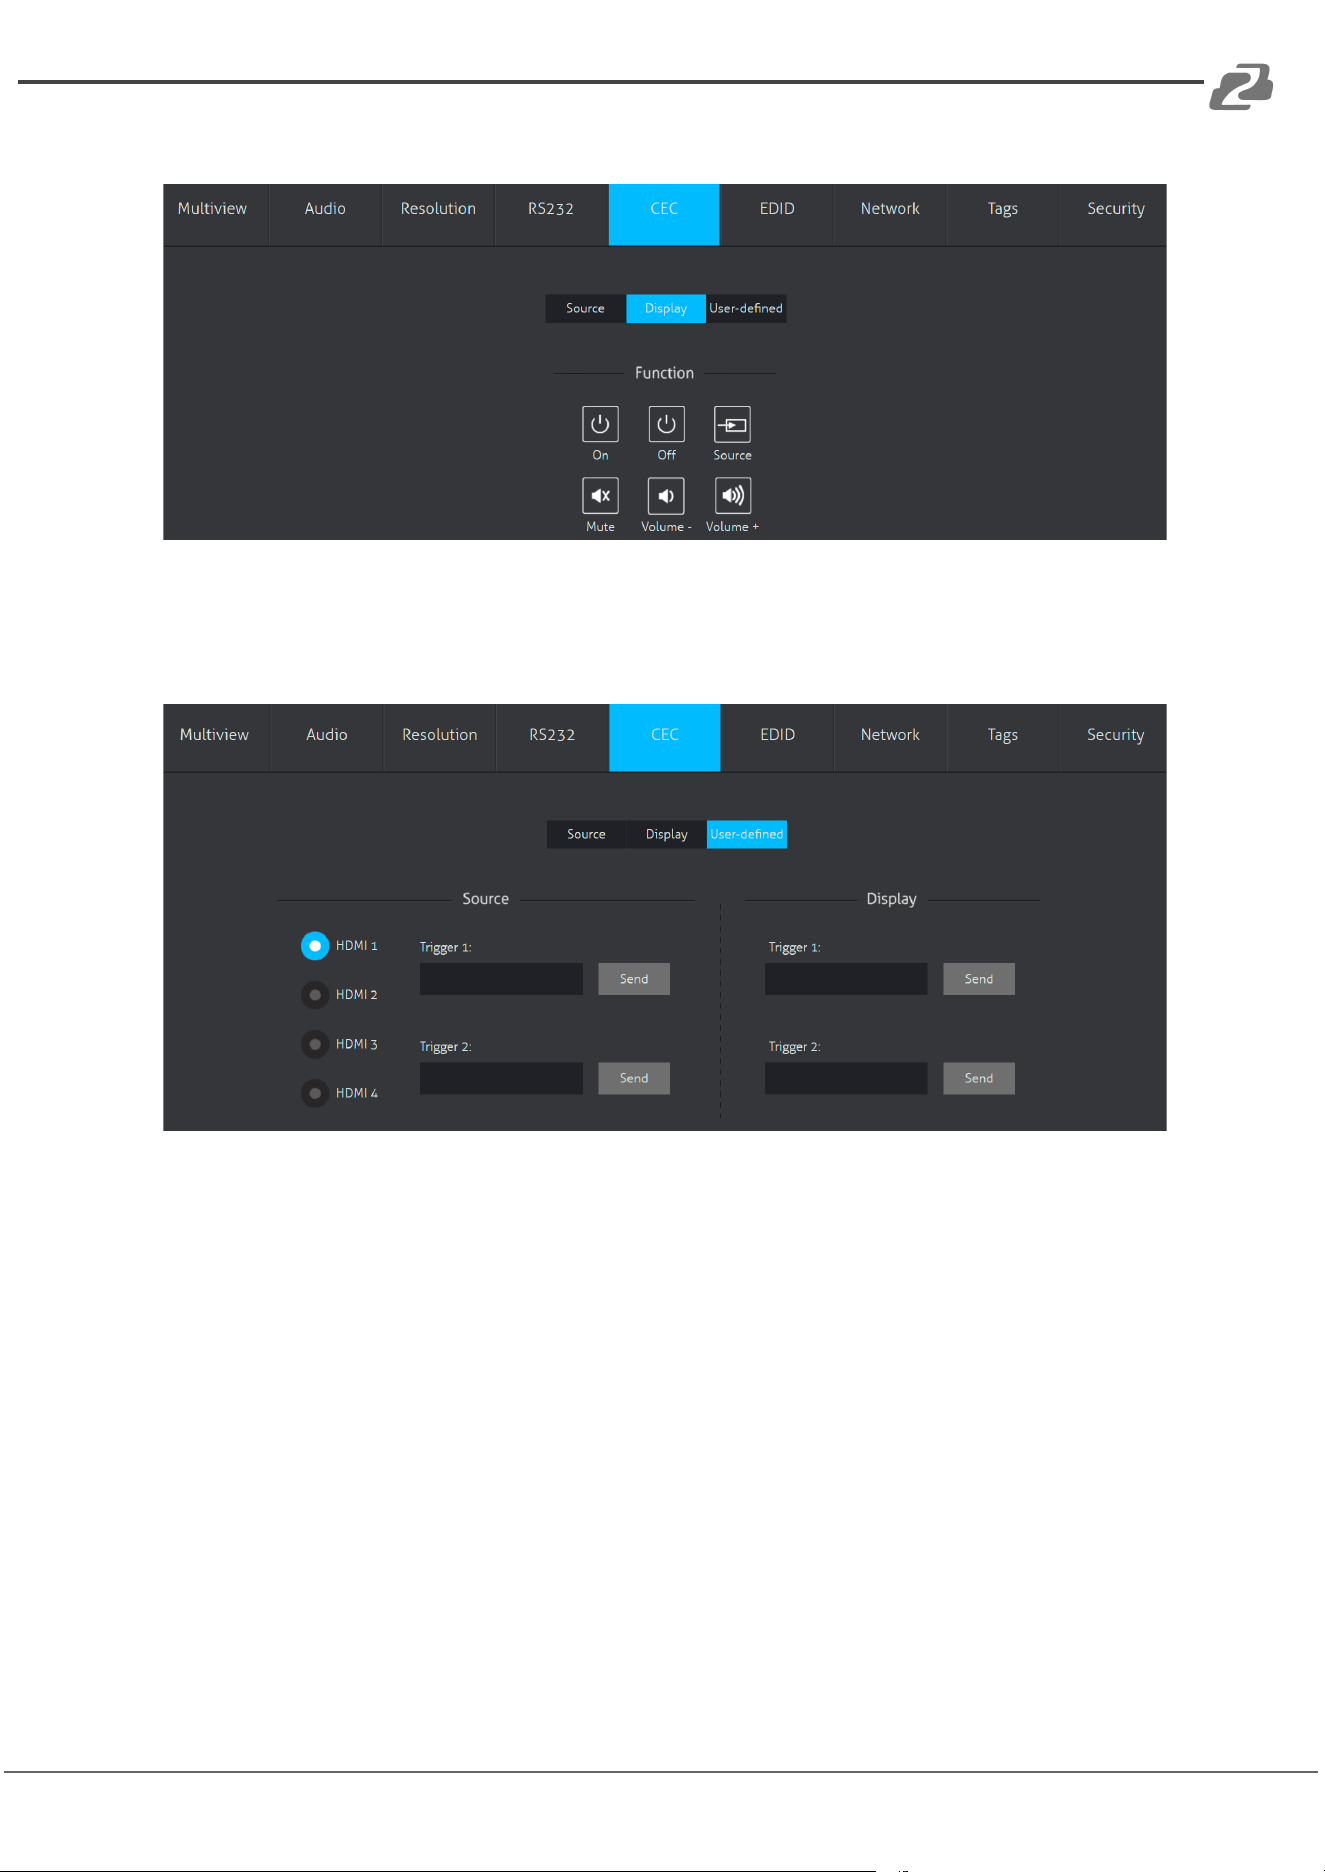
2. Display
➢ Click a display function button to control connected display devices.
3. User-defined
➢ Select a corresponding input source device and display devices to control via CEC
commands.
NOTE: Not all devices are compatible with CEC or every function show may not be
available.
Address: 830 National Drive #140, Sacramento, CA 95834, USA · Tel: +1(888)499-9906 · Email: support@bzbgear.com 19
BZBGEAR BG-UMV-HA41 PRODUCT MANUAL
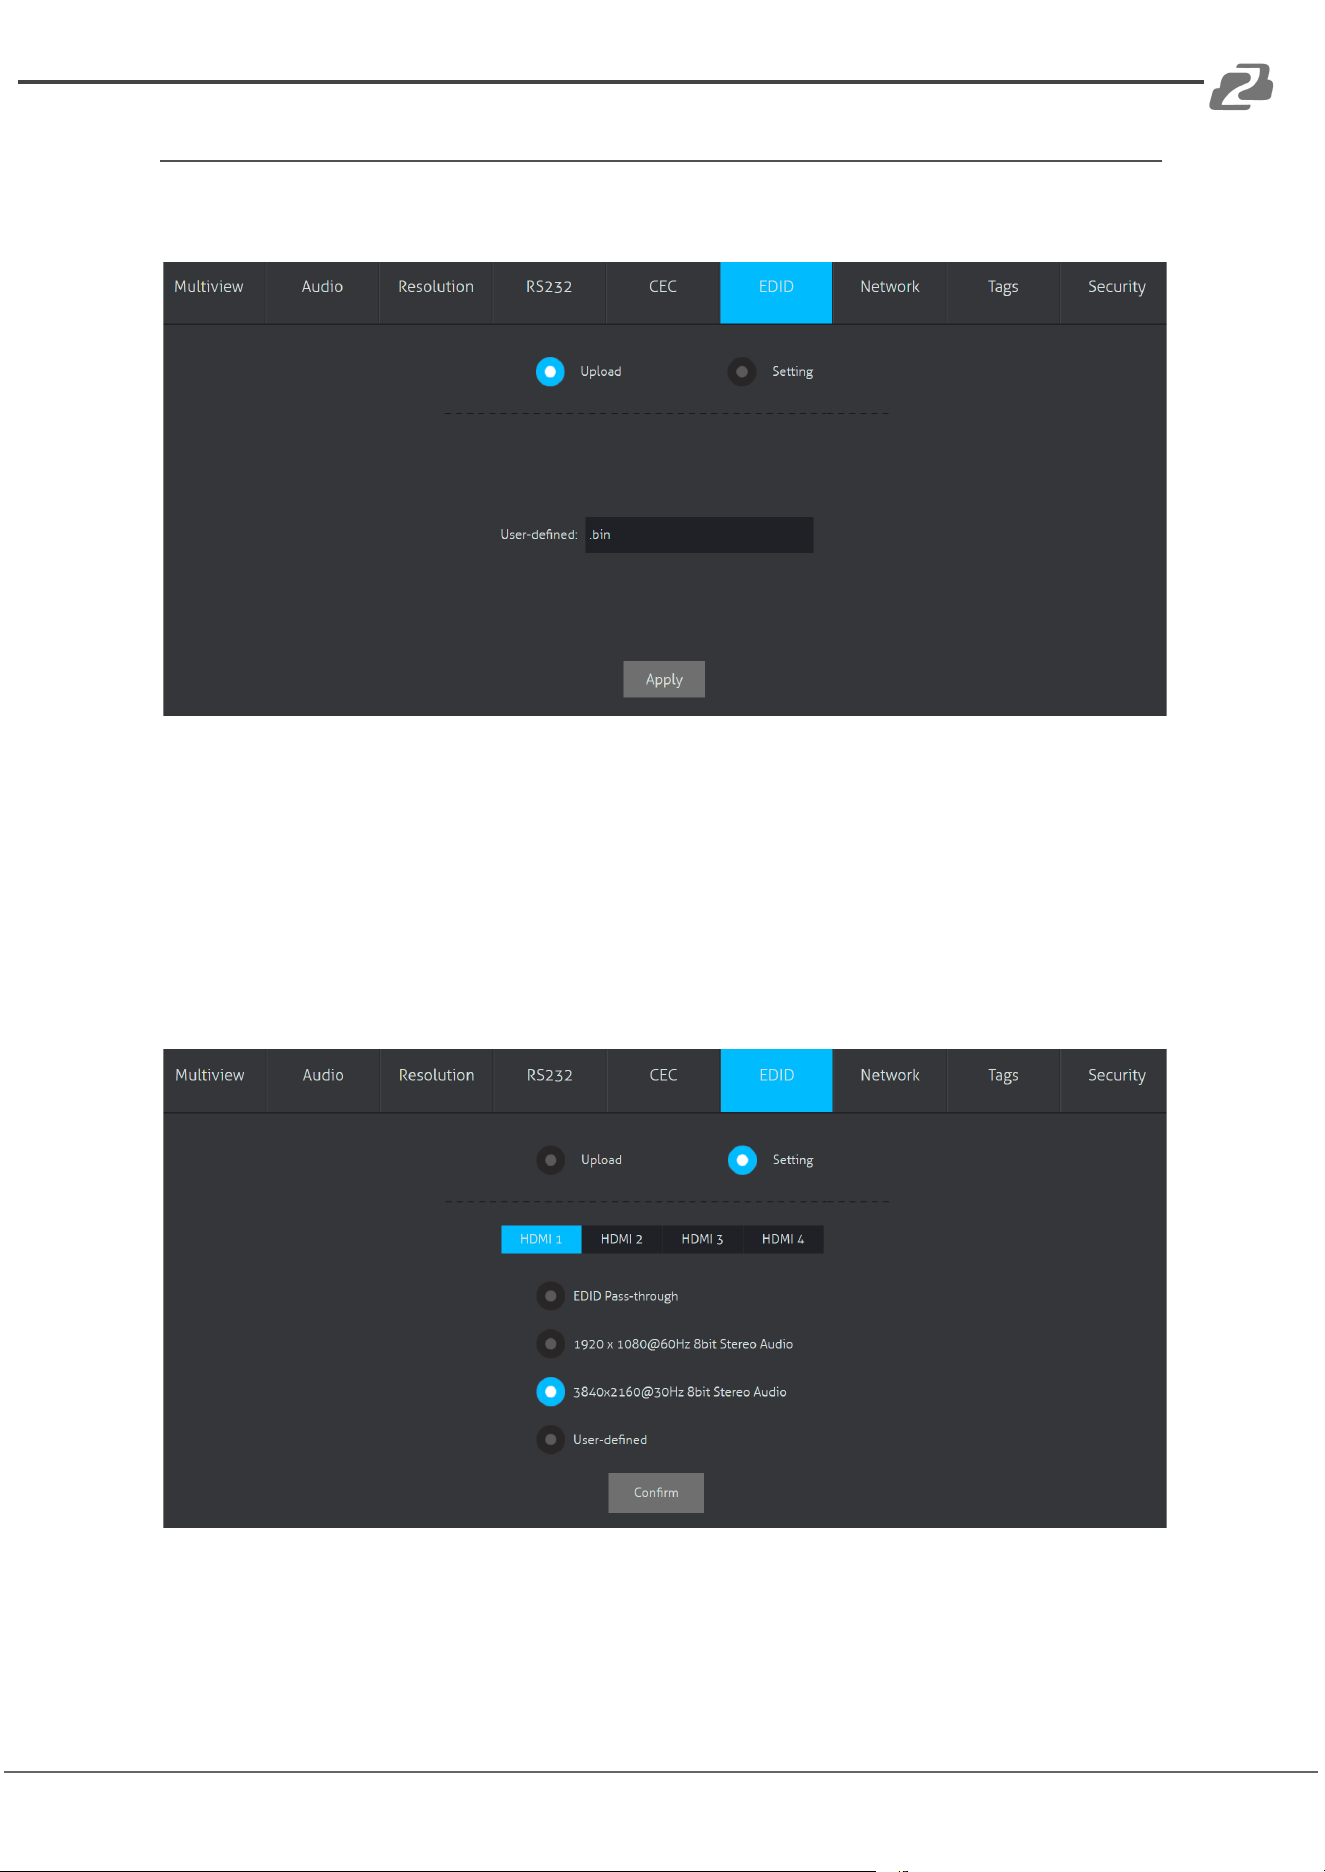
EDID Tab
1. Upload
User-defined EDID can be customized using the following steps:
● Step 1: Click the User-defined box and a file explorer will pop up.
● Step 2: Select the EDID file (.bin) and click Open.
● Step 3: Click Apply to upload the user-defined EDID.
2. Setting
➢ Click the Setting button to set built-in EDID options.
➢ Click the HDMI 1-4 tabs to select an input source to modify.
➢ Click any of the built-in EDIDs and then click Confirm to apply changes.
Address: 830 National Drive #140, Sacramento, CA 95834, USA · Tel: +1(888)499-9906 · Email: support@bzbgear.com 20
BZBGEAR BG-UMV-HA41 PRODUCT MANUAL
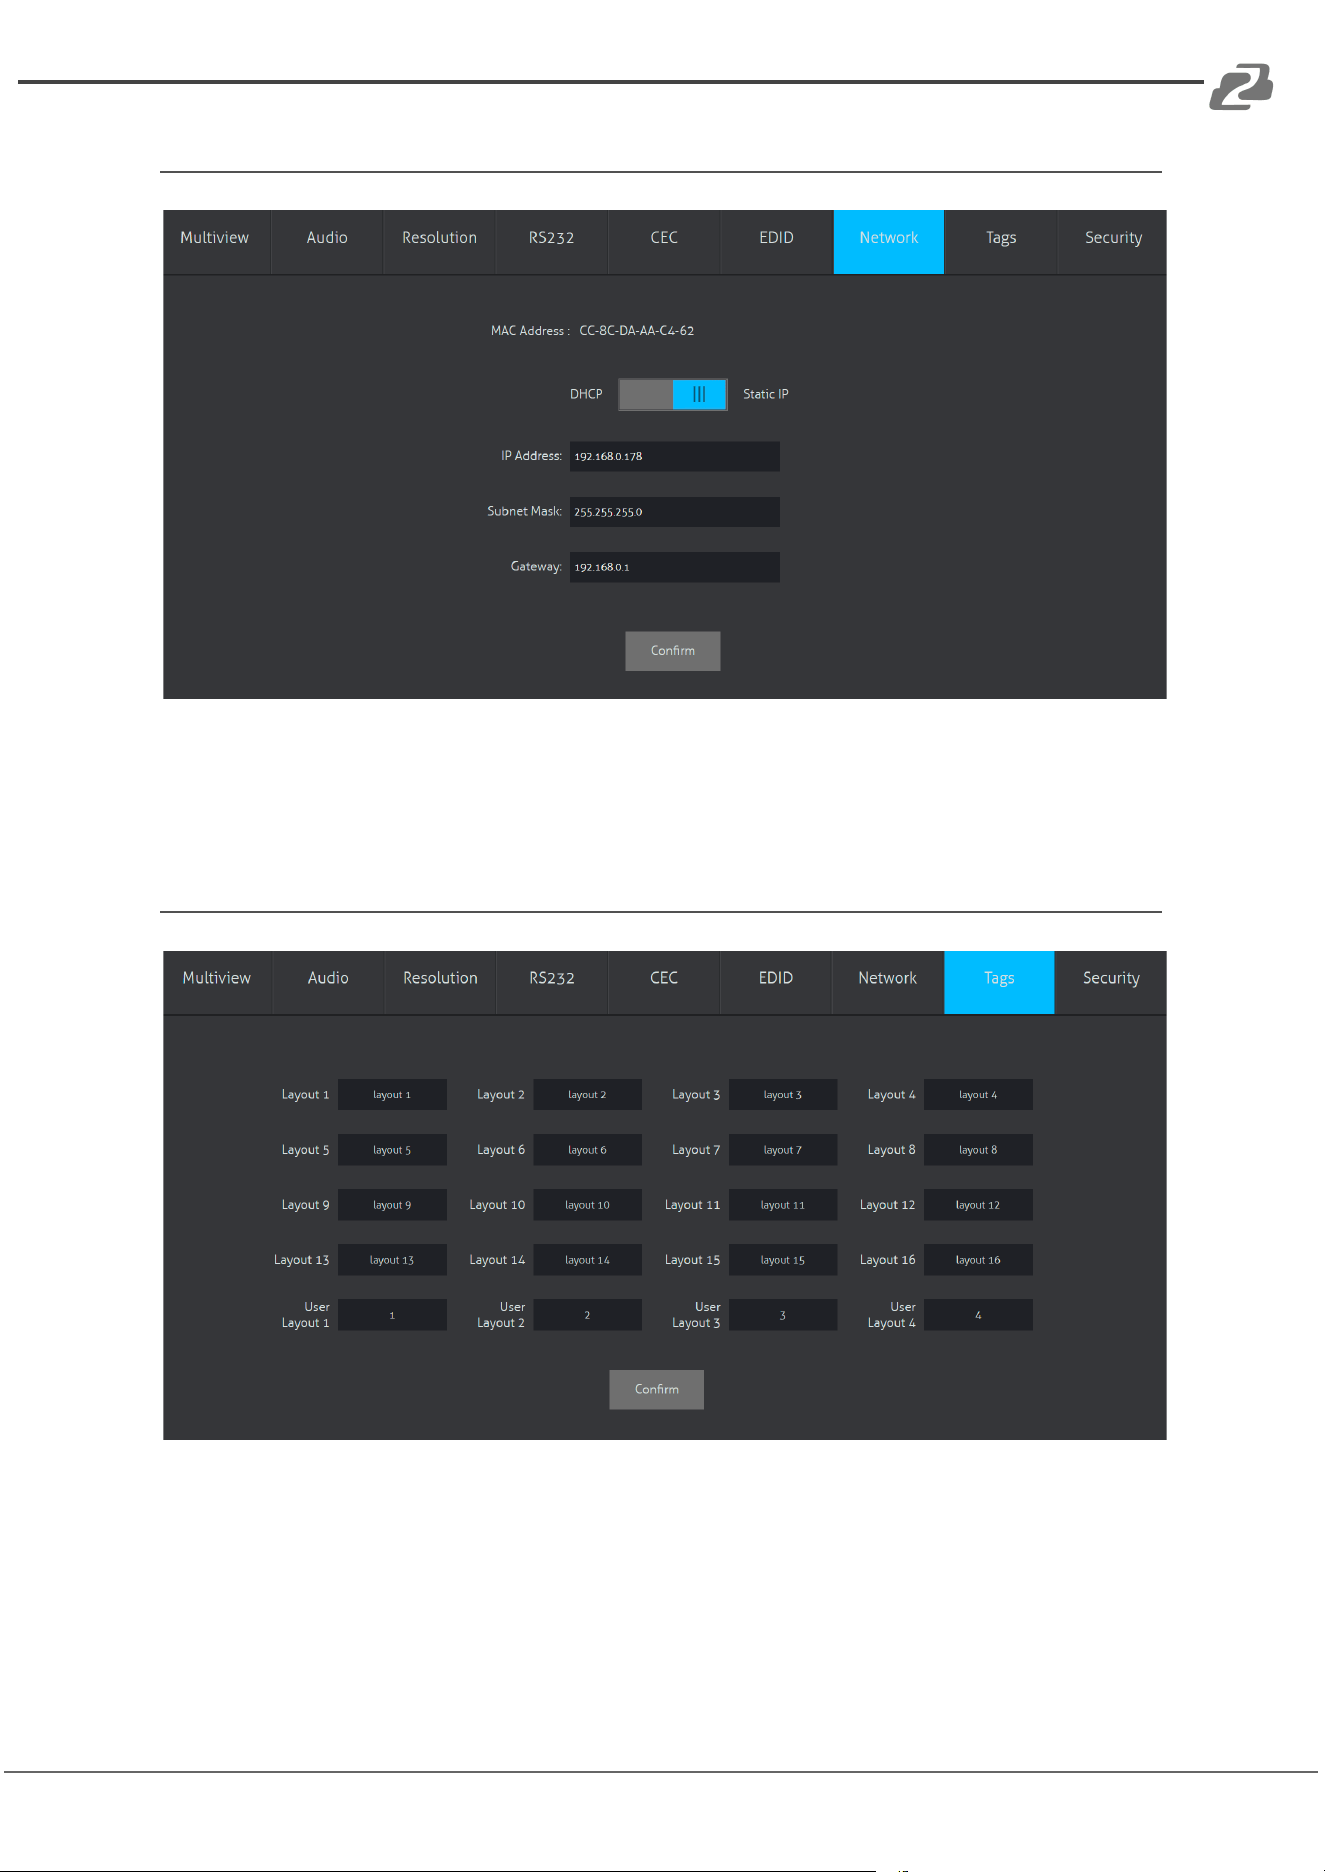
Network Tab
➢ Static IP or Dynamic Host Configuration Protocol (DHCP).
➢ Modify the static IP Address, Subnet Mask, and Gateway.
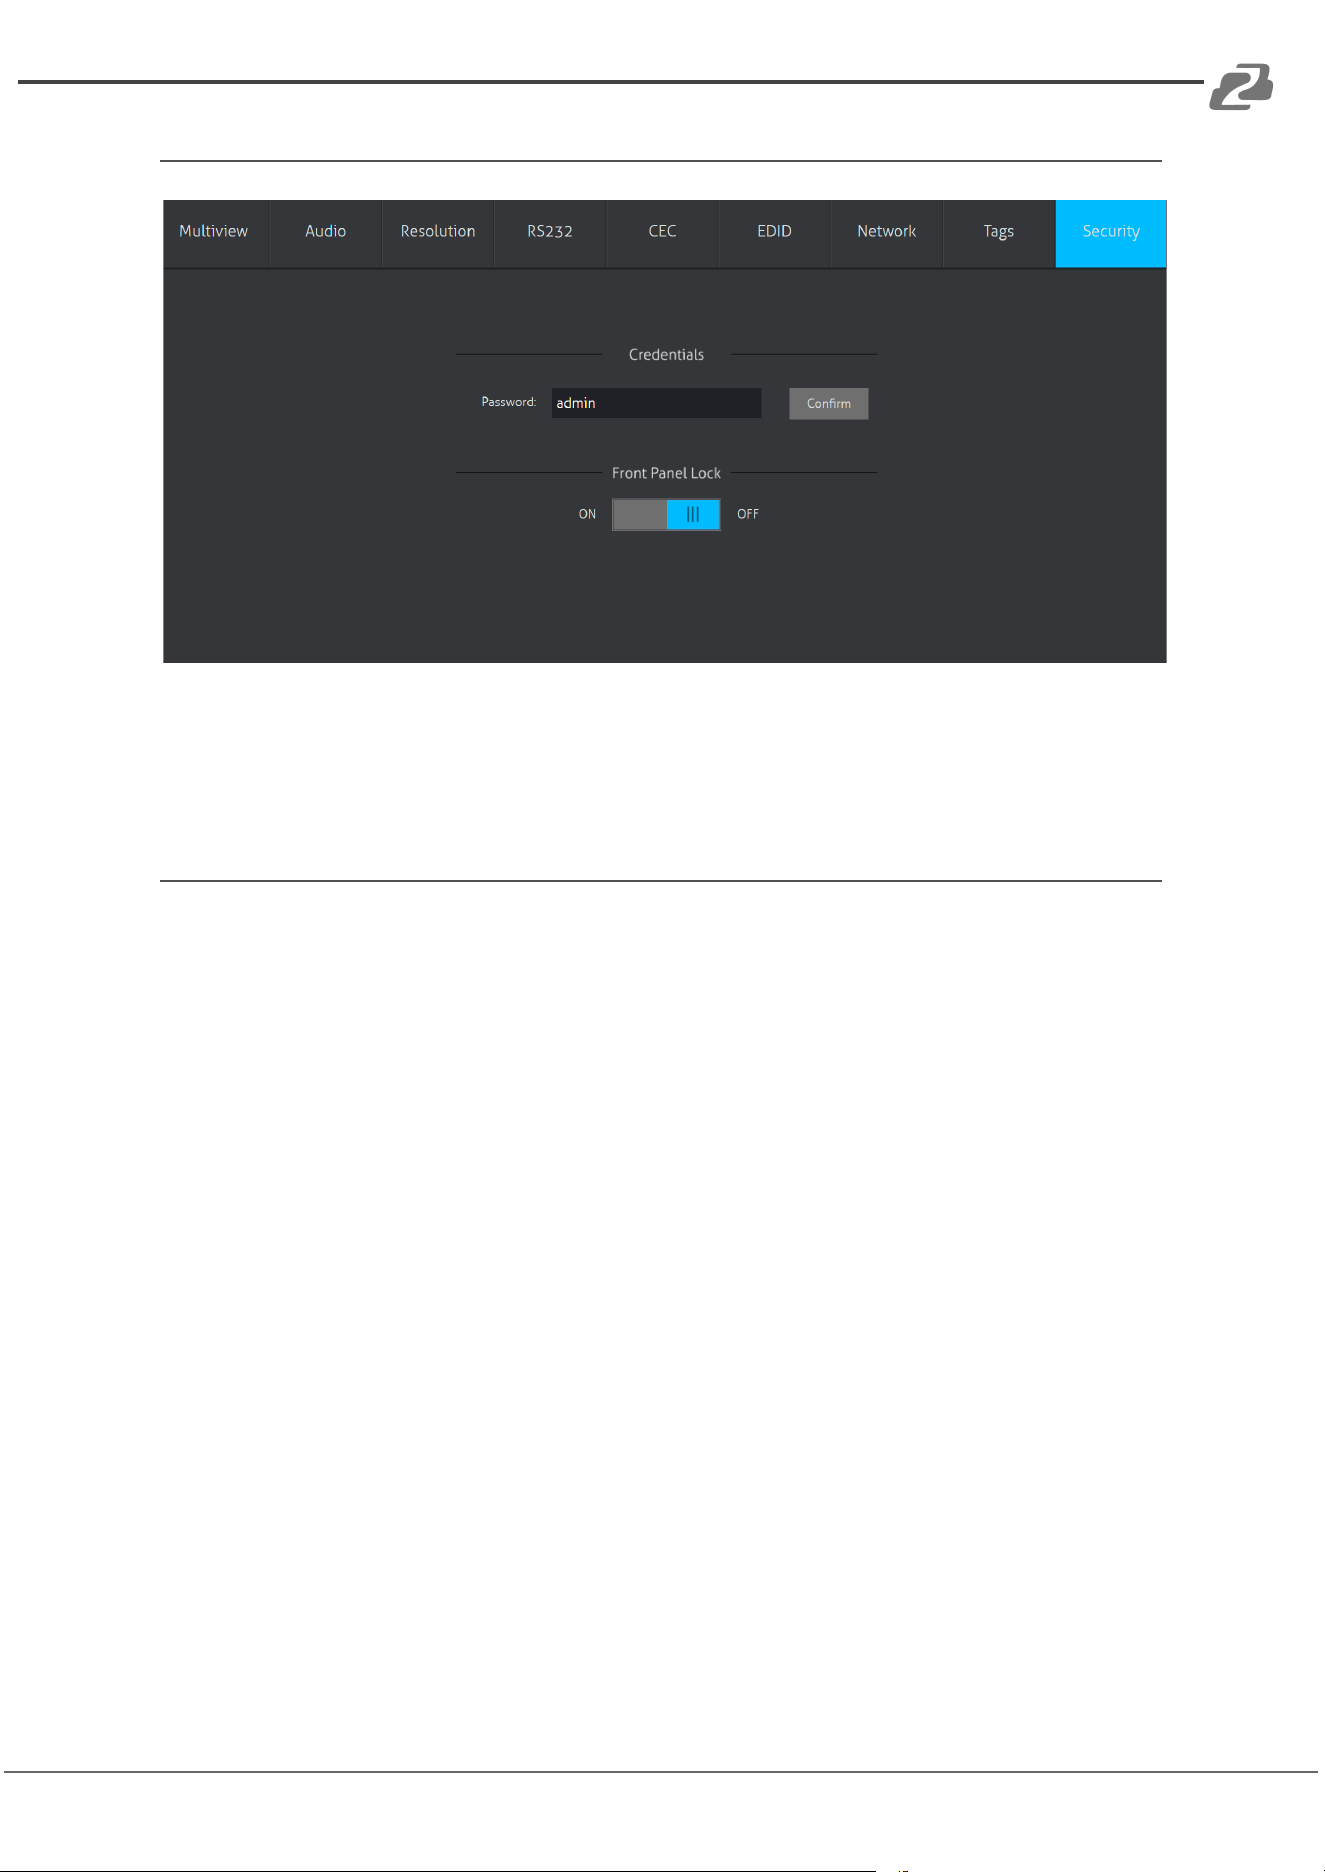
Tags Tab
➢ Modify the Layout names in the multiview tab.
Address: 830 National Drive #140, Sacramento, CA 95834, USA · Tel: +1(888)499-9906 · Email: support@bzbgear.com 21
BZBGEAR BG-UMV-HA41 PRODUCT MANUAL
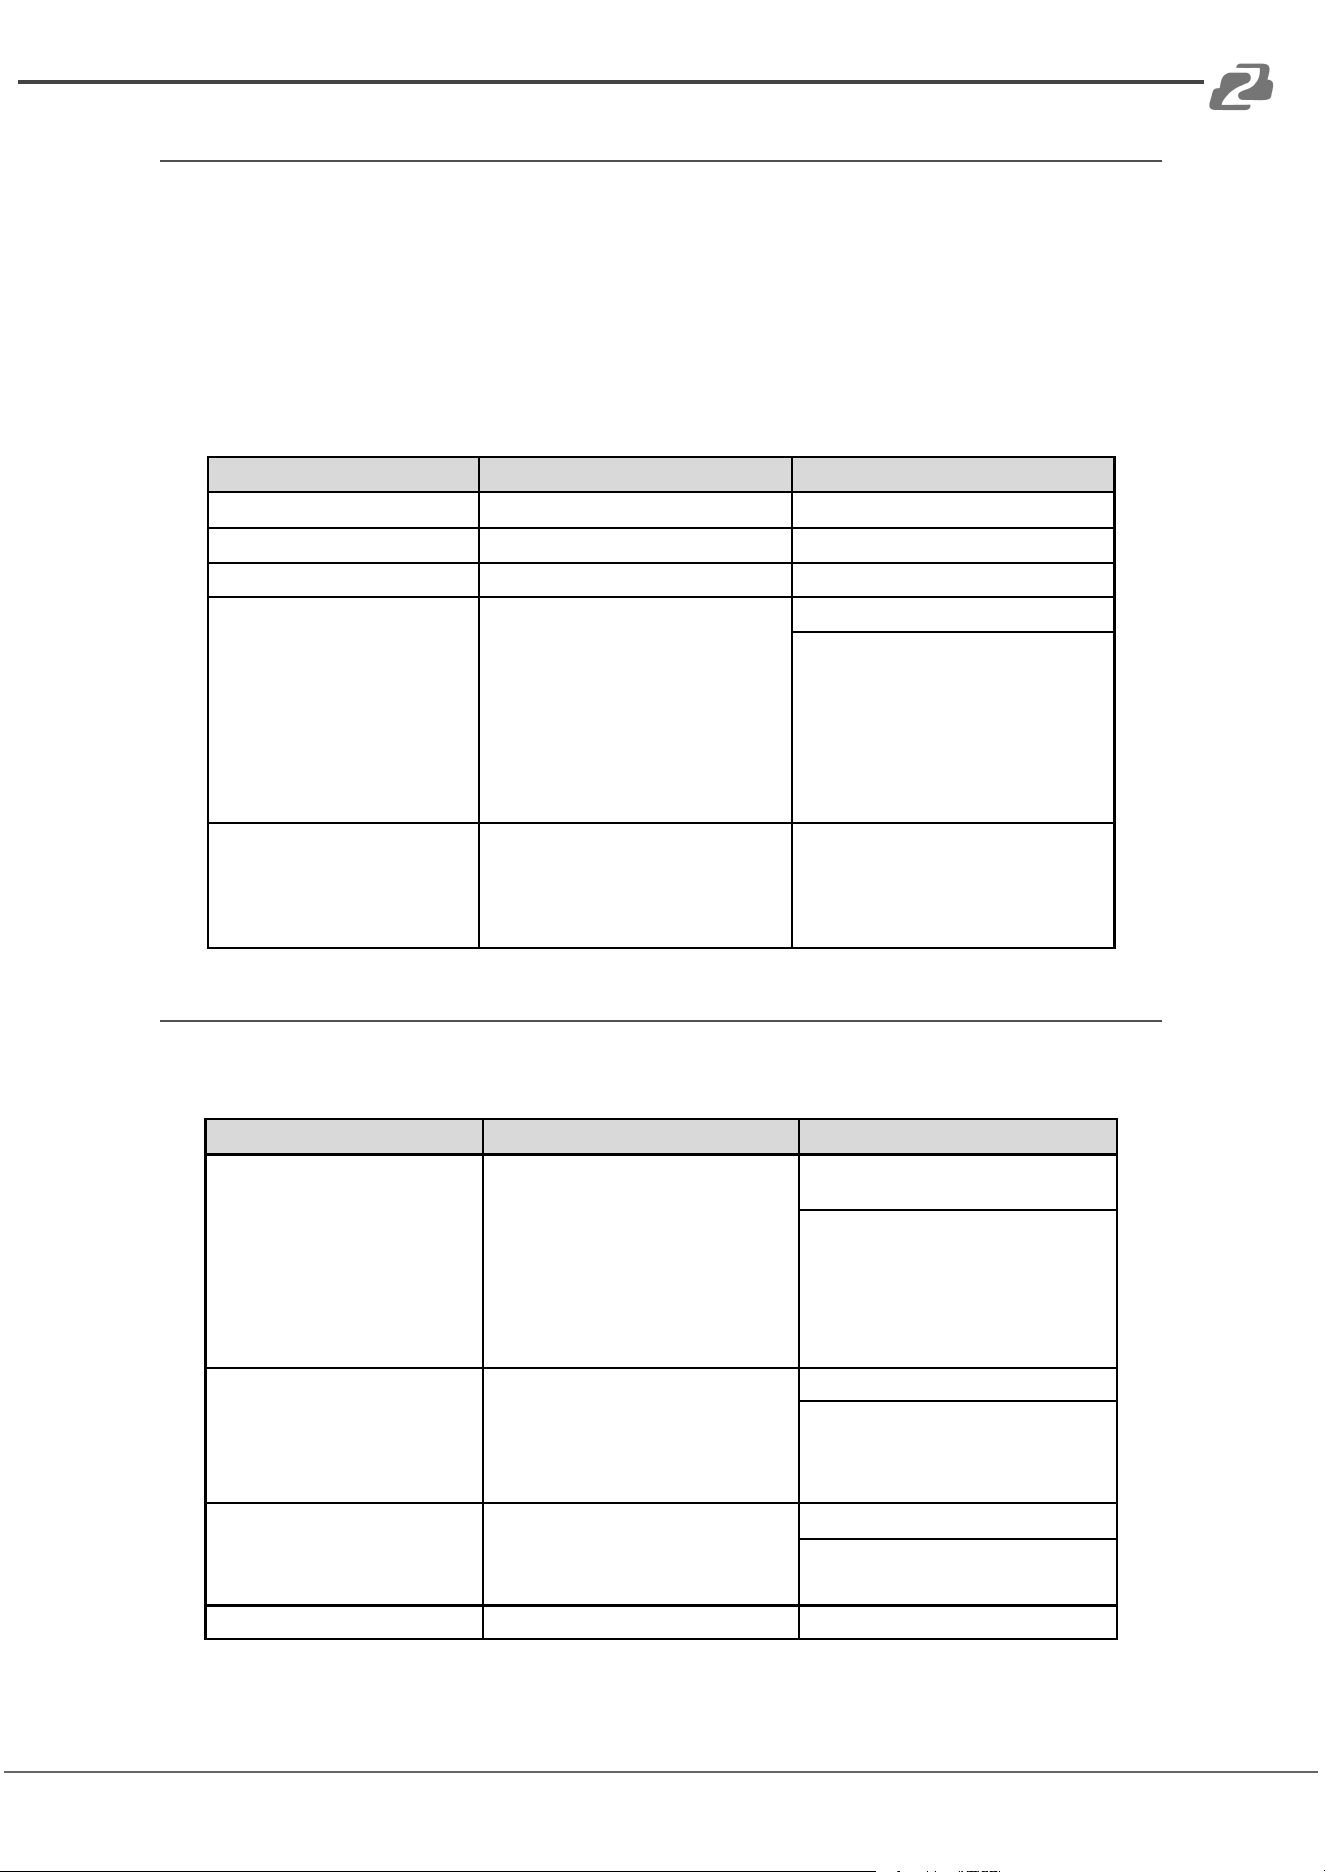
Security Tab
➢ Modify the login password.
➢ Lock or unlock the front panel buttons.
RS-232 Control
Connect to the RS-232 port to control the unit via a RS-232 cable.
The below command lists are used to control the switcher. The RS-232 control software
(e.g. Docklight) needs to be installed on the control PC to send RS-232 commands.
After installing RS-232 control software, set the parameters for COM number, baud rate,
data bit, stop bit, and parity bit correctly as shown below to be able to send commands.
● Baud rate: 9600
● Data bit: 8
● Stop bit: 1
● Parity bit: none
Address: 830 National Drive #140, Sacramento, CA 95834, USA · Tel: +1(888)499-9906 · Email: support@bzbgear.com 22
BZBGEAR BG-UMV-HA41 PRODUCT MANUAL
System Control
Note:
● In the commands below “[”and “]” are symbols for ease of reading and are not typed
in actual operation.
● Commands are case-sensitive.
The ending mark of a command is “<CR><LF>” (in docklite “r” and “n” are the shortcut
keys for the ending commands for ASCII or “0D 0A” for HEX)
Command
Description
Command & Feedback Example
#GET_FIRMWARE_VERSION
Get the firmware version
@V1.0.0
#FACTORY_RESET
Factory Default
@FACTORY_RESET
#REBOOT
System reboot
@REBOOT
#HELP [PARAM]
Get the command details
[PARAM]=Any command (Random
commands and without symbol “#”, it
means the feedback command
describes its usage).
[PARAM]=Null (Report all commands).
#HELP SET_AV
@Select the input source.
#SET_AV INPARAM TO OUTPARAM
INPARAM = 1 ~ 4
1 - HDMI 1
2 - HDMI 2
3 - HDMI 3
4 - HDMI 4
OUTPARAM = A ~ D
#GET_IP_ADDR
Get the IP to access GUI.
@IP_ADDR: 192.168.0.178
@SUBNET_MASK:
255.255.255.0
@GATEWAY:
192.168.0.1
Signal Switching
The ending mark of a command is “<CR><LF>” (in docklite “r” and “n” are the shortcut
keys for the ending commands for ASCII or “0D 0A” for HEX)
Command
Description
Command & Feedback Example
#SET_AV [INPARAM] TO
[OUTPARAM]
Switch an input AV signal to one or
more outputs. [INPARAM]=1 ~ 4
1 - HDMI 1
2 - HDMI 2
3 - HDMI 3
4 - HDMI 4
[OUTPARAM]=A ~ D.
[OUTPARAM]=Null. Switch any input
to window A.
#SET_AV 1
#SET_AV 1 TO
@AV 1 TO A
#GET_AV [PARAM]
Get the current AV switching status of
input or output channel.
[PARAM]=A ~ D.
[PARAM]=Null. Get all switching
status.
#GET_AV
@VIDEO
OUT A B C D
IN 1 2 3 4
@AUDIO_SRC 1
#SET_AUTO_SWITCH
[PARAM]
Enable/disable auto switching mode.
[PARAM]=0~1.
0 - Disable
1 - Enable
#SET_AUTO_SWITCH 1
@AUTO_SWITCH 1
#GET_AUTO_SWITCH
Get the auto switching status.
@AUTO_SWITCH 1
Address: 830 National Drive #140, Sacramento, CA 95834, USA · Tel: +1(888)499-9906 · Email: support@bzbgear.com 23
BZBGEAR BG-UMV-HA41 PRODUCT MANUAL
Audio Switching
The ending mark of a command is “<CR><LF>” (in docklite “r” and “n” are the shortcut
keys for the ending commands for ASCII or “0D 0A” for HEX)
Command
Description
Command & Feedback Example
#SET_AUDIO_MUTE
[PARAM]
Mute/Unmute audio.
[PARAM]=0~1.
0 - Disable
1 - Enable
#SET_AUDIO_MUTE 1
@AUDIO_MUTE 1
#GET_AUDIO_MUTE
Get the audio mute status.
@AUDIO_MUTE 1
#SET_AUDIO_SRC
[PARAM]
Set the audio output source.
[PARAM]=1 ~ 5
1 - HDMI 1
2 - HDMI 2
3 - HDMI 3
4 - HDMI 4
5 - LINE IN
#SET_AUDIO_SRC 1
@AUDIO_SRC 1
#GET_AUDIO_SRC
Get the audio output source.
@AUDIO_SRC 1
#SET_AUDIO_MIX
[PARAM]
Enable/Disable audio mix.
[PARAM]=0~1.
0 - Disable
1 - Enable
#SET_AUDIO_MIX 1
@AUDIO_MIX 1
#GET_AUDIO_MIX
Get audio mix status.
@AUDIO_MIX 1
#SET_FULL_SWAUD
[PARAM]
Enable/disable whether the audio
follows the video switching when
fullscreen mode is selected.
[PARAM]=0~1.
0 - Disable
1 - Enable
#SET_FULL_SWAUD 1
@FULL_SWAUD 1
#GET_FULL_SWAUD
Get whether the audio follows the
video switching when full-screen mode
is selected.
@FULL_SWAUD 1
Function Setting
The ending mark of a command is “<CR><LF>” (in docklite “r” and “n” are the shortcut
keys for the ending commands for ASCII or “0D 0A” for HEX)
Command
Function
Command & Feedback Example
#SET_RS232_BAUD [PARAM]
Set the RS232 baud rate.
[PARAM]=1 ~ 7
1 - 115200
2 - 57600
3 - 38400
4 - 19200
5 - 9600
6 - 4800
7 - 2400
#SET_RS232_BAUD 0
@RS232_BAUD 5
#GET_RS232_BAUD
Get the RS232 baud rate
#GET_RS232_BAUD
@RS232_BAUD 5
#SET_OUTPUT_RES [PARAM]
Set the output resolution.
[PARAM]= 1 ~ 8
1 - 1024x768 60 HZ
2 - 1280x720 60 HZ
3 - 1360x768 60 HZ
4 - 1600x1200 60 Hz
5 - 1920x1080 60 HZ
6 - 1920x1200 60 HZ
7 - 3840x2160 30 HZ
8 - Auto
#SET_OUTPUT_RES 7
@OUTPUT_RES 7
Address: 830 National Drive #140, Sacramento, CA 95834, USA · Tel: +1(888)499-9906 · Email: support@bzbgear.com 24
BZBGEAR BG-UMV-HA41 PRODUCT MANUAL
Command
Function
Command & Feedback Example
#GET_OUTPUT_RES
Get the output resolution
@OUTPUT_RES 4
#GET_INPUT_RES [PARAM]
Get the input resolution.
[PARAM]=1 ~ 4
1 - HDMI 1
2 - HDMI 2
3 - HDMI 3
4 - HDMI 4
@INPUT_RES: 1920x1080 60HZ
#SET_OUTPUT_HDCP
[PARAM]
Set the HDCP mode for output port.
[PARAM]=1 ~ 3
1 - HDCP1.4
2 - HDCP2.2
3 - OFF
#SET_OUTPUT_HDCP 1
@OUTPUT_HDCP 1
#GET_OUTPUT_HDCP
Get the HDCP mode of output port.
@OUTPUT_HDCP 1
#SET_EDID_MODE
[PARAM1] [PARAM2]
Set the EDID of HDMI input.
[PARAM1]=1 ~ 4
1 - HDMI 1
2 - HDMI 2
3 - HDMI 3
4 - HDMI 4
[PARAM2]=1 ~ 4
1 - 1920x1080 60HZ PCM 2CH
2 - 3840x2160 30HZ PCM 2CH
3 - BYPASS
4 - USER
#SET_EDID_MODE 1 1
@EDID_MODE 1 1
#GET_EDID_MODE [PARAM]
Get the EDID of input.
[PARAM]=1 ~ 4
1 - HDMI 1
2 - HDMI 2
3 - HDMI 3
4 - HDMI 4
#GET_EDID_MODE 1
@EDID_MODE 1 1
#UPLOAD_USER_EDID
Upload the user defined EDID.
@USER_EDID READY
PLEASE SEND EDID
DATA IN 10S
OK
#SET_KEYPAD_LOCK [PARAM]
Lock/unlock the keypad.
[PARAM]=0~1.
0 - Unlock.
1 - Lock.
#SET_KEYPAD_LOCK 1
@KEYPAD_LOCK 1
#GET_KEYPAD_LOCK
Get the keypad locking status
#GET_KEYPAD_LOCK
#SET_POWER [PARAM]
Enter/exit standby mode
[PARAM]=0 ~ 1 0 - Standby
mode.
1 - Power on mode.
#SET_POWER 1
@POWER 1
#GET_POWER
Get the standby status
@POWER 1
Address: 830 National Drive #140, Sacramento, CA 95834, USA · Tel: +1(888)499-9906 · Email: support@bzbgear.com 25
BZBGEAR BG-UMV-HA41 PRODUCT MANUAL
Command
Function
Command & Feedback Example
#SET_MV_MODE [PARAM]
Set multiview mode.
[PARAM]=1 ~ 20
1 - 1 WINDOWS Full
2 - 2 WINDOWS PBP
3 - 3 WINDOWS 2U1D
4 - 4 WINDOWS SAME SIZE
5 - 2 WINDOWS PIP LU
6 - 2 WINDOWS PIP LD
7 - 2 WINDOWS PIP RU
8 - 2 WINDOWS PIP RD
9 - 4 WINDOWS PBP 3L1R
10 - 4 WINDOWS PBP 1L3R
11 - 4 WINDOWS PBP 3U1D
12 - 4 WINDOWS PBP 1U3D
13 - 4 WINDOWS PIP 1F3L
14 - 4 WINDOWS PIP 1F3R
15 - 4 WINDOWS PIP 1F3U
16 - 4 WINDOWS PIP 1F3D
17 - USER CONFIG 1
18 - USER CONFIG 2
19 - USER CONFIG 3
20 - USER CONFIG 4
#SET_MV_MODE 1
@MV_MODE 1
#GET_MV_MODE
Get multiview mode
@MV_MODE 1
#GET_STATUS
Get the system status
@V1.0.0
@VIDEO
OUT A B C D
IN 1 2 3 4
@AUDIO_SRC 1
@OUTPUT_RES 7
@AUTO_SWITCH 1
@EDID_MODE 1 2
…
#SET_SWAP_SRC
Swap input source
@SWAP_SRC
@VIDEO
OUT A B C D
IN 1 2 3 4
@AUDIO_SRC 1
#SET_RESIZE_WIM
Resize display windows.
@RESIZE_WIM
#SET_SYNCACT_CEC
[PARAM]
Enable/Disable whether automatically
send corresponding CEC command
when detecting Power on/off signal.
[PARAM]= 0 ~ 1
0 - Disable
1 - Enable
#SET_SYNCACT_CEC 1
@SYNCACT_CEC 1
#GET_SYNCACT_CEC
Get whether automatically send
corresponding CEC command when
detecting Power on/off signal.
#GET_SYNCACT_CEC
@SYNCACT_CEC 1
#SET_SYNCACT_RS232
[PARAM]
Enable/Disable whether automatically
send corresponding RS232 command
when detecting Power on/off signal.
[PARAM]= 0 ~ 1
0 - Disable
1 - Enable
#SET_SYNCACT_RS232 1
@SYNCACT_RS232 1
#GET_SYNCACT_RS232
Get whether automatically send
corresponding RS232 command when
detecting Power on/off signal.
#GET_SYNCACT_RS232
@SYNCACT_RS232 1
#SET_DTIME
[PARAM1]:[PARAM2]
Set the delay time of auto sending
Display OFF command when no signal
is detected.
[PARAM1]=0 ~ 30 minus
[PARAM2]=0 ~ 1800 seconds
(PS: All the time in 0s ~ 30m)
#SET_DTIME 1:30
@DTIME 1:30
Address: 830 National Drive #140, Sacramento, CA 95834, USA · Tel: +1(888)499-9906 · Email: support@bzbgear.com 26
BZBGEAR BG-UMV-HA41 PRODUCT MANUAL
Command
Function
Command & Feedback Example
#GET_DTIME
Get the delay time of auto sending
Display OFF command when no signal
is detected.
@DTIME 1:30
#SET_AUTO_POWER [PARAM]
Enable/Disable auto standby function.
[PARAM]=0 ~ 1
0 - Disable
1 - Enable
#SET_AUTO_POWER 1
@AUTO_POWER 1
#GET_AUTO_POWER
Get the auto standby function status.
@AUTO_POWER 1
#SET_OFF_CNT [PARAM]
Set the number of times to send the
DISPLAY OFF command.
[PARAM]=1 ~ 2
#SET_OFF_CNT 1
@OFF_CNT 1
#GET_OFF_CNT
Get the number of times to send the
DISPLAY OFF command.
@OFF_CNT 1
#SET_OFF_DELAY [PARAM]
Set the sending interval between two
Display OFF commands.
[PARAM]=5 ~ 100 (1=100ms)
#SET_OFF_DELAY 5
@OFF_DELAY 5
#GET_OFF_DELAY
Get the the sending interval between
two Display OFF commands.
@OFF_DELAY 5
CEC Command
The ending mark of a command is “<CR><LF>” (in docklite “r” and “n” are the shortcut
keys for the ending commands for ASCII or “0D 0A” for HEX)
Command
Function
Command & Feedback Example
#SET_SRC_MENU [PARAM]
Send CEC MENU command to source
device.
[PARAM]=1 ~ 4
1 - HDMI 1
2 - HDMI 2
3 - HDMI 3
4 - HDMI 4
#SET_SRC_MENU 1
@SRC_MENU 1
#SET_SRC_UP [PARAM]
Send CEC UP command to source
device.
[PARAM]=1 ~ 4
1 - HDMI 1
2 - HDMI 2
3 - HDMI 3
4 - HDMI 4
#SET_SRC_UP 1
@SRC_UP 1
#SET_SRC_DOWN [PARAM]
Send CEC DOWN command to source
device.
[PARAM]=1 ~ 4
1 - HDMI 1
2 - HDMI 2
3 - HDMI 3
4 - HDMI 4
#SET_SRC_DOWN 1
@SRC_DOWN 1
#SET_SRC_LEFT [PARAM]
Send CEC LEFT command to source
device.
[PARAM]=1 ~ 4
1 - HDMI 1
2 - HDMI 2
3 - HDMI 3
4 - HDMI 4
#SET_SRC_LEFT 1
@SRC_LEFT 1
#SET_SRC_RIGHT [PARAM]
Send CEC RIGHT command to source
device.
[PARAM]=1 ~ 4
1 - HDMI 1
2 - HDMI 2
3 - HDMI 3
4 - HDMI 4
#SET_SRC_RIGHT 1
@SRC_RIGHT 1
Address: 830 National Drive #140, Sacramento, CA 95834, USA · Tel: +1(888)499-9906 · Email: support@bzbgear.com 27
BZBGEAR BG-UMV-HA41 PRODUCT MANUAL
Command
Function
Command & Feedback Example
#SET_SRC_BACK [PARAM]
Send CEC BACK command to source
device.
[PARAM]=1 ~ 4
1 - HDMI 1
2 - HDMI 2
3 - HDMI 3
4 - HDMI 4
#SET_SRC_BACK 1
@SRC_BACK 1
#SET_SRC_ENTER [PARAM]
Send CEC ENTER command to source
device.
[PARAM]=1 ~ 4
1 - HDMI 1
2 - HDMI 2
3 - HDMI 3
4 - HDMI 4
#SET_SRC_ENTER 1
@SRC_ENTER 1
#SET_SRC_ON [PARAM]
Send CEC ON command to source
device.
[PARAM]=1 ~ 4
1 - HDMI 1
2 - HDMI 2
3 - HDMI 3
4 - HDMI 4
#SET_SRC_ON 1
@SRC_ON 1
#SET_SRC_OFF [PARAM]
Send CEC OFF command to source
device.
[PARAM]=1 ~ 4
1 - HDMI 1
2 - HDMI 2
3 - HDMI 3
4 - HDMI 4
#SET_SRC_OFF 1
@SRC_OFF 1
#SET_SRC_STOP [PARAM]
Send CEC STOP command to source
device.
[PARAM]=1 ~ 4
1 - HDMI 1
2 - HDMI 2
3 - HDMI 3
4 - HDMI 4
#SET_SRC_STOP 1
@SRC_STOP 1
#SET_SRC_PLAY [PARAM]
Send CEC PLAY command to source
device.
[PARAM]=1 ~ 4
1 - HDMI 1
2 - HDMI 2
3 - HDMI 3
4 - HDMI 4
#SET_SRC_PLAY 1
@SRC_PLAY 1
#SET_SRC_PAUSE [PARAM]
Send CEC PAUSE command to source
device.
[PARAM]=1 ~ 4
1 - HDMI 1
2 - HDMI 2
3 - HDMI 3
4 - HDMI 4
#SET_SRC_PAUSE 1
@SRC_PAUSE 1
#SET_SRC_PREV [PARAM]
Send CEC PREV command to source
device.
[PARAM]=1 ~ 4
1 - HDMI 1
2 - HDMI 2
3 - HDMI 3
4 - HDMI 4
#SET_SRC_PREV 1
@SRC_PREV 1
Address: 830 National Drive #140, Sacramento, CA 95834, USA · Tel: +1(888)499-9906 · Email: support@bzbgear.com 28
BZBGEAR BG-UMV-HA41 PRODUCT MANUAL
Command
Function
Command & Feedback Example
#SET_SRC_NEXT [PARAM]
Send CEC NEXT command to source
device.
[PARAM]=1 ~ 4
1 - HDMI 1
2 - HDMI 2
3 - HDMI 3
4 - HDMI 4
#SET_SRC_NEXT 1
@SRC_NEXT 1
#SET_SRC_REW [PARAM]
Send CEC rewind command to source
device.
[PARAM]=1 ~ 4
1 - HDMI 1
2 - HDMI 2
3 - HDMI 3
4 - HDMI 4
#SET_SRC_REW 1
@SRC_REW 1
#SET_SRC_FF [PARAM]
Send CEC fast-forward command to
source device.
[PARAM]=1 ~ 4
1 - HDMI 1
2 - HDMI 2
3 - HDMI 3
4 - HDMI 4
#SET_SRC_FF 1
@SRC_MENU 1
#SET_DIS_ON
Send CEC ON command to display
device.
@DIS_ON
#SET_DIS_OFF
Send CEC OFF command to display
device.
@DIS_OFF
#SET_DIS_SOURCE
Send CEC SOURCE command to
display device.
@DIS_SOURCE
#SET_DIS_MUTE
Send CEC MUTE command to display
device.
@DIS_MUTE/UNMUTE
#SET_DIS_VOL+
Send CEC volume plus command to
display device.
@DIS_VOL+
#SET_DIS_VOL-
Send CEC volume minus command to
display device.
@DIS_VOL-
Special Command
Note: The below commands don’t need ending mark
Command
Description
Command & Feedback Example
#SET_ON_[PARAM]:XXXX
Set the ASCII command to be sent to
display device when power on the
switcher.
[PARAM]= 01~07
01 - 115200
02 - 57600
03 - 38400
04 - 19200
05 - 9600
06 - 4800
07 - 2400
XXXX= ASCII data to be sent (Up to 48
characters).
#SET_ON_05:1234567
@@BAUDRATE: 9600
@DISPLAY ON TO
SEND:1234567
Address: 830 National Drive #140, Sacramento, CA 95834, USA · Tel: +1(888)499-9906 · Email: support@bzbgear.com 29
BZBGEAR BG-UMV-HA41 PRODUCT MANUAL
Command
Description
Command & Feedback Example
#SET_H_ON_[PARAM]:XX
XX
Set the HEX command to be sent to
display device when power on the
switcher.
[PARAM]= 01~07
01 - 115200
02 - 57600
03 - 38400
04 - 19200
05 - 9600
06 - 4800
07 - 2400
XX XX= HEX data to be sent (X = 0~9,
A~F and up to 20 XX).
#SET_H_ON_05:30 31 32
33 34
@BAUDRATE: 9600
@DISPLAY ON HEX TO
SEND:30 31 32 33 34
#SET_OF_[PARAM]:XXXX
Set the ASCII command to be sent to
display device when the switcher enter
power off or standby mode.
[PARAM]= 01~07
01 - 115200
02 - 57600
03 - 38400
04 - 19200
05 - 9600
06 - 4800
07 - 2400
XXXX= ASCII data to be sent (Up to 48
characters).
#SET_OF_05:ABCDEFG
@BAUDRATE: 9600
@DISPLAY OFF TO
SEND:ABCDEFG
#SET_H_OF_[PARAM]:XX
XX
Set the HEX command to be sent to
display device when the switcher enter
power off or standby mode.
[PARAM]= 01~07
01 - 115200
02 - 57600
03 - 38400
04 - 19200
05 - 9600
06 - 4800
07 - 2400
XX XX= HEX data to be sent (X = 0~9,
A~F and up to 20 XX).
#SET_OF_05:41 42 43 44
45 46
@BAUDRATE: 9600
@DISPLAY OFF HEX TO
SEND:41 42 43 44 45 46
Firmware Upgrade
1. Prepare the latest upgrade file (.bin) and rename it as “FW_MV bin” on PC.
2. Power off the switcher and connect the FIRMWARE port of the switcher to the PC
with Type-A USB cable.
3. Power on the switcher and then the PC will automatically detect a U-disk named
“BOOTDISK”.
4. Directly copy the latest upgrade file (.bin) to the “BOOTDISK” U-disk.
5. Reopen the U-disk to check whether where is a filename “SUCCESS.TXT”, if yes,
the firmware was updated successfully, otherwise, the firmware updating is fail, the
name of upgrade file (.bin) should be confirm again, and then follow the above steps
to update again.
6. Remove the Type-A USB cable after firmware upgrade.
7. After firmware upgrade, the switcher should be restored to factory default by
sending commands.
Address: 830 National Drive #140, Sacramento, CA 95834, USA · Tel: +1(888)499-9906 · Email: support@bzbgear.com 30

BZBGEAR BG-UMV-HA41 PRODUCT MANUAL
Tech Support
Have technical questions? We may have answered them already!
Please visit BZBGEAR’s support page (bzbgear.com/support) for helpful information and
tips regarding our products. Here you will find our Knowledge Base
(bzbgear.com/knowledge-base) with detailed tutorials, quick start guides, and step-by-step
troubleshooting instructions. Or explore our YouTube channel, BZB TV
(youtube.com/c/BZBTVchannel), for help setting up, configuring, and other helpful how-to
videos about our gear.
Need more in-depth support? Connect with one of our technical specialists directly:
Phone
1.888.499.9906
Email
support@bzbgear.com
Live Chat
bzbgear.com
Limited Product Warranty Terms
Pro Line: 5-year warranty from the date of purchase for AV/Broadcasting products bought
on or after August 1, 2024.
Essential Line: 3-year warranty from the date of purchase for AV/Broadcasting products
bought on or after August 1, 2024.
Cables: Lifetime Limited Product Warranty.
For complete warranty information, please visit bzbgear.com/warranty.
For questions, please call 1.888.499.9906 or email support@bzbgear.com.
Address: 830 National Drive #140, Sacramento, CA 95834, USA · Tel: +1(888)499-9906 · Email: support@bzbgear.com 31

BZBGEAR BG-UMV-HA41 PRODUCT MANUAL
Mission Statement
BZBGEAR is a breakthrough manufacturer of high-quality, innovative audiovisual equipment
ranging from AVoIP, professional broadcasting, conferencing, home theater, to live
streaming solutions. We pride ourselves on unparalleled customer support and services.
Our team offers system design consultation, and highly reviewed technical support for all
the products in our catalog. BZBGEAR delivers quality products designed with users in
mind.
Copyright
All the contents in this manual and its copyright are owned by BZBGEAR. No one is allowed
to imitate, copy, or translate this manual without BZBGEAR’s permission. This manual
contains no guarantee, standpoint expression or other implies in any form. Product
specification and information in this manual is for reference only and subject to change
without notice.
All rights reserved. No reproducing is allowed without acknowledgement.
Address: 830 National Drive #140, Sacramento, CA 95834, USA · Tel: +1(888)499-9906 · Email: support@bzbgear.com 32