
Espresso Coffee Maker
BDC002A
INSTRUCTION MANUAL
Applicable Scenarios: Home, Office, Outdoor, Party, Leisure
!"#$%&'()%*#+,#-%&'./.,0'-1%2"3./"%,)(+0%#+$%)#4"%(&%3./%3,&,/"%/"3"/"+5"
support@xixubx.com

CONTENTS
I M P O R T A N T S A F E G U A R D S . . . . . . . . . . . . . . . . . . . . . . . . . . . . . . . . . . . . . . . . . . . . . . . . 1-2
SAVE THESE INSTRAUCTION ................................................ 2
SPECIFICATIONS ................................................................. 3
K N O W Y O U R C O F F E E M A K E R . . . . . . . . . . . . . . . . . . . . . . . . . . . . . . . . . . . . . . . . . . . . . . 4
T H E F I R S T U S E . . . . . . . . . . . . . . . . . . . . . . . . . . . . . . . . . . . . . . . . . . . . . . . . . . . . . . . . . . . . . . . . . . . . 5
USER TIPS .......................................................................... 6
M A K I N G E S P R E S S O . . . . . . . . . . . . . . . . . . . . . . . . . . . . . . . . . . . . . . . . . . . . . . . . . . . . . . . . . . 7 - 8
F R O T H I N G M I L K . . . . . . . . . . . . . . . . . . . . . . . . . . . . . . . . . . . . . . . . . . . . . . . . . . . . . . . . . . . . 9 - 1 0
PRESSURE RELIEF & SAFETY TIPS ......................................... 11
C L E A N I N G A N D M A I N T E N A N C E . . . . . . . . . . . . . . . . . . . . . . . . . . . . . . . . . . . . 1 2 - 1 3
CLEANING THE COFFEE MAKER ................................................... 12
CLEANING THE FILTER HOLDER AND THE FILTER ........................... 12
C L E A N I N G T H E S T E A M W A N D . . . . . . . . . . . . . . . . . . . . . . . . . . . . . . . . . . . . . . . . . . . . . . . . . . . . . 13
C L E A N I N G T H E B R E W H E A D . . . . . . . . . . . . . . . . . . . . . . . . . . . . . . . . . . . . . . . . . . . . . . . . . . . . . . . . 13
D E S C A L I N G T H E A P P L I A N C E . . . . . . . . . . . . . . . . . . . . . . . . . . . . . . . . . . . . . . . . . . . . . . . 14
T R O U B L E S H O O T I N G . . . . . ................................................. 15-16
WARRANTY INFORMATION ................................................. 17

-1-
IMPORTANT SAFEGUARDS
Read all instructions and keep them for future reference.
Before using the appliance, check that the voltage of the wall outlet corresponds
to the voltage marked on the rating plate.
To protect against fire, electric shock, and injury, do not immerse the power cord
or plug in water or other liquids.
Remove the plug from the wall outlet before cleaning and when not in use. Allow
the appliance to cool down completely before removing or attaching components,
or before cleaning.
!"#$" %#operate any appliance with a damaged power cord or plug, after the
appliance has malfunctioned, or is dropped or damaged in any way. Take the appli-
ance to the nearest authorized service facility for examination, repairs or adjust-
ments, or contact the dealer.
The use of accessory attachments not recommended by the appliance manufactur-
er may result in fire, electric shock and injury.
Place the appliance on a flat surface or table.
!"#$" % hang the power cord over
the edge of the table or counter.
Ensure the power cord does not touch the hot surface of the appliance.
!"#$" % place the coffee maker on a hot surface or next to an open flame.
To disconnect the appliance, turn it off, then remove the plug from the wall outlet.
When removing the plug from the outlet, hold by the plug, never pull on the cord.
!"#$" %#use the appliance other than for the intended use.
Always supervise closely when the appliance is used by or near children.
Be careful when using the appliance, as steam may escape and pose a risk of get-
ting scalded.
!"#$" % touch any hot surface of the appliance(including the steam wand and the
filter). Only use the handle or knobs.
!"#$" %#operate the coffee maker without water.
!"# $%&#!'()*+!,-)(!.//0).*1#2!/0#.(#!$%00%3!,-#(#!4.()1!/.',)%*(5
&
'
(
)
*
+
,
-
.
&/
&&
&'
&(
&)
&*

-2-
!"#$" % remove the portafilter when in use or when steam or hot water escape
from the filter holder.
This appliance is not intended for use by children, or by individuals with reduced
physical, sensory, or mental capabilities, or lack of experience and knowledge,
unless they have been given adequate instruction on how to use the appliance and
are supervised by a responsible adult.
Children must not clean or maintain the appliance without supervision.
This appliance is intended to be used in household and similar applications such
as: staff kitchen areas in shops, offices and other working environments; farm
houses; bed and breakfast type environments.
!"#$" %#place on or near a hot gas or electric burner, or in a heated oven.
&'
&(
&)
&*
+,
SAVE THESE INSTRUCTIONS
Plug Note:
This appliance utilizes a polarized plug (one blade wider than the other). To minimize
the risk of electric shock, the plug is designed to fit into a polarized outlet in one
direction only. If the plug does not fit fully, try reversing it. If it still doesn't fit, con-
tact a qualified electrician. Do not attempt to modify the plug in any way.
Cord Note:
1. A short power supply cord (or detachable cord) is provided to reduce the risk of entang-
lement or tripping over a longer cord.
2. Longer detachable power supply cords or extension cords are available and can be
used with caution.
3. If using a longer detachable cord or extension cord, please note:
a. The cord's electrical rating should be at least as high as the appliance's.
b. Arrange the cord to avoid draping over countertops or tables where children
might pull on it or people could trip over it.

Intertek
5025276
-3-
SPECIFICATIONS
!"#$!""%&'%((!!&)*+!$
),-. / 0&12 '33 4*
5678 9 &:,/9; <.0 &= 4 3:>& ? 3@A
$;9.-&#,B.C0&D33E
'*FG5%H
2%&H%G&5))!$"!&5H&E*G!$
*77/IJ;K/.&"J.6;CI,L0&@,M.>&%NIJ. >&%89-,,C>&#;C9 O>&P.IL8C.
Intertek
5034168
$.J,MM.6-.-&9,&8L.&.L7C.LL,&<C,86-&J,N..Q
-4-
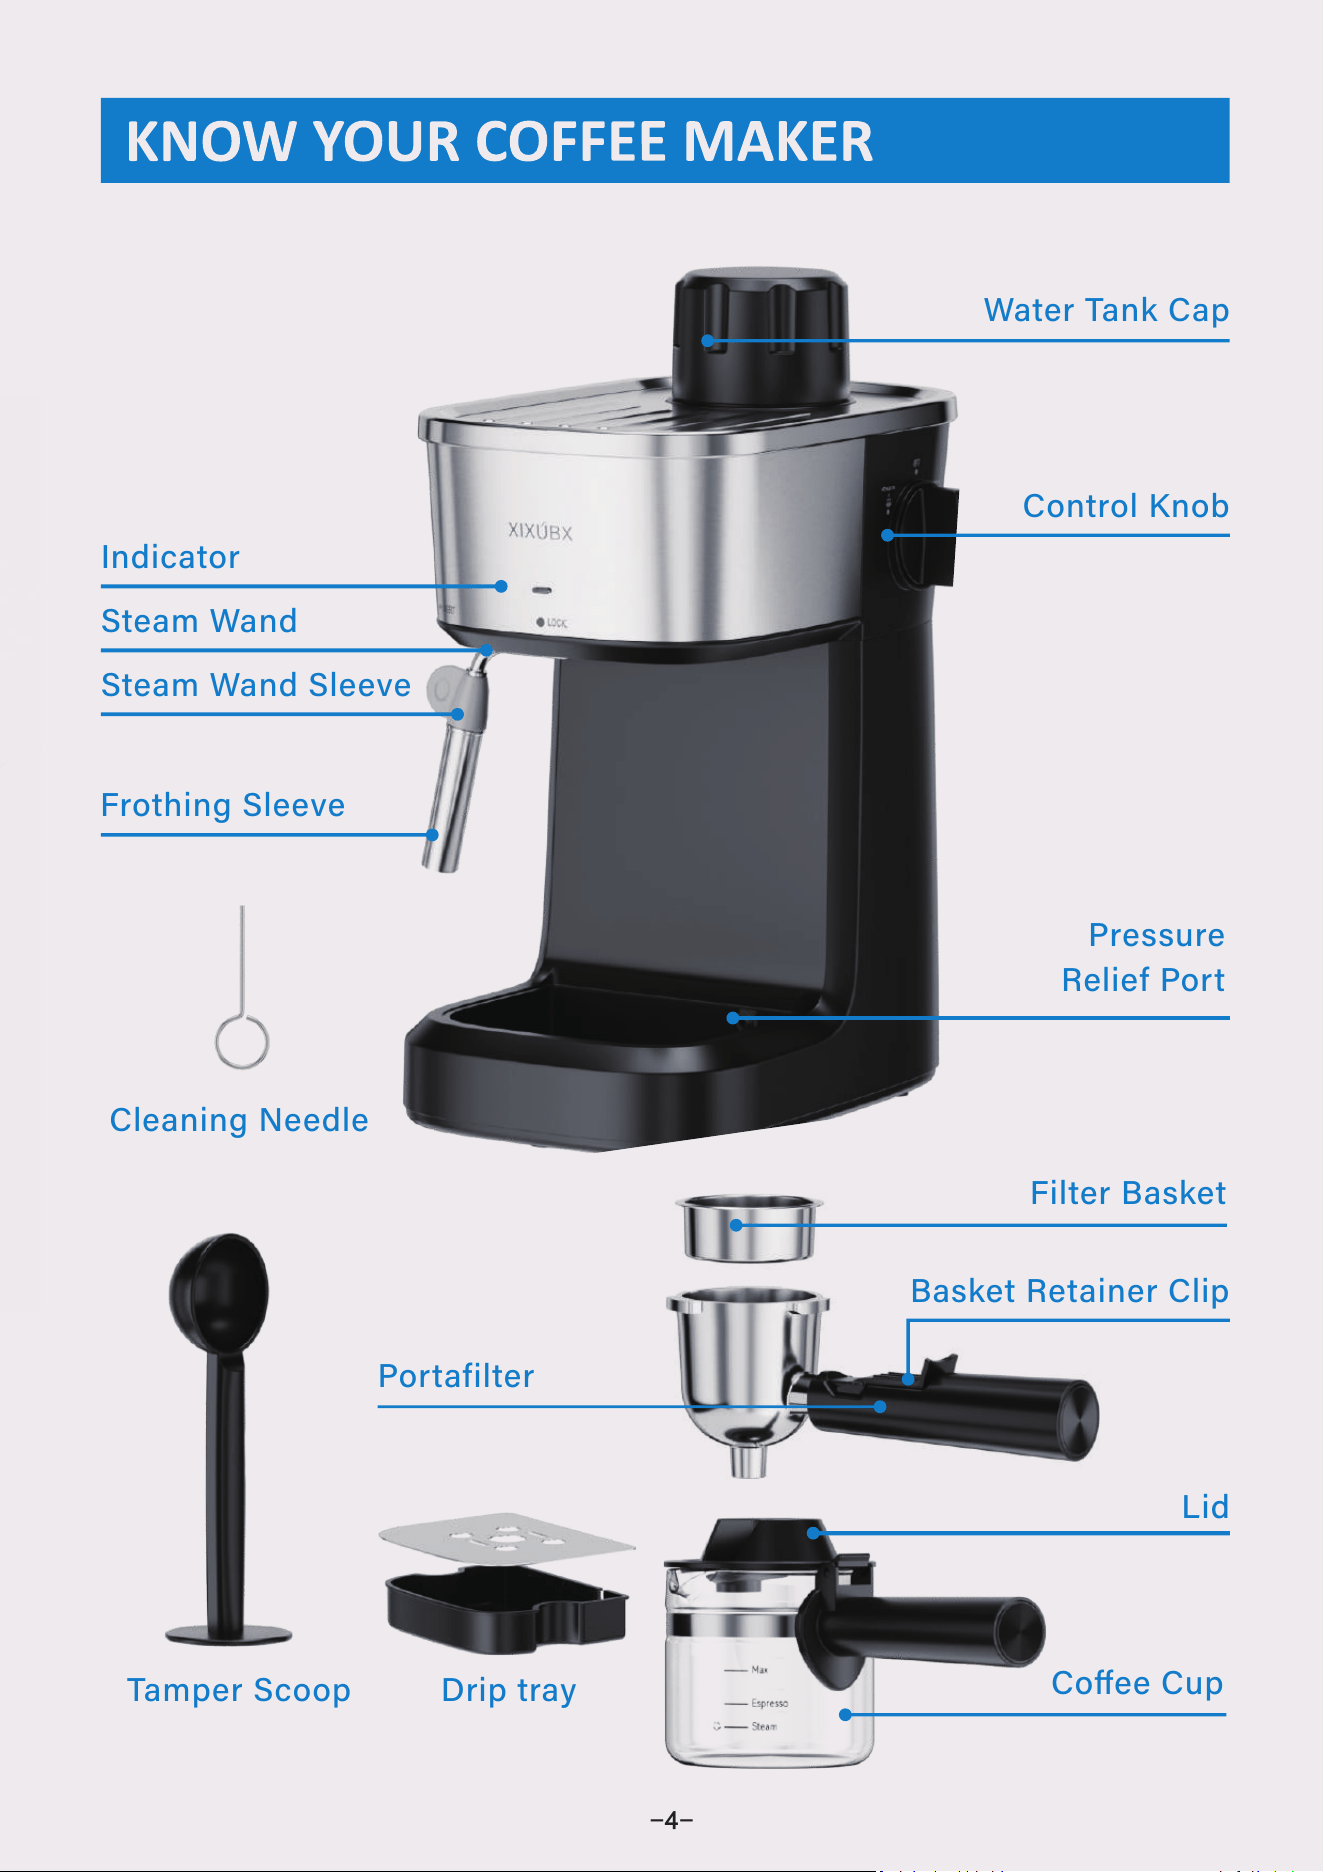
!"#$%&'"()&*"+
*,(#%,-&.(,/&
0(1 23 "#, %&
&4%,#52(6&7-$$8$
*-$"( 2(6&9$ $1-$
:%2+&#%";
42-#$%&<"=)$#
<"=)$#&>$#"2($%&*-2+
?21
&*,@$$&*A+
&&B%$==A%$
&>$-2$C&B,%#
7#$"D& !"(1 &7-$$ 8$
7#$"D& !"(1
B, %#"C2-#$%
'"D+$%&73,,+
A hissing sound may occur
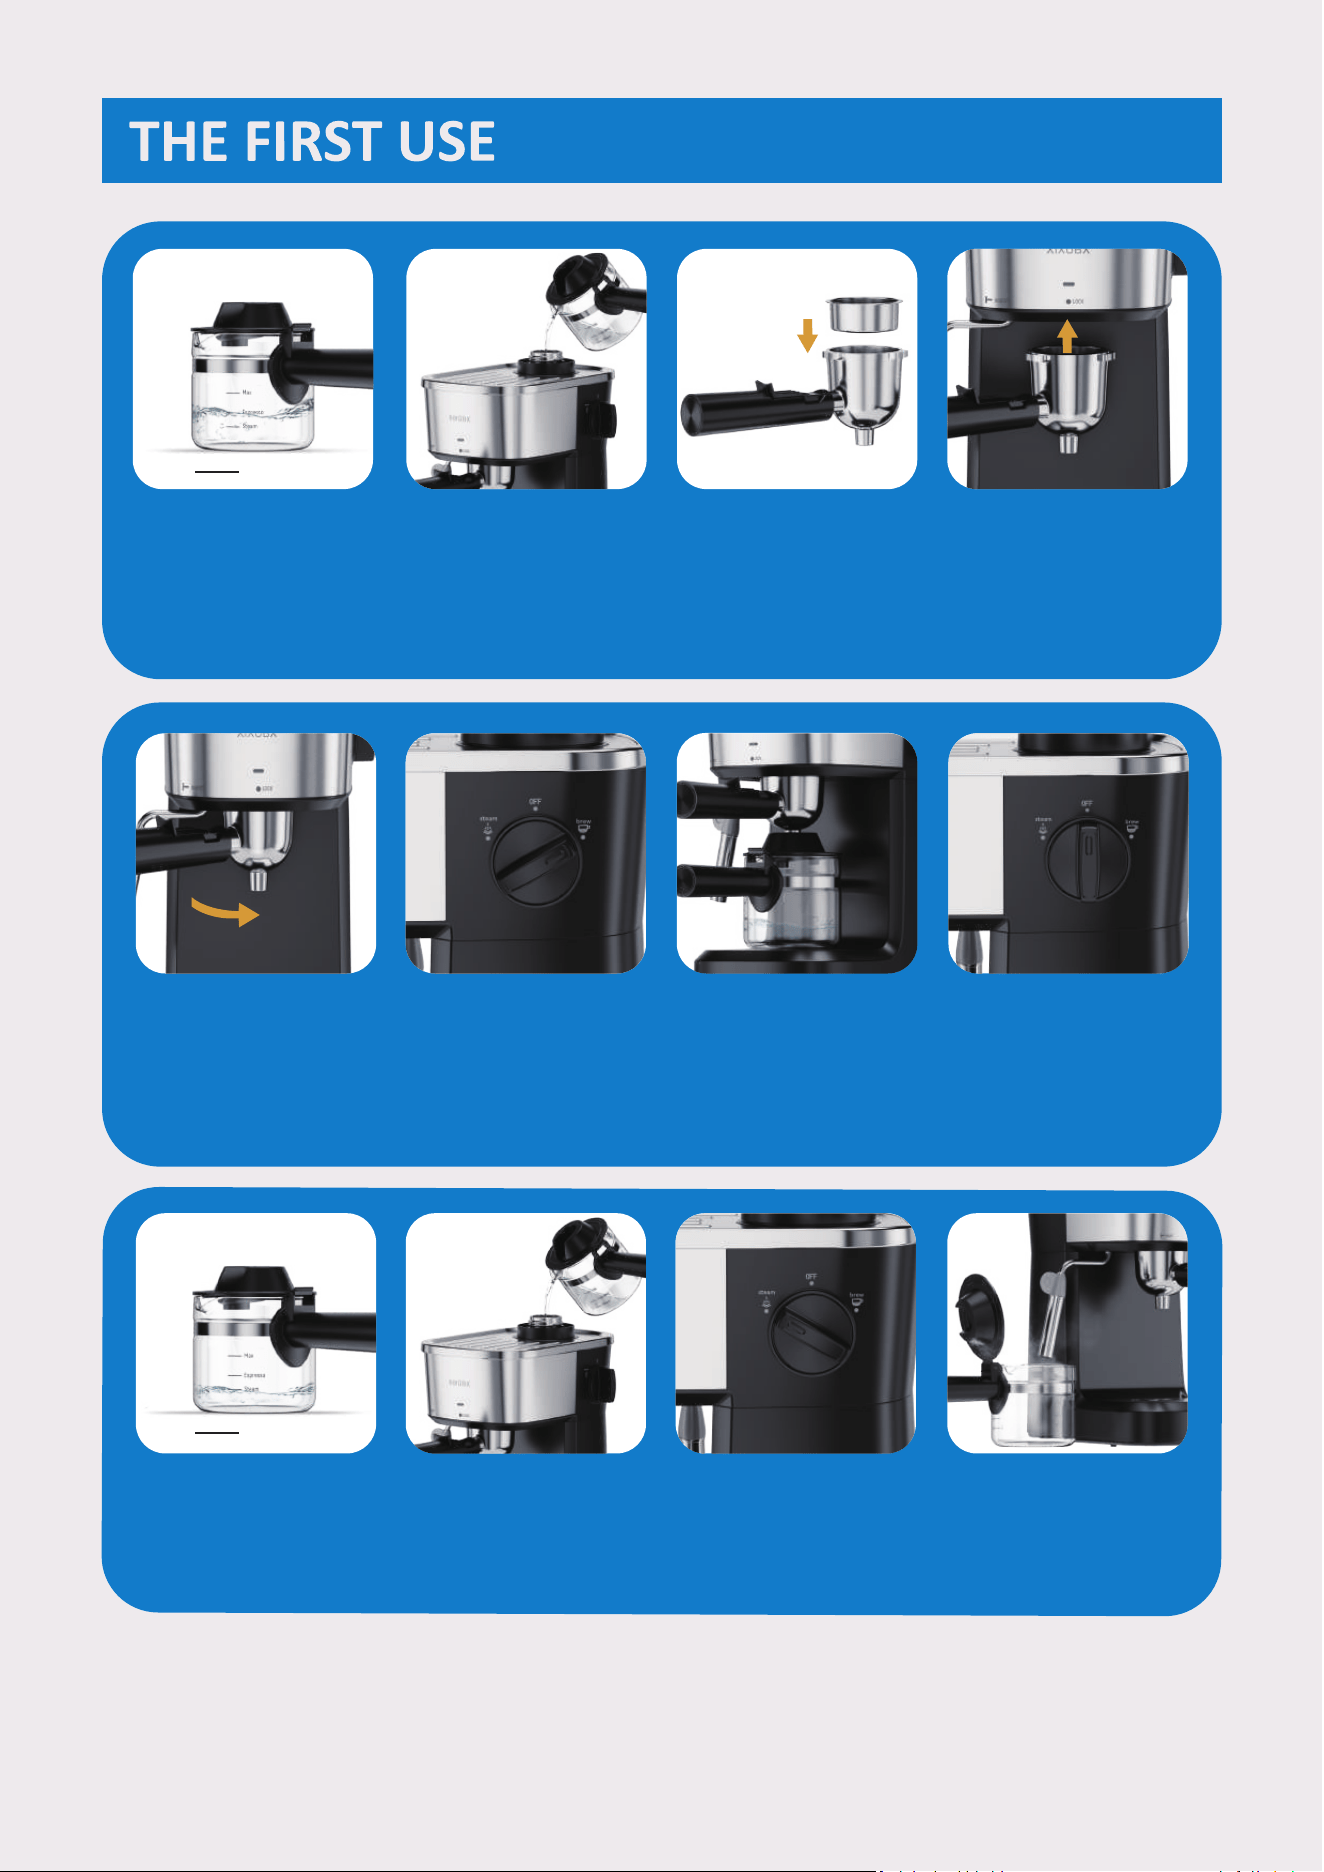
-5-
Cleaning the “Steam Wand”
1. Fill the coffee cup
with water to the
"Espresso" mark.
3. Insert the empty
filter basket into
the portafilter.
4. Keep it level and
insert into the
group head.
5. Turn the portafilt-
er to the right to
the “LOCK” posi-
tion to lock it.
6. Turn the control k-
nob to the "Brew"
posion.
7. Wait a few minut-
es, and the water
comes out.
8. Turn the control
knob to the "OFF"
position to relea-
se the pressure.
9. Fill the coffee cup
with water to the
"Steam" mark.
10. Pour the water
into the water
tank.
11. Turn the c o n t r o l
knob to the "St-
eam" position.
Note:
Please repeat the above process 2–3 times for optimal cleaning.
A hissing sound may occur when releasing pressure — this is normal.
12. Wait a few minu-
tes, and the stea-
m comes out.
2. Pour the water in-
to the water tank.
Steam
Espresso
-6-
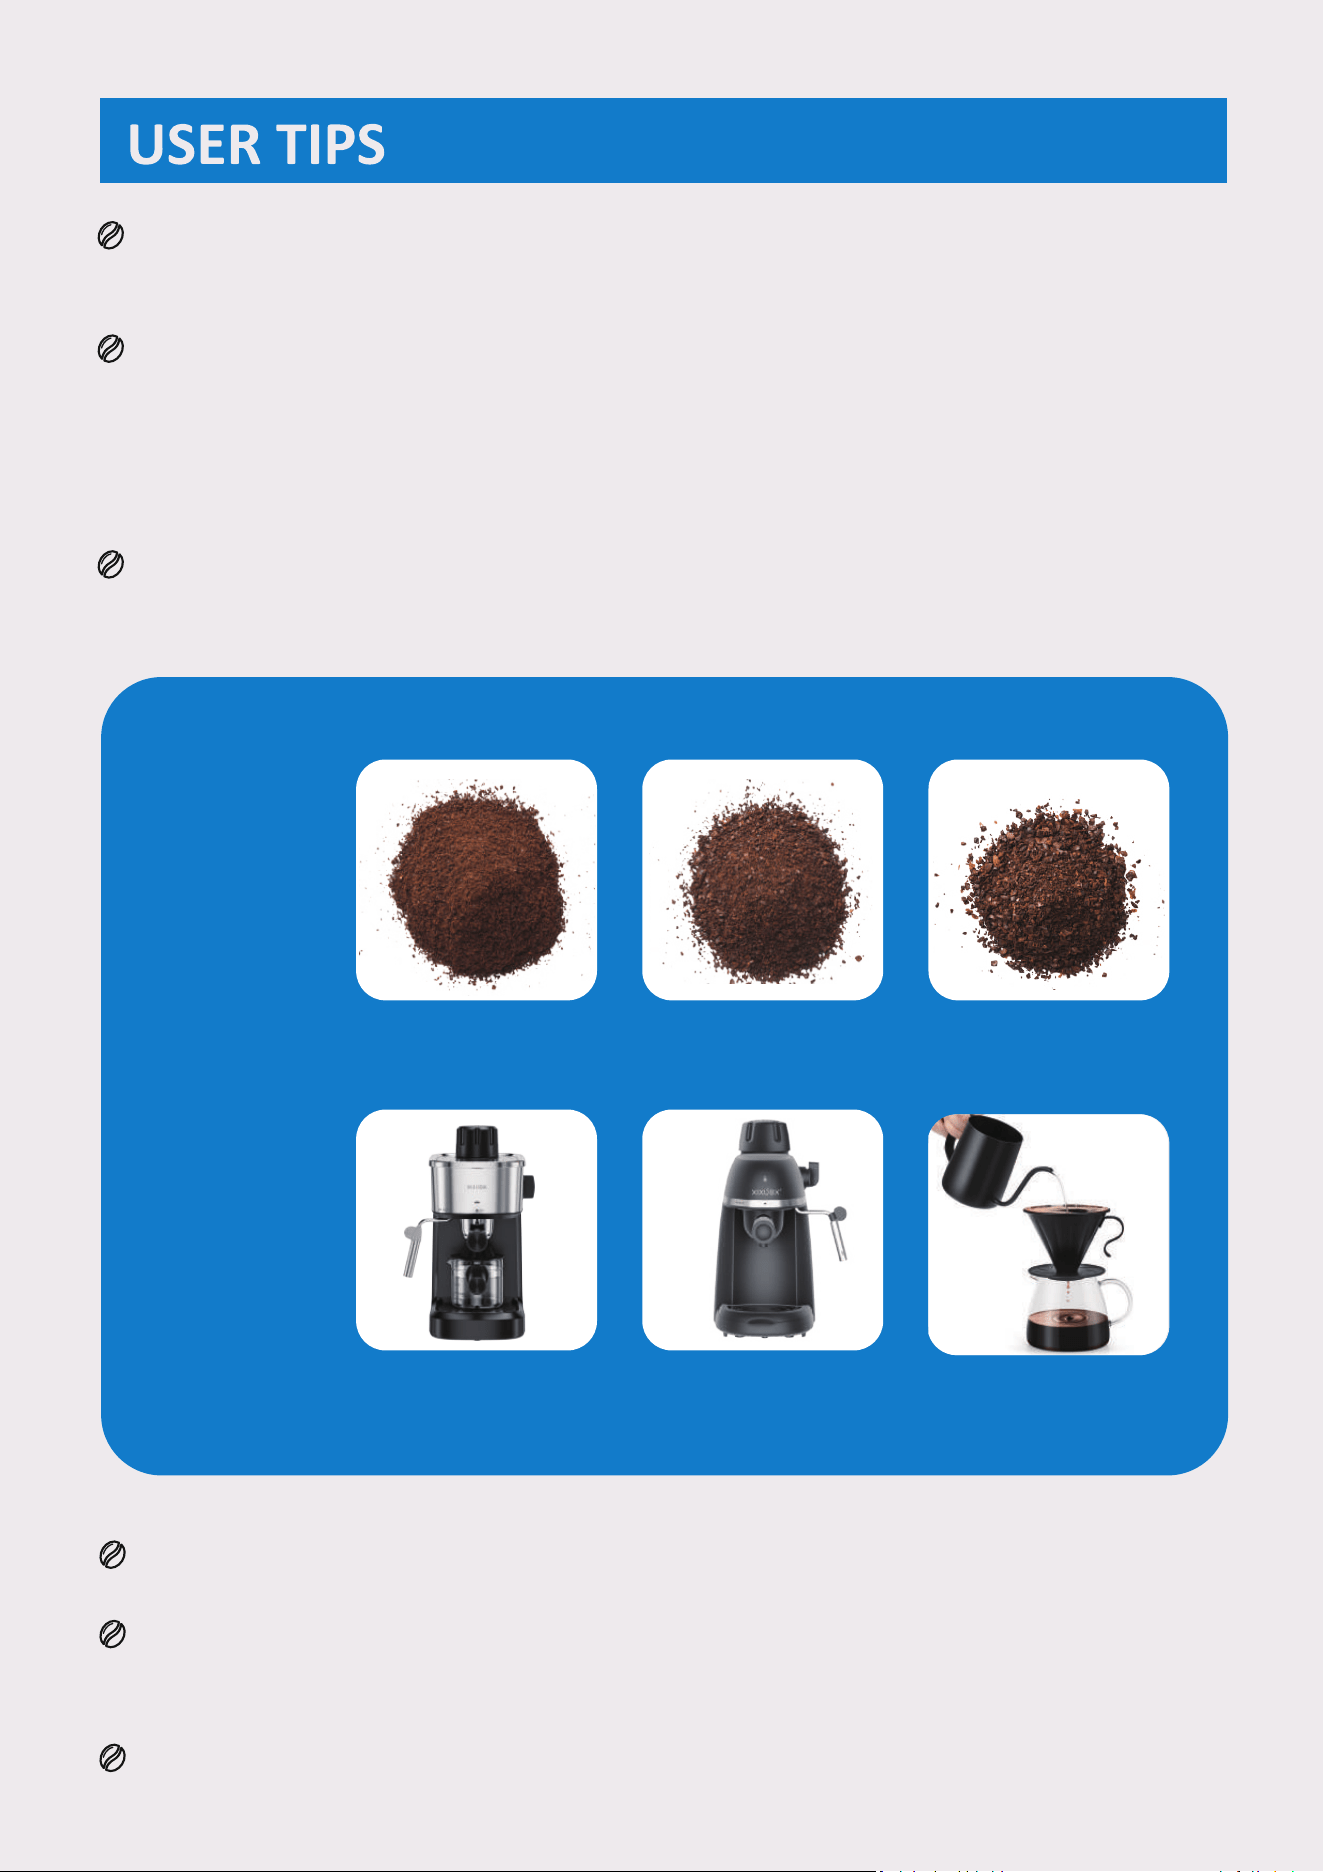
The flavor of espresso is influenced by the quantity and variety of coffee grounds
utilized.
Various factors contribute to the unique taste of a coffee bean, yet its taste and
aroma are primarily shaped by the roasting procedure. Beans roasted at elevated
temperatures for an extended period exhibit a darker hue and yield richer flavors
compared to lightly roasted ones.
We suggest opting for a conical burr grinder instead of a blade mill for optimal
results.
Choose fresh, high-quality coffee beans to achieve the best flavor extraction.
Store your coffee beans/grounds in an airtight container in a cool, dry place,
away from direct heat sources.
Serve espresso immediately after preparation for optimal taste.
Fine Medium Coarse
French Press
Coffee MachineEspresso Machine
Grind
Setting
Best for
-7-
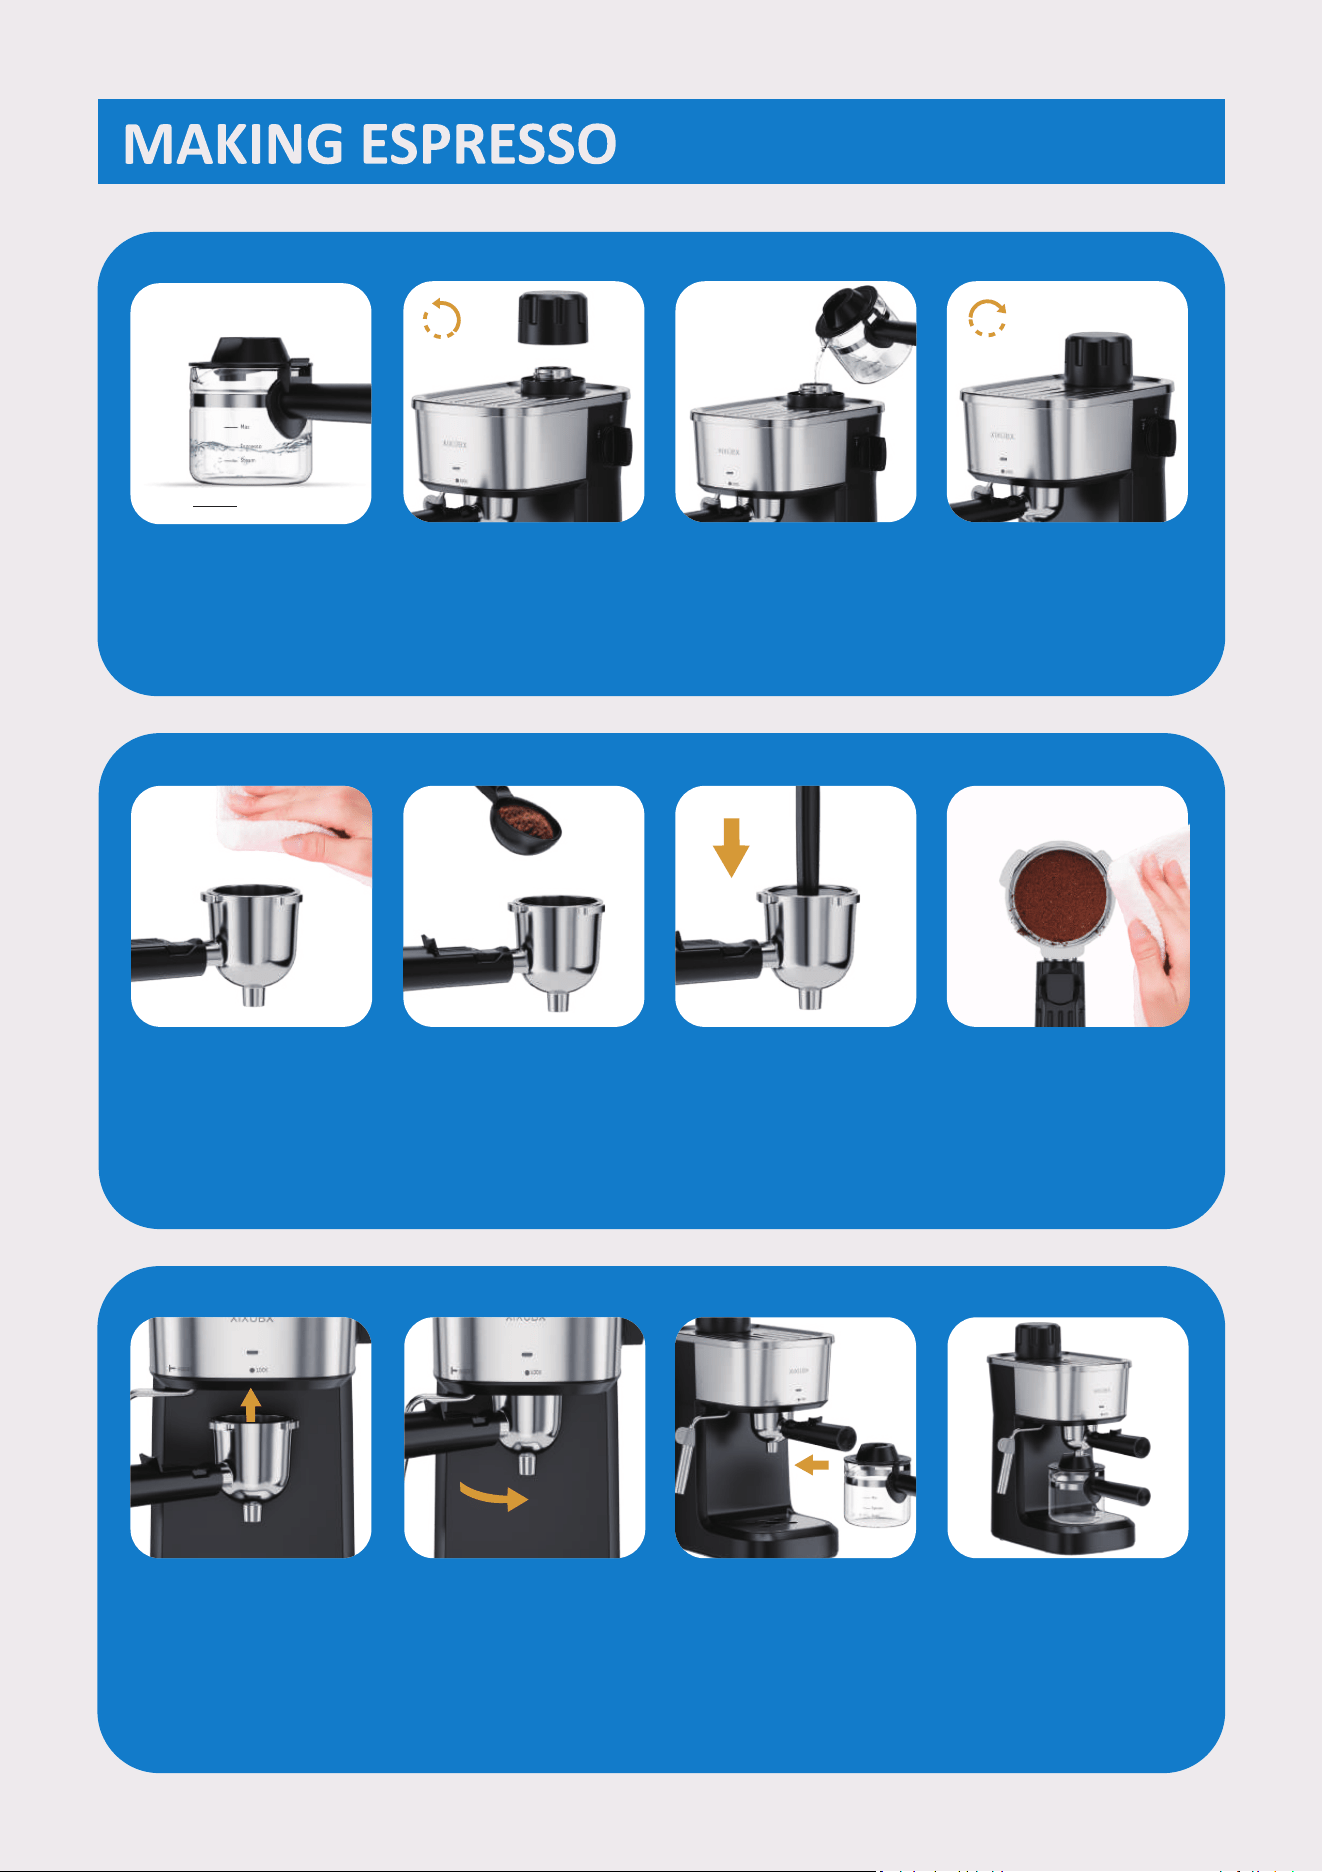
1. Fill the coffee cup
with water to the
"Espresso" mark.
2. Remove the water
tank cap by turn-
ing it counterclo-
ckwise.
3. Pour the water
into the water
tank.
4. Tighten the water
tank cap by turn-
ing it clockwise.
5. Wipe the filter ba-
sket with a dry
cloth.
6. Fill the filter bas-
ket with ground
coffee.
7. Tam p the g rou n d
coffee evenly
and firmly.
8. Wipe filter basket
edges to remove
residue.
9. Keep it level and
insert into the
group head.
10. Turn the portafil-
ter to the right to
the “LOCK” posi-
tion to lock it.
11-12. Place the coffee cup on the drip tray,
with the water outlet aligned to the
innermost part of the groove.
Espresso

-8-
Pour Over / Drip
11. Ensure the “ Ste-
am Knob” is set
to the “ ”
position.
!""
13. Turn the control
knob to the
"Brew" posion.
14. Wait a few min-
utes, and the
coffee comes
out.
18. Turn the p o r t afi-
lter to the left
to unlock and
remove it.
15. Wait until the
coffee stops
flowing.
19. Knock out the
espresso puck.
#$
20. Wash all parts
with warm w-
ater by hand.
Do not wash in
a dishwasher.
Note:
1. It is recommended to use the recommended amount of powder (e.g. 13-14 grams)
to ensure optimal taste and machine performance.
2. After turning off the coffee machine and completing pressure release, the drip tray
will be hot. Wait for it to cool before cleaning to avoid scalding.
1-2
minutes
16. Turn the c o n t rol
knob to the "OFF"
position to relea-
se the pressure.
17. Remove the coff-
ee cup after pres-
sure release.
Pour Over / Drip
-9-
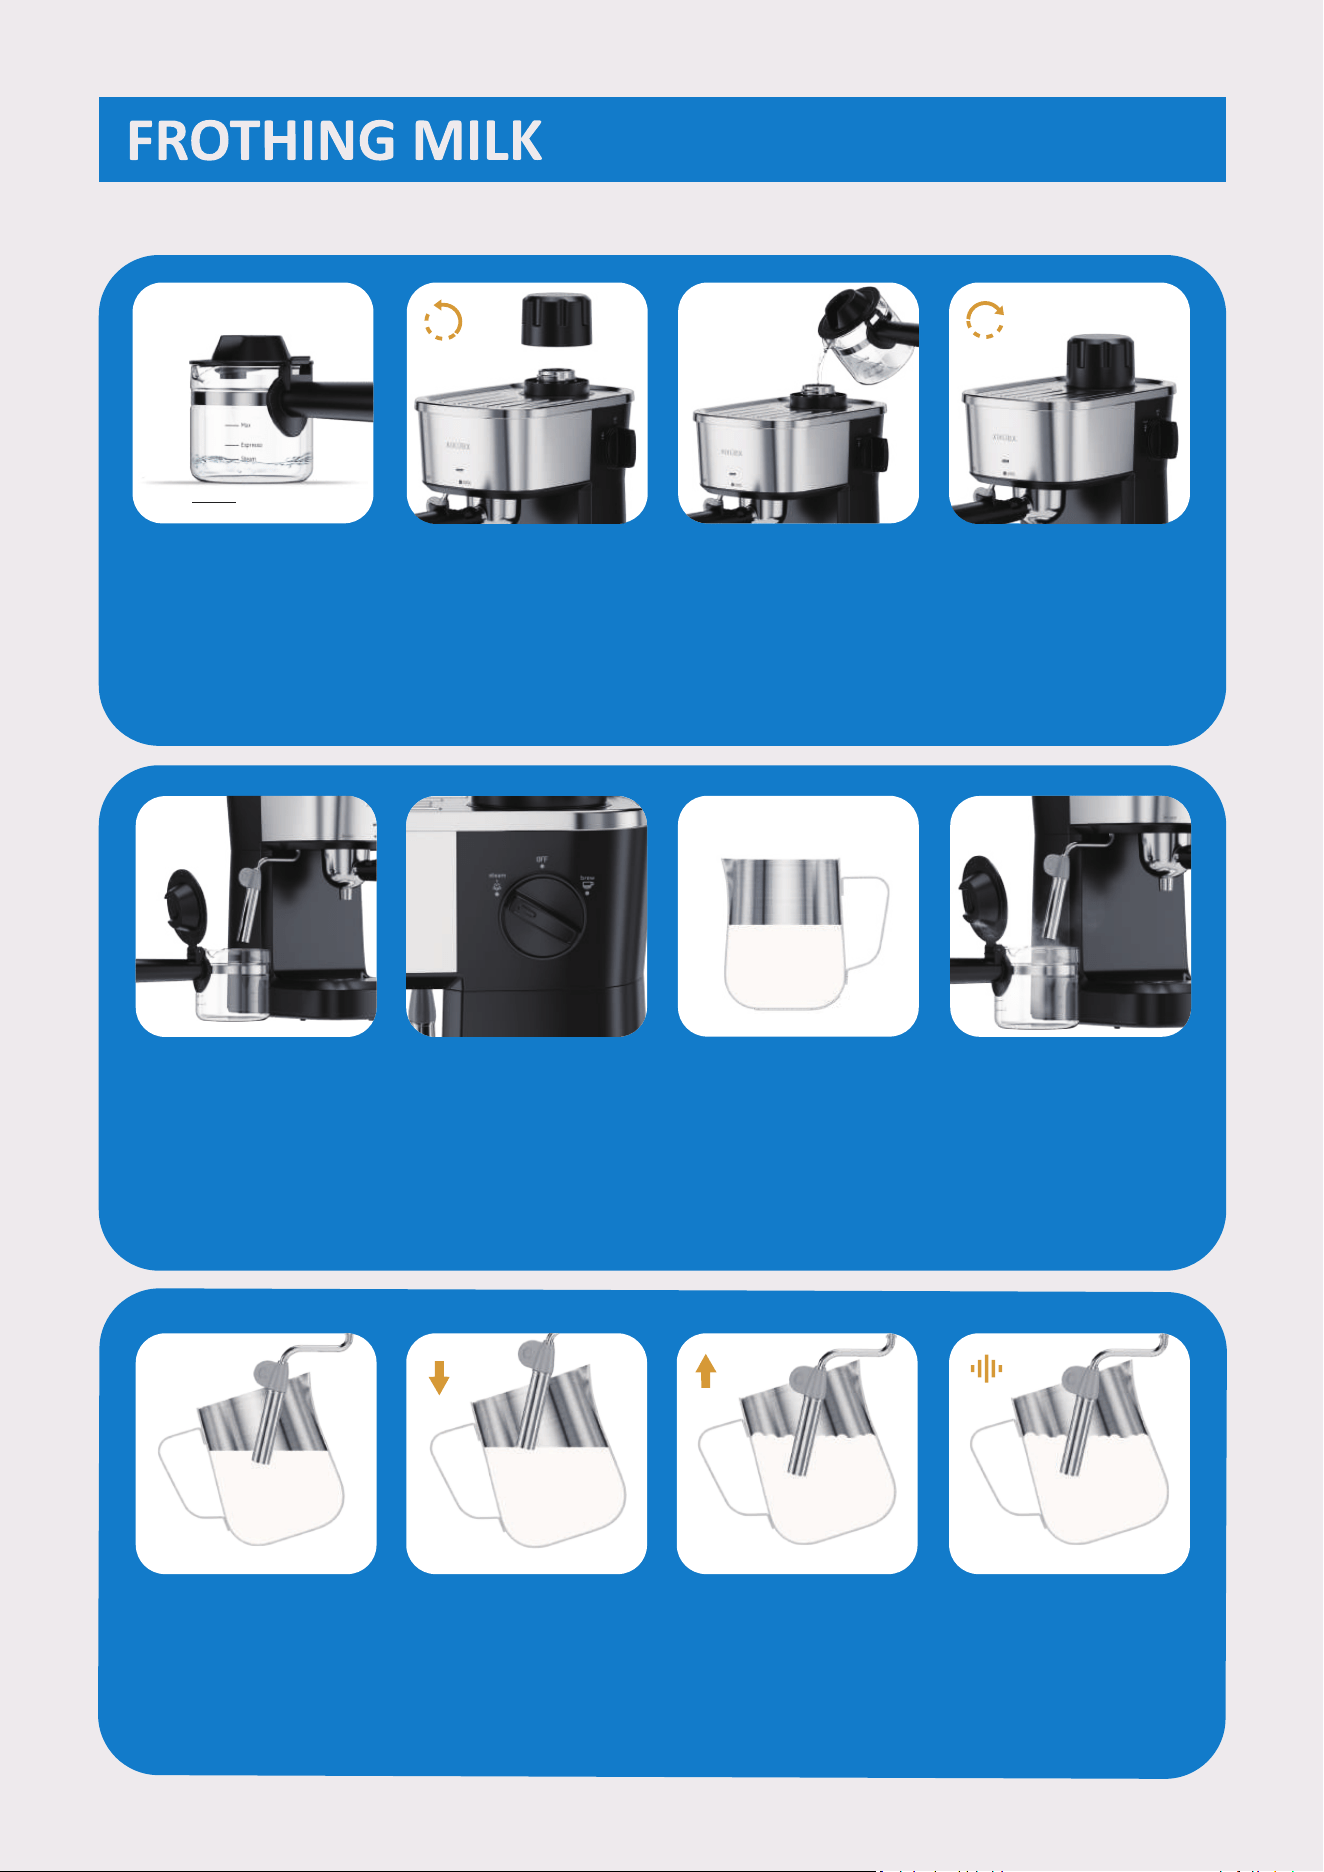
Cleaning the “Steam Wand”
1. Fill the coffee cup
with water to the
"Steam" mark.
2. Remove the water
tank cap by turni-
ng it countercloc-
kwise
3. Pour the water
into the water
tank.
4. Tighten the water
tank cap by turn-
ing it clockwise.
5. Place an empty cup
on the countertop
and turn the steam
wand towards the
cup.
6. Turn the control
knob to the
"Steam" posion
to preheat the
steam.
7. Fill a pitcher with
cold whole milk
to no more than
half its capacity.
8. When only steam
comes out, it me-
ans all condensate
has been expelled.
9. Insert the frothing
sleeve about 0.4
inches into the
milk.
10. Lower the pitcher
slightly to let air
in.
11. When the milk ex-
pands,lift the
pitcher to get it
spinning.
NOTE: Make sure to release all pressure from the machine before adding water.
12. A hissing sound
may be heard
during frothing.
Steam
-10-
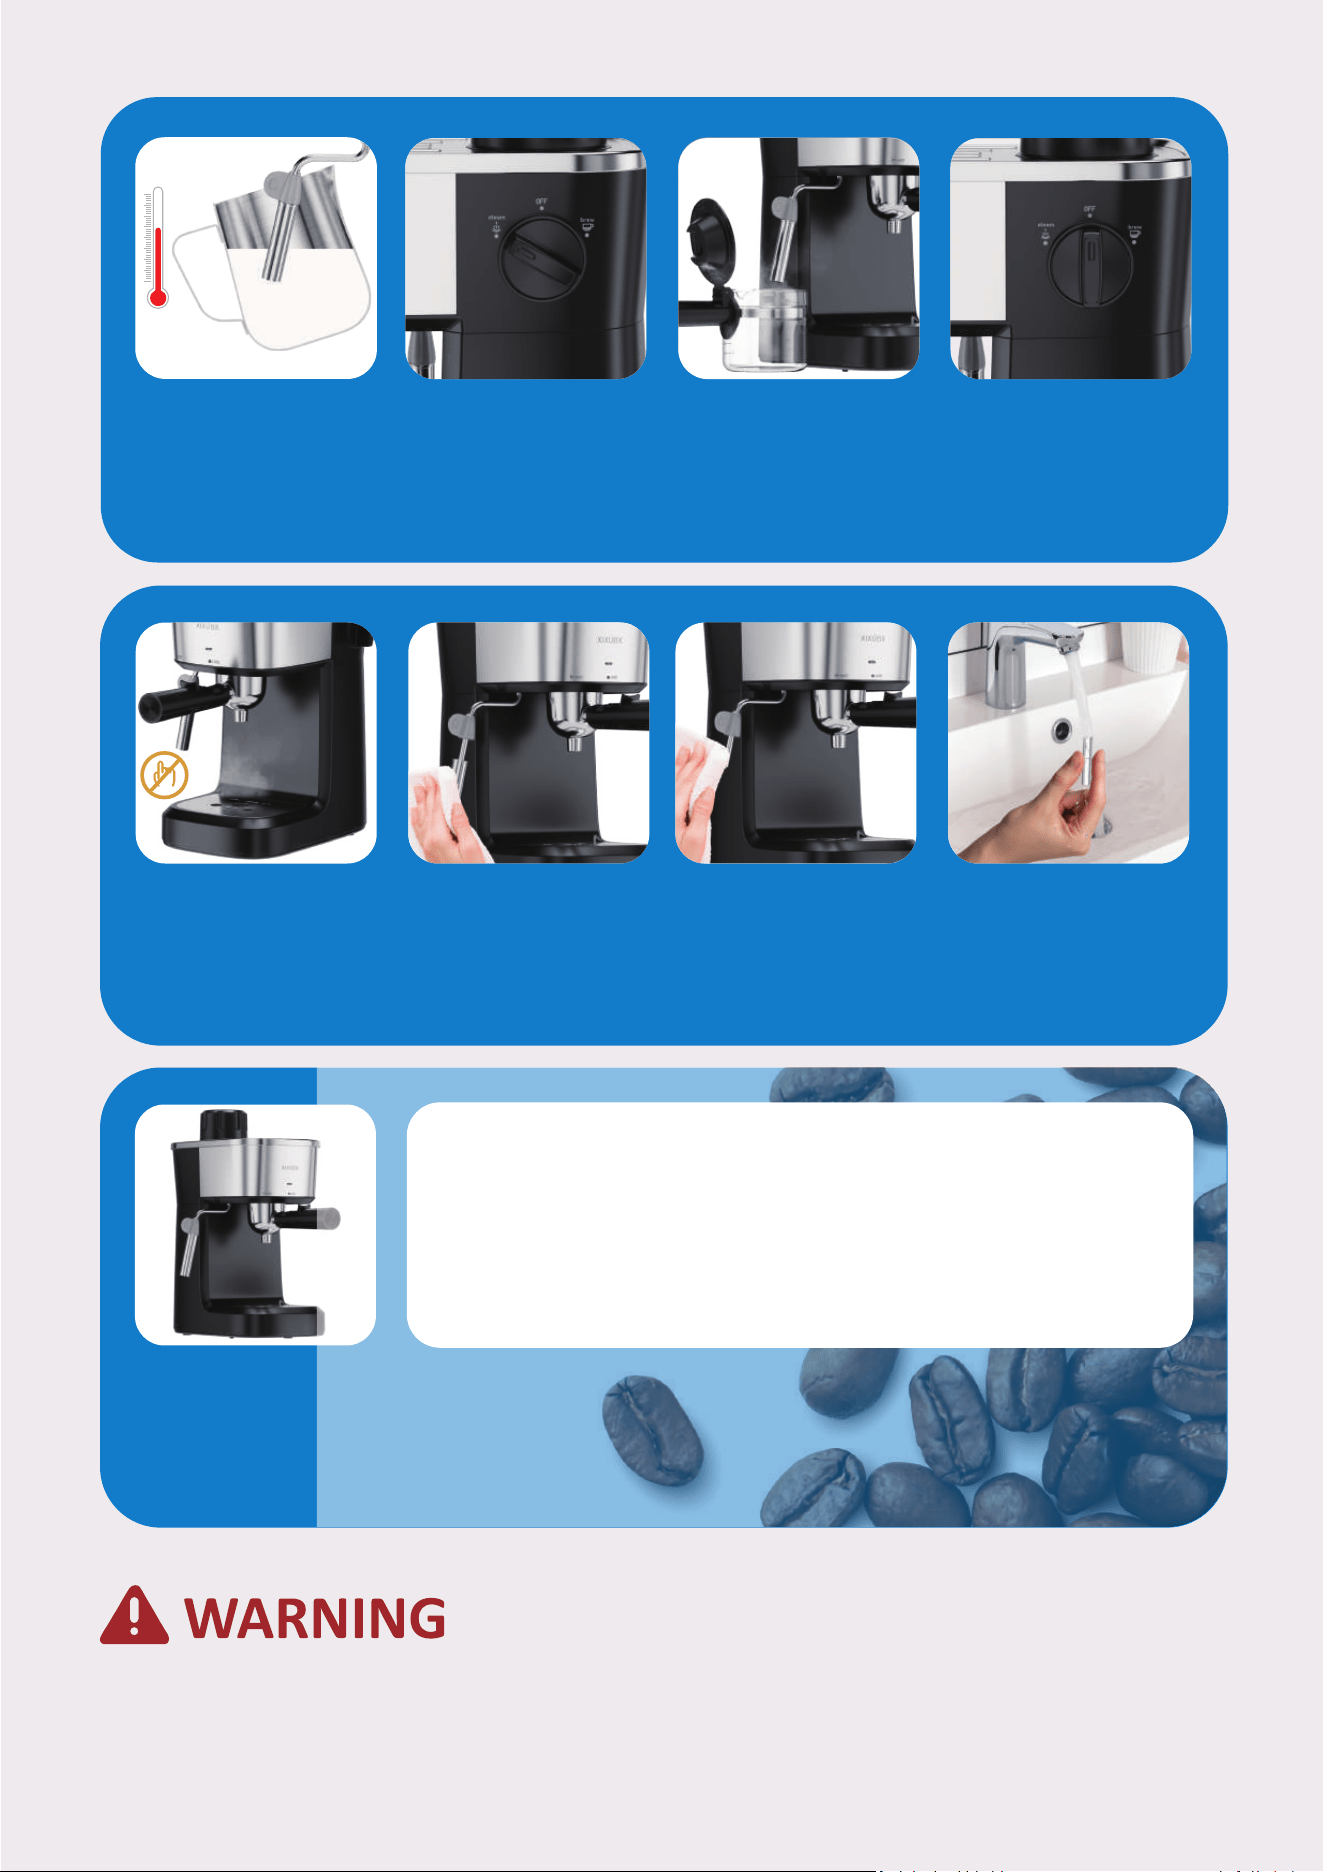
11. Ensure the “ Ste-
am Knob” is set
to the “ ”
position.
!""
13.The foam milk is
ready when you
feel a little hot.
14-15. After removing the pitcher, keep the
steam on to purge out any residual
milk.
16. Turn the c o n t r ol
knob to the "OFF"
position to relea-
se the pressure.
17. Hot steam may
be released near
the drip tray. Do
not touch it.
#$
18. Then remove the
sleeve with a
damp cloth.
19. Clean the steam
wand with a
damp cloth.
20. Clean the sleeve
under running
water.
Be careful when operating the steam wand. Steam can cause burns or
injury.
21. Reinstall the sle-
eve securely.
Note:
If there is any water left in the tank, dispose of it and
keep the tank clean and clear.
Do not fill above the Max line. Excess water will drain
from the pressure relief port and group head.
140-149°F

-11-
I. Pressure Relief Function
Safety: Avoid High-Pressure Risks and Protect Equipment & Personnel
• Discharges high-temperature steam or water in a controlled manner.
II. Pressure Relief Precautions
1. Avoid Direct Contact with the Pressure Relief Port
• High-temperature steam or hot water may eject from the port—never touch or get
close to it to prevent scalding.
• Avoid touching high-temperature parts such as the drip tray and steam wand to
prevent burns.
2. Ensure Complete Pressure Release Before Operation
• Do not remove the tank cover or portafilter while the system is still under pressure.
Always wait until full pressure release before proceeding.
Note:
The water tank is equipped with an overflow protection system. If the water level
exceeds the max limit, excess water will drain from the pressure relief port and
group head.

-12-
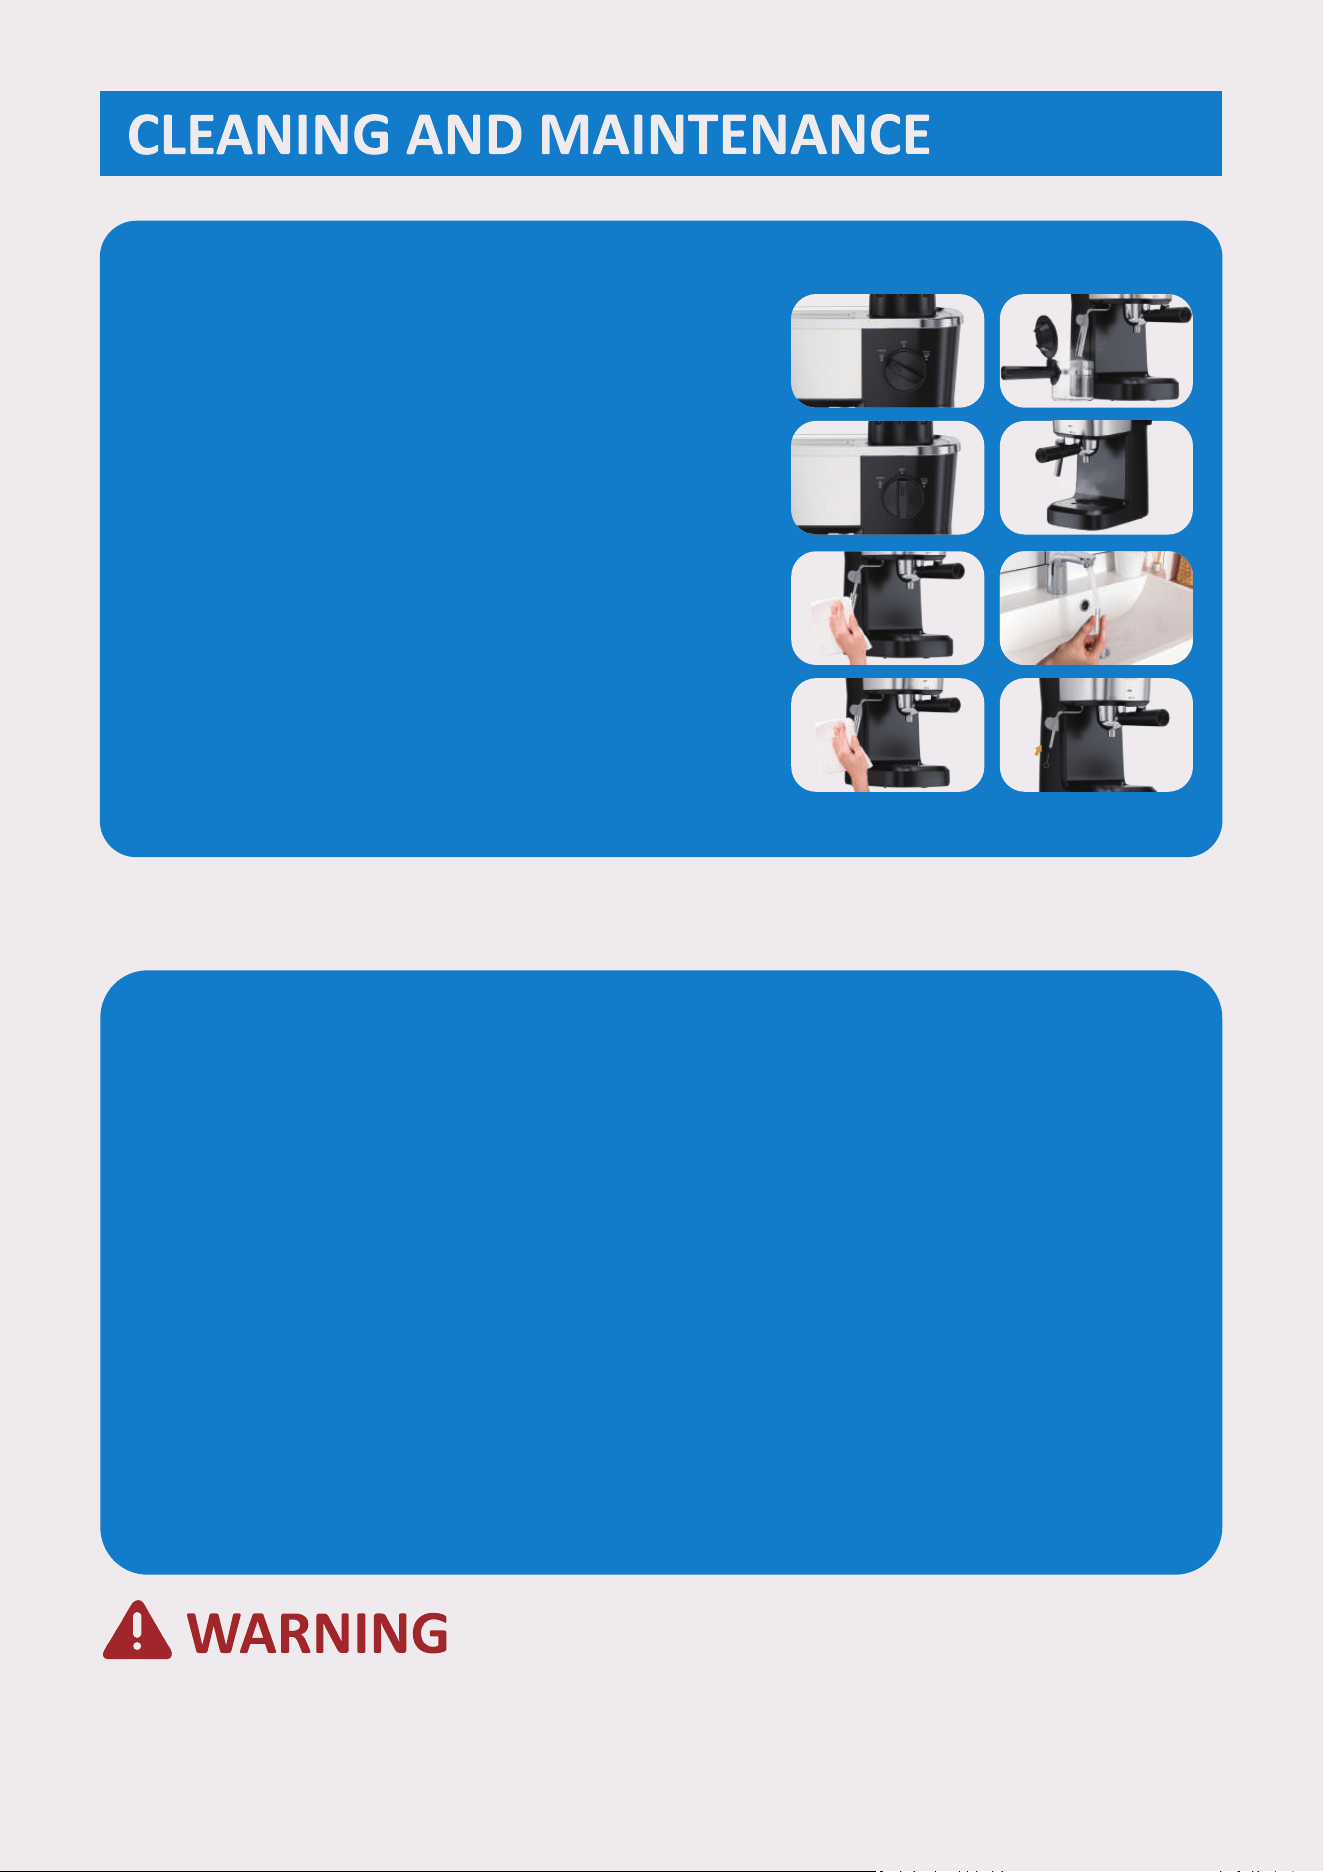
Cleaning the coffee maker
Cleaning the filter baskets and the portafilter
1. Turn the knob to "OFF" position before cleaning the coffee maker, and the
machine will automatically start releasing pressure.
The filter baskets should be kept clean to guarantee perfect results.
1. Remove the filter basket from the portafilter and wash them with warm water.
2. If you notice a malfunction when brewing coffee, immerse the filter basket in
boiling water for 10 minutes and then rinse with running water.
2. Regularly clean the casing of the coffee maker with a damp sponge, to clean
the water tank, drip tray and dry them.
3. Clean all the attachments and dry them thoroughly.
NOTE: Do not clean the drip tray until the coffee machine completes pressure
release and it cools down fully.
To avoid burns, the filter basket must only be removed when the portafil-
ter has cooled down completely.
-13-
Cleaning the steam wand
1. After frothing milk, keep the steam on to purge
out any residual milk.
2. Tur n the c on tr ol knob t o "O FF" pos it io n to
release pressure.
3. Remove the sleeve with a damp cloth after the
pressure release is complete. Clean the sleeve
under running water.
4. Clean the steam wand with a damp cloth. Use
the cleaning needle if the nozzle is blocked.
NOTE: Do not clean any of the parts in the dishwasher.
Cleaning the group head
Regularly remove any residual coffee grounds from the group head with a
brush, using the following steps.
1. Do not insert the portafilter.
2. Place an empty cup under the group head.
3. Pour water into the tank, and turn the control knob to "Brew" positon.
4. After the brewing program is complete, turn the control knob to "OFF"
position to release pressure.
5. When the group head is cool, use a damp cloth to clean it.
Do not try to disassemble the group head. This will damage the group
head and lead to leakage.

-14-
To make sure your coffee maker operates efficiently, to clean the internal pipes,
and to preserve the flavor of your coffee, the coffee machine needs to be des-
caled, cleaned and maintained periodically. It is recommended to clean the ma-
chine every 2-3 months.
1. Fill the water tank with water and a descaling agent (4 parts water to 1 par
descaling agent) to the “Max” level.
Please also refer to the instructions on the descaling agent. Please use a house-
hold descaling agent, or you can use citric acid instead of a commercial descaling
agent(in this case use 100 parts of water to 3 parts of citric acid).
2. Place a cup or other container on the drip tray and start the brewing process,
when the water is ready to drip out of the brewing head, stop the brewing
process and leave the descaling solution in the water tank for 5 minutes.
After that, start the brewing process again and drip a half water into the
cup to clean the brewing pipes. Then, start the steam process and let all the
water come out of the steam wand to clean the steam pipes.
3. Turn on the appliance again and repeat the previous steps 3 more times.
4. Next, repeat the process 2 more times using only DRINKING WATER without
any descaling agent.

-15-
TROUBLESHOOTING
!"#$ %&# '()!* '&++*'%,&-!
./012341/5637803
927:3;8<34=>?
./012341/563927:3
0@13A 7007:37 93
;7B113:/512?
./012341/5637803793
7801236=>137939=4012?
%@13;7 B113:/5123
;/CC703D7253
/CE:721?
'7B11301:<12/08213
=6347D12?
'7B113D=443C70372
7C4E3647D4E3;7:1
780 ?
%@13601/:3; /CC703
9270@?
The cup is not located
properly.
The pressure relief port is
releasing steam or water.
There is much water in the
drip tray.
There is coffee grounds on
the edge of the filter,
causing a loose seal.
The power outlet is not
plugged well.
The temperature is too low
and the machine and coffee
cup are not preheated.
Coffee is ground too finely.
Ground coffee is tamped
too strongly.
The filter is clogged up.
No steam comes out.
Make sure the water tank has
enough water, if not, add water.
Use high and narrow pitcher.
The container is too big, or
the shape is not fit.
You used room-temperature
skim milk
Please use refrigerated whole
milk instead.
Clean the filters hole
Tamp grou n d co f fee l ess
strongly.
Do not use extra-fine coffee
grounds.
In a low room temperature
environment, preheat the
brewing system and coffee
cup with water in advance.
Plug the power cord into a wall
outlet correctly, if the appliance
still does not work, please
contact us for help.
Wait until the process is
complete.
Please clean the drip tray.
Get rid of them.
The water outlet is aligned with
the innermost part of the
groove of the cup lid.

TROUBLESHOOTING
-16-
!"#$ %&# '()!* '&++*'%,&-!
-./0123 4/5.42 0/
.61 7
%82/42 139/:3; 10/. <
182/13 =>/83?2/;601 7
%82/: .; 13<@912;/@0/
;6012A/ 3=A/
5.;;.A2A7
(5@A/(?@=2B3;)/13012
2C@010/@=/20:;200./
5.D227
The water tank is empty.
The nozzle is clogged.
The descaler is not recomme-
Inded type. It may corrode
the metal parts in the tank.
Prolonged contact with coffee
residue or coffee liquid.
No clean correctly after
cleaning mineral deposits.
The coffee powder is stored in
a hot, wet place for a long
time. The coffee powder
turns bad.
Please use fresh coffee powder,
or store unused coffee powder
in a cool, dry place.
Refer the section
"THE FIRST USE".
Clean and dry it immediately
after use.
Use of corrosive cleaning
agents.
Use mild or neutral cleaners —
avoid harsh chemicals.
It may be corroded by the
dishwasher.
Don't wash it in dishwasher.
Remove the sleeve and unclog
the steam nozzle with the
cleaning needle.
Use the descaler recommended
by manufacturer.
Fill the water tank with drinking
water.
E./=.1 /13>2/3:3; 1/182/3 ::9@3=52/F G/G.6;0 29</@ </182/53602 /.</<3@96;2/@0 /
=.1/<.6=AH/G.6IA/F2112;/5.=1351/60/<.;/829:7

-17-
WARRANTY INFORMATION
The manufacturer provides warranty in accordance withe the legislation of the cus-
tomer's own country of residence, with a minimum of 12 months, starting from the
date on which the appliance is sold to the end user.
The warranty only covers defects in material or workmanship.
The warranty will not apply in cases of:
- Normal wear and tear.
- Incorrect use, e.g. overloading of the appliance, use of non-approved accessories.
- Use of force, damage caused by external influences.
- Damage caused by non-observance of the user manual, e.g. connection to an unsu-
itable mains supply or non-compliance with the installation instructions.
- Partially or completely dismantled appliances.

support@xixubx.com www.xixubx.comwww.xixubx.net
E-mail
Warranty
Website
ACTIVATE WARRANTY
Scan& Save
Scan the QR code, register your product,
and get a 12-month Extended Warranty!

