
Technical Support and E-Warranty Certificate www.vevor.com/support
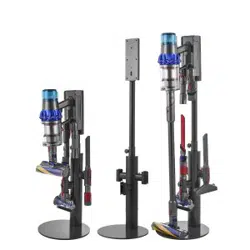
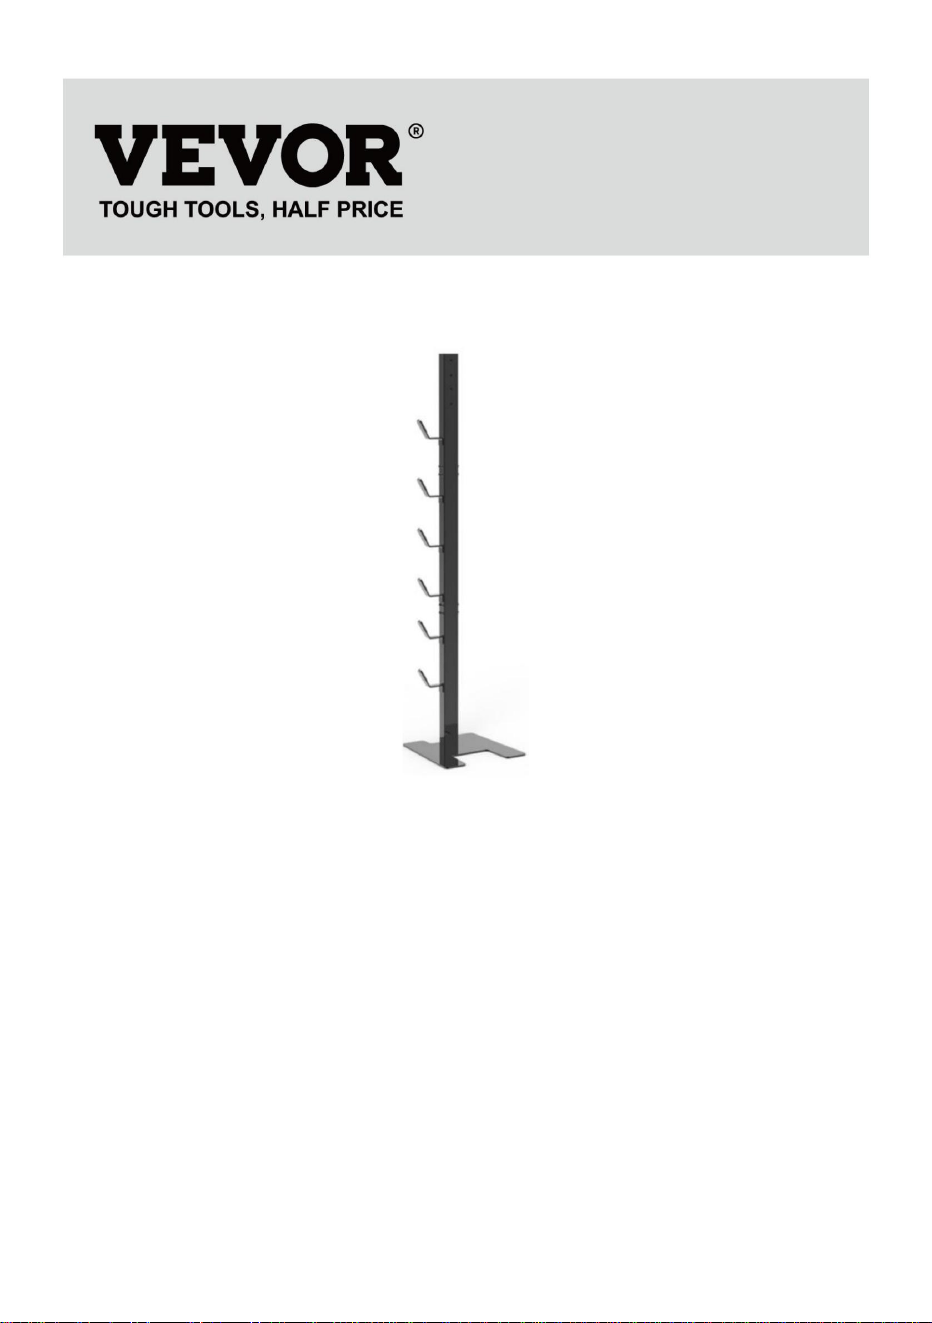
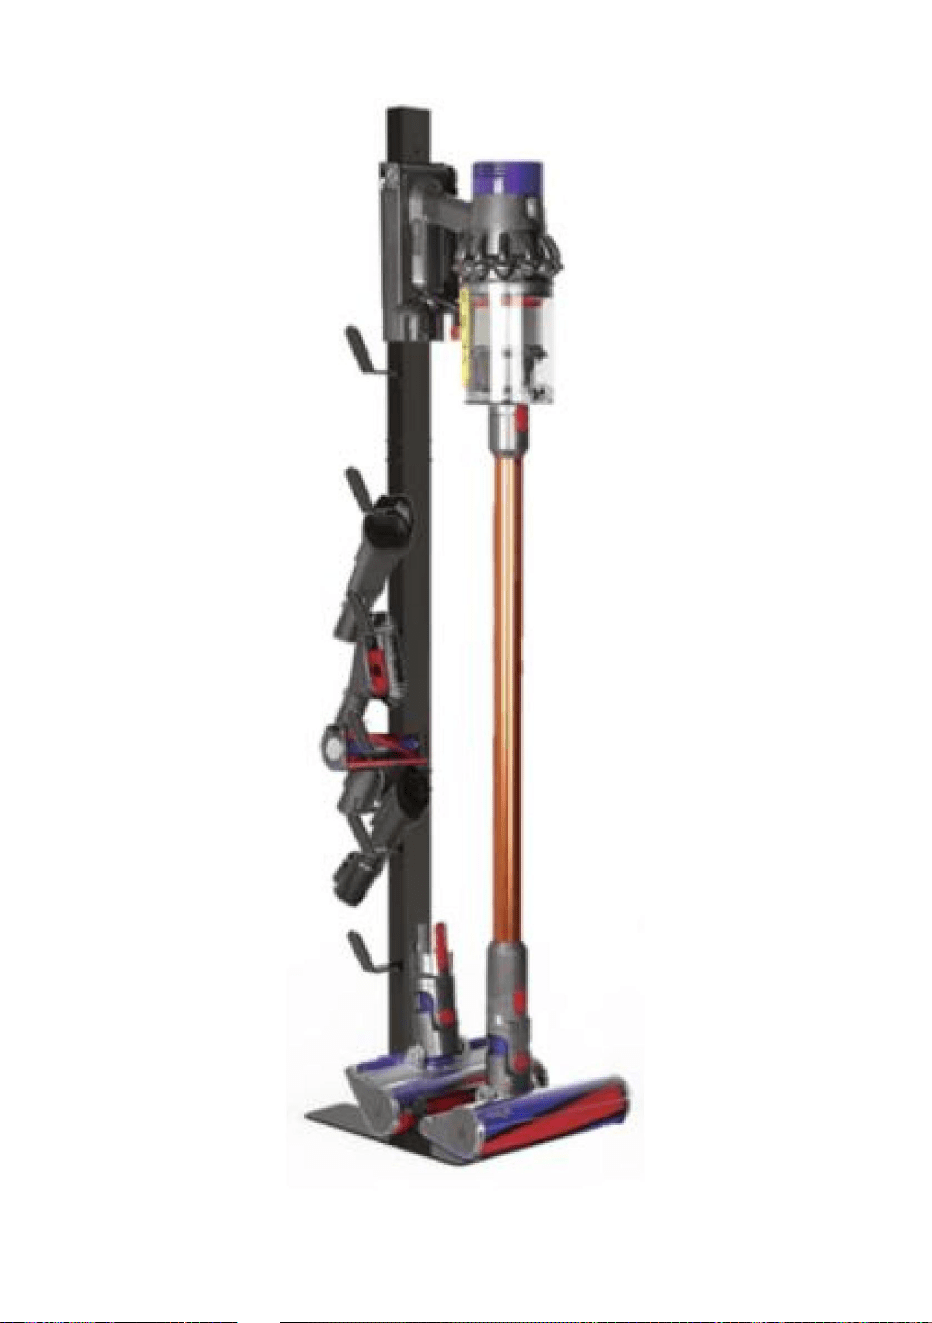
VACUUM STAND
MODEL:HLFGSJLG-01
We continue to be committed to provide you tools with competitive price.
"Save Half", "Half Price" or any other similar expressions used by us only
represents an estimate of savings you might benefit from buying certain tools
with us compared to the major top brands and does not necessarily mean to cover
all categories of tools offered by us. You are kindly reminded to verify carefully
when you are placing an order with us if you are actually Saving
Half in comparison with the top major brands.


- 1 -
Model:HLFGSJLG-01
NEED HELP? CONTACT US!
Have product questions? Need technical support? Please feel free to
contact us:
Technical Support and E-Warranty Certificate
www.vevor.com/support
This is the original instruction, please read all manual instructions
carefully before operating. VEVOR reserves a clear interpretation of our
user manual. The appearance of the product shall be subject to the
product you received. Please forgive us that we won't inform you again if
there are any technology or software updates on our product.
Vacuum Stand

- 2 -
SAFETY INSTRUCTIONS
1.Products shall be installed by adults;
2.Products are installed away from children and pets;
3.Please wear gloves to install the product to avoid hand injury;
4.Install the product as per this instruction to avoid personnel injury or
product damage.
5.Please re-tighten the screws of each part regularly to avoid the screw
loosening due to the long-term use of the product.
PARAMETER LIST
Model
HLFGSJLG-01
product size
L*W*H:280×290*1270mm
Total number of hooks
6pcs
Rolling wheel
NO
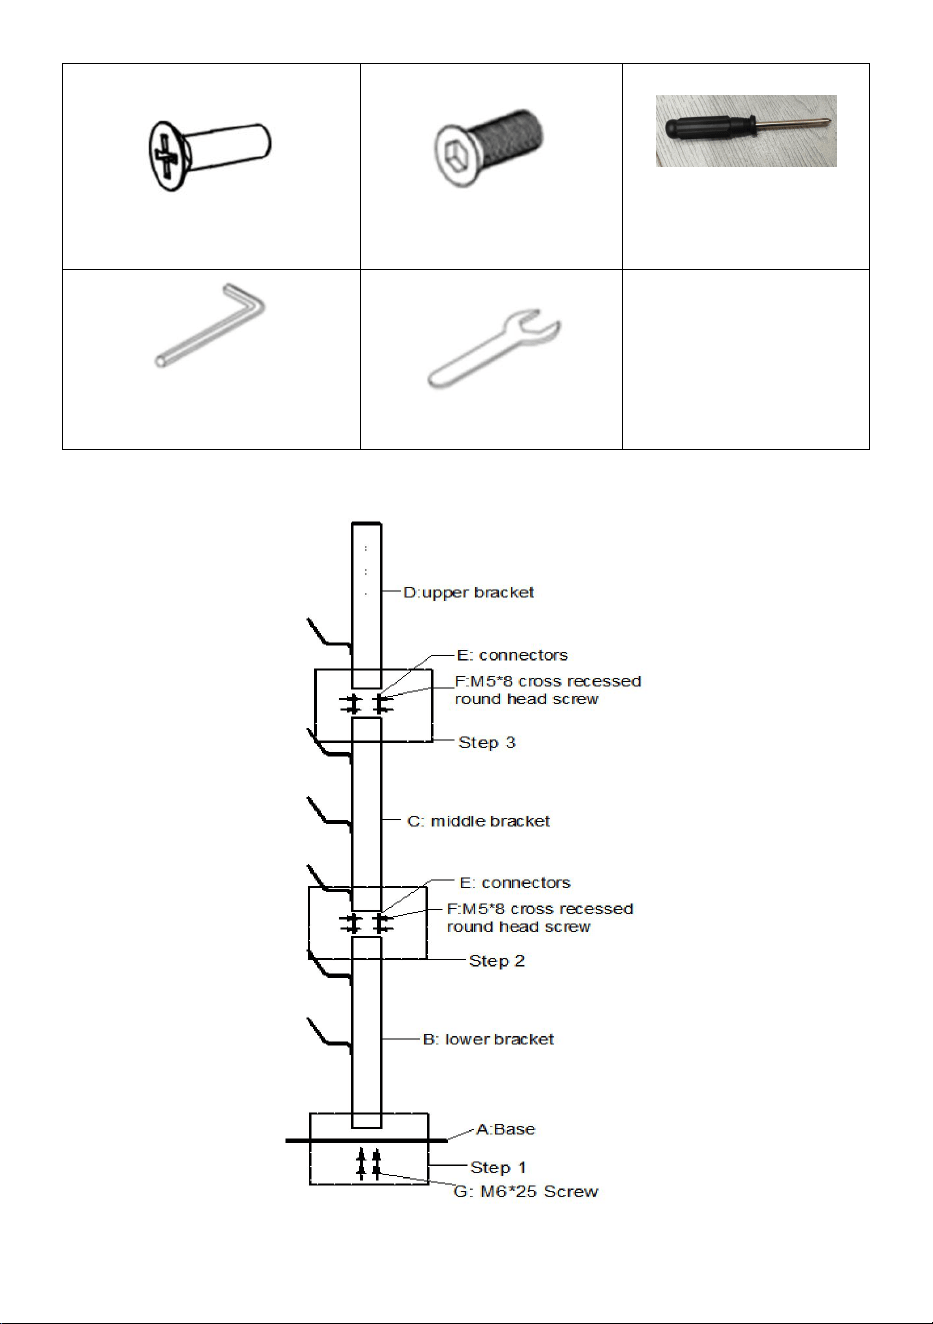
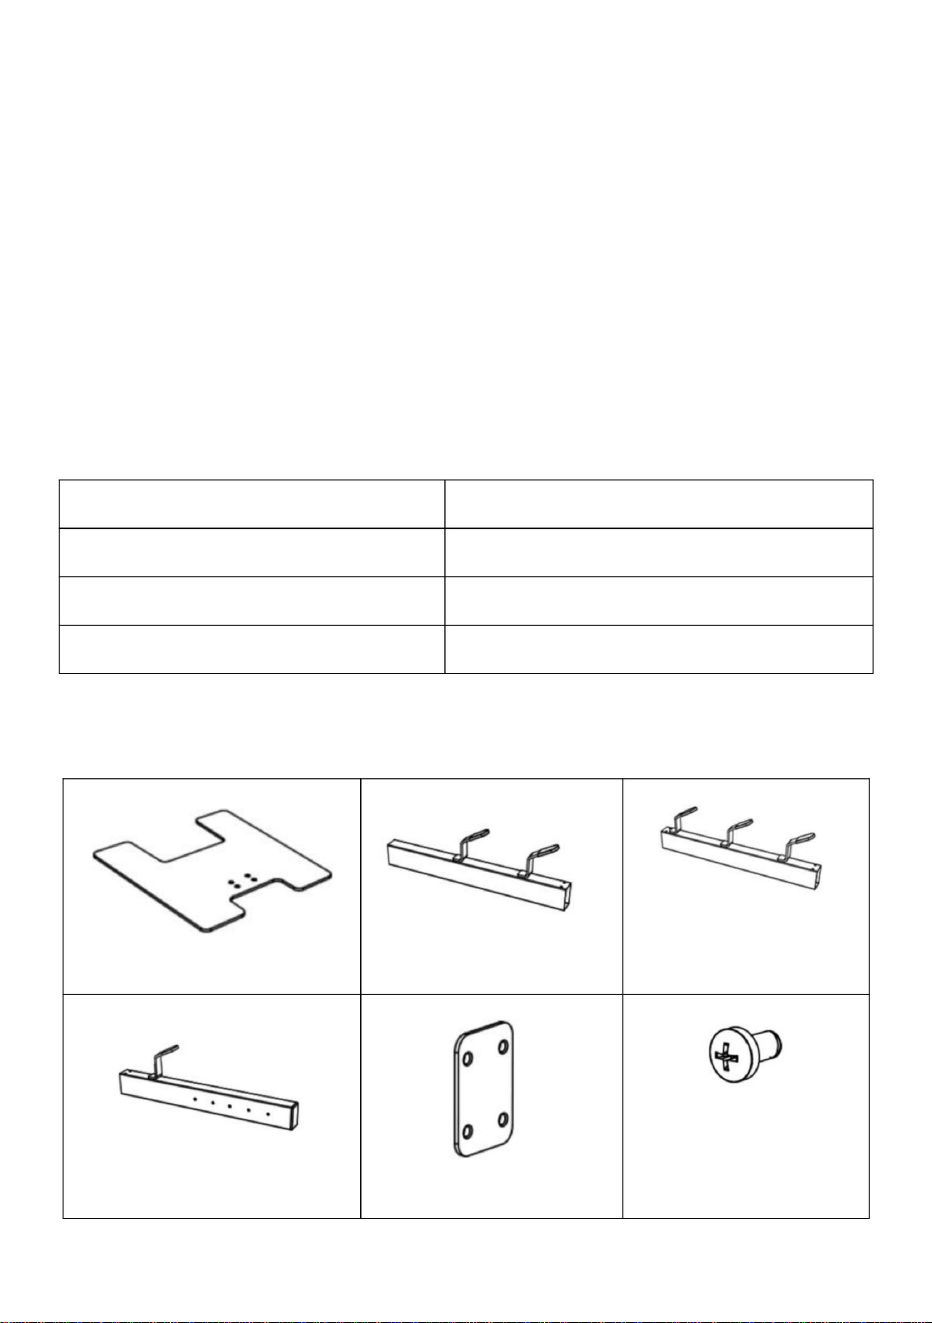
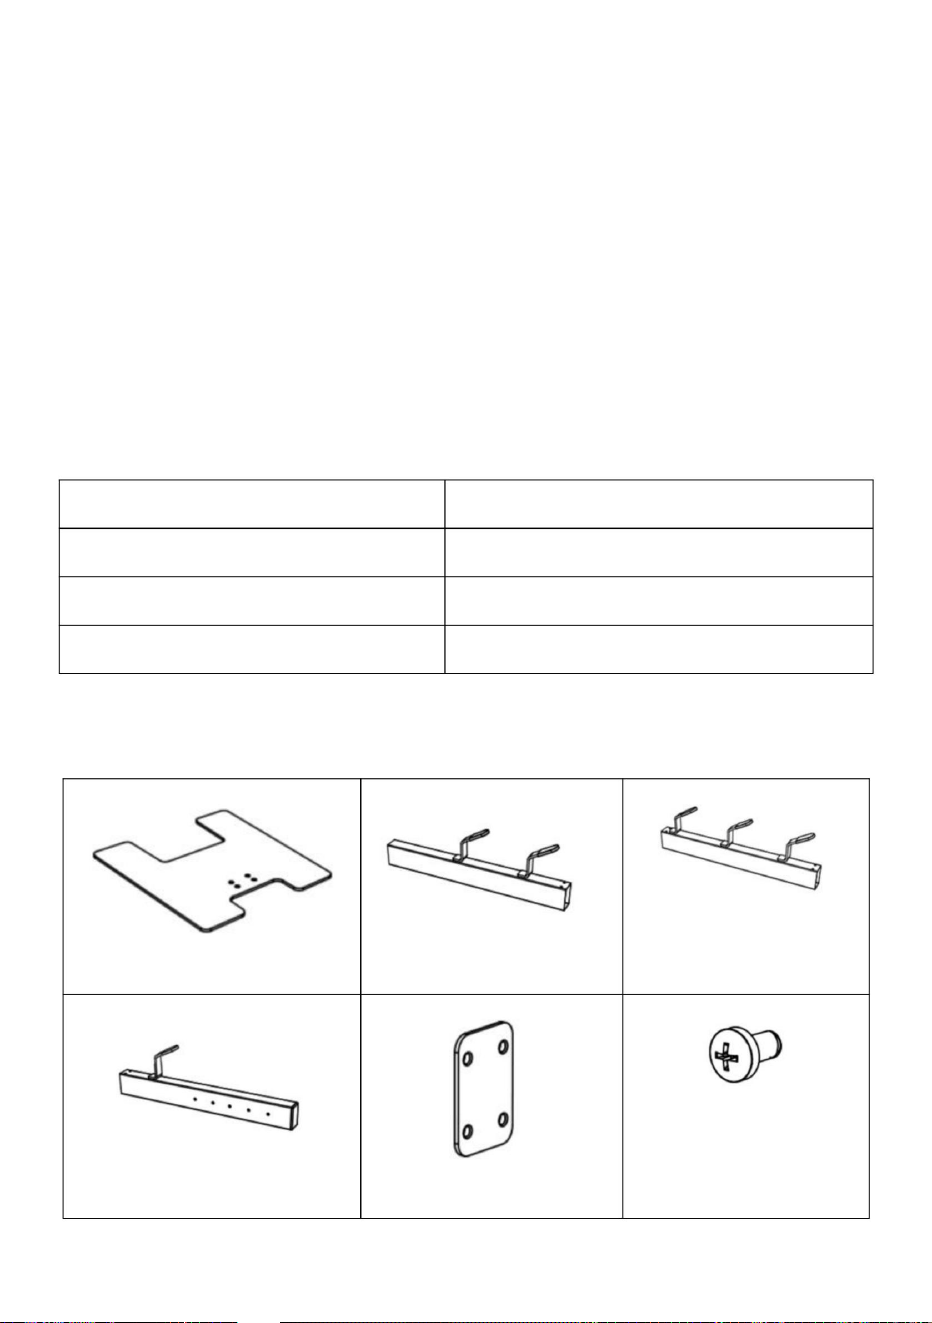
Parts list
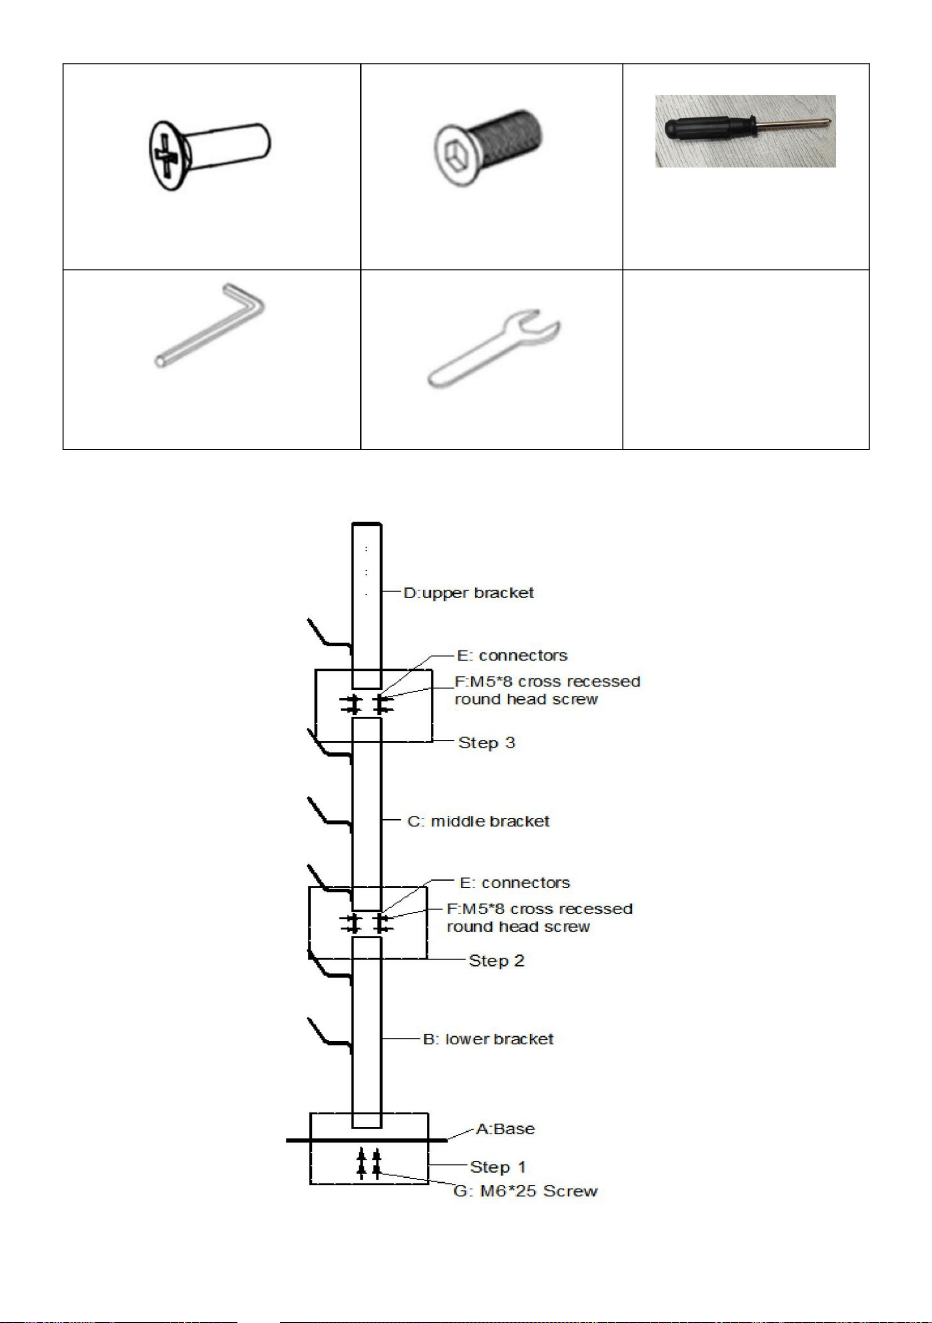
A:Base × 1pc
B: lower bracket × 1pc
C: middle bracket×
1pc
D:upper bracket×1pc
E: connectors×4pc
F:M4*8 cross
recessed round head
screw×16pcs
- 3 -
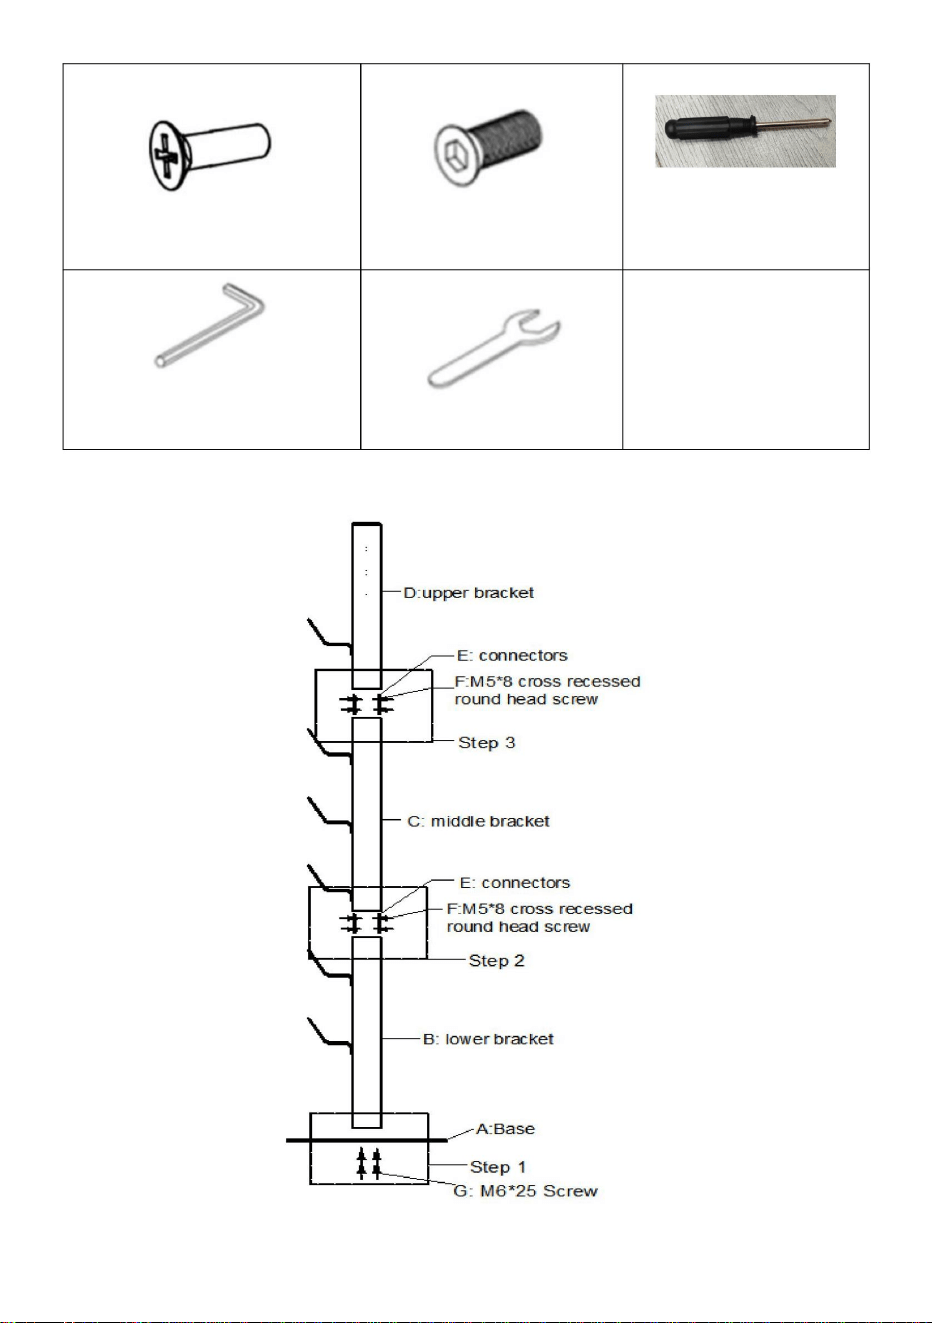
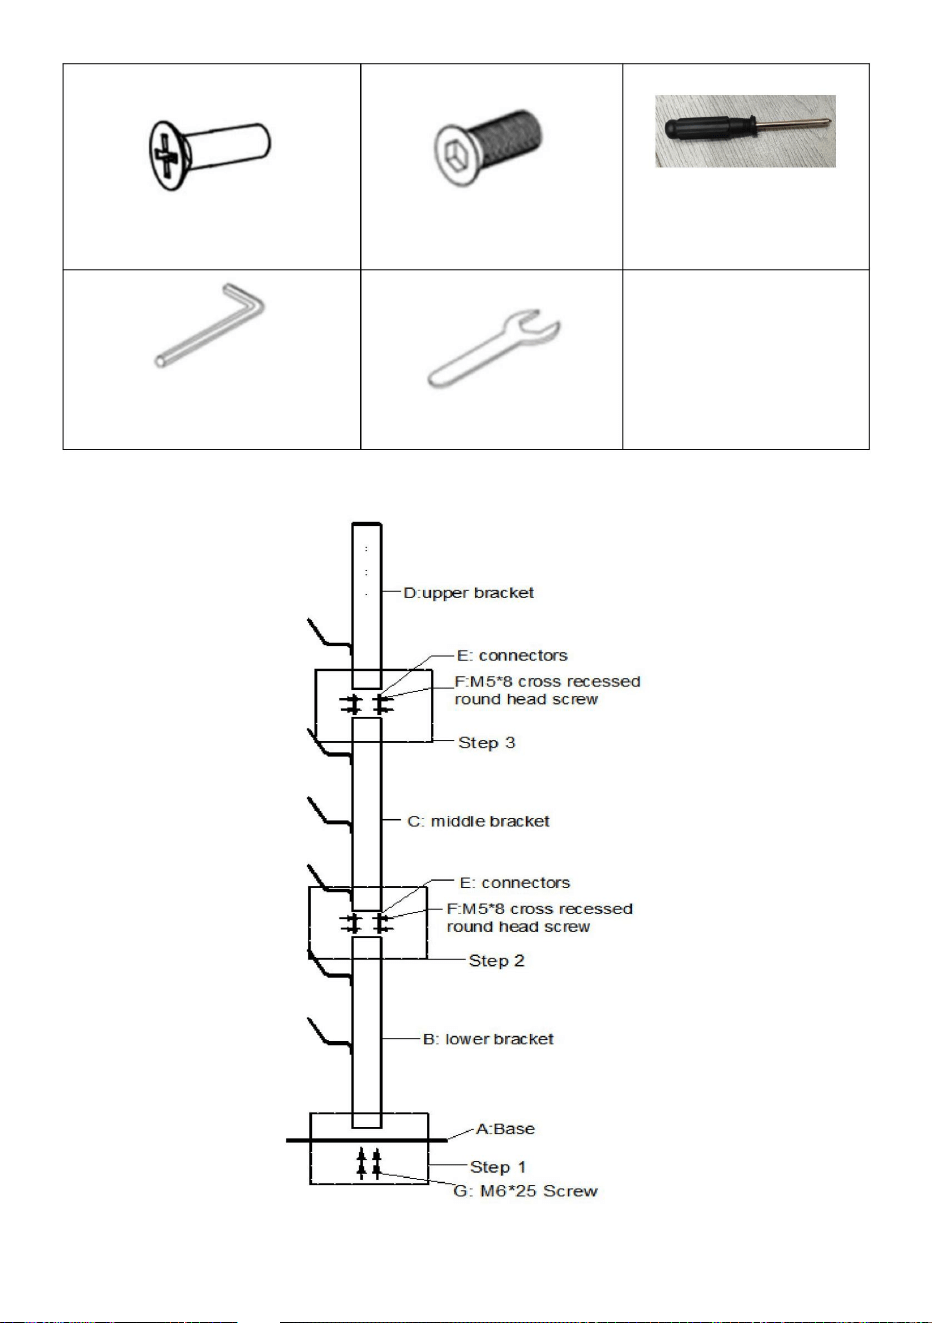
G: M6*25 Screw ×4pcs
H:M5*20 Screw ×2pcs
J: Phillips
Screwdriver ×1pc
K: hex
wrench×1pc
K: M8-Wrench×1pc
Product decomposition diagram

- 4 -
Installation Guide
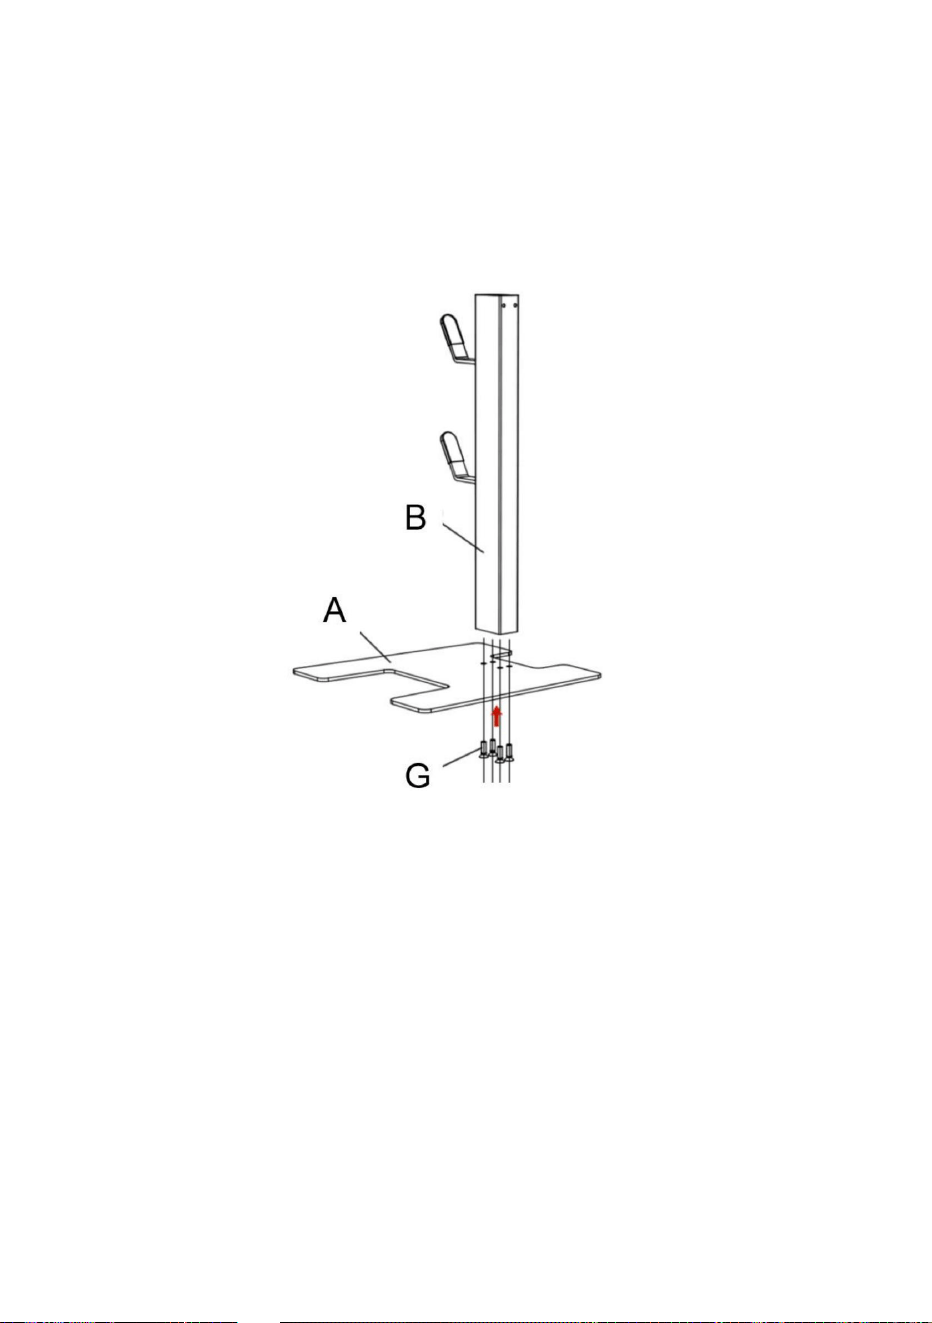
1.Install lower bracket B on base A
Use Screws G to lock lower bracket B from the bottom of the base A.
Note:The hook of the lower bracket B goes up, directly facing the left bian
side or right side of the base.
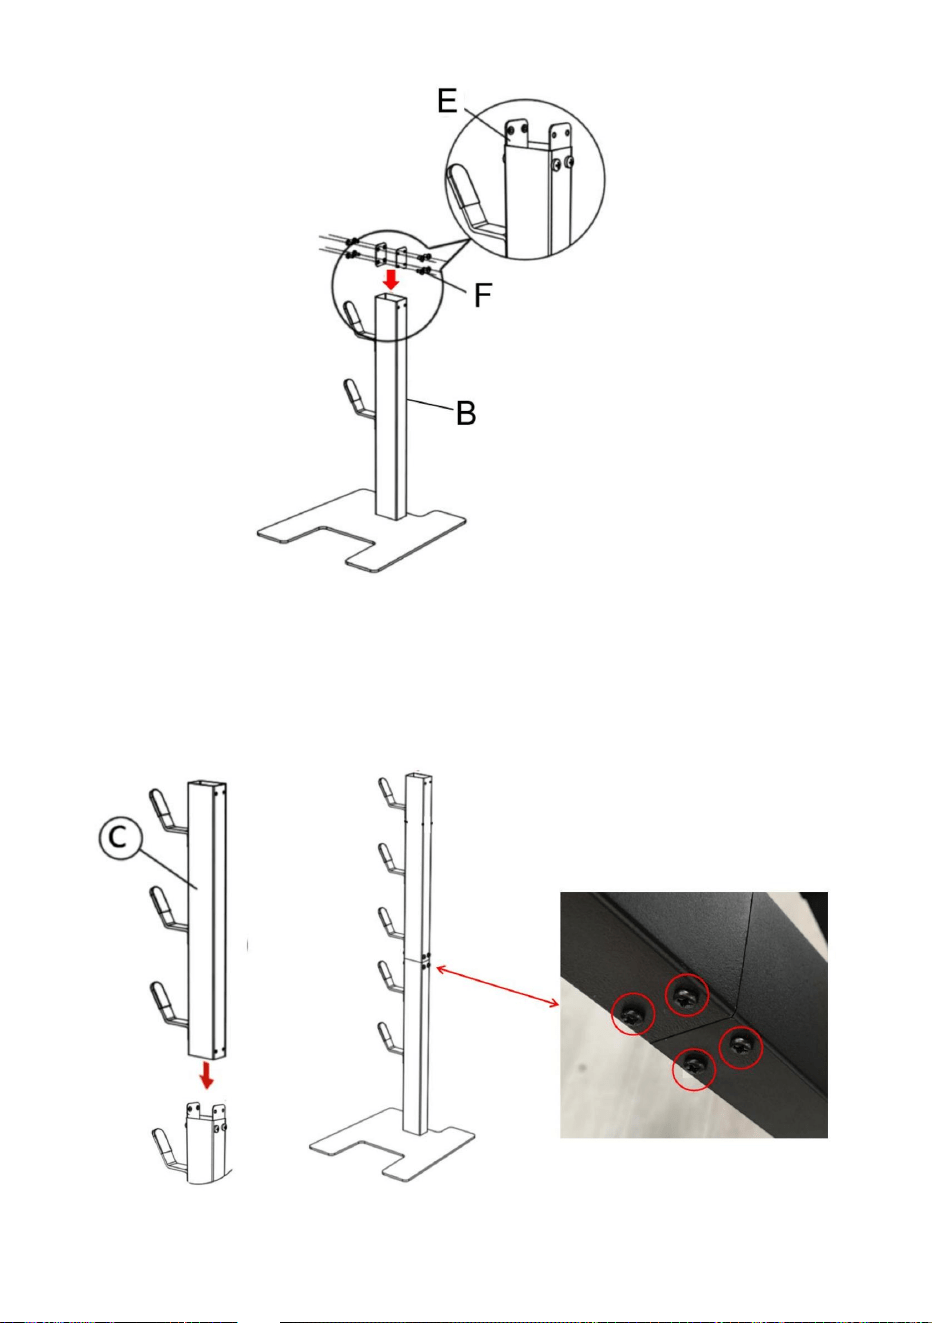
2.Install middle bracket C on lower bracket B.
2.1.Place two connector E into the inner chamber of lower bracket B, align
the screw holes of bracket B and connector E, and secure both with two
cross recessed round head screws F.

- 5 -
2.2.Cover the middle bracket C into the connector E, align the two screw
holes, and fix with cross recessed round head screws F;

- 6 -
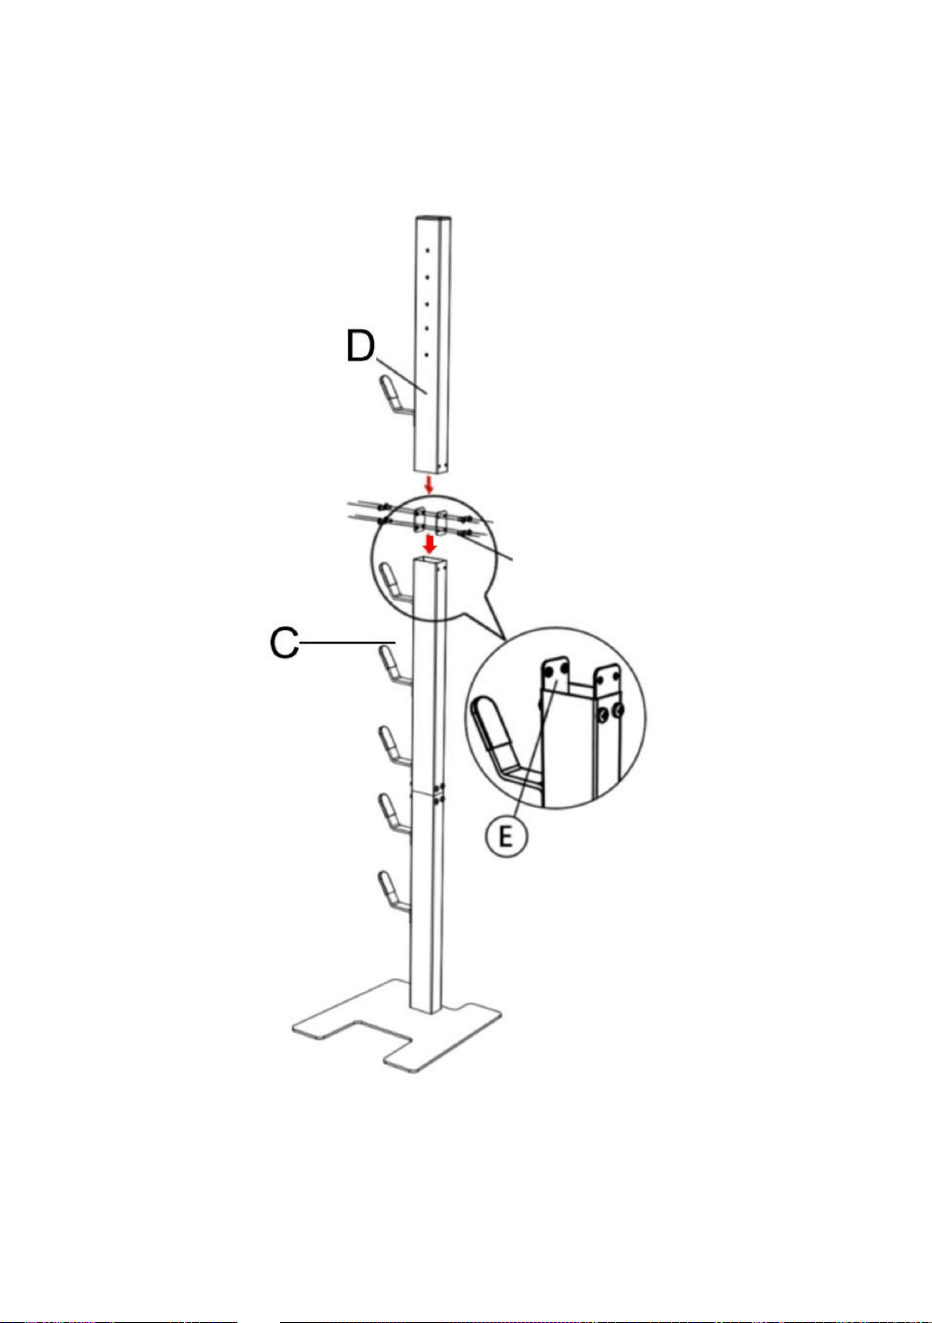
3.Same manner as in the second step,install upper bracket D on
middle bracket C.
Note:Use two connector E and 8 cross recessed round head screws F
- 7 -
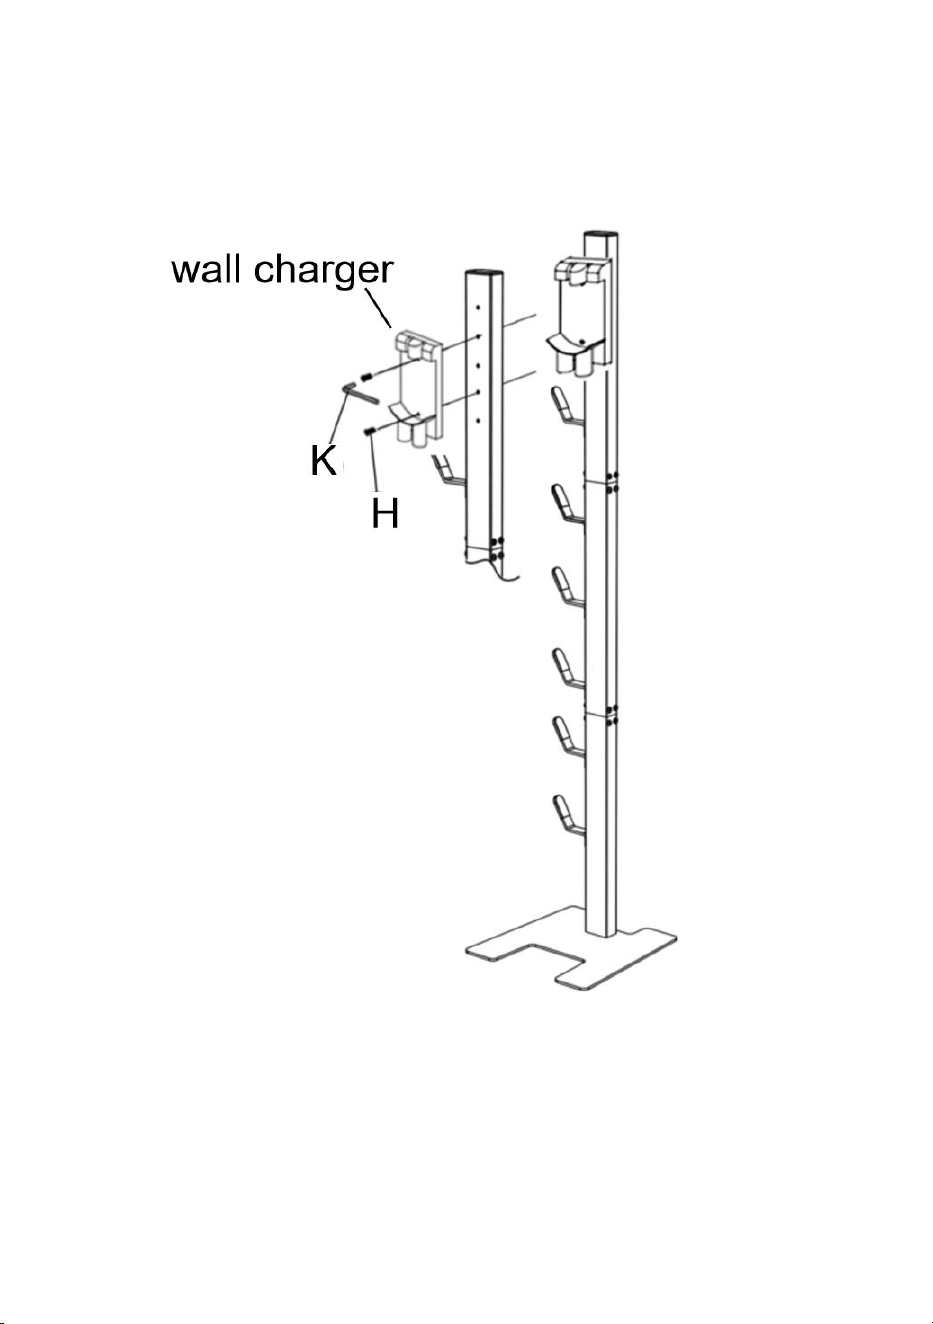
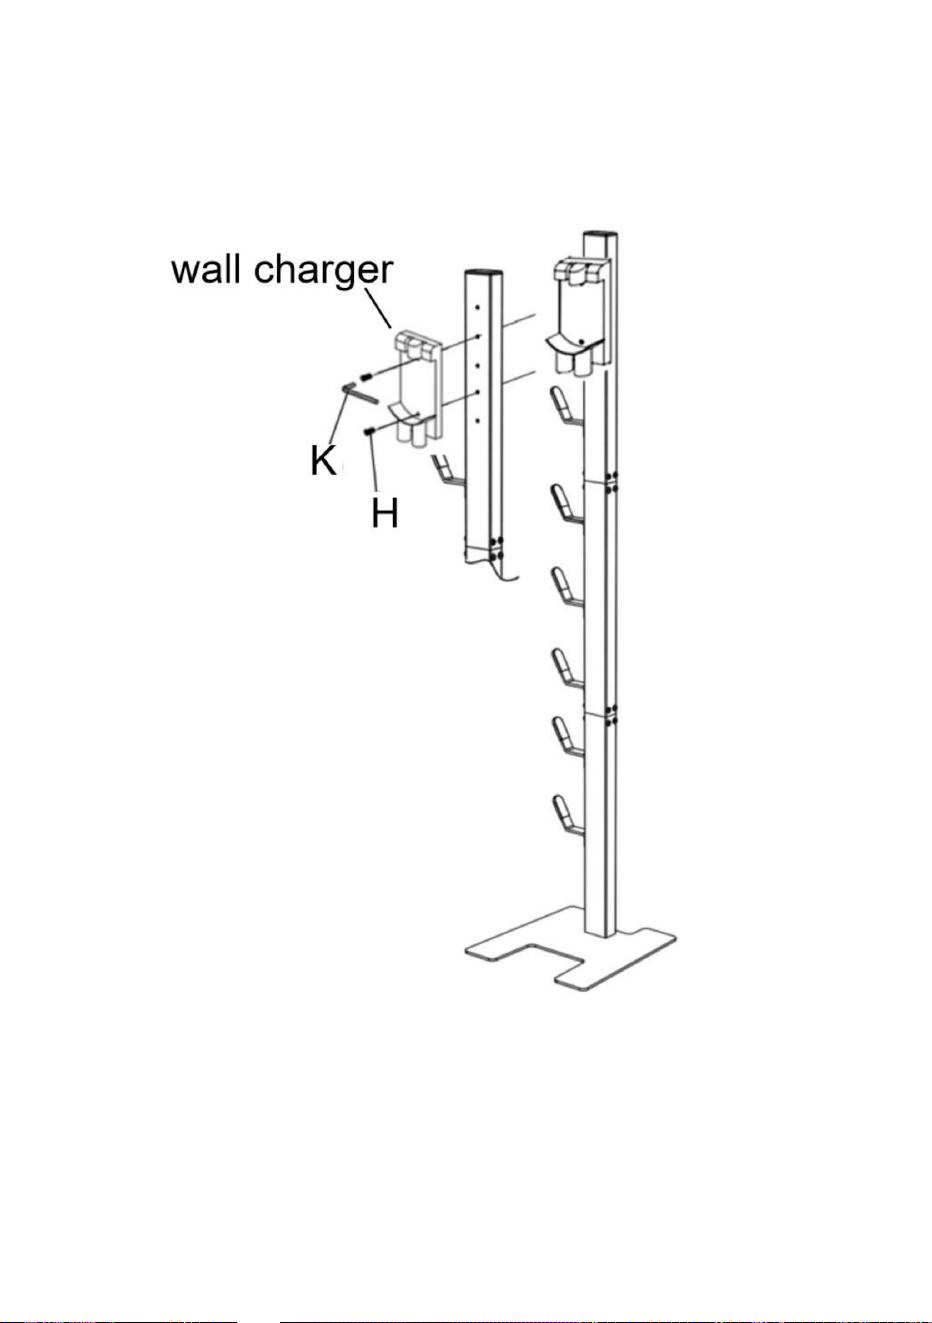
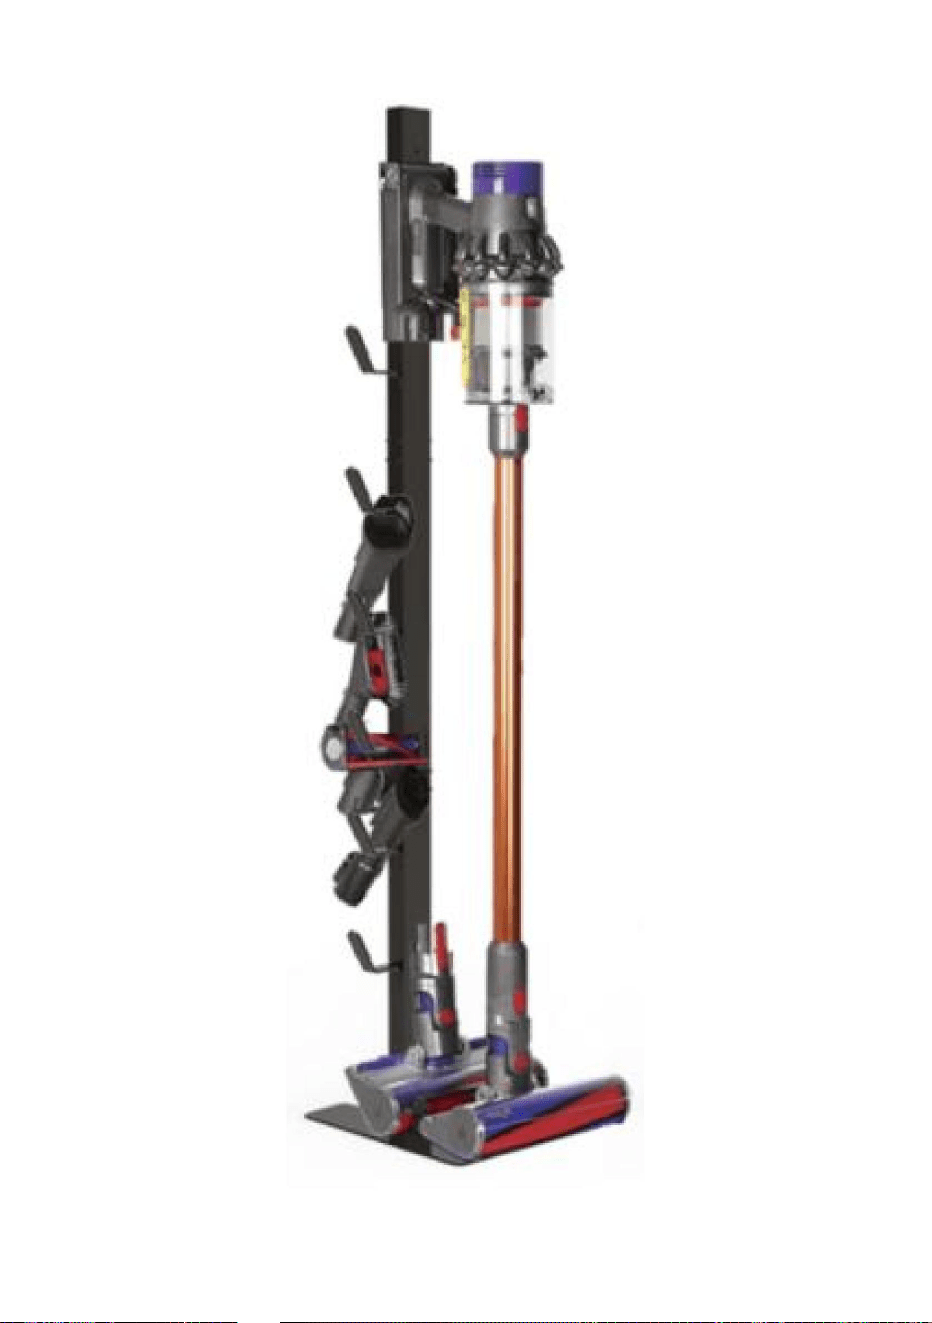
4.Attach the wall charger to the upper bracket D by 2 screws H.
Note:The screws can be tightened by a hex Wrench K, but the package
does not include the wall charger,which needs to be purchased extra
yourself.
5.After assembly, place the product on flat ground to avoid tilting;
stay away from children and pets.

- 8 -
- 9 -
Manufacturer: Shanghaimuxinmuyeyouxiangongsi
Address: Shuangchenglu 803nong11hao1602A-1609shi, baoshanqu,
shanghai 200000 CN.
Imported to AUS: SIHAO PTY LTD. 1 ROKEVA STREETEASTWOOD
NSW 2122 Australia
Imported to USA: Sanven Technology Ltd. Suite 250, 9166 Anaheim
Place, Rancho Cucamonga, CA 91730
REP
UK
YH CONSULTING LIMITED. C/O YH Consulting
Limited Office 147, Centurion House, London
Road, Staines-upon-Thames, Surrey, TW18 4AX
REP
EC
E-CrossStu GmbH
Mainzer Landstr.69,
60329 Frankfurt am Main.


MODÈLE:HLFGSJLG01
«Économisezlamoitié»,«Moitiéprix»outouteautreexpressionsimilaireutiliséepar
nousnereprésentequ'uneestimationdeséconomiesquevouspourriezréaliserenachetant
certainsoutilscheznousparrapportauxgrandesmarquesetnecouvrepasnécessairementtoutes
lescatégoriesd'outilsquenousproposons.Nousvousrappelonsdebienvouloirvérifier
soigneusementlorsquevouspassezunecommandecheznoussivous
économisezréellementlamoitiéparrapportauxgrandesmarques.
Nouscontinuonsànousengageràvousfournirdesoutilsàdesprixcompétitifs.
SUPPORTSOUSVIDE
Assistancetechniqueetcertificatdegarantieélectroniquewww.vevor.com/support
Machine Translated by Google

Machine Translated by Google
Vousavezdesquestionssurnosproduits?Vousavezbesoind'assistancetechnique?
N'hésitezpas
ànouscontacter:Assistancetechniqueetcertificatdegarantie
électroniquewww.vevor.com/support
Modèle:HLFGSJLG01
Ils'agitdelanoticed'utilisationd'origine.Veuillezlireattentivementtoutesles
instructionsdumanuelavantdel'utiliser.VEVORseréserveledroitd'interpréterclairement
notremanueld'utilisation.L'apparenceduproduitdépendduproduitquevousavez
reçu.Veuilleznousexcuser,nousnevousinformeronsplusencasdemiseàjourtechnologique
oulogicielledenotreproduit.
Supportpouraspirateur
BESOIND'AIDE?CONTACTEZNOUS!
1
Machine Translated by Google
4.Installezleproduitconformémentàcesinstructionspouréviterlesblessuresdupersonnelou
6pièces
relâchementdûàl'utilisationprolongéeduproduit.
têterondeencastrée
NON
vis×16pièces
D:supportsupérieur×1pièce
5.Veuillezresserrerrégulièrementlesvisdechaquepiècepouréviterquelavisnesedesserre.
E:connecteurs×4pièces
1.Lesproduitsdoiventêtreinstalléspardesadultes;
tailleduproduit
Modèle
C:crochetdumilieu×
1pièce
3.Veuillezporterdesgantspourinstallerleproduitafind'éviterlesblessuresauxmains;
B:supportinférieur×1pièce
2.Lesproduitssontinstallésloindesenfantsetdesanimauxdomestiques;
Nombretotald'hameçons
A:Base×1pièce
Roueroulante
dommageauproduit.
HLFGSJLG01
L*l*H:280×290×1270mm
F:M4*8croix
LISTEDESPARAMÈTRES
CONSIGNESDESÉCURITÉ
Listedespièces
2
Machine Translated by Google
Diagrammededécompositionduproduit
G:VisM6*25×4piècesH:VisM5*20×2pièces
K:cléM8×1pièce
Tournevis×1pièce
J:Phillips
K:clé
hexagonale×1pièce
3
Machine Translated by Google

UtilisezlesvisGpourverrouillerlesupportinférieurBdepuislebasdelabaseA.
2.InstallezlesupportcentralCsurlesupportinférieurB.
Remarque:LecrochetdusupportinférieurBmonte,directementfaceaucôtégaucheouau
côtédroitdelabase.
1.InstallezlesupportinférieurBsurlabaseA
2.1.PlacezdeuxconnecteursEdanslachambreintérieuredusupportinférieurB,alignezles
trousdevisdusupportBetduconnecteurE,etfixezlesdeuxavecdeuxvisàtêterondeà
empreintecruciformeF.
Guided'installation
4
Machine Translated by Google

5
2.2.CouvrezlesupportcentralCdansleconnecteurE,alignezlesdeuxtrousdevis
etfixezleavecdesvisàtêterondeàempreintecruciformeF;
Machine Translated by Google

6
supportmédianC.
3.Delamêmemanièrequ'àladeuxièmeétape,installezlesupportsupérieurDsur
Remarque:utilisezdeuxconnecteursEet8visàtêterondeàempreintecruciformeF
Machine Translated by Google

7
Remarque:lesvispeuventêtreserréesàl'aided'unecléhexagonaleK,maislecolisn'inclut
paslechargeurmural,quidoitêtreachetéenplusvousmême.
4.FixezlechargeurmuralausupportsupérieurDàl'aidede2visH.
5.Aprèsl'assemblage,placezleproduitsurunsolplatpourévitertoutbasculement;restez
loindesenfantsetdesanimauxdomestiques.
Machine Translated by Google

8
Machine Translated by Google

REPRÉSENTANTDUROYAUMEUNI
REPRÉSENTANTDELACE
ImportéauxÉtatsUnis:SanvenTechnologyLtd.Suite250,9166AnaheimPlace,
RanchoCucamonga,CA91730
ECrossStuGmbH
MainzerLandstr.69,
60329FrancfortsurleMain.
ImportéenAustralie:SIHAOPTYLTD.1ROKEVASTREETEASTWOODNSW2122
Australie
Fabricant:ShanghaimuxinmuyeyouxiangongsiAdresse:
Shuangchenglu803nong11hao1602A1609shi,baoshanqu,shanghai200000CN.
YHCONSULTINGLIMITED.C/OYHConsultingLimited
Bureau147,CenturionHouse,LondonRoad,Staines
uponThames,Surrey,TW184AX
9
Machine Translated by Google


MODELL:HLFGSJLG-01
„Sparen Sie die Hälfte“, „Halber Preis“ oder andere ähnliche Ausdrücke, die wir verwenden,
stellen nur eine Schätzung der Ersparnis dar, die Sie beim Kauf bestimmter Werkzeuge bei uns
im Vergleich zu den großen Topmarken erzielen können, und decken nicht unbedingt alle von uns
angebotenen Werkzeugkategorien ab. Wir möchten Sie freundlich daran erinnern, bei Ihrer
Bestellung bei uns sorgfältig zu prüfen, ob Sie im Vergleich zu den großen
Topmarken tatsächlich die Hälfte sparen.
Wir sind weiterhin bestrebt, Ihnen Werkzeuge zu wettbewerbsfähigen Preisen anzubieten.
VAKUUMSTÄNDER
Technischer Support und E-Garantie-Zertifikat www.vevor.com/support
Machine Translated by Google

Machine Translated by Google

Haben Sie Fragen zum Produkt? Benötigen Sie technischen Support? Bitte kontaktieren Sie
uns:
Technischer Support und E-Garantie-Zertifikat www.vevor.com/
support
Modell:HLFGSJLG-01
Dies ist die Originalanleitung. Bitte lesen Sie alle Anweisungen sorgfältig durch, bevor
Sie das Gerät in Betrieb nehmen. VEVOR behält sich eine klare Auslegung unserer
Bedienungsanleitung vor. Das Erscheinungsbild des Produkts richtet sich nach dem
Produkt, das Sie erhalten haben. Bitte verzeihen Sie uns, dass wir Sie nicht erneut informieren,
wenn es Technologie- oder Software-Updates für unser Produkt gibt.
Brauchen Sie Hilfe? Kontaktieren Sie uns!
Vakuumständer
- 1 -
Machine Translated by Google

4.Installieren Sie das Produkt gemäß dieser Anleitung, um Verletzungen oder
6 Stück
Lockerung durch langfristige Verwendung des Produkts.
versenkter runder Kopf
NEIN
Schraube × 16 Stück
D: obere Halterung × 1 Stück
5.Bitte ziehen Sie die Schrauben der einzelnen Teile regelmäßig nach, um zu vermeiden, dass die Schraube
E: Anschlüsse×4Stk
1. Die Produkte müssen von Erwachsenen installiert werden.
Produktgröße
Modell
C: mittlere Klammer×
1 Stück
3. Bitte tragen Sie bei der Installation des Produkts Handschuhe, um Handverletzungen zu vermeiden.
B: untere Halterung × 1 Stück
2. Produkte werden außerhalb der Reichweite von Kindern und Haustieren installiert.
Gesamtzahl der Haken
A: Basis × 1 Stück
Rollendes Rad
Produktschäden.
HLFGSJLG-01
L*B*H:280×290*1270mm
F:M4*8 Kreuz
PARAMETERLISTE
SICHERHEITSHINWEISE
Ersatzteilliste
- 2 -
Machine Translated by Google
Produktzerlegungsdiagramm
Schraubendreher × 1 Stück
K: M8-Schraubenschlüssel×1 Stk
G: M6*25-Schraube × 4 Stück H: M5*20-Schraube × 2 Stück
J: Phillips
K:
Inbusschlüssel × 1 Stk
- 3 -
Machine Translated by Google

Hinweis: Der Haken der unteren Halterung B zeigt nach oben und ist direkt der linken bzw. rechten Seite der
Basis zugewandt.
2. Installieren Sie die mittlere Halterung C an der unteren Halterung B.
Mit den Schrauben G die untere Halterung B von der Unterseite der Basis A aus verriegeln.
1.Installieren Sie die untere Halterung B auf der Basis A
2.1.Setzen Sie zwei Verbinder E in die innere Kammer der unteren Halterung B ein, richten Sie die
Schraubenlöcher von Halterung B und Verbinder E aus und befestigen Sie beide mit zwei
Kreuzschlitzschrauben F.
Installationshandbuch
- 4 -
Machine Translated by Google

- 5 -
2.2. Stecken Sie die mittlere Halterung C in den Anschluss E, richten Sie die beiden
Schraubenlöcher aus und befestigen Sie sie mit Kreuzschlitzschrauben F.
Machine Translated by Google

- 6 -
mittlere Klammer C.
3.Montieren Sie die obere Halterung D auf die gleiche Weise wie im zweiten Schritt.
Hinweis: Verwenden Sie zwei Verbinder E und 8 Kreuzschlitzschrauben F
Machine Translated by Google

- 7 -
Hinweis: Die Schrauben können mit einem Inbusschlüssel K festgezogen werden. Im Lieferumfang
ist jedoch kein Wandladegerät enthalten, das Sie separat erwerben müssen.
4. Befestigen Sie das Wandladegerät mit zwei Schrauben H an der oberen Halterung D.
5. Stellen Sie das Produkt nach der Montage auf einen ebenen Boden, um ein Umkippen zu
vermeiden; halten Sie es von Kindern und Haustieren fern.
Machine Translated by Google

- 8 -
Machine Translated by Google

Vertreter der EG
UK REP
Importiert in die USA: Sanven Technology Ltd. Suite 250, 9166 Anaheim Place,
Rancho Cucamonga, CA 91730
E-CrossStu GmbH
Mainzer Landstr.69,
60329 Frankfurt am Main.
Nach AUS importiert: SIHAO PTY LTD. 1 ROKEVA STREETEASTWOOD NSW 2122
Australien
Hersteller: Shanghaimuxinmuyeyouxiangongsi Adresse:
Shuangchenglu 803nong11hao1602A-1609shi, baoshanqu, Shanghai 200000 CN.
YH CONSULTING LIMITED. C/O YH Consulting Limited
Office 147, Centurion House, London Road, Staines-
upon-Thames, Surrey, TW18 4AX
- 9 -
Machine Translated by Google


SUPPORTO PER VUOTO
"Risparmia la metà", "Metà prezzo" o qualsiasi altra espressione simile da noi
utilizzata rappresenta solo una stima del risparmio che potresti ottenere acquistando
determinati utensili con noi rispetto ai principali marchi principali e non significa
necessariamente coprire tutte le categorie di utensili da noi offerti. Ti ricordiamo
gentilmente di verificare attentamente quando effettui un ordine con noi
se stai effettivamente risparmiando la metà rispetto ai principali marchi principali.
Continuiamo a impegnarci per fornirvi strumenti a prezzi competitivi.
MODELLO:HLFGSJLG-01
Supporto tecnico e certificato di garanzia elettronica www.vevor.com/support
Machine Translated by Google

Machine Translated by Google

Hai domande sul prodotto? Hai bisogno di supporto tecnico? Non esitare a contattarci:
Supporto
tecnico e certificato di garanzia elettronica www.vevor.com/
support
Modello:HLFGSJLG-01
Questa è l'istruzione originale, si prega di leggere attentamente tutte le istruzioni del
manuale prima di utilizzare. VEVOR si riserva una chiara interpretazione del nostro manuale
utente. L'aspetto del prodotto sarà soggetto al prodotto ricevuto. Vi preghiamo di
perdonarci se non vi informeremo di nuovo se ci sono aggiornamenti tecnologici o software sul
nostro prodotto.
HAI BISOGNO DI AIUTO? CONTATTACI!
Supporto per vuoto
- 1 -
Machine Translated by Google

dimensione del prodotto
1. I prodotti devono essere installati da adulti;
1 pz.
C: parentesi centrale×
Modello
E: connettori×4pz
NO
allentamento dovuto all'uso prolungato del prodotto.
D: staffa superiore×1 pz
5. Si prega di serrare nuovamente le viti di ogni parte regolarmente per evitare che la vite
6 pezzi
vite×16pz
testa tonda incassata
danni al prodotto.
L*W*H:280×290*1270mm
Modello: HLFGSJLG-01
4. Installare il prodotto secondo queste istruzioni per evitare lesioni personali o
F:M4*8 croce
A:Base × 1 pz.
3. Indossare guanti durante l'installazione del prodotto per evitare lesioni alle mani;
Ruota che rotola
Numero totale di ganci
2. I prodotti siano installati lontano dalla portata di bambini e animali domestici;
B: staffa inferiore × 1 pz.
ELENCO PARAMETRI
ISTRUZIONI DI SICUREZZA
Elenco dei pezzi
- 2 -
Machine Translated by Google

Diagramma di decomposizione del prodotto
G: Vite M6*25 × 4 pezzi H: Vite M5*20 × 2 pezzi
K: chiave
esagonale×1pz
Cacciavite ×1 pz
J: Phillips
K: chiave M8×1 pz
- 3 -
Machine Translated by Google

Nota: il gancio della staffa inferiore B va verso l'alto, direttamente rivolto verso il lato bianco
sinistro o verso il lato destro della base.
2. Installare la staffa centrale C sulla staffa inferiore B.
Utilizzare le viti G per bloccare la staffa inferiore B dalla parte inferiore della base A.
1. Installare la staffa inferiore B sulla base A
2.1. Posizionare due connettori E nella camera interna della staffa inferiore B, allineare i fori
delle viti della staffa B e del connettore E e fissare entrambi con due viti a testa tonda con
intaglio a croce F.
Guida all'installazione
- 4 -
Machine Translated by Google

- 5 -
2.2. Coprire la staffa centrale C nel connettore E, allineare i due fori per le viti e
fissare con le viti a testa tonda con intaglio a croce F;
Machine Translated by Google

- 6 -
parentesi mediana C.
3. Allo stesso modo del secondo passaggio, installare la staffa superiore D su
Nota: utilizzare due connettori E e 8 viti a testa tonda con intaglio a croce F
Machine Translated by Google

- 7 -
Nota: le viti possono essere serrate con una chiave esagonale K, ma la confezione non include il
caricabatterie da muro, che dovrà essere acquistato separatamente.
4. Fissare il caricabatterie da muro alla staffa superiore D mediante 2 viti H.
5. Dopo il montaggio, posizionare il prodotto su una superficie piana per evitare che si ribalti;
tenere lontano dalla portata dei bambini e degli animali domestici.
Machine Translated by Google

- 8 -
Machine Translated by Google

Rappresentante della CE
RAPPRESENTANZA DEL REGNO UNITO
Importato negli USA: Sanven Technology Ltd. Suite 250, 9166 Anaheim Place,
Rancho Cucamonga, CA 91730
YH CONSULTING LIMITED. C/O YH Consulting Limited
Ufficio 147, Centurion House, London Road, Staines-
upon-Thames, Surrey, TW18 4AX
Importato in AUS: SIHAO PTY LTD. 1 ROKEVA STREETEASTWOOD NSW 2122
Australia
Produttore: Shanghaimuxinmuyeyouxiangongsi Indirizzo:
Shuangchenglu 803nong11hao1602A-1609shi, baoshanqu, shanghai 200000 CN.
E-CrossStu GmbH
Mainzer Landstr.69,
60329 Francoforte sul Meno.
- 9 -
Machine Translated by Google


SOPORTEDEVACÍO
MODELO:HLFGSJLG01
Soportetécnicoycertificadodegarantíaelectrónicawww.vevor.com/support
"Ahorrelamitad","mitaddeprecio"ocualquierotraexpresiónsimilarqueutilicemos
solorepresentaunaestimacióndelahorroquepodríaobteneralcomprarciertas
herramientasconnosotrosencomparaciónconlasprincipalesmarcasynonecesariamente
significaquecubratodaslascategoríasdeherramientasqueofrecemos.Lerecordamos
que,alrealizarunpedidoconnosotros,verifiquecuidadosamentesi
realmenteestáahorrandolamitadencomparaciónconlasprincipalesmarcas.
Seguimoscomprometidosabrindarleherramientasaprecioscompetitivos.
Machine Translated by Google

Machine Translated by Google
1
Soportedevacío
¿NECESITAAYUDA?¡CONTÁCTENOS!
¿Tienepreguntassobreelproducto?¿Necesitaasistenciatécnica?Nodudeenponerseen
contactocon
nosotros:Asistenciatécnicaycertificadodegarantíaelectrónica
www.vevor.com/support
Modelo:HLFGSJLG01
Estassonlasinstruccionesoriginales,leaatentamentetodaslasinstruccionesdel
manualantesdeutilizarelproducto.VEVORsereservaunainterpretaciónclaradenuestro
manualdeusuario.Laaparienciadelproductoestarásujetaalproductoquerecibió.
Perdónenospornoinformarlenuevamentesihayactualizacionesdetecnologíaosoftwareen
nuestroproducto.
Machine Translated by Google

2
LISTADEPARÁMETROS
INSTRUCCIONESDESEGURIDAD
Listadepiezas
1.Losproductosdeberánserinstaladosporadultos;
Tamañodelproducto
2.Losproductosseinstalanlejosdelosniñosylasmascotas;
Númerototaldeganchos
1piezaB:soporteinferior×1pieza
3.Utiliceguantesparainstalarelproductoparaevitarlesionesenlasmanos;
Ruedarodante
A:Base×1pieza
4.Instaleelproductosegúnestasinstruccionesparaevitarlesionespersonaleso
HLFGSJLG01
F:M4*8cruz
Dañoalproducto.
LargoxAnchoxAlto:280x290x1270mm
cabezaredondaempotrada
5.Vuelvaaapretarlostornillosdecadapiezaperiódicamenteparaevitarqueseaflojen.
6piezas
Tornillo×16piezas
aflojamientodebidoalusoprolongadodelproducto.
NO
D:soportesuperior×1pieza
E:conectores×4pc
Modelo
C:corcheteintermedio×
Machine Translated by Google
3
G:TornilloM6*25×4piezasH:TornilloM5*20×2piezas
K:llave
hexagonal×1pieza
Destornillador×1pieza
J:Phillips
K:LlaveM8×1pieza
Diagramadedescomposicióndelproducto
Machine Translated by Google
4
Guíadeinstalación
UtilicelostornillosGparabloquearelsoporteinferiorBdesdelaparteinferiordelabaseA.
2.InstaleelsoportecentralCenelsoporteinferiorB.
Nota:ElganchodelsoporteinferiorBvahaciaarriba,mirandodirectamentehaciaellado
izquierdooelladoderechodelabase.
1.InstaleelsoporteinferiorBenlabaseA
2.1.ColoquedosconectoresEenlacámarainteriordelsoporteinferiorB,alineelosorificiosde
lostornillosdelsoporteBydelconectorE,yasegureamboscondostornillosdecabeza
redondaconranuraencruzF.
Machine Translated by Google

2.2.CubraelsoportecentralCenelconectorE,alineelosdosorificiosparatornillos
yfíjeloconlostornillosdecabezaredondaconranuraencruzF;
5
Machine Translated by Google

soporteintermedioC.
3.Delamismamaneraqueenelsegundopaso,instaleelsoportesuperiorDen
Nota:UtilicedosconectoresEy8tornillosdecabezaredondaconranuraencruzF
6
Machine Translated by Google
5.Despuésdelmontaje,coloqueelproductosobreunasuperficieplanaparaevitarqueseincline;
manténgaloalejadodelosniñosylasmascotas.
4.FijeelcargadordeparedalsoportesuperiorDcon2tornillosH.
Nota:LostornillossepuedenapretarconunallavehexagonalK,peroel
paquetenoincluyeelcargadordepared,quedebecomprarseporseparado.
7
Machine Translated by Google

8
Machine Translated by Google

REPRESENTANTECE
REPRESENTANTEDELREINOUNIDO
ImportadoaAUS:SIHAOPTYLTD.1ROKEVASTREETEASTWOODNSW2122
Australia
YHCONSULTINGLIMITED.ALADIRECCIÓNDEYH
ConsultingLimitedOficina147,CenturionHouse,London
Road,StainesuponThames,Surrey,TW184AX
ImportadoaEE.UU.:SanvenTechnologyLtd.Suite250,9166AnaheimPlace,Rancho
Cucamonga,CA91730
Fabricante:ShanghaimuxinmuyeyouxiangongsiDirección:
Shuangchenglu803nong11hao1602A1609shi,baoshanqu,shanghai200000CN.
ECrossStuGmbH
MainzerLandstr.69,
60329FráncfortdelMeno.
9
Machine Translated by Google


MODEL:HLFGSJLG-01
„Oszczędź połowę”, „Połowa ceny” lub inne podobne wyrażenia używane przez
nas stanowią jedynie szacunkowe oszczędności, jakie możesz uzyskać, kupując u nas
określone narzędzia w porównaniu z głównymi markami i niekoniecznie oznaczają one
objęcie wszystkich kategorii narzędzi oferowanych przez nas. Uprzejmie przypominamy,
aby dokładnie sprawdzić, czy składając u nas zamówienie faktycznie
oszczędzasz połowę w porównaniu z głównymi markami.
Nadal staramy się oferować Państwu narzędzia w konkurencyjnych cenach.
STOJAK PRÓŻNIOWY
Wsparcie techniczne i certyfikat gwarancji elektronicznej www.vevor.com/support
Machine Translated by Google

Machine Translated by Google

To jest oryginalna instrukcja, przed użyciem należy uważnie przeczytać wszystkie
instrukcje. VEVOR zastrzega sobie jasną interpretację naszej instrukcji obsługi. Wygląd produktu
będzie zależał od produktu, który otrzymałeś. Prosimy o wybaczenie, że nie poinformujemy
Cię ponownie, jeśli w naszym produkcie pojawią się jakiekolwiek aktualizacje technologiczne lub
oprogramowania.
Model:HLFGSJLG-01
Masz pytania dotyczące produktu? Potrzebujesz wsparcia technicznego? Skontaktuj się z nami:
Wsparcie
techniczne i certyfikat E-Gwarancji www.vevor.com/support
POTRZEBUJESZ POMOCY? SKONTAKTUJ SIĘ Z NAMI!
Stojak próżniowy
- 1 -
Machine Translated by Google

Całkowita liczba haczyków
C: środkowy wspornik×
B: dolny wspornik × 1 szt.
1. Produkty powinny być instalowane przez osoby dorosłe;
rozmiar produktu
1 szt.
E: złącza×4 szt
Model
poluzowania powstałe na skutek długotrwałego stosowania produktu.
NIE
D: górny wspornik × 1 szt.
5. Regularnie dokręcaj śruby każdej części, aby zapobiec ich uszkodzeniu.
6 szt.
śruba×16szt
uszkodzenie produktu.
Dł. x szer. x wys.: 280×290*1270 mm
zagłębiona okrągła główka
4. Zainstaluj produkt zgodnie z niniejszą instrukcją, aby uniknąć obrażeń ciała lub
HLFGSJLG-01
F:M4*8 krzyż
3. Aby uniknąć obrażeń dłoni, podczas instalacji produktu należy założyć rękawice.
Koło toczące się
A:Podstawa × 1 szt.
2. Produkty należy instalować w miejscu niedostępnym dla dzieci i zwierząt domowych;
LISTA PARAMETRÓW
INSTRUKCJE BEZPIECZEŃSTWA
Lista części
- 2 -
Machine Translated by Google

Schemat rozkładu produktu
Śrubokręt ×1 szt.
G: Śruba M6*25 × 4 szt. H: Śruba M5*20 × 2 szt
J: Phillips
K: klucz
imbusowy×1 szt K: Klucz M8 × 1 szt
- 3 -
Machine Translated by Google

Uwaga: Hak dolnego uchwytu B skierowany jest do góry, bezpośrednio w lewą lub prawą
stronę podstawy.
2. Zamontuj środkowy wspornik C na dolnym wsporniku B.
Za pomocą śrub G zablokuj dolny wspornik B od spodu podstawy A.
1. Zamontuj dolny wspornik B na podstawie A
2.1. Umieść dwa łączniki E w wewnętrznej komorze dolnego uchwytu B, wyrównaj otwory na
śruby uchwytu B i łącznika E, a następnie przymocuj oba elementy za pomocą dwóch śrub z
łbem okrągłym z gniazdem krzyżowym F.
Instrukcja instalacji
- 4 -
Machine Translated by Google

- 5 -
2.2. Przykryj środkowy wspornik C łącznikiem E, wyrównaj dwa otwory na śruby i
przymocuj za pomocą śrub z łbem okrągłym z gniazdem krzyżowym F;
Machine Translated by Google

- 6 -
Uwaga: Użyj dwóch łączników E i 8 śrub z łbem okrągłym z gniazdem krzyżowym F
3. W ten sam sposób, jak w kroku drugim, zamontuj górny wspornik D na
środkowy wspornik C.
Machine Translated by Google

- 7 -
Uwaga: Śruby można dokręcić kluczem imbusowym K, ale zestaw nie zawiera
ładowarki ściennej, którą należy dokupić osobno.
4. Przymocuj ładowarkę ścienną do górnego uchwytu D za pomocą 2 śrub H.
5. Po złożeniu należy umieścić produkt na płaskim podłożu, aby zapobiec jego przechyleniu. Należy
trzymać go z dala od dzieci i zwierząt domowych.
Machine Translated by Google

- 8 -
Machine Translated by Google

Przedstawiciel UE
REP WIELKIEJ BRYTANII
Importowane do USA: Sanven Technology Ltd. Suite 250, 9166 Anaheim Place, Rancho
Cucamonga, CA 91730
Importowane do AUS: SIHAO PTY LTD. 1 ROKEVA STREETEASTWOOD NSW 2122 Australia
Producent: Shanghaimuxinmuyeyouxiangongsi Adres:
Shuangchenglu 803nong11hao1602A-1609shi, baoshanqu, szanghaj 200000 CN.
YH CONSULTING LIMITED. C/O YH Consulting Limited Biuro
147, Centurion House, London Road, Staines-upon-
Thames, Surrey, TW18 4AX
E-CrossStu GmbH
Mainzer Landstr.69,
60329 Frankfurt nad Menem.
- 9 -
Machine Translated by Google


MODEL:HLFGSJLG-01
VACUÜMSTANDAARD
Technische ondersteuning en e-garantiecertificaat www.vevor.com/support
"Save Half", "Half Price" of andere soortgelijke uitdrukkingen die wij gebruiken, geven alleen
een schatting weer van de besparingen die u kunt behalen door bepaalde gereedschappen bij ons
te kopen in vergelijking met de grote topmerken en betekent niet noodzakelijkerwijs dat alle categorieën
gereedschappen die wij aanbieden, worden gedekt. Wij herinneren u eraan om zorgvuldig te
controleren of u daadwerkelijk de helft bespaart in vergelijking met de grote
topmerken wanneer u een bestelling bij ons plaatst.
Wij streven er voortdurend naar om u gereedschappen tegen concurrerende prijzen te leveren.
Machine Translated by Google

Machine Translated by Google

- 1 -
HULP NODIG? NEEM CONTACT MET ONS OP!
Vacuümstandaard
Heeft u vragen over het product? Heeft u technische ondersteuning nodig? Neem dan gerust
contact met
ons op: Technische ondersteuning en E-garantiecertificaat
www.vevor.com/support
Model:HLFGSJLG-01
Dit is de originele instructie, lees alle handleidingen zorgvuldig door voordat u het
product gebruikt. VEVOR behoudt zich een duidelijke interpretatie van onze
gebruikershandleiding voor. Het uiterlijk van het product is afhankelijk van het product
dat u hebt ontvangen. Vergeef ons dat we u niet opnieuw zullen informeren als er technologie-
of software-updates voor ons product zijn.
Machine Translated by Google

- 2 -
PARAMETERLIJST
VEILIGHEIDSINSTRUCTIES
Onderdelenlijst
productschade.
L*B*H:280×290*1270mm
5. Draai de schroeven van elk onderdeel regelmatig opnieuw vast om te voorkomen dat de schroeven losraken.
6 stuks
schroef×16st
Loslaten door langdurig gebruik van het product.
NEE
D:bovenste beugel×1st
Model
E: connectoren × 4 st
1. Producten moeten door volwassenen worden geïnstalleerd;
productgrootte
C: middelste haak×
2. Producten worden buiten bereik van kinderen en huisdieren geïnstalleerd;
Totaal aantal haken
1 stukB: onderste beugel × 1st
Rollend wiel
3. Draag handschoenen bij de installatie van het product om handletsel te voorkomen;
A: Basis × 1st
HLFGSJLG-01
F:M4*8 kruis
4. Installeer het product volgens deze instructies om persoonlijk letsel of
verzonken ronde kop
Machine Translated by Google

Productontledingsdiagram
G: M6*25 Schroef ×4 stuks H: M5*20 Schroef ×2 stuks
K:
inbussleutel × 1 st
Schroevendraaier ×1st
J: Phillips
K: M8-sleutel x 1 st
- 3 -
Machine Translated by Google

Let op: De haak van de onderste beugel B gaat omhoog, direct naar de linker- of rechterkant van de
basis gericht.
2.1. Plaats twee connectoren E in de binnenkamer van de onderste beugel B, lijn de schroefgaten van
beugel B en connector E uit en bevestig beide met twee kruiskopschroeven F.
Gebruik schroeven G om de onderste beugel B aan de onderkant van de basis A vast te zetten.
1. Monteer de onderste beugel B op basis A
2. Monteer de middelste beugel C op de onderste beugel B.
Installatiehandleiding
- 4 -
Machine Translated by Google
- 5 -
2.2. Plaats de middelste beugel C in de connector E, lijn de twee schroefgaten
uit en bevestig met kruiskopschroeven F;
Machine Translated by Google
- 6 -
midden haak C.
3. Op dezelfde manier als in de tweede stap, installeert u de bovenste beugel D op
Let op: Gebruik twee connector E en 8 kruiskopschroeven met ronde kop F
Machine Translated by Google

- 7 -
Let op: De schroeven kunnen worden vastgedraaid met een inbussleutel K, maar de verpakking
bevat geen wandlader, deze moet u zelf apart aanschaffen.
4. Bevestig de wandlader aan de bovenste beugel D met 2 schroeven H.
5. Plaats het product na montage op een vlakke ondergrond om kantelen te voorkomen.
Houd het product uit de buurt van kinderen en huisdieren.
Machine Translated by Google
- 8 -
Machine Translated by Google

EC-REP
VK REP
Geïmporteerd naar de VS: Sanven Technology Ltd. Suite 250, 9166 Anaheim Place,
Rancho Cucamonga, CA 91730
YH CONSULTING LIMITED. C/O YH Consulting Limited
Kantoor 147, Centurion House, London Road, Staines-
upon-Thames, Surrey, TW18 4AX
Geïmporteerd naar AUS: SIHAO PTY LTD. 1 ROKEVA STREETEASTWOOD NSW
2122 Australië
Fabrikant: Shanghaimuxinmuyeyouxiangongsi Adres:
Shuangchenglu 803nong11hao1602A-1609shi, baoshanqu, shanghai 200000 CN.
E-CrossStu GmbH
Mainzer Landstr.69,
60329 Frankfurt am Main.
- 9 -
Machine Translated by Google


VAKUUMSTÄLL
MODELL:HLFGSJLG-01
Teknisk support och e-garanticertifikat www.vevor.com/support
"Spara hälften", "halva priset" eller andra liknande uttryck som används av oss
representerar bara en uppskattning av besparingar du kan dra nytta av att köpa vissa
verktyg hos oss jämfört med de stora toppmärkena och betyder inte nödvändigtvis att täcka
alla kategorier av verktyg som erbjuds av oss. Du påminns om att noggrant kontrollera
när du gör en beställning hos oss om du verkligen sparar hälften i
jämförelse med de främsta varumärkena.
Vi fortsätter att vara engagerade i att ge dig verktyg till konkurrenskraftiga priser.
Machine Translated by Google

Machine Translated by Google

- 1 -
BEHÖVER HJÄLP? KONTAKTA OSS!
Vakuumstativ
Har du produktfrågor? Behöver du teknisk support? Kontakta oss gärna: Teknisk support och
e-
garanticertifikat www.vevor.com/support
Modell: HLFGSJLG-01
Detta är den ursprungliga instruktionen, läs alla instruktioner noggrant innan du
använder den. VEVOR reserverar sig för en tydlig tolkning av vår användarmanual. Utseendet
på produkten är beroende av den produkt du fått. Ursäkta oss att vi inte kommer att
informera dig igen om det finns någon teknik eller mjukvaruuppdateringar på vår produkt.
Machine Translated by Google
- 2 -
PARAMETERLISTA
SÄKERHETSINSTRUKTIONER
Lista över delar
1. Produkterna ska installeras av vuxna;
produktstorlek
2. Produkter installeras på avstånd från barn och husdjur;
Totalt antal krokar
1 stB: nedre fäste × 1 st
3. Använd handskar för att installera produkten för att undvika handskador;
Rullande hjul
A: Bas × 1 st
4. Installera produkten enligt denna instruktion för att undvika personskador eller
HLFGSJLG-01
F:M4*8 kors
produktskada.
L*B*H:280×290*1270mm
infällt runt huvud
5. Dra åt skruvarna på varje del regelbundet för att undvika skruven
6 st
skruv×16st
lossnar på grund av långvarig användning av produkten.
INGA
D:övre fäste×1st
E: kontakter×4st
Modell
C: mellanfäste×
Machine Translated by Google

- 3 -
Skruvmejsel × 1 st
K:
sexkantnyckel×1st
G: M6*25 Skruv ×4st H:M5*20 Skruv ×2st
J: Philips
K: M8-skiftnyckel×1st
Produktnedbrytningsdiagram
Machine Translated by Google

- 4 -
Installationsguide
Använd skruvarna G för att låsa nedre fästet B från botten av basen A.
2. Montera mellanfästet C på nedre fäste B.
Obs: Kroken på det nedre fästet B går uppåt, direkt vänd mot vänster sida eller höger sida av
basen.
1. Montera nedre fästet B på basen A
2.1.Placera två anslutningar E i den inre kammaren på det nedre fästet B, rikta in skruvhålen på
fästet B och anslutningen E, och fäst båda med två korsförsänkta runda skruvar F.
Machine Translated by Google

2.2.Täck mittfästet C in i kontaktdonet E, rikta in de två skruvhålen och
fixera med korsförsänkta skruvar F;
- 5 -
Machine Translated by Google

mellanfäste C.
3. På samma sätt som i det andra steget, montera övre fästet D på
Obs: Använd två kontakter E och 8 korsförsänkta skruvar F
- 6 -
Machine Translated by Google

Obs: Skruvarna kan dras åt med en sexkantnyckel K, men paketet
inkluderar inte väggladdaren, som måste köpas extra själv.
4. Fäst väggladdaren i det övre fästet D med 2 skruvar H.
5. Efter montering, placera produkten på plan mark för att undvika
lutning; håll dig borta från barn och husdjur.
- 7 -
Machine Translated by Google
- 8 -
Machine Translated by Google
EC REP
UK REP
Importerad till USA: Sanven Technology Ltd. Suite 250, 9166 Anaheim Place,
Rancho Cucamonga, CA 91730
YH CONSULTING LIMITED. C/O YH Consulting Limited
Office 147, Centurion House, London Road, Staines-
upon-Thames, Surrey, TW18 4AX
Importerad till AUS: SIHAO PTY LTD. 1 ROKEVA STREETEASTWOOD NSW 2122
Australien
Tillverkare: Shanghaimuxinmuyeyouxiangongsi Adress:
Shuangchenglu 803nong11hao1602A-1609shi, baoshanqu, shanghai 200000 CN.
E-CrossStu GmbH
Mainzer Landstr.69,
60329 Frankfurt am Main.
- 9 -
Machine Translated by Google