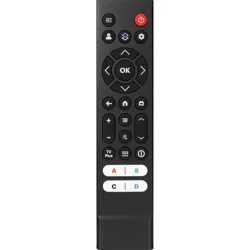
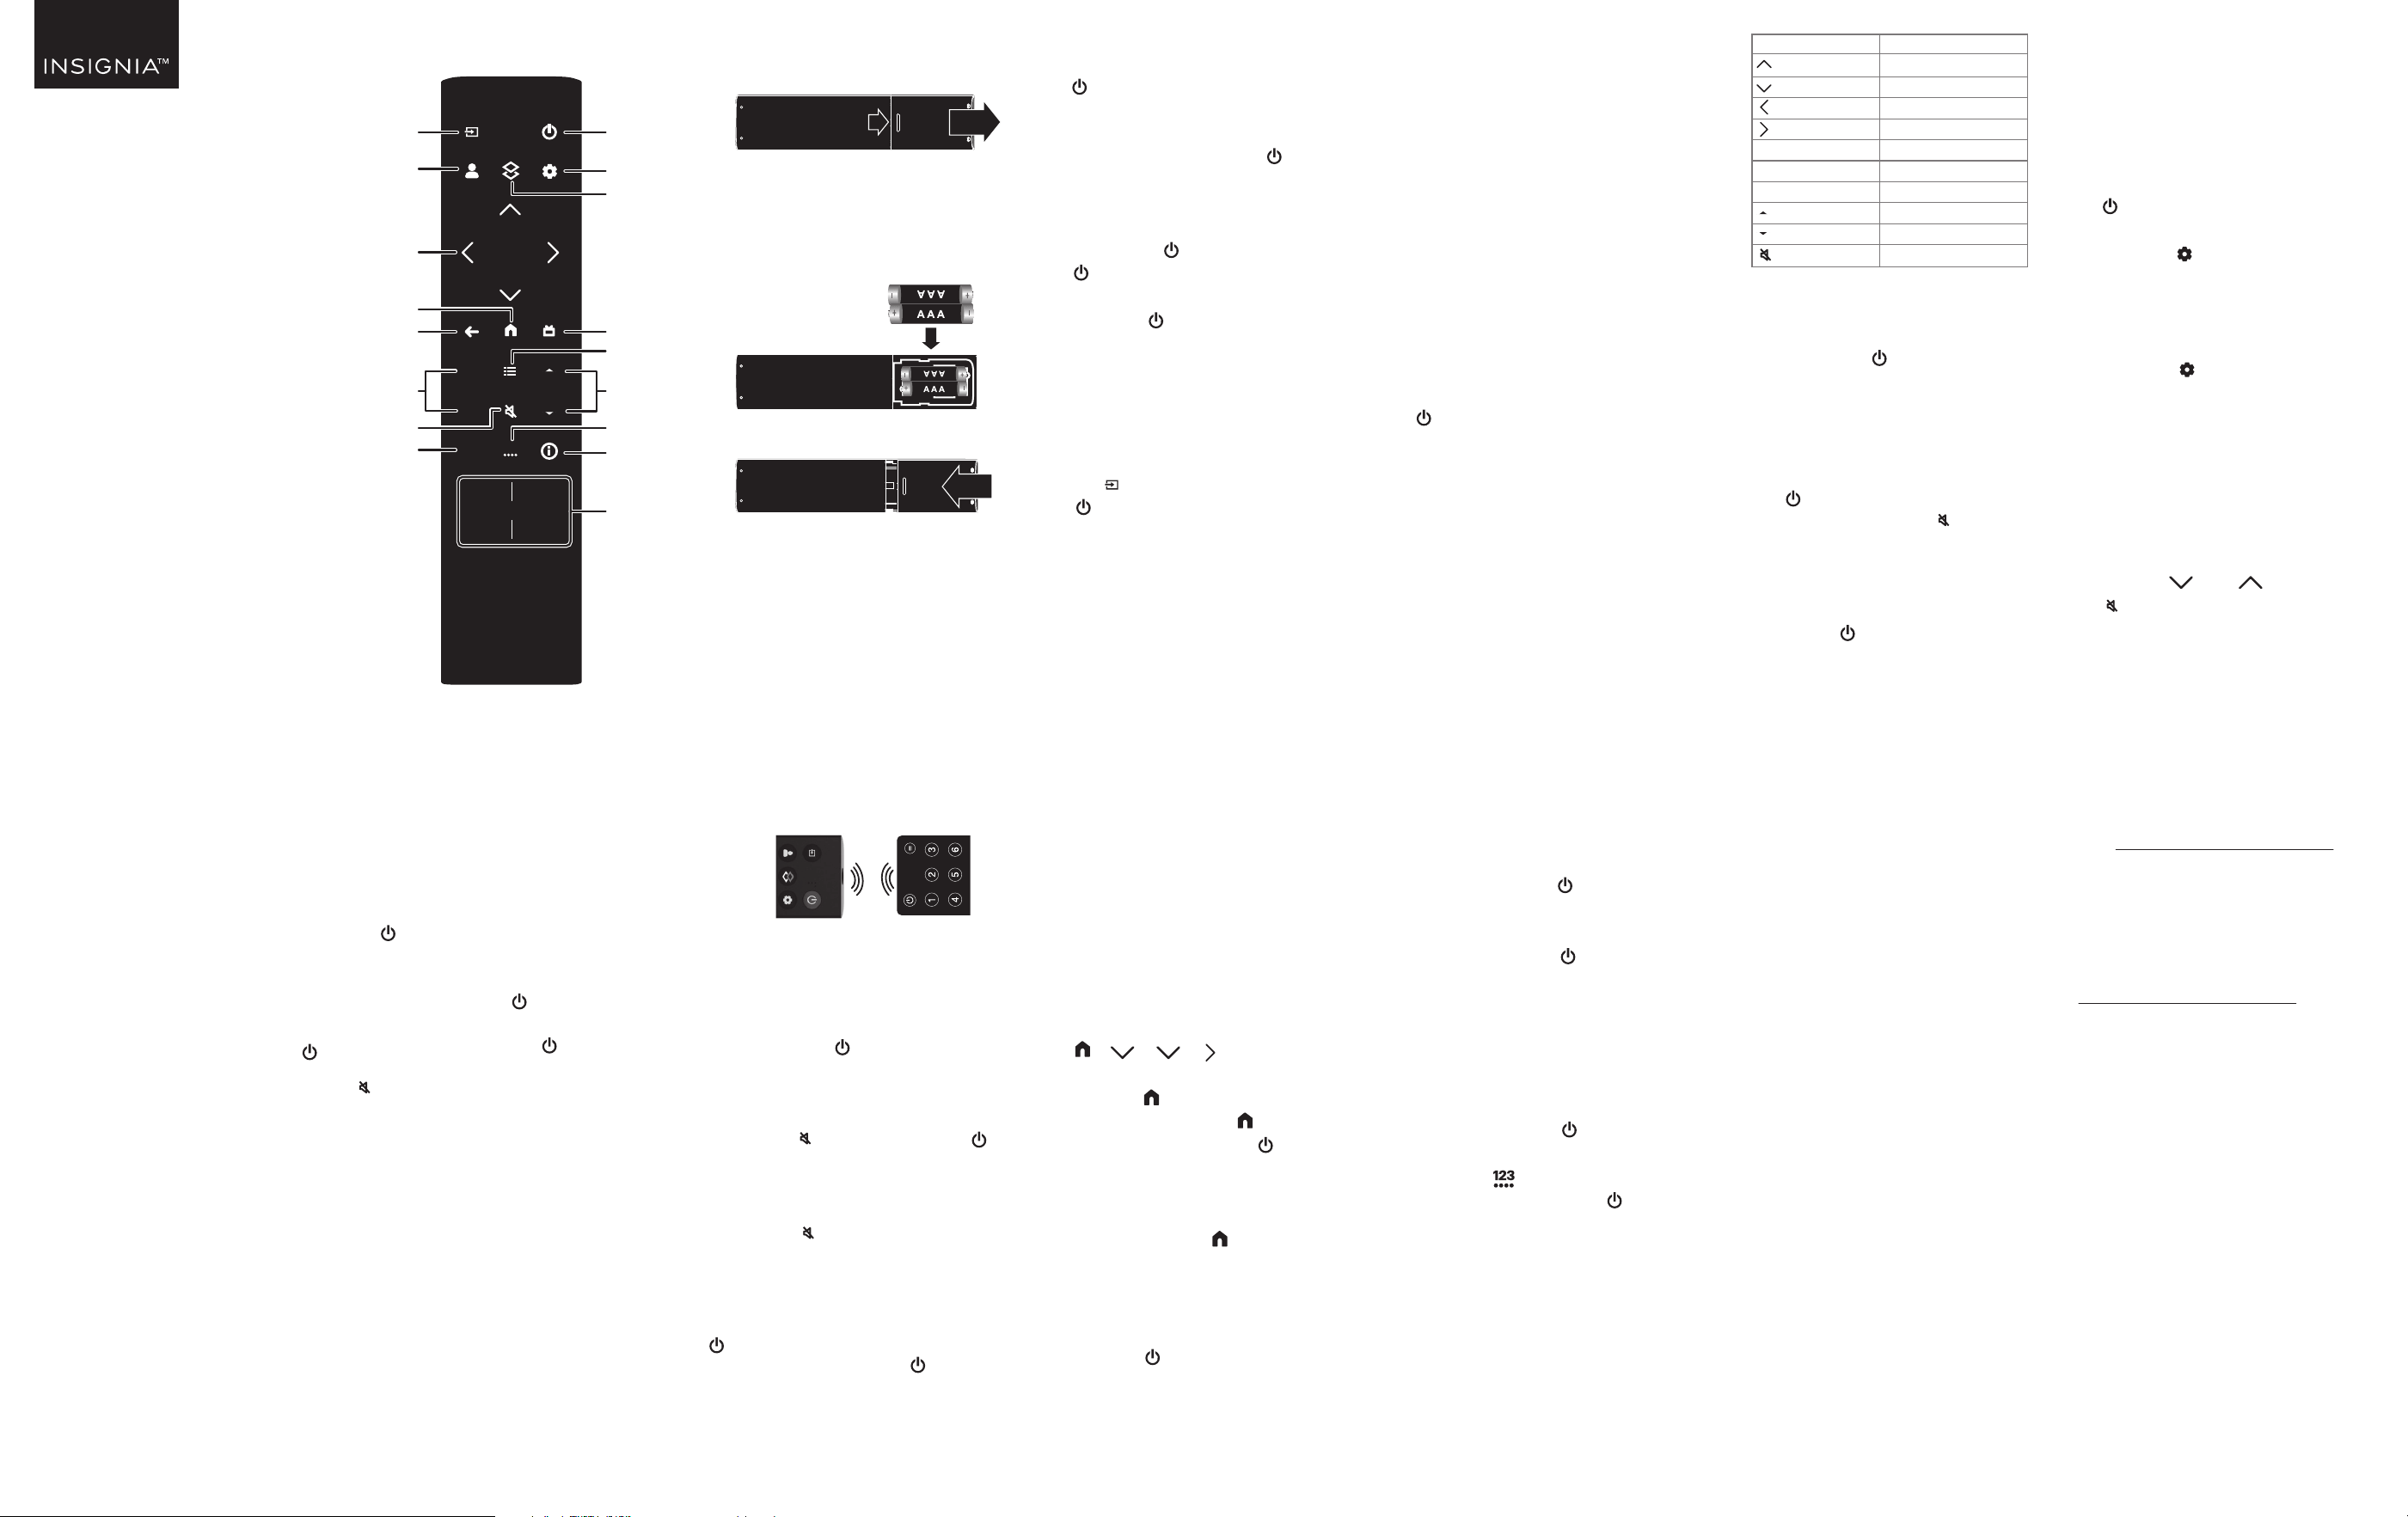
INSTALLING BATTERIES
1 Remove the battery cover.
2 Insert two AAA batteries (included)
into the battery compartment. Make
sure that the + and - symbols match
the + and - symbols in the
compartment.
3 Replace the battery cover.
SETTING UP YOUR REMOTE
Your Insignia remote is
pre-programmed to control most TCL
Google TVs. If the buttons do not work,
complete the following steps:
1 Make sure that your TV is plugged in
and turned on.
Before using your new product, please read
these instructions to prevent any damage.
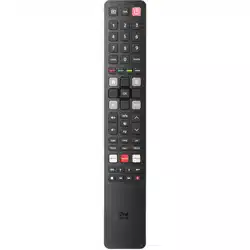
QUICK SETUP GUIDE
Replacement
Remote
NS-RMTTCL25
V2 ENGLISH 25-0731
4 Only when your audio device
mutes the sound, release the
button immediately (within three
seconds). The (Power) LED blinks
twice and your new remote saves
the code.
5 Your new remote should now
control the volume on your
connected audio device. Test this
by (Power), + (Volume up),
- (Volume down), and (Mute)
buttons.
Notes:
• Your new remote automatically exits
this mode after 15 seconds.
• To test the (Power) button, see
“Turning on all devices” for instructions.
Audio code setup
1 Make sure that your audio device
is turned on and playing music or
dialog.
2 On your new remote, press and
hold both the + (Volume up) and
- (Volume down) buttons until the
(Power) LED blinks twice and
stays on.
3 Press the (Settings) button once.
Your new remote control will
output 10 groups of codes. Wait
for the audio device to mute.
4 If your audio device is not muted,
press the (Settings) button
again until your audio device is
muted.
5 Restore the sound to your audio
device.
6 Press the + (Volume up) or -
(Volume down) buttons until your
audio device is muted, then press
the OK button to save.
7 Test the (Up)/ (Down) and
(Mute) buttons. The volume
buttons should now control the
volume of your sound bar or audio
devices.
8 If the buttons do not work, start
over from step 1 to reset.
2 On your new remote, press and
hold the A and C buttons until the
(Power) LED blinks twice and
stays on.
3 Point your new remote at your TV,
then press and hold the (Power)
button until your TV turns o.
4 When your TV turns o,
immediately (within three seconds)
release the (Power) button. The
(Power) LED blinks twice and
your remote saves the code.
5 Press the (Power) button to turn
your TV back on.
6 On your new remote, test the
other buttons to see if they work. lf
they do not, go to step 7.
7 If multiple buttons do not work as
expected, repeat steps 1-6 using
the (Input) button instead of the
(Power) button. Your TV should
react to the Input function instead
of turning o in step 4.
Notes:
• If multiple buttons require
programming, you may need to repeat
step 7 up to 13 times to complete your
remote setup.
• Some remote functions may vary
depending on your TV’s operating
system.
SETTING UP THE VOLUME
CONTROL ON YOUR SOUND
BAR, AUDIO RECEIVER, OR
SPEAKERS
If you have your TV connected to a
sound bar, audio receiver, or
speakers, you can set up your new
remote to control the volume of one
of these devices.
Simple setup
1 Make sure that your audio device
is turned on and playing music or
dialog.
2 On your new remote, press and
hold both the + (Volume up) and
- (Volume down) buttons until the
(Power) LED blinks three and
stays on.
3 Point your new remote at the
audio device and press and hold
the designated search key,
indicated in the table below, for at
least two minutes. For example,
press and hold the OK button for
LG/JVC/Amazon/Hisense products.
Note: You may have to hold the
designated search key for over two
minutes to complete setup.
PACKAGE CONTENTS
• Replacement remote
• AAA alkaline battery (2)
• Quick Setup Guide
FEATURES
Notes:
• Your new remote automatically exits this
mode after 15 seconds.
• After completing the audio setup, settings
are locked. To unlock and reset them, reset
the audio volume controls. See
“RESETTING THE AUDIO VOLUME
CONTROLS” for instructions.
Turning on all devices
If you used either the Simple setup or
Audio code setup to set up a sound bar
or audio device, press and hold the
(Power) button for three seconds to
turn on both your TV and audio device
at the same time. A quick press only
turns on your TV.
RESETTING THE AUDIO
VOLUME CONTROLS
You can reset the volume control back
to your sound bar or audio device.
1 Press and hold both the A and C
buttons for ve seconds, until the
(Power) LED blinks twice and stays
on.
2 Press the - (Volume down) button
three times. The (Power) LED
blinks two times to conrm the reset.
Note: This only resets the (Power),
+ (Volume up), - (Volume down), and
(Mute) buttons.
MACRO LEARNING FOR
SHORTCUT BUTTONS
Your new remote has four preset app
shortcut buttons, including
A, B, C, and D. To customize other
apps to these buttons, do the
following:
1 Make sure that the remote
controls your TV.
2 Plan the sequence you will use to
launch your app (for example,
> > > > OK).
3 On your new remote, press and
hold the (Home) and shortcut
button (for example, + A) for
three seconds until the (Power)
LED ashes once and stays on.
4 Point your new remote at the TV.
5 Press the sequence you planned in
step 2 (start with (Home)
button). Your new remote records
the steps and timing.
6 After launching the app, press and
hold the shortcut button (A) again,
until the (Power) LED blinks
twice.
Note: Wait for your TV to respond
between steps. Each shortcut can store up
to 15 steps. After 15 seconds of inactivity,
your new remote will automatically exit
the learning mode.
DELETING LEARNED
BUTTONS (IR/MACRO)
1 On your new remote, press and
hold the A and B buttons for ve
seconds until the (Power) LED
blinks twice and stays on.
2 Immediately press the target
button twice. The (Power) LED
blinks twice to conrm the
deletion.
FACTORY RESET
1 On your new remote, press and
hold the A and C buttons for ve
seconds. until the (Power) LED
blinks twice and stays on.
2 Press the (Virtual keyboard)
button three times. The (Power)
LED blinks three times to conrm
the reset.
IR LEARNING FUNCTION FOR
ALL BUTTONS
1 Place your old and new remotes on
the same level, about 1–2 in.
(2.5–5 cm) apart.
2 Press and hold both the B and C
buttons on the new remote for three
seconds. The (Power) LED blinks
twice and stays on (indicating that
the remote is in learning mode).
3 Press the button to be learned (for
example (Mute) button). The
(Power) LED blinks rapidly.
4 On your old remote, press the
desired button to be taught (in this
example (Mute) button) once for
short press remote functions, or hold
for three seconds for long press
remote functions.
Note: If the IR learning is successful, the
(Power) LED blinks and stays lit. If the IR
learning is unsuccessful, the (Power) LED
blinks continuously.
5 Your new remote automatically exits
IR learning mode after 15 seconds of
inactivity.
A
OK
123
B
CD
TV
Plus
+
-
Input
Prole selector
TV power/
Power LED
Settings
Quick panel
Home
Menu
Virtual keyboard
Live guide
Navigation
buttons
Back
Information
Shortcut buttons
Volume
TV Plus
Mute
Channel
LEGAL NOTICES
FCC Statement:
This equipment has been tested and found to comply with the
limits for a Class B digital device, pursuant to part 15 of the FCC
Rules. These limits are designed to provide reasonable
protection against harmful interference in a residential
installation. This equipment generates, uses and can radiate
radio frequency energy and, if not installed and used in
accordance with the instructions, may cause harmful
interference to radio communications. However, there is no
guarantee that interference will not occur in a particular
installation. If this equipment does cause harmful interference
to radio or television reception, which can be determined by
turning the equipment o and on, the user is encouraged to try
to correct the interference by one or more of the following
measures:
• Reorient or relocate the receiving antenna.
• Increase the separation between the equipment and receiver.
• Connect the equipment into an outlet on a circuit dierent
from that to which the receiver is connected.
• Consult the dealer or an experienced radio/TV technician for
help.
This device complies with part 15 of the FCC Rules. Operation is
subject to the following two conditions: (1) This device may not
cause harmful interference, and (2) this device must accept any
interference received, including interference that may cause
undesired operation.
Caution: Changes or modications not expressly approved by
the party responsible for compliance could void the user’s
authority to operate the equipment.
Original
remote
New
remote
ONE-YEAR LIMITED
WARRANTY
Visit www.insigniaproducts.com for
details.
CONTACT INSIGNIA:
For customer service, call
1-877-467-4289 (U.S. and Canada)
www.insigniaproducts.com
INSIGNIA is a trademark of Best Buy and its aliated companies.
Distributed by Best Buy Purchasing, LLC
7601 Penn Ave South, Richeld, MN 55423 U.S.A.
©2025 Best Buy. All rights reserved.
SEARCH KEY BRAND
Up Yamaha/Creative
Down Bose/Vizio/Philips
Left Denon/onn./Insignia
Right Samsung/Harman/Kardon
OK LG/JVC/Amazon/Hisense
+ (Volume up) Marantz
- (Volume down) Onkyo/Roku/Sonos
(Channel up) Panasonic/Technics
(Channel down) Pioneer/Polk Audio/JBL
Mute Sony/Klipsch
INSTALACIÓN DE LAS PILAS
1 Retire la cubierta de las pilas.
2 Inserte dos pilas AAA (incluidas) en
el compartimiento de las pilas.
Verique que los símbolos + y – en
las pilas correspondan con los
símbolos + y – en el
compartimiento.
3 Vuelva a colocar la tapa del
compartimiento de las pilas.
CONFIGURACIÓN DE SU
CONTROL REMOTO
Su control remoto del Insignia está
preprogramado para controlar la
mayoría de los televisores Google TV
de TCL. Si los botones no funcionan,
complete los siguientes pasos:
Antes de usar su producto nuevo, lea estas
instrucciones para prevenir cualquier daño.
GUÍA DE INSTALACIÓN
RÁPIDA
Control
remoto de
reemplazo
NS-RMTTCL25
V2 ESPAÑOL 25-0731
Nota: Es posible que tenga que mantener
pulsado el botón de búsqueda designado
durante más de dos minutos para
completar la conguración.
4 Solo cuando su dispositivo de audio
silencia el sonido, suelte el botón
inmediatamente (antes de tres
segundos). El LED (encendido)
parpadea dos veces y su control
remoto nuevo guarda el código.
5 Su nuevo control remoto debería
controlar ahora el volumen de su
dispositivo de audio conectado.
Compruébelo con los botones
(Encendido), + (Subir volumen), -
(Bajar volumen) y (Silenciar).
Notas:
• Su nuevo control remoto sale
automáticamente de este modo
transcurridos 15 segundos.
• Para probar el botón (Encendido),
consulte “Encendido de todos los
dispositivos” para obtener instrucciones.
Conguración del código de audio
1 Asegúrese de que su dispositivo de
audio está encendido y
reproduciendo música o diálogo.
2 En su nuevo control remoto,
mantenga pulsados los botones +
(Subir volumen) y - (Bajar volumen)
hasta que (Encendido) parpadee
dos veces y permanezca encendido.
3 Pulse una vez el botón
(Conguración). Su nuevo control
remoto generará 10 grupos de
códigos. Espere a que el dispositivo
de audio se silencie.
4 Si su dispositivo de audio no está
silenciado, pulse de nuevo el botón
(Conguración) hasta que su
dispositivo de audio se silencie.
5 Restablezca el sonido en su
dispositivo de audio.
6 Pulse los botones + (Subir volumen)
o - (Bajar volumen) hasta que su
dispositivo de audio se silencie y, a
continuación, pulse el botón OK
(Aceptar) para guardar.
1 Asegúrese de que su televisor esté
enchufado y encendido.
2 En su nuevo control remoto, mantenga
pulsados los botones A y C hasta que
el LED (Encendido) parpadee dos
veces y permanezca encendido.
3 Apunte con su nuevo control remoto al
televisor y, a continuación, mantenga
pulsado el botón (Encendido) hasta
que el televisor se apague.
4 Cuando el televisor se apague, suelte
inmediatamente (antes de tres
segundos) el botón (Encendido). El
(Encendido) parpadea dos veces y
el control remoto guarda el código.
5 Pulse (Encendido) para volver a
encender el televisor.
6 En su nuevo control remoto, pruebe los
demás botones para ver si funcionan.
Si no funcionan, vaya al paso 7.
7 Si varios botones no funcionan como se
espera, repita los pasos 1-6 utilizando el
botón (Entrada) en lugar del botón
(Encendido). Su televisor debería
reaccionar a la función Entrada en
lugar de apagarse en el paso 4.
Notas:
• Si es necesario programar varios botones,
es posible que tenga que repetir el paso 7
hasta 13 veces para completar la
conguración del control remoto.
• Algunas funciones del control remoto
pueden variar en función del sistema
operativo de su televisor.
CONFIGURACIÓN DEL CONTROL
DE VOLUMEN DE LA BARRA DE
SONIDO, EL RECEPTOR DE
AUDIO O LOS ALTAVOCES
Si tienes el televisor conectado a una
barra de sonido, un receptor de audio o
unos altavoces, puedes congurar su
nuevo control remoto para controlar el
volumen de uno de estos dispositivos.
Conguración básica
1 Asegúrese de que su dispositivo de
audio está encendido y
reproduciendo música o diálogo.
2 En su nuevo control remoto,
mantenga pulsados los botones +
(Subir volumen) y - (Bajar volumen)
hasta que (Encendido) parpadee
tres veces y permanezca encendido.
3 Apunte con su nuevo control remoto
al dispositivo de audio y mantenga
pulsado el botón de búsqueda
designada, indicado en la tabla
siguiente, durante al menos dos
minutos. Por ejemplo, mantenga
pulsado el botón OK (Aceptar) para los
productos LG/JVC/Amazon/Hisense.
CONTENIDO DEL PAQUETE
• Control remoto de reemplazo
• Pila alcalina AAA (2)
• Guía de instalación rápida
CARACTERÍSTICAS
7 Pruebe los botones (Subir)/
(Bajar) y (Silenciar). Los
botones de volumen deben
controlar el volumen de su barra de
sonido o de los dispositivos de
audio.
8 Si los botones no funcionan, vuelva
a empezar desde el paso 1 para
reiniciar.
Notas:
• Su nuevo control remoto sale
automáticamente de este modo
transcurridos 15 segundos.
• Después de completar la conguración de
audio, los ajustes se bloquean. Para
desbloquearlos y restablecerlos,
restablezca los controles de volumen de
audio. Consulte “RESTABLECER LOS
CONTROLES DE VOLUMEN DE AUDIO”
para obtener instrucciones.
Encendido de todos los dispositivos
Si ha utilizado la conguración simple
o la conguración de código de audio
para congurar una barra de sonido o
un dispositivo de audio, mantenga
pulsado el botón (Encendido)
durante tres segundos para encender
el televisor y el dispositivo de audio al
mismo tiempo. Una pulsación rápida
sólo enciende el televisor.
RESTABLECER LOS CONTROLES
DE VOLUMEN DE AUDIO
Puede restablecer el control de
volumen en su barra de sonido o
dispositivo de audio.
1 Mantenga pulsados los botones A y
C durante cinco segundos, hasta que
(Encendido) parpadee dos veces y
permanezca encendido.
2 Pulse tres veces el botón - (Bajar
volumen). El LED (Encendido)
parpadea dos veces para conrmar
el reinicio.
Nota: Esto sólo restablece los botones
(Encendido), + (Subir volumen), - (Bajar
volumen) y (Silenciar).
Nota: Si el aprendizaje por infrarrojos se
realiza correctamente, el LED (Encendido)
parpadea y permanece encendido. Si el
aprendizaje por infrarrojos no tiene éxito, el
LED (Encendido) parpadea continuamente.
5 Su nuevo control remoto sale
automáticamente del modo de
aprendizaje por infrarrojos tras
15 segundos de inactividad.
APRENDIZAJE DE MACROS PARA
BOTONES DE ACCESO DIRECTO
Su nuevo control remoto tiene cuatro
botones preestablecidos de acceso
directo a aplicaciones, que incluyen A, B,
C y D. Para personalizar otras aplicaciones
en estos botones, haga lo siguiente:
1 Asegúrese de que el control remoto
controla su televisor.
2 Planique la secuencia que utilizará
para lanzar su aplicación (por ejemplo,
> > > > OK).
3 En su nuevo control remoto,
mantenga pulsados (Inicio) y el
botón de acceso directo (por ejemplo,
+ A) durante tres segundos hasta
que el LED (Encendido) parpadee
una vez y permanezca encendido.
4 Apunte su nuevo control remoto hacia
el televisor.
5 Pulse la secuencia planicada en el
paso 2 (comience con el botón
(Inicio)). Su nuevo control remoto
registra los pasos y el tiempo.
6 Después de iniciar la aplicación,
mantenga pulsado el botón de
acceso directo (A) de nuevo, hasta
que (Encendido) LED parpadee
dos veces.
Nota: Espere a que el televisor responda
entre paso y paso. Cada acceso directo
puede almacenar hasta 15 pasos. Tras 15
segundos de inactividad, su nuevo control
remoto saldrá automáticamente del modo
de aprendizaje.
BORRAR BOTONES
APRENDIDOS (IR/MACRO)
1 En su nuevo control remoto,
mantenga pulsados los botones A y
B durante cinco segundos hasta que
(Encendido) parpadee dos veces y
permanezca encendido.
2 Pulse inmediatamente dos veces el
botón de objetivo. El LED
(Encendido) parpadea dos veces
para conrmar el borrado.
FUNCIÓN DE APRENDIZAJE
POR INFRARROJOS PARA
TODOS LOS BOTONES
1 Coloque el control remoto antiguo y
el nuevo al mismo nivel, a una
distancia de 2.5 a 5 cm (1 a 2 pulg.).
2 Mantenga pulsados los botones B y
C del nuevo control remoto durante
tres segundos. El LED (Encendido)
parpadea dos veces y permanece
encendido (lo que indica que el
control remoto está en modo de
aprendizaje).
3 Presione el botón que desea
memorizar (por ejemplo, el botón
(silenciar)). El LED (Encendido)
parpadea rápidamente.
4 En su control remoto viejo, pulse el
botón que desee enseñe (en este
ejemplo el botón (Silenciar)) una
vez para funciones de control
remoto de pulsación corta, o
manténgalo pulsado durante tres
segundos para las funciones de
control remoto de pulsación larga.
A
OK
123
B
CD
TV
Plus
+
-
Entrada
Selector
de perl
Encendido del
televisor/LED
de encendido
Conguración
Panel de
acceso rápido
Página
principal
Menú
Teclado virtual
Guía en directo
Botones de
navegación
Atrás
Información
Botones de
acceso directo
Volumen
TV Plus
Silenciar
Canal
RESTABLECIMIENTO DE
FABRICA
1 En su nuevo control remoto,
mantenga pulsados los botones A y C
durante cinco segundos. hasta que el
LED (Encendido) parpadee dos
veces y permanezca encendido.
2 Pulse tres veces (Teclado virtual).
El LED (Encendido) parpadea tres
veces para conrmar el reinicio.
AVISOS LEGALES
Declaración de la FCC:
Este dispositivo ha sido sometido a prueba y se ha determinado que
satisface los límites establecidos para ser clasicado como dispositivo
digital de Clase B, de acuerdo con la Parte 15 del reglamento FCC.
Estos límites están diseñados para proporcionar una protección
razonable contra interferencias dañinas en un ambiente residencial.
Este equipo genera, utiliza y puede irradiar energía de radiofrecuencia
y, si no se instala y utiliza de acuerdo con las instrucciones, puede
causar interferencias perjudiciales en las comunicaciones por radio.
Sin embargo, no se garantiza que no ocurrirá interferencia en una
instalación particular. Si este equipo causa interferencias perjudiciales
en la recepción de radio o televisión, lo cual puede determinarse
apagando y encendiendo el equipo, se recomienda al usuario que
intente corregir las interferencias mediante una o varias de las
siguientes medidas:
• Cambiar la orientación o la ubicación de la antena receptora.
• Aumentar la distancia entre el equipo y el receptor.
• Conectar el equipo a un tomacorriente de un circuito distinto de
aquel al que está conectado el receptor.
• Pedir consejo al distribuidor o a un técnico experto en radio y
televisión para obtener ayuda.
Control
remoto
original
Control
remoto
nuevo
Este dispositivo satisface la parte 15 del reglamento FCC. Su
utilización está sujeta a las siguientes dos condiciones: (1) este
dispositivo no puede causar interferencia dañina, y (2) este
dispositivo debe aceptar cualquier interferencia recibida
incluyendo interferencias que puedan causar una operación no
deseada.
Cuidado: Cualquier cambio o modicación que no esté aprobado
expresamente por la parte responsable por el cumplimiento puede
anular la autoridad del usuario para operar el equipo.
GARANTÍA LIMITADA DE UN
AÑO
Visite www.insigniaproducts.com para
obtener más detalles.
COMUNÍQUESE CON INSIGNIA:
Para servicio al cliente favor llamar al
1-877-467-4289 (Estados Unidos y
Canadá)
www.insigniaproducts.com
INSIGNIA es una marca comercial de Best Buy y sus compañías asociadas.
Distribuido por Best Buy Purchasing, LLC
7601 Penn Ave South, Richeld, MN 55423 U.S.A.
©2025 Best Buy. Todos los derechos reservados.
BOTÓN DE BÚSQUEDA MARCA
Arriba Yamaha/Creative
Abajo Bose/Vizio/Philips
Izquierdo Denon/onn./Insignia
Derecho Samsung/Harman/Kardon
OK (Aceptar) LG/JVC/Amazon/Hisense
+ (subir el volumen) Marantz
- (bajar el volumen) Onkyo/Roku/Sonos
(Subir canales) Panasonic/Technics
(Bajar canales) Pioneer/Polk Audio/JBL
(Silenciar) Sony/Klipsch