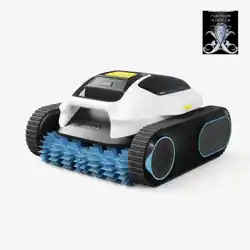
USER MANUAL
Robotic Pool Cleaner
SPINO E1
Original Instructions Version 2.0
08/2025

This manual is copyrighted by Mammotion company. Without the written permission of the company, any
unit or individual shall not copy, modify, reproduce, transcribe or transmit in any way or for any reason.
This manual is subject to change without notice at any time.
Unless explicitly agreed otherwise, this manual serves solely as a usage guide, and all statements and
information contained herein do not constitute any form of warranty.
Revision Log
Date
Version
Description
05/2025
V1.0
Initial version
08/2025
V2.0
1. Updated beta features
2. Added the Chapter 10
3. Updated technical specifications

CONTENTS
1 Safety Instructions ............................................................................................................................... - 1 -
1.1 General Safety ..............................................................................................................................- 1 -
1.2 Battery Safety .............................................................................................................................- 2 -
1.3 Intended Use .............................................................................................................................. - 2 -
1.4 Disposal ..................................................................................................................................... - 2 -
2 Introduction .........................................................................................................................................- 3 -
2.1 In the Box ................................................................................................................................... - 3 -
2.2 Product Overview .......................................................................................................................- 4 -
3 Operation ............................................................................................................................................. - 6 -
3.1 Charge Before Initial Use ............................................................................................................. - 6 -
3.2 Cleaning .....................................................................................................................................- 7 -
3.3 After Cleaning ...........................................................................................................................- 10 -
4 Mammotion App Operation ................................................................................................................- 12 -
4.1 Download and Register .............................................................................................................. - 12 -
4.2 Connect to Mammotion Account ................................................................................................ - 13 -
4.3 Update Firmware ...................................................................................................................... - 14 -
4.4 Upload Logs ..............................................................................................................................- 15 -
4.5 Beta Features ........................................................................................................................... - 16 -
5 Inspection and Maintenance ..............................................................................................................- 17 -
5.1 Cleaning .................................................................................................................................... - 17 -
5.2 Routine Inspection .................................................................................................................... - 17 -
5.3 Storage .................................................................................................................................... - 18 -
5.4 Replaceable Accessories ...........................................................................................................- 18 -
6 Product Specifications ......................................................................................................................- 20 -
6.1 Technical Specifications ........................................................................................................... - 20 -
7 Warranty ............................................................................................................................................ - 22 -
8 Compliance ........................................................................................................................................- 24 -
9 Simplified EU Declaration of Conformity ..........................................................................................- 26 -
10 Contact Us ........................................................................................................................................ - 27 -

- 1 -
1 Safety Instructions
1.1 General Safety
READ AND FOLLOW ALL INSTRUCTIONS
Carefully read and fully understand the instructions before operating the robotic pool cleaner.
Keep the robot out of reach of children and those with reduced physical, sensory, or mental capabilities
unless properly supervised. Do not allow anyone in the pool while the robot is operating, or allow
children to place it into or remove it from the pool.
Children must not play with the robot.
Cleaning and user maintenance shall not be made by children without supervision.
Ensure that children do not attempt to access the robot while it is operating.
Only use the robot and accessories recommended by Mammotion. Using unauthorized items may
result in incorrect operation or damage.
This robot must only be supplied at SELV.
Ensure the robot is turned off and the charger is unplugged before performing any maintenance.
Pollution of the liquid could occur due to leakage of lubricants.
Use the robot for regular pool cleaning. If the pool hasn't been cleaned for an extended period,
manually remove large debris before using the robot.
Do not strike, throw, or mishandle the robot to avoid damage or injury.
The charger must be connected only to a supply circuit that is protected by a ground-fault circuit-
interrupter (GFCI). This GFCI should be tested on a routine basis. To test the GFCI, push the test button.
The GFCI should interrupt power. Push the reset button. Power should be restored. If the GFCI fails to
operate in this manner, the GFCI is defective. If the GFCI interrupts power to the charger without the
test button being pushed, a ground current may be flowing, indicating the possibility of an electric
shock. Do not use the charger. Disconnect the charger and contact the manufacturer for assistance.
Warning: Use only with TS-A081-2703003 charger.

- 2 -
1.2 Battery Safety
Lithium-ion batteries can explode or cause a fire if disassembled, short-circuited, exposed to water, fire, or
high temperatures. Handle them with care, do not dismantle or open the battery, and avoid any form of
electrical/mechanical abuse. Store them away from direct sunlight.
For the purposes of recharging the battery, only use the charger provided with this robot, and operate
this charger at least 3.5 meters from the edge of the pool.
DO NOT ATTEMPT TO REPAIR OR MODIFY BATTERIES! Repair attempts may result in severe personal
injury, due to explosion or electrical shock. If a leak develops, released electrolytes are corrosive and
toxic.
This robot contains batteries that are only replaceable by authorized persons.
1.3 Intended Use
Mammotion robots are designed for residential pool cleaning and are not intended for commercial use.
1.4 Disposal
Dispose of this product in compliance with local electronic waste (WEEE) regulations. Do not dispose of it
with regular household waste. Instead, bring it to an authorized recycling center or collection point to
ensure safe handling and environmentally responsible disposal of electronic components.
SAVE THESE INSTRUCTIONS
- 3 -
2 Introduction
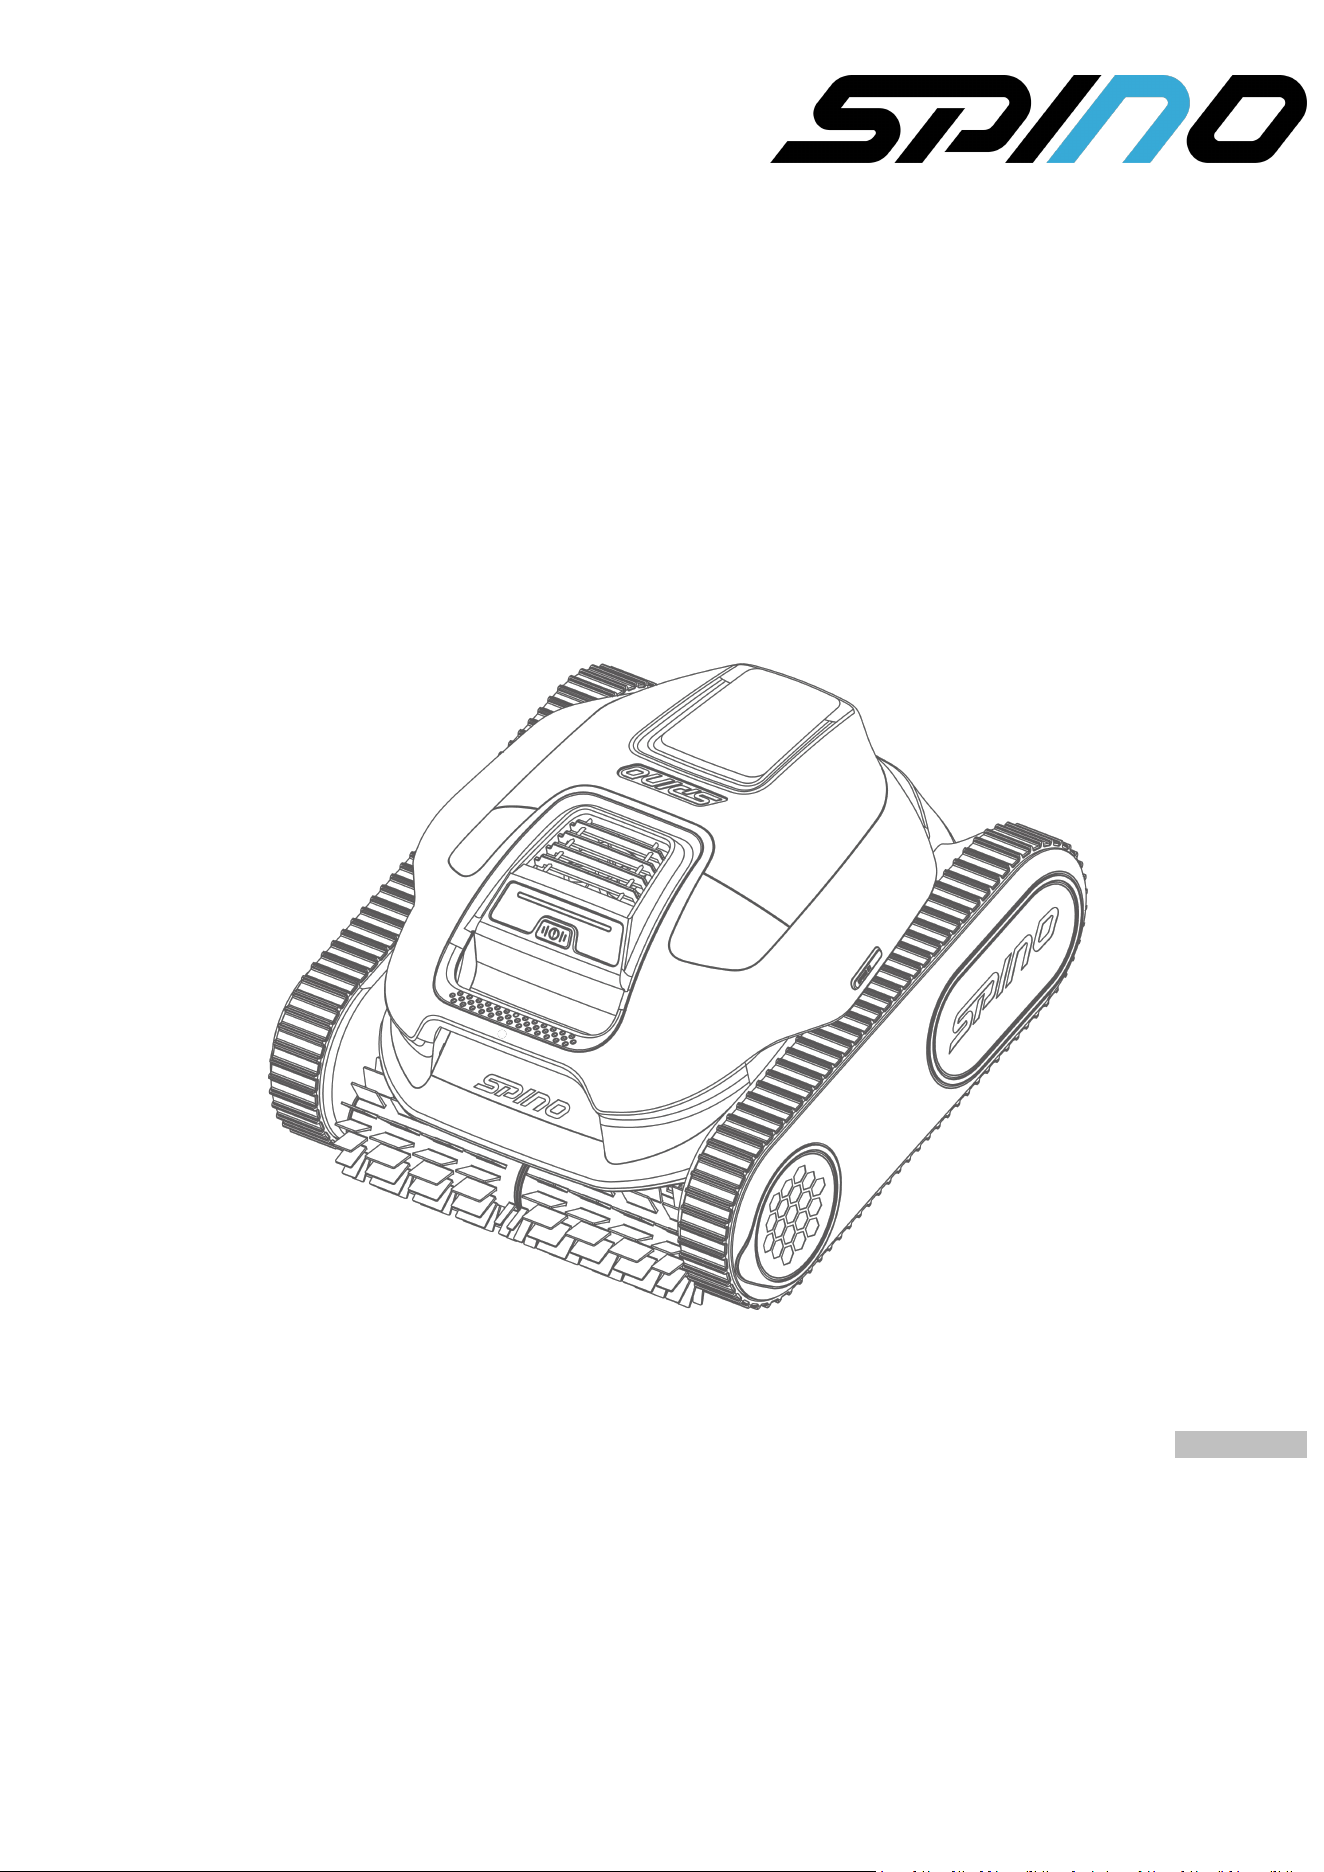
2.1 In the Box
SPINO E1
Charger
Hook
- 4 -
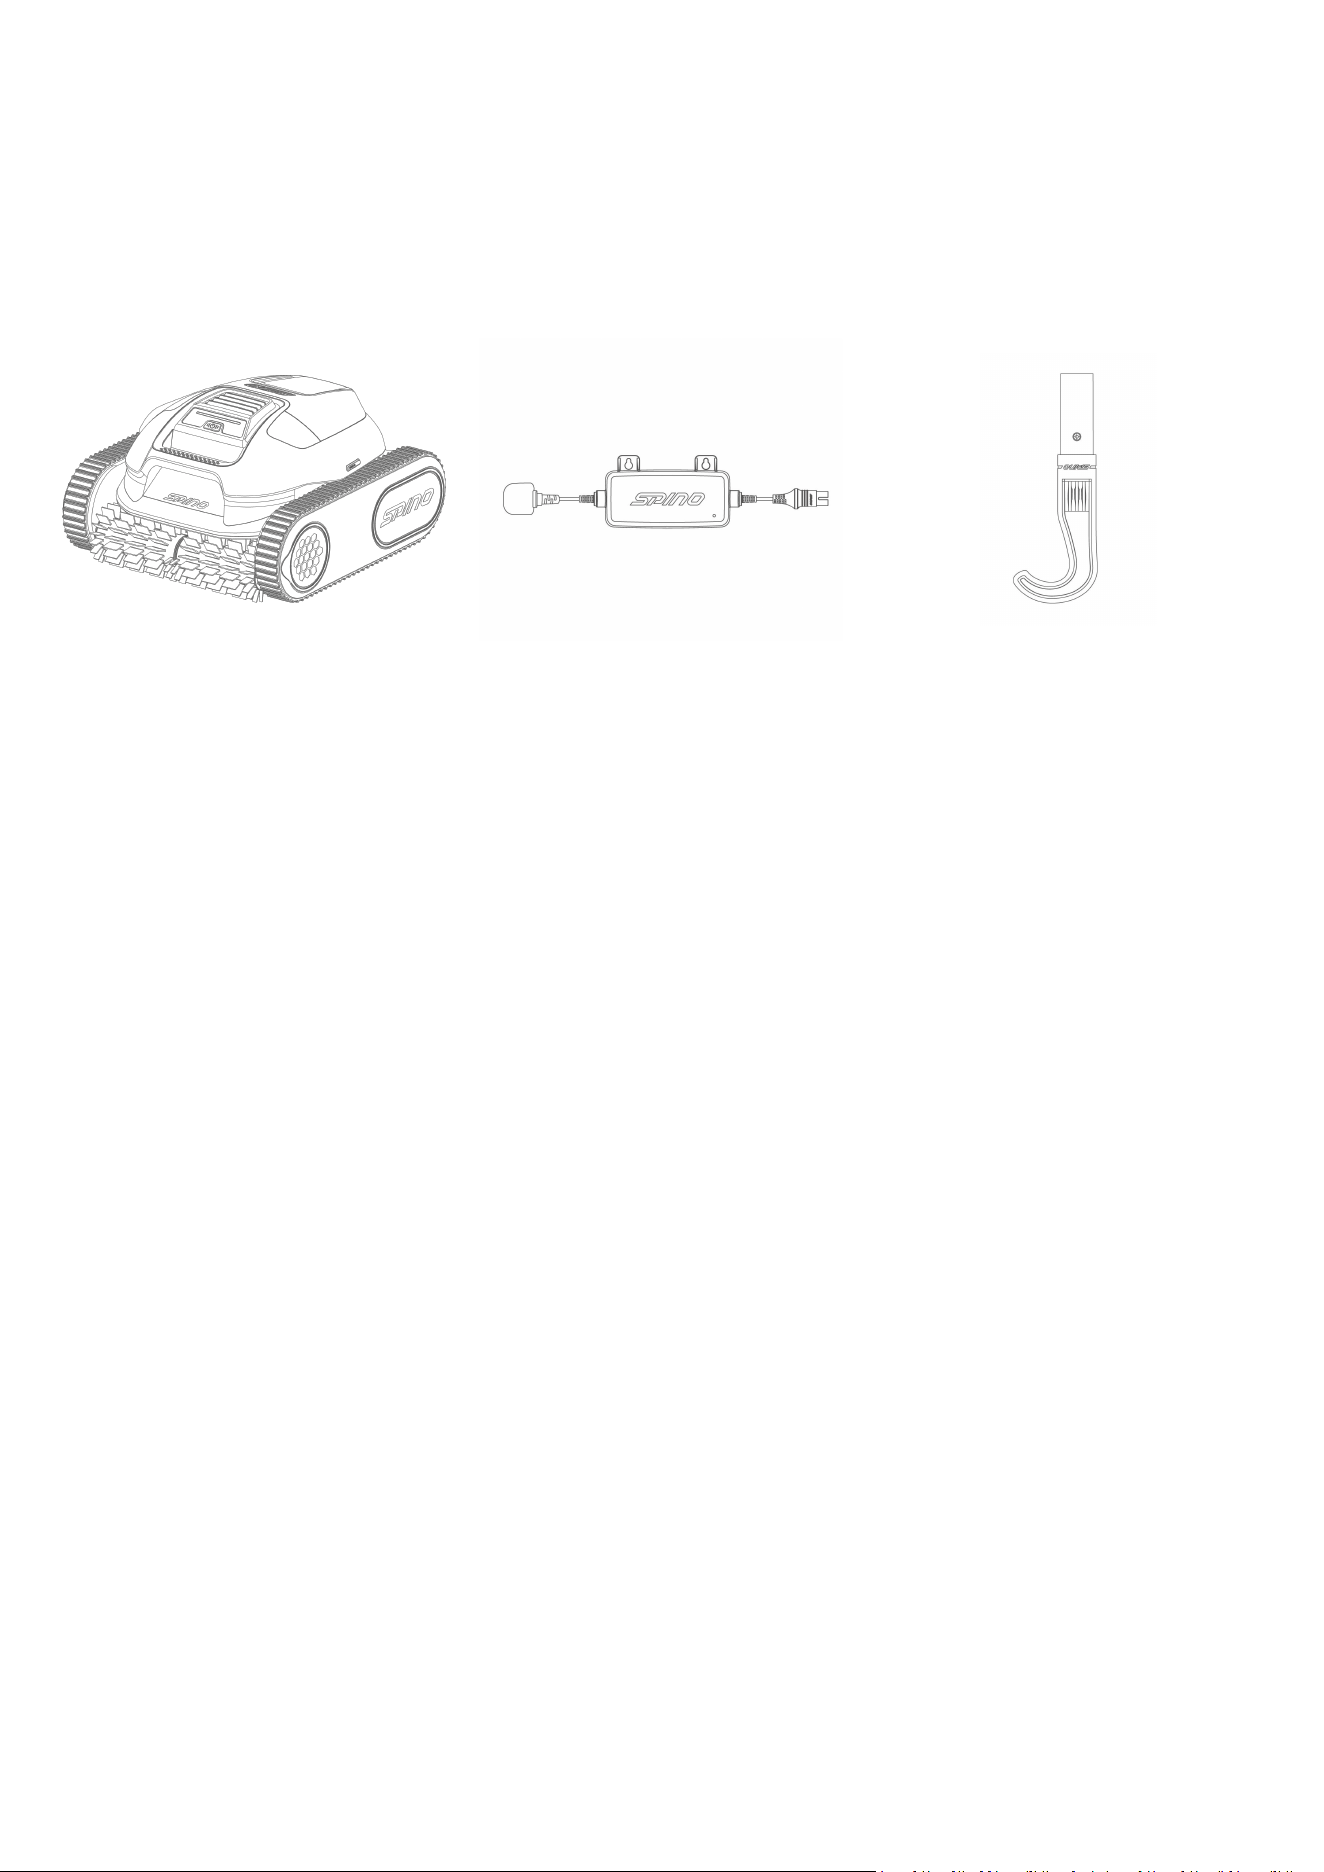
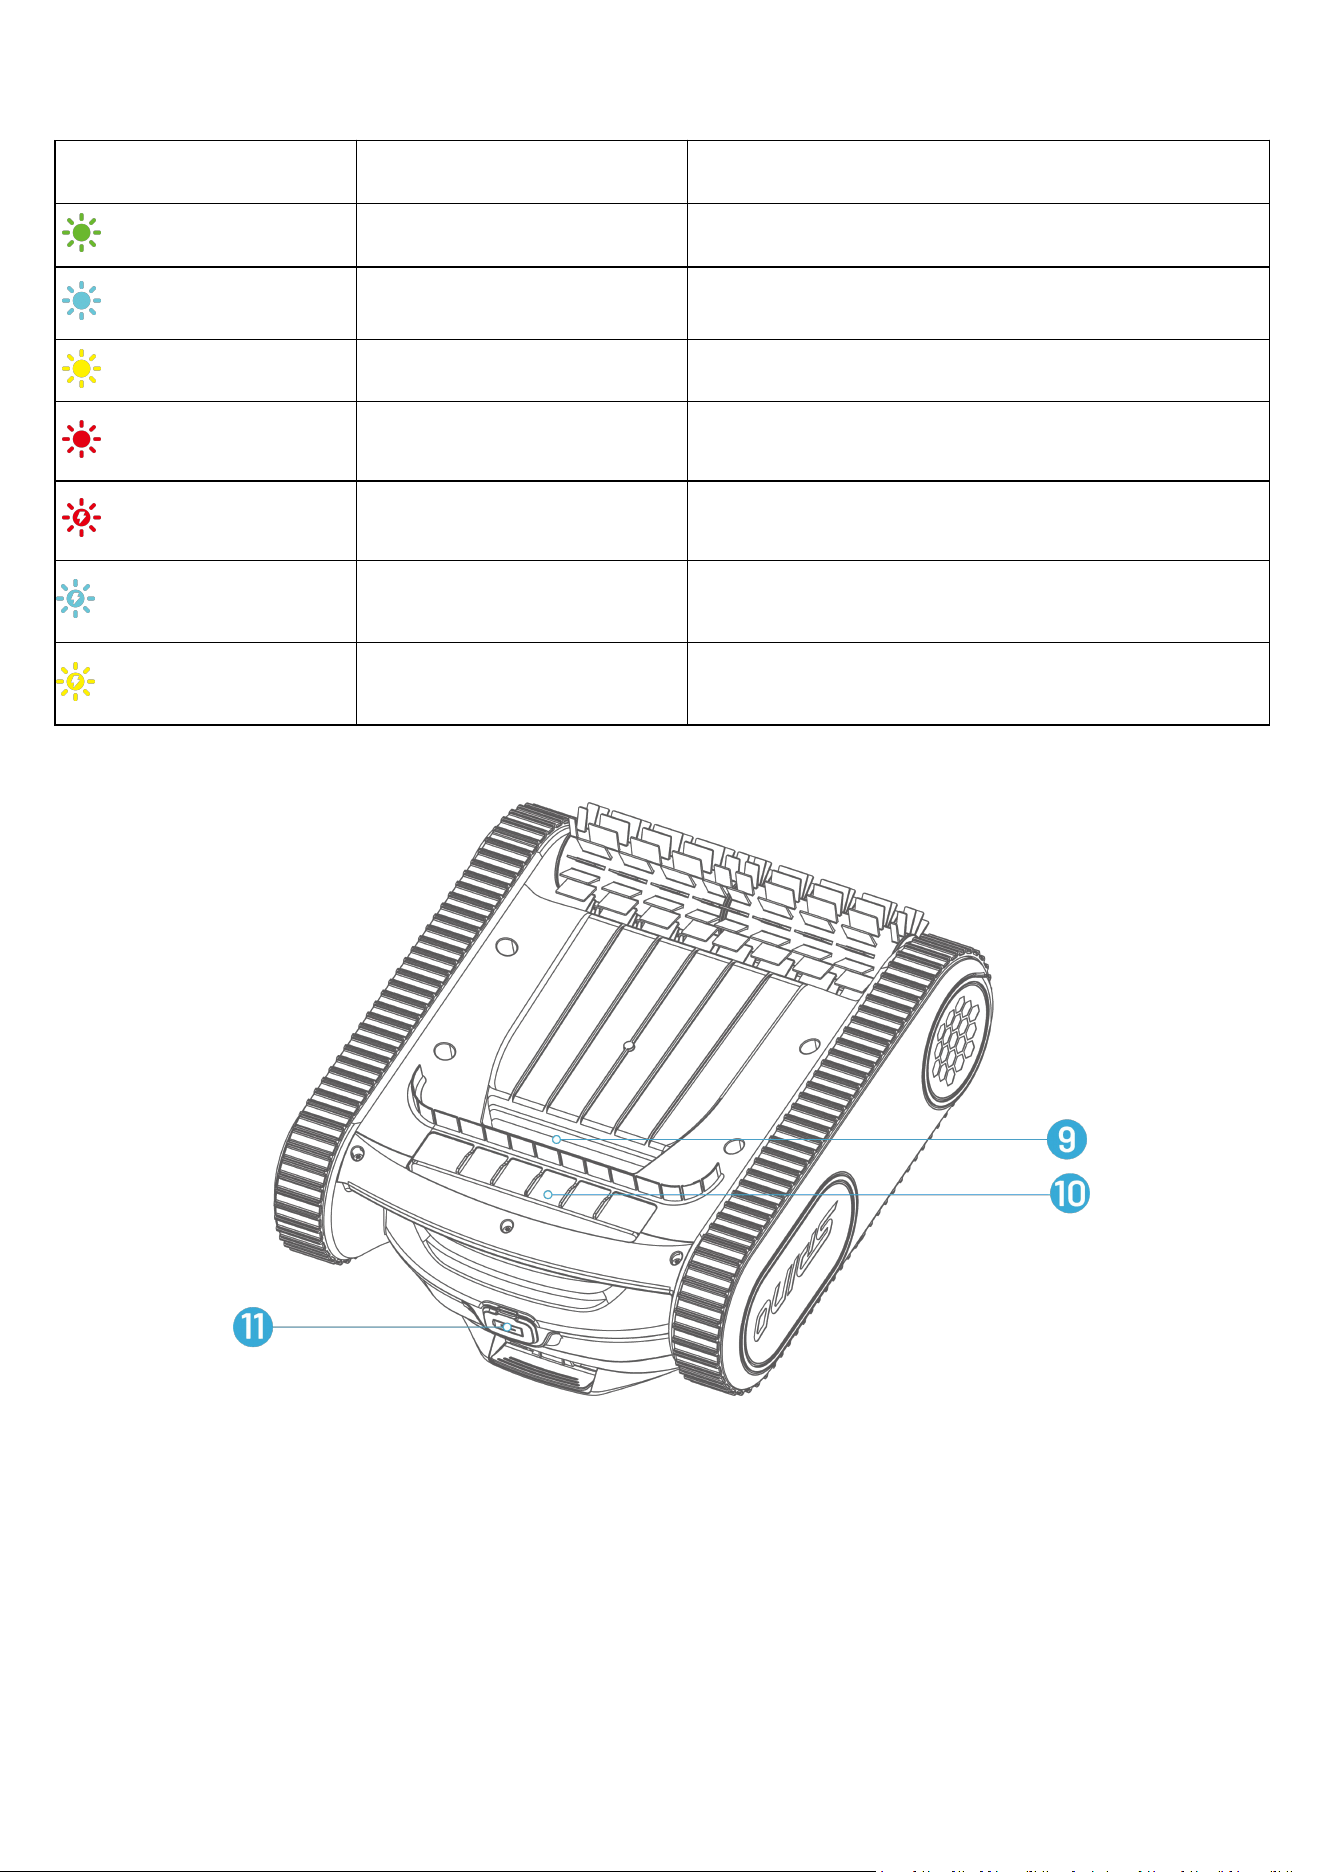
2.2 Product Overview
1. Water Outlet
2. LED
3. Power Button
4. Handle
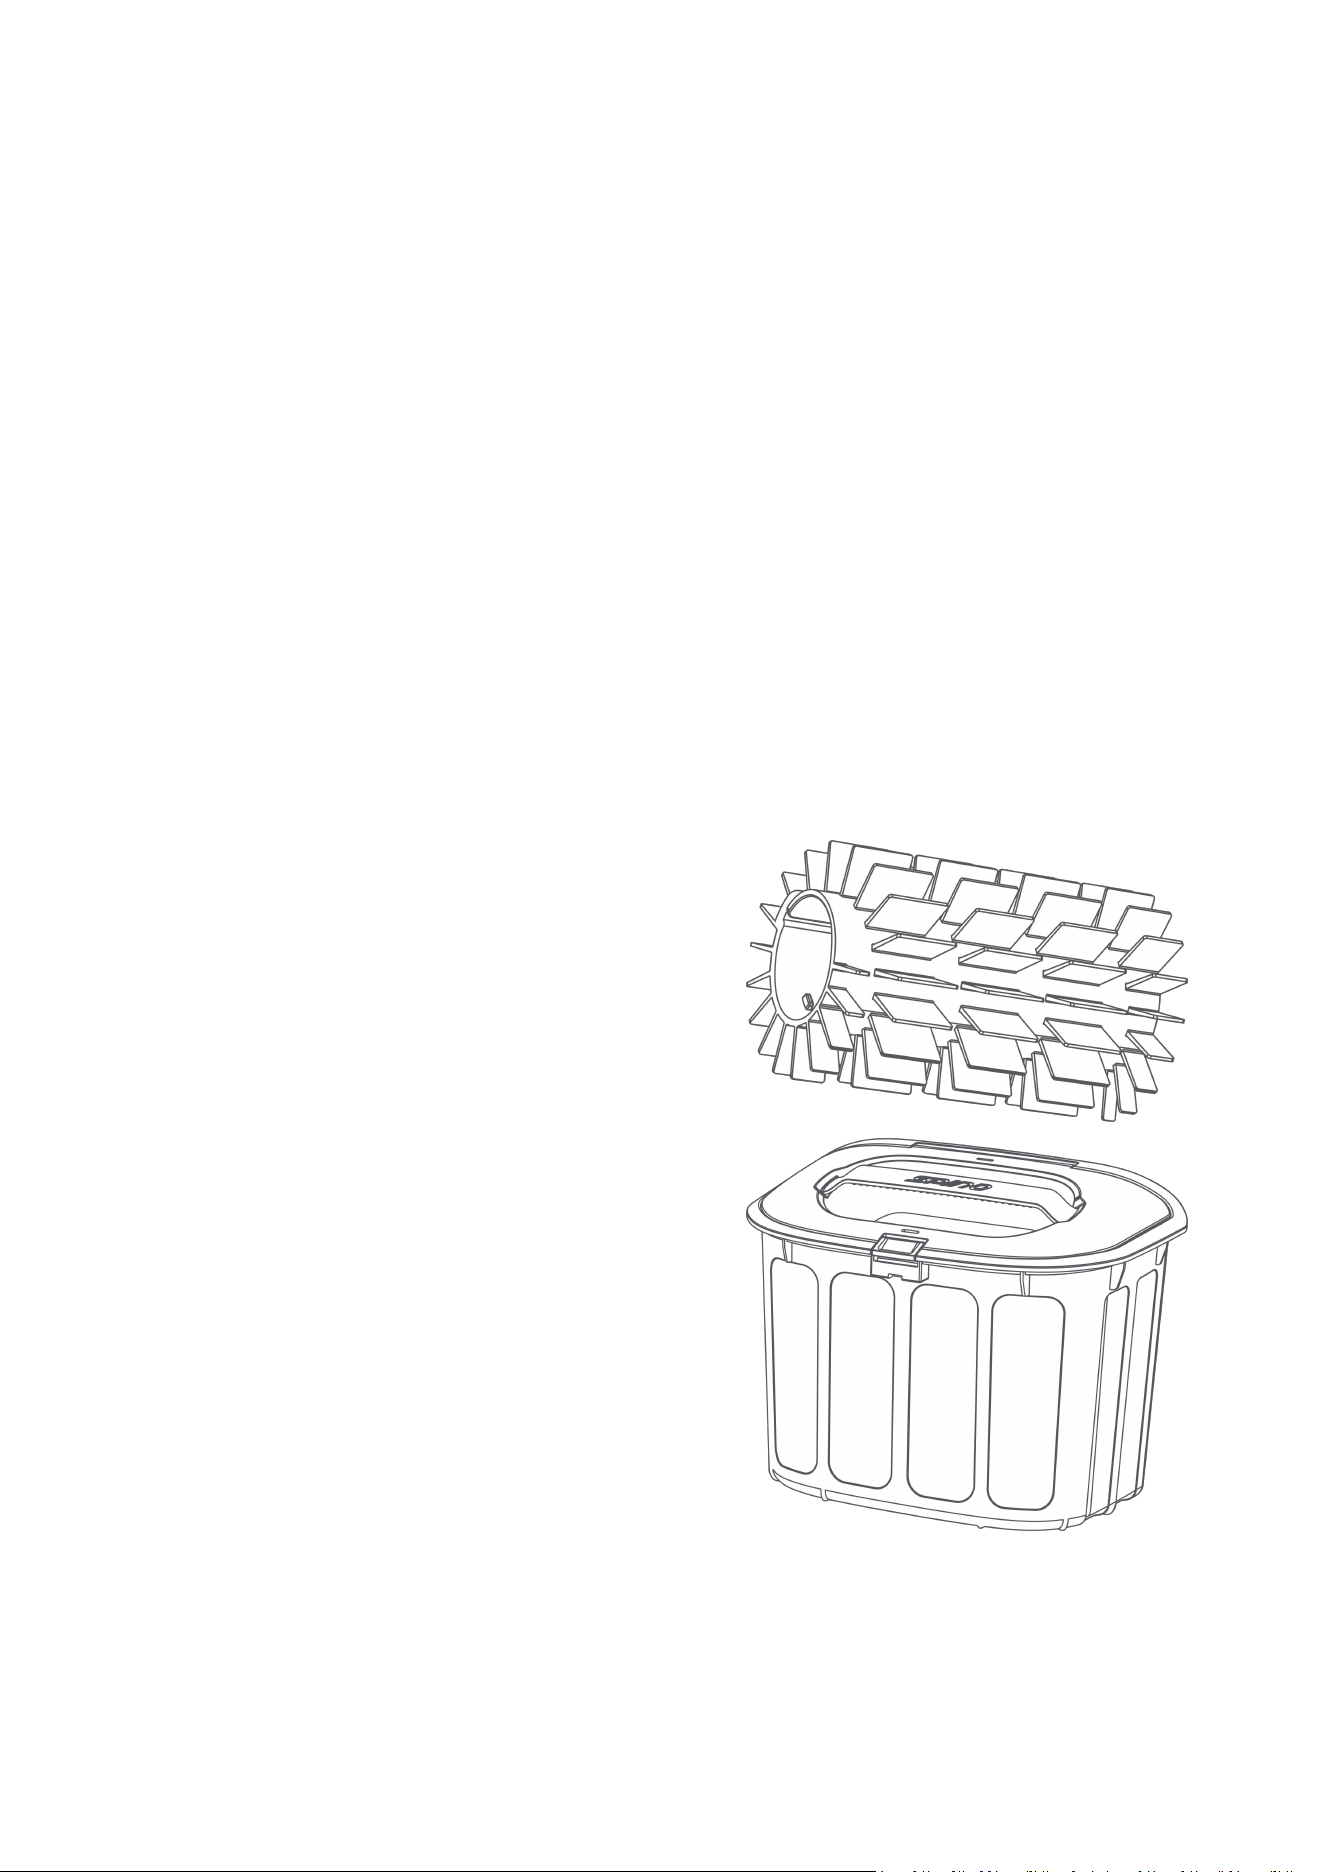
5. Roller Brush
6. Filter Basket Cover
7. Filter Basket
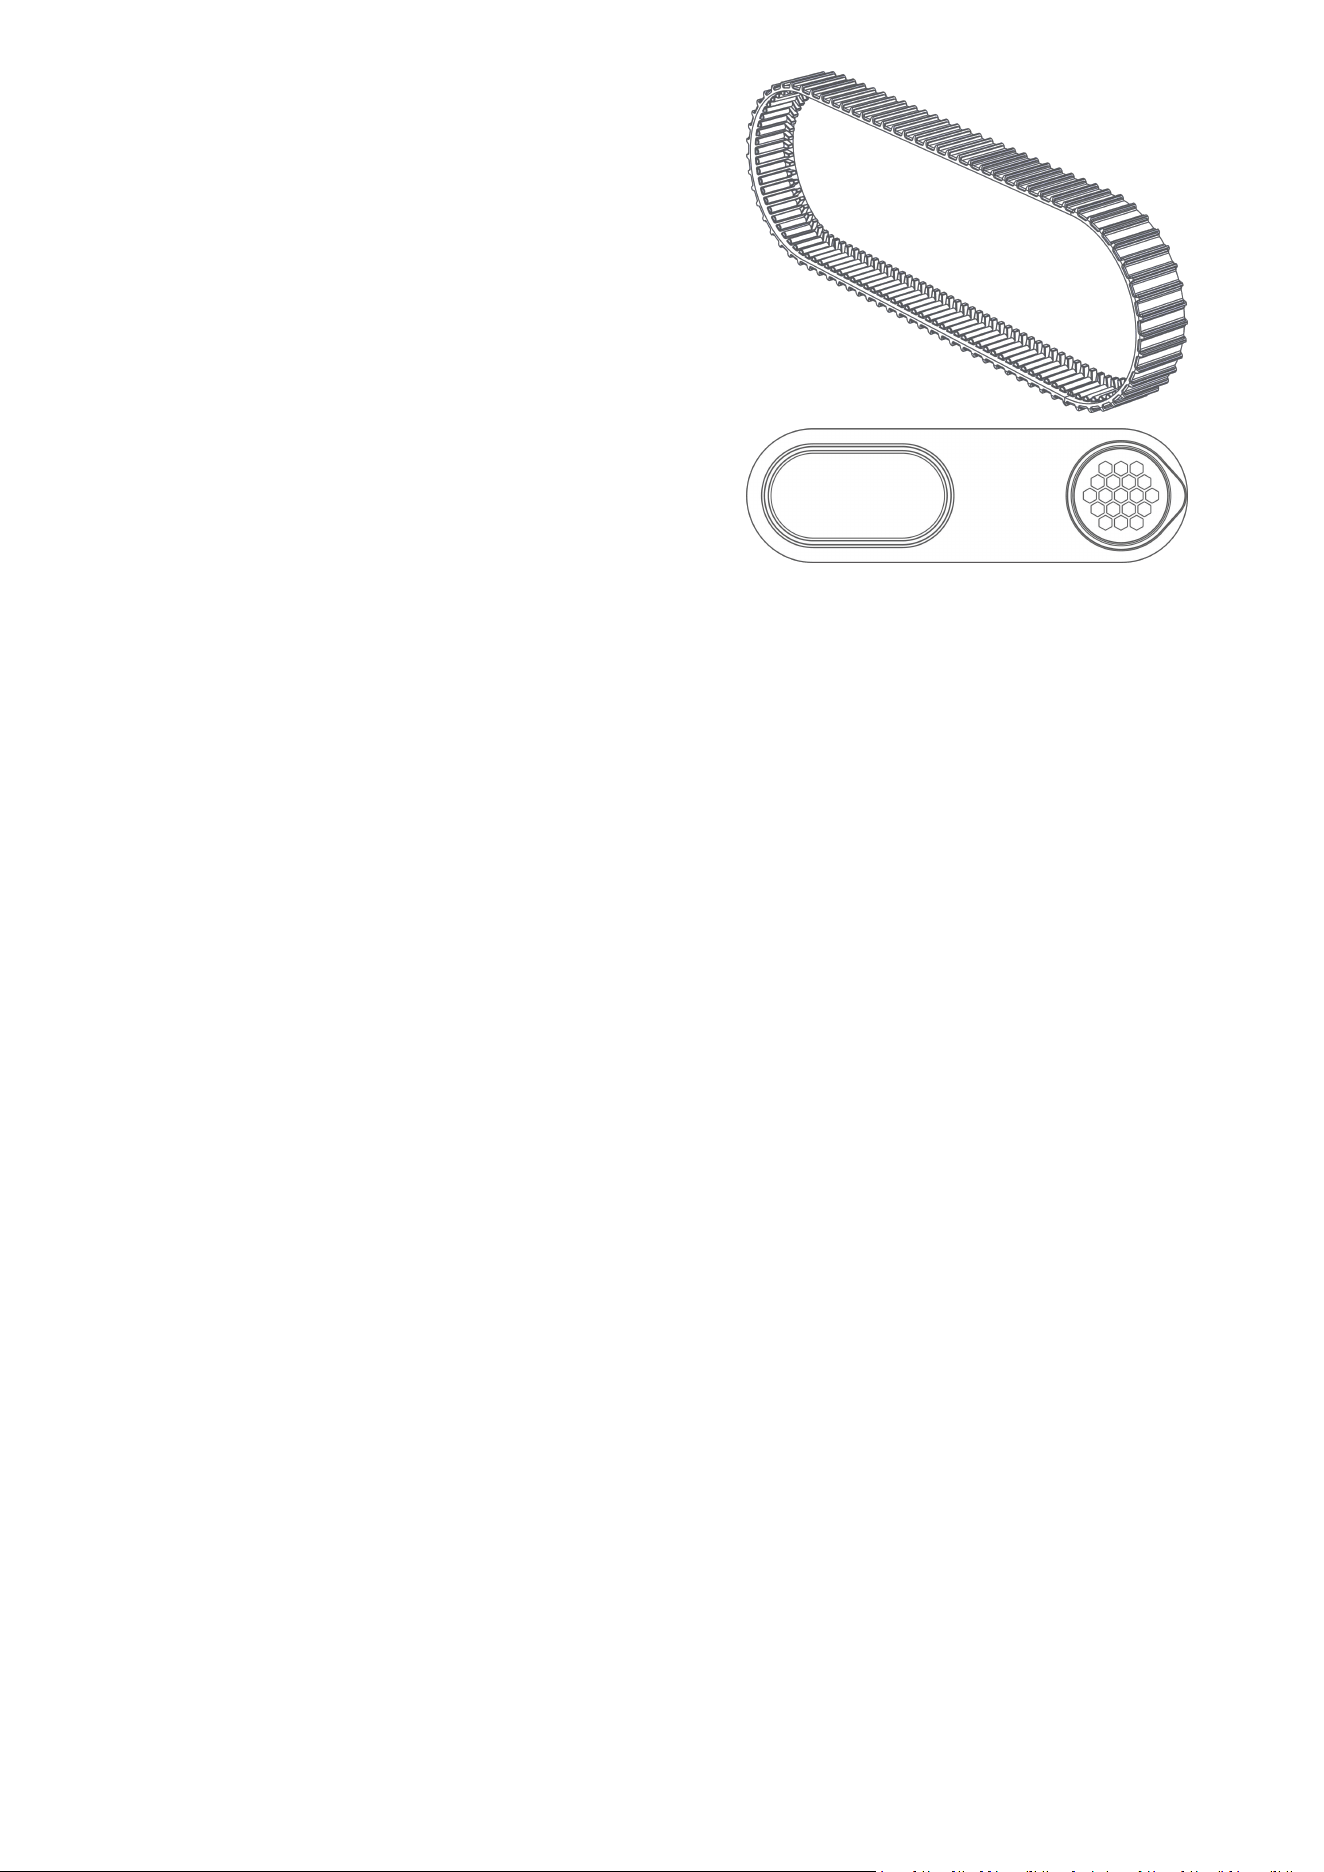
8. Caterpillar Tread*2
LED Codes
When the robot is charging:
Color
Battery Level
Solid Green
Battery=100%
Breathing Green
75%<Battery<100%
Breathing Blue
50%<Battery≤75%
Breathing Yellow
25%<Battery≤50%
Breathing Red
Battery≤25%
- 5 -
When the robot is off charge:
Color
Battery Level
Description
Solid Green
75%<Battery≤100%
/
Solid Blue
50%<Battery≤75%
/
Solid Yellow
25%<Battery≤50%
/
Solid Red
Battery≤25%
The robot stops cleaning and parks at waterline.
Fast Blinking Red
/
An error has occurred.
Fast Blinking Blue
/
The robot is upgrading.
Fast Blinking Yellow
/
The filter basket is not properly installed.
9. Water Inlet
10. Drain Outlet
11. Charging Port

- 6 -
3 Operation
3.1 Charge Before Initial Use
WARNING
DO NOT charge the robot outdoors in rainy conditions.
For initial use, please follow these steps to charge your robot:
1. Remove the rubber plug.
2. Connect the charger to the charging port.
3. Plug the charger into a power socket.
NOTE
Ensure the charging port and charger connector are as dry as possible before charging.
For long-term storage, apply an anti-rust agent to the metal contacts of the charging port
and connector.
- 7 -
3.2 Cleaning
WARNING
Do not allow children to operate the robot, including placing it into or removing it from the pool.
Keep all persons out of the pool while the robot is in operation.
3.2.1 Preparation
Before cleaning, check whether the filter basket is attached properly.
Before cleaning, ensure there are no foreign objects such as towels or toys in the pool.
If the pool hasn't been cleaned for an extended period, manually remove large debris before using the
robot.
NOTE
Do not take out the filter basket during cleaning.
Do not allow people or animals enter the pool during cleaning.
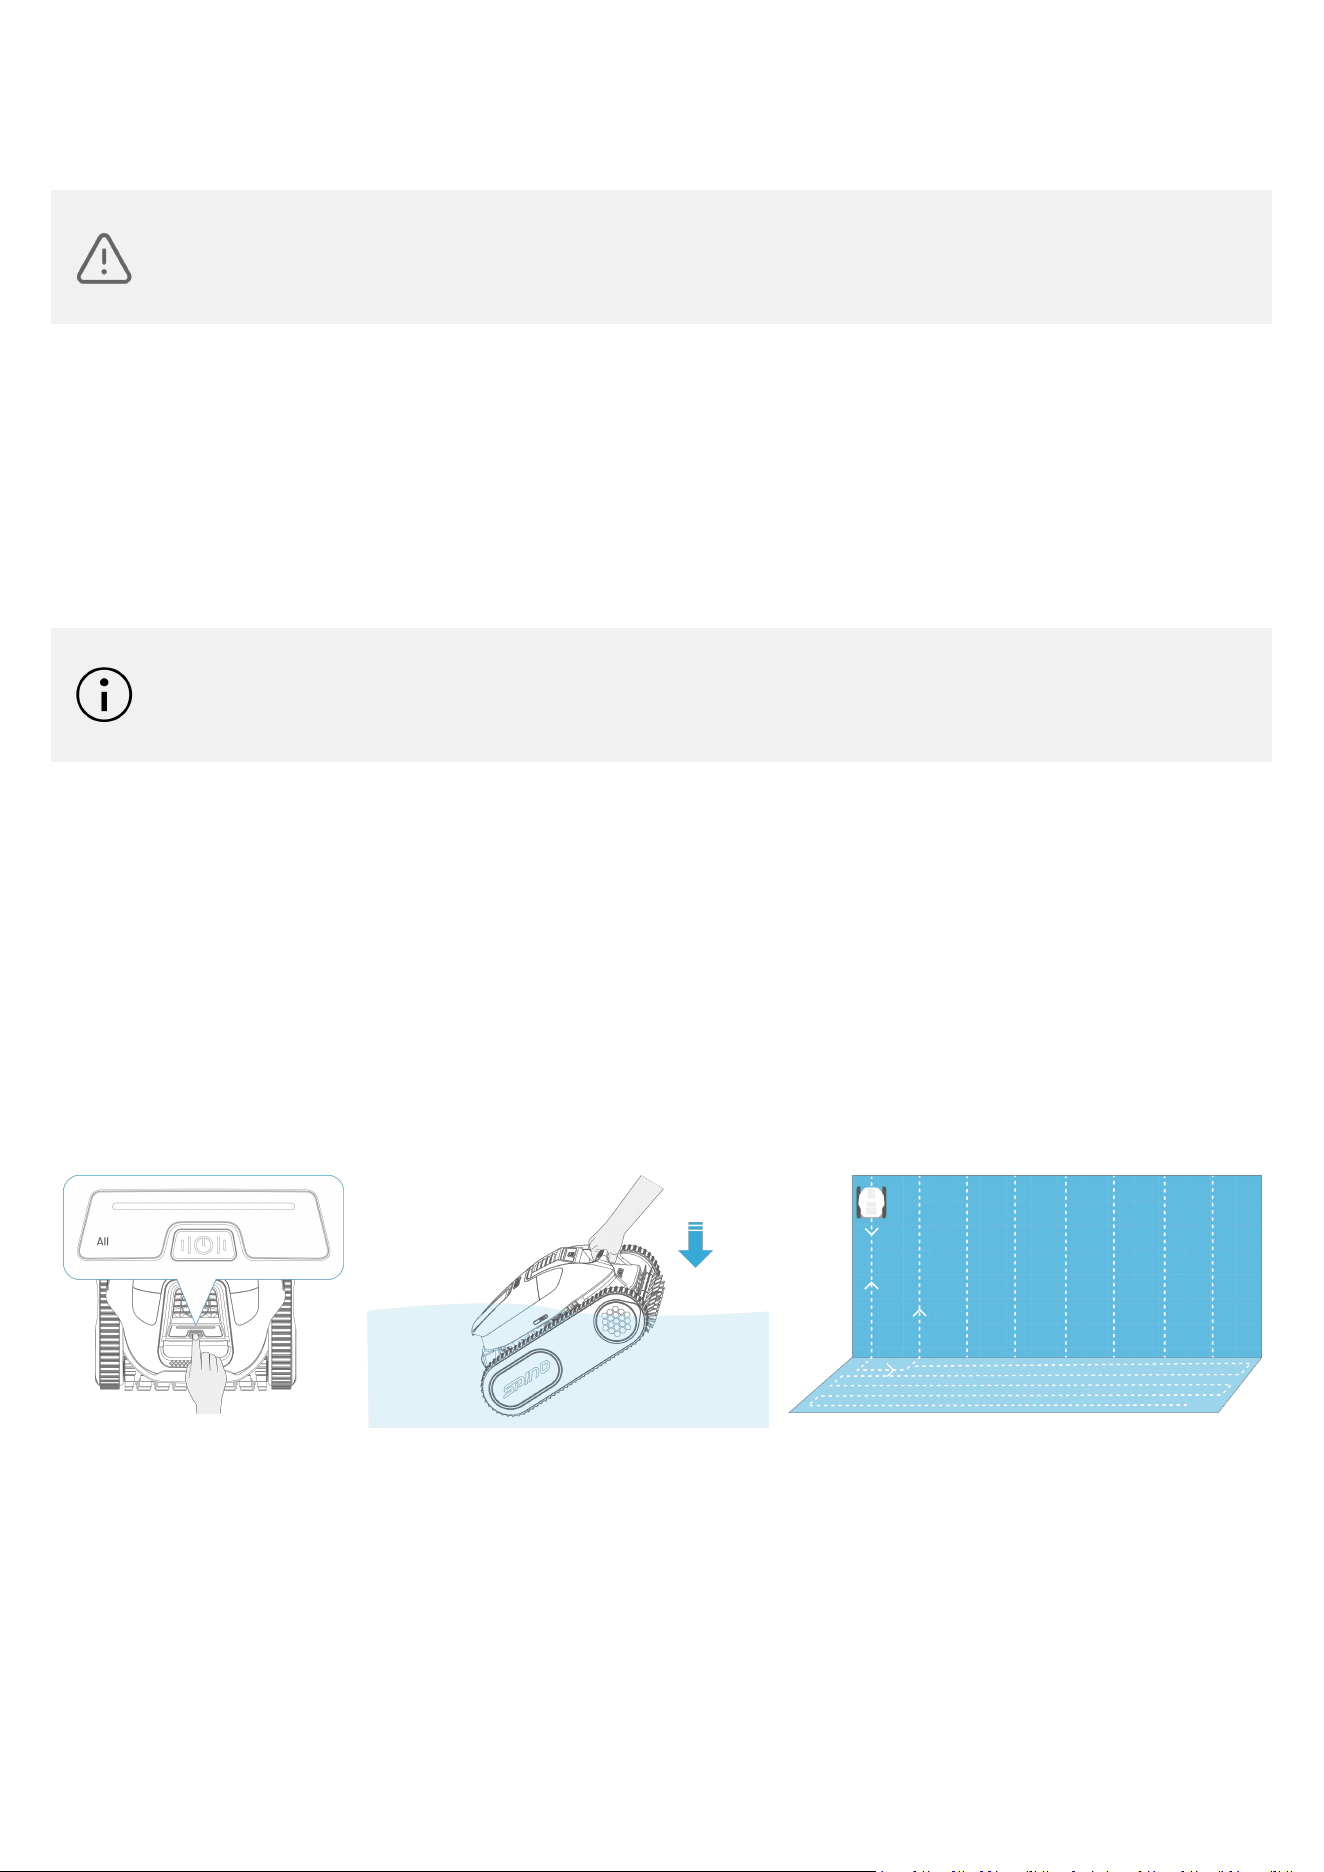
3.2.2 All Mode
Turn on the robot and briefly press the power button until the "ALL" mode indicator lights up. The robot is
now set to ALL mode. Place the robot in the water pool. In this mode, the robot will clean the floor, walls,
and waterline.
While cleaning the walls, the robot will return to the floor after completing each cleaning path, then move
on to the next path.
- 8 -
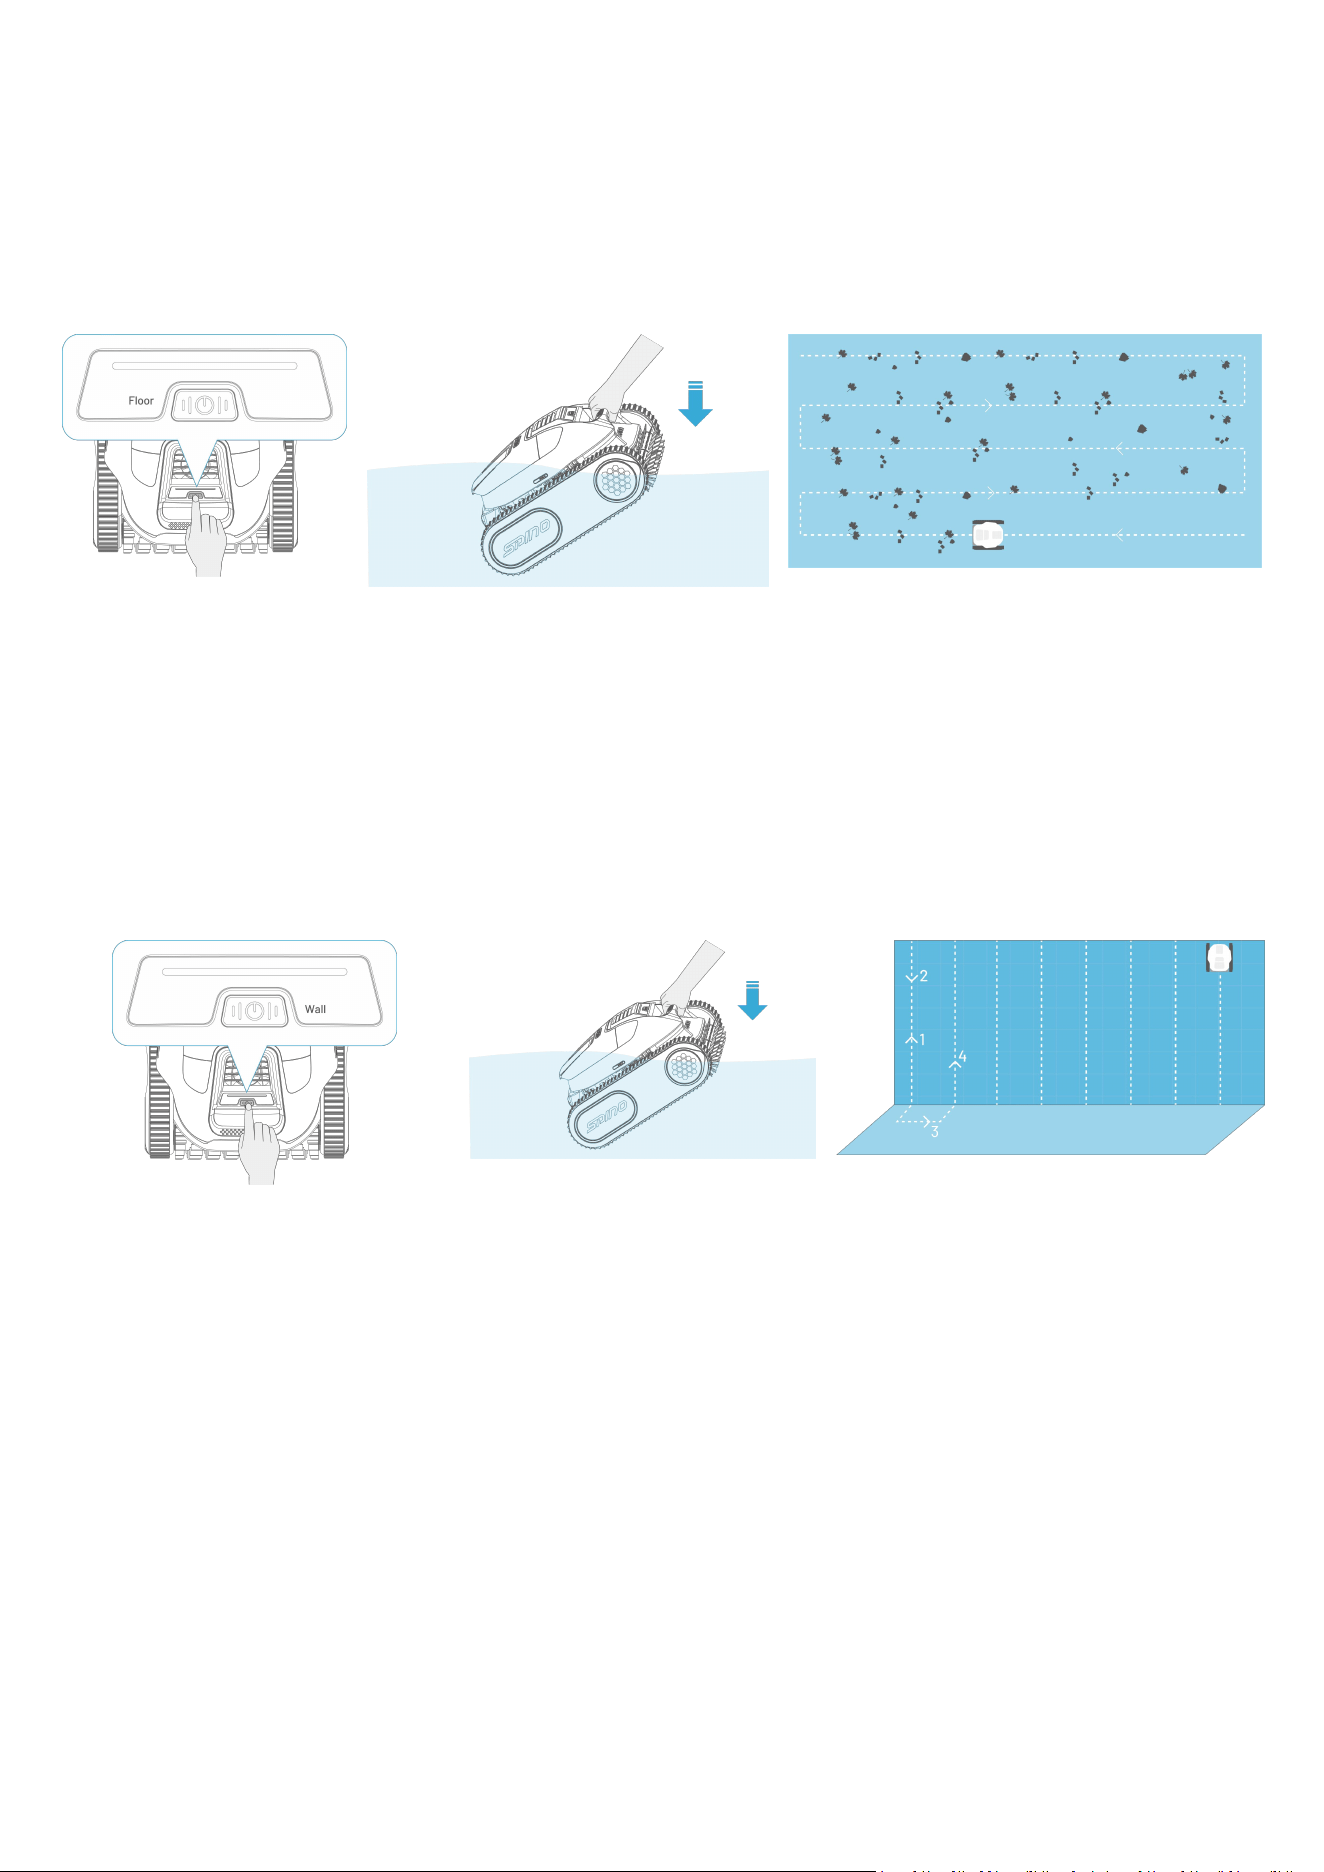
3.2.3 Floor Mode
Turn on the robot and briefly press the power button until the "Floor" mode indicator lights up. The robot is
now set to Floor mode. Place the robot in the water pool. In this mode, the robot will clean the floor only.
This mode is suitable for cleaning pool floors with leaves, stones, and other larger debris.
3.2.4 Wall Mode
Turn on the robot and briefly press the power button until the "Wall" mode indicator lights up. The robot is
now set to Wall mode. Place the robot in the water pool. In this mode, the robot will clean the wall only.
While cleaning, the robot will return to the floor after completing each cleaning path, then move on to the
next path.
- 9 -
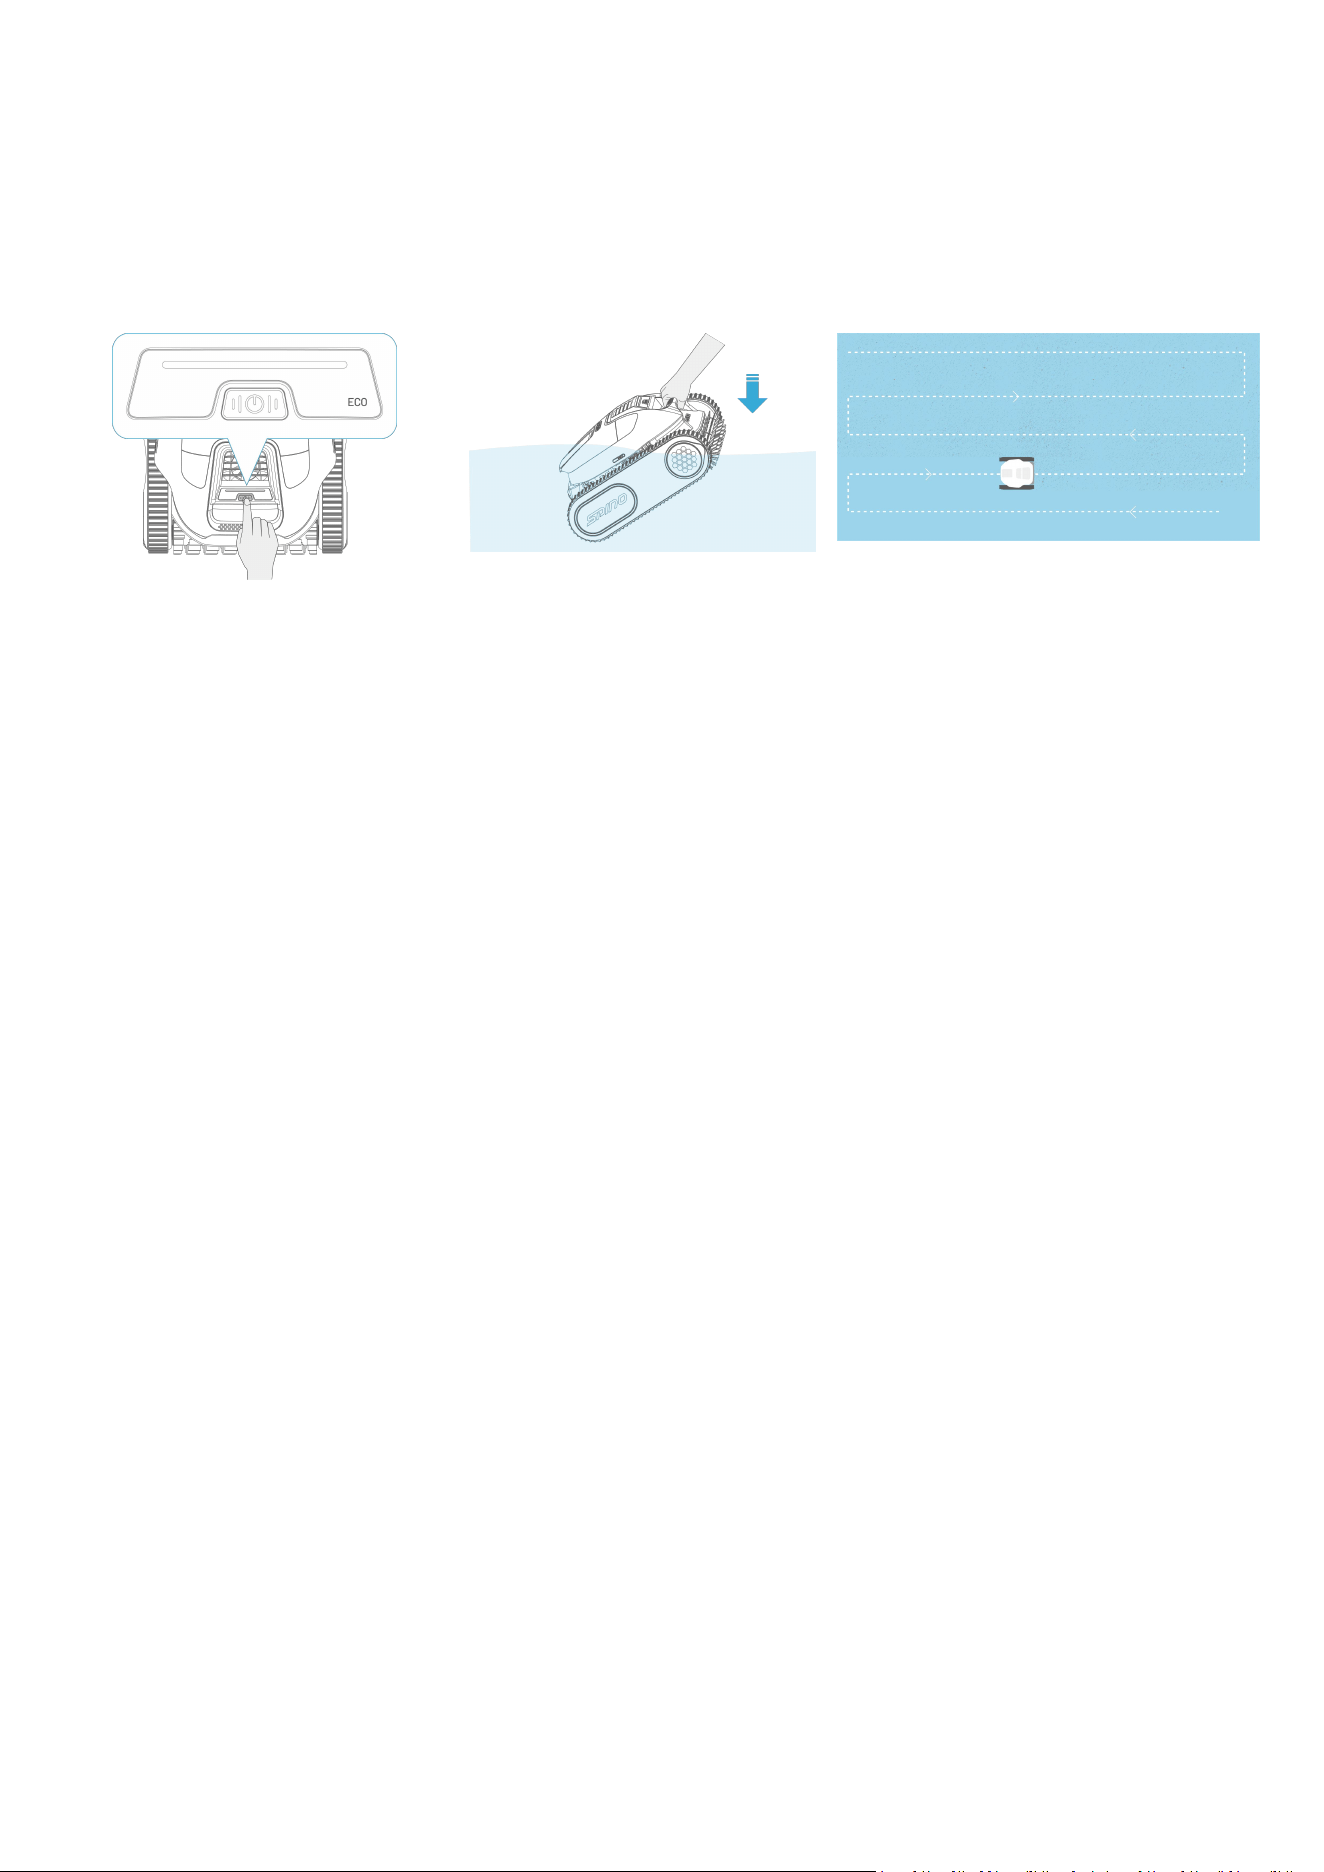
3.2.5 ECO Mode
Turn on the robot and briefly press the power button until the "ECO" mode indicator lights up. The robot is
now set to ECO mode. Place the robot in the water pool.
In this mode, the robot will clean the pool floor for 50 minutes every other day until battery is depleted.
- 10 -
3.3 After Cleaning
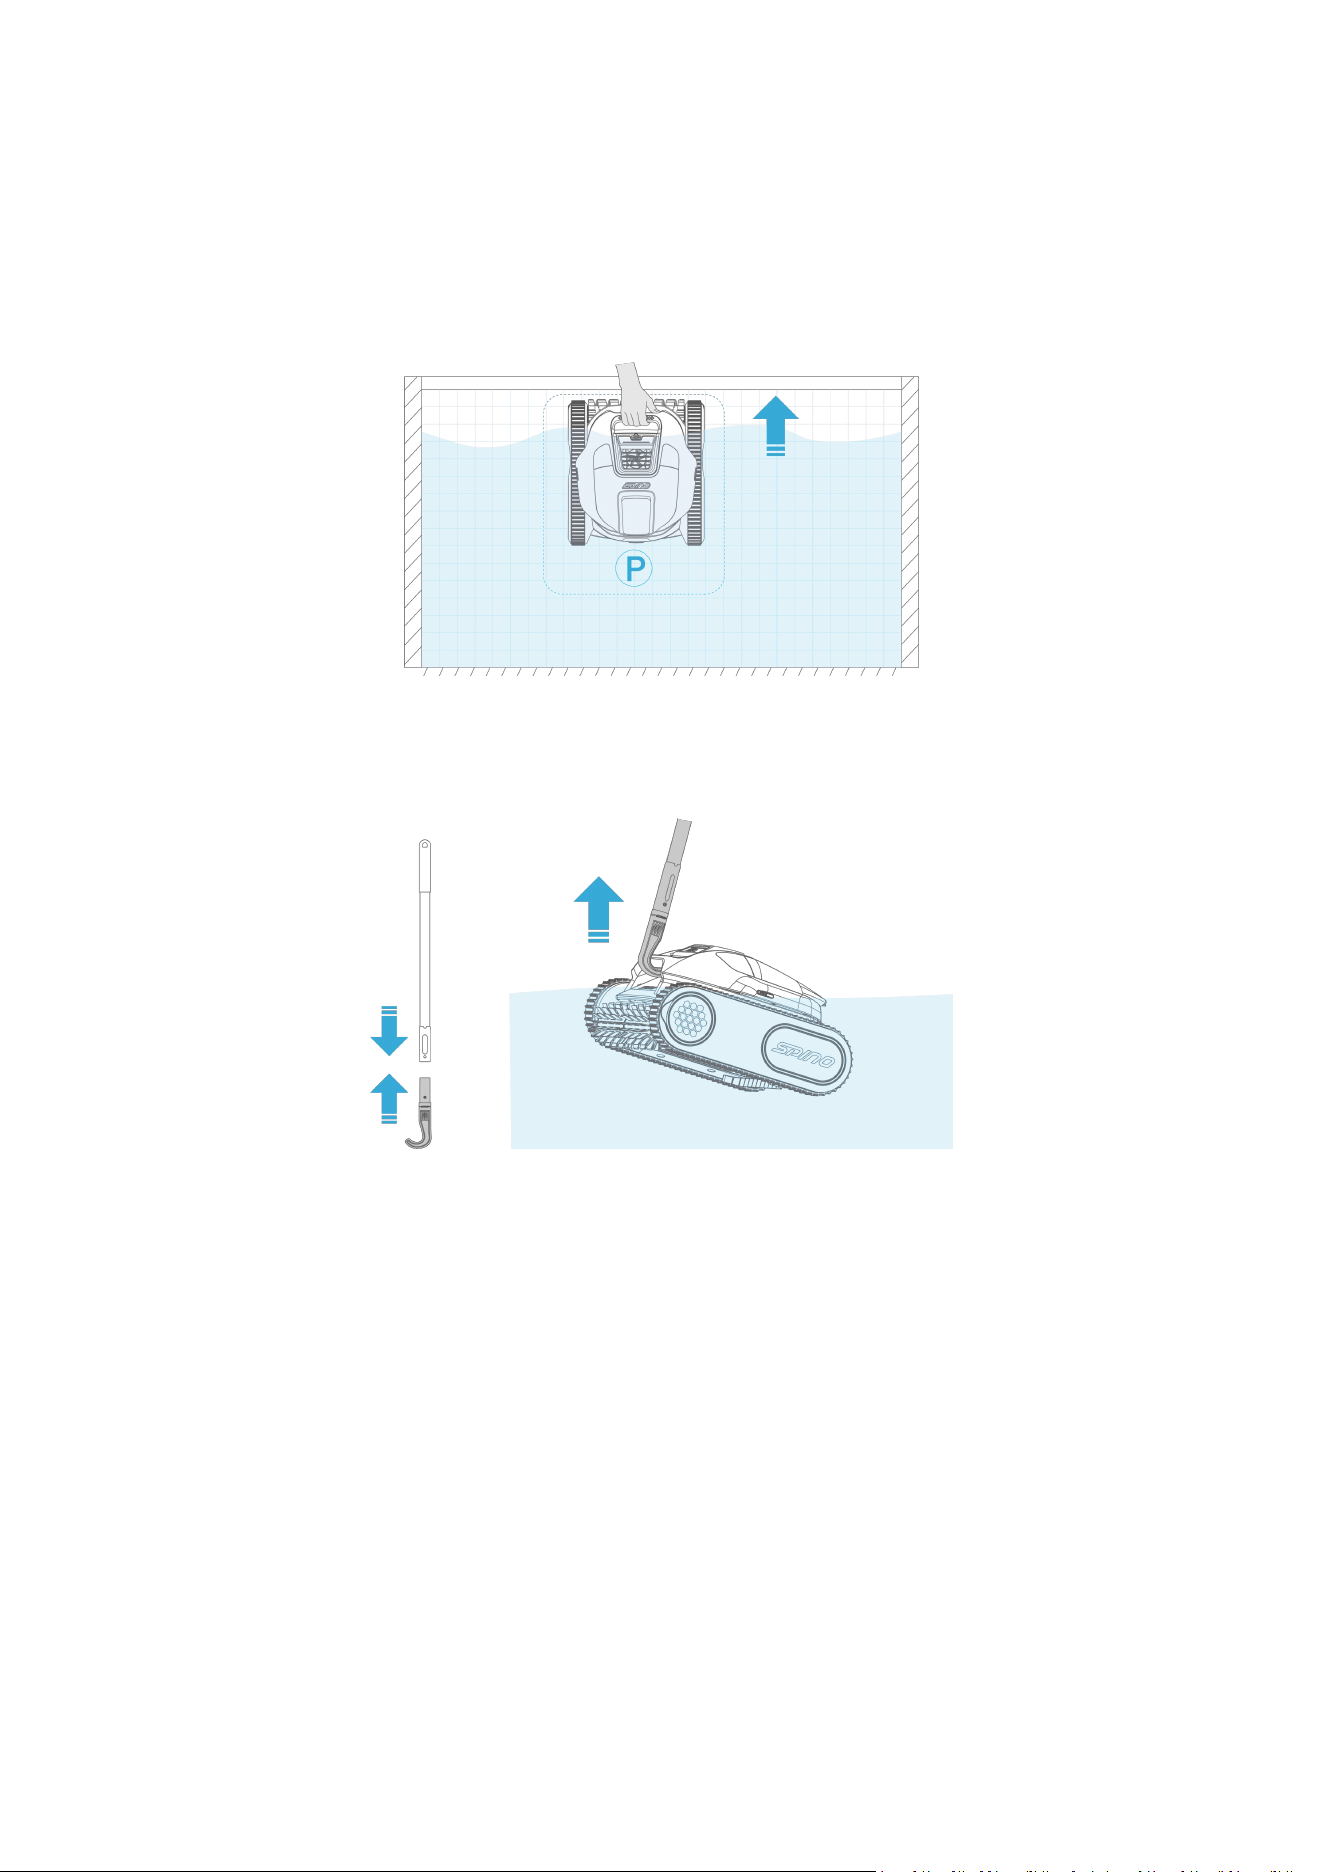
3.3.1 Exit Water
After the cleaning task is complete, the robot will automatically climb to the waterline and park there for 15
minutes for your retrieval.
Or you can attach the hook to a standard pole (not included) and use it to lift the robot to the water surface.
Then, manually grab the handle to remove the robot from the water.
- 11 -
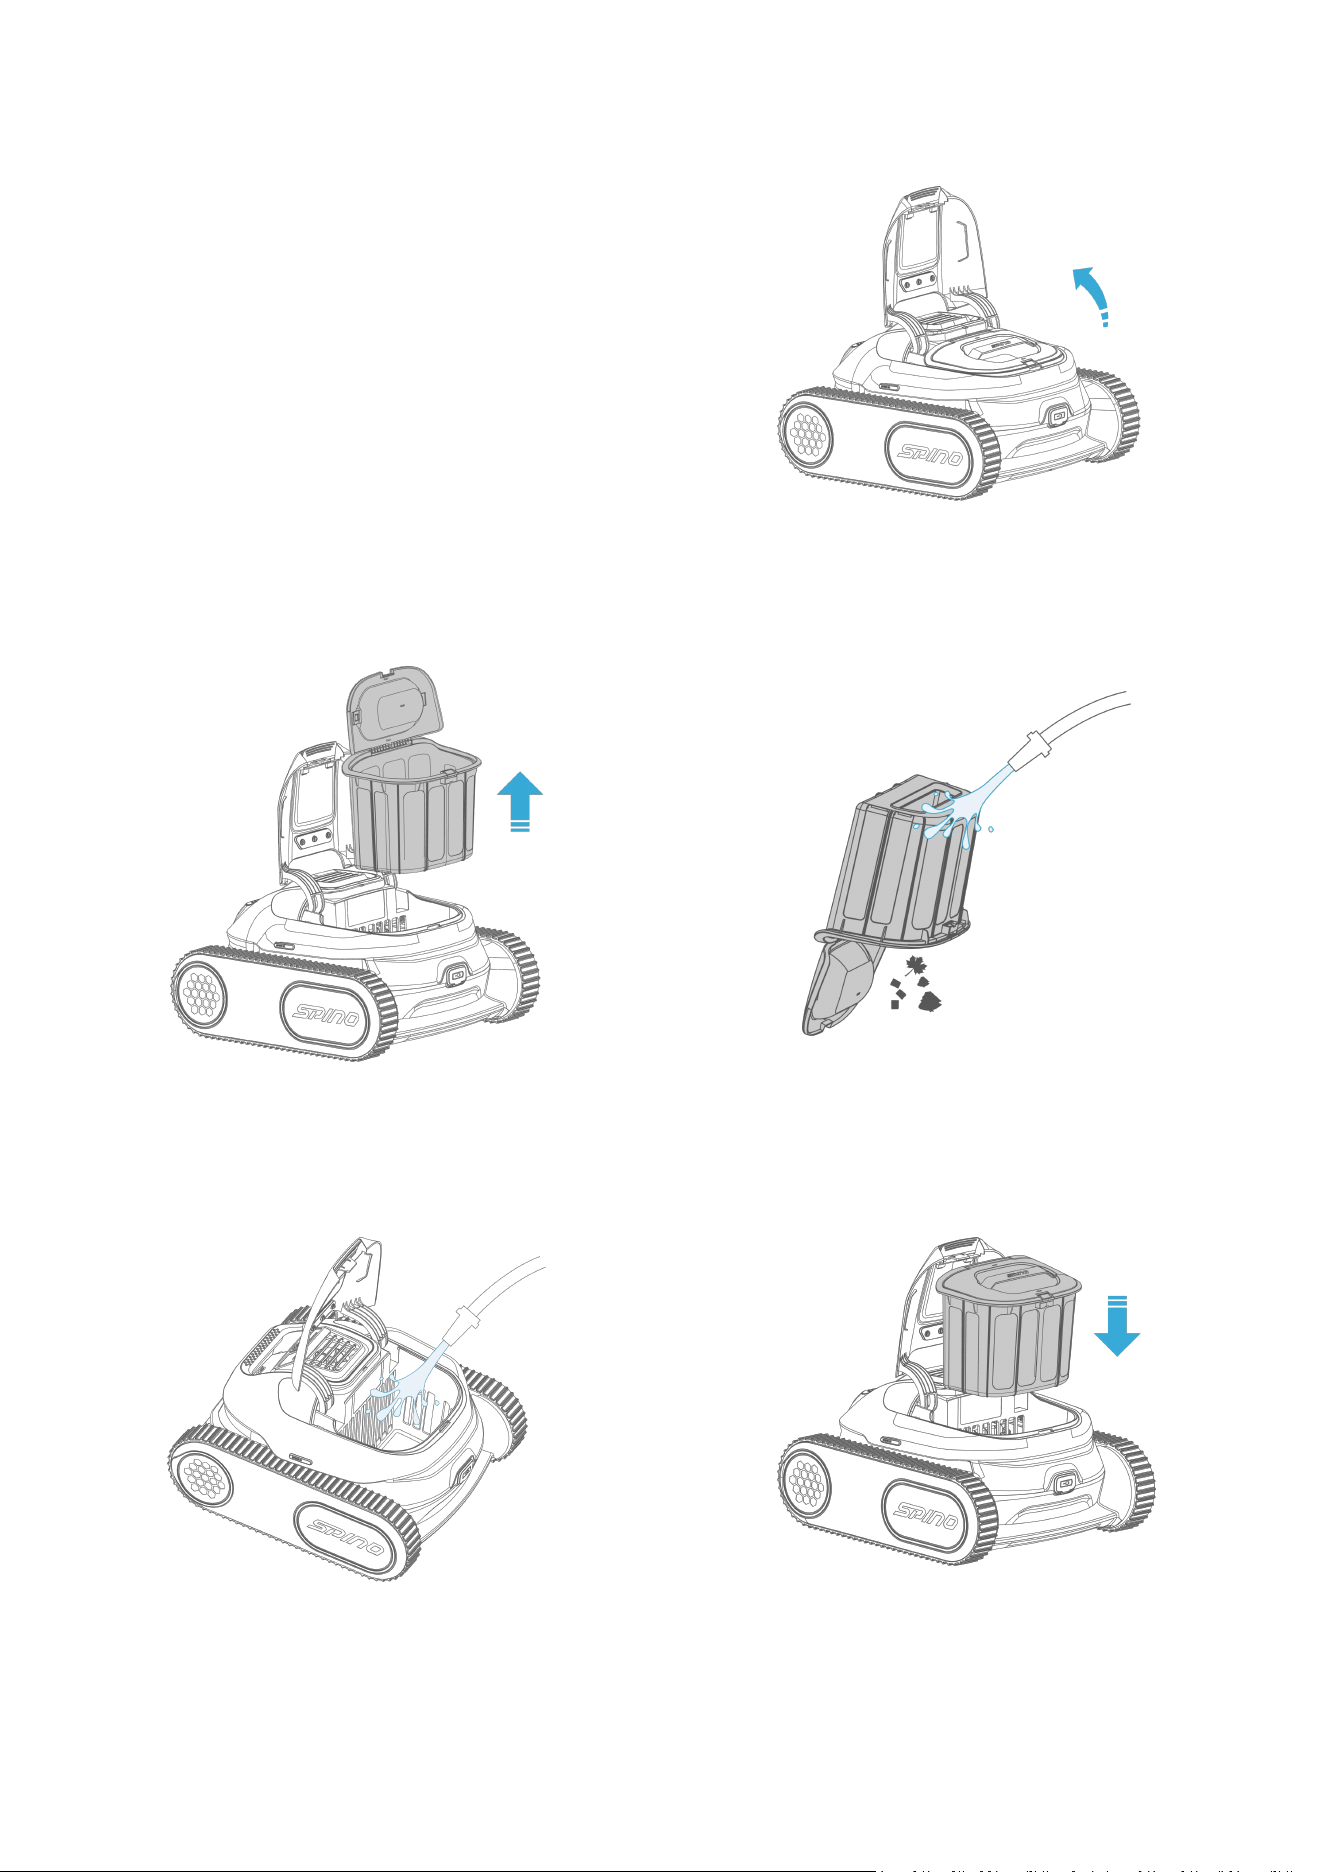
3.3.2 Clean After Use
1. Open the filter basket cover.
2. Take out the filter basket.
3. Empty and rinse the filter basket
4. Rinse the entire robot.
5. Reattach the filter basket.
①
②
③
④
⑤
- 12 -
4 Mammotion App Operation
NOTE
The screens are only for reference. Please refer to the actual ones.
With the Mammotion app, you can manage your robot. The app allows you to:
Easily manage your robot and perform timely firmware updates to keep it running efficiently.
Upload diagnostic logs directly to the Mammotion technical support team for quick assistance and
troubleshooting.
Seamlessly switch between different cleaning mode.
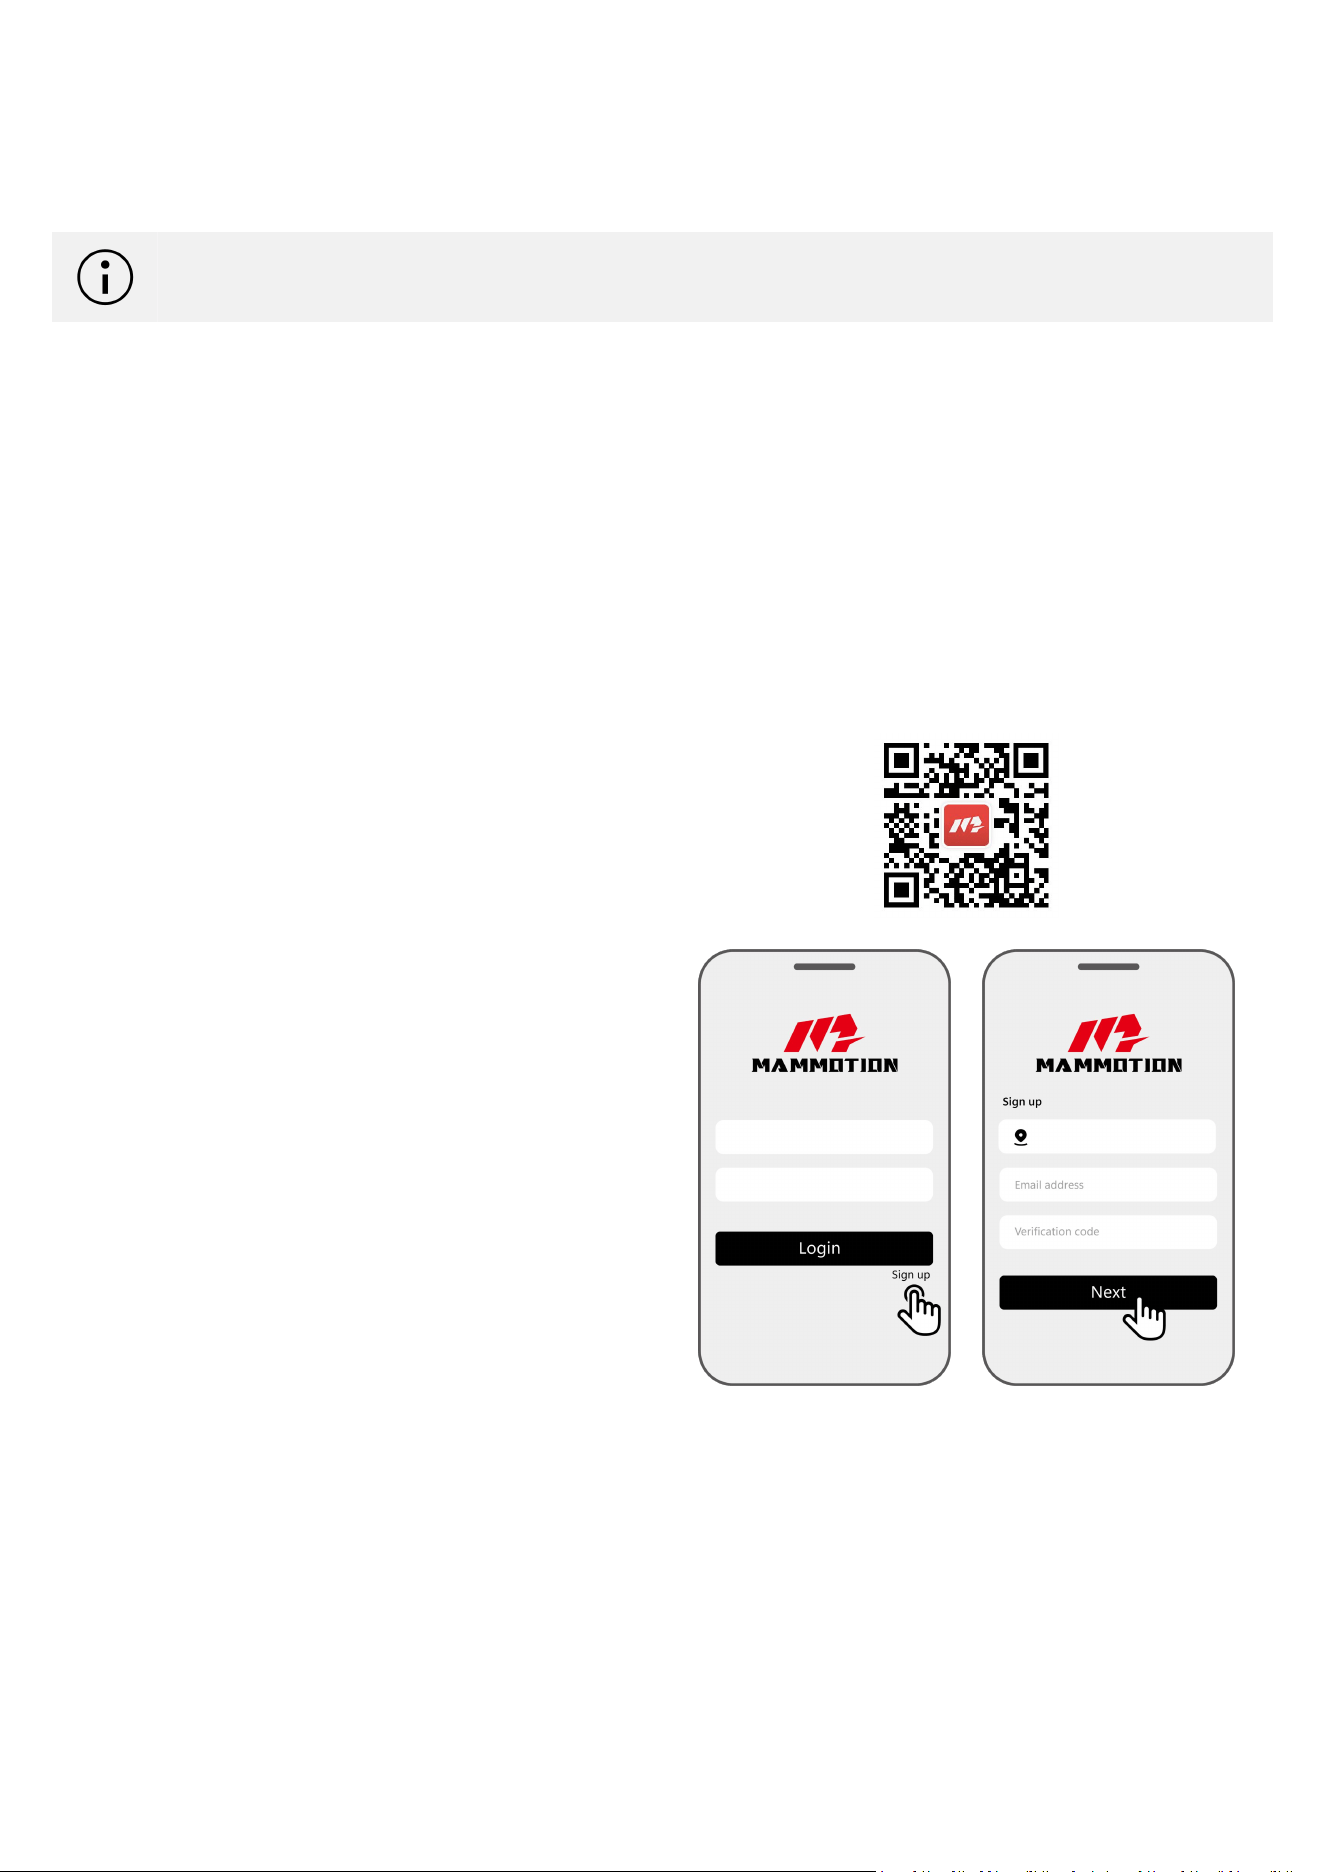
4.1 Download and Register
For initial use, you can scan the QR code to get it
from the Android or Apple app stores, or search for
Mammotion in these stores.
Register your account according to the on-screen
instructions. If you already has a Mammotion
account, input your email address and password to
log it in.
During use, the app may ask you for Bluetooth, Location, and local network access when necessary. For
optimal use, it is recommended to allow the above access. For more information, please refer to our
Privacy Agreement. Go to Mammotion app > Me > About Mammotion > Privacy Agreement.
- 13 -
If you want to log in with a third-party account, tap or on the login page to continue. Mammotion
app now supports logging in with Google and Apple accounts.
4.2 Connect to Mammotion Account
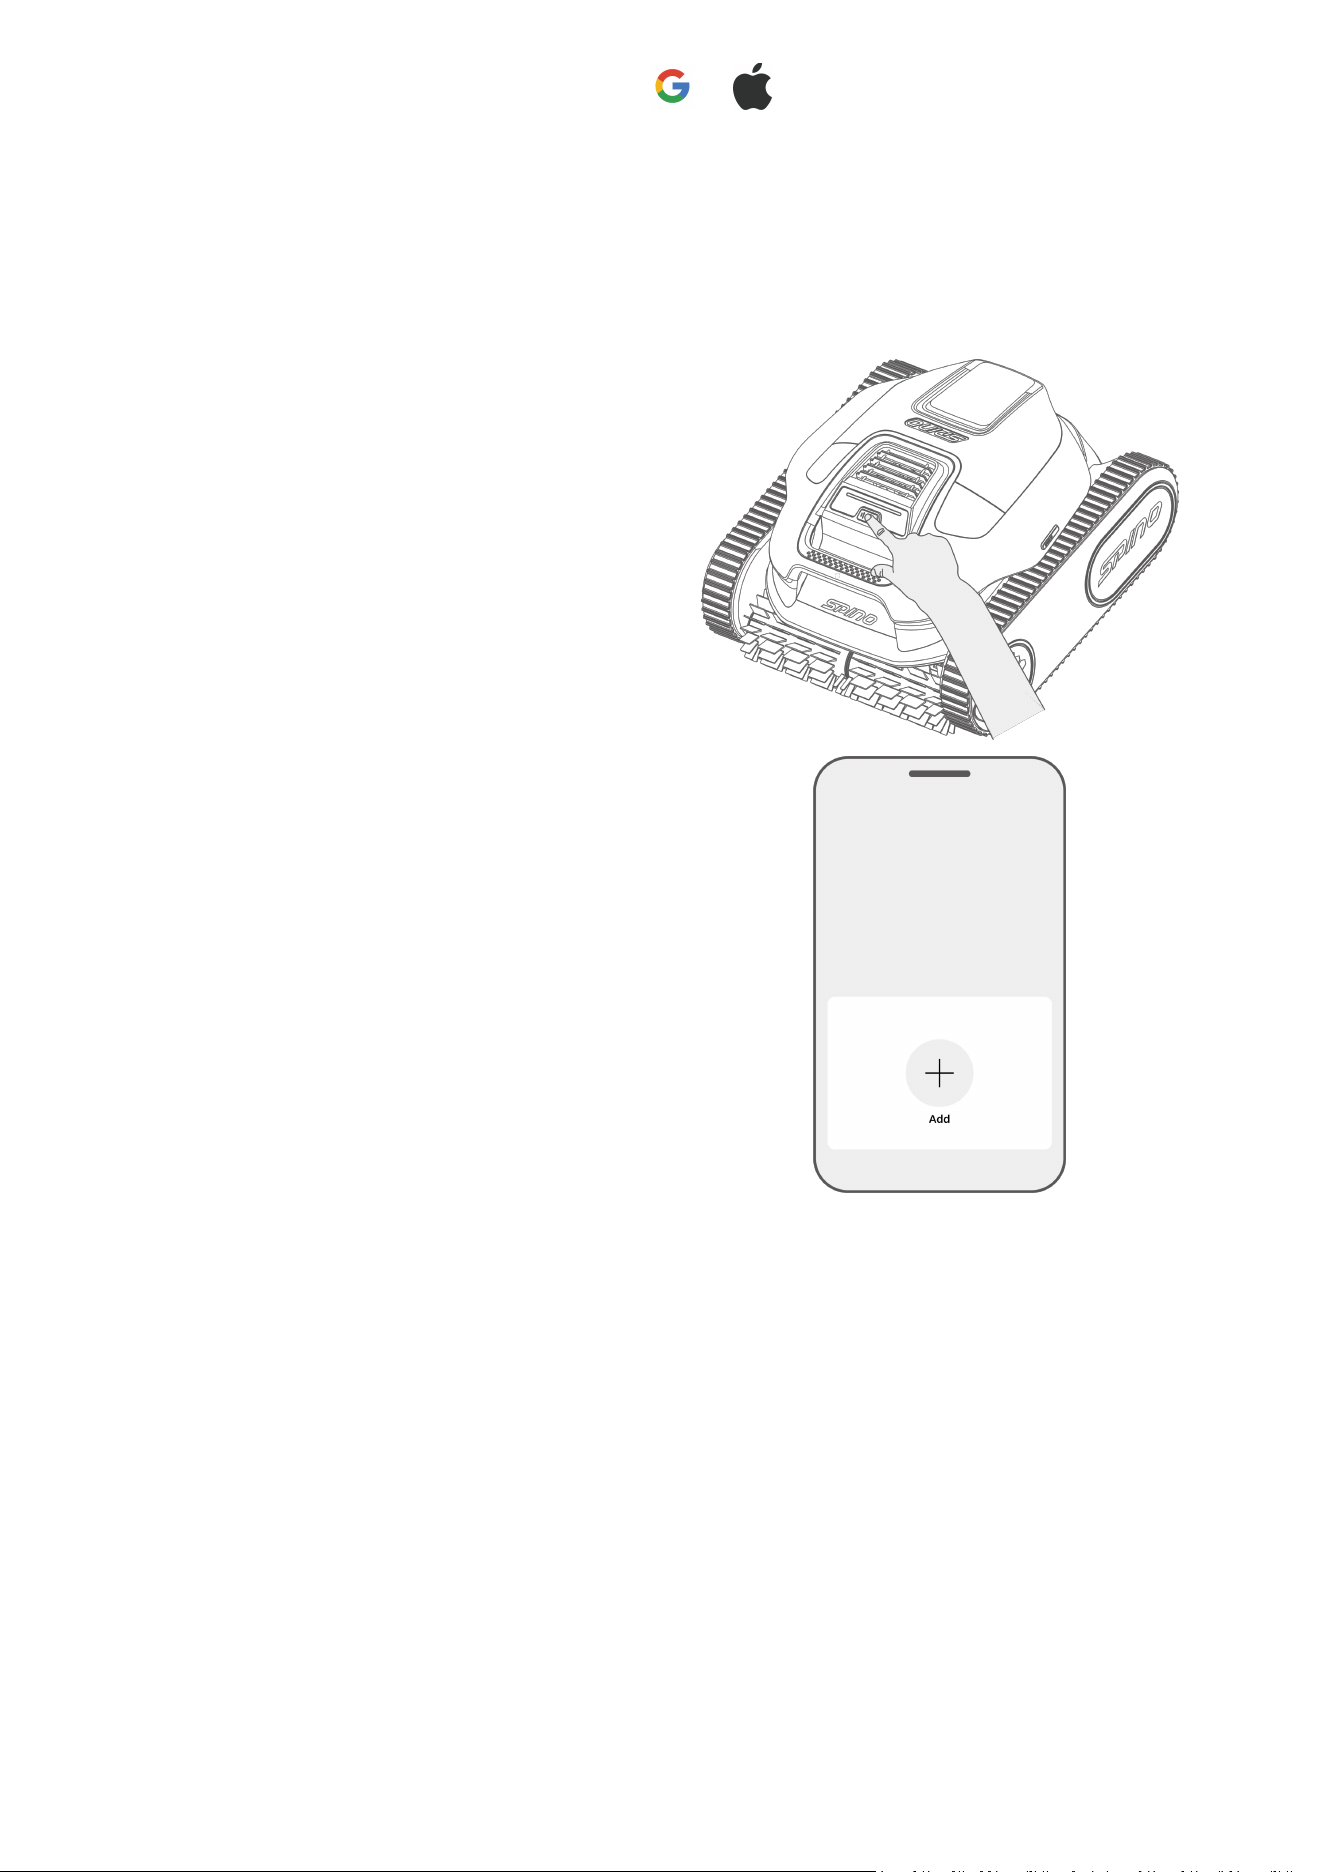
Long press the power button to turn on the
robotic pool cleaner.
Tap Add to connect your robot to your account.
- 14 -
If you already bind another Mammotion
product, switch to the last page and tap Add to
connect a new one.
NOTE
You can only bind the robot to your phone when it is out of water. The connection will
automatically disconnect when the robot enters water.
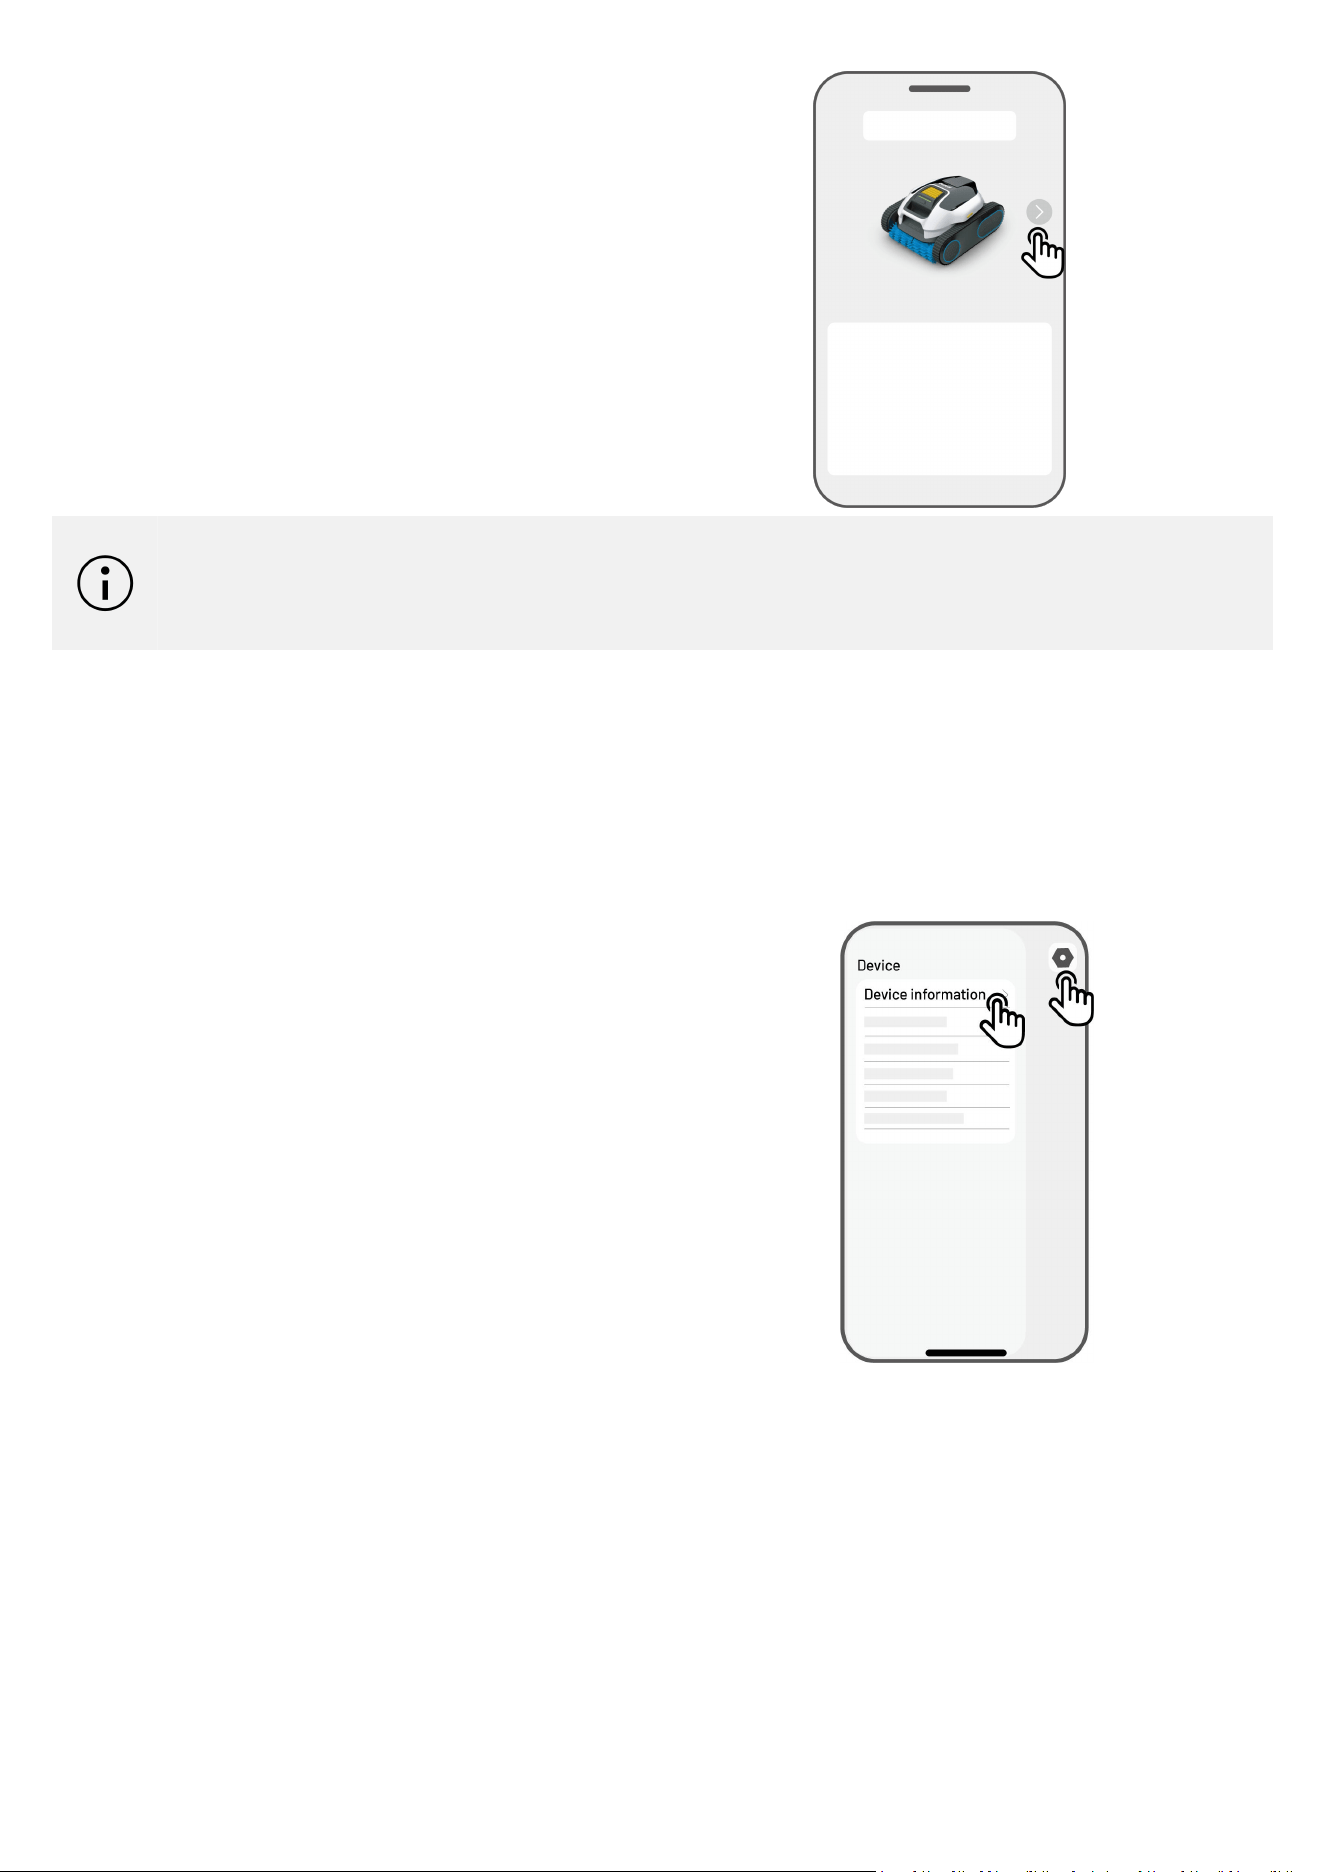
4.3 Update Firmware
For optimal experience, ensure your devices are updated to the latest firmware version.
To update the firmware
1. Go to Settings > Device information >
Robot version to update the firmware.
2. Ensure the robot is connected to a stable
network.
During the update, please do not exit the app,
perform other operations, turn off the robot,
disconnect the Bluetooth, or place the robot into
water.
- 15 -
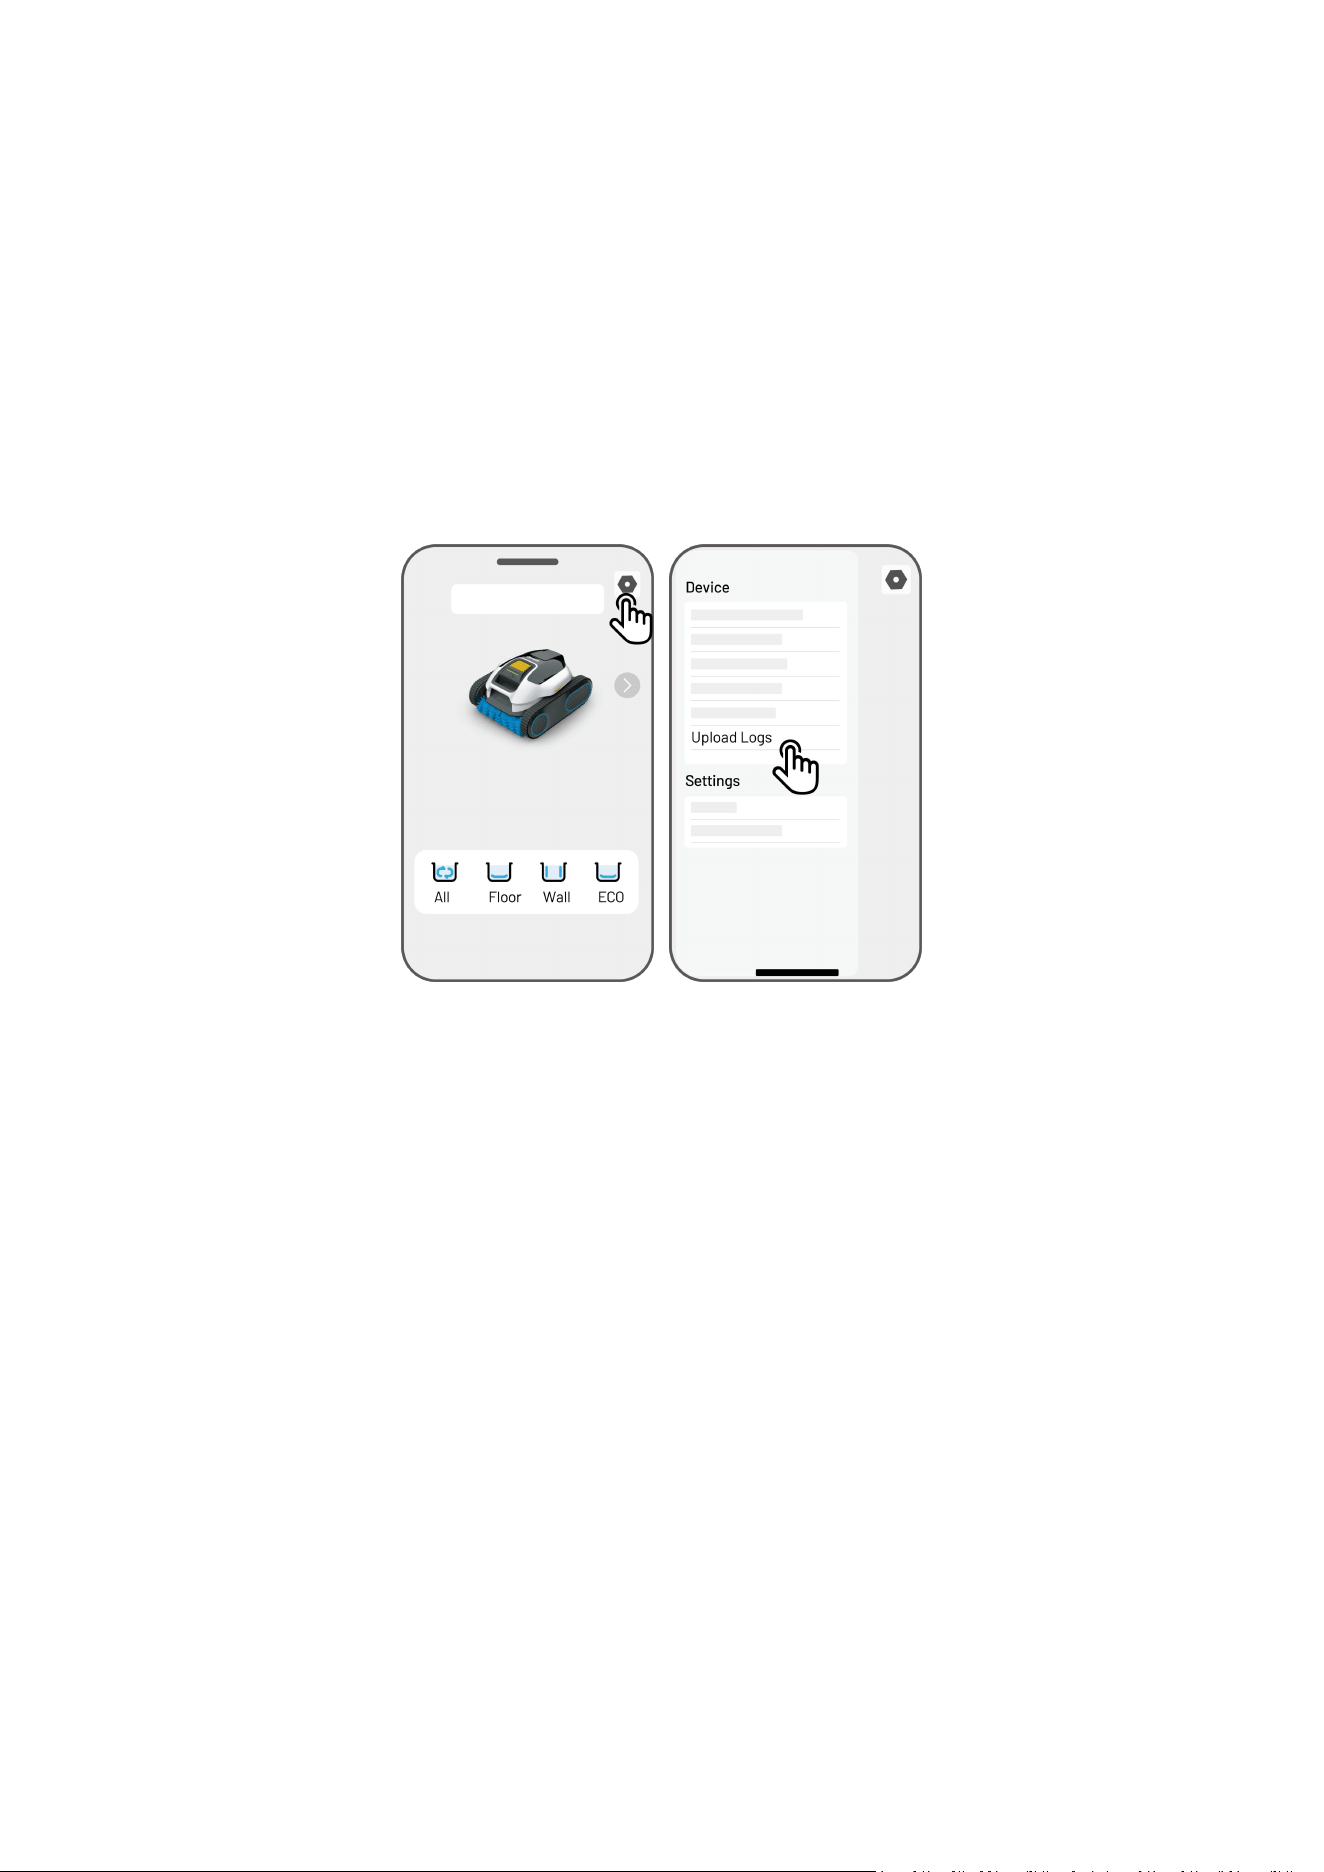
4.4 Upload Logs
To upload logs
1. Go to Settings > Upload Logs to upload the logs.
2. Ensure the robot is connected to a stable network.
3. Follow the on-screen instructions to complete the process.
During the upload, please do not exit the app, perform other operations, turn off the robot, disconnect
Bluetooth, or place the robot in water.

- 16 -
4.5 Beta Features
The Beta Features section provides early access to experimental functions and smart technologies under
development.
Turbo Clean
It is ideal for pools with heavy debris or those that haven’t been cleaned in a while. It boosts spray and
suction performance for a deeper clean, but also increases battery usage. This mode will automatically
turn off after a restart.
Platform Clean
Activate this feature for enhanced cleaning of platforms and walls in your pool. The robot will
automatically climb these surfaces upon encounter. This feature deactivates when the robot turns off,
so you'll need to manually reactivate it each time.

- 17 -
5 Inspection and Maintenance
WARNING
Ensure the robot is fully turned off before performing any inspection or maintenance.
5.1 Cleaning
After each use, inspect and clear any debris, such as tangled hair or trapped sand, from the water
outlet, caterpillar treads, and roller brush.
Rinse the robot and filter basket thoroughly after each use.
5.2 Routine Inspection
Check the Water Outlet
Inspect the water outlet for any foreign objects. Ensure the robot is turned off before the inspection.
Remove any obstructions if found.
Check the Charging Port
Examine the charging port for any signs of damage. If damage is detected, please contact our after-
sales support for assistance.
Check the Caterpillar Tread
Ensure the caterpillar treads are securely in place. If any caterpillar tread is loose, reattach it to its
proper position on the track.
Check the Roller Brush
Check for any wear on the roller brush. If wear is found, replace it with a new roller brush. You can
purchase replacement parts from Mammotion official stores and follow the provided instructions for
installation.
- 18 -
5.3 Storage
Please thoroughly clean the robot and filter basket, then allow them to dry completely.
Please apply an anti-rust agent to the metal contacts of the charging port and charger connector.
Please store the robot in a well-ventilated, dry indoor space, away from direct sunlight, rain, and frost.
Please ensure the robot is turned off during storage.
Please make sure the robot is fully drained of water and completely dry before storing.
Please fully charge the robot before storing it, and recharge it every 3 months to maintain battery
health.
5.4 Replaceable Accessories
To ensure your robot operates smoothly and effectively, regularly inspect the following components and
replace them if necessary:
Roller Brush
Filter Basket
- 19 -
Caterpillar Tread
Side Cover

- 20 -
6 Product Specifications
6.1 Technical Specifications
Model Name
SPINO E1
Working Voltage
Robotic Pool Cleaner: 21.6 V
Battery Charger: 100-240 V~, 50/60 Hz
Battery Charger Input
100-240 V~, 50/60 Hz, 2.0 A Max.
Battery Charger Output
27 V ⎓ 3 A, 81 W
Battery Charger Model
TS-A081-2703003
Battery Capacity
21.6 Vdc, 6.0 Ah, 129.6 Wh
Charging Temperature
10°C-40°C (50°F-104°F)
Charging Time
3 hours
Working Time
Up to 210 min
Working Water Depth
Max. 3 m (9.84 ft.)
Cleaning Path
Smart Arc
Wall Climbing
45°-110°
Filter Basket
2.8 L
Filter Layer
180 µm Fine Filter Basket
App Control
Mammotion App
Automatic Surface
Parking
YES
Quick Water Release
YES
OTA Upgrade
YES
Dimensions (L*W*H)
444 x 412 x 243 mm (17.5 x 16.2 x 9.6 inches)
Robot Net Weight
9.3 kg (21 lbs.)
Waterproof
IPX8 & Battery Double Layer Waterproof
Applicable Pool Conditions
Pool Surfaces
Concrete
Fiberglass
Vinyl
Tile
Marble
Pebble Tec
PH
6.5-8.3
Temperature
5°C-40°C (41°F-104°F)

- 21 -
NaCl
Max. 5000 ppm
Chlorine
Max. 3 ppm
Operating Frequency
Bluetooth
2400-2483.5MHz
Wi-Fi
2400-2483.5MHz
Maximum Transmitter Power
Bluetooth
<20dBm
Wi-Fi
<20dBm
- 22 -
7 Warranty
Shenzhen Mammotion Innovation Co., Ltd warrants that this product will be free from material and
workmanship defects under normal use in accordance with the product materials published by
Mammotion during the warranty period. The published product materials include but not limited to user
manual, quick start guide, maintenance, specifications, disclaimer, in-app notifications, etc. The warranty
period varies among different products and parts. Check the table below:
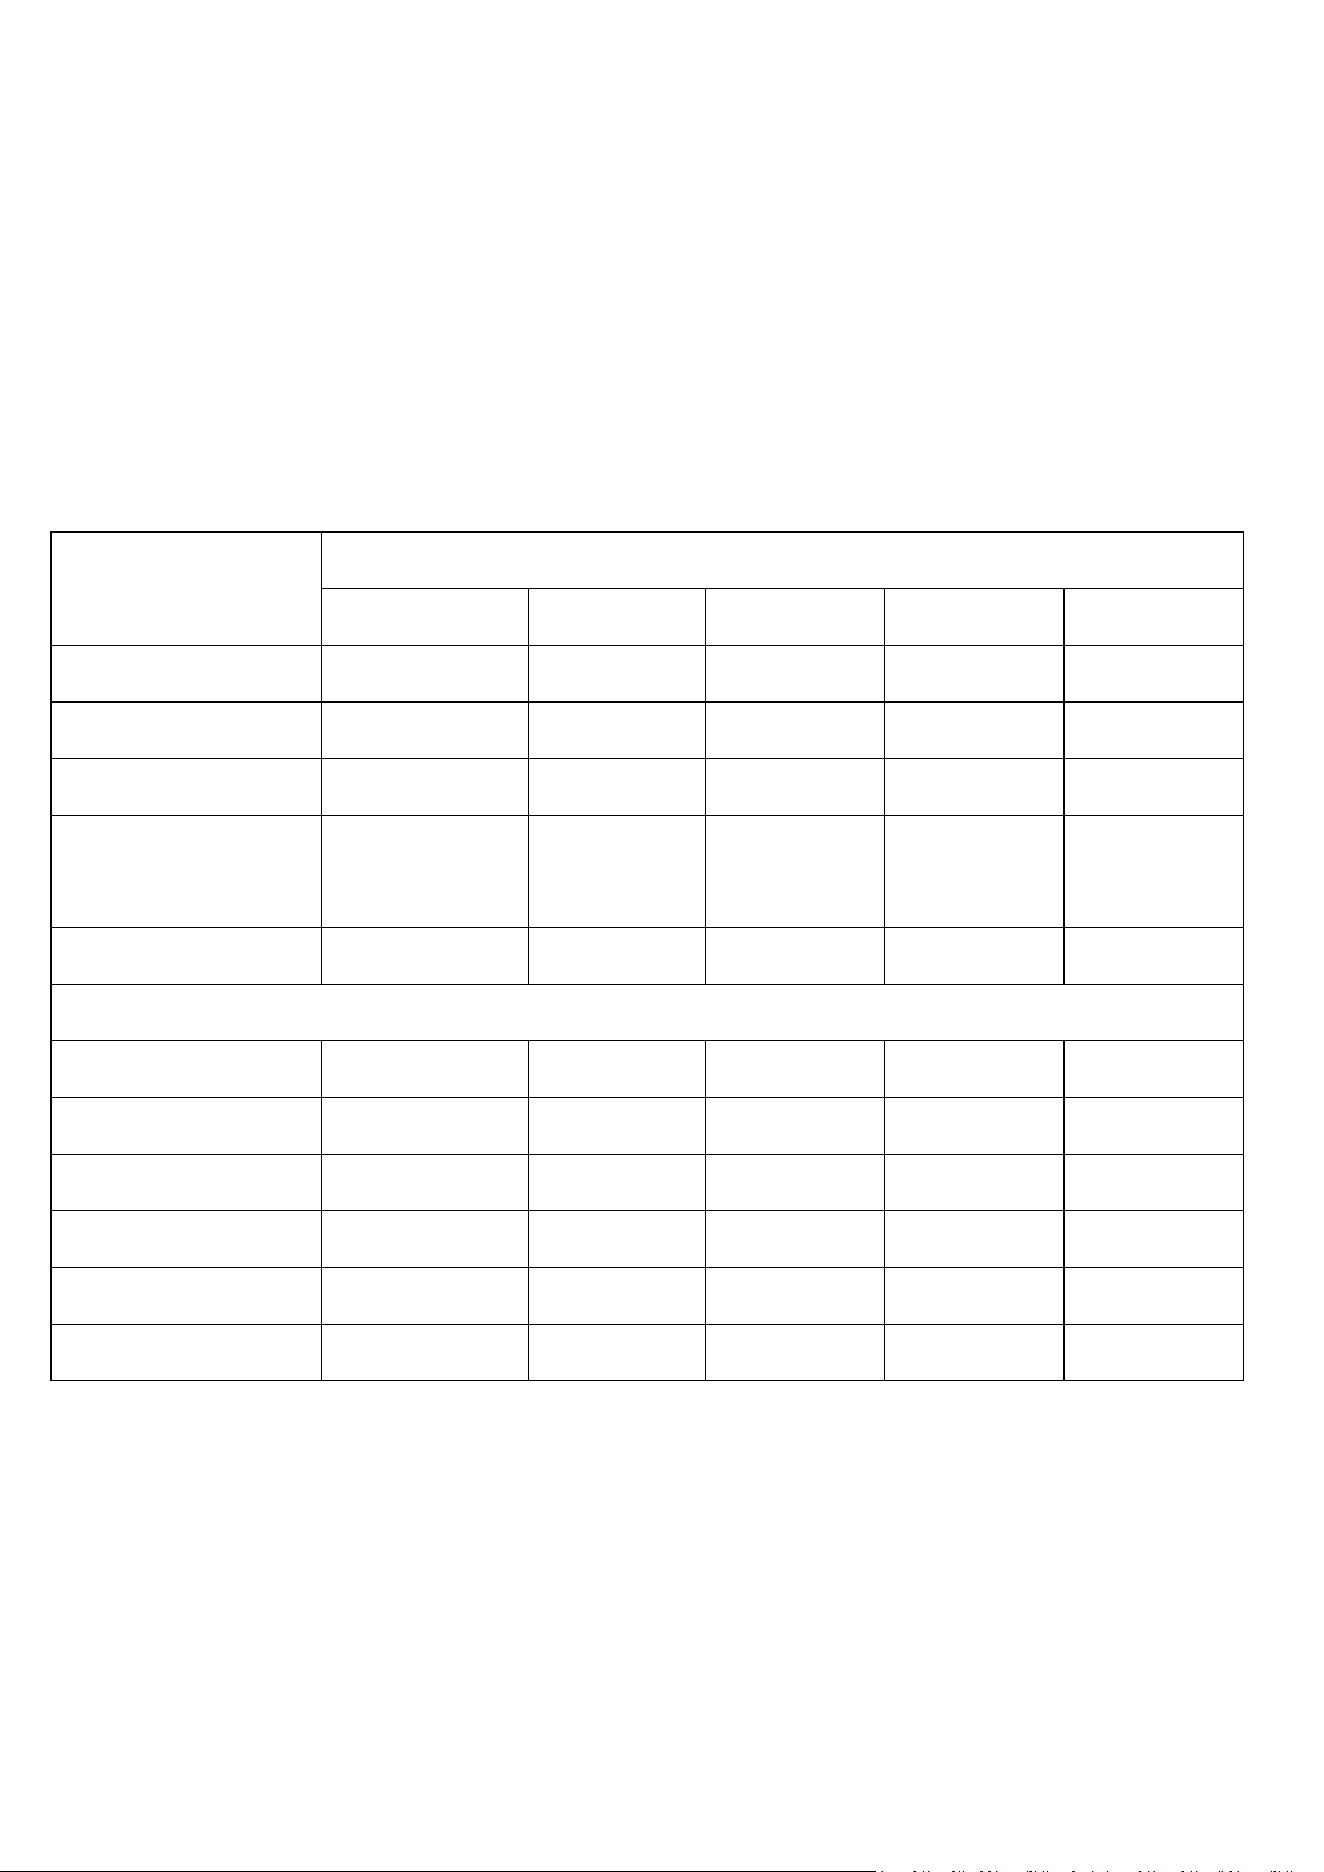
Component
Warranty
EU
US
UK
AU
CA
Motor Module
2 years
2 years
2 years
2 years
2 years
Top Cover
2 years
2 years
2 years
2 years
2 years
Chassis
2 years
2 years
2 years
2 years
2 years
Caterpillar Tread
Drive System
2 years
2 years
2 years
2 years
2 years
Roller Shaft
2 years
2 years
2 years
2 years
2 years
Wearing Parts
Left/Right Side Cover
3 months
3 months
3 months
3 months
3 months
Hook
3 months
3 months
3 months
3 months
3 months
Filter Basket
3 months
3 months
3 months
3 months
3 months
Caterpillar Tread
3 months
3 months
3 months
3 months
3 months
Roller Brush
3 months
3 months
3 months
3 months
3 months
Charger
3 months
3 months
3 months
3 months
3 months
If the product does not function as warranted during the warranty period, please contact Mammotion
customer service for instructions.
For products purchased from a local dealer, kindly reach out to the dealer first.

- 23 -
Users must present a valid proof of purchase, receipt, or order number (for Mammotion Direct Sales).
The serial number of the product is crucial for initiating warranty service.
Mammotion will make every effort to address concerns through phone calls, email, or online chat.
In some cases, Mammotion may advise you to download or install specific software updates.
If issues persist, you may need to send the product to Mammotion for further assessment or to a local
Mammotion-appointed service center.
The warranty period for the product commences from the original date of purchase indicated on the
sales receipt or invoice.
For pre-ordered products, the warranty period begins from the shipping date from the local
warehouse.
Mammotion will need users to arrange the shipment by themselves if users would like to send the
products to local service center or Mammotion factory for further diagnosis. Mammotion will repair or
replace and send back to users at no cost if the problem falls under the warranty. If not, Mammotion
or designated service center may charge a fee accordingly.
Here puts some examples of faults that warranty will not cover:
Failure to follow the instructions outlined in the user manual.
If the product arrives damaged during shipment and is not rejected upon delivery, or if no official
documentation confirming the damages is provided by the shipping company. Inability to provide
evidence of damage occurring during transit.
Product malfunction due to accidents, misuse, abuse, natural disasters like floods, fires, earthquakes,
exposure to food or liquid spills, incorrect electrical charging, or other external factors.
Damage resulting from using the product in ways not permitted or intended as specified by
Mammotion.
Modification of the product or its components that significantly alters functionality or capabilities
without obtaining written permission from Mammotion.
Loss, damage, or unauthorized access to your data.
Signs of tampering or alteration on product labels, serial numbers, etc.
Failure to provide a valid proof of purchase from Mammotion, such as a receipt or invoice, or if there
are suspicions of forgery or tampering with the documentation.

- 24 -
8 Compliance
FCC Compliance Statements
This device complies with Part 15 of the FCC Rules. Operation is subject to the following two conditions: (1)
this device may not cause harmful interference, and (2) this device must accept any interference received,
including interference that may cause undesired operation.
Caution: Changes or modifications not expressly approved by the party responsible for compliance could
void the user’s authority to operate the equipment.
Note: This equipment has been tested and found to comply with the limits for a Class B digital device,
pursuant to Part 15 of the FCC Rules. These limits are designed to provide reasonable protection against
harmful interference in a residential installation. This equipment generates, uses and can radiate radio
frequency energy and, if not installed and used in accordance with the instructions, may cause harmful
interference to radio communications. However, there is no guarantee that interference will not occur in a
particular installation.
If this equipment does cause harmful interference to radio or television reception, which can be
determined by turning the equipment off and on, the user is encouraged to try to correct the interference
by one or more of the following measures:
-- Reorient or relocate the receiving antenna.
-- Increase the separation between the equipment and receiver.
-- Connect the equipment into an outlet on a circuit different from that to which the receiver is connected.
-- Consult the dealer or an experienced radio/TV technician for help.
ISED Compliance Statements
This device contains licence-exempt transmitter(s)/receiver(s) that comply with Innovation, Science and
Economic Development Canada’s licence-exempt RSS(s). Operation is subject to the following two

- 25 -
conditions:
(1) This device may not cause interference.
(2) This device must accept any interference, including interference that may cause undesired operation
of the device.
This equipment complies with IC RSS-102 radiation exposure limits set forth for an uncontrolled
environment.
L’émetteur/récepteur exempt de licence contenu dans le présent appareil est conforme aux CNR
d’Innovation,
Sciences et Développement économique Canada applicables aux appareils radio exempts de licence.
L’exploitation est autorisée aux deux conditions suivantes:
(1) L’appareil ne doit pas produire de brouillage;
(2) L’appareil doit accepter tout brouillage radioélectrique subi, même si le brouillage est susceptible d’en
compromettre le fonctionnement.
Cet équipement est conforme aux limites d'exposition aux radiations IC CNR-102 établies pour un
environnement non contrôlé.
RF Exposure Compliance
This equipment complies with FCC/IC RSS-102 radiation exposure limits set forth for an uncontrolled
environment. This transmitter must not be co-located or operating in conjunction with any other antenna
or transmitter. This equipment should be installed and operated with minimum distance 20 cm between
the radiator and your body.
Cet équipement est conforme aux limites d'exposition aux radiations IC CNR-102 établies pour un
environnement non contrôlé.
Cet émetteur ne doit pas être colocalisé ou fonctionner en conjonction avec une autre antenne ou un
autre émetteur. Cet équipement doit être installé et utilisé avec une distance minimale de 20 cm entre le
radiateur et votre corps.

- 26 -
9Simplified EU Declaration of Conformity
Hereby, Shenzhen Mammotion Innovation Co., Limited declares that the radio equipment type [Model:E1] is
in compliance with Directive 2014/53/EU.
The full text of the EU declaration of conformity is available at the following internet address:
https://mammotion.com/pages/eu-declaration-of-conformity.

- 27 -
10 Contact Us
If you experience any issues with your Mammotion robot's operation, maintenance, safety, or encounter
any faults, please contact us.
Manufacturer: Shenzhen Mammotion Innovation Co., Limited
9th Floor, Building A3, Nanshan Zhiyuan, No. 1001 Xueyuan Avenue, Changyuan Community, Taoyuan
Street, Nanshan District, Shenzhen
Asia Pacific
Importer: Mammotion Technology Co., Limited
Shop 28 on 1st Floor, Lee Bo Building, No.3 Tsing Ho Square, Tuen Mun, Hong Kong
Australia: (+61) 1800-991-136
Mon-Fri 9:00-17:00 (AEST)
Europe
Importer/Authorized Representative: Mammotion Technik GmbH
Monschauer Str. 1 11.OG, 40549 Düsseldorf, Germany
Germany: (+49) 800-000-1148
France: (+33) 800-992-268
Mon-Fri 9:00-17:00 (CEST)
United Kingdom
Authorized Representative: WSJ Product Ltd.
Unit 1 Alsopo Arcade, Brownlow Hill, Liverpool, L3 5TX, UK
North America
Importer: Mammotion Technology LLC
13640 REDWOOD CT CHINO, CA 91710
USA/Canada: (+1) 877-778-1164
Mon-Fri 10:00-21:00 (EST)