User Manual
BEEM 550
INTRODUCTION
/////
Thank you for choosing the Beem 550 Smart LED Projector.
This manual will guide you through the setup, operation, and
maintenance of your projector to ensure optimal performance
and longevity. Please read the instructions carefully before using
the device.
SAFETY PRECAUTIONS
/////
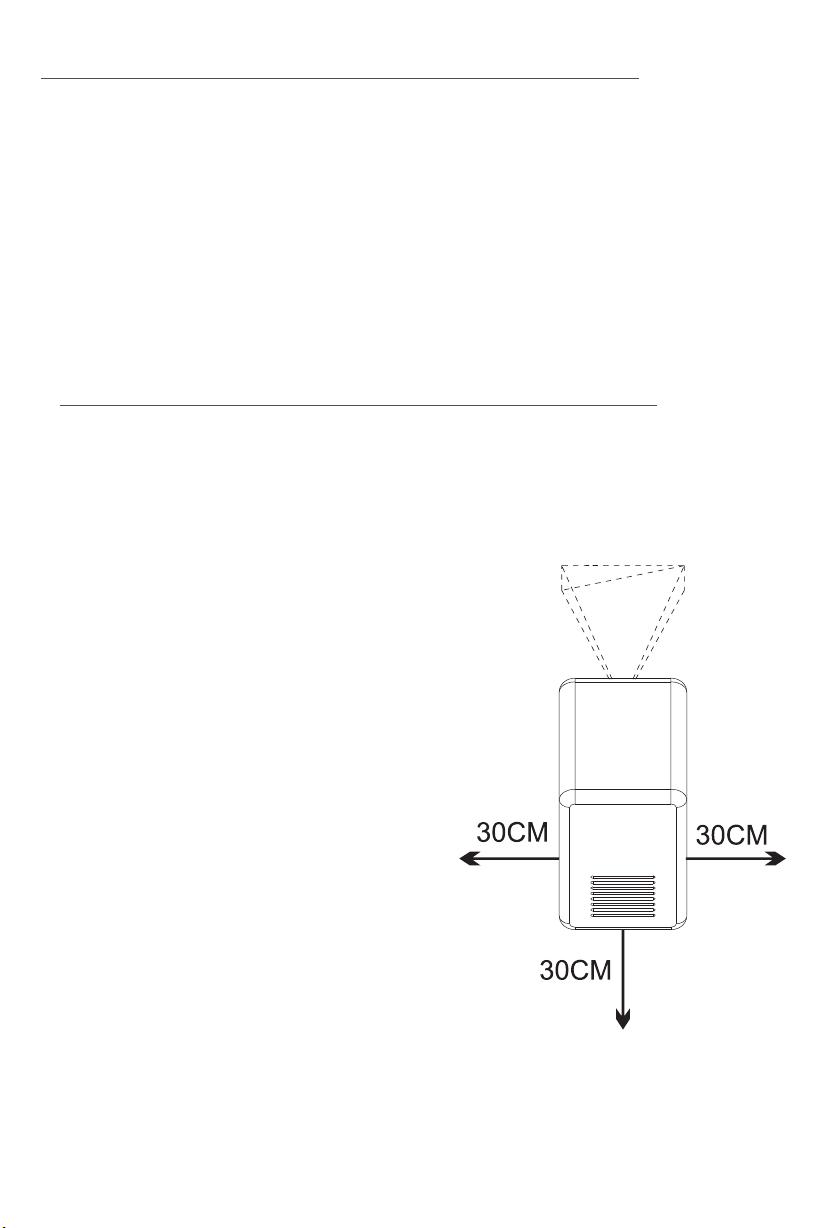
Ensure there are no obstacles within
30 cm of the projector's air inlet and
outlet during use.
Provide adequate ventilation to
prevent hot air from building up
inside the projector.
Blocked airflow can lead to
overheating and abnormal
functioning of the projector.
(Refer to the diagram for correct
setup)
Dust Maintenance
After using the dust removal
window, always close it properly.
Leaving it open may cause serious
damage to the projector.
E-Waste Management
For E-Waste & ROHS compliance
refer to www.portronics.com/ewaste
www.portronics.com
For Support
Visit : www.portronics.com
E-mail : [email protected]
Contact No.: +91 9555245245
(Working Hours: Monday - Saturday, 10:00am - 6:00pm)
For best viewing performance, it is recommended to use this
product in a dark room.
1. Do not install the projector in areas exposed directly to air
conditioning. Moisture or high temperature may cause
malfunction.
2. Ensure proper ventilation to avoid heat buildup inside the
projector. Blocked airflow can lead to overheating or failure.
3. Do not insert clips, paper, or metal objects into the projector.
If anything falls inside, power off immediately and contact
qualified service personnel.
4. To avoid the risk of electrical damage, do not place any
liquids on or near the projector.
5. When transporting the projector, use soft materials and
always apply the lens protection cover to prevent scratches
and damage.
6. After use, the exhaust vent area may become hot. Avoid
touching it with bare hands.
7. Never look directly into the projector lens while it is powered
on. This can cause serious eye injury.
CAUTIONS AND WARNINGS
/////
⚠
IMPORTANT NOTICES
/////
⚠
⚠
NOTICE 1
Do not open the projector casing. Only trained professionals
should perform internal maintenance.
NOTICE 2
Warning: Parts inside the projector may carry uninsulated
high voltage and a surface magnetic field. Do not touch internal
components as this may result in electric shock.
NOTICE 3
To avoid fire or electric shock, do not expose the projector to
rain or moisture under any circumstances.
Regularly clean the air inlet dust screen to avoid dust buildup,
which can block airflow and harm the device.
You may use soft brushes, vacuum cleaners, or similar tools for
cleaning.
SMART LED PROJECTOR
CATALOGUE
/////
Thank you very much for purchasing our products.
Please check whether the physical products received are
complete;
If the products and accessories you receive are not complete,
please contact the sales personnel in a timely manner.
(For specific items, please refer to the actual package.)
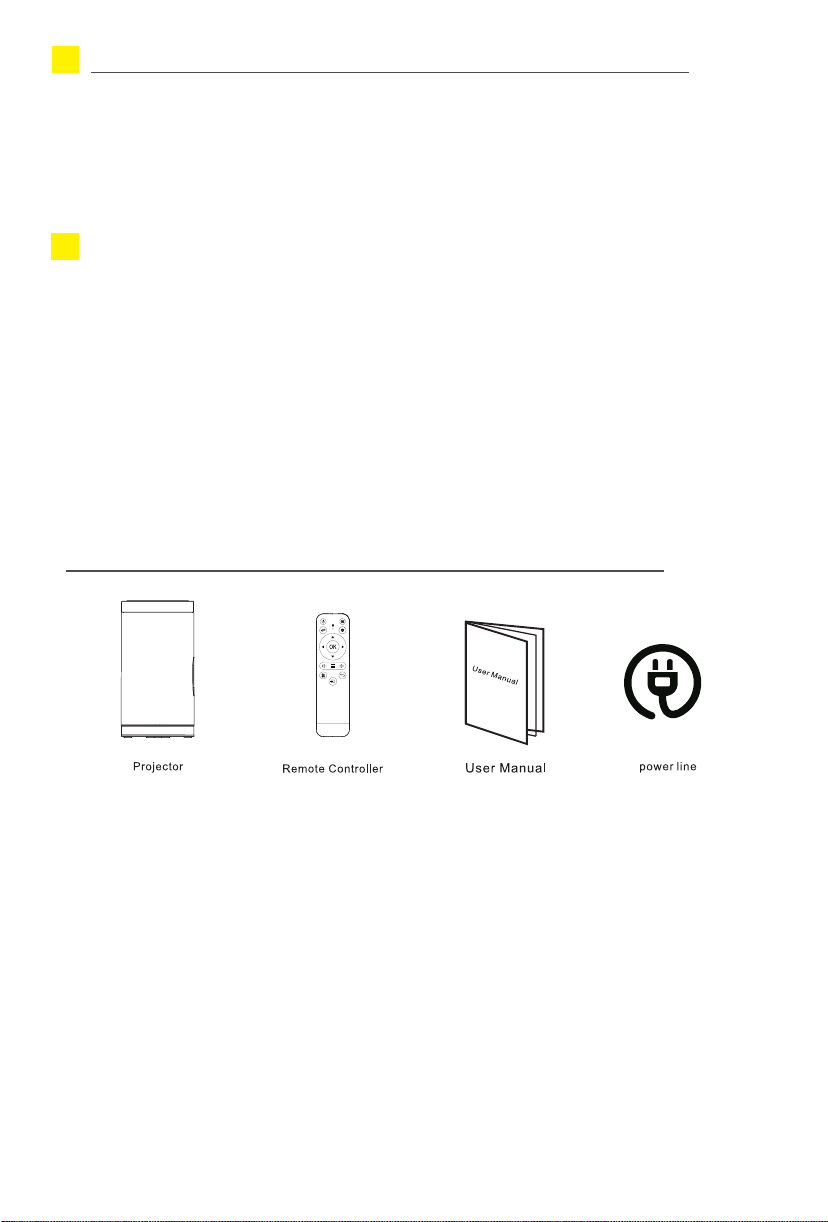
LIST OF ITEMS
/////
Products with different configurations
have different remote control configurations
please move the fuselage to adjust it appropriately.
2. Autofocus: For versions with autofocus capability, after
enabling the autofocus function in the settings interface, the
mobile device can achiev automatic focusing.
3. Autofocus: Whether it's autofocus or manual focusing, as long
as the version has the autofocus function, the focal length can
be adjusted by operating the remote control.
*Please select the appropriate operation method for your
device based on the model and version of the projector you are
currently using. Here are some general guidelines to consider.
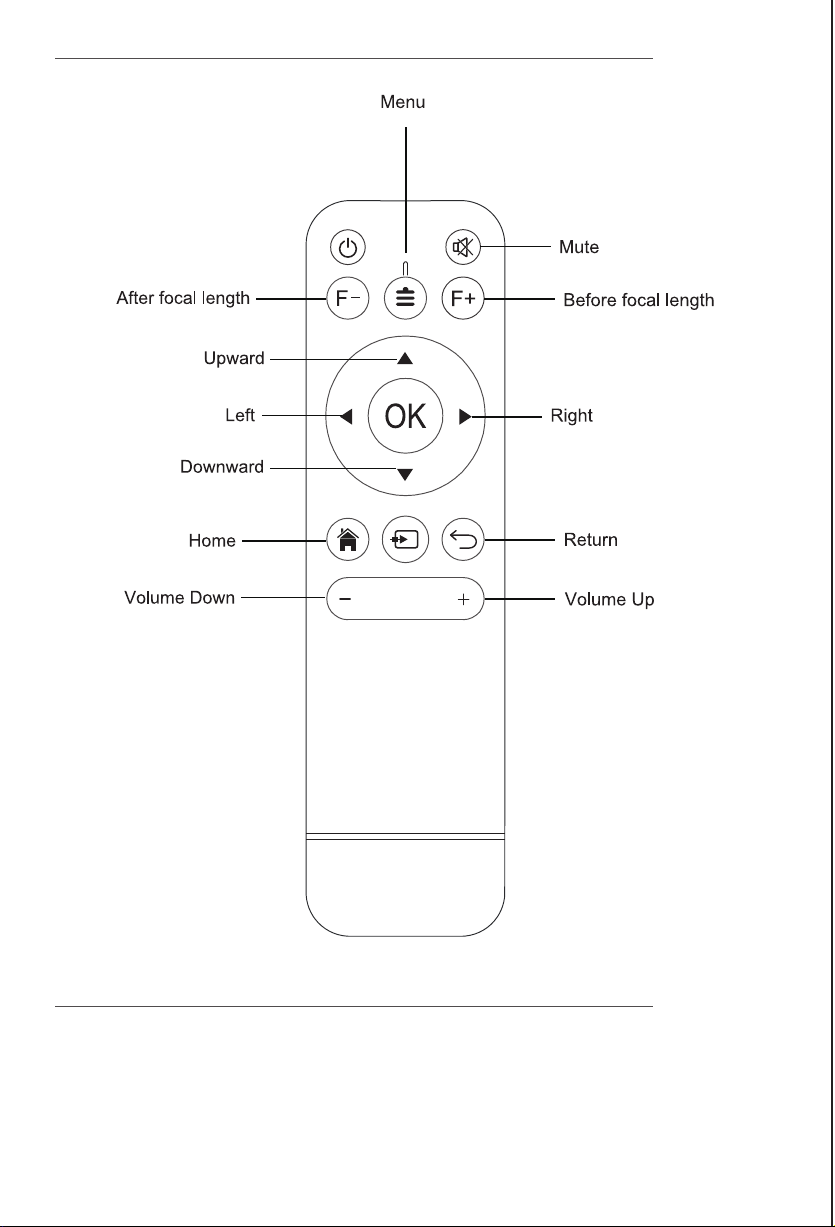
REMOTE CONTROL
/////
INSTALLATION AND DEBUGGING
/////
1. Manual Focusing: When the projection image is blurred
(as shown in the figure below), rotate the focusing ring on the
fuselage to adjust the effect, so as to obtain satisfactory results.
If you cannot obtain satisfactory clarit through adjustment,
INTELLIGENT PROJECTOR
/////
HOW TO POWER OFF
/////
1. Press the ON/OFF button on the remote control or
the power switch on the unit.
2. Put the lens cap on and store the unit in a dry and
cool place.
THE SOFTWARE SETTINGS
/////
Notes: With the update of system version, there will
be differences from the actual interfaces.
Please refer to the displayed interfaces as final.
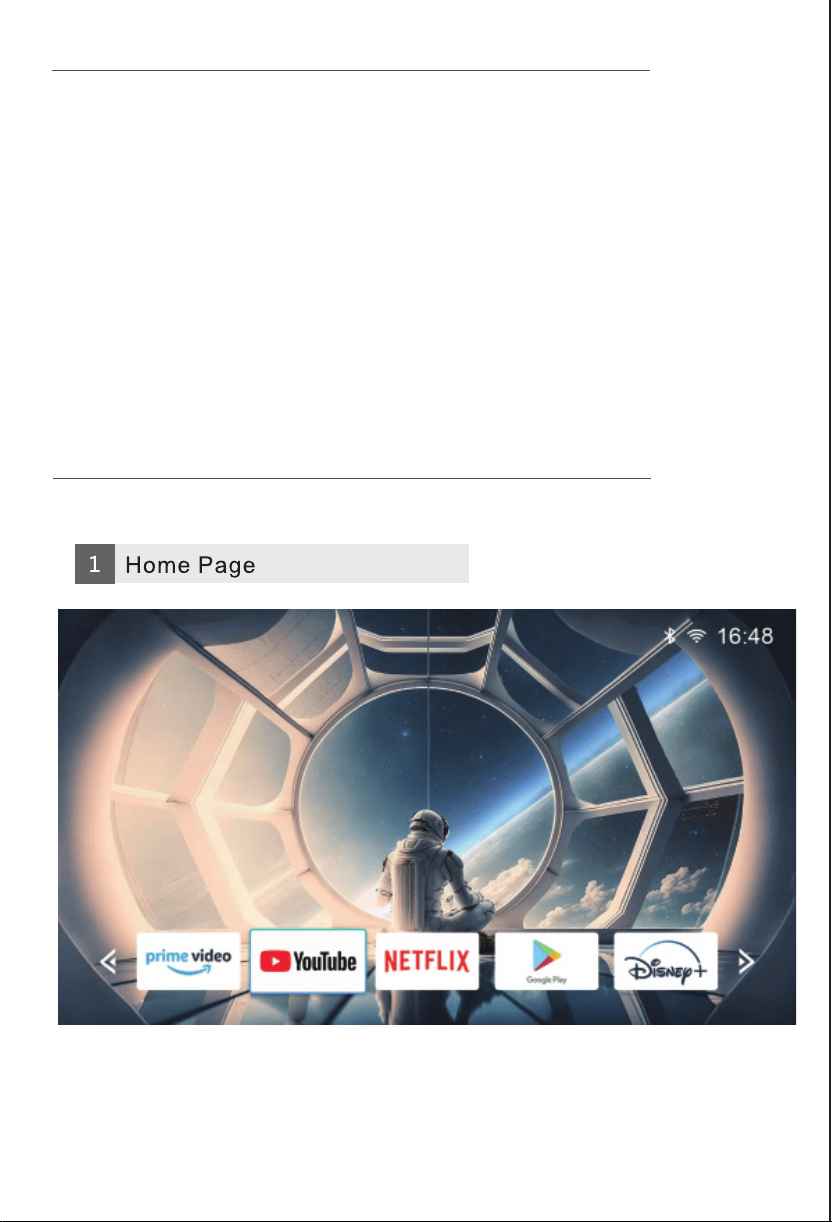
INTELLIGENT PROJECTOR
/////
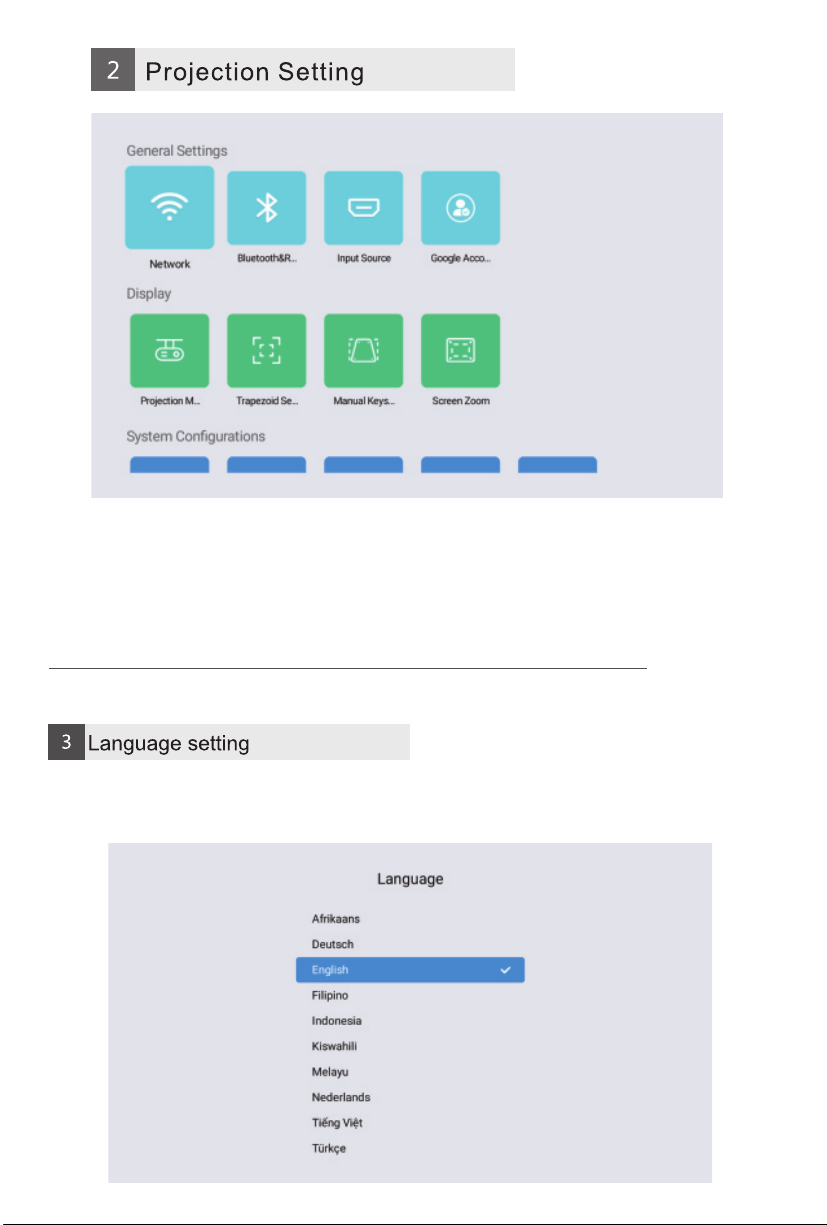
Setting Screen - Select the appropriate language in system
configuration.
Setting Screen - Select the appropriate time setting for you in
system configuration.
SOFTWARE SETTINGS
/////
Notes: With the update of system version, there will
be differences from the actual interfaces.
Please refer to the displayed interfaces as final.
PICTURE ADJUSTMENT
/////
MEDIA PLAYER
/////
You can play videos, music, or pictures from a storage device in
the following ways.
(1) After the projector is turned on, insert a USB flash drive, and
the system will detect the external device by itself, and a pop-up
prompt will pop up. Select the type of file you want to play, and
press the "OK" button on the remote control panel to enter.
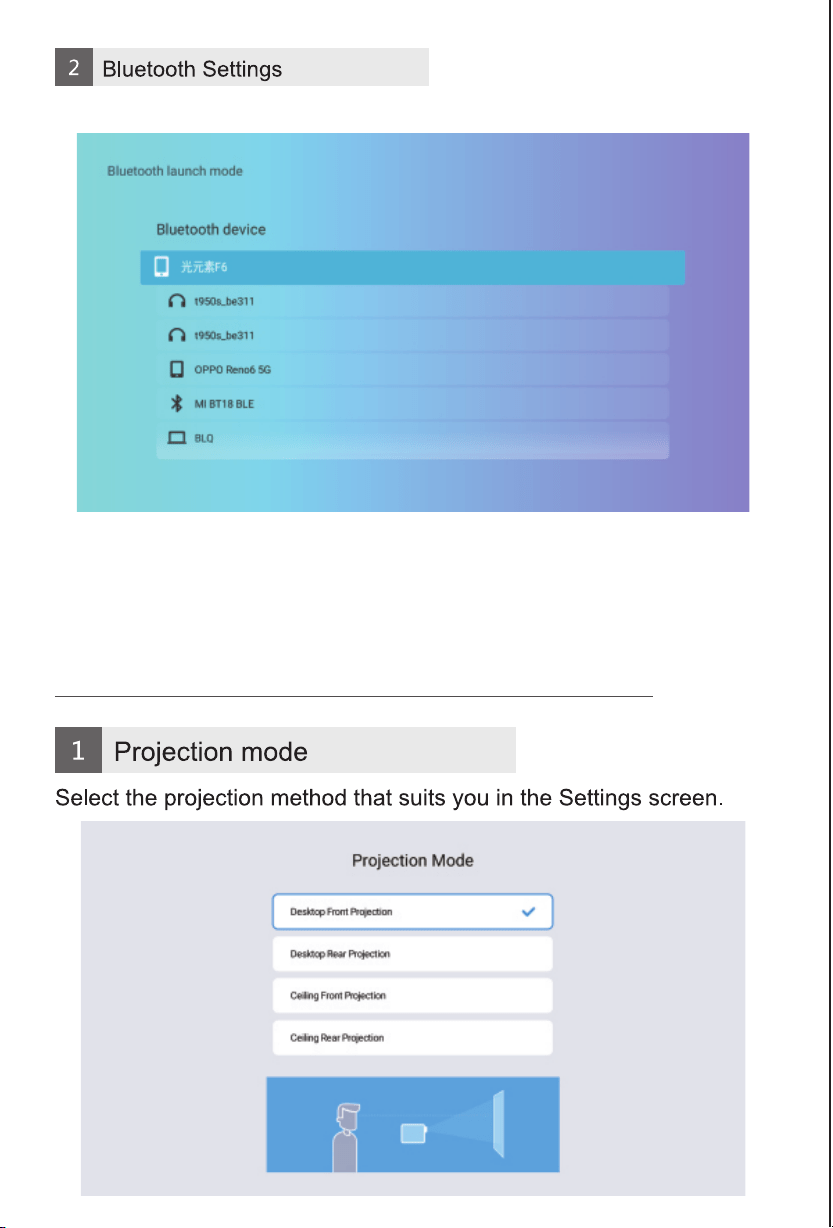
SCREEN SHARING
/////
The Projector And Mobile Phone Can Be Connected To Each Other
Through Screen Sharing Software In The Same Wi-fi Environment
To Achieve Screen Sharing.
(you Can Choose The Software That Comes With The System,
Or Download Other Same Screen Software From The Application Store)
Open Bluetooth Setting
User Manual
BEEM 550
INTRODUCTION
/////
Thank you for choosing the Beem 550 Smart LED Projector.
This manual will guide you through the setup, operation, and
maintenance of your projector to ensure optimal performance
and longevity. Please read the instructions carefully before using
the device.
SAFETY PRECAUTIONS
/////
Ensure there are no obstacles within
30 cm of the projector's air inlet and
outlet during use.
Provide adequate ventilation to
prevent hot air from building up
inside the projector.
Blocked airflow can lead to
overheating and abnormal
functioning of the projector.
(Refer to the diagram for correct
setup)
Dust Maintenance
After using the dust removal
window, always close it properly.
Leaving it open may cause serious
damage to the projector.
E-Waste Management
For E-Waste & ROHS compliance
refer to www.portronics.com/ewaste
www.portronics.com
For Support
Visit : www.portronics.com
E-mail : [email protected]
Contact No.: +91 9555245245
(Working Hours: Monday - Saturday, 10:00am - 6:00pm)
For best viewing performance, it is recommended to use this
product in a dark room.
1. Do not install the projector in areas exposed directly to air
conditioning. Moisture or high temperature may cause
malfunction.
2. Ensure proper ventilation to avoid heat buildup inside the
projector. Blocked airflow can lead to overheating or failure.
3. Do not insert clips, paper, or metal objects into the projector.
If anything falls inside, power off immediately and contact
qualified service personnel.
4. To avoid the risk of electrical damage, do not place any
liquids on or near the projector.
5. When transporting the projector, use soft materials and
always apply the lens protection cover to prevent scratches
and damage.
6. After use, the exhaust vent area may become hot. Avoid
touching it with bare hands.
7. Never look directly into the projector lens while it is powered
on. This can cause serious eye injury.
CAUTIONS AND WARNINGS
/////
⚠
IMPORTANT NOTICES
/////
⚠
⚠
NOTICE 1
Do not open the projector casing. Only trained professionals
should perform internal maintenance.
NOTICE 2
Warning: Parts inside the projector may carry uninsulated
high voltage and a surface magnetic field. Do not touch internal
components as this may result in electric shock.
NOTICE 3
To avoid fire or electric shock, do not expose the projector to
rain or moisture under any circumstances.
Regularly clean the air inlet dust screen to avoid dust buildup,
which can block airflow and harm the device.
You may use soft brushes, vacuum cleaners, or similar tools for
cleaning.
SMART LED PROJECTOR
CATALOGUE
/////
Thank you very much for purchasing our products.
Please check whether the physical products received are
complete;
If the products and accessories you receive are not complete,
please contact the sales personnel in a timely manner.
(For specific items, please refer to the actual package.)
LIST OF ITEMS
/////
Products with different configurations
have different remote control configurations
please move the fuselage to adjust it appropriately.
2. Autofocus: For versions with autofocus capability, after
enabling the autofocus function in the settings interface, the
mobile device can achiev automatic focusing.
3. Autofocus: Whether it's autofocus or manual focusing, as long
as the version has the autofocus function, the focal length can
be adjusted by operating the remote control.
*Please select the appropriate operation method for your
device based on the model and version of the projector you are
currently using. Here are some general guidelines to consider.
REMOTE CONTROL
/////
INSTALLATION AND DEBUGGING
/////
1. Manual Focusing: When the projection image is blurred
(as shown in the figure below), rotate the focusing ring on the
fuselage to adjust the effect, so as to obtain satisfactory results.
If you cannot obtain satisfactory clarit through adjustment,
INTELLIGENT PROJECTOR
/////
HOW TO POWER OFF
/////
1. Press the ON/OFF button on the remote control or
the power switch on the unit.
2. Put the lens cap on and store the unit in a dry and
cool place.
THE SOFTWARE SETTINGS
/////
Notes: With the update of system version, there will
be differences from the actual interfaces.
Please refer to the displayed interfaces as final.
INTELLIGENT PROJECTOR
/////
Setting Screen - Select the appropriate language in system
configuration.
Setting Screen - Select the appropriate time setting for you in
system configuration.
SOFTWARE SETTINGS
/////
Notes: With the update of system version, there will
be differences from the actual interfaces.
Please refer to the displayed interfaces as final.
PICTURE ADJUSTMENT
/////
MEDIA PLAYER
/////
You can play videos, music, or pictures from a storage device in
the following ways.
(1) After the projector is turned on, insert a USB flash drive, and
the system will detect the external device by itself, and a pop-up
prompt will pop up. Select the type of file you want to play, and
press the "OK" button on the remote control panel to enter.
SCREEN SHARING
/////
The Projector And Mobile Phone Can Be Connected To Each Other
Through Screen Sharing Software In The Same Wi-fi Environment
To Achieve Screen Sharing.
(you Can Choose The Software That Comes With The System,
Or Download Other Same Screen Software From The Application Store)
Open Bluetooth Setting
User Manual
BEEM 550
INTRODUCTION
/////
Thank you for choosing the Beem 550 Smart LED Projector.
This manual will guide you through the setup, operation, and
maintenance of your projector to ensure optimal performance
and longevity. Please read the instructions carefully before using
the device.
SAFETY PRECAUTIONS
/////
Ensure there are no obstacles within
30 cm of the projector's air inlet and
outlet during use.
Provide adequate ventilation to
prevent hot air from building up
inside the projector.
Blocked airflow can lead to
overheating and abnormal
functioning of the projector.
(Refer to the diagram for correct
setup)
Dust Maintenance
After using the dust removal
window, always close it properly.
Leaving it open may cause serious
damage to the projector.
E-Waste Management
For E-Waste & ROHS compliance
refer to www.portronics.com/ewaste
www.portronics.com
For Support
Visit : www.portronics.com
E-mail : [email protected]
Contact No.: +91 9555245245
(Working Hours: Monday - Saturday, 10:00am - 6:00pm)
For best viewing performance, it is recommended to use this
product in a dark room.
1. Do not install the projector in areas exposed directly to air
conditioning. Moisture or high temperature may cause
malfunction.
2. Ensure proper ventilation to avoid heat buildup inside the
projector. Blocked airflow can lead to overheating or failure.
3. Do not insert clips, paper, or metal objects into the projector.
If anything falls inside, power off immediately and contact
qualified service personnel.
4. To avoid the risk of electrical damage, do not place any
liquids on or near the projector.
5. When transporting the projector, use soft materials and
always apply the lens protection cover to prevent scratches
and damage.
6. After use, the exhaust vent area may become hot. Avoid
touching it with bare hands.
7. Never look directly into the projector lens while it is powered
on. This can cause serious eye injury.
CAUTIONS AND WARNINGS
/////
⚠
IMPORTANT NOTICES
/////
⚠
⚠
NOTICE 1
Do not open the projector casing. Only trained professionals
should perform internal maintenance.
NOTICE 2
Warning: Parts inside the projector may carry uninsulated
high voltage and a surface magnetic field. Do not touch internal
components as this may result in electric shock.
NOTICE 3
To avoid fire or electric shock, do not expose the projector to
rain or moisture under any circumstances.
Regularly clean the air inlet dust screen to avoid dust buildup,
which can block airflow and harm the device.
You may use soft brushes, vacuum cleaners, or similar tools for
cleaning.
SMART LED PROJECTOR
CATALOGUE
/////
Thank you very much for purchasing our products.
Please check whether the physical products received are
complete;
If the products and accessories you receive are not complete,
please contact the sales personnel in a timely manner.
(For specific items, please refer to the actual package.)
LIST OF ITEMS
/////
Products with different configurations
have different remote control configurations
please move the fuselage to adjust it appropriately.
2. Autofocus: For versions with autofocus capability, after
enabling the autofocus function in the settings interface, the
mobile device can achiev automatic focusing.
3. Autofocus: Whether it's autofocus or manual focusing, as long
as the version has the autofocus function, the focal length can
be adjusted by operating the remote control.
*Please select the appropriate operation method for your
device based on the model and version of the projector you are
currently using. Here are some general guidelines to consider.
REMOTE CONTROL
/////
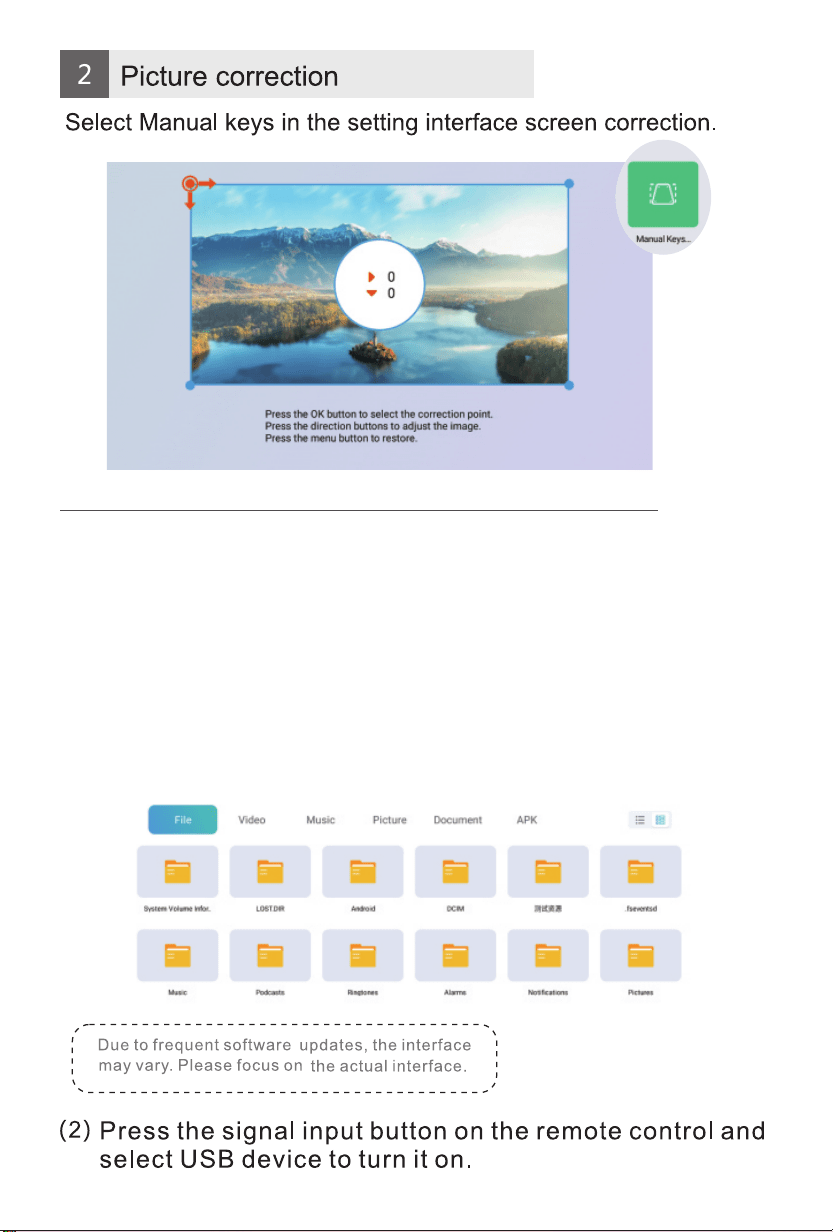
INSTALLATION AND DEBUGGING
/////
1. Manual Focusing: When the projection image is blurred
(as shown in the figure below), rotate the focusing ring on the
fuselage to adjust the effect, so as to obtain satisfactory results.
If you cannot obtain satisfactory clarit through adjustment,
INTELLIGENT PROJECTOR
/////
HOW TO POWER OFF
/////
1. Press the ON/OFF button on the remote control or
the power switch on the unit.
2. Put the lens cap on and store the unit in a dry and
cool place.
THE SOFTWARE SETTINGS
/////
Notes: With the update of system version, there will
be differences from the actual interfaces.
Please refer to the displayed interfaces as final.
INTELLIGENT PROJECTOR
/////
Setting Screen - Select the appropriate language in system
configuration.
Setting Screen - Select the appropriate time setting for you in
system configuration.
SOFTWARE SETTINGS
/////
Notes: With the update of system version, there will
be differences from the actual interfaces.
Please refer to the displayed interfaces as final.
PICTURE ADJUSTMENT
/////
MEDIA PLAYER
/////
You can play videos, music, or pictures from a storage device in
the following ways.
(1) After the projector is turned on, insert a USB flash drive, and
the system will detect the external device by itself, and a pop-up
prompt will pop up. Select the type of file you want to play, and
press the "OK" button on the remote control panel to enter.
SCREEN SHARING
/////
The Projector And Mobile Phone Can Be Connected To Each Other
Through Screen Sharing Software In The Same Wi-fi Environment
To Achieve Screen Sharing.
(you Can Choose The Software That Comes With The System,
Or Download Other Same Screen Software From The Application Store)
Open Bluetooth Setting
