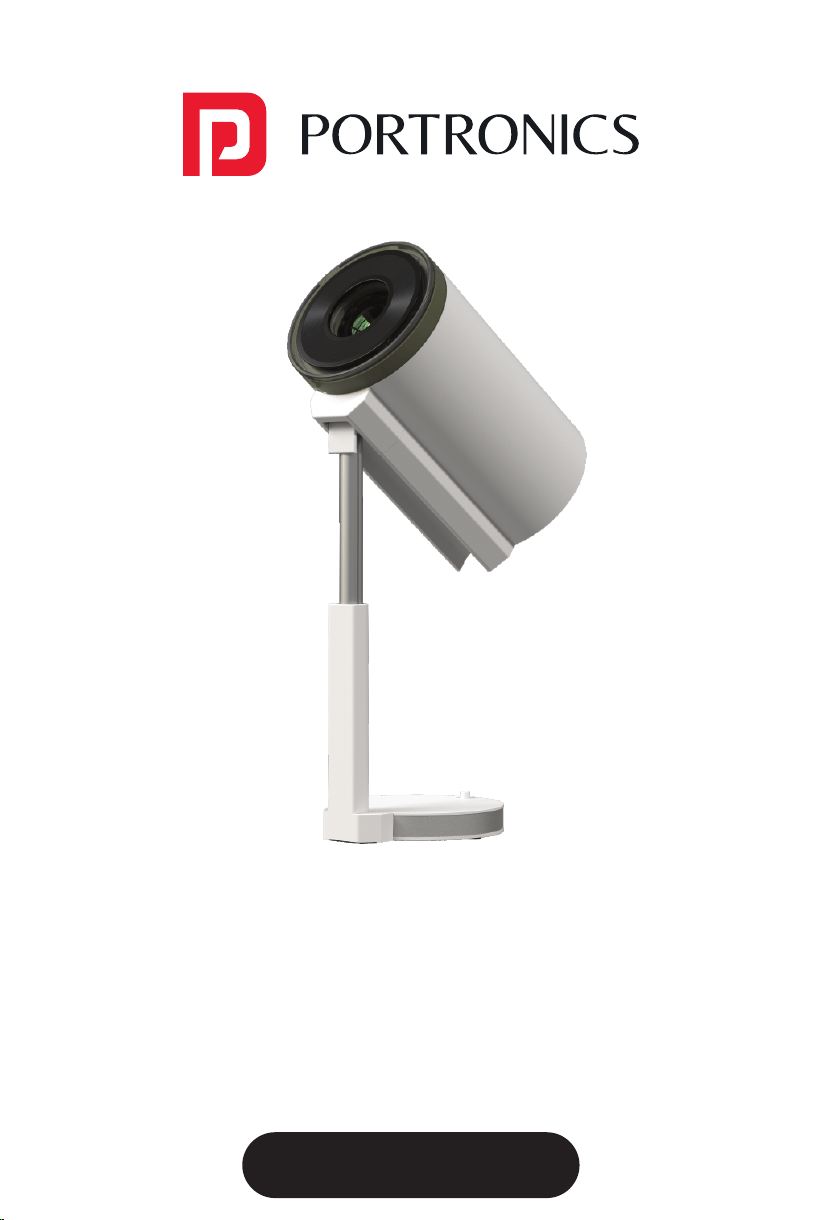
User Manual
BEEM 520
S M A R T L E D P R O J E C T O R
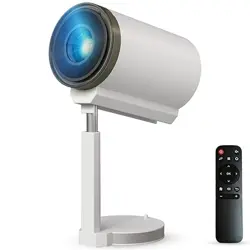
PACKAGE CONTENTS
/////
E-Waste Management
For E-Waste & ROHS compliance
refer to www.portronics.com/ewaste
www.portronics.com
For Support
Visit : www.portronics.com
E-mail : [email protected]
Contact No.: +91 9555245245
(Working Hours: Monday - Saturday, 10:00am - 6:00pm)
PLEASE NOTE
/////
Note: Any damage caused by physical impact, water/ liquid, fire, etc.
caused by the customer or nature shall not be covered under warranty.
Only product design, feature and functionality-related faults can be
considered. As per the brand's discretion, the product is eligible for
repair and not for replacement, during the warranty period.
Please read this manual carefully before use and keep
it for future reference.
•
Avoid exposure of the projector to dust, water / moisture and
extreme temperatures.
•
This device is not dustproof or waterproof, regularly clean
projector vents to avoid cooling malfunction.
•
Please use high quality power cord and under specified rated
power supply.
•
When projector is working, please do not look directly into the
lens, the strong light will flash your eyes and cause slight pain.
Children should use the projector under the supervision of
adults.
•
Do not cover the vents of projector and ensure it is in a well-
ventilated area when in use, positioned at least 2 feet away
from the wall from behind. Heating will reduce the life of
projector and cause danger.
•
Please cut off the power if the projector is out of use for long
time.
•
Users or third-party professionals should not attempt to
disassemble the projector for testing and maintenance, in
which case, the warranty will be void.
•
For optimal viewing performance, the projector should be
positioned at a height of 5 feet from the ground and at least 5
feet away from the wall or screen in the front.
•
Use the remote control from behind the projector for
convenient operation.
ð Projector 1 N
ð Remote Control 1 N
ð User Manual 1 N
Please check whether the physical products received are complete;
If the products and accessories you receive are not complete,
please contact the sales personnel in a timely manner.
(For specific items, please refer to the actual package.)
You can play videos, music, or pictures from a storage
device in the following ways.
and the system will detect the external device by itself,
and a pop-up prompt will pop up. Select the type of file you want to play,
and press the "OK" button on the remote control panel to enter.
F
On the home page, press the direction down key to select applications, change
the desktop background, and sound effects.
or screen sharing function, please use
for Apple Phones, and Airscreen for Android phones.
Miracast
"
"
"
"
"
M
M
M
M
M
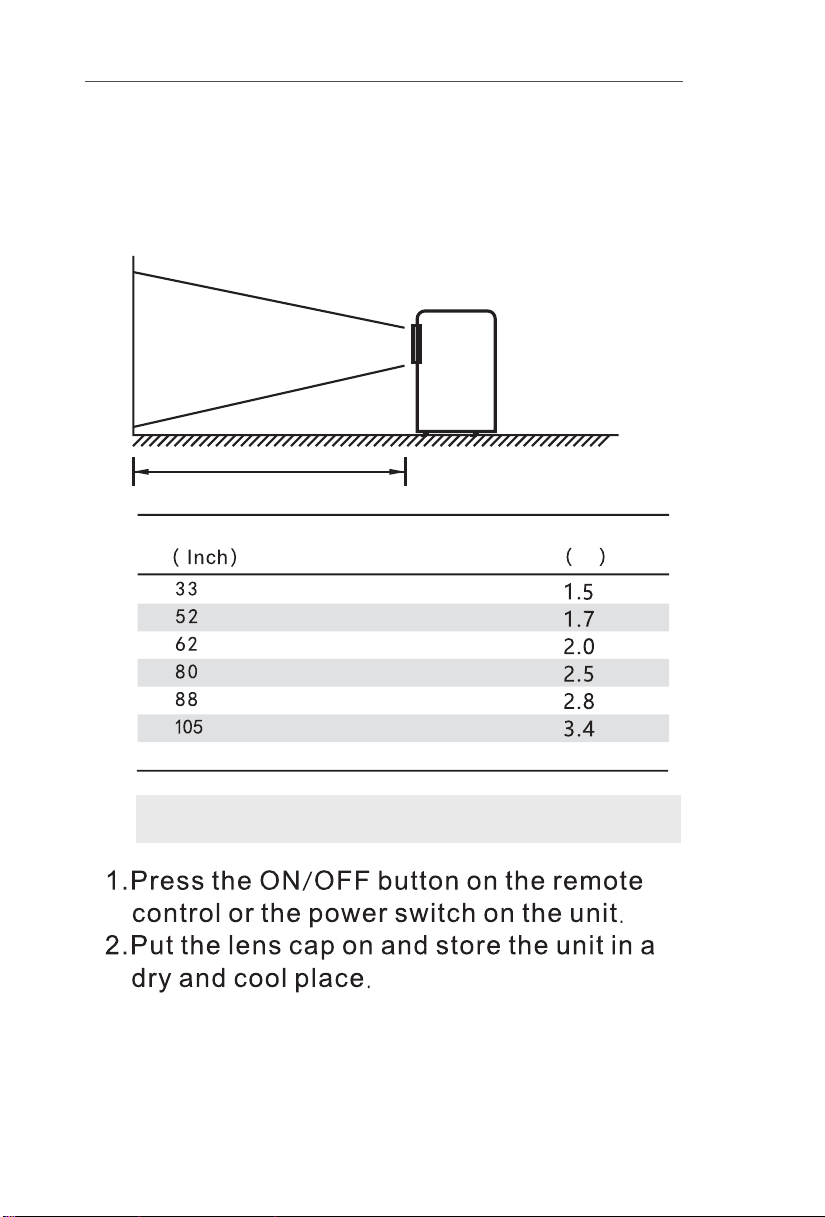
Projection Size Projection Distance
M
How To Power Off
Projection Setting
Language setting
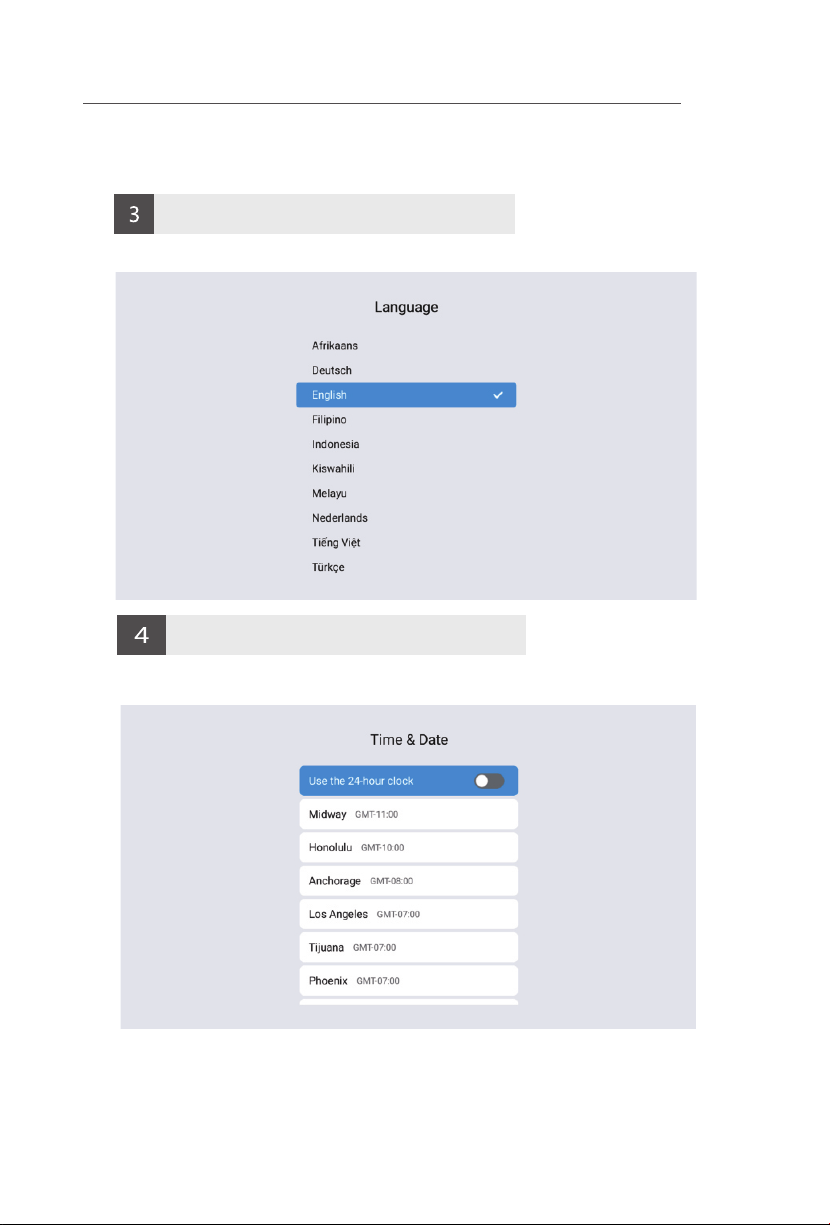
Settings Screen - Select the appropriate language in System configuration. .
Time setting
Settings screen - Select the appropriate time Settings for you in System Configurationg
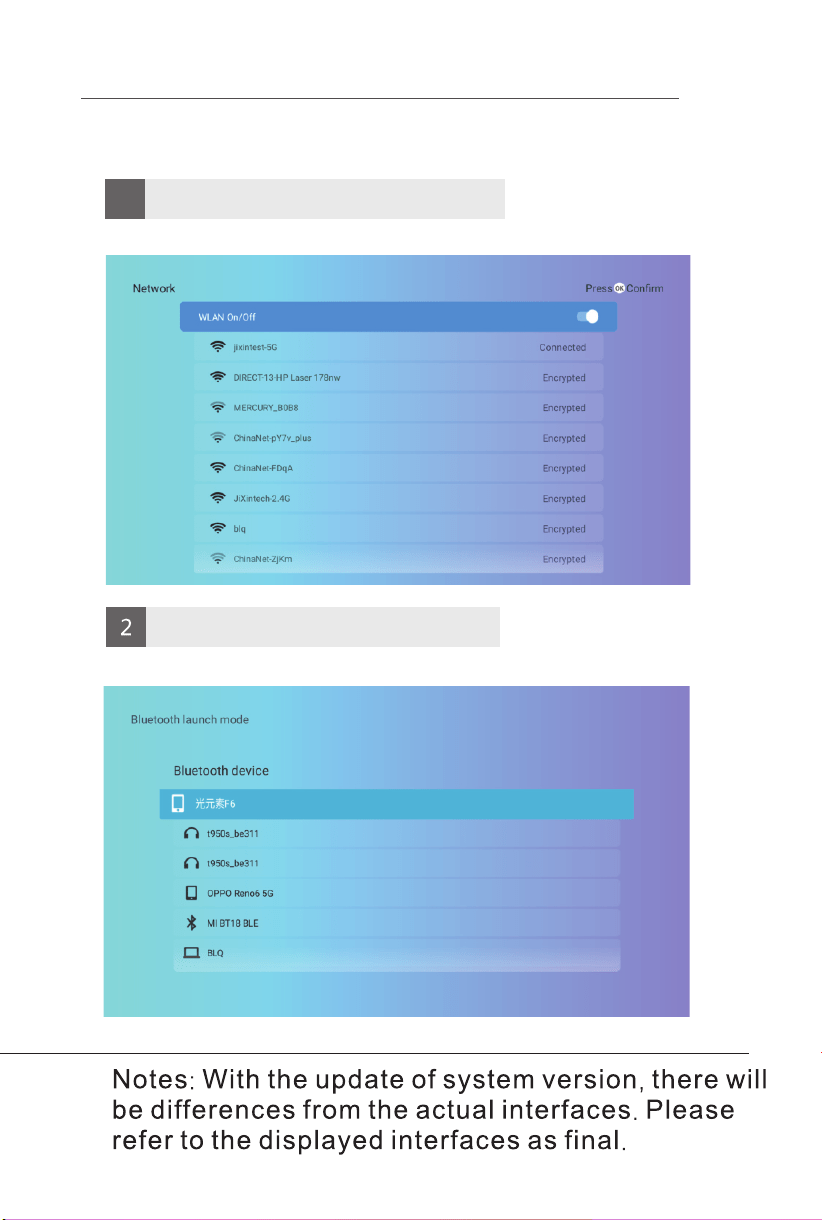
Bluetooth Settings
Select the projection method that suits you in the Settings screen.
Select Manual keys in the setting interface screen correction.
5
6
Select a hotspot and enter a password to connect.
Open Bluetooth and select pairing successfully.
Projection mode
Picture correction
SAME SCREEN
Other operations
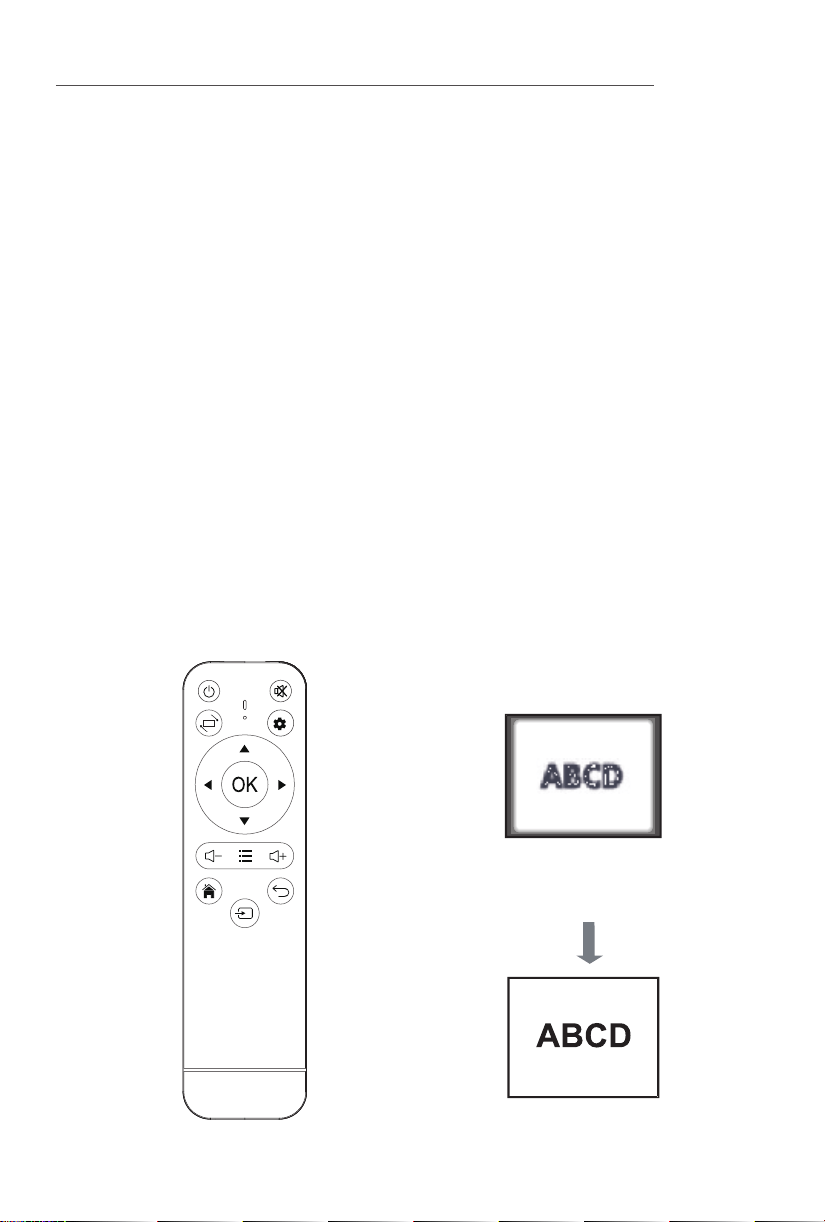
Manual Focusing: When the projection image is blurred (as shown in the
figure below),rotate the focusing ring on the fuselage to adjust the effect,
so as to obtain satisfactory results. If you cannot obtain satisfactory clarity
through adjustment, please move the fuselage to adjust it appropriately.
Autofocus: For versions with autofocus capability, after enabling the
autofocus function in the settings interface, the mobile device can achieve
automatic focusing.
Autofocus: Whether it's autofocus or manual focusing, as long as the
version has the autofocus function, the focal length can be adjusted by
operating the remote control.
*Please select the appropriate operation method for your device based on the model and version of the
projector you are currently using. Here are some general guidelines to consider:
①
②
③
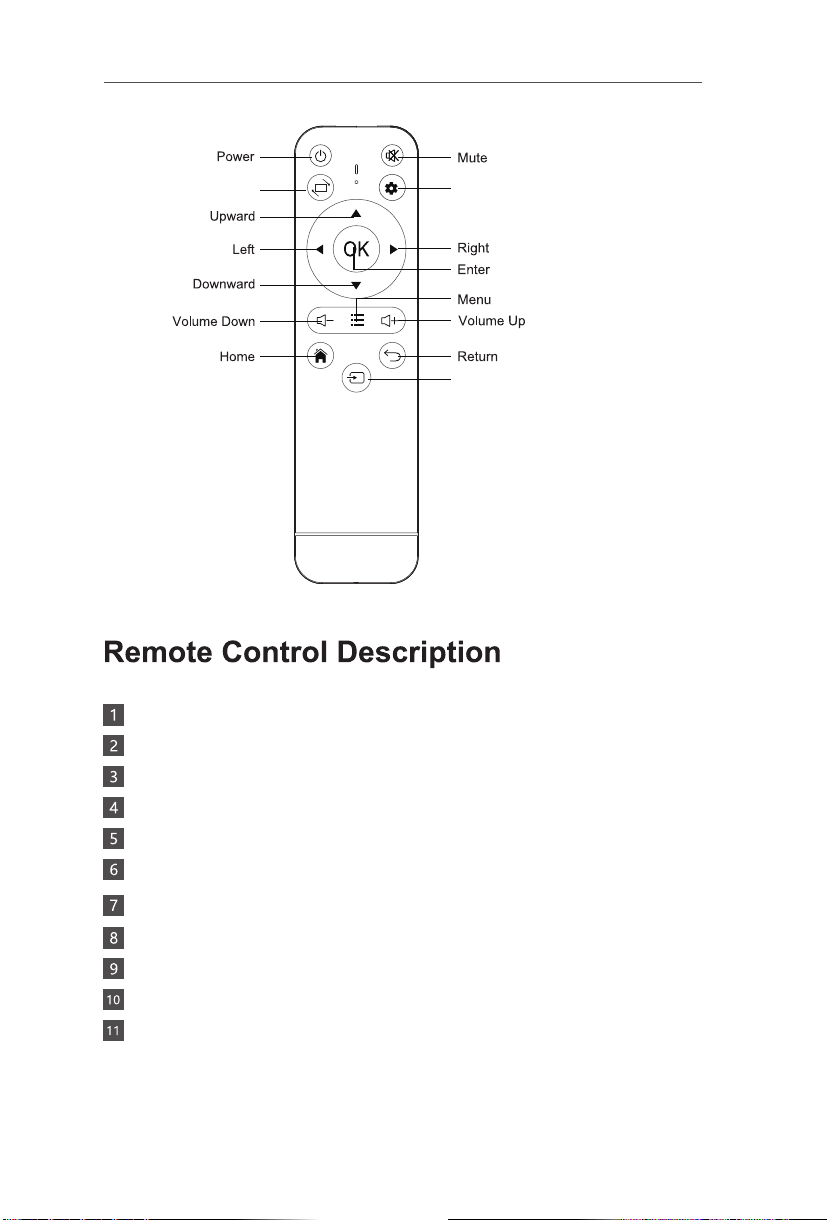
Power: Turn ON or OFF the projector
Mute: Mute or unmute the projector speaker
Projection Adjust: Mirror and/or flip projection
Settings: Open projector Settings
Direction Keys: Up, down, left and right navigation
Enter: Performs Open or accept action
Volume +/-: Increase / decrease speaker volume
Menu: Open the menu of applications or files
Home: Go to homepage
Return: Back to previous menu or close current applications
Signal Source: Switch between projection sources
NOTICE
NOTICE
To prevent fire or electric shock, do not expose this machine to rain or moisture.
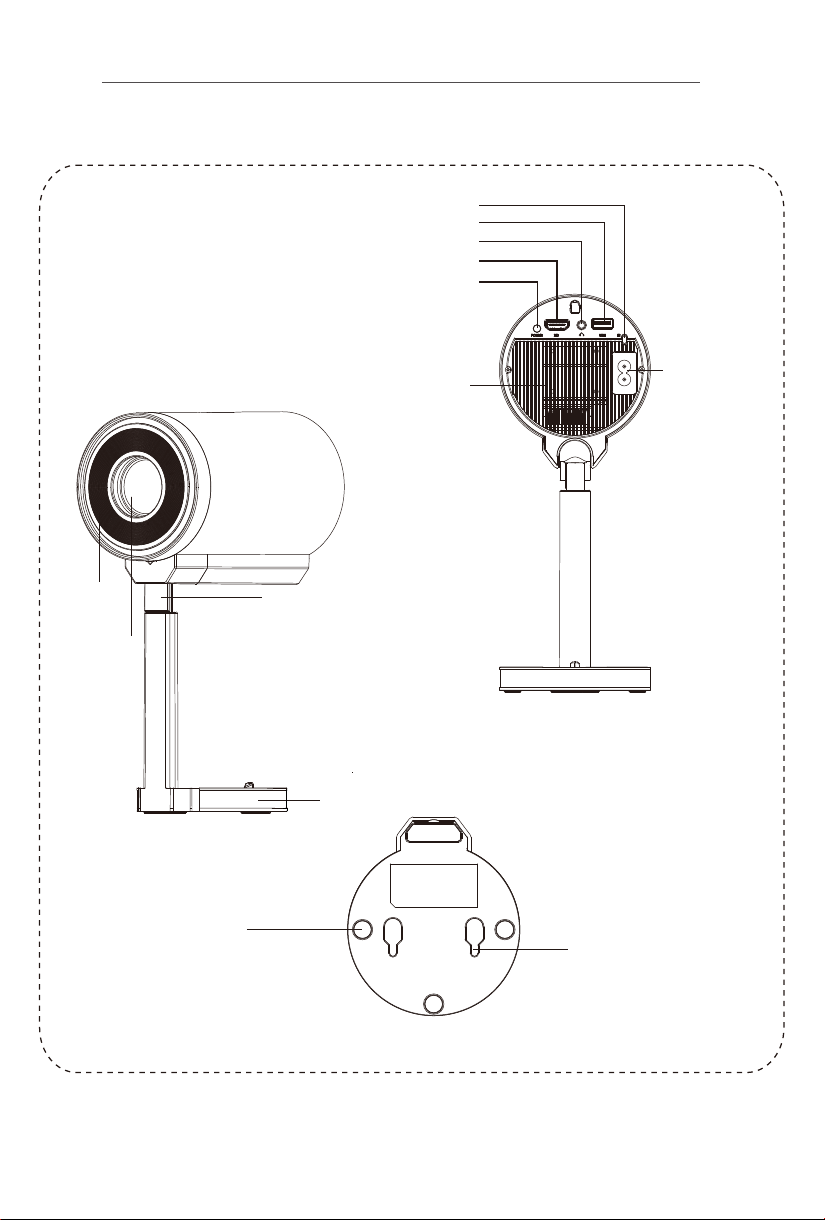
Air inlet
shot
base
Telescopic rod
Air outlet
IR
USB
3.5mm Audio Out
HD
power switch
power input
Anti slip foot pads
Wall hanging hole
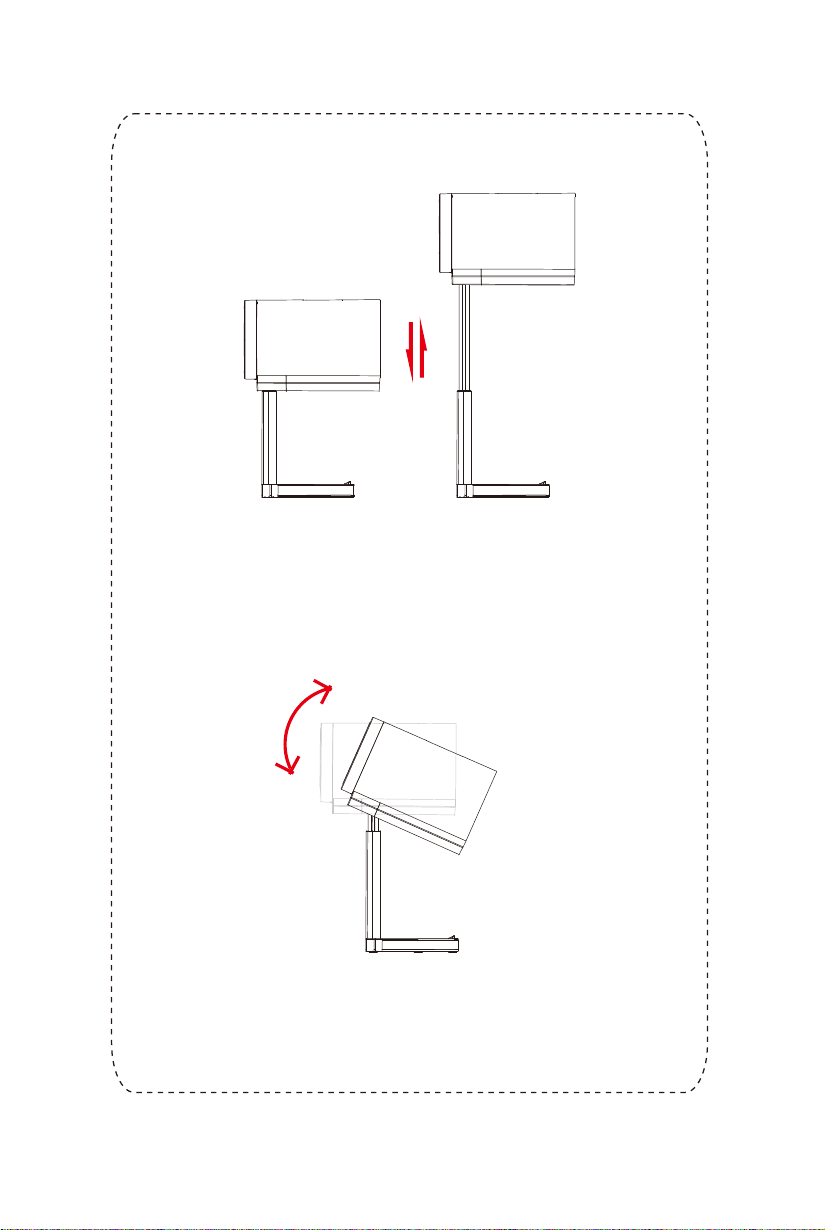
Adjustable Angle
Adjustable Height
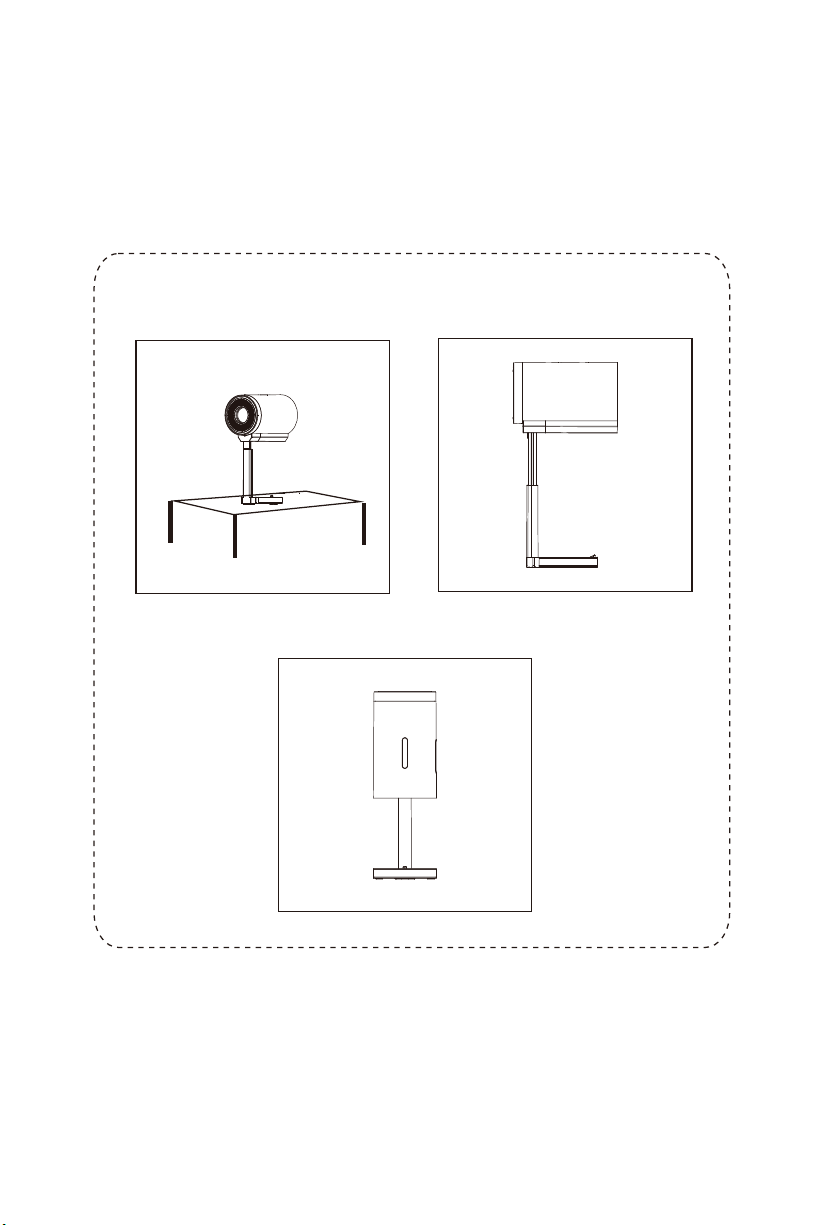
Horizontal placement
Placed on the ground
Throw to the ceiling
CAUTIONS AND WARNINGS
/////
THE REMOTE CONTROL
/////
INSTALLATION AND DEBUGGING
/////
Blurry ImageProjection
Distance Reference
INTELLIGENT PROJECTOR
/////
ATTACHED INSTRUCTION MANUAL
/////
THE SOFTWARE SETTINGS
/////
INTELLIGENT PROJECTOR
/////
M
"
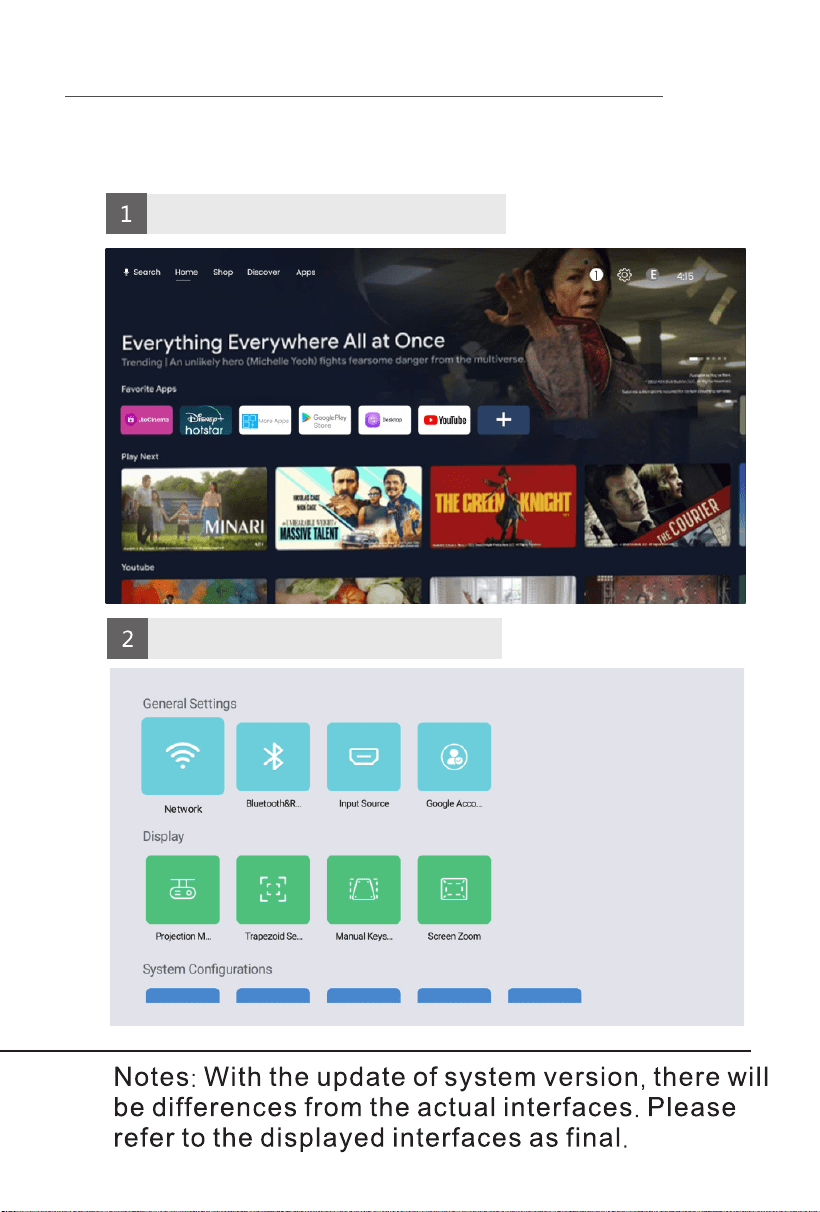
Home Page
THE SOFTWARE SETTINGS
/////
Wi-Fi setting
PICTURE ADJUSTMENT
/////
MEDIA PLAYER
/////
Press the signal input button on the remote control
and select USB device to turn it on.
After the projector is turned on, insert a USB flash drive,
SCREEN SHARING
/////
SettingsProjection Adjust
Signal Source
User Manual
BEEM 520
S M A R T L E D P R O J E C T O R
PACKAGE CONTENTS
/////
E-Waste Management
For E-Waste & ROHS compliance
refer to www.portronics.com/ewaste
www.portronics.com
For Support
Visit : www.portronics.com
E-mail : [email protected]
Contact No.: +91 9555245245
(Working Hours: Monday - Saturday, 10:00am - 6:00pm)
PLEASE NOTE
/////
Note: Any damage caused by physical impact, water/ liquid, fire, etc.
caused by the customer or nature shall not be covered under warranty.
Only product design, feature and functionality-related faults can be
considered. As per the brand's discretion, the product is eligible for
repair and not for replacement, during the warranty period.
Please read this manual carefully before use and keep
it for future reference.
•
Avoid exposure of the projector to dust, water / moisture and
extreme temperatures.
•
This device is not dustproof or waterproof, regularly clean
projector vents to avoid cooling malfunction.
•
Please use high quality power cord and under specified rated
power supply.
•
When projector is working, please do not look directly into the
lens, the strong light will flash your eyes and cause slight pain.
Children should use the projector under the supervision of
adults.
•
Do not cover the vents of projector and ensure it is in a well-
ventilated area when in use, positioned at least 2 feet away
from the wall from behind. Heating will reduce the life of
projector and cause danger.
•
Please cut off the power if the projector is out of use for long
time.
•
Users or third-party professionals should not attempt to
disassemble the projector for testing and maintenance, in
which case, the warranty will be void.
•
For optimal viewing performance, the projector should be
positioned at a height of 5 feet from the ground and at least 5
feet away from the wall or screen in the front.
•
Use the remote control from behind the projector for
convenient operation.
ð Projector 1 N
ð Remote Control 1 N
ð User Manual 1 N
Please check whether the physical products received are complete;
If the products and accessories you receive are not complete,
please contact the sales personnel in a timely manner.
(For specific items, please refer to the actual package.)
You can play videos, music, or pictures from a storage
device in the following ways.
and the system will detect the external device by itself,
and a pop-up prompt will pop up. Select the type of file you want to play,
and press the "OK" button on the remote control panel to enter.
F
On the home page, press the direction down key to select applications, change
the desktop background, and sound effects.
or screen sharing function, please use
for Apple Phones, and Airscreen for Android phones.
Miracast
"
"
"
"
"
M
M
M
M
M
Projection Size Projection Distance
M
How To Power Off
Projection Setting
Language setting
Settings Screen - Select the appropriate language in System configuration. .
Time setting
Settings screen - Select the appropriate time Settings for you in System Configurationg
Bluetooth Settings
Select the projection method that suits you in the Settings screen.
Select Manual keys in the setting interface screen correction.
5
6
Select a hotspot and enter a password to connect.
Open Bluetooth and select pairing successfully.
Projection mode
Picture correction
SAME SCREEN
Other operations
Manual Focusing: When the projection image is blurred (as shown in the
figure below),rotate the focusing ring on the fuselage to adjust the effect,
so as to obtain satisfactory results. If you cannot obtain satisfactory clarity
through adjustment, please move the fuselage to adjust it appropriately.
Autofocus: For versions with autofocus capability, after enabling the
autofocus function in the settings interface, the mobile device can achieve
automatic focusing.
Autofocus: Whether it's autofocus or manual focusing, as long as the
version has the autofocus function, the focal length can be adjusted by
operating the remote control.
*Please select the appropriate operation method for your device based on the model and version of the
projector you are currently using. Here are some general guidelines to consider:
①
②
③
Power: Turn ON or OFF the projector
Mute: Mute or unmute the projector speaker
Projection Adjust: Mirror and/or flip projection
Settings: Open projector Settings
Direction Keys: Up, down, left and right navigation
Enter: Performs Open or accept action
Volume +/-: Increase / decrease speaker volume
Menu: Open the menu of applications or files
Home: Go to homepage
Return: Back to previous menu or close current applications
Signal Source: Switch between projection sources
NOTICE
NOTICE
To prevent fire or electric shock, do not expose this machine to rain or moisture.
Air inlet
shot
base
Telescopic rod
Air outlet
IR
USB
3.5mm Audio Out
HD
power switch
power input
Anti slip foot pads
Wall hanging hole
Adjustable Angle
Adjustable Height
Horizontal placement
Placed on the ground
Throw to the ceiling
CAUTIONS AND WARNINGS
/////
THE REMOTE CONTROL
/////
INSTALLATION AND DEBUGGING
/////
Blurry ImageProjection
Distance Reference
INTELLIGENT PROJECTOR
/////
ATTACHED INSTRUCTION MANUAL
/////
THE SOFTWARE SETTINGS
/////
INTELLIGENT PROJECTOR
/////
M
"
Home Page
THE SOFTWARE SETTINGS
/////
Wi-Fi setting
PICTURE ADJUSTMENT
/////
MEDIA PLAYER
/////
Press the signal input button on the remote control
and select USB device to turn it on.
After the projector is turned on, insert a USB flash drive,
SCREEN SHARING
/////
SettingsProjection Adjust
Signal Source
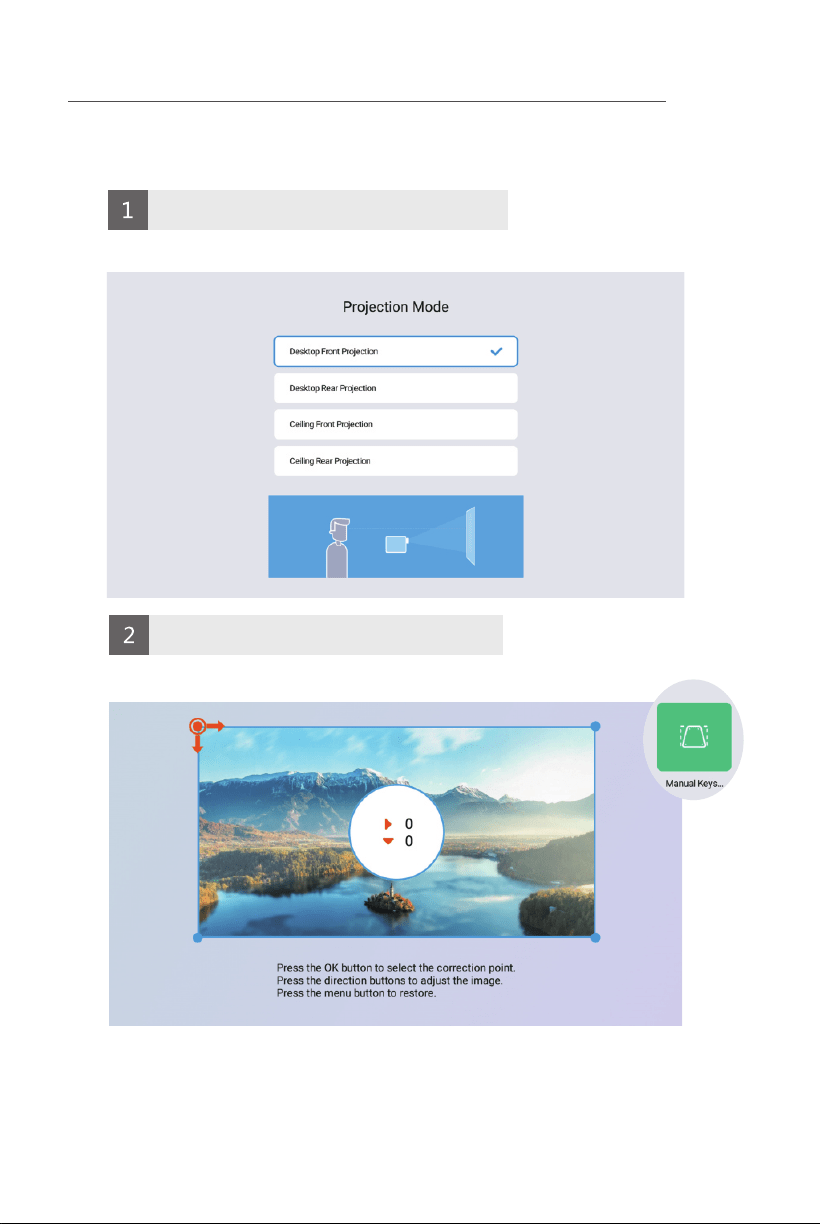
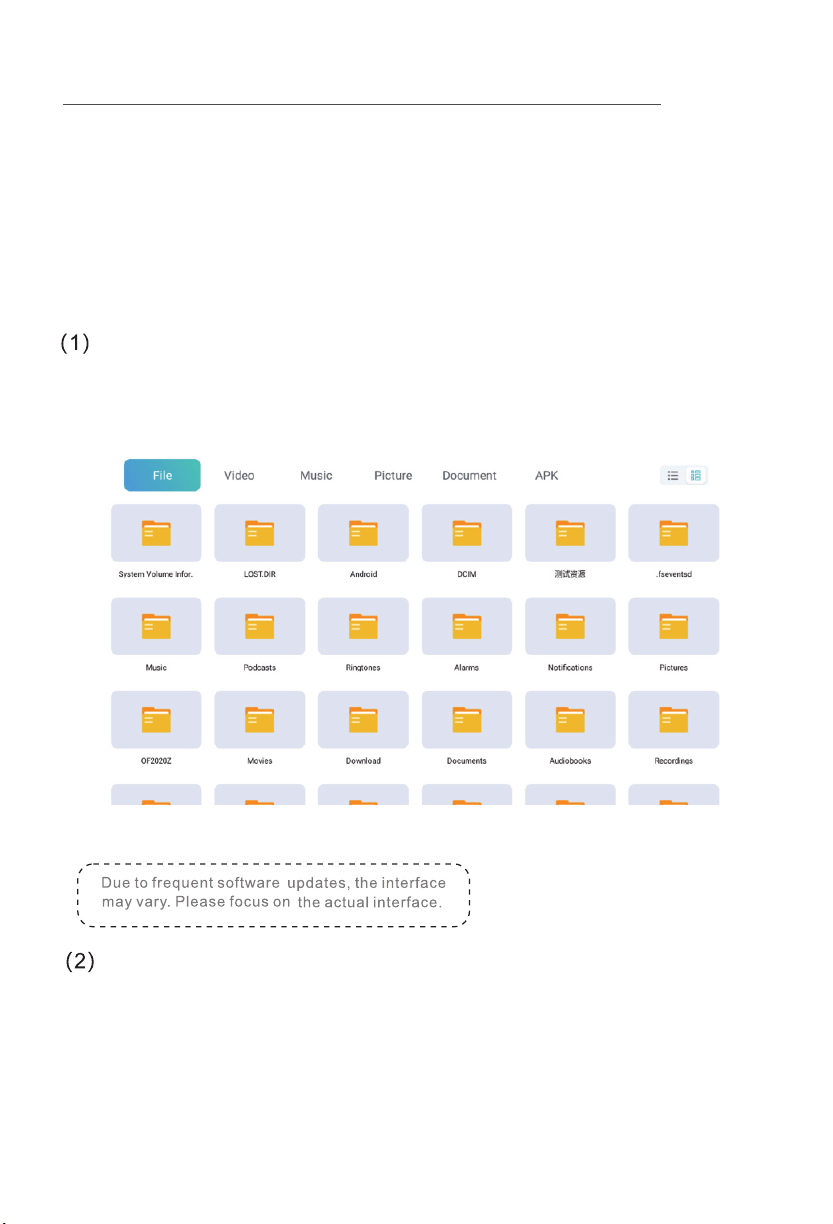
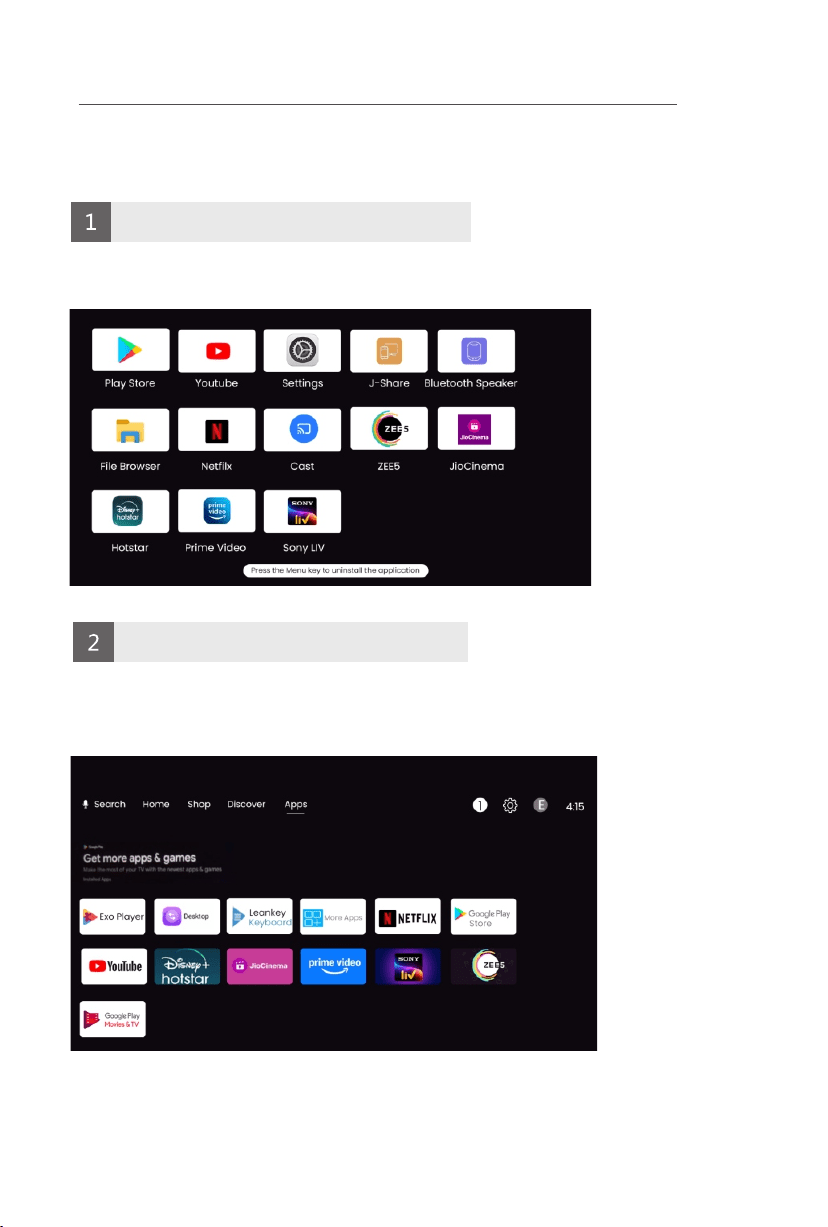
