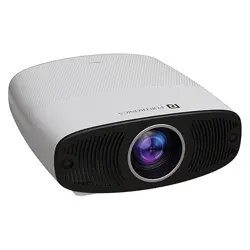

User Manual
BEEM 530
S M A R T L E D P R O J E C T O R
PACKAGE CONTENTS
/////
E-Waste Management
For E-Waste & ROHS compliance
refer to www.portronics.com/ewaste
www.portronics.com
For Support
Visit : www.portronics.com
E-mail : [email protected]
Contact No.: +91 9555245245
(Working Hours: Monday - Saturday, 10:00am - 6:00pm)
PLEASE NOTE
/////
Note: Any damage caused by physical impact, water/
liquid, fire, etc. caused by the customer or nature shall not
be covered under warranty.
Only product design, feature and functionality-related faults
can be considered. As per the brand's discretion, the
product is eligible for repair and not for replacement,
during the warranty period.
Please read this manual carefully before use and keep
it for future reference.
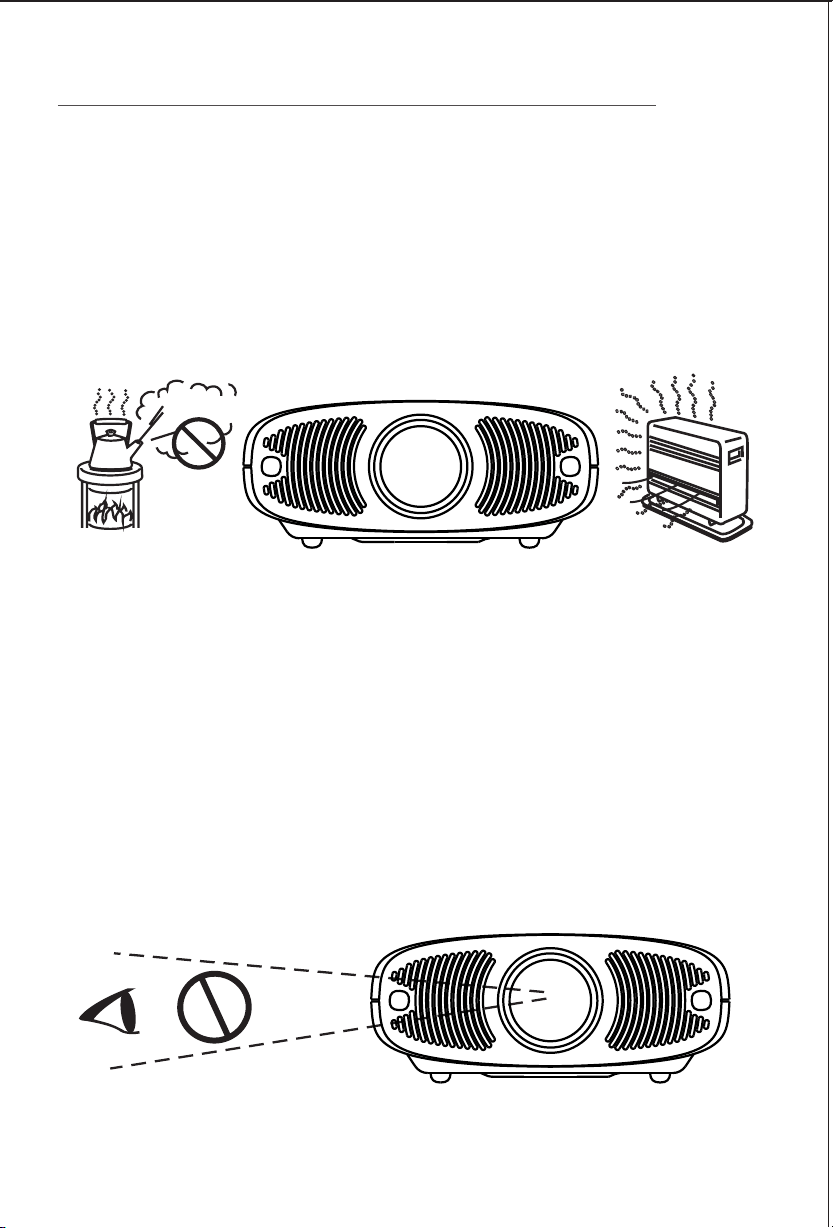
•
Avoid exposure of the projector to dust, water / moisture and
extreme temperatures.
ð Projector x 1
ð Remote Control x 1
ð Power Cord x 1
ð User Manual x 1
TURNING THE PROJECTOR ON & OFF
/////
1. Please read the user manual carefully before using the product
and store the user manual properly for future reference.
2. This document provides basic function operation instructions,
please refer to the "User Manual" on the home page of the system
for detailed operation and other functions.
1. Powering On: After the projector is connected to a power source,
press the power button of the device or the power button on the
remote control to turn on the projector.
2. Powering Off: Press the power button on the device or remote
control and the "Shutdown" icon will pop-up on the projection
screen. Confirm again to shut down the projector.
3. Indicator light description:The indicator lights are in two colors and
the different operating states of the projector are indicated by a
colour change.
ADJUSTING THE PROJECTOR FOCUS
/////
1. The projector will automatically focus every time it is turned on and
whenever the projector is moved, it will automatically adjust the
projection focal length to maintain a clear image.
2. To disable the auto-focus function, you must turn off the "Auto Focus"
option in the "Projection Settings" section of the settings interface.
3. Sometimes after the projector auto focuses, because of different
personal visual perception, there may be differences in the judgment of
the clarity of the projection picture. You can use the focus buttons on
the remote control to make minor corrections to the projection clarity,
so that the projection picture can achieve the required optimal viewing
effect.
Automatic Focus:
Electronic Focus:
1. You can also use the remote control to adjust the focus manually /
electronically. To focus quicker, long press the F+/F- key on the remote
control, and a focus icon will appear in the center of the projection
screen and rotate rapidly in clockwise or anti-clockwise direction.
2. To focus precisely, press the F+/F- key on the remote control to adjust
the focus, and the focus icon in the center of the projection screen will
change with the direction of F+/F- until the screen is clear.
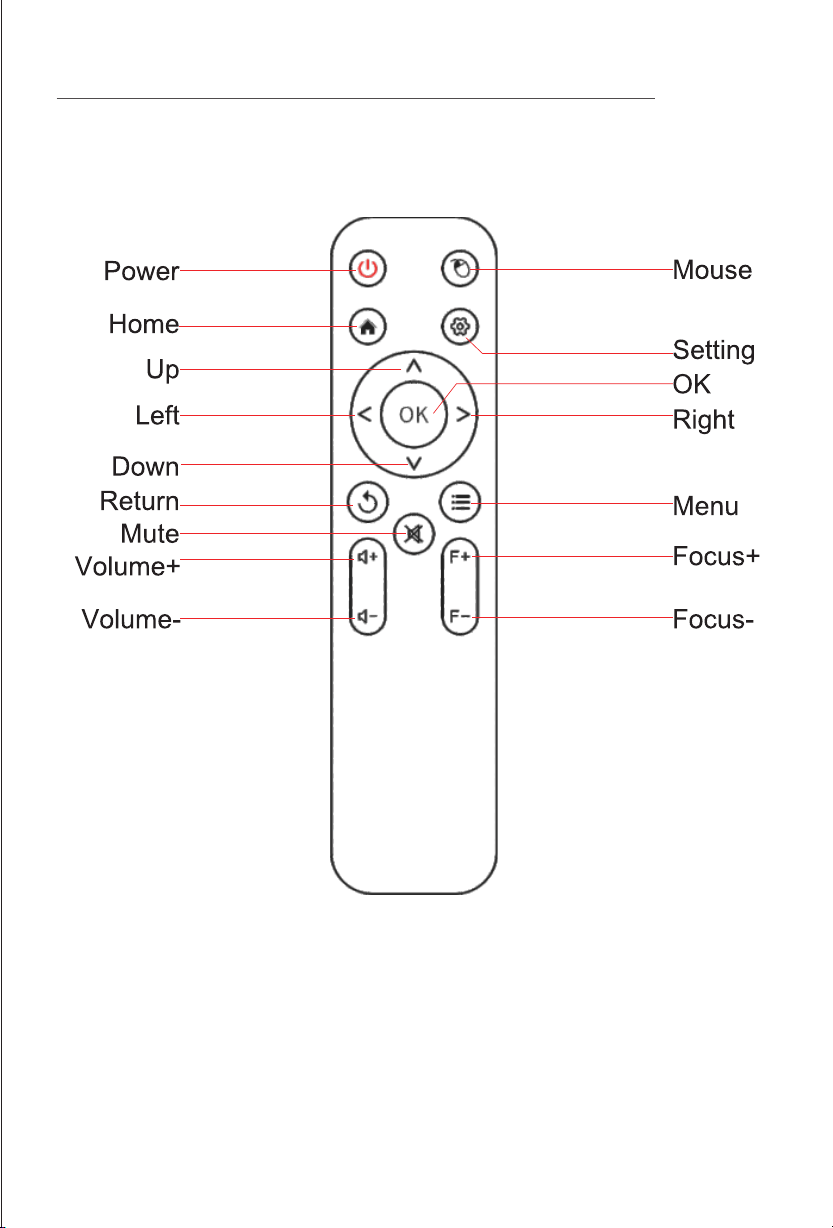
REMOTE CONTROL
/////
Attention: Please aim the remote control behind the projector for using.
Please remove the batteries if you are not going to use the remote control
for a long time.
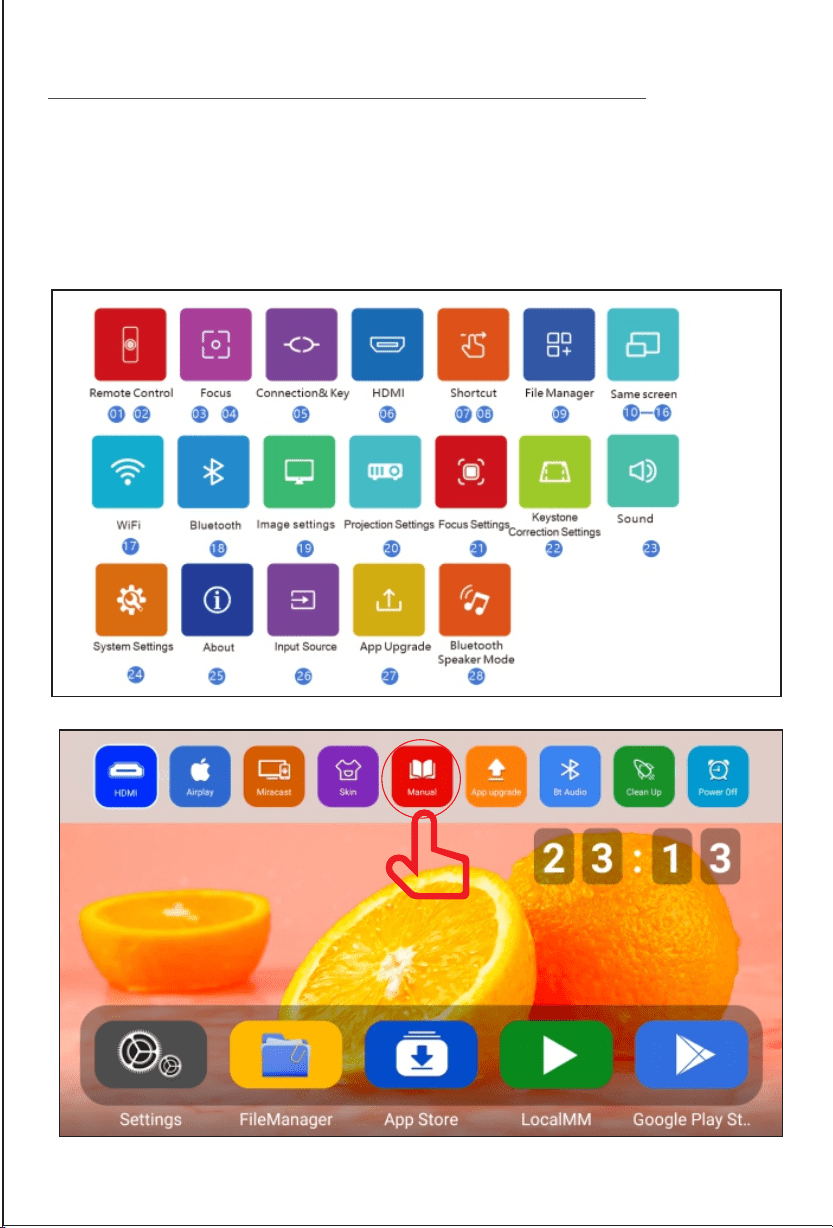
VIEWING USER MANUAL APP
/////
Click the Up arrow button on the remote control while on the homepage to
pop up a shortcut operation pop-up window. Open the "Instructions" to
browse the product instructions.
•
Please cut off the power if the projector is out of use for long time.
•
Users or third-party professionals should not attempt to disassemble
the projector for testing and maintenance, in which case, the
warranty will be void.
•
For optimal viewing performance, the projector should be positioned
at a height of 5 feet from the ground and at least 5 feet away from
the wall or screen in the front.
•
Use the remote control from behind the projector for convenient
operation.
•
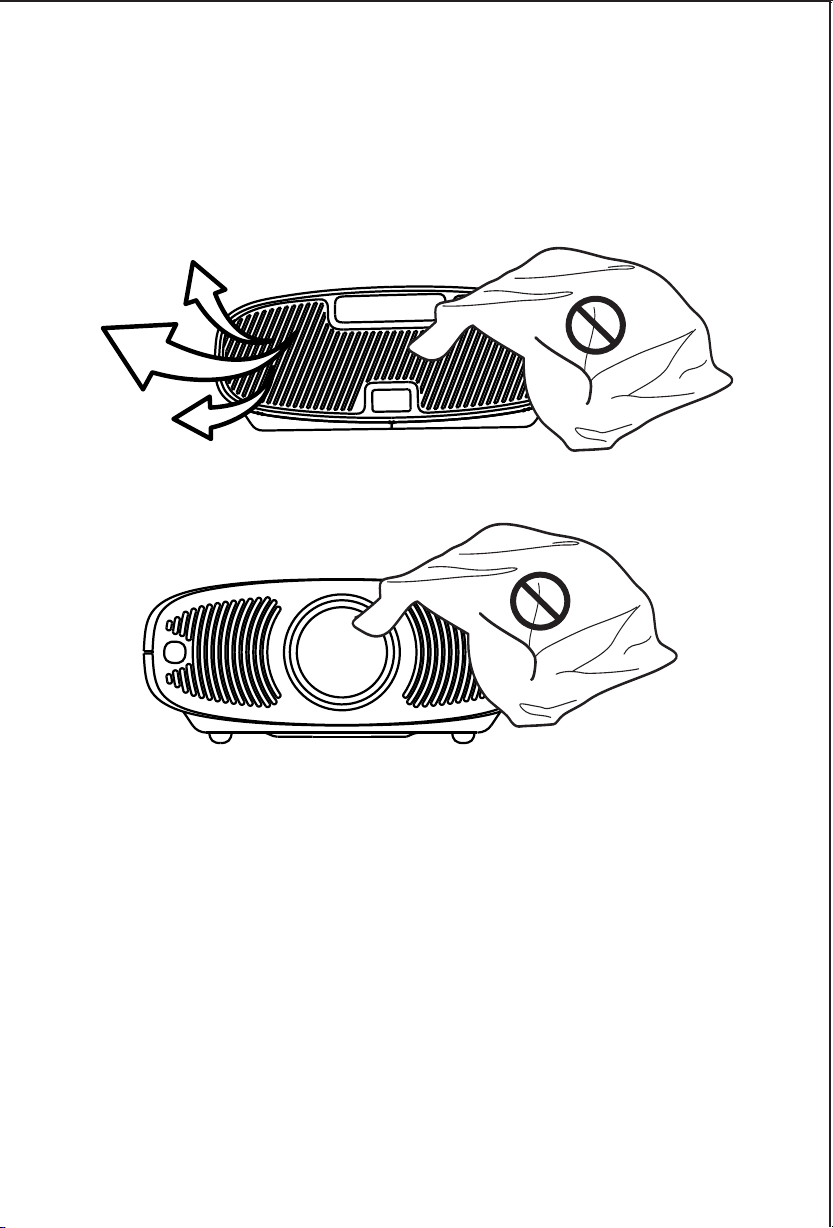
This device is not dustproof or waterproof, regularly clean
projector vents to avoid cooling malfunction.
•
Please use high quality power cord and under specified rated
power supply.
•
When projector is working, please do not look directly into the
lens, the strong light will flash your eyes and cause slight pain.
Children should use the projector under the supervision of
adults.
•
Do not cover the vents of projector and ensure it is in a well-
ventilated area when in use, positioned at least 2 feet away
from the wall from behind. Heating will reduce the life of
projector and cause danger.
• When the red colour light indicator is on, the projector is in
standby mode.
• When the blue colour indicator light is on, the projector is in
working mode.
• If the device is kept idle for more than fifteen minutes, it may
automatically enter standby mode.

User Manual
BEEM 530
S M A R T L E D P R O J E C T O R
PACKAGE CONTENTS
/////
E-Waste Management
For E-Waste & ROHS compliance
refer to www.portronics.com/ewaste
www.portronics.com
For Support
Visit : www.portronics.com
E-mail : [email protected]
Contact No.: +91 9555245245
(Working Hours: Monday - Saturday, 10:00am - 6:00pm)
PLEASE NOTE
/////
Note: Any damage caused by physical impact, water/
liquid, fire, etc. caused by the customer or nature shall not
be covered under warranty.
Only product design, feature and functionality-related faults
can be considered. As per the brand's discretion, the
product is eligible for repair and not for replacement,
during the warranty period.
Please read this manual carefully before use and keep
it for future reference.
•
Avoid exposure of the projector to dust, water / moisture and
extreme temperatures.
ð Projector x 1
ð Remote Control x 1
ð Power Cord x 1
ð User Manual x 1
TURNING THE PROJECTOR ON & OFF
/////
1. Please read the user manual carefully before using the product
and store the user manual properly for future reference.
2. This document provides basic function operation instructions,
please refer to the "User Manual" on the home page of the system
for detailed operation and other functions.
1. Powering On: After the projector is connected to a power source,
press the power button of the device or the power button on the
remote control to turn on the projector.
2. Powering Off: Press the power button on the device or remote
control and the "Shutdown" icon will pop-up on the projection
screen. Confirm again to shut down the projector.
3. Indicator light description:The indicator lights are in two colors and
the different operating states of the projector are indicated by a
colour change.
ADJUSTING THE PROJECTOR FOCUS
/////
1. The projector will automatically focus every time it is turned on and
whenever the projector is moved, it will automatically adjust the
projection focal length to maintain a clear image.
2. To disable the auto-focus function, you must turn off the "Auto Focus"
option in the "Projection Settings" section of the settings interface.
3. Sometimes after the projector auto focuses, because of different
personal visual perception, there may be differences in the judgment of
the clarity of the projection picture. You can use the focus buttons on
the remote control to make minor corrections to the projection clarity,
so that the projection picture can achieve the required optimal viewing
effect.
Automatic Focus:
Electronic Focus:
1. You can also use the remote control to adjust the focus manually /
electronically. To focus quicker, long press the F+/F- key on the remote
control, and a focus icon will appear in the center of the projection
screen and rotate rapidly in clockwise or anti-clockwise direction.
2. To focus precisely, press the F+/F- key on the remote control to adjust
the focus, and the focus icon in the center of the projection screen will
change with the direction of F+/F- until the screen is clear.
REMOTE CONTROL
/////
Attention: Please aim the remote control behind the projector for using.
Please remove the batteries if you are not going to use the remote control
for a long time.
VIEWING USER MANUAL APP
/////
Click the Up arrow button on the remote control while on the homepage to
pop up a shortcut operation pop-up window. Open the "Instructions" to
browse the product instructions.
•
Please cut off the power if the projector is out of use for long time.
•
Users or third-party professionals should not attempt to disassemble
the projector for testing and maintenance, in which case, the
warranty will be void.
•
For optimal viewing performance, the projector should be positioned
at a height of 5 feet from the ground and at least 5 feet away from
the wall or screen in the front.
•
Use the remote control from behind the projector for convenient
operation.
•
This device is not dustproof or waterproof, regularly clean
projector vents to avoid cooling malfunction.
•
Please use high quality power cord and under specified rated
power supply.
•
When projector is working, please do not look directly into the
lens, the strong light will flash your eyes and cause slight pain.
Children should use the projector under the supervision of
adults.
•
Do not cover the vents of projector and ensure it is in a well-
ventilated area when in use, positioned at least 2 feet away
from the wall from behind. Heating will reduce the life of
projector and cause danger.
• When the red colour light indicator is on, the projector is in
standby mode.
• When the blue colour indicator light is on, the projector is in
working mode.
• If the device is kept idle for more than fifteen minutes, it may
automatically enter standby mode.
