
22.5
Criterion@hisense.com
888-411-7118
105 Satellite Blvd NW, Suwanee, GA 30024
25
27
29
32
Thank you for choosing Criterion. We are sure you will find your new refrigerator
a pleasure to use. However, before you use the appliance, we recommend that
you carefully read the instructions, which provide details about installing and
using the product. Please keep this manual for future reference.
01
07
17
18
22
For questions or assistance, please contact Customer Service at: 1-888-411-7118 between
9:00 am and 6:00 pm EST or ernail: Cr[email protected]
WARNING
This appliance is intended to be used in household and similar applications
such as 1.staff kitchen areas in shops, offices and other working
environments; 2.farm houses and by clients in hotels, motels and other
residential type environments;
1. bed and breakfast type environments;
2. catering and similar non-retail applications.
WARNING
Fill with potable water only.
WARNING
Do not store explosive substances such as aerosol cans with a flammable
propellant in this appliance.
WARNING
If the supply cord is damaged, it must be replaced by the manufacturer, its
service agent or similarly qualified persons in order to avoid a hazard.
WARNING
Keep ventilation openings, in the appliance enclosure or in the built-in
structure, clear of obstruction.
WARNING
Do not use mechanical devices or other means to accelerate the defrosting
process,other than those recommended by the manufacturer.
WARNING
Do not damage the refrigerant circuit.
WARNING
Do not use electrical appliances inside the food storage compartments of the
appliance, unless they are of the type recommended by the manufacturer.
General safety
01
Safety and warning information
WARNING
The illuminating lamps must not be replaced by the user! If the illuminating
lamps is damaged, contact the customer helpline for assistance. This
warning is only for refrigerators that contain illuminating lamps.
Replacing the illuminating lamps
WARNING
The refrigerant and insulation blowing gas are flammable. When disposing of
the appliance, do so only at an authorized waste disposal centre. Do not
expose to flame.
WARNING
When positioning the appliance, ensure the supply cord is not trapped or
damaged.
WARNING
Do not locate multiple portable socket-outlets or portable power supplies at
the rear of the appliance.
General safety
02
Safety and warning information
The refrigerant isobutene (R600a) is contained within the refrigerant circuit of
the appliance, a natural gas with a high level of environmental compatibility,
which is nevertheless flammable. During transportation and installation of
the appliance, ensure that none of the components of the refrigerant circuit
becomes damaged. The refrigerant (R600a) is flammable.
WARNING
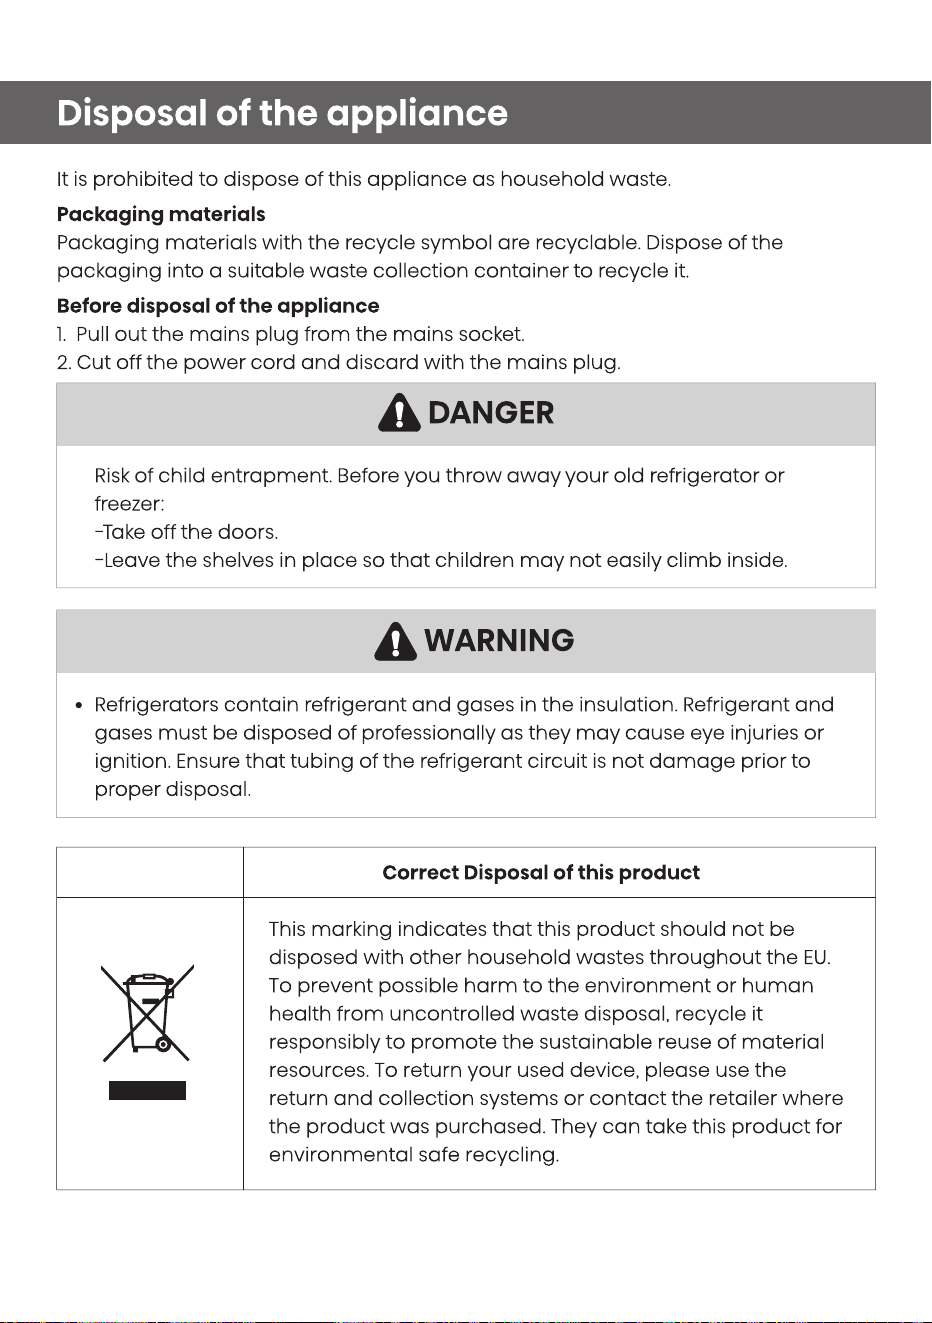
Refrigerators contain refrigerant andgases in the insulation. Refrigerant and
gases must be disposed of professionally as they may cause eye injuries or
ignition. Ensure that tubing of the refrigerant circuit is not damage prior to
proper disposal.
WARNING
Risk of fire / flammable materials If the refrigerant circuit should be
damaged:
1. Avoid opening flames and sources of ignition.
2. Thoroughly ventilate the room in which the appliance is situated.
It is dangerous to alter the specifications or modify this product in any way.
Any damage to the cord may cause a shortcircuit, fire, and/or electric
shock.
Refrigerant
03
Safety and warning information
1. The power cord must not be lengthened.
2. Make sure that the power plug is not crushed or damaged. A crushed or
damaged power plug may overheat and cause a fire.
3. Make sure that you can access the main plug of
the appliance.
4.Do not pull the main cable.
5. If the power plug socket is loose, do not insert the power plug. There is a risk
of electric shock or fire.
6. You must not operate the appliance without the interior lighting lamp cover.
7. The fridge is only applied with power supply of single phase alternating
current of 110~115V/60Hz. If fluctuation of voltage in the district of user is so
large that the voltage exceeds the above scope, for safety sake, be sure to
apply A.C.
Automatic voltage regulator of more than 350W to the fridge. The
fridge must employ a special power socket instead of common one with
other electric appliances. Its plug must match the socket with ground wire.
Electrical safety
Do not store flammable gass or liquids in the appliance, There is a risk of an
explosion.
Do not operate any electrical appliances in the appliance (e.g.electric ice cream
makers,mixers etc.).
When unplugging always pull the plug from the mains socket,do not pull on the
cable.
Do not place hot items near the plastic components of this appliance.
This refrigerating appliance is not intended to be used as a built-in appliance.
Do not place food products directly against the air outlet onthe rear wall.
Store pre-packed frozen food in accordance with the frozen food manufacture’s
instructions.
The appliances manufactures storage recommendations should be strictly
adhered to. Refer to relevant instructions for storage.
Do not place carbonated or fizzy drinks in the freezer compartment as it creates
pressure on the container, which may cause it to explode, resulting in damage to
the appliance.
Daily use
04
Safety and warning information

Do not place food products directly against the air outlet on the rear wall.
Store pre-packed frozen food in accordance with the frozen food manufacture's
instructions.
The appliances manufactures storage recommendations should be strictly
adhered to. Refer to relevant instructions for storage.
Do not place carbonated or fizzy drinks in the freezer compartment as it creates
pressure on the container,which may cause it to explode,resulting in damage to
the appliance.
Frozen food can cause frost burns if consumed straight from the freezer
compartment.
Do not place the appliance in direct sunlight.
Keep burning candles,lamps and other items with naked flames away from the
appliance so that do not set the appliance on fire.
The appliance is intended for keeping food stuff and/or beverages in normal
household as explained in this instruction booklet.The appliance is heavy.Care
should be taken when moving it.
Do not remove nor touch items from the freezer compartment if your hands are
damp/wet,as this could cause skin abrasions or frost/freezer burns.
Never use the base,drawers, doors etc. to stand on or assupports.
Frozen food must not be refrozen once it has been thawedout.
Do not consume ice popsicles or ice cubes straight from the freezer as this can
cause freezer burn to the mouth and lips. ,
To avoid items falling and causing injury or damage to the appliance, do not
overload the door racks or put too much food in the crisper drawers.
Before maintenance, switch off the appliance and disconnect the mains plug
from the mains socket.
Do not clean the appliance with metal objects, steam cleaner, ethereal oils,
organic solvents or abrasive cleansers.
Do not use sharp objects to remove frost from the appliance. Use a plastic
scraper.
Caution! Care and cleaning
05
Safety and warning information

For electrical connection carefully, follow the instructions given in this manual.
Unpack the appliance and check if there are damages on it.
Do not connect the appliance if it is damaged. Report possible damages
immediately to the place you bought it. In this case retain packing.
It is advisable to wait at least four hours before connecting the appliance to allow
the oil to flow back in the compressor.
Adequate air circulation should be around the appliance, lacking this leads to
overheating. To achieve sufficient ventilation, follow the instructions relevant to
installation.
Wherever possible the back of the product should not be too close to a wall to
avoid touching or catching warm parts (compressor, condenser) to prevent the
risk of fire, follow the instructions relevant to installation.
The appliance must not be locate close to radiators or cookers.
Make sure that the mains plug is accessible after the installation of the appliance.
Installation Important
Any electrical work required to do the servicing of the appliance should be carried
out by qualified electrician or competent person.
This product must be serviced by an authorized Service Center, and only genuine
spare parts must be used.
1. If the appliance is Frost Free.
2. If the appliance contains freezer compartment.
Service
06
Safety and warning information
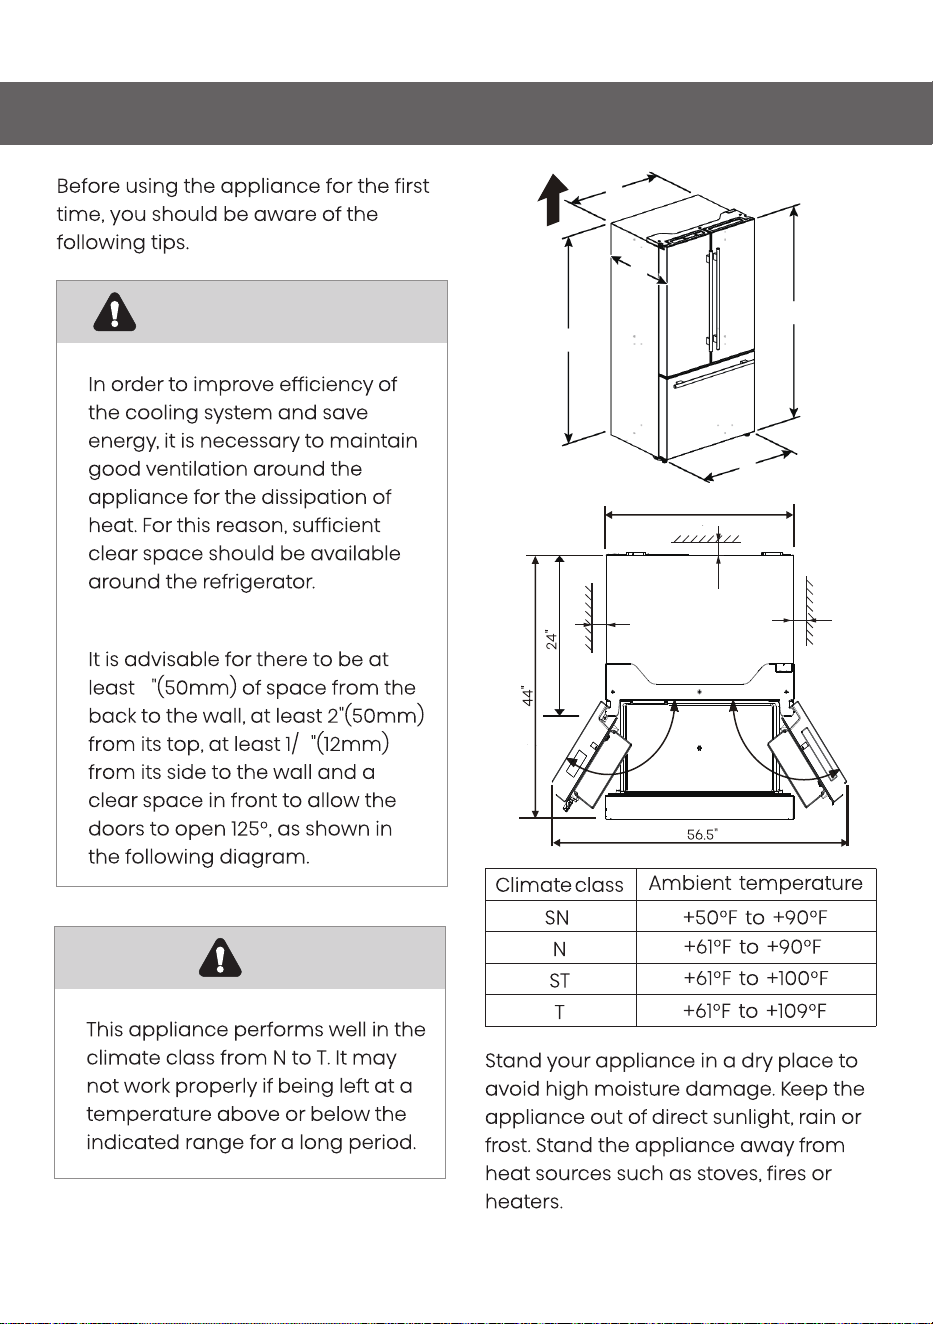
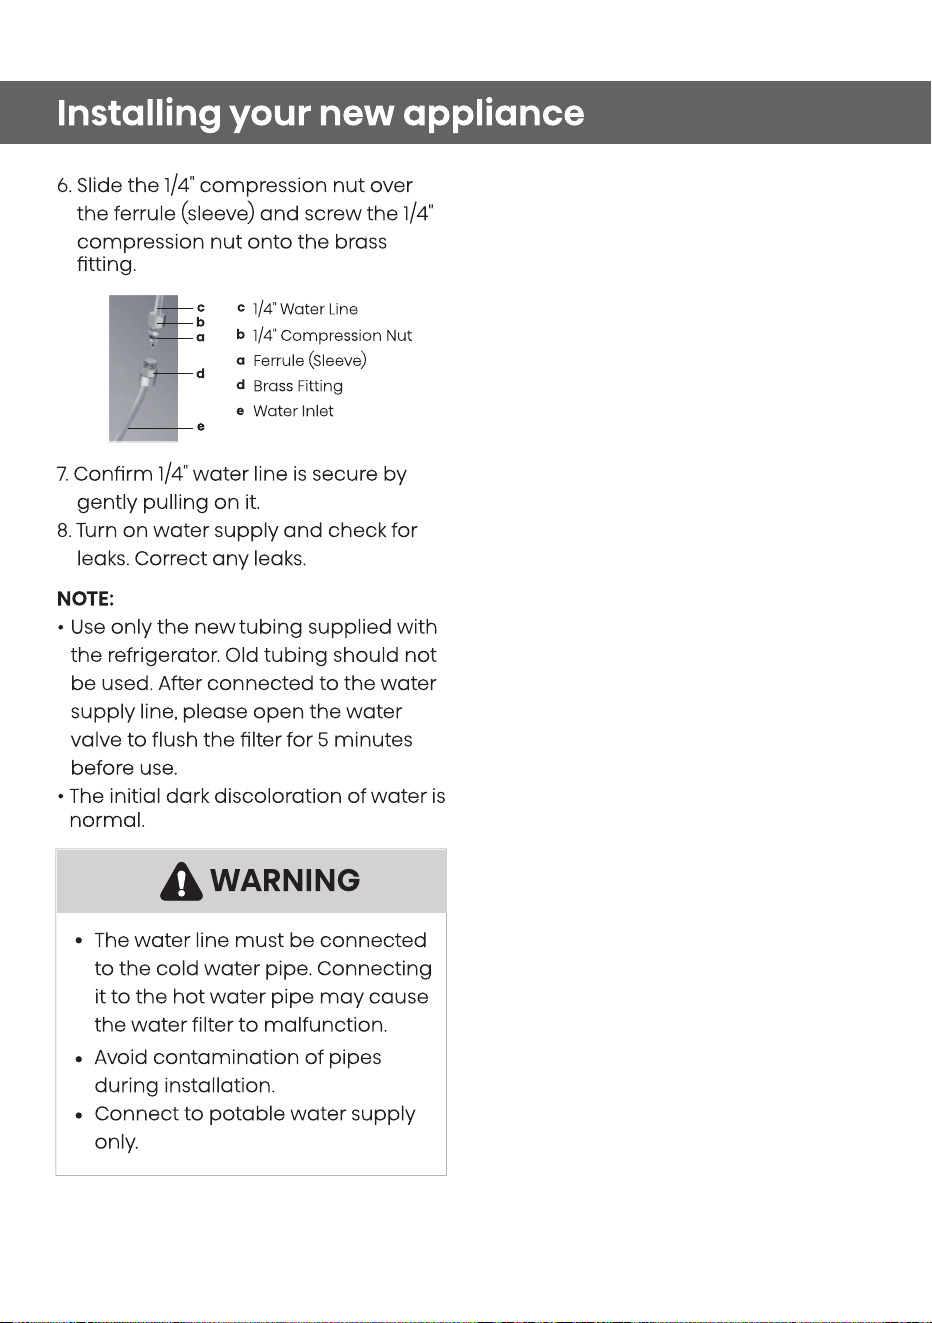
Installing your new appliance
07
Suggest:
2
2
Ventilation of appliance
Note
28.7”
36”
69”
70.3”
35.8”
≥2”
≥0.5”
≥0.5”
≥35.8”
Installing your new appliance
08
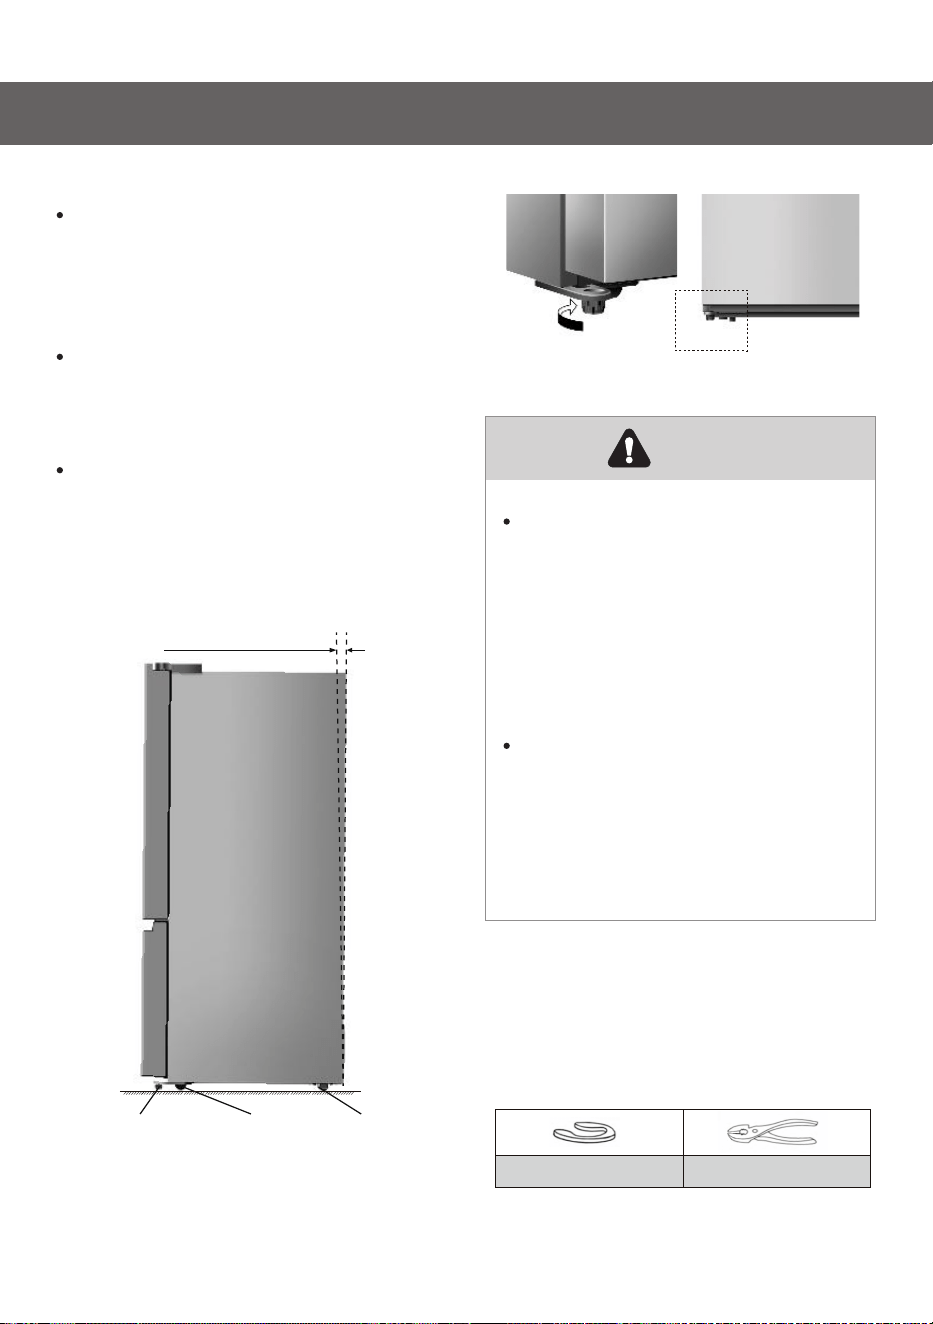
For sufficient leveling and air
circulating in the lower rear section of
the appliance, the bottom feet may
need to be adjusted. Please use a
suitable spanner.
To allow the doors to self-close, tilt
back the top backwards at about
15mm or 0.5 by turning the adjustable
feet.
Whenever you want to move the
appliance, remember to turn the feet
back up, so that the appliance can
roll freely. Reinstall the appliance
whenrelocating.
Leveling of appliance
For proper installation, this
refrigerator must be placed on a
level surface of hard material
that is the same height as the
r
est of the flooring, This surface
should be strong enough to
support a fully loaded
refrigerator.
The rollers, which are not castors,
should be only used for forward
or backward movement. Moving
the r
efrigerator sideways may
damage your floor and the
rollers.
Warning
Adjustable
bottom feet
Front roller Rear roller
0.4"-0.6"
Adjustable
bottom feet
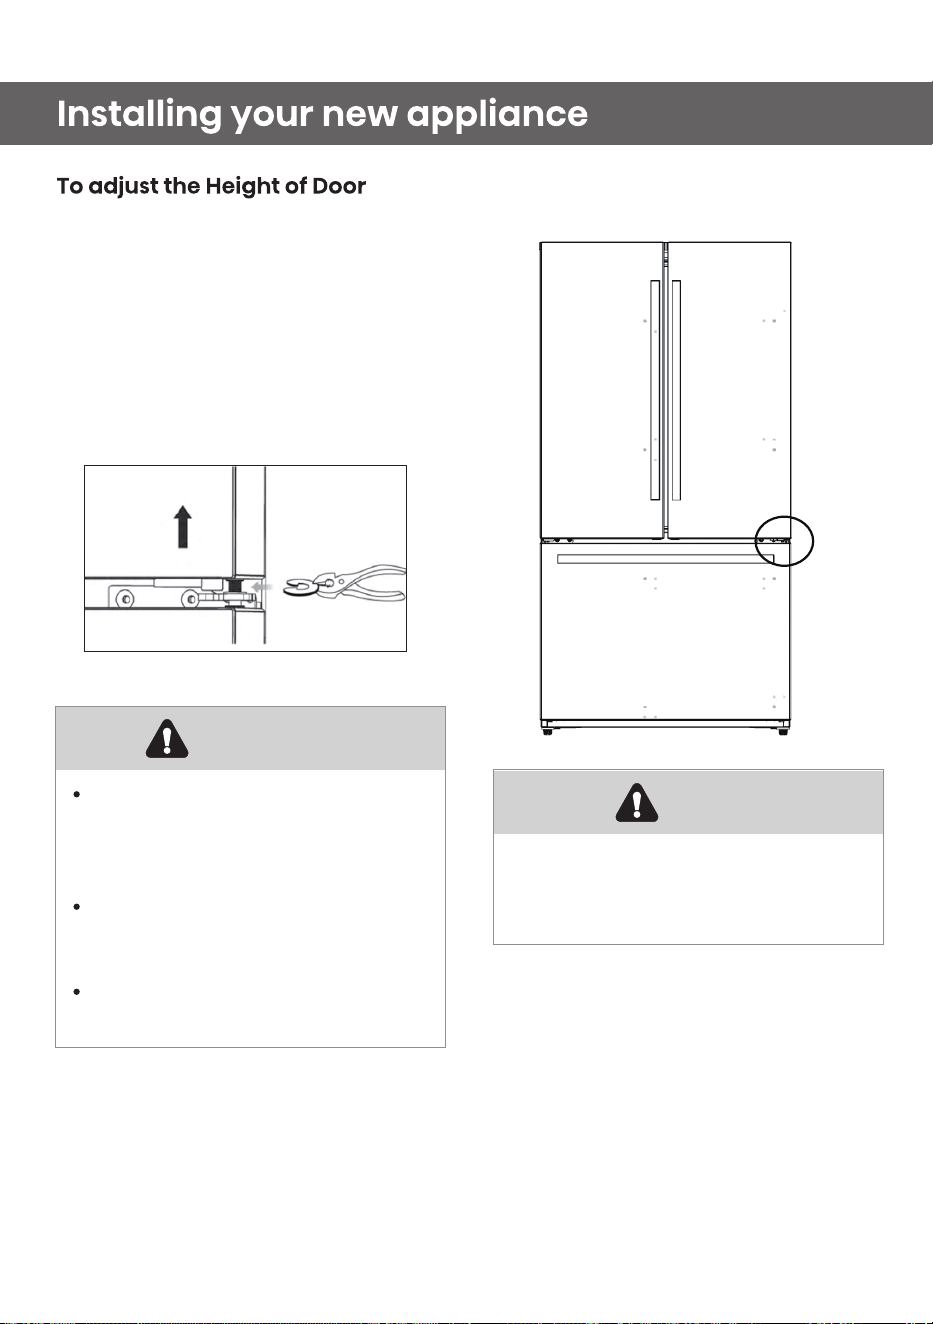
The height of a door can be adjusted
using the provided Snap Rings.
Tools you will need:
Adjusting Door Height and Door Gap
Snap Ring (4pcs)
Wrench(Not provided)
09
1. Check the height difference
between the doors and then lift
and hold the lowest door to be
even with the other.
2. Insert a suitably sized Snap Ring
between the Door and the Hinge
as shown.
Contains Small Parts, keep the
Snap Rings Away From Babies
and Children.
Warning
Insert only one Snap Ring. If you
insert two or more Snap Rings,
they may slip out or cause a
rubbing noise.
Do not raise the door too much.
The door may contact and
damage the top cover.
Save remaining Snap Rings for
possible future use.
IMPORTANT !
10
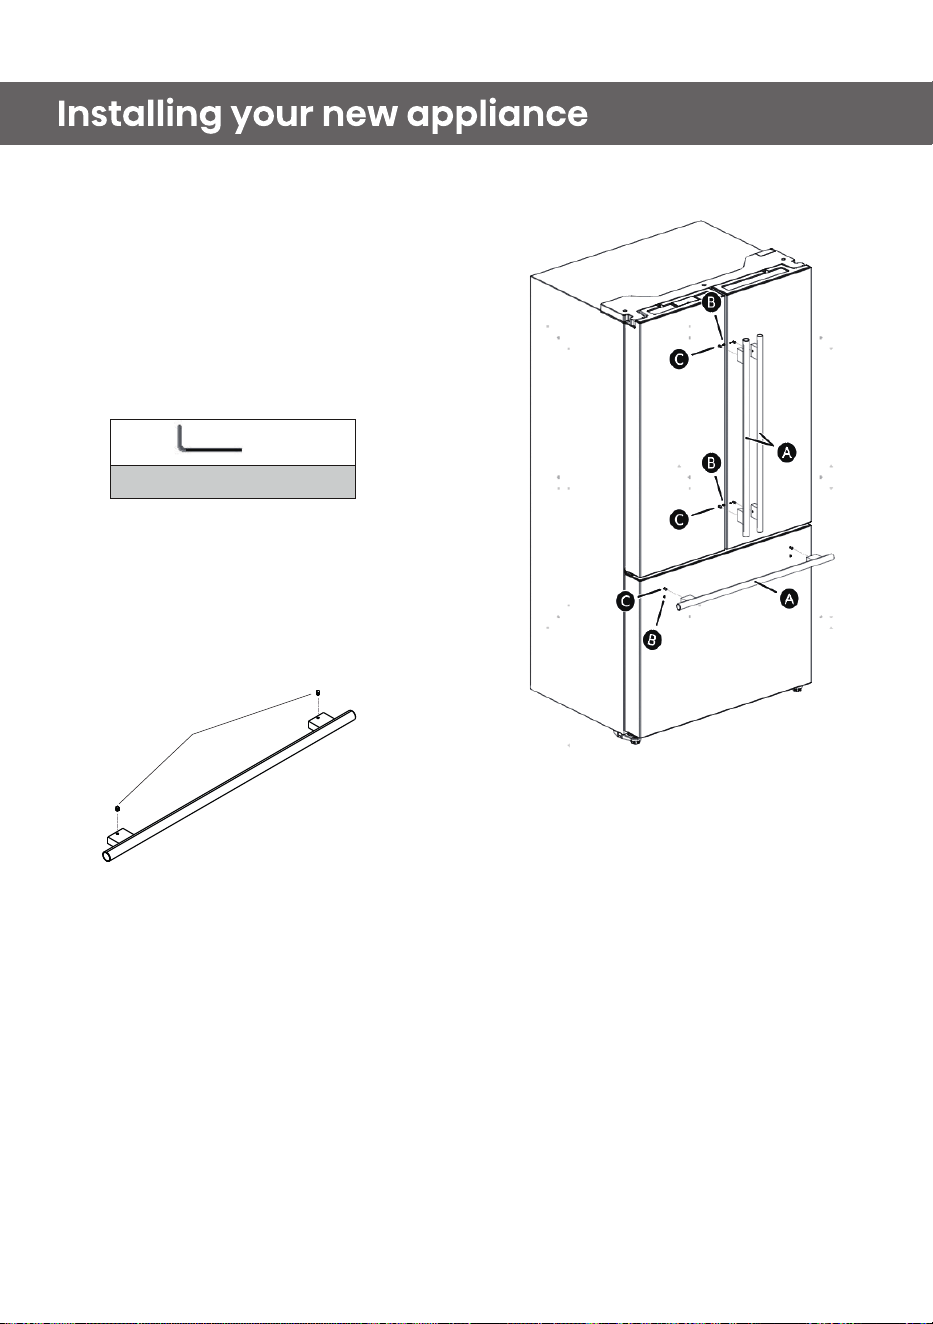
Be very careful not to scratch the doors
or the drawers if you must remove the
handles. The appearance of the handles
may vary from what is shown in the
manual.
.
Removing & Assembling Handles
Tools you will need(Provided)
1/8 in. (3 mm) Allen Wrench
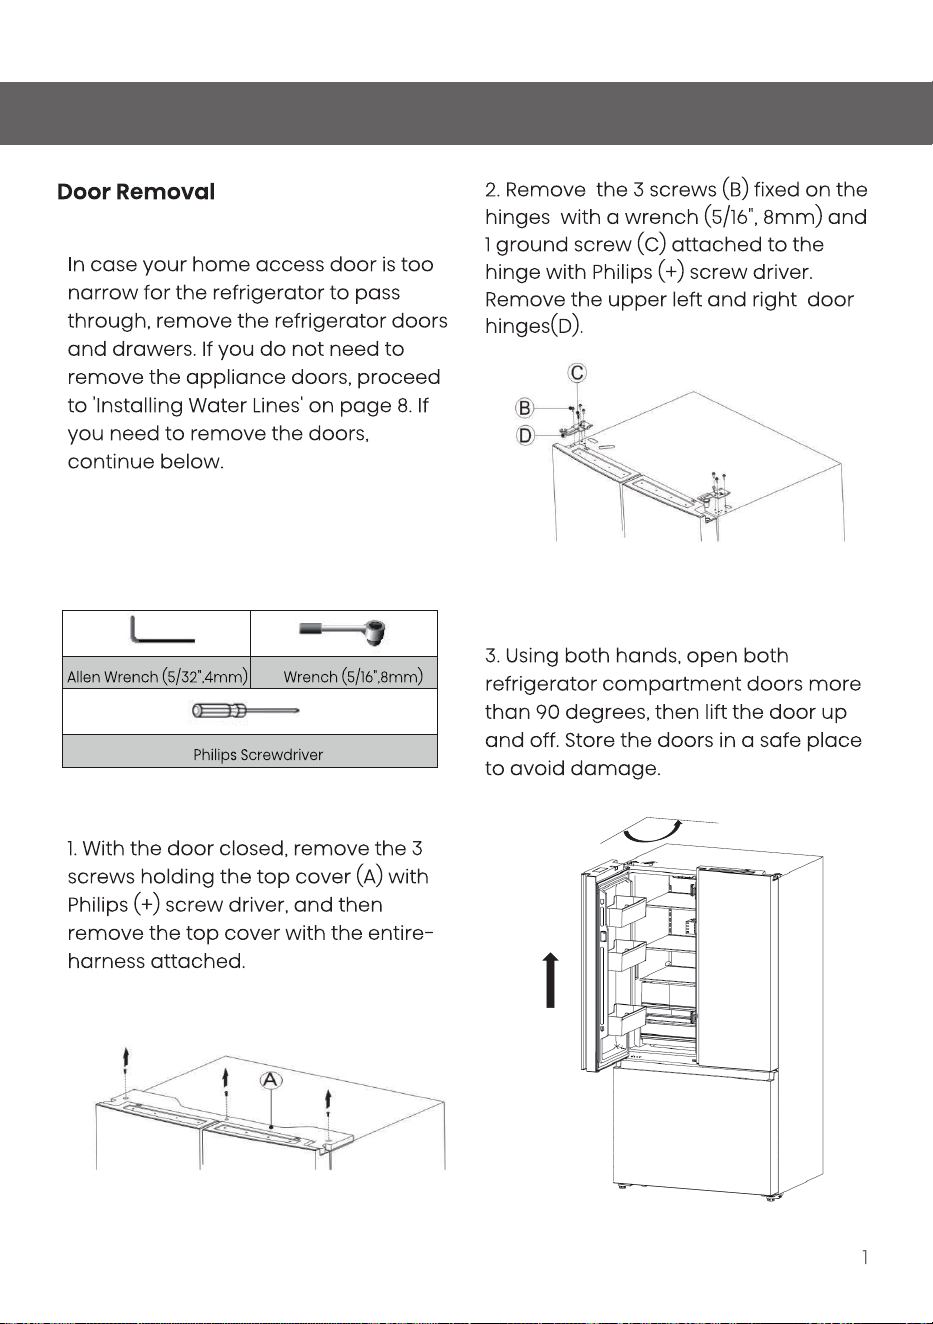
Removing Handles
1. Loosen the M6 x 8 mm set screws
with a 1/8 in. (3 mm) Allen wrench
and remove the handle.
2. If needed, loosen and remove the
mounting fasteners that connect
the handle and the refrigerator
door (or the freezer drawer).
set screw
Assembling Handles
1. If needed, reassemble the mounting
fasteners on the door (or the drawer).
2. Partially insert the M6 x 8 mm set
screws provided into both ends of
the handle.
3. Place the handle on the door (or
the drawer) by fitting the handle
footprints over the mounting
fasteners and tightening the set
screws with a 1/8 in. (3 mm) Allen
wrench.
A: Handle
B: Set screw
C: Mounting fastener
Installing your new appliance
Tools you will need(Not provided)
>90°
1
Installing your new appliance
12
Upper basket
Middle tray
Lower basket
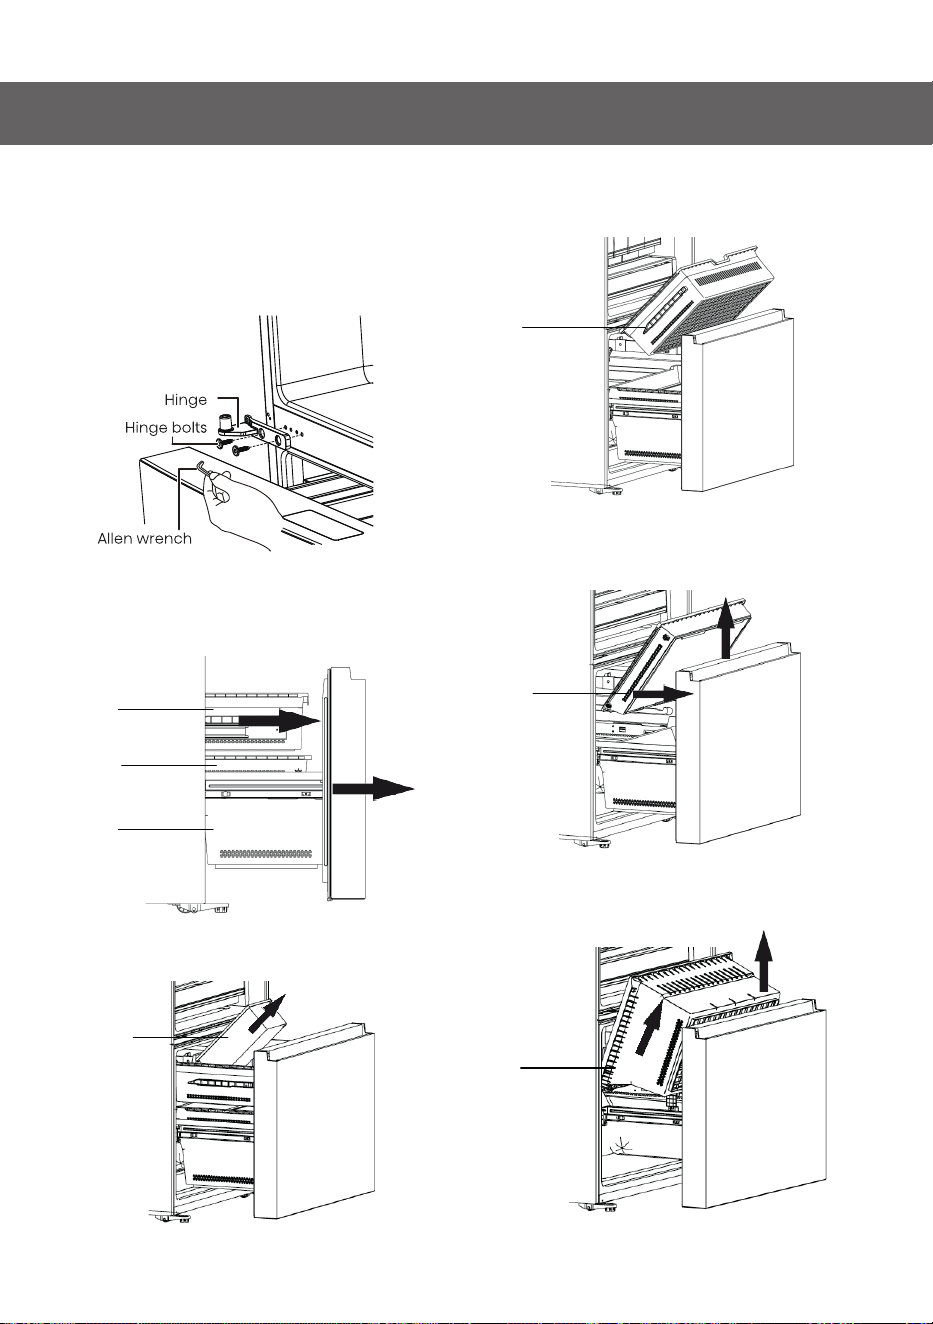
6. If equipped, remove the ice bin.
7. Pull out the upper basket. Lift the front
of the basket up and pull it straight out.
Ice Bin
8. Pull out the middle tray. Lift the front of
the tray up and pull it straight out.
Middle tray
Upper basket
9. Lift the front of the lower basket up and
pull it straight out.
Lower basket
4. Use a 5 mm Allen wrench to
remove the four hex head hinge
bolts (two per hinge) on the lower left
and rights sides of your refrigerator,
then remove the hinges.
5. Pull the freezer compartment door
and the upper freezer drawer fully
open.
Installing your new appliance
3
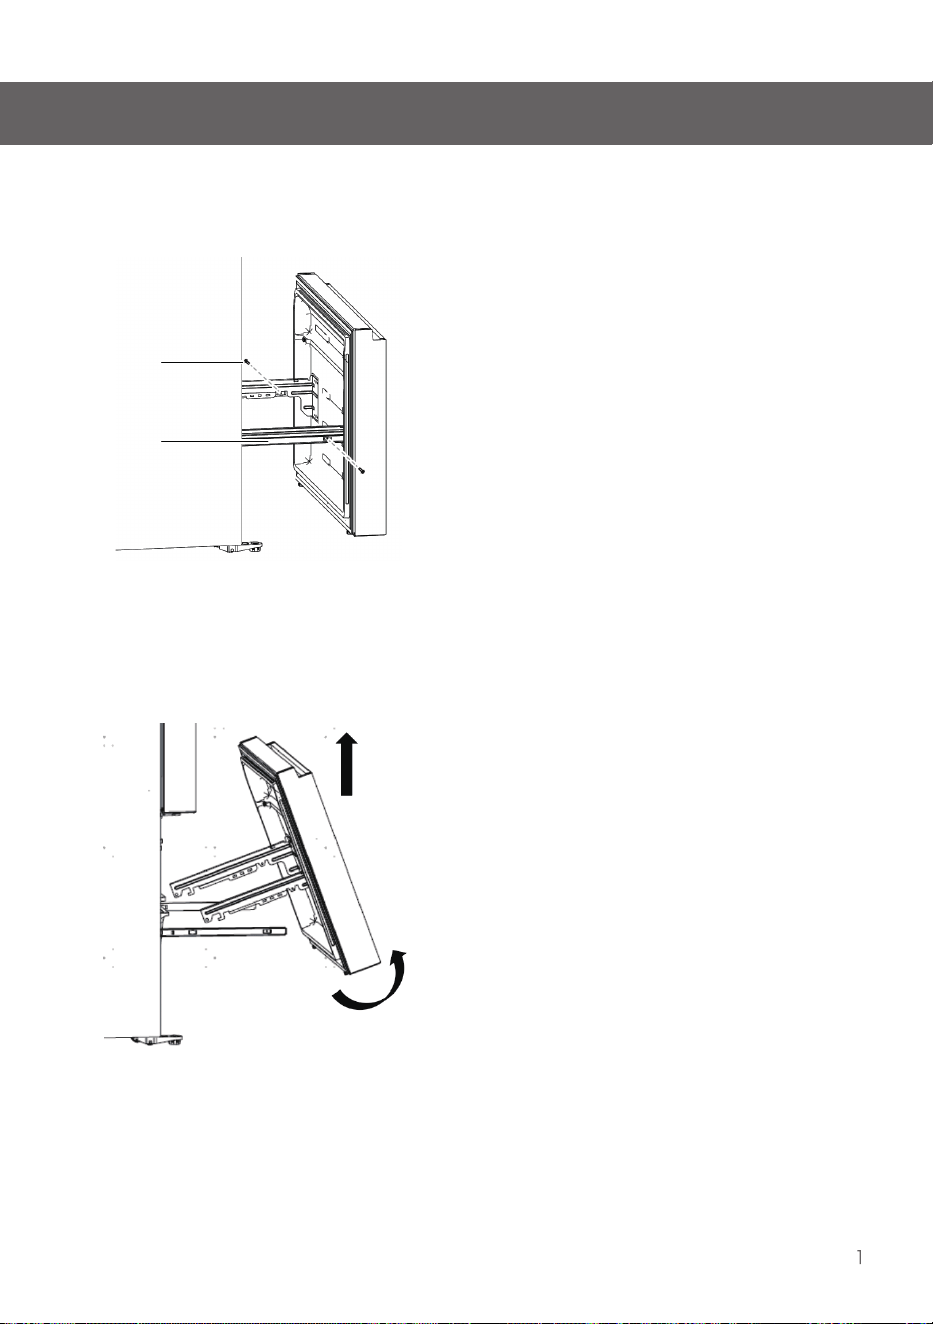
11. Pull the bottom of freezer
compartment door away from the
support frame, then lift the door up
and out. Store the door in a safe
place to avoid damage.
10. Remove the screw on each side
of the rail.
Screw
Rail
To reattach the fridge doors after you
have moved the appliance to its final
location, follow the instructions in
reverse order.
14
15
16
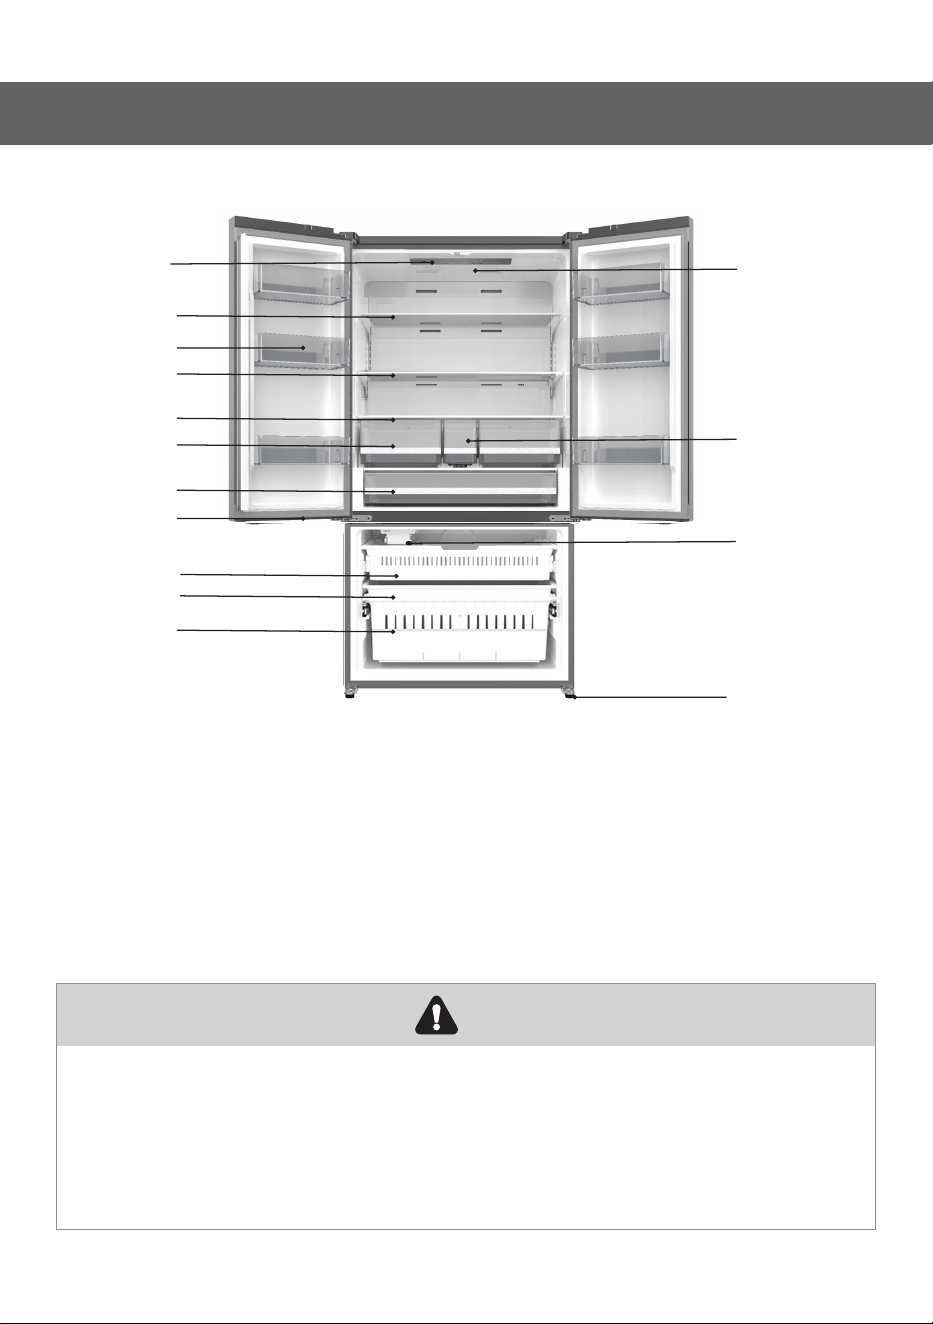
Description of the appliance
17
12
13
15
01
03
04
06
07
08
14
10
05
02
1. Control Panel
2. Vertical Baffle Part
3. Refrigerator Door Bin
4. Glass Shelf
5. Crisper Cover
6. Fruits and vegetables Crisper
7. Full width pantry
View of the appliance
Due to constant development of our products, your refrigerator may be
slightly different from this instruction manual, but its functions and usage
remain the same.
To get the best energy efficiency of this product, please place all shelves,
drawers on their original position as the illustration above.
Note
8. Freezer LED light
9. Upper Freezer Drawer
10. Middle Freezer Drawer
11. Lower Freezer Drawer
12. Refrigerator LED Light
13. Middle Storage Drawer
14. Ice maker
15. Leveling Leg
9
11
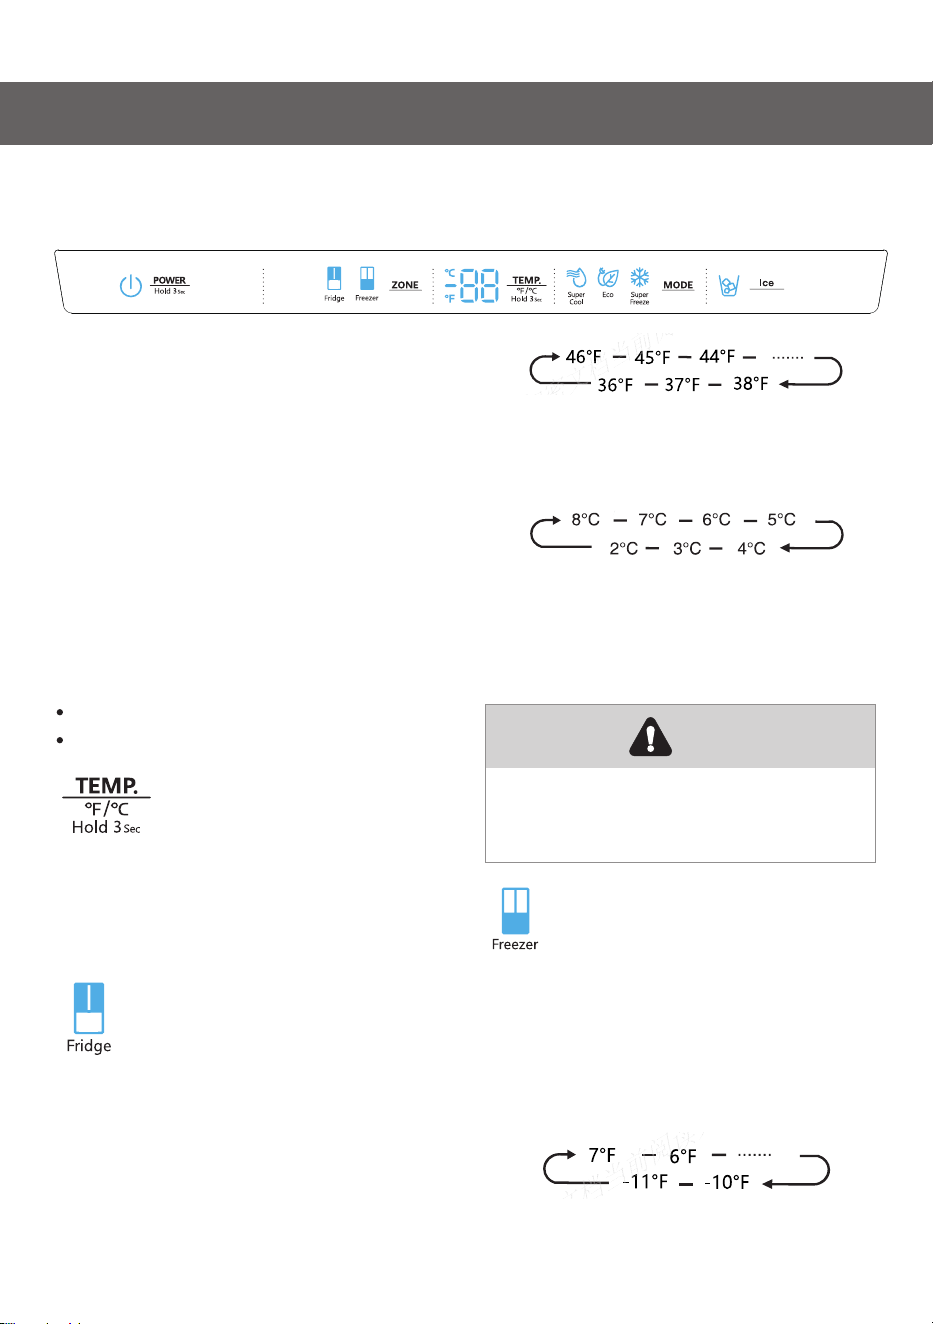
Display controls
Your product has one control panel which is installed on the fridge door. Use your
appliance according to the following control guidelines.
When you set a temperature, you are
setting an average temperature for
the entire compartment. The actual
compartment temperatures may
vary from the temperatures
displayed depending on the amount
and placement of stored food, and
the surrounding room temperature.
Setting Compartment Temperatures
Recommended Temperature
Settings
Fridge Compartment: 39°F (4°C)
Freezer Compartment: 0°F (-18°C)
"°F /°C"
To toggle between Celsius and
Fahrenheit on the display, press and
hold the "TEMP." button for three
seconds.
"Fridge temperature control"
Press the "ZONE" button until the
"Fridge" icon appears, then press the
"TEMP." button repeatedly to cycle
through the available temperature
settings from 46°F to 36°F.
Release the "TEMP." button control
when the desired temperature setting
appears.
If you have set the temperature type
to °C, the temperature setting cycle
from 8°C to 2°C.
Each press of the button decrease
the setting by one degree.
Note
"Freezer temperature control"
Press the "ZONE" button until the
"Freezer" icon appears, then press the
"TEMP." button repeatedly to cycle
through the available temperature
settings from 7°F to -11°F.
18
Display controls
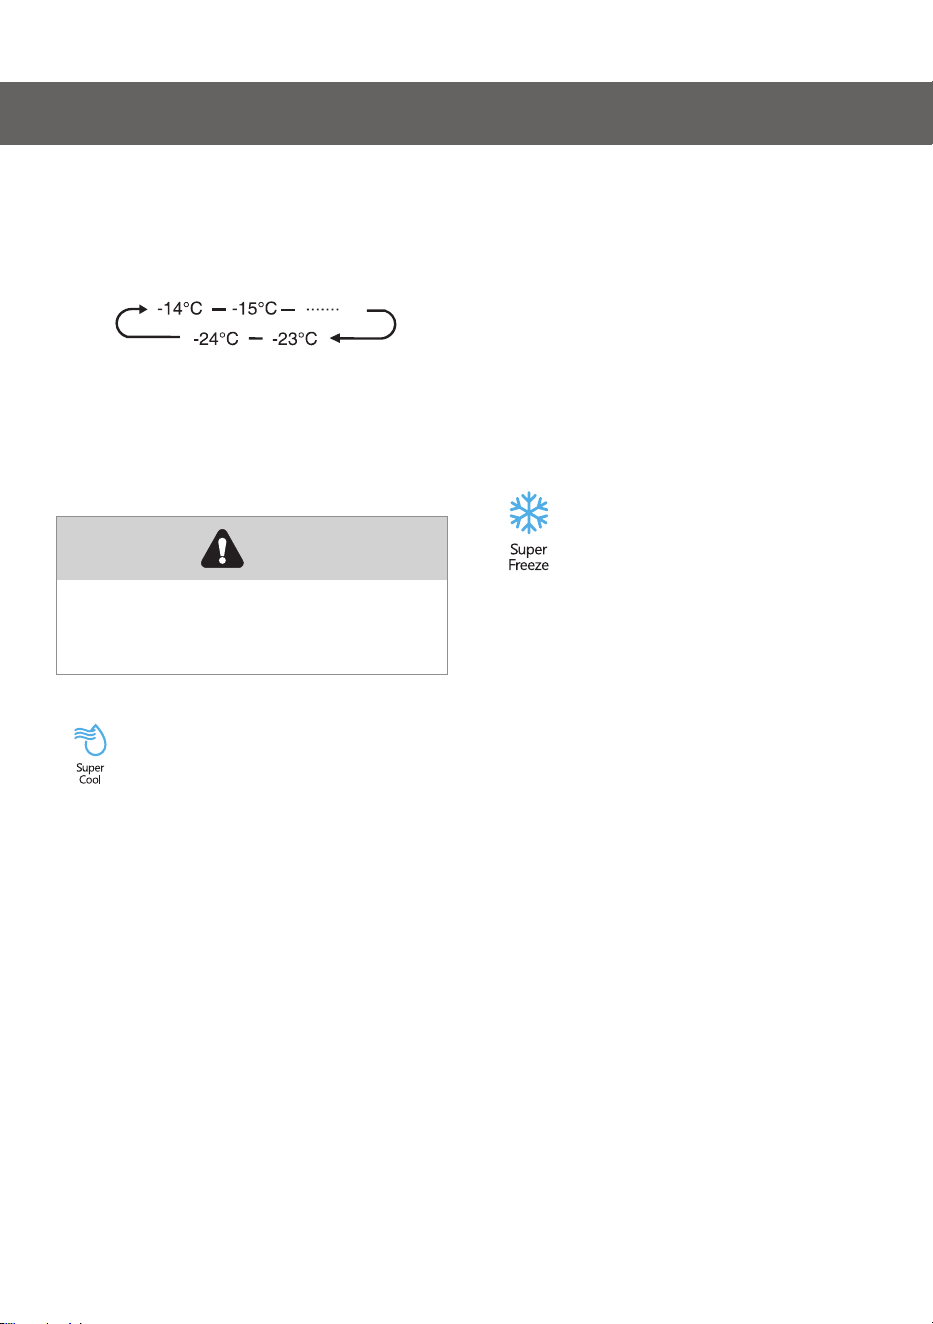
If you have set the temperature type
to °C , the temperature setting cycle
from -14°C to -24°C.
Each press of the button decrease
the setting by one degree.
Note
Release the "TEMP." button control
when the desired temperature setting
appears.
"Super Cool"
The Super Cool feature helps to keep
food stored in the refrigerator at the set
temperature during periods of high
usage, large grocery loads, or
temporarily warm room temperatures.
The Super Cool feature lowers the
temperature in the fridge
compartment.
2. Super Cool will automatically turn off
after 3 hours.
3. When Super Cool function is on you
can turn it off by pressing the
"MODE" button or setting fridge
temperature. To manually turn off the
Super Cool function, the fridge
temperature setting will revert back to
the previous setting.
"Super Freeze"
Super Freeze will quickly lower the
temperature within the freezer so food
will freeze faster than usual. This
feature also helps to keep vitamins
and nutrition of fresh food and keep
for longer period.
1. Press the "MODE" button to activate
this function. The "Super Freeze" icon
will be illuminated and the
temperature for the freezer is set to
-11°F(-24°C).
2. Super Freeze will automatically turn
off after 52 hours.
3. When Super Freeze function is on
you can turn it off by pressing the
"MODE" button or setting freezer
temperature. To manually turn off the
Super Freeze function,the freezer
temperature setting will revert back to
the previous setting.
1. Press the "MODE" button to activate
this function. The "Super Cool" icon will
be illuminated and the fridge
temperature indicator will display 36°F
(2°C).
19

Display controls
When you selecting the Super
Freeze function, ensure there are
no bottled or canned
drinks(especially carbonated
drinks) in the freezer
compartment. Bottles and cans
may explode.
Note
"Eco"
Press the "MODE" button to turn on the
energy saving function, the "Eco" icon
will be illuminated. When the Eco
function is on, the temperature of
fridge is automatically switched to
43°F (6°C)and the temperature of
freezer is automatically switched to 1°F
(-17°C). When Eco function is on, you
can switch it off by pressing the
"MODE" button or adjusting the fridge/
freezer temperature, the refrigerator
temperature setting will revert back to
the previous setting.
"ICE"
The ice maker is located inside the
freezer compartment, near the top of
the compartment. When the ice
maker makes ice, the ice is stored in
freezer tray.
Press the "ICE" button to turn the ice
maker on or off. When the ice maker
is turned on, the " "icon lights.
To use ice, open the freezer
compartment door, then pull open
the freezer tray and get the ice.
When the power function is on, the
refrigerator is stopped cooling.
Note
POWER
Press and hold the "POWER" button for
3 seconds to turn the power function
on or off. When the power function is
on, the icon lights and the display
panel will show " -- ".
20

Display controls
Demo mode
Demo mode is for store display, and it
prevents the refrigerator from
generating cool air. In this of Cooling
off Mode, the refrigerator may seem
like it is working but it will not make
cool air. The display panel will show
special segments as follow.
To switch off demo mode, press and
hold "POWER" and "ICE"buttons at the
same time for three seconds and the
buzzer gave a long sound.
Door Open Alarm
lf a door is open for longer than 2
minutes, an alarm will sound to alert
you and the control panel will display
"dr". The alarm will sound 3 times
every minute for 8 minutes.
To turn off the alarm, close all doors
completely.
21
Using your appliance
Never close the refrigerator door
while the shelves, crisper and/or
telescopic slides are extended. It
may damage both them and the
refrigerator.
Caution
The refrigerator compartment is
provided with several glass shelves
and six
door bins, which are
suitable for the storage of eggs,
canned liquid, bottled drinks and
packed food. They can be placed
at different heights according to
your need. But do not place too
many heavy things in racks. Before
you lift up the door shelf vertically,
please take the food out.
Glass shelves and Door bins
1. Using your refrigerator
compartment
The refrigerator compartment is
suitable for storage of vegetables
and fruit. Food inside should be
packed to store in order to avoid
losing moisture or flavor
permeating into other foods.
22
Door Bins
To remove the door, simply lift the
racks up and pull straight out. To
relocate the door , slide it in above
the desired location and push down
until it stops.
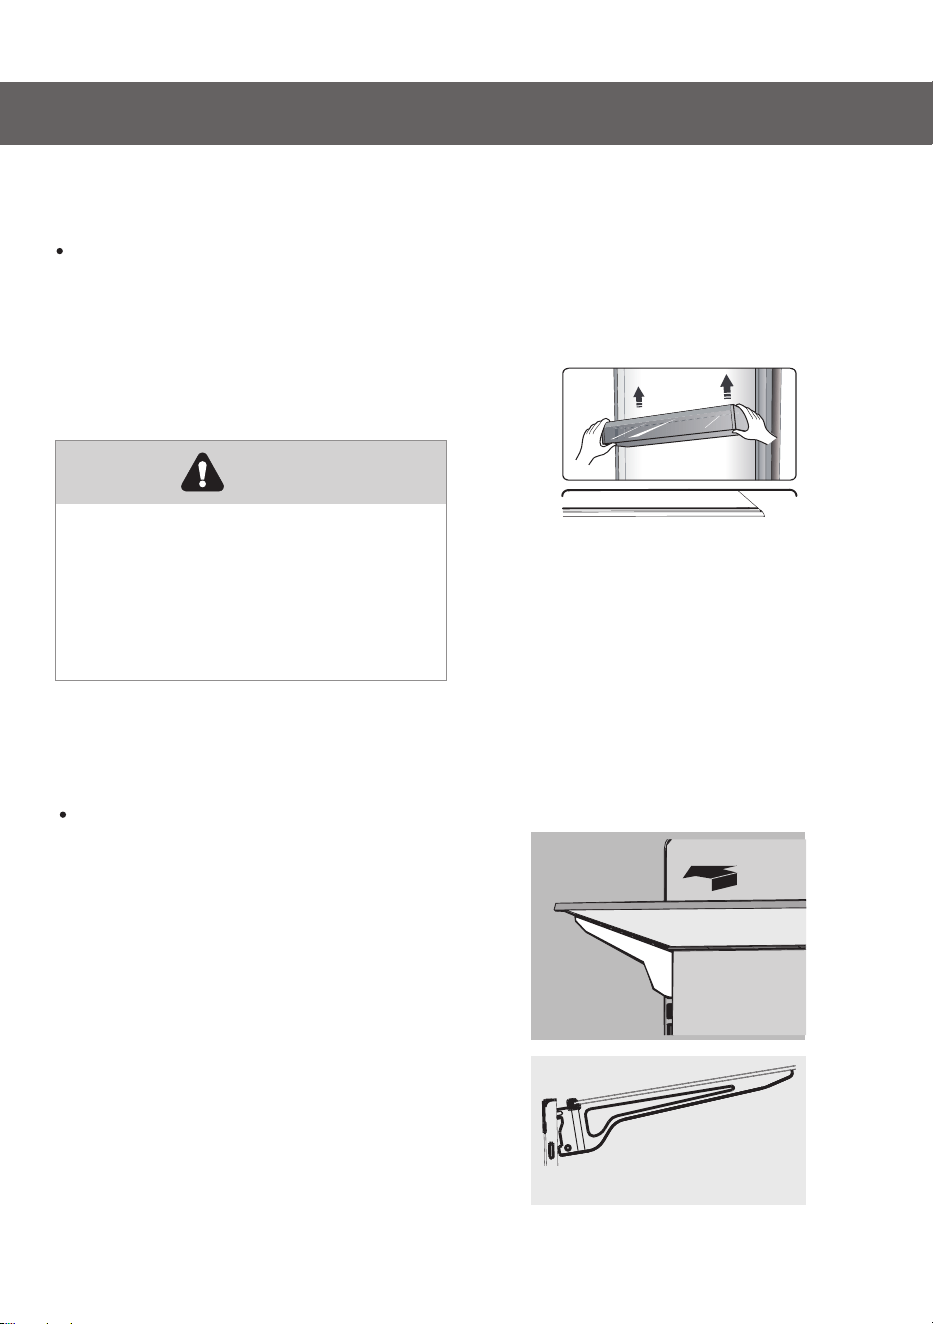
Adjustable Shelves
The height of the shelves can be
adjusted to fit your storage needs.
To remove a shelf, gently lift upward
and then pull the shelf forward until
the end of the shelf is past the rail
support.
23
Using your appliance
To reinstall a shelf, gently slide the shelf
back into the refrigerator
compartment, and the lower the
shelf onto the rail support.
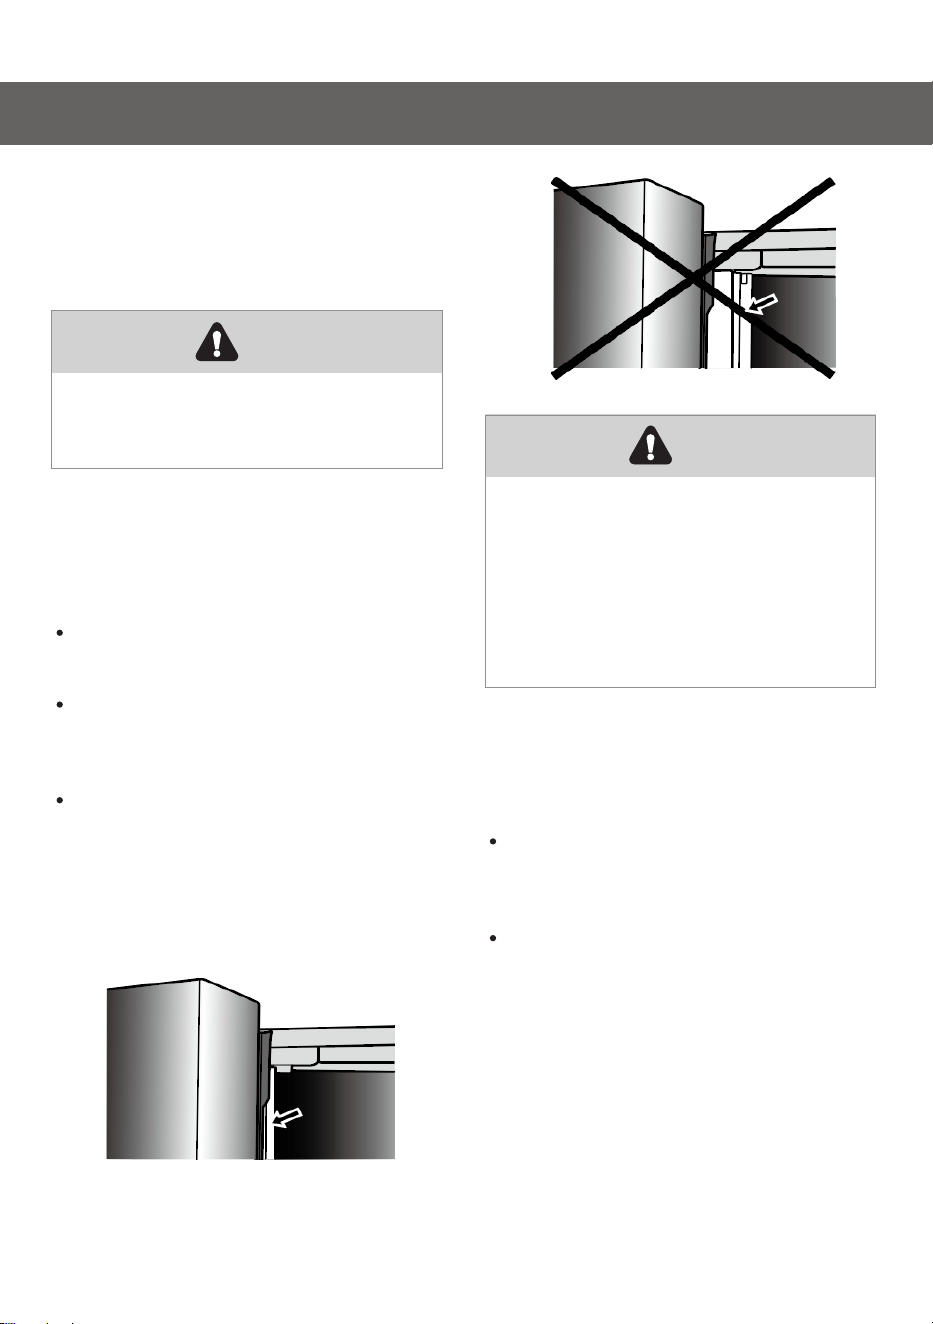
Opening and Closing Doors
The four doors can be opened and
closed either separately or together.
There is a mullion on the left-hand
side refrigerator compartment door.
When closing the left-hand door , the
mullion folds behind the right-hand
door joining the two doors.
The temperature of the door frame is
controlled to help prevent moisture
from developing on the mullion. The
temperature of the surface may be
warm, which is normal, and will not
affect the performance of the
refrigerator.
Note
Before closing the left-hand door,
make sure the mullion is folded
inward. If the mullion is pulled
outward it may become
damaged when you try to close
the door.
2. Using your freezer compartment
The freezer compartment is suitable
for storage of foods required to be
frozen, such as meat, fish, ice cream
and other perishable items.
Caution! Ensure that bottles are not
left in the freezer for longer than
needed as freezing may cause the
bottle break. Bottled or canned liquid
are at risk of exploding caused by
volume expansion and so should not
be stored in the freezer
compartment.
Note
The door bins and shelves can be
taken out to be cleaned.
Using your appliance
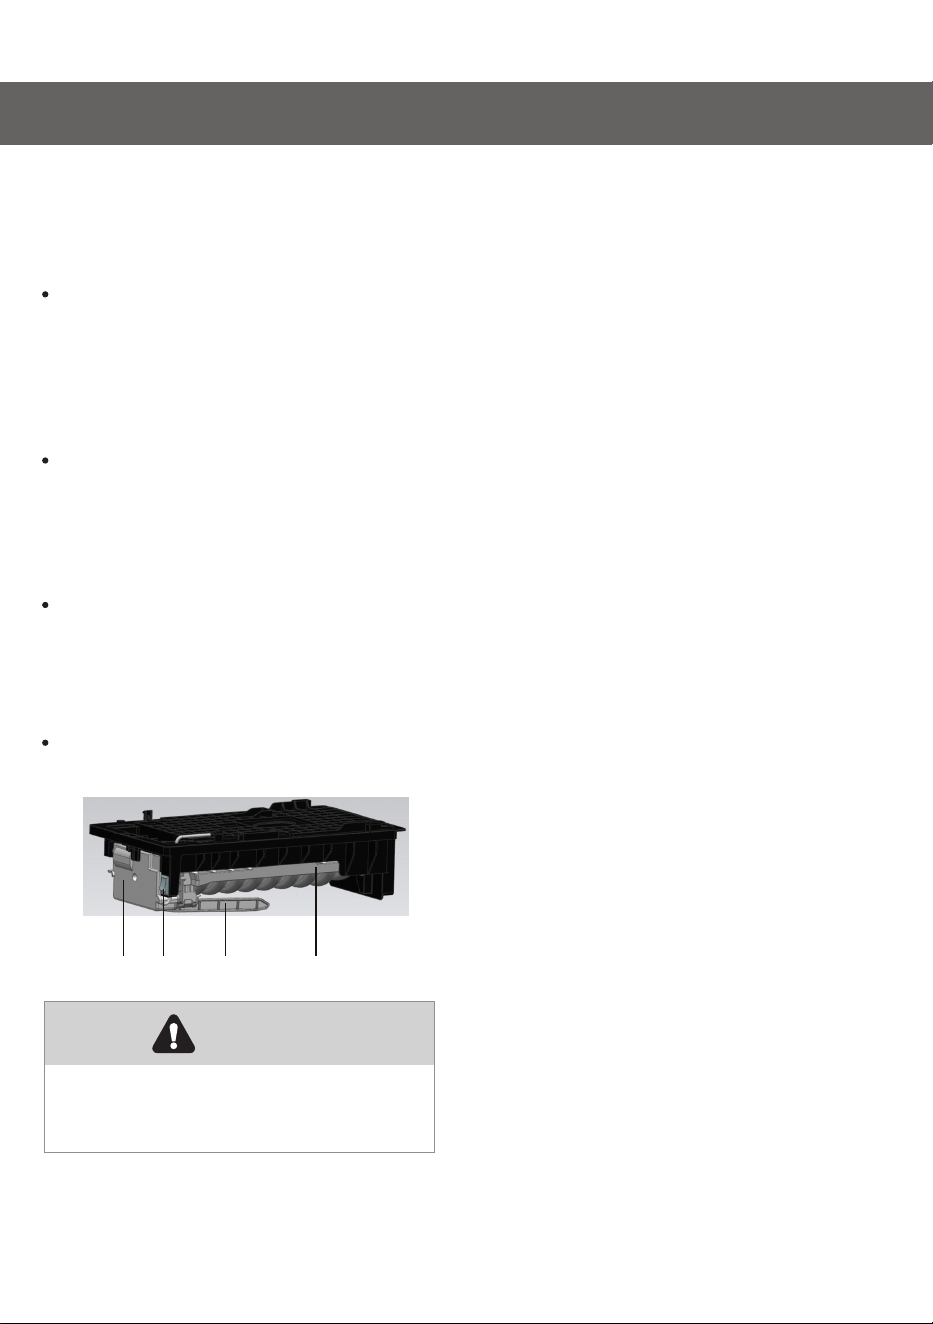
Ice Maker in Freezer
If the water line is connected, set the
ice maker power switch to the ON
position.
The ice maker will not begin to the
operate until it reaches its operating
temperature of 15°F(-9°C) or below. It
will then begin operation
automatically if the ice maker power
switch is at the ON position.
Following installation, allow 24 hours
to produce the first batch of ice.
Discard the first three batches of ice
produced. Allow 2 to 3 days to fill the
ice storage container.
If the ice in the ice container clumps,
break up ice using a plastic utensil
and discard. Do not use a sharp tool
to break up the ice. This can cause
damage to the ice container.
Do not store any items other than ice
in the ice storage container.
Feeler Arm Ice Storage
Container
Motor
Switch
Do not allow children to touch the
ice maker. This could cause injury.
Caution
24
For hygienic reasons the appliance
(including exterior and interior
accessories) should be cleaned at
least every two months.
Don’t use sharp objects to clean
with, as they are likely to scratch
the surface.
Don’t use thinner, car cleaner,
bleach, oil, abrasive cleansers or
organic solvent such as benzene
for cleaning. They may damage
the surface of the appliance and
may cause fire.
Caution
To avoid electrical shock, the
appliance must not be
connected to the main power
supply during cleaning. Before
cleaning, switch the appliance
off and remove the plug from
the main socket.
Warning
Wipe the digital panel and display
panel with a clean, soft cloth.
Spray water onto a cleaning cloth
instead of spraying directly on the
surface of the appliance. This helps
ensure an even distribution of
moisture to the surface.
Clean the doors, handles and
cabinet surfaces with a mild
detergent and then wipe dry with a
soft cloth.
Exterior cleaning
You should clean the appliance
interior regularly. It will be easier to
clean when food stocks are low. Wipe
the inside of the fridge and freezer
with a weak solution of backing soda
and water, and then rinse with warm
water using a wrung-out sponge or
cloth. Wipe completely dry before
replacing the shelves and baskets.
Thoroughly dry all surfaces and
removable parts before putting them
back into place.
Interior cleaning
Cleaning and care
To maintain good appearance of your
appliance, you should clean it
regularly.
25
Cleaning and care
Do not use sharp objects to
remove frost from the freezer
compartment
Only after the interior is
completely dry should the
appliance be switched back on
and plugged back into the main
socket.
Warning
Door seals cleaning
Take care to keep door seals clean.
Sticky food and drinks can cause seals
to stick to the cabinet and tear when
you open the door. Wash seal with a
mild detergent and warm water. Rinse
and dry it thoroughly after cleaning.
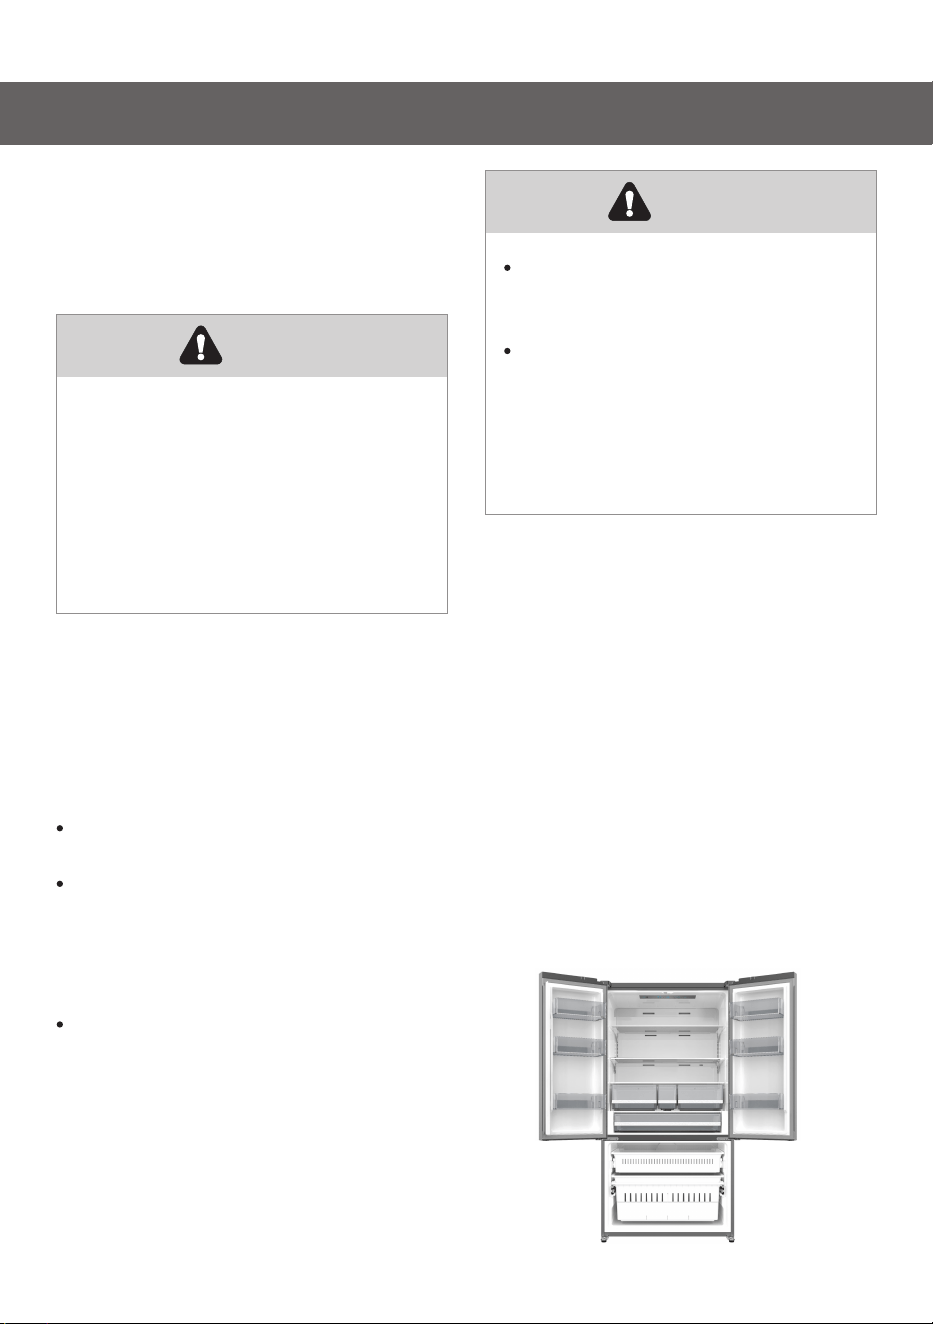
Although this appliance
automatically defrosts, a layer of frost
may occur on the freezer
compartment’s interior walls if the
freezer door is opened frequently or
kept open too long. If the frost is too
thick, choose a time when the freezer
is nearly empty and proceed as
follows:
1. Remove existing food and
accessories baskets, unplug the
appliance from the mains power
and leave the doors open.
Ventilate theroom thoroughly to
accelerate theprocess.
2. When defrosting is completed,
clean your freezer as described
above.
The LED light must be replaced by
a competent person. If the LED
light is damaged, follow the steps
below:
1. Unplug your appliance.
2. Remove the light cover by
lifting up and pulling out.
3. Hold the LED light with one
hand and pull it while pressing
the connector latch with the
other hand.
4. Replace the LED light and snap
it correctly in place and replace
the light cover
Warning
Only after the door seals are
completely dry should the
appliance be powered on.
Caution
26
27
28
29
30
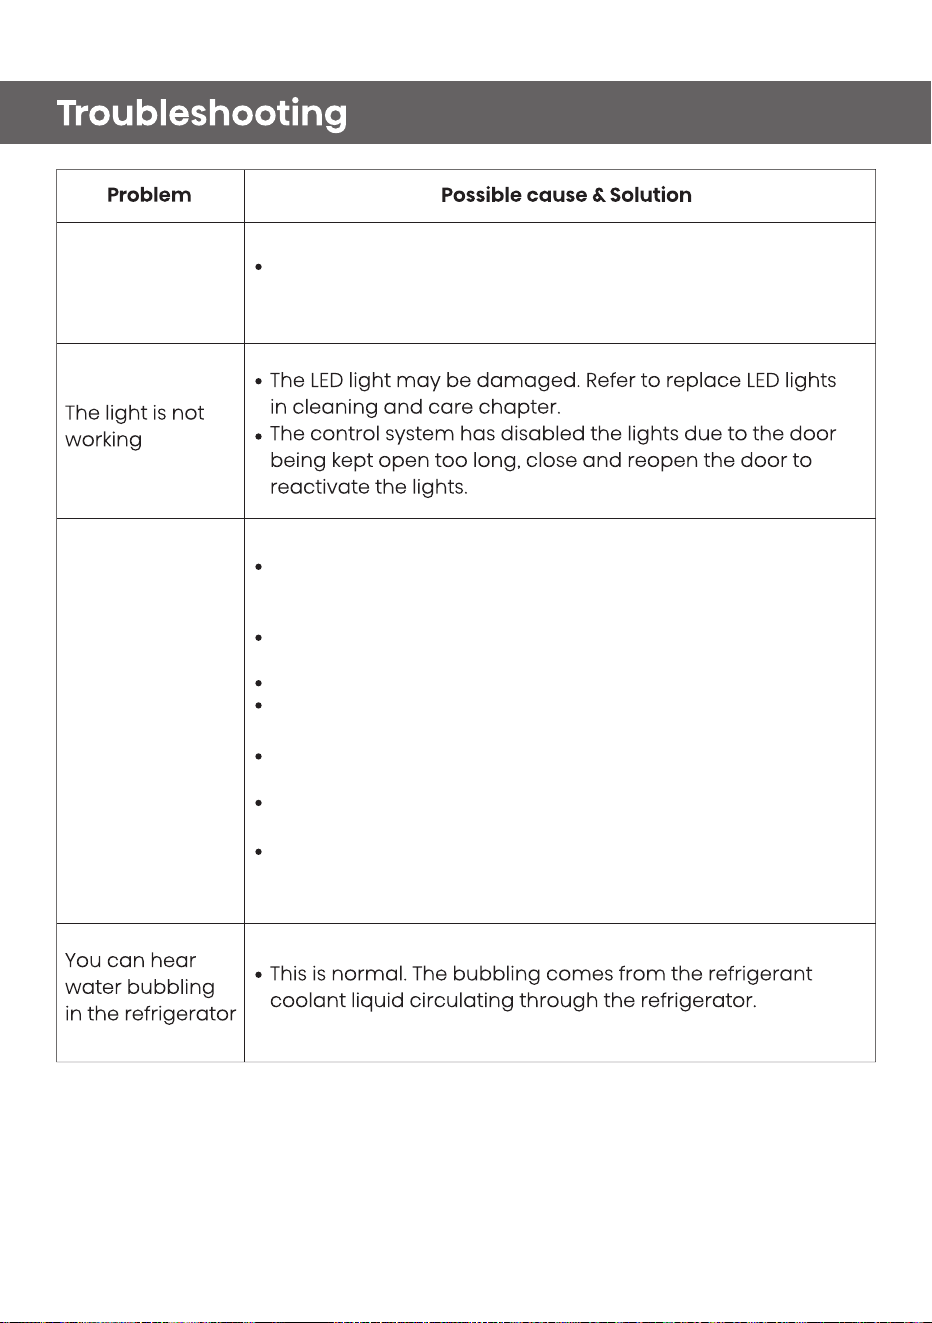
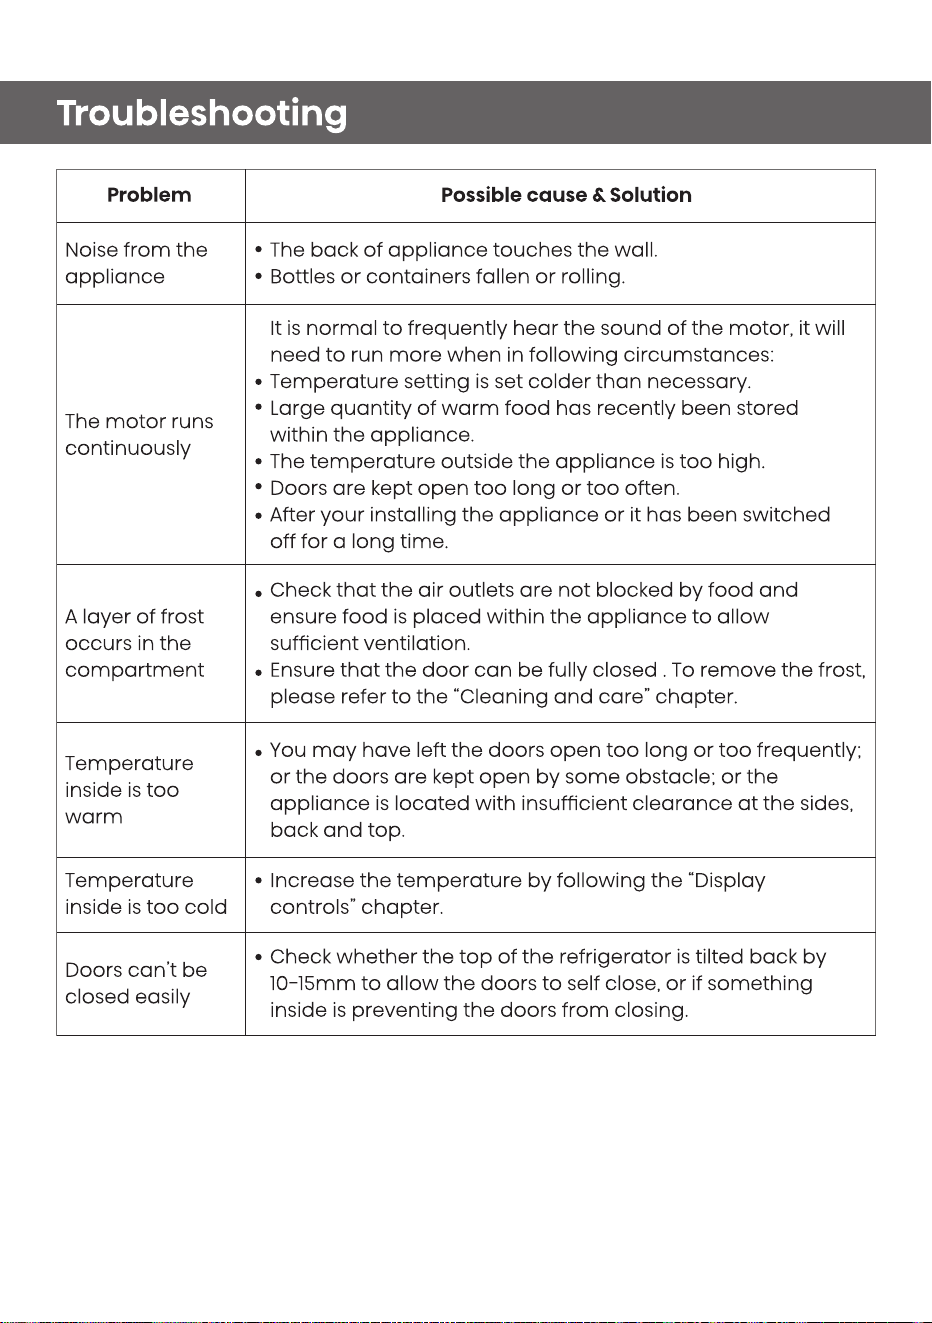
Hear water
bubbling in the
refrigerator
This is normal. The bubbling comes from the refrigerant
coolant liquid circulating through the refrigerator.
Ice is not
making
Did you wait for 24 hours after installation of the water
supply line before making ice? If it is not sufficiently cool, it
may take longer to make ice, such as when first installed.
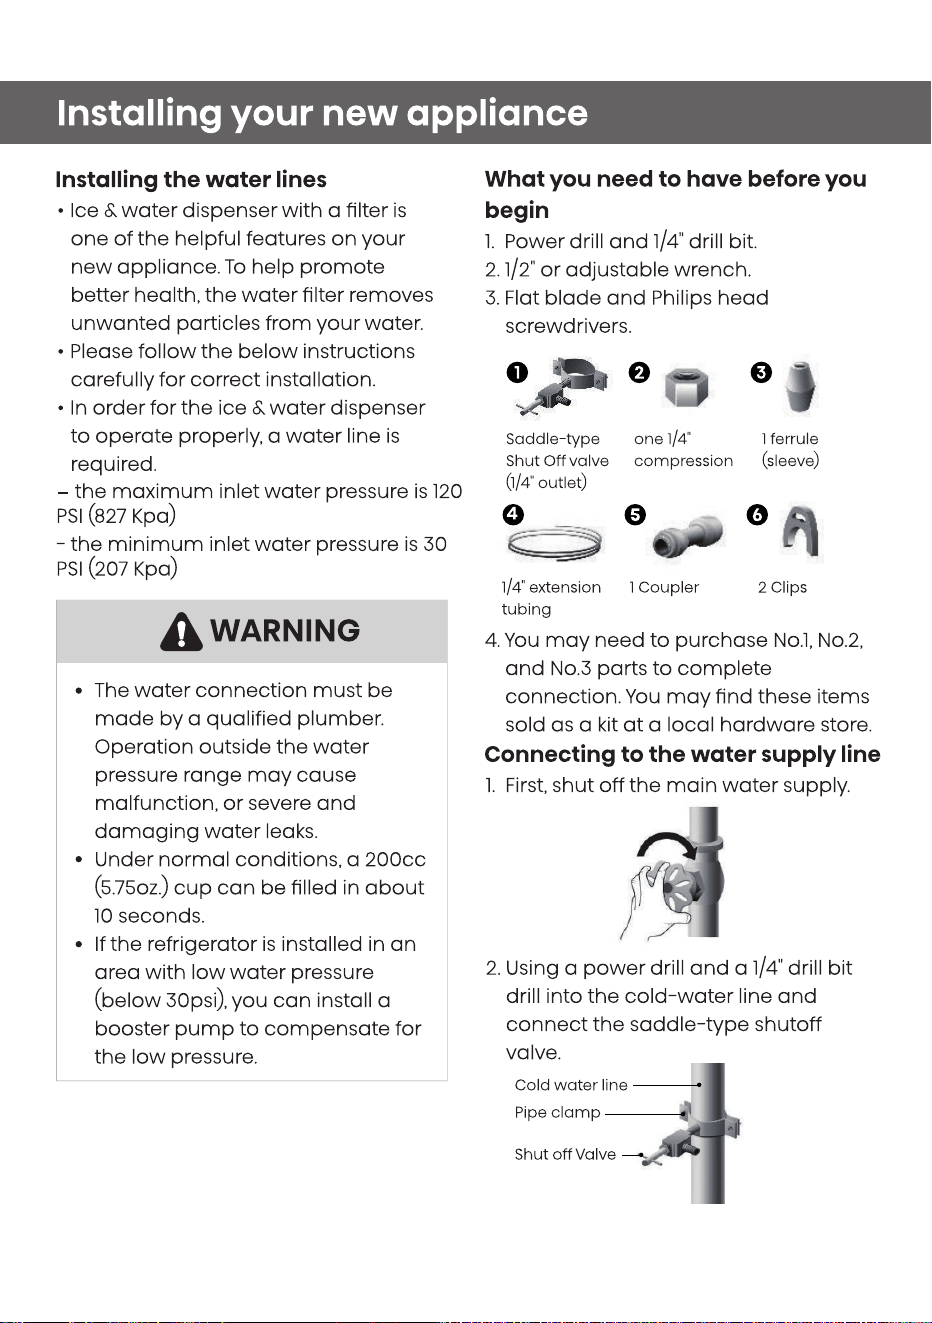
Is the water line connected and the water valve open?Did
you manually stop the ice making function?
Is there any ice blocked within the ice maker bucket?
Is the water pressure less than 30psi? Install a booster
pump to compensate for the low pressure.
Is the freezer temperature too warm? Try setting the
freezer temperature lower.
Ice maker is not making the ice fast enough. Please wait
for at least 90 minutes.
Remove the bucket and check if the ice clums or sticks to
the wall, break up ice using a plastic utensit and discard.
31
32
Customer Service, (toll free: 888-411-7118) between the hours of 9:00 am and 6:00 pm EST
EMAIL: Criterion@hisense.com
Customer Service, (toll free: 888-411-7118) between the hours of 9:00 am and 6:00 pm EST
EMAIL: Criterion@hisense.com
A CALIFORNIA RESIDENTS ONLY-WARNING:
Cancer and Reproductive
Harm-www.P65Warnings.ca.gov