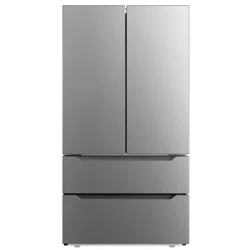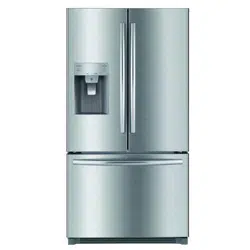
MODEL: CFDR286M4S
Refrigerator-Freezer

02
CONTENTS
SAFETY WARNINGS
-------------------------------------------- 03
PRODUCT OVERVIEW
------------------------------------------ 05
PRODUCT INSTALLATION
------------------------------------ 06
OPERATION INSTRUCTIONS
--------------------------------- 12
CLEANING AND MAINTENANCE
---------------------------- 18
TROUBLESHOOTING
------------------------------------------- 22
WARRANTY
------------------------------------------------------- 24
03
SAFETY WARNINGS
Warning: risk of re / ammable materials
• This appliance is intended to be used in household and similar applications
such as staff kitchen areas in shops, ofces and other working environments;
farm houses and by clients in hotels, motels and other residential type
environments; bed and breakfast type environments; catering and similar non-
retail applications.
• This appliance is not intended for use by persons (including children) with
reduced physical, sensory or mental capabilities, or lack of experience and
knowledge, unless they have been given supervision or instruction concerning
use of the appliance by a person responsible for their safety.
• Children should be supervised to ensure that they do not play with the
appliance.
• If the supply cord is damaged, it must be replaced by the manufacturer, its
service agent or similarly qualied persons in order to avoid a hazard.
• Do not store explosive substances such as aerosol cans with a ammable
propellant in this appliance.
• The appliance has to be unplugged after use and before carrying out user
maintenance on the appliance.
• WARNING: Keep ventilation openings, in the appliance enclosure or in the
built-in structure, clear of obstruction.
• WARNING: Do not use mechanical devices or other means to accelerate the
defrosting process, other than those recommended by the manufacturer.
• WARNING: Do not damage the refrigerant circuit.
• WARNING: Do not use electrical appliances inside the food storage
compartments of the appliance, unless they are of the type recommended by
the manufacturer.
• WARNING: Please abandon the refrigerator according to local regulators for it
use ammable blowing gas and refrigerant.
• WARNING: When positioning the appliance, ensure the supply cord is not
trapped or damaged.
• WARNING: Do not locate multiple portable socket-outlets or portable power
supplies at the rear of the appliance.
• Do not use extension cords or ungrounded (two prong) adapters.

04
• WARNING: Risk of child entrapment. Before you throw away your old
refrigerator or freezer:
- Take off the doors.
- Leave the shelves in place so that children may not easily climb inside.
• The refrigerator must be disconnected from the source of electrical supply
before attempting the installation of accessory.
• Refrigerant and cyclopentane foaming material used for the appliance are
ammable. Therefore, when the appliance is scrapped, it shall be kept away
from any re source and be recovered by a special recovering company with
corresponding qualication other than be disposed by combustion, so as to
prevent damage to the environment or any other harm.
• The necessity that, for doors or lids tted with locks and keys, the keys be
kept out of the reach of children and not in the vicinity of the refrigerating
appliance, in order to prevent children from being locked inside.
• WARNING: To avoid a hazard due to instability of the appliance, it must be
xed in accordance with the instructions.
• WARNING: Connect to potable water supply only.
05
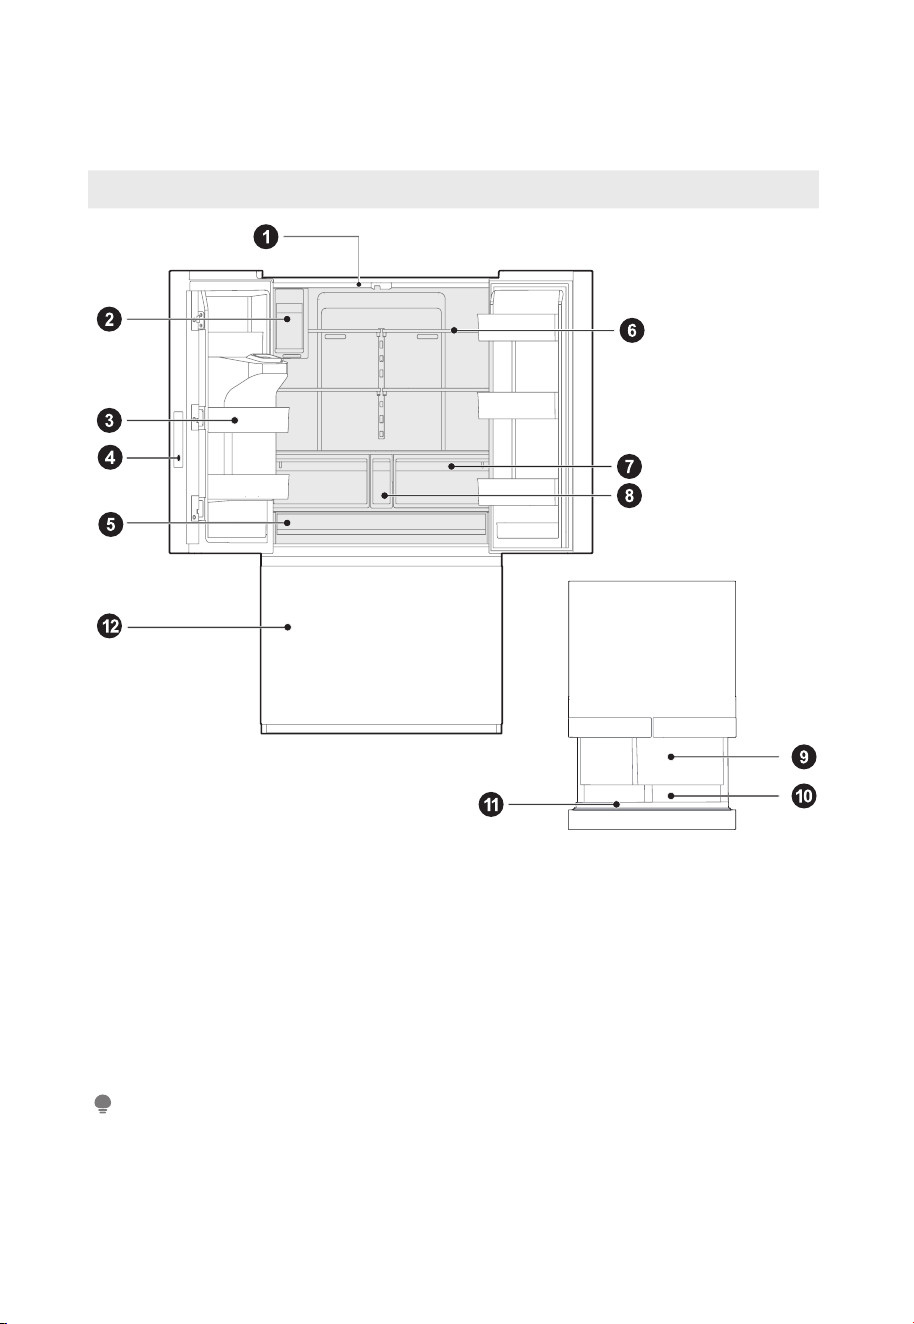
PRODUCT OVERVIEW
Names of components
1
LED lighting
7
Crisper drawer
2
Ice maker
8
Small drawer
3
Door tray
9
Upper freezer drawer
4
Control panal
10
Lower freezer drawer
5
Big drawer
11
Freezer tray
6
Shelf
12
Freezer drawer
ATTENTION
• The picture above is only for reference. The actual conguration will depend on the physical
product or statement by the distributor
.
• Small drawers suggest placing items suitable for its size, such as smaller milk cartons.
06
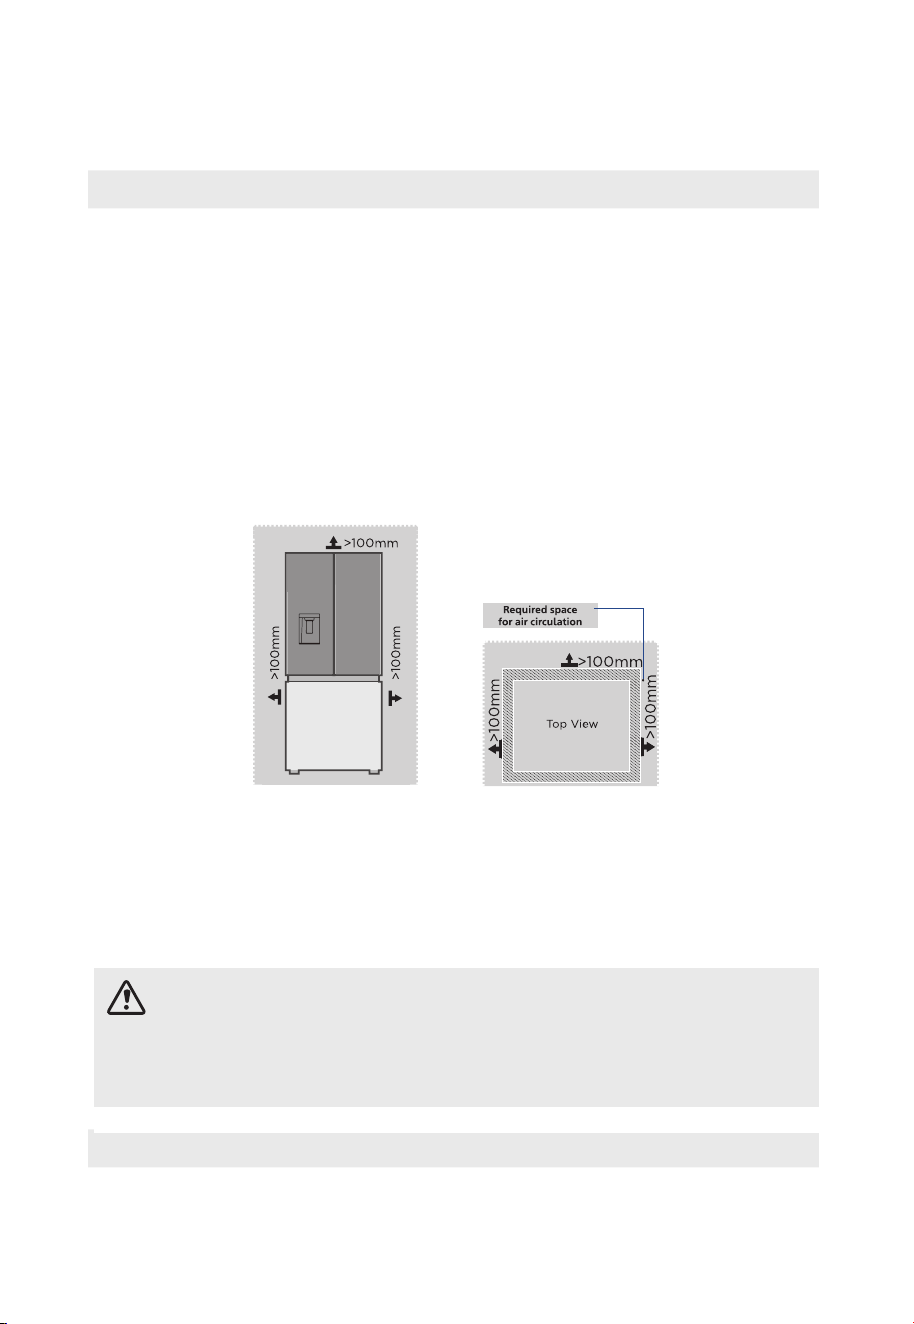
PRODUCT INSTALLATION
Install Instruction
Finding a suitable location
• This refrigerator is designed to be free standing only, and should not be
recessed or built-in.
• The refrigerator should be placed in a well-ventilated indoor place; the ground
shall be at and sturdy.
• Keep away from heat and avoid direct sunlight. Do not place the refrigerator in
moist or watery places to prevent rust or reduction of insulating effect.
Dimensions and Clearances
• Too small of a distance from adjacent items may result in the degradation
of freezing capability and increased electricity costs. Allow over 100 mm of
clearance from each adjacent wall when installing the appliance.
Providing a proper power supply
• Check your local power source. This refrigerator requires a 115 V, 60 Hz power
supply.
• Use a receptacle that accepts the grounding prong. The power cord is
equipped with a 3-prong (grounding) plug which mates with a standard
3-prong (grounding) wall outlet to minimize the possibility of electric shock
hazard from this refrigerator.
CAUTION
The refrigerator should always be plugged into its own individual electrical outlet
which has a voltage rating that matches the rating plate.
Never unplug your refrigerator by pulling on the power cord. Always grip the plug
rmly and pull straight out from the outlet.
Start to use
• The refrigerator shall stay for half an hour before connecting power when it is rstly
started.
• The refrigerator shall run 2 to 3 hours before loading fresh or frozen foods; the
refrigerator shall run for more than 4 hours in summer in advance considering that
the ambient temperature is high.
07
Space requirement diagram (when the door is open and when the door is closed).
C
E
B
135 °
B
A
C1
D
Width
Overall
Height
Depth
Depth
Only Cabinet
Depth
doors open
135
o
Width
doors open
135
o
A B C C1 D E
910 1775 862 745 1127 1596
Notice: All dimensions in mm
08
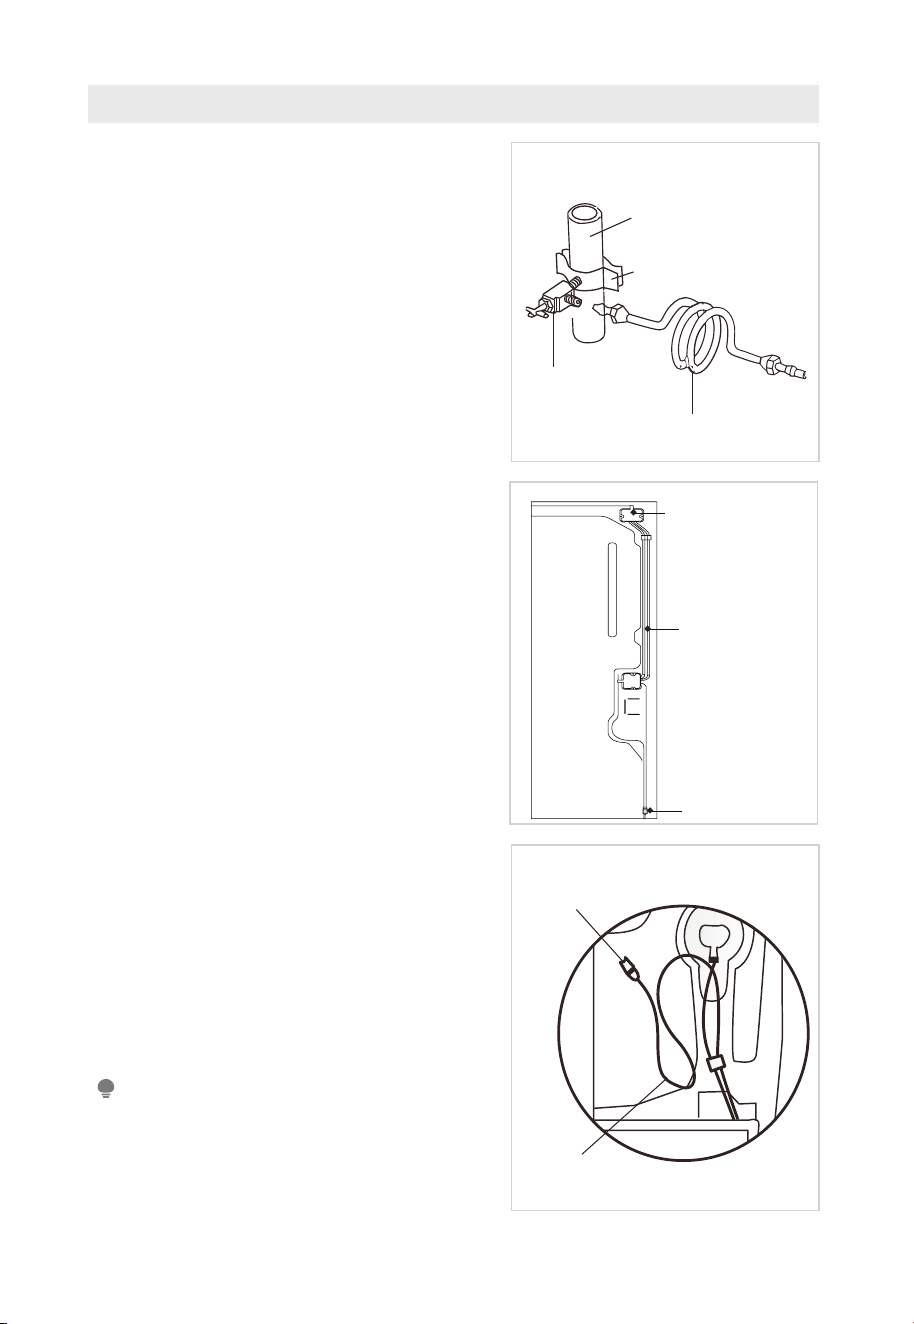
Installing the Water Line
Installing the Water Line
• Water line installation kits are available
as an addional accessory from your
dealer or at a local hardware store.
1. First, shut off the main water supply line
and turn the ice-maker off.
2. Locate the nearest cold water supply
valve.
3. After connecting the water supply to the
water valve, turn your main water supply
back on and ush several gallons of water
to clear the water supply line.
Connecting the Water Line to The
Refrigerator
• There are several items that you need to
purchase to complete this connection.
• You will nd these items sold as a kit at
your local hardware store.
4. First, close the main water supply and
locate the nearest cold water line.
5. Second, connect the water valve to the
cold water line.
6. Turn water valve on and check for any
leakage.
7. When moving the refrigerator, you can
hang the power cord on the power cord
hook.
Connecting the Water Line to A
Drinkable Water Source
• If your water line is not drinkable, please
add an external water lter.
• If you must repair or disassemble the
water line, cut off the plastic tubing to
make sure you get a snug, leak-free
connection.
ATTENTION
• The minimum inlet water pressure: 276kPa
.
• The maximum inlet water pressure: 689kPa.
• Connect to potable water supply only new
hose-sets supplied with the appliance are to
be used and that old hose-sets should not be
reused.
Power cord hook
Water line
Water connector
Cold water line
Pipe clamp
Shut off walve
Water line installation kit
Water connector
Water tube
09
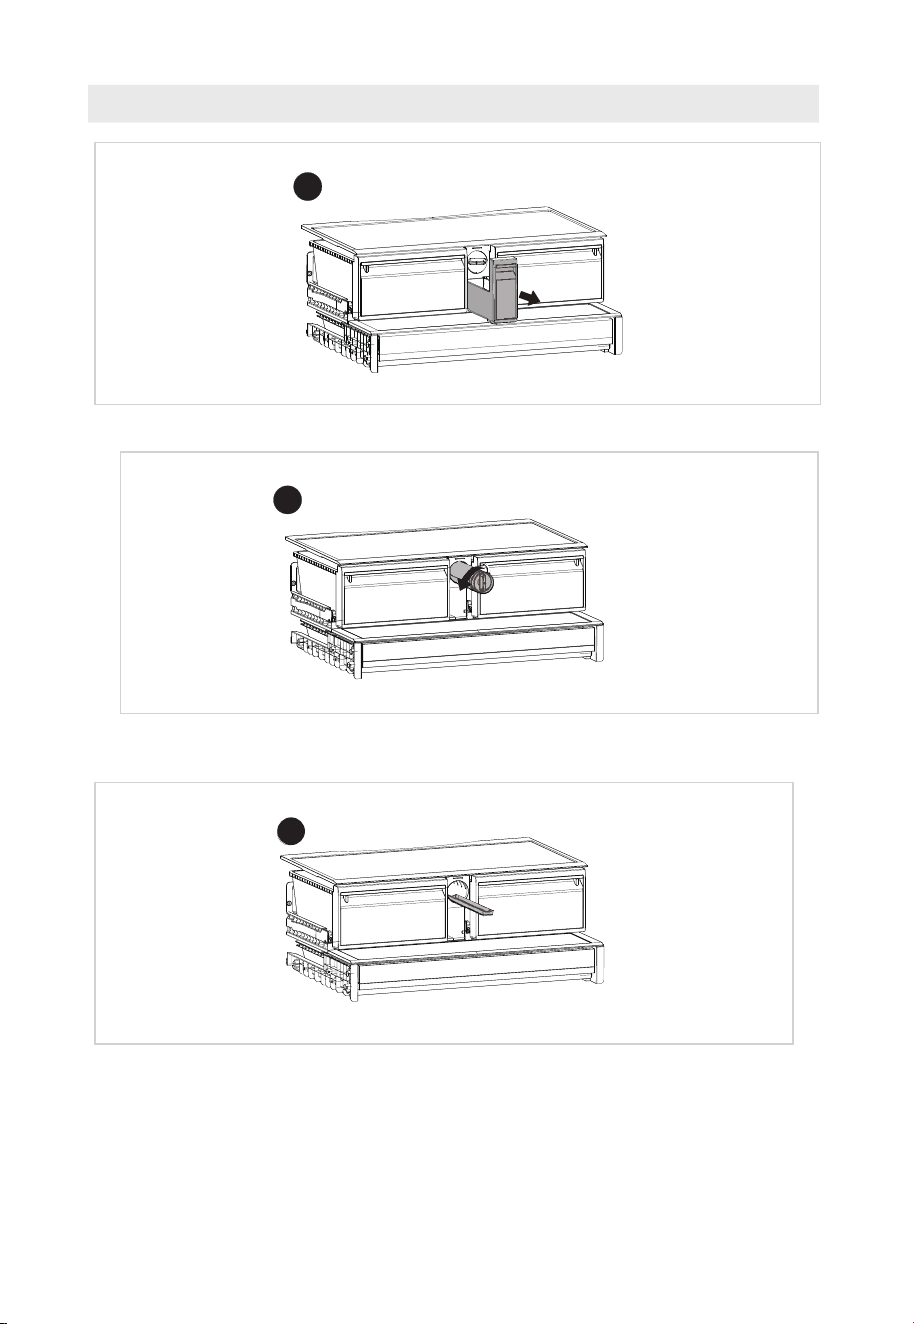
Installing Filter
• Pull out the small drawer in the middle.
• Press the lter knob and rotate 90° counterclockwise, the lter will disengage
from the connector and the lter can be removed.
• Check the water tray under the strainer with your nger, take out and dump
the overow water.
1
2
3

10
Leveling feet
To avoid vibration, the unit must be leveled.
If required, adjust the leveling screws to compensate for the uneven oor.
The front should be slightly higher than the rear to aid in door closing.
Leveling screws can be turned easily by tipping the cabinet slightly.
Turn the leveling screws counterclockwise to raise the unit, clockwise to
lower it.
Leveling doors
List of tools to be provided by the user
Pliers
1. Raise the lower door up to the level of the higher door.
2. Insert the supplied fastener-ring by using plier in the gap between the hinge-
grommet and the lower hinge. The number of fasten-rings you will need to
insert depends on the gap.
Moving the appliance
1. Remove all food from inside the appliance.
2. Pull the power plug out, insert and x it into the power plug hook at the rear or
on top of the appliance.
3. Tape parts such as shelves and the door handle to prevent from falling off
while moving the appliance.
4. Move the appliance with more than two people carefully. When transporting
the appliance over a long distance, keep the appliance upright.
5. After installing the appliance, connect the power plug into a socket out to
switch on the appliance.
Hinge
grommet
Pliers
Fastener-ring
Lower hinge

11
Changing the light
• Any replacement or maintenance of the LED lamps is intended to be made by
the manufacturer, its service agent or similar qualied person.
Connecting the appliance
After installing the appliance, connect the power plug into a socket outlet.
ATTENTION
• After connecting the power supply cord (or plug) to the outlet, wait 2 or 3 hours before you
put food into the appliance. If you add food before the appliance has cooled completely,
your food may spoil.
Precautions before operation:
• Before making changes the refrigerator must be disconnected from power.
• precautions should be taken to prevent any personal injury.
Tips for energy saving
• Do not place the appliance near cookers, radiators or other heat sources. If the
ambient temperature is high, the compressor will run more frequently and for
longer, resulting in increased energy consumption.
• Ensure that there is sufcient ventilation at the base of the appliance, on the sides
of the appliance and at the back of the appliance. Never cover ventilation openings.
• Please also observe the spacing dimensions in the chapter “Installation”.
• The arrangement of drawers, shelves and racks as shown in the illustration offers the
most efcient use of energy and should therefore be retained as far as possible. All
drawers and shelves should remain in the appliance to keep the temperature stable
and save energy.
• To obtain a larger storage space (e.g. for large refrigerated/frozen goods), the
middle drawers can be removed. The top and bottom drawers and shelves should
be removed last if necessary.
• An evenly lled refrigerator/freezer compartment contributes to optimal energy
use. Therefore, avoid empty or half-empty compartments.
• Allow warm food to cool before placing it in the refrigerator/freezer. Food that has
already cooled down increases energy efciency.
• Allow frozen food to defrost in the refrigerator. The coldness of the frozen food
reduces the energy consumption in the refrigerator compartment and thus increases
the energy efciency.
• Open the door only as briey as necessary to minimise cold loss. Opening the door
briey and closing it properly reduces energy consumption.
• The door seals of your appliance must be perfectly intact so that the doors close
properly and energy consumption is not increased unnecessarily.
12
OPERATION INSTRUCTIONS
Control panal
Display Button
1
Refrigerating icon
A
Temperature up button
2
Freezer icon
B
Temperature zone selection button
3
Temperature display icon
C
Temperature down button
4
Filter replacement reminder icon
D
Super cool/Super freeze button
5
Super cool icon
E
Ice maker button
6
Super freeze icon
F
Lock/Unlock button
7
Refrigerating ice on icon
Display
• When electrify the refrigerator, the display screen will totally display for 3
seconds, meanwhile the starting up bell rings ,then the display screen enters
the normal display of operation.(if power-on for rst time, the default set
temperature of the refrigerator room and the freezer room is 39
℉
/ 0
℉
).
• It will display the set temperature of both refrigerator and freezer rooms when
there is no fault
.
ATTENTION
The actual control panel may differ from model to model.
13
• Under normal circumstances, the display light will go out after 30 seconds
in lock state, button operation on display panel would wake up the display
screen; if the opening door action wakes up the display screen, the display
light would go out immediately when the door is closed; when the “fault code
visible” type of fault occurs, the display screen lights up, and will go out after
30 seconds.
Operating instructions
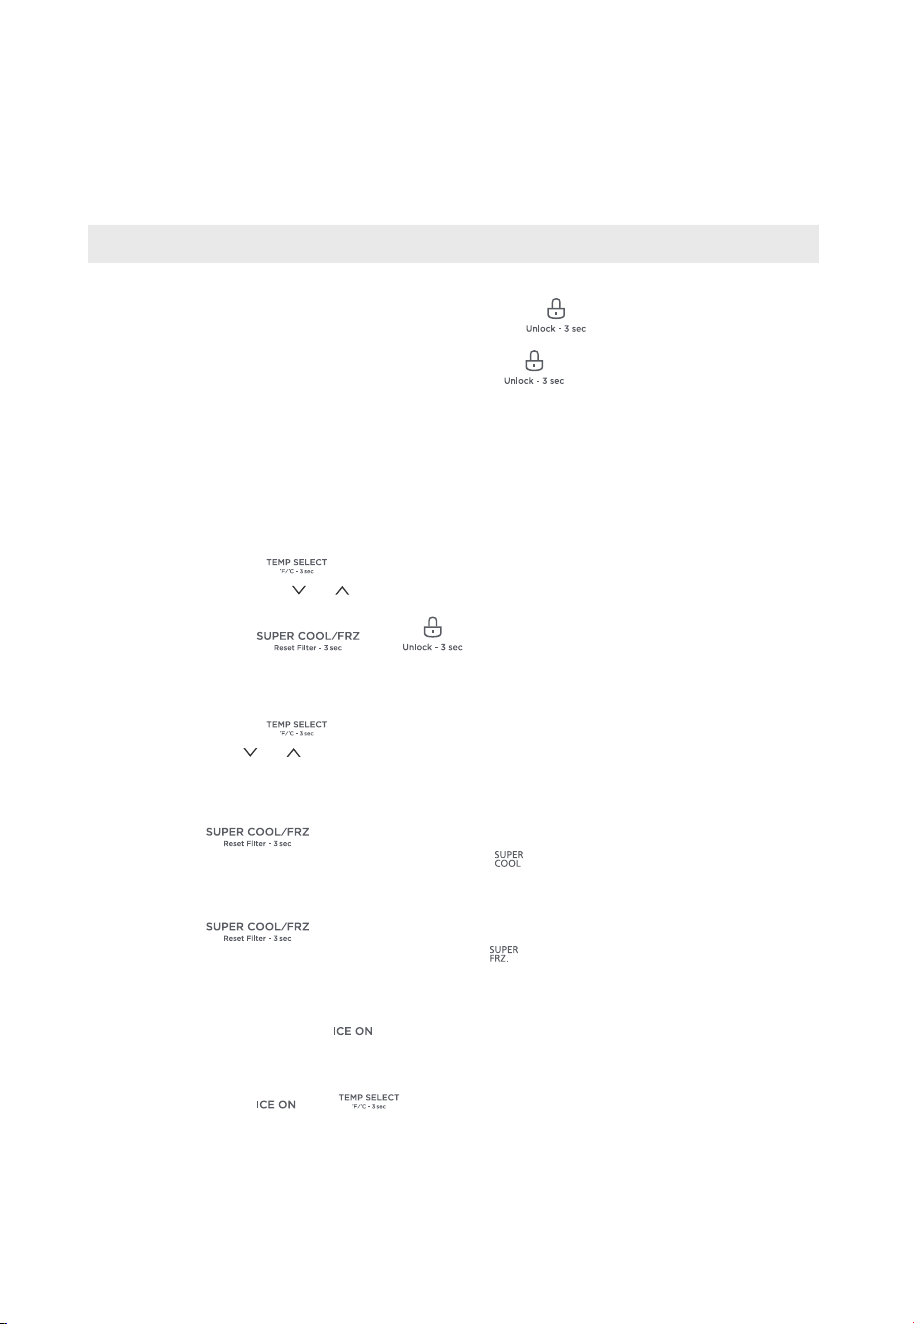
Lock/Unlock
• In the unlock state, press and hold the button for 3 seconds to enter
the lock state and the buzzer sound rings.
• In the lock state, press and hold the button for 3 seconds to enter the
unlock state and the buzzer sound rings.
• It will enter the lock state if there is no opening door action or any buttons
operation within 30 seconds.
• TThe alarm sound can be stopped by pressing any one button in lock state,
but all other button operations need to be performed in unlock state.
Refrigerator temperature setting
• Click the button to change the set temperature of refrigerator room,
Each time click the or , the set temperature will drop 1°F or will rise 1°F.
The temperature setting will take effect after the display panel is locked.
• Long press the and 4s to close or open the cold storage
room.
Freezer temperature setting
• Click the button to change the set temperature of freezer room, Each
time click the or , the set temperature will drop 1°F or will rise 1°F. The
temperature setting will take effect after the display panel is locked.
Mode setting
• Press the button to start the super cool function. The refrigerator
room is set at 34°F automatically, and the icon shines. When exit the super
cool mode, the set temperature of refrigerator room will go back to the set
temperature before super cool mode.
• Press the button to start the super freeze function. The freezer
room is set at -7°F automatically, and the icon shines. When exit the
super freeze mode, the set temperature of freezer room will go back to the
set temperature before super freeze mode.
• Press the switch button to set/cancel the function of the ice maker. When
the function setting of the ice maker is effective, the indicator light of the ice
maker will be on, otherwise it will be off.
• Long press the and 4s to close or open the ice making room.
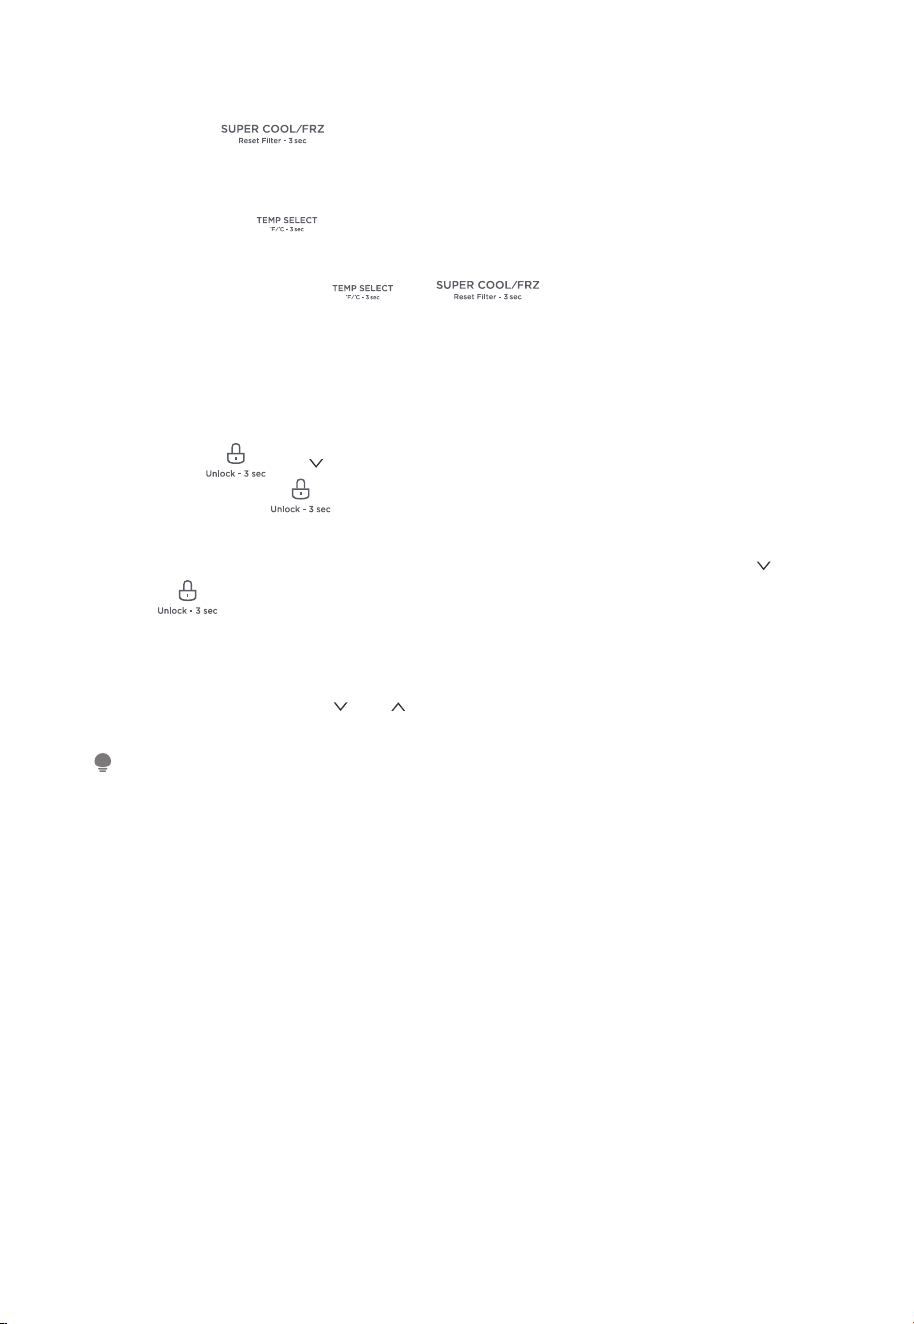
14
Filter element time reset
• Hold down for 3 seconds to perform the “RESET FILTER” function.
At this time, the FILTER working data is cleared.
Celsius transformation
• Long press the 3s to achieve Celsius Fahrenheit conversion function.
Sabbath mode
• Press simultaneousl the and for 3s to enter or exit the
Sabbath mode.
• 6s after entering the Sabbath mode lock, the display goes out, the buzzer does
not sound, the door opening lamp does not light up, and the distributor only
displays the selected function in low brightness.
Anti-condensation heating element on/o mode.
• Press the and for 4 seconds, the Fahrenheit icon ashes, and then
press the button , and the anti-condensation heating wire shutdown
function is successfully set.
• Under the above settings, unlock and enter again, continue to press the
and for 4s, the Fahrenheit icon no longer ashes, press the button to
release the anti-condensation heating element off function.
Open door prompt sound switch
• At the same time, press and button 4s, close or open the door prompt
tone.
ATTENTION
If the rear door is not closed after power-on, the machine will give an alarm, call three times
after exceeding 2 minutes, and then add one alarm every 1 minute.
15
Fault indication
• When the following tips to appear on the display screen, it indicates a problem
with the refrigerator. Although the refrigerator in the following fault case can
still provide cool/freeze functions, but the user should contact maintenance
personnel, ensure the normal use of refrigerator.
Fault Code Fault Description
E1 Temperature sensor failure of refrigerator room
E2 Temperature sensor failure of freezer room
E5 Defrost sensor error of freezer room
E6 Communication error
E7 Ambient temperature sensor error
EH The humidity sensor fails
F4 The sensor at the bottom of refrigerating ice maker fails
F5 Refrigerating ice maker fails to turn over ice
F6 Initialization fault of refrigerating ice maker
CC The defrosting sensor in ice making chamber fails
C9 The sensor in ice making chamber fails
CA
The communication between main control board and ice
making board fails
ATTENTION
The quick-freezing function is designed to maintain the nutritional value of the food in the
freezer. It can freeze the food in the shortest time. If a large amount of food is frozen at one
time, it is recommended that the user turn on the quick-freezing function and put the food in.
At this time, the freezing speed of the freezer compartment is increased, which can quickly
freeze the food, effectively lock the nutrition of the food, and facilitate storage.
16
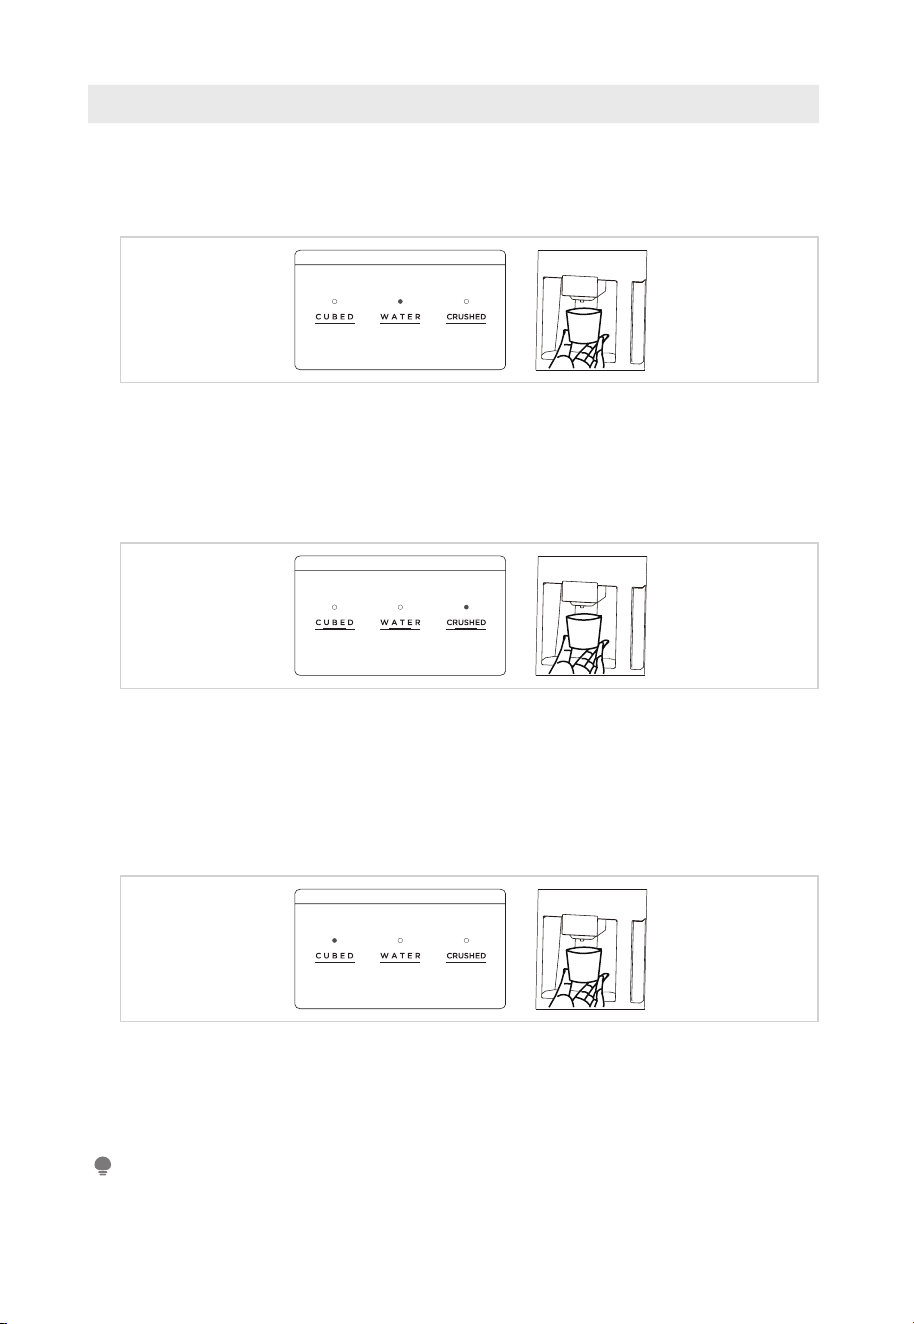
Fetching water and Ice
• The ice/water dispenser is located on the outside of refrigerating chamber door.
It offers a choice of cubed or crushed ice, or cold water. The dispenser only works
when the refrigerating chamber door is closed.
1. Fetching cold water
• Keep pressing the buttons WATER until the indicator turns on.
• Push the container in the direction of fetching water cushion, Cold water starts to
ow into the container.
• Remove the container from fetching water cushion and end the exporting of water.
2. Fetching crushed ice
• Keep pressing the buttons of CRUSHED until the signal turns up.
• Make the container tight with mouth of water dispenser to prevent the side jet.
• Press the container in the direction of fetching water cushion. Fill the container with
crushed ice.
• Remove the container from fetching water cushion and end the exporting of ice.
3. Fetching ice cubes
• Keep pressing the buttons CUBED until the signal lights up.
• Push the container in the direction of fetching water cushion, Ice cubes start to fall
into the container.
• Remove the container from fetching water cushion and end the exporting of ice.
ATTENTION
• When the user presses to fetch water/ice, there will be a 2s delay.
• When taking ice, the user should try to keep the container close to the ice outlet to prevent
the ice from splashing.

17
Tips on storing food
Freezer compartment
• The freezer is designated for the storage of food frozen at very low temperature,
long-term storage of frozen food, and for the production of ice.
• Only use the shelves in the door of the freezer to store frozen food, not for storing
hot food designated for freezing.
• Do not put fresh and frozen food next to each other. The frozen food may thaw.
• When freezing fresh food (such as meat, sh or chopped meat), cut them into parts
that can be used at the same time.
• Storing frozen food: instructions are usually stated on the packages, which must be
followed. If there is no information on the packaging, food should not be stored for
longer than three months from the date of purchase.
• When purchasing frozen food, make sure that it was frozen at a suitable
temperature and that the packaging is not damaged.
• Frozen food should be kept in suitable packages to retain the quality and should be
returned to the freezer compartment as soon as possible.
• If a package of frozen food shows moisture or abnormal bulging, it is probable that
it was stored at the wrong temperature and the content is spoiled.
• The storage period for frozen food depends on the room temperature, the
thermostat setting, the frequency of opening the door of the freezer, the type of
food and the time of transporting the product from the shop to the household.
Always follow the instructions printed on the packaging and never exceed the
maximum storage time stated on the package.
Cooling compartment
• To reduce moisture and subsequent ice build-up, never put liquid into the
refrigerator in unsealed containers. Frost tends to concentrate in the coolest parts
of the evaporator. Storing uncovered liquids results in a more frequent need for
defrosting.
• Never put warm foods in the refrigerator. These should rst cool down at room
temperature and then be placed so as to ensure adequate air circulation in the
refrigerator.
• Foods or food containers should not touch the back wall of the refrigerator because
they could freeze to the wall. Do not keep regularly opening the door of the
refrigerator.
• Meat and clean sh (packed in a package or plastic foil) can be placed in the
refrigerator, which can be used in 1–2 days.
• Fruit and vegetables without packaging can be placed in the part designated for
fresh fruit and vegetables.
Recommended Temperature
The optimal temperature setting for food storage:
• Fridge: 4 °C(39
℉
) , Freezer: -18 °C(0
℉
)
ATTENTION
The optimal temperature setting of each compartment depends on the ambient temperature.
Above optimal temperature is based on the ambient temperature of 25 °C.
18
CLEANING AND MAINTENANCE
Defrosting
• The refrigerator is made based on the air-cooling principle and thus has
automatic defrosting function. Frost formed due to change of season or
temperature may also be manually removed by disconnection of the appliance
from power supply or by wiping with a dry towel.
Cleaning of door tray
• According to the direction arrow in the
gure below, use both hands to squeeze
the tray, and push it upward, then you can
take it out.
• After washing the tray having been taken
out, you can adjust its installing height in
accordance with your requirement.
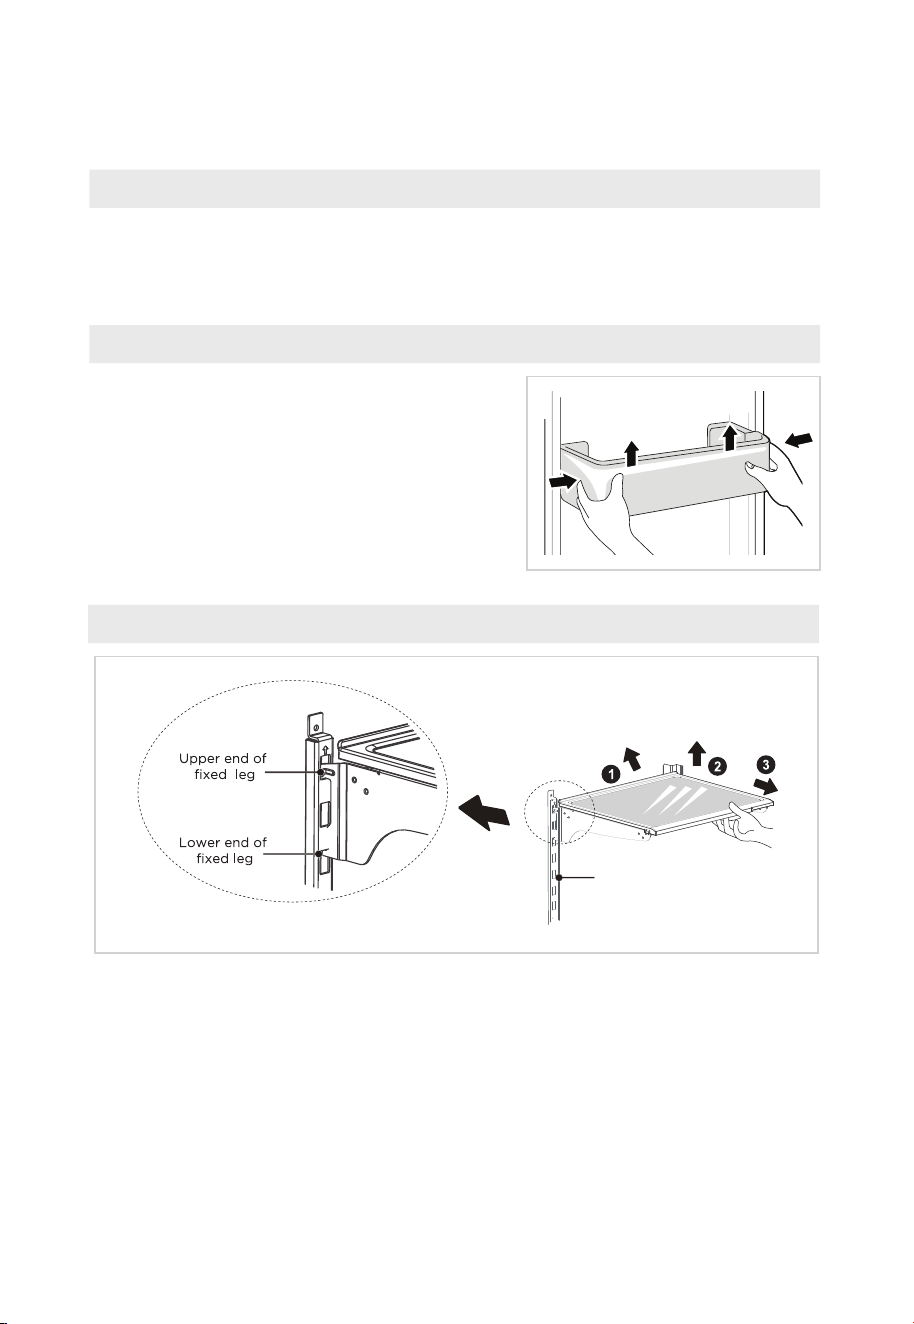
Cleaning of glass shelf
Please dismantle the cantilever shelf according to the arrows shown as above:
1. Please hold the front edge of shelf, and tilt the shelf inwards until the lower
end of xed leg is separated from the slot of supporting iron;
2. Uplift the whole shelf until it can not rise anymore;
3. Take out the shelf horizontally.
During installation, put the upper end of the xed leg into one of the upper slots
on the supporting iron rst and then put the lower end of the xed leg into the
third slot on the lower part of the supporting iron.
Slot

19
Cleaning of ice storage box
• When you need to use a lot of ice, or take ice abnormally, or need to clean the
ice storage box, you can take out the ice storage box, but please put it back in
time.
• Hold the button of the ice storage box with your hand, press it gently, and then pull
it out horizontally.
• Push the ice storage box in slightly after cleaning
• In the process of pulling out, if ice cubes fall into the ice making room, please clean it up in
time.
• If the ice cubes are not used for a long time, please clean them up in time.
• When you need to use a lot of ice cubes, take abnormal ice or need to clean the ice storage
box, you can take out the ice storage box and put it back in time.
• When the ice storage box cannot be installed in place, rotate the tail as illustrated to align it
with the corresponding position in the ice tank.
ATTENTION
1
2
20
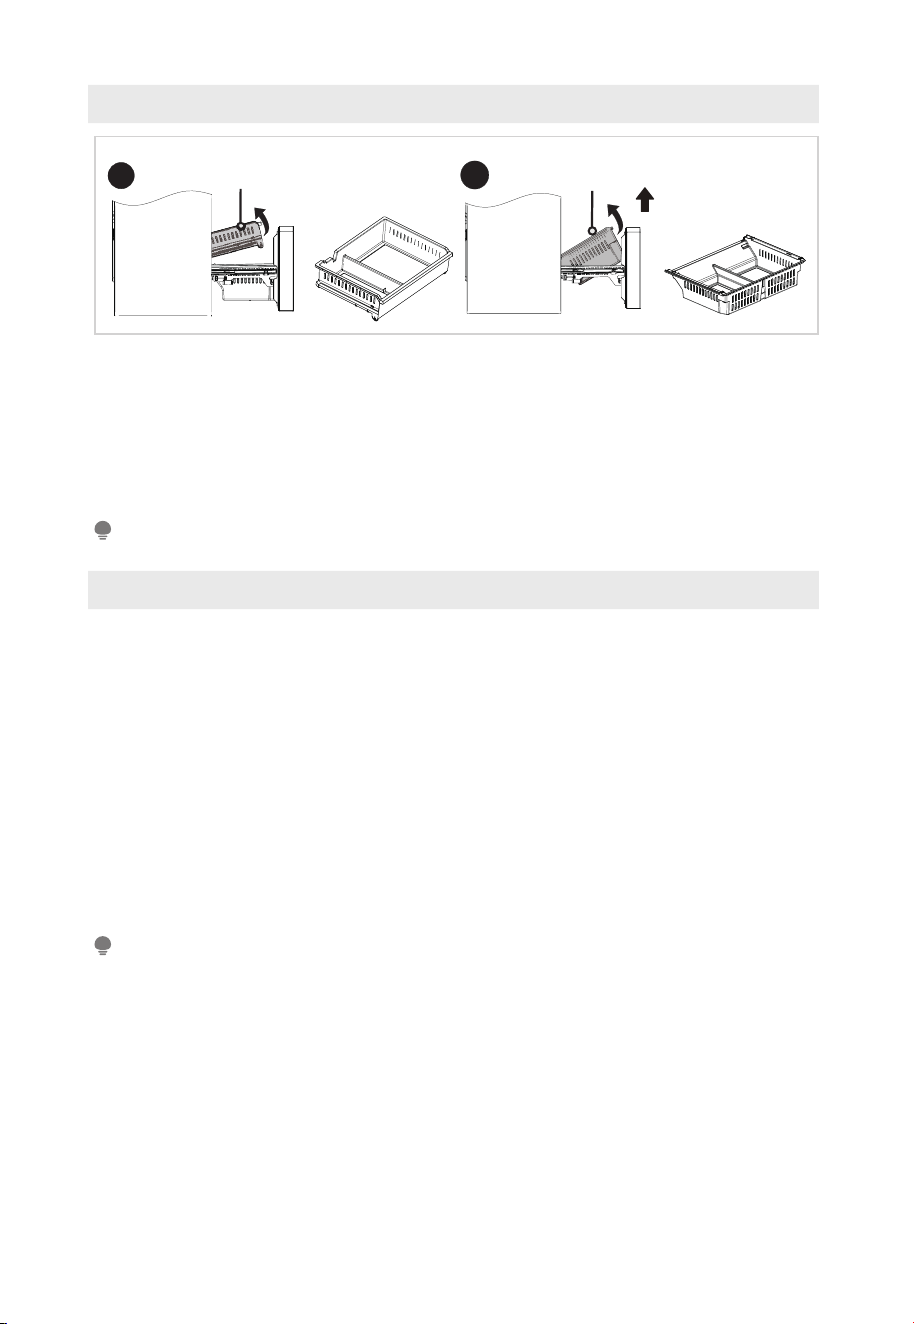
Cleaning of freezer drawer
Upper freezer drawer
:
• Open the freezing chamber door to the maximum stroke, lift the tail of the upper
drawer of the freezing chamber, take ou
t the upper freezer drawer.
Lower freezer drawer
:
• Open the freezing chamber door to the maximum stroke, Lift the end of the
lower
freezer drawer
and lift it up
.
ATTENTION
Note: Don’t remove the lower freezer drawer if not necessary.
Stop using
Power failure:
In case of power failure, even if it is in summer, foods inside the appliance can be kept
for several hours; during the power failure, the times of door opening shall be reduced,
and no more fresh food shall be put into the appliance.
Long-time nonuse:
The appliance shall be unplugged and then cleaned; then the doors are left open to
prevent odor.
Moving:
Before the refrigerator is moved, take all objects inside out, x the glass partitions,
vegetable holder, freezing chamber drawers and etc. with tape, and tighten the leveling
feet; close the doors and seal them with tape. During moving, the appliance shall not
be laid upside down or horizontally, or be vibrated; the inclination during movement
shall be no more than 45°.
ATTENTION
The appliance shall run continuously once it is started. Generally, the operation of the
appliance shall not be nterrupted; otherwise the service life may be impaired.
Foods can be preserved for a couple of hours even in summer in case of power failure; it is
recommended to reduce the frequency of opening door.
1
Upper freezer drawer
2
Lower freezer drawer

21
TROUBLESHOOTING
The following simple issues can be handled by the user. Please call the after-sale
service department if the issues are not solved.
Problem Possible reason
Failed operation
• Check whether the appliance is connected to power or
whether the plug is in well contact
• Check whether the voltage is too low
• Check whether there is a power failure or partial circuits have
tripped
Odor
• Odorous foods shall be tightly wrapped
• Check whether there is any rotten food
• Clean the inside of the refrigerator
Long-time operation
of the compressor
• Long operation of the refrigerator is normal in summer
• When the ambient temperature is high it is not suggestible
having too much food in the appliance at the same time
• Food shall get cool before being put into the appliance
• The doors are opened too frequently
Light fails to get lit
• Check whether the refrigerator is connected to power supply
and whether the illuminating light is damaged
• Have the light replaced by a specialist
Door can not be
properly closed
• The door is stuck by food packages too much food is placed
• The refrigerator is tiltedr.
Loud noises
• Check whether the oor is level and whether the refrigerator
is placed stably
• Check whether accessories are placed at proper locations

22
Problem Possible reason
Door seal fails to be
tight
• Remove foreign matters on the door seal
• Heat the door seal and then cool it for restoration (or blow it
with an electrical drier or use a hot towel for heating)
Water pan overows
• There is too much food in the chamber or food stored
contains too much water, resulting in heavy defrosting
• The doors are not closed properly, resulting in frosting due to
entry of air and increased water due to defrosting
Hot housing
• Heat dissipation of the built-in condenser via the housing,
which is normal when housing becomes hot due to high
ambient temperature, storage of too much food or shutdown
of the compressor is shut down, provide sound ventilation to
facilitate heat dissipation
Surface
condensation
• Condensation on the exterior surface and door seals of the
refrigerator is normal when the ambient humidity is too high.
Just wipe the condensate with a clean towel.
Abnormal noise
• Buzz: The compressor may produce buzzes during operation,
and the buzzes are loud particularly upon start or stop. This is
normal.
• Creak: Refrigerant owing inside of the appliance may
produce creak, which is normal.
23
WARRANTY
Refrigerator Warranty
1.
2.
3.
4.
5.
6.
7.
8.
9.
10.
11.
12.
13.
1-866-646-4332
NORMAL RESPONSIBILITIES OF THE CONSUMER**
The date on the bill established the warranty period should service be required.
and
24
Es sencillo! Complete y envie su Tarjeta de Registracion de Producto hoy!

25
Es sencillo! Complete y envie su Tarjeta de Registracion de Producto hoy!
Midea America Corp.
759 Bloomfield Ave. # 386
West Caldwell, NJ 07006
Call

26
CFDR286M4S

CFDR286M4S