
111
FE400AW User Manual
Cover:
UHD VIDEO CAMERA
User's manual
Contents
Important Notice............................................................................................1
1 About this device.........................................................................................2
2 Prepare to use...........................................................................................4
2.1Installing the memory card.......................................................................4
2.2 Install the battery......................................................................................4
2.3 Charging...................................................................................................4
2.4 Turn on and turn off the camera...............................................................5
2.5 Switch Working Mode..............................................................................5
2.6 Remote Control........................................................................................5
2.7 Connecting to the Computer....................................................................6
2.8 Use of an external microphone..............................................................6
2.9 Zoom.......................................................................................................6
2.10 IR Night Vision.......................................................................................6
3 Video Mode.................................................................................................7
4 Photo Mode.................................................................................................10
5 Playback Mode.............................................................................................12
6. Setting System Parameters.........................................................................14
7 Use Wi-Fi..................................................................................................17
8 Appendix ......................................................................................................18
8.1 Technical Specifications.............................................................................18
8.2 Common Faults and Solutions....................................................................19

211
Important Notice
Improper use may damage the camera or pose a safety hazard; please read this manual carefully and
follow its instructions when operating the device.
Safety Precautions
◇ Supervise children at all times; it is strictly prohibited for children to operate the camera alone.
◇ If the camera is damaged or has been exposed to water, turn off the power immediately and remove the
batteries.
◇ Do not use the camera near open flames or in high-temperature environments, such as near radiators or
stoves.
◇ Do not charge the device for extended periods. Ensure proper ventilation during charging; do not cover
the device with anything.
◇ Incorrect battery handling may lead to accidents. When the camera will not be used for an extended
period, please remove the batteries. Do not use swollen or leaking batteries; furthermore, do not attempt
short-circuiting, striking, puncturing, disassembling, or incinerating the device.
◇If the screen or battery is cracked, do not touch it. If accidental contact occurs, rinse thoroughly with
clean water. If accidentally ingested, drink plenty of water immediately and seek medical attention.
Usage and Storage
◇Protect from water, moisture, dust, and shock.
◇Use only a clean, soft cloth to clean the camera and its accessories; do not use corrosive solvents.
◇Operating environment: Temperature-10°C to 50°C (14°F to 122°F), relative humidity ≤ 60%.
◇Storage environment: Temperature-20°C to 60°C (-4°F to 140°F), relative humidity ≤ 30%.
Other Warnings
◇Some cameras are equipped with built-in Wi-Fi or Bluetooth, which may interfere with aviation, medical,
or military facilities; these devices must not be used in restricted areas.
◇Please comply with local laws and regulations regarding the use of wireless devices and the protection of
personal privacy.
◇Do not discard the camera and its accessories carelessly; please dispose of them in accordance with
local laws.
◇ Please perform a pre-use inspection; we shall not be liable for any additional losses resulting from
improper use or camera malfunctions.
Computer System Requirements
When connecting the camera to a computer, the computer must meet the following specifications:
CORE i3-3.0G / Windows XP / 4GB RAM / 2GB graphics card / 500GB disk space / standard USB 2.0 port
/ 1920×1080 screen resolution.
Copyrights and Trademarks
Microsoft/Windows are registered trademarks of Microsoft Corporation.
CORE/Pentium is a registered trademark of Intel Corporation.
Macintosh/Mac OS/iOS are registered trademarks of Apple Inc.
Android is a registered trademark of Google LLC.
All product names, proprietary terms, or trademarks herein cited are registered trademarks of their
respective owners.
1
1
T
◆
◆
◆
◆
1
Micr
o
1
About thi
s
1
.1 Feature
s
T
his is an 8
K
◆
UHD 8K
◆
EIS Imag
e
◆
Infrared r
e
◆
Maximum
1
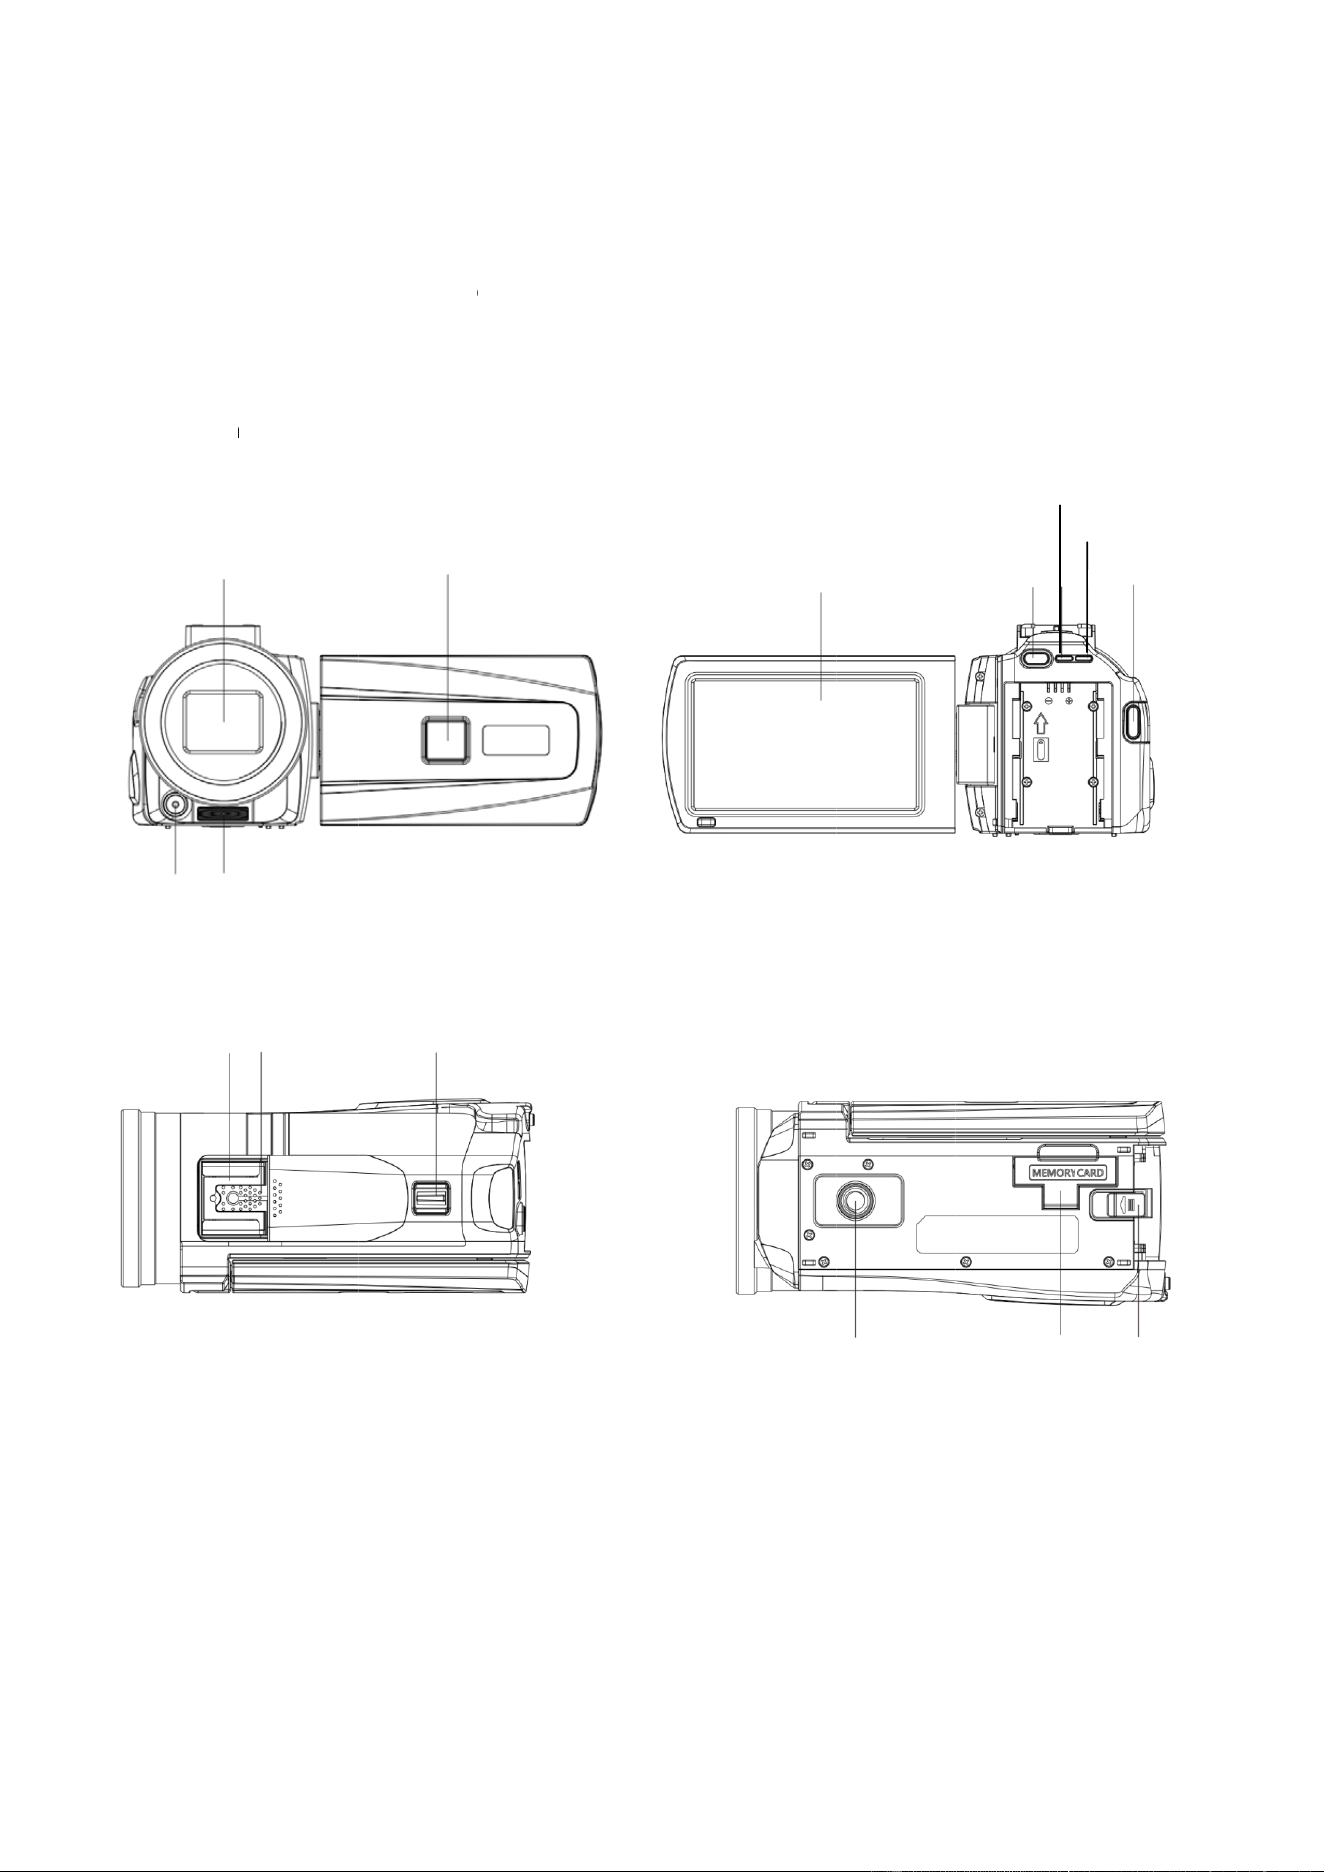
.2 Diagra
m
Lens
Cold shoe
o
phone
Re
m
s
device
s
K
UHD cam
e
◆
90MP
e
Stabilizati
o
e
mote contr
o
256GB me
m
m
s
Speaker
m
ote Control R
e
e
ra with the
◆
Infrared
N
o
n
◆
L
o
◆
o
l WIFI
c
m
ory card
IR Light
Zoom button
e
ceiver
following f
e
N
ight Visio
n
o
op recordi
n
c
onnectivity
◆
Suppo
311
e
atures:
◆
n
3.0-in
c
◆
n
g Time
◆
App ope
r
rts external
c
h IPS HD
T
-lapse reco
r
r
ation
microphon
e
Display sc
Tripod m
o
T
ouchscree
n
◆
r
ding Sl
o
e
reen
MOD
E
o
unt hole
M
n
o
w-motion r
e
E
button
Charging in
d
W
M
emory Card C
o
e
cording
d
icato
r
W
ork indicato
r
REC butt
o
o
ve
r
Battery Loc
k
o
n
k
411
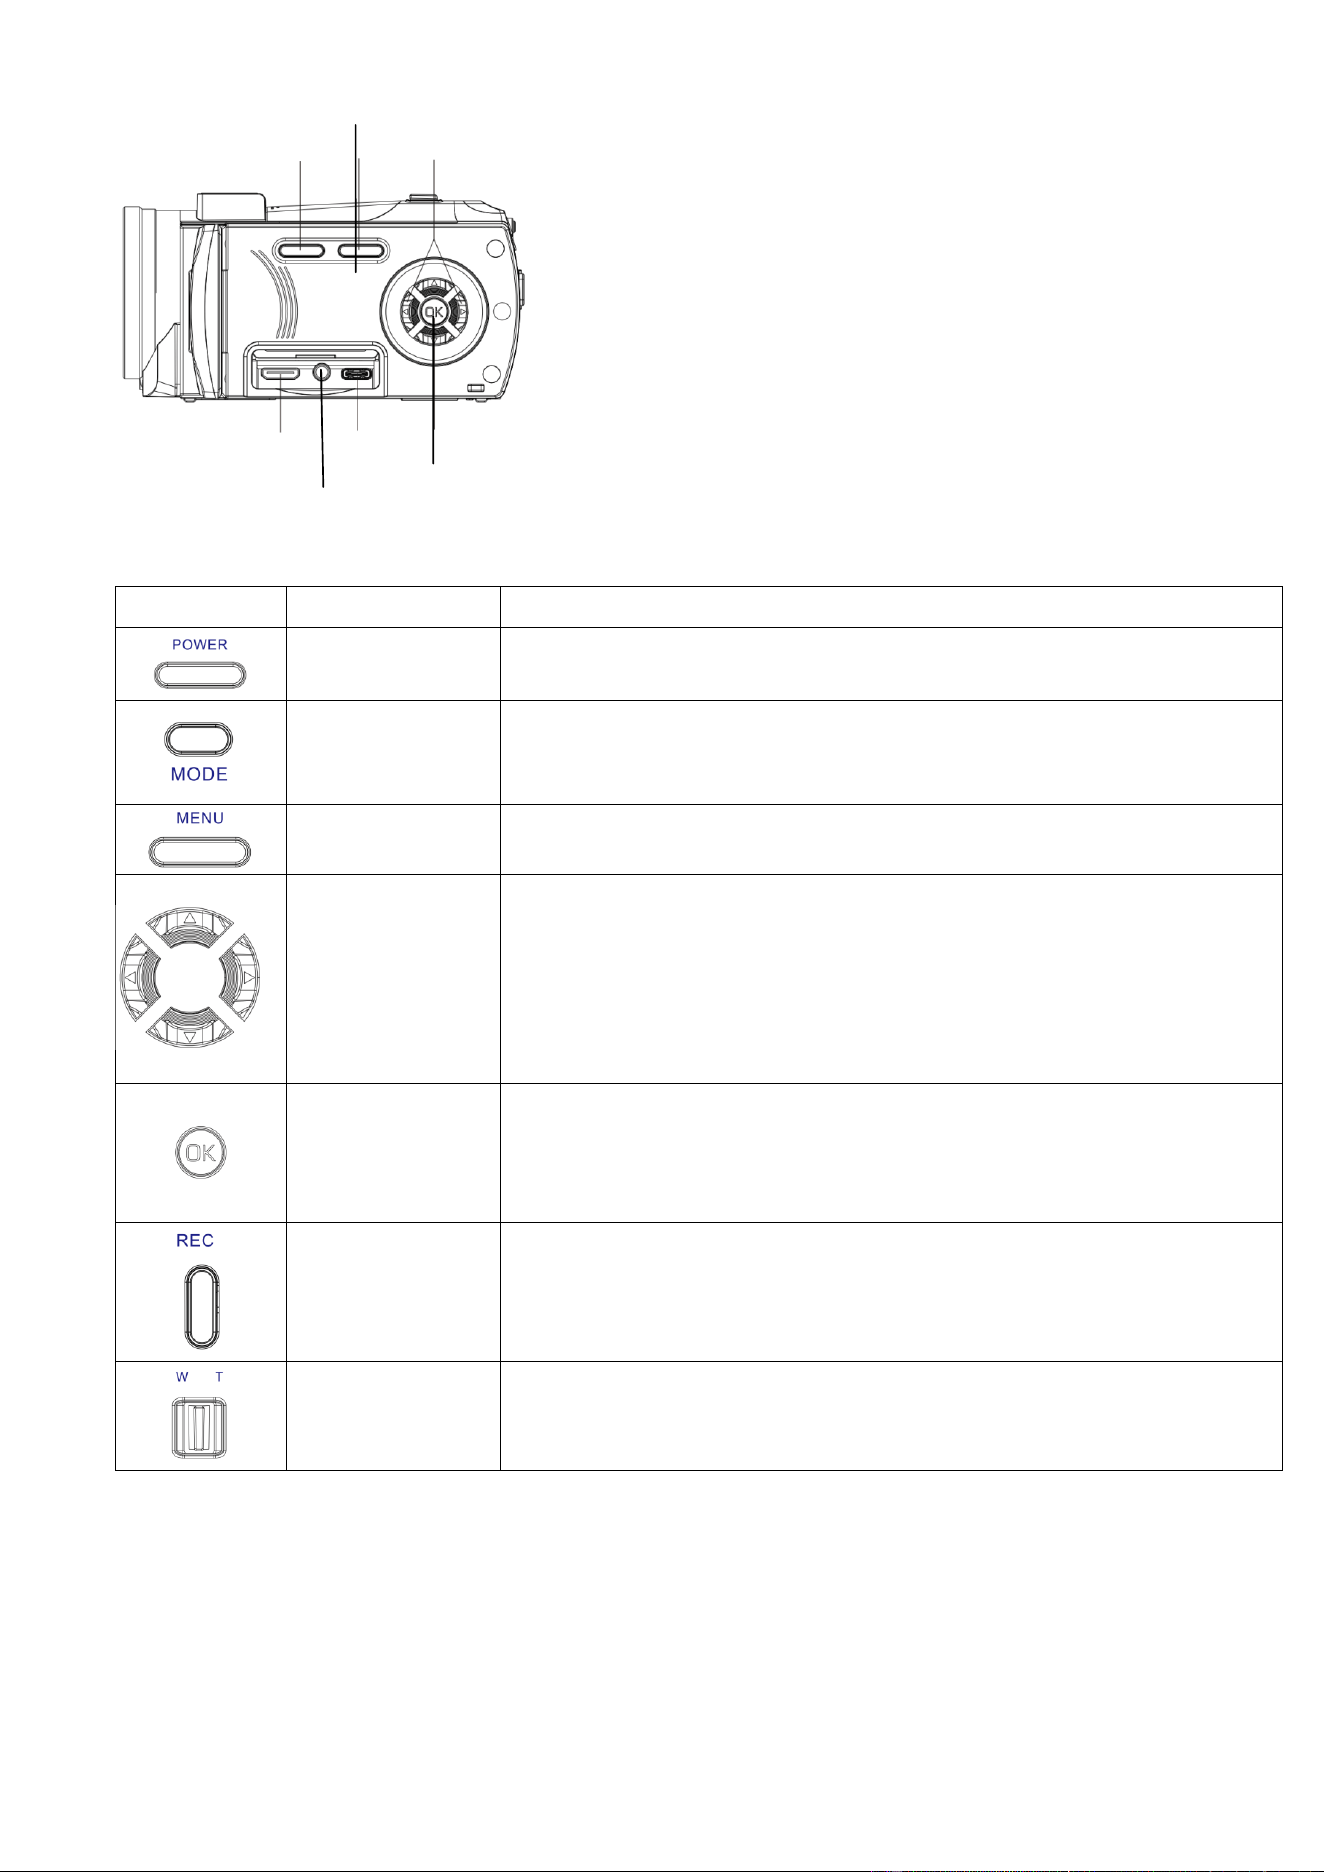
1.3 Button Instructions
graphic Button Name Functional Description
〔POWER〕
Long press: Turn power on/off
〔MODE〕
During preview, switch among working modes: Video Mode/Photo Mode
/Playback Mode.
Stop playback when playing a video
〔MENU〕
Call out the Setting Menu
Exit or return to the previous menu
[Four-way] button
Move Up/Down/Left/Right
Quick Functions (In video or photo mode):
[UP] – Increase EV value
[DOWN] – Decrease EV value
[LEFT] – Turn on/off the night vision
[RIGHT] – Long-press to turn Wi-Fi on/off
〔OK〕
Confirm operation and save setting
During recording: Pause/Resume
Playback Mode: Play/Pause
〔REC〕
Photo Mode: Take Photo;
Video Mode: Record/Stop recording
〔W/T〕
Photo or Video Mode: Zoom, Reduce and enlarge
Photo Playback: Zoom In/Zoom Out
Note: [] indicates a button or switch; for example, [MENU] indicates the MENU button.
2 Prepare to Use
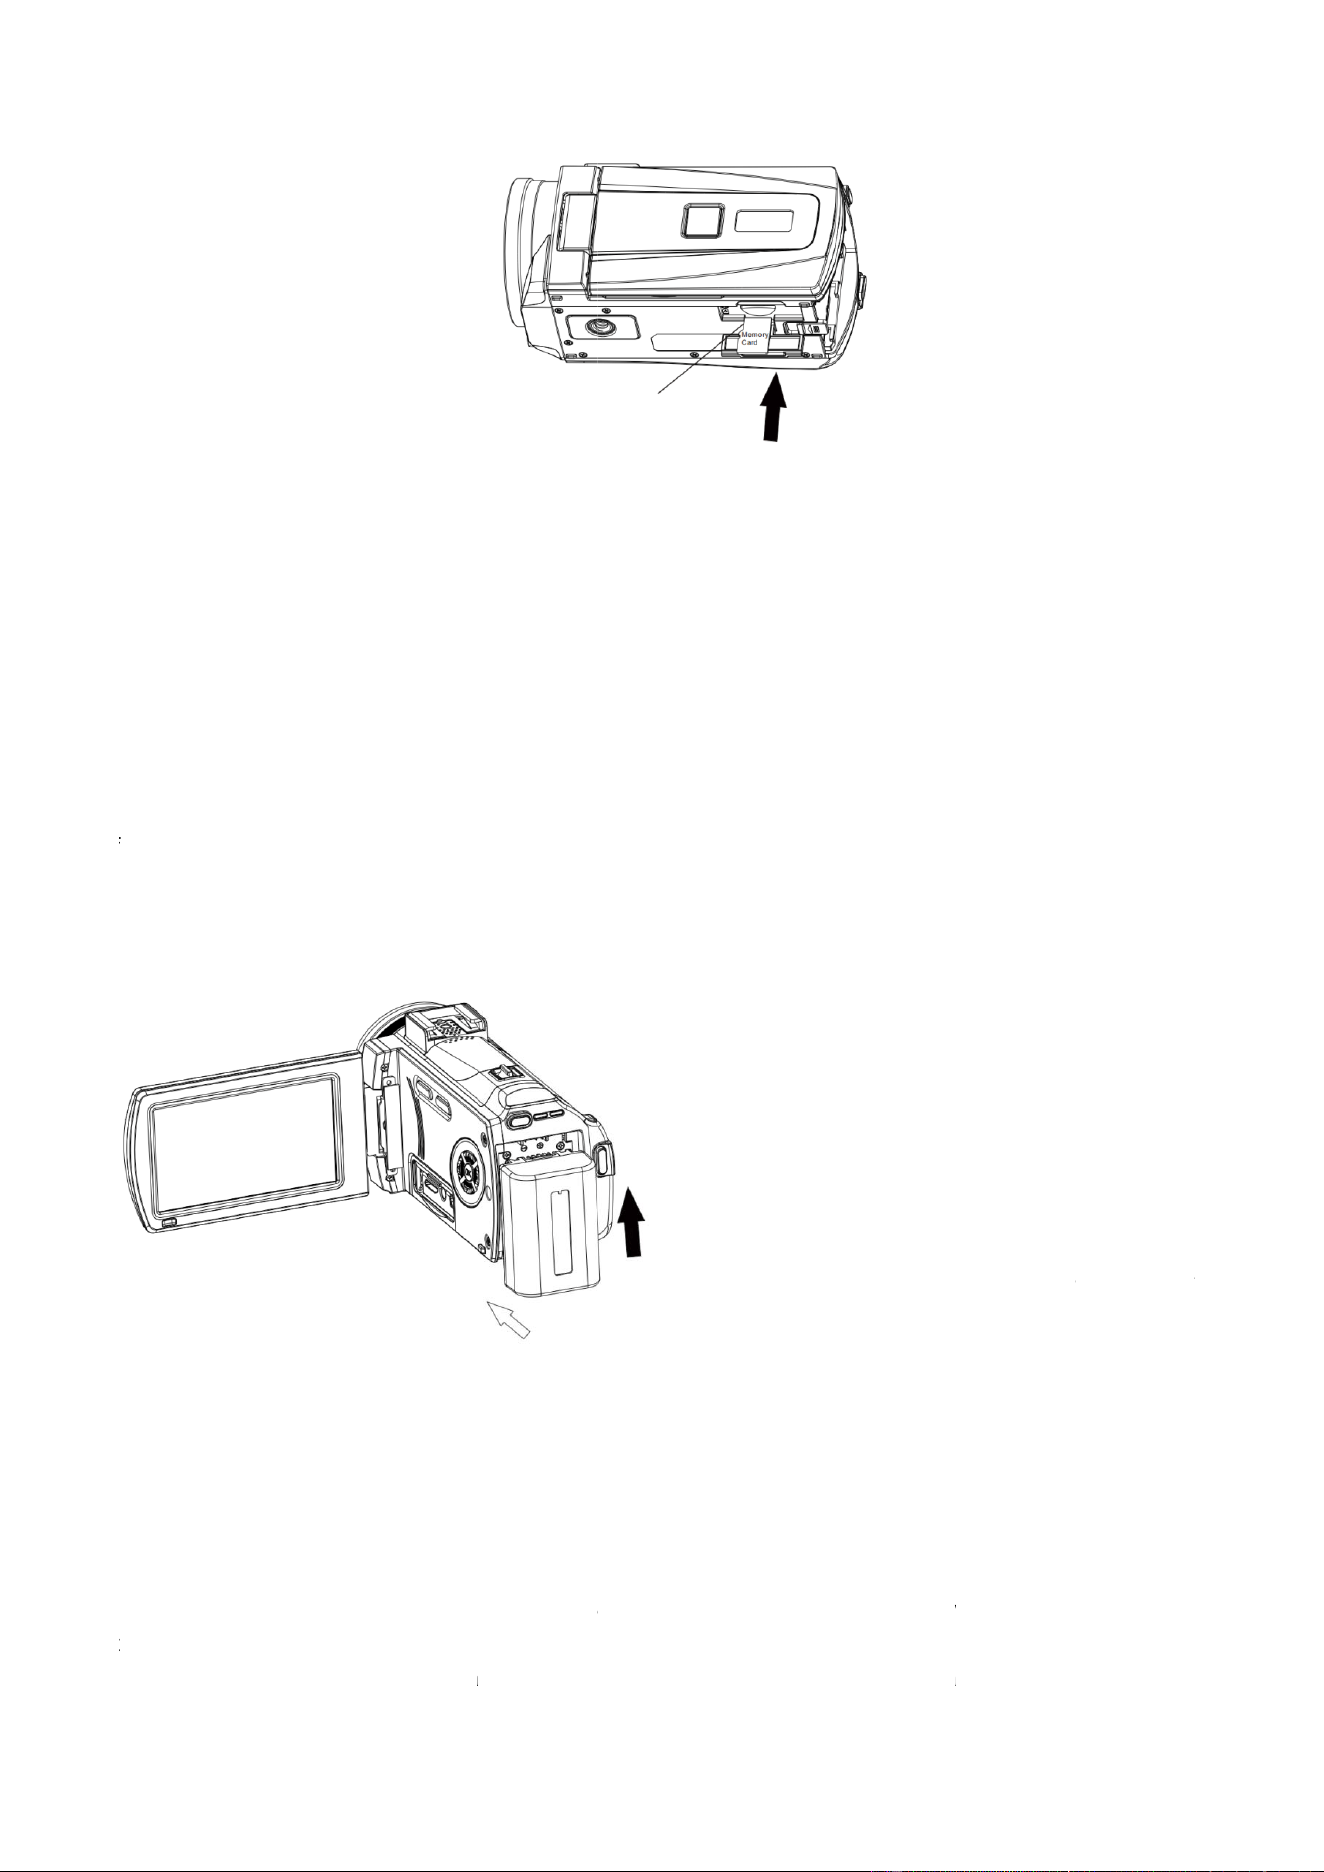
2.1 Installing the memory card
The camera must be equipped with a memory card to function.
Open the memory card cover, insert the memory card as shown in the diagram, push it in until you hear a
"click," then close the memory card cover.
POWER button
MENU button
Four-way button
HD interface
External microphone interface
USB port
OK button
N
U
S
I
r
2
T
f
2
2
N
D
I
2
2
t
i
t
N
otice:
U
se a comp
S
ome mem
o
t is prohibit
e
r
esult in dat
a
2
.2 Install th
T
his device
f
ollows.
2
.2.1 With t
h
2
.2.2 Hold t
h
N
otice:
D
o not use
b
mproper in
s
2
.3 Chargin
g
2
.3.1 Insert
t
t
hat chargin
g
t
is recomm
atible mem
o
o
ry cards m
a
e
d to insert
o
a
loss.
e battery
uses an ex
t
h
e battery's
h
e battery i
n
b
atteries of
i
s
tallation m
a
g
t
he battery
a
g
is in progr
e
ended to tu
r
o
ry card (U
3
a
y not be c
o
o
r remove s
t
ernal-moun
metal conta
n
place and
p
i
ncorrect m
o
a
y damage t
a
nd connec
t
e
ss, and wil
r
n off the c
a
1. Al
i
3
or higher)
a
o
mpatible wi
torage card
s
ted lithium
b
cts facing u
p
ush upwar
d
o
dels or tho
s
he camera.
t
it to a US
B
l turn off on
c
a
mera durin
g
Insert memor
y
i
gn with the ba
t
511
a
nd format i
th the cam
e
s
during wo
r
b
attery; ple
a
pward, inse
d
until you
h
s
e that are
s
B
charger; th
c
e charging
g
charging.
A
y
ca
r
d
t
tery compartm
t using the
c
e
ra; please
u
r
king; as thi
s
a
se ensure i
t
rt the batter
y
h
ear a "click
s
ubstandard
e "CHG" in
d
is complet
e
A
lternativel
y
ent; the contac
t
c
amera.
u
se a comp
a
s
may dam
a
t
is installe
d
y
into the sl
o
" sound.
.
d
icator light
w
e
. To speed
u
y
, you may a
t
s should face
u
2. Press do
w
a
tible adapt
e
a
ge the stor
a
d
correctly b
e
o
t.
w
ill illumina
t
u
p the char
g
a
lso charge
t
u
pward.
w
n on the
b
att
e
e
r.
a
ge card or
e
fore use,
a
t
e to indicat
e
g
ing proces
s
t
he device
e
ry and push up
w
a
s
e
s
,
w
ard.
611
using a computer.
2.3.2 Charger output specifications: DC 5V/2A.
2.3.3 For prolonged use, the camera can be charged while recording. This feature requires using the
charger; it is prohibited to use the computer as a power source.
Notice:
Please ensure that the charger and power supply meet the requirements!
Ensure proper ventilation during charging; And avoid covering. Once charging is complete, remove the
power supply as soon as possible!
2.4 Turn on and turn off the camera
2.4.1 Long-press [POWER] to turn on; long-press [POWER] to turn off.
2.4.2 The camera supports automatic power-on or power-off based on sensor detection: it automatically
powers on when the screen is opened and automatically powers off when the screen is closed.
2.4.3 To conserve power, the camera will automatically shut down when not in use for an extended period.
2.5 Switch Working Mode
The camera features three operating modes: Video Mode,Photo Mode, and Playback Mode; press [MODE]
to switch among these modes, with the current mode icon displayed on the screen.
Video Mode: An icon appears in the upper-left corner; at this time, you can record a video.
Photo Mode: An icon appears in the upper-left corner; at this time, you can take a photo.
Playback Mode: The screen displays the video and photo options icons. In this mode, you can play photos
or videos.
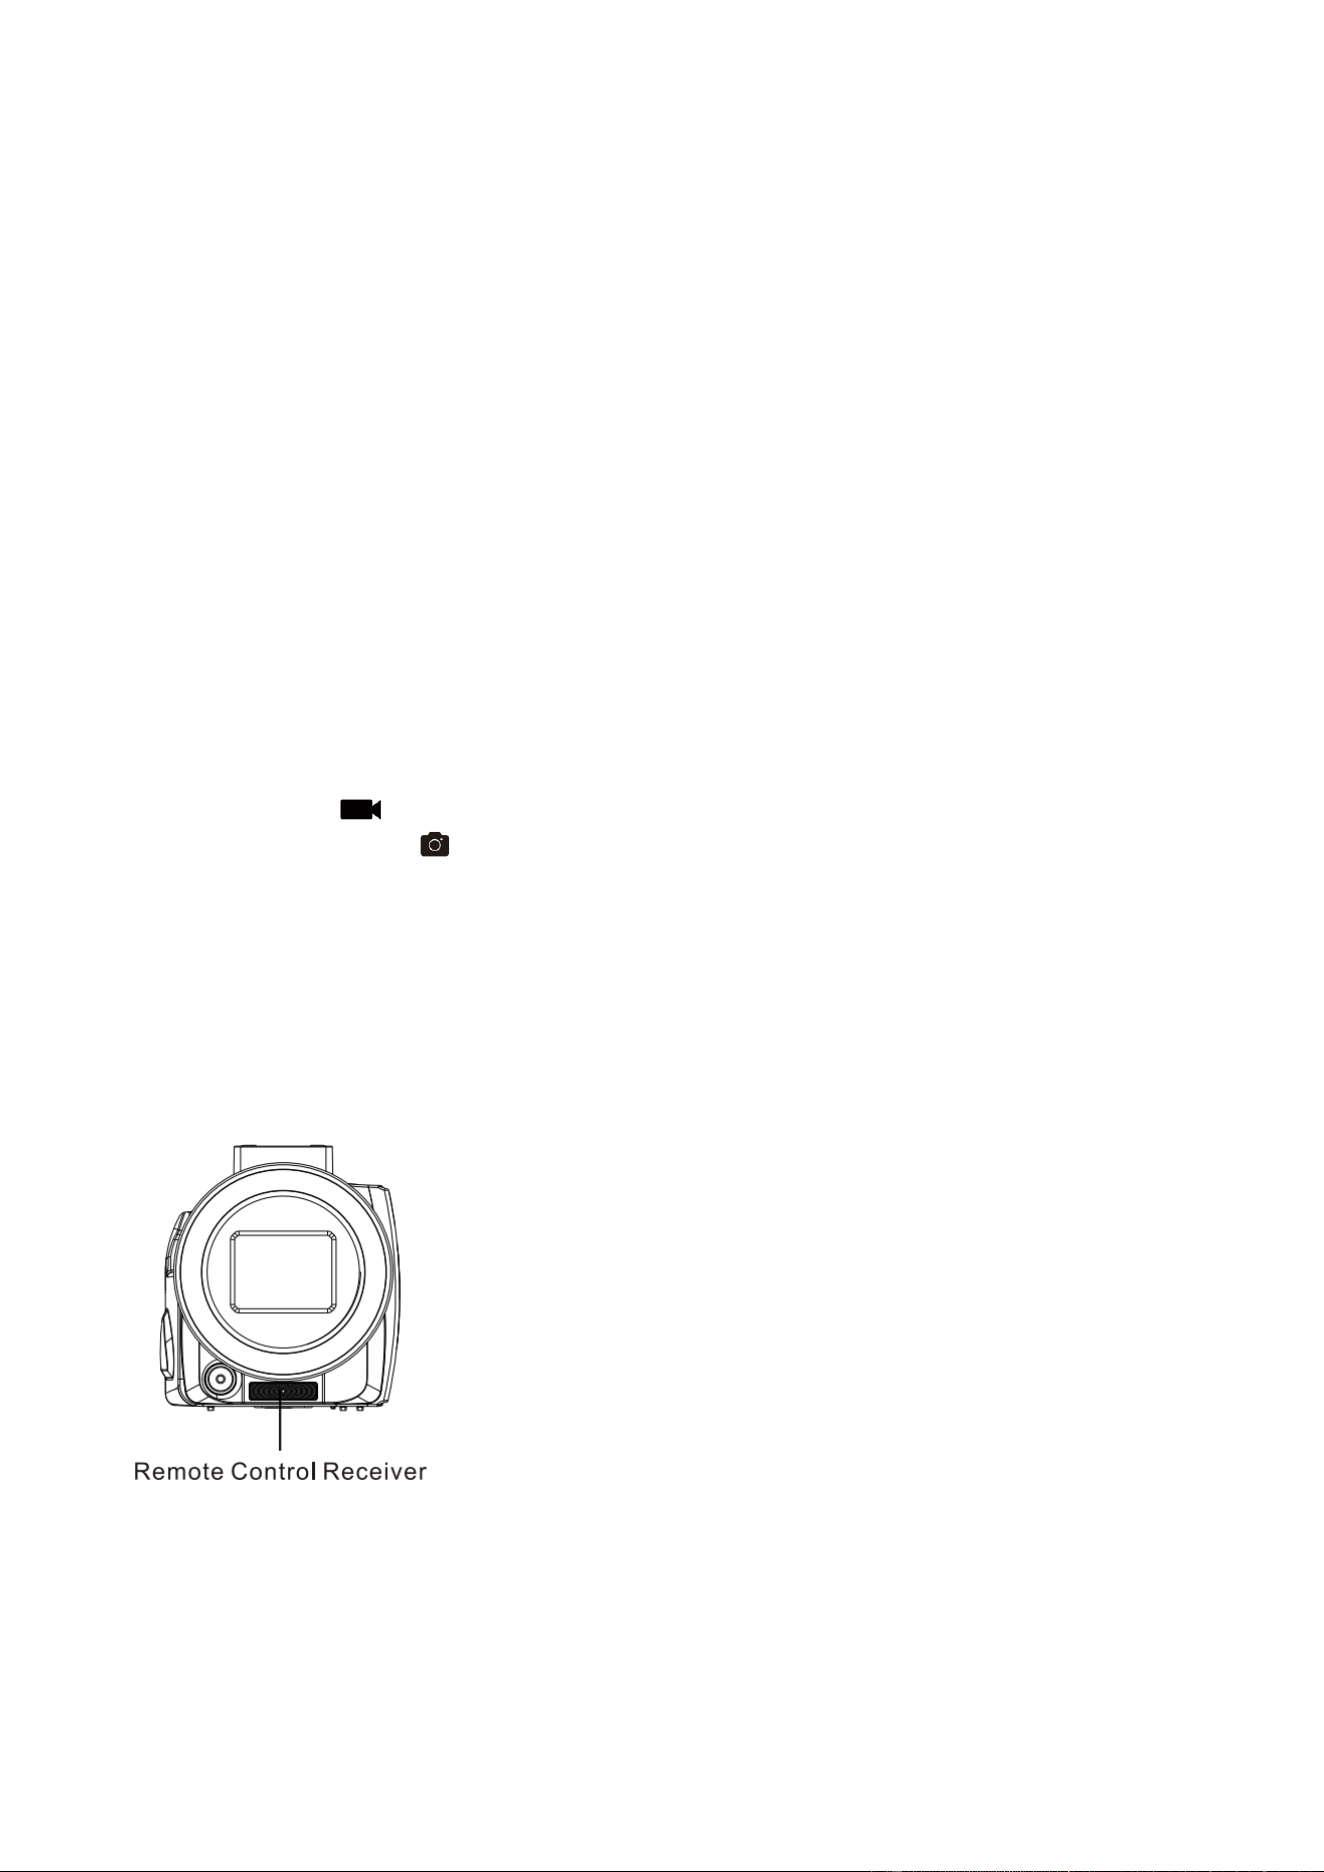
2.6 Remote Control
When using the remote control, please align it with the camera's receiver window; do not allow any objects
to obstruct the view. The maximum remote control range is 6 meters.
Notice:
Before use, remove the remote control battery protective cover.
711
Align the remote control with the receiving window for operation; do not obstruct it.
2.7 Connecting to the Computer
The camera can be connected to a computer using a USB cable.
After completing the connection, the screen will display two icons: "Mass Storage" and "PC Camera."
Select the "Mass Storage" icon and press [OK] to use it as a USB flash drive.
Select the PC Camera icon and press [OK] to use it as a computer camera.
Notice: When selecting "PC Camera", you will need to download and install the corresponding software on
your PC.
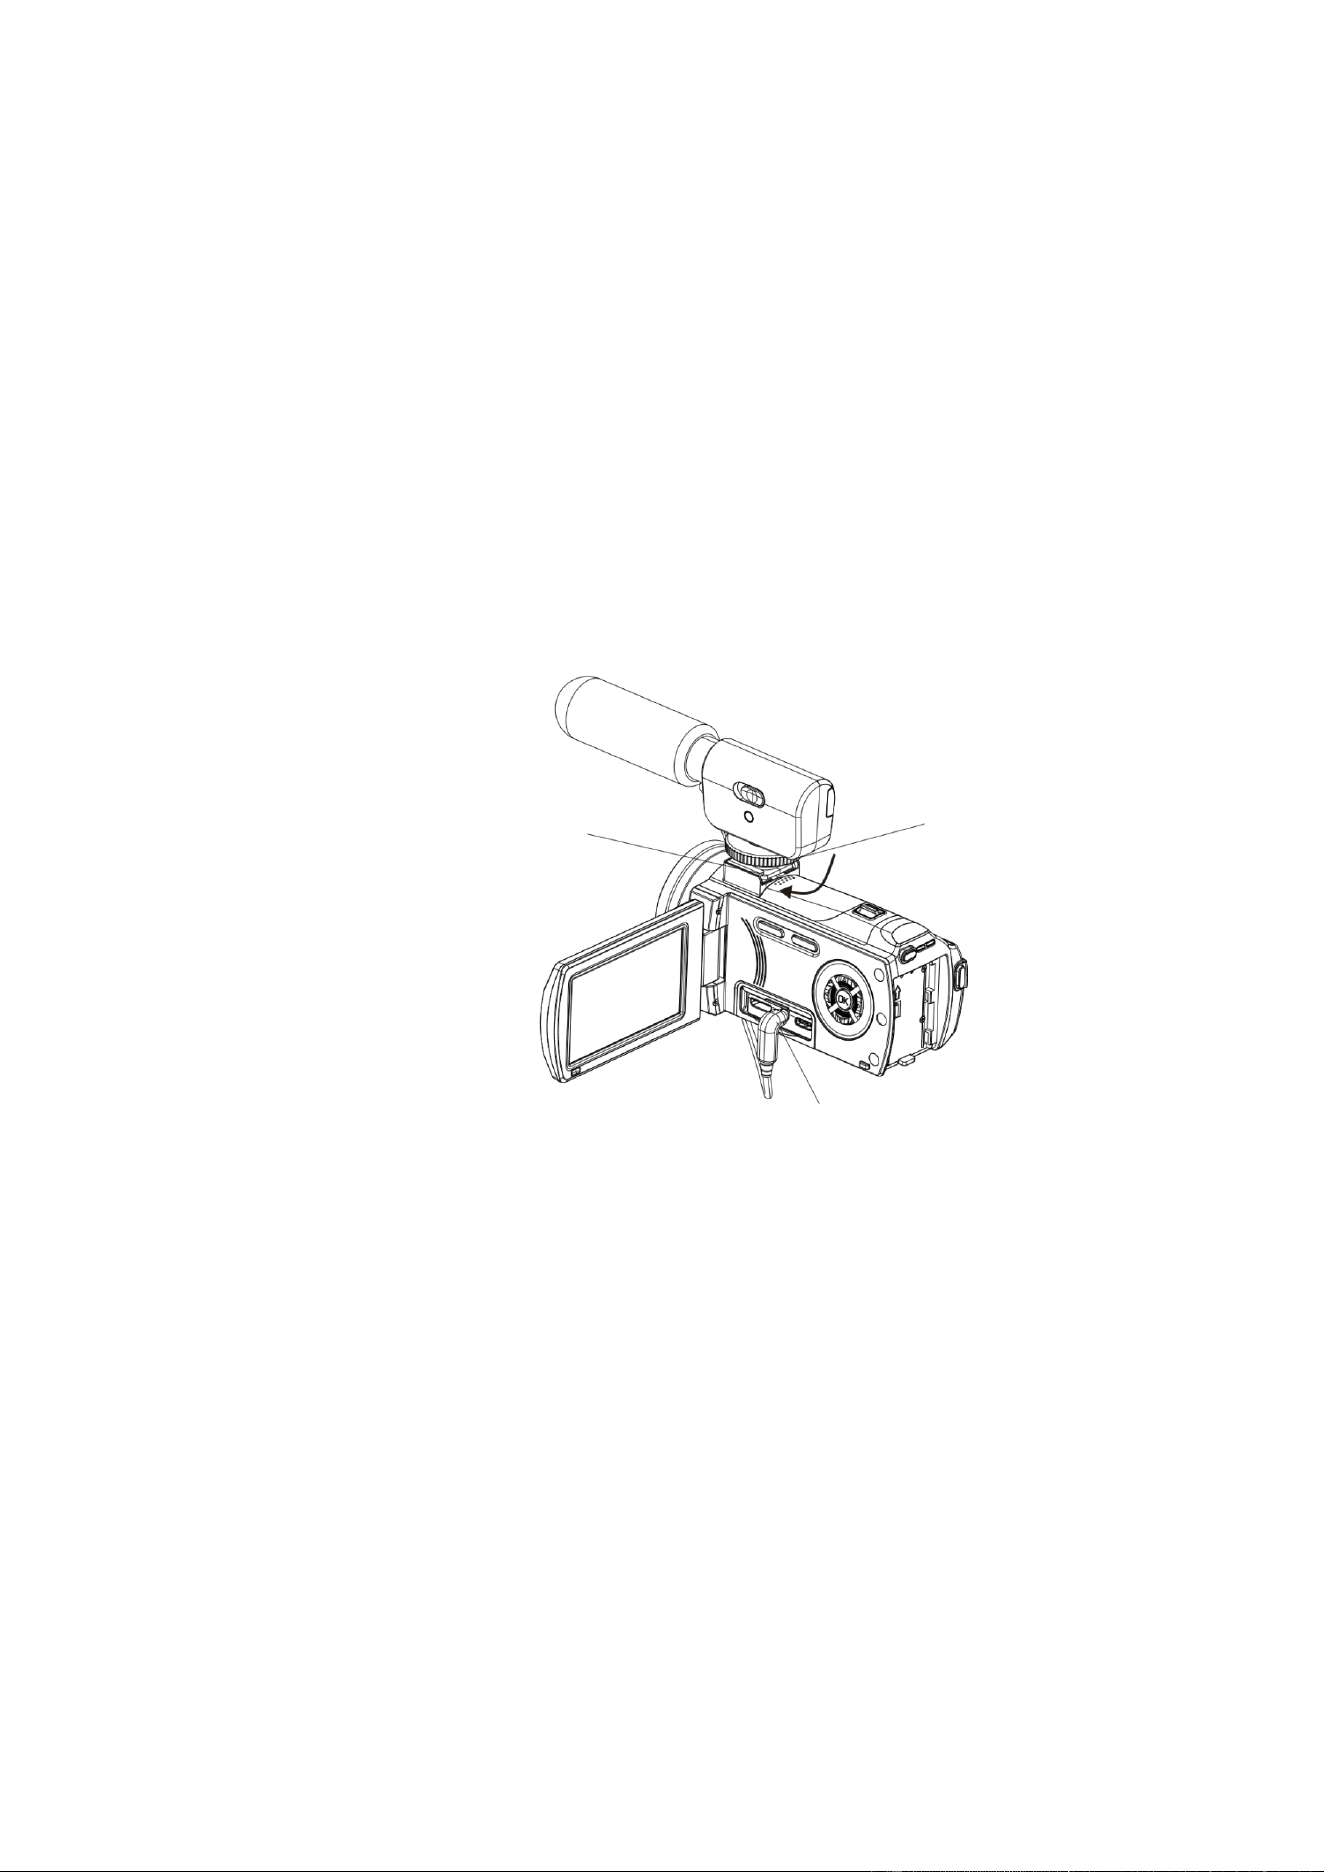
2.8 Use of an external microphone (Optional accessory, must be purchased separately)
2.8.1 Read the instructions for the external microphone before use; install batteries in the microphone.
2.8.2 Install the external microphone according to the diagram and tighten the fixing nut.
2.8.3 Insert the external microphone plug into the camera's MIC interface, then turn on the switch.
Notice:
Carefully read the technical specifications and user instructions for the external microphone, ensuring
proper compatibility.
Microphone specifications: output impedance 0.2 kΩ–2.2 kΩ, 3.5 mm coaxial plug.
2.9 Zoom
In video or photo mode, press [W/T] to the right to zoom in on the subject (Enlarge), and press [W/T] to the
left to zoom out of the subject.
2.10 IR Night Vision
The camera features infrared night vision function, enabling it to capture black-and-white photos and
videos in low-light conditions.
In photo or video mode,short press [LEFT] to enable night vision; when finished, short press [LEFT] to
disable night vision.
Install the external
Tighten the nut
Insert the external microphone plug
3
S
p
I
3
3
3
r
3
3
r
3
t
T
3
a
3
d
3
T
3
3
S
3
. Video Mo
d
S
hoots vide
o
p
erformed i
n
n video rec
o
3
.1 Recordi
n
3
.1.1 Turn o
3
.1.2 Press
r
ecording, p
r
3
.2 Video R
e
3
.2.1 In vid
e
r
esolution",
t
3
.2.2 Press
t
o return.
T
his feature
3
.2.3 Click t
h
a
rea of the
s
3
.2.4 Slide t
h
d
esired opti
o
3
.2.5 Click t
h
T
he followin
g
3
.2.3—plea
s
3
.3 Audio R
e
S
elect whet
h
d
e
o
and sets
u
n
video mod
o
rding mode,
n
g Videos
n the devic
e
[REC] to st
a
r
ess [OK] t
o
e
solution
e
o recording
t
hen press [
[UP]/[DOW
N
supports to
h
e bottom
s
creen to di
s
h
e screen t
o
o
n, and the
c
h
e icon t
o
g
functions
s
e refer to t
h
e
cording
h
er to recor
d
u
p the vario
u
e.
the screen
d
e
to enter vi
d
a
rt recordin
g
o
pause, an
d
mode, pre
s
OK] to ente
r
N
] to select
t
uch operati
o
icon to p
o
s
play it).
o
select the
c
amera will
o
return to
v
in the secti
o
h
at section f
o
d
sound wh
e
u
s menus f
o
d
isplay is as
d
eo mode. I
f
g
; the red ic
o
d
then press
s
s [MENU] t
o
r
the setting
t
he desired
o
ns:
o
p-up the m
e
menu, tap "
V
automatica
l
v
ideo mode.
o
n support t
o
o
r instructio
e
n recordin
g
811
o
r the video
m
shown in th
e
f
in another
o
n will flash.
[OK] again
o
display th
e
s.
option, pre
s
e
nu. (if no
V
ideo Reso
l
ly save the
o
uch operat
ns.
g
video.
1
2
3
4
5
6
7
m
ode.All op
e
figure:
mode, pres
Press [RE
C
to resume
r
e
menu; pre
s
s [OK] to c
o
icon is pr
e
lution" to di
s
settings an
d
ion and are
Video Mode I
n
Resolution In
d
Audio indicat
o
Loop recordi
n
Remaining
time indicato
r
Memory Car
d
Battery Indic
a
erations in
t
s [MODE] t
o
C
] again to
s
r
ecording.
ss [Down] t
o
o
nfirm and
s
e
sent at the
s
play the o
p
d
return.
used in the
Video Recor
d
n
dicato
r
d
icato
r
or
n
g indicato
r
recording
r
d
Indicato
r
a
to
r
t
his chapter
o
switch to
v
s
top recordi
n
o
select "Vi
d
s
ave, then p
r
bottom, cli
c
p
tions menu
,
same way
a
d
ing Mode Ic
o
8 Zoom i
n
9 IR Nigh
t
10 Special
E
11 Sharpne
s
12 White b
a
13 Exposur
e
are
v
ideo mode.
n
g. During
d
eo
r
ess [MEN
U
c
k an empty
,
tap the
a
s in
o
n
n
dicato
r
t
Vision Indica
t
E
ffects Indicat
o
s
s indicato
r
a
lance indicato
r
e
indicato
r
U
]
t
o
r
or
r

911
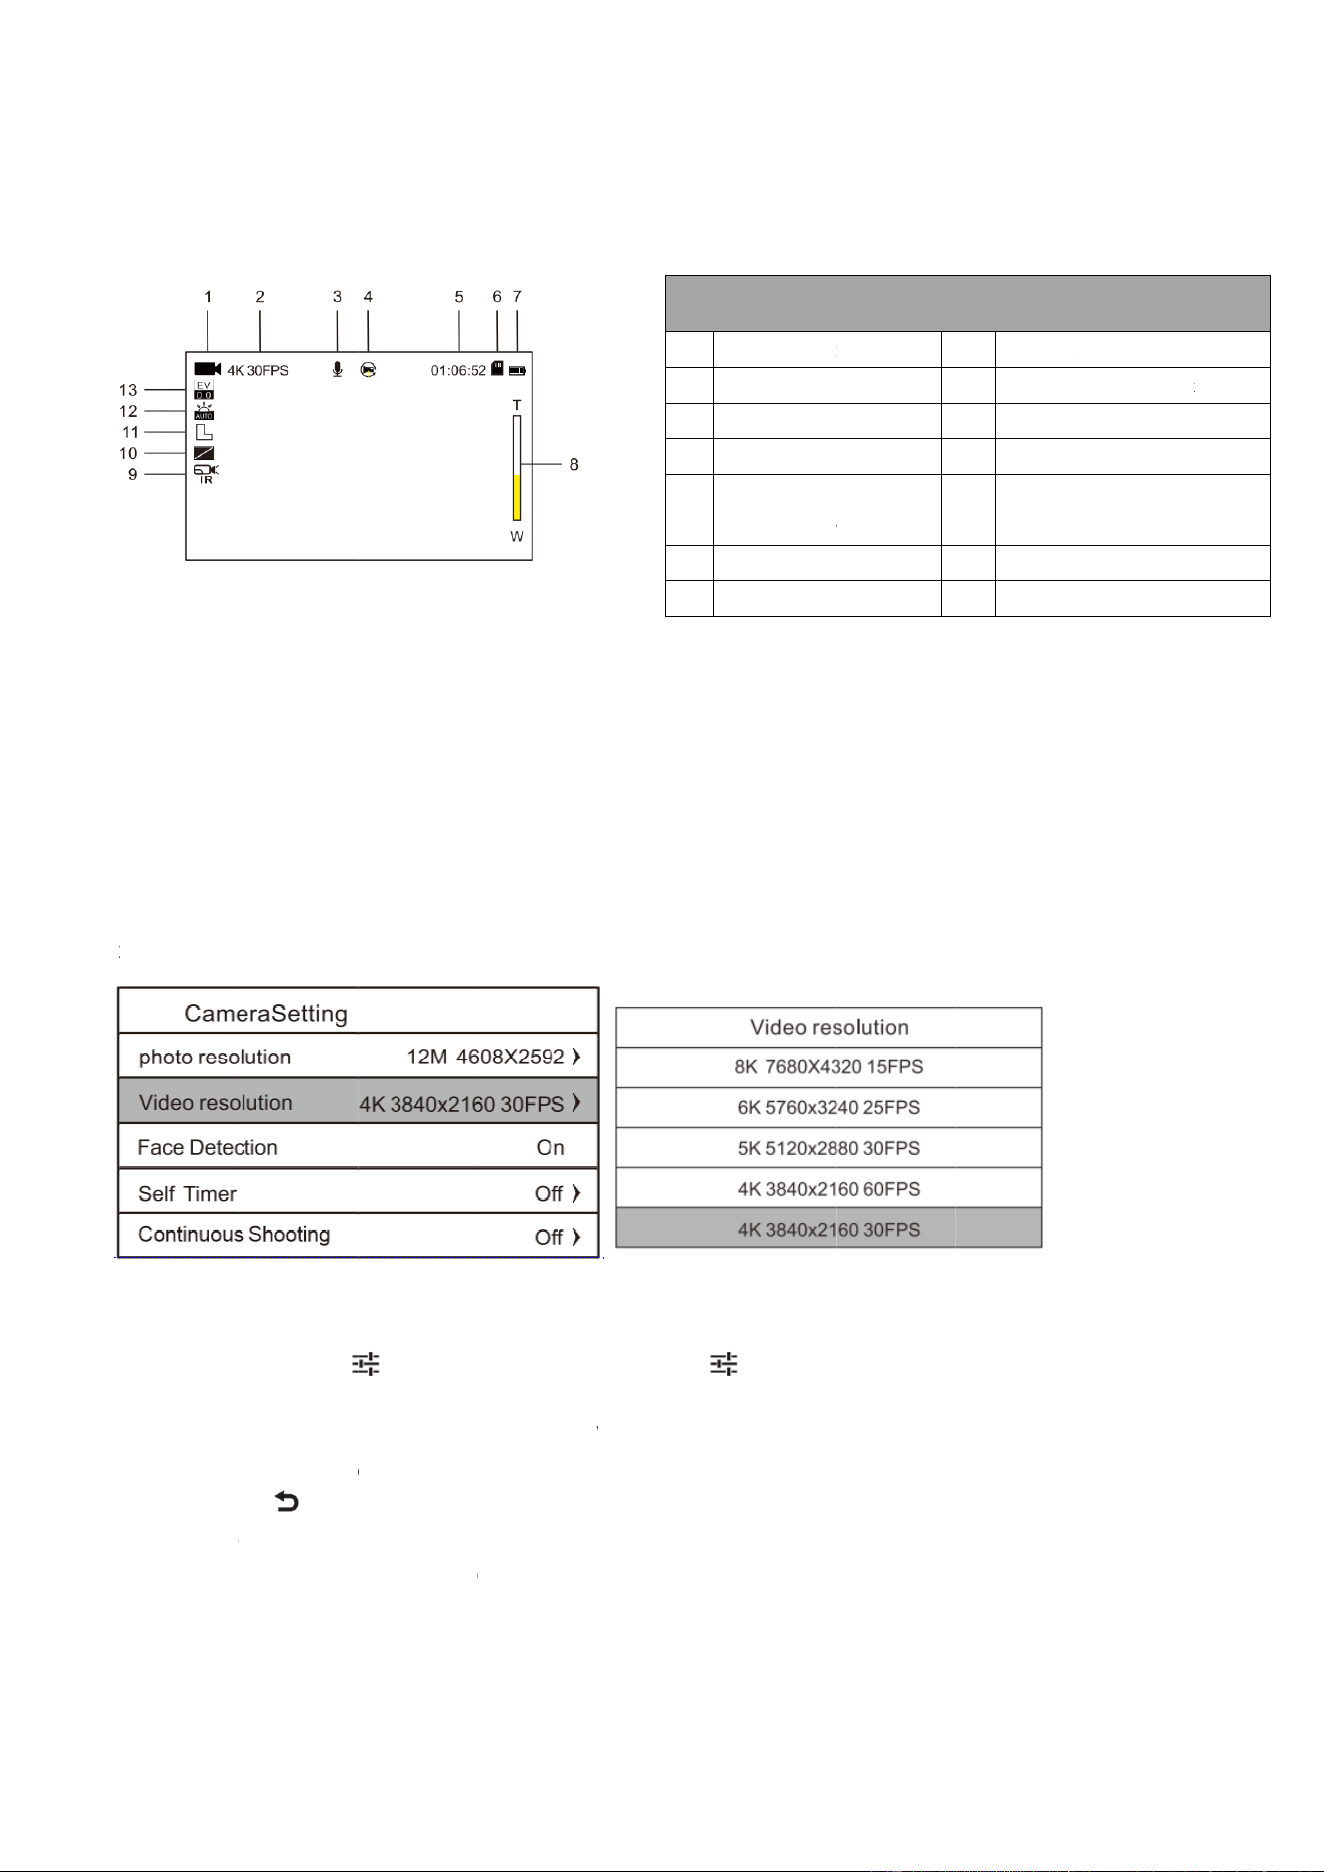
In the menu, press [UP]/[DOWN] to select "Audio Recording", then press [OK] to select: "On" or "Off".
3.4 Time Lapse Recording
Time-lapse recording is a time-compression filming technique that compresses lengthy processes into a
shorter video; it is particularly suitable for capturing scenes with slow changes, such as the blooming
process of flowers.
3.4.1 In the menu, press [UP]/[DOWN] to select "Time Lapse Recording",then press [OK] to enter the
sub-menu.
3.4.2 Select a time option such as "1 Sec",then press [OK] to activate the function. At this point, press [REC]
to start time-stretched recording at a rate of 1 frame per second.
Notice:
Loop recording, slow-motion recording, and time-lapse recording may not work simultaneously.
After configuring and enabling these special recording modes, the camera can operate in the designated
mode by pressing [REC] button.
3.5 Loop Recording
Loop recording refers to a mode where the camera continuously records video; once the storage card is full,
it continues recording, with new video automatically overwriting the previous recordings (Starting from the
earliest file).
This feature allows you to enable or disable loop recording and to adjust the duration of each video
segment within the cyclic recording.
3.5.1 In the menu, select "Loop Recording",then press [OK] to enter the sub-menu.
3.5.2 Select the duration; for example, "1 Min" indicates that each video length will be 1 minute; Press [OK]
to start loop recording. Selecting "Off" will turn off loop recording.
Notice:
When enabling loop recording, if the storage card is full, new videos will overwrite existing ones; please
save important files promptly.
3.6 EIS
This device is equipped with a built-in gyroscope and supports EIS image stabilization. Enabling EIS can
effectively reduce camera shake, resulting in smooth and clear video footage.
In the menu, select "EIS",then press [OK] to select: On/Off.
Notice :
EIS does not support 4K/60fps or higher resolutions. Once EIS is enabled, [W/T] button will no longer be
functional.
3.7 Slow Motion Recording
In the menu, select "Slow Motion Recording", then press [OK] to select: On/Off.
Notice:
Slow motion recording is supported only at 60fps or higher frame rates. Before use, set the resolution to:
4K/60fps, FHD/60fps, or HD/60fps. Audio cannot be recorded when using slow motion recording.
3
I
n
N
W
3
I
t
3
A
I
t
3
C
I
t
4
T
d
P
4
A
4
4
3
.8 Exposur
n the menu
,
n
avigate thr
o
N
otice:
W
hen ambi
e
3
.9 White B
a
n the menu
,
t
hrough the
o
3
.10 Sharp
n
A
djust the i
m
n the menu
,
t
hrough the
o
3
.11 Filte
r
C
hoose spe
c
n the menu
,
t
he options,
4
. Photo M
o
T
ake photos
d
efault setti
n
P
ress [MO
D
4
.1 Taking
P
A
im the len
s
4
.2 Photo R
e
4
.2.1 In Pho
e Compens
a
,
select "Ex
p
o
ugh the op
e
nt light is l
o
a
lance
,
select "W
h
o
ptions, the
n
ess
m
age sharp
n
,
select "Sh
a
o
ptions, the
c
ial color ef
f
,
select "Filt
e
then press
[
o
de
and set ph
o
n
gs.
D
E] to switc
h
P
hotos
s
at the subj
e
e
solution
to Mode: P
r
a
tion
p
osure Co
m
tions, then
p
o
w, adjustin
g
h
ite Balance
"
n press [O
K
n
ess to ma
k
a
rpness", p
r
n press [O
K
f
ects, such
a
e
r", press [
O
[
OK] to con
f
o
to paramet
e
h
to photo m
o
e
ct, keep th
e
r
ess [MENU
m
pensation",
p
ress [OK] t
o
g
this functi
o
"
, press [O
K
K
] to confirm
k
e edges sh
a
r
ess [OK] to
K
] to confirm
a
s nostalgic
O
K] to enter
f
irm.
e
rs. If you a
o
de; the sc
r
e
camera s
t
] to display
t
1011
press [OK]
o
confirm.
o
n will have
K
] to enter t
h
. It is recom
a
rper or sof
t
enter the t
h
.
or negativ
e
the sub-
m
re not famili
r
een will dis
p
t
eady, and
p
t
he menu;
p
1
2
3
4
5
6
7
to enter the
no effect.
h
e sub-men
u
mended to
u
t
er.
h
e sub-men
u
e
film effects
m
enu. Press
ar with this
d
p
lay as follo
w
p
ress [REC]
p
ress [UP]/[
D
Photo Mod
e
Resolution
I
Self Timer
I
Continuous
Indicator
Remaining
Indicator
Memory C
a
Battery Ind
i
sub-menu.
u
. Press [U
P
u
se the Aut
o
u
. Press [U
P
.
[UP]/[DOW
d
evice, it is
r
w
s:
to capture
a
D
OWN] to s
e
Photo
M
e
Indicato
r
I
ndicato
r
I
ndicato
r
Shooting
Photo Count
a
rd Indicato
r
i
cato
r
Press [UP]
/
P
]/[DOWN] t
o
o
option.
P
]/[DOWN] t
o
N] to navig
a
r
ecommend
a
photo.
e
lect "photo
M
ode Icon
8 Zoom
9 IR
Indica
t
10 Filter
I
11 Sharp
n
12 White
13 Expos
u
indica
t
/
[DOWN] to
o
navigate
o
navigate
a
te through
ed to use t
h
resolution"
;
indicato
r
Night Vi
t
o
r
I
ndicato
r
n
ess indicator
balance indica
t
u
re compens
a
t
o
r
h
e
;
sion
t
o
r
a
tion
t
4
T
4
o
4
d
4
T
4
4
T
I
4
T
t
I
[
4
S
I
P
4
T
I
[
5
V
P
t
hen press [
O
4
.2.2 press
[
T
his feature
4
.2.3 Click t
h
o
n the scre
e
4
.2.4 Swipe
d
esired opti
o
4
.2.5 Click t
h
T
he followin
g
4
.2.3—plea
s
4
.3 Face D
e
T
urn on or o
n the menu
,
4
.4 Self Tim
e
T
his feature
t
ake a phot
o
n the menu
,
[
UP]/[DOW
N
4
.5 Continu
o
S
et the num
n the menu
,
P
ress [UP]/[
4
.6Interval
S
T
his feature
n the menu
,
[
UP]/[DOW
N
5
Playback
M
V
iew saved
P
ress [MO
D
O
K] to ente
r
[
UP]/[DOW
N
supports to
h
e bottom
e
n to displa
y
the screen
t
o
n, and the
c
h
e icon t
o
g
functions
s
e refer to t
h
e
tection
ff facial rec
o
,
press [UP]
er
helps user
s
o
after a spe
,
press[UP]
/
N
] to select
a
o
us Shootin
g
ber of phot
o
,
press [UP]
/
DOWN] to
n
S
hooting
allows you
,
press [UP]
/
N
] to naviga
t
M
ode
photos or vi
D
E] to switc
h
r
the sub-m
e
N
] to select
t
uch operati
o
icon to p
o
y
it).
t
o select th
e
c
amera will
o
return to t
h
in the secti
o
h
at section f
o
o
gnition. En
a
/[DOWN] to
s
take selfie
s
cified delay
.
/
[DOWN] to
a
time, then
g
o
s to be cap
/
[DOWN]to
n
avigate thr
o
to set up a
u
/
[DOWN]to
s
t
e through t
h
deos on thi
s
h
to playbac
k
e
nu.
t
he desired
o
o
ns:
o
p-up the m
e
e
menu, tap
automatica
l
h
e photo-ta
k
o
n support t
o
o
r instructio
a
bling this f
e
select "Fa
c
s
. To enabl
e
.
select "Self
press [OK]
tured in co
n
select "Con
t
o
ugh the op
t
u
tomatic ph
o
s
elect "Inte
r
h
e options,
a
s
device.
k
mode; the
1111
o
ption, pre
s
e
nu (if no
"Photo Res
l
ly save the
k
ing mode.
o
uch operat
ns.
e
ature allo
w
c
e Detection
e
this featur
e
Timer," the
n
to confirm.
n
tinuous sh
o
t
inuous Sh
o
t
ions, and p
o
to-taking at
r
val Shootin
g
a
nd press [
O
screen will
s [OK] to c
o
icon is pr
e
olution" to
d
settings an
d
ion and are
w
s the syste
m
" ,then pres
s
e
, press the
n
press [OK
]
o
oting mode
o
oting", th
e
ress [OK] t
o
regular int
e
g
",then pre
s
O
K] to confi
r
display the
f
o
nfirm, and
p
e
sent at the
d
isplay the
o
d
return.
used in the
m
to autom
a
s
[OK] to s
e
[REC] butt
o
]
to enter th
e
.
e
n press [O
K
o
confirm.
e
rvals.
s
s [OK] to e
n
r
m.
f
ollowing:
p
ress [MEN
U
bottom, clic
k
o
ptions men
u
same way
a
a
tically reco
g
e
lect: On or
O
o
n; the cam
e
e
sub-menu
K
] to enter t
h
n
ter the sub
-
U
] to return.
k
anywhere
u
, tap the
a
s in
g
nize faces.
O
ff.
e
ra will then
. Press
h
e sub-men
u
-
menu. Pre
s
u
.
s
s

5
5
p
5
p
P
P
5
5
p
5
5
[
5
D
5
5
"
5
N
L
O
5
P
5
5
S
5
N
S
5
.1 Playbac
k
5
.1.1 In pla
y
p
review mo
d
5
.1.2 Press
p
layback, th
P
ress [OK]:
P
ress [UP]:
5
.2 View Ph
o
5
.2.1 In pla
y
p
review mo
d
5
.2.2 Press
5
.2.3 Press
[
RIGHT]]/[U
P
5
.3 Delete
F
D
elete one
o
5
.3.1 Select
5
.3.2 Press
"
Single"or"
A
5
.3.3 In the
p
N
otice :
L
ocked files
O
nce a file
h
5
.4 Protect
F
P
rotect or r
e
5
.4.1 Select
5
.4.2 Press
S
ingle / Pro
t
5
.4.3 Press
N
otice:
S
ingle: Loc
k
k
Video
y
back mode
d
e.
[LEFT] / [
R
e key functi
o
Pause/Res
u
Increase vo
o
tos
y
back mode
,
d
e.
[LEFT] / [RI
[W/T] to z
o
P
]/[DOWN]
t
F
ile
o
r more file
s
a photo or
v
[DOWN] to
A
ll", and final
p
op-up win
d
cannot be
d
h
as been d
e
F
ile
e
move file p
r
a photo or
v
[DOWN] to
t
ect All / Un
p
[UP]/[DOW
N
k
/Unlock the
, press [LE
F
R
IGHT] to s
e
o
ns are as
f
u
me playba
c
lume; pres
s
,
press [L
E
GHT] to flip
o
om in or
o
t
o move th
e
s
v
ideo, then
p
select "Del
e
ly press [O
K
d
ow, select:
d
eleted; ple
a
e
leted, it can
r
otection.
v
ideo, then
p
select"Prot
e
p
rotect All.
N
] to select
d
current vid
e
F
T] / [RIGH
T
e
lect a vide
f
ollows:
c
k; press [
M
s
[DWON]:
D
E
FT] / [RIG
H
the page f
o
o
ut on the
p
e
photo in th
e
p
ress [MEN
e
te" , press
K
].
Yes/No. Se
l
a
se unlock
t
not be reco
v
p
ress [MEN
e
ct", press
d
esired opti
e
o or photo.
1211
T
] to select
t
o file; after
M
ODE]: Sto
p
D
ecrease vo
H
T]to select
o
rward or ba
p
hoto. After
e
correspon
U] to pop-u
p
[OK] to ent
e
l
ect "Yes",
p
t
hem before
v
ered; plea
s
U] to pop-u
p
[OK] to ent
e
on, press [
O
t
he "Video"
selection,
p
playback.
lume.
the "Photo"
ckward.
the photo
ding directi
o
p
the menu.
e
r the sub-
m
p
ress [OK] t
o
proceeding
s
e proceed
w
p
the menu.
e
r the sub-
m
O
K], and co
n
icon, then
p
p
ress [OK]
t
icon, then
p
has been
e
o
n.
m
enu, then
o
execute th
.
w
ith caution
m
enu, then
p
n
firm the op
e
p
ress [OK] t
o
t
o start pla
y
p
ress [OK] t
o
e
nlarged, p
r
press [DO
W
e operation
.
p
ress [DO
W
e
ration in th
o
enter vid
e
y
back. Duri
n
o
enter pho
t
r
ess [LEFT]
W
N] to sele
c
and return.
W
N] to sele
c
e dialog bo
x
e
o
n
g
t
o
/
c
t:
c
t:
x
.
P
U
T
C
p
C
6
S
I
c
T
I
e
O
6
I
[
6
T
6
[
n
6
i
c
6
S
a
p
I
P
rotect all:
L
U
nprotect A
l
T
ouch oper
a
C
lick the "Vi
d
p
ause or re
s
C
lick the "P
h
6
. Setting
S
S
et the syst
e
n photo or
v
c
ompleting
t
T
ouch oper
a
n photo or
v
e
mpty area
o
O
nce the se
6
.1 Langua
g
n the menu
,
[
UP]/[DOW
N
6
.2 Wireles
s
T
urn Wi-Fi
o
6
.2.1 In the
m
[
UP]/[DOW
N
n
ame and p
a
6
.2.2 In the
W
nterface. P
r
c
hanges ar
e
6
.3 Auto Sc
r
S
et up an a
u
a
utomaticall
y
p
ress any k
e
n the menu
,
L
ocks all file
s
l
l: Unlock al
l
a
tions:
d
eo" icon t
o
s
ume playb
a
h
otos" icon
t
S
ystem Par
a
e
m parame
t
v
ideo mode,
t
he process,
a
tions:
v
ideo mode,
o
f the scree
ttings are c
o
g
e
,
press [UP]
N
] to naviga
t
s
Hotspot (
W
o
n or off, an
d
m
enu, pres
s
N
] to select
t
a
ssword. Af
t
W
i-Fi menu
,
r
ess [LEFT]
/
e
complete,
p
r
een Of
f
u
tomatic sc
r
y
turn off th
e
e
y to turn th
e
,
press[UP]
/
s
of the sa
m
l
files of the
o
review the
a
ck. Click
t
o review th
e
a
meters
t
ers such a
s
press [ME
N
press [ME
N
tap the
n to display
o
mplete, cli
c
/[DOWN] to
t
e through t
h
W
i-Fi)
d
change th
e
s
[UP]/[DO
W
t
he first opti
o
t
er use, lon
g
,
select "Ch
a
/
[RIGHT] to
p
ress [OK]
t
r
een saver. I
e
screen to
c
e
screen ba
/
[DOWN]to
s
m
e type as t
h
same type
a
video file.
C
to Exit.
e
photo file,
s
language,
b
N
U] to enter
N
U] to exit.
icon to pop
-
it); drag th
e
c
k " " to e
x
select "La
n
h
e options,
a
e
Wi-Fi pas
s
W
N] to select
o
n, then pre
g
-press [RI
G
a
nge Wi-Fi
P
move curso
t
o return.
f no operati
o
c
onserve b
a
ck on.
s
elect "Auto
1311
h
e current fi
a
s the curre
C
lick the OK
. Click the
b
eep sound
the menu;
t
-
up the men
u
e
screen to
s
x
it. The sa
m
n
guage," the
a
nd press [
O
s
word.
"Wi-Fi", th
e
ss [OK] to
e
G
HT] to dis
a
P
assword,"
r
, and pres
s
o
n is perfor
m
a
ttery powe
r
Screen Off
"
le.
nt file.
icon to pla
y
icon to fl
i
s, time, and
t
he screen
w
u
(if the ico
n
s
elect the p
a
m
e steps ap
p
n press [O
K
O
K] to confi
r
e
n press [O
K
e
nable Wi-Fi
a
ble Wi-Fi.
then press
[
s
[UP]/[DO
W
m
ed within
a
r
. If a scree
n
"
, then pres
s
y
the video,
t
i
p through
p
date.
w
ill display
a
n
does not
a
a
rameters, t
h
p
ly to the fol
K
] to enter t
h
r
m.
K
] to enter t
h
; the scree
n
[
OK] to ent
e
W
N] to modif
y
a
specified
p
n
saver has
a
s
[OK] to en
t
t
hen click O
p
ages, or cli
c
a
s shown b
e
a
ppear belo
w
h
en click it
t
lowing oper
a
h
e sub-men
u
h
e Wi-Fi me
n
will displa
y
e
r the pass
w
y
the digits;
p
eriod, the
c
a
lready bee
t
er the sub-
m
K again to
c
k to Exit
e
low. After
w
, tap an
t
o execute.
a
tions.
u
. Press
nu.Press
y
the Wi-Fi
w
ord setup
once all
c
amera will
n activated,
m
enu. Pres
s
.
s

1411
[UP]/[DOWN] to navigate through the options, and press [OK] to confirm.
6.4 Auto Power Off
To conserve power, if the camera is turned on but not used for a specified period of time, it will
automatically shut down.
In the menu, press [UP]/[DOWN]to select "Auto Power Off", then press [OK] to enter the sub-menu. Press
[UP]/[DOWN] to navigate through the options, and press [OK] to confirm.
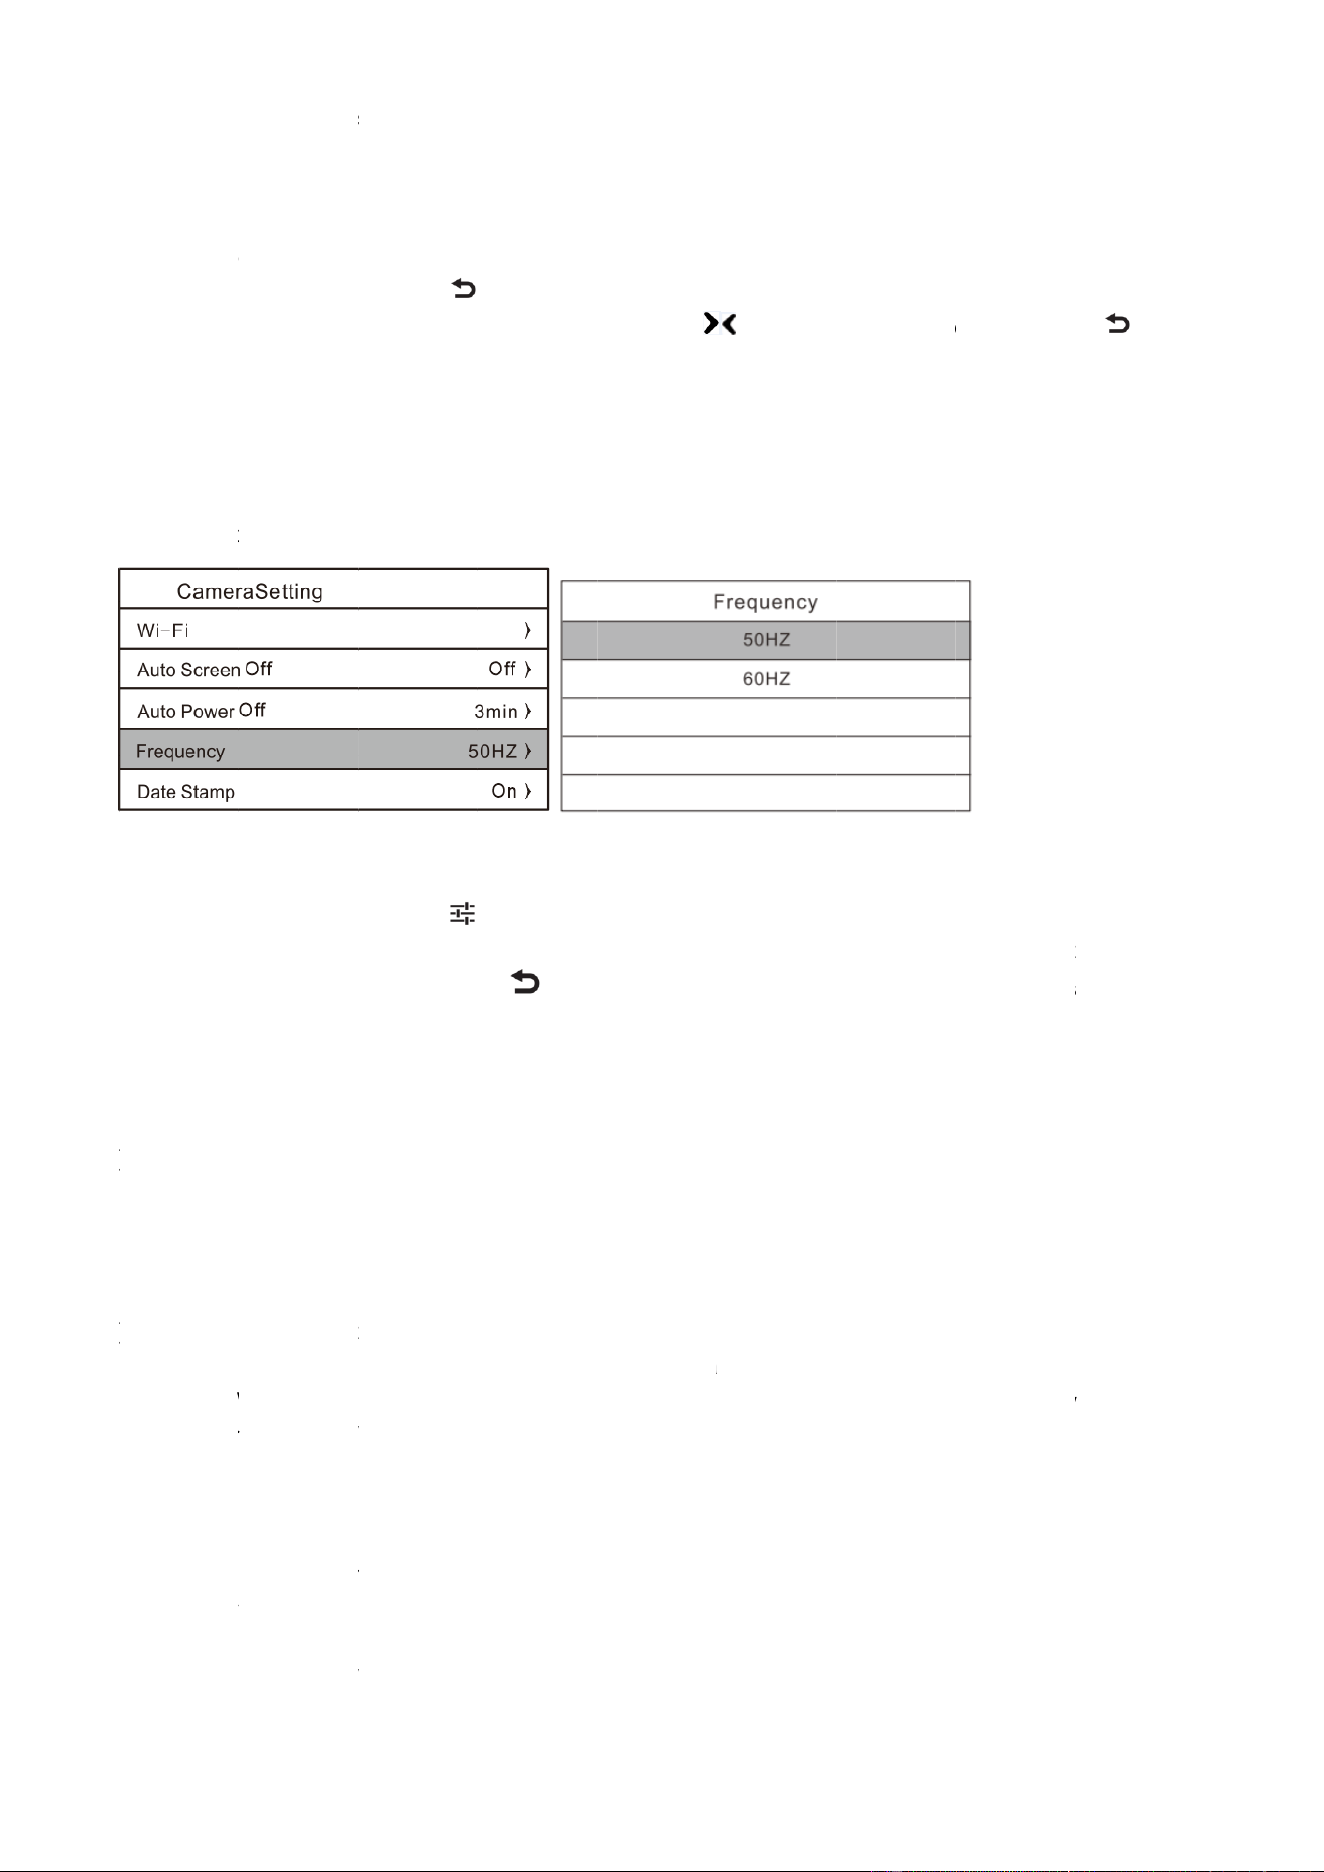
6.5 Frequency
Set the light source frequency to prevent screen flickering in lighting environments.
In the menu, press[UP]/[DOWN] to select "Frequency," then press [OK] to enter the sub-menu. Press
[UP]/[DOWN] to navigate through the options, and press [OK] to confirm.
6.6 Date Stamp
Enable or disable the display of time and date watermarks for videos or photos.
In the menu, press[UP]/[DOWN] to select "Date Stamp", then press [OK] to enter the sub-menu. Press
[UP]/[DOWN] to navigate through the options, and press [OK] to confirm.
6.7 Date & Time
Set the system date and time.
6.7.1 In the menu, press [UP]/[DOWN] to select "Date&Time," then press [OK] to enter the settings
interface.
6.7.2 Press [LEFT] / [RIGHT] to move the cursor , and press [UP] /[DOWN] to modify the number or
formatting ; once all operations are complete, press [OK] to return.
6.8 Beep
Turn on/off the button operation sound and adjust the volume level.
In the menu, press [UP]/[DOWN]to select "Beep", then press [OK] to entersub-menu. Press [UP]/[DOWN]
to navigate through the options, and press [OK] to confirm.
6.9 Format Card
Format the memory card. The formatting operation will delete all files on the memory card permanently and
cannot be recovered.
In the menu, press[UP]/[DOWN] to select "Format Card", then press [OK] to enter the sub-menu. Press
[UP]/[DOWN] to select: No/Yes. Press [OK] to execute; wait for the formatting process to complete. After
which the system will automatically return to the setup menu.
Before performing the formatting operation, please ensure that the device has sufficient battery power.
During the operation, it is strictly prohibited to move the camera or to disconnect the power supply.
Notice:
Formatting will delete all files permanently and cannot be undone; please use this option with caution.
The factory reset operation will not delete any files.
6.10 Restore to Factory Settings
1511
If incorrect settings cause the camera to malfunction, use this operation to restore the factory settings.
In the menu, press[UP]/[DOWN] to select "Factory Reset", then press [OK] to enter the sub-menu. Next,
press [UP]/[DOWN] to select: No/Yes, and press [OK] to execute the operation.
6.11 Firmware Version
Check the camera's firmware version.
In the menu, press [UP]/[DOWN] to select "Firmware Version," press [OK] to display the firmware
information, and then press [OK] to return.
7 Use Wi-Fi
The camera is equipped with built-in Wi-Fi and can be connected to a mobile phone and operated through
the APP.
This device's Wi-Fi only supports peer-to-peer connection with a mobile phone; it does not support
connecting to a hotspot or accessing the internet.
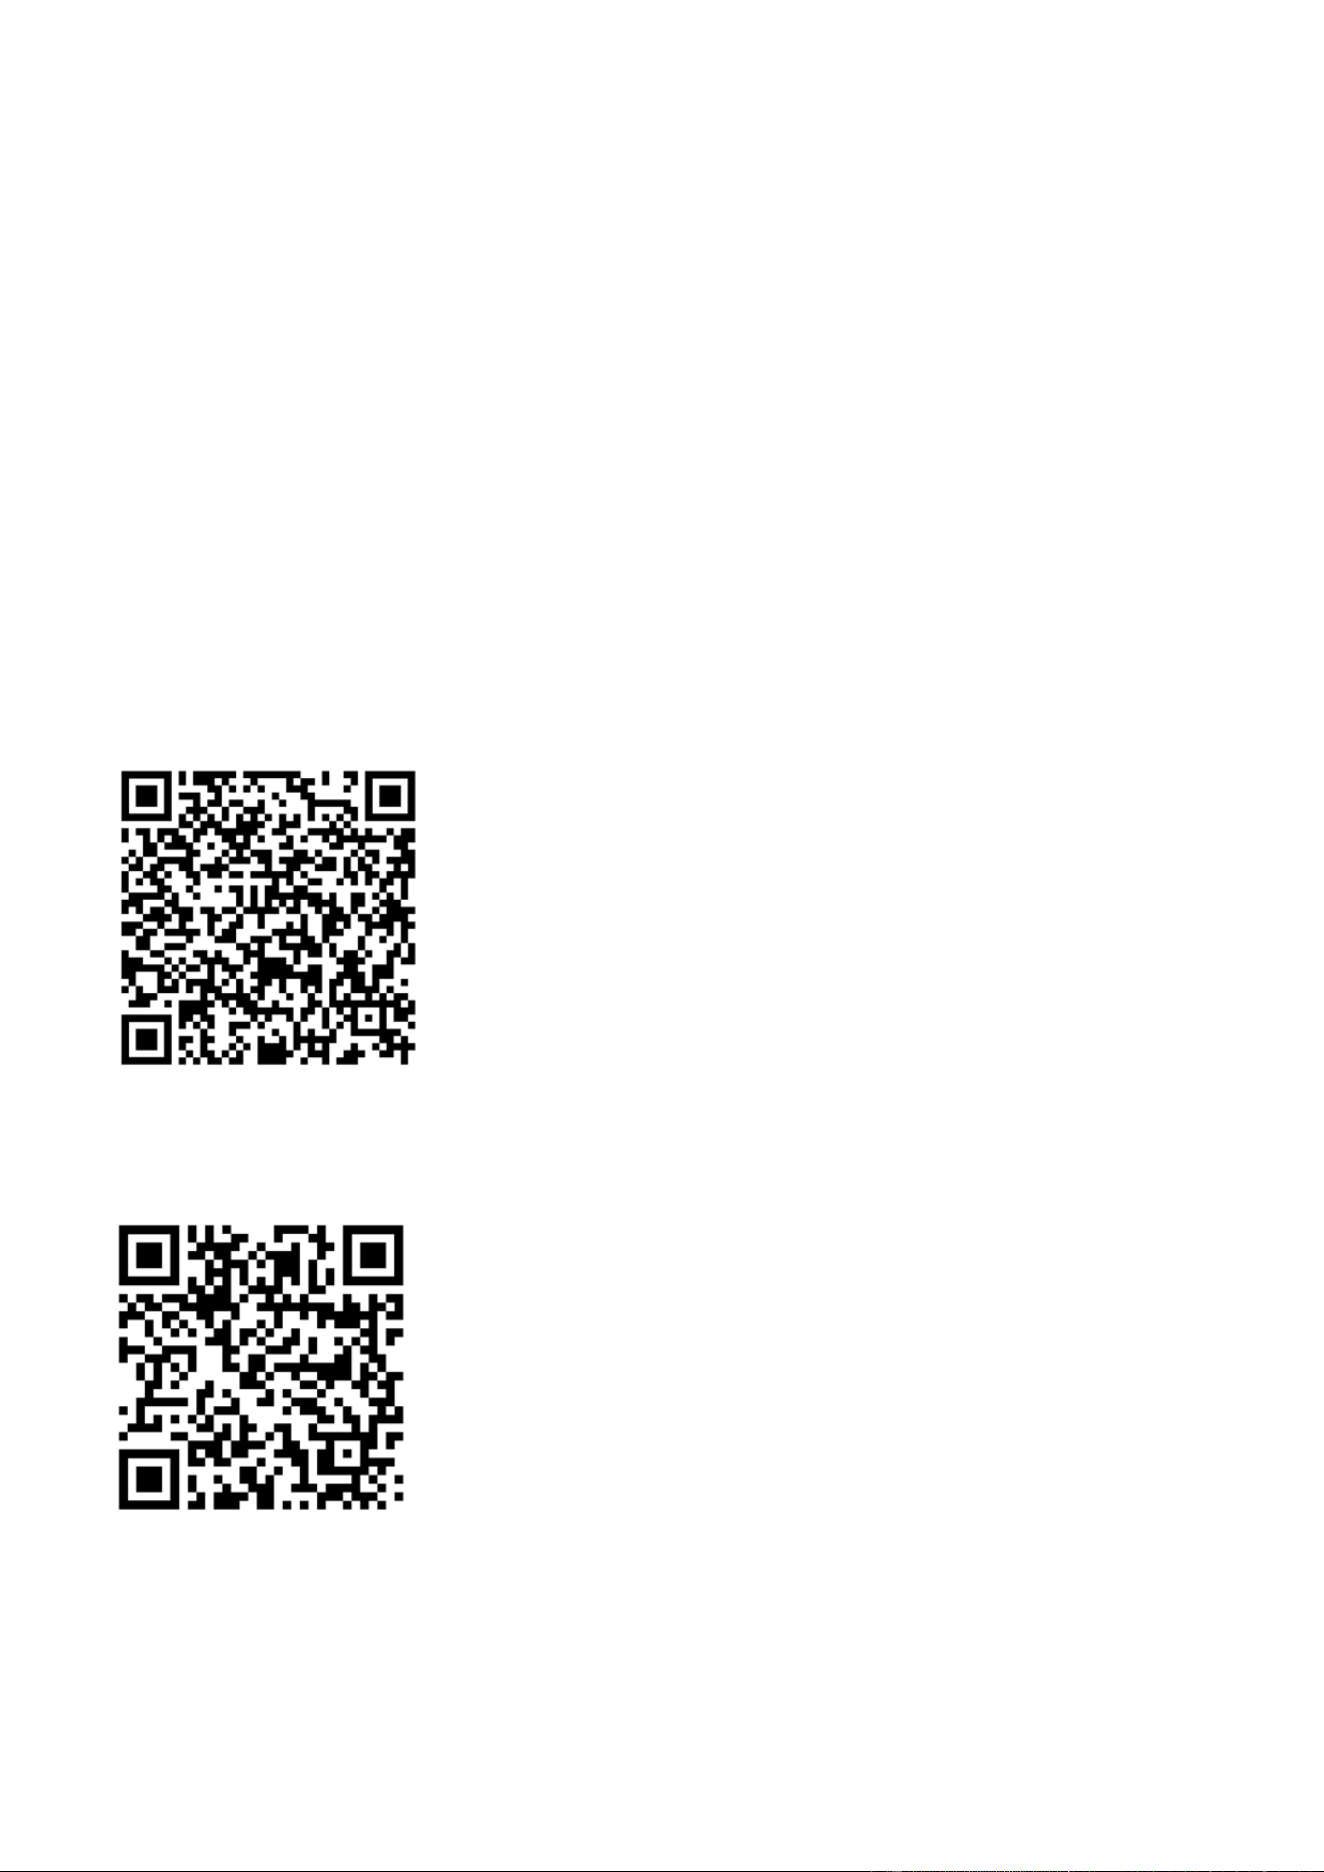
7.1 Install App
7.1.1 For Android devices: scan the QR code, follow the on-screen instructions to download and install the
"iSmart DV2" app.
android QR
7.1.2 For Apple devices (iOS), scan the QR code and follow the on-screen instructions to download and
install the "iSmart DV2" app.
IOS QR
7.2 Connect to mobile phone
7.2.1 In video or photo mode, long press [RIGHT] to enable Wi-Fi; the camera screen will display the
following:
WiFi Name: HDV_XXXXXX; WiFi Password: 12345678.

1611
7.2.2 Open the phone's settings menu, enter to Wi-Fi settings, refresh the list, locate the device named
HDV_XXXXXX, click to connect to this network, enter the password, and complete the connection.
7.2.3 Open the iSmart DV2 APP on your mobile phone and follow the on-screen instructions.
7.2.4 After use, long-press the [RIGHT] to turn off Wi-Fi.
Notice:
The device's Wi-Fi only supports connection to mobile phones; it cannot access the internet.
The operating methods for Android and iOS systems is different; please refer to your phone's system
prompts for instructions.
8Appendix
8.1 Technical Specifications
Image sensor CMOS sensor, up to 90 MP (interpolated)
Storage
medium
Supports memory cards (U3 or higher), up to 256 GB
Lens
F:2.0 ,f=2.9mm
Focus Range 1m ~ infinity
Photo Format: JPG;
Resolution: 3M,5M,8M,12M,20M,24M,32M,48M,65M,70M,90M (interpolated)
Video Format: MOV;
Resolution: 8K/15fps, 6K/25fps, 5K/30fps, 4K/60fps, 4K/30fps, 2.7K/30fps, FHD/60fps,
FHD/30fps, HD/60fps, HD/30fps
Zoom 18X Digital Zoom
IR Night
Vision
Support
White balance Auto / Daylight /Shade/ Tungsten Light / White Fluorescent
Exposure
Compensation
–2.0EV~+2.0EV
Computer
Interface
USB TYPE-C
LCD screen 3.0-inch IPS HD Touch Screen
Microphone Built-in; supports external microphones (Output impedance: 0.2 kΩ–2.2 kΩ).
Speaker Built-in
Wi-Fi Built-in; supports smartphone connectivity

1711
Infrared
remote control
Support: less than 6 meters
Battery Lithium Battery NP-180
Language English / French / Spanish / German / Italian / Simplified Chinese / Traditional Chinese /
Japanese / Korean / Russian
Size 123 (L) × 57 (W) × 64 (H) mm
Weight Approx. 260 ± 5 g (excluding battery)
8.2 Common Faults and Solutions
Problem
Possible causes
Solutions
Unable to power
on
Incorrect battery installation or low
battery power
Properly install the battery and charge it.
Sudden black
screen
Power-saving mode has been
enabled or battery power is
insufficient.
Power on again or charge the battery.
No video
recording or
photography
permitted.
The memory card is not formatted.
The memory card has low speed.
Format memory card
Replace with a U3 or higher memory card
Video recording
error
Enabled time-lapse recording or
slow-motion mode
Turn off this feature
Thefocusisnot
clear.
Lens is dirty or contains foreign
objects
Exceeds the effective focal length
Use a dedicated soft cloth to clean the lens and
keep it clean.
Use within the available range.
Storage card
error detected
The memory card format is
incorrect or the card is damaged.
Replace with a qualified memory card and
format it.
System crashes
during work
The memory card is
non-compliant.
Replace with a qualified memory card
Color distortion
Errors in parameters such as
White Balance or Effects
Correctly configure the parameters or perform a
factory reset
The remote
control cannot
operate.
The camera's receive window is
obstructed.
The remote control is out of
power.
Too far away
Remove obstruction
Replace battery
For close-range use
The external
microphone is
not functioning
properly.
The external microphone does not
have a battery or is out of power.
Connection error
External microphone parameters
are incorrect.
Insert a battery with sufficient charge.
Correct Connection
Select the appropriate microphone
Computer
connection error
Incorrect connection or damaged
USB cable
Correctly connect or replace the USB cable

1811
Computer
playback
stuttering
Low computer specifications
Use computers that meet the specified
requirements.
Copy the file to your computer for playback.
Wi-Fi has a short
range.
The environment may be subject
to electromagnetic interference.
Use in areas with minimal interference.
Wi-Fi connection
is intermittent.
The environment may be subject
to electromagnetic interference.
Use in areas with minimal interference.
The app
experiences
video playback
lag.
The video file is too large,
resulting in a long buffering time.
Download to your local album and then play it.
If the above steps do not resolve the issue, the camera may be faulty; please contact our after-sales
support or consult a professional.
*The camera contains no user-replaceable components. It is strictly prohibited to disassemble the
camera; otherwise, you will lose your warranty rights.
*The images are for reference only; please refer to the actual product. If any specifications are modified, no
further notice will be given; please refer to the actual product.
* We reserve all rights to this manual. No entity or individual may reproduce or disseminate this manual
without our prior written consent.
FIP260731FE400AW-ZX-EN-A1

This device complies with part 15 of the FCC Rules. Operation is subject to the following two
conditions: (1) this device may not cause harmful interference, and (2) this device must accept
any interference received, including interference that may cause undesired operation.
Any changes or modifications not expressly approved by the party responsible for compliance
could void the user's authority to operate the equipment.
NOTE: This equipment has been tested and found to comply with the limits for a Class B
digital device, pursuant to Part 15 of the FCC Rules. These limits are designed to provide
reasonable protection against harmful interference in a residential installation. This equipment
generates, uses and can radiate radio frequency energy and, if not installed and used in
accordance with the instructions, may cause harmful interference to radio communications.
However, there is no guarantee that interference will not occur in a particular installation.
If this equipment does cause harmful interference to radio or television reception,
which can be determined by turning the equipment off and on, the user is encouraged to try to
correct the interference by one or more of the following measures:
-- Reorient or relocate the receiving antenna.
-- Increase the separation between the equipment and receiver.
-- Connect the equipment into an outlet on a circuit different
from that to which the receiver is connected.
-- Consult the dealer or an experienced radio/TV technician for help.
The device has been evaluated to meet general RF exposure requirement. The device can be
used in portable exposure condition without restriction