
February 11
2026
V01.00
Authored by CMY Labs and BIQU
PANDA TREAT BETA
GUIDE

CONFIDENTIAL
PLEASE DO NOT DISTRIBUTE
Page 1 of 15
TABLE OF CONTENTS
1 Introduction ......................................................................................................................... 2
2 Food Safety ........................................................................................................................ 2
3 Key Components ................................................................................................................ 2
4 Ink Cartridge Handling ........................................................................................................ 3
5 Installation ........................................................................................................................... 4
5.1 Printing parts ................................................................................................................... 4
5.2 Assembly ......................................................................................................................... 4
6 First Time Operation ........................................................................................................... 9
6.1 WiFi and printer binding .................................................................................................. 9
6.2 Settings ........................................................................................................................... 9
7 Printing Onto Items ........................................................................................................... 11
7.1 Process Overview ......................................................................................................... 11
7.2 “Slicing” and image ....................................................................................................... 11
7.3 Printing an image .......................................................................................................... 13
8 Print Quality ...................................................................................................................... 14
9 Beta Testing Checklist ...................................................................................................... 15

CONFIDENTIAL
PLEASE DO NOT DISTRIBUTE
Page 2 of 15
1 INTRODUCTION
The Panda Treat is a toolhead addon for 3D printers that enables inkjet printing and has
resulted from a collaborative effort between CMY Labs and BIQU.
The Panda Treat is capable of using food grade ink as well as standard ink (dispensed from
a different cartridge) which offers two possibilities for use:
1. Printing edible food colouring onto any object in 3D space.
2. Printing standard ink, layer by layer, onto a 3D print so as to give it a full colour
effect.
Point number 1 has been implemented for Bambu Lab A series machines and will be
expanded to additional machines in the near future. Point number 2 will be implemented and
released as an OTA firmware update at a later stage.
This part of the beta program will focus in on point number 1.
2 FOOD SAFETY
The inks used in the Panda Treat are produced in an ISO 22000 facility that is registered
with the FDA and subjected to batch level testing for traceability according to regional
regulations.
The inks meets Kosher and Halal standards.
All inks are completely food safe and contain commonly used food colourings as well as
binding agents which are also used in the food industry. A full ingredients list for each ink
colour can be found within the MSDS of each ink.
A MSDS for each ink colour is provided along with the other regulatory approvals.
In order to ensure food safety when working with the Panda Treat, apply sensible practices
that you would apply when preparing any foodstuff such as:
• Do not allow the foodstuff to come into contact with any part of the 3D printer.
• Lay a food safe layer down between the print bed and the foodstuff.
• Ensure that the foodstuff does not come into contact with any unsafe materials
before or after being processed on the print bed.
3 KEY COMPONENTS
The Panda Treat consists of the following key components:
1. The main PCB.
2. Edible ink print cartridge.
3. Printer interface cable.
4. Screws for assembly.
If any of these are missing then please reach out to BIQU via the beta group.
CONFIDENTIAL
PLEASE DO NOT DISTRIBUTE
Page 3 of 15
4 INK CARTRIDGE HANDLING
The print quality that you will be able to achieve using the Panda Treat largely depends on
how you handle the print cartridge. Poor handling can damage nozzles and create print
artifacts.
Bear in mind that the cartridges that you are using during this beta test lack the final
packaging and labelling which will make use, storage and maintenance easier for end users.
For the sake of this beta test below are some key points to keep in mind regarding handling
of your ink cartridges.
1. Never place the ink cartridge directly onto the printhead. The printhead is the shiny
strip at the base of the cartridge.
2. Never use alcohol to clean the printhead. Alcohol should only ever be used to clean
the pads in the rear electrical contact area if they tarnish.
3. Never store the cartridge on its side. This may cause ink to leak from one well into
another if there is any residue remaining on the printhead.
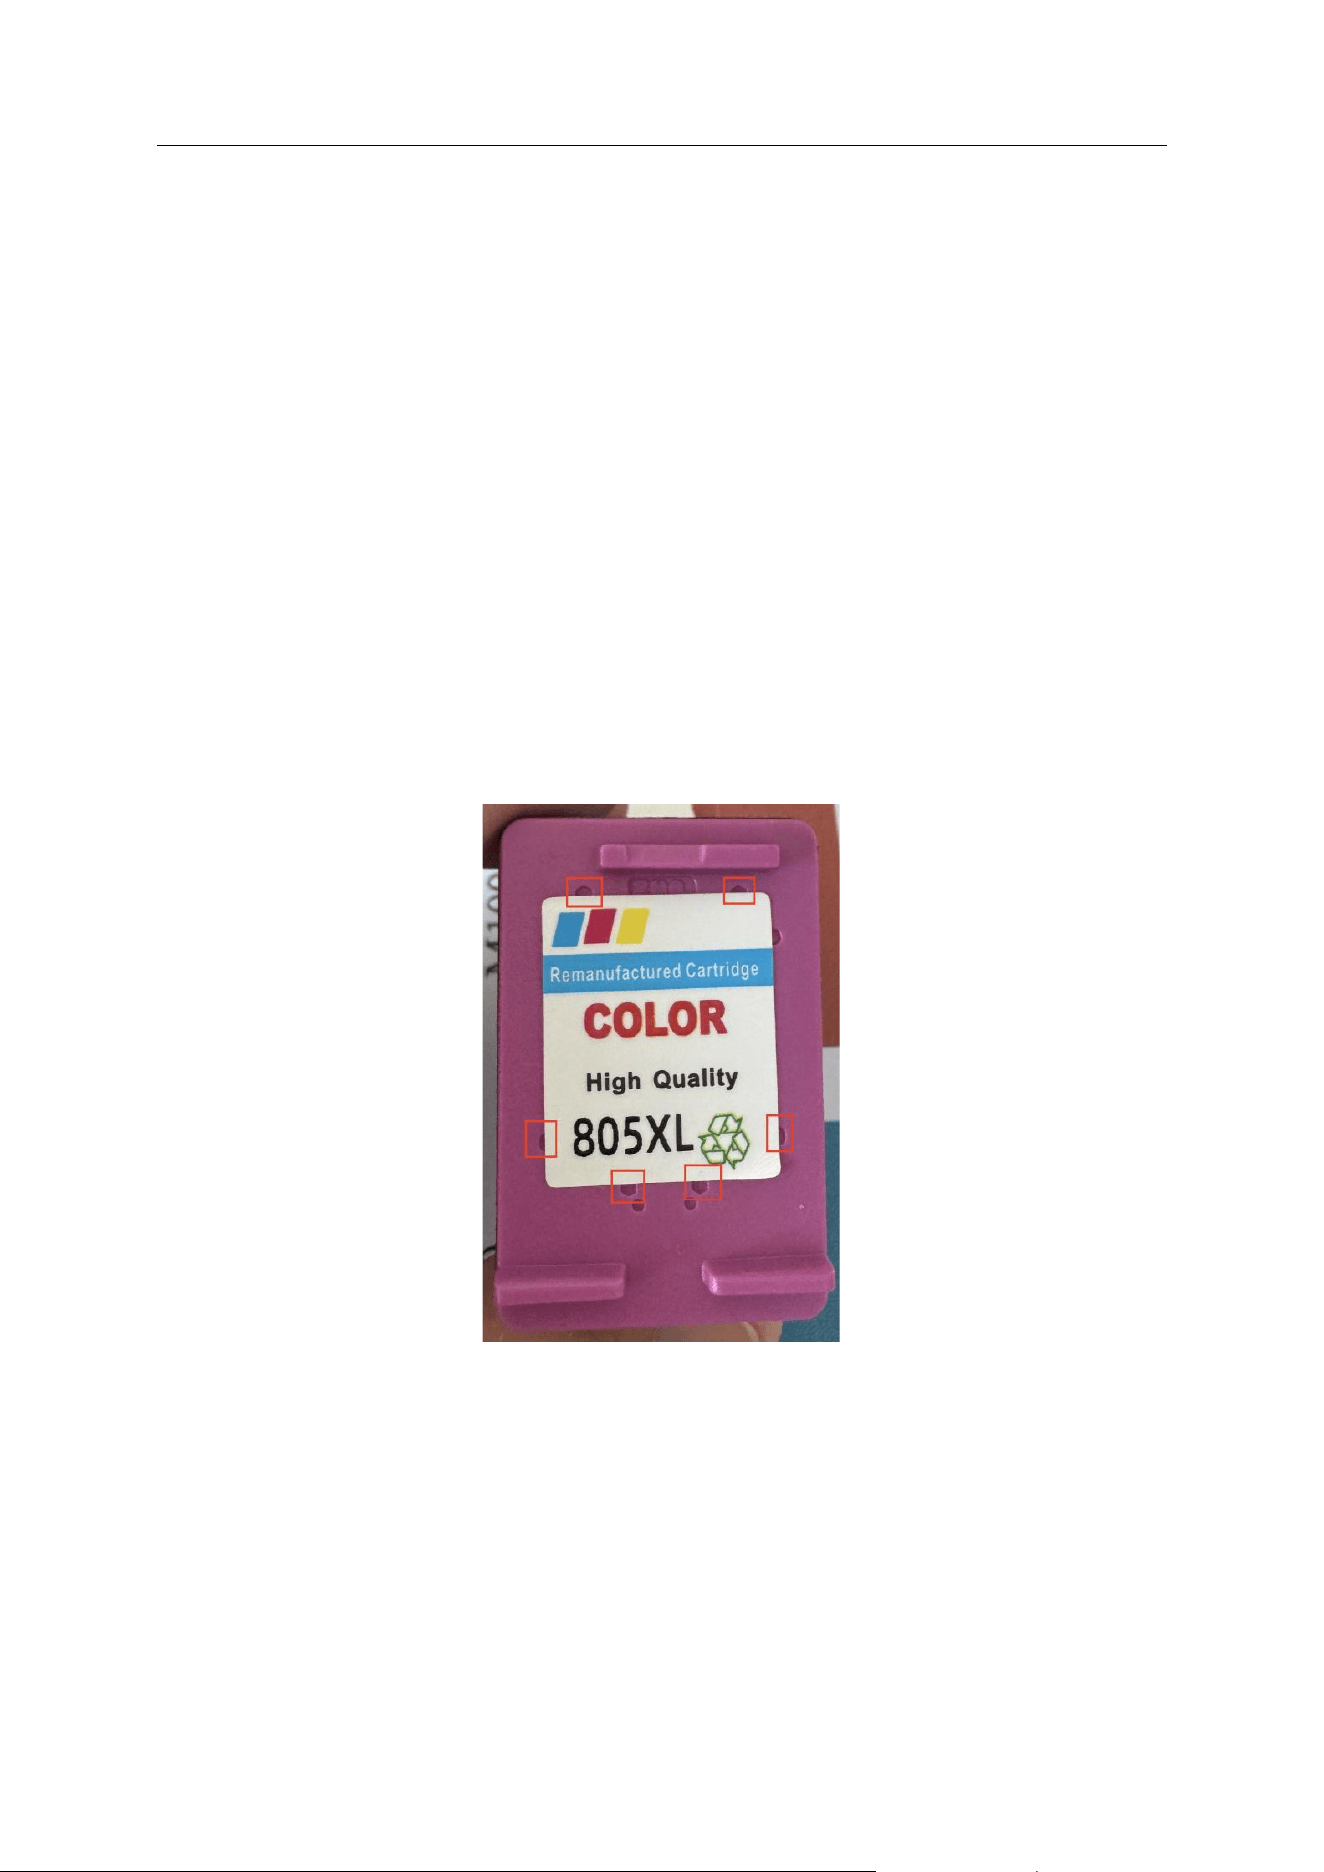
4. Always check to see that your top label is not completely covering the breather inlets
shown in the image below. If any are completely covered then gently peel the label
off and reapply it so that all have at least a tiny opening. The application process will
be refined in the final production environment.
5. If you remove the cartridge from the Panda Treat when not in use then store it within
a small, airtight container, standing upright but at an angle so that the printhead is not
making direct contact with the base of the container.
6. If the cartridge has not been used for more than a few hours then use a paper towel
to gently wipe the printhead (can be done when installed in the mounted treat). Wipe
towards you at a moderate pace until you see three distinct colour lines being
formed. Repeat at least three times after seeing three distinct colour lines.
7. If your cartridge has not been used for several days then you may need to wet the
paper towel before wiping. Press and hold the damp paper towel in place for 5
seconds and then perform the wiping action as above.
CONFIDENTIAL
PLEASE DO NOT DISTRIBUTE
Page 4 of 15
5 INSTALLATION
5.1 PRINTING PARTS
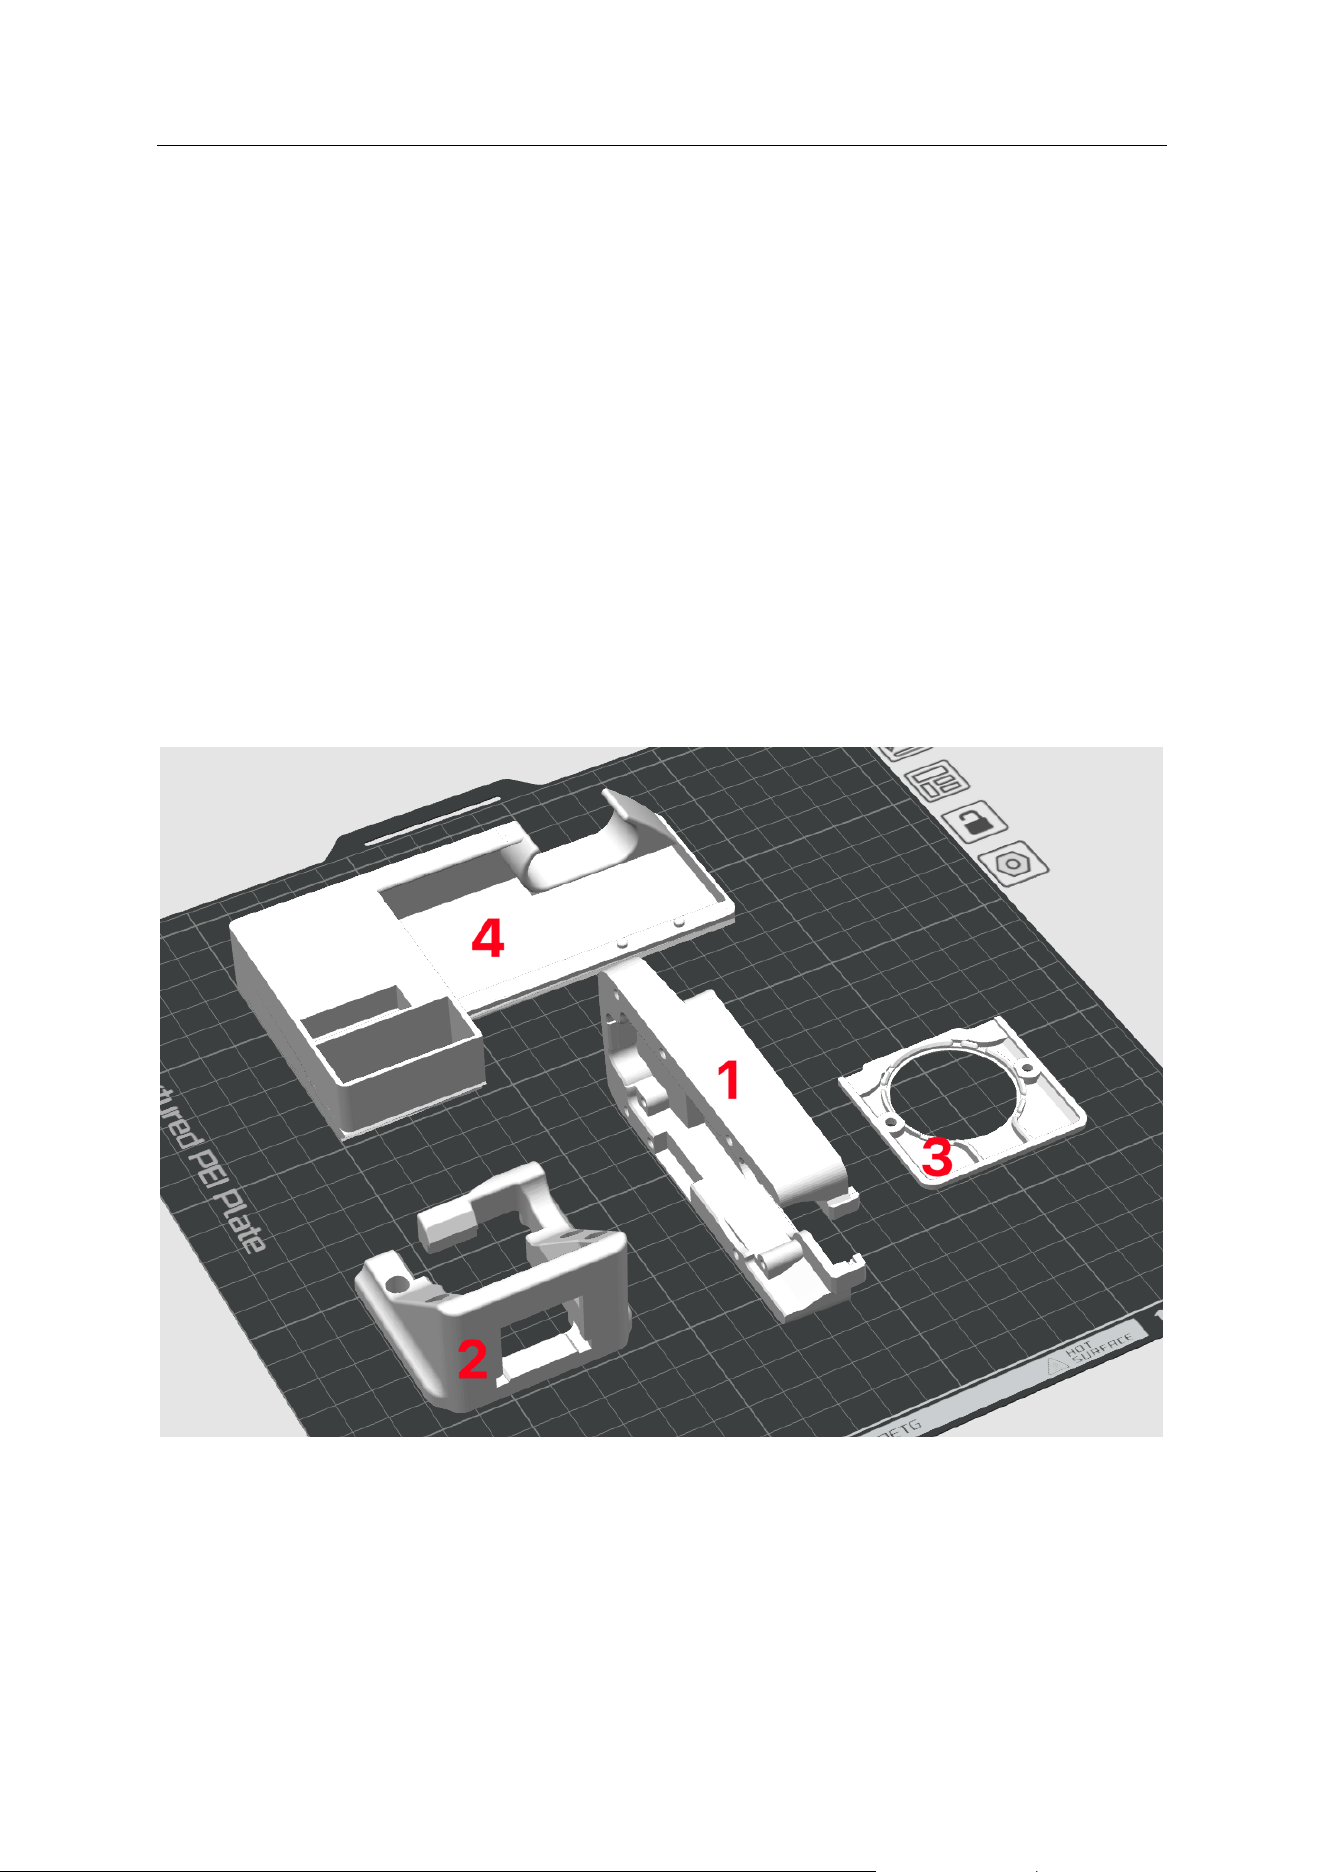
Begin the installation process by printing all of the needed parts. A 3mf file has been
provided that contains the needed parts. Naturally, the 3mf has been configured to operate
on a Bambu A1 machine since that is the machine associated with this phase of the beta
testing. Printing in PLA is recommended.
Do not adjust the support settings or part orientation within the provided 3mf. The parts and
supports have been optimised to ensure good alignment and support where needed.
Once your print is done you should have the parts listed below and shown in the image that
follows.
1. Main body
2. Edible ink cartridge mount
3. LCD cover
4. Purge bucket
5.2 ASSEMBLY
To assemble the Panda Treat for the A1, do the following:
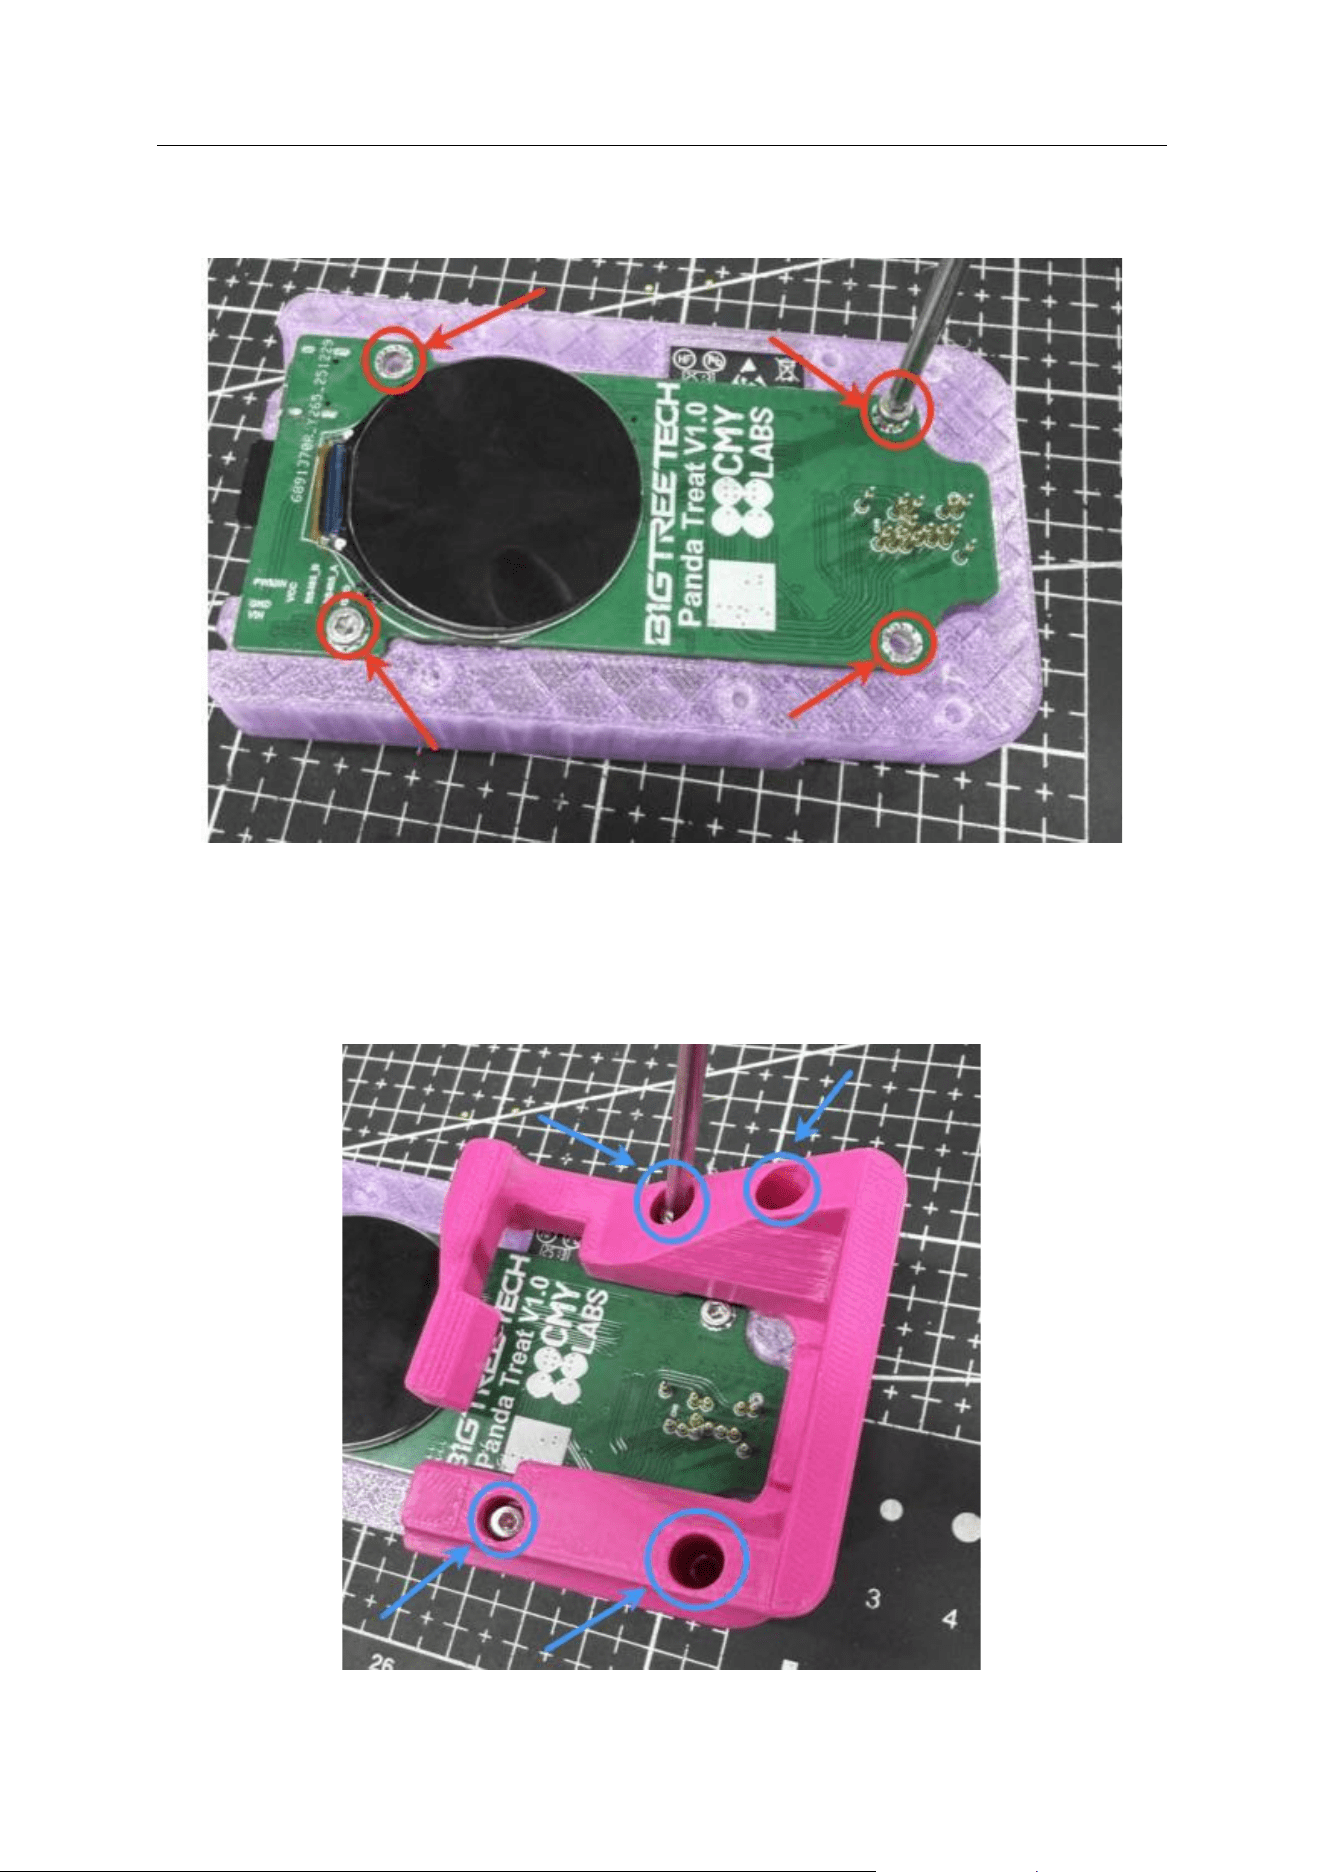
1. Place the PCB into the main mount with the LCD facing upwards. Ensure that the
PCB holes align well with the mounting screw holes and screw the four SHCS down.
CONFIDENTIAL
PLEASE DO NOT DISTRIBUTE
Page 5 of 15
There is no need to over torque the SHCS. Simply ensure that the PCB is pressed
firmly against the mount by them.
2. Place the cartridge mount over the front of the main mount and ensure that the holes
in the cartridge mount align well with the holes in the main mount. Screw the four
SHCS into place. Again, do not over torque them otherwise you risk stripping the
printed plastic. There should however, be no play at all between the cartridge mount
and the main mount.
CONFIDENTIAL
PLEASE DO NOT DISTRIBUTE
Page 6 of 15
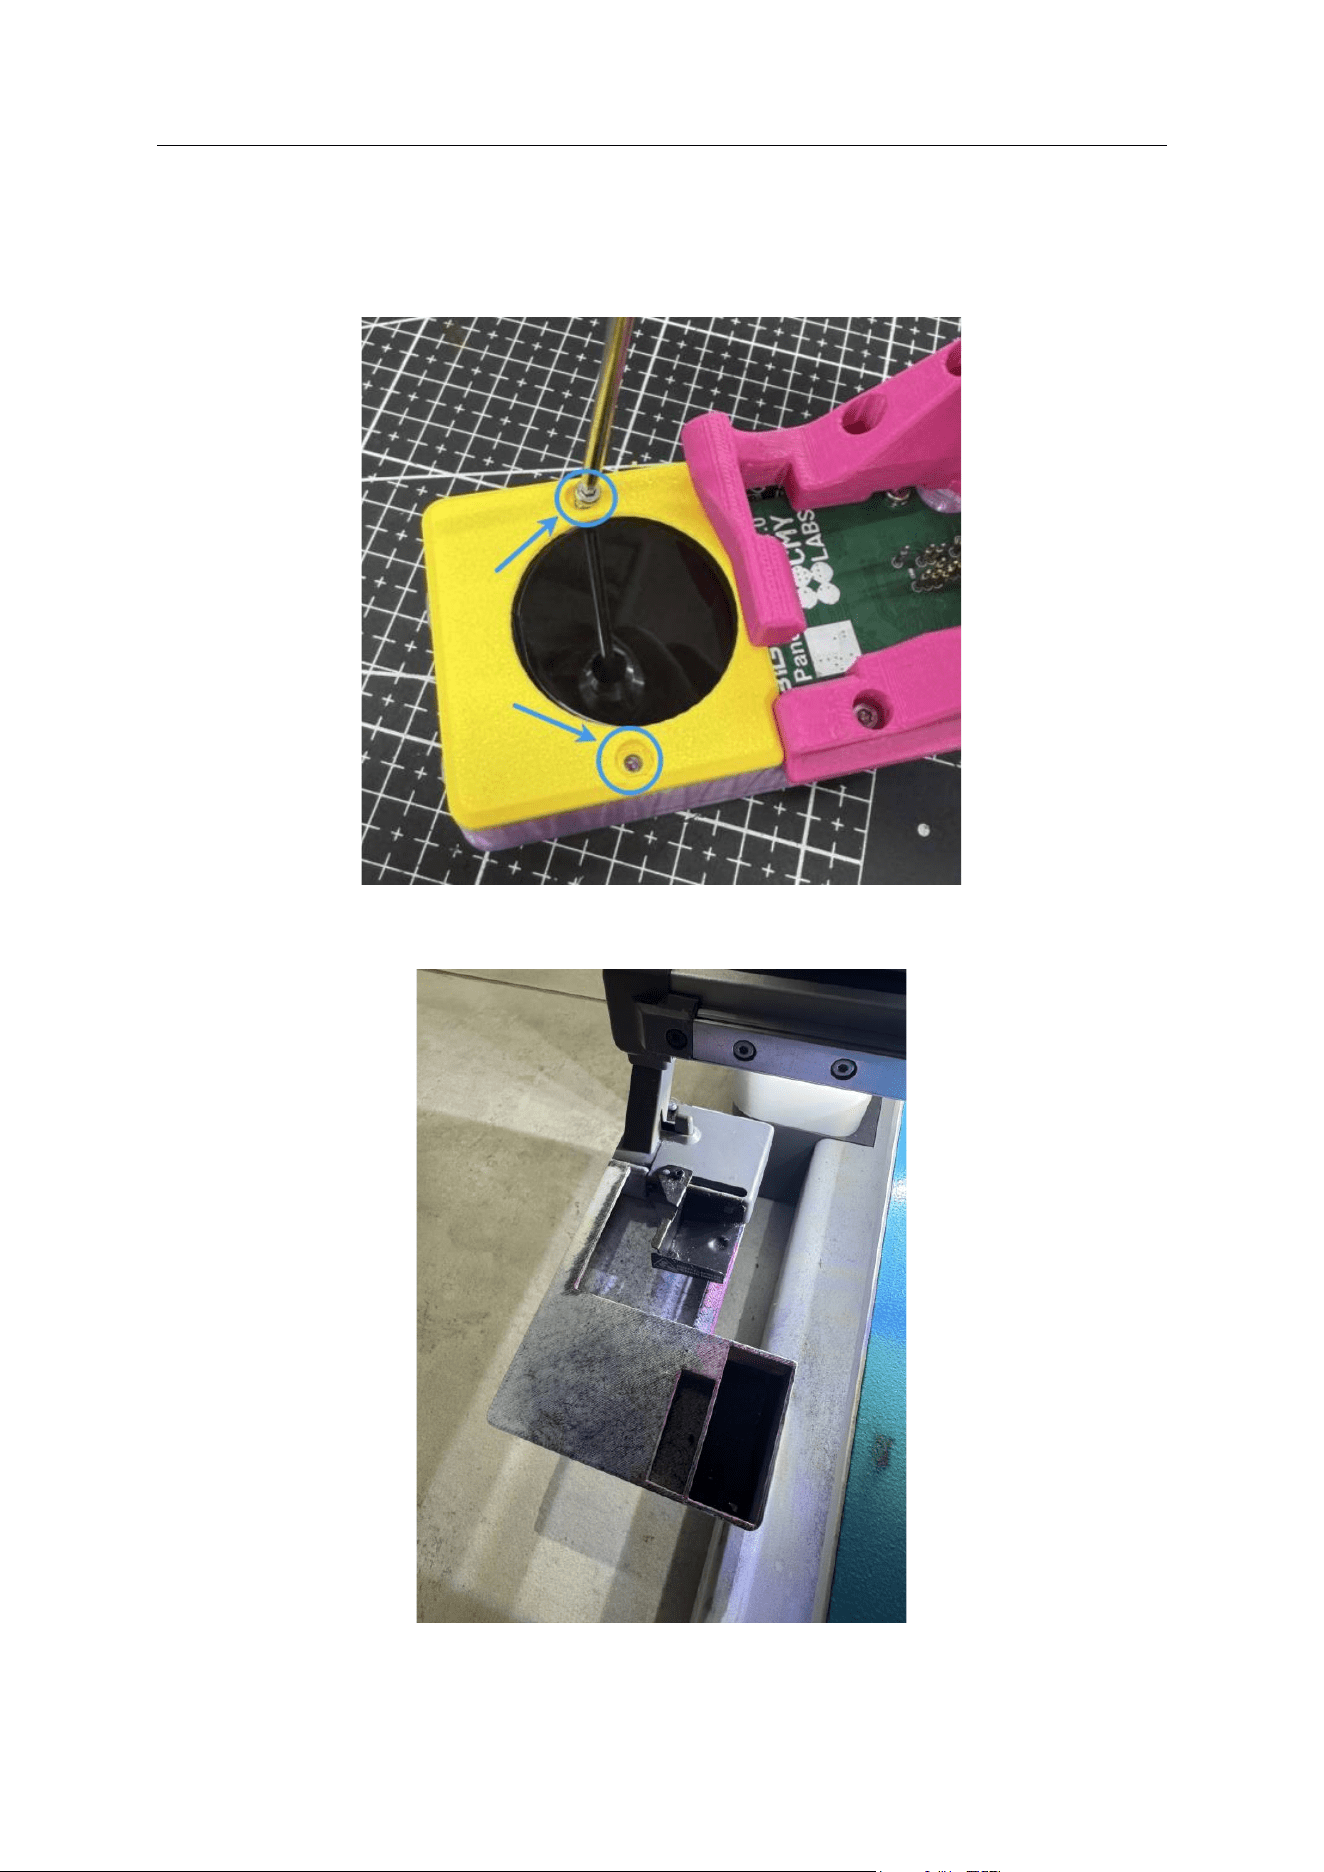
3. N.B. Be particularly cautious not to cause damage to the LCD by pinching it between
the cover and the main body during this step. Place the LCD cover over the LCD and
wiggle it around a bit to ensure that the LCD has slid into the mounting groove.
Tighten the two SHCS on either side of the LCD. Again, do not over torque them.
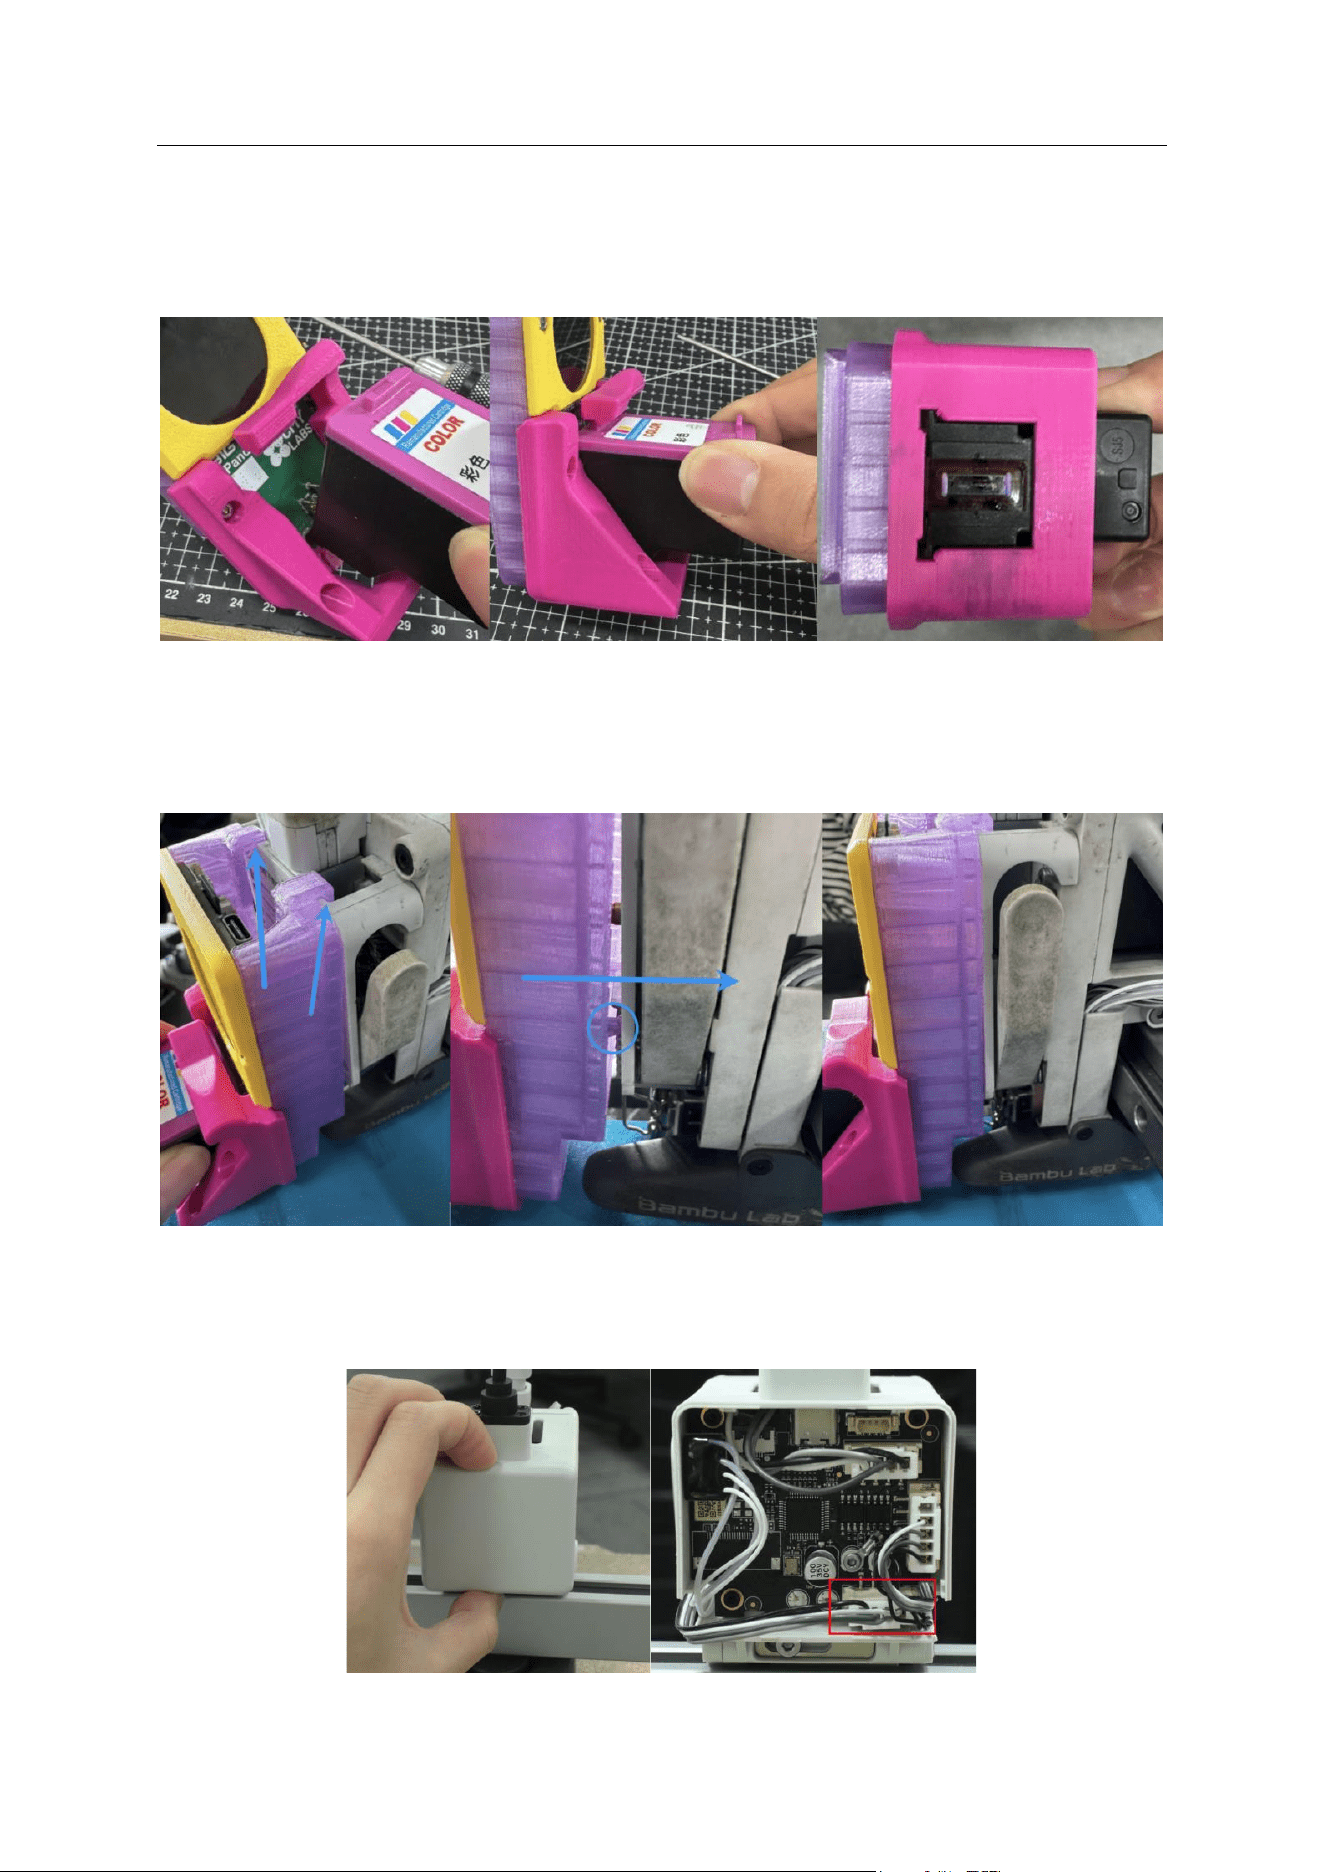
4. Clip the edible ink purge bucket onto the existing purge bucket of the A1 machine.
CONFIDENTIAL
PLEASE DO NOT DISTRIBUTE
Page 7 of 15
5. N.B. Never perform this step or cartridge removal with power applied to the Panda
Treat. Clip the edible ink cartridge into the Panda Treat assembly by inserting the
bottom into the cartridge mount and then rotating the top into the lever arm clip.
Apply force until the lever arm clip has secured the cartridge in place.
6. Remove the front cover of the A1 toolhead as well as the extruder movement
indicator wheel and then clip the Panda Treat assembly in place. Ensure that the
toolhead body and the main body of the Panda Treat are relatively flush and well
fixed.
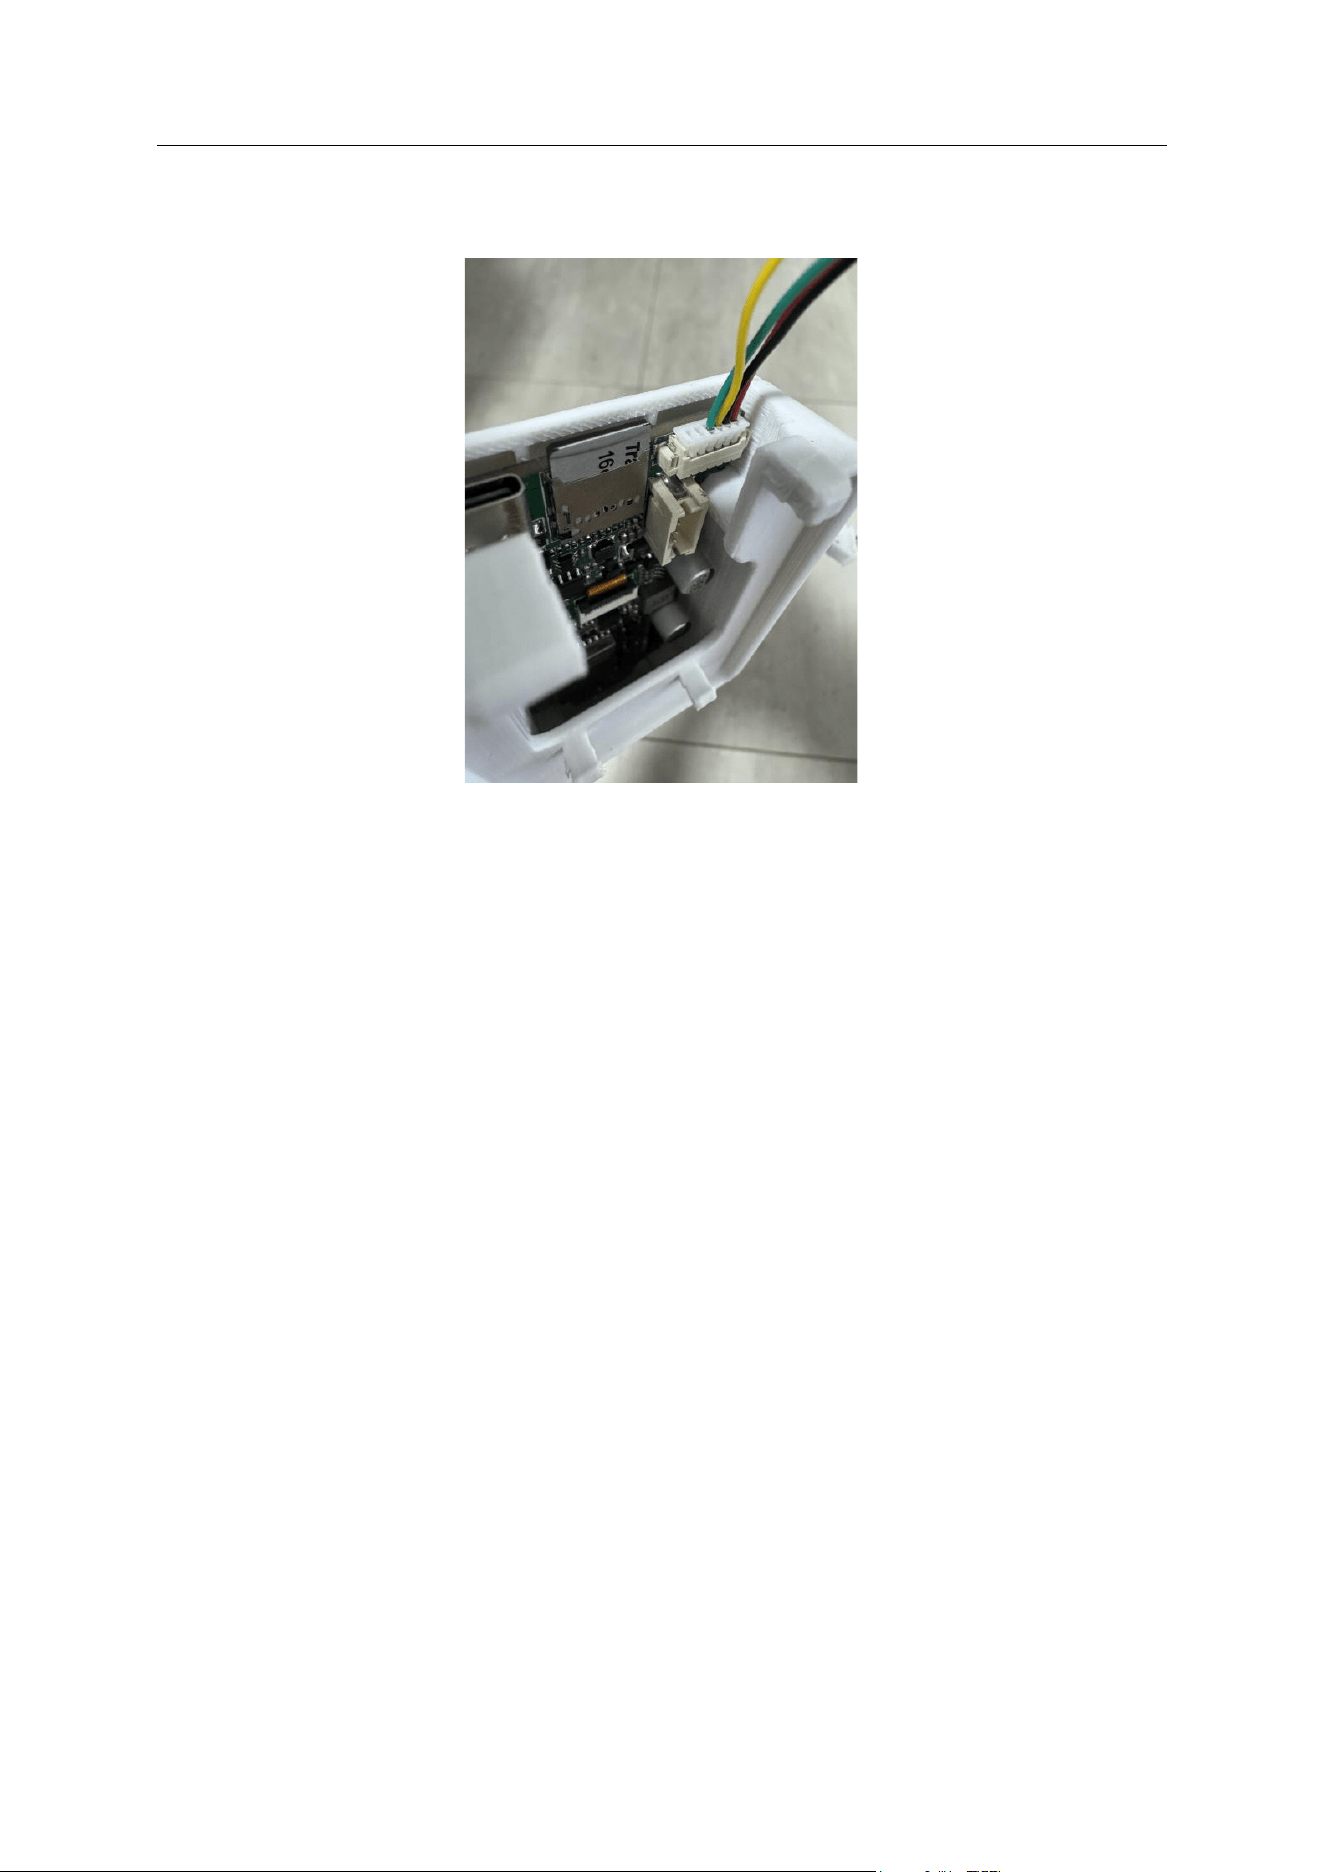
7. Ensure that your A1 is powered off and remove the rear cover of the toolhead and
unplug the PWM fan JST connector. You can tuck the PWM fan connector safely
within the enclosure.
CONFIDENTIAL
PLEASE DO NOT DISTRIBUTE
Page 8 of 15
8. Plug the Panda Treat A1 power cable into the PWM fan connector socket and then
insert the other end of the cable into the Panda Treat as shown below.
9. Format an SD card using FAT32 and then insert it into the Panda Treat as shown in
the image above.
Congratulations, your installation is complete and you are ready to get started.

CONFIDENTIAL
PLEASE DO NOT DISTRIBUTE
Page 9 of 15
6 FIRST TIME OPERATION
6.1 WIFI AND PRINTER BINDING
Upon first power up the Panda Treat will present you with a screen that displays a QR code
inviting you to scan it and get started. Scanning this code should result in your device
connecting to the Panda Treat hotspot once you allow it. If you have trouble connecting to
the hotspot using the QR code then please log it as an issue in the beta repo and connect to
the hotspot manually using 987654321 as the password.
After your device connects to the Panda Treat hotspot you should automatically be directed
to a captive portal. If you are not directed to the captive portal then you can navigate to
192.168.4.1 which will take you to the Panda Treat landing page where you will be able to
configure the WiFi connection and printer binding. If your home network uses 192.168.4.X as
a DHCP space then you should disable the Panda Treat access point after connecting it to
your network to prevent a DHCP conflict. This will be fixed in the final version.
We recommend using the Panda Treat when the printer is in LAN Only – Dev mode as this
will allow the Panda Treat to stop a print if it detects that the printer has not yet been
properly prepared for the print.
Configuring the WiFi connection and printer binding should be a self-explanatory process but
please take note if there is anything that is not intuitive during the process. Note that you
must connect the Panda Treat to the same WiFi network that the printer is connected to
before you can bind them together. Also note that this network cannot be a “Guest” style
network since they usually block inter device communication.
6.2 SETTINGS
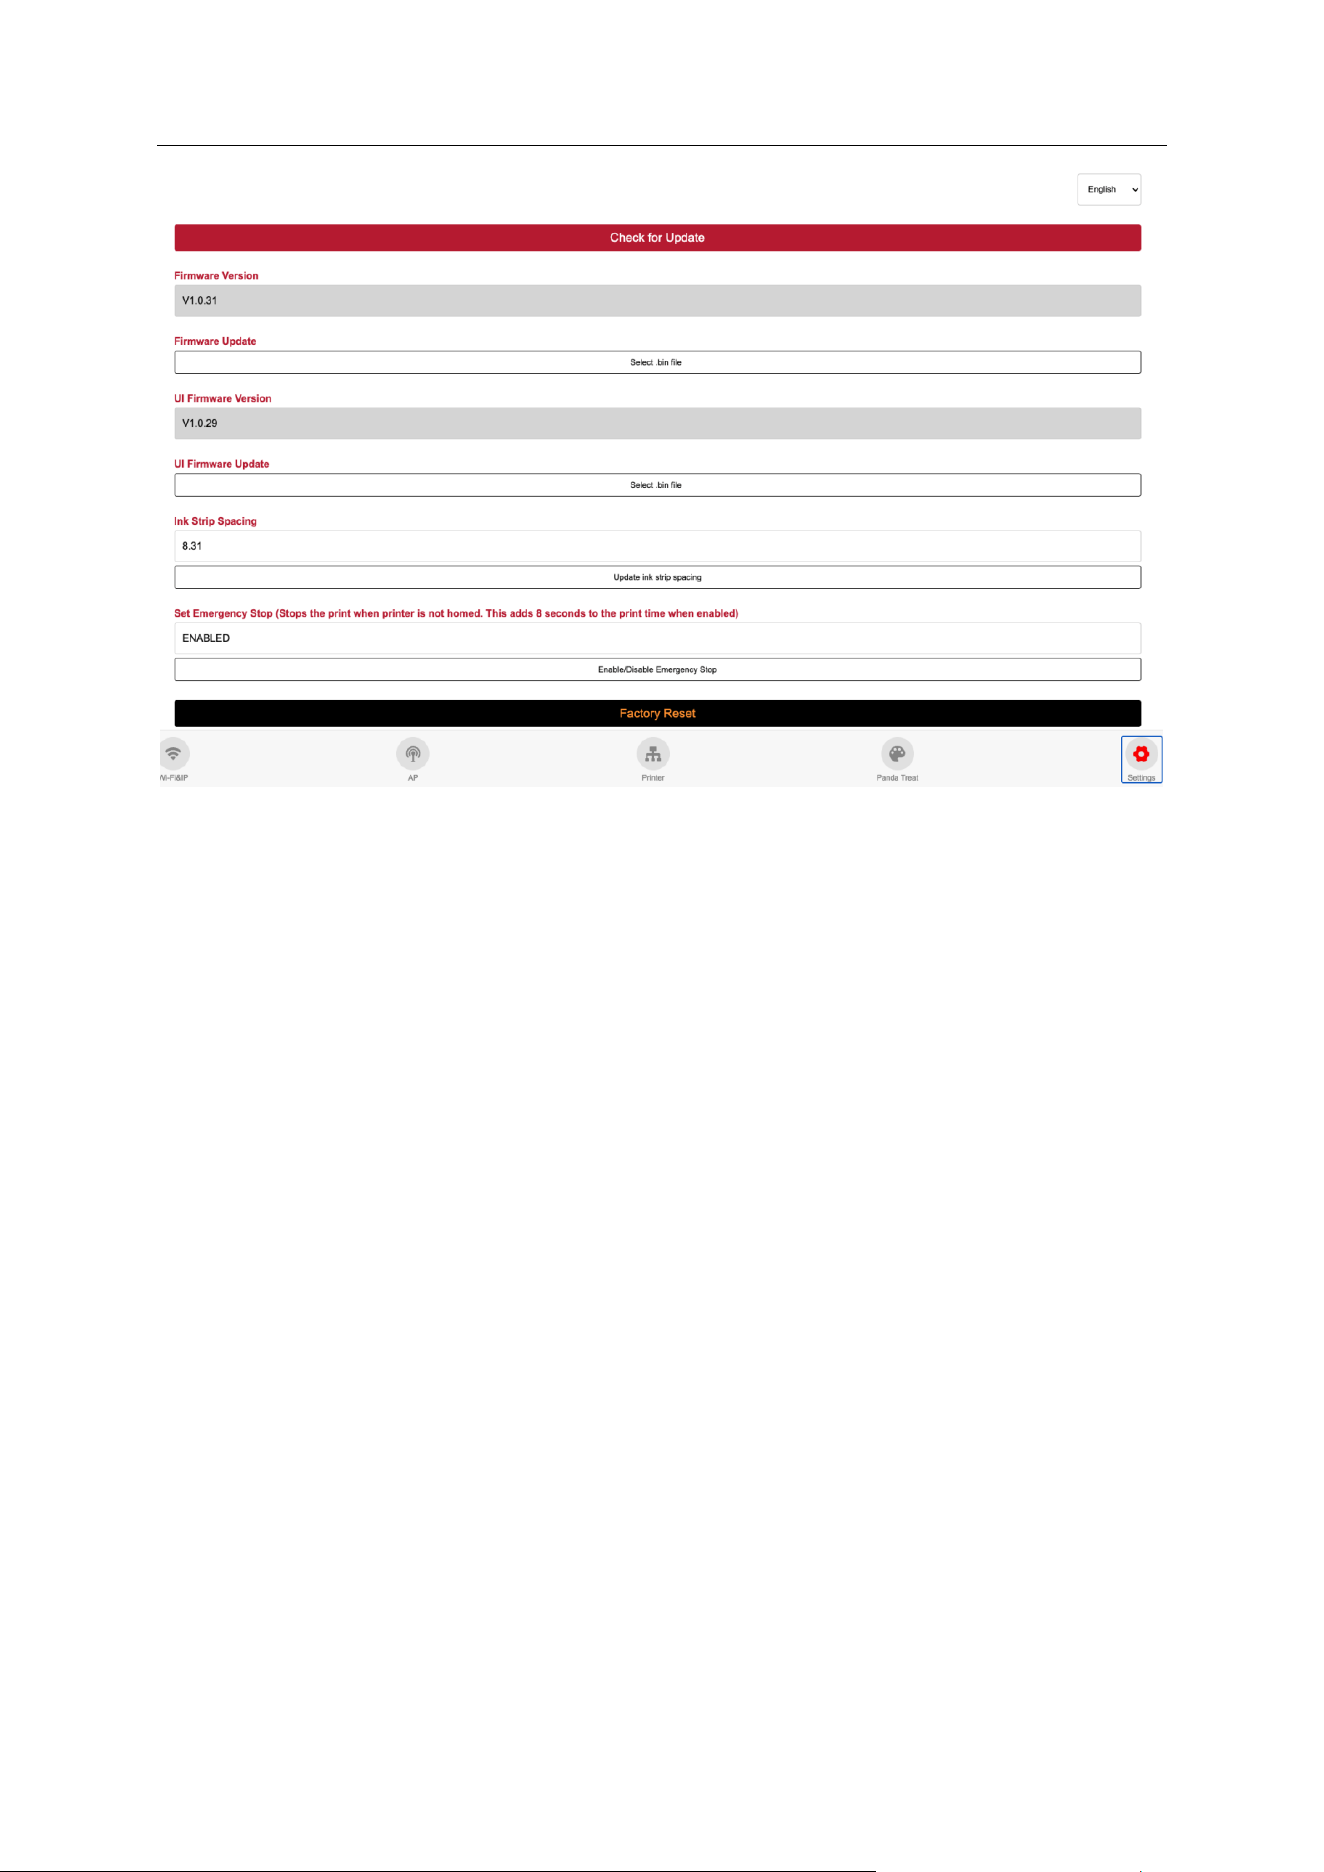
Once the WiFi and printer are bound to the Panda Treat you should check that your default
settings are correct. The settings can be found on the final tab of the configuration screen.
When you start the beta test you should have the following default settings:
• Firmware version → 1.0.31
• UI Version → 1.0.29
• Ink strip spacing → 8.31
• Set emergency stop → Enabled
CONFIDENTIAL
PLEASE DO NOT DISTRIBUTE
Page 10 of 15
CONFIDENTIAL
PLEASE DO NOT DISTRIBUTE
Page 11 of 15
7 PRINTING ONTO ITEMS
7.1 PROCESS OVERVIEW
When performing a 3D print, it all starts in the slicer and then moves across to the printer.
When performing an edible ink print, it all starts with the web UI and then moves into two
locations: the printer and the Panda Treat itself.
The process overview is summarised as:
• Access the Panda Treat local website.
• Upload the image you’d like to print to that website.
• Scale the image and select the shape of your object you’d like to print onto.
• Set what height the print should take place at.
• Decide if you want that image to persist or be overwritten by the next one. If you want
it to persist then make it a favourite and give it a name.
• Decide if you want to YOLO the print without printing markers or if you would like the
Panda Treat to first print markers onto the surface to let you know where the actual
print will be placed.
• Send the desired prints to the Panda Treat and the printer.
7.2 “SLICING” AND IMAGE
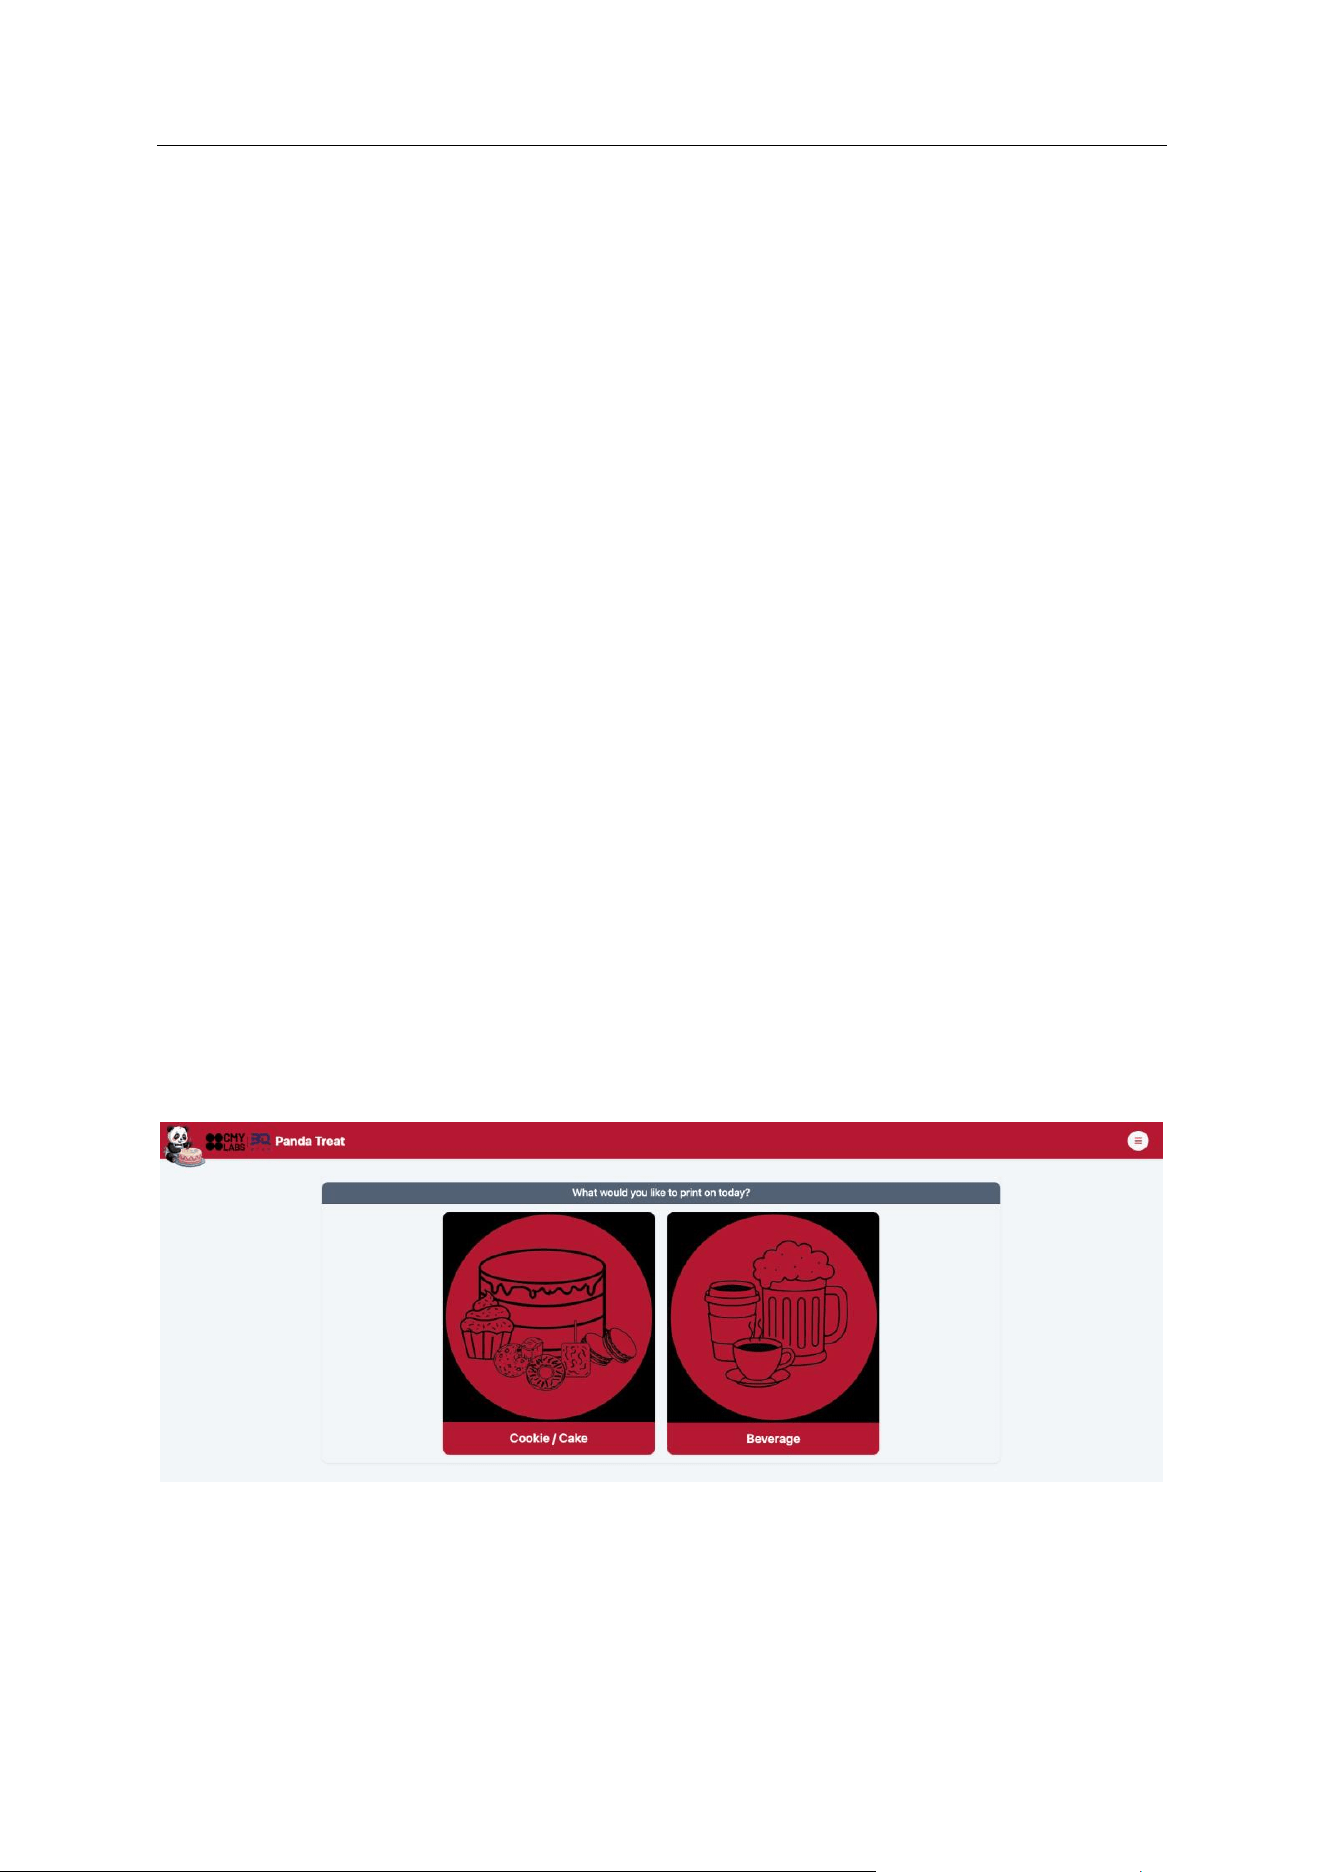
The first step is to access the web UI by going to pandatreat.local on the WiFi network that
you programmed into the Panda Treat. This should present you with a page that offers you
the option to print onto a solid or a liquid. If it presents you with the settings page then please
let us know in the beta repo. In such a case, simply select the Panda Treat option from the
bottom menu in order to access the correct page.
From this page, select the type of object that you plan to print to. The process is almost the
same for both types with a few added checks and balances for drinks.
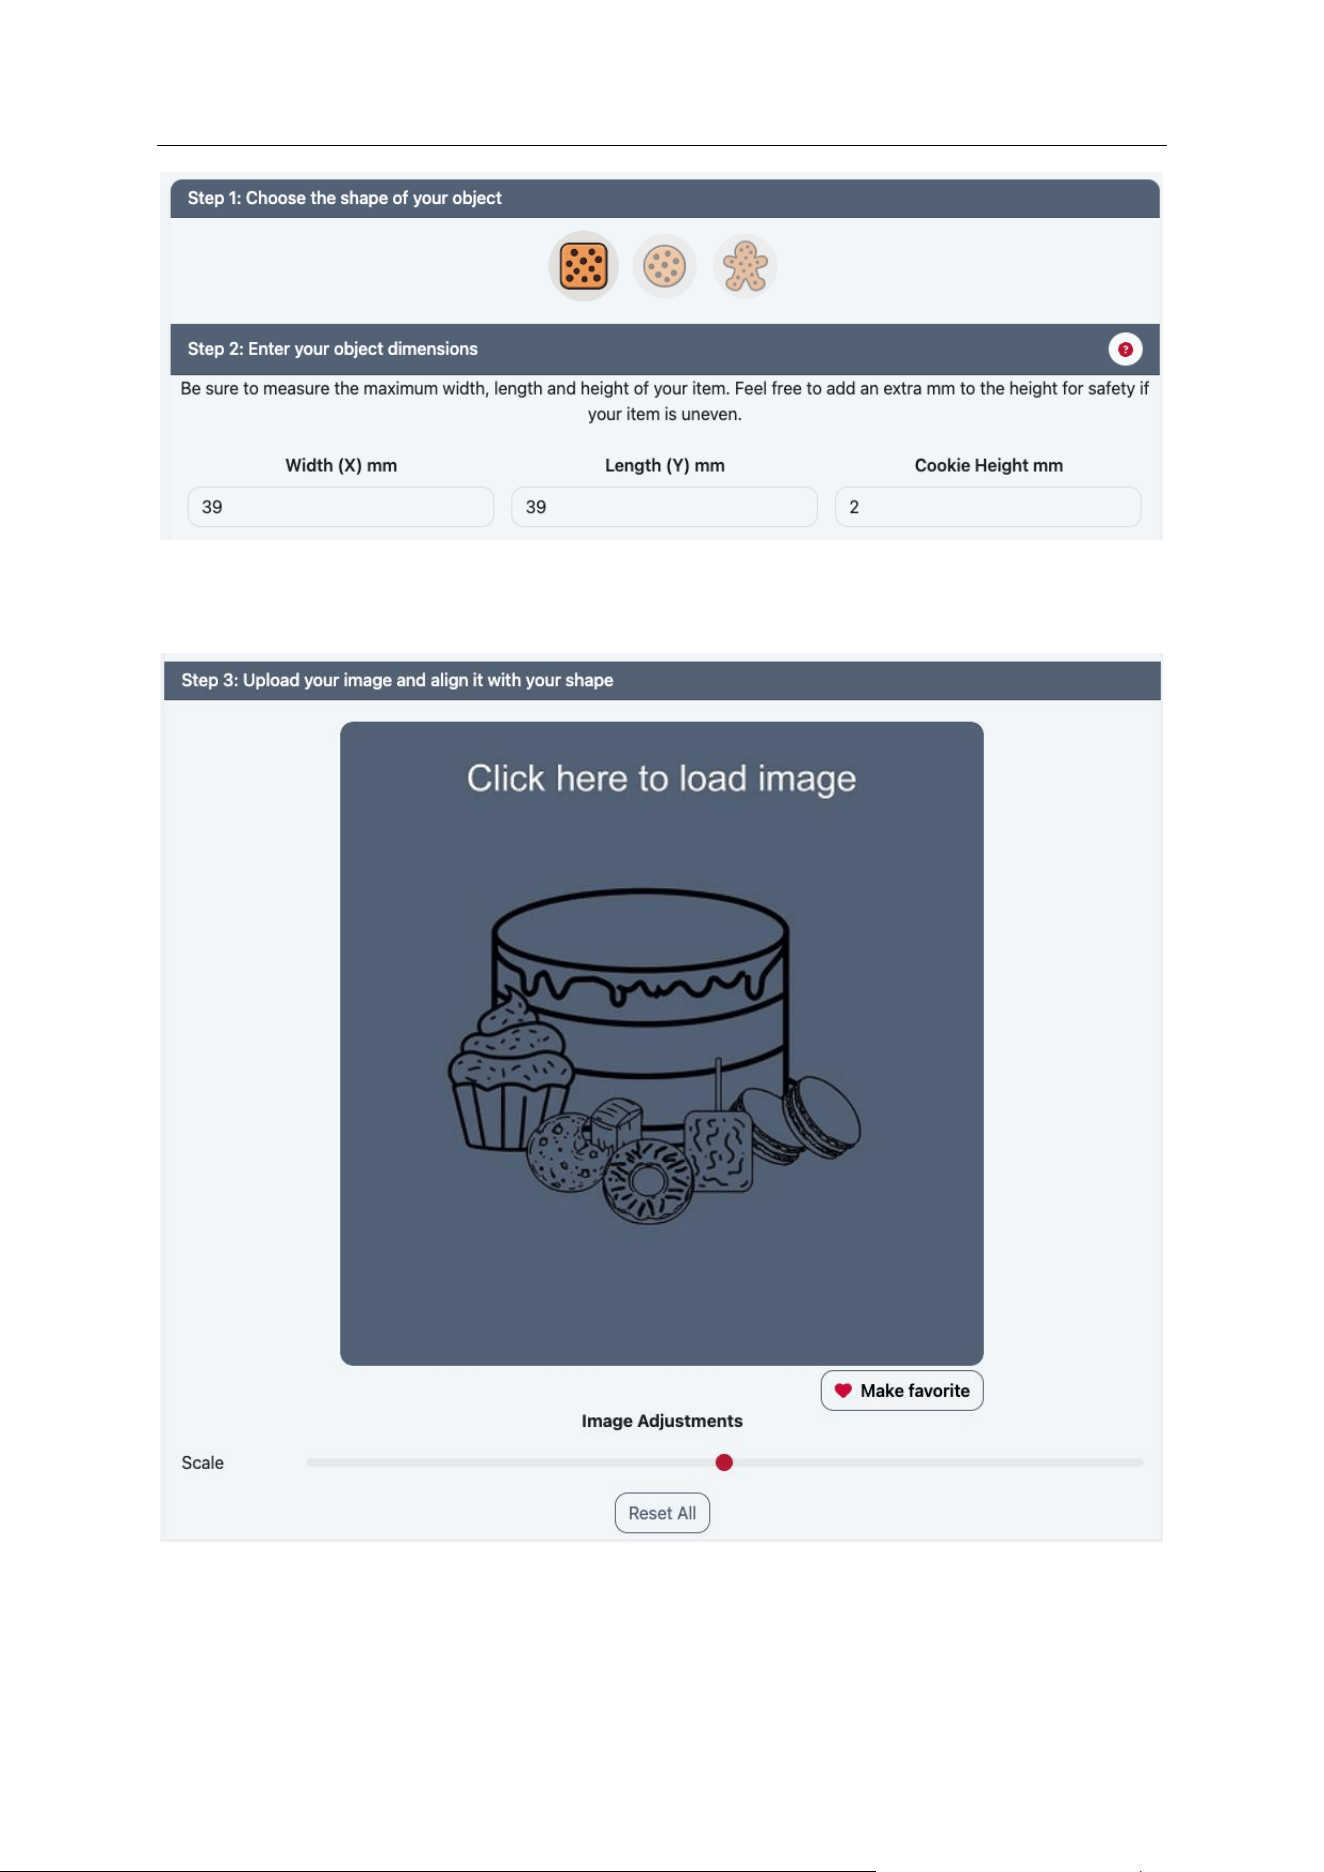
Once within the print menu, select the shape of your object and then enter the dimensions of
it. The height is the most critical dimension as an incorrect setting here could result in the
print head dragging over your object. Simply measure the height of your object using the
printable height measurement tool (available in the github repo soon) or using any other
device that is accurate to within 1mm. Set the height to what you measured +0.5mm.
CONFIDENTIAL
PLEASE DO NOT DISTRIBUTE
Page 12 of 15
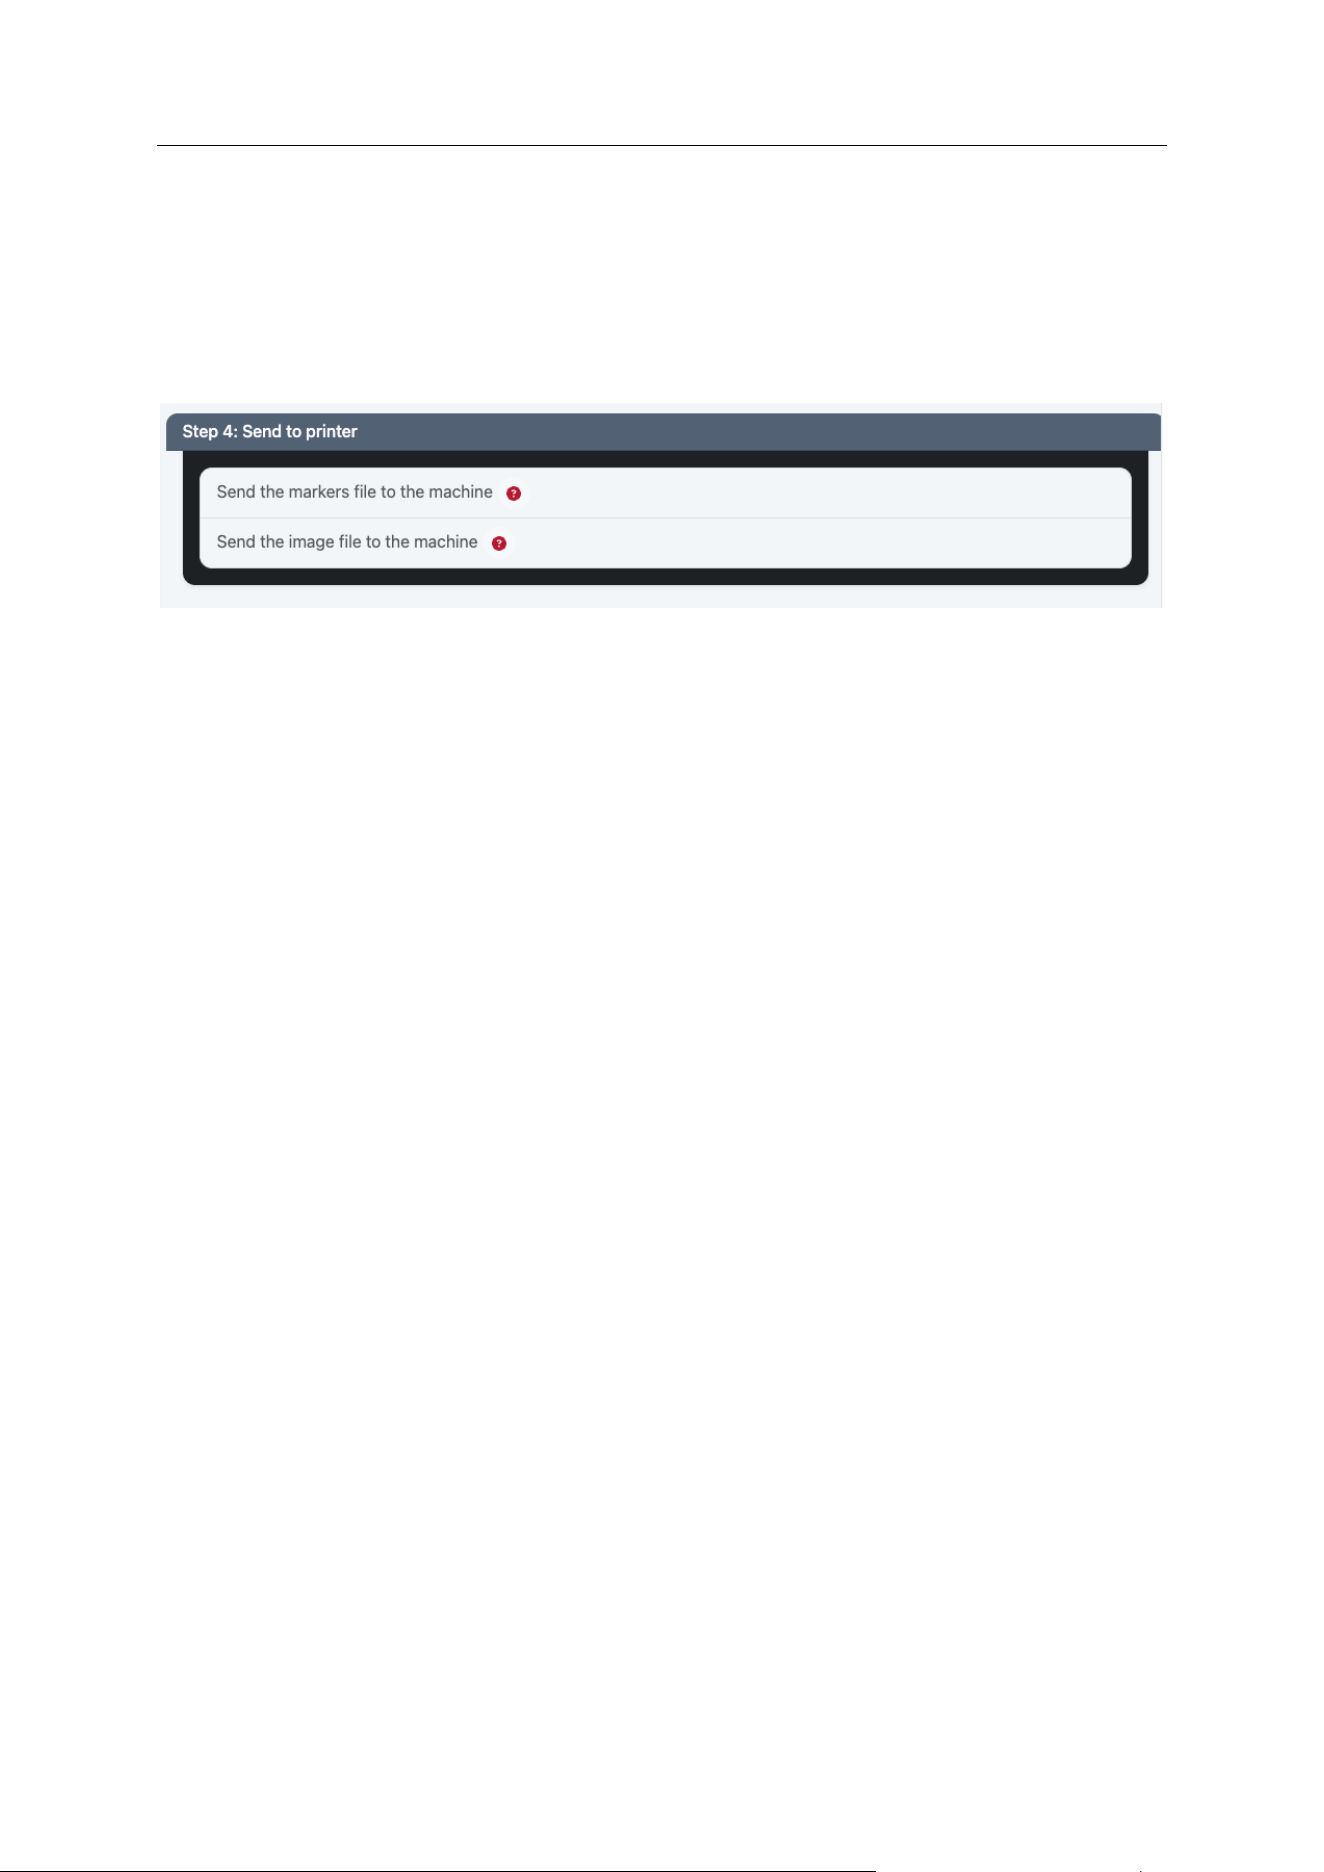
Once the dimensions of your object are set, you can upload your image, scale it and view it
within a bounding box that is defined by your object dimensions.
Use the “Make favorite” button if you would like this print to remain available even after you
upload a new one. If you do not make it a favorite then the next print will overwrite this one.
CONFIDENTIAL
PLEASE DO NOT DISTRIBUTE
Page 13 of 15
Finally, select if you would like to send markers to the machine or the image to the machine.
The marker is the red bounding box that is shown in the preview and it defines where you
should place your object on the bed. If you are printing onto something for the first time then
it is generally good to send the marker along with the actual print.
If you plan to send both files then you will need to select each, one-by-one and wait for the
upload to complete.
7.3 PRINTING AN IMAGE
With the markers or the actual image on the SD card of the machine, you are now in a
position to start the print.
Before you start a Panda Treat print, the printer must be prepared. You may notice that
when the Panda Treat uploads the files to the printer SD card, it also uploads a file that is
named “Prepare.gcode.3mf”. If the Panda Treat displays “Printer not prepared” on the LCD
then run this file first. Before running this file, remove all objects from the bed and ensure
that whatever surface you plan to place the objects onto is now on the bed. After running the
file, the Panda Treat will display a picture of a small Panda bear and a cake which indicates
that it is ready.
With the printer prepared you are now in the position to start a print. Select the print file from
the print menu on the printer and then ensure that ALL of the additional options that Bambu
provide such as “Timelapse”, “Be Levelling” and “Dynamic Flow” are disabled. Once they are
disabled you can start the print.
When printing a marker file, ensure that the object that you want to print onto is not on the
bed. The marker file will be printed onto the surface that you will place that object onto at the
same height of that surface.
If the marker file has already been printed or you don’t need one then you can place the
object directly onto the print surface and print the final file.

CONFIDENTIAL
PLEASE DO NOT DISTRIBUTE
Page 14 of 15
8 PRINT QUALITY
The Panda Treat is capable of producing 600dpi image quality although the quality of prints
produced will largely depend on how well your cartridge is performing. Please refer to
section 4 for information on how to get the best performance from a print cartridge.
If you notice that there are very obvious gaps or dark lines in between print passes then it
may mean that your printer Y axis is not moving as much as it should be or perhaps that it is
moving too little. Try to re-tension your Y belt and then print again. If that does not work then
you can try to adjust your ink spacing up or down in 0.01 increments.
If there are other artifacts in your prints then please snap a picture of them and upload them
to the Panda Treat beta repo for further analysis.

CONFIDENTIAL
PLEASE DO NOT DISTRIBUTE
Page 15 of 15
9 BETA TESTING CHECKLIST
Below are a few brief points to look out for but please report anything that you find to the
Panda Treat beta repo.
• Did you encounter any difficulties when printing the needed parts?
• Did you encounter any difficulties when assembling or installing the Panda Treat?
• Did you encounter any difficulties during the initial power up and configuration
process?
• Did the automatic scanning and connection to the Panda Treat hotspot work?
• Are there any UI problems?
• Did you have any print quality problems?
• Do you have any suggestions for the print workflow?

FCC Statement
Changes or modifications not expressly approved by the party responsible for compliance could
void the user's authority to operate the equipment.
This equipment has been tested and found to comply with the limits for a Class B digital device,
pursuant to Part 15 of the FCC Rules. These limits are designed to provide reasonable
protection against harmful interference in a residential installation. This equipment generates
uses and can radiate radio frequency energy and, if not installed and used in accordance with
the instructions, may cause harmful interference to radio communications. However, there is no
guarantee that interference will not occur in a particular installation. If this equipment does
cause harmful interference to radio or television reception, which can be determined by turning
the equipment off and on, the user is encouraged to try to correct the interference by one or
more of the following measures:
-- Reorient or relocate the receiving antenna.
-- Increase the separation between the equipment and receiver.
-- Connect the equipment into an outlet on a circuit different from that to which the receiver is
connected.
-- Consult the dealer or an experienced radio/TV technician for help
This device complies with part 15 of the FCC rules. Operation is subject to the following two
conditions (1)this device may not cause harmful interference, and (2) this device must accept
any interference received, including interference that may cause undesired operation.
This equipment complies with FCC radiation exposure limits set forth for an uncontrolled
environment. This equipment should be installed and operated with minimum distance 20cm
between the radiator & your body.