EN
1
Owner’s Manual
PRODUCT DESCRIPTION
1
2
8
3
5
7
10
11
4
6
9
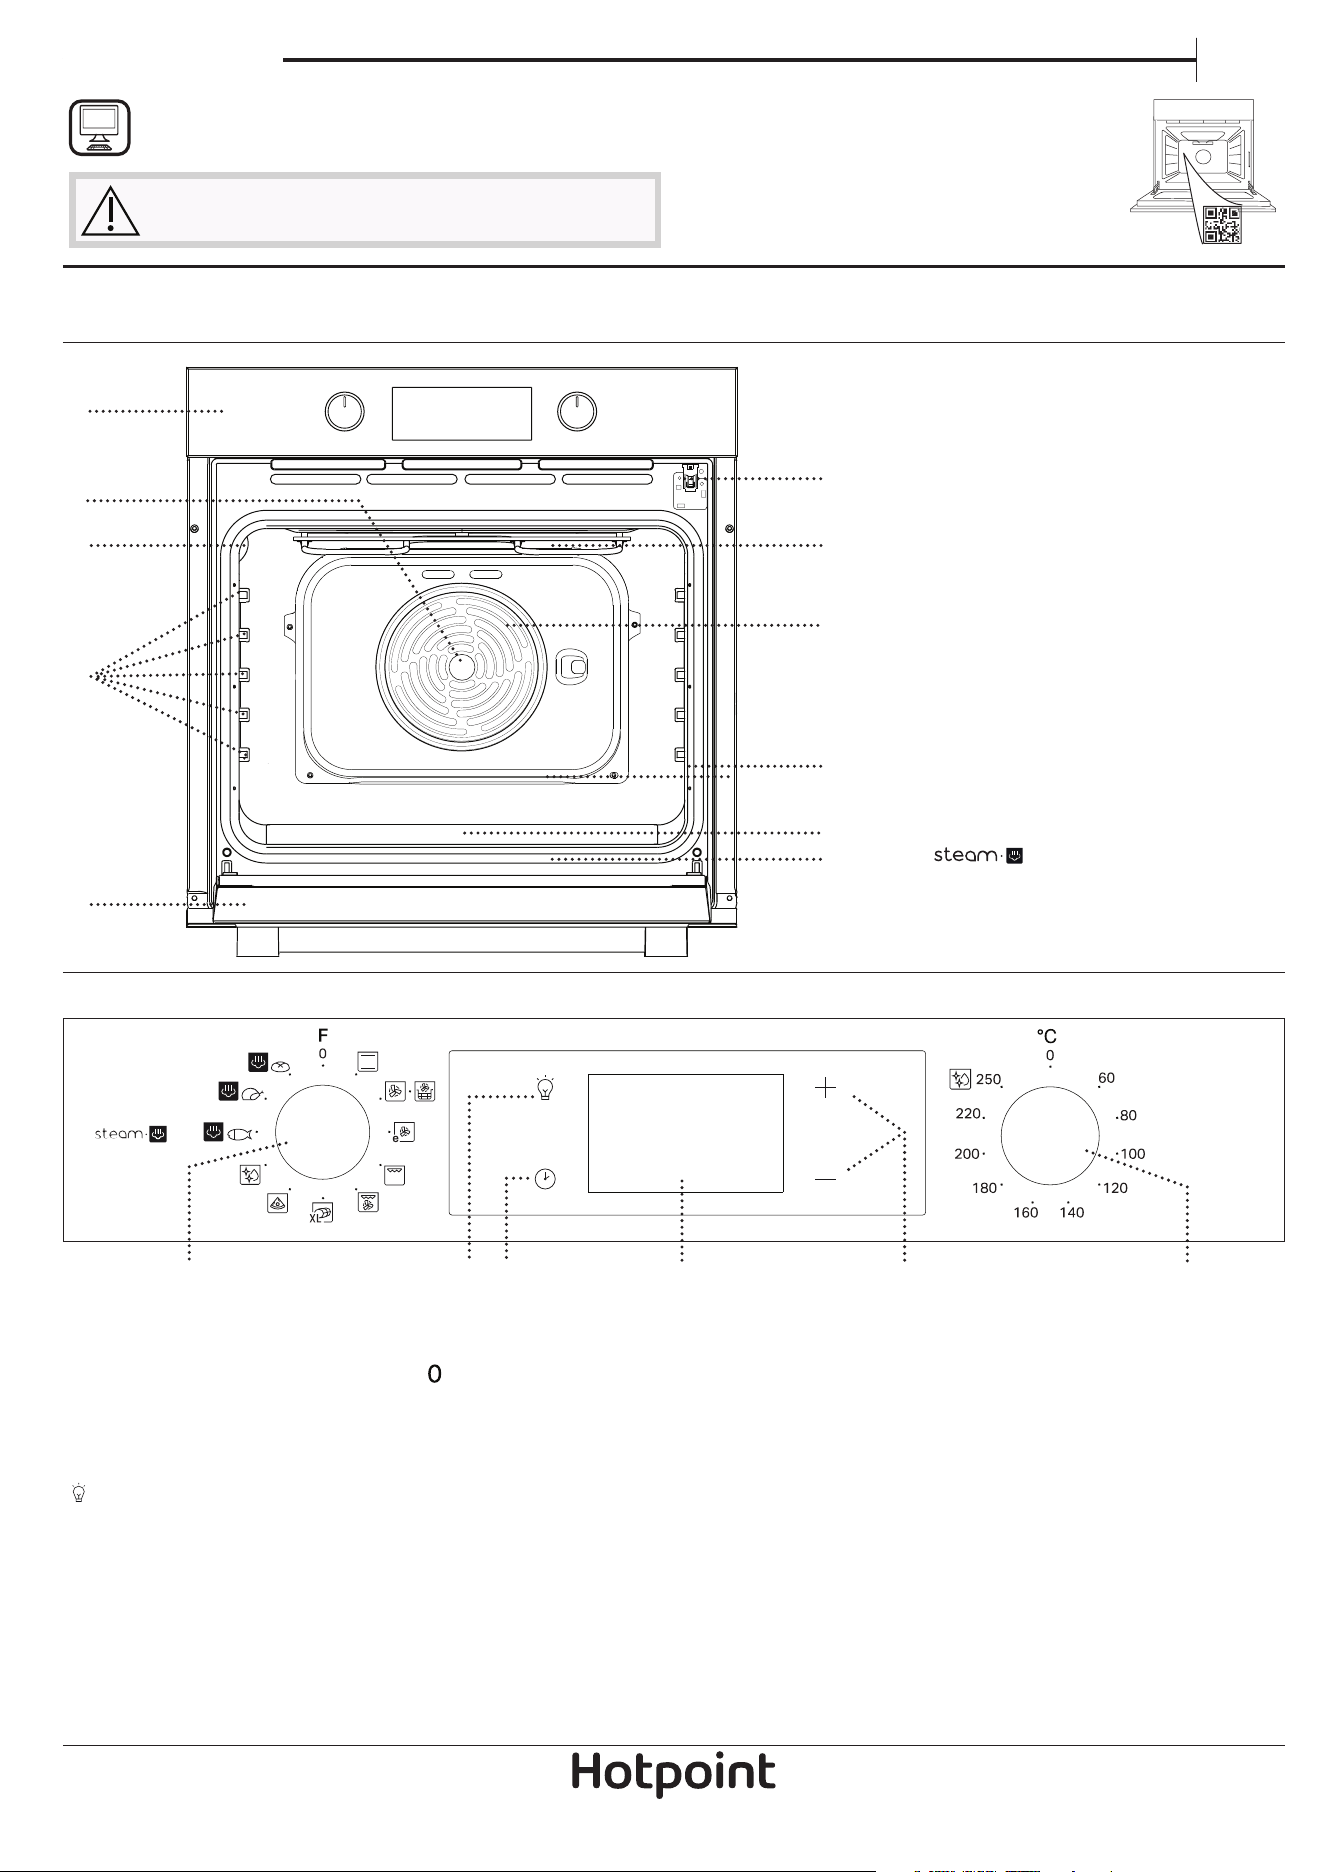
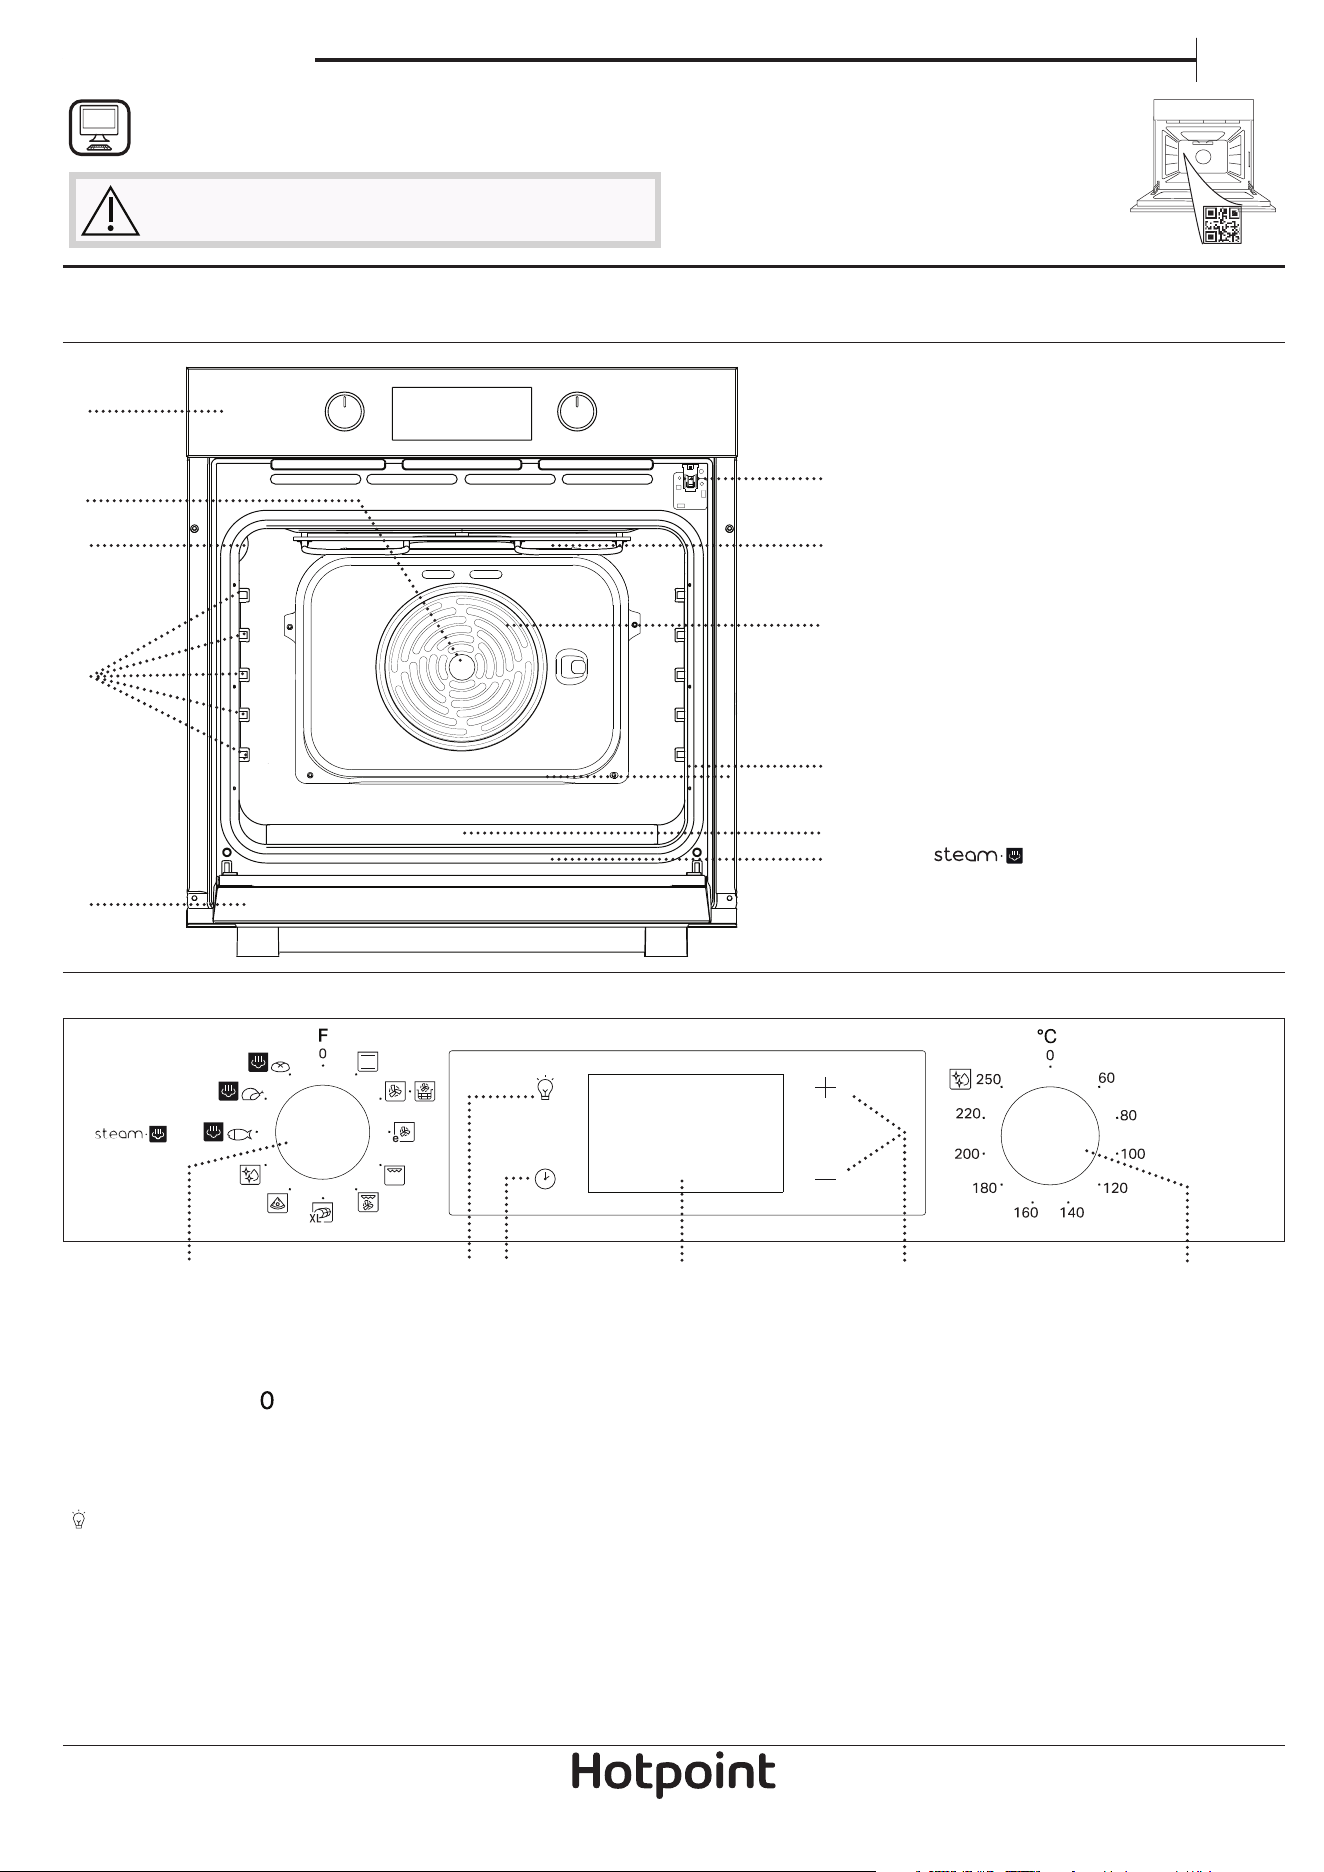
1. Control panel
2. Fan
3. Lamp
4. Shelf guides (the level is
indicated on the wall of the
cooking compartment)
5. Door
6. Door lock (locks the door while
automatic cleaning is in progress
and afterwards)
7. Upper heating element/grill
8. Circular heating element (not
visible)
9. Identification plate (do not
remove)
10.
embossing for drinking
water
11. Bottom heating element (not
visible)
CONTROL PANEL DESCRIPTION
1 32 4 5 6
1. SELECTION KNOB
For switching the oven on by
selecting a function. Turn to the
position to switch the oven off.
2. LIGHT
With the oven switched on, press
to turn the oven compartment
lamp on or off.
3. SETTING THE TIME
For accessing the cooking time
settings, delayed start and timer.
For displaying the time when the
oven is off.
4. DISPLAY
5. ADJUSTMENT BUTTONS
For changing the cooking time
settings.
6. THERMOSTAT KNOB
Turn to select the temperature you
require when activating manual
functions.
THANK YOU FOR BUYING A HOTPOINT
In order to receive a more complete assistance, please
register your product on www . register10 . eu
PLEASE SCAN THE QR CODE ON
YOUR APPLIANCE IN ORDER TO
REACH MORE INFORMATION
Before using the appliance carefully read the Safety
Instruction.
10
Please note: Type of knob may vary from model type. If the knobs are push-activated, push down on the center of the knob to
release it from seating.
2
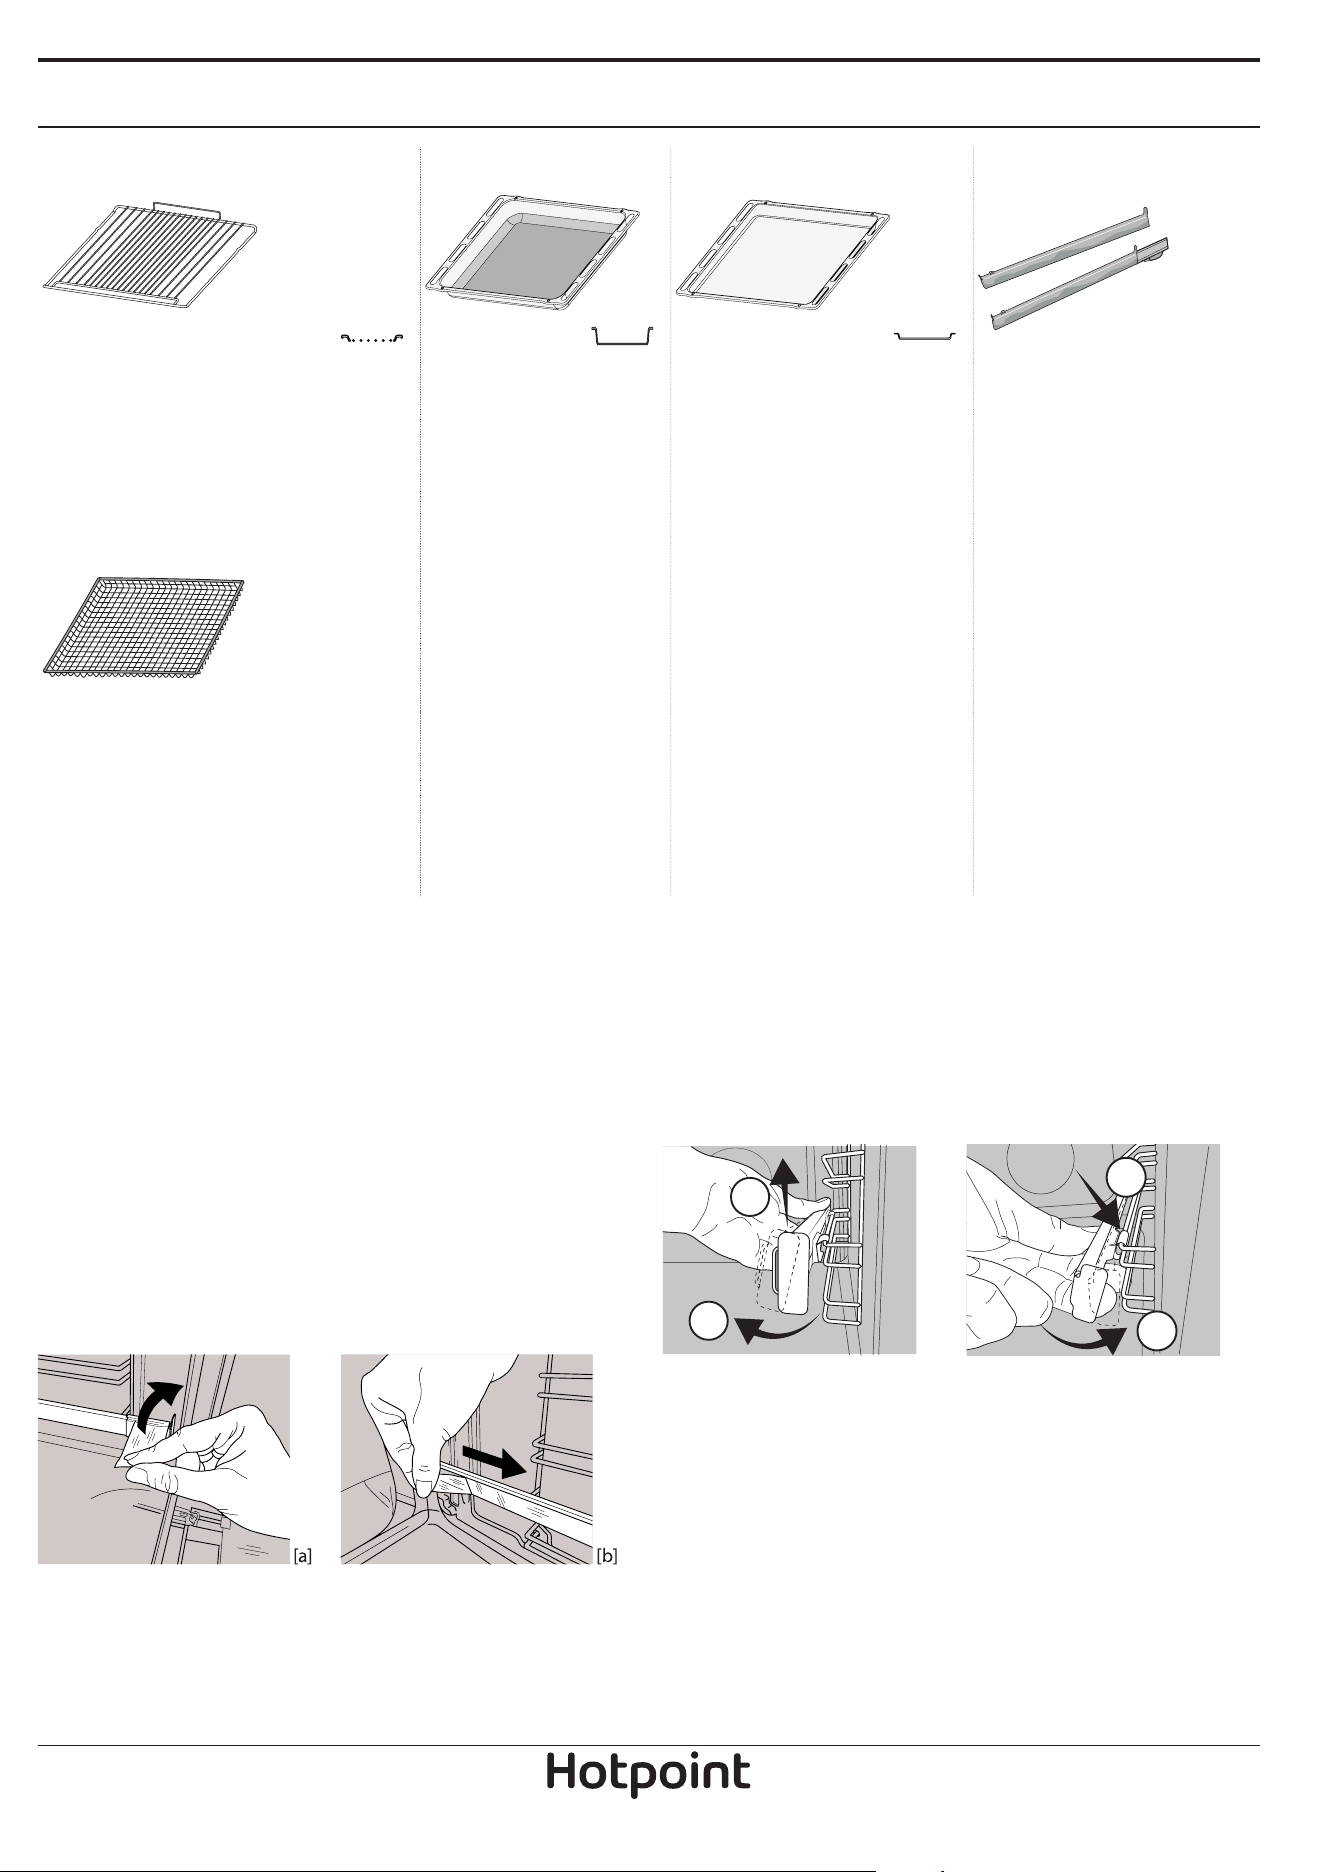
ACCESSORIES
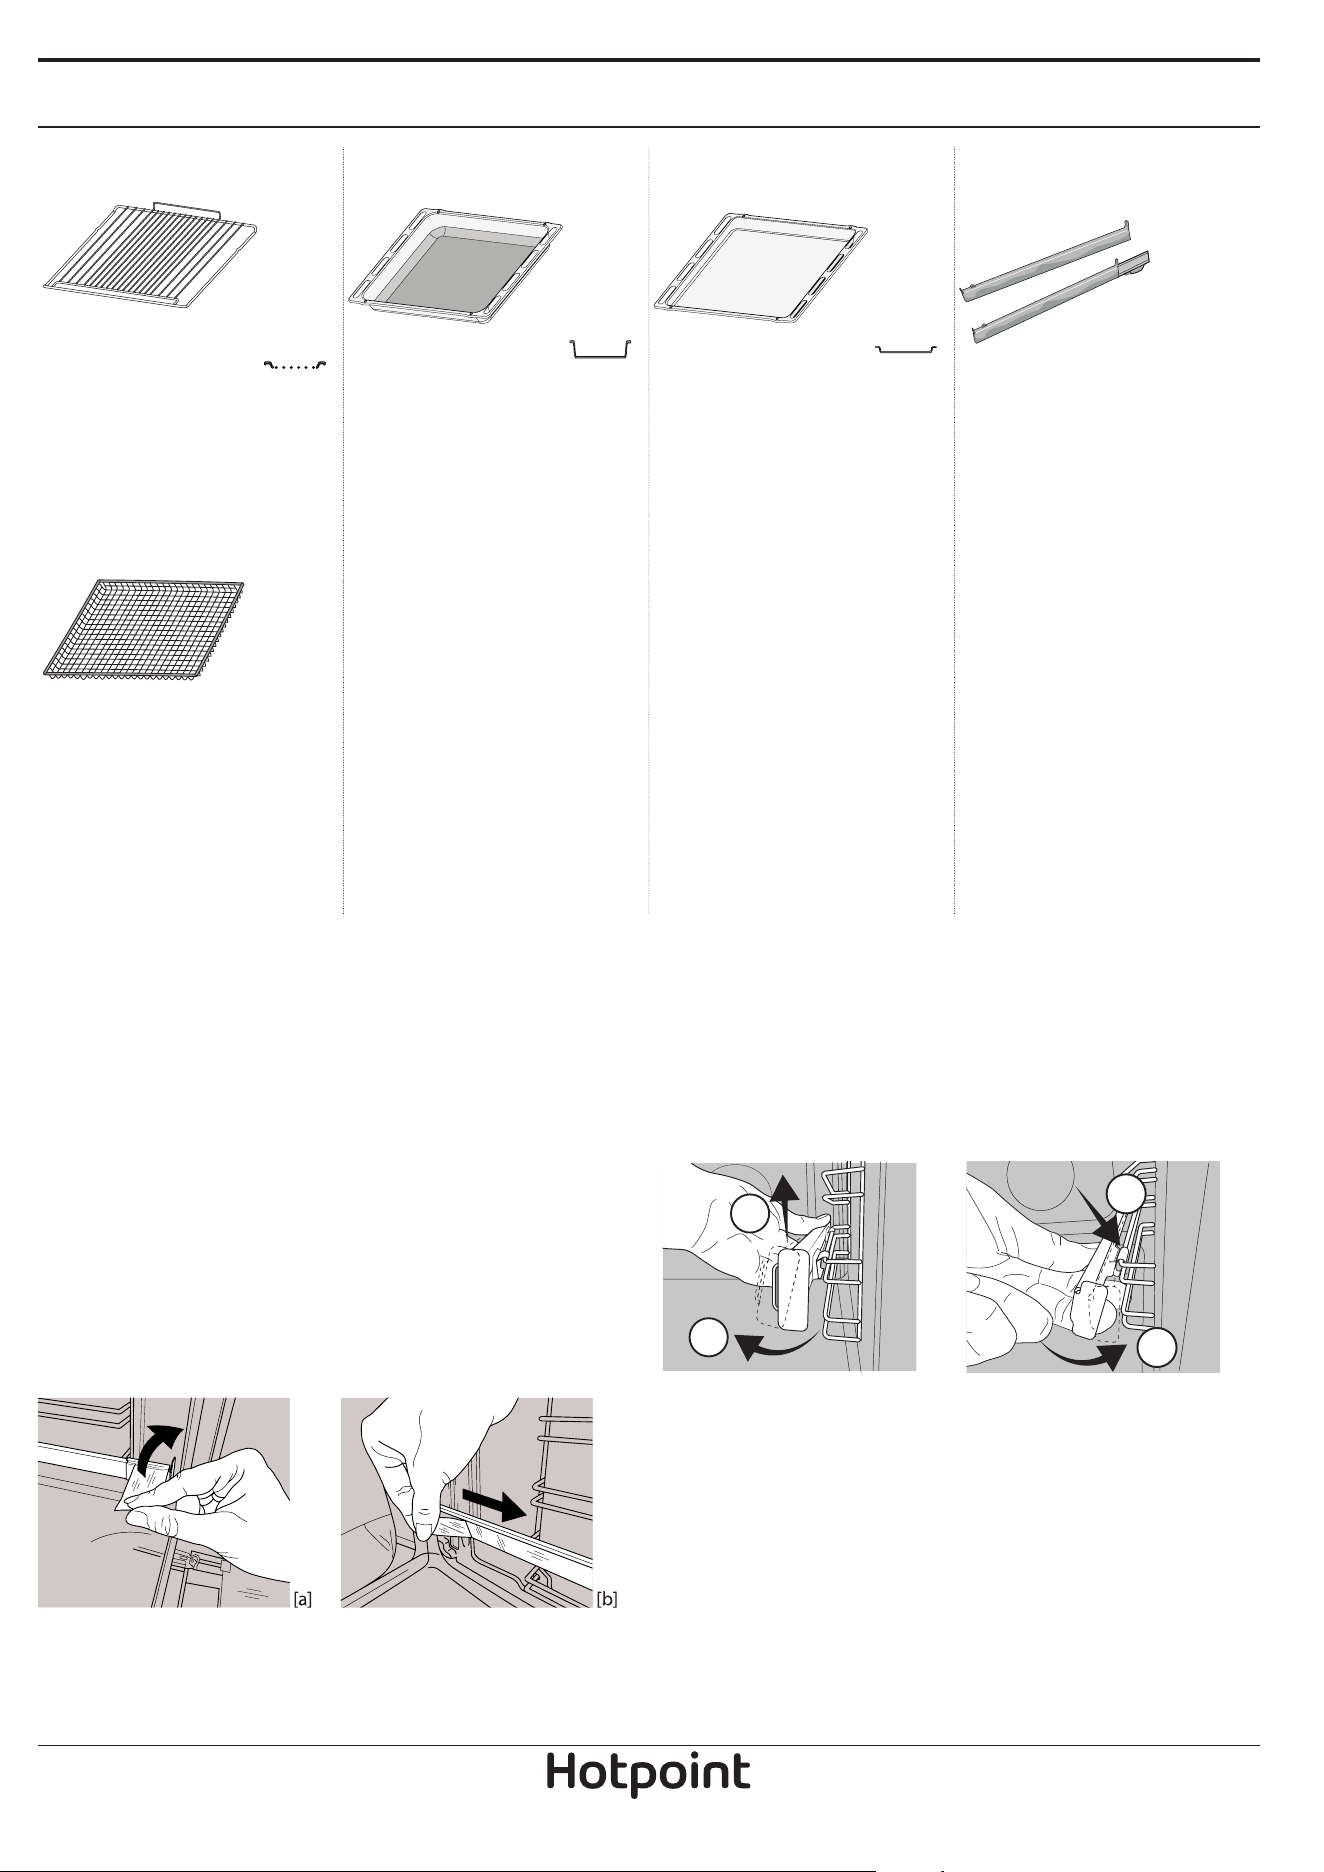
WIRE SHELF DRIP TRAY * BAKING TRAY * SLIDING RUNNERS *
Use to cook food or as a
support for pans, cake tins and
other ovenproof items of
cookware.
Use as an oven tray for
cooking meat, sh, vegetables,
focaccia, etc. or position
underneath the wire shelf to
collect cooking juices.
Use for cooking all bread and
pastry products, but also for
roasts, sh en papillotte, etc.
To facilitate inserting or
removing accessories.
AIR FRY TRAY*
This accessory is designed to be
used when cooking foods with
Air Fry function, ensuring
optimal crispness and
crunchiness for your food. To
use, place the tray on the wire
shelf. It is dishwasher-safe for
easy cleaning.
* Availble only on certain models
The number and the type of accessories may vary depending on which model is purchased.
Other accessories can be purchased separately from the After-sales Service.
INSERTING THE WIRE SHELF AND OTHER ACCESSORIES
Insert the wire shelf onto the level you require by
holding it tilted slightly upwards and resting the
raised rear side (pointing upwards) down first.
Then slide it horizontally along the runners as far as possible.
Other accessories, like the baking tray, are to be
inserted horizontally, letting them slide on the
runners.
SLIDING SHELVES AND SHELF GUIDES
Before using the oven remove the protective tape
[a] and then remove the protective foil [b] from the
sliding runners.
REMOVING THE SLIDING RUNNERS [c]
Pull the lower part of the sliding runner to uncouple
the lower hooks (1) and pull the the sliding runners
upwards, removing them from the upper hooks (2).
REFITTING THE SLIDING RUNNERS [d]
Hook the upper hooks on the shelf guides (1) then
press the lower part of the sliding runners against the
shelf guides, until the lower hooks are clicking (2).
1
2
1
2
[c] [d]
REMOVING AND REFITTING THE SHELF GUIDES
1. To remove the shelf guides, firmly grip the external
part of the guide, and pull it towards you to
extract the support and the two internal pins from
the lodging.
2. To reposition the shelf guides, position them near
the cavity and initially insert the two pins into
their lodgings. Next, position the external part
near its lodging, insert the support, and firmly
press towards the wall of the cavity to make sure
the shelf guide is properly secured.
EN
3
FIRST TIME USE
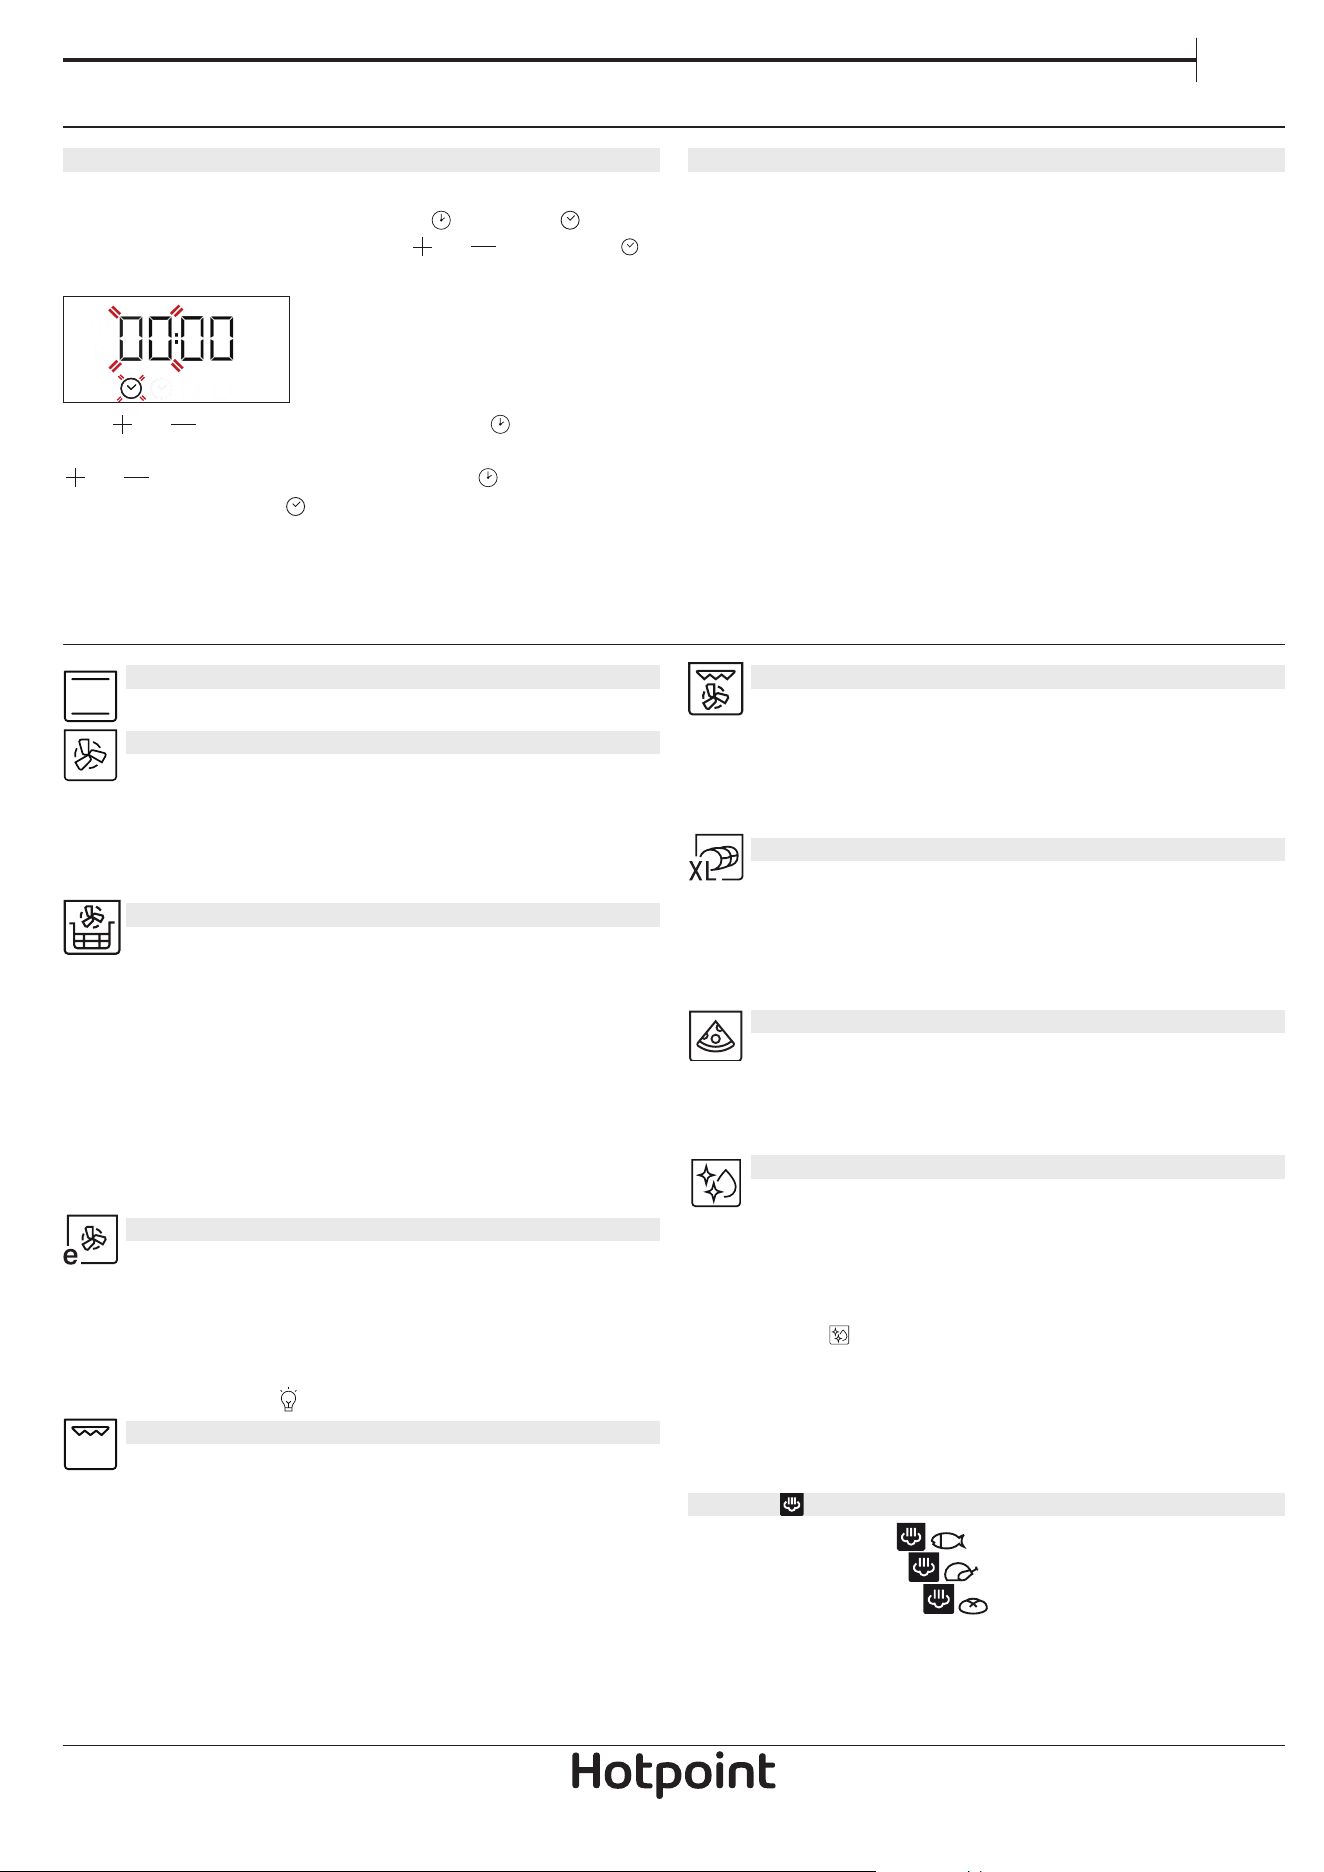
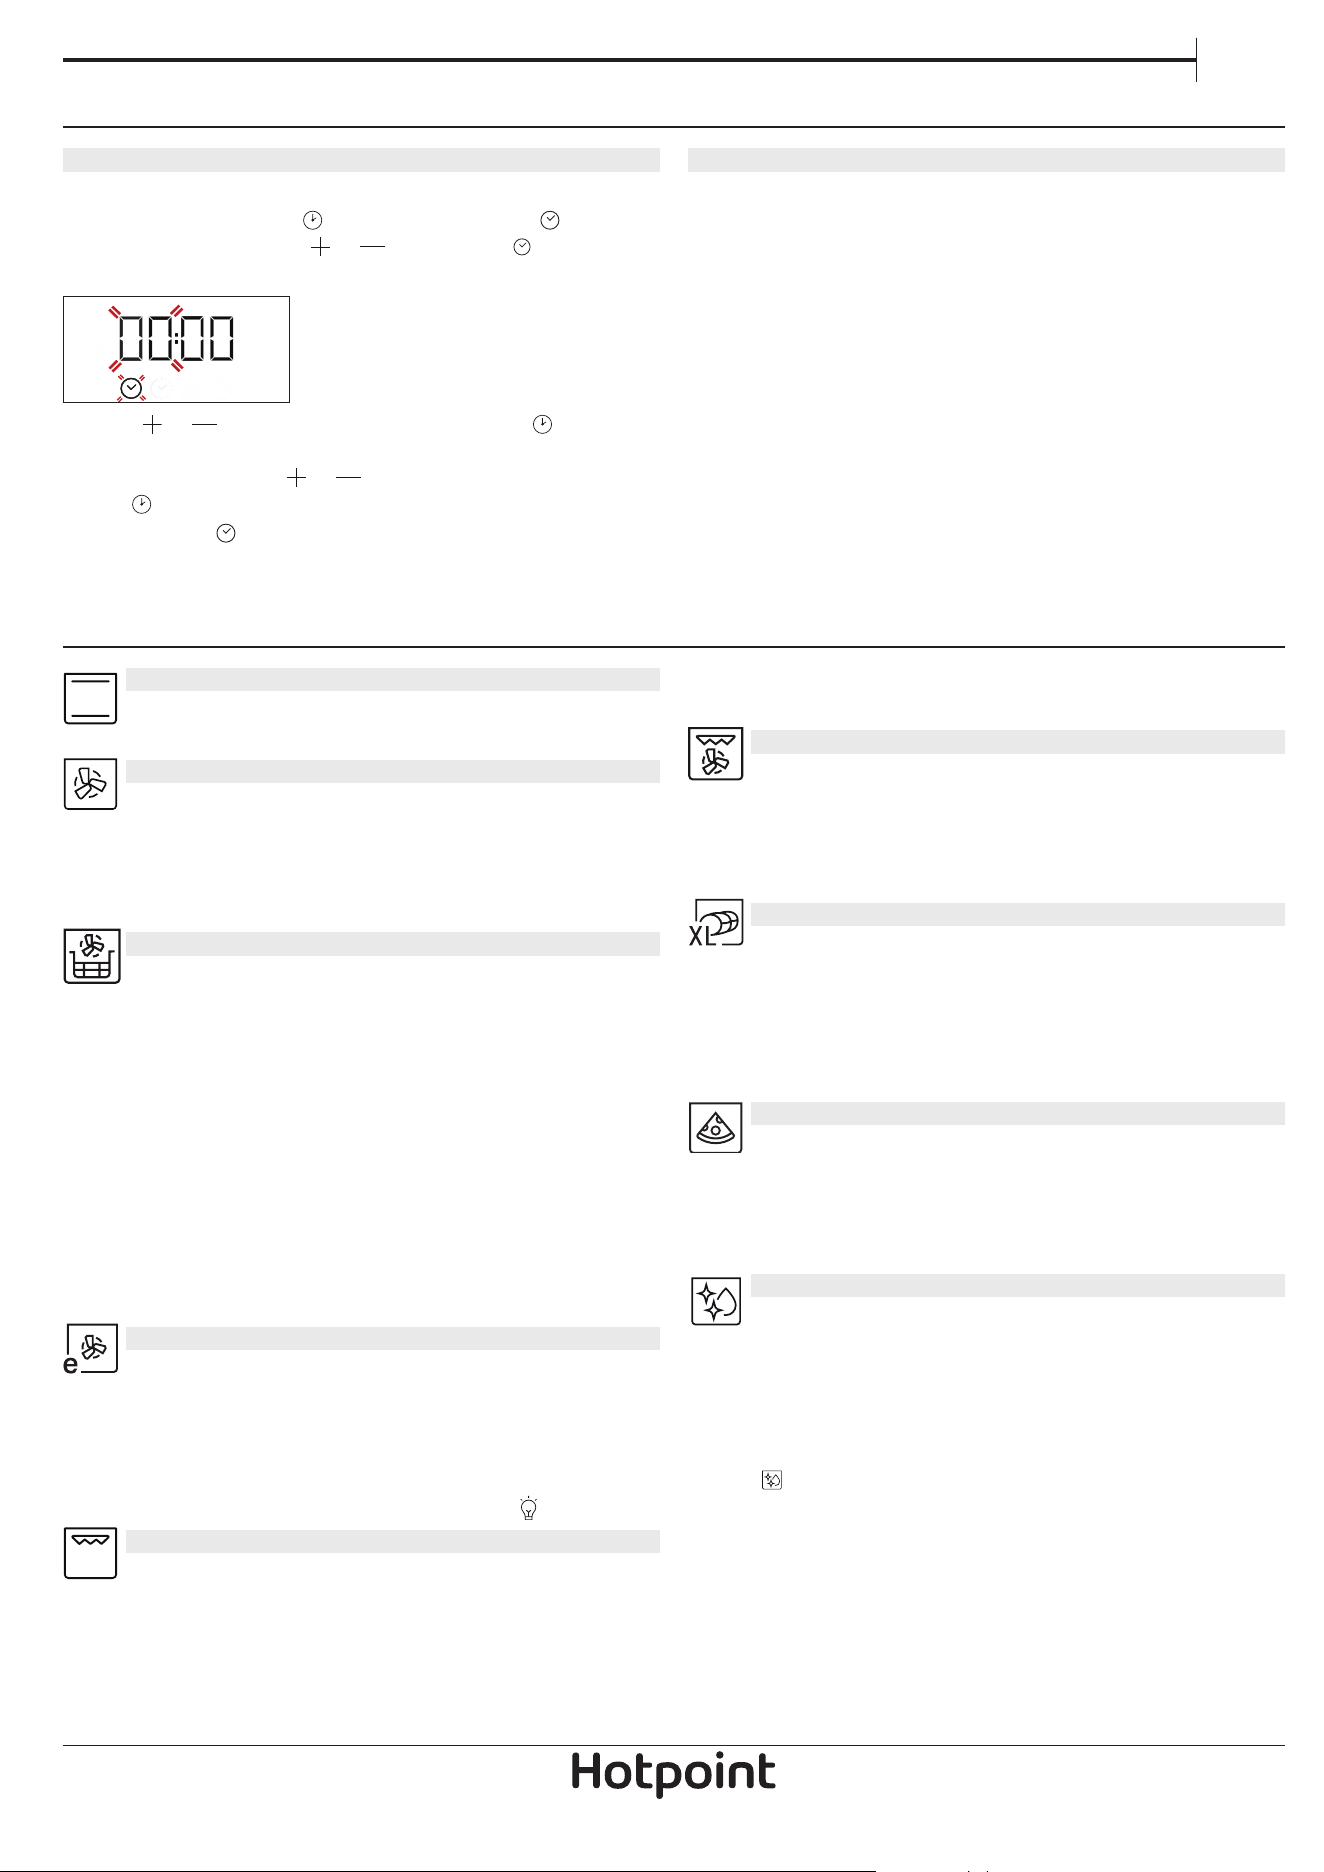
1. SETTING THE TIME
You will need to set the time when you switch on the
appliance for the first time: Press
until the icon
and the two digits for the hour
or and clock
start flashing on the display.
Use or to set the hour and press to confirm.
The two digits for the minutes will start flashing. Use
or to set the minutes and press to confirm.
Please note: When the icon is ashing, for example
following lengthy power outages, you will need to reset the
time.
2. HEAT THE OVEN
A new oven may release odours that have been left
behind during manufacturing: this is completely
normal.
Before starting to cook food, we therefore
recommend heating the oven with it empty in order
to remove any possible odours.
Remove any protective cardboard or transparent
film from the oven and remove any accessories from
inside it.
Heat the oven to 250 °C for about one hour. The oven
must be empty during this time.
Please note: It is advisable to air the room after using the
appliance for the rst time.
FUNCTIONS
CONVENTIONAL
For cooking any kind of dish on one shelf only.
FORCED AIR
For cooking different foods that require
the same cooking temperature on several shelves
(maximum three) at the same time. This function can
be used to cook different foods without odours being
transferred from one food to another.
AIR FRY
The Air Fry function allows you to cook many
types of food with less oil, resulting in pleasantly
crispy and healthy dishes. The oven cavity heats up
while the fan circulates hot air.
To use, place the food in a single layer on the Air
Fry basket, avoiding any overlap, and follow the Air
Fry Cooking Table instructions. Place the tray on the
wire shelf and insert a baking tray at a lower level to
collect any crumbs or drips.
Avoid using multiple trays to ensure even cooking.
ECO FORCED AIR
For cooking roasts and stuffed roasting joints
on a single shelf. Food is prevented from drying out
excessively by gentle, intermittent air circulation.
When this ECO function is in use, the light will remain
switched off during cooking but can be switched on
again by pressing
.
GRILL
For grilling steaks, kebabs and sausages,
cooking vegetables au gratin or toasting bread.
When grilling meat, we recommend using a dripping
pan to collect the cooking juices: position the pan on
any of the levels below the wire shelf and add 200 ml
of drinking water.
TURBO GRILL
For roasting large joints of meat (legs, roast
beef, chicken). We recommend using a dripping pan
to collect the cooking juices: position the pan on any
of the levels below the wire shelf and add 200 ml of
drinking water.
MAXI COOKING
For cooking large joints of meat (above 2.5
kg). We recommend turning the meat over during
cooking to ensure that both sides brown evenly. We
also recommend basting the joint to prevent it from
drying out excessively.
PIZZA
This function allows you to cook great
hommade pizza. The dedicated cooking cycle works
up to 270°C, delivering pizza soft inside, crunchy on
the edges and with a perfectly even browning.
DIAMOND CLEAN
The action of the steam released during this
special low-temperature cleaning cycle allows dirt
and food residues to be removed with ease. Pour 100-
120 ml of drinking water on the bottom of the oven
then turn the selection knob and the thermostat
knob to the
icon. It is best to use the function for
35minutes.
Activate the function when the oven is cold and
let it cool down for 15minutes once the cycle ends.
The position of the icon does not correspond to the
temperature reached during the cleaning cycle.
STEAM
EASY STEAM FISH
EASY STEAM MEAT
EASY STEAM BREAD
The Steam function allows to obtain excellent
performances thanks to the presence of steam in the
4
cooking cycle. This function automatically manages
the ideal temperature for cooking a wide range of
recipes; the cooking times of the main dishes are
shown in the relative cooking table. Always activate
the steam function when the oven is cold, and after
pouring 200 ml of drinking water into the bottom of
the cavity. To activate Steam function, the thermostat
knob needs to be turned in to position of
icon.
DAILY USE
1. SELECT A FUNCTION
To select a function, turn the selection knob to the
symbol for the function you require: the display will
light up and an audible signal will sound.
2. ACTIVATE A FUNCTION
MANUAL
To start the function you have selected, turn the
thermostat knob to set the temperature you require.
Please note: During cooking you can change the function by
turning the selection knob or adjust the temperature by
turning the thermostat knob. The function will not start if the
thermostat knob will be on you can set the cooking time,
cooking end time (only if you set a cooking time) and a timer.
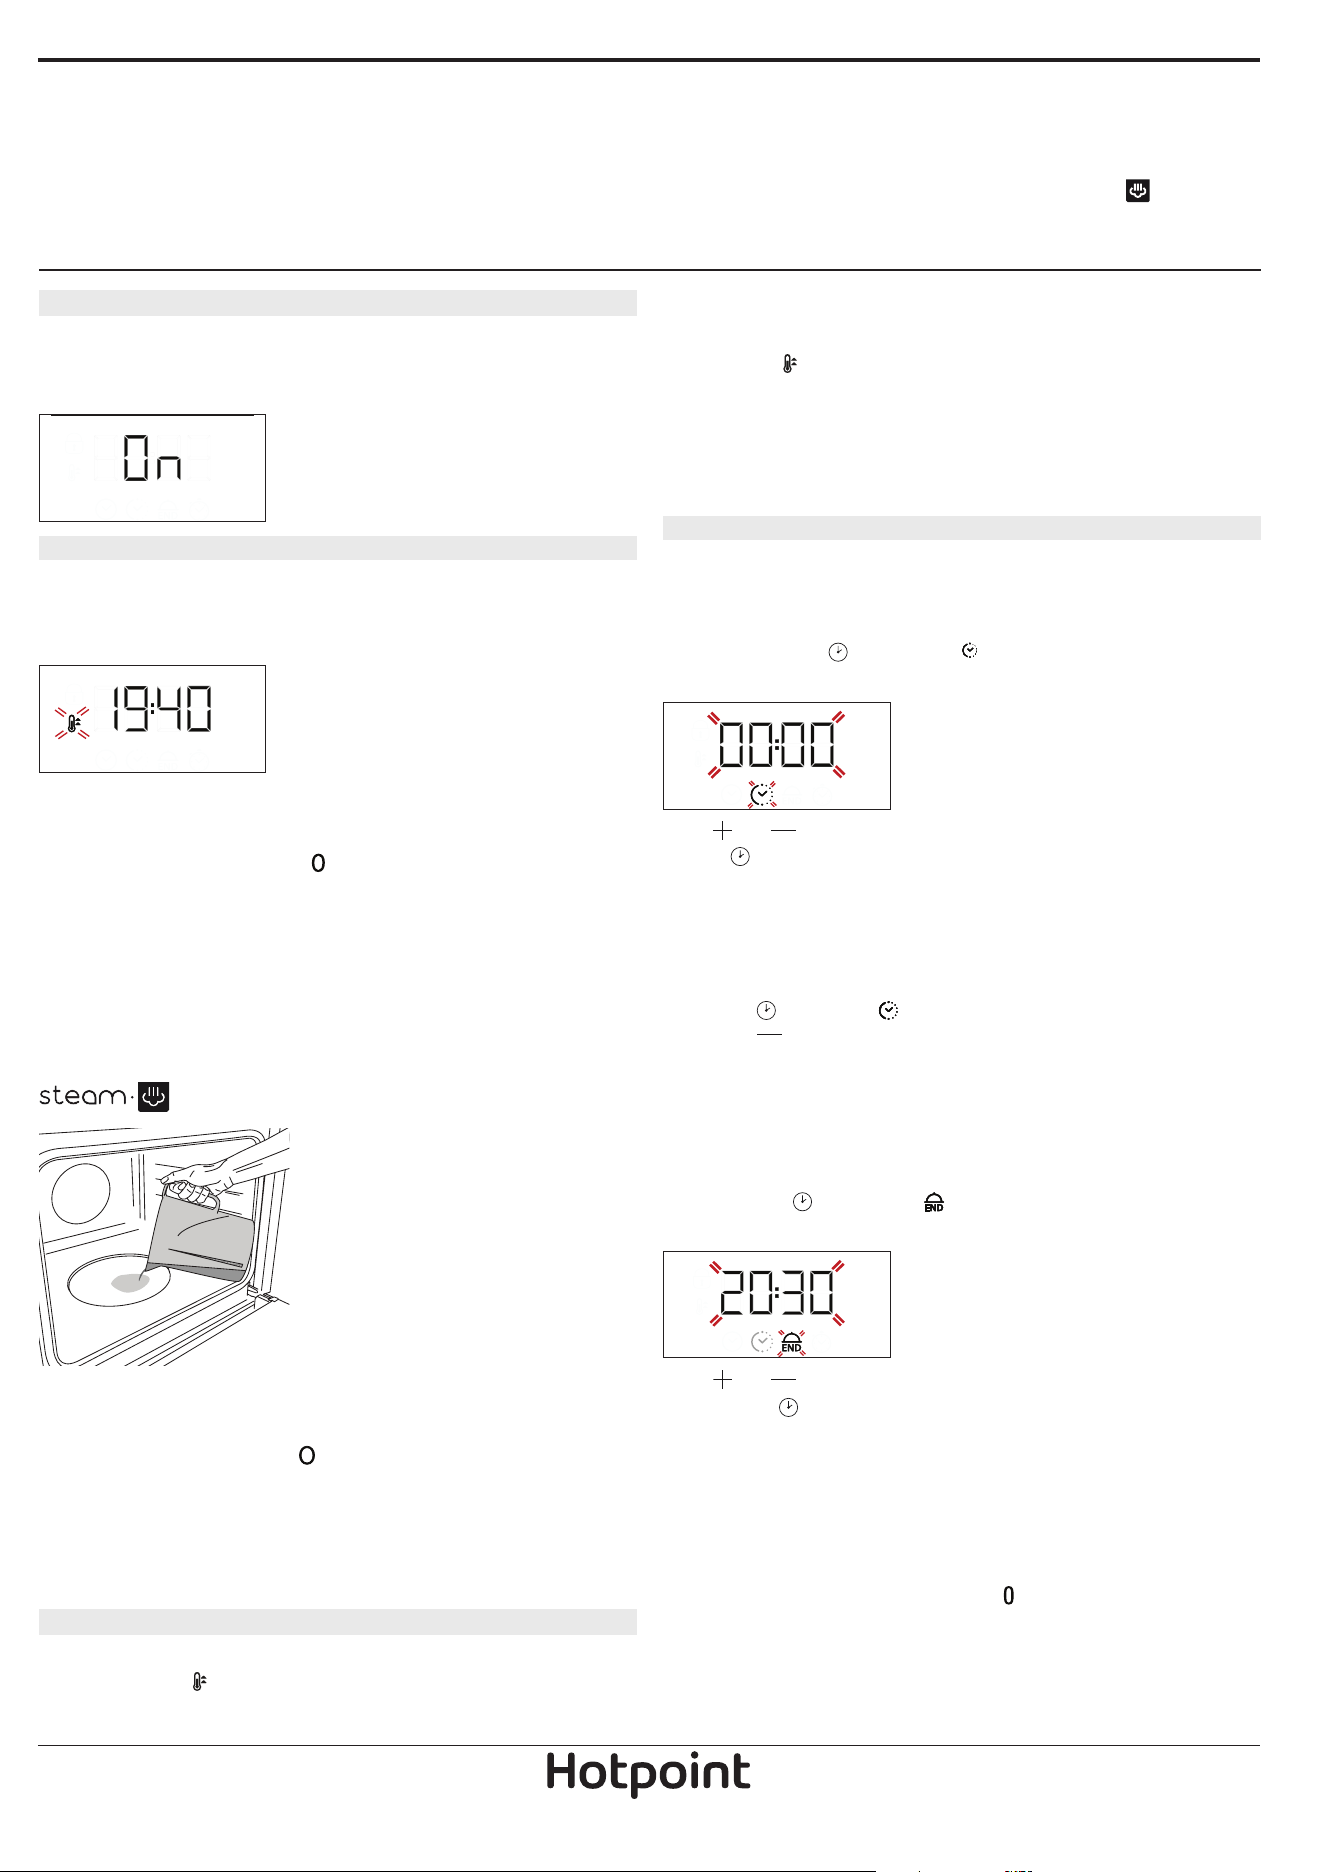
RISING
To start the “Rising” function, turn the thermostat
knob to the relevant symbol; if the oven is set to a
different temperature, the function will not start.
Please note: You can set the cooking time, cooking end time
(only if you set a cooking time) and a timer.
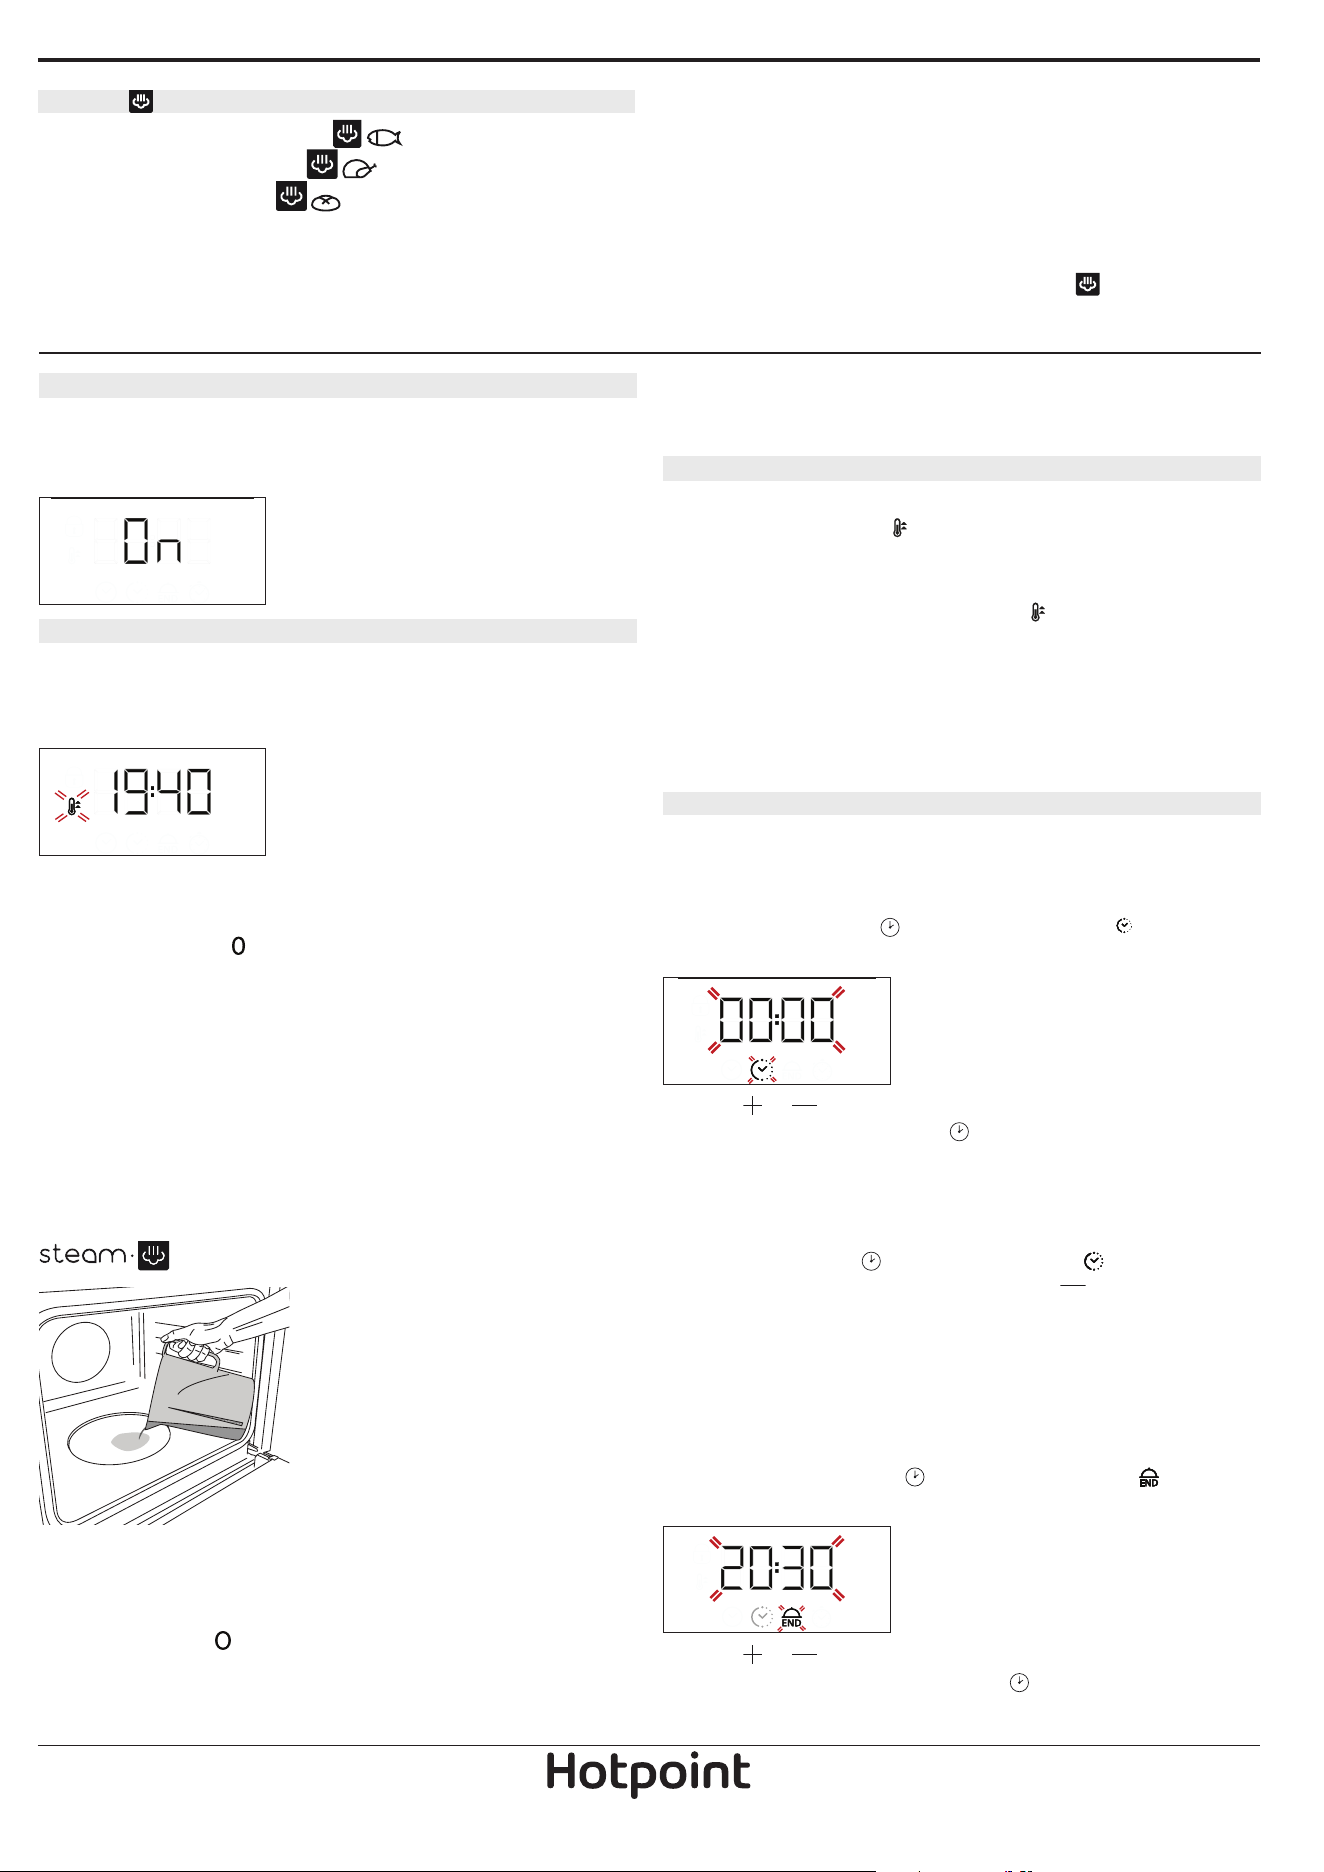
To start the Steam function,
pour 200 ml of drinking water
in the oven bottom.
Select the function turning
clockwise the selection knob
on the relevant icon, and
the thermostat knob in any
position between 160 and
180°C (as suggested by the
icon). The function will start
and the display will show the current time of the day.
No preheating is needed. To end the cooking, turn
the selection knob on “
”.
During Steam cooking do not open the door and
never top up the water.
Please note: Opening the door and topping up the water
during cooking may have an adverse eect on the nal
cooking result.
3. PREHEATING
Once the function starts, an audible signal and a
flashing icon
on the display indicate that the
preheating phase has been activated.
At the end of this phase, an audible signal and the
fixed icon
on the display will indicate that the oven
has reached the set temperature: at this point, place
the food inside and proceed with cooking.
Please note: Placing the food in the oven before preheating
has nished may have an adverse eect on the nal cooking
result.
4. PROGRAMMING COOKING
You will need to select a function before you can start
programming cooking.
DURATION
Keep pressing until the icon and “00:00” start
flashing on the display.
Use or to set the cooking time you require, then
press
to confirm.
Activate the function by turning the thermostat knob
to the temperature you require: an audible signal will
sound and the display will indicate that cooking is
complete.
Please note: To cancel the cooking time you have set, keep
pressing until the icon starts flashing on the display,
then use to reset the cooking time to “00:00”. This
cooking time includes a preheating phase.
PROGRAMMING THE END COOKING TIME/
DELAYED START
After a cooking time has been set, starting the
function can be delayed by programming its end
time: press
until the icon and the current time
start flashing on the display.
Use or to set the time you want cooking to end
and press
to confirm.
Activate the function by turning the thermostat
knob to the temperature you require: the function
will remain paused until it starts automatically after
the period of time that has been calculated in order
forcooking to finish at the time you have set.
Please note: To cancel the setting, switch the oven off by
turning the selection knob to the position.
Delay to start functionality is not available for Grill
and Turbo Grill functions.
EN
5
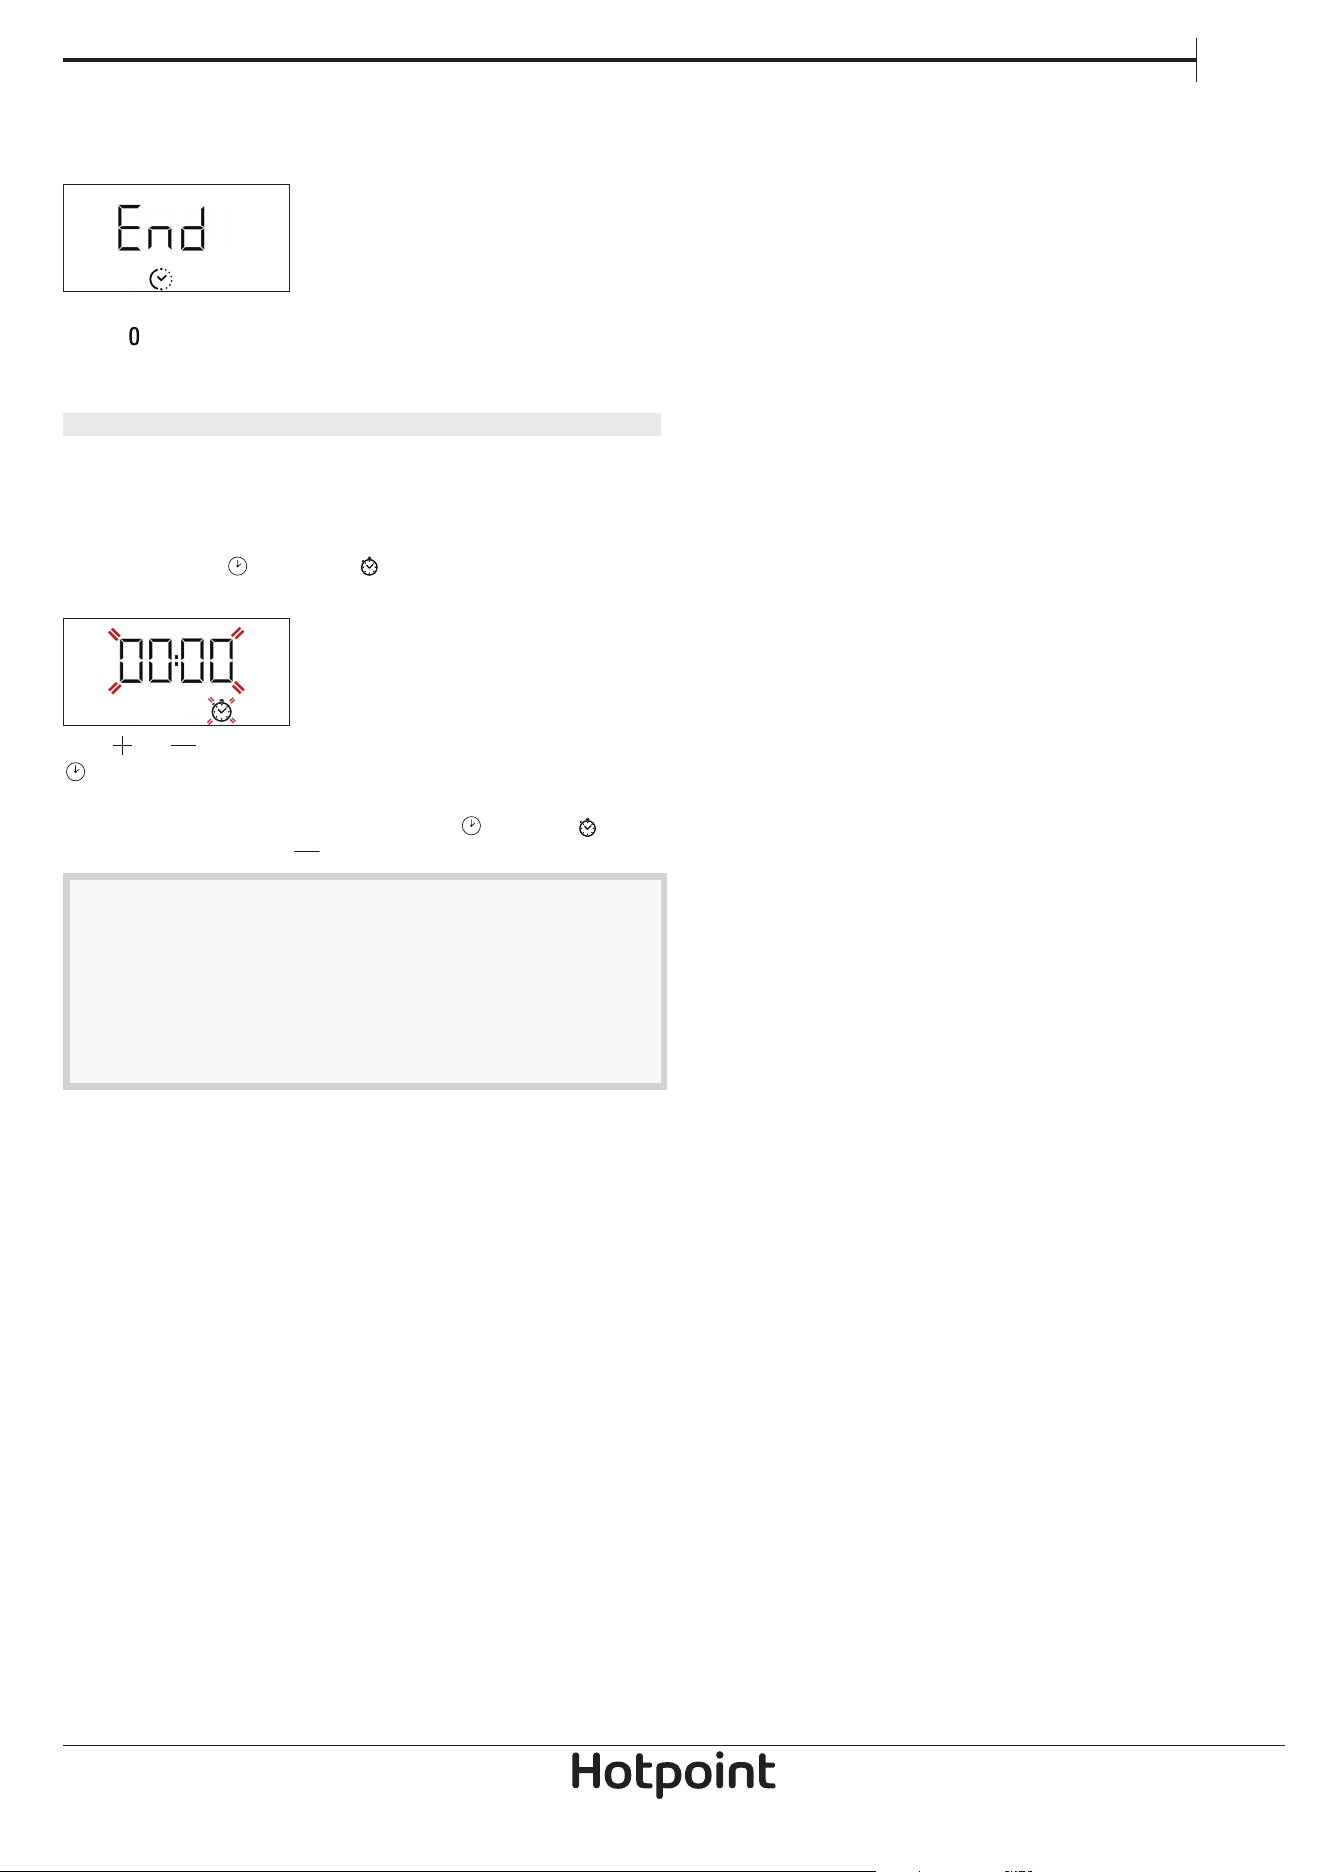
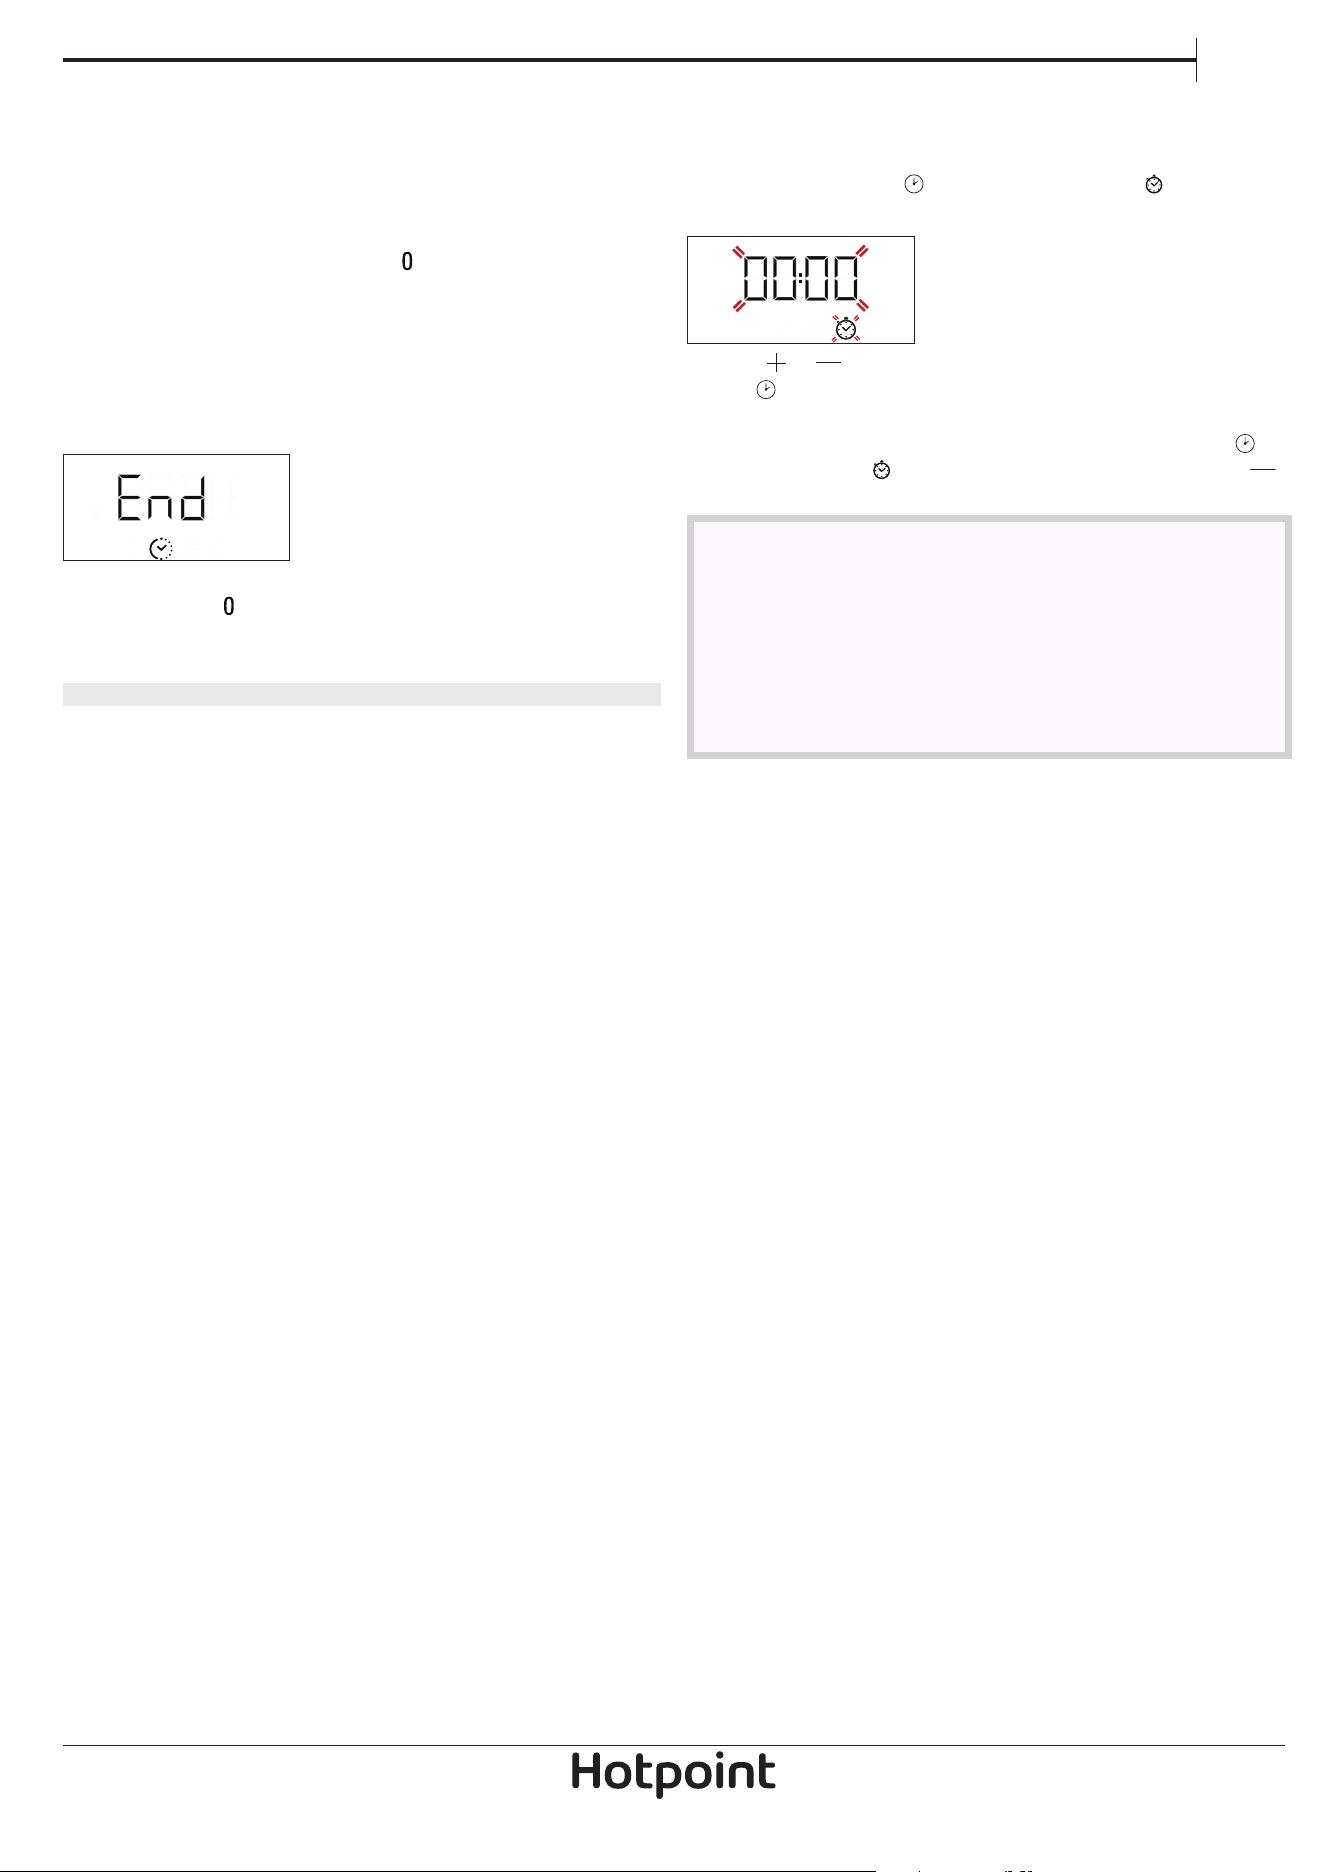
END OF COOKING
An audible signal will sound and the display will
indicate that the function has finished.
Turn the selection knob to select a different function
or to
to switch the oven off.
Please note: If the timer is active, the display will show “END”
alternately with the remaining time.
5. SETTING THE TIMER
This option does not interrupt or program cooking
but allows you to use the display as a timer, either
during while a function is active or when the oven is
off.
Keep pressing
until the and “00:00” icon and
“00:00” start flashing on the display.
Use or to set the time you require and press
to confirm. An audible signal will sound once the
timer has finished counting down the selected time.
Notes: To cancel the timer, keep pressing until the icon
starts ashing, then use to reset the time to “00:00”.
NOTES
• Do not cover the inside of the oven with
aluminium foil.
• Never drag pots or pans across the bottom of the
oven as this could damage the enamel coating.
• Do not place heavy weights on the door and do
not hold on to the door.
6
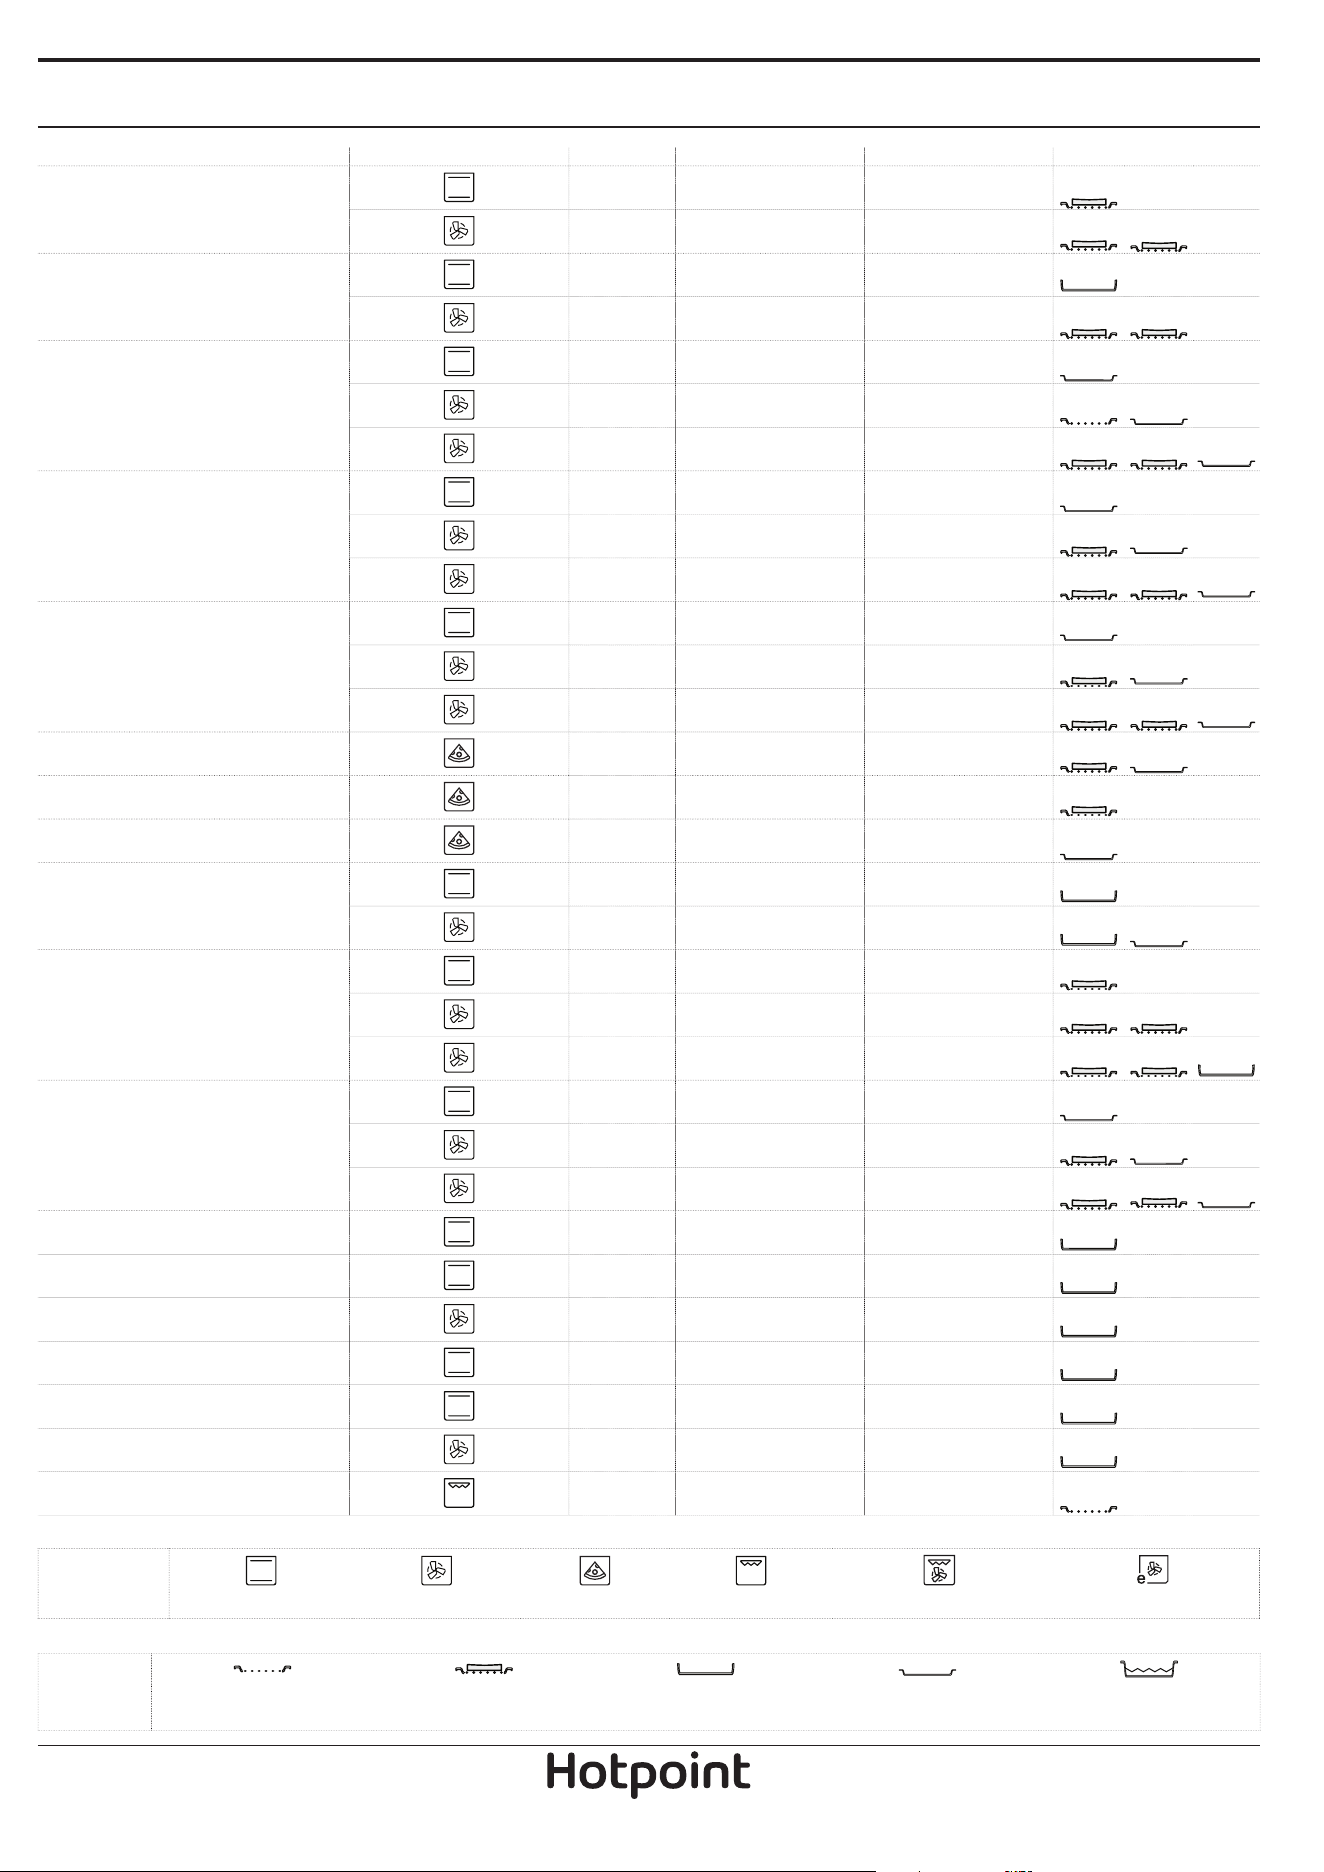
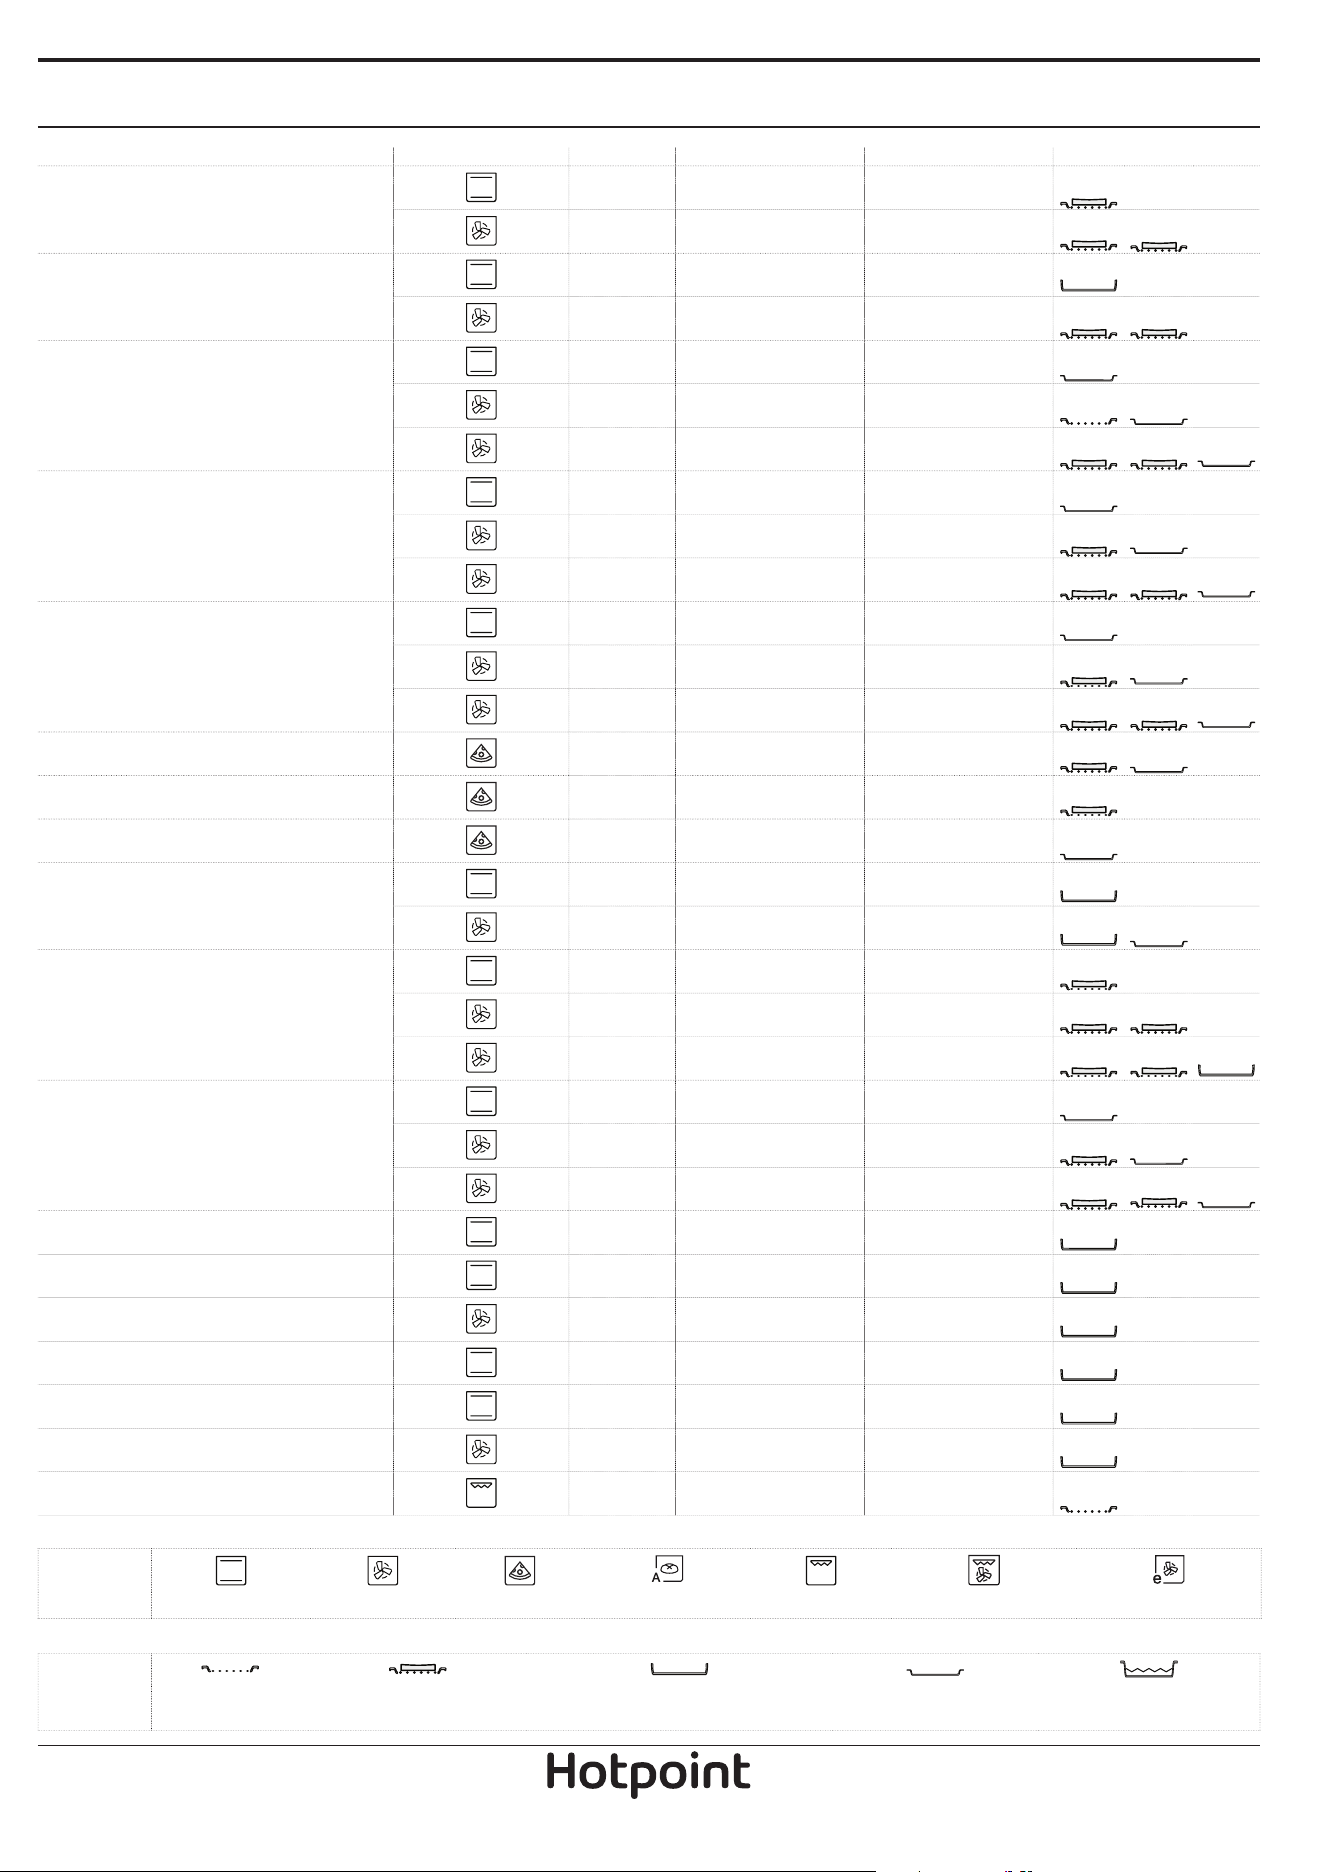
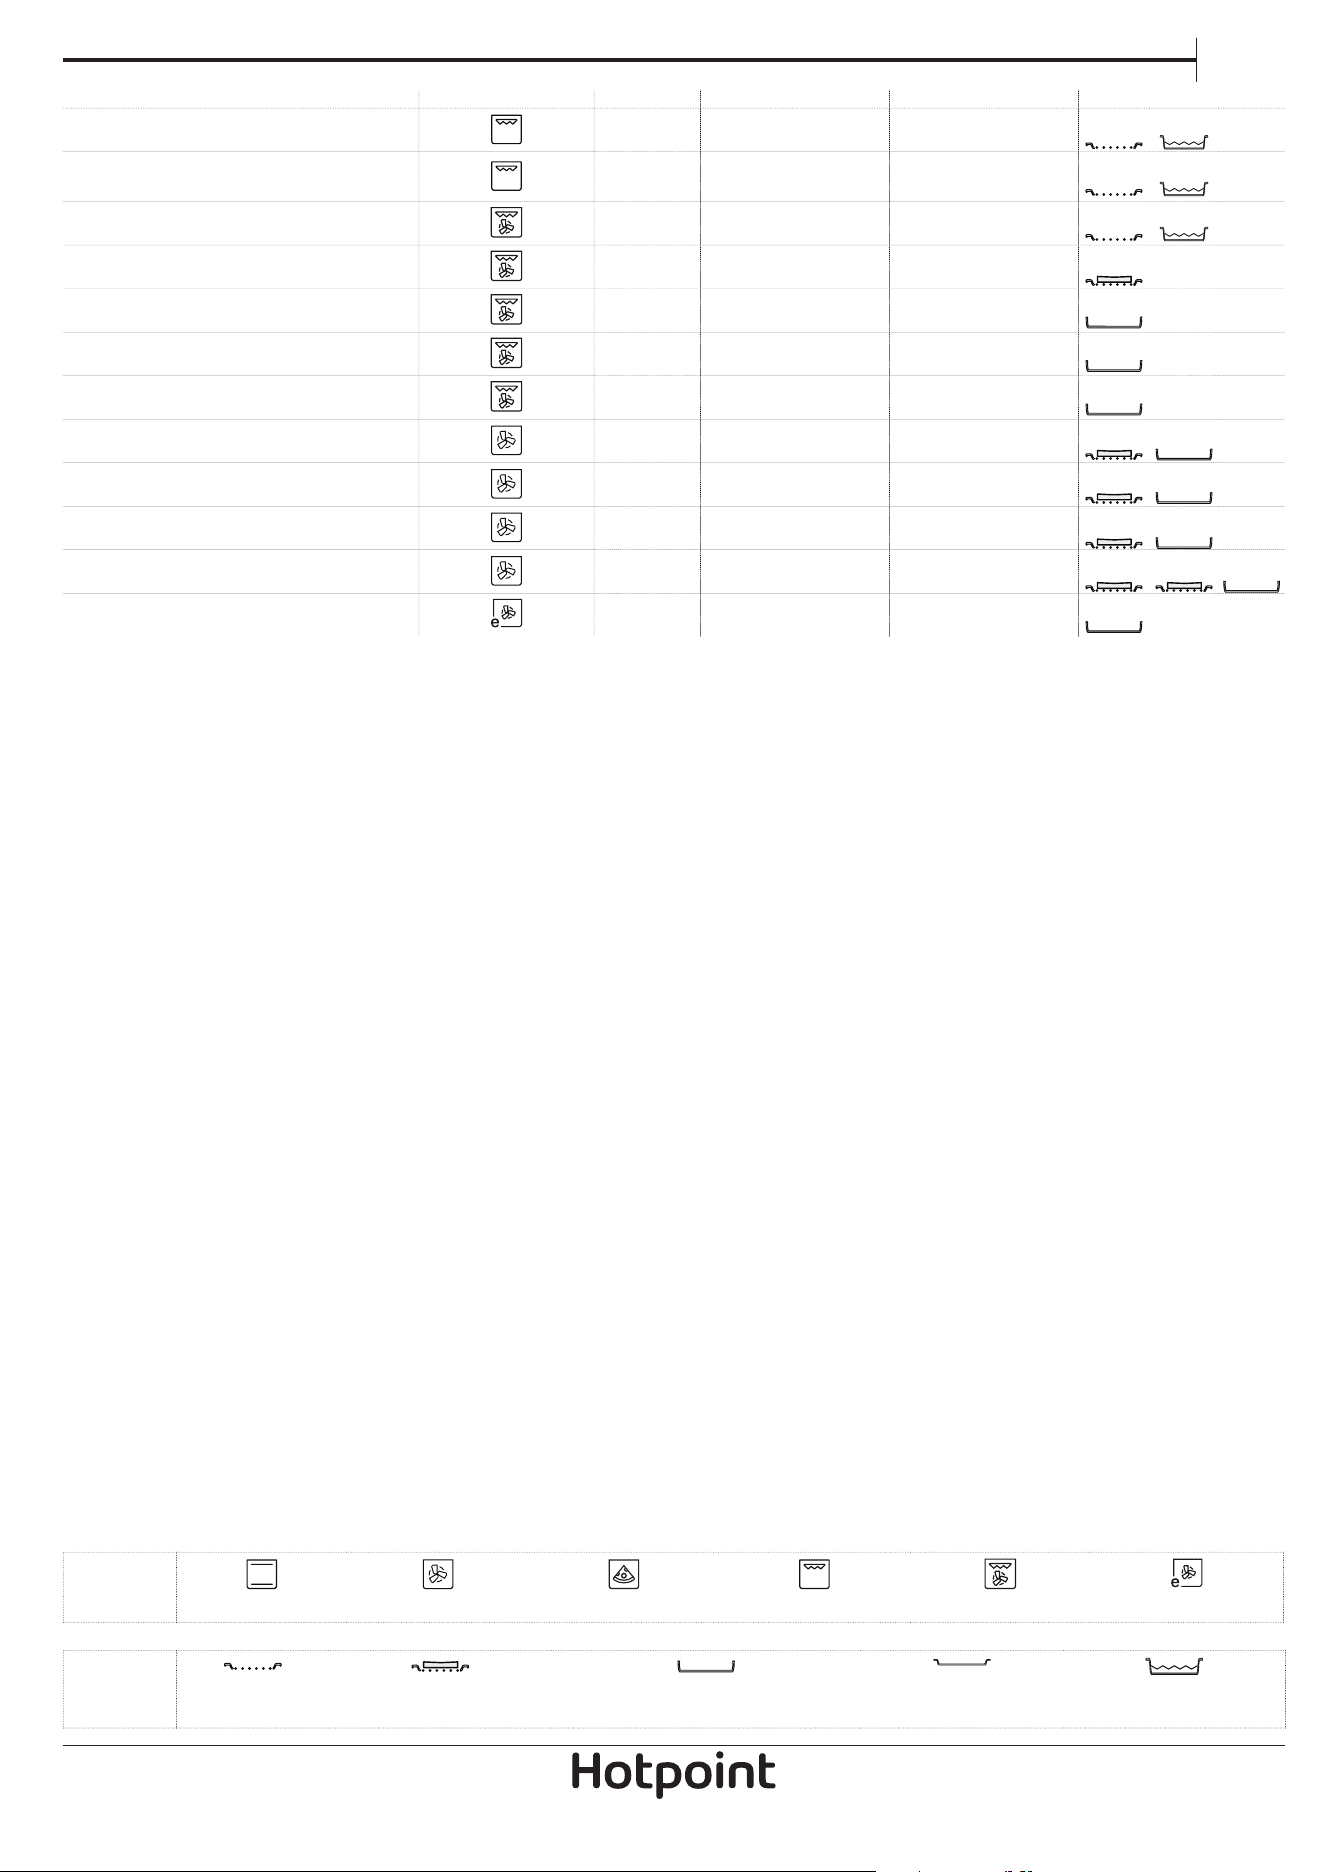
COOKING TABLE
RECIPE FUNCTION PREHEAT TEMPERATURE (°C) DURATION (Min) LEVEL AND ACCESSORIES
Leavened cakes
Yes 160-180 30 - 90
2/3
Yes 160-180 30 - 90
4
1
Filled cake
(cheese cake, strudel, fruit pie)
Yes 160 - 200 35 - 90
2
Yes 160 - 200 40 - 90
4
2
Biscuits / tartlets
Yes 160-180 20 - 45
3
Yes 150-170 20 - 45
4
2
Yes 150-170 20 - 45
5
3
1
Choux buns
Yes 180 - 210 30 - 40
3
Yes 180 - 200 35 - 45
4
2
Yes 180 - 200 35 - 45
5
3
1
Meringues
Yes 90 150 - 200
3
Yes 90 140 - 200
4
2
Yes 90 140 - 200
5
3
1
Pizza / Focaccia Yes 190 - 220 20 - 50
4
2
Pizza thin Yes MAX 10 - 15
2
Tray pizza / Focaccia Yes MAX 15 - 20
2
Frozen pizza
Yes MAX 10 - 20
3
Yes 220 - MAX 10 - 25
3
2
Salty cakes
(vegetable pie, quiche)
Yes 180 - 200 40 - 55
3
Yes 180 - 200 45 - 60
4
2
Yes 180 - 200 45 - 60
5
3 1
Vols-au-vents / puff pastry crackers
Yes 190 - 200 20 - 30
3
Yes 180 - 190 20 - 40
4
2
Yes 180 - 190 20 - 40
5
3 1
Lasagne / baked pasta /
canneloni / flans
Yes 190 - 200 45 - 65
2
Lamb / veal / beef / pork 1 kg Yes 190 - 200 80 - 110
3
Roast pork with crackling 2 kg Yes 180 - 190 110 - 150
2
Chicken / rabbit / duck 1 kg Yes 200 - 230 50 - 100
2
Turkey / goose 3 kg - 190 - 200 100 - 160
2
Stuffed vegetables
(tomatoes, courgettes, aubergines)
Yes 180 - 200 50 - 70
2
Toasted bread - 250 2 - 6
5
FUNCTIONS
Conventional Forced Air Pizza Grill Turbo Grill
Eco Forced Air
ACCESSORIES
Wire shelf
Baking dish or cake tin
on the wire shelf
Baking tray/Drip tray or
Baking dish on the wire shelf
Drip tray / Baking tray
Drip tray / Baking tray with
200 ml of water
EN
7
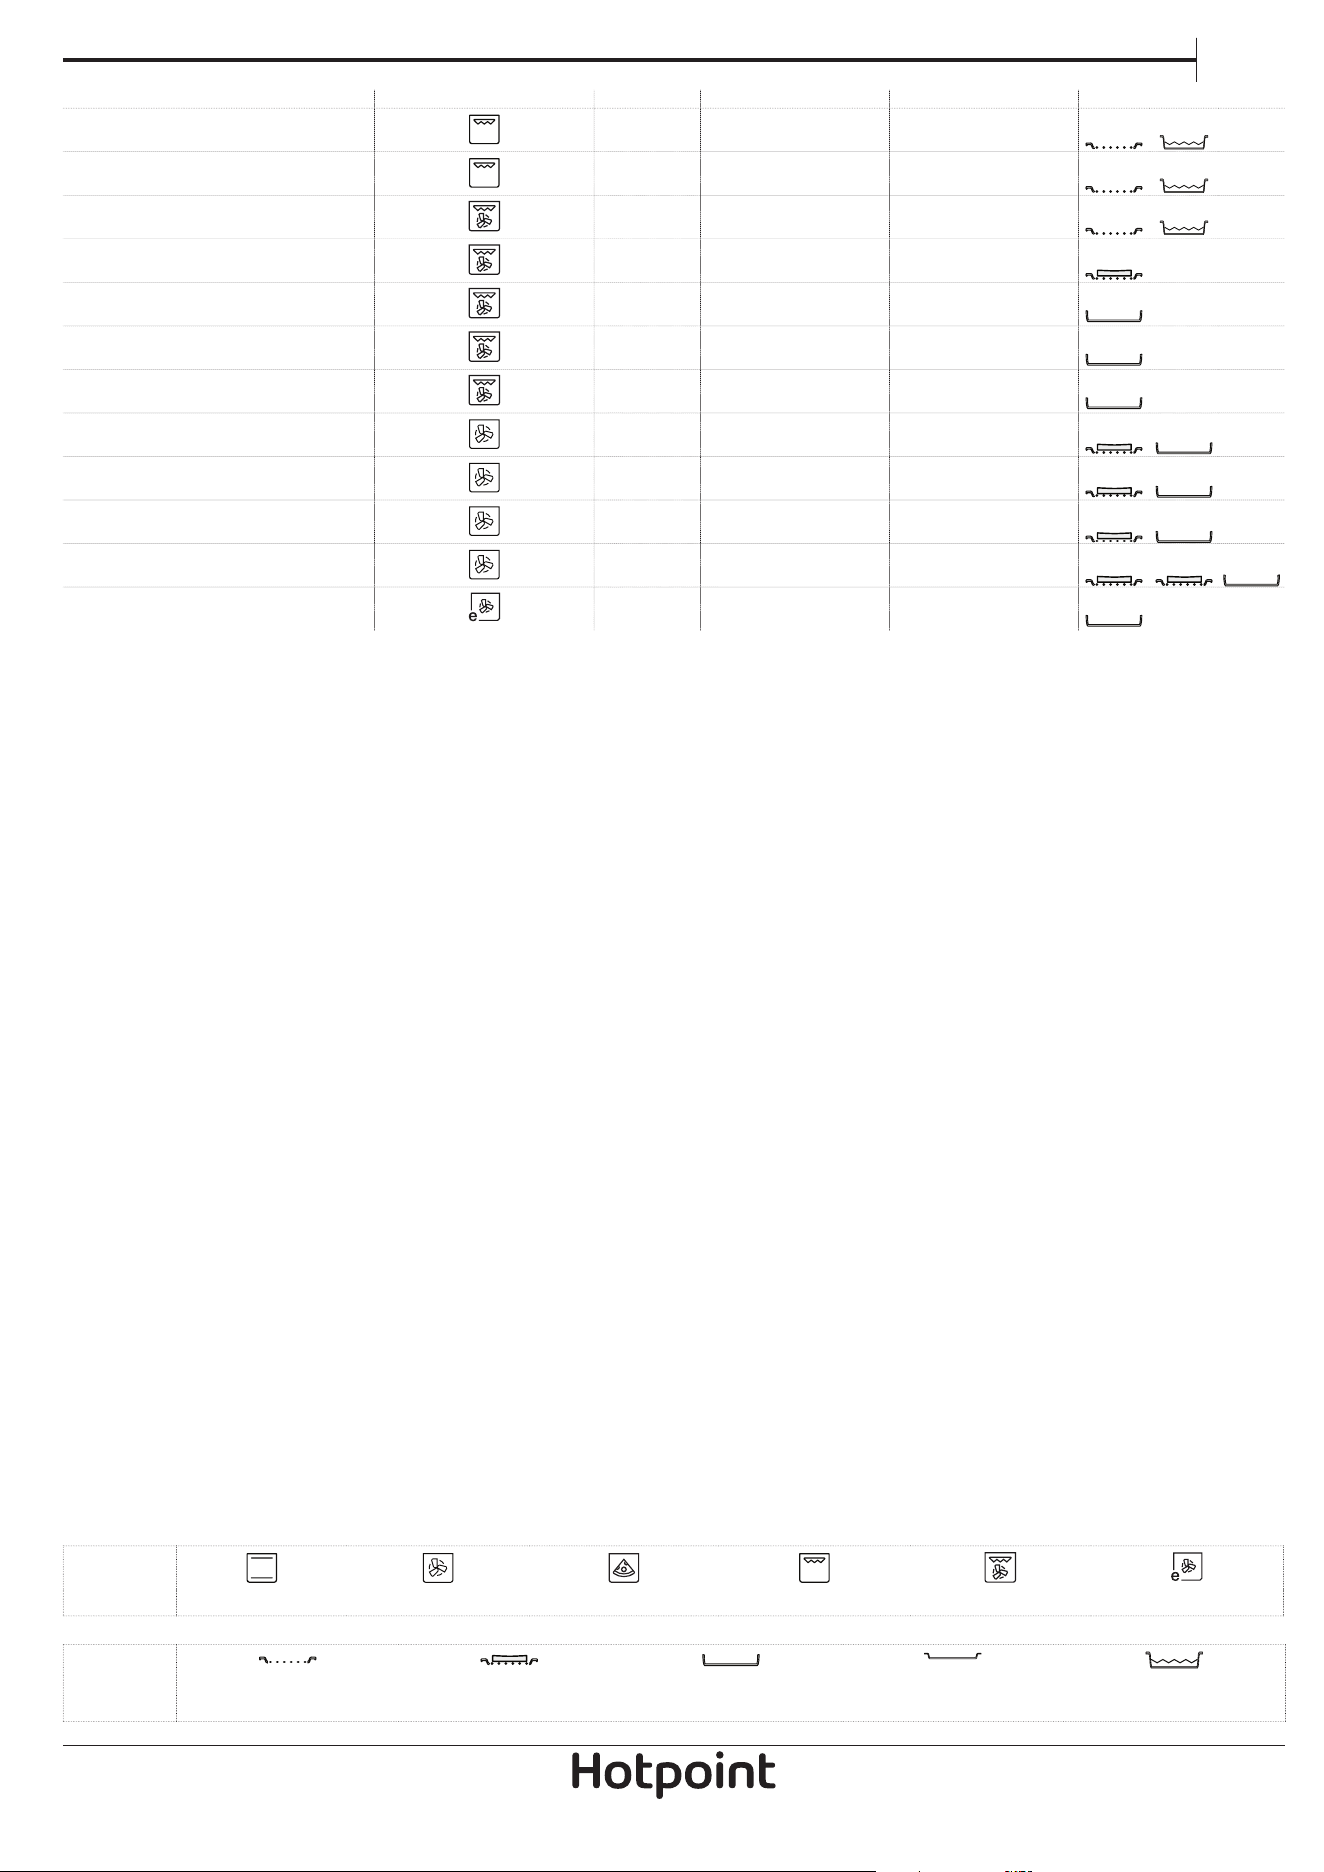
RECIPE FUNCTION PREHEAT TEMPERATURE (°C) DURATION (Min) LEVEL AND ACCESSORIES
Fish fillets / slices - 220 - MAX 20 - 30 *
4
3
Sausages / kebabs /
spare ribs / hamburgers
- MAX 15 - 30 *
5
4
Roast chicken 1-1.3 kg Yes 200 - 220 55 - 70 **
2
1
Roast beef rare 1 kg Yes 200 - 210 35 - 50 **
3
Leg of lamb / knuckle Yes 200 - 210 60 - 90 **
3
Roast potatoes Yes 200 - 210 35 - 55**
3
Vegetable gratin - 200 - 210 25 - 55
3
Meat and potatoes Yes 190 - 200 45 - 100 ***
4
1
Fish and vegetables Yes 180 30 - 50 ***
4
1
Lasagne and meat Yes 200 50 - 100 ***
4
1
Complete meal: fruit tart (level 5) /
lasagne (level 3) / meat (level 1)
Yes 180 - 190 40 - 120 ***
5
3 1
Roast meat / stuffed roasting joints - 170 - 180 100 - 150
3
* Turn food halfway through cooking
** Turn food two thirds of the way through cooking (if
necessary).
*** Estimated length of time: dishes can be removed from the
oven at dierent times depending on personal preference.
FUNCTIONS
Conventional Forced Air Pizza Grill Turbo Grill Eco Forced Air
ACCESSORIES
Wire shelf
Baking dish or cake tin
on the wire shelf
Baking tray/Drip tray or
Baking dish on the wire shelf
Drip tray / Baking tray
Drip tray / Baking tray with
200 ml of water
8
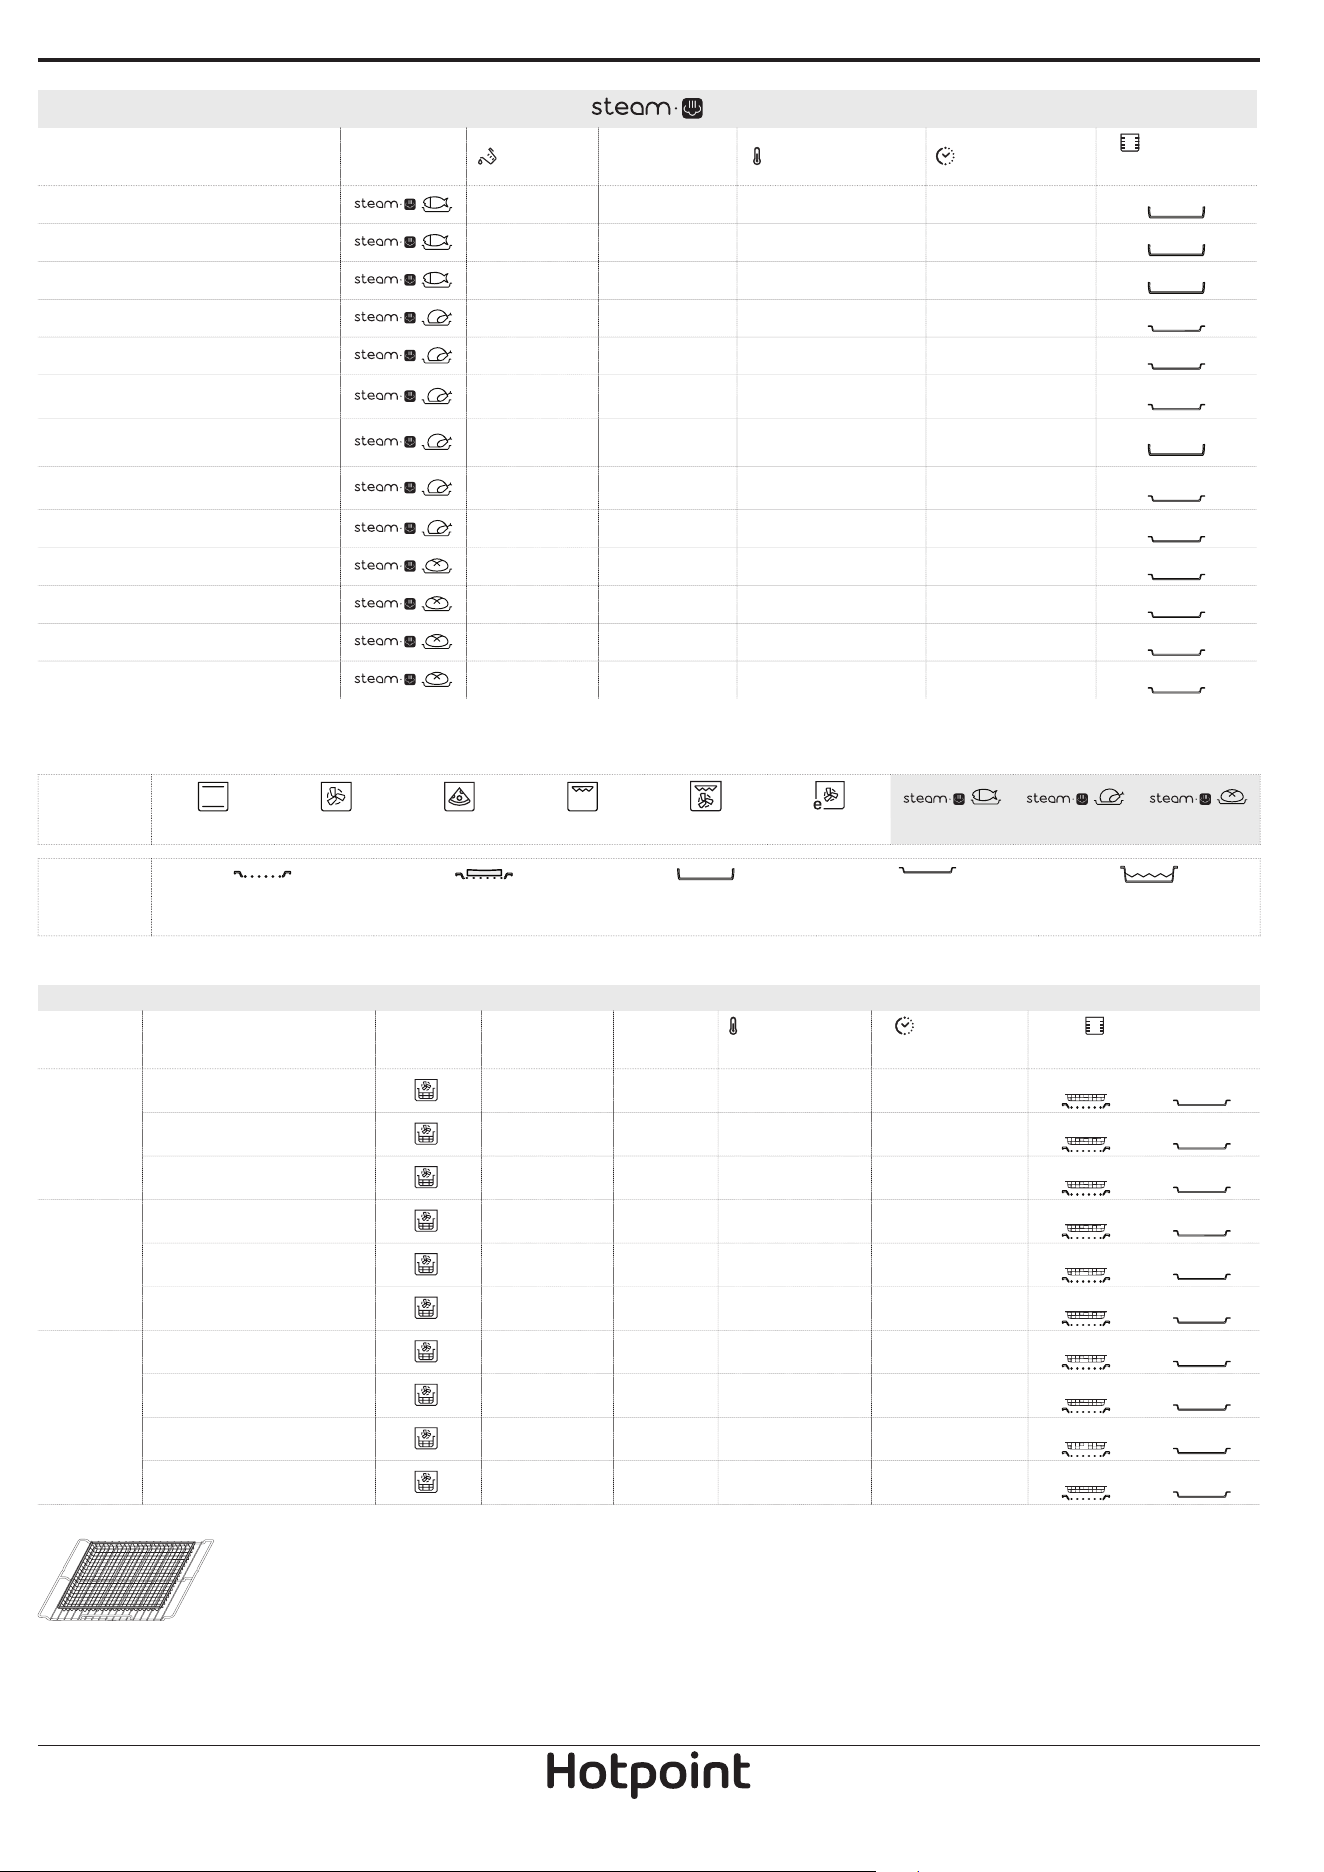
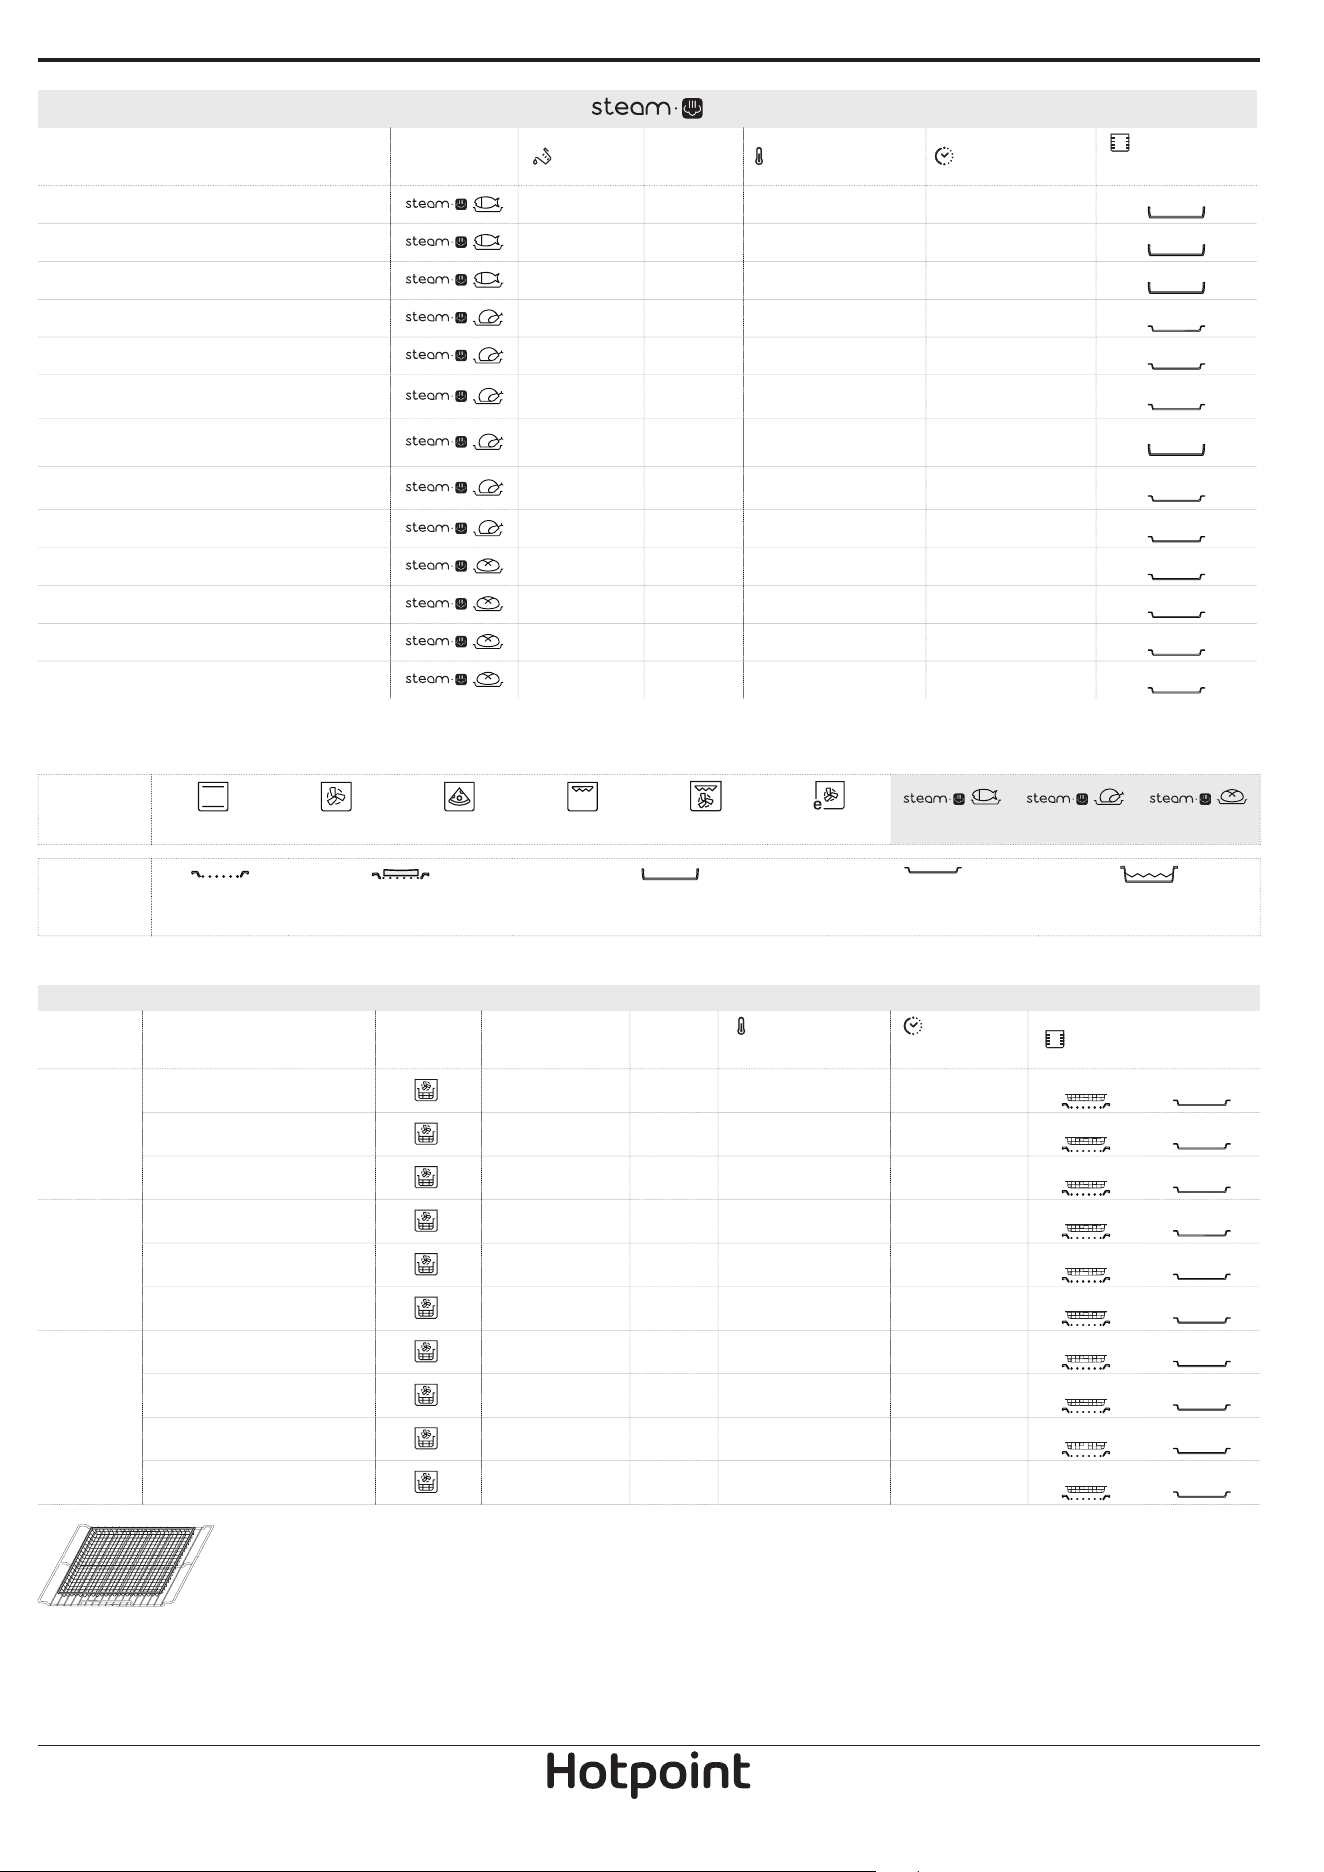
AIR FRY COOKING TABLE
CATEGORY RECIPE FUNCTION
SUGGESTED
QUANTITY
PREHEAT
TEMPERATURE
(°C)
DURATION
(MIN)
LEVEL AND
ACCESSORIES
Frozen Food
Frozen French Fries 500 - 700
200 20 - 30
3
1
Frozen Chicken Nuggets 500 - 700
200 15 - 20
4
1
Fish Sticks 500 - 700
220 15 - 20
4
1
Vegetables
Fresh Breaded Zucchini 400
200 15 - 20
4
1
Homemade Fries 300 - 800
200 25 - 40
4
1
Mixed Vegetables 300 - 800
200 20 - 35
4
1
Meat and Fish
Chicken Breast 1 - 4 cm
200 20 - 50
4
1
Chicken Wings 2300 - 800
220 20 - 40
4
1
Breaded Cutlet 1 - 4 cm
220 15 - 40
4
1
Fish Fillet 1 - 4 cm
200 15 - 25
4
1
Please note: the special Air Fry
tray has always to be placed on
the wire shelf.
For cooking fresh or homemade
foods, spread the oil evenly.
We suggest adding an empty tray on Level 1 in order
to collect eventual grease residual coming from the
Air Fry tray during the cooking.
In order to guarantee uniform cooking results, mix
food halfway through the recommended cooking
time.
RECIPE FUNCTION
WATER (ml)
PREHEAT
TEMPERATURE (°C) DURATION (Min)
LEVEL AND
ACCESSORIES
Fish fillets / cutlets 0.5 - 2 cm
200 - 190 - 210 15 - 25
3
Whole fish 300 - 600 g
200 - 190 - 210 15 - 30
3
Whole fish 600 g - 1.2 kg
200 - 180 - 200 25 - 45
3
Roast Beef rare 1 kg
200 - 190 - 210 40 - 55
3
Lamb shank 500 g - 1.5 kg
200 - 170 - 190 60 - 75
2
Chicken / guinea fowl / duck
Whole 1 - 1.5 kg
200 - 200 - 220 55 - 75
2
Chicken / guinea fowl / duck
Pieces 500 g - 1.5 kg
200 - 200 - 220 40 - 60
3
Chicken / turkey / duck
Whole 3 kg
200 - 160 - 180 100 - 140
2
Lamb / Beef / Pork 1 kg
200 - 170 - 190 60 - 100
3
Small bread 80 - 100 g
200 - 200 - 220 30 - 45
3
Sandwich loaf in tin 300 - 500 g
200 - 170 - 190 45 - 60
3
Bread loaf 500 g - 2 kg
200 - 160 - 170 50 - 100
2
Baguettes 200 - 300 g
200 - 200 - 220 30 - 45
3
The time indicated includes the preheating phase: we recommend placing the food in the oven and setting
the cooking time when starting the function.
FUNCTIONS
Conventional Forced Air Pizza Grill Turbo Grill Eco Forced Air Fish Meat Bread
ACCESSORIES
Wire shelf
Baking dish or cake tin
on the wire shelf
Baking tray/Drip tray or
Baking dish on the wire shelf
Drip tray / Baking tray
Drip tray / Baking tray with
200 ml of water
EN
9
CLEANING AND MAINTENANCE
Make sure that the oven has
cooled down before carrying out
any maintenance or cleaning.
Do not use steam cleaners.
Do not use wire wool, abrasive
scourers or abrasive/corrosive
cleaning agents, as these could
damage the surfaces of the
appliance.
Wear protective gloves.
The oven must be disconnected
from the mains before carrying
out any kind of maintenance
work.
EXTERIOR SURFACES
Clean the surfaces with a damp microfibre cloth. If
they are very dirty, add a few drops of pH-neutral
detergent. Finish off with a dry cloth.
Do not use corrosive or abrasive detergents. If any of
these products inadvertently comes into contact with
the surfaces of the appliance, clean immediately with
a damp microfibre cloth.
INTERIOR SURFACES
• After every use, leave the oven to cool and then
clean it, preferably while it is still warm, to remove
any deposits or stains caused by food residues. To
dry any condensation that has formed as a result
of cooking foods with a high water content, leave
the oven to cool completely and then wipe it with
a cloth or sponge.
• If there is stubborn dirt on the interior surfaces,
we recommend running the automatic cleaning
function for optimal cleaning results. Avoid
activating the pyrolitic cycle cleaning in the
presence of limescale residues. Before activating,
perform limescale cleaning as described above.
• The door can be easily removed and refitted to
facilitate cleaning of the glass.
• Clean the glass in the door with a suitable liquid
detergent.
ACCESSORIES
Soak the accessories in a washing-up liquid solution
after use, handling them with oven gloves if they
are still hot. Food residues can be removed using a
washing-up brush or a sponge.
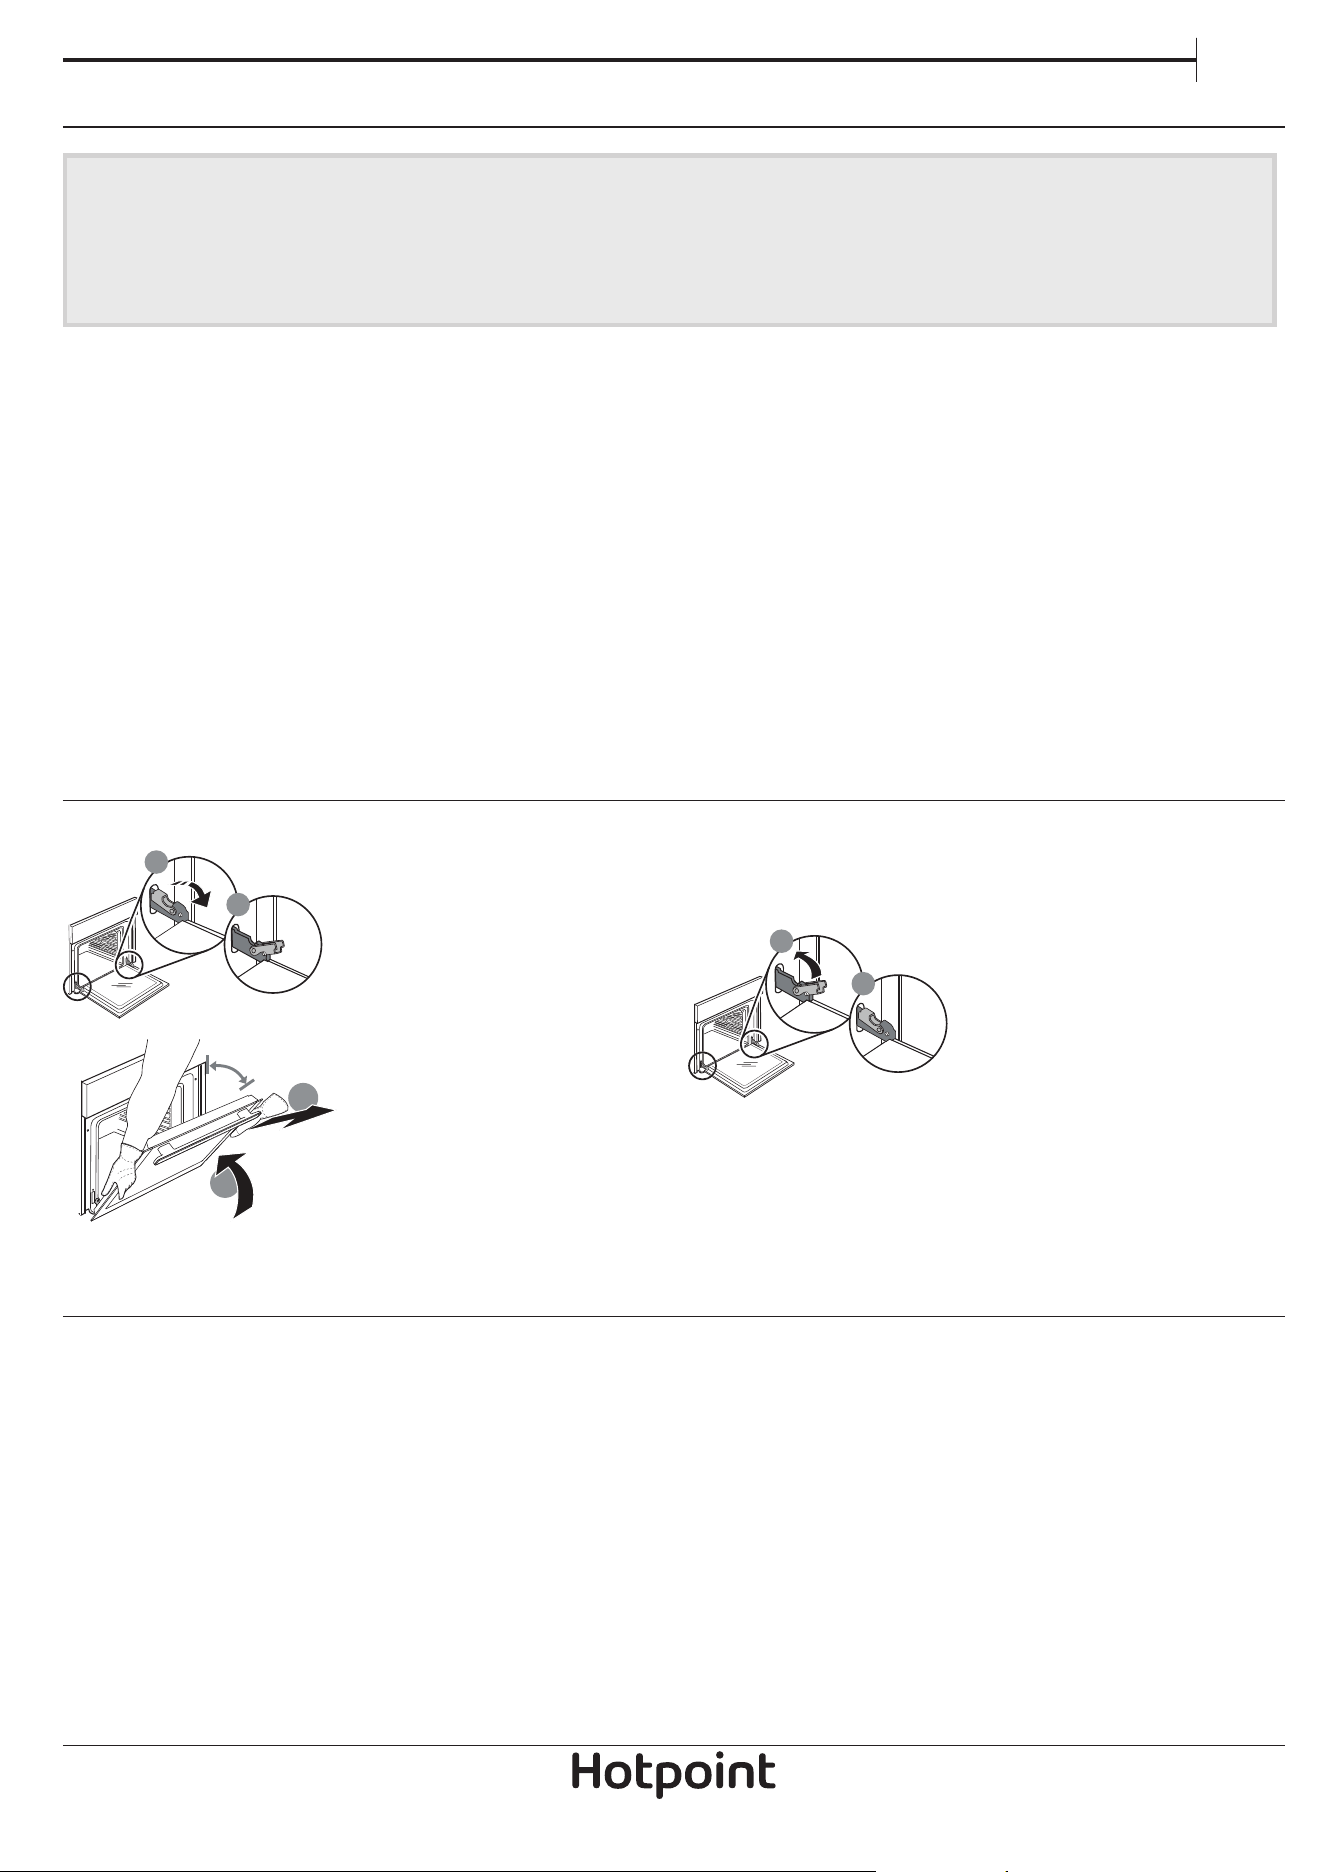
REMOVING AND REFITTING THE DOOR
b
a
1. To remove the door, open
it fully and lower the
catches until they are in the
unlock position.
a
b
~15°
2. Close the door as much
as you can. Take a firm hold
of the door with both hands
– do not hold it by the
handle. Simply remove the
door by continuing to close
it while pulling it upwards
at the same time until it is
released from its seating. Put the door to one side,
resting it on a soft surface.
3. Refit the door by moving it towards the oven,
aligning the hooks of the hinges with their seating
and securing the upper part onto its seating.
b
a
4. Lower the door and then
open it fully. Lower the
catches into their original
position: Make sure that
you lower them down
completely.
Apply gentle pressure to check that the catches are in
the correct position.
5. Try closing the door and check to make sure that it
lines up with the control panel. If it does not, repeat
the steps above: The door could become damaged if
it does not work properly.
REPLACING THE LAMP
1. Disconnect the oven from the power supply.
2. Unscrew the cover from the light, replace the bulb
and screw the cover back on the light.
3. Reconnect the oven to the power supply.
Please note: Use 25 W/230 V type G9, T300 °C halogen lamps.
The bulb used in the product is specically designed for
domestic appliances and is not suitable for general room
lighting within the home (EC Regulation 244/2009).
Light bulbs are available from our After-sales Service. - Do not
handle bulbs with your bare hands as your ngerprints could
damage them. Do not use the oven until the light cover has
been retted.
10
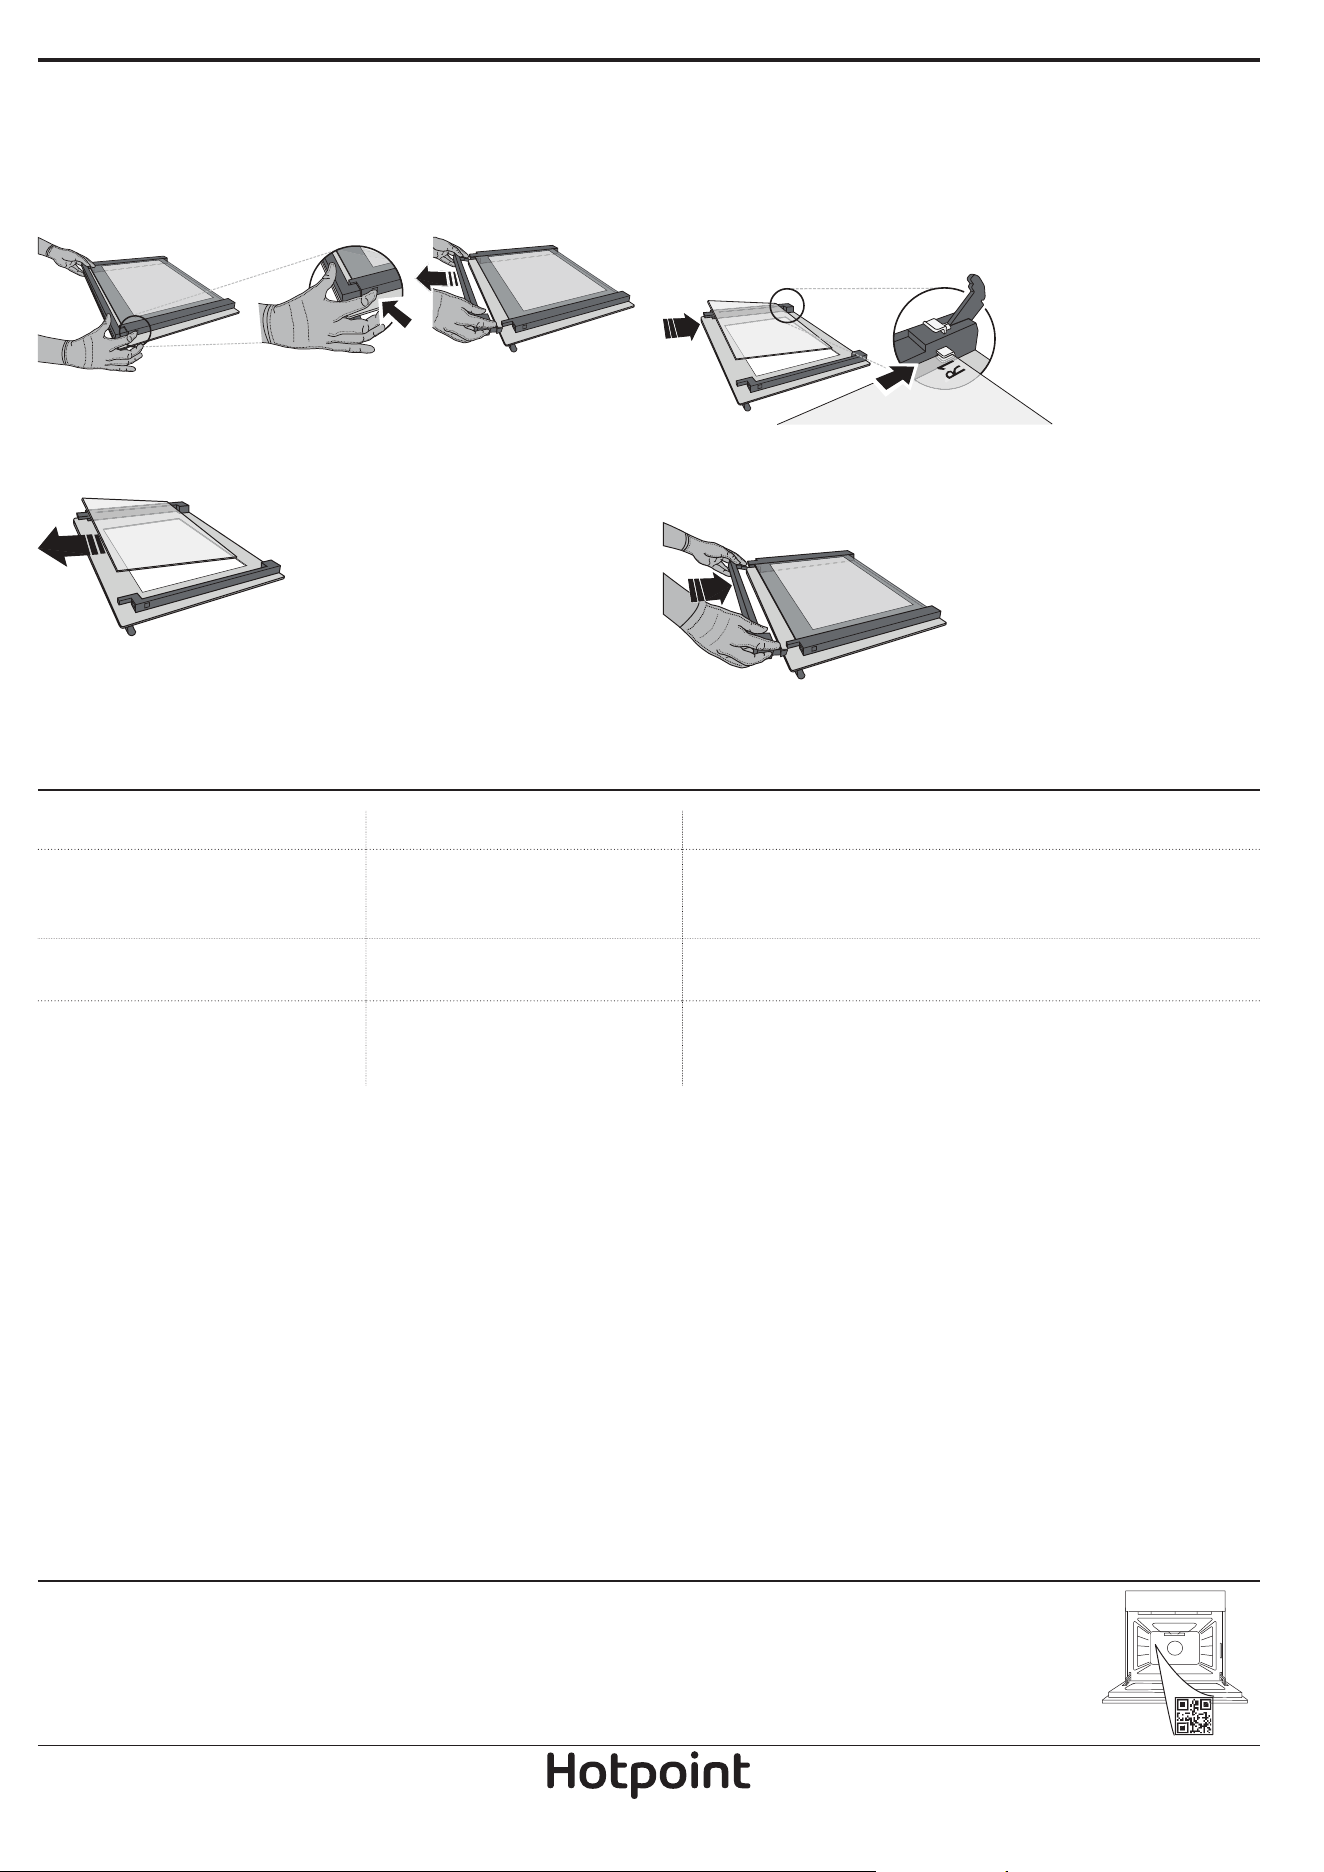
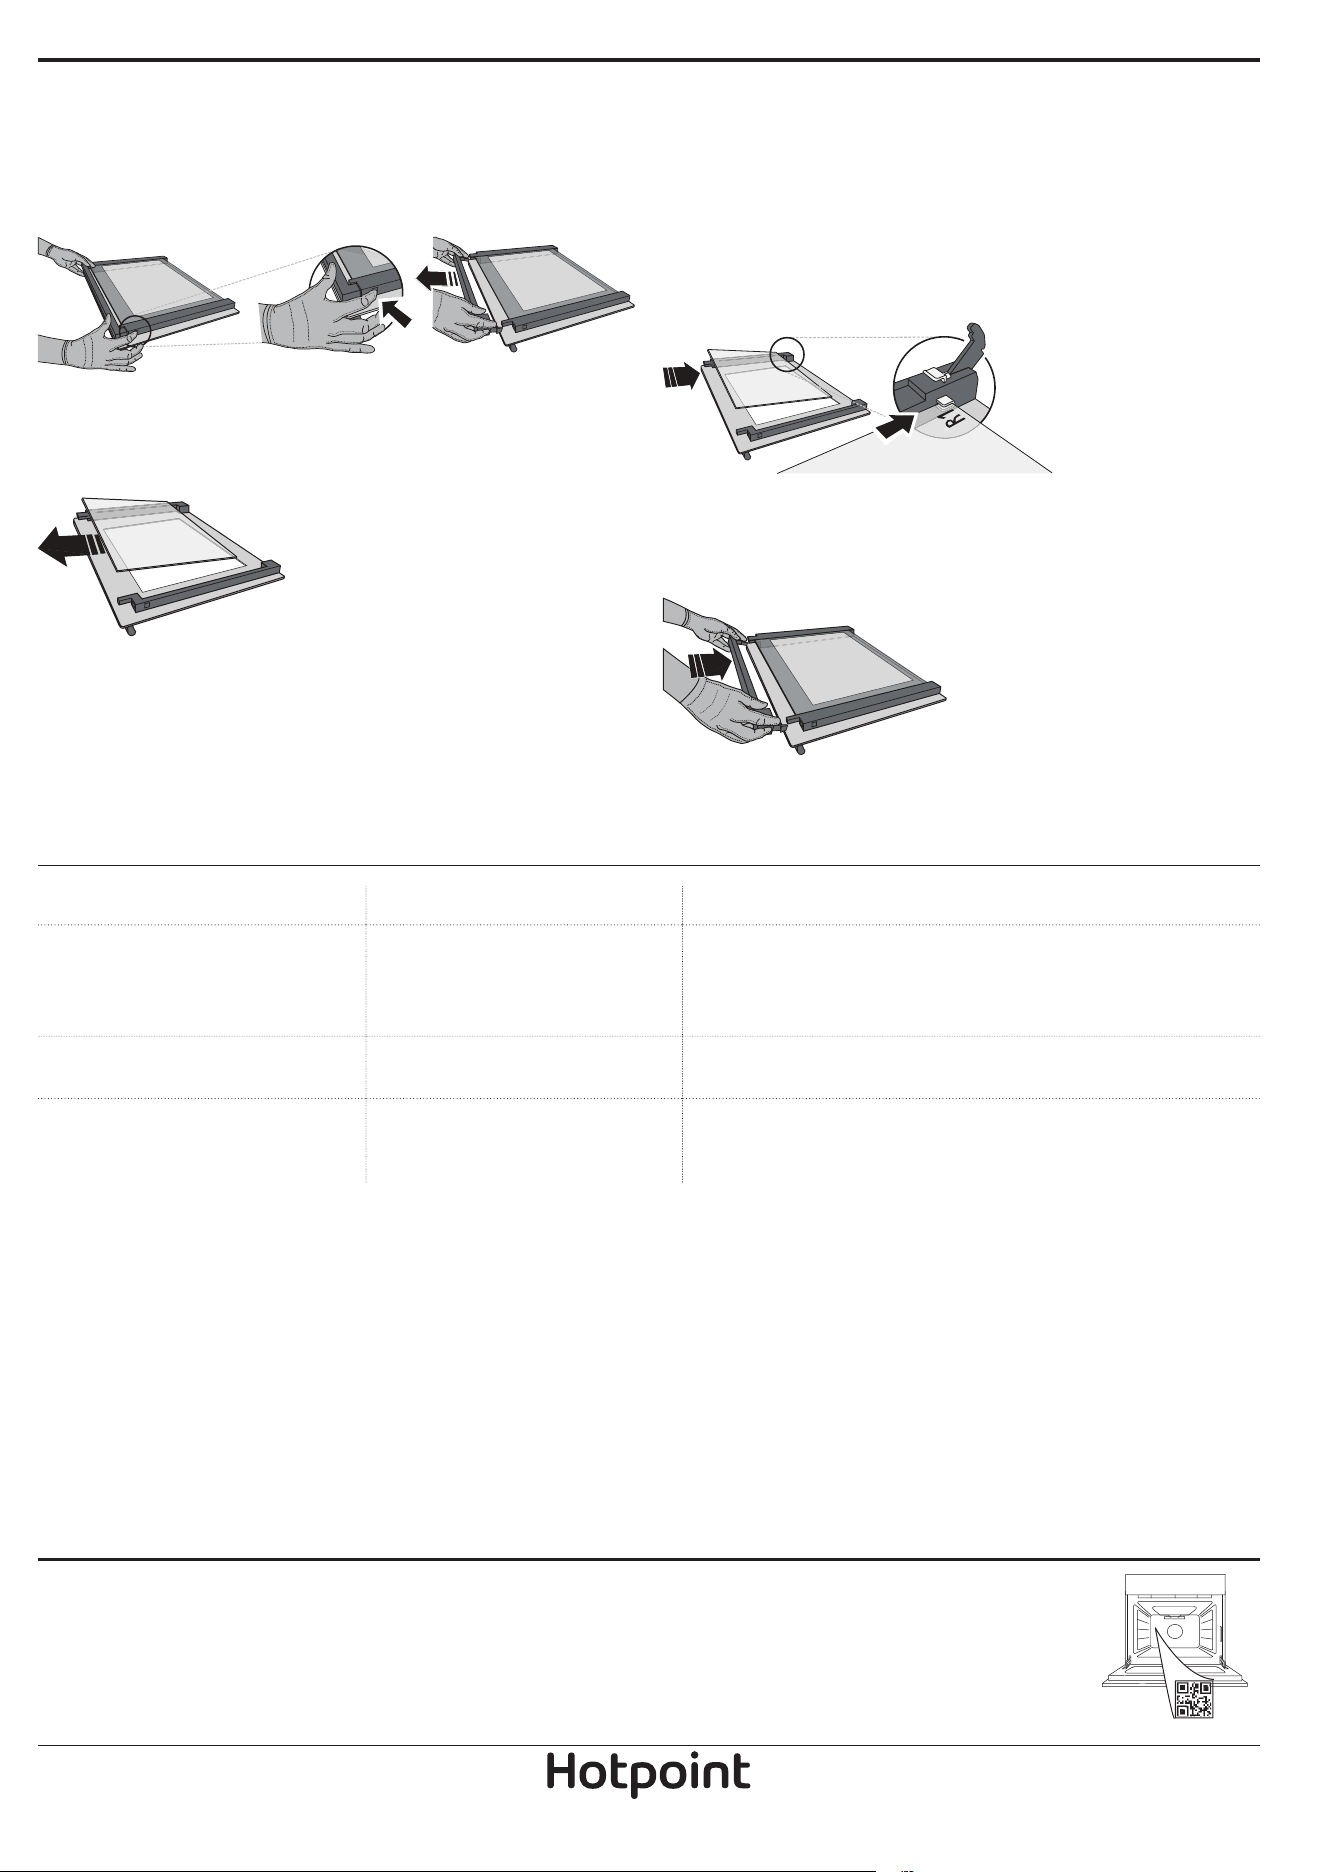
CLEANING THE DOOR GLASSES
1. After removing the door and resting it on a soft
surface with the handle downwards, simultaneously
press the two retaining clips and remove the upper
edge of the door by pulling it towards you.
2. Lift and firmly hold the inner glass with both
hands, remove it and place it on a soft surface before
cleaning it.
3. Refit the intermediate pane (marked with “1R”)
before refitting the inside pane: To position the panes
of glass correctly, make sure that the “R” mark can be
seen in the left-hand corner. First insert the long side
of the glass marked “R” into the support seats, then
lower it into position. Repeat this procedure for both
panes of glass.
4. Refit the upper edge: A click will indicate correct
positioning. Make sure the seal is secure before
refitting the door.
TROUBLESHOOTING
PROBLEM POSSIBLE CAUSE SOLUTION
The oven is not working.
Power cut.
Disconnection from the mains.
Check for the presence of mains electrical power and whether
the oven is connected to the electricity supply.
Turn off the oven and restart it to see if the fault persists.
The display shows the letter “F”
followed by a number or letter.
Oven failure.
Contact you nearest Client After-sales Service Centre and state
the number following the letter “F”.
The display is showing the
message “Hot” and the selected
function will not start.
Temperature too high.
Allow the oven to cool down before activating the function.
Select a different function.
Policies, standard documentation and additional product information can be found by:
• Using the QR code in your appliance
• Visiting our website docs . hotpoint . eu
• Alternatively, contact our After-sales Service (See phone number in the warranty booklet). When contacting our After-
sales Service, please state the codes provided on your product's identication plate.
ES
1
Manual del usuario
DESCRIPCIÓN DEL PRODUCTO
1
2
8
3
5
7
10
11
4
6
9
1. Panel de control
2. Ventilador
3. Lámpara
4. Guías para los estantes (el
nivel está indicado en la pared del
compartimento de cocción)
5. Puerta
6. Bloqueo de la puerta (bloquean
la puerta durante el proceso de
limpieza automática y después del
mismo)
7. Resistencia superior / grill
8. Resistencia circular (no visible)
9. Placa de características (no
debe retirarse)
10.
cavidad para agua
potable
11. Resistencia inferior (no visible)
DESCRIPCIÓN DEL PANEL DE CONTROL
1 32 4 5 6
1. SELECTOR
Para encender el horno
seleccionando una función. Gírelo
hasta la posición
para apagar el
horno.
2. LUZ
Con el horno encendido, pulse
para apagar o encender la
bombilla del compartimento del
horno.
3. AJUSTE DE LA HORA
Para acceder a las configuraciones
del tiempo de cocción, inicio
diferido y temporizador.
Para ver la hora cuando el horno
está apagado.
4. PANTALLA
5. BOTONES DE REGULACIÓN
Para cambiar la configuración del
tiempo de cocción.
6. SELECTOR DEL TERMOSTATO
Gire para seleccionar la
temperatura deseada cuando
active las funciones manuales.
GRACIAS POR COMPRAR UN PRODUCTO HOTPOINT
Para recibir una asistencia más completa, registre su
producto en www . register10 . eu
ESCANEE EL CÓDIGO QR DE SU
APARATO PARA OBTENER MÁS
INFORMACIÓN
Antes de usar el aparato, lea atentamente las
Instrucciones de seguridad.
10
Nota: El tipo de selector puede variar según el tipo de modelo. Si los selectores se quedan pulsados al activarlos, pulse en el
centro del selector para liberarlo de su alojamiento.
2
ACCESORIOS
REJILLA GRASERA * BANDEJA PASTELERA * GUÍAS DESLIZANTES *
Para cocinar alimentos o como
soporte de cazuelas, moldes de tartas
y otros recipientes de cocción aptos
para horno.
Para utilizar como bandeja
de horno para cocinar
carne, pescado, verduras,
focaccia, etc. o para
recoger los jugos de la
cocción debajo de la rejilla.
Se utiliza para la cocción de
pan y pasteles, pero también
para asados, pescado en
papillote, etc.
Para facilitar la inserción y
extracción de accesorios.
BANDEJA FREIDORA DE AIRE*
Este accesorio está diseñado para ser
utilizado al cocinar alimentos con la
función Air Fry, garantizando un punto
crujiente óptimo para la comida. Para
utilizarla, coloque la bandeja en el
estante de alambre. Se puede lavar en el
lavavajillas para facilitar su limpieza.
* Disponible en determinados modelos solamente
El número y el tipo de accesorio puede variar dependiendo del modelo comprado.
Se pueden adquirir otros accesorios por separado en el Servicio Postventa.
INTRODUCCIÓN DE LA PARRILLA Y OTROS ACCESORIOS
Introduzca la rejilla en el nivel que desee, manteniéndola
ligeramente inclinada hacia arriba y apoyando primero la
parte trasera elevada (orientada hacia arriba).
Luego desplácela horizontalmente por las guías hasta el tope.
Otros accesorios, como la bandeja pastelera, se
deben introducir horizontalmente, dejando que se
deslicen por las guías.
ESTANTES DESLIZANTES Y GUÍAS PARA ESTANTES
Antes de utilizar el horno, retire la cinta protectora [a]
y luego extraiga la lámina protectora [b] de las guías
deslizantes.
EXTRAER LAS GUÍAS DESLIZANTES [c]
Tire de la parte inferior de la guía deslizante para
desacoplar los ganchos inferiores (1) y tire de las
guías deslizantes hacia arriba para extraerlas de los
ganchos superiores (2).
VOLVER A COLOCAR LAS GUÍAS DESLIZANTES [d]
Enganche los ganchos superiores en las guías de los
estantes (1) y, a continuación, presione la parte inferior
de las guías deslizantes contra las guías de los estantes
hasta que los ganchos inferiores (2) se enganchen.
1
2
1
2
[c] [d]
CÓMO EXTRAER Y VOLVER A COLOCAR LAS GUÍAS
PARA ESTANTES
1. Para extraer las guías para estantes, sujete
firmemente la parte externa de la guía y tire hacia
usted para extraer el soporte y las dos clavijas
internas del alojamiento.
2. Para volver a colocar las guías para estantes,
colóquelas cerca de la cavidad e introduzca primero
las dos clavijas en sus alojamientos. Luego, coloque
la parte externa cerca de su alojamiento, introduzca
el soporte y presione rmemente hacia la pared
de la cavidad para asegurarse de que la guía para
estantes quede bien sujeta.
ES
3
PRIMER USO
1. AJUSTE DE LA HORA
La primera vez que encienda el aparato, tendrá que
ajustar la hora: Pulse
hasta que el icono y los
dos dígitos de la hora
o y del reloj empiecen
a parpadear en la pantalla.
Utilice o para ajustar la hora y pulse para
confirmar. Los dos dígitos de los minutos empezarán
a parpadear. Utilice
o para ajustar los minutos y
pulse
para confirmar.
Nota: Si el icono parpadea, por ejemplo después de un corte
de corriente muy largo, será necesario volver a ajustar la hora.
2. CALENTAR EL HORNO
Un horno nuevo puede liberar olores que se han
quedado impregnados durante la fabricación: es
completamente normal.
Antes de empezar a cocinar, le recomendamos calentar
el horno en vacío para eliminar cualquier olor.
Quite todos los cartones de protección o el film
transparente del horno y saque todos los accesorios
de su interior.
Caliente el horno a 250 °C durante una hora
aproximadamente. Durante este tiempo, el horno
debe permanecer vacío.
Nota: Es aconsejable ventilar la habitación después de usar el
aparato por primera vez.
FUNCIONES
CONVENCIONAL
Para cocinar cualquier tipo de alimento en un
estante.
AIRE FORZADO
Para hacer diferentes alimentos que requieren
la misma temperatura de cocción en varios niveles
(máximo tres) al mismo tiempo. Esta función puede
utilizarse para cocinar diferentes alimentos sin que se
mezclen los olores.
FREÍR CON AIRE
La función Air Fry permite cocinar muchos
tipos de alimentos con menos aceite, obteniendo
platos agradablemente crujientes y saludables. La
cavidad del horno se calienta mientras el ventilador
hace circular aire caliente.
Para utilizarla, coloque los alimentos en una sola capa
en la cesta Air Fry, evitando que se superpongan,
y siga las instrucciones de la tabla de cocción Air
Fry. Coloque la bandeja en el estante de alambre e
introduzca una bandeja de horno en un nivel inferior
para recoger las migas o goteos.
Evite utilizar varias bandejas para garantizar una
cocción uniforme.
AIRE FORZADO ECO
Para cocinar asados y carne rellena en un solo
estante. Para evitar que los alimentos se resequen, el
aire circula de manera suave e intermitente.
Cuando se utiliza la función ECO, la luz permanece
apagada durante la cocción pero se puede volver a
encender momentáneamente pulsando
.
GRILL
Para asar al grill filetes, pinchos morunos y
salchichas, cocinar verduras gratinadas o tostar pan.
Cuando ase carne, le recomendamos colocar la
grasera debajo para recoger los jugos de cocción:
Coloque el recipiente en cualquiera de los niveles
debajo de la rejilla y añada 200 ml de agua potable.
TURBO GRILL
Para asar piezas de carne grandes (pierna de
cordero, rosbif, pollo). Le recomendamos utilizar la
grasera para recoger los jugos de cocción: Coloque el
recipiente en cualquiera de los niveles debajo de la
rejilla y añada 200 ml de agua potable.
MAXI COOKING
Para cocinar piezas de carne de gran tamaño
(más de 2,5 kg). Le recomendamos darle la vuelta a
la carne durante la cocción para que los dos lados
se doren uniformemente. También recomendamos
embadurnar la junta para evitar que se seque en
exceso.
PIZZA
Esta función le permite cocinar una estupenda
pizza casera. El ciclo de cocción específico funciona
hasta 270°C, ofreciendo una pizza tierna por
dentro, crujiente en los bordes y con un dorado
perfectamente uniforme.
DIAMOND CLEAN
La acción del vapor liberado durante este ciclo
especial de limpieza a baja temperatura permite
eliminar la suciedad y los residuos de alimentos con
facilidad. Vierta 100-120 ml de agua potable en el
fondo del horno y, a continuación, gire el mando
de selección y el mando del termostato hasta el
icono
. Lo mejor es utilizar la función durante 35
minutos.
Active la función cuando el horno esté frío y déjelo
enfriar durante 15 minutos una vez finalizado el
ciclo. La posición del icono no se corresponde con la
temperatura alcanzada durante el ciclo de limpieza.
4
VAPOR
PESCADO AL VAPOR FÁCIL
CARNE AL VAPOR FÁCIL
PAN AL VAPOR FÁCIL
La función Vapor permite obtener excelentes
prestaciones gracias a la presencia de vapor en el ciclo
de cocción. Esta función gestiona
automáticamente la temperatura ideal para cocinar
una amplia gama de recetas; los tiempos de cocción
de los platos principales se muestran en la tabla de
cocción correspondiente. Activar siempre la función
de vapor cuando el horno esté frío, y después de vertir
200 ml de agua potable en el fondo de la cavidad. Para
activar la función Vapor, es necesario girar el selector
del termostato a la posición del icono
.
USO DIARIO
1. SELECCIONAR UNA FUNCIÓN
Para seleccionar una función, gire el selector hasta
el símbolo de la función deseada: la pantalla se
iluminará y sonará una señal acústica.
2. ACTIVAR UNA FUNCIÓN
MANUAL
Para iniciar la función seleccionada, gire el selector del
termostato hasta la temperatura deseada.
Nota: Durante la cocción puede cambiar la función girando el
selector o regulando la temperatura con el selector del
termostato. La función no se iniciará si el mando del
termostato está en ; podrá ajustar el tiempo de cocción, la
hora de nalización de la cocción (sólo si ha ajustado un
tiempo de cocción) y un temporizador.
FERMENTAR MASA
Para activar la función “Fermentar masas”, gire el
selector del termostato al símbolo correspondiente;
si el horno está programado con una temperatura
diferente, la función no se activará.
Nota: Puede programar el tiempo de cocción, el tiempo de
nalización de la cocción (solo si selecciona un tiempo de
cocción) y un temporizador.
Para poner en marcha la
función Vapor, vierta 200 ml
de agua potable en el fondo
del horno.
Seleccione la función girando
en el sentido de las agujas del
reloj el mando de selección
en el icono correspondiente,
y el mando del termostato en
cualquier posición entre 160 y
180°C (como sugiere el icono). La función se iniciará
y la pantalla mostrará la hora actual del día. No es
necesario precalentar. Para finalizar la cocción, gire el
selector hasta «
».
Durante la cocción al vapor no abra la puerta y no
rellene nunca el agua.
Nota: Abrir la puerta y rellenar con agua durante la cocción
puede tener un efecto adverso en el resultado nal de la
cocción.
3. PRECALENTAMIENTO
Una vez iniciada la función, una señal acústica y un
icono parpadeando
en la pantalla le indicarán que
la fase de precalentamiento se ha activado.
Cuando el precalentamiento haya terminado, sonará
una señal acústica y el icono fijo
en la pantalla le
indicará que el horno ha alcanzado la temperatura
programada: en ese momento, coloque los alimentos
dentro y proceda con la cocción.
Nota: Colocar los alimentos en el horno antes de que haya
nalizado el precalentado puede tener efectos adversos en el
resultado nal de la cocción.
4. COCCIÓN PROGRAMADA
Antes de comenzar la cocción, deberá seleccionar
una función.
DURACIÓN
Mantenga pulsado hasta que el icono y «00:00»
empiecen a parpadear en la pantalla.
Utilice o para configurar el tiempo de cocción
deseado y después pulse
para confirmar.
Active la función girando el selector del termostato hasta
la temperatura deseada: Sonará una señal acústica y la
pantalla indicará que la cocción ha terminado.
Nota: Para cancelar el tiempo de cocción programado,
mantenga pulsado hasta que el icono empiece a
parpadear en la pantalla y después use para
reconfigurar el tiempo de cocción a «00:00». Este tiempo
de cocción incluye una fase de precalentamiento.
SELECCIONAR LA HORA DE FINALIZACIÓN DE LA
COCCIÓN/INICIO DIFERIDO
Una vez programado el tiempo de cocción, se puede
retrasar el inicio de la función programando su hora
de finalización: pulse
hasta que el icono y la hora
actual empiecen a parpadear en la pantalla.
Utilice o para ajustar el tiempo deseado de
finalización de cocción y pulse
para confirmar.
ES
5
Active la función girando el selector del termostato
hasta la temperatura deseada: la función se iniciará
automáticamente cuando haya transcurrido el
periodo de tiempo calculado para que la cocción
termine a la hora programada.
Nota: Para cancelar la programación, apague el horno
girando el selector a la posición “ ”.
La función de inicio retardado no está disponible para
las funciones Grill y Turbo Grill.
FINAL DE COCCIÓN
Sonará una señal acústica y la pantalla indicará que la
función ha terminado.
Gire el selector para seleccionar una función diferente
o póngalo en
para apagar el horno.
Nota: Si el temporizador está activo, la pantalla mostrará
alternativamente «END» y el tiempo restante.
5. AJUSTE DEL TEMPORIZADOR
Esta opción no interrumpe ni programa la
cocción, pero le permite utilizar la pantalla como
temporizador, tanto si la función está activada como
si el horno está apagado.
Mantenga pulsado
hasta que el icono “00:00” y
“00:00” empiecen a parpadear en la pantalla.
Utilice o para establecer el tiempo que desee y
pulse
para confirmar. Una vez que haya finalizado
la cuenta atrás sonará una señal acústica.
Notas: Para cancelar el temporizador, mantenga pulsado
hasta que el icono empiece a parpadear y después use
para recongurar el tiempo a «00:00».
NOTAS
• No recubra el interior del horno con papel de
aluminio.
• No arrastre ollas ni sartenes sobre la base del
horno, ya que podrían dañar el revestimiento
esmaltado.
• No coloque pesos pesados sobre la puerta ni se
agarre a ella.
6
TABLA DE COCCIÓN
RECETA FUNCIÓN RÁPIDO TEMPERATURA (°C) DURACIÓN (Min) NIVEL Y ACCESORIOS
Tartas esponjosas
Sí 160-180 30 - 90
2/3
Sí 160-180 30 - 90
4
1
Bizcocho relleno
(tarta de queso, strudel, tarta de frutas)
Sí 160 - 200 35 - 90
2
Sí 160 - 200 40 - 90
4
2
Biscuits / tartaletas
Sí 160-180 20 - 45
3
Sí 150-170 20 - 45
4
2
Sí 150-170 20 - 45
5
3
1
Lionesas
Sí 180 - 210 30 - 40
3
Sí 180 - 200 35 - 45
4
2
Sí 180 - 200 35 - 45
5
3
1
Merengues
Sí 90 150-200
3
Sí 90 140 - 200
4
2
Sí 90 140 - 200
5
3
1
Pizza/Focaccia Sí 190 - 220 20 - 50
4
2
Pizza delgada Sí MAX 10 - 15
2
Pizza de bandeja / Focaccia Sí MAX 15 - 20
2
Pizza congelada
Sí MAX 10 - 20
3
Sí 220 - MAX 10 - 25
3
2
Tartas saladas
(tarta de verdura, quiche)
Sí 180 - 200 40 - 55
3
Sí 180 - 200 45 - 60
4
2
Sí 180 - 200 45 - 60
5
3 1
Volovanes/hojaldres
Sí 190 - 200 20 - 30
3
Sí 180 - 190 20 - 40
4
2
Sí 180 - 190 20 - 40
5
3 1
Lasaña / pasta al horno /
canelones / budines
Sí 190 - 200 45 - 65
2
Cordero/ternera / carne de res/cerdo
1kg
Sí 190 - 200 80-110
3
Asado de cerdo con piel 2 kg Sí 180 - 190 110 - 150
2
Pollo / Conejo / Pato 1 kg Sí 200-220 50-100
2
Pavo / oca 3 kg - 190 - 200 100 - 160
2
Verduras rellenas
(tomates, calabacines, berenjenas)
Sí 180 - 200 50 - 70
2
Pan tostado - MAX 2 - 6
5
FUNCIONES
Convencional Aire Forzado Pizza Pan Auto Grill Turbo Grill
Eco aire forzado
ACCESORIOS
Rejilla
Bandeja para hornear o
molde sobre rejilla
Bandeja pastelera / Grasera o bandeja
para hornear sobre la rejilla
Grasera /
bandeja pastelera
Grasera/bandeja pastelera
con 200ml de agua
ES
7
RECETA FUNCIÓN RÁPIDO TEMPERATURA (°C) DURACIÓN (Min) NIVEL Y ACCESORIOS
Filetes/rodajas de pescado - 220 - MAX 20 - 30 *
4
3
Salchichas / pinchos morunos /
costillas / hamburguesas
- MAX 15 - 30 *
5
4
Pollo asado 1-1,3 kg Sí 200-220 55 - 70 **
2
1
Rosbif poco hecho 1 kg Sí 200 - 210 35 - 50 **
3
Pierna de cordero / codillo Sí 200 - 210 60 - 90 **
3
Patatas asadas Sí 200 - 210 35 - 55**
3
Verduras gratinadas - 200 - 210 25-55
3
Carnes y patatas Sí 190 - 200 45 - 100 ***
4
1
Pescados y verduras Sí 180 30 - 50 ***
4
1
Lasañas y carnes Sí 200 50 - 100 ***
4
1
Menú completo: Tarta de fruta (nivel 5)/
lasaña (nivel 3)/carne (nivel 1)
Sí 180 - 190 40 - 120 ***
5
3 1
Carne asada / carne rellena asada - 170 - 180 100 - 150
3
*Dar la vuelta al alimento a mitad de la cocción
** Dé la vuelta al alimento en el segundo tercio de la cocción
(si fuera necesario).
*** Tiempo de cocción estimado: Los platos se pueden
extraer del horno antes o después según los gustos
personales.
FUNCIONES
Convencional Aire Forzado Pizza Grill Turbo Grill Eco aire forzado
ACCESORIOS
Rejilla
Bandeja para hornear o
molde sobre rejilla
Bandeja pastelera / Grasera o bandeja
para hornear sobre la rejilla
Grasera /
bandeja pastelera
Grasera/bandeja pastelera
con 200ml de agua
8
TABLA DE COCCIÓN DE FREIDORA DE AIRE
CATEGORÍA RECETA FUNCIÓN
CANTIDAD
RECOMENDADA
RÁPIDO
TEMPERATURA
(°C)
DURACIÓN
(MIN)
NIVEL Y ACCESORIOS
Alimentos
Congelados
Patatas Fritas Congeladas 500 - 700
200 20 - 30
3
1
Nuggets de pollo
congelados
500 - 700
200 15 - 20
4
1
Palitos de pescado 500 - 700
220 15 - 20
4
1
Verduras
Calabacín fresco
empanado
400
200 15 - 20
4
1
Patatas fritas caseras 300 - 800
200 25 - 40
4
1
Verduras variadas 300 - 800
200 20 - 35
4
1
Carne y Pescado
Pechugas de pollo 1-4cm
200 20 - 50
4
1
Alitas de pollo 2300 - 800
220 20 - 40
4
1
Chuleta empanada 1-4cm
220 15 - 40
4
1
Filete de pescado 1-4cm
200 15 - 25
4
1
Nota: la bandeja especial Air Fry
debe colocarse siempre en el
estante de alambre.
Para cocinar alimentos frescos
o caseros, extienda el aceite
uniformemente.
Sugerimos añadir una bandeja vacía en el Nivel 1 para
recoger eventuales residuos de grasa procedentes de
la bandeja Air Fry durante la cocción.
Para garantizar resultados de cocción uniformes,
mezcle los alimentos a mitad del tiempo de cocción
recomendado.
RECETA FUNCIÓN
Agua (ml)
RÁPIDO
TEMPERATURA (°C) DURACIÓN (Min)
NIVEL Y ACCE-
SORIOS
Filetes de pescado / chuletas 0,5 - 2 cm
200 - 190 - 210 15 - 25
3
Pescado entero 300 - 600 g
200 - 190 - 210 15-30
3
Pescado entero 600 g - 1,2 kg
200 - 180 - 200 25 - 45
3
Rosbif poco hecho 1kg
200 - 190 - 210 40 - 55
3
Pierna de cordero 500 g - 1,5 kg
200 - 170 - 190 60 - 75
2
Pollo / pintada / pato
Entero 1 - 1,5 kg
200 - 200-220 55 - 75
2
Pollo, pintada y pato
Piezas 500 g - 1,5 kg
200 - 200-220 40 - 60
3
Pollo / pavo / pato
Entero 3 kg
200 - 160 - 180 100 - 140
2
Cordero / ternera / buey 1 kg
200 - 170 - 190 60 - 100
3
Pan pequeño 80 - 100 kg
200 - 200-220 30 - 45
3
Pan de sándwich en lata 300 - 500 g
200 - 170 - 190 45 - 60
3
Barra de pan 500 g - 2 kg
200 - 160 - 170 50-100
2
Baguette 200 - 300 g
200 - 200-220 30 - 45
3
El tiempo indicado incluye la fase de precalentamiento: recomendamos colocar los alimentos en el horno y
ajustar el tiempo de cocción al iniciar la función.
FUNCIONES
Convencional Aire Forzado Pizza Grill Turbo Grill Eco aire forzado Pescado Carne Pan
ACCESORIOS
Rejilla
Bandeja para hornear o
molde sobre rejilla
Bandeja pastelera / Grasera o bandeja
para hornear sobre la rejilla
Grasera /
bandeja pastelera
Grasera/bandeja pastelera
con 200ml de agua

ES
9
LIMPIEZA Y MANTENIMIENTO
Asegúrese de que el horno
se haya enfriado antes de
llevar a cabo las tareas de
mantenimiento o limpieza.
No utilice productos de lavado
con vapor.
No utilice estropajos de
acero, estropajos abrasivos ni
productos de limpieza abrasivos/
corrosivos, ya que podrían dañar
las superficies del aparato.
Utilice guantes de protección.
El horno debe desconectarse de
la red eléctrica antes de llevar
a cabo cualquier trabajo de
mantenimiento.
SUPERFICIES EXTERIORES
Limpie las superficies con un paño húmedo de
microfibra. Si están muy sucias, añada unas gotas de
detergente neutro al agua. Seque con un paño seco.
No utilice detergentes corrosivos ni abrasivos. Si uno
de esos productos entra accidentalmente en contacto
con la superficie del aparato, límpielo de inmediato
con un paño húmedo de microfibra.
SUPERFICIES INTERIORES
• Después de cada uso deje que el horno se enfríe y,
a continuación, límpielo, preferiblemente cuando
aún esté tibio, para quitar los restos o las manchas
causadas por los residuos de los alimentos. Para
secar la condensación que se haya podido formar
debido a la cocción de alimentos con un alto
contenido en agua, deje que el horno se enfríe por
completo y límpielo con un paño o esponja.
• Si hay suciedad persistente en las superficies
interiores, se recomienda activar la función de
limpieza automática para obtener los mejores
resultados. Evite activar el ciclo de limpieza
pirolítica en caso de que haya incrustaciones de
cal. Antes de activarlo, limpie las incrustaciones de
cal como se ha descrito anteriormente.
• La puerta se puede montar y desmontar para
facilitar la limpieza del cristal.
• Limpie el cristal de la puerta con un detergente líquido
adecuado.
ACCESORIOS
Después del uso sumerja los accesorios en una
solución líquida con detergente, utilice guantes
si aún están calientes. Los residuos de alimentos
pueden quitarse con un cepillo o esponja.
CÓMO EXTRAER Y VOLVER A COLOCAR LA PUERTA
b
a
1. Para quitar la puerta,
ábrala por completo y baje
los pestillos hasta que estén
en posición desbloqueada.
a
b
~15°
2. Cierre la puerta tanto
como pueda. Sujete bien la
puerta con las dos manos
– no la sujete por el asa.
Simplemente extraiga la
puerta continuando
cerrándola y a la vez
levantándola hasta que se
salga de su alojamiento. Ponga la puerta en un lado,
apoyada sobre una superficie blanda.
3. Vuelva a instalar la puerta llevándola hacia el
horno, alineando los ganchos de las ranuras con
sus alojamientos y fijando la parte superior en su
alojamiento.
b
a
4. Baje la puerta y ábrala
por completo. Baje los
pestillos hasta su posición
original: Asegúrese de
haberlos bajado por
completo.
Presione suavemente para comprobar que los
pestillos están en la posición correcta.
5. Intente cerrar la puerta y compruebe que esté
alineada con el panel de control. Si no lo está, repita
los pasos de arriba: La puerta podría dañarse si no
funciona correctamente.
SUSTITUCIÓN DE LA LÁMPARA
1. Desconecte el horno de la red eléctrica.
2. Desenrosque la tapa de la lámpara, sustituya la
bombilla y vuelva a enroscar la tapa de la lámpara.
3. Vuelva a conectar el horno a la red eléctrica.
Nota: Utilice bombillas halógenas de 25W/230 V tipo G9, T
300°C. La bombilla que se usa en el aparato está diseñada
especícamente para electrodomésticos y no es adecuada
para la iluminación general de estancias en una vivienda
(Normativa CE 244/2009).
Las bombillas están disponibles en nuestro Servicio
Postventa. - No manipule las bombillas con las manos
desprotegidas, ya que las huellas dactilares podrían dañarlas.
No utilice el horno hasta que no haya vuelto a colocar la tapa
de la bombilla.
10
LIMPIEZA DE LOS CRISTALES DE LAS PUERTAS
1. Después de quitar la puerta y apoyarla sobre una
superficie blanda con el tirador hacia abajo, presione
simultáneamente los dos clips de sujeción y retire el
borde superior de la puerta tirando de él hacia usted.
2. Sujete los cristales interiores firmemente con las
dos manos, extráigalos y colóquelos sobre una
superficie blanda antes de limpiarlos.
3. Vuelva a colocar la hoja intermedia (marcada con
“1R”)
antes de volver a colocar la hoja interna: Para colocar
las hojas de cristal correctamente, asegúrese de que
la marca «R» se vea en la esquina de la izquierda.
Primero introduzca el lado largo del cristal marcado
con una “R” en los soportes y después bájelo hasta su
posición. Repita este procedimiento en ambas hojas
de cristal.
4. Vuelva a colocar la parte superior: un clic le indicará
que se ha colocado correctamente. Asegúrese de que
el precinto esté asegurado antes de volver a montar
la puerta.
RESOLUCIÓN DE PROBLEMAS
PROBLEMA POSIBLE CAUSA SOLUCIÓN
El horno no funciona.
Corte de suministro.
Desconexión de la red eléctrica.
Compruebe que haya corriente eléctrica en la red y que el
horno esté enchufado a la toma de electricidad.
Apague el horno y vuelva a encenderlo para comprobar si se ha
solucionado el problema.
En la pantalla aparecerá la letra “F”
seguida de un número o letra.
Fallo del horno.
Póngase en contacto con el Servicio Postventa más cercano e
indique el número que aparece detrás de la letra «F».
La pantalla muestra el mensaje
“Hot” y la función seleccionada no
se inicia.
Temperatura demasiado alta.
Deje que el horno se enfríe antes de activar la función.
Seleccione otra función.
Puede consultar los reglamentos, la documentación estándar e información adicional sobre productos mediante
alguna de las siguientes formas:
• Utilizando el código QR en tu aplicación
• Visitando nuestra página web docs . hotpoint . eu
• También puede ponerse en contacto con nuestro Servicio Postventa (Consulte el número de teléfono en el folleto de
la garantía). Cuando se ponga en contacto con nuestro Servicio Postventa, deberá indicar los códigos que guran en la
placa de características de su producto.
400020036780
