EN
Owner's Manual
THANK YOU FOR BUYING A HOTPOINT/ARISTON
PRODUCT
In order to receive a more complete assistance, please
register your product on www . hotpoint. eu/ register
Before using the appliance carefully read the Safety
Instruction.
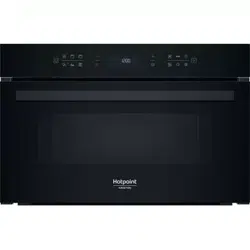
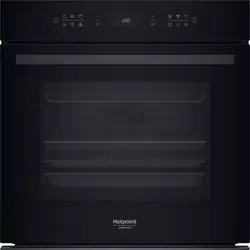
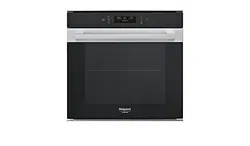
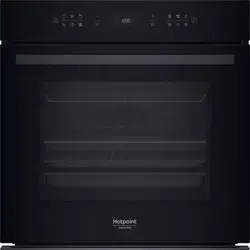
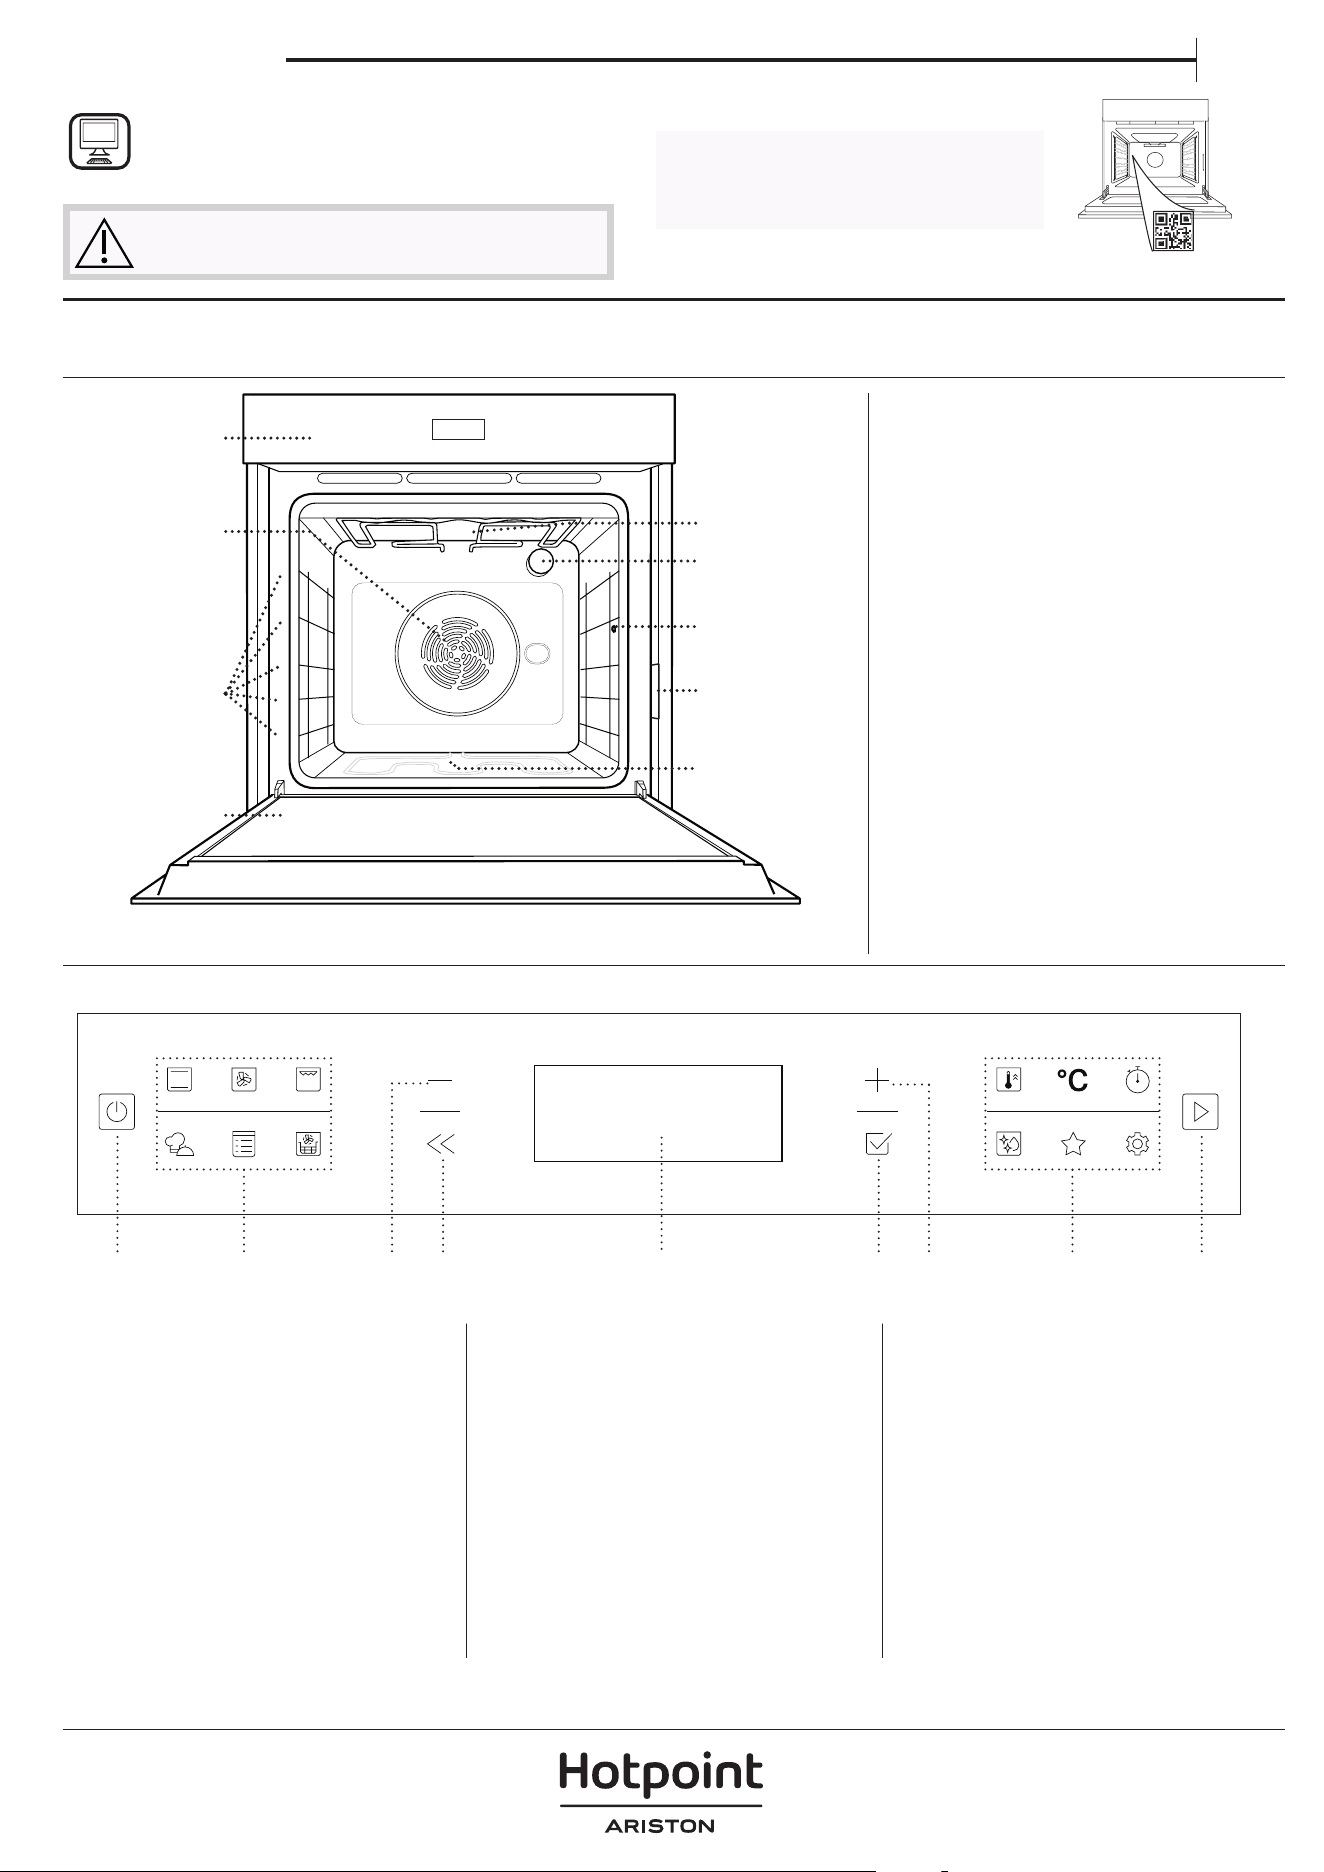
PRODUCT DESCRIPTION
CONTROL PANEL
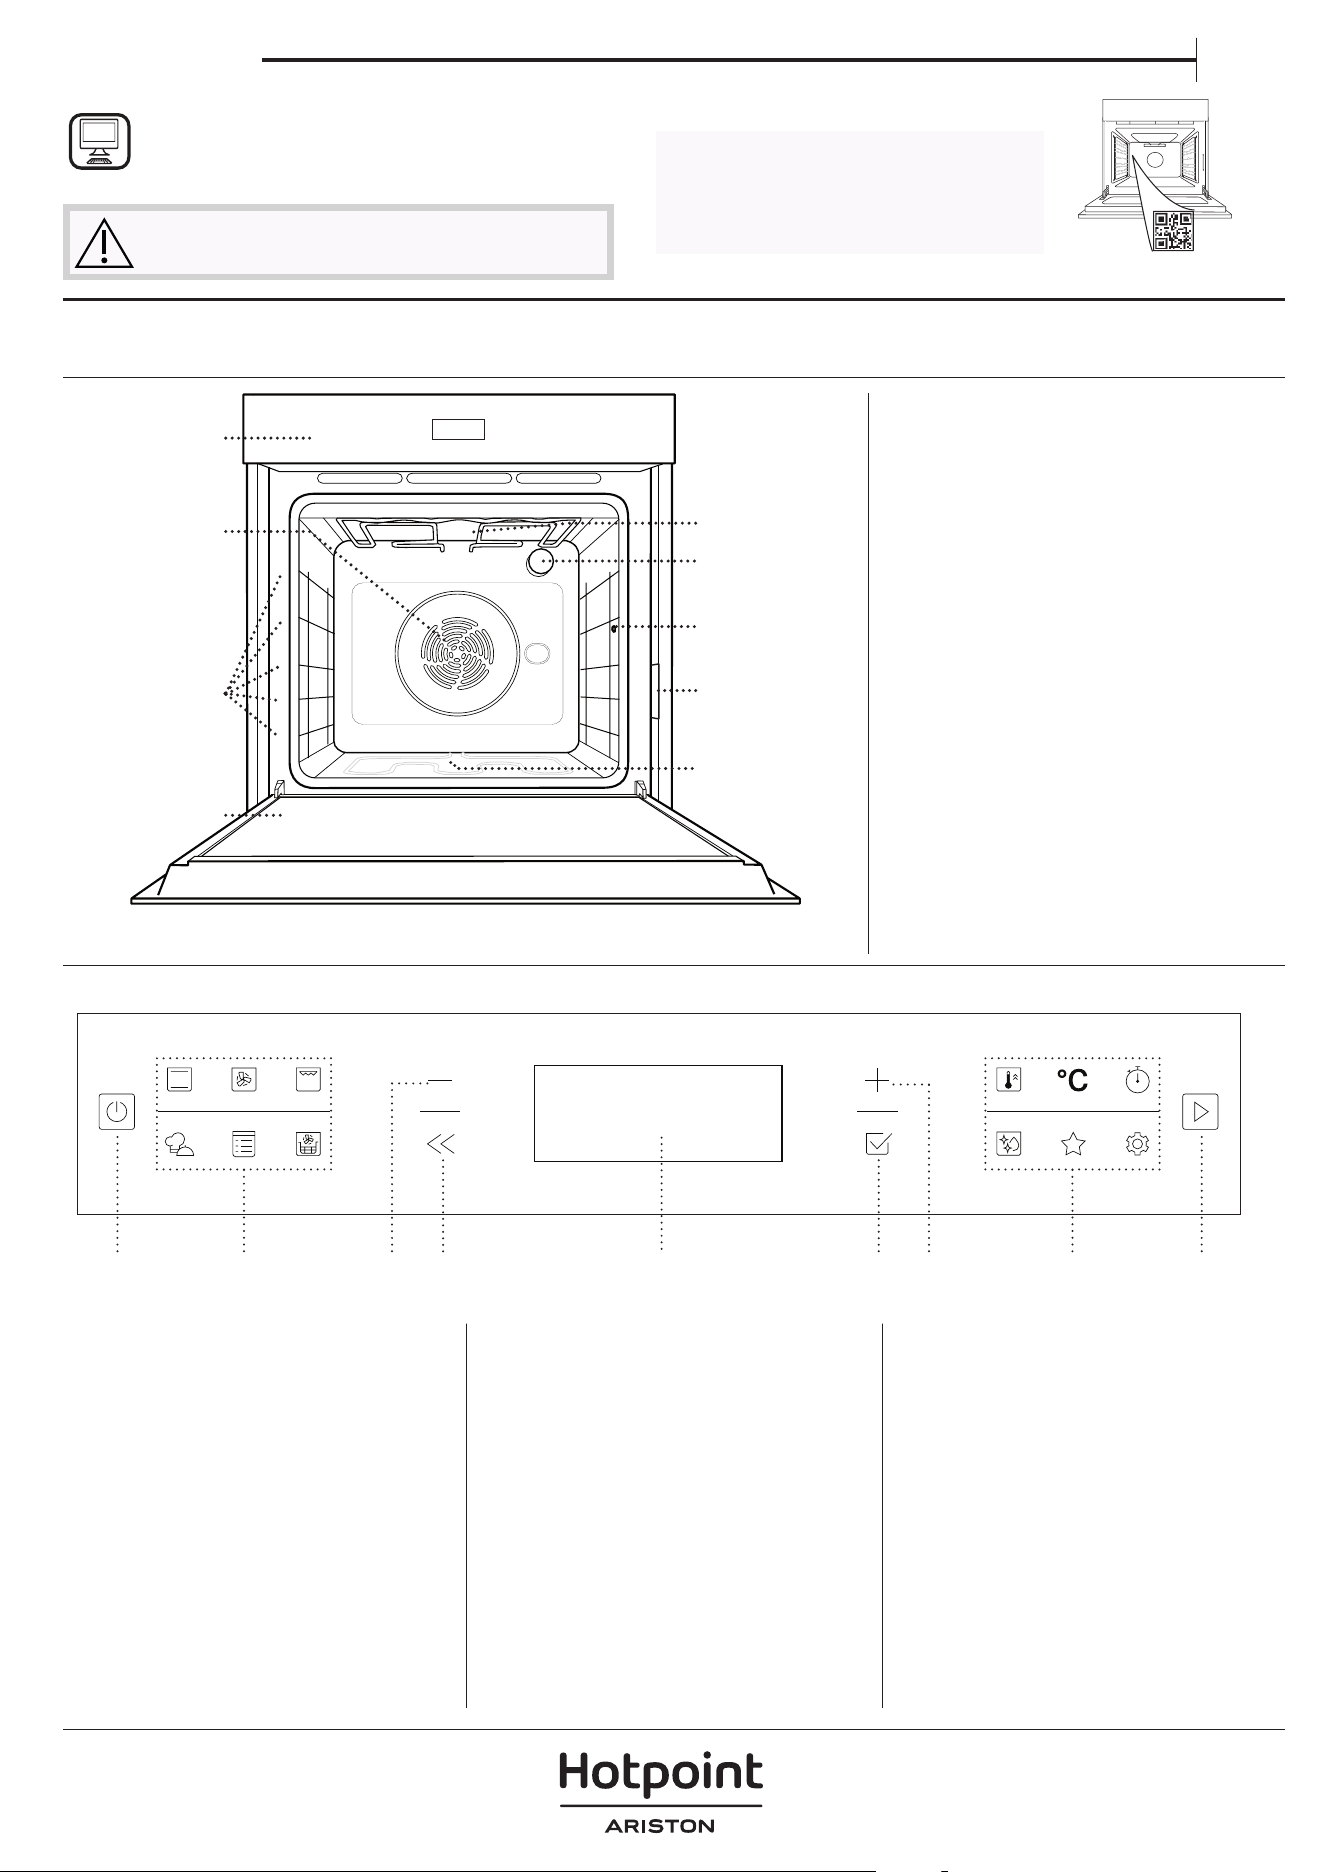
1. Control panel
2. Fan and circular heating element
(non-visible)
3. Shelf guides
(the level is indicated on the front
of the oven)
4. Door
5. Upper heating element/grill
6. Lamp
7. Meat probe insert point
8. Identification plate
(do not remove)
9. Lower heating element
(non-visible)
1. ON / OFF
For switching the oven on and
off and for stopping an active
function.
2. FUNCTIONS DIRECT ACCESS
For quick access to the functions
and menu.
3. NAVIGATION BUTTON MINUS
For scrolling through a menu and
decreasing the settings or values
of a function.
4. BACK
For returning to the previous
screen. During cooking, allows
settings to be changed.
5. DISPLAY
6. CONFIRM
For confirming a selected function
or a set value.
7. NAVIGATION BUTTON PLUS
For scrolling through a menu and
increasing the settings or values of
a function.
8. OPTIONS / FUNCTIONS
DIRECT ACCESS
For quick access to the functions,
duration, settings and favorites.
9. START
For starting a function using the
specified or basic settings.
5
4
3
2
1
5
4
3
2
1
1
2
3
4
7
9
6
5
PLEASE SCAN THE QR CODE ON
YOUR APPLIANCE IN ORDER TO
REACH MORE INFORMATION
8
1 3 4 5 6 7 8 92
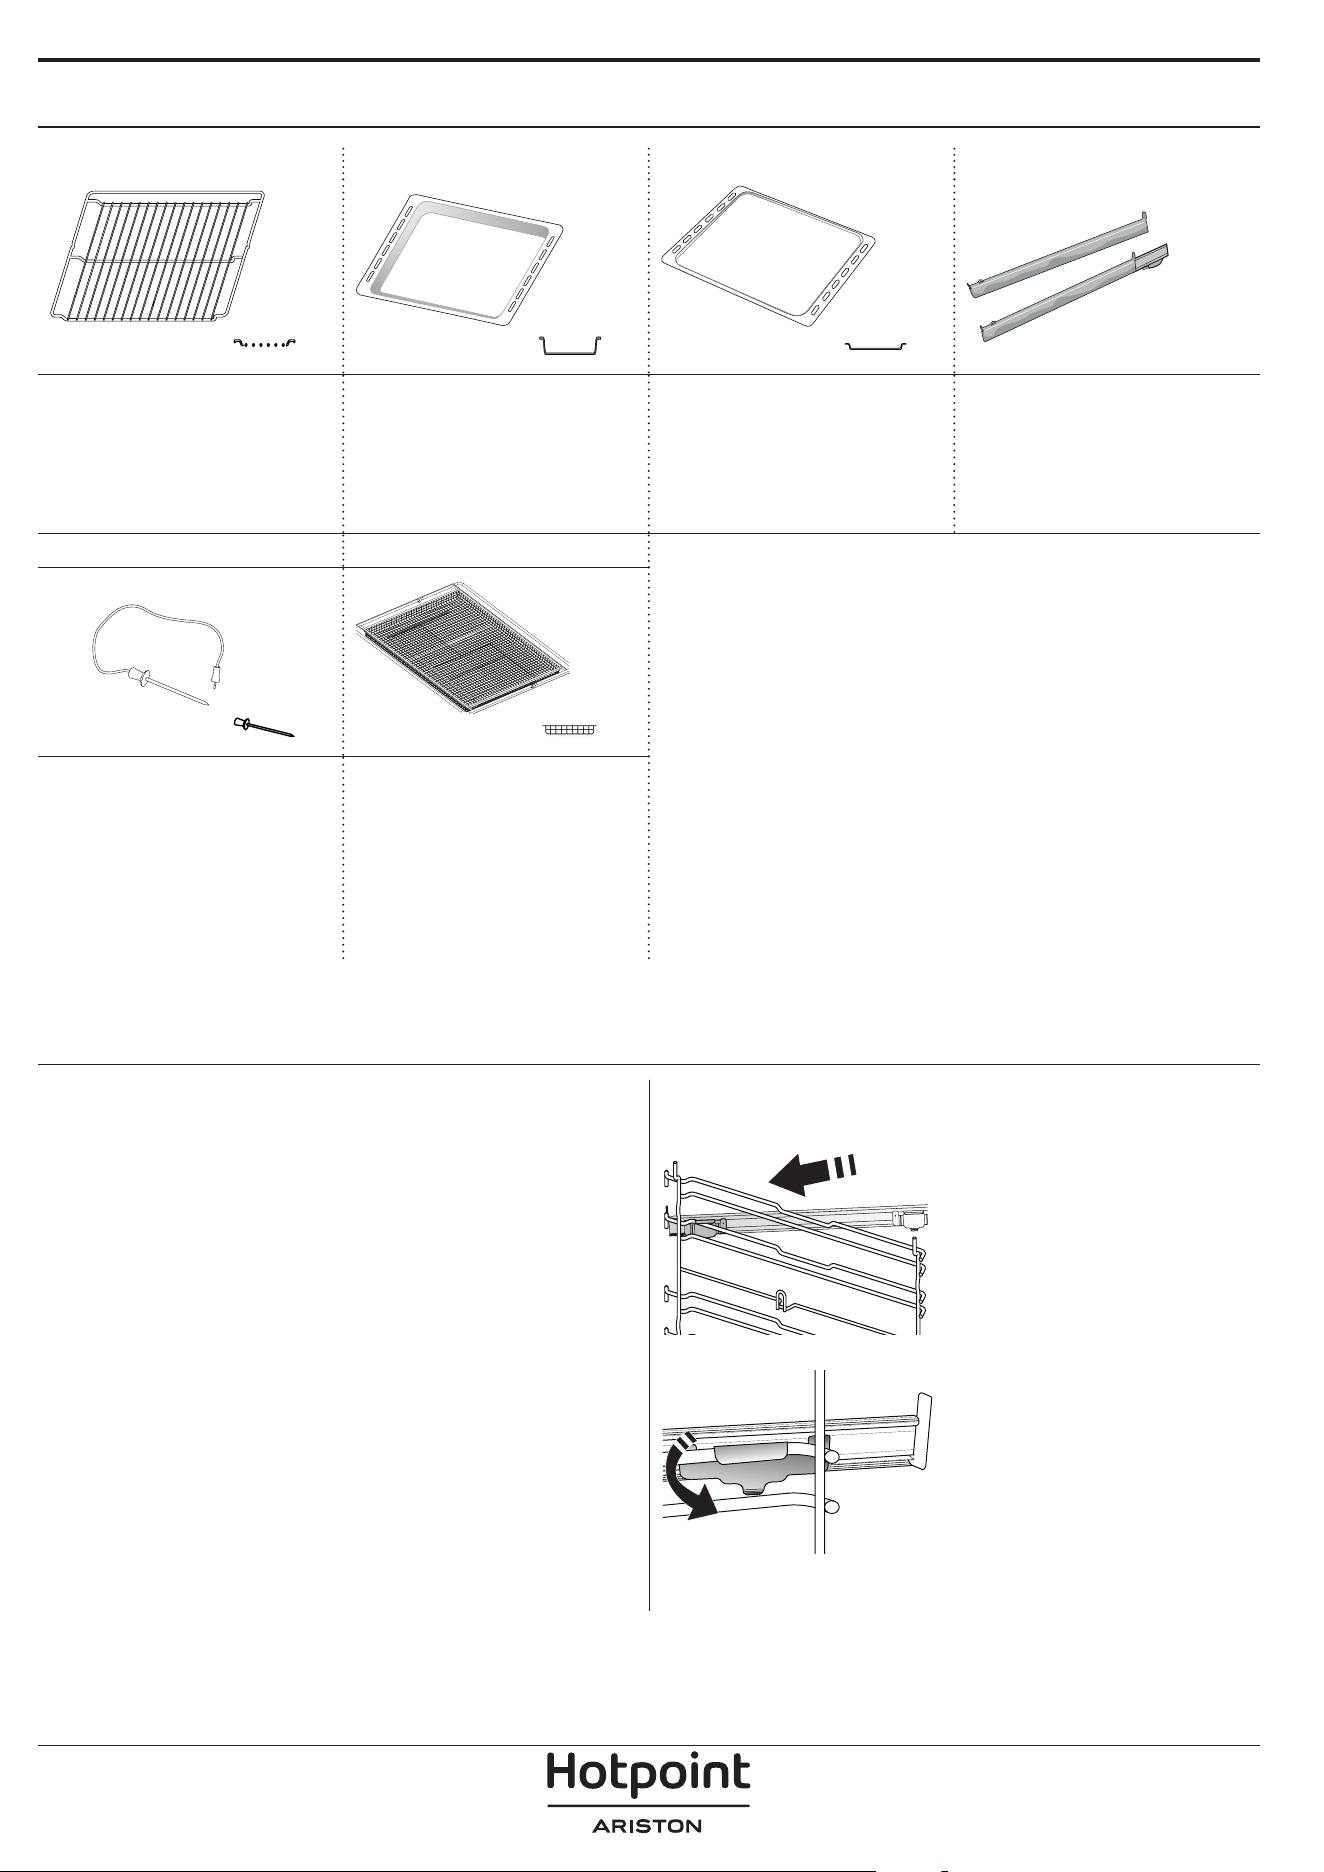
ACCESSORIES
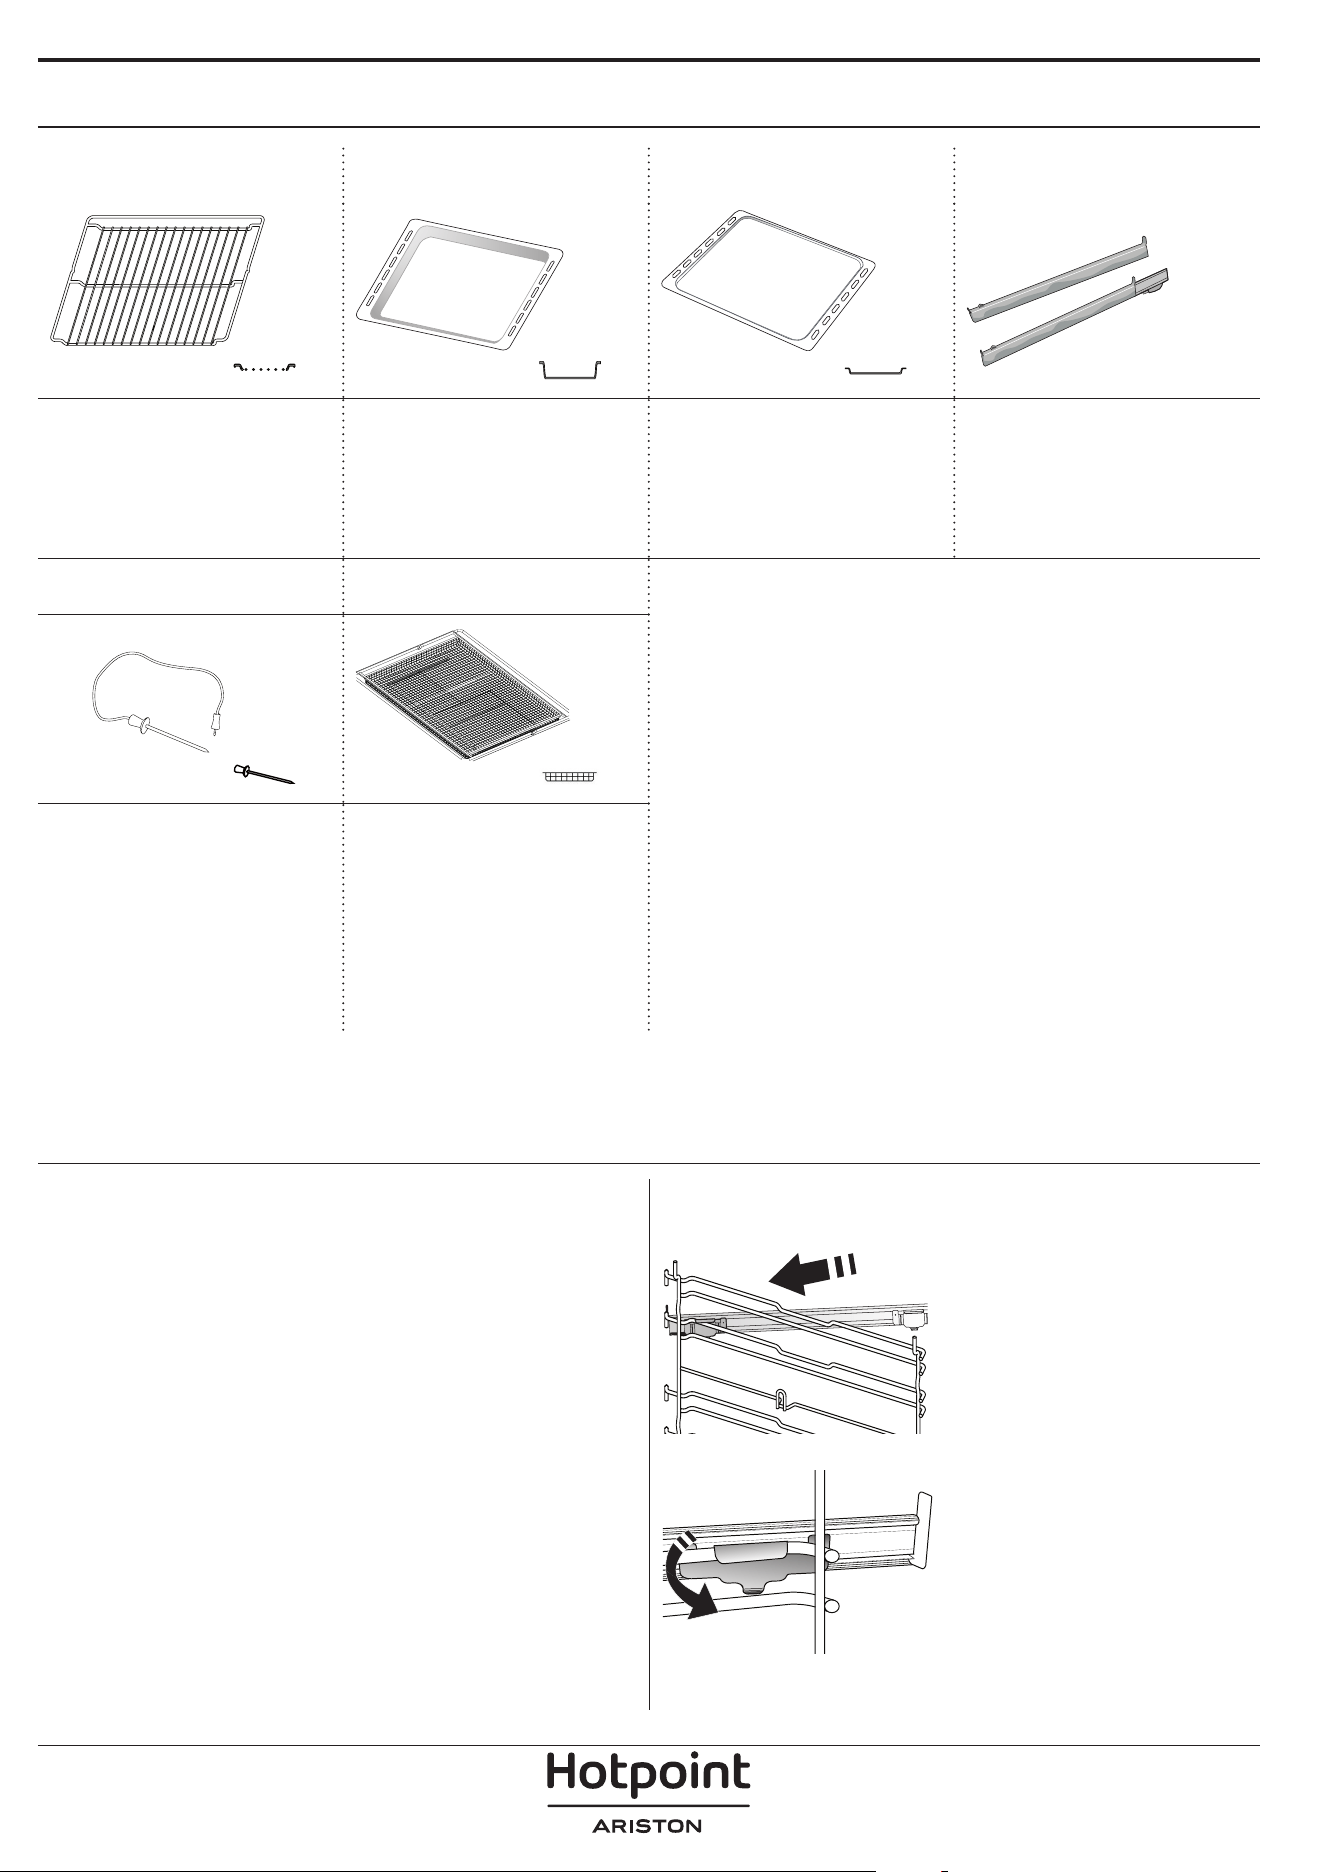
WIRE SHELF DRIP TRAY BAKING TRAY* SLIDING RUNNERS*
Use to cook food or as a
support for pans, cake
tins and other ovenproof
items of cookware.
Use as an oven tray
for cooking meat, fish,
vegetables, focaccia, etc.
or position underneath
the wire shelf to collect
cooking juices.
Use for cooking all bread
and pastry products, but
also for roasts, fish en
papillotte, etc.
To facilitate inserting or
removing accessories.
MEAT PROBE * AIR FRY TRAY *
To accurately measure
the core temperature of
food during cooking.
To be used when
cooking foods with Air
Fry function, with a
baking tray positioned
at a lower level to collect
possible crumbs and
drip. It can be cleaned in
the dishwasher.
INSERTING THE WIRE SHELF AND OTHER
ACCESSORIES
Insert the wire shelf horizontally by sliding it across
the shelf guides, making sure that the side with the
raised edge is facing upwards.
Other accessories, such as the drip tray and the
baking tray, are inserted horizontally in the same way
as the wire shelf.
REMOVING AND REFITTING THE SHELF GUIDES
• To remove the shelf guides, lift them up and pull the
lower parts out of their lodgings: The shelf guides can
now be removed.
• To refit the shelf guides, first fit them back into their
upper seating. Keeping them held up, slide them
into the cooking compartment, then lower them into
position in the lower seating.
FITTING THE SLIDING RUNNERS
Remove the shelf guides
from the oven and remove
the protective plastic from
the sliding runners.
Fasten the upper clip of the
runner to the shelf guide
and slide it along as far as it
will go. Lower the other clip
into position.
To secure the guide, press
the lower portion of the clip
firmly against the shelf
guide. Make sure that the
runners can move freely.
Repeat these steps on the
other shelf guide on the
same level.
Please note: The sliding runners can be tted on any level.
The number and the type of accessories may vary depending on which model is purchased.
Other accessories can be purchased separately; for orders and information contact the after sales service.
* Available only in certain models

FUNCTIONS
CONVENTIONAL
For cooking any kind of dish on one shelf only.
FORCED AIR
For cooking different foods that require the same
cooking temperature on several shelves (maximum
three) at the same time. This function can be used to
cook different foods without odours being transferred
from one food to another.
GRILL
For grilling steaks, kebabs and sausages, cooking
vegetables au gratin or toasting bread. When grilling
meat, we recommend using a drip tray to collect the
cooking juices: Position the tray on any of the levels
below the wire shelf and add 500 ml of drinking
water.
MY MENU
These allow a fully automatic cooking for all types
of food (Lasagna, Meat, Fish, Vegetables, Cakes &
Pastries, Salt cakes, Bread, Pizza). To get the best from
this function, follow the indications on the relative
cooking table.
MANUAL FUNCTIONS
• CONVECT BAKE
For cooking any kind of dish on one shelf only.
• MULTIFLOW MENU
For cooking different foods that require the same
cooking temperature on four levels at the same
time. This function can be used to cook cookies,
cakes, round pizzas (also frozen) and to prepare a
complete meal. Follow the cooking table to obtain
the best results.
• TURBO GRILL
For roasting large joints of meat (legs, roast beef,
chicken). We recommend using a drip tray to
collect the cooking juices: Position the pan on any
of the levels below the wire shelf and add 500 ml
of drinking water.
• FROZEN BAKE
The function automatically selects the ideal
cooking temperature and mode for 5 different
types of ready frozen food. The oven does not
have to be preheated.
• SPECIAL FUNCTIONS
» PIZZA
This function allows you to cook great
homemade pizza, in less than 10 minutes like
in a restaurant.
The dedicated cooking cycle works at
temperature level above 300 degree Celsius,
delivering pizza soft inside, crunchy on the
edges and with a perfectly even browning.
Combining this function with the Pizza Stone
WPro accessory and preheating for 30 minutes
can bake a pizza in 5-8 min. (For orders and
information contact the after sales service or
www.hotpoint.eu.)
» RISING
For optimal proving of sweet or savoury
dough. To maintain the quality of proving, do
not activate the function if the oven is still hot
following a cooking cycle.
» KEEP WARM
For keeping just-cooked food hot and crisp.
» DEFROST
To speed up defrosting of food. Place food on
the middle shelf. Leave food in its packaging
to prevent it from drying out on the outside.
» ECO CYCLE
For cooking stuffed roasting joints and fillets
of meat on a single shelf. When this Eco Cycle
is in use, the light will remain switched off
during cooking. To use the Eco Cycle and
therefore optimise power consumption, the
oven door should not be opened until the
food is completely cooked.
» MAXI COOKING
The function automatically selects the best
cooking mode and temperature to cook large
joints of meat (above 2.5 kg). It is advisable
to turn the meat over during cooking, to
obtain even browning on both sides. It is best
to baste the meat every now and again to
prevent it from drying out.
• SLOW COOKING
To gently cook meat and fish. This function cooks
food slowly to keep it tender and succulent. Due
to the low temperature, the food does not brown
on the outside and the end result is similar to
steam cooking. We recommend searing roast meat
in a pan first to brown the meat and help seal in
its natural juices. For best results, keep the oven
door closed during cooking in order to avoid heat
dispersion.Suggested cooking times ranges for
fish (300 g - 3 kg) are between 2-5 hours, for meat
(1-3 kg) between 4-7 hours.
AIR FRY
This function allows you to cook French fries, chicken
nuggets and more using less oil, resulting pleasantly
crispy. Heating elements cycle to properly heat the
cavity, while the fan circulates hot air. Best expected
cooking results can be achieved only by using an Air
Fry tray (provided with some models). Position the
food on the Air Fry tray in a single layer and follow Air
Fry Cooking Table instructions for best performances.
Avoid using more than one tray to prevent uneven
cooking.
FAST PREHEAT
For preheating the oven quickly.
MINUTE-MINDER
For keeping time without activating a function.
DIAMOND CLEAN
The action of the steam released during this special
low-temperature cleaning cycle allows dirt and food
residues to be removed with ease. Pour 200 ml of
drinking water on the bottom of the oven and only
activate the function when the oven is cold.
FAVORITES
For retrieving the list of 10 favorite functions.
SETTINGS
For adjusting the oven settings. When “ECO” mode is
active the brightness of the display will be reduced
to save energy and lamp switches off after 1 minute.
It will be reactivated automatically whenever any of
the buttons are pressed. When “DEMO” is “On” all
commands are active and menus available but the
oven doesn’t heat up. To deactivate this mode, access
“DEMO” from “SETTINGS” menu and select “Off”. By
selecting “FACTORY RESET”, the product switches off
and then it returns to first switch on. All settings will
be deleted.
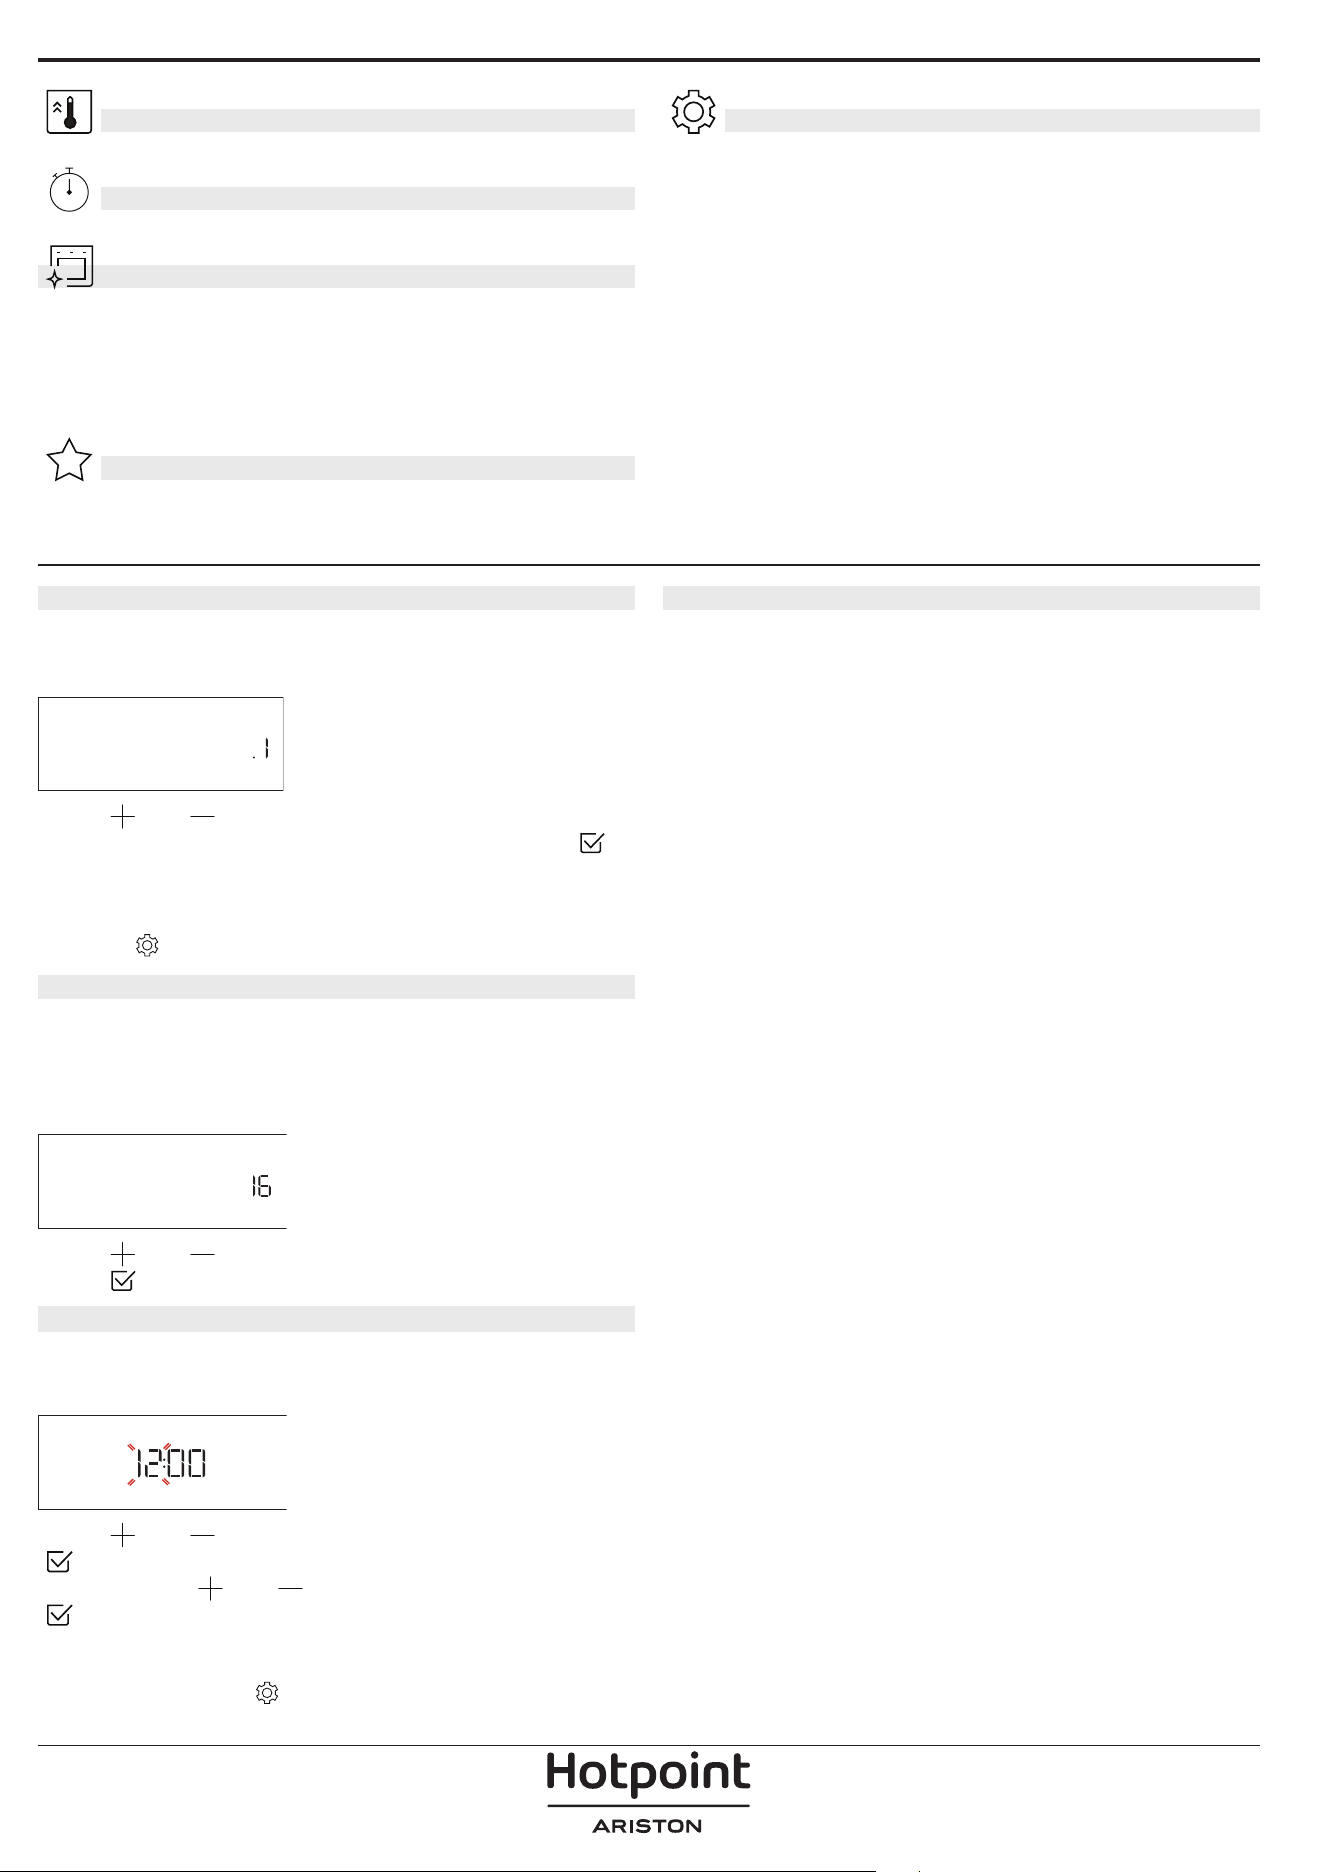
FIRST TIME USE
1. SELECT THE LANGUAGE
You will need to set the language and the time
when you switch on the appliance for the first time:
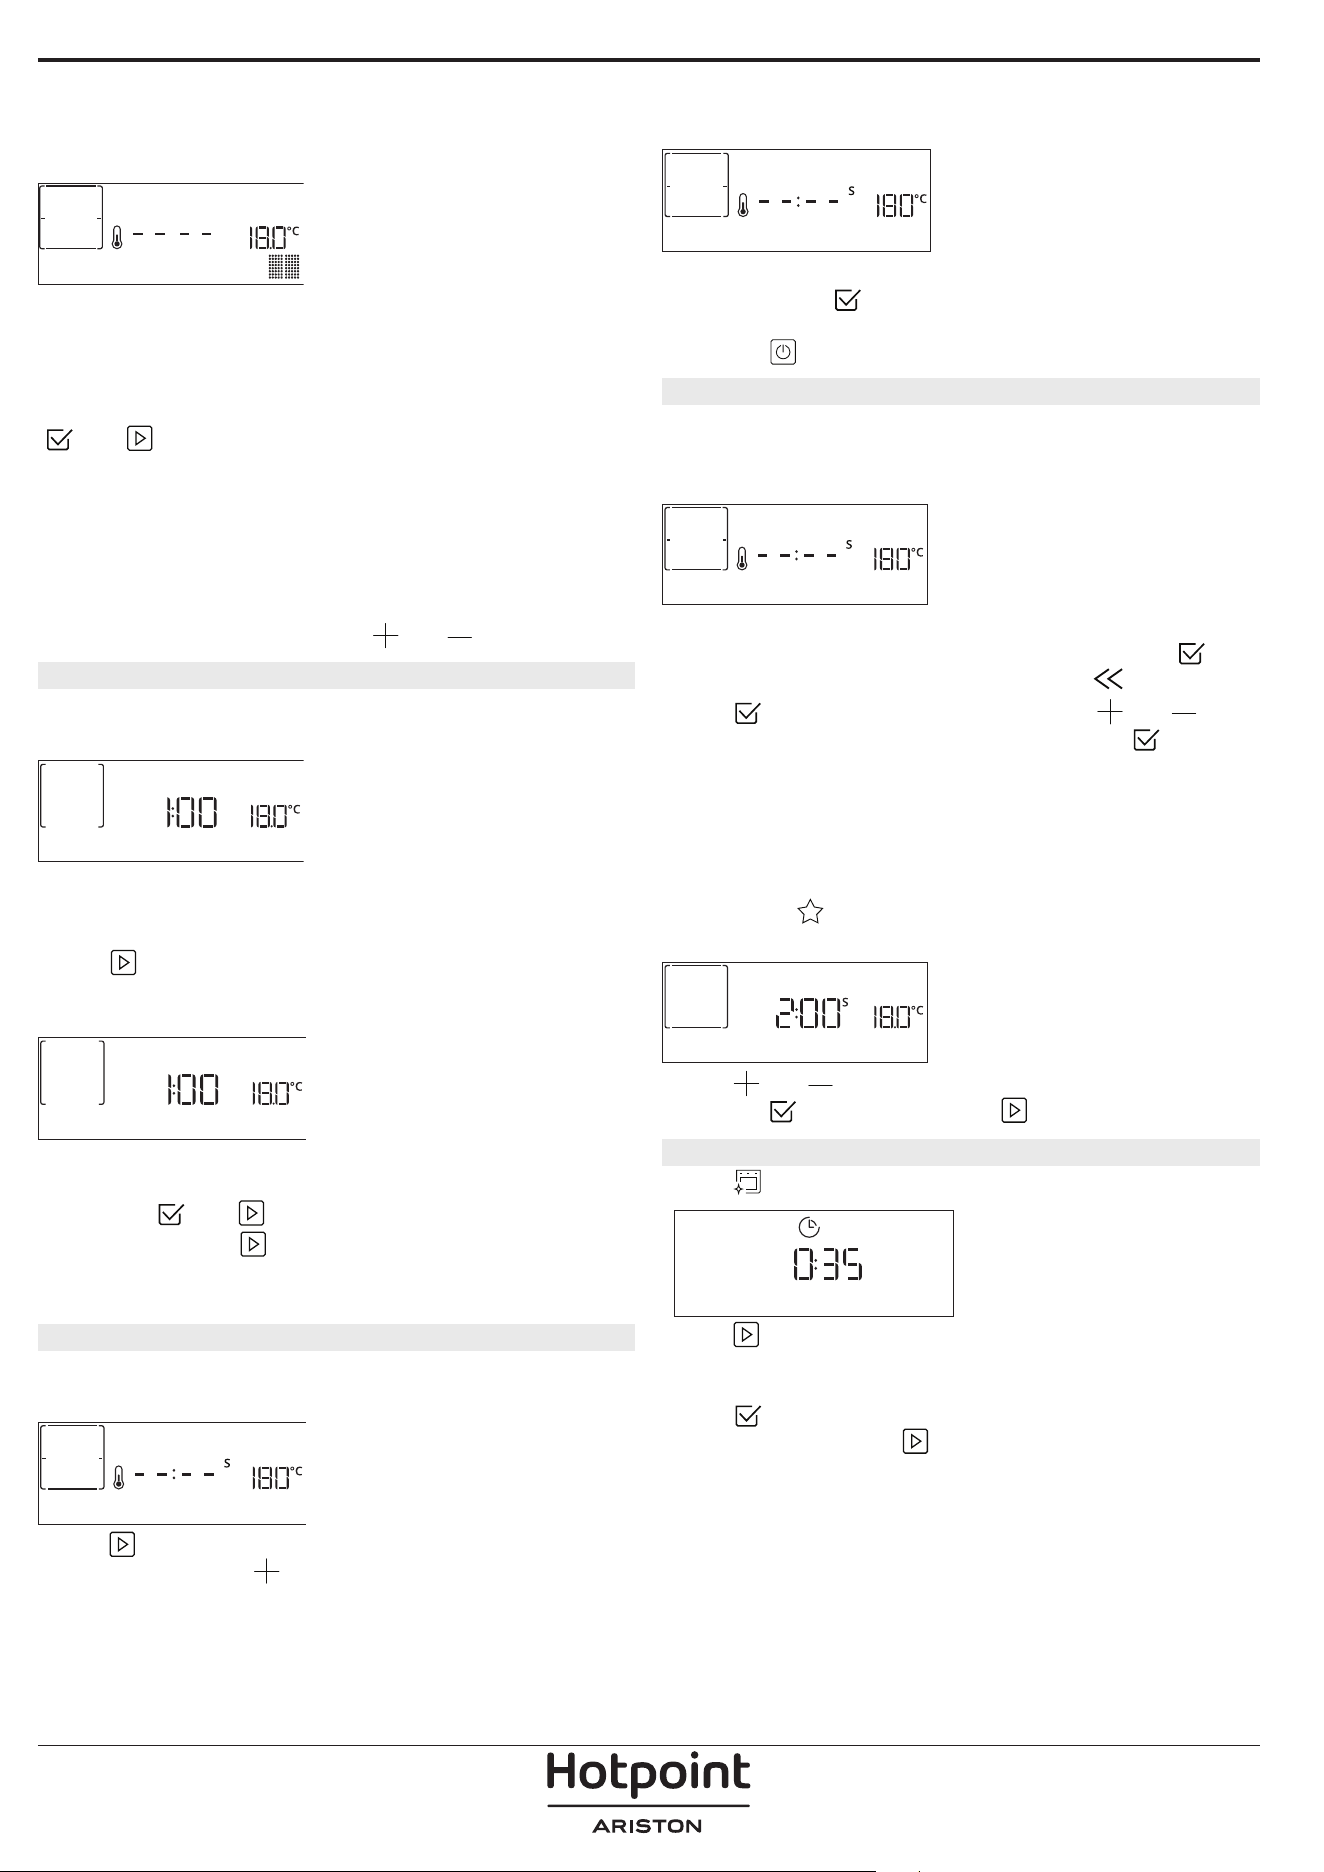
“English” will show on the display.
ENGLISH
Press or to scroll through the list of available
languages and select the one you require. Press
to confirm your selection.
Please note: The language can subsequently be changed
by selecting “LANGUAGE” in “SETTINGS” menu, available by
pressing
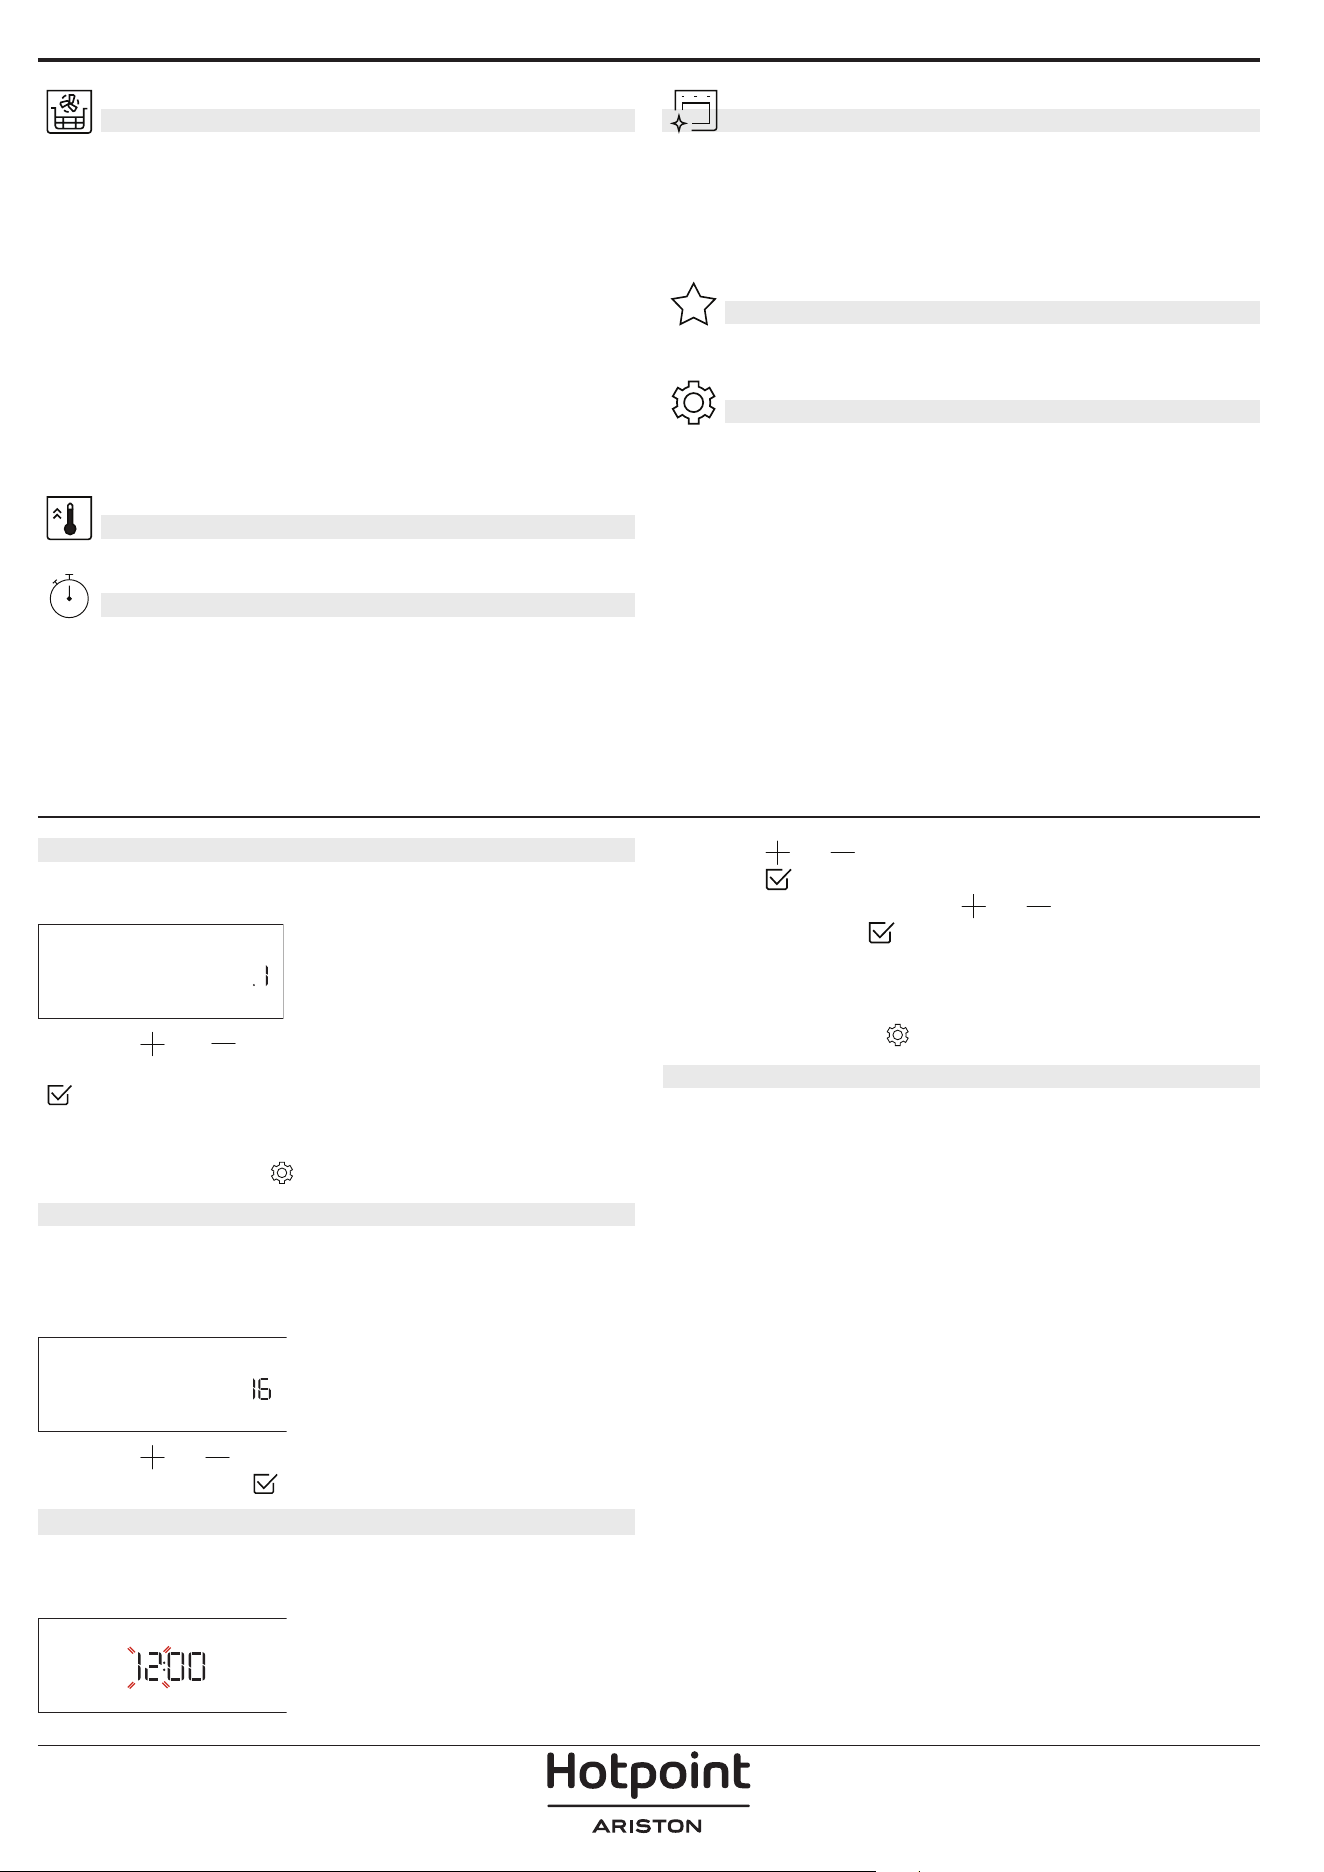
2. SET THE POWER CONSUMPTION
The oven is programmed to consume a level of
electrical power that is compatible with a domestic
network that has a rating of more than 3 kW (16): If
your household uses a lower power, you will need to
decrease this value (13).
POWER
Press or to select 16 “High” or 13 “Low” and
press
to confirm.
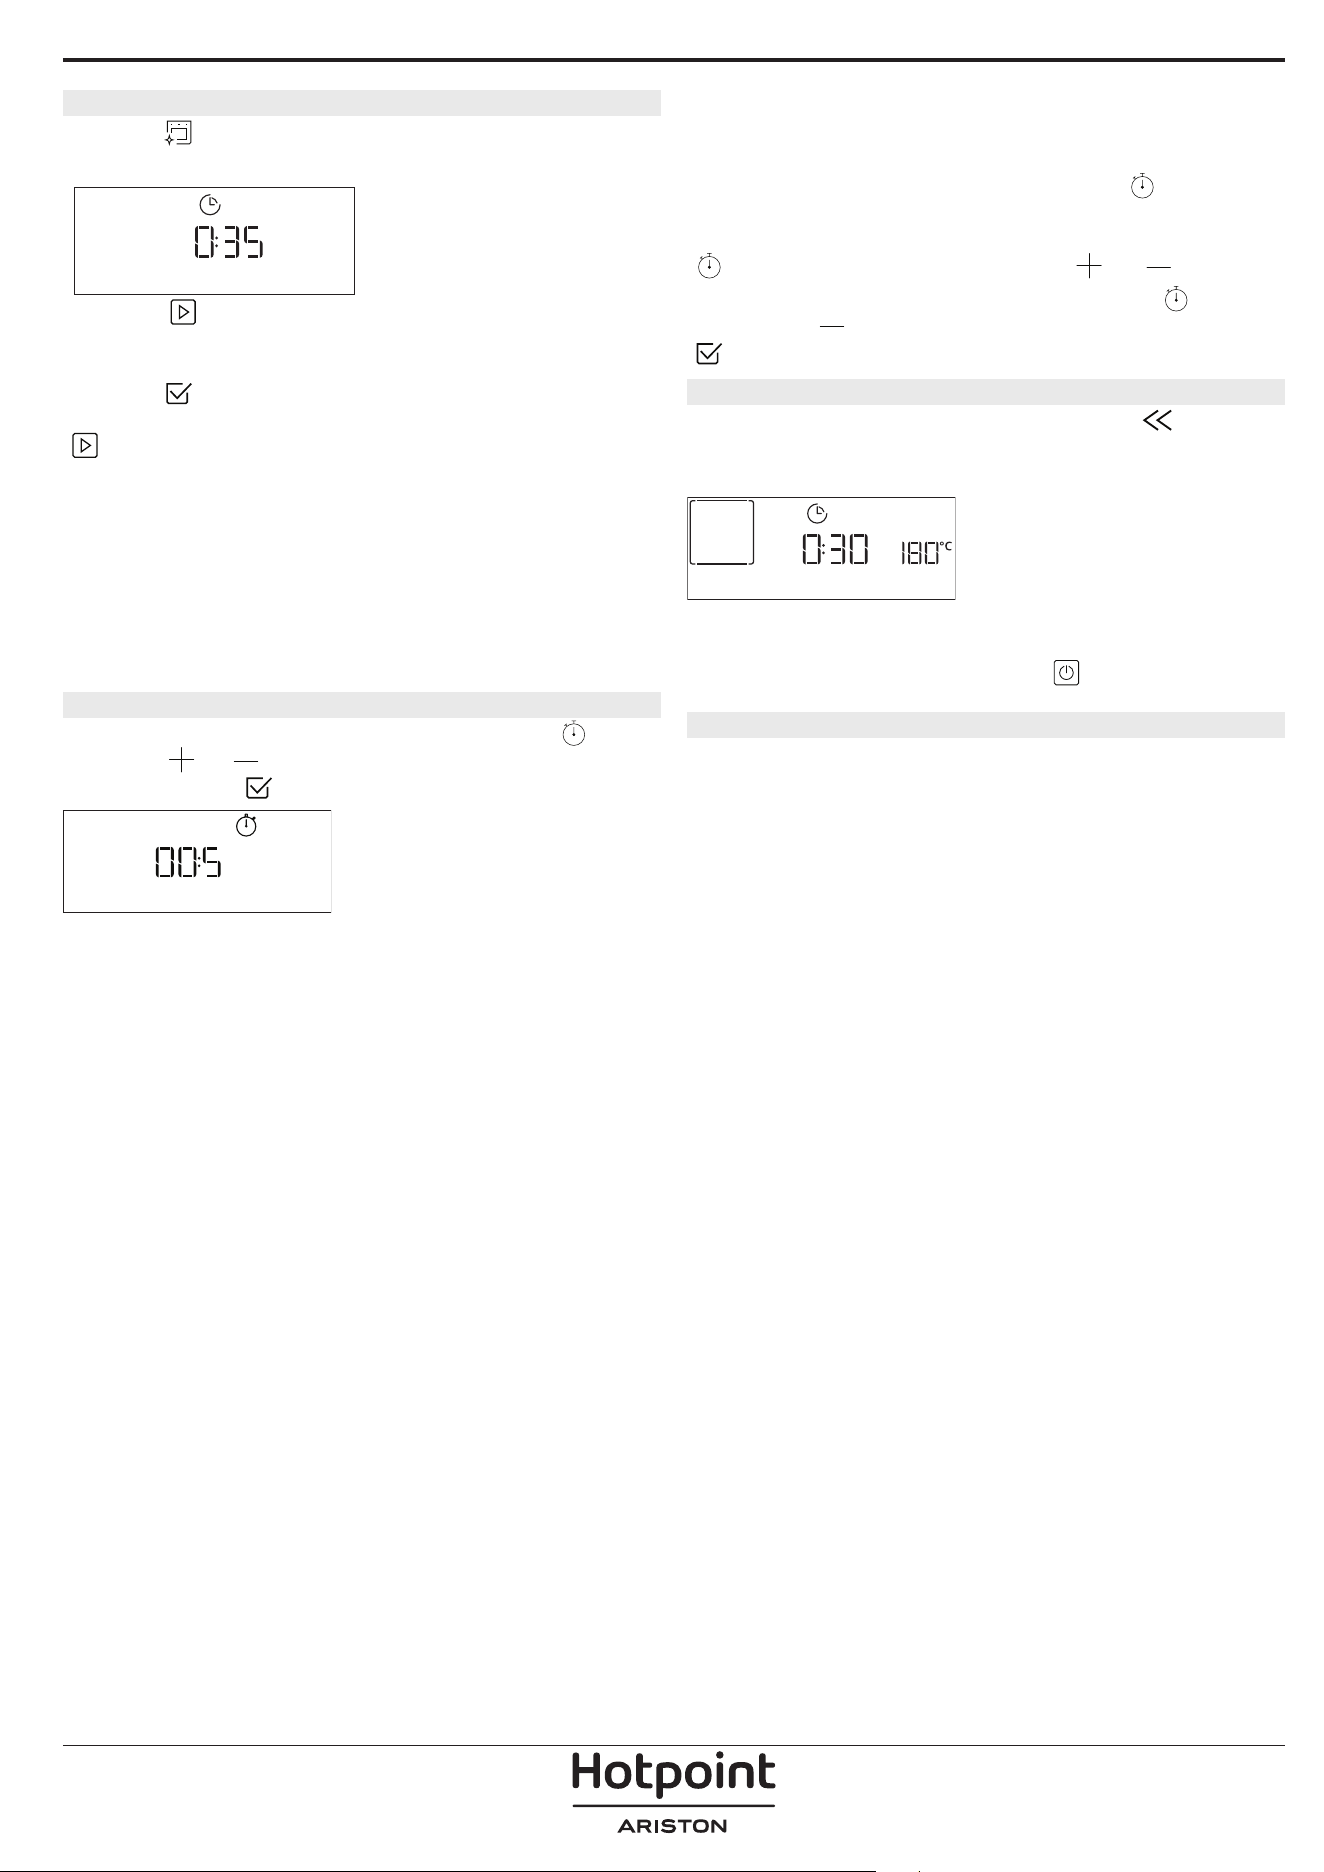
3. SET THE TIME
After selecting the language, you will need to set the
current time: The two digits for the hour will flash on
the display.
CLOCK
Press or to set the correct hour and press
: The two digits for the minutes will flash on the
display. Press
or to set the minutes and press
to confirm.
Please note: You may need to set the time again following
lengthy power outages. Select “CLOCK” in “SETTINGS” menu,
available by pressing
4. HEAT THE OVEN
A new oven may release odours that have been left
behind during manufacturing: This is completely
normal.
Before starting to cook food, we therefore
recommend heating the oven with it empty in
order to remove any possible odours.
Remove any
protective cardboard or transparent film from the
oven and remove any accessories from inside it. Heat
the oven to 200 °C for around one hour, ideally using
a function with air circulation (e.g. “Forced Air” or
“Convection Bake”).
Please note: It is advisable to air the room after using the
appliance for the rst time.
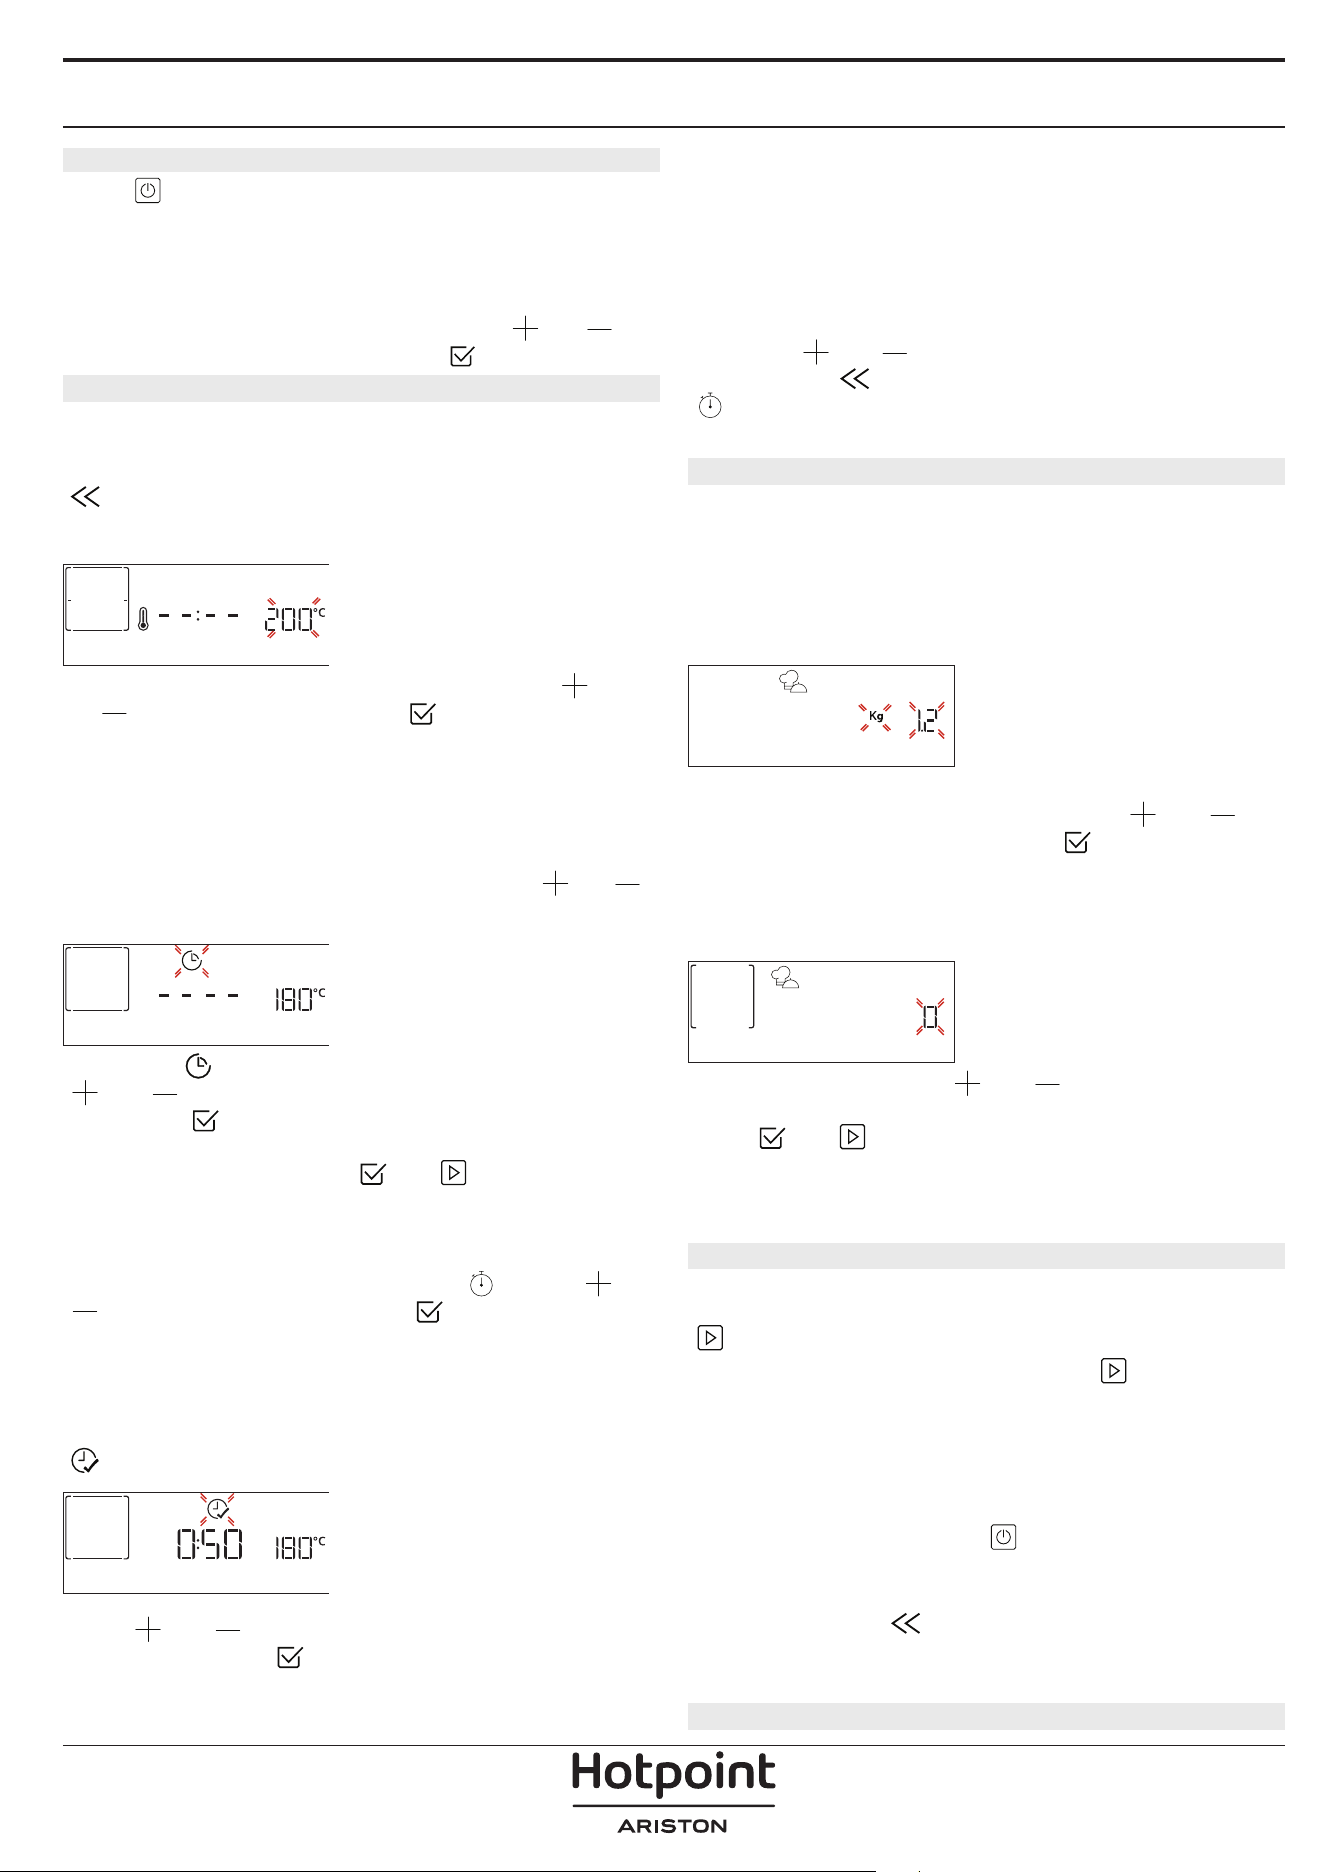
DAILY USE
1. SELECT A FUNCTION
Press to switch on the oven: the display will show
the last running main function or the main menu.
The functions can be selected by pressing the icon
for one of the main functions or by scrolling through
a menu: To select an item from a menu (the display
will show the first available item), press
or to
select the desired one, then press
to confirm.
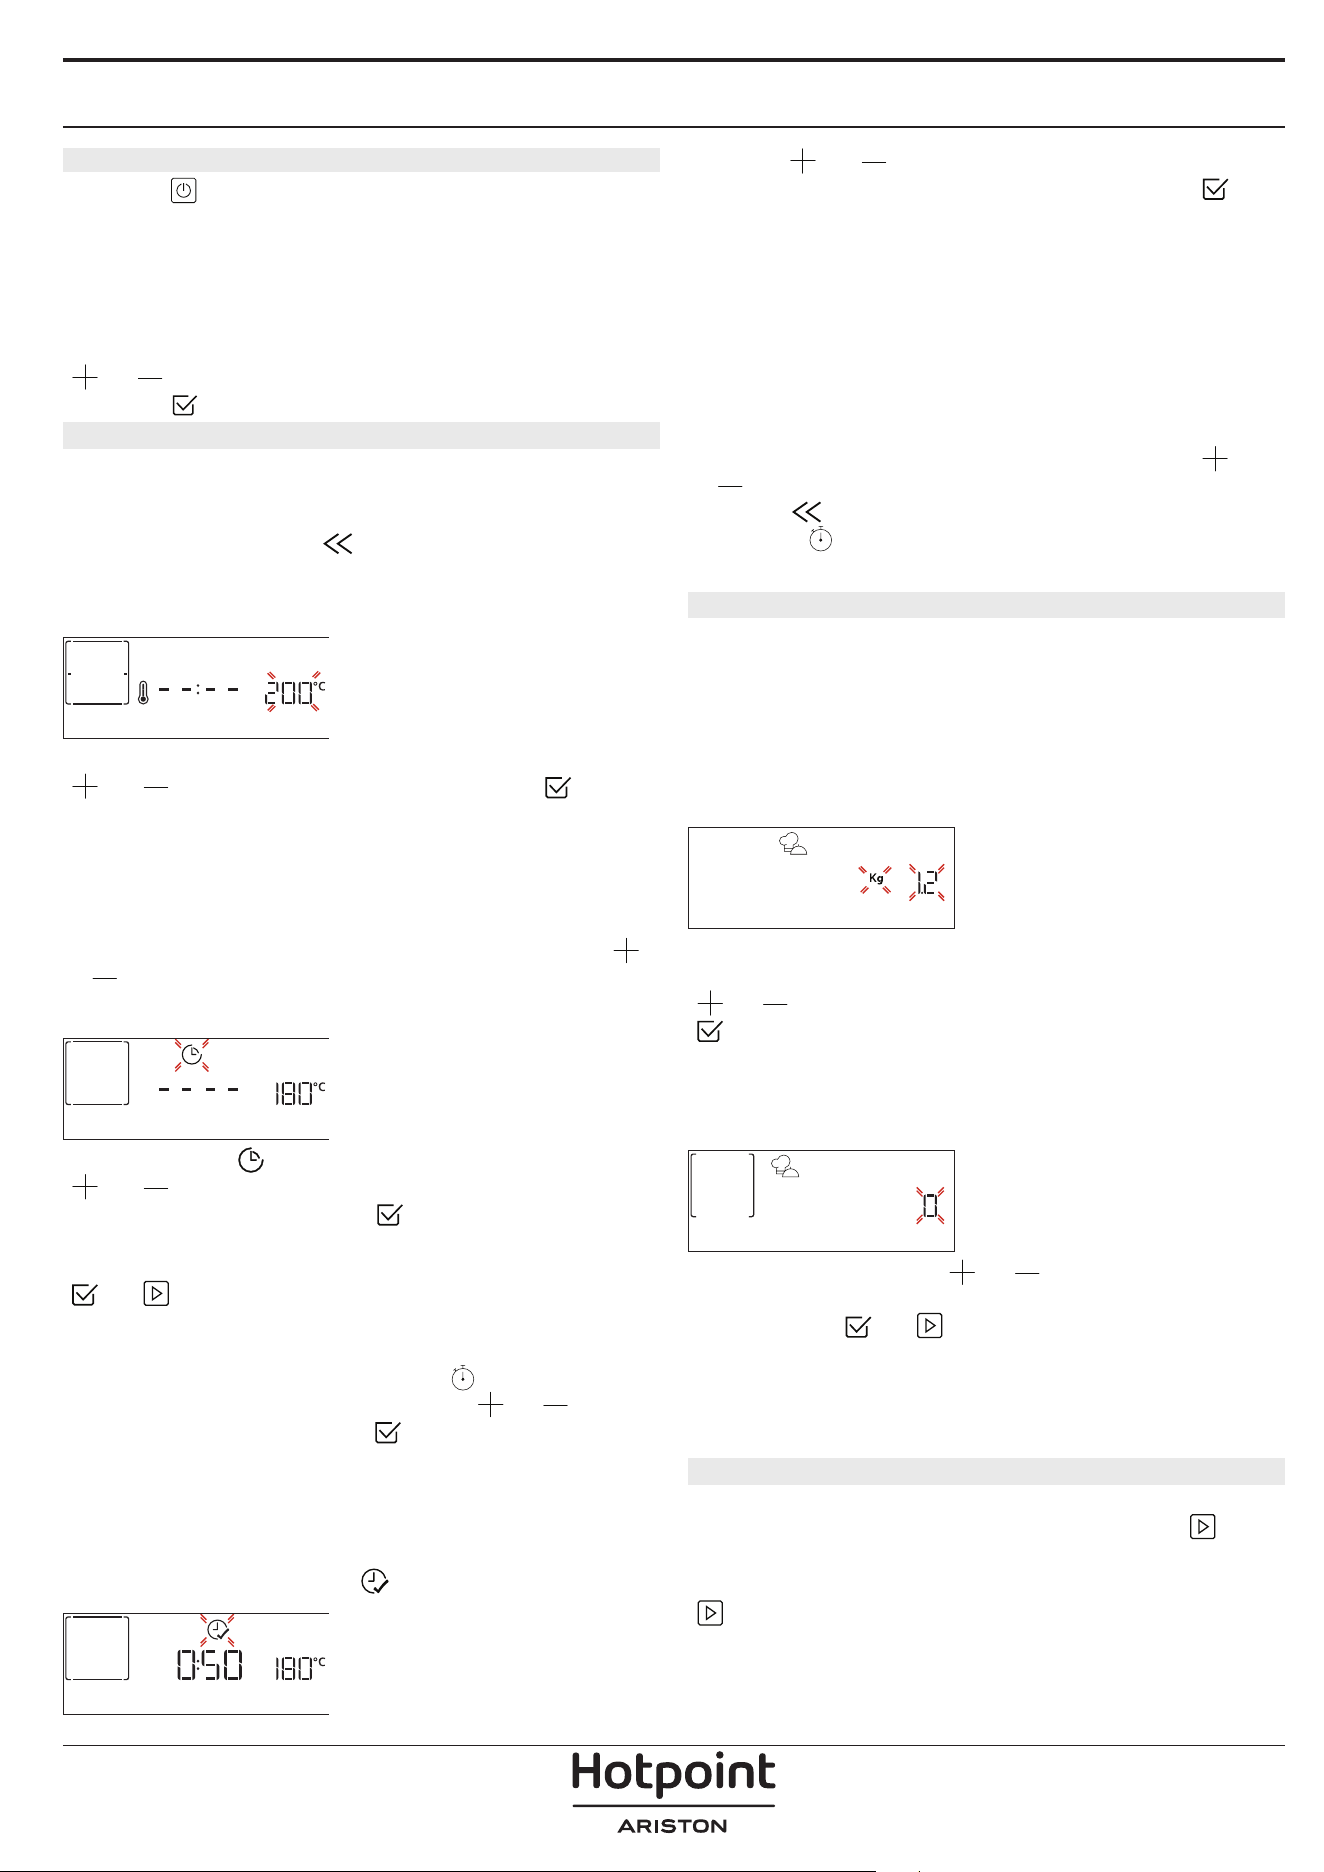
2. SET THE FUNCTION
After having selected the function you require, you
can change its settings. The display will show the
settings that can be changed in sequence. Pressing
allows you to change the previous setting again.
TEMPERATURE / GRILL LEVEL
TEMPERATURE
When the value flashes on the display, press
or
to change it, then press to confirm and
continue with the settings that follow (if possible).
In the same way, it is possible to set the grill level:
There are three defined power levels for grilling: 3
(high), 2 (mid), 1 (low).
Please note: Once the function has been activated, the
temperature/grill level can be changed using
or .
DURATION
DURATION
When the icon flashes on the display, press
or to set the cooking time you require and
then press
to confirm. You do not have to set
the cooking time if you want to manage cooking
manually (untimed): Press
or to confirm and
start the function. By selecting this mode, you cannot
program a delayed start.
Please note: You can adjust the cooking time that has
been set during cooking by pressing
: press or
to amend it and then press to confirm.
END TIME (START DELAY)
In many functions, once you have set a cooking time
you can delay starting the function by programming
its end time. The display shows the end time while the
icon flashes.
END TIME
Press or to set the time you want cooking
to end, then press
to confirm and activate the
function. Place the food in the oven and close the
door: The function will start automatically after the
period of time that has been calculated in order for
cooking to finish at the time you have set.
Please note: Programming a delayed cooking start time
will disable the oven preheating phase: The oven will
reach the temperature your require gradually, meaning
that cooking times will be slightly longer than those
listed in the cooking table. During the waiting time, you
can press
or to amend the programmed end
time or press
to change other settings. By pressing
, in order to visualize information, it is possible to
switch between end time and duration.
. MY MENU
These functions automatically select the best cooking
mode, temperature and duration to cook, roast or
bake all the dishes available.
When required, simply indicate the characteristic of
food to obtain an optimal result.
WEIGHT / HEIGHT (ROUND-TRAY-LAYERS)
KILOGRAMS
To set the function correctly, follow the indications on
the display, when prompted, and press
or to
set the required value then press
to confirm.
DONENESS / BROWNING
In some MyMenu functions it is possible to adjust the
doneness level.
DONENESS
When prompted, press or to select the
desired level between rare (-1) and well done (+1).
Press
or to confirm and start the function.
In the same way, where allowed, in some MyMenu
functions, it’s possible to adjust the browning level
between low (-1) and high (+1).
3. START THE FUNCTION
At any time, if the default values are those desired or
once you have applied the settings you require, press
to activate the function.
During the delay phase, by pressing
the oven
will ask if you want to skip this phase, starting
immediately the function.
Please note: Once a function has been selected, the
display will recommend the most suitable level for each
function. At any time you can stop the function that has
been activated by pressing
.
If the oven is hot and the function requires a specific
maximum temperature, a message will shown on
the display. Press
to return to previous screen
and select a different function or wait for a complete
cooling.
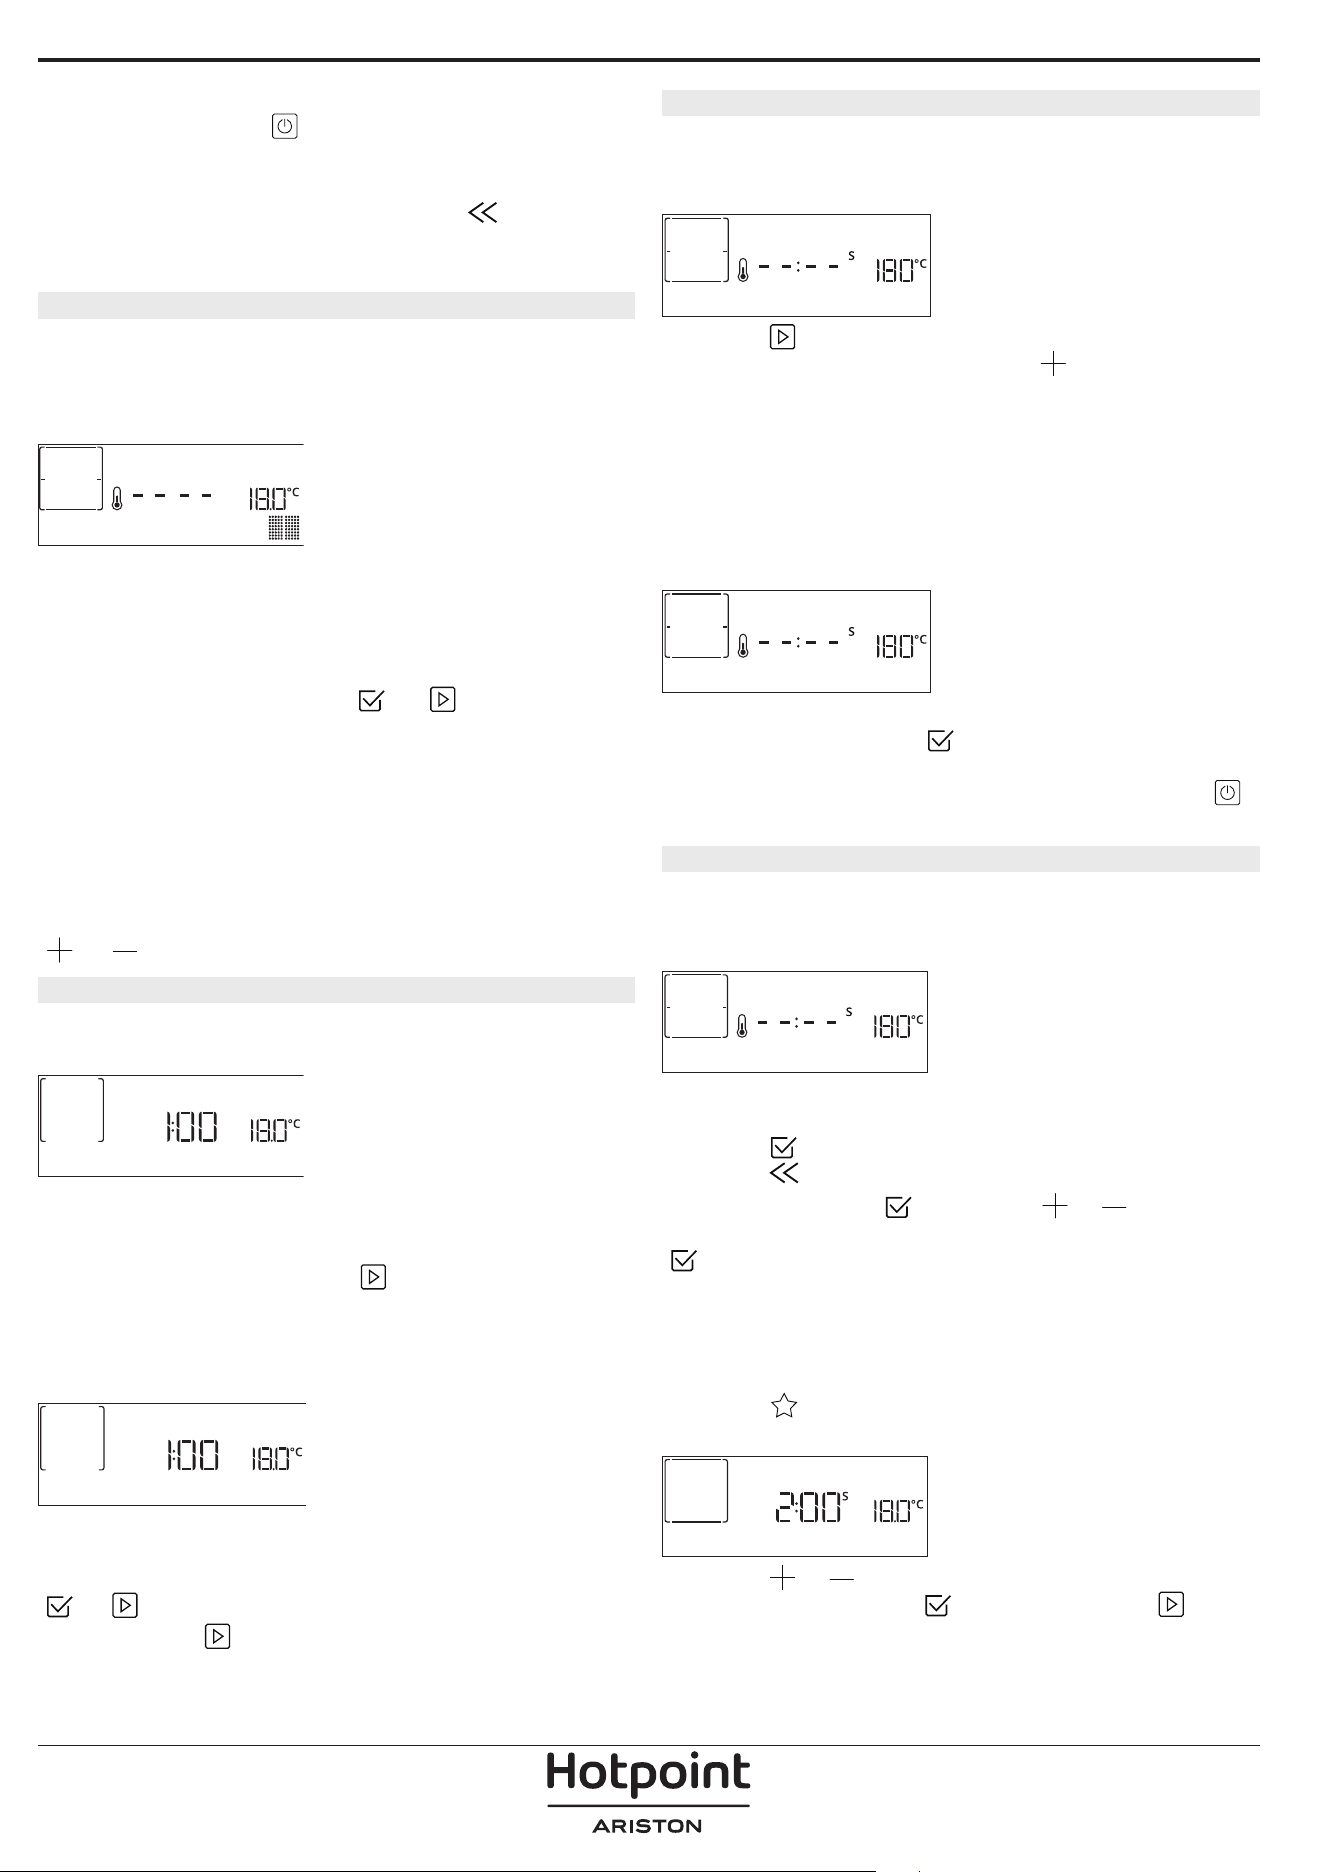
4. PREHEATING
Some functions have an oven preheating phase: Once
the function has started, the display indicates that
the preheating phase has been activated.
PREHEATING
Once this phase has finished, an audible signal will
sound and the display will indicate that the oven
has reached the set temperature, requiring to “ADD
FOOD”. At this point, open the door, place the food in
the oven, close the door and start cooking by pressing
or .
Please note: Placing the food in the oven before
preheating has finished may have an adverse effect on
the final cooking result. Opening the door during the
preheating phase will stop pause it.
The cooking time does not include a preheating
phase. You can always change the temperature you
want the oven to reach using
or .
5. TURN OR CHECK FOOD
Some MyMenu functions will require the food to be
turned during cooking.
TURN FOOD
An audible signal will sound and the display shows
the action to be done. Open the door, do the action
prompted by the display and close the door, then
press
to continue cooking.
In the same way, at 10% of time before the end of
cooking, the oven prompts you to check the food.
CHECK ON FOOD
An audible signal will sound and the display shows
the action to be done. Check the food, close the door
and press
or to continue cooking.
Please note: Press
to skip these actions. Otherwise,
if no action is done after a certain time the oven will
continue the cooking.
6. END OF COOKING
An audible signal will sound and the display will
indicate that cooking is complete.
END
Press to continue cooking in manual mode
(untimed) or press
to extend the cooking time
by setting a new duration. In both cases, the cooking
parameters will be retained.
BROWNING
Some functions of the oven enable you to brown
the surface of the food by activating the grill once
cooking is complete.
PRESS v TO BROWN
When the display shows the relevant message, if
required press
to start a five-minute browning
cycle. You can stop the function at any time by
pressing
to switch the oven off.
8. FAVORITES
Once cooking is complete the display will prompt you
to save the function in a number between 1 and 10
on your list of favorites.
ADD FAVORITE?
If you would like to save a function as a favorite and
store the current settings for future use, press
otherwise, to ignore the request press
.
Once
has been pressed, press the or
to select the number position, then press
to
confirm.
Please note: If the memory is full or the number chosen
has already been taken, the oven will ask you to confirm
overwriting the previous function.
To call up the functions you have saved at a later
time, press
: The display will show your list of
favorite functions.
1. CONVENTIONAL
Press or to select the function, confirm by
pressing
, and then press to activate.
9. DIAMOND CLEAN
Press to show “Diamond Clean” on the display.
Diamond clean
Press to activate the function: the display will
prompt you to do all actions needed to obtain the
best cleaning results: Follow the indications and then
press
when done. Once you have done all steps,
when required press
to activate the cleaning
cycle.
Please note: It is reccommended to do not open the
oven door during the cleaning cycle to avoid a loss of
water vapor that could get an adverse effect on the
final cleaning result.
An appropriate message will start ashing on the
display once the cycle has nished. Leave the oven to
cool and then wipe and dry the interior surfaces with a
cloth or sponge.
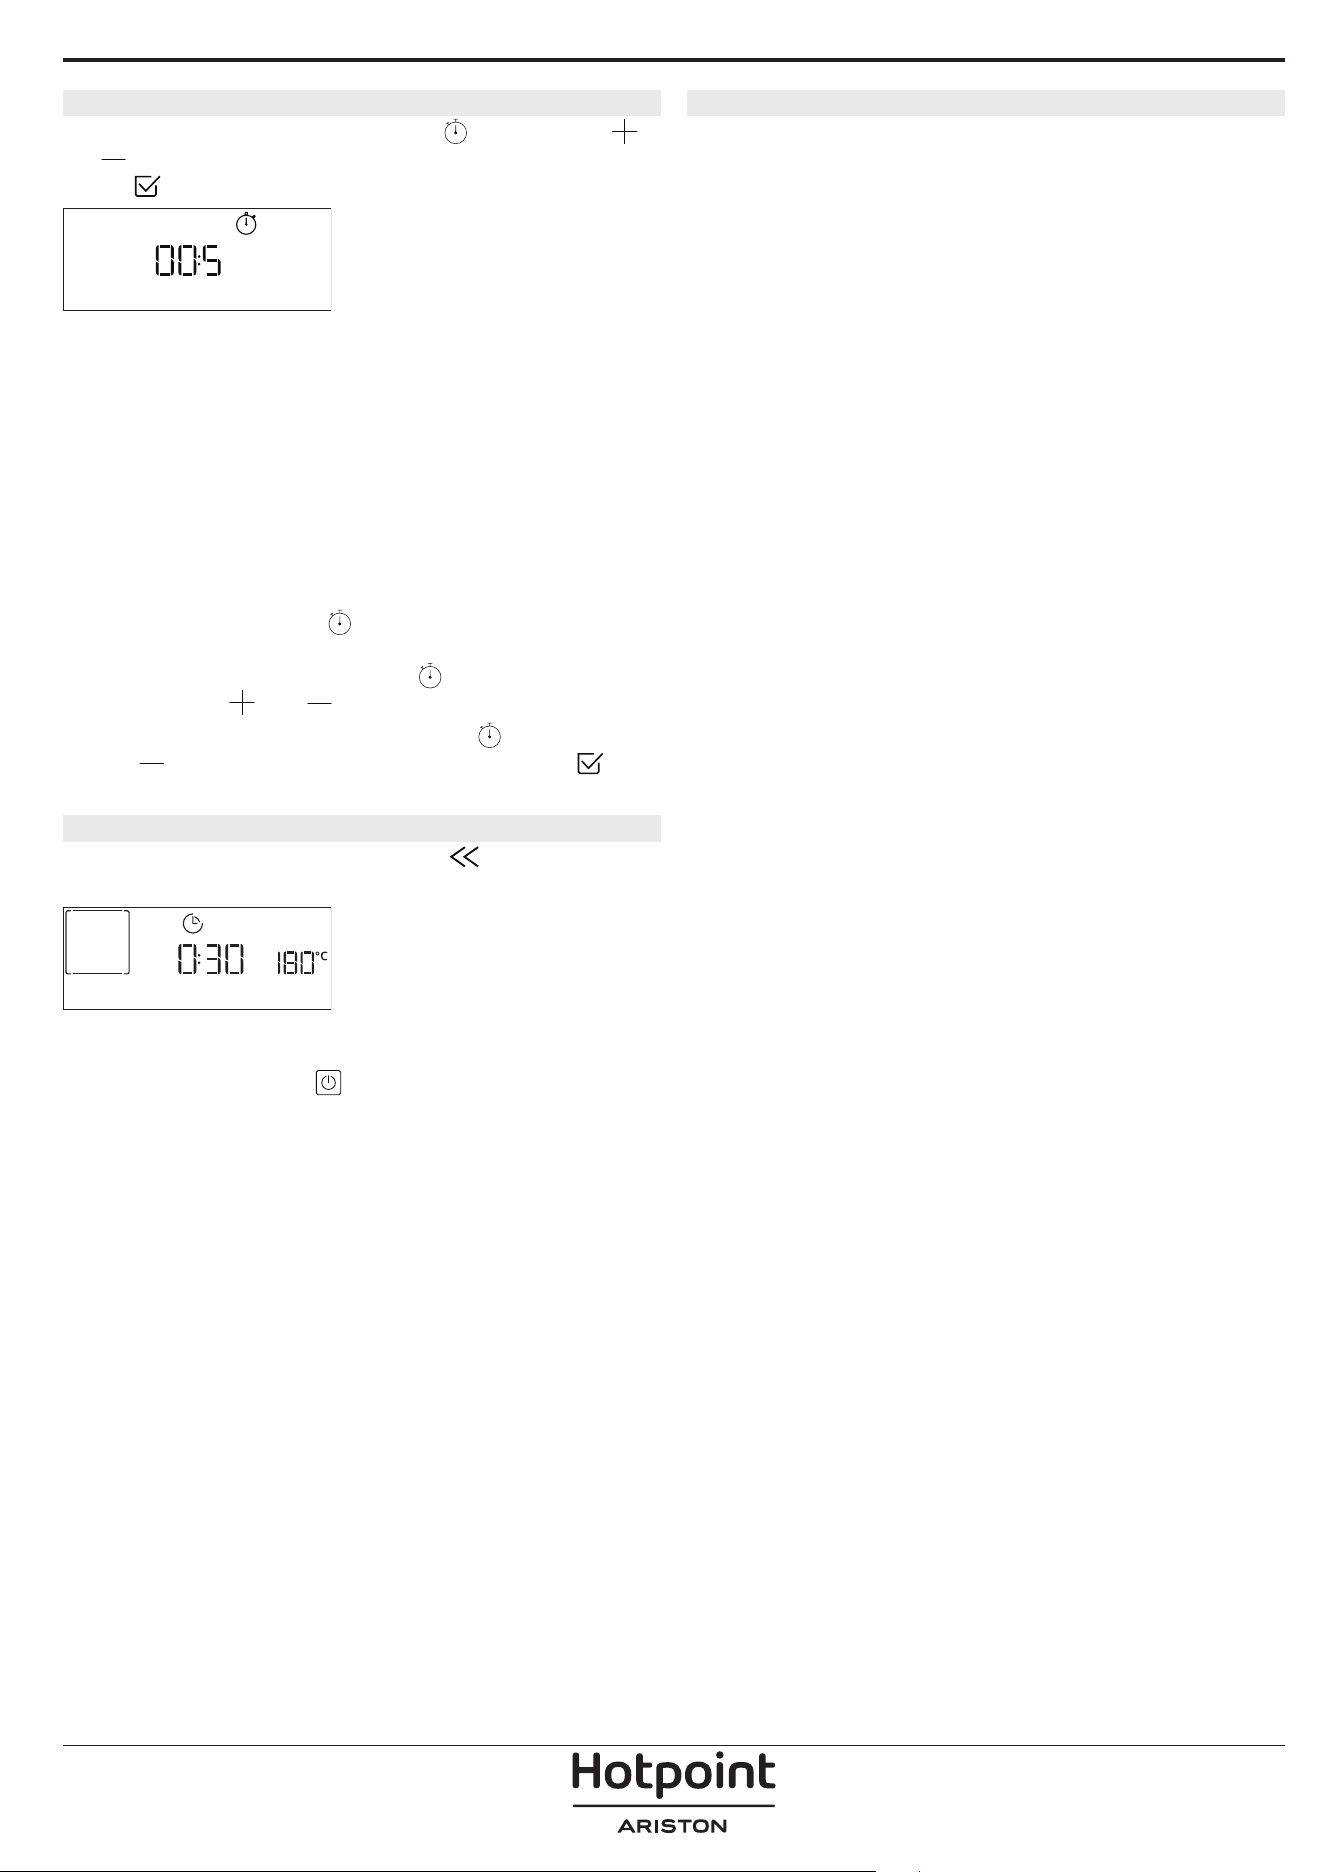
. MINUTEMINDER
To activate this function press the icon. Press
or to set the length of time you require and then
press
to activate the timer.
MINUTE-MINDER
An audible signal will sound and the display will
indicate once the minuteminder has nished counting
down the selected time.
Please note: The minuteminder does not activate any of
the cooking cycles.
The minute minder can be activated also when a
function is running.
The timer will continue to count down independently
without interfering with the function itself.
During this phase, it isn’t possible to see the
minuteminder (only the
icon will be displayed), that
will continue counting down in background. To edit the
minuteminder you can press the
icon and set the
time using the
or icon.
To cancel the minuteminder, press the
icon, then
select
until the time displayed is “--:--”. Press to
conrm.
. KEYLOCK
To lock the keypad, press and hold for at least ve
seconds. Do this again to unlock the keypad.
KEYLOCK
Please note: This function can also be activated during
cooking. For safety reasons, the oven can be switched o
at any time by pressing
.
. NOTES
• Do not cover the inside of the oven with
aluminium foil.
• Never drag pots or pans across the bottom of the
oven as this could damage the enamel coating.
• Do not place heavy weights on the door and do
not hold on to the door.
• Due to the higher temperature of the Pizza cycle it
is expected to experience slightly higher cooling
fan noise.

USEFUL TIPS
HOW TO READ THE COOKING TABLE
The table lists the best function, accessories and level
to use to cook different types of food. Cooking times
start from the moment food is placed in the oven,
excluding preheating (where required). Cooking
temperatures and times are approximate and depend
on the amount of food and the type of accessory
used. Use the lowest recommended settings to
begin with and, if the food is not cooked enough,
then switch to higher settings. Use the accessories
supplied and preferably dark-coloured metal cake
tins and baking trays. You can also use Pyrex or
stoneware pans and accessories, but bear in mind
that cooking times will be slightly longer.
COOKING DIFFERENT FOODS AT THE SAME TIME
Using the “Forced Air” function, you can cook
different foods which require the same cooking
temperature at the same time (for example: fish and
vegetables), using different shelves. Remove the food
which requires a shorter cooking time and leave the
food which requires a longer cooking time in the
oven.
MEAT
Use any kind of oven tray or pyrex dish suited to the
size of the piece of meat being cooked. For roast
joints, it is best to add some stock to the bottom of
the dish, basting the meat during cooking for added
flavour. Please note that steam will be generated
during this operation. When the roast is ready, let it
rest in the oven for another 10-15 minutes, or wrap it
in aluminium foil.
When you want to grill meat, choose cuts with an
even thickness all over in order to achieve uniform
cooking results. Very thick pieces of meat require
longer cooking times. To prevent the meat from
burning on the outside, lower the position of the
wire shelf, keeping the food farther away from the
grill. Turn the meat two thirds of the way through
cooking. Take care when opening the door as steam
will escape.
To collect the cooking juices, we recommend placing
a dripping pan filled with half a litre of drinking water
directly underneath the wire shelf on which the food
is placed. Top-up when necessary.
DESSERTS
Cook delicate desserts with the conventional function
on one shelf only.
Use dark-coloured metal baking pans and always
place them on the wire shelf supplied. To cook on
more than one shelf, select the forced air function and
stagger the position of the cake tins on the shelves,
aiding optimum circulation of the hot air.
To check whether a leavened cake is cooked, insert a
wooden toothpick into the centre of the cake. If the
toothpick comes out clean, the cake is ready.
If using non-stick baking pans, do not butter the
edges as the cake may not rise evenly around the
edges.
If the item “swells” during baking, use a lower
temperature next time and consider reducing the
amount of liquid you add or stirring the mixture more
gently.
For desserts with moist fillings or toppings (such
as cheesecake or fruit tarts), use the “Convection
bake” function. If the base of the cake is soggy, lower
the shelf and sprinkle the bottom of the cake with
breadcrumbs or biscuit crumbs before adding the
filling.
RISING
It is always best to cover the dough with a damp cloth
before placing it in the oven. Dough proving time
with this function is reduced by approximately one
third compared to proving at room temperature (20-
25°C). The rising time for pizza starts at around one
hour for 1 kg of dough.

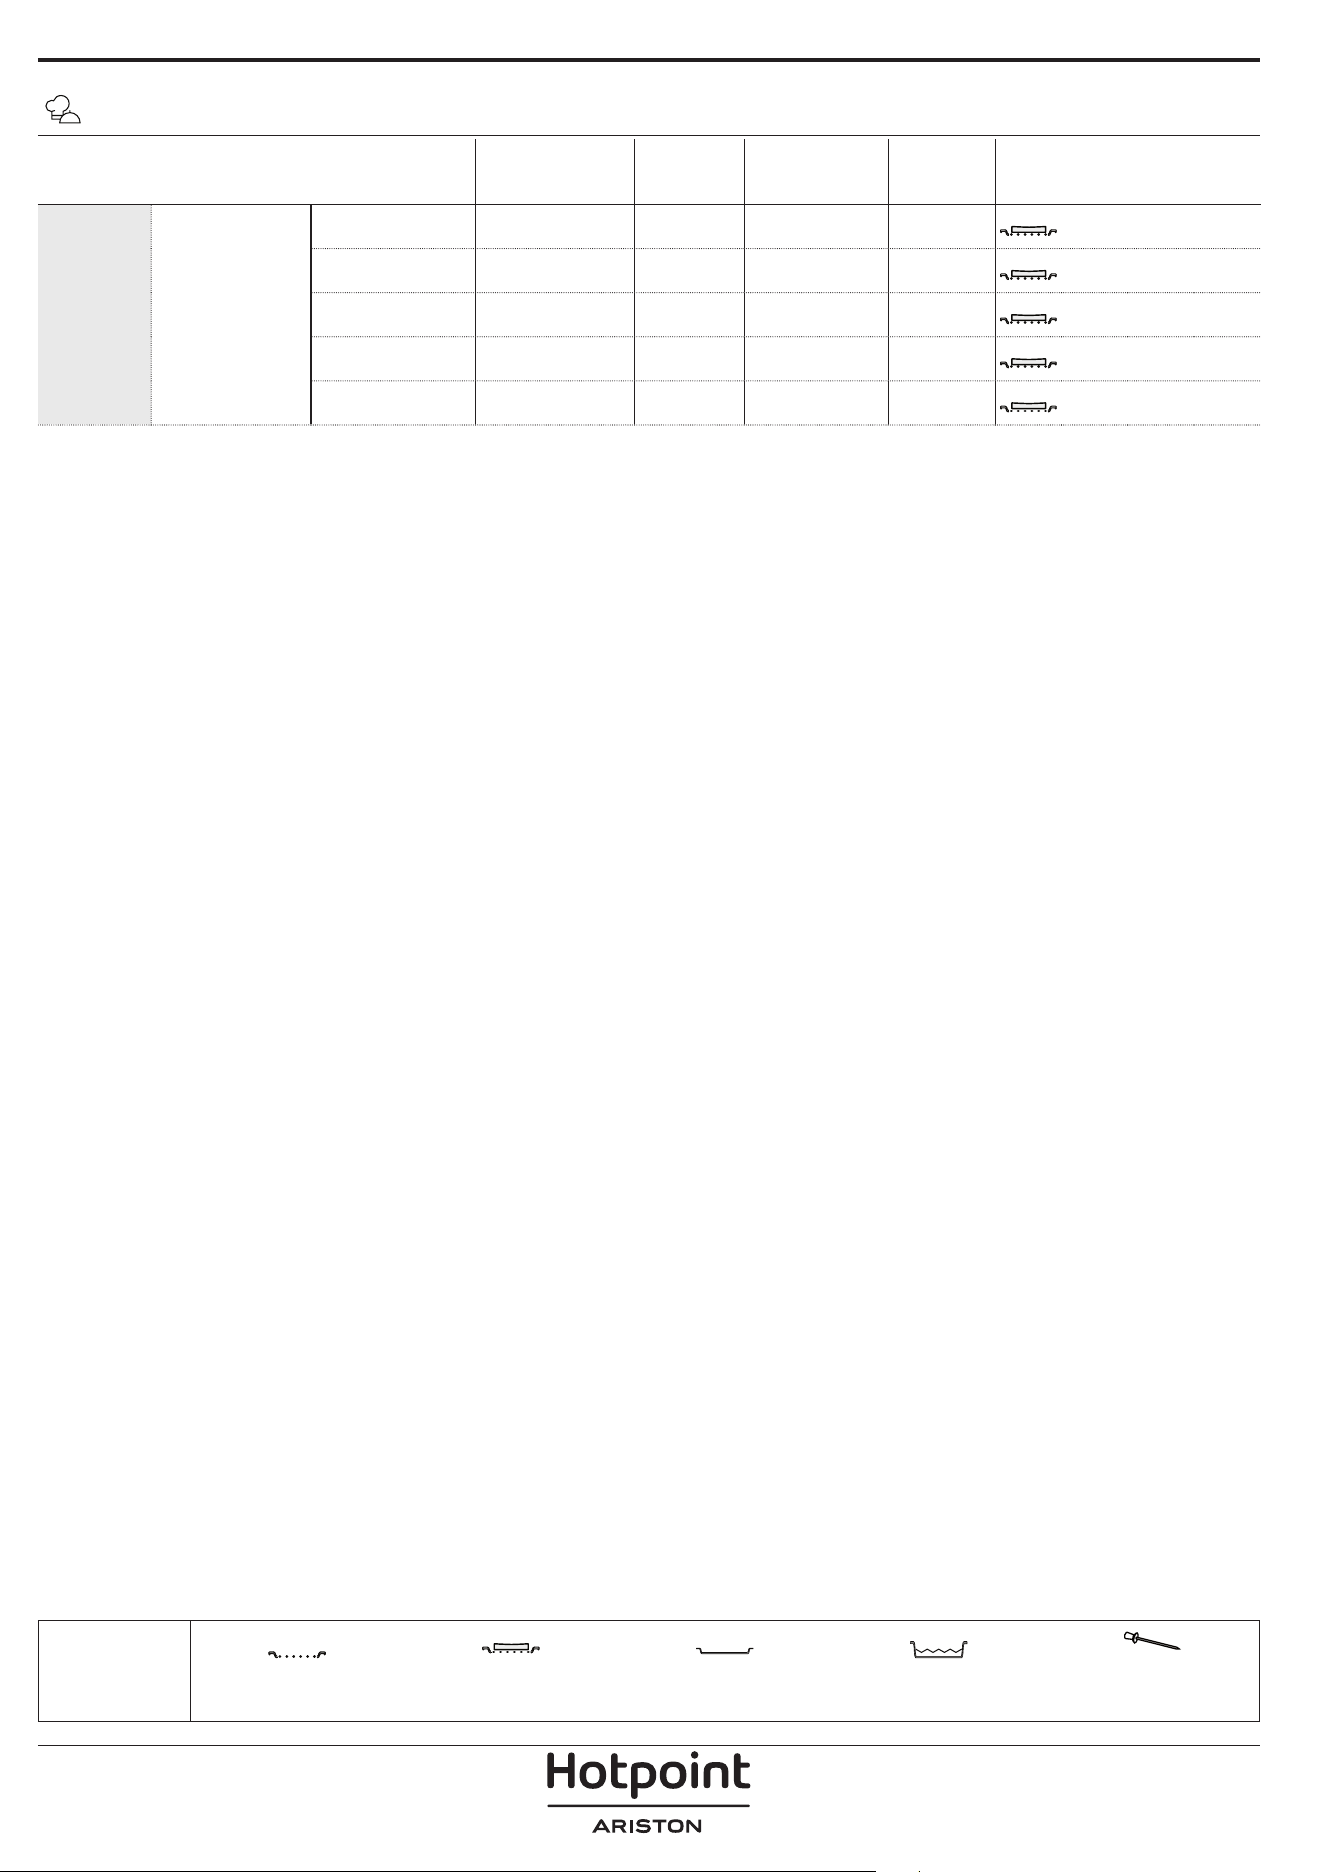
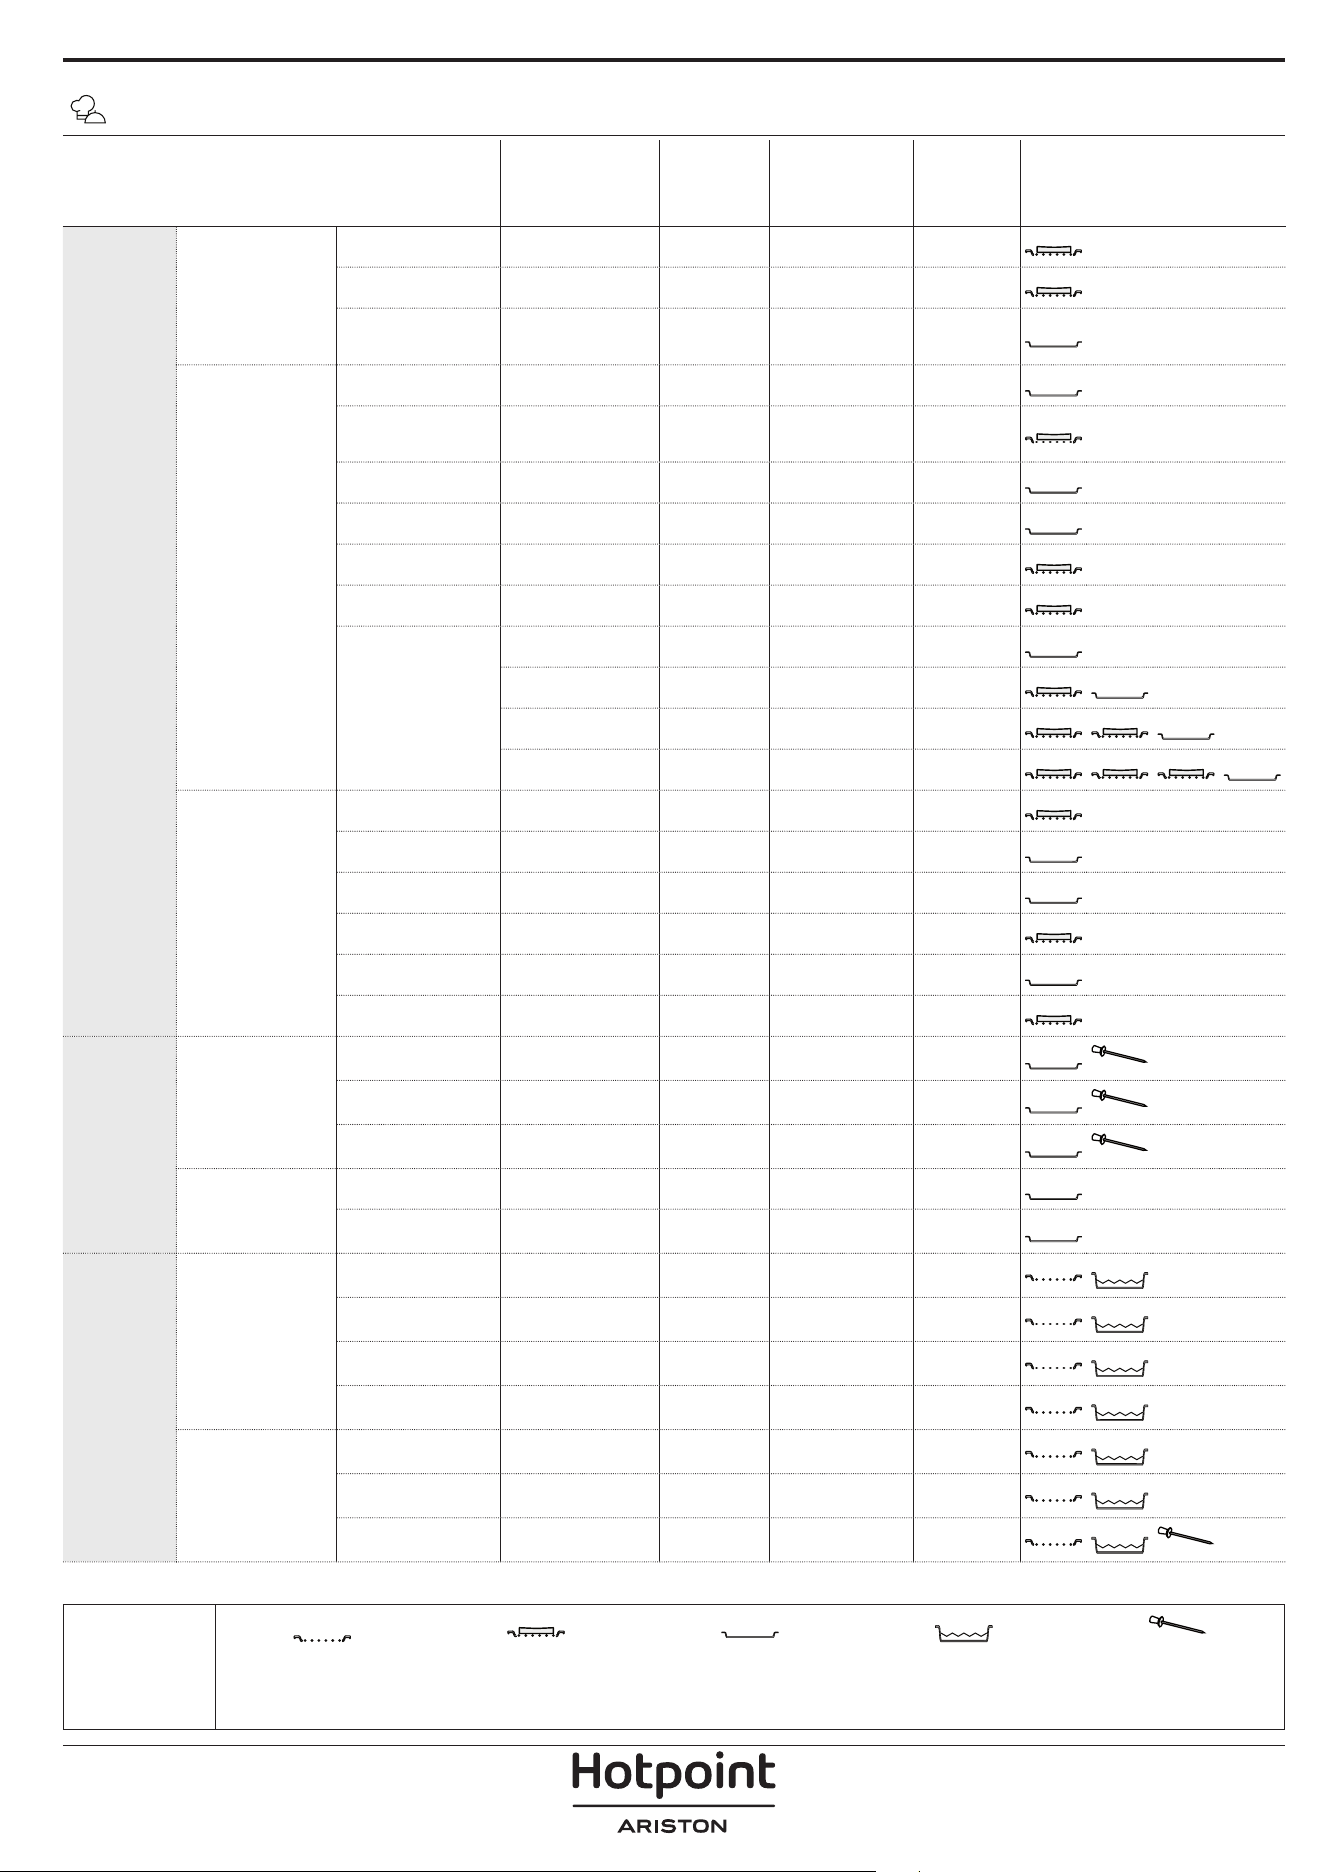
FOOD CATEGORIES QUANTITY
DONENESS
LEVEL
BROWNING
LEVEL
TURN
(OF COOK
TIME)
LEVEL AND ACCESSORIES
BAKED
Main dishes
Lasagna 0.5 - 3 kg - 0 -
2
Salty cakes 0.8 - 1.2 kg - 0 -
2
Stued
Vegetables
0.1 - 0.5 kg
[each]
- - -
3
Pizza & bread
Bread Rolls 60 - 150g [each] - - -
3
Sandwich Loaf 400 - 600 g [each] - - -
2
Big Bread 0.7 - 2.0kg - - -
2
Baguettes 200 - 300g [each] - - -
3
Round Pizza round - - -
2
Thick Pizza tray - - -
2
Pizza [frozen]
1 layer* - - -
2
2 layers* - - -
4
1
3 layers* - - -
5
3 1
4 layers* - - -
5
4 2 1
Sweet bakery
Sponge Cake 0.5 - 1.2 kg - - -
2
Cookies 0.2 - 0.6 kg - - -
3
Choux Pastry one tray* - - -
3
Tart 0.4 - 1.6kg - - -
3
Strudel 0.4 - 1.6kg - - -
3
Fruit Pie 0.5 -2 kg - - -
2
ROASTED
Meat
Roast Beef 0.6 - 2 kg 0 0 -
3
Roast Pork 0.6 - 2.5 kg - 0 -
3
Roast Chicken 0.6 - 3 kg - 0 -
2
Side dish
Roasted
Vegetables
0.5 - 1.5 kg - 0 -
3
Roasted Potatoes 0.5 - 1.5 kg - - -
3
GRILLED
Meat
Burger 1.5 - 3 cm 0 - 3/5
5
4
Sausages &
Wurstel
1.5 - 4.5 cm - - 2/3
5
4
Kebabs one grid - - 1/2
5
4
Fillet & Breast 1 - 5 cm - - 2/3
5
4
Fish & seafood
Fillets 0.5 - 3 (cm) - - -
3
2
Fillets [frozen] 0.5 - 3 (cm) - - -
3
2
Whole fish 0.2 - 1.5 kg* - - -
3
2
* Suggested quantity
MY MENU COOKING TABLE
ACCESSORIES
Wire shelf
Oven tray / Cake tray / Round
pizza tray on wire shelf
Drip tray / Baking tray
Drip tray with 500 ml of
water
Food Probe
FOOD CATEGORIES QUANTITY
DONENESS
LEVEL
BROWNING
LEVEL
TURN
(OF COOK
TIME)
LEVEL AND ACCESSORIES
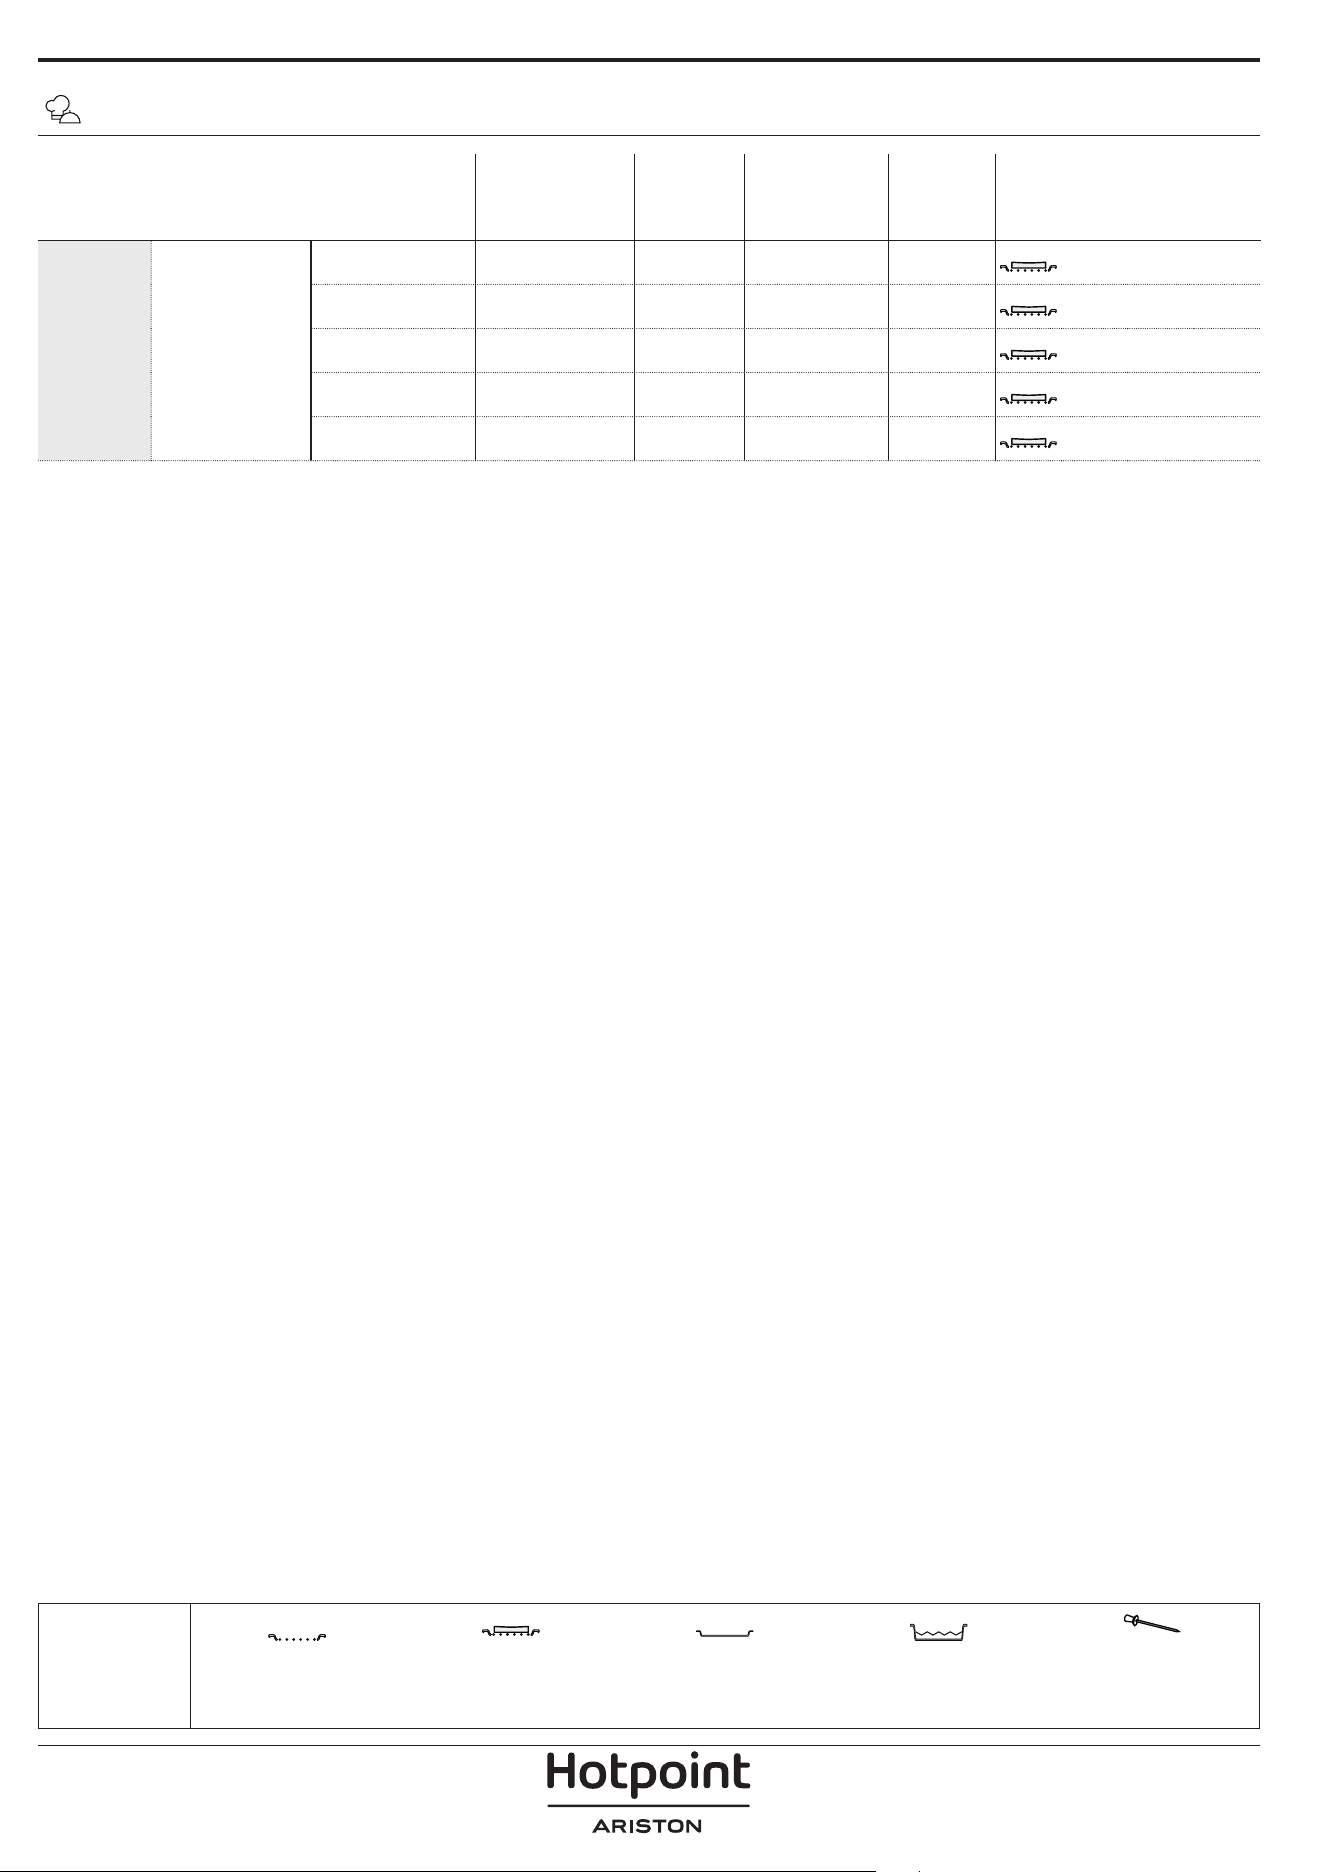
GRILLED Side dish
Tomatoes Gratin one tray - - -
3
Peppers Gratin one tray - - -
3
Broccoli Gratin one tray - - -
3
Cauliflower
Gratin
one tray - - -
3
Vegetables
Gratin
one tray - - -
3
MY MENU COOKING TABLE
* Suggested quantity
ACCESSORIES
Wire shelf
Oven tray / Cake tray / Round
pizza tray on wire shelf
Drip tray / Baking tray
Drip tray with 500 ml of
water
Food Probe
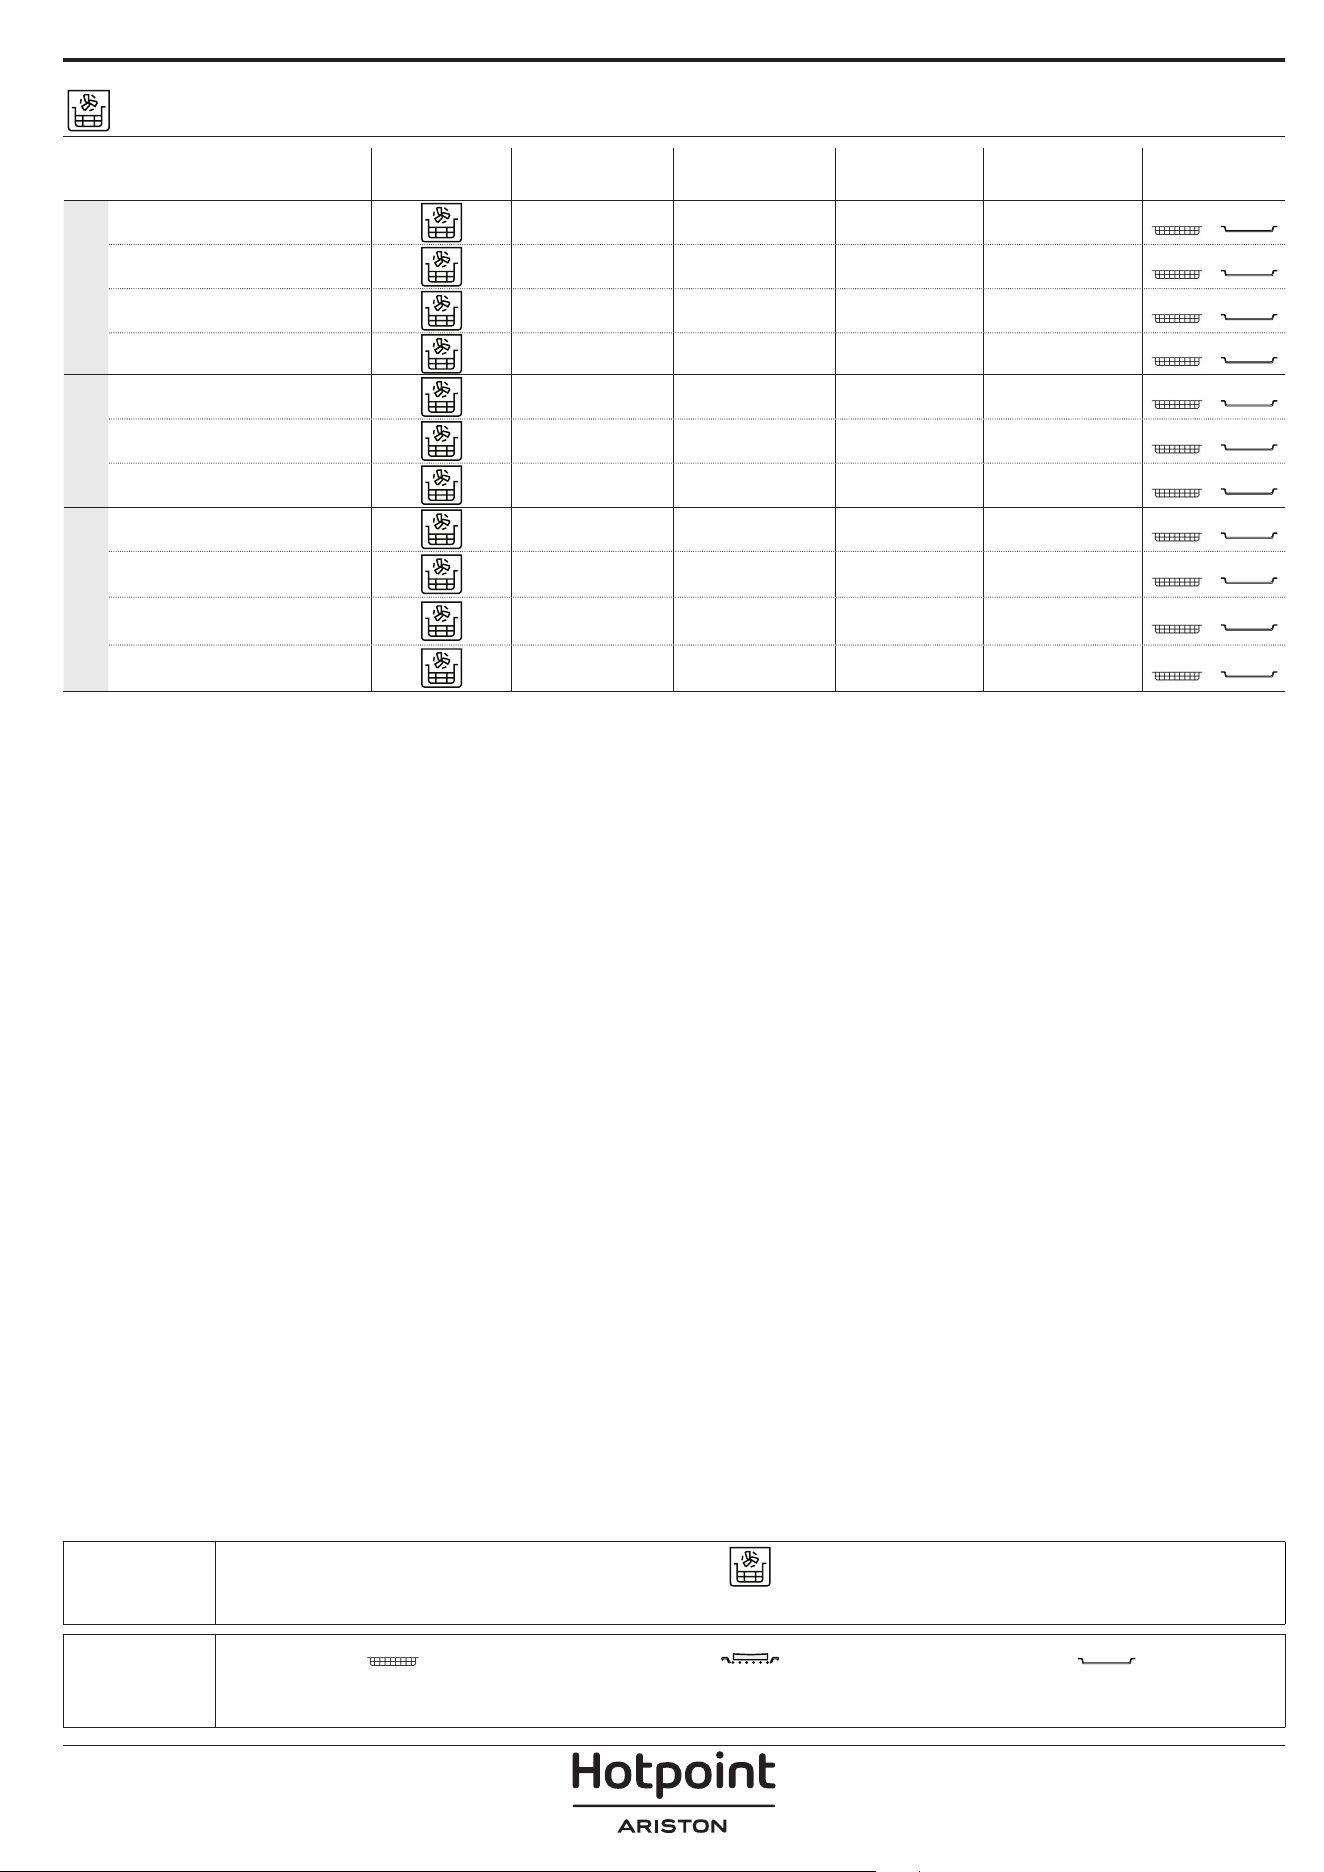
ACCESSORIES
Air Fry tray Oven tray or cake tray on wire shelf
Drip tray / Baking tray or
oven tray on wire shelf
AIR FRY COOKING TABLE
RECIPE FUNCTION
SUGGESTED
QUANTITY
PREHEAT
TEMPERATURE
(°C)
DURATION
(MIN.)
SHELF AND
ACCESSORIES
FROZEN FOOD
Frozen French Fries 650 - 850g Yes 200 25 - 30
4
2
Frozen Chicken Nugget
500g Yes 200 15 - 20
4
2
Fish Sticks 500g Yes 220 15 - 20
4
2
Onion Rings 500g Yes 200 15 - 20
4
2
VEGETABLES
Fresh Breaded Zucchini 400g Yes 200 15 - 20
4
2
Homemade Fries 300 - 800 g Yes 200 20 - 40
4
2
Mixed Vegetables 300 - 800 g Yes 200 20 - 30
4
2
MEAT AND FISH
Chicken Breasts 1 - 4 cm Yes 200 20 - 40
4
2
Chicken Wings 200 - 1500 g Yes 220 30 - 50
4
2
Breaded Cutlet 1 - 4 cm Yes 220 20 - 50
4
2
Fish Fillet 1 - 4 cm Yes 220 15 - 25
4
2
For cooking fresh or homemade foods, spread a thin layer of oil across the food surface.
In order to guarantee uniform cooking results, mix food halfway through the recommended cooking time.
FUNCTIONS
Air Fry

COOKING TABLE
RECIPE FUNCTION PREHEAT TEMPERATURE (°C) DURATION (MIN.) SHELF AND ACCESSORIES
Leavened cakes / Sponge cakes
Yes 170 30 - 50
2
Yes 160 30 - 50
2
Yes 160 30 - 50
4
1
Filled cakes
(cheesecake, strudel, apple pie)
Yes 160 - 200 30 - 85
3
Yes 160 - 200 30 - 90
4
1
Cookies
Yes 150 20 - 40
3
Yes 140 30 - 50
4
Yes 140 30 - 50
4
1
Yes 135 40 - 60
5
3 1
Small cakes / Mun
Yes 170 20 - 40
3
Yes 150 30 - 50
4
Yes 150 30 - 50
4
1
Yes 150 40 - 60
5
3 1
Choux buns
Yes 180 - 200 30 - 40
3
Yes 180 - 190 35 - 45
4
1
Yes 180 - 190 35 - 45 *
5
3 1
Meringues
Yes 90 110 - 150
3
Yes 90 130 - 150
4
1
Yes 90 140 - 160 *
5
3 1
Pizza / Bread / Focaccia
Yes 190 - 250 15 - 50
2
Yes 190 - 230 20 - 50
5
3 1
Pizza (Thin, thick, focaccia)
Yes 310 7 - 12
2
Yes 220 - 240 25 - 50 *
5
3 1
Frozen pizza
Yes 250 10 - 15
3
Yes 250 10 - 20
4
1
Yes 220 - 240 15 - 30
5
3 1
Savoury pies
(vegetable pie, quiche)
Yes 180 - 190 45 - 55
3
Yes 180 - 190 45 - 60
4
1
Yes 180 - 190 45 - 70 *
5
3 1
ACCESSORIES
Wire shelf
Oven tray or cake tray on
wire shelf
Drip tray / Baking tray or
oven tray on wire shelf
Drip tray / Baking tray
Drip tray with 500 ml of
water
FUNCTIONS
XL
ECO
Conventional Forced Air Convection Bake Grill Turbo Grill MaxiCooking Multiflow Menu Eco Cycle Pizza

RECIPE FUNCTION PREHEAT TEMPERATURE (°C) DURATION (MIN.) SHELF AND ACCESSORIES
Vols-au-vent / Pu pastry crackers
Yes 190 - 200 20 - 30
3
Yes 180 - 190 20 - 40
4
1
Yes 180 - 190 20 - 40 *
5
3 1
Lasagna / Flans / Baked pasta /
Cannelloni
Yes 190 - 200 45 - 65
3
Lamb / Veal / Beef / Pork 1 kg Yes 190 - 200 80 - 110
3
Roast pork with crackling 2 kg
XL
- 170 110 - 150
2
Chicken / Rabbit / Duck 1 kg Yes 200 - 230 50 - 100
3
Turkey / Goose 3 kg Yes 190 - 200 80 - 130
2
Baked sh / en papillote (llets, whole) Yes 180 - 200 40 - 60
3
Stued vegetables
(tomatoes, courgettes, aubergines)
Yes 180 - 200 50 - 60
2
Toast - 3 (High) 3 - 6
5
Fish llets / Steaks - 2 (Mid) 20 - 30 **
4
3
Sausages / Kebabs / Spare ribs /
Hamburgers
- 2 - 3 (Mid - High) 15 - 30 **
5
4
Roast chicken 1-1.3 kg - 2 (Mid) 55 - 70 ***
2
1
Leg of lamb / Shanks - 2 (Mid) 60 - 90 ***
3
Roast potatoes - 2 (Mid) 35 - 55 ***
3
Vegetable gratin - 3 (High) 10 - 25
3
Cookies
Cookies
Yes 135 50 - 70
5
4 3 1
Tarts
Tarts
Yes 170 50 - 70
5
3 2 1
Round pizzas
Pizza
Yes 210 40 - 60
5
3 2 1
Complete meal: Fruit tart (level 5) /
lasagna (level 3) / meat (level 1)
Yes 190 40 - 120 *
5
3 1
Complete meal: Fruit tart (level 5) /
roasted vegetables (level 4) / lasagna
(level 2) / cuts of meat (level 1)
Menu
Yes 190 40 - 120 *
5
4 2 1
Lasagna & Meat Yes 200 50 - 100 *
4
1
Meat & Potatoes Yes 200 45 - 100 *
4
1
Fish & Vegetebles Yes 180 30 - 50 *
4
1
Stued roasting joints
ECO
- 200 80 - 120 *
3
Cuts of meat
(rabbit, chicken, lamb)
ECO
- 200 50 - 100 *
3
* Estimated length of time: dishes can be removed from the oven at different times depending on personal preference.
** Turn food halfway through cooking.
*** Turn food two thirds of the way through cooking (if necessary).
ACCESSORIES
Wire shelf
Oven tray or cake tray on
wire shelf
Drip tray / Baking tray or
oven tray on wire shelf
Drip tray / Baking tray
Drip tray with 500 ml of
water
FUNCTIONS
XL
ECO
Conventional Forced Air Convection Bake Grill Turbo Grill MaxiCooking Multiflow Menu Eco Cycle Pizza
Make sure that the oven has
cooled down before carrying out
any maintenance or cleaning.
Do not use steam cleaners.
Do not use wire wool, abrasive
scourers or abrasive/corrosive
cleaning agents, as these could
damage the surfaces of the
appliance.
Wear protective gloves.
The oven must be disconnected
from the mains before carrying
out any kind of maintenance
work.
MAINTENANCE AND CLEANING
HOW TO READ THE COOKING TABLE
The table lists the best function, accessories and level to use to cook different types of food.
Cooking times start from the moment food is placed in the oven, excluding preheating (where required).
Cooking temperatures and times are approximate and depend on the amount of food and the type of accessory used.
Use the lowest recommended settings to begin with and, if the food is not cooked enough, then switch to higher
settings.
Use the accessories supplied and preferably darkcoloured metal cake tins and baking trays. You can also use Pyrex or
stoneware pans and accessories, but bear in mind that cooking times will be slightly longer.
EXTERIOR SURFACES
• Clean the surfaces with a damp microfibre cloth.
If they are very dirty, add a few drops of pH-neutral
detergent. Finish off with a dry cloth.
• Do not use corrosive or abrasive detergents. If any of
these products inadvertently comes into contact with
the surfaces of the appliance, clean immediately with
a damp microfibre cloth.
INTERIOR SURFACES
• After every use, leave the oven to cool and then
clean it, preferably while it is still warm, to remove
any deposits or stains caused by food residues. To
dry any condensation that has formed as a result of
cooking foods with a high water content, leave the
oven to cool completely and then wipe it with a cloth
or sponge.
• Activate the “Diamond Clean” function for optimum
cleaning of the internal surfaces. (Only in some
models).
• Clean the glass in the door with a suitable liquid
detergent.
• The oven door can be removed to facilitate cleaning.
ACCESSORIES
Soak the accessories in a washing-up liquid solution
after use, handling them with oven gloves if they
are still hot. Food residues can be removed using a
washing-up brush or a sponge.
Do not clean Food Probe and Meat Probe (if present)
in the dishwasher.
Air Fry tray (if present) can be cleaned in the dishwasher.

REMOVING AND REFITTING THE DOOR
1. To remove the door, open it fully and lower the
catches until they are in the unlock position.
b
a
2. Close the door as much as you can.
Take a firm hold of the door with both hands – do not
hold it by the handle.
Simply remove the door by continuing to close it
while pulling it upwards at the same time until it is
released from its seating. Put the door to one side,
resting it on a soft surface.
a
b
~15°
3. Refit the door by moving it towards the oven,
aligning the hooks of the hinges with their seating
and securing the upper part onto its seating.
4. Lower the door and then open it fully.
Lower the catches into their original position: Make
sure that you lower them down completely.
b
a
Apply gentle pressure to check that the catches are in
the correct position.
“CLICK”
5. Try closing the door and check to make sure that it
lines up with the control panel. If it does not, repeat
the steps above: The door could become damaged if
it does not work properly.
REPLACING THE LAMP
For the replacement of the lamp, contact the after sales service.
Problem Possible cause Solution
The oven is not working.
Power cut.
Disconnection from the
mains.
Check for the presence of mains electrical power
and whether the oven is connected to the
electricity supply.
Turn off the oven and restart it to see if the fault
persists.
The display shows the letter “F”
followed by a number.
Software problem.
Contact the Call Center and state the number
following the letter “F”.
The oven does not heat up.
When “DEMO” is “On” all
commands are active and
menus available but the
oven doesn’t heat up.
DEMO appears on display
every 60 seconds.
Access “DEMO” from “SETTINGS” and select “Off”.
The light switches off.
“ECO” mode is “On”. Access “ECO” from “SETTINGS” and select “Off”.
The door will not close
properly.
The safety catches are in the
wrong position.
Make sure that the safety catches are in the
correct position by following the instructions for
removing and refitting the door in the “Cleaning
and Maintenance” section.
The home power goes off.
Power setting wrong.
Verify if your domestic network has at least a
rating of more than 3 kW. If no, decrease the
power to 13 Ampere. Access “POWER” from
“SETTINGS” and select “LOW”.
Cooking cycle with probe
ended without evident cause
or error F3E3 is printed on the
screen
Food Probe is not properly
connected
Food Probe is not properly connected
TROUBLESHOOTING
Policies, standard documentation and additional product information can be found by:
• Using the QR on your product
• Visiting our website docs . hotpoint. eu
• Alternatively, contact our After-sales Service (See phone number in the warranty booklet). When contacting
our After-sales Service, please state the codes provided on your product's identication plate.
400020004738
IT
Manuale d'uso
GRAZIE PER AVERE ACQUISTATO UN PRODOTTO
HOTPOINT/ARISTON
Per ricevere un'assistenza più completa, registrare il
prodotto su www . hotpoint. eu/ register
Prima di utilizzare l'apparecchio leggere
attentamente le istruzioni di sicurezza.
DESCRIZIONE DEL PRODOTTO
PANNELLO COMANDI
1. Pannello comandi
2. Ventola e resistenza circolare
(non visibile)
3. Griglie laterali
(il livello è indicato sulla parte
frontale del forno)
4. Porta
5. Resistenza superiore / Grill
6. Luce
7. Punto di inserimento della sonda
carne
8. Targhetta matricola
(da non rimuovere)
9. Resistenza inferiore
(non visibile)
1. ON / OFF
Per accendere e spegnere il forno o
arrestare un funzione attiva.
2. ACCESSO DIRETTO ALLE
FUNZIONI
Per accedere rapidamente alle
funzioni e al menu.
3. TASTO DI NAVIGAZIONE
MENO
Per scorrere i menu e ridurre
le impostazioni o i valori delle
funzioni.
4. INDIETRO
Per tornare alla schermata
precedente. Durante la cottura,
permette di modificare le
impostazioni.
5. DISPLAY
6. CONFERMA
Per confermare la selezione di una
funzione o un valore impostato.
7. TASTO DI NAVIGAZIONE PIÙ
Per scorrere i menu e aumentare
le impostazioni o i valori delle
funzioni.
8. TASTI DI ACCESSO DIRETTO A
OPZIONI/FUNZIONI
Per impostare rapidamente le
funzioni, la durata, le impostazioni
e i preferiti.
9. AVVIO
Per avviare una funzione
utilizzando le impostazioni
specificate o quelle di base.
5
4
3
2
1
5
4
3
2
1
1
2
3
4
7
9
6
5
SCANSIONARE IL CODICE QR
SUL PROPRIO APPARECCHIO
PER OTTENERE MAGGIORI
INFORMAZIONI
8
1 3 4 5 6 7 8 92
ACCESSORI
GRIGLIA LECCARDA TEGLIA*
GUIDE DI
SCORRIMENTO*
Utilizzare per cuocere
gli alimenti o come
supporto per teglie,
tortiere e altre pentole
da forno.
Utilizzare come teglia da
forno per cucinare carne,
pesce, verdure, focacce,
ecc. o posizionare sotto
la griglia per raccogliere i
succhi di cottura.
Utilizzare per la cottura
di tutti i prodotti di
panetteria e pasticceria,
ma anche per arrosti,
pesce en papillotte, ecc.
Per facilitare
l'inserimento o la
rimozione degli
accessori.
SONDA CARNE*
LECCARDA FRITTURA
AD ARIA *
Per misurare con
precisione la
temperatura interna
degli alimenti durante la
cottura.
Da utilizzare quando si
cucinano alimenti con la
funzione Frittura ad aria,
con una teglia posizionata
a un livello inferiore per
raccogliere eventuali
briciole e sgocciolamenti.
Può essere lavata in
lavastoviglie.
INSERIRE LA GRIGLIA E GLI ALTRI ACCESSORI
Inserire la griglia orizzontalmente facendola scivolare
sulle griglie laterali inserendo dapprima il lato rialzato
orientato verso l'alto.
Gli altri accessori, come la leccarda o la teglia, si
inseriscono orizzontalmente come la griglia.
TOGLIERE E RIMONTARE LE GRIGLIE LATERALI
• Per togliere le griglie, sollevare le griglie prima di
scostare la parte inferiore dalle proprie sedi: a questo
punto è possibile rimuovere le griglie.
• Per rimontare le griglie, inserirle dapprima nelle sedi
superiori. Avvicinarle alla cavità tenendo sollevato,
quindi abbassarle in posizione nelle sedi inferiori.
MONTARE LE GUIDE SCORREVOLI
Togliere dal forno le griglie
laterali e rimuovere la
protezione in plastica dalle
guide scorrevoli.
Ancorare alla griglia laterale
la clip superiore della guida
e farla scivolare fino a fine
corsa. Abbassare l'altra clip
in posizione.
Per fissare la guida, premere
la parte inferiore della clip
contro la griglia laterale.
Assicurarsi che le guide
possano scorrere
liberamente. Ripetere questa
operazione sull'altra griglia
laterale, allo stesso livello.
Note: le guide scorrevoli possono essere montate a qualsiasi
livello.
Il numero e il tipo di accessori possono variare a seconda del modello acquistato.
Altri accessori possono essere acquistati separatamente; per ordini e informazioni contattare il servizio assistenza
clienti.
* Disponibile solo in alcuni modelli
FUNZIONI
STATICO
Per cuocere qualsiasi tipo di pietanza su un solo
ripiano.
TERMOVENTILATO
Per cuocere contemporaneamente su più ripiani
(massimo tre) alimenti diversi che richiedono la
medesima temperatura di cottura. Questa funzione
permette di eseguire la cottura senza trasmissione di
odori da un alimento all'altro.
GRILL
Per grigliare bistecche, spiedini e salsicce, cucinare
verdure gratinate o tostare il pane. Per la grigliatura
delle carni, si consiglia di utilizzare una leccarda per
raccogliere il liquido di cottura: posizionare la leccarda
un livello sotto la griglia e aggiungere 500 ml di acqua
potabile.
MY MENU
Questa funzione permette la cottura completamente
automatica di tutte le pietanze (lasagna, carne, pesce,
verdure, torte & dolci, torte salate, pane, pizza). Per
utilizzare al meglio questa funzione si raccomanda di
seguire le indicazioni della tabella di cottura.
FUNZIONI MANUALI
• VENTILATO
Per cuocere qualsiasi tipo di pietanza su un solo
ripiano.
• MULTIFLOW MENU
Per cuocere contemporaneamente su quattro
ripiani alimenti diversi che richiedono la
medesima temperatura di cottura.
Questa funzione può essere utilizzata per cuocere
biscotti, torte, pizze tonde (anche surgelate) e
per preparare un pasto completo. Per ottenere
risultati ottimali si raccomanda di seguire la
tabella di cottura.
• TURBO GRILL
Per arrostire grandi tagli di carne (cosce, roast
beef, pollo). Si consiglia di utilizzare una leccarda
per raccogliere il liquido di cottura: posizionarla
un livello sotto la griglia e aggiungere 500 ml di
acqua potabile.
• CIBI SURGELATI
Questa funzione seleziona automaticamente la
temperatura e la modalità di cottura ottimali per 5
diverse categorie di alimenti pronti surgelati. Non
è necessario preriscaldare il forno.
• FUNZIONI SPECIALI
» PIZZA
Questa funzione consente di cucinare
un'ottima pizza fatta in casa, in meno di 10
minuti come al ristorante.
Il ciclo di cottura dedicato funziona a
temperature superiori a 300 gradi Celsius,
garantendo una pizza morbida all'interno,
croccante sui bordi e con una doratura
perfettamente uniforme. Combinando questa
funzione con l'accessorio Pizza Stone WPro e
preriscaldando per 30 minuti, può cuocere una
pizza in 5-8 minuti (per ordini e informazioni,
contattare il servizio assistenza clienti o www.
hotpoint.eu.)
» LIEVITAZIONE
Per ottenere una lievitazione ottimale di
impasti dolci o salati. Allo scopo di preservare
la qualità della lievitazione, non attivare la
funzione se il forno è ancora caldo dopo un
ciclo di cottura.
» MANTENIMENTO IN CALDO
Per mantenere caldi e croccanti cibi appena
cotti.
» SCONGELARE
Per velocizzare lo scongelamento degli
alimenti. Posizionare gli alimenti sul ripiano
intermedio. Si suggerisce di lasciare l'alimento
nella sua confezione per impedire che si
asciughi eccessivamente all'esterno.
» CICLO ECO
Per cuocere arrosti ripieni e filetti di carne in
pezzi su un solo ripiano. Quando questo Ciclo
Eco è in uso, la spia rimarrà spenta durante
la cottura. Per utilizzare il Ciclo Eco e quindi
ottimizzare il consumo di energia, la porta
del forno non deve essere aperta finché gli
alimenti non sono completamente cotti.
» MAXI COOKING
Questa funzione seleziona automaticamente la
migliore temperatura e modalità di cottura per
tagli di carne di grandi dimensioni (oltre 2,5
kg). Si suggerisce di girare la carne durante la
cottura per ottenere una doratura omogenea
su entrambi i lati. È preferibile irrorarla di tanto
in tanto con il fondo di cottura per evitare che
si asciughi eccessivamente.
• COTTURA LENTA
Per cuocere delicatamente carne e pesce.
Questa funzione cuoce gli alimenti lentamente
per mantenerli teneri e saporiti. Grazie alla
bassa temperatura, la pietanza non si asciuga
esternamente e il risultato finale è simile a
quello che si ottiene con la cottura a vapore.
Per gli arrosti, si suggerisce di farli rosolare
prima in padella per creare una crosta esterna
che trattenga i succhi interni della carne. Per un
risultato ottimale, tenere chiusa la porta del forno
durante la cottura per evitare la dispersione del
calore. I tempi di cottura consigliati per il pesce
(300 g - 3 kg) variano tra 2 e 5 ore, per la carne
(1-3 kg) tra 4 e 7 ore.
FRITTURA AD ARIA
Questa funzione consente di cuocere patate fritte,
bocconcini di pollo e altro ancora utilizzando
meno olio, ottenendo un risultato piacevolmente
croccante. Gli elementi riscaldanti si attivano per
riscaldare adeguatamente la cavità, mentre la
ventola fa circolare l'aria calda. I migliori risultati di
cottura previsti si ottengono solo utilizzando una
leccarda Frittura ad aria (fornita con alcuni modelli).
Posizionare gli alimenti sulla leccarda Frittura ad aria
in un unico strato e seguire le istruzioni della tabella
di cottura Frittura ad aria per ottenere le migliori
prestazioni. Evitare di utilizzare più di una leccarda
per evitare una cottura non uniforme.
PRERISCALDAMENTO RAPIDO
Per preriscaldare rapidamente il forno.
CONTA MINUTI
Per impostare il timer senza attivare una funzione.
DIAMOND CLEAN
L'azione del vapore rilasciato durante questo speciale
ciclo di pulizia a bassa temperatura permette di
rimuovere facilmente sporco e residui di cibo. Versare
200 ml di acqua potabile sul fondo del forno,
attivando la funzione a forno freddo.
PREFERITI
Per richiamare la lista delle 10 funzioni preferite.
IMPOSTAZIONI
Per regolare le impostazioni del forno. Attivando la
modalità "ECO", la luminosità del display si riduce e la
luce si spegne dopo 1 minuto per risparmiare energia.
Il display si riattiva automaticamente premendo un
tasto qualsiasi. Se la modalità "DEMO" è impostata
su "On", tutti i comandi sono operativi e i menu
sono disponibili ma il forno non viene riscaldato. Per
disattivare questa modalità, accedere a "DEMO" dal
menu "IMPOSTAZIONI" e scegliere "Off". Selezionando
"RESET", l'apparecchio si spegne e vengono
ripristinate le impostazioni della prima accensione.
Tutte le impostazioni successive vengono cancellate.
PRIMO UTILIZZO
1. SELEZIONE DELLA LINGUA
Alla prima accensione, è necessario impostare lingua
e ora: Sul display compare "English".
ITALIANO
Premere o per scorrere L'elenco delle lingue
disponibili e selezionare quella desiderata. Premere
per confermare la selezione.
Note: La lingua può essere successivamente modicata
selezionando "LINGUA" nel menu "IMPOSTAZIONI",
disponibile premendo
2. IMPOSTARE L'ASSORBIMENTO DI POTENZA
Il forno è programmato per assorbire una potenza
elettrica compatibile con una rete domestica di capacità
superiore a 3 kW (16): nel caso si disponga di una potenza
inferiore, è necessario diminuire questo valore (13).
POTENZA
Premere o per selezionare 16 "Alto" o 13
"Basso" e premere
per confermare.
3. IMPOSTARE L'ORA
Dopo aver selezionato la lingua, sarà necessario
impostare l'ora corrente: sul display lampeggiano le
due cifre relative all'ora.
OROLOGIO
Premere o per impostare l'ora corretta e
premere
: sul display lampeggiano le due cifre
relative ai minuti. Premere
o per impostare i
minuti e premere
per confermare.
Note: dopo una prolungata interruzione di corrente
potrebbe essere necessario impostare nuovamente l'ora.
Selezionare "OROLOGIO" nel menu "IMPOSTAZIONI",
accessibile premendo
4. RISCALDAMENTO DEL FORNO
Un nuovo forno può rilasciare degli odori dovuti alla
lavorazione di fabbrica: questo è normale.
Prima di cucinare gli alimenti è dunque raccomandato
di riscaldare a vuoto il forno per rimuovere
ogni odore.
Rimuovere protezioni di cartone o
pellicole trasparenti e togliere gli accessori dal
forno. Riscaldare il forno a 200°C per circa un'ora
utilizzando preferibilmente una funzione ventilata
("Termoventilato" o "Ventilato").
Note: si consiglia di arieggiare il locale dopo il primo utilizzo
dell'apparecchio.
USO QUOTIDIANO
1. SELEZIONARE UNA FUNZIONE
Premere per accendere il forno: il display
mostrerà l'ultima funzione utilizzata o il menu
principale. Per selezionare una funzione è possibile
premere l'icona corrispondente (per le funzioni
principali) oppure scegliere la voce desiderata da
un menu: Per selezionare una voce da un menu (il
display mostrerà la prima voce disponibile), premere
o per selezionare quella desiderata, quindi
premere
per confermare.
2. IMPOSTARE LA FUNZIONE
Dopo avere selezionato la funzione desiderata è
possibile modificarne le impostazioni. Il display
mostra in sequenza le impostazioni che è possibile
modificare. premendo
è possibile modificare
nuovamente il valore precedente.
TEMPERATURA / LIVELLO GRILL
TEMPERATURA
Quando il valore lampeggia sul display, premere
o per modificarlo, quindi premere
per confermare e continuare con le impostazioni
successive (se possibile). Usare la stessa procedura per
impostare il livello grill: Sono disponibili tre livelli di
potenza per il grill: 3 (alto), 2 (medio), 1 (basso).
Note: una volta attivata la funzione, il livello
temperatura/grill può essere modicato utilizzando
o .
DURATA
DURATA
Quando l'icona lampeggia sul display, premere
o per impostare il tempo di cottura
desiderato, quindi premere
per confermare. È
possibile non impostare la durata se si preferisce
gestire manualmente il tempo di cottura: Premere
o per confermare e avviare la funzione.
Selezionando questa modalità non è possibile
programmare un avvio ritardato.
Note: durante la cottura, premendo
è possibile
regolare il tempo impostato: premere
o per
modificarlo, quindi premere
per confermare.
ORA DI FINE (AVVIO RITARDATO)
In molte funzioni, una volta impostato un tempo di
cottura è possibile posticipare l'avvio della funzione
programmando l'ora di fine cottura. Il display mostra
l'ora di fine mentre l'icona
lampeggia.
FINE COTTURA
Premere o per impostare l'ora in cui si
desidera terminare la cottura, quindi premere
per confermare e attivare la funzione. Posizionare gli
alimenti nel forno e chiudere la porta: la funzione si
avvierà automaticamente dopo un periodo di tempo
calcolato per terminare la cottura all'orario impostato.
Note: La programmazione dell'avvio ritardato di una
cottura disattiva la fase di preriscaldamento del forno: la
temperatura desiderata viene raggiunta gradualmente,
quindi i tempi di cottura si allungheranno leggermente
rispetto a quanto indicato nella tabella di cottura.
Durante il tempo di attesa, è possibile premere
o per modificare l'ora di fine programmata o
premere
per modificare altre impostazioni.
Premendo
è possibile alternare la visualizzazione tra
l'ora di fine cottura e la durata.
. MY MENU
Queste funzioni selezionano automaticamente la
modalità, la temperatura e la durata di cottura più
adatte per ottenere risultati ottimali.
Alla richiesta, sarà sufficiente indicare le
caratteristiche degli alimenti per ottenere un risultato
ottimale.
PESO / ALTEZZA (LIVELLI TEGLIA ROTONDA)
CHILOGRAMMI
Per impostare correttamente la funzione, seguire le
indicazioni sul display, quando richiesto, e premere
o per impostare il valore richiesto e premere
per confermare.
GRADO DI COTTURA / DORATURA
In alcune funzioni My Menu è possibile regolare il
grado di cottura.
GRADO DI COTTURA
Alla richiesta, premere o per selezionare
il livello desiderato tra al sangue (-1) e ben cotto
(+1). Premere
o per confermare e avviare la
funzione.
Allo stesso modo, in alcune funzioni MyMenu è
possibile regolare il grado di doratura tra un valore
minimo (-1) e un valore massimo (+1).
3. AVVIO DELLA FUNZIONE
Dopo avere confermato i valori predefiniti o avere
applicato le impostazioni preferite, premere
per
attivare la funzione prescelta.
Se è stato impostato un avvio ritardato, premendo
il forno chiederà se si desidera saltare questa
fase, avviando immediatamente la funzione.
Note: dopo avere selezionato una funzione, il display
consiglia il livello più adatto per quella funzione. La
funzione avviata può essere interrotta in qualsiasi
momento premendo
.
Se il forno è caldo e la funzione prevede una
determinata temperatura massima, sul display compare
un messaggio corrispondente. Premere
per tornare
alla schermata precedente e selezionare un'altra
funzione o attendere il rareddamento completo.
4. PRERISCALDAMENTO
In alcune funzioni, è prevista una fase di
preriscaldamento del forno: una volta avviata la
funzione, il display segnala che si è attivata la fase di
preriscaldamento.
PRERISCALDAMENTO
Al termine di questa fase, un segnale acustico e
il display indicheranno che il forno ha raggiunto
la temperatura impostata e comparirà la richiesta
"AGG. ALIMENTO". A questo punto, aprire la porta,
posizionare gli alimenti nel forno, chiudere la porta e
avviare la cottura premendo
o .
Note: inserire gli alimenti nel forno prima della
fine del preriscaldamento può compromettere
i risultati di cottura. Aprendo la porta durante la
fase di preriscaldamento, questa si interrompe
temporaneamente.
Il tempo di cottura non comprende la fase di
preriscaldamento. È sempre possibile modificare la
temperatura che il forno deve raggiungere utilizzando
o .
5. GIRARE O CONTROLLARE GLI ALIMENTI
Alcune funzioni My Menu prevedono che gli alimenti
vengano girati durante la cottura.
GIRA ALIMENTO
Questa richiesta sarà segnalata da un segnale acustico
e da un messaggio corrispondente sul display. Aprire
la porta, eseguire l'operazione indicata sul display,
chiudere la porta e premere
per continuare la
cottura.
Allo stesso modo, quando manca il 10% del tempo di
cottura impostato, il forno richiede di controllare gli
alimenti.
CONTROLLARE IL CIBO
Questa richiesta sarà segnalata da un segnale acustico
e da un messaggio corrispondente sul display.
Controllare gli alimenti, chiudere la porta e premere
o per continuare la cottura.
Note: Premere
per saltare queste azioni. In ogni
caso, una volta trascorso un certo tempo senza
che l'operazione venga eseguita, il forno riprende
automaticamente la cottura.
6. FINE COTTURA
Allo scadere del tempo programmato, un segnale
acustico e il display indicheranno che la cottura è
terminata.
FINE
Premere per continuare la cottura in modalità
manuale (senza timer) o premere
per prolungare
il tempo di cottura impostando una nuova durata.
In entrambi i casi, i parametri di cottura saranno
mantenuti.
DORATURA
Con alcune funzioni, alla fine della cottura il forno
consente di dorare la superficie del cibo grazie
all'utilizzo del grill.
PREMERE v PER DORARE
Quando il display visualizza il messaggio pertinente,
se necessario, premere
per avviare un ciclo di
doratura di cinque minuti. Questa funzione può
essere interrotta in qualsiasi momento premendo
per spegnere il forno.
8. PREFERITI
Al termine della cottura, sul display compare un
messaggio che propone di salvare la funzione nella
lista dei preferiti con un numero da 1 a 10.
AGG. PREFERITO?
Se si desidera salvare una funzione come preferita e
memorizzare le impostazioni attuali per un uso futuro,
premere
altrimenti, per ignorare la richiesta
premere
.
Una volta premuto
, premere o per
selezionare la posizione del numero, quindi premere
per confermare.
Note: se la memoria è piena o la posizione è già
occupata, viene chiesto di confermare la sovrascrittura
della funzione precedente.
Per richiamare successivamente le funzioni salvate
premere
: il display mostrerà la lista delle funzioni
preferite.
1. STATICO
Premere o per selezionare la funzione,
confermare premendo
, quindi premere per
attivare.
9. DIAMOND CLEAN
Premere per visualizzare "Diamond Clean" sul
display.
DIAMOND CLEAN
Premere per attivare la funzione: il display
indicherà le operazioni richieste per ottenere una
pulizia ottimale: Seguire le indicazioni, quindi
premere
al termine. Una volta eseguite tutte le
operazioni preliminari, alla richiesta del forno premere
per attivare il ciclo di pulizia.
Note: Si raccomanda di non aprire la porta del forno
durante il ciclo di pulizia per evitare perdite di vapore,
che potrebbero avere un effetto negativo sul risultato
finale.
A ciclo ultimato, il relativo messaggio di avviso
lampeggia sul display. Lasciar rareddare il forno,
quindi pulire e asciugare le superci interne con un
panno o una spugna.
. CONTA MINUTI
Per attivare questa funzione, premere l'icona .
Premere
o per impostare la durata desiderata,
quindi premere
per attivare il timer.
CONTA MINUTI
Verrà emesso un segnale acustico e il display indicherà
che il cronometro ha terminato il conteggio dell'ora
selezionata.
Note: il conta minuti non attiva nessun ciclo di cottura.
Il minutaggio può essere attivato anche quando è
attiva una funzione.
Il timer continuerà il conto alla rovescia in modo
indipendente, senza interferire con la funzione stessa.
Durante questa fase non sarà possibile vedere il
contaminuti (sarà visualizzata solo l'icona
), che
continuerà il conteggio alla rovescia in background. Per
modicare il minutaggio, è possibile premere il l'icona
e impostare l'ora usando l'icona o .
Per annullare il promemoria, premere l'icona
, quindi
selezionare
nché l'ora visualizzata è "--:--". Premere
per confermare.
. BLOCCO TASTI
Per bloccare il tastierino, tenere premuto per
almeno cinque secondi. Ripetere la procedura per
sbloccare il tastierino..
BLOCCO TASTI
Nota: questa funzione può essere attivata anche durante
la cottura. Per ragioni di sicurezza, è possibile spegnere il
forno in ogni momento premendo
.
. NOTE
• Non coprire l'interno del forno con pellicola di
alluminio.
• Non trascinare pentole o tegami sul fondo del
forno, perché così facendo si potrebbe rovinare lo
smalto.
• Non appoggiare pesi elevati sulla porta e non
aggrapparsi ad essa.
• A causa della temperatura più elevata del ciclo
Pizza, si prevede che il rumore della ventola di
raffreddamento sarà leggermente più elevato.

CONSIGLI UTILI
COME LEGGERE LA TABELLA DI COTTURA
La tabella indica la funzione, gli accessori e il livello
migliore da utilizzare per cuocere svariati tipi di cibo.
I tempi di cottura si intendono dall'introduzione
degli alimenti nel forno, escluso il preriscaldamento
(dove richiesto). Le temperature e i tempi di cottura
sono indicativi e dipendono dalla quantità di cibo e
dal tipo di accessori. Utilizzare inizialmente i valori
più bassi consigliati e, se il risultato della cottura
non è quello desiderato, passare a quelli più alti. Si
consiglia di utilizzare gli accessori in dotazione e
tortiere o teglie possibilmente in metallo scuro. È
possibile utilizzare anche tegami e accessori in pyrex
o in ceramica, ma occorre considerare che i tempi di
cottura si allungheranno leggermente.
COTTURA SIMULTANEA DI PIETANZE DIVERSE
Utilizzando la funzione "Termoventilato", è possibile
cuocere contemporaneamente alimenti diversi (ad
esempio: pesce e verdure) che richiedono la stessa
temperatura, su differenti ripiani. Si potranno estrarre
prima gli alimenti che richiedono tempi di cottura più
brevi e lasciare continuare la cottura per quelli che
necessitano di tempi più lunghi.
CARNE
Utilizzare qualunque tipo di teglia o pirofila adatta
alle dimensioni della carne da cuocere. Per gli arrosti,
aggiungere preferibilmente del brodo sul fondo della
pirofila inumidendo la carne durante la cottura per
insaporirla. Fare attenzione al vapore che si sviluppa
durante tale operazione. Quando l'arrosto è pronto,
lasciarlo riposare in forno per altri 10-15 minuti
oppure avvolgerlo in un foglio di alluminio.
Per la cottura uniforme della carne alla griglia,
scegliere tagli dello stesso spessore. I pezzi di carne
molto spessi richiedono tempi di cottura più lunghi.
Per evitare che si brucino in superficie, allontanarli dal
grill disponendoli su ripiani più bassi. Girare la carne a
due terzi della cottura. Aprire con cautela la porta in
quanto può fuoriuscire vapore caldo.
Si consiglia di posizionare una leccarda con mezzo
litro d'acqua potabile direttamente sotto la griglia
sulla quale avete posizionato il cibo da grigliare, per
raccogliere il liquido di cottura. Rabboccare quando
necessario.
DESSERT
Cuocere i dessert delicati con la funzione statica su un
solo livello.
Utilizzare tortiere in metallo scuro e posizionarle
sempre sulla griglia in dotazione. Per la cottura su
più livelli selezionare la funzione termoventilato e
disporre le tortiere sfalsate sulle griglie, in modo da
favorire la circolazione dell'aria.
Per capire se la torta lievitata è cotta, inserire uno
stuzzicadenti nella parte centrale del dolce. Se lo
stuzzicadenti rimane asciutto, il dolce è pronto.
Se si utilizzano tortiere antiaderenti, non
imburrare i bordi, il dolce potrebbe non crescere
omogeneamente sui lati.
Se il dolce si "sgonfia" durante la cottura, la volta
successiva utilizzare una temperatura inferiore,
magari riducendo la quantità di liquido e mescolando
più delicatamente l'impasto.
I dessert con guarnitura succosa (torte al formaggio o
crostate di frutta) richiedono la funzione "Ventilato".
Se la base della torta risulta troppo umida, usare un
ripiano più basso e cospargere la base del dolce di
pan grattato o biscotti sbriciolati prima di aggiungere
il ripieno.
LIEVITAZIONE
Si consiglia di coprire l'impasto con un panno umido
prima di introdurlo nel forno. Con questa funzione,
i tempi di lievitazione si riducono di circa un terzo
rispetto ai tempi di lievitazione a temperatura
ambiente (20-25°C). Il tempo di lievitazione per un
impasto da pizza da 1 kg è di circa un'ora.
CATEGORIE DI ALIMENTI QUANTITÀ
GRADO DI
COTTURA
LIVELLO DI
DORATURA
GIRARE
(DEL
TEMPO DI
COTTURA)
LIVELLO E ACCESSORI
COTTURA
TRADIZ.
PIATTI UNICI
Lasagna 0,5 - 3 kg - 0 -
2
Torte salate 0,8 - 1,2 kg - 0 -
2
Verdure ripiene
0,1 - 0,5 kg
[l'uno]
- - -
3
PIZZA & PANE
Panini 60 - 150 g [l'uno] - - -
3
Pane per
tramezzini
400 - 600 g [l'uno] - - -
2
Pane Grande 0,7 - 2,0 kg - - -
2
Baguette 200 - 300 g [l'una] - - -
3
Pizza al piatto Rotonda - - -
2
Pizza alta Leccarda - - -
2
Pizza [surgelata]
1 strato* - - -
2
2 strati* - - -
4
1
3 strati* - - -
5
3 1
4 strati* - - -
5
4 2 1
Prodotti da
forno dolci
Pan di spagna 0,5 - 1,2 kg - - -
2
Biscotti 0,2 - 0,6 kg - - -
3
Bignè una teglia * - - -
3
Crostata 0,4 - 1,6 kg - - -
3
Strudel 0,4 - 1,6 kg - - -
3
Torta di frutta 0,5 - 2 kg - - -
2
ARROSTITI
Carne
Roast Beef 0,6 - 2 kg 0 0 -
3
Arrosto di maiale 0,6 - 2,5 kg - 0 -
3
Pollo arrosto 0,6 - 3 kg - 0 -
2
Contorni
Verdure arrostite 0,5 - 1,5 kg - 0 -
3
Patate arrosto 0,5 - 1,5 kg - - -
3
GRIGLIATI
Carne
Burger 1,5 - 3 cm 0 - 3/5
5
4
Salsicce &
wurstel
1,5 - 4,5 cm - - 2/3
5
4
Spiedini una griglia - - 1/2
5
4
Filetto & petto 1 - 5 cm - - 2/3
5
4
Pesci e frutti di
mare
Filetti 0,5 - 3 cm - - -
3
2
Filetti [surgelati] 0,5 - 3 cm - - -
3
2
Pesce intero 0,2 - 1,5 kg * - - -
3
2
* Quantità consigliata
TABELLA DI COTTURA MY MENU
ACCESSORI
Griglia
Pirola / Tortiera / Teglia
per pizza tonda su griglia
metallica
Leccarda / Teglia
Leccarda con 500 ml di
acqua
Termosonda
CATEGORIE DI ALIMENTI QUANTITÀ
GRADO DI
COTTURA
LIVELLO DI
DORATURA
GIRARE
(DEL
TEMPO DI
COTTURA)
LIVELLO E ACCESSORI
GRIGLIATI Contorni
Pomodori al
gratin
una teglia - - -
3
Peperoni al
gratin
una teglia - - -
3
Broccoli al gratin una teglia - - -
3
Cavolfiori al
gratin
una teglia - - -
3
Verdure
gratinate
una teglia - - -
3
TABELLA DI COTTURA MY MENU
* Quantità consigliata
ACCESSORI
Griglia
Pirola / Tortiera / Teglia
per pizza tonda su griglia
metallica
Leccarda / Teglia
Leccarda con 500 ml di
acqua
Termosonda

ACCESSORI
Teglia frittura ad aria Pirofila o tortiera su griglia
Leccarda/piastra dolci o
teglia su griglia
TABELLA DI COTTURA PER FRITTURA AD ARIA
RICET TA FUNZIONE
QUANTITÀ
CONSIGLIATA
PRERISC.
TEMPERATURA
(°C)
DURATA
(MIN.)
RIPIANI E
ACCESSORI
ALIMENTI SURGELATI
Patate fritte surgelate
650 - 850 g Sì 200 25 - 30
4
2
Nugget di pollo surgelati
500 g Sì 200 15 - 20
4
2
Bastoncini di pesce 500 g Sì 220 15 - 20
4
2
Anelli di cipolle
500 g Sì 200 15 - 20
4
2
VERDURE
Zucchini freschi impanati 400 g Sì 200 15 - 20
4
2
Patatine fritte fatte in casa
300 - 800 g Sì 200 20 - 40
4
2
Verdure miste 300 - 800 g Sì 200 20 - 30
4
2
CARNE E PESCE
Petti di pollo 1 - 4 cm Sì 200 20 - 40
4
2
Alette di pollo 200 - 1500 g Sì 220 30 - 50
4
2
Cotolette impanate 1 - 4 cm Sì 220 20 - 50
4
2
Filetti di pesce 1 - 4 cm Sì 220 15 - 25
4
2
Per cucinare alimenti freschi o fatti in casa, distribuire uno strato sottile di olio sulla superficie dell'alimento.
Per garantire risultati di cottura uniformi, mescolare gli alimenti a metà del tempo di cottura consigliato.
FUNZIONI
Frittura ad aria
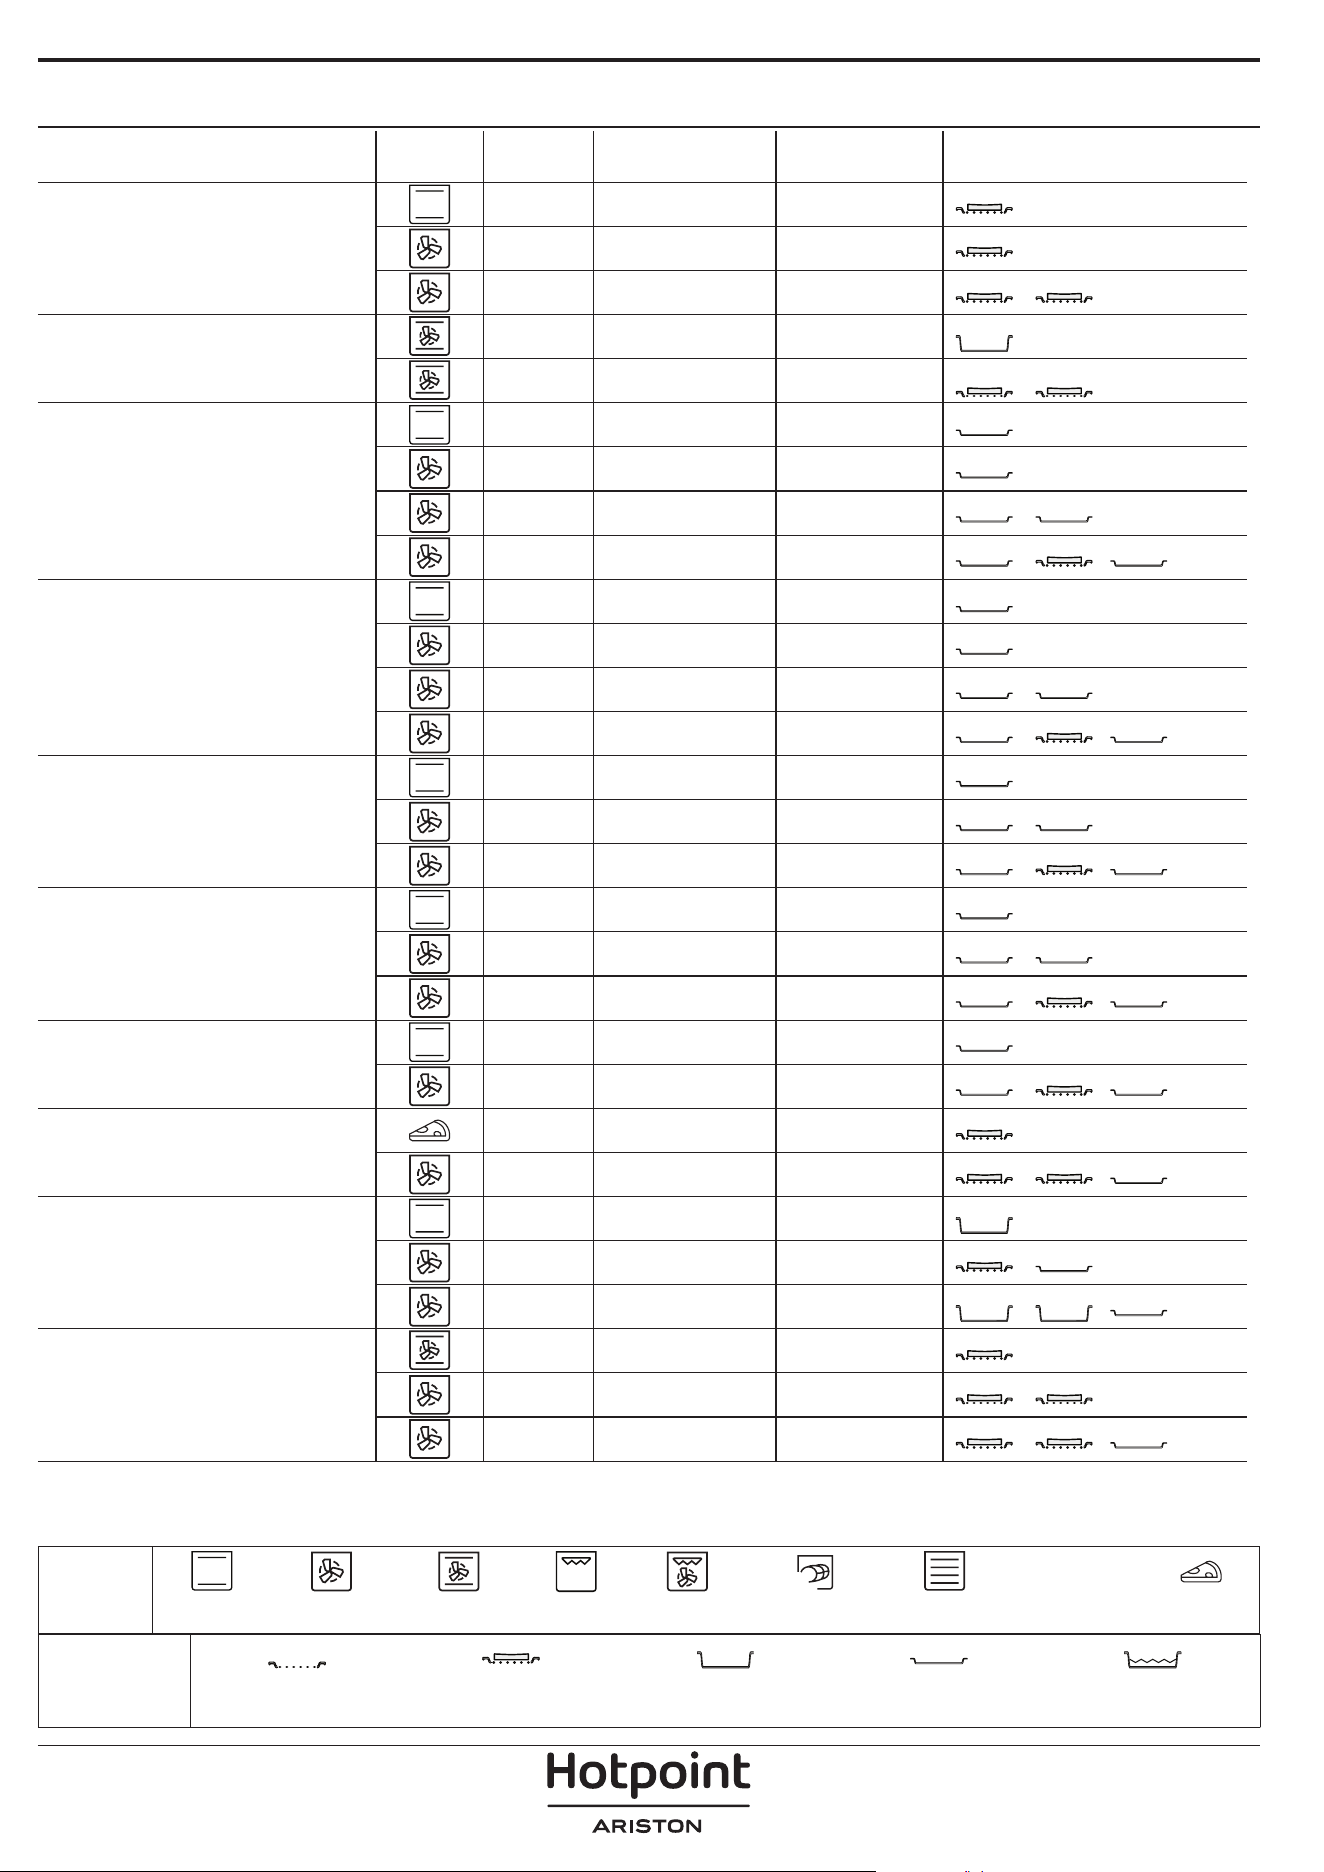
TABELLA DI COTTURA
RICETTA FUNZIONE PRERISC. TEMPERATURA (°C) DURATA (MIN.) RIPIANI E ACCESSORI
Torte lievitate / Pan di Spagna
Sì 170 30 - 50
2
Sì 160 30 - 50
2
Sì 160 30 - 50
4
1
Torte ripiene
(cheesecake, strudel, torta di mele)
Sì 160 – 200 30 - 85
3
Sì 160 – 200 30 - 90
4
1
Biscotti
Sì 150 20 - 40
3
Sì 140 30 - 50
4
Sì 140 30 - 50
4
1
Sì 135 40 - 60
5
3 1
Tortine / Mun
Sì 170 20 - 40
3
Sì 150 30 - 50
4
Sì 150 30 - 50
4
1
Sì 150 40 - 60
5
3 1
Bigné
Sì 180 - 200 30 - 40
3
Sì 180 - 190 35 - 45
4
1
Sì 180 - 190 35 - 45 *
5
3 1
Meringhe
Sì 90 110 - 150
3
Sì 90 130 - 150
4
1
Sì 90 140 - 160 *
5
3 1
Pizza / Pane / Focaccia
Sì 190 - 250 15 - 50
2
Sì 190 - 230 20 - 50
5
3 1
Pizza (sottile, alta, focaccia)
Sì 310 7 - 12
2
Sì 220 - 240 25 - 50 *
5
3 1
Pizza surgelata
Sì 250 10 - 15
3
Sì 250 10 - 20
4
1
Sì 220 - 240 15 - 30
5
3 1
Torte salate
(torta di verdure, quiche)
Sì 180 - 190 45 - 55
3
Sì 180 - 190 45 - 60
4
1
Sì 180 - 190 45 - 70 *
5
3 1
ACCESSORI
Griglia Pirofila o tortiera su griglia
Leccarda / piastra dolci o
teglia su griglia
Leccarda / Teglia
Leccarda con 500 ml di
acqua
FUNZIONI
XL
ECO
Statico Termoventilato Ventilato Grill Turbo Grill Maxi Cooking Multiflow menu Ciclo ECO Pizza

RICETTA FUNZIONE PRERISC. TEMPERATURA (°C) DURATA (MIN.) RIPIANI E ACCESSORI
Vols-au-vent / Salatini di pasta sfoglia
Sì 190 - 200 20 - 30
3
Sì 180 - 190 20 - 40
4
1
Sì 180 - 190 20 - 40 *
5
3 1
Lasagne / Sformati / Pasta al forno /
Cannelloni
Sì 190 - 200 45 - 65
3
Agnello / Vitello / Manzo / Maiale 1 kg Sì 190 - 200 80 - 110
3
Arrosto di maiale con cotenna 2 kg
XL
- 170 110 - 150
2
Pollo / Coniglio / Anatra 1 kg Sì 200 - 230 50 - 100
3
Tacchino / Oca 3 kg Sì 190 - 200 80 - 130
2
Pesce al forno / al cartoccio (letti,
intero)
Sì 180 - 200 40 - 60
3
Verdure ripiene
(pomodori, zucchine, melanzane)
Sì 180 - 200 50 - 60
2
Pane tostato - 3 (Alta) 3 - 6
5
Filetti di pesce / Bistecche - 2 (media) 20 - 30 **
4
3
Salsicce / Spiedini / Costine /
Hamburger
- 2 - 3 (media – alto) 15 - 30 **
5
4
Pollo arrosto (1-1,3 kg) - 2 (media) 55 - 70 ***
2
1
Coscia d'agnello / Stinco - 2 (media) 60 - 90 ***
3
Patate arrosto - 2 (media) 35 - 55 ***
3
Verdure gratinate - 3 (Alta) 10 - 25
3
Biscotti
Biscotti
Sì 135 50 - 70
5
4 3 1
Crostate
Crostate
Sì 170 50 - 70
5
3 2 1
Pizze tonde
Pizza
Sì 210 40 - 60
5
3 2 1
Pasto completo: Crostata di frutta (livello
5) / Lasagne (livello 3) / Carne (livello 1)
Sì 190 40 - 120 *
5
3 1
Pasto completo: Crostata di frutta (livello
5) / Verdure arrostite (livello 4) / Lasagne
(livello 2) / Tagli di carne (livello 1)
Menu
Sì 190 40 - 120 *
5
4 2 1
Lasagne e carne Sì 200 50 - 100 *
4
1
Carne e patate Sì 200 45 - 100 *
4
1
Pesce e verdure Sì 180 30 - 50 *
4
1
Arrosti ripieni
ECO
- 200 80 - 120 *
3
Carne in pezzi
(coniglio, pollo, agnello)
ECO
- 200 50 - 100 *
3
* Il tempo di cottura è indicativo: i piatti possono essere estratti dal forno in momenti diversi, a seconda delle preferenze
personali.
** Girare gli alimenti a metà cottura.
*** Girare gli alimenti a due terzi di cottura (se necessario).
ACCESSORI
Griglia Pirofila o tortiera su griglia
Leccarda / piastra dolci o
teglia su griglia
Leccarda / Teglia
Leccarda con 500 ml di
acqua
FUNZIONI
XL
ECO
Statico Termoventilato Ventilato Grill Turbo Grill Maxi Cooking Multiflow menu Ciclo ECO Pizza
Assicurarsi che il forno si sia
rareddato prima di eettuare
qualsiasi intervento di
manutenzione o pulizia.
Non utilizzare apparecchi a
vapore.
Non usare pagliette metalliche,
panni abrasivi e detergenti
abrasivi o corrosivi che possano
danneggiare le superci.
Indossare guanti protettivi.
Il forno deve essere scollegato
dalla rete elettrica prima di
eettuare qualsiasi tipo di
manutenzione.
MANUTENZIONE E PULIZIA
COME LEGGERE LA TABELLA DI COTTURA
La tabella indica la funzione, gli accessori e il livello migliore da utilizzare per cuocere svariati tipi di cibo.
I tempi di cottura si intendono dall'introduzione degli alimenti nel forno, escluso il preriscaldamento (dove richiesto).
Le temperature e i tempi di cottura sono indicativi e dipendono dalla quantità di cibo e dal tipo di accessori.
Utilizzare inizialmente i valori più bassi consigliati e, se il risultato della cottura non è quello desiderato, passare a quelli
più alti.
Si consiglia di utilizzare gli accessori in dotazione e tortiere o teglie possibilmente in metallo scuro. È possibile utilizzare
anche tegami e accessori in pyrex o in ceramica, ma occorre considerare che i tempi di cottura si allungheranno
leggermente.
SUPERFICI ESTERNE
• Pulire le superfici con un panno in microfibra umido.
Se molto sporche, aggiungere qualche goccia di
detergente con pH neutro. Asciugare con un panno.
• Non utilizzare detergenti corrosivi o abrasivi. Se
inavvertitamente uno di questi prodotti dovesse
venire a contatto con le superfici, pulire subito con un
panno in microfibra umido.
SUPERFICI INTERNE
• Dopo ogni uso, lasciare raffreddare il forno e
pulirlo preferibilmente quando è ancora tiepido per
rimuovere incrostazioni e macchie dovute a residui
di cibo. per asciugare la condensa dovuta alla cottura
di alimenti ad alto contenuto di acqua, usare a forno
freddo un panno o una spugna.
• Attivare la funzione "Diamond Clean" per una
pulizia ottimale delle superfici interne. (Solo in alcuni
modelli).
• Pulire i vetri della porta con detergenti liquidi
specifici.
• La porta del forno può essere rimossa per facilitare la
pulizia.
ACCESSORI
Mettere a bagno gli accessori con detersivo per piatti
dopo l'uso, maneggiandoli con guanti da forno, se
ancora caldi. I residui di cibo possono essere rimossi
con una spazzola per piatti o con una spugna.
Non pulire la sonda alimenti e la sonda carne (se
presente) in lavastoviglie.
La teglia per frittura ad aria (se presente) può essere
lavata in lavastoviglie.
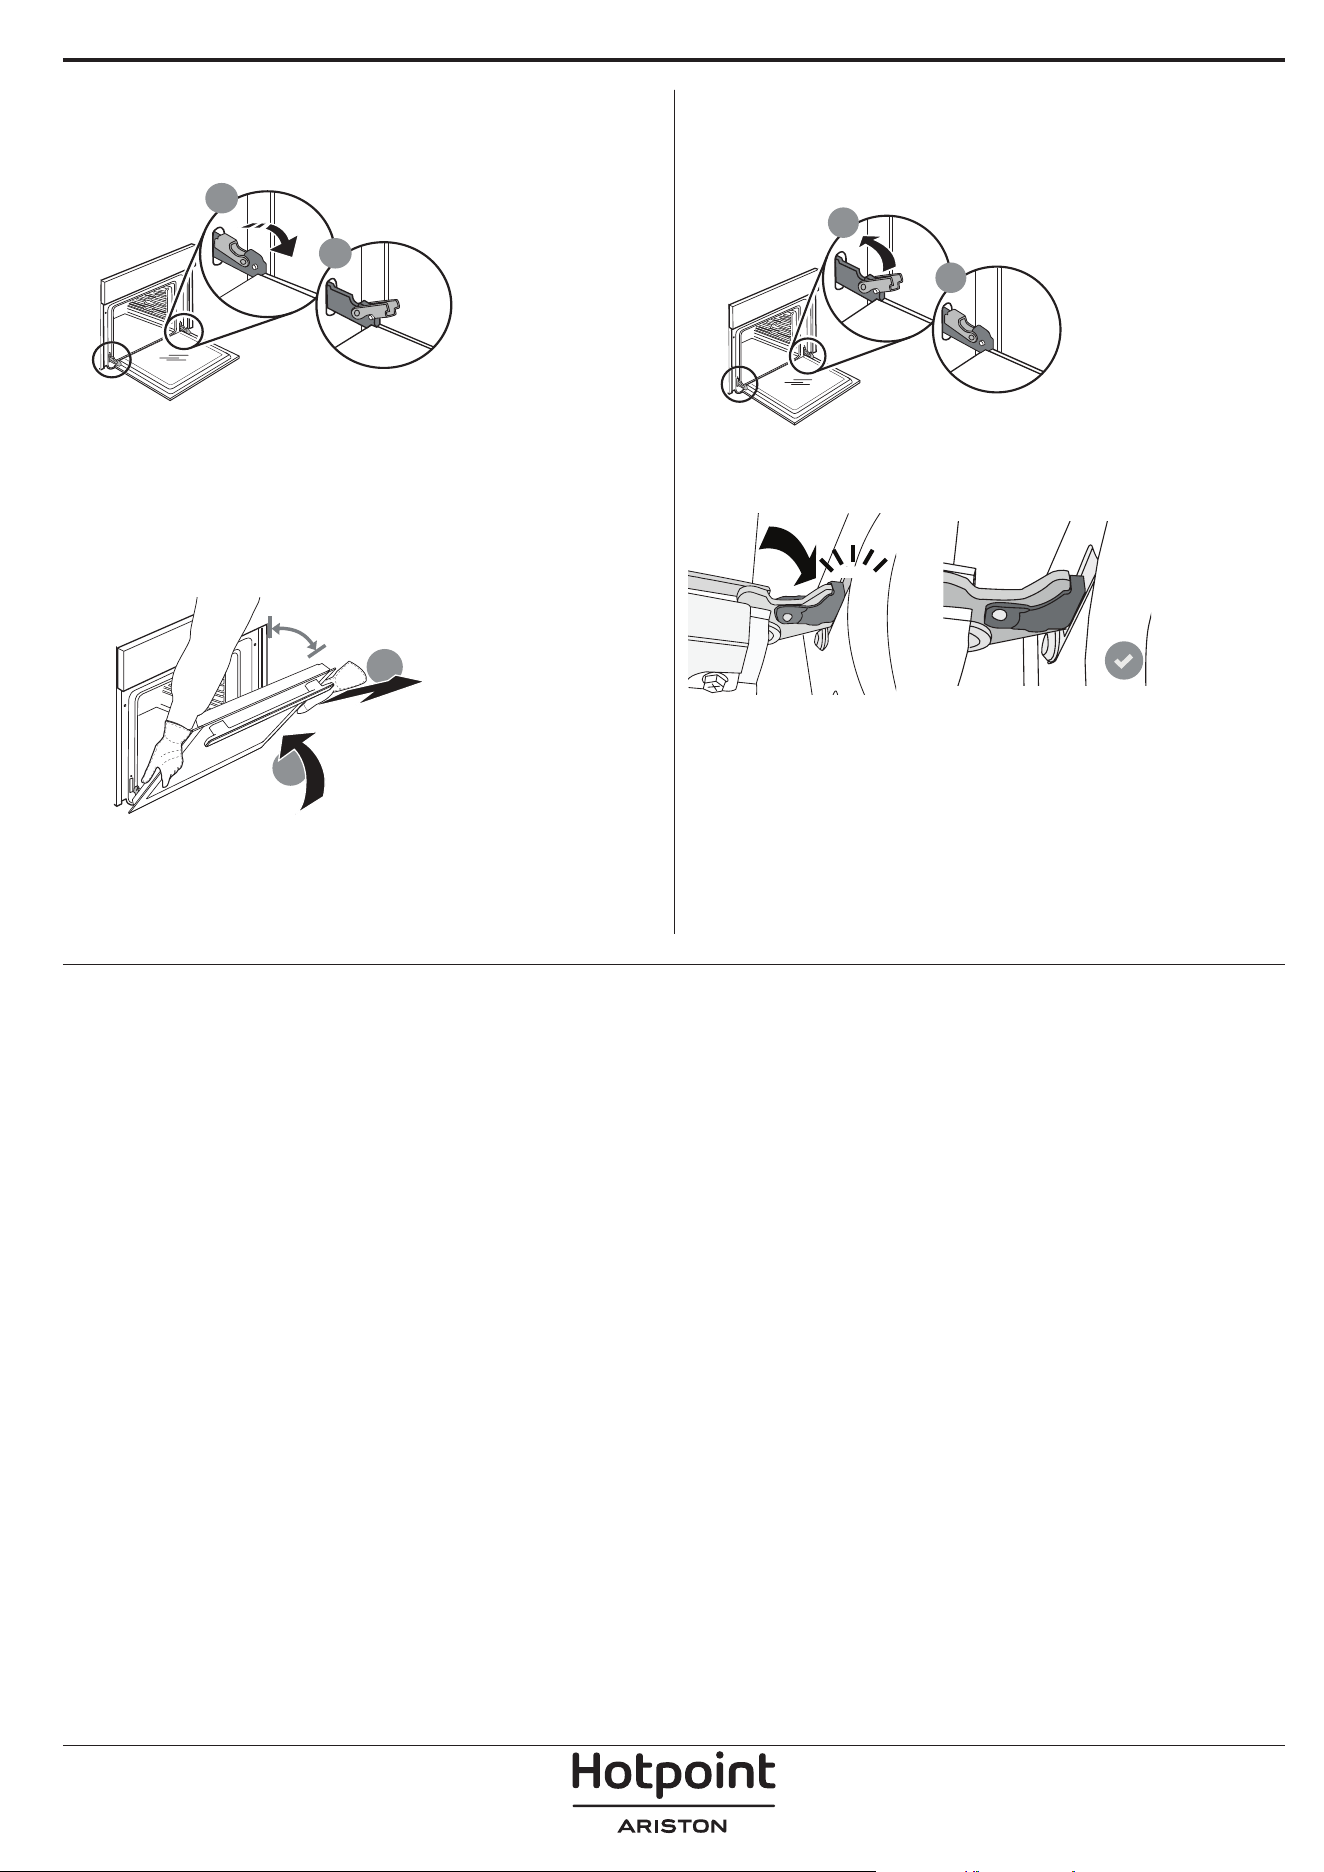
RIMOZIONE E MONTAGGIO DELLA PORTA
1. Per rimuovere la porta, aprirla completamente e
abbassare i fermi fino alla posizione di sblocco.
b
a
2. Chiudere la porta fino a quando è possibile.
Prendere saldamente la porta con entrambe le mani,
evitando di tenerla per la maniglia.
È sufficiente rimuovere la porta continuando a
chiuderla e tirandola contemporaneamente verso
l'alto, finché non si sgancia dalla propria sede. Togliere
la porta e appoggiarla su un piano morbido.
a
b
~15°
3. Per rimontare la porta, avvicinarla al forno
allineando i ganci delle cerniere alle proprie sedi e
ancorare la parte superiore agli alloggiamenti.
4. Abbassare la porta e poi aprirla completamente.
Abbassare i fermi nella posizione originale: fare
attenzione che siano completamente abbassati.
b
a
Sarà necessario applicare una leggera pressione per
assicurare il corretto posizionamento dei fermi.
“CLICK”
5. Provare a chiudere la porta, verificando che sia
allineata al pannello di controllo. Nel caso non lo
fosse, ripetere i passi sopra descritti: La porta
potrebbe danneggiarsi se non funziona
correttamente.
SOSTITUZIONE DELLA LAMPADINA
Per la sostituzione della lampadina, contattare il servizio assistenza.

Problema Possibile causa Soluzione
Il forno non funziona.
Interruzione di corrente
elettrica.
Disconnessione dalla rete
principale.
Verificare che ci sia tensione in rete e che il forno
sia collegato all'alimentazione elettrica.
Spegnere e riaccendere il forno e verificare se
l'inconveniente persiste.
Il display mostra la lettera "F"
seguita da un numero.
Problema software.
Contattare il Call Center e indicare il numero che
segue la lettera "F".
Il forno non si riscalda.
Se la modalità "DEMO" è
impostata su "On", tutti i
comandi sono operativi e i
menu sono disponibili ma il
forno non viene riscaldato.
Sul display appare la scritta
"DEMO" ogni 60 secondi.
Accedere a "DEMO" dal menu "IMPOSTAZIONI" e
scegliere "Off".
La luce si spegne.
La modalità "ECO" è
impostata su "On".
Accedere a "ECO" dal menu "IMPOSTAZIONI" e
scegliere "Off".
La porta non si chiude
correttamente.
I fermi di sicurezza si trovano
in posizione errata.
Verificare che i fermi di sicurezza siano in
posizione corretta facendo riferimento alle
istruzioni di rimozione e riapplicazione della porta
contenute nella sezione "Pulizia e manutenzione".
L'interruttore generale
dell'impianto domestico si
spegne.
La potenza dell'apparecchio
non è regolata
correttamente.
Verificare che la rete domestica abbia una portata
nominale di almeno 3 kW. In caso contrario,
ridurre la potenza a 13 Ampere. Selezionare
"POTENZA" dal menu "IMPOSTAZIONI" e scegliere
"BASSO".
Il ciclo di cottura con la sonda
è terminato senza una causa
evidente o l'errore F3E3 è
stampato sullo schermo
La sonda alimenti non è
collegata correttamente
La sonda alimenti non è collegata correttamente
RISOLUZIONE DEI PROBLEMI
Per le linee guida, la documentazione standard e altre informazioni sui prodotti:
• Utilizzare il QR sul proprio prodotto
• Visitare il nostro sito web docs . hotpoint. eu
• Oppure, contattare il Servizio Assistenza Tecnica (al numero di telefono riportato sul libretto di garanzia).
Prima di contattare il Servizio Assistenza Clienti, prepararsi a fornire i codici riportati sulla targhetta matricola
del prodotto.
400020004738
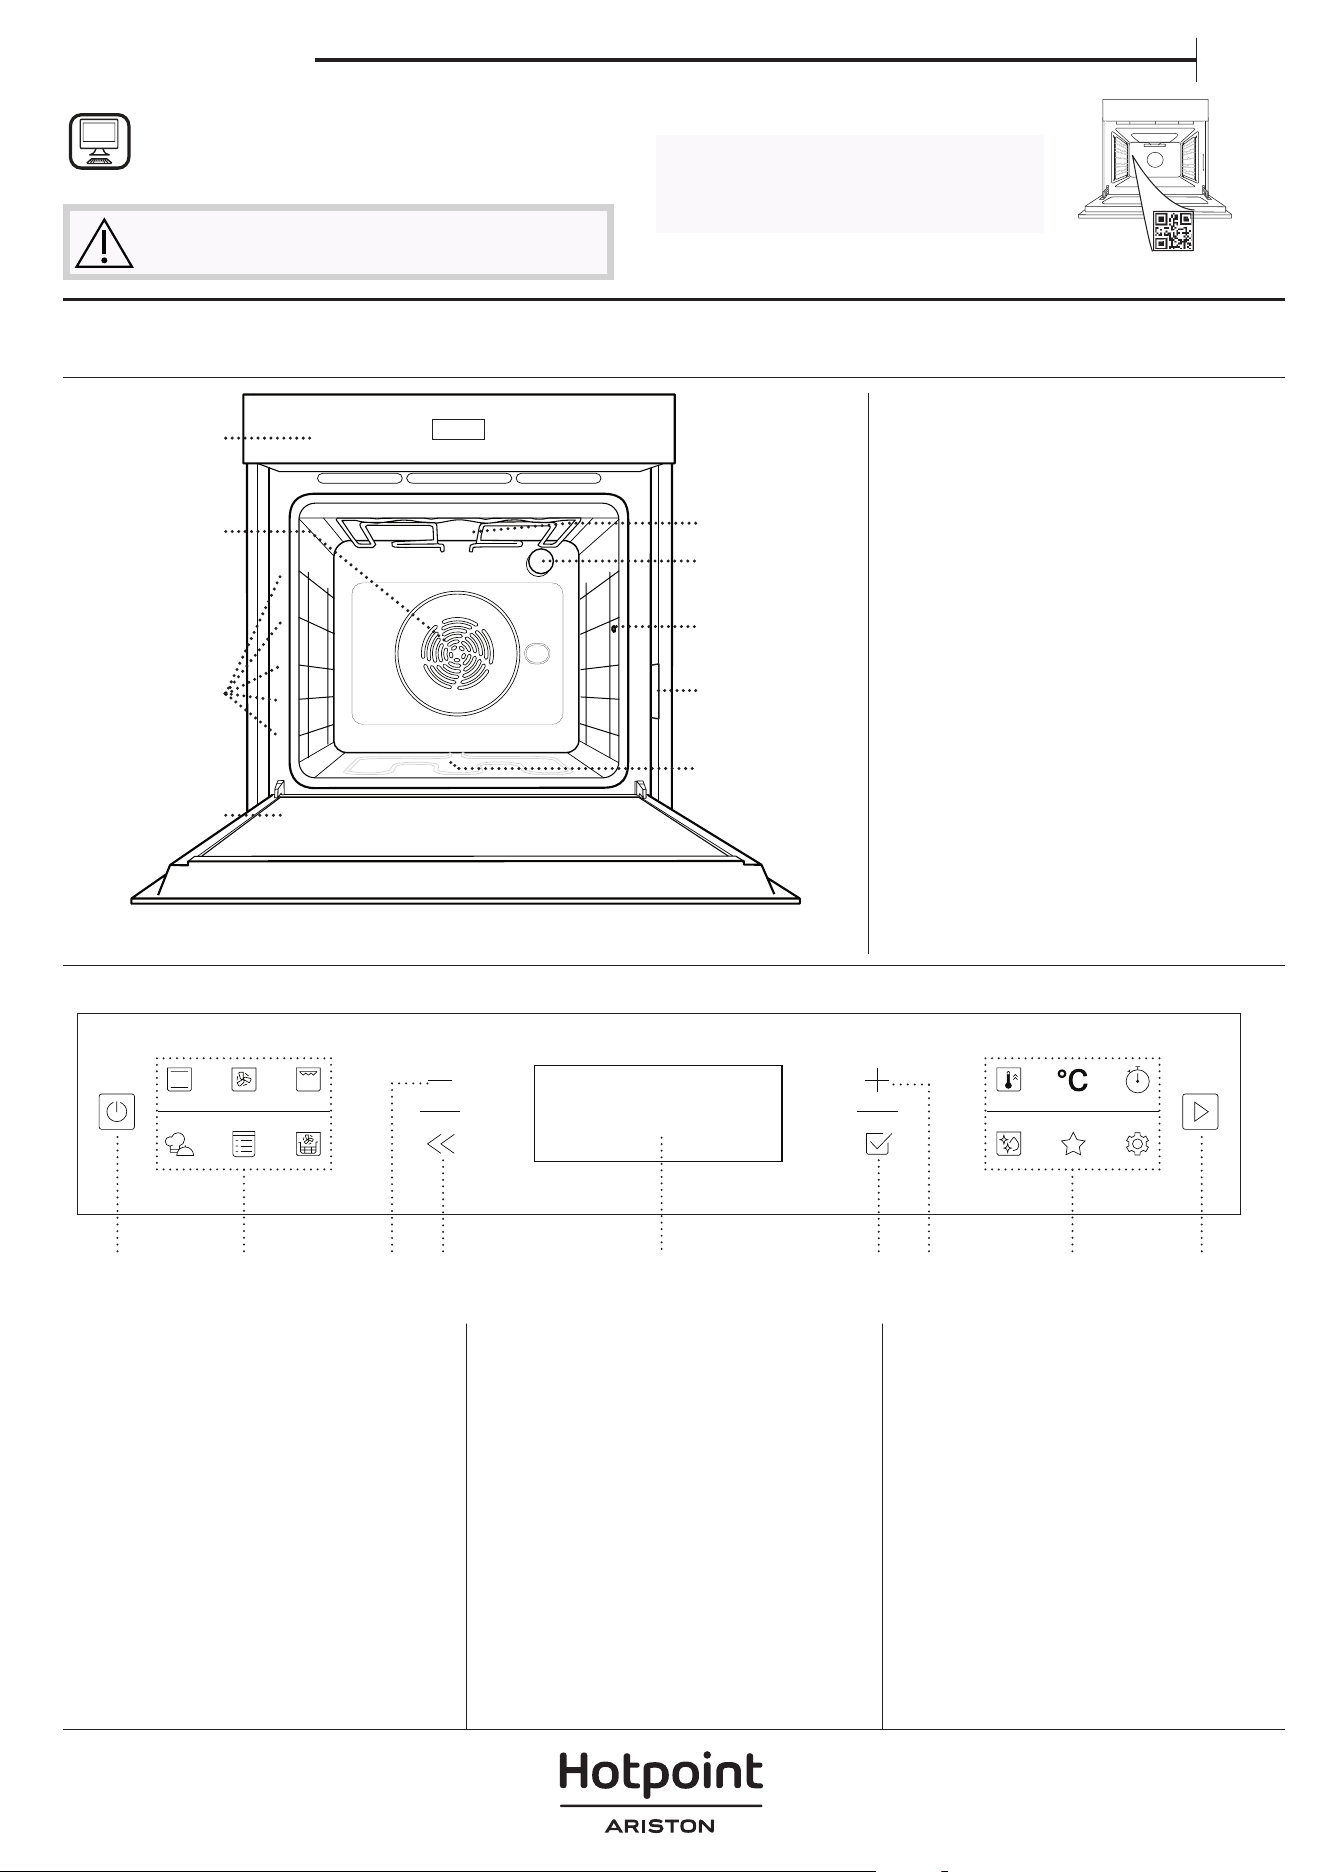
ES
Manual del usuario
GRACIAS POR COMPRAR UN PRODUCTO
HOTPOINT-ARISTON
Para recibir una asistencia más completa, registre su
producto en www . hotpoint. eu/ register
Antes de usar el aparato, lea atentamente las
Instrucciones de seguridad.
DESCRIPCIÓN DEL PRODUCTO
PANEL DE CONTROL
1. Panel de control
2. Ventilador y resistencia circular
(no visible)
3. Guías para estantes
(el nivel está indicado en la parte
frontal del horno)
4. Puerta
5. Resistencia superior / grill
6. Luz
7. Punto de inserción de la sonda
para carne
8. Placa de características
(no debe retirarse)
9. Resistencia inferior
(no visible)
1. ON / OFF
Sirve para encender o apagar el
horno, y para detener una función
activa.
2. ACCESO DIRECTO A LAS
FUNCIONES
Sirve para obtener acceso rápido a
las funciones y al menú.
3. BOTÓN DE NAVEGACIÓN
MENOS
Sirve para desplazarse por un
menú y reducir los ajustes o
valores de una función.
4. ATRÁS
Sirve para volver a la pantalla
anterior. Durante la cocción,
permite cambiar los ajustes.
5. PANTALLA
6. CONFIRMAR
Sirve para confirmar una función o
un valor seleccionados.
7. BOTÓN DE NAVEGACIÓN
MÁS
Sirve para desplazarse por un
menú e incrementar los ajustes o
valores de una función.
8. ACCESO DIRECTO A LAS
OPCIONES/FUNCIONES
Sirve para obtener acceso rápido
a las funciones, a la duración, a los
ajustes y a los favoritos.
9. INICIO
Para iniciar una función utilizando
la configuración específica o
básica.
5
4
3
2
1
5
4
3
2
1
1
2
3
4
7
9
6
5
ESCANEE EL CÓDIGO QR DE SU
APARATO PARA OBTENER MÁS
INFORMACIÓN
8
1 3 4 5 6 7 8 92
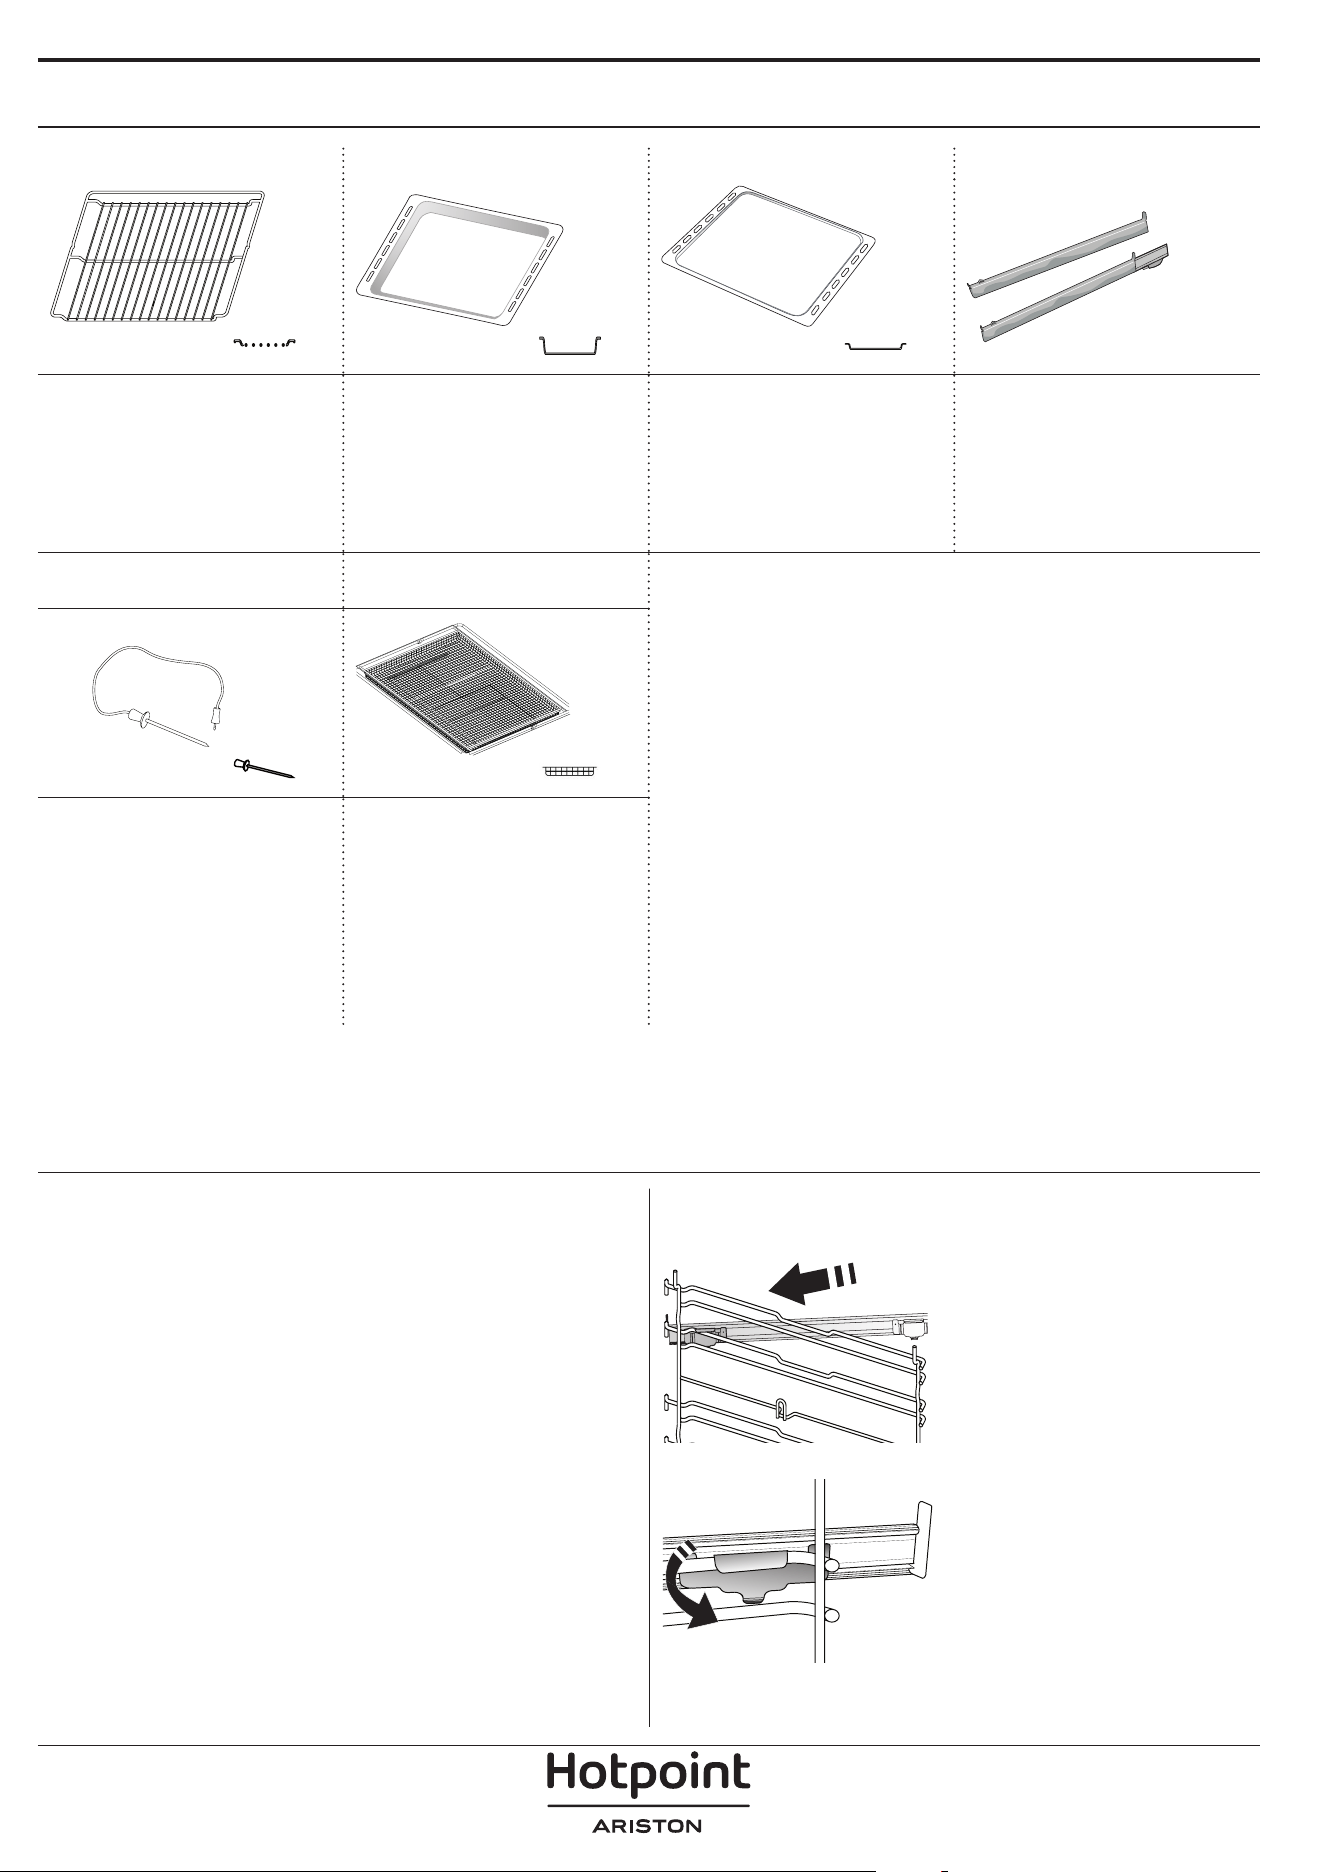
ACCESORIOS
REJILLA GRASERA BANDEJA PASTELERA * GUÍAS DESLIZANTES *
Para cocinar alimentos
o como soporte de
cazuelas, moldes de
tartas y otros recipientes
de cocción aptos para
horno.
Para utilizar como
bandeja de horno para
cocinar carne, pescado,
verduras, focaccia, etc. o
para recoger los jugos de
la cocción debajo de la
rejilla.
Se utiliza para la cocción
de pan y pasteles, pero
también para asados,
pescado en papillote, etc.
Para facilitar la inserción
y extracción de
accesorios.
SONDA DE CARNE*
BANDEJA FEIDORA DE
AIRE*
Para medir de forma
precisa la temperatura
del centro de los
alimentos durante la
cocción.
Para utilizar cuando se
cocinan alimentos con
la función Freidora de
aire, con una bandeja
de horno colocada a
un nivel inferior para
recoger posibles migas
y goteos. Se puede lavar
en el lavavajillas.
INTRODUCCIÓN DE LA PARRILLA Y OTROS
ACCESORIOS
Introduzca la rejilla horizontalmente deslizándola a
través de las guías y asegúrese de que el lado con el
borde en relieve queda mirando hacia arriba.
Otros accesorios, como la grasera y la bandeja
pastelera, se introducen horizontalmente igual que la
rejilla.
CÓMO EXTRAER Y VOLVER A COLOCAR LAS
GUÍAS PARA ESTANTES
• Para retirar las guías para estantes, levántelas y
saque las partes inferiores de sus alojamientos: Ahora
puede extraer las guías.
• Para volver a colocar las guías para estantes,
primero colóquelas en su alojamiento superior.
Manteniéndolas en alto, deslícelas en el
compartimento de cocción, y luego bájelas hasta
colocarlas en el alojamiento inferior.
MONTAJE DE LAS GUÍAS DESLIZANTES
Extraiga las guías para los
estantes del horno y quite el
plástico de protección de las
guías deslizantes.
Fije el cierre superior de la
corredera a la guía para los
estantes y deslícela hasta el
tope. Baje el otro clip a su
posición.
Para fijar la guía, empuje
la parte inferior del
cierre contra la guía para
estantes. Asegúrese de que
las guías se pueden mover
libremente. Repita estos
pasos en la otra guía para
estantes del mismo nivel.
Nota: Las guías deslizantes se pueden montar en cualquier
nivel.
El número y el tipo de accesorio puede variar dependiendo del modelo comprado.
Otros accesorios pueden adquirirse por separado; para pedidos e información, póngase en contacto con el servicio
posventa.
* Disponible solo en determinados modelos
FUNCIONES
CONVENCIONAL
Para cocinar cualquier tipo de alimento en un estante.
AIRE FORZADO
Para hacer diferentes alimentos que requieren la
misma temperatura de cocción en varios niveles
(máximo tres) al mismo tiempo. Esta función puede
utilizarse para cocinar diferentes alimentos sin que se
mezclen los olores.
GRILL
Para asar al grill filetes, pinchos morunos y salchichas,
cocinar verduras gratinadas o tostar pan. Cuando ase
carne, le recomendamos colocar la grasera debajo
para recoger los jugos de la cocción: Coloque la
bandeja en cualquiera de los niveles debajo de la
rejilla y añada 500 ml de agua potable.
MY MENU
Permiten una cocción completamente automática
para todo tipo de platos (Lasaña, Carne, Pescado,
Verduras, Tartas y pasteles dulces, Tartas saladas, Pan
o Pizza). Para sacar el máximo rendimiento a esta
función, siga las indicaciones de la tabla de cocción
correspondiente.
FUNCIONES MANUALES
• HORNO CONVECC.
Para cocinar cualquier tipo de alimento en un
estante.
• MENÚ MULTIFLOW
Para cocinar diferentes tipos de alimentos que
requieran la misma temperatura de cocción en
cuatro estantes distintos al mismo tiempo. Esta
función puede utilizarse para hornear galletas,
tartas, pizzas redondas (también congeladas) y
para preparar un menú completo. Siga la tabla de
cocción para obtener los mejores resultados.
• TURBO GRILL
Para asar piezas de carne grandes (pierna de
cordero, rosbif, pollo). Le recomendamos utilizar
la grasera para recoger los jugos de la cocción:
Coloque el recipiente en cualquiera de los niveles
debajo de la rejilla y añada 500 ml de agua
potable.
• HORNEAR CONG.
Esta función selecciona automáticamente la
temperatura y el modo de cocción ideal para
5 tipos diferentes de alimentos congelados
preparados. No es necesario precalentar el horno.
• FUNCIONES ESPECIALES
» PIZZA
Esta función le permite cocinar una estupenda
pizza casera en menos de 10 minutos, como en
un restaurante.
El ciclo de cocción específico funciona a una
temperatura superior a 300 grados Celsius,
proporcionando una pizza suave por dentro,
crujiente por los bordes y con un dorado
perfectamente uniforme. Combinando esta
función con el accesorio Piedra para Pizza
WPro y precalentando durante 30 minutos
se puede hornear una pizza en 5-8 min. (Para
pedidos e información contacte con el servicio
postventa o www.hotpoint.eu.)
» FERMENTAR MASA
Para optimizar la fermentación de masas
dulces o saladas. Para garantizar la calidad del
leudado, no active la función si el horno está
caliente después de un ciclo de cocción.
» MANT. CALIENTE
Para mantener calientes y crujientes los
alimentos recién cocinados.
» DESCONGELAR
Para acelerar la descongelación de los
alimentos. Se recomienda colocar los
alimentos en el estante central. Además, se
recomienda dejar los alimentos en su envase
para evitar que se sequen por fuera.
» CICLO ECO
Para cocinar piezas de carne asadas con
relleno y filetes de carne en un solo estante.
Cuando se utiliza el Ciclo Eco, la luz permanece
apagada durante la cocción. Para utilizar el
ciclo ECO y optimizar el consumo de energía,
la puerta del horno no se debe abrir hasta que
termine la cocción.
» MAXI-COCCIÓN
Esta función selecciona automáticamente la
mejor forma de cocción y temperatura para
cocinar una gran cantidad de carne (más de
2,5 kg). Se recomienda dar la vuelta a la carne
durante la cocción para obtener un gratinado
homogéneo por ambos lados. Se recomienda
untar la carne periódicamente con su propio
jugo para que no se seque en exceso.
• COCCIÓN LENTA
Para cocinar carne y pescado lentamente. Esta
función cocina los alimentos lentamente para
mantenerlos tiernos y suculentos. Gracias a la
temperatura baja, los alimentos no se doran por
fuera y el resultado es similar al de la cocción al
vapor. Le recomendamos dorar antes la carne
en una sartén para sellarla y evitar que se salgan
los jugos. Para obtener los mejores resultados,
mantenga la puerta del horno cerrada durante la
cocción para evitar que el calor se disperse. Los
rangos de tiempo de cocción sugeridos para el
pescado (entre 300 g y 3 kg) van de las 2 a las 5
horas, y para la carne (entre 1 y 3 kg) van de las 4 a
las 7 horas.
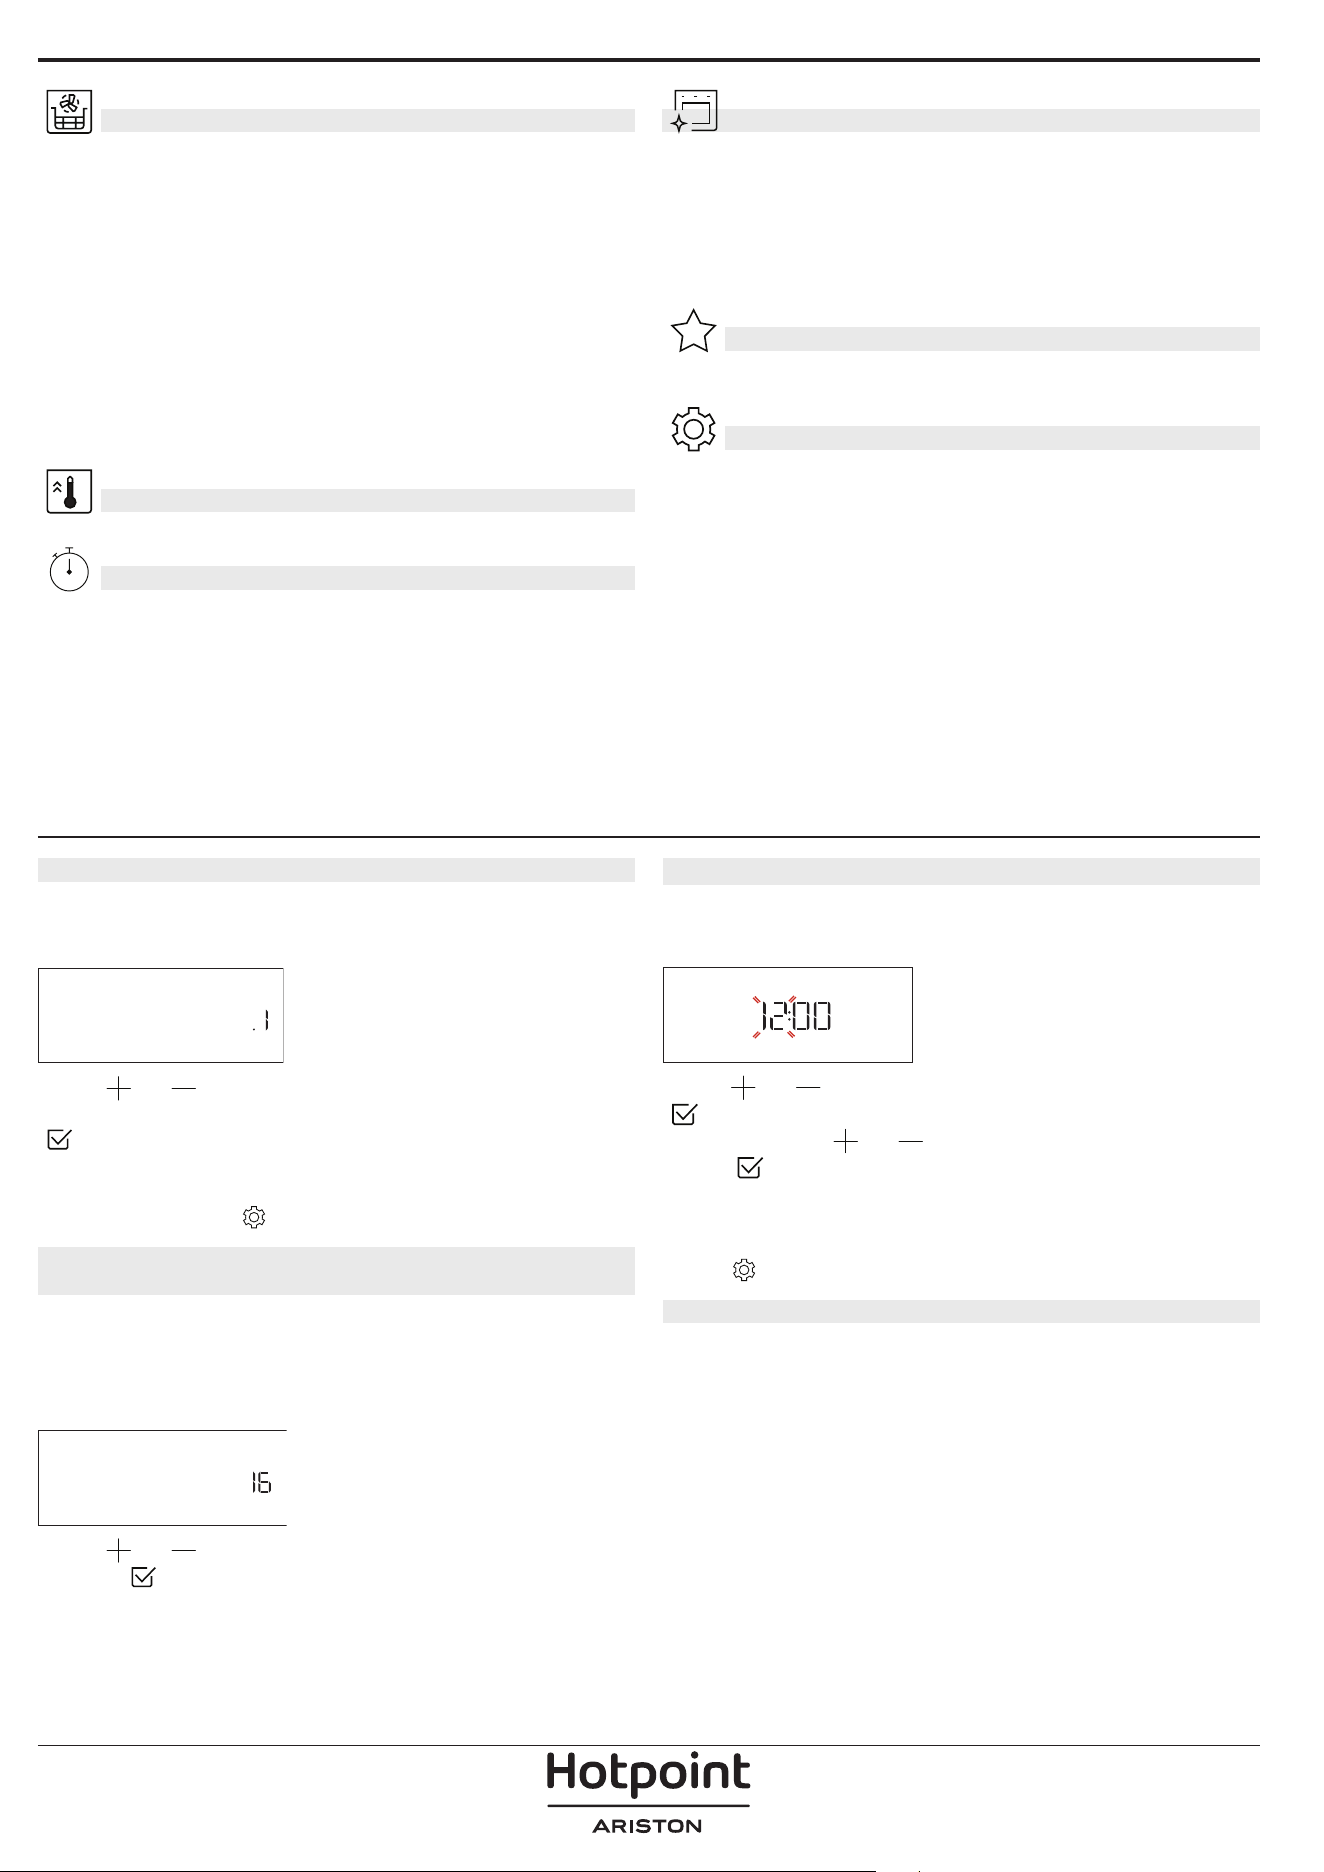
FREIDORA DE AIRE
Esta función le permite cocinar patatas fritas,
nuggets de pollo y mucho más utilizando menos
aceite, lo que resulta agradablemente crujiente. Los
elementos calefactores realizan un ciclo para calentar
adecuadamente la cavidad, mientras el ventilador
hace circular el aire caliente. Los mejores resultados
de cocción sólo se consiguen utilizando una bandeja
Freidora de aire (suministrada con algunos modelos).
Coloque los alimentos en la bandeja Freidora de
aire de la Freidora de aire para obtener los mejores
resultados. Evite utilizar más de una bandeja para
evitar una cocción desigual.
PRECALEN. RÁPIDO
Para precalentar el horno rápidamente.
TEMPORIZADOR
Para controlar el tiempo sin activar una función.
DIAMOND CLEAN
La acción del vapor liberado durante este ciclo
especial de limpieza a baja temperatura permite
eliminar la suciedad y los residuos de alimentos con
facilidad. Vierta 200ml de agua potable en el fondo
del horno y active la función únicamente cuando el
horno esté frío.
FAVORITOS
Para recuperar la lista de las 10 funciones favoritas.
AJUSTES
Para establecer los ajustes del horno. Cuando el modo
«ECO» está activado, se reduce el brillo de la pantalla
para ahorrar energía y la lámpara se apaga al cabo
de 1 minuto. Se volverá a activar automáticamente
al pulsar cualquier botón. Cuando «DEMO» está
establecido en «On» , todos los mandos están activos
y los menús disponibles, pero el horno no se calienta.
Para desactivar este modo, acceda a «DEMO» desde el
menú de «AJUSTES» y seleccione «Off». Si selecciona
«RES. AJUSTE FAB.», el producto se apagará y después
volverá a su puesta en marcha por primera vez. Se
borrarán todos los ajustes.
PRIMER USO
1. SELECCIONE EL IDIOMA
La primera vez que encienda el aparato, tendrá que
seleccionar el idioma y ajustar la hora: La pantalla
mostrará «Español».
ESPAÑOL
Pulse o para desplazarse por la lista de
idiomas disponibles y seleccione el que desee. Pulse
para confirmar la selección.
Nota: El idioma puede cambiarse posteriormente
seleccionando «IDIOMA» en el menú de «AJUSTES», que está
disponible al pulsar
2. CONFIGURACIÓN DEL CONSUMO DE
POTENCIA
El horno está programado para consumir un nivel
de potencia eléctrica compatible con el de una red
doméstica que tenga una potencia superior a 3 kW
(16): Si su hogar tiene menos potencia, deberá reducir
este valor (13).
POTENCIA
Pulse o para seleccionar 16 «Alto» o 13 «Bajo»
y pulse
para confirmar.
3. CÓMO CONFIGURAR LA HORA
Después de seleccionar el idioma, tendrá que
configurar la hora actual: En la pantalla parpadean las
dos cifras de la hora.
RELOJ
Pulse o para ajustar la hora correcta y pulse
: En la pantalla parpadean las dos cifras de los
minutos. Pulse
o para ajustar los minutos y
pulse
para confirmar.
Nota: Después de un corte de suministro prolongado, es
posible que tenga que volver congurar la hora. Seleccione
«RELOJ» en el menú de «AJUSTES», que está disponible al
pulsar
4. CALENTAR EL HORNO
Un horno nuevo puede liberar olores que se han
quedado impregnados durante la fabricación: Es
completamente normal.
Antes de empezar a cocinar, le recomendamos
calentar el horno en vacío para eliminar cualquier
olor.
Quite todos los cartones de protección o el
film transparente del horno y saque todos los
accesorios de su interior. Caliente el horno a 200°C
aproximadamente durante una hora, preferiblemente
utilizando la función con circulación del aire (p. ej.
«Aire forzado» u «Horno de Convección»).
Nota: Es aconsejable ventilar la habitación después de usar el
aparato por primera vez.
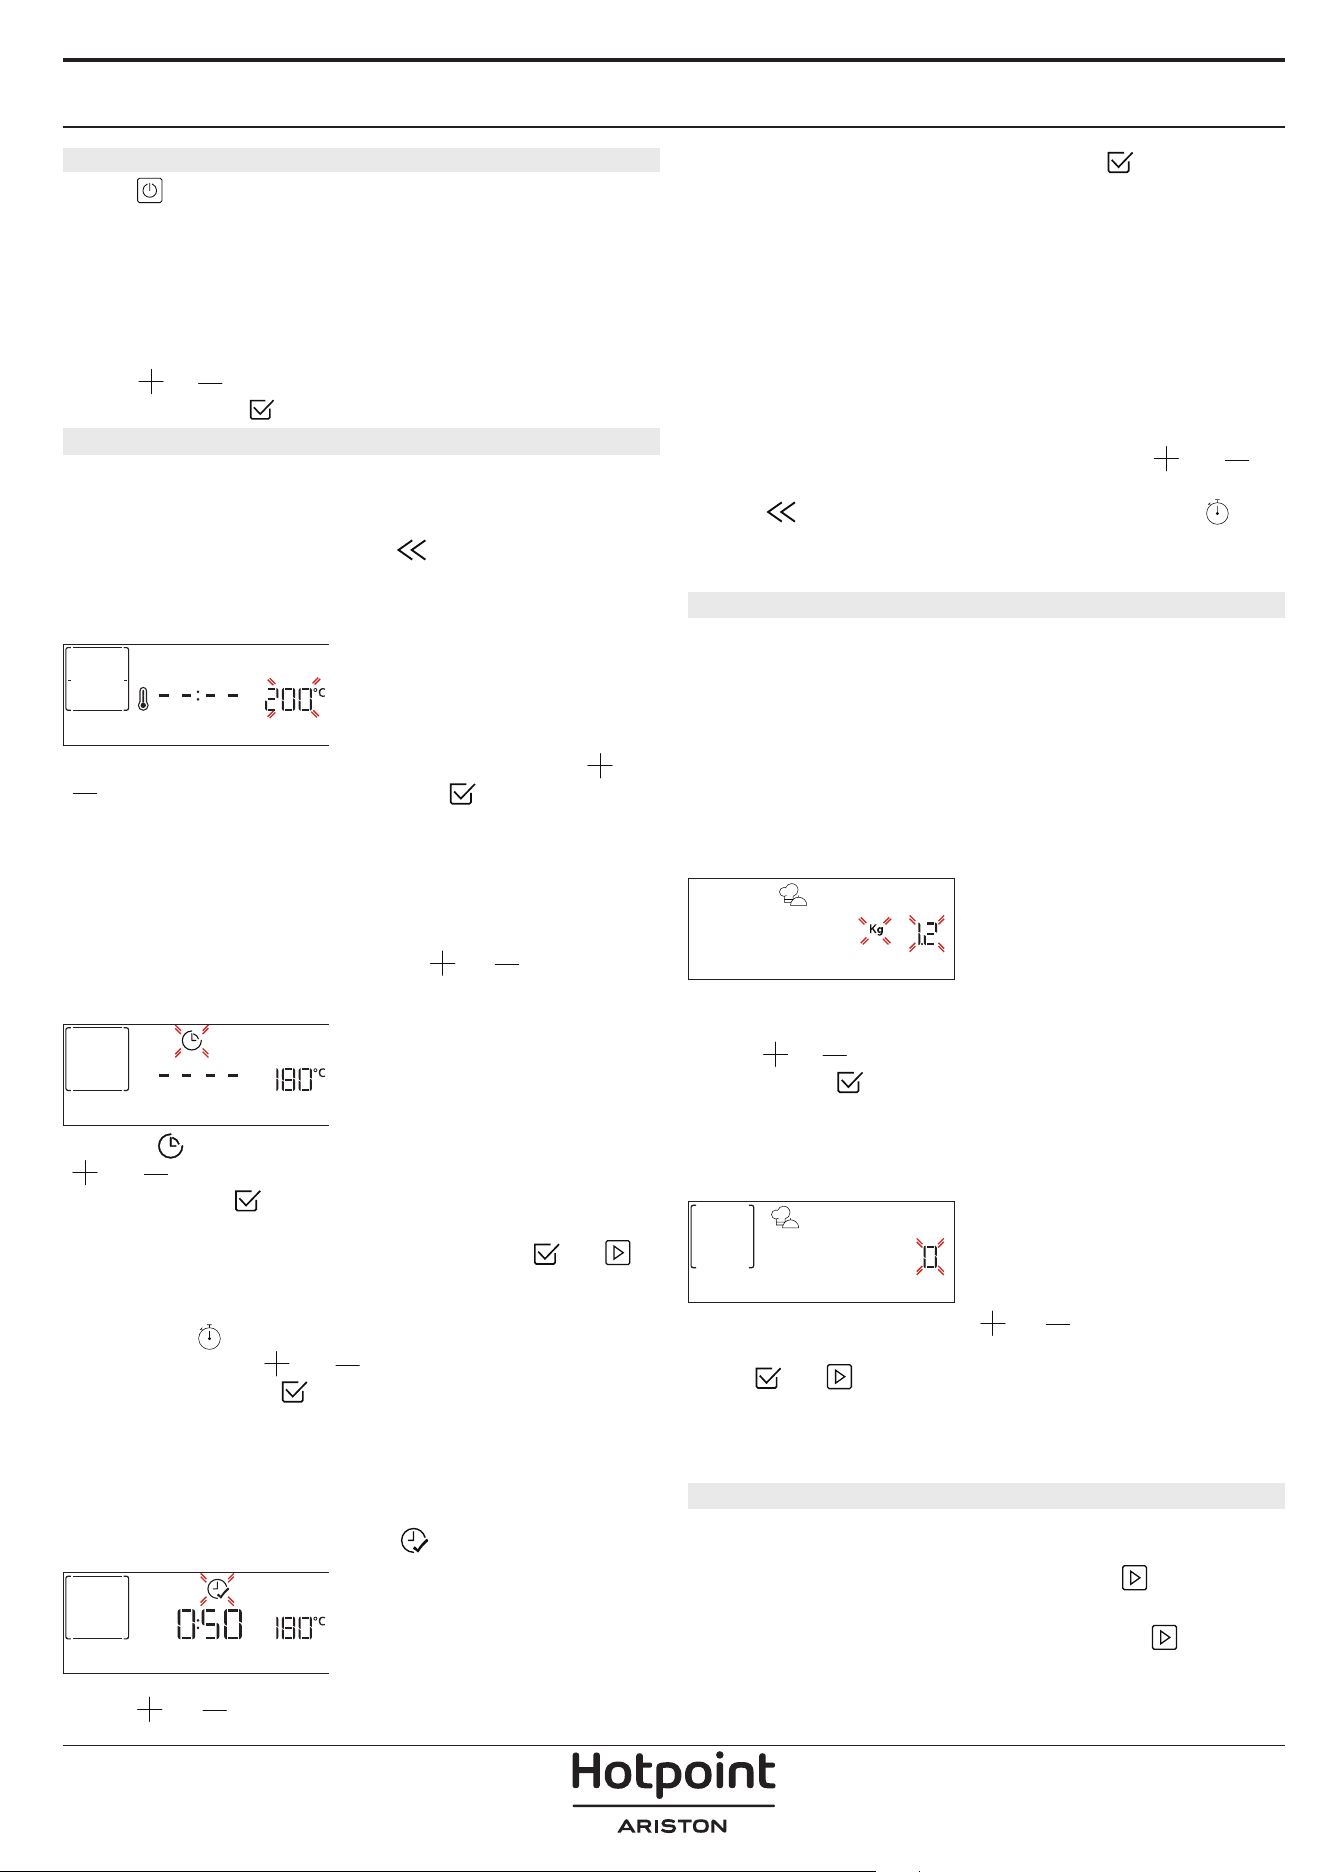
USO DIARIO
1. SELECCIONAR UNA FUNCIÓN
Pulse para encender el horno: la pantalla
mostrará la última función principal en curso o el
menú principal.
Puede seleccionar las funciones pulsando el icono
de una de las funciones principales o desplazándose
por el menú: Para seleccionar un elemento del menú
(la pantalla mostrará el primer elemento disponible),
pulse
o para seleccionar el elemento deseado
y después pulse
para confirmar.
2. AJUSTAR LA FUNCIÓN
Cuando haya seleccionado la función que desee,
puede cambiar la configuración correspondiente. En
la pantalla aparecerá la configuración que se puede
cambiar por orden. Pulsando
puede volver a
cambiar el ajuste anterior.
TEMPERATURA / NIVEL DEL GRILL
TEMPERATURA
Cuando el valor parpadee en la pantalla, pulse o
para cambiarlo, después pulse para confirmar
y continuar con los ajustes siguientes (si es posible).
Del mismo modo puede ajustar el nivel del grill:
Existen tres niveles de potencia para el grill: 3 (alta), 2
(media), 1 (baja).
Nota: Una vez activada la función, se puede cambiar la
temperatura o el nivel del grill con
o .
DURACIÓN
DURACIÓN
Cuando parpadee el icono en la pantalla, pulse
o para ajustar el tiempo de cocción necesario
y, luego, pulse
para confirmar. Si quiere cocinar
de forma manual no es necesario configurar el tiempo
de cocción (sin tiempo programado: Pulse
o
para confirmar y activar la función. Si selecciona este
modo no puede programar un inicio diferido.
Nota: Pulse
para ajustar el tiempo de cocción
establecido: pulse
o para modificarlo y, a
continuación, pulse
para confirmar.
HORA DE FINALIZACIÓN (INICIO DIFERIDO)
En muchas funciones, una vez configurado el tiempo
de cocción, podrá retrasar el inicio de la función
programando el tiempo final. La pantalla muestra
tiempo final mientras elicono
parpadea.
HORA DE FINALIZA
Pulse o para ajustar la hora a la que desea
que finalice la cocción y, luego, pulse para
confirmar y activar la función. Coloque los alimentos
en el horno y cierre la puerta: Esta función se iniciará
automáticamente cuando haya transcurrido el
periodo de tiempo calculado para que la cocción
termine a la hora programada.
Nota: Programar una cocción con inicio diferido
deshabilitará la fase de precalentado del horno: el
horno alcanzará la temperatura deseada de forma
gradual, con lo que los tiempos de cocción serán
ligeramente mayores que los de la tabla de cocción.
Durante el tiempo de espera, puede pulsar
o
para modificar la hora de finalización programada o
pulsar
para modificar otros ajustes. Si pulsa
para ver la información, puede cambiar entre el tiempo
final y la duración.
. MY MENU
Estas funciones seleccionan de forma automática el
mejor modo de cocción y la mejor la temperatura y
duración para cocinar, asar u hornear todos los platos
disponibles.
Cuando sea necesario, indique simplemente la
característica del alimento para obtener un resultado
óptimo.
PESO / ALTURA (NIVEL DE BANDEJAS
REDONDAS)
KILOGRAMOS
Para configurar la función correctamente, siga las
indicaciones en la pantalla cuando se muestren y
pulse
o para establecer el valor deseado y,
luego, pulse
para confirmar.
PUNTO DE COCCIÓN / GRATINAR
En algunas funciones de MyMenu es posible ajustar el
nivel de cocción.
PUNTO DE COCCIÓN
Cuando se indique, pulse o para seleccionar el
nivel deseado entre poco hecho (-1) y muy hecho (+1).
Pulse
o para confirmar y activar la función.
Del mismo modo, cuando sea posible, en algunas
funciones de MyMenu puede ajustarse el nivel de
gratinado entre bajo (-1) y alto (+1).
3. INICIO DE LA FUNCIÓN
En cualquier momento, si los valores
predeterminados son los deseados o una vez
aplicados los ajustes que desea, pulse
para
activar la función.
Durante la fase de inicio diferido, si pulsa
el
horno le preguntará si desea omitir esta fase e iniciar
la función inmediatamente.
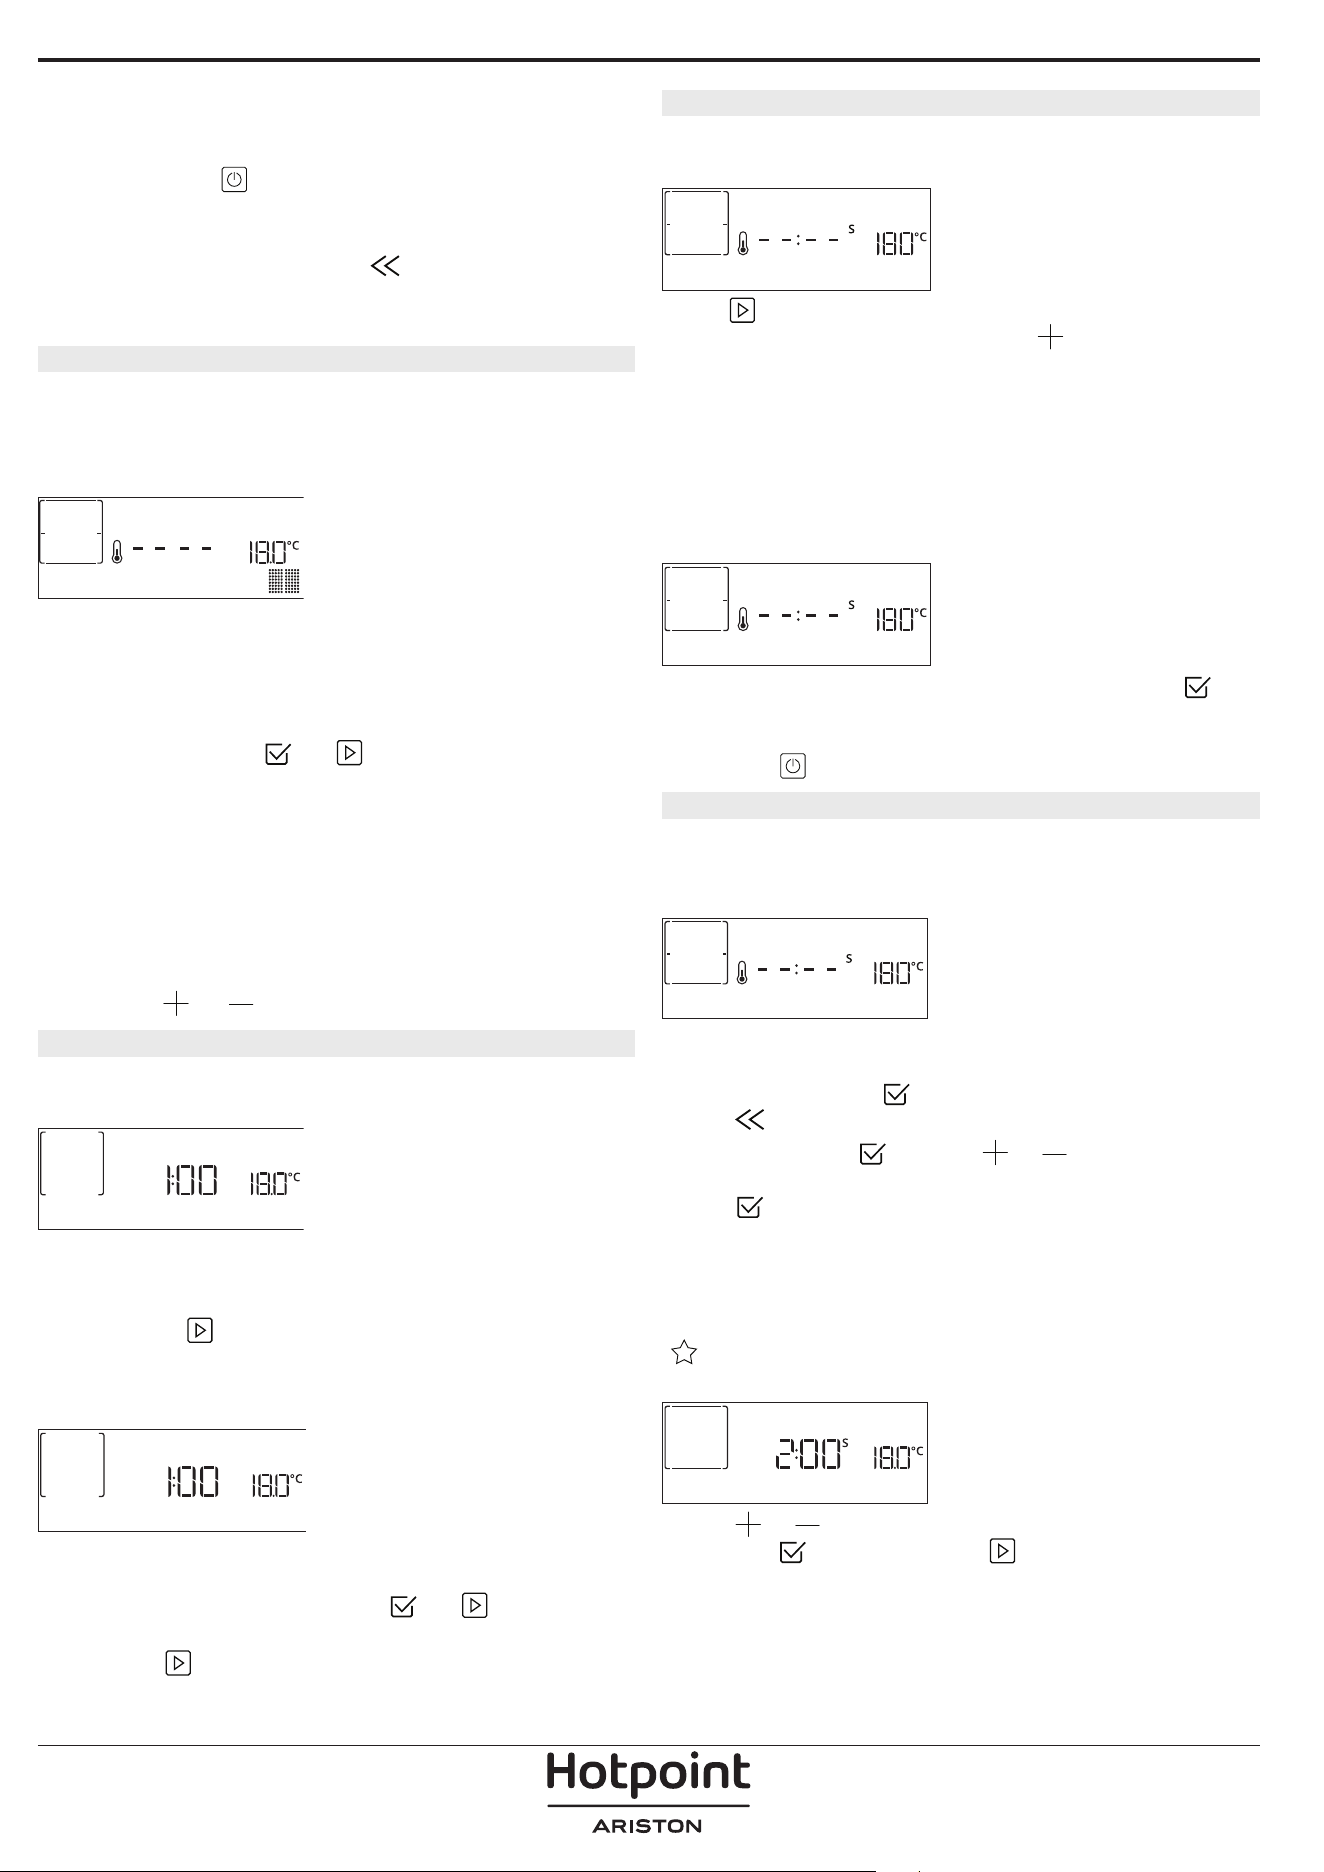
Nota: Una vez seleccionada una función, la pantalla
recomendará el nivel más adecuado para cada función.
En cualquier momento puede detener una función
activa pulsando
.
Si el horno está caliente y la función requiere una
temperatura máxima específica, se mostrará un
mensaje en la pantalla. Pulse
para volver a la
pantalla anterior y seleccionar una función distinta o
espere a que se enfríe por completo.
4. PRECALENTAMIENTO
Algunas funciones incluyen una fase de
precalentamiento de horno: Una vez iniciada la
función, la pantalla indica que se ha activado la fase
de precalentado.
PRECALENTAMIENTO
Cuando el precalentamiento haya terminado, sonará
una señal acústica y la pantalla indicará que el horno
ha alcanzado la temperatura establecida y le pedirá
«AÑADIR ALIMENTO». En ese momento, abra la puerta,
coloque los alimentos en el horno y cierre para iniciar
la cocción pulsando
o .
Nota: Colocar los alimentos en el horno antes de que
haya finalizado el precalentado puede tener efectos
adversos en el resultado final de la cocción. Abrir la
puerta durante la fase de precalentado pausará el
proceso.
El tiempo de cocción no incluye la fase de
precalentamiento. Siempre puede cambiar la
temperatura que desea que alcance el horno
utilizando
o .
5. DAR LA VUELTA O COMPROBAR EL ALIMENTO
Algunas funciones de MyMenu requerirán que se gire
el alimento durante la cocción.
GIRAR ALIMENTO
Se emitirá una señal acústica y la pantalla indicará las
acciones que deberá realizar. Abra la puerta, realice
la acción indicada en la pantalla, cierre la puerta y,
luego, pulse
para seguir con la cocción.
Del mismo modo, cuando haya pasado el 10%
del tiempo de la cocción el horno le solicitará que
compruebe el estado de la comida.
COMPRUEBE ALIMENTOS
Se emitirá una señal acústica y la pantalla indicará
las acciones que deberá realizar. Compruebe la
comida, cierre la puerta y pulse
o para seguir
cocinando.
Nota: Pulse
para omitir estas acciones. Por otro lado,
si no se realiza ninguna acción pasado un tiempo, el
horno continuará con la cocción.
6. FINAL DE COCCIÓN
Sonará una señal acústica y la pantalla indicará que la
cocción ha terminado.
FIN
Pulse para seguir cocinando en modo manual
(sin tiempo programado) o pulse
para alargar el
tiempo de cocción configurando una nueva duración.
En ambos casos, los parámetros de cocción se
mantendrán.
GRATINAR
Algunas funciones del honro le permiten gratinar la
superficie de los alimentos activando el grill una vez
finalizada la cocción.
PULSE v P. DORAR
Cuando la pantalla lo indique, si lo desea pulse
para iniciar un ciclo de gratinado de cinco minutos.
Puede detener la función en cualquier momento
pulsando
para apagar el horno.
8. FAVORITOS
Una vez completada la cocción, la pantalla le indicará
que guarde la función asignándole un número del 1
al 10 en su lista de favoritos.
¿AÑAD. FAVORITO?
Si desea guardar una función como favorita y
memorizar los ajustes actuales para el futuro,
mantenga pulsado
; si desea ignorar la solicitud,
pulse
.
Una vez pulsado
, pulse o para
seleccionar la posición del número y, a continuación,
pulse
para confirmar.
Nota: Si la memoria está llena o si él número
seleccionado ya está ocupado, el horno le solicitará la
confirmación para sobrescribir la función anterior.
Para activar las últimas funciones guardadas, pulse
: La pantalla mostrará una lista de sus funciones
favoritas.
1. CONVENCIONAL
Pulse o para seleccionar la función, confirme
pulsando
, y luego pulse para activarla.
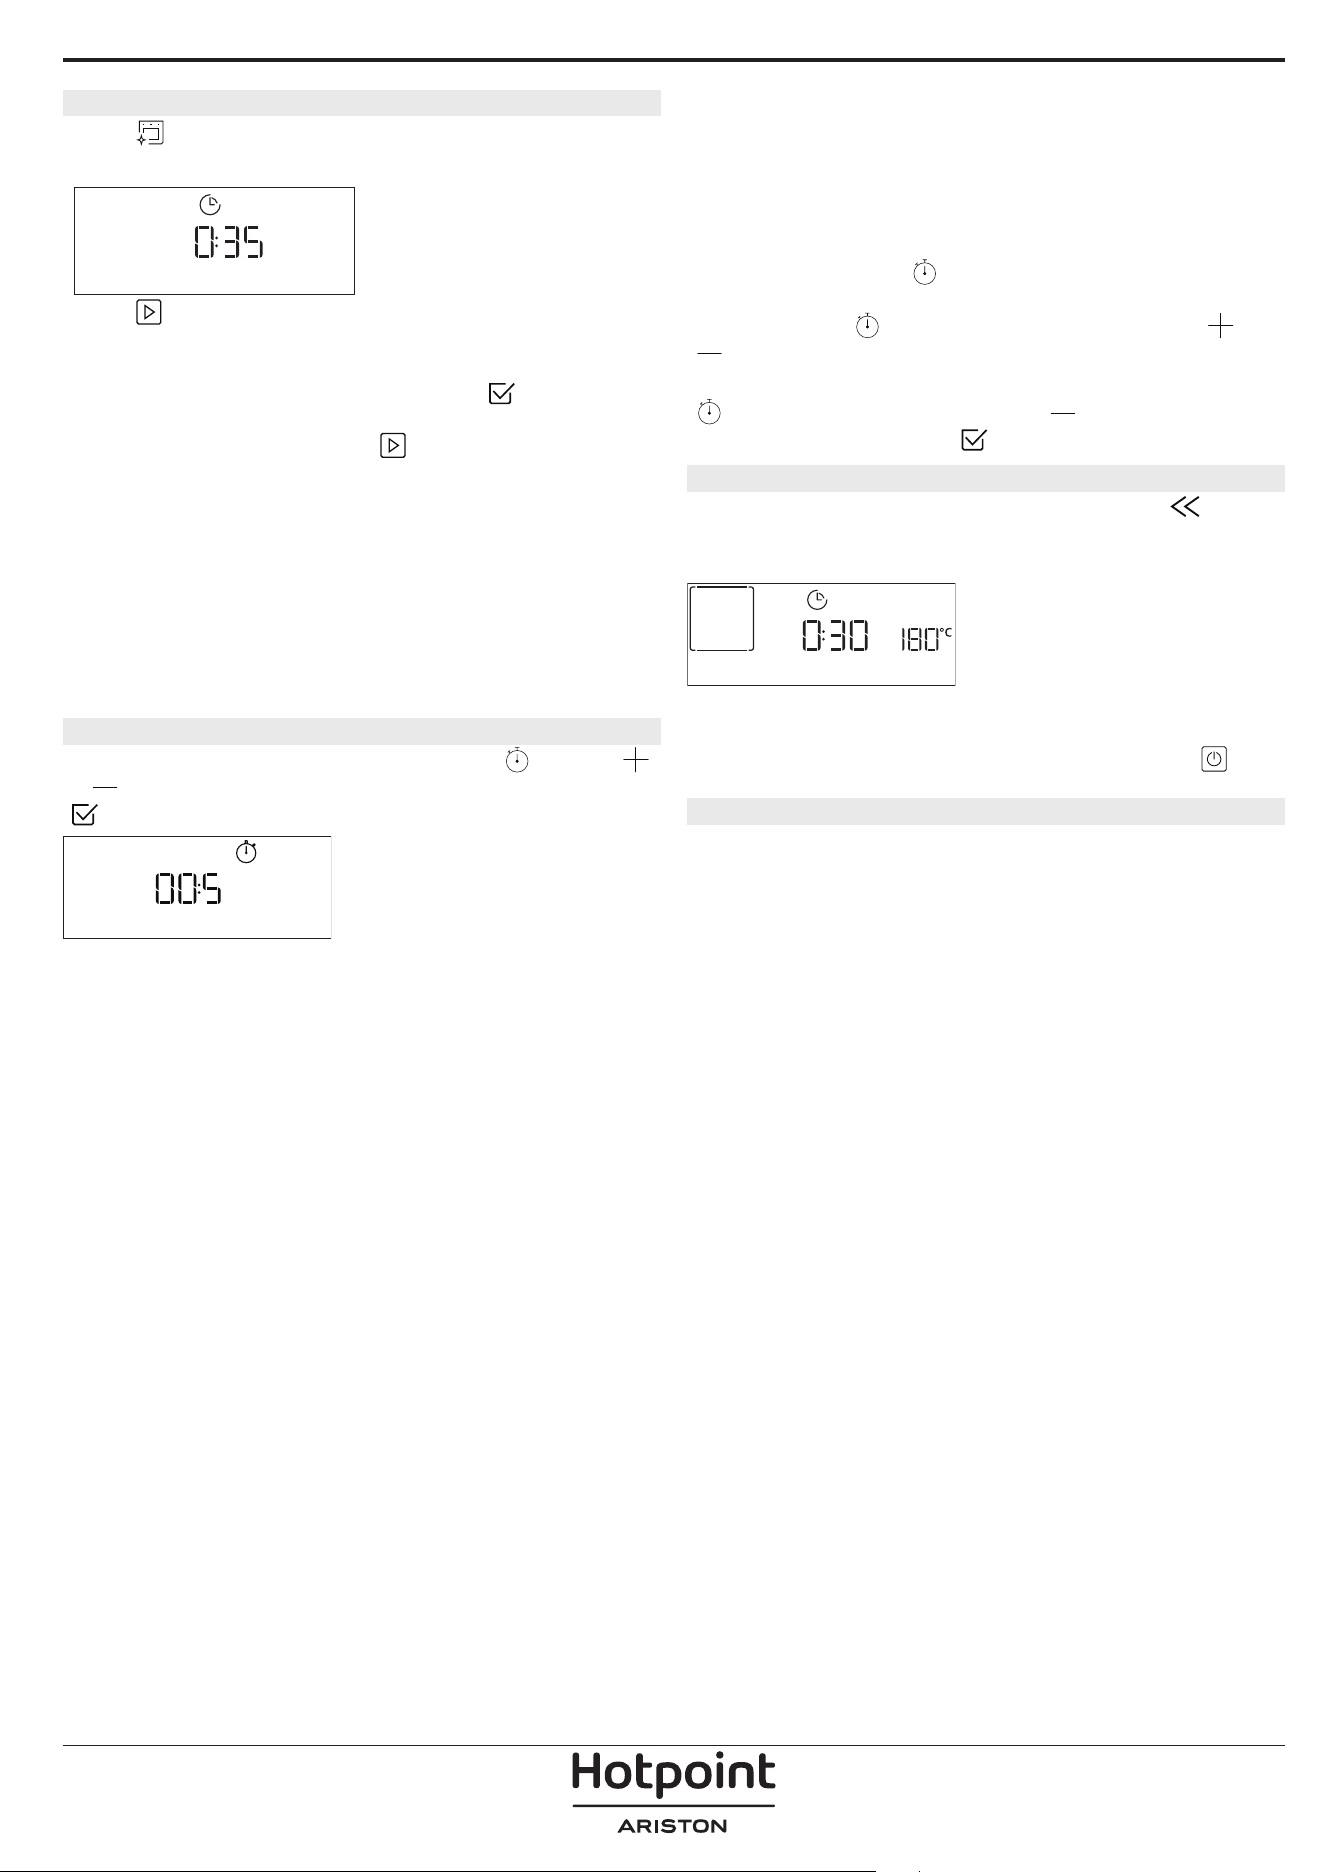
9. DIAMOND CLEAN
Pulse para mostrar "Diamond Clean" en la
pantalla.
Diamond clean
Pulse para activar la función: la pantalla le
indicará que realice todas las acciones necesarias
para obtener los mejores resultados de limpieza:
Siga las indicaciones y después pulse
cuando
haya acabado. Una vez realizados todos los pasos,
cuando sea necesario pulse
para activar el ciclo de
limpieza.
Nota: Recomendamos no abrir la puerta del horno
durante el ciclo de limpieza para evitar la pérdida de
vapor de agua, ya que esto podría afectar de forma
negativa al resultado final de la limpieza.
Cuando termine el ciclo, un mensaje parpadeará en la
pantalla. Deje que se enfríe el horno y, a continuación,
limpie y seque las supercies interiores con un paño o
una esponja.
. TEMPORIZADOR
Para activar esta función, pulse el icono . Pulse
o para seleccionar el tiempo que necesita y pulse
para activar el temporizador.
TEMPORIZADOR
Una vez que el temporizador haya nalizado la cuenta
atrás del tiempo seleccionado sonará una señal
acústica y la pantalla lo indicará.
Nota: El temporizador no activa ninguno de los ciclos de
cocción.
El minutero puede activarse también cuando una
función está en marcha.
Una vez iniciada la función, el timer (temporizador)
seguirá la cuenta atrás de forma independiente sin
interferir en la función.
Durante esta fase, no es posible ver el temporizador (solo
se mostrará el icono
), que continuará con su cuenta
atrás en segundo plano. Para editar el minutero puede
pulsar el icono
y ajustar la hora con el icono o
.
Para cancelar el recordatorio de minutos, pulse el icono
y, a continuación, seleccione hasta que la hora
mostrada sea "--:--". Pulse
para conrmar.
. BLOQUEO DE TECLAS
Para bloquear las teclas, mantenga pulsado
durante al menos cinco segundos. Vuelva a hacer esto
para desbloquear las teclas.
BLOQ. DE TECLAS
Nota: Esta función también puede activarse durante
la cocción. Por motivos de seguridad, puede apagar el
horno en cualquier momento pulsando el botón
.
. NOTAS
• No recubra el interior del horno con papel de
aluminio.
• No arrastre ollas ni sartenes sobre la base del
horno, ya que podrían dañar el revestimiento
esmaltado.
• No coloque pesos pesados sobre la puerta ni se
agarre a ella.
• Debido a la mayor temperatura del ciclo Pizza, se
espera que el ruido del ventilador de refrigeración
sea ligeramente superior.

CONSEJOS ÚTILES
CÓMO UTILIZAR LA TABLA DE COCCIÓN
La tabla indica la mejor función, accesorios y nivel
para cocinar los diferentes tipos de alimentos.
Los tiempos de cocción inician en el momento en
que se coloca el alimento en el horno, excluyendo
el precalentamiento (cuando sea necesario).
Las temperaturas y los tiempos de cocción son
orientativos y dependen de la cantidad de alimentos
y del tipo de accesorio utilizado. En principio, aplique
los valores de ajuste recomendados más bajos y, si
la cocción no es suficiente, auméntelos. Utilice los
accesorios suministrados y, si es posible, moldes
y bandejas pasteleras metálicas de color oscuro.
También puede utilizar recipientes y accesorios
tipo pírex o de cerámica, aunque deberá tener en
cuenta que los tiempos de cocción serán ligeramente
mayores.
COCCIÓN DE VARIOS ALIMENTOS A LA VEZ
El uso de la función «Aire forzado» permite cocinar
al mismo tiempo distintos alimentos que requieran
la misma temperatura (por ejemplo: pescado y
verduras), utilizando estantes diferentes. Retire del
horno los alimentos que requieran menor tiempo
de cocción y deje los que necesiten una cocción más
prolongada.
CARNE
Utilice cualquier tipo de bandeja de horno o fuente de
Pyrex adecuada al tamaño de la pieza de carne que va
a cocinar. En el caso de asados, es conveniente añadir
caldo a la base de la fuente y rociar la carne durante la
cocción para realzar el sabor. Durante esta operación
se generará vapor. Cuando el asado esté listo, déjelo
reposar en el horno durante 10 o 15 minutos, o
envuélvalo en papel de aluminio.
Cuando desee gratinar carne, elija cortes de carne de
igual grosor para obtener un resultado de cocción
uniforme. Las piezas de carne muy gruesas requieren
tiempos de cocción más prolongados. Para evitar que
la carne se queme por fuera, coloque la rejilla en un
estante inferior para alejarla del grill. Gire la carne
en el segundo tercio del tiempo de cocción. Abra la
puerta con cuidado, ya que puede salir vapor caliente.
Para recoger los jugos de la cocción, es conveniente
colocar una grasera con medio litro de agua
directamente debajo de la rejilla en la que se coloque
la carne. Reponga el líquido cuando sea necesario.
POSTRES
Cocine los postres delicados con la función
convencional y en un solo nivel.
Utilice bandejas para hornear metálicas de color
oscuro y colóquelas siempre sobre la rejilla
suministrada. Para cocinar en varios estantes,
seleccione la función de aire forzado y disponga los
moldes en ellos de modo que la circulación de aire
caliente sea óptima.
Para saber si un bizcocho está listo, introduzca un
palillo en el centro. Si al retirar el palillo está limpio, el
bizcocho está listo.
Si utiliza bandejas para hornear antiadherentes, no
unte con mantequilla los bordes, ya que es posible
que el bizcocho no suba de manera uniforme por los
bordes.
Si el producto se «hincha» durante la cocción, use
una temperatura más baja la próxima vez y plantéese
reducir la cantidad de líquido añadido o remover la
mezcla más suavemente.
Para postres con relleno húmedo (tartas de queso
o de fruta) utilice la función «Horno convección». Si
la base del bizcocho o tarta está demasiado líquida,
coloque el estante en un nivel más bajo y salpique
la base con pan rallado o galletas antes de añadir el
relleno.
FERMENTAR MASA
Es conveniente cubrir siempre la masa con un paño
húmedo antes de introducirla en el horno. Al utilizar
esta función, el tiempo de fermentación de la masa
se reduce en un tercio con respecto al tiempo de
fermentación a temperatura ambiente (20-25ºC).
El tiempo de leudado de una pizza de 1 kg es de
alrededor de una hora.

CATEGORÍAS DE ALIMENTOS CANTIDAD
PUNTO DE
COCCIÓN
NIVEL DE
HORNEADO
DAR LA
VUELTA
(TIEMPO DE
COCCIÓN)
NIVEL Y ACCESORIOS
HORNEADO
Platos
principales
Lasaña 0,5-3 kg - 0 -
2
Tartas saladas 0,8-1,2 kg - 0 -
2
Hortalizas
rellenas
0,1 - 0,5 kg
[cada uno]
- - -
3
Pizza & Pan
Panecillos
60 - 150g
[cada una]
- - -
3
Pan de sándwich
400 - 600 g
[cada uno]
- - -
2
Pan grande 0,7-2.0 kg - - -
2
Baguettes
200 - 300g
[cada una]
- - -
3
Pizza redonda Redonda - - -
2
Pizza gruesa Bandeja - - -
2
Pizza [congelada]
1 capa* - - -
2
2 capas* - - -
4
1
3 capas* - - -
5
3 1
4 capas* - - -
5
4 2 1
Pastas dulces
Bizcocho 0,5-1,2 kg - - -
2
Galletas 0,2-0,6 kg - - -
3
Pasta choux una bandeja * - - -
3
Tarta 0,4-1,6 kg - - -
3
Strudel 0,4-1,6 kg - - -
3
Tarta de fruta 0,5-2 kg - - -
2
ASADO
Carne
Asado de carne
de res
0,6-2 Kg 0 0 -
3
Cerdo asado 0,6-2,5 kg - 0 -
3
Pollo asado 0,6-3 kg - 0 -
2
Acompañamiento
Verduras asadas 0,5-1,5 kg - 0 -
3
Papas asadas 0,5-1,5 kg - - -
3
* cantidad recomendada
TABLA DE COCCIÓN DE MY MENU
ACCESORIOS
Rejilla
Bandeja para horno /
Bandeja para tartas /
Bandeja redonda para pizza
sobre rejilla
Grasera / bandeja pastelera
Bandeja con 500 ml de
agua
Sonda de alimentos
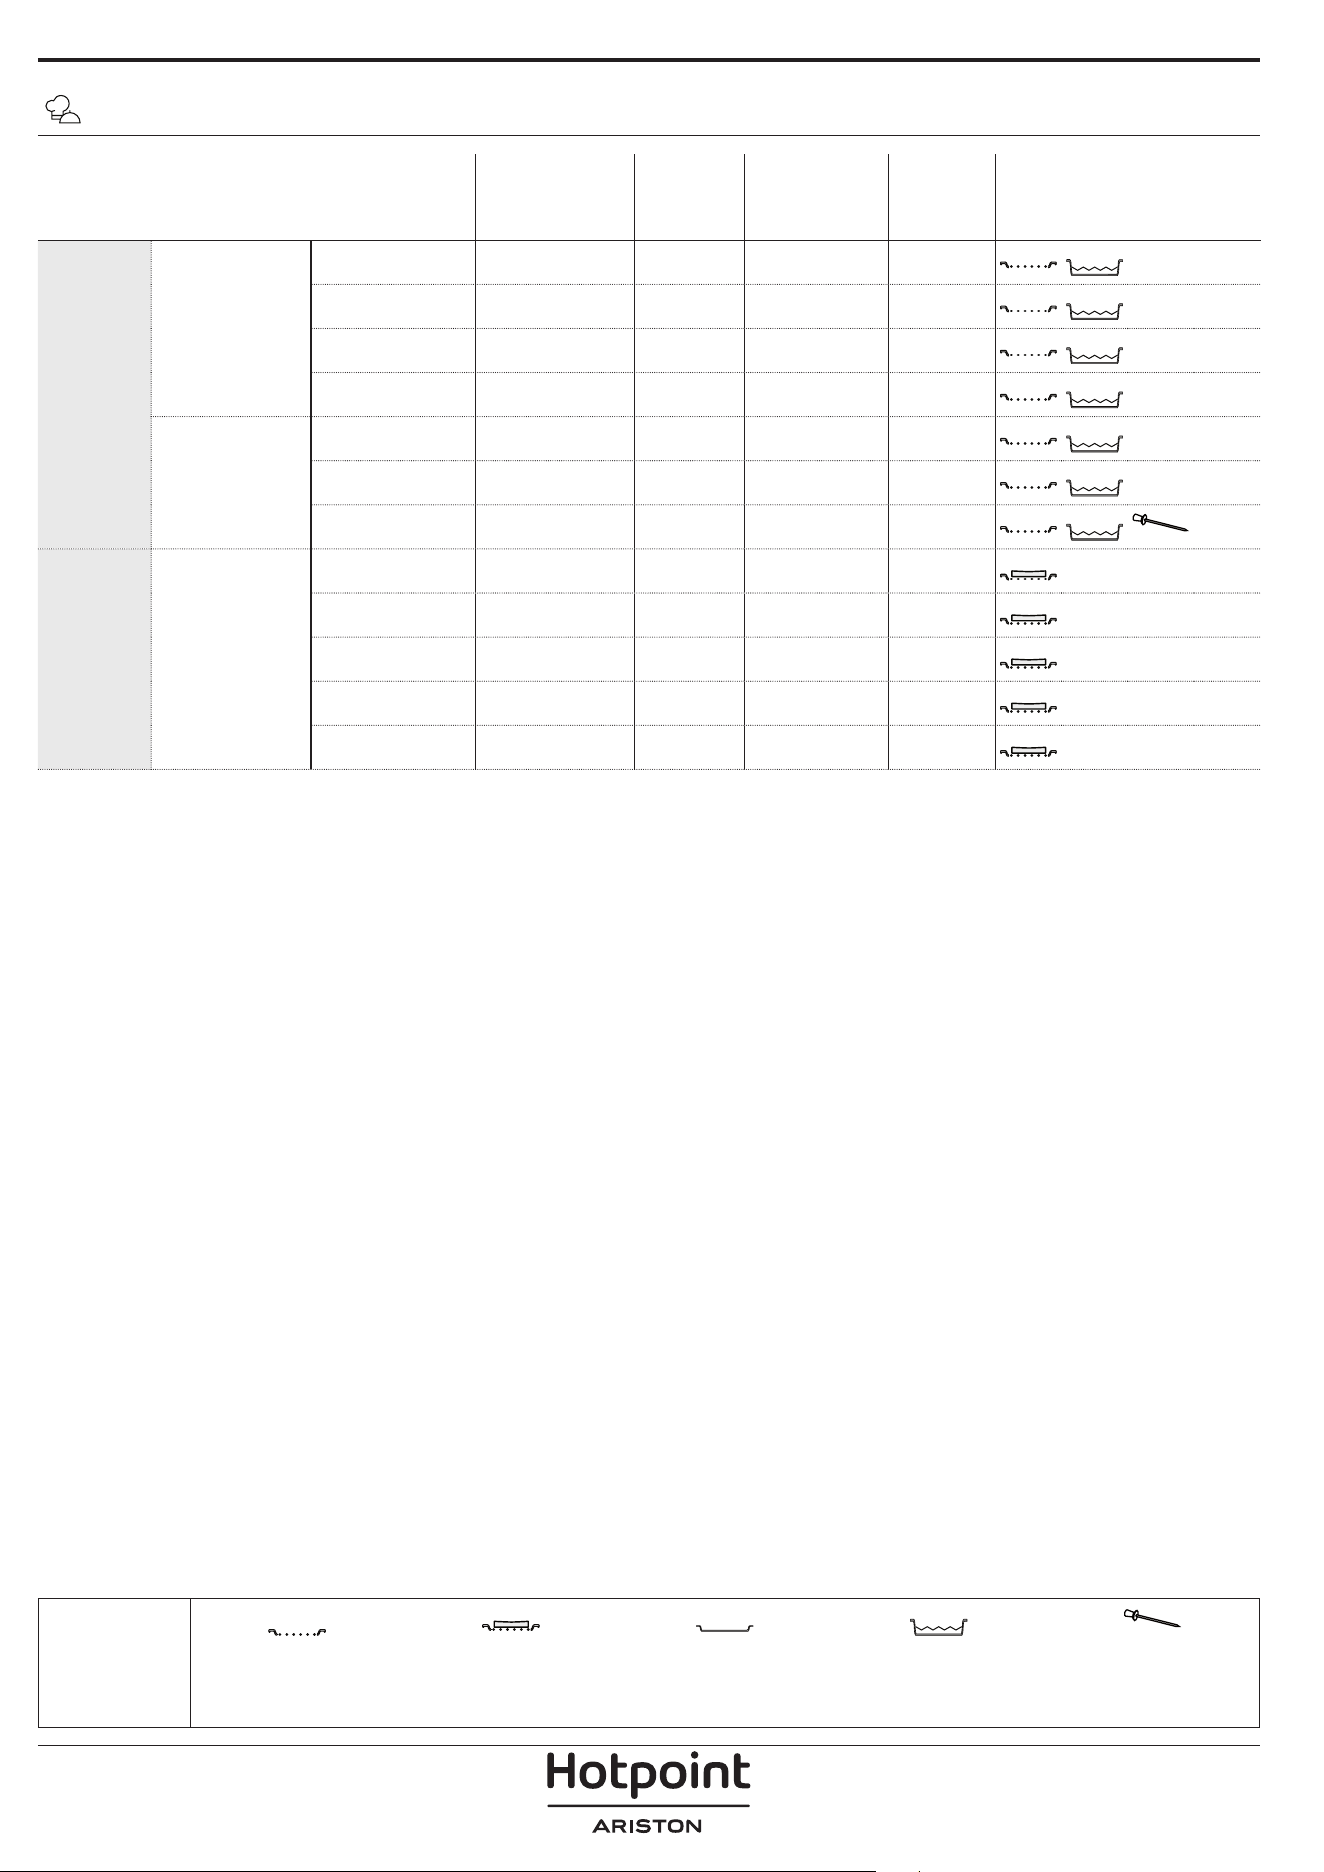
CATEGORÍAS DE ALIMENTOS CANTIDAD
PUNTO DE
COCCIÓN
NIVEL DE
HORNEADO
DAR LA
VUELTA
(TIEMPO DE
COCCIÓN)
NIVEL Y ACCESORIOS
AL GRILL
Carne
Hamburguesa 1,5-3 cm 0 - 3/5
5
4
Salchichas y
wurstel
1,5 - 4.5 cm - - 2/3
5
4
Pinchos morunos una rejilla - - 1/2
5
4
Filete y pechuga 1-5 cm - - 2/3
5
4
Pescado y
marisco
Filetes 0,5 - 3 (cm) - - -
3
2
Filetes
[congelados]
0,5 - 3 (cm) - - -
3
2
Pescado entero 0,2-1,5 kg * - - -
3
2
AL GRILL
Acompañamiento
Tomates
gratinados
una bandeja - - -
3
Pimientos
gratinados
una bandeja - - -
3
Brócolis
gratinados
una bandeja - - -
3
Coliflor gratinada una bandeja - - -
3
Verduras
gratinadas
una bandeja - - -
3
TABLA DE COCCIÓN DE MY MENU
* cantidad recomendada
ACCESORIOS
Rejilla
Bandeja para horno /
Bandeja para tartas /
Bandeja redonda para pizza
sobre rejilla
Grasera / bandeja pastelera
Bandeja con 500 ml de
agua
Sonda de alimentos
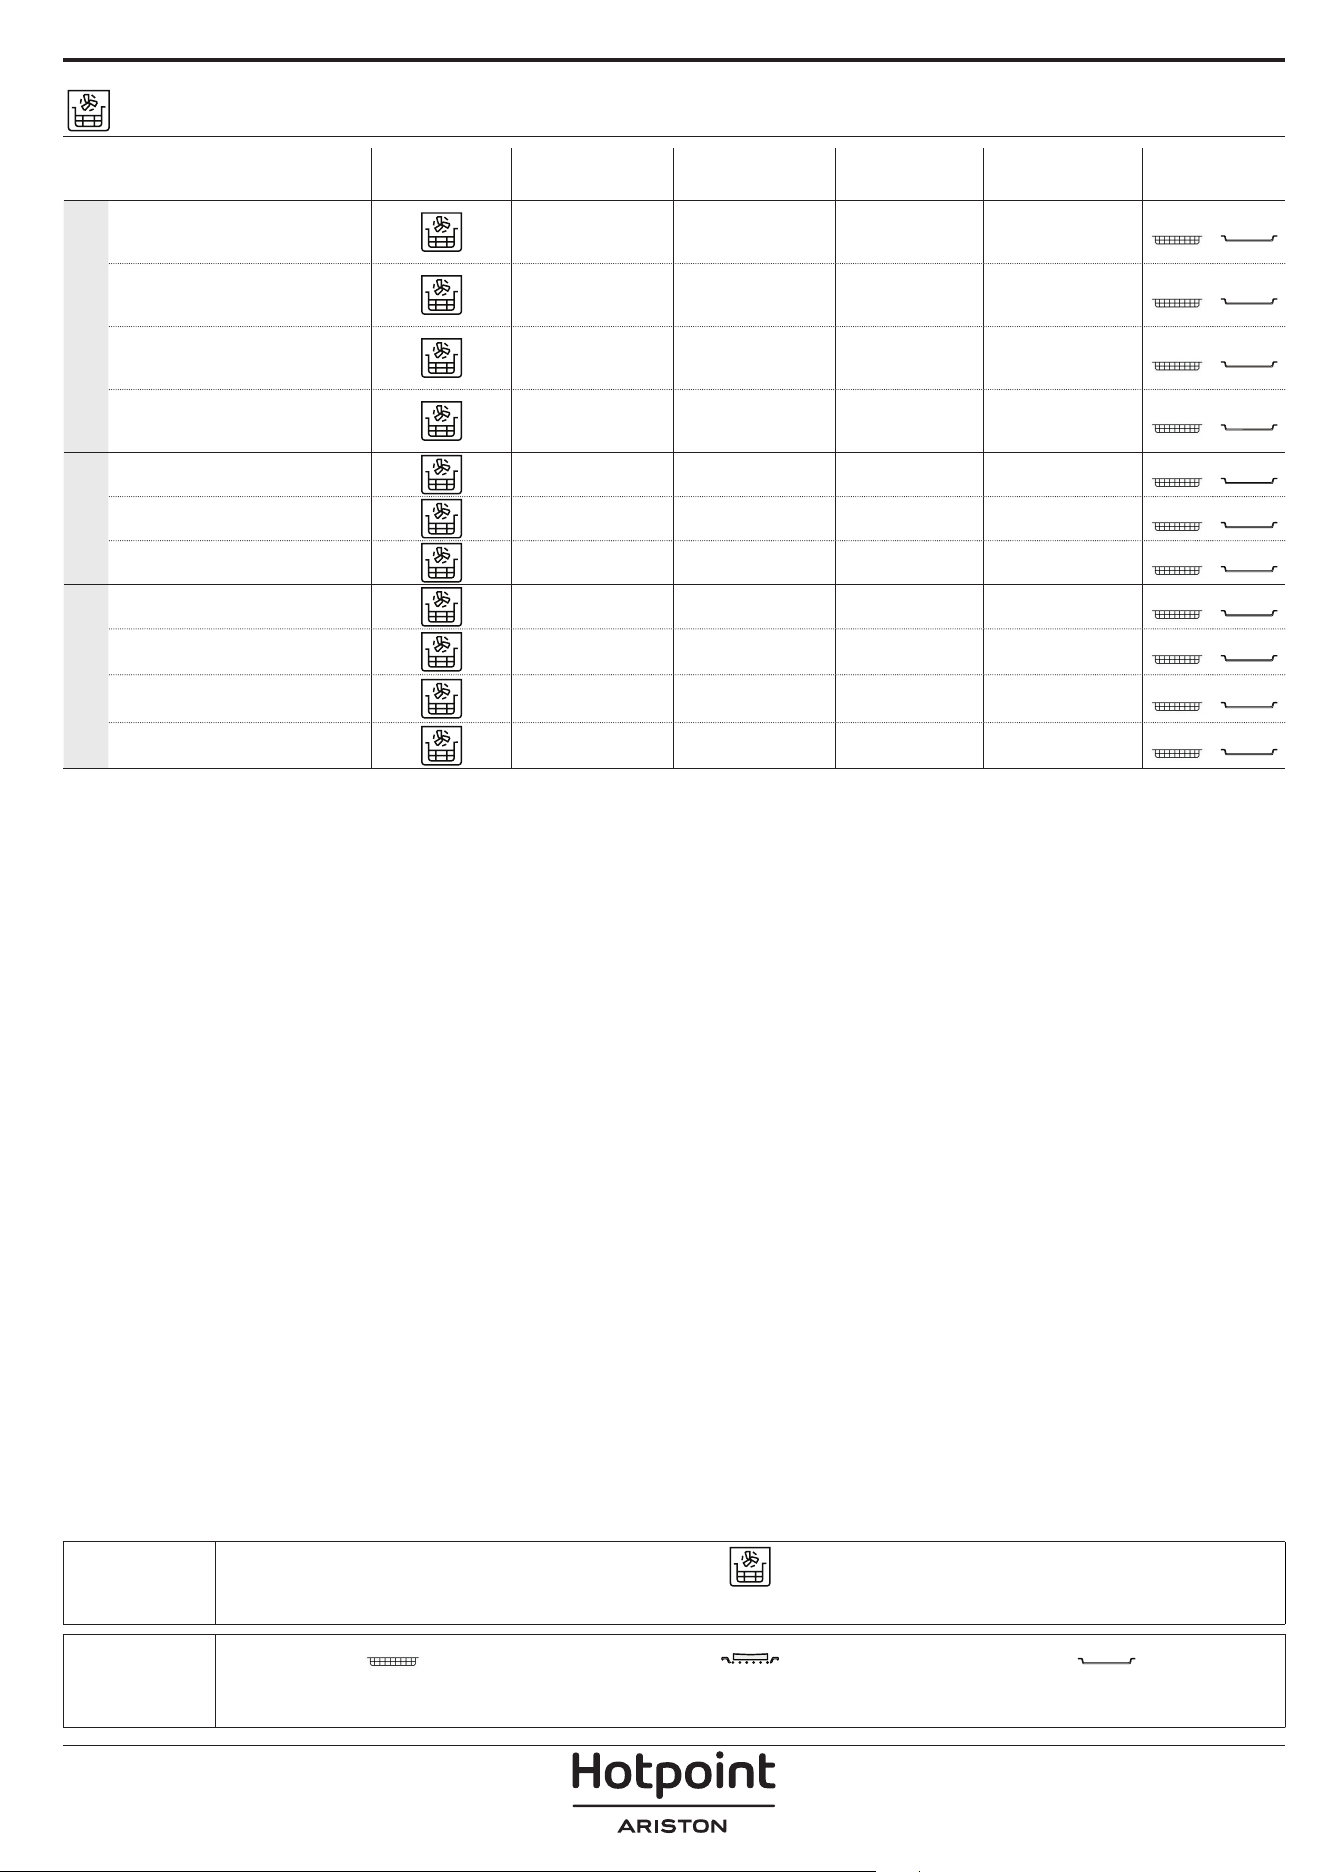
ACCESORIOS
Bandeja Freidora de aire Bandeja de horno o molde sobre rejilla
Grasera/bandeja pastelera o
bandeja sobre rejilla
TABLA DE COCCIÓN DE FREIDORA DE AIRE
RECETA FUNCIÓN
CANTIDAD
RECOMENDADA
RÁPIDO
TEMPERATURA
(°C)
DURACIÓN
(MIN.)
REJILLAS Y
ACCESORIOS
ALIMENTOS CONGELADOS
Patatas Fritas Congeladas 650 - 850 g Sí 200 25-30
4
2
Nugget de pollo congelado 500 g Sí 200 15 - 20
4
2
Palitos de pescado
500 g Sí 220 15 - 20
4
2
Aros de cebolla 500 g Sí 200 15 - 20
4
2
VERDURAS
Calabacín fresco empanado 400g Sí 200 15 - 20
4
2
Patatas fritas caseras 300-800 g Sí 200 20 - 40
4
2
Verduras variadas 300-800 g Sí 200 20 - 30
4
2
CARNE Y PESCADO
Pechugas de pollo 1-4cm Sí 200 20 - 40
4
2
Alitas de pollo 200-1500g Sí 220 30 - 50
4
2
Chuleta empanada 1-4cm Sí 220 20 - 50
4
2
Filete de pescado 1-4cm Sí 220 15 - 25
4
2
Para cocinar alimentos frescos o caseros, extienda una fina capa de aceite sobre la superficie del alimento.
Para garantizar resultados de cocción uniformes, mezcle los alimentos a mitad del tiempo de cocción recomendado.
FUNCIONES
Freidora de aire
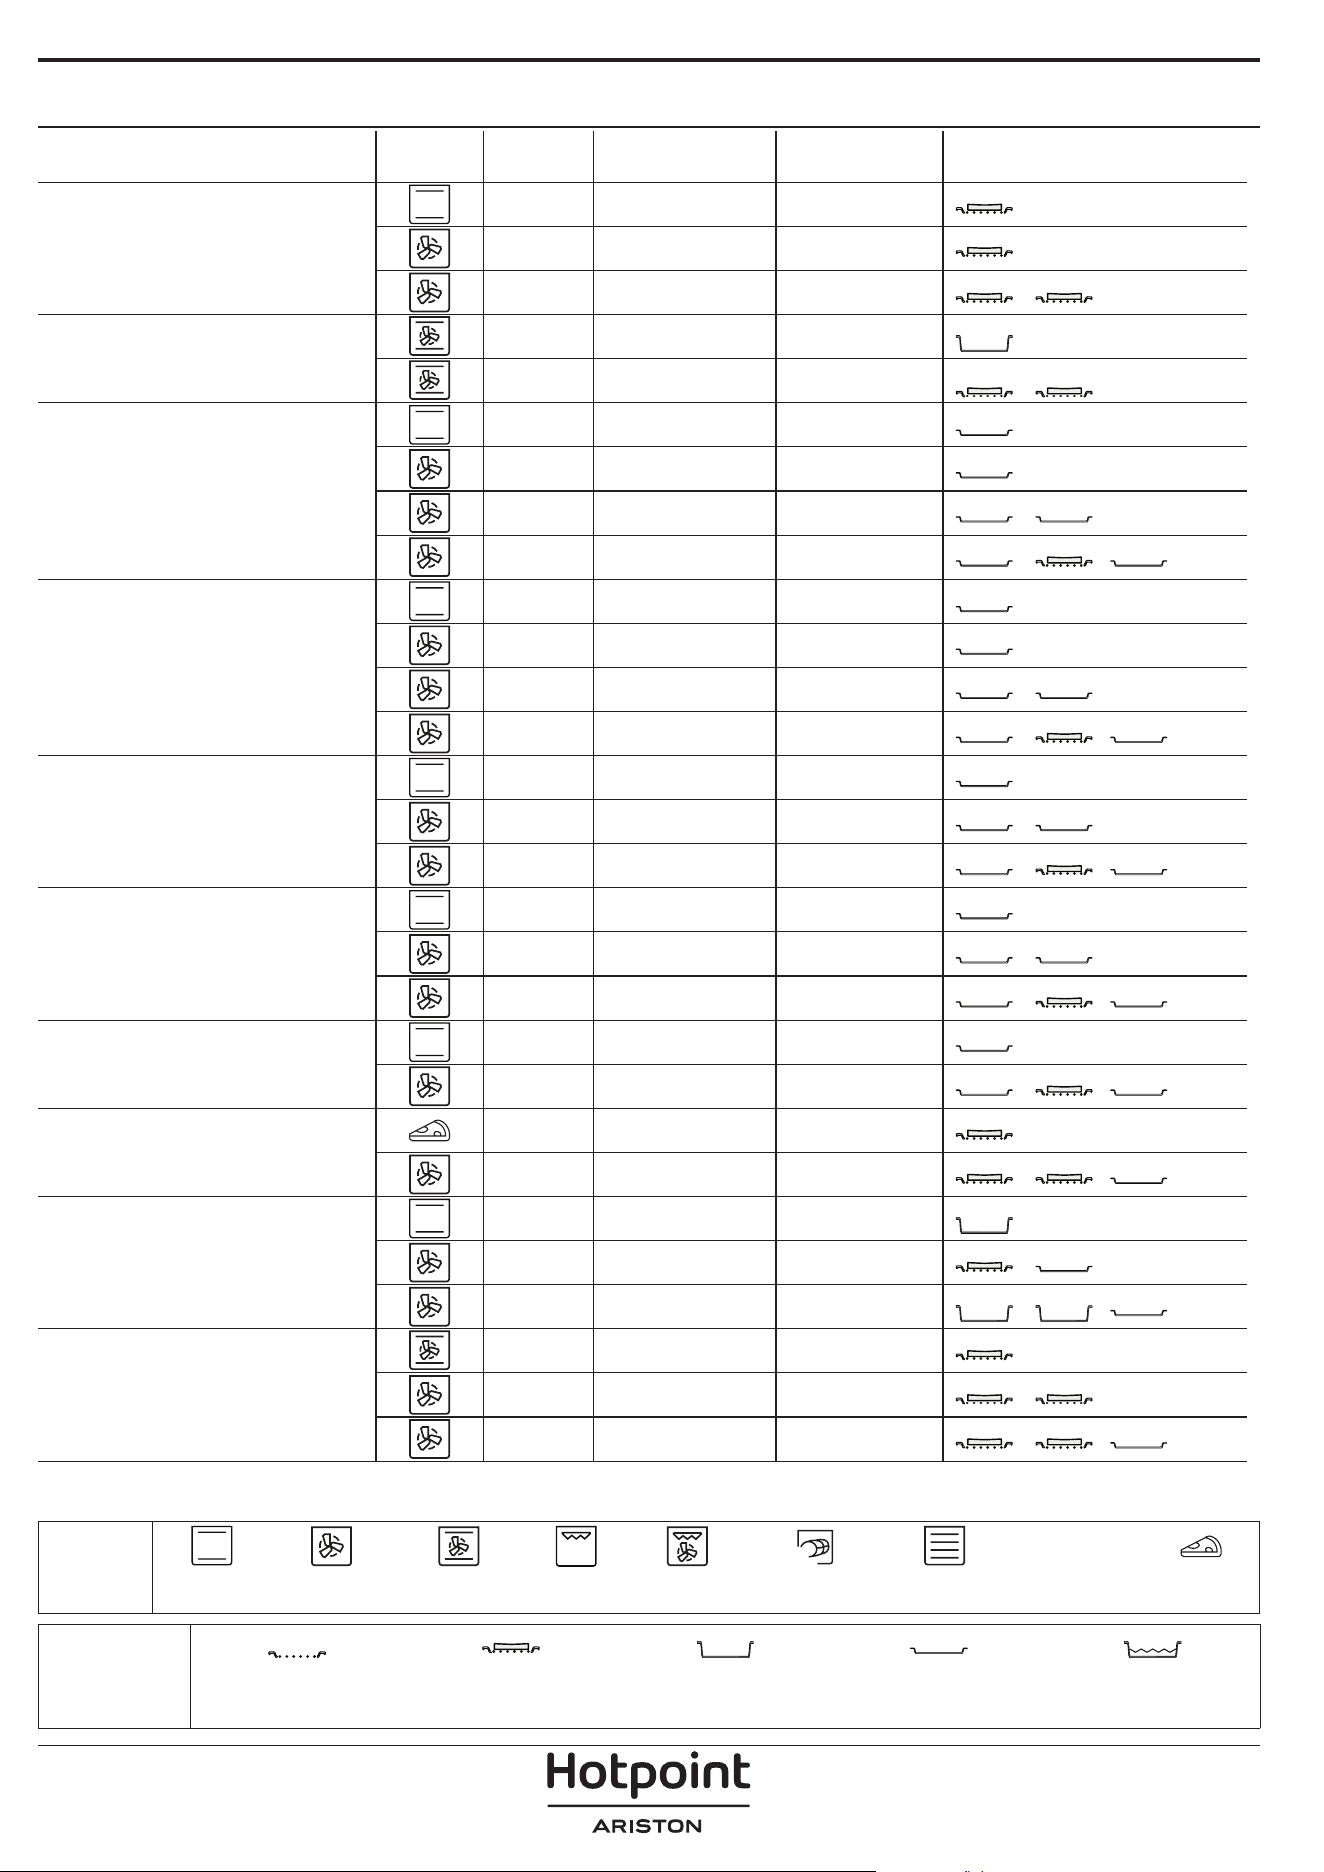
TABLA DE COCCIÓN
RECETA FUNCIÓN RÁPIDO TEMPERATURA (°C) DURACIÓN (MIN.) REJILLAS Y ACCESORIOS
Leavened cakes / Bizcochos
esponjosos
Sí 170 30 - 50
2
Sí 160 30 - 50
2
Sí 160 30 - 50
4
1
Tartas rellenas
(tarta de queso, strudel, tarta de
manzana)
Sí 160 - 200 30 - 85
3
Sí 160 - 200 30 - 90
4
1
Galletas
Sí 150 20 - 40
3
Sí 140 30 - 50
4
Sí 140 30 - 50
4
1
Sí 135 40 - 60
5
3 1
Pastelitos / Magdalenas
Sí 170 20 - 40
3
Sí 150 30 - 50
4
Sí 150 30 - 50
4
1
Sí 150 40 - 60
5
3 1
Lionesas
Sí 180 - 200 30 - 40
3
Sí 180 - 190 35 - 45
4
1
Sí 180 - 190 35-45 *
5
3 1
Merengues
Sí 90 110 - 150
3
Sí 90 130 - 150
4
1
Sí 90 140-160 *
5
3 1
Pizza / Pan / Focaccia
Sí 190 - 250 15 - 50
2
Sí 190-230 20 - 50
5
3 1
Pizza (Fina, gruesa, focaccia)
Sí 310 7 - 12
2
Sí 220 - 240 25-50 *
5
3 1
Pizza congelada
Sí 250 10-15
3
Sí 250 10 - 20
4
1
Sí 220 - 240 15-30
5
3 1
Tartas saladas
(tarta de verdura, quiche)
Sí 180 - 190 45 - 55
3
Sí 180 - 190 45 - 60
4
1
Sí 180 - 190 45-70 *
5
3 1
ACCESORIOS
Rejilla
Bandeja de horno o molde
sobre rejilla
Grasera / bandeja
pastelera o bandeja de
horno sobre rejilla
Grasera / bandeja pastelera
Bandeja con 500 ml de
agua
FUNCIONES
XL
ECO
Convencional Aire Forzado
Horno
convección
Gratinar Turbo Grill MaxiCooking Menú Multiflow Ciclo ECO Pizza
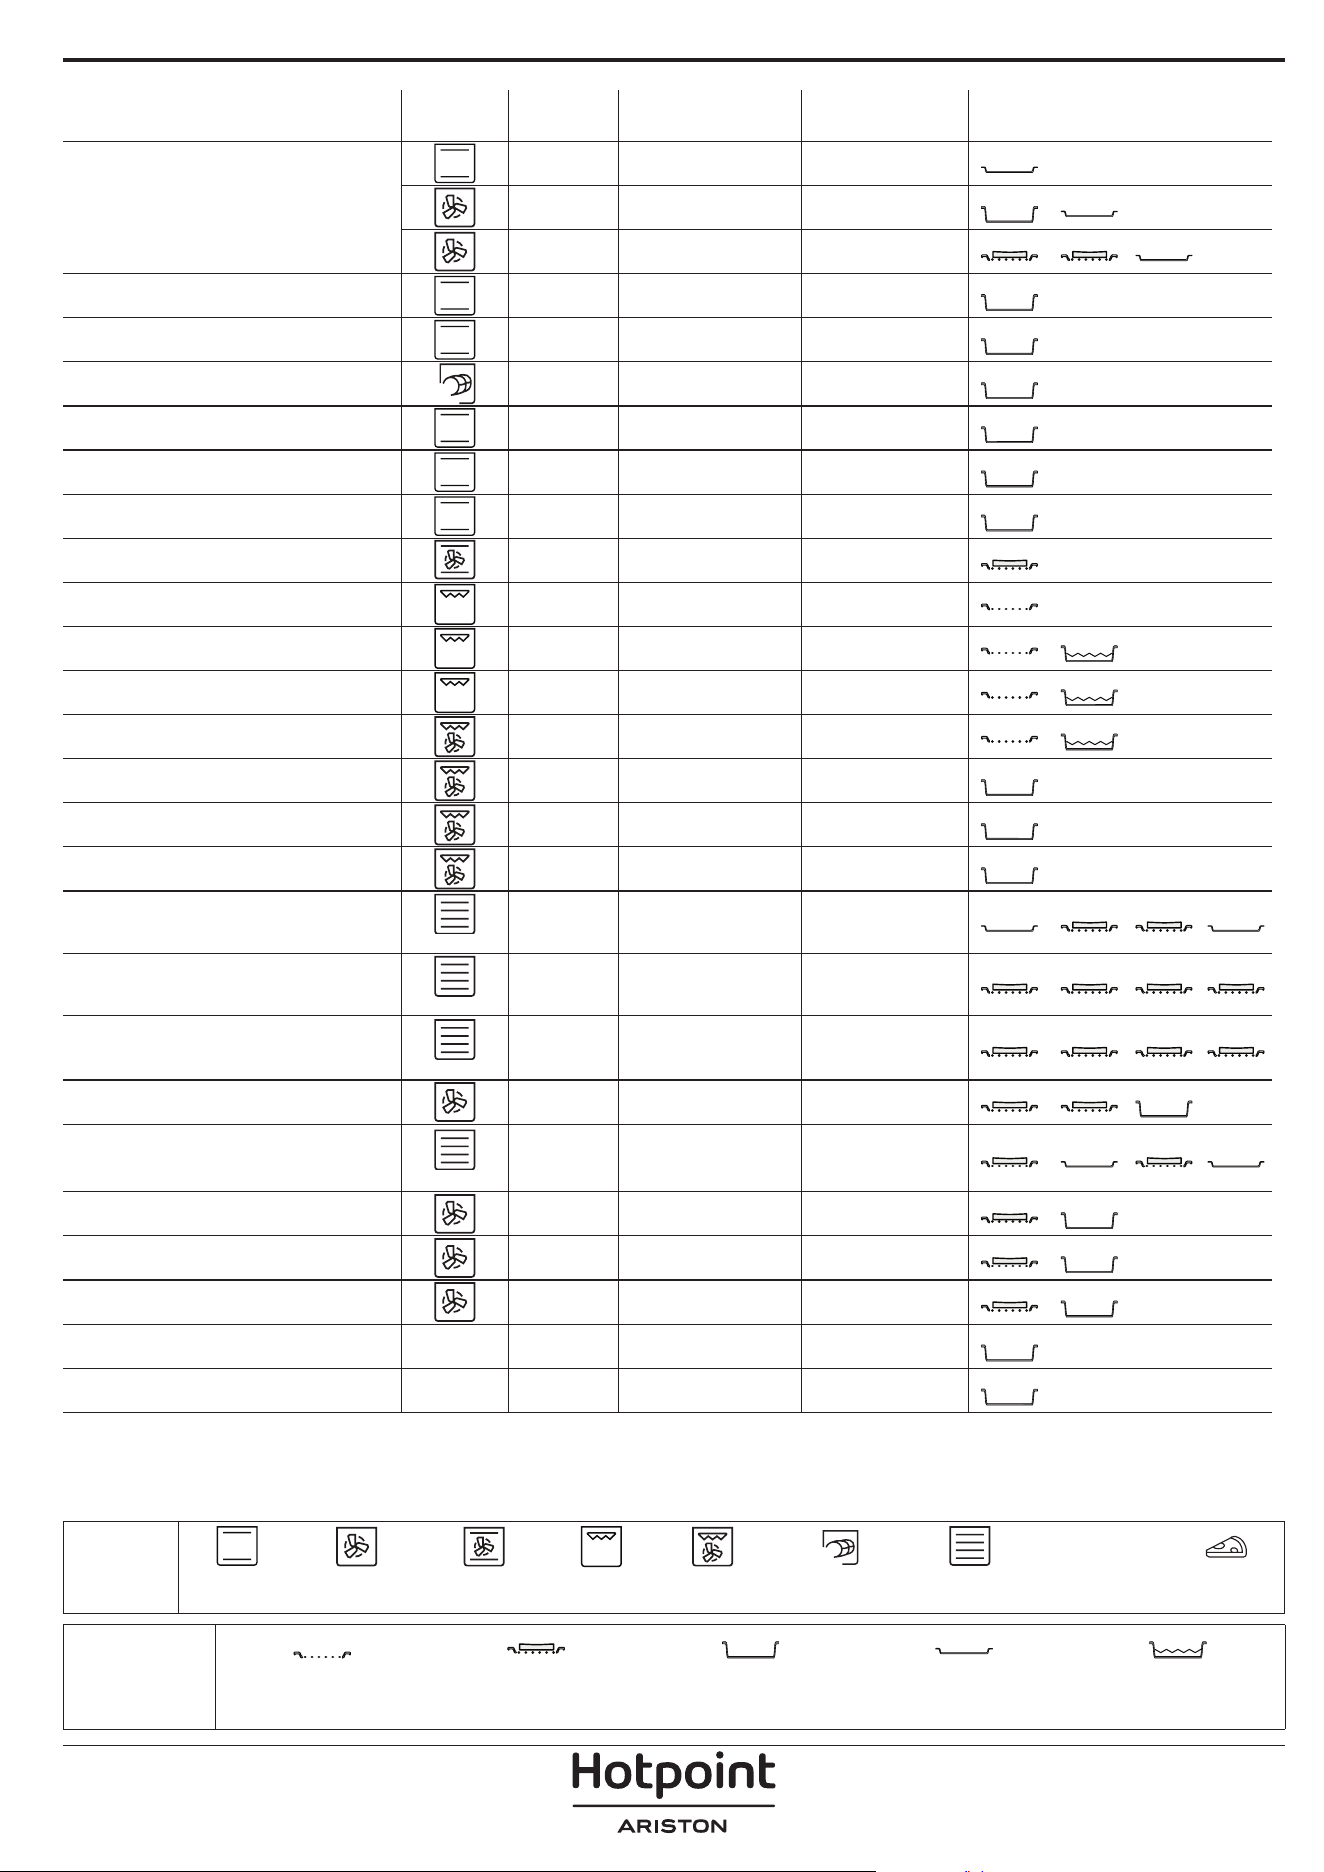
RECETA FUNCIÓN RÁPIDO TEMPERATURA (°C) DURACIÓN (MIN.) REJILLAS Y ACCESORIOS
Volovanes / Canapés de hojaldre
Sí 190 - 200 20 - 30
3
Sí 180 - 190 20 - 40
4
1
Sí 180 - 190 20-40 *
5
3 1
Lasaña / anes / pasta al horno /
canelones
Sí 190 - 200 45 - 65
3
Cordero / Ternera / Carne de res /
Cerdo 1 kg
Sí 190 - 200 80 -110
3
Cerdo asado con piel 2 kg
XL
- 170 110 - 150
2
Pollo / conejo / pato 1 kg Sí 200-230 50-100
3
Pavo / oca 3 kg Sí 190 - 200 80 - 130
2
Pescado al horno / en papillote (letes,
entero)
Sí 180 - 200 40 - 60
3
Verduras rellenas
(tomates, calabacines, berenjenas)
Sí 180 - 200 50 - 60
2
Tostada - 3 (Alta) 3 - 6
5
Filetes de pescado/de carne - 2 (Media) 20 - 30 **
4
3
Salchichas / Pinchos morunos /
Costillas / Hamburguesas
- 2-3 (Medio – Alto) 15 - 30 **
5
4
Pollo asado 1-1,3 kg - 2 (Media) 55 - 70 ***
2
1
Pierna de cordero / Jarretes - 2 (Media) 60 - 90 ***
3
Patatas asadas - 2 (Media) 35 - 55 ***
3
Verduras gratinadas - 3 (Alta) 10 - 25
3
Galletas
Galletas
Sí 135 50 - 70
5
4 3 1
Tartas
Tartas
Sí 170 50 - 70
5
3 2 1
Pizzas redondas
Pizza
Sí 210 40 - 60
5
3 2 1
Menú completo: Tarta de frutas (nivel
5), lasaña (nivel 3), carne (nivel 1)
Sí 190 40-120 *
5
3 1
Menú completo: Tarta de frutas (nivel
5) / verduras asadas (nivel 4) / lasaña
(nivel 2) / trozos de carne (nivel 1)
Menú
Sí 190 40-120 *
5
4 2 1
Lasañas y carnes Sí 200 50-100 *
4
1
Carnes y patatas Sí 200 45-100 *
4
1
Pescado y verduras Sí 180 30-50 *
4
1
Piezas de carne rellenas asadas
ECO
- 200 80-120 *
3
Trozos de carne)
(conejo, pollo, cordero)
ECO
- 200 50-100 *
3
* Tiempo de cocción estimado: Los platos se pueden extraer del horno antes o después según los gustos personales.
** Dar la vuelta al alimento a mitad de la cocción.
*** Dar la vuelta al alimento en el segundo tercio de la cocción (si fuera necesario).
ACCESORIOS
Rejilla
Bandeja de horno o molde
sobre rejilla
Grasera / bandeja
pastelera o bandeja de
horno sobre rejilla
Grasera / bandeja pastelera
Bandeja con 500 ml de
agua
FUNCIONES
XL
ECO
Convencional Aire Forzado
Horno
convección
Gratinar Turbo Grill MaxiCooking Menú Multiflow Ciclo ECO Pizza

Asegúrese de que el horno
se haya enfriado antes de
llevar a cabo las tareas de
mantenimiento o limpieza.
No utilice productos de lavado
con vapor.
No utilice estropajos de
acero, estropajos abrasivos ni
productos de limpieza abrasivos/
corrosivos, ya que podrían dañar
las supercies del aparato.
Utilice guantes protectores.
El horno debe desconectarse de
la red eléctrica antes de llevar
a cabo cualquier trabajo de
mantenimiento.
MANTENIMIENTO Y LIMPIEZA
CÓMO UTILIZAR LA TABLA DE COCCIÓN
La tabla indica la mejor función, accesorios y nivel para cocinar los diferentes tipos de alimentos.
Los tiempos de cocción inician en el momento en que se coloca el alimento en el horno, excluyendo el precalentamiento
(cuando sea necesario).
Las temperaturas y los tiempos de cocción son orientativos y dependen de la cantidad de alimentos y del tipo de
accesorio utilizado.
En principio, aplique los valores de ajuste recomendados más bajos y, si la cocción no es suficiente, auméntelos.
Utilice los accesorios suministrados y, si es posible, moldes y bandejas pasteleras metálicas de color oscuro. También
puede utilizar recipientes y accesorios tipo pírex o de cerámica, aunque deberá tener en cuenta que los tiempos de
cocción serán ligeramente mayores.
SUPERFICIES EXTERIORES
• Limpie las superficies con un paño húmedo de
microfibra. Si están muy sucias, añada unas gotas de
detergente neutro al agua. Seque con un paño seco.
• No utilice detergentes corrosivos ni abrasivos. Si uno
de esos productos entra accidentalmente en contacto
con la superficie del aparato, límpielo de inmediato
con un paño húmedo de microfibra.
SUPERFICIES INTERIORES
• Después de cada uso deje que el horno se enfríe
y, a continuación, límpielo, preferiblemente cuando
aún esté tibio, para quitar los restos o las manchas
causadas por los residuos de los alimentos. Para secar
la condensación que se haya podido formar debido
a la cocción de alimentos con un alto contenido en
agua, deje que el horno se enfríe por completo y
límpielo con un paño o esponja.
• Active la función «Diamond Clean» para unos
resultados de limpieza óptimos de las superficies
internas. (Solo en algunos modelos).
• Limpie el cristal de la puerta con un detergente
líquido adecuado.
• Para limpiar el horno con facilidad, quite la puerta.
ACCESORIOS
Después del uso sumerja los accesorios en una
solución líquida con detergente, utilice guantes si aún
están calientes. Los residuos de alimentos pueden
quitarse con un cepillo o esponja.
No limpie la sonda para alimentos ni la sonda para
carne (si la hay) en el lavavajillas.
La bandeja Freír con aire(si la hay) se puede limpiar en el
lavavajillas.

CÓMO EXTRAER Y VOLVER A COLOCAR LA PUERTA
1. Para quitar la puerta, ábrala por completo y
baje los pestillos hasta que estén en posición
desbloqueada.
b
a
2. Cierre la puerta tanto como pueda.
Sujete bien la puerta con las dos manos – no la sujete
por el asa.
Simplemente extraiga la puerta continuando
cerrándola y a la vez levantándola hasta que se
salga de su alojamiento. Ponga la puerta en un lado,
apoyada sobre una superficie blanda.
a
b
~15°
3. Vuelva a instalar la puerta llevándola hacia el
horno, alineando los ganchos de las ranuras con sus
alojamientos y fijando la parte superior en su
alojamiento.
4. Baje la puerta y ábrala por completo.
Baje los pestillos hasta su posición original: Asegúrese
de haberlos bajado por completo.
b
a
Presione suavemente para comprobar que los
pestillos están en la posición correcta.
“CLICK”
5. Intente cerrar la puerta y compruebe que esté
alineada con el panel de control. Si no lo está, repita
los pasos de arriba: La puerta podría dañarse si no
funciona correctamente.
SUSTITUCIÓN DE LA LÁMPARA
Para sustituir la lámpara, póngase en contacto con el servicio posventa.

Problema Posible causa Solución
El horno no funciona.
Corte de suministro.
Desconexión de la red
eléctrica.
Compruebe que haya corriente eléctrica en la
red y que el horno esté enchufado a la toma de
electricidad.
Apague el horno y vuelva a encenderlo para
comprobar si se ha solucionado el problema.
En la pantalla aparecerá la letra
«F» seguida de un número.
Problema de software.
Póngase en contacto con el Centro de Atención
Telefónica e indique el número que sigue a la
letra «F».
El horno no se calienta.
Cuando «DEMO» está
establecido en «On» , todos
los mandos están activos y
los menús disponibles, pero
el horno no se calienta.
DEMO aparecerá en la
pantalla cada 60 segundos.
Acceda a «DEMO» desde «AJUSTES» y seleccione
«Off».
La luz se apaga.
El modo «ECO está activado.
Acceda a «ECO» desde «AJUSTES» y seleccione
«Off».
La puerta no cierra
correctamente.
Los cierres de seguridad
están mal colocados.
Asegúrese de que los cierres de seguridad estén
en la posición correcta siguiendo las instrucciones
para desmontar y volver a colocar la puerta en la
sección de «Limpieza y mantenimiento».
El suministro eléctrico de la
casa se desconecta.
Configuración de potencia
incorrecta.
Compruebe que la red doméstica tenga una
potencia superior a 3 kW. Si o es así, reduzca la
potencia a 13 amperios. Acceda a «POTENCIA» en
«AJUSTES» y seleccione «BAJA».
Ciclo de cocción con sonda
finalizado sin causa evidente
o error F3E3 se imprime en
pantalla
La sonda alimentaria no está
bien conectada
La sonda alimentaria no está bien conectada
RESOLUCIÓN DE PROBLEMAS
Puede consultar los reglamentos, la documentación estándar e información adicional sobre productos
mediante alguna de las siguientes formas:
• Utilizando el QR que aparece en el producto
• Visitando nuestra página web docs . hotpoint. eu
• También puede ponerse en contacto con nuestro Servicio postventa (Consulte el número de teléfono en el
folleto de la garantía). Cuando se ponga en contacto con nuestro Servicio Postventa, deberá indicar los códigos
que guran en la placa de características de su producto.
400020004738