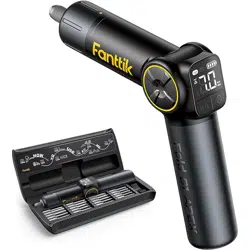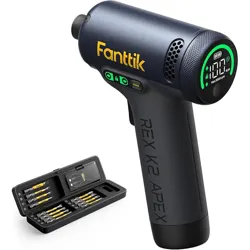
Cordless Impact Driver
REX K2 APEX
Please read this instruction manual carefully before
use and save it for future reference.
REX K2 APEX

Contents
1. Safety Instructions
2. Package Contents
3. Product Overview
4. Operation and Functions
5. Specifications
6. Troubleshooting
7. Warranty
02
03
04
05
11
13
14
- 01 -

1. Safety Instructions
•
•
•
•
•
•
•
Avoid exposure to moisture, dust, and dropping.
Do not store or operate the product in extreme temperature environment.
Stay alert, watch what you are doing and use common sense when operating. Do not
operate while you are tired or under the influence of drugs, alcohol or medication.
Use personal protective equipment. Always wear eye protection.
This product is not a toy and should not be used by children.
This product contains a built-in battery. Do not throw it into fire. Dispose of the battery
according to local laws and regulations.
Do not dismantle the machine by yourself. Have your power tool serviced by a
qualified repair person or contact us for advice.
- 02 -
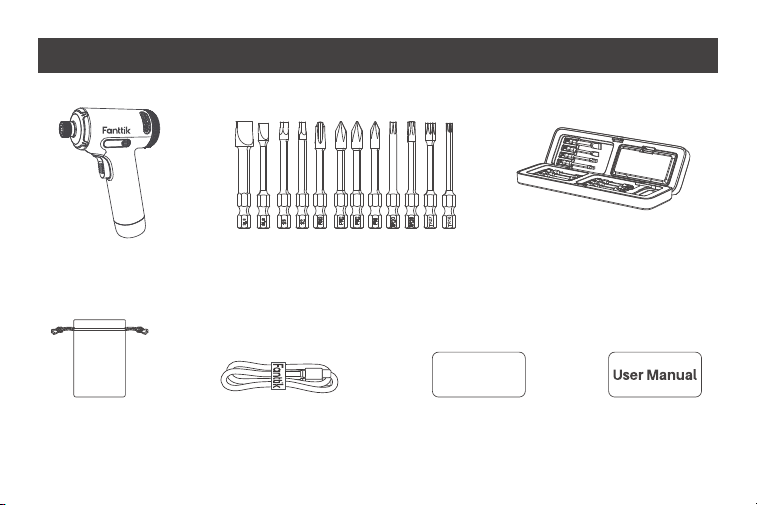
2. Package Contents
•
•
•
•
•
•
•
Impact driver x 1 Impact bits x 12
Storage bag x 1 Quick start guide x 1
USB charging cable x 1
User Manual x 1
QUICK GUIDE
- 03 -
REX K2 APEX
Accessory storage case x 1
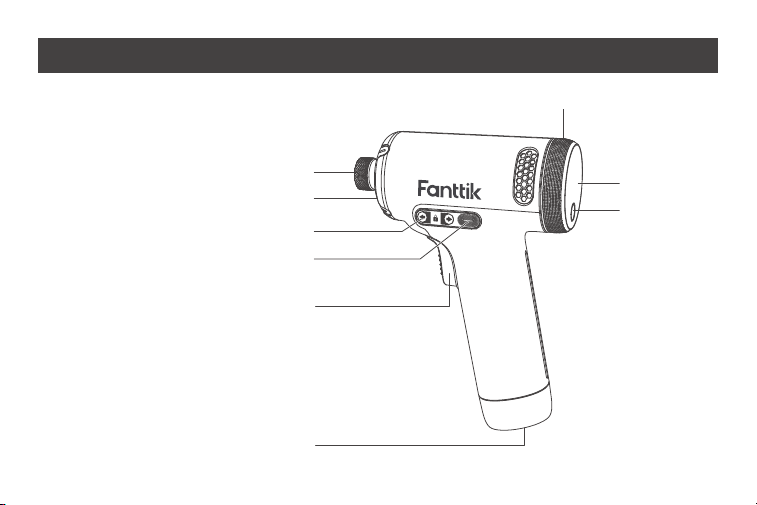
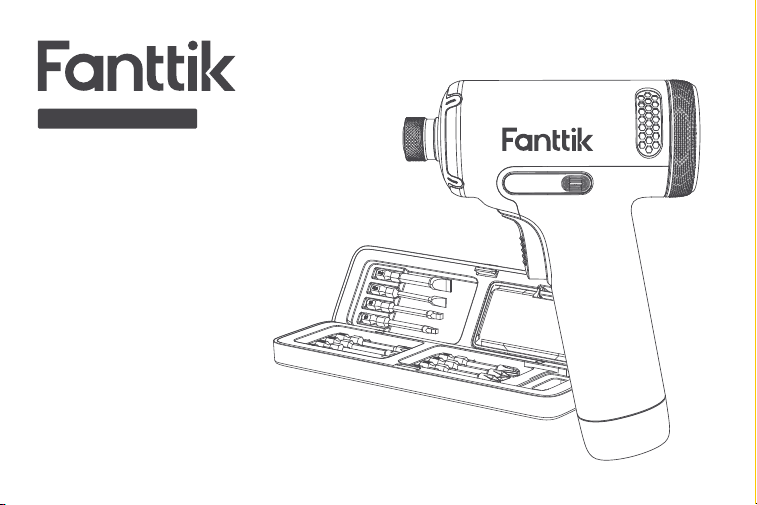
3. Product Overview
1. 1/4”Hex Drive Chuck
2. LED Work Light
3. Variable Speed Trigger
4. Side Button
5. Side Screen
6. Torque Setting Knob
7. Main Screen
8. Mode Switch Button
9. Type-C Charging Port
1
6
7
2
5
4
3
9
8
- 04 -
REX K2 APEX

4. Operation and Functions
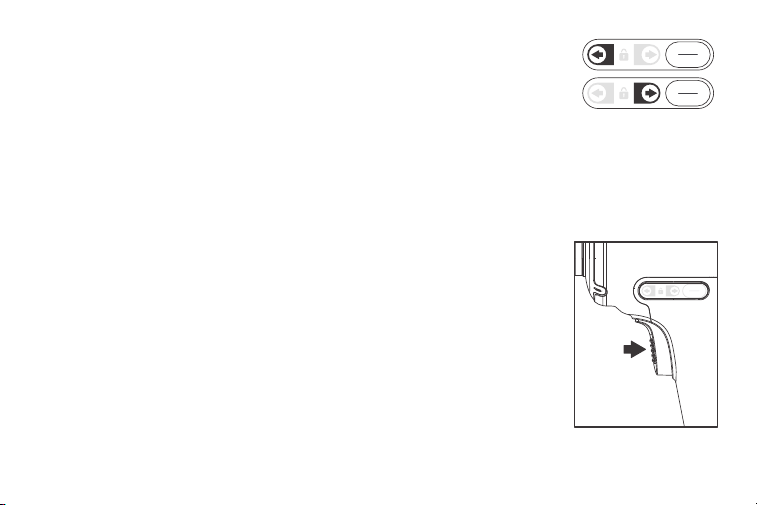
Turn On and Unlock the Tool
The safety lock is engaged by default, please unlock it before first use.
•
Side Button (Direction select Children/Transportation safety lock button)
•
- 05 -
Press and hold the Side Button for 2 seconds to unlock the tool;
after use, please press and hold the button for 2 seconds to
lock the tool to prevent accidental use by children or during
transport. In locked mode, a lock symbol appears on the Side
Screen; in unlock mode, the lock symbol disappears.
For the first time use, pull the Variable Speed Trigger to turn on the tool, then press
the Side Button for 2 seconds to unlock the tool for further operation.
Locked
Unlocked
•
•
Variable Speed Trigger
•
•
•
In unlocked mode, quick press the Side Button to switch rotation
directions. A corresponding forward or reverse arrow symbol
appears on the Side Screen.
Please lock the tool for safe transportation or to prevent acciden-
tal access by children.
To start the tool, grasp the handle firmly and pull the trigger. The
Main Screen and Side Screen will be activated simultaneously.
To vary the speed, increase or decrease the pressure on the
trigger. The further the trigger is pulled, the greater the rotation-
al speed.
To stop the tool, release the trigger. Ensure the tool has come to
a complete stop before laying the tool down.
- 06 -

- 07 -
Installing and Removing Bits
This driver is intended for use with drill or driver bits with a 1/4”shank and ball detent
recess. Please be cautious, do not start the tool when installing or removing bits.
•
•
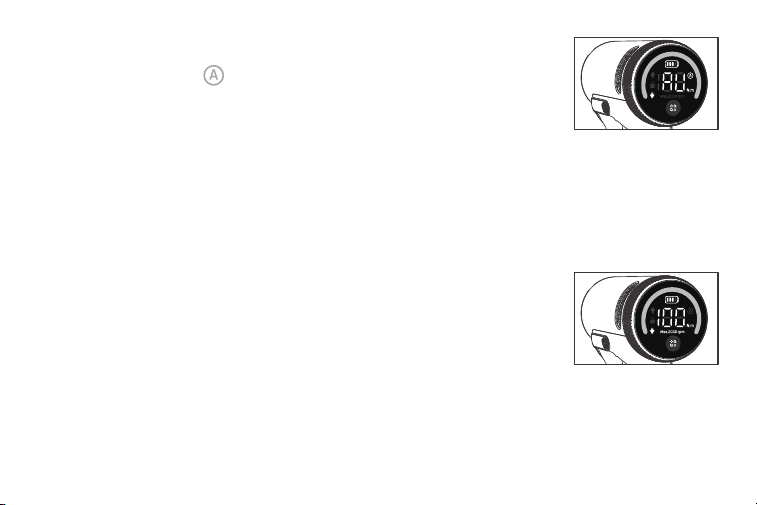
Working Modes and Mode Switch Button
•
•
The tool has two working modes: Regular working mode and
AutoAssist mode. Shortly press the Mode Switch Button to
toggle between two modes.
Regular working mode: Enables manually select torque level by
rotating the Torque Setting Knob, the Main Screen also displays
the torque selected.
2
1
2
1
To install a bit, pull out the chuck collar (1) and
press the bit shank into the chuck (2).
To remove a bit, pull out the chuck collar (1) and
remove the bit (2), then release the collar.
Attach Remove
Regular Mode
- 08 -
•
Torque Setting Knob
•
AutoAssist mode: Torque selection is disabled, the Main Screen
displays ‘AU’and “ ”symbols. In this mode, the tool automati-
cally halts when fastening a screw fully into material, this helps
prevent over-tightening(*Performance may vary depending on
material and self-tapping screw size. The motor may occasional-
ly stop before the screw is fully seated.)
In regular working mode, rotate the Torque Setting Knob to
select torque output: 20, 40, 60, 80, 100 N·m(177, 354, 531, 708,
885 in-lbs). The higher torque setting also results in higher
rotational speed. The maximum unloaded speed is 3000 RPM
when setting to 100 N·m.
AutoAssist Mode

Turn On/Off the LED Work Light
•
Turn Off the Tool
•
Power indicator
•
•
•
The tool powers on when the Variable Speed Trigger is pulled and automatically
powers off 10 seconds after the trigger is released.
- 09 -
The LED Work Light turns on automatically when the Variable Speed
Trigger is pulled. The light remains on for 10 seconds after the trigger
is released.
A battery symbol is always displayed on the Main Screen indicating
current battery level. When the symbol is empty, please charge the tool.
While charging, the green arc LED indicator and the battery symbol will flash.
When the battery is fully charged, both the arc LED indicator and
battery symbol will remain solid.

- 10 -
Battery charging
•
•
The tool has USB type-C charging port. A USB-C to USB-C charging cable is included,
charger is NOT included. The tool supports a maximum 10W (5V/2A) charging input.
Note: For safety, the tool is programmed to be inoperable while charging.

5. Specifications
Product Name
Product Model
Impact Driver Dimensions
Impact Driver Net Weight
Torque Settings
Max. Speed (unloaded)
Battery Capacity
Rated Voltage
Charging Input
Charging Time
Storage Temperature
Working Temperature
Cordless Impact Driver
REX K2 APEX
5.3 x 2.1 x 7.1 inches (135 x 54 x 180 mm)
1.88 lb. (855g)
20, 40, 60, 80, 100 N·m
(177, 354, 531, 708, 885 in-lbs)
3000 RPM
3000mAh/21.6Wh
7.2V
5V/2A
150-180min
-4-140(-20-60)
32-113(0-45)VVT
- 11 -

Bit specifications
- 12 -
Bit Shank: 1/4-inch (6.35mm) hex shank
Bit Material: Coated S2 Steel
Bit Type: Impact Driver Bit
Bit List:
Phillips PH1, PH2*2, PH3
Slot SL6, SL8
Tamper-Resistant Torx TR15, TR20, TR25, TR27
Square S2, S3

6. Troubleshooting
- 13 -
Error Code
E0
E1
E2
E3
E4
E5
E6
E7
E8
E9
EB
Error Cause
Battery overheated
Overvoltage fault
Startup error
MOSFET overheating
Overcurrent fault
Short-circuit protection
Motor stalling fault
Electrical fault
MOSFET driver fault
Battery pack fault
Static bias current anomaly
Recovery Action
Waiting for cool down
Press trigger again, if error persists,
wait for up to 48h
Release the trigger
Waiting for cool down
Release the trigger
Release the trigger
Release the trigger
Release the trigger
Release the trigger
Release the trigger, if error persists,
wait for up to 48h
Hardware fault, contact support

7. Warranty
- 14 -
This product is covered by a 12-month limited warranty for manufacturing defects.
*If you cannot find a solution to the issue encountered, please contact us at support@-
fanttik.com, we provide timely and effective online after-sales service.
CET Product Service Ltd.
Beacon House Stokenchurch Business
Park, Ibstone Rd, Stokenchurch High
Wycombe HP14 3FE UK
Email: [email protected]
Phone/Fax: +44 7419325266
Lienco SAS
8 RUE MARCEL CERDAN,BUSSY
SAINT GEORGES,77600.France
Email: [email protected]
Phone/Fax: +33766929910
[Service hotline available in the U.S. and Canada only]
929-693-6066 MON-FRI 9AM-5PM[ET]
www.fanttik.com
Manufacturer/Hersteller: METASEE LLC
Address/Adresse: 12 GREENWAY PLZ STE 1161A
HOUSTON, TX 77046-1203
CAN ICES(B)/NMB(B)