For Video / User Guide / Support
eufyCam S4
Quick Start Guide
The number of cameras varies.
Model: T8172, T8030
51005005774_V3
©Anker Innovations Limited. All rights reserved, registered in the United
States and other countries.
Anker Innovations Limited
Unit 56, 8th Floor, Tower 2, Admiralty Centre, 18 Harcourt Road, Hong
Kong
1 2
❸❶ ❷ ❹
❶
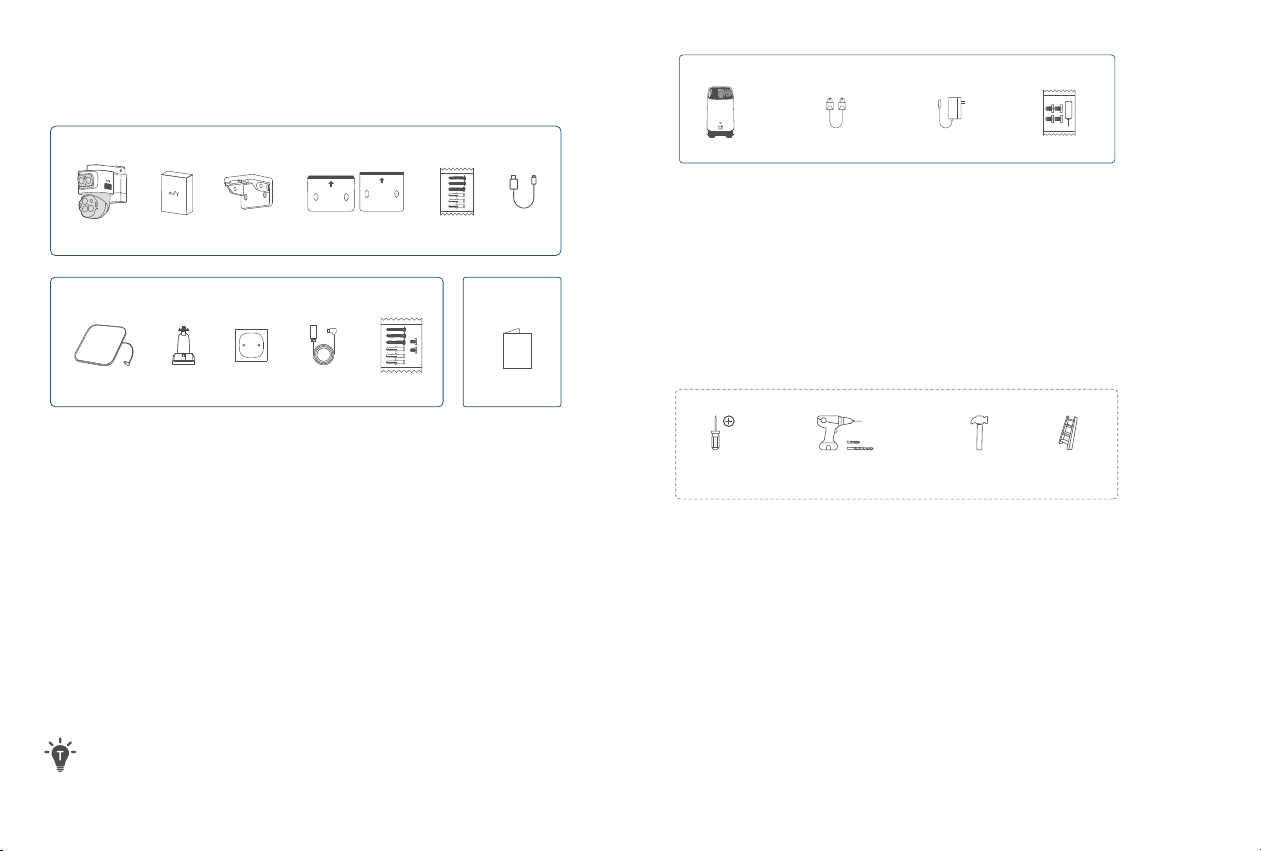
HomeBase S380
❷
Ethernet Cable
❸
Power Adapter
❹
Reset Pin & Hard Drive Screw Pack
Tools You Will Need
What's in the Box
Contact support@eufy.com if anything is missing.
❶ ❸
UP
WALL MOUNT
INWARD
TOP MOUNT
❹
❻
⓬
❼ ❽
❾ ❿
⓫
❺
QSG
❷
❶
Cameras
❼
Solar Panels
❷
Rechargeable Battery
(Pre-installed or
Included Separately)
❽
Solar Panel Mounting
Brackets
❸
Camera Mounting
Brackets
❾
Positioning Stickers for Solar
Panel Mounting Bracket
❹
Positioning Stickers for
Camera Mount
❿
Solar Panel Extension Cables
❺
Screw Packs (Camera)
⓫
Screw Packs (Solar Panel)
❻
USB Charging Cables
⓬
QSG
For Camera Installation
For Solar Panel Installation
For HomeBase Setup *Only available in 2-cam/4-cam kit.
Other
× 1/2/4
× 1/2/4
× 1
× 1
× 1 × 1 × 1
× 1/2/4 × 1/2/4
× 1/2/4 × 1/2/4 × 1/2/4 × 1/2/4
× 1/2/4 × 1/2/4 × 1/2/4
The number of cameras and the types of accessories
vary depending on the kit you purchase.
#1 Phillips
Screwdriver
Power Drill & Drill Bits
Pilot holes: 1.5 mm (1/16 in)
Wall anchors: 6 mm (15/64 in)
Hammer Ladder
3 4
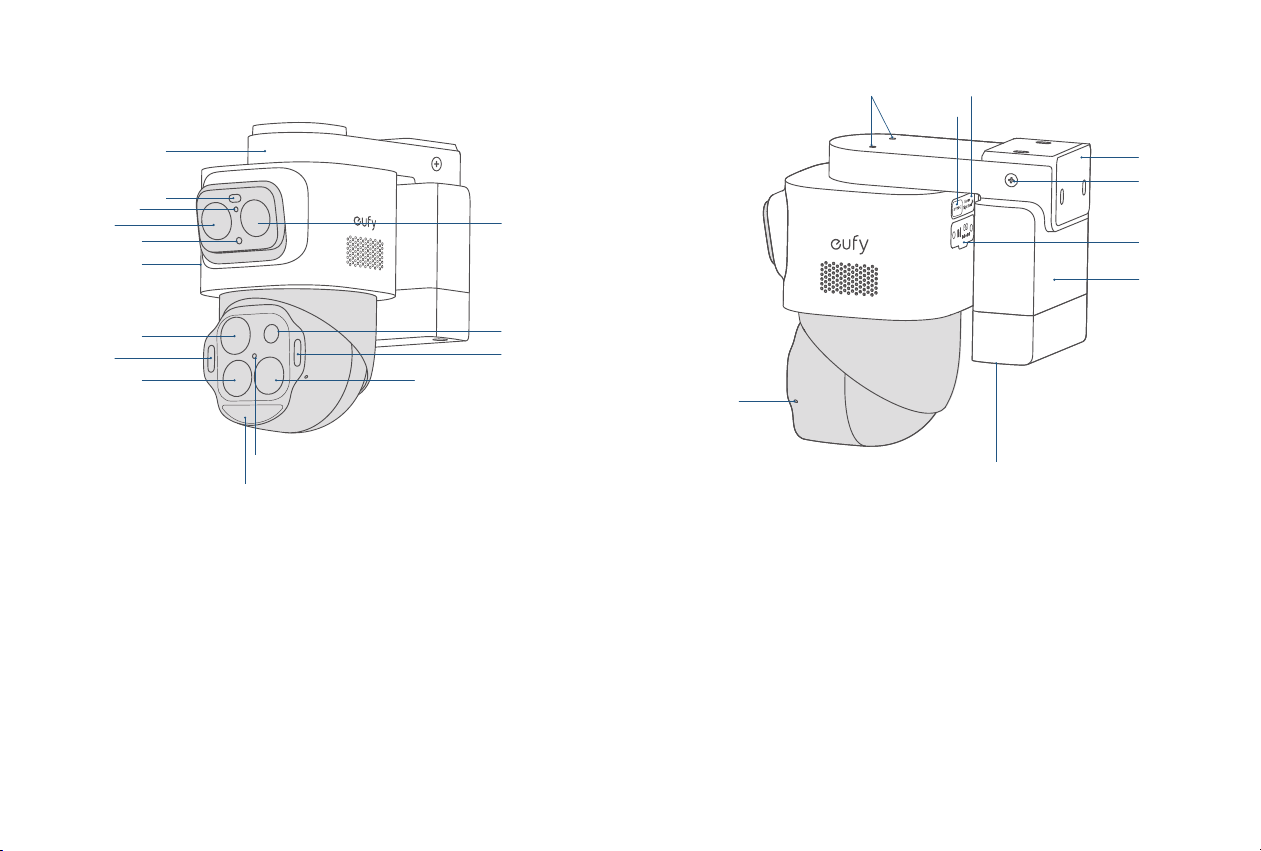
At a Glance
➃
➁
➇
➆
➀
➂
➃
➃
➆
➁
➄
➇
➂
➈
➅
①
Mounting Base
②
Spotlight
③
Photosensitive Sensor
④
Camera Lens
⑤
LED Indicator
⑥
Speaker
⑦
Warning Light
⑧
PIR Sensor
⑨
Radar Sensor
➀
➂
➃
➄
➅
➇
➆
➁
➄
①
Solar Panel Mounting Holes
②
Microphone
③
Battery Holder
④
Fusion Link Port & SD Card Slot
⑤
Spring Screw
⑥
Mounting Bracket
⑦
USB-C Charging Port
⑧
SYNC Button
5 6
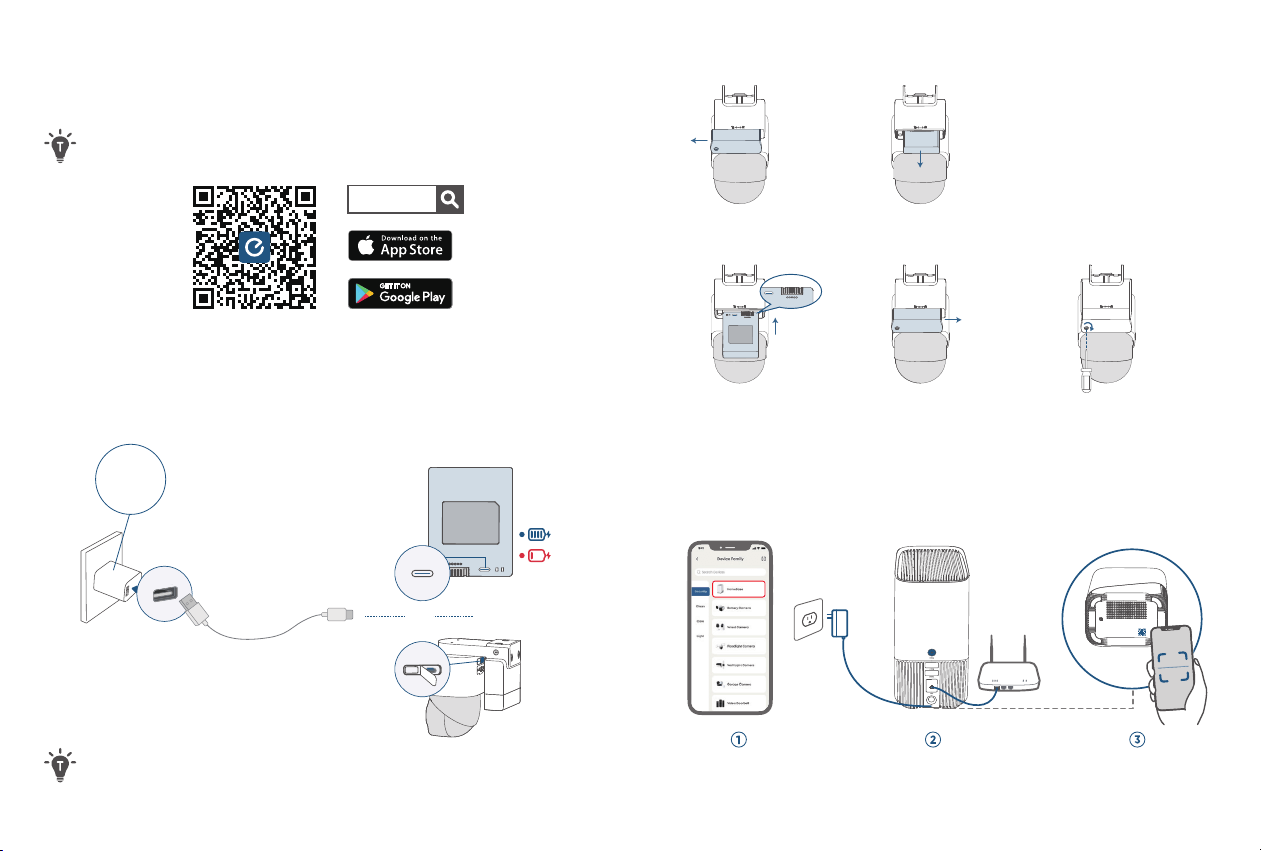
Before Mounting
1. Download eufy App
Make sure your app is updated to the latest version.
eufy
2. Fully Charge the Camera
Charge the camera directly or take out the battery for
charging.
SYNC
SYNC
Charger Output:
5V
⎓
2A
6-8 Hours
or
You can check the battery level in the app.
To Install/Uninstall the Battery
3. Add HomeBase (Optional)
Follow the in-app instructions to add HomeBase.
Add HomeBase Connect Scan via the app
①
Push le to open
③
Reinstall the
battery
④
Push right to
close
⑤
Lock the spring
screw
②
Remove the battery
7 8
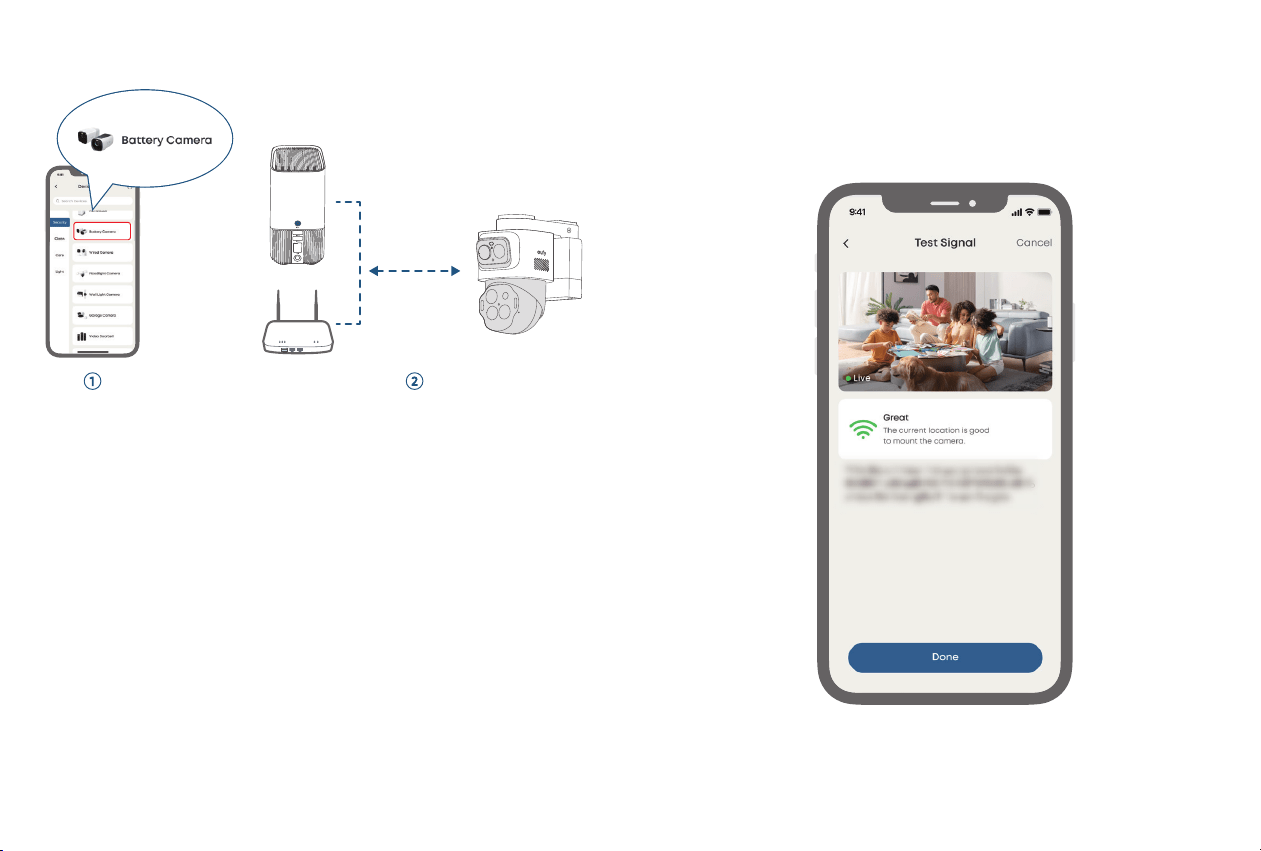
5. Recheck in the App
Check before installation:
• Strong Wi-Fi signal
• Smooth live streaming
4. Add eufyCam S4
< 3.3 (1 m)
Add camera Connect to HomeBase or router
9 10
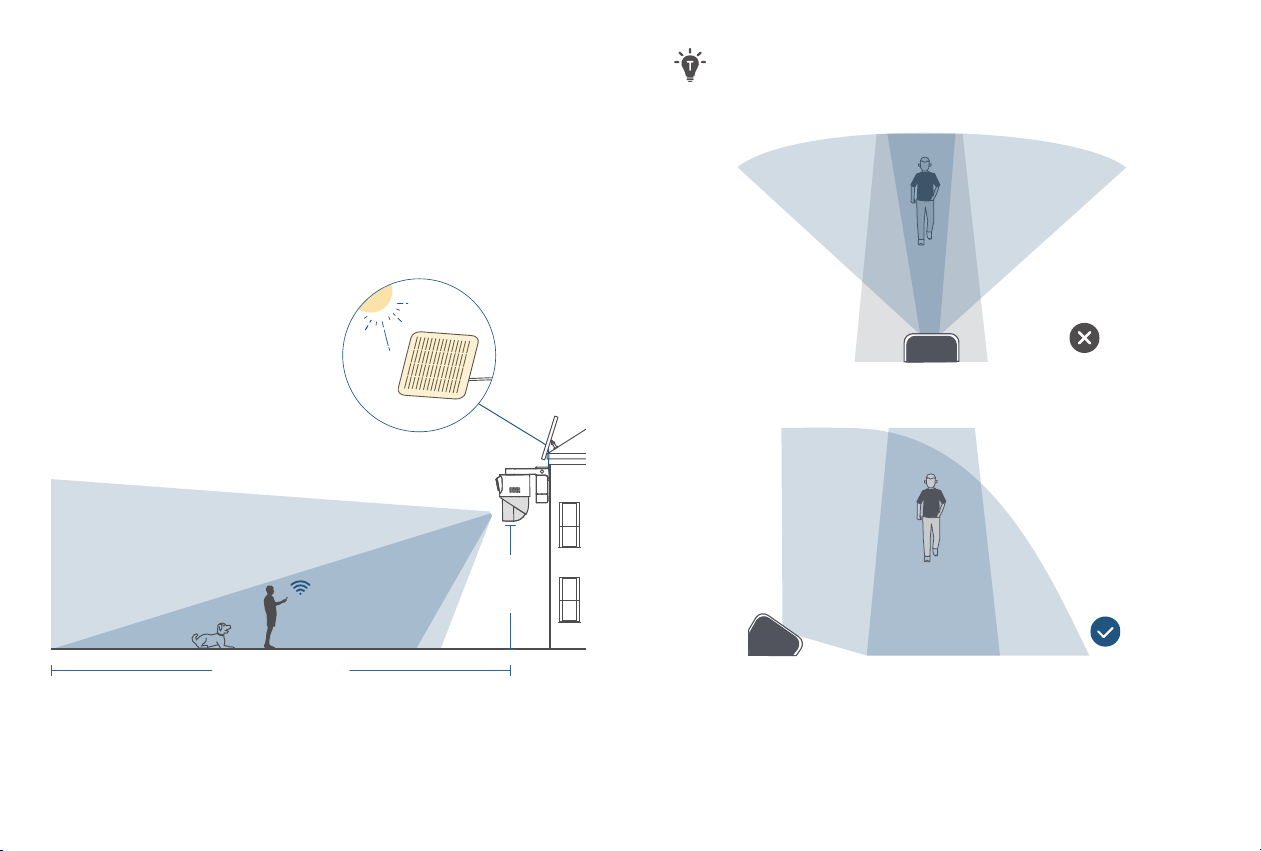
6. Choose a Location
Recommended location:
• Height of 2 m to 3 m (7 to 10 )
• Where solar panels get enough sunlight
• Strong Wi-Fi signal
Camera Field-of-View
Up to 40 (12m)
7-10
(2-3 m)
Motion
Detection Zone
To avoid missed detections, install the cameras at an
angle rather than directly facing the monitoring area.
Blind Spot Blind Spot
11 12
UP
WALL MOUNT
INWARD
TOP MOUNT
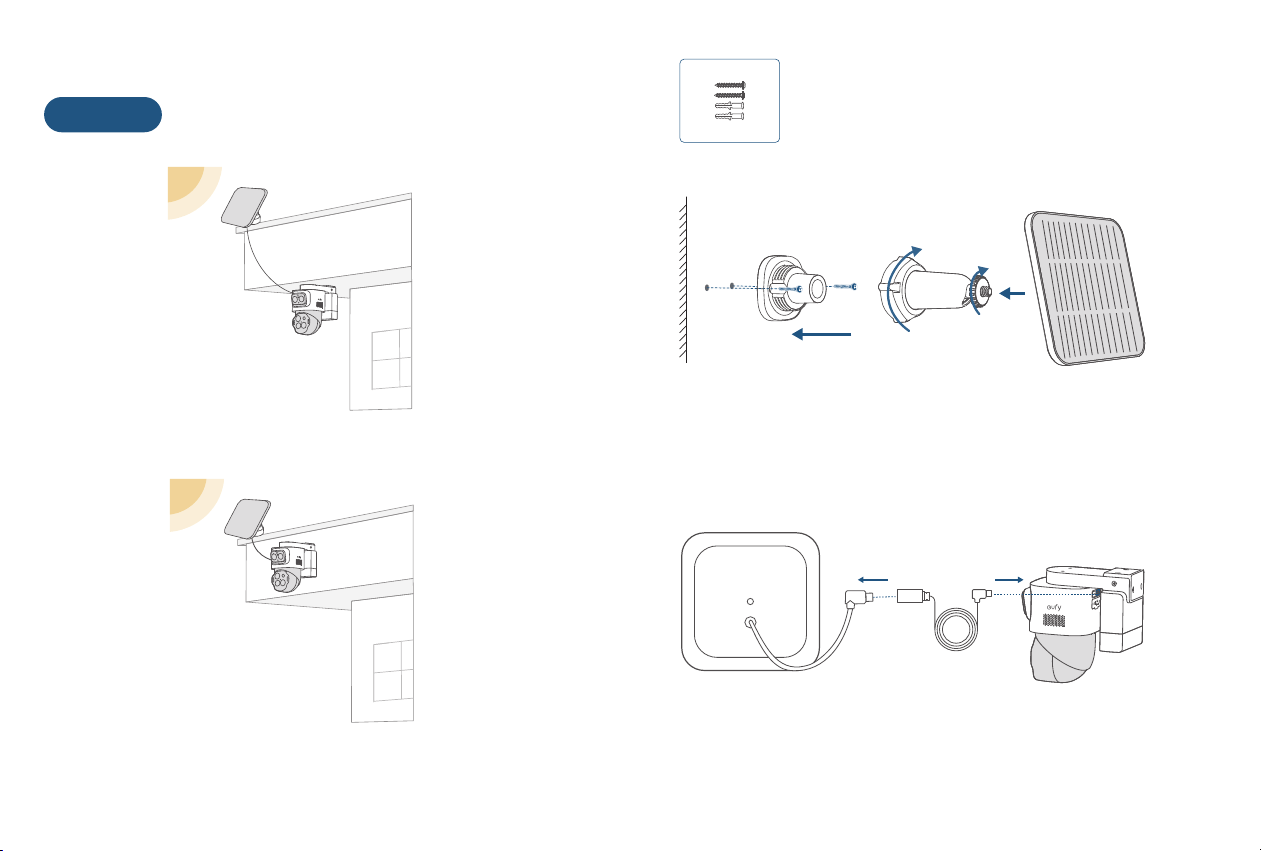
Mount the Solar Panel
Flexible Mounting (Best Sunlight)
Top Mounting
Wall Mounting
Option 1
④ Connect the solar panel to the camera
① Install the base
② Tighten the small knob
③ Tighten the large knob
① ③
②
13 14
UP
WALL MOUNT
INWARD
TOP MOUNT
SYNC
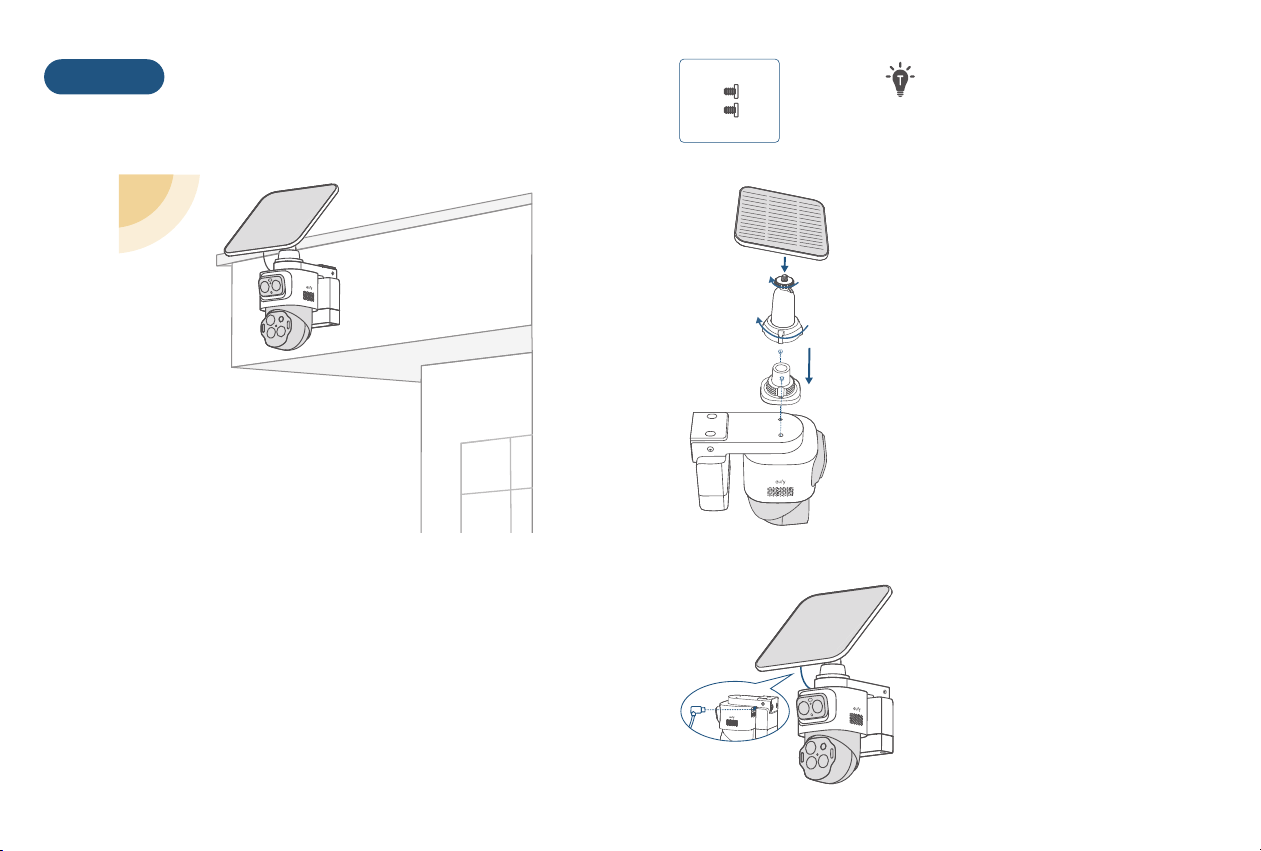
Integrated Mounting (Less Drilling)
Option 2
Wall Mounting Only
Please use the 8 mm screws to
install the solar panel onto the
camera.
①
③
②
① Install the base
② Tighten the small knob
③ Tighten the large knob
④ Connect the solar panel to
the camera
15 16
UP
WALL MOUNT
INWARD
TOP MOUNT
INWARD
TOP MOUNT
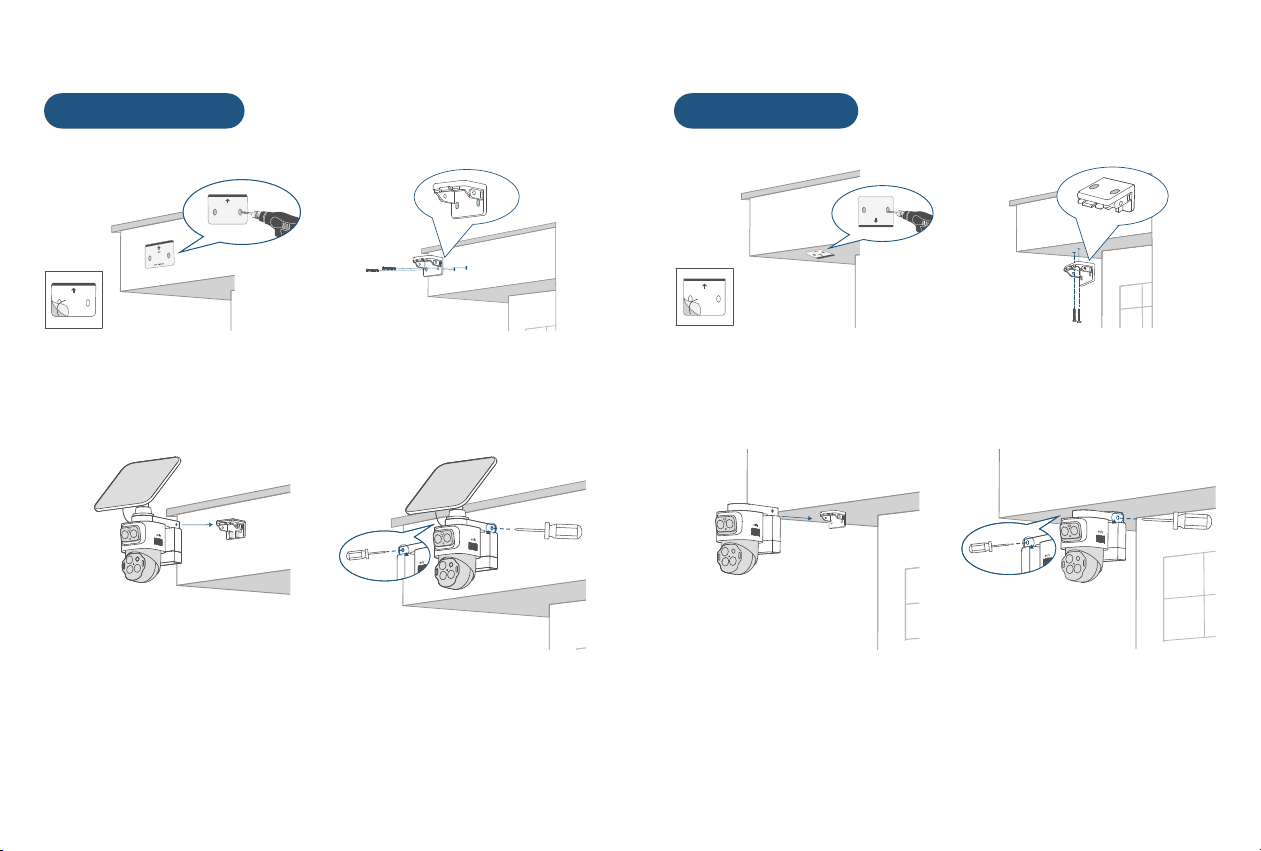
Mount the Camera
UP
WALL MOUNT
INWARD
TOP MOUNT
UP
WALL MOUNT
①
Position & Drill holes
②
Install the Mounting Bracket
③
Insert the camera
④
Lock the 2 spring screws
①
Position & Drill holes
②
Install the Mounting Bracket
③
Insert the camera
④
Lock the 2 spring screws
Wall Mounting Top Mounting
17 18
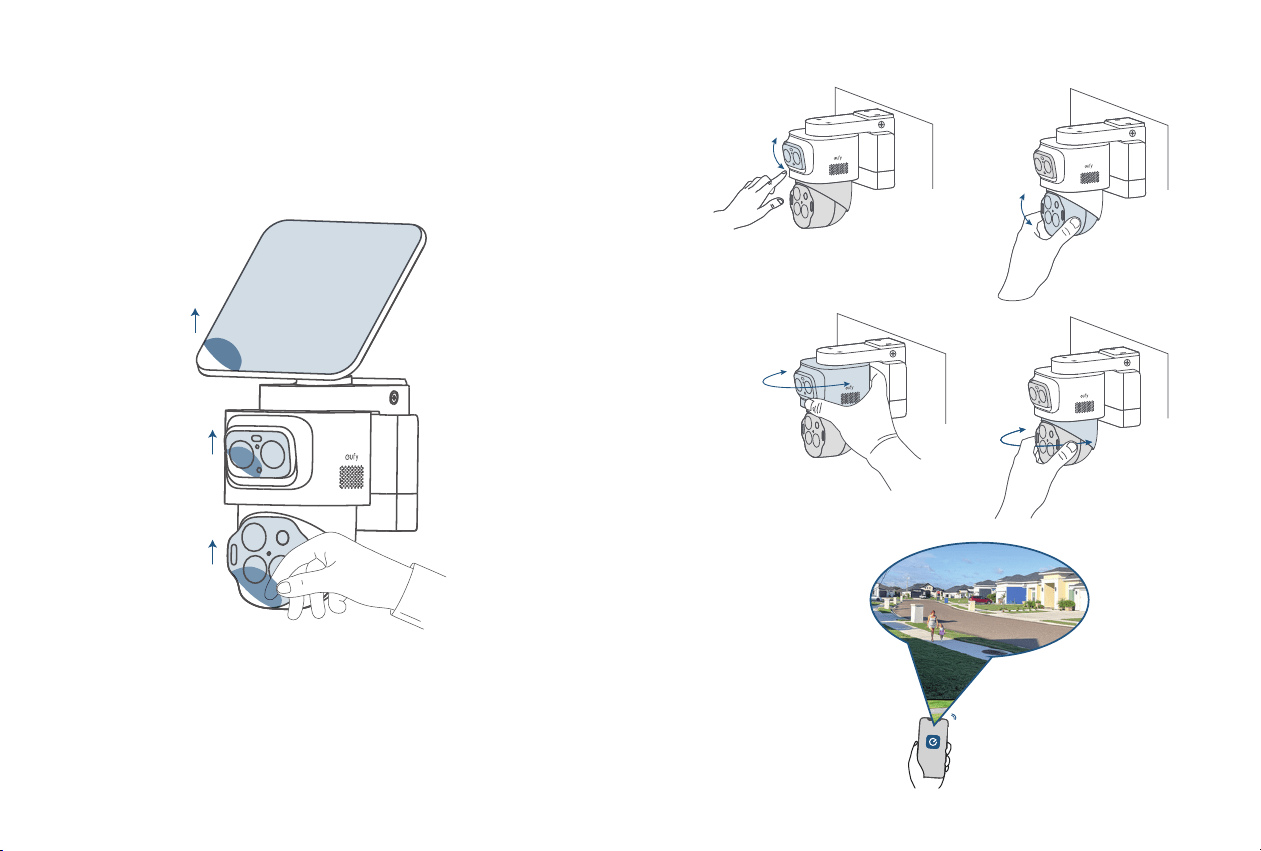
Aer Mounting
Adjust the Camera Field of View
① Remove the protective film
② Rotate the camera to the optimal angle
30°
a
b
c d
355°355°
180°
20°-90°
19 20
Find Out More
Congratulations! Now you're all set to use your eufyCam S4!
Please explore more in the eufy app.
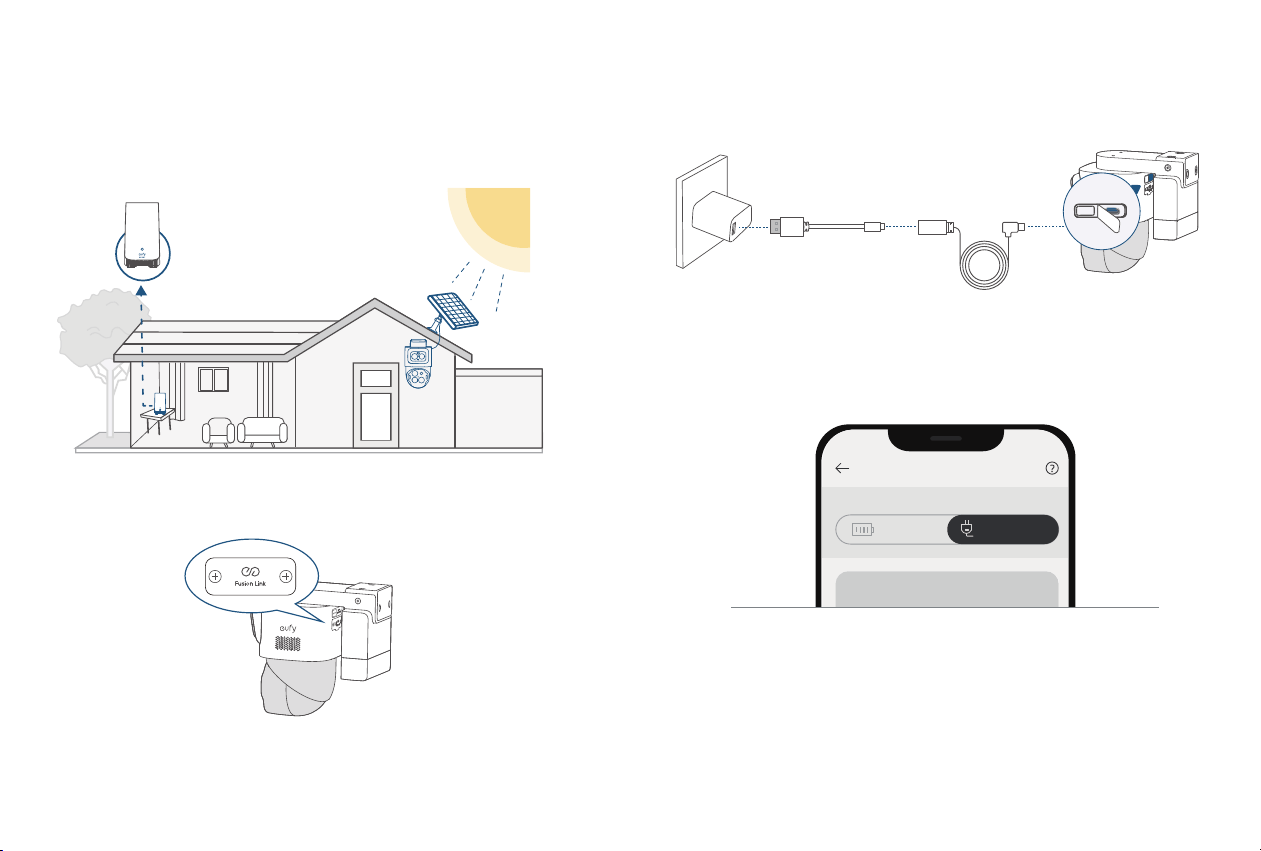
HomeBase
Fusion Link
Fusion Link serves as an expansion port for future eufy
accessories, including support for long-range image
transmission. Learn more at support.eufy.com.
Set Up the Wired Mode
① Connect the camera to a 5V/3A adapter.
SYNC
SYNC
5V
/
3A
USB-C Cable
Extension Cable
② Switch to Wired Mode in the eufy app and enjoy 24/7
surveillance.
Working Mode
Power Manager
Battery
Direct power
Customer Service
12-month limited warranty
support@eufy.com
support.au.eufy.com (AU)
(US) +1 (800) 988 7973
@EufyOfficial
@EufyOfficial
@EufyOfficial
Australian and New Zealand customers, please scan the QR
code for the warranty information: