Anker Innovations Limited. All rights reserved. eufy Security and
eufy Security Logo are trademarks of Anker Innovations Limited,
registered in the United States and other countries. All other
trademarks are the property of their respective owners.
51005002587 V01
QUICK
START GUIDE
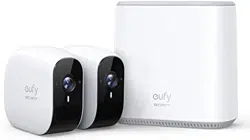
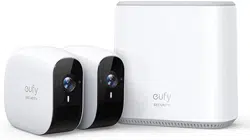
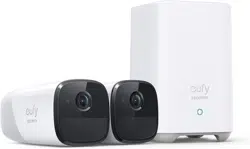
eufyCam 2 Pro
WIRE-FREE HD SECURITY CAMERA
Anker Innovations Limited. All rights reserved. eufy Security and
eufy Security Logo are trademarks of Anker Innovations Limited,
registered in the United States and other countries. All other
trademarks are the property of their respective owners.
51005002587 V01
QUICK
START GUIDE
eufyCam 2 Pro
WIRE-FREE HD SECURITY CAMERA

EN
01
TABLE OF
CONTENTS
What's Included
02
Product Overview
03
Adding eufyCam 2 Pro
04
Mounting the Camera
05
Charging eufyCam 2 Pro
10
Notice
11
English 01
Deutsch 15
Español 25
Français 35
Italiano 45
Nederlands 55
Portuguese 65
ةي
ِ
ب
َ
ر
َ
عل
75

EN
01
TABLE OF
CONTENTS
What's Included
02
Product Overview
03
Adding eufyCam 2 Pro
04
Mounting the Camera
05
Charging eufyCam 2 Pro
10
Notice
11
English 01
Deutsch 15
Español 25
Français 35
Italiano 45
Nederlands 55
Portuguese 65
ةي
ِ
ب
َ
ر
َ
عل
75
02
EN EN
03
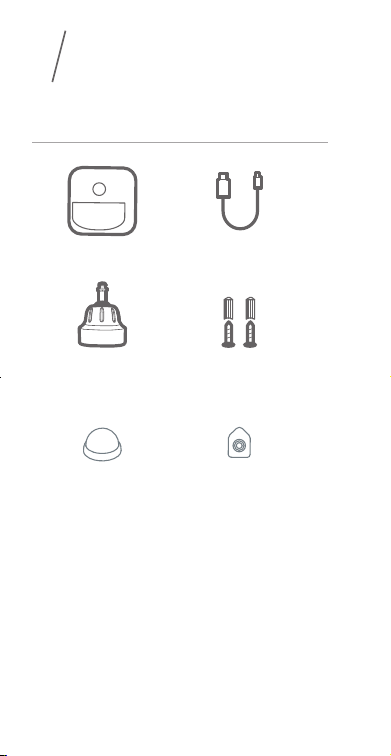
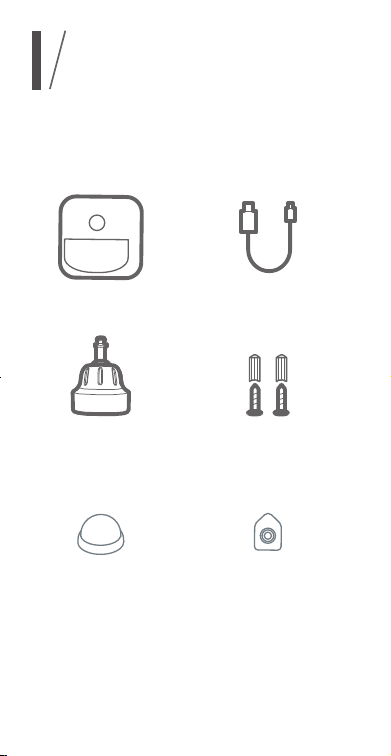
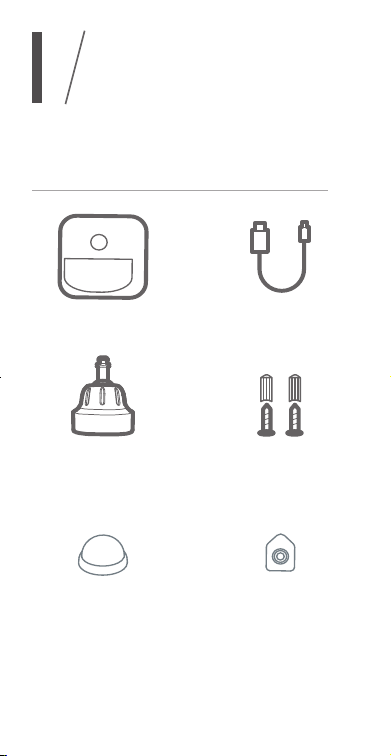
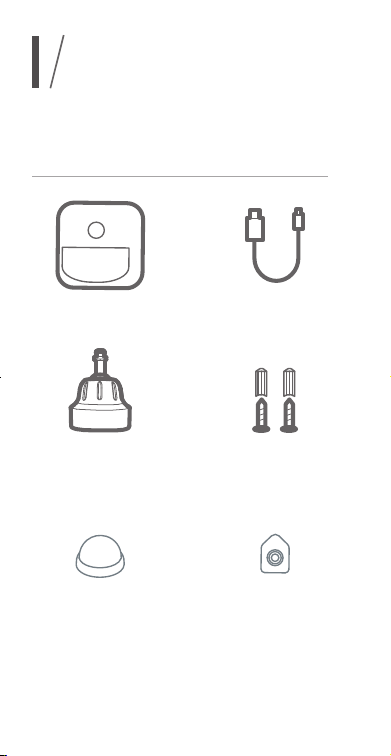
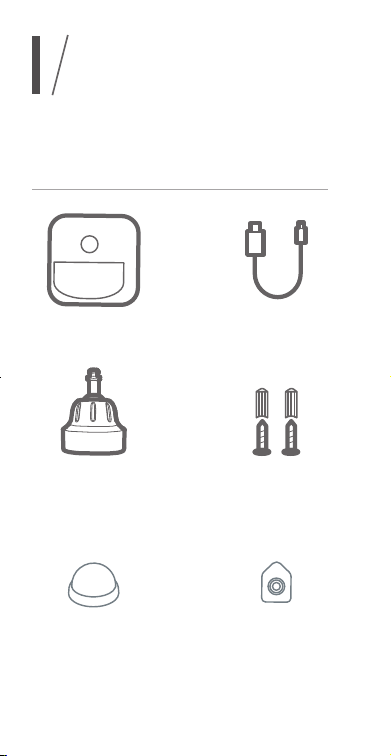
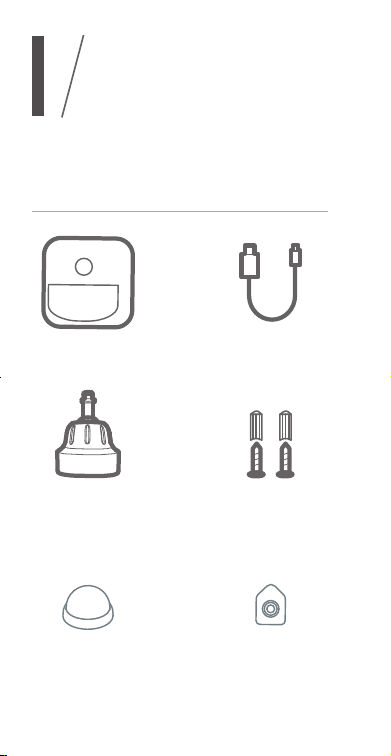
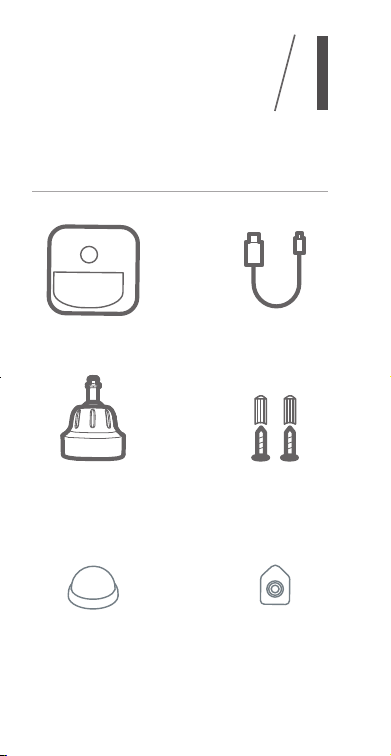
WHAT’S
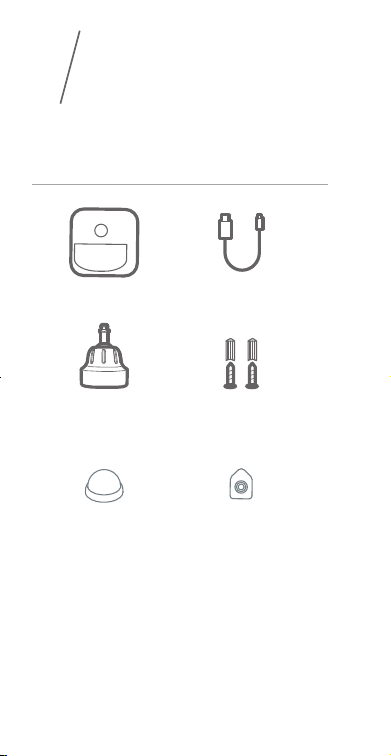
INCLUDED
1
For eufyCam 2 Pro installation
eufyCam 2 Pro
(T8140)
Micro-USB
Charging Cable
Mounting
Bracket
Mounting Screws
and Anchors
2
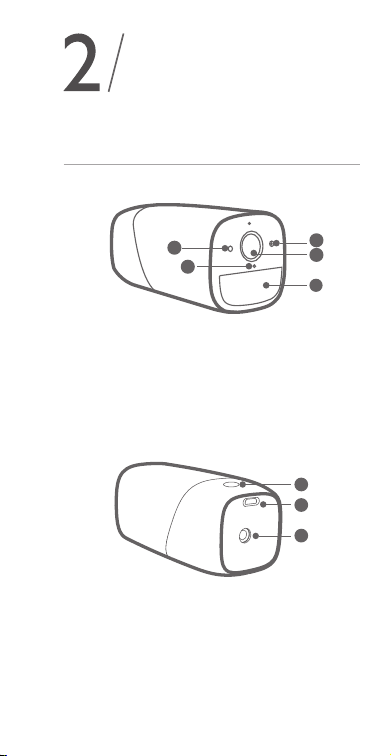
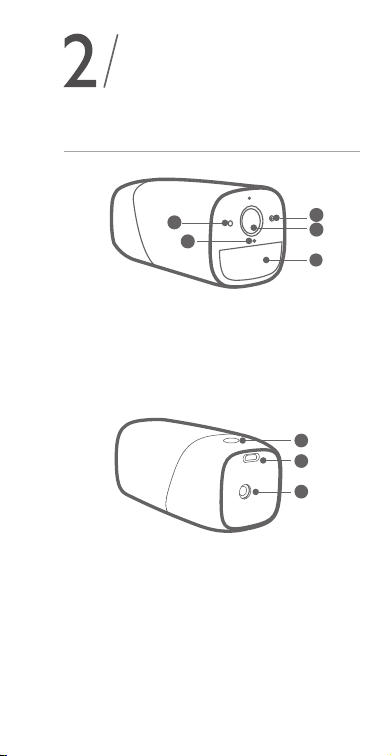
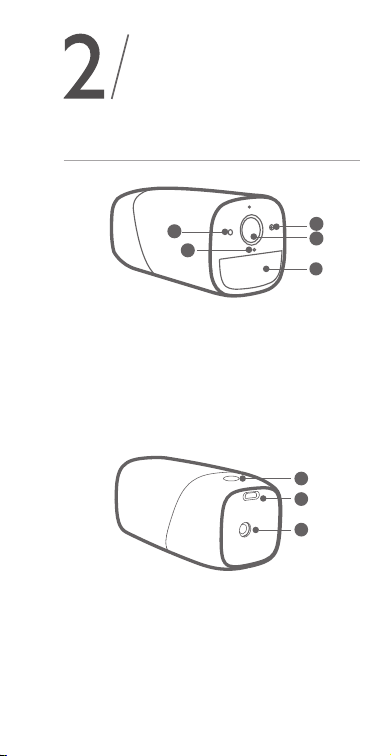
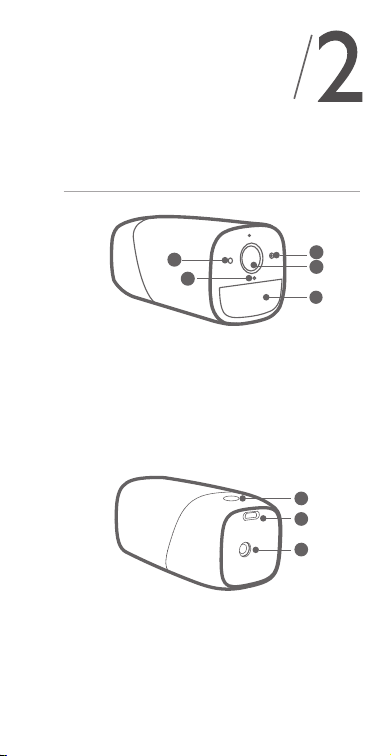
PRODUCT
OVERVIEW
eufyCam 2 Pro
6
3
4
5
2
1
8
7
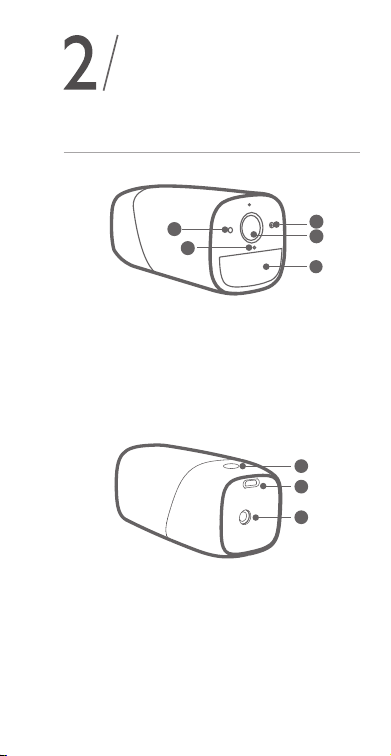
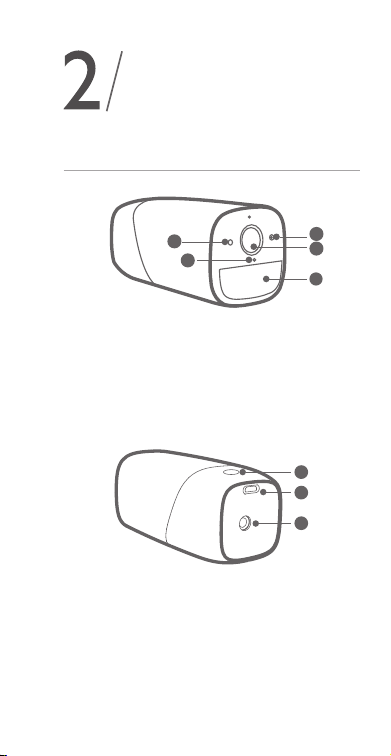
1. Photosensitive sensor
2. Camera lens
3. Motion sensor
4. Microphone
5. LED indicator
6
3
4
5
2
1
8
7
6. Sync button
7. USB charging port
8. Screw hole
Indoor
Mount
Hook
(for Indoor Mount)

02
EN EN
03
WHAT’S
INCLUDED
1
For eufyCam 2 Pro installation
eufyCam 2 Pro
(T8140)
Micro-USB
Charging Cable
Mounting
Bracket
Mounting Screws
and Anchors
2
PRODUCT
OVERVIEW
eufyCam 2 Pro
6
3
4
5
2
1
8
7
1. Photosensitive sensor
2. Camera lens
3. Motion sensor
4. Microphone
5. LED indicator
6
3
4
5
2
1
8
7
6. Sync button
7. USB charging port
8. Screw hole
Indoor
Mount
Hook
(for Indoor Mount)
04
EN EN
05
3
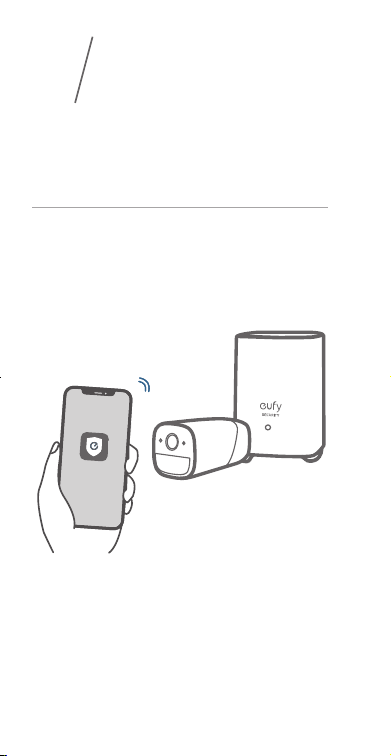
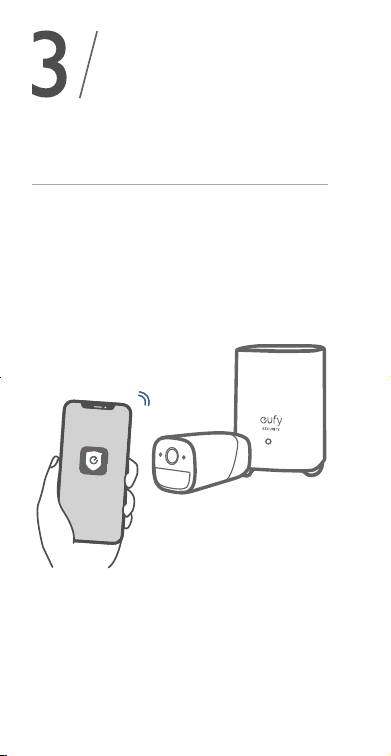
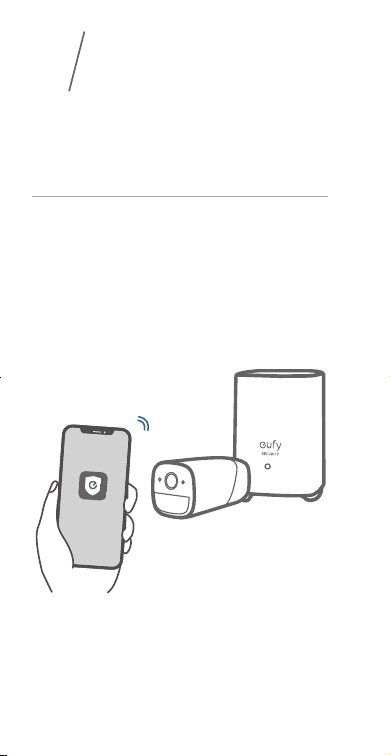
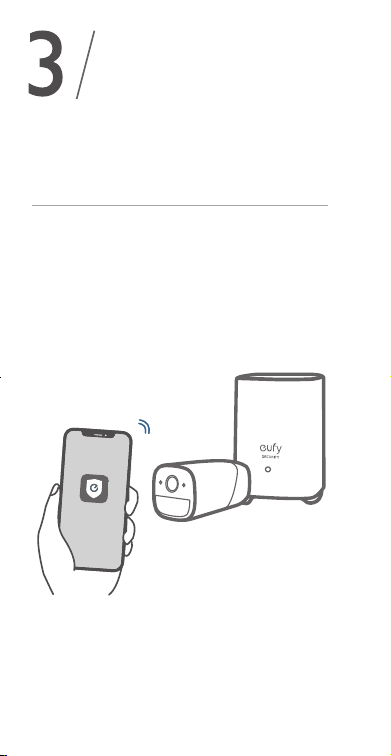
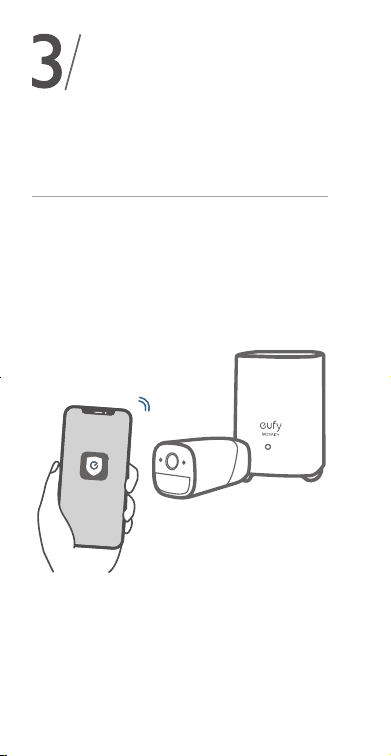
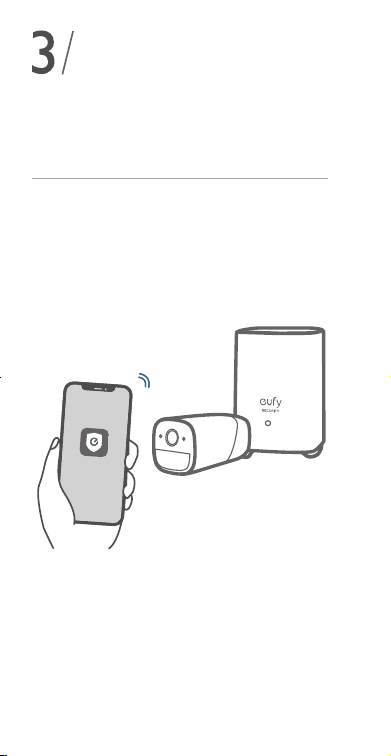
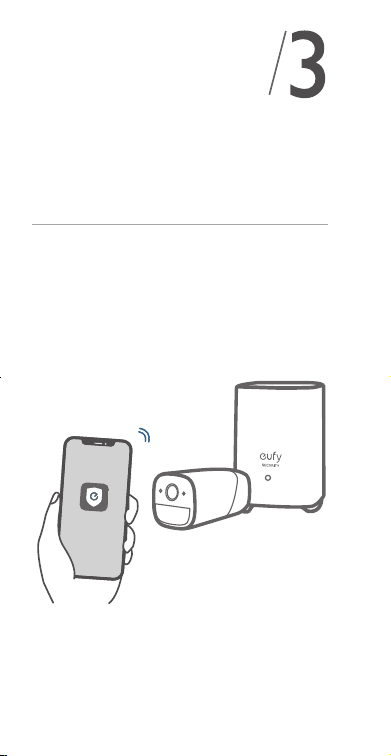
ADDING
Adding eufyCam 2 Pro to Your
Existing System
On eufy Security app, follow the onscreen
instructions to add your eufy devices. Choose
Add Device, then select eufyCam 2 Pro to add
it to your system.
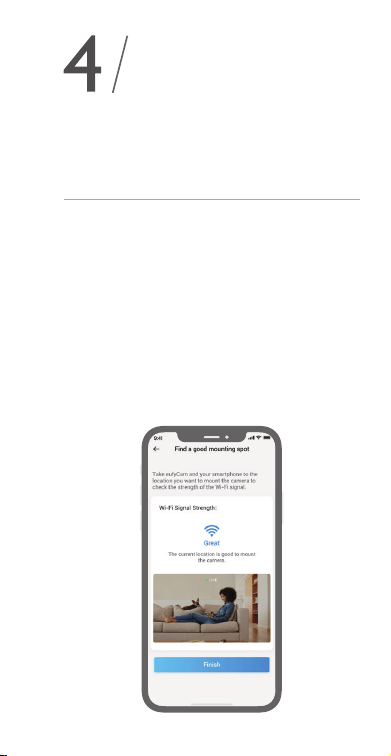
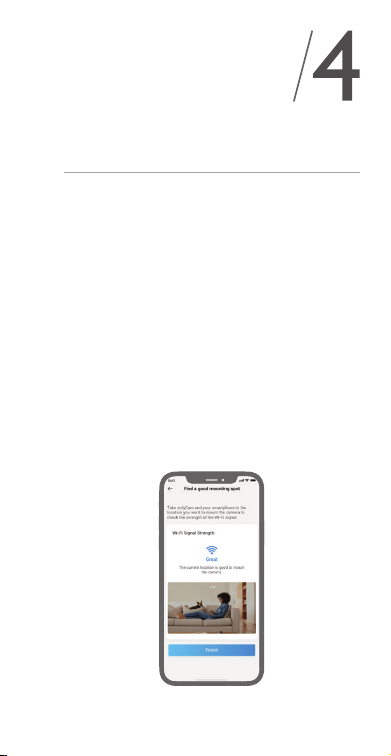
4
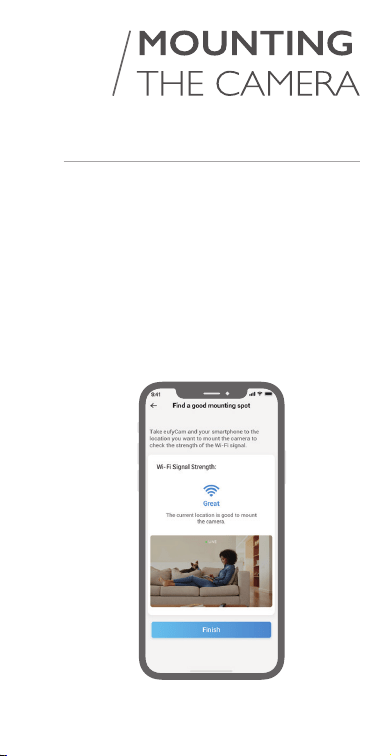
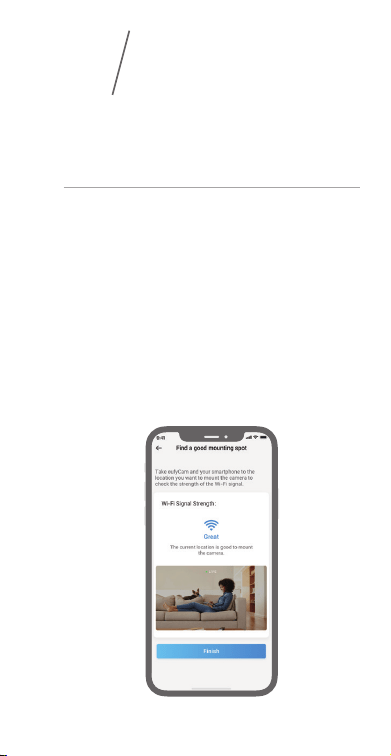
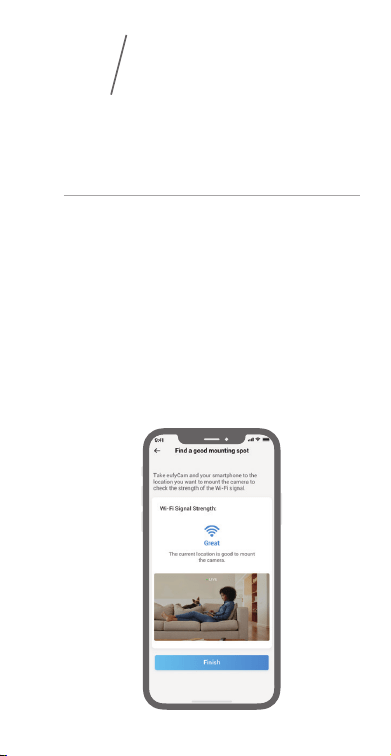
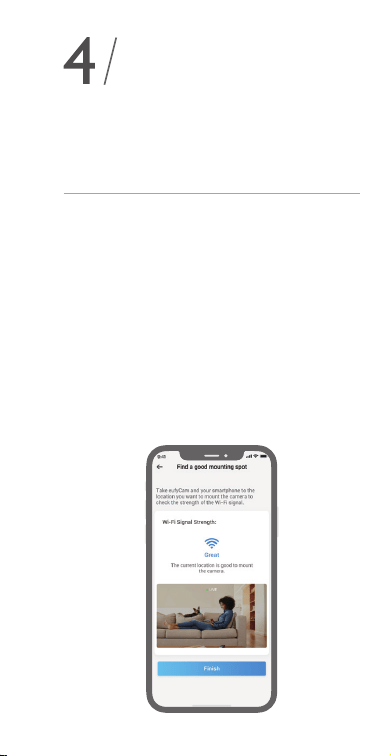
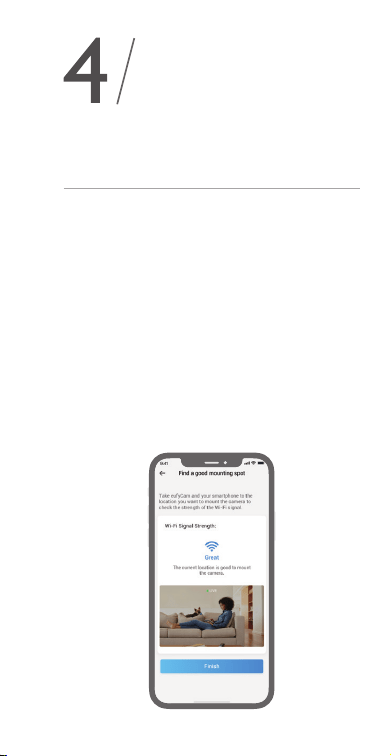
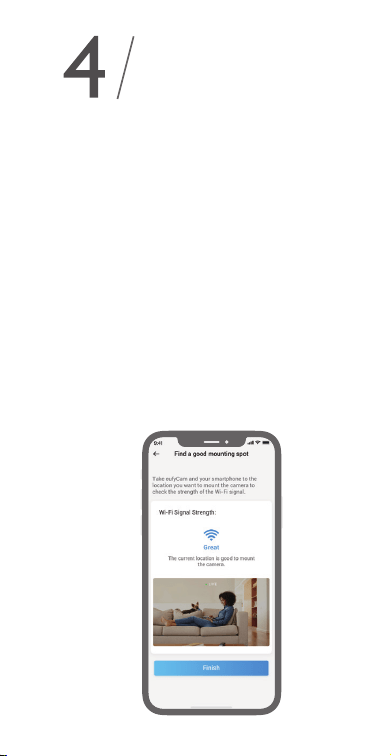
Find a Good Mounting Spot
To nd a spot to mount eufyCam 2 Pro, you need
to test wireless signal strength.
①
Open the eufy Security app, go to Camera
Settings > Mounting Guide.
②
To test the wireless signal strength, take your
camera and phone to the location where you
want to mount the camera.
③
Move the camera as close to the HomeBase 2
as possible if the wireless.
EUFYCAM 2 Pro
04
EN EN
05
3
ADDING
Adding eufyCam 2 Pro to Your
Existing System
On eufy Security app, follow the onscreen
instructions to add your eufy devices. Choose
Add Device, then select eufyCam 2 Pro to add
it to your system.
4
Find a Good Mounting Spot
To nd a spot to mount eufyCam 2 Pro, you need
to test wireless signal strength.
①
Open the eufy Security app, go to Camera
Settings > Mounting Guide.
②
To test the wireless signal strength, take your
camera and phone to the location where you
want to mount the camera.
③
Move the camera as close to the HomeBase 2
as possible if the wireless.
EUFYCAM 2 Pro
06
EN EN
07
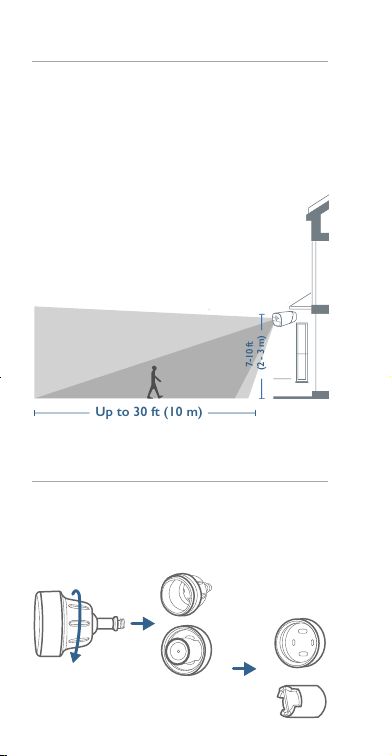
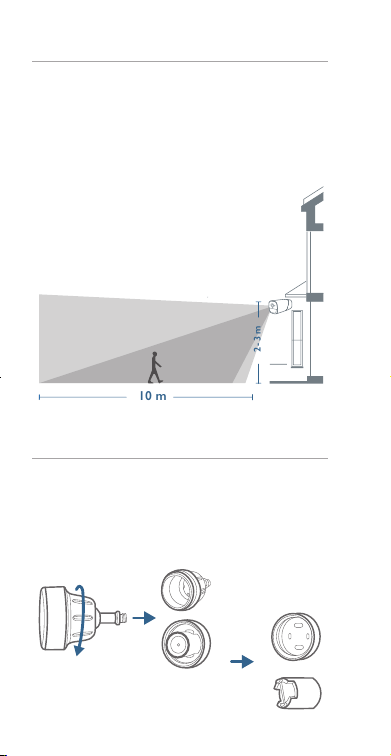
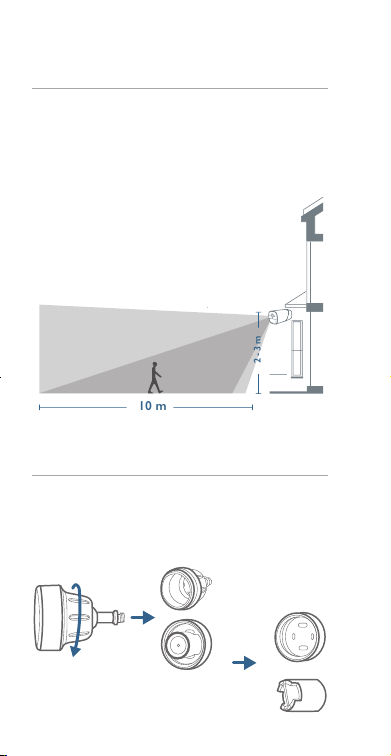
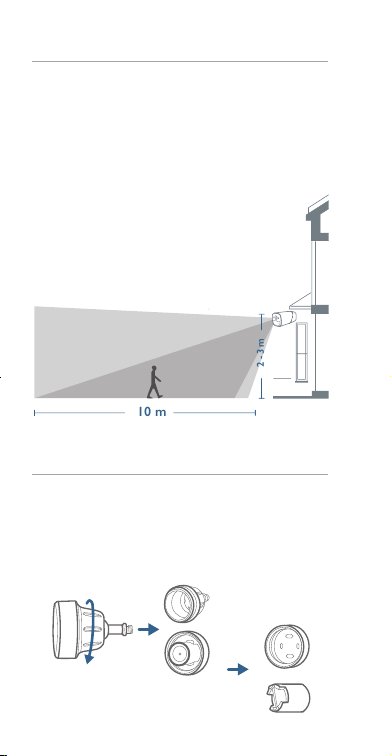
Select Height and Location
Hang eufyCam 2 Pro 7-10 ft (2-3 m) above the
ground. This height maximizes the detection
range of the motion sensor of eufyCam 2 Pro.
Avoid placing eufyCam 2 Pro under direct
sunlight.
Up to 30 ft (10 m)
7-10 ft
(2 - 3 m)
Camera eld
of view
Motion
Detection
Zone
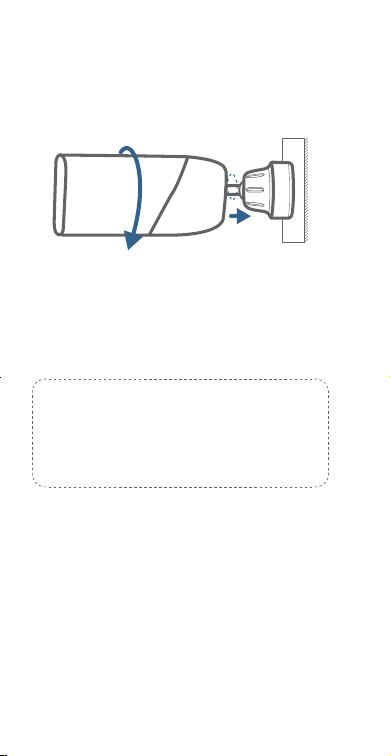
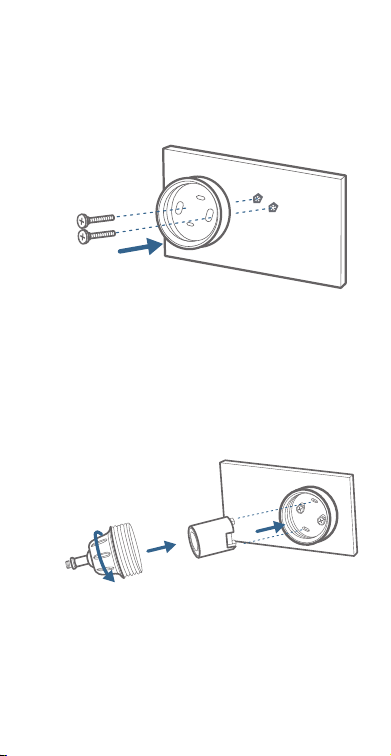
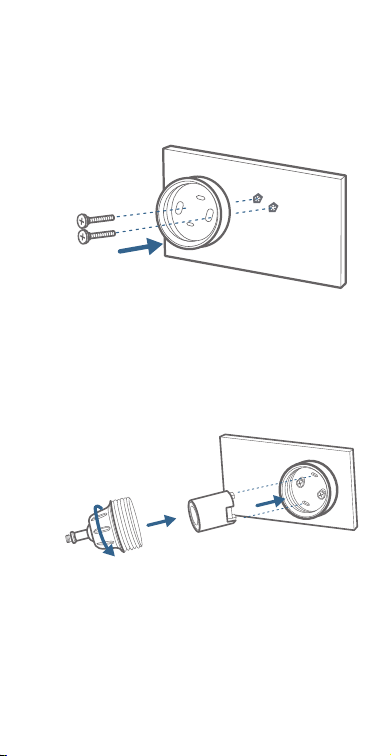
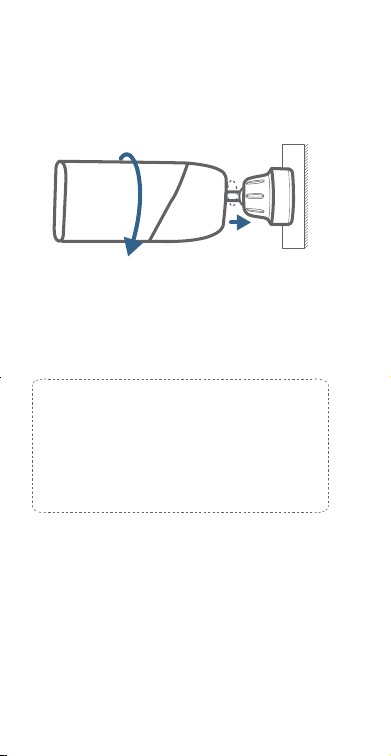
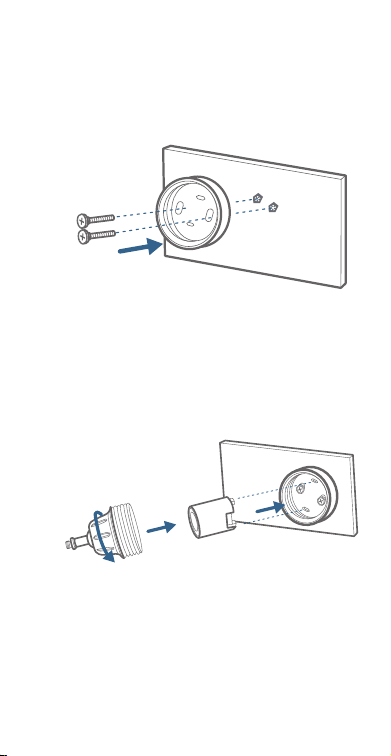
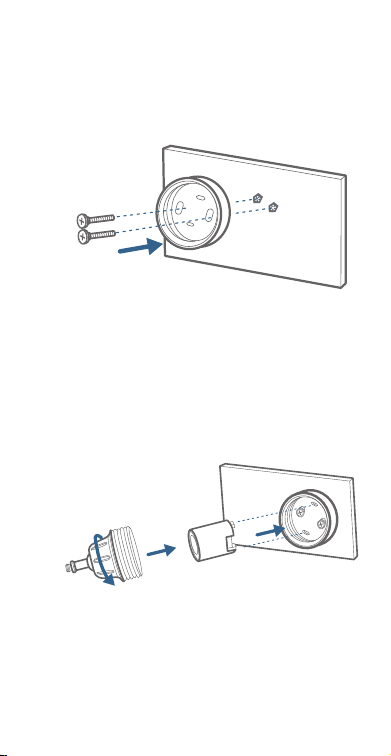
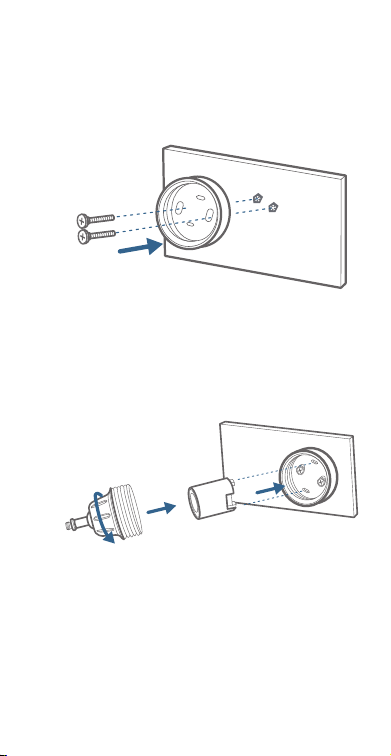
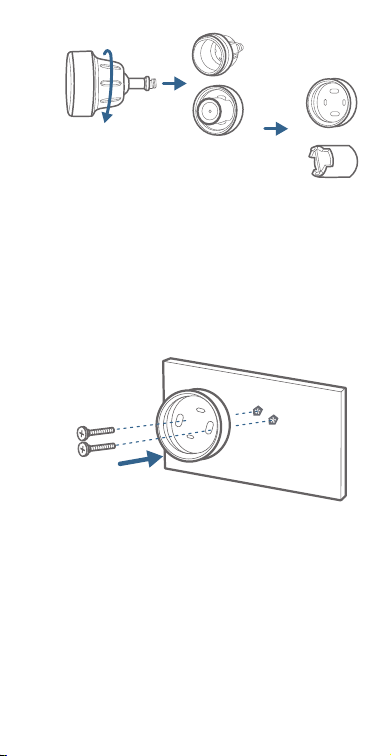
Mount the camera
The camera can be mounted both indoors and
outdoors.
1. Turn the knob of the mounting bracket
clockwise to loosen and disassemble it.
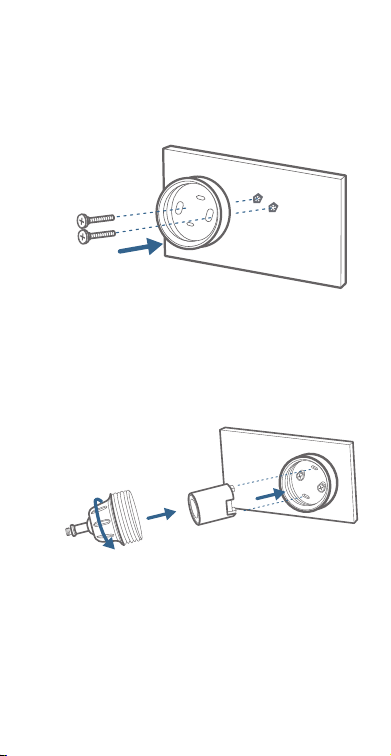
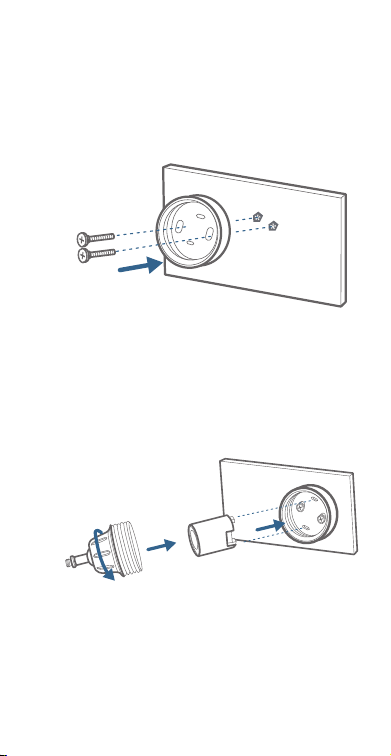
2. Drill holes with a 15/64 inch (5.95mm)
drill bit, then insert the anchors into the
holes; anchors are necessary for walls that
are made out of hard materials such as
concrete, brick, or stucco.
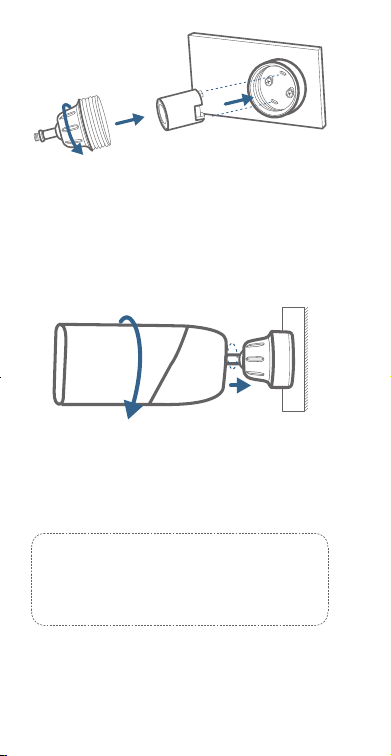
3. Firmly screw the base of the mounting bracket
onto the wall. Fasten the ball knob of the
bracket to the base of the bracket.
06
EN EN
07
Select Height and Location
Hang eufyCam 2 Pro 7-10 ft (2-3 m) above the
ground. This height maximizes the detection
range of the motion sensor of eufyCam 2 Pro.
Avoid placing eufyCam 2 Pro under direct
sunlight.
Up to 30 ft (10 m)
7-10 ft
(2 - 3 m)
Camera eld
of view
Motion
Detection
Zone
Mount the camera
The camera can be mounted both indoors and
outdoors.
1. Turn the knob of the mounting bracket
clockwise to loosen and disassemble it.
2. Drill holes with a 15/64 inch (5.95mm)
drill bit, then insert the anchors into the
holes; anchors are necessary for walls that
are made out of hard materials such as
concrete, brick, or stucco.
3. Firmly screw the base of the mounting bracket
onto the wall. Fasten the ball knob of the
bracket to the base of the bracket.
08
EN EN
09
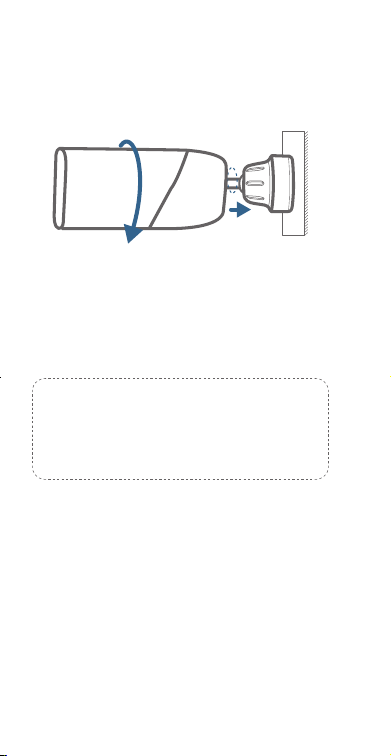
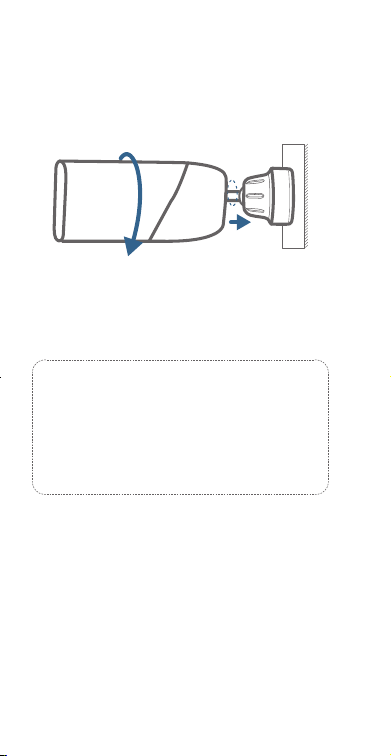
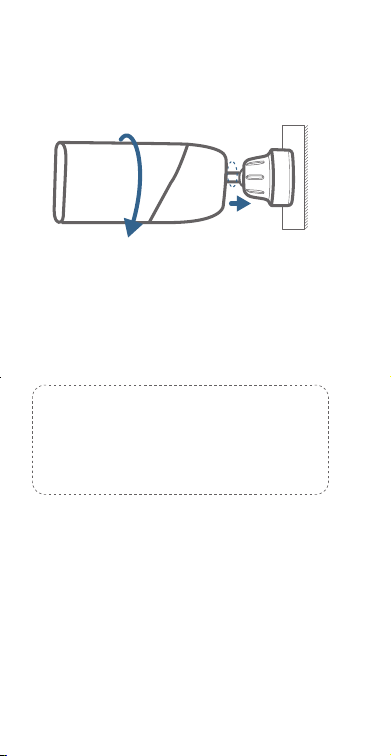
4. Tighten eufyCam 2 Pro to the mounting
bracket and adjust the viewing angle by
checking the live stream feed in the Eufy
Security app.
Tips:
For troubleshooting, check Help on the
eufy Security App.
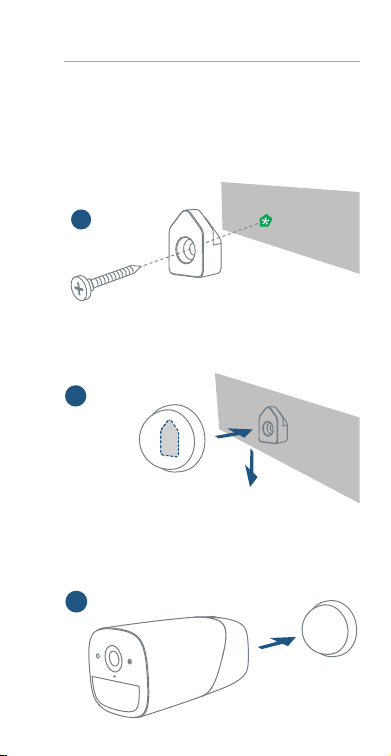
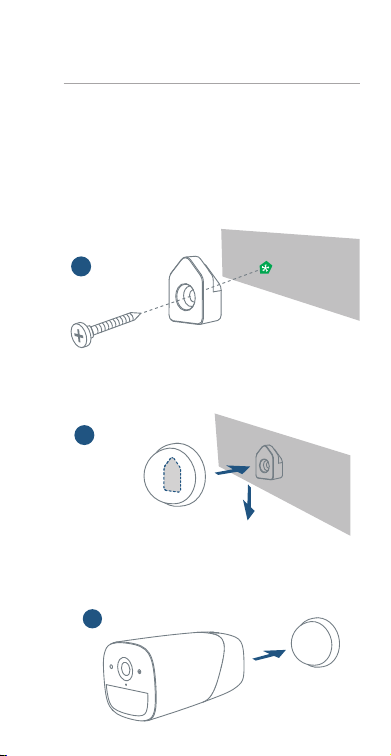
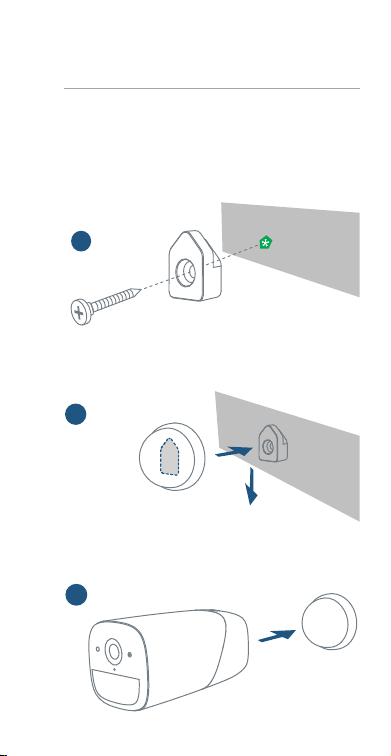
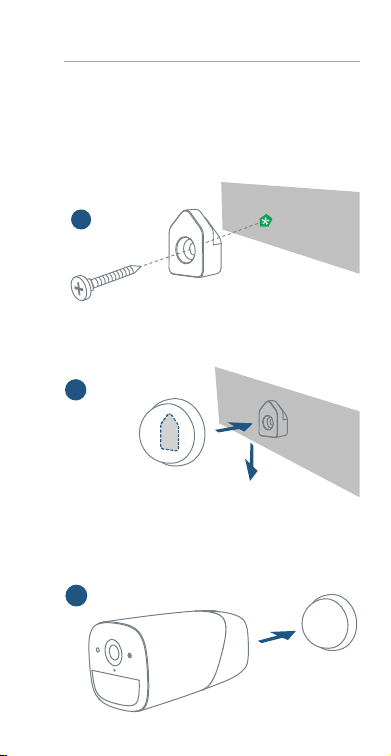
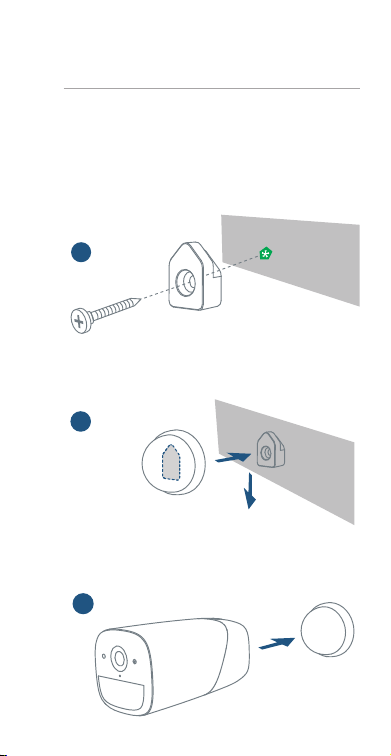
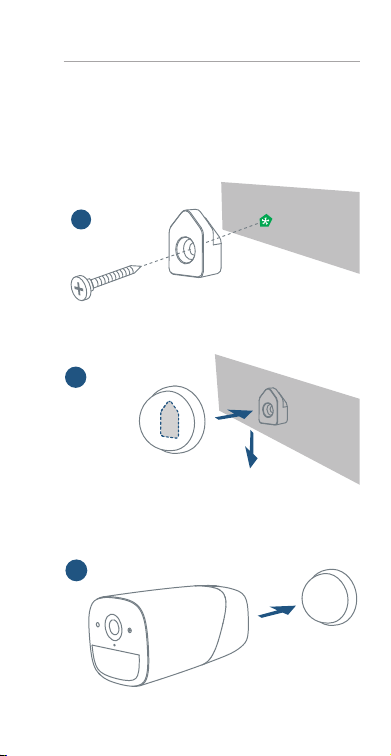
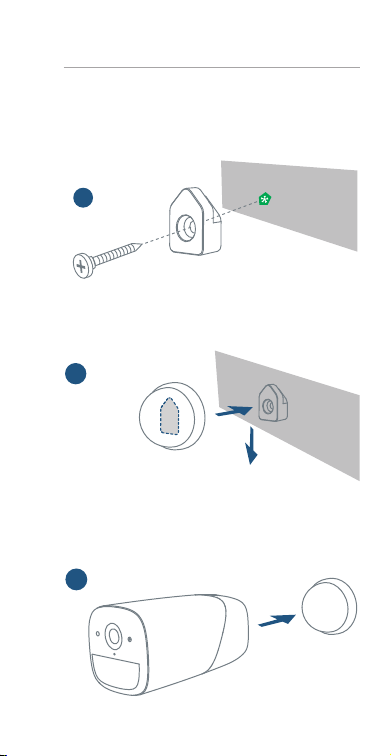
Mount the Camera Indoors
Stick the camera directly to any at surface
made out of iron. Or you can use the indoor
mount to mount the camera:
1. Drill a hole. Use the included anchor if it’s
drywall and fasten the hook.
a
2. Hang the indoor mount on the hook.
b
3. Attach eufyCam 2 Pro to the indoor mount
and adjust the viewing angle.
c
08
EN EN
09
4. Tighten eufyCam 2 Pro to the mounting
bracket and adjust the viewing angle by
checking the live stream feed in the Eufy
Security app.
Tips:
For troubleshooting, check Help on the
eufy Security App.
Mount the Camera Indoors
Stick the camera directly to any at surface
made out of iron. Or you can use the indoor
mount to mount the camera:
1. Drill a hole. Use the included anchor if it’s
drywall and fasten the hook.
a
2. Hang the indoor mount on the hook.
b
3. Attach eufyCam 2 Pro to the indoor mount
and adjust the viewing angle.
c
10
EN EN
11
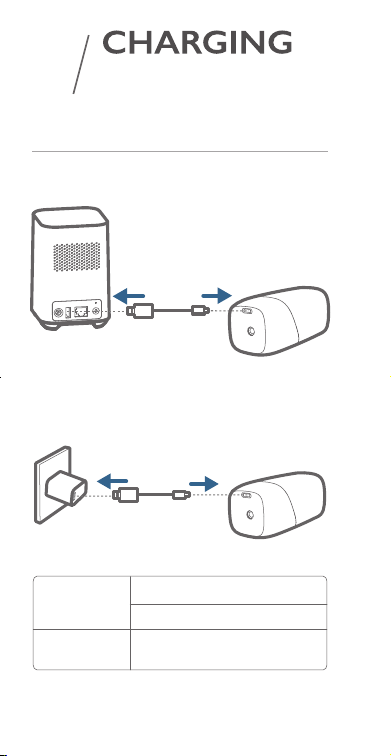
EUFYCAM 2 PRO
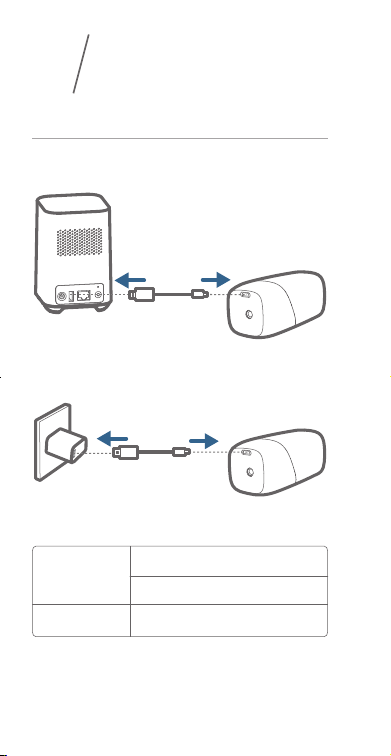
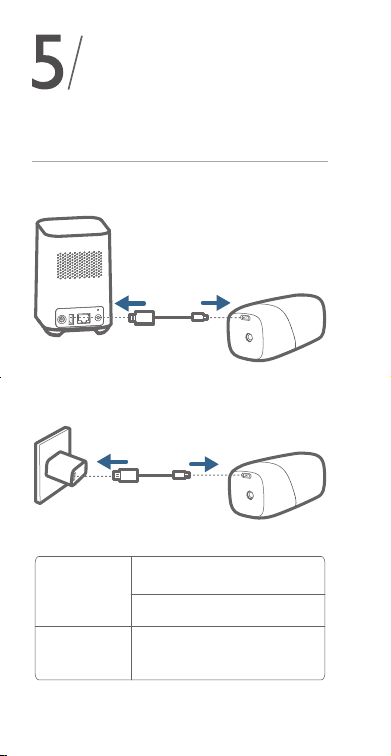
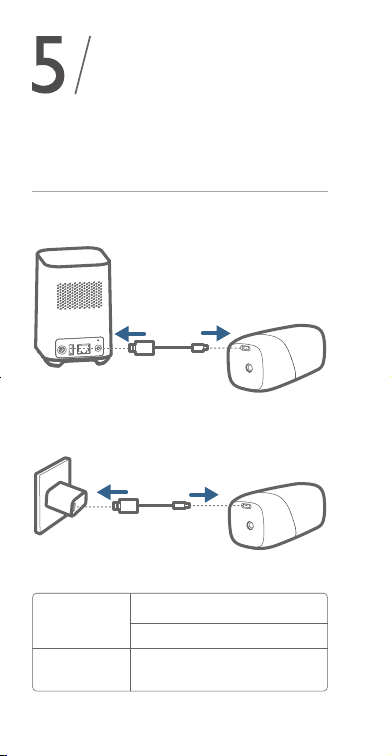
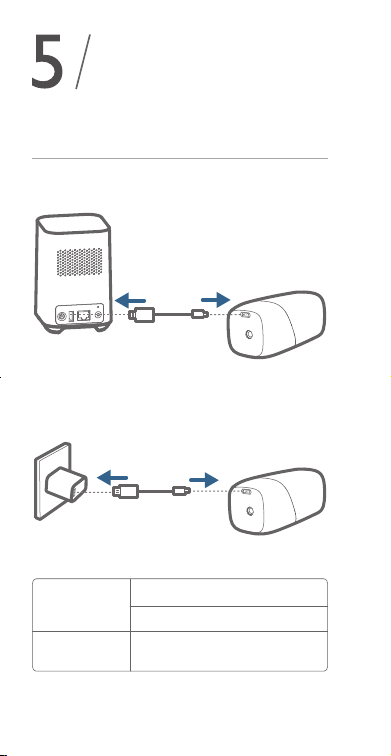
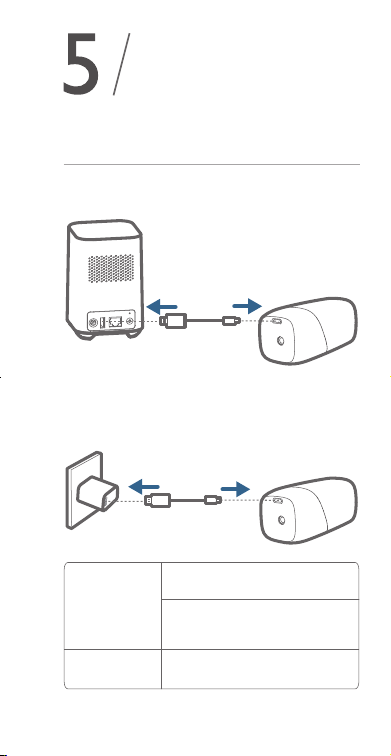
5
Charge eufyCam 2 Pro
Method 1
Method 2
5V / 2A
LED
indication
Charging
time
12 hours
Fully charged: Off
Charging: Steady blue
6
NOTICE
FCC Statement
This device complies with Part 15 of the FCC Rules.
Operation is subject to the following two conditions:
(1) this device may not cause harmful interference,
and (2) this device must accept any interference
received, including interference that may cause
undesired operation.
Warning:
Changes or modications not expressly
approved by the party responsible for compliance
could void the user's authority to operate the
equipment.
Note:
This equipment has been tested and found
to comply with the limits for a Class B digital device,
pursuant to Part 15 of the FCC Rules. These limits
are designed to provide reasonable protection
against harmful interference in a residential
installation.
This equipment generates, uses and can radiate
radio frequency energy and, if not installed and
used in accordance with the instructions, may cause
harmful interference to radio communications.
However, there is no guarantee that interference
will not occur in a particular installation. If this
equipment does cause harmful interference to radio
or television reception, which can be determined
by turning the equipment off and on, the user is
encouraged to try to correct the interference by
one or more of the following measures:
(1) Reorient or relocate the receiving antenna.
(2) Increase the separation between the equipment
and receiver.
(3) Connect the equipment into an outlet on a circuit
different from that to which the receiver is connected.

10
EN EN
11
EUFYCAM 2 PRO
5
Charge eufyCam 2 Pro
Method 1
Method 2
5V / 2A
LED
indication
Charging
time
12 hours
Fully charged: Off
Charging: Steady blue
6
NOTICE
FCC Statement
This device complies with Part 15 of the FCC Rules.
Operation is subject to the following two conditions:
(1) this device may not cause harmful interference,
and (2) this device must accept any interference
received, including interference that may cause
undesired operation.
Warning:
Changes or modications not expressly
approved by the party responsible for compliance
could void the user's authority to operate the
equipment.
Note:
This equipment has been tested and found
to comply with the limits for a Class B digital device,
pursuant to Part 15 of the FCC Rules. These limits
are designed to provide reasonable protection
against harmful interference in a residential
installation.
This equipment generates, uses and can radiate
radio frequency energy and, if not installed and
used in accordance with the instructions, may cause
harmful interference to radio communications.
However, there is no guarantee that interference
will not occur in a particular installation. If this
equipment does cause harmful interference to radio
or television reception, which can be determined
by turning the equipment off and on, the user is
encouraged to try to correct the interference by
one or more of the following measures:
(1) Reorient or relocate the receiving antenna.
(2) Increase the separation between the equipment
and receiver.
(3) Connect the equipment into an outlet on a circuit
different from that to which the receiver is connected.
12
EN EN
13
(4) Consult the dealer or an experienced radio/TV
technician for help.
FCC Radio Frequency Exposure Statement
The device has been evaluated to meet general RF
exposure requirements. The device can be used in
xed/mobile exposure condition. The min separation
distance is 20 cm.
Notice:
Shielded cables
All connections to other computing devices must be
made using shielded cables to maintain compliance
with FCC regulations.
FCC ID:2AOKB-T8114
The following importer is the responsible party.
Company Name: POWER MOBILE LIFE, LLC
Address: 400 108th Ave NE Ste 400, Bellevue, WA
98004-5541
Telephone:1-800-988-7973
This product complies with the radio
interference requirements of the European
Community.
Declaration of Conformity
Hereby, Anker Innovations Limited declares that
this device is in compliance with the essential
requirements and other relevant provisions of
Directive 2014/53/EU. For the declaration of
conformity, visit the Web site www.eufylife.com
Do not use the Device in the environment at
too high or too low temperature, never expose
the Device under strong sunshine or too wet
environment.
The suitable temperature for eufyCam 2 Pro and
accessories is -20°C-50°C.
When charging, please place the device in an
environment that has a normal room temperature
and good ventilation.
It is recommended to charge the device in an
environment with a temperature that ranges from
5°C~25°C.
RF exposure information: The Maximum Permissible
Exposure (MPE) level has been calculated based
on a distance of d=20 cm between the device and
the human body. To maintain compliance with RF
exposure requirement, use product that maintain a
20cm distance between the device and human body.
CAUTION RISK OF EXPLOSION IF BATTERY IS
REPLACED BY AN INCORRECT TYPE. DISPOSE
OF USED BATTERIES ACCORDING TO THE
INSTRUCTIONS.
Wi-Fi Operating Frequency
Range: 2412~2472MHz ; Wi-Fi Max
Output Power: 17.47 dBm
Anker Innovations Deutschland GmbH | Georg-
Muche-Strasse 3-5, 80807 Munich, Germany
Anker Technology (UK) Ltd | Suite B, Fairgate
House, 205 Kings Road, Tyseley, Birmingham, B11
2AA, United Kingdom
This product is designed and manufactured
with high quality materials and components,
which can be recycled and reused.
This symbol means the product must not be
discarded as household waste, and should be
delivered to an appropriate collection facility
for recycling. Proper disposal and recycling helps
protect natural resources, human health and the
environment. For more information on disposal
and recycling of this product, contact your local
municipality, disposal service, or the shop where
you bought this product.

DE
15
14
EN
IC Statement
This device complies with Industry Canada licence-
exempt RSS standard(s). Operation is subject to the
following two conditions:
(1) this device may not cause interference, and
(2) this device must accept any interference,
including interference that may cause undesired
operation of the device."
Le présent appareil est conforme aux CNR
d'Industrie Canada applicables aux appareils radio
exempts de licence. L'exploitation est autorisée aux
deux conditions suivantes:
(1) l'appareil nedoit pas produire de brouillage, et
(2) l'utilisateur de l'appareil doit accepter tout
brouillage radioélectrique subi, même si le
brouillage est susceptible d'en compromettre le
fonctionnement."
This Class B digital apparatus complies with
Canadian ICES-003.
Cet appareil numérique de la classe B est conforme
à la norme NMB-003 du Canada.
IC RF Statement:
When using the product, maintain a distance of
20cm from the body to ensure compliance with RF
exposure requirements.
Lors de l'utilisation du produit, maintenez une
distance de 20 cm du corps an de vous conformer
aux exigences en matière d'exposition RF.
INHALTSVERZEICHNIS
Im Lieferumfang enthalten
16
Produktübersicht
17
18
Montieren der Kamera
19
Auaden der eufyCam 2 Pro
24
eufyCam 2 Pro zur Ihrem
existierenden System hinzufügen
16
DE DE
17
IM LIEFERUMFANG
ENTHALTEN
1
Für eufyCam 2 Pro-Installation
eufyCam 2 Pro
(T8140)
Mikro-USB-
Ladekabel
Montage-Halterung Befestigungsschrauben
und Dübel
2
PRODUKT-
ÜBERSICHT
eufyCam 2 Pro
6
3
4
5
2
1
8
7
1. Lichtempndlicher Sensor
2. Kameraobjektiv
3. Bewegungssensor
4. Mikrofon
5. LED-Anzeige
6
3
4
5
2
1
8
7
6. SYNC-Taste
7. USB-Ladeanschluss
8. Schraubenloch
Halterung für
Innenbereich
Haken (für Montage
im Innenbereich)
18
DE DE
19
eufyCam 2 Pro zur Ihrem
existierenden System hinzufügen
eufyCam 2 Pro zur Ihrem
existierenden System hinzufügen
Befolgen Sie in der eufy Security-App die
Anweisungen auf dem Display, um Ihre eufy
Security-Geräte hinzuzufügen. Wählen Sie
Gerät hinzufügen und dann eufyCam 2 Pro, um
das Gerät zu Ihrem System hinzuzufügen.
4
MONTIEREN
DER KAMERA
Einen geeigneten
Befestigungsort nden
Um einen guten Befestigungsort für die eufyCam 2
Pro zu nden, müssen Sie die Stärke des WLAN-
Signals prüfen.
①
Öffnen Sie die eufy Security-App, gehen Sie zu
Kameraeinstellungen> Montageanleitung.
②
Um die Stärke des WLAN-Signals zu testen,
bringen Sie Ihre Kamera und Ihr Telefon an
den Ort, an dem Sie die Kamera montieren
möchten.
③
Bewegen Sie die Kamera so nah wie möglich
an die HomeBase 2, falls das Signal schwach ist.
20
DE DE
21
Höhe und Position wählen
Hängen Sie die eufyCam 2 Pro in einer Höhe
von 2–3 m über dem Boden auf. Dadurch wird
der Erfassungsbereich des Bewegungssensors
der eufyCam 2 Pro maximiert. Bringen Sie die
eufyCam 2 Pro nicht an Orten mit direkter
Sonneneinstrahlung an.
10 m
2 - 3 m
Sichtfeld der
Kamera
Bewegungser-
kennungsbereich
Kamera montieren
Die Kamera kann sowohl im Innen- als auch im
Außenbereich montiert werden.
1. Drehen Sie den Knopf der Montagehalterung
im Uhrzeigersinn, um ihn zu lösen und zu
demontieren.
2. Bohren Sie Löcher mit einem 6-mm-Bohrer
in die Wand und stecken Sie anschließend
die Dübel in die Löcher. Dübel sind für
Wände erforderlich, die aus einem harten
Material wie Beton, Ziegel oder Stuck
bestehen.
3. Schrauben Sie die Basis der
Montagehalterung fest an die Wand.
Befestigen Sie den Kugelknopf der
Halterung an die Basis der Halterung.
22
DE DE
23
4. Befestigen Sie die eufyCam 2 Pro Kamera
an der Montagehalterung und passen Sie
den Blickwinkel an, indem Sie den Live-
Stream über die eufy Security-App prüfen.
Tipps:
Tipps zur Fehlerbehebung nden Sie in
der Hilfe der eufy Security-App.
Die Kamera einem
Innenbereich anbringen
Sie können die Kamera direkt auf einer achen
Oberäche aus Eisen anbringen. Alternativ können
Sie die Halterung für den Innenbereich verwenden:
1. Bohren Sie ein Loch. Falls es sich um eine
Trockenbauwand handelt, verwenden Sie
den im Lieferumfang enthaltenen Dübel und
bringen Sie den Haken an.
a
2. Hängen Sie die Halterung für den Innenbereich
an den Haken
.
b
3. Bringen Sie die eufyCam 2 Pro an der
Halterung für den Innenbereich an und stellen
Sie den Blickwinkel ein.
c
ES
2524
DE
5
AUFLADEN DER
EufyCam 2 Pro
eufyCam 2 Pro auaden
Methode 1
Methode 2
5V / 2A
LED-Anzeige
Ladedauer 12 Stunden
Vollständig aufgeladen: Aus
Ladevorgang: Leuchtet blau
TABLA DE
CONTENIDO
Contenido
26
Descripción del producto
27
28
Montaje de la cámara
29
CARGA DE LA EufyCam 2 Pro
34
Adición de eufyCam 2 Pro
a su sistema existente
26
ES ES
27
CONTENIDO
Para la instalación de la
eufyCam 2 Pro
eufyCam 2 Pro
(T8140)
Cable de carga
micro-USB
Soporte de
montaje
Tornillos y anclajes
de montaje
Soporte para
interiores
Gancho (para el
montaje en interiores)
DESCRIPCIÓN
DEL PRODUCTO
eufyCam 2 Pro
6
3
4
5
2
1
8
7
1. Sensor fotosensible
2. Lente de cámara
3. Sensor de movimiento
4. Micrófono
5. Indicador LED
6
3
4
5
2
1
8
7
6. Botón de sincronización
7. Puerto de carga USB
8. Oricio roscado
28
ES ES
29
Adición de eufyCam 2
a su sistema existente
3
Adición de eufyCam 2 Pro a
su sistema existente
En la aplicación eufy Security, siga las
instrucciones que aparecen en la pantalla para
agregar sus dispositivos de seguridad eufy.
Elija Agregar dispositivo y, a continuación,
seleccione eufyCam 2 Pro para agregarlo a su
sistema.
.system.
MONTAJE DE
LA CÁMARA
4
Localización de un punto de
montaje adecuado
Para localizar un punto de montaje para la cámara
eufyCam 2 Pro, debe probar la intensidad de la señal
inalámbrica.
①
Abra la aplicación eufy Security, vaya a
Conguración de la cámara > Guía de montaje.
②
Para probar la intensidad de la señal inalámbrica,
diríjase al punto de montaje deseado con su
teléfono y la cámara.
③
Si la intensidad de la señal inalámbrica es débil,
acerque la cámara al sistema HomeBase 2 lo
máximo posible.
30
ES ES
31
Selección de la altura y la
ubicación
Coloque la eufyCam 2 Pro de 2 a 3 m por
encima del suelo. Esta altura maximiza
el alcance de detección del sensor de
movimiento de la eufyCam 2 Pro. Evite colocar
la eufyCam 2 Pro bajo la luz solar directa.
10 m
2 - 3 m
Campo de visión de la
cámara
Zona de
detección de
movimiento
Montaje de la cámara
La cámara se puede instalar en interiores y en
exteriores.
1. Gire la perilla del soporte de montaje hacia
la derecha para aojarlo y desmontarlo.
2. Taladre oricios de 5,99 mm con una broca
y, a continuación, introduzca los anclajes
en los oricios. Es necesario utilizar los
anclajes en paredes hechas de materiales
duros como hormigón, ladrillo o yeso.
3. Atornille rmemente la base del soporte de
montaje a la pared. Fije la perilla del soporte
a la base del soporte.

32
ES ES
33
4. Fije la eufyCam 2 Pro al soporte de montaje
y ajuste el ángulo de visión con ayuda de
la transmisión en directo disponible en la
aplicación eufy Security.
Consejos:
Para solucionar problemas, consulte
la sección Ayuda de la aplicación
eufy Security.
Montaje de la cámara en
interiores
Coloque la cámara directamente sobre
cualquier supercie plana de hierro o utilice el
soporte para interiores para instalarla:
1. Taladre un oricio. Utilice el anclaje incluido
si la pared es de yeso y je el gancho.
a
2. Coloque el soporte para interiores en el
gancho.
b
3. Fije la eufyCam 2 Pro al soporte para
interiores y ajuste el ángulo de visión.
c
FR
3534
ES
CARGA DE LA
EufyCam 2 Pro
Carga de la eufyCam 2 Pro
Método 1
Método 2
5V / 2A
Indicación
led
Tiempo de
carga
12 horas
Carga completa: apagado
Carga: azul jo
SOMMAIRE
Contenu
36
Présentation du produit
37
38
Montage de la caméra
39
Charge de l'eufyCam 2 Pro
44
Ajouter une caméra
eufyCam 2 Pro à votre
système existant
36
FR FR
37
CONTENU
Pour une installation
eufyCam 2 Pro
eufyCam 2 Pro
(T8140)
Câble de charge
micro-USB
Support de
montage
Vis de montage
et ancrages
Montage en
intérieur
Crochet (pour
montage en intérieur)
PRÉSENTATION
DU PRODUIT
eufyCam 2 Pro
6
3
4
5
2
1
8
7
1. Capteur photosensible
2. Objectif de la caméra
3. Détecteur de mouvement
4. Microphone
5. Voyant LED
6
3
4
5
2
1
8
7
6. Bouton Sync
7. Port de chargement USB
8. Trou de vis
38
FR FR
39
Ajouter une caméra
eufyCam 2 Pro à votre
système existant
Ajouter une caméra eufyCam 2
Pro à votre système existant
En la aplicación eufy Security, siga las
instrucciones que aparecen en la pantalla para
agregar sus dispositivos de seguridad eufy.
Elija Agregar dispositivo y, a continuación,
seleccione eufyCam 2 Pro para agregarlo a su
sistema.
MONTAGE DE
LA CAMÉRA
Trouver un emplacement de
montage adapté
Pour trouver l'endroit où installer l'eufyCam 2
Pro, vous devez tester la force du signal sans l.
①
Ouvrez l'application Eufy Security, accédez à
Camera Settings (Paramètres de la caméra)
> Mounting Guide (Guide de montage).
②
Pour tester la force du signal sans l, apportez
votre caméra et votre téléphone à l'endroit où
vous souhaitez installer la caméra.
③
Approchez la caméra aussi près que possible
du HomeBase 2 si la force du signal sans l est
faible.

40
FR FR
41
Sélection de la hauteur et de
l'emplacement
Positionnez l'eufyCam 2 Pro entre 2 et 3
mètres au-dessus du sol. Cette hauteur
optimise la portée de détection du détecteur
de mouvement de l'eufyCam 2 Pro. Évitez
d'exposer l'eufyCam 2 Pro en plein soleil.
10 m
2 - 3 m
Champ de la
caméra
Zone de
détection de
mouvement
Montage de la caméra
La caméra peut être montée en intérieur
comme en extérieur.
1. Tournez le bouton du support de montage
dans le sens des aiguilles d'une montre pour
le desserrer et le démonter.
2. Forez des trous de 5,99 mm avec une mèche,
puis insérez les chevilles dans les trous. Les
chevilles sont nécessaires pour les murs
fabriqués dans des matériaux durs tels que
le béton, la brique ou le stuc.
3. Vissez fermement la base du support de
montage dans le mur. Fixez la poignée
circulaire du support sur la base du support.
42
FR FR
43
4. Resserrez la caméra eufyCam 2 Pro sur le
support de montage et ajustez l'angle de
vue en contrôlant le ux d'alimentation en
direct dans l'application eufy Security.
Conseils:
Pour les opérations de dépannage,
consultez la section «Help » (Aide) de
l'application eufy Security.
Monter la caméra en intérieur
Fixez la caméra directement sur une surface
plane en métal. Ou alors, xez la caméra sur le
support intérieur :
1. Percez un trou. Utilisez l'ancrage fourni s'il
s'agit d'une cloison sèche et xez le crochet.
a
2. Accrochez le support intérieur au crochet.
b
3. Fixez l'eufyCam 2 Pro sur le support
intérieur et réglez l'angle de vision.
c
IT
45
44
FR
CHARGE DE
L'EufyCam 2 PRO
Charger la caméra eufyCam 2
Pro
Méthode 1
Méthode 2
5V / 2A
Indication de
LED
Temps de
charge
12 heures
Charge complète : éteint
Charge en cours : bleu xe
INDICE
Contenuto
della confezione
46
Panoramica del prodotto
47
48
Montaggio della telecamera
49
Ricarica di eufyCam 2 Pro
54
Aggiunta di eufyCam 2 Pro
al sistema in uso
46
IT IT
47
CONTENUTO
DELLA CONFEZIONE
Per l'installazione di eufyCam 2
Pro
eufyCam 2 Pro
(T8140)
Cavo di ricarica
micro-USB
Staffa di ssaggio Viti e tasselli
di ssaggio
Supporto per
montaggio al
chiuso
Gancio (per
montaggio al chiuso)
PANORAMICA
DEL PRODOTTO
eufyCam 2 Pro
6
3
4
5
2
1
8
7
1. Sensore fotosensibile
2. Obiettivo telecamera
3. Sensore di movimento
4. Microfono
5. Indicatore LED
6
3
4
5
2
1
8
7
6. Pulsante Sync
7. Porta di ricarica USB
8. Foro per la vite
48
IT IT
49
Aggiunta di eufyCam
2 Pro al sistema in uso
Download dell'app e
congurazione del sistema
Nell'app eufy Security, seguire le istruzioni
visualizzate sullo schermo per aggiungere
i propri dispositivi eufy Security. Scegliere
Aggiungi dispositivo, quindi selezionare
eufyCam 2 Pro per aggiungerlo al sistema.
MONTAGGIO
DELLA TELECAMERA
Individuazione di un punto di
montaggio adeguato
Per individuare un punto in cui montare eufyCam 2,
Pro occorre testare l'intensità del segnale wireless.
①
Aprire l'app Eufy Security e andare su
Impostazioni telecamera > Guida al
montaggio.
②
Per testare l'intensità del segnale wireless,
collocare la telecamera e il proprio telefono
nel punto in cui si desidera montare la
telecamera.
③
Se l'intensità del segnale wireless è debole,
spostare la telecamera quanto più vicino
possibile a HomeBase 2.
50
IT IT
51
Selezione di altezza e posizione
Posizionare eufyCam 2 Pro a 2-3 m da terra.
Tale altezza ottimizza la portata di rilevamento
del sensore di movimento di eufyCam 2 Pro.
Non posizionare eufyCam 2 Pro alla luce
solare diretta.
10 m
2 - 3 m
Campo di
visualizzazione della
telecamera
Zona di
rilevamento del
movimento
Montaggio della telecamera
La telecamera può essere montata sia
all'interno che all'esterno.
1. Ruotare in senso orario la manopola
della staffa di ssaggio in modo
tale da allentarla e smontarla.
2. Praticare fori da 5,99 mm utilizzando una
punta da trapano, quindi inserire i tasselli
all'interno dei fori; I tasselli sono necessari
nel caso in cui le pareti siano in materiali
duri come calcestruzzo, mattoni o stucco.
3. Avvitare saldamente la base della staffa di
ssaggio alla parete. Fissare la manopola a
sfera della staffa alla relativa base.

52
IT IT
53
4. Serrare la telecamera eufyCam 2 Pro alla
staffa di ssaggio e regolare l'angolo di
visualizzazione controllando le immagini in
live streaming nell'app Eufy Security.
Suggerimenti:
Per la risoluzione dei problemi,
consultare la Guida nell'app eufy Security.
Montaggio della telecamera al
chiuso
Fissare la telecamera direttamente su una
supercie piana in ferro. In alternativa, per
montare la telecamera, è possibile utilizzare il
supporto per montaggio al chiuso:
1. Praticare un foro. Se la parete è in cartongesso,
utilizzare il tassello in dotazione e ssare il gancio.
a
2. Appendere il supporto per montaggio da interni
al gancio.
b
3. Fissare eufyCam 2 Pro al supporto per montaggio
al chiuso e regolare l'angolo di visualizzazione.
c

NL
5554
IT
RICARICA DI
EufyCam 2 PRO
Ricarica di eufyCam 2 Pro
Metodo 1
Metodo 2
5V / 2A
Spia LED
Tempo di
ricarica
12 ore
Carica completata: spenta
In carica: blu sso
INHOUDSOPGAVE
Wat zit er in de doos?
56
Productover-zicht
57
58
De camera monteren
59
De eufyCam 2 Pro opladen
64
De eufyCam 2 Pro
toevoegen aan uw
huidige systeem
56
NL NL
57
WAT ZIT ER IN
DE DOOS?
Voor de installatie van de
eufyCam 2 Pro
eufyCam 2 Pro
(T8140)
Micro-USB-
oplaadkabel
Montagebeugel
Montageschroeven
en pluggen
Montage binnen
Haak (voor montage
binnen)
PRODUCTOVER-
ZICHT
eufyCam 2 Pro
6
3
4
5
2
1
8
7
1. Lichtgevoelige sensor
2. Cameralens
3. Bewegingssensor
4. Microfoon
5. LED-indicator
6
3
4
5
2
1
8
7
6. Sync-knop
7. USB-oplaadpoort
8. Schroefgat

58
NL NL
59
De eufyCam 2 Pro
toevoegen aan uw
huidige systeem
De eufyCam 2 Pro toevoegen
aan uw huidige systeem
Volg in de eufy Security-app de instructies op
het scherm om uw eufy Security-apparaten
toe te voegen. Kies Apparaat toevoegen en
selecteer vervolgens eufyCam 2 Pro om de
camera toe te voegen aan uw systeem.
DE CAMERA
MONTEREN
Een goede montageplek vinden
Om een plek voor het monteren van de
eufyCam 2 Pro te vinden, moet u de draadloze
signaalsterkte testen.
①
Open de eufy Security-app en ga naar
Camera-instellingen (Camera Settings) >
Montagegids (Mounting Guide).
②
Om de draadloze signaalsterkte te testen,
neemt u uw camera en telefoon mee naar de
locatie waar u de camera wilt monteren.
③
Plaats de camera zo dicht mogelijk bij de
HomeBase 2 als de draadloze signaalsterkte
zwak is.

60
NL NL
61
De hoogte en locatie bepalen
Hang de eufyCam 2 Pro 2 tot 3 meter boven de
grond. Op deze hoogte heeft de bewegingssensor
van de eufyCam 2 Pro het maximale
detectiebereik. Plaats de eufyCam 2 Pro niet in
direct zonlicht.
10 m
2 - 3 m
Gezichtsveld
camera
Bewegings-
detectiezone
De camera monteren
De camera kan zowel binnen als buiten
worden gemonteerd.
1. Draai de knop van de montagebeugel met
de klok mee los om de knop los te maken
en te demonteren.
2. Boor gaten van 6 mm met een boortje en
steek vervolgens de pluggen in de gaten; de
pluggen zijn nodig voor harde muren van
beton, baksteen, stucwerk, e.d.
3. Schroef de grondplaat van de montagebeugel
stevig op de muur. Bevestig de kogelknop van
de beugel aan de grondplaat van de beugel.
62
NL NL
63
4. Bevestig de eufyCam 2 Pro-camera aan
de montagebeugel en pas eventueel de
kijkhoek aan door de livestream te bekijken
in de eufy Security-app.
Tips:
Als u problemen ondervindt, raadpleeg
dan Help in de Eufy Security-app.
De camera binnen monteren
Hecht de camera rechtstreeks aan een
vlakke ondergrond van ijzer. Of gebruik de
binnensteun om de camera te monteren:
1. Boor een gat. Gebruik de meegeleverde plug
als het om gipsplaat gaat en bevestig de haak.
a
2. Hang de binnensteun op de haak.
b
3. Bevestig de eufyCam 2 Pro aan de
binnensteun en pas de kijkhoek aan.
c
PT
6564
NL
DE EUFYCAM
2 OPLADEN
De eufyCam 2 Pro opladen
Methode 1
Methode 2
5V / 2A
LED-indicatie
Oplaadtijd 12 uur
Volledig opgeladen: uit
Opladen: brandt blauw
ÍNDICE
Está Incluído
66
Descrição Do Produto
67
68
Instalar A Câmara
69
Carregar A eufyCam 2 Pro
74
Adicionar a eufyCam 2 Pro
ao seu sistema existente
66
PT PT
67
ESTÁ
INCLUÍDO
Para a instalação da eufyCam 2
Pro
eufyCam 2 Pro
(T8140)
Cabo de
carregamento
micro-USB
Suporte de
instalação
Parafusos e âncoras
de instalação
Suporte de
interior
Gancho (para o
suporte de interior)
DESCRIÇÃO
DO PRODUTO
eufyCam 2 Pro
6
3
4
5
2
1
8
7
1. Sensor de fotossensibilidade
2. Lente da câmara
3. Sensor de movimento
4. Microfone
5. Indicador LED
6
3
4
5
2
1
8
7
6. Botão Sync
7. Porta de carregamento USB
8. Orifício para parafuso
68
PT PT
69
Adicionar a eufyCam 2 Pro
ao seu sistema existente
Adicionar a eufyCam 2 Pro ao
seu sistema existente
Na aplicação eufy Security, siga as instruções
no ecrã para adicionar os seus dispositivos eufy
Security. Selecione Add Device e, em seguida,
selecione eufyCam 2 Pro para a adicionar ao
seu sistema.
INSTALAR A
CÂMARA
Encontre um bom local para a
instalação
Para encontrar um local para a instalação da
eufyCam 2 Pro, deverá testar a intensidade do sinal
sem os.
①
Abra a aplicação eufy Security, aceda a
Camera Settings (Denições da câmara) >
Mounting Guide (Guia de instalação).
②
Para testar a intensidade do sinal sem os,
leve a câmara e o telefone para o local onde
pretende instalar a câmara.
③
Se a intensidade do sinal sem os for fraca,
aproxime o máximo possível a câmara da
HomeBase 2.

70
PT PT
71
Selecione a altura e o local
Pendure a eufyCam 2 Pro a 2-3 metros do
solo. Esta altura maximiza o alcance de deteção
do sensor de movimento da eufyCam 2 Pro.
Evite colocar a eufyCam 2 Pro sob a luz solar direta.
10 m
2 - 3 m
Campo de visão
da câmara
Zona de
deteção de
movimento
Instale a câmara
A câmara pode ser instalada no interior e no
exterior.
1. Rode o suporte de instalação no sentido
dos ponteiros do relógio para o desapertar
e desmontar.
2. Utilize um berbequim para perfurar orifícios
com 5,99 mm, em seguida, insira as âncoras
nos orifícios. São necessárias âncoras para
paredes feitas com materiais duros, tais
como betão, tijolo ou estuque.
3. Aparafuse bem a base do suporte de
instalação à parede. Prenda o manípulo
redondo do suporte à base do suporte.
72
PT PT
73
4. Fixe a câmara eufyCam 2 Pro ao suporte e
ajuste o ângulo de visualização ao vericar
a transmissão em direto na aplicação eufy
Security.
Sugestões:
Para a resolução de problemas, consulte a
secção Help na aplicação eufy Security.
Instalar a câmara no interior
Fixe diretamente a câmara a qualquer
superfície plana em ferro. Ou pode utilizar a
instalação no interior para instalar a câmara:
1. Faça um orifício. Utilize o gancho fornecido
se a parede for em estuque e xe o gancho.
a
2. Pendure o suporte de interior no gancho.
b
3. Fixe a eufyCam 2 Pro ao suporte de interior
e ajuste o ângulo de visão.
c
AR
7574
PT
CARREGAR A
EufyCam 2 PRO
Carregar a eufyCam 2 Pro
Método 1
Método 2
5V / 2A
Indicação LED
Tempo de
carregamento
12 horas
Totalmente carregada:
desligada
A carregar: azul xo
تايوتحملا لودج
ةبلعلا تايوتحم
76
جتنملا ىلع ةماع ةرظن
77
HomeBase 2 ليصوت
78
اريماكلا بيكرت
79
eufyCam 2 Proحش
84

AR
7574
PT
CARREGAR A
EufyCam 2 PRO
Carregar a eufyCam 2 Pro
Método 1
Método 2
5V / 2A
Indicação LED
Tempo de
carregamento
12 horas
Totalmente carregada:
desligada
A carregar: azul xo
تايوتحملا لودج
ةبلعلا تايوتحم
76
جتنملا ىلع ةماع ةرظن
77
HomeBase 2 ليصوت
78
اريماكلا بيكرت
79
eufyCam 2 Proحش
84
76
AR AR
77
ةبلعلا تايوتحم
eufyCam 2 Pro تيبثتل
eufyCam 2 Pro
(T8140)
USB نحش لبك
ريغص
بيكرت ةفيتك
بيكرتلل يغارب
تاتبثمو
جتنملا ىلع ةماع ةرظن
eufyCam 2 Pro
6
3
4
5
2
1
8
7
ءوضلل ساسح رعشتسم .1
len لوطلا عضو يف اريماكلا .2
ةكرحلا ساسح .3
نوفوركيم .4
LED رشؤم .5
6
3
4
5
2
1
8
7
ةنمازملا رز .6
USB نحش ذفانم .7
يغربلا ةحتف .8
تيبثتلا زاهج
يلخادلا
فاطخ
(يلخادلا تيبثتلا زاهجل)
78
AR AR
79
eufyCam 2 Pro ةفاضإ
يلاحلا كماظن ىلإ
ىلإ eufyCam 2 Pro ةفاضإ
يلاحلا كماظن
تاميلعتلا عبتا ،eufy Security قيبطت يف
ةزهجأ ةفاض ةشاشلا ىلع رهظت يتلا
ددح مث ،زاهج ةفاضإ رتخا .eufy Security
.كماظن ىلإ اهتفاض eufyCam 2 Pro
اريماكلا بيكرت
تيبثتلل بسانم عقوم ىلع روثعلا
،eufyCam 2 Pro بيكرتل ناكم ىلع روثعلل
.ةيكلسلا ةراشا ةوق رابتخا ىلإ جاتحت
ىلإ لقتناو ،eufy Security app قيبطت حتفا ①
.بيكرتلا ليلد > اريماكلا تادادعإ
بحطصا ،ةيكلسلا ةراشا ةوق رابتخ ②
ديرت يذلا عقوملا ىلإ فتاهلاو اريماكلا
.هيف اريماكلا بيكرت
نم نكمم عقوم برقأ ىلإ اريماكلا لقنا ③
ةراشا ةوق تناك اذإ HomeBase 2
.ةفيعض ةيكلسلا

80
AR AR
81
عقوملاو عافترا ددح
ام حوارتي عافترا ىلع eufyCam 2 Pro ق
ّ
لع
نع (ةثثو ني
َ
رتم نيب ام يأ) مادقأ 10و 7 نيب
زاهج فاشتكا قاطن عافترا اذه ديزي .ضرا
eufyCam 2 Pro ـب صاخلا ةكرحلا راعشتسا
eufyCam 2 Pro عضو بنجت .نكمم دح ىصقأ ىلا
.
ً
ةرشابم
سمشلا ةعشأ تحت
10 m
2 - 3 m
اريماكلا ةيؤر لاجم
فاشتكا ةقطنم
ةكرحلا
اريماكلا بيكرت
جراخلاو لخادلا يف اريماكلا بيكرت نكمي
.ءاوس دح ىلع
براقع هاجتا يف بيكرتلا ةفيتك حاتفم ردأ .1
.اهكيكفتو ةبئاس اهلعجل ةعاسلا
(مم 5.99) ةصوب 15/64 مجحب بقثا .2
يف تاتبثملا لخدأ مث ،باقثم ةطساوب
ناردجلل
ً
ةيرورض
تاتبثملا
ّ
دع
ُ
ت
؛تاحتفلا
وأ نوطابلا لثم ةبلص داوم نم ةعونصملا
.صجلا وأ ديمرقلا
ىلع بيكرتلا ةفيتك زاهج ةدعاق ماكحإب ت
ّ
بث .3
ةفيتكلا حاتفم
ّ
دش
.يغاربلا مادختساب طئاحلا
.ةفيتكلا ةدعاق ىلع ماكحإب
82
AR AR
83
ىلع eufyCam 2 Pro اريماك طبر مكحأ .4
ضرع ةيواز طبضاو بيكرتلا ةفيتك
ثبلا زجوم نم ققحتلا لخ نم اريماكلا
.Eufy Security قيبطت يف رشابملا
:حئاصن
نم ققحتلا ىجري ،اهحصإو ءاطخا فاشكتس
.eufy Security قيبطت ىلع "ةدعاسملا"
لخادلا يف اريماكلا تيبثت
.ديدحلا نم عونصم
ٍ
وتسم
حطس يأ ىلع
ً
ةرشابم
اريماكلا ز
ّ
ك
اريماكلا بيكرتل يلخادلا تيبثتلا زاهج مادختسا كنكمي وأ:
.ا
ً
فاج طئاحلا ناك اذإ ن
ّ
مضملا ت
ّ
بثملا مدختسا .
ً
ةحتف
بقثا
فاطخلا ت
ّ
بثو.
a
.فاطخلاب يلخادلا تيبثتلا زاهج ق
ّ
لع.
b
ق
ّ
لع Pro 2 eufyCam ةيواز طبضاو يلخادلا تيبثتلا زاهجب
اريماكلا ضرع.
c

84
AR
eufyCam 2 Pro نحش
نحش
1 ةقيرطلا
2 ةقيرطلا
5V / 2A
LED رشؤم
نحشلا ةدمتاعاس 5
فاقيإ :لماكلاب نحشلا
تباث قرزأ :نحشلا
eufyCam 2 Pro
Customer Service
Kundenservice | Servicio de atención al cliente
Service client | Servizio clienti | Klantenservice
Warranty
Garantie | Garantía | Garantie | Garanzia |
Garantie |
12-month limited warranty
12 Monate eingeschränkte Garantie | Garantía
limitada de 12 meses
Garantie limitée de 12 mois | Garanzia limitata
di 12 mesi | 12 maanden beperkte garantie
ا
ً
رهش 12 ةدمل دودحم نامض
Rufen Sie uns an | Contacto por teléfono |
Par téléphone | Telefono | Bel ons |
United States
+1 (800) 988 7973 Mon-Fri 9AM-5PM (PT)
United Kingdom
+44 (0) 1604 936 200 Mon-Fri 6AM-11AM (GMT)
Germany
+49 (0) 69 9579 7960 Mon-Fri 6:00-11:00
Senden Sie uns eine E-Mail | Contacto por
correo electrónico | Par e-mail | E-mail
Email ons |
Customer Support: support@eufylife.com
Anker Innovations Limited
Room 1318-19, Hollywood Plaza, 610 Nathan
Road, Mongkok, Kowloon, Hong Kong
@EufyOfficial @EufyOfficial
@EufyOfficial