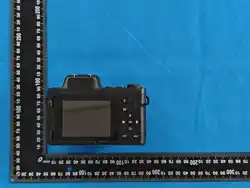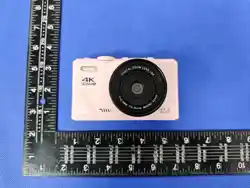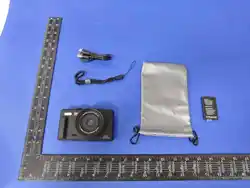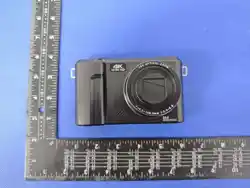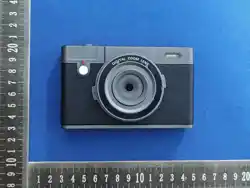
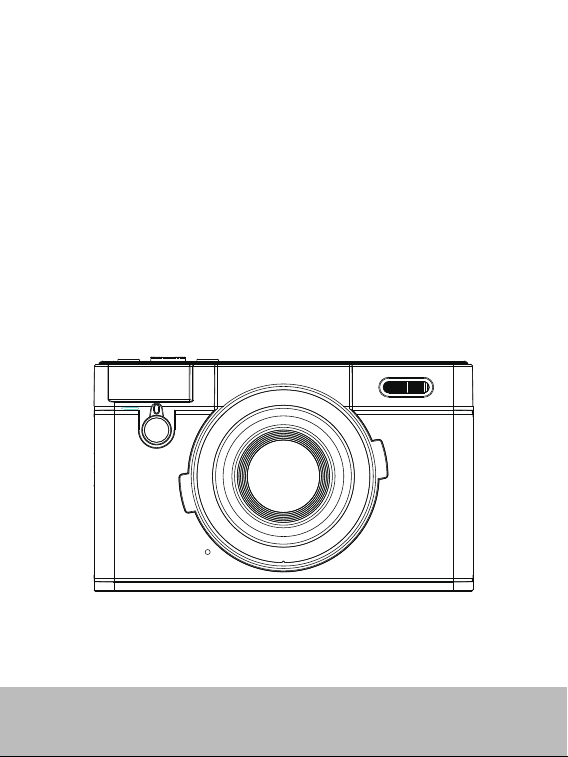
4.0” Touch Screen
DIGITAL CAMERA
Instruction Manual
Please read this manual carefully before use
Please keep this manual safe for future reference
Ver: LY01

Contents
About the camera ...................................................................1
Quick Start Guide ...................................................................4
System Settings....................................................................10
Photo Mode & Setting...........................................................11
Video Mode & Setting...........................................................13
Other Modes.........................................................................15
Using the Wi-Fi function.........................................................16
For Your Safety.....................................................................19
Technical Notes ....................................................................22
FCC Warning........................................................................23

▶ Read this first
Before operating the unit, please read this manual thoroughly, and
retain it for future reference.
▶ Specification
Still Image Size (Horizontal x Vertical):
64M 9248x6913(4:3); 64M 10560x5921(16:9); 48M 8000x6000(4:3);
48M 9120x5129(16:9); 36M 6928x5184(4:3); 21M 5248x3930(4:3);
21M 6144x3454(16:9); 16M 4640x3480(4:3); 12M 4000x3000(4:3);
8M 3264x2448(4:3); 5M 2592x1944(4:3)
Still image format: JPEG
Movie size (Horizontal x Vertical):
4K 3840x2160; 2K 2560x1440; FHD 1920X1080; HD 1280X720
Movie format: MOV
4.0 inch Touch Screen
16X digital zoom
Multipoint autofocus
Digital anti-shake
Face detection
Continuous shooting
Self-timer
Wifi Fuction
Built-in flash
Built-in microphone
Built-in speaker
Built-in 32MB flash memory, Up to 256GB Micro SD card.
Design and specification are subject to change without notice.
About the camera
1
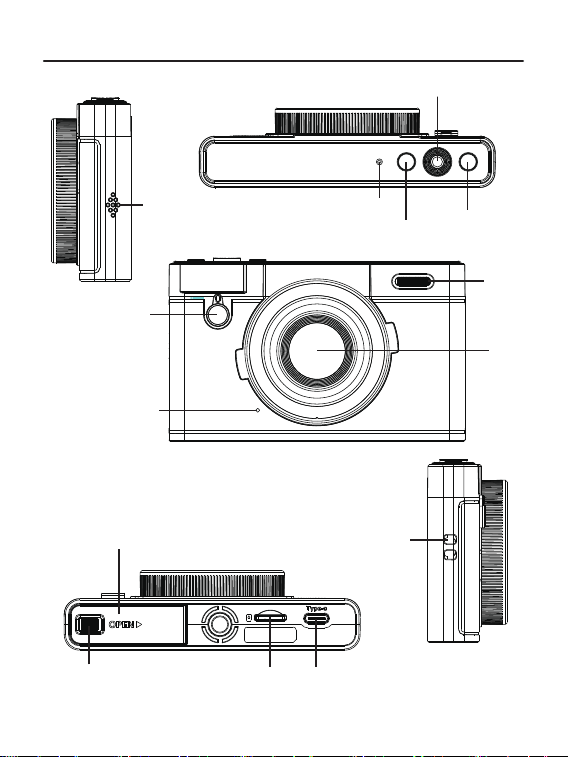
Shutter Key
Indicator light
Power Key
Filter switch
Flash
Lens
Microphone
Hanging rope hole
Speaker
Menu Key
Push button
Battery cover
Type-C USBCard slot
About the camera
2
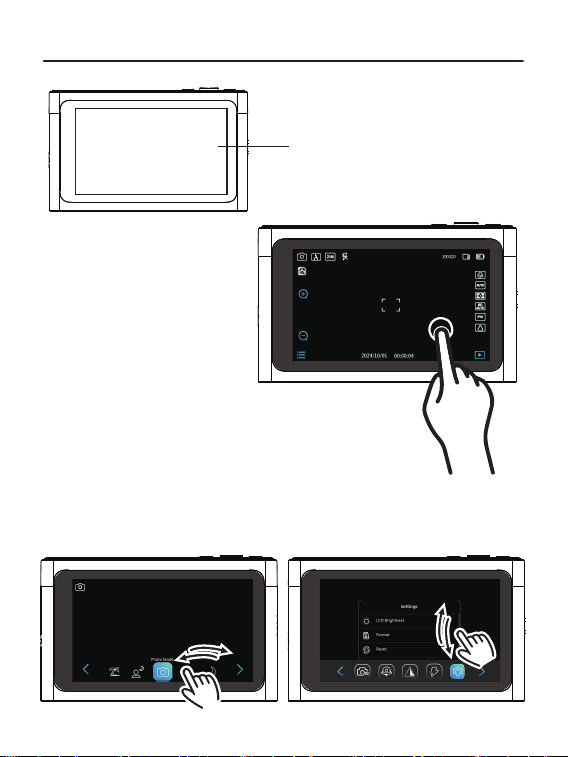
4.0 inch Touch Screen
Touchscreen operation:
- Tap to select/highlight an item
- Tap the selected item again to enter its submenu.
- Swipe up, down, left, or right to browse the menu.
About the camera
3
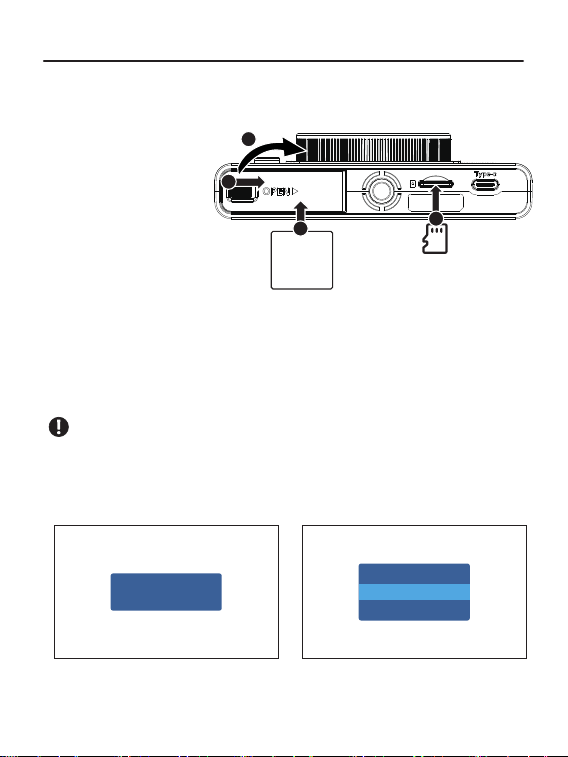
▶ Inserting the battery and SD card
1. Unlock the cover lock
2. Open the battery cover
3. Insert the Battery
4. Insert the micro SD card
Battery
1
3
4
To remove the memory card/ battery
Memory card: push the memory card in once to eject the memory card.
Battery: Slide the battery eject lever.
2
Format the memory card
After inserting the card, briefly press the [Power] button to turn
on the camera. The screen will display [Card is not formatted.]
→ A pop-up window will automatically appear [Format? Yes/No]
→ Click [Yes] → Start using the camera.
Quick Start Guide
Card is not formatted.
Format
Yes
No
4
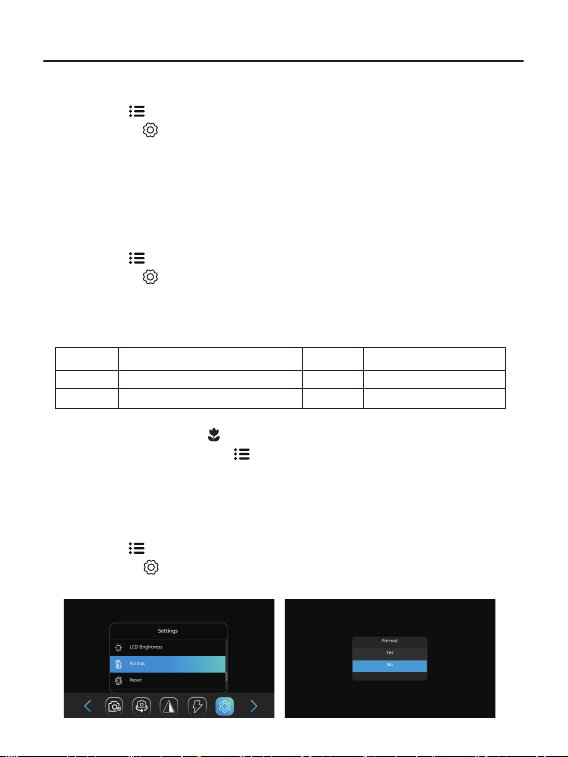
● Setting the Language
● Setting the [Macro]
● Setting the Date&Time
Tap the [ ] icon in the bottom left corner → swipe left or right
to find the [ ] icon → swipe up or down to find [format] → tap
[format] → tap [Yes].
Tap the [ ] icon in the bottom left corner → swipe left or right
to find the [ ] icon → swipe up or down to find [Language] →
Click [Language] → swipe up or down to find the language you
want → Click it.
In photo mode, tap the [ ] icon in the bottom left corner →
swipe left or right on the screen to find [Macro] →[
Macro On/
Macro Off
]→Click[Macro On]
Tap the [ ] icon in the bottom left corner → swipe left or right
to find the [ ] icon → swipe up or down to find [Date & Time]
→Click [Date & Time] →[Year-Month-Day-Hour-Minute-Sec-
ond]→ Click it.(Each click increments the number by 1; it cannot
decrease. This cycle repeats continuously.)
Year
Month
Day
Cycle from 2026 to 2039
Cycle from 1 to 12
Cycle from 1 to 31
Cycle from 0 to 23
Cycle from 0 to 59
Cycle from 0 to 59
Hour
Minute
Second
● Format the memory card
[ 繁體中文 / Español / 简体中文 / Português / 日本語 / Italiano / 한국인/
Deutsch / English / Français ]
Quick Start Guide
5
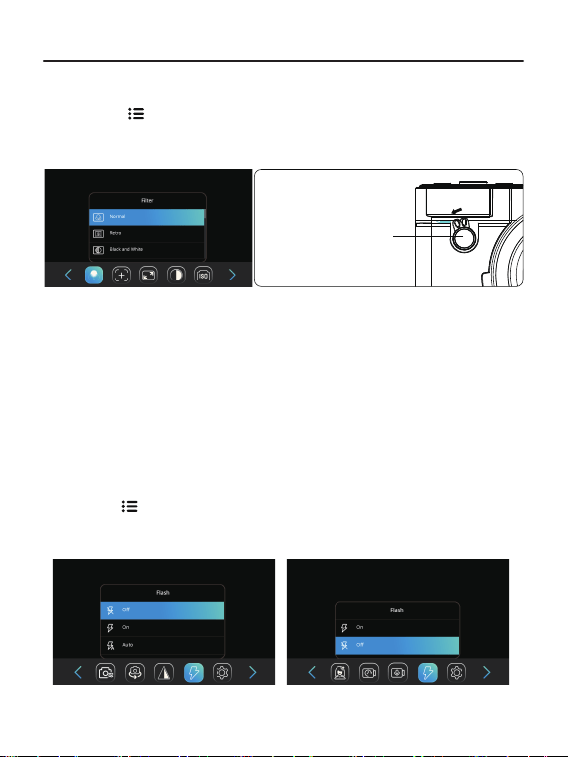
Tap the [ ] icon in the bottom left corner → swipe left or right to
find the [Flash] icon → In the Photo mode,you can see [Flash?
Off/On/Auto]; In the Video mode,you can see [Flash? On/Off]
● Quickly adjust the filter
● Setting the Filters
● Setting the Flash
Click the [ ] icon in the bottom left corner → You will see [Filter]
→ Swipe up or down to find the filter you want → Click it → Enter
the desired filter and take a photo.
Quick Start Guide
Press the filter switch
to cycle through
[ Normal→Retro→Black and White→Sepia→Vivid→Lomo→
Sketch→Colored Pencils→Negative→Dreamy→Salon→Japanese
Style→Dopamine→Cream→Warm→Cool→Gothic→Single Red→
Singe Yellow→Singe Bule→Singe Green ]
Press the filter switch to cycle through:
[Photo mode] [Video mode]
(Swipe once to switch)
6
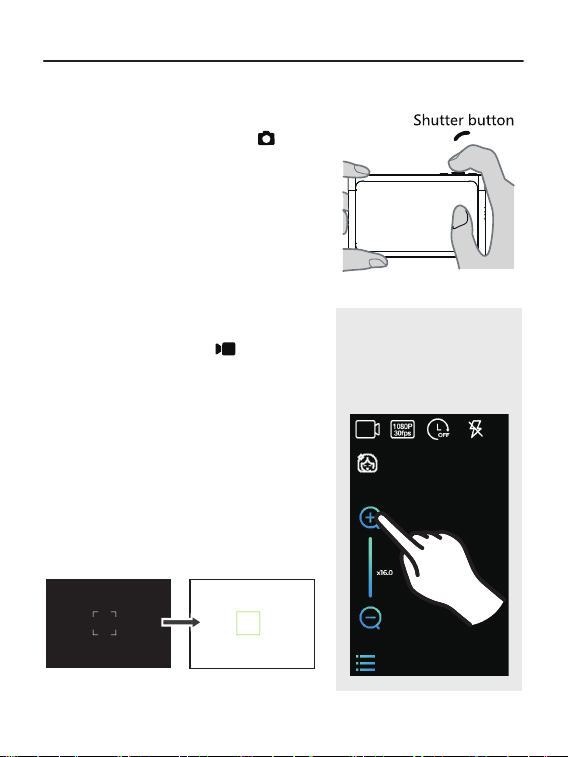
▶ Shooting still images/movies
Shooting still images
Quick Start Guide
Using the Zoom
T: Capture a bigger subject.
W: Capture a wider view
[White focus frame] [Green focus frame]
1. Press the [M] button → swipe the
screen → select [Photo Mode] to enter
photo mode.
2. Half-press the shutter button to
autofocus
3. Fully press the shutter button to take
the photo.
Shooting movies
1. Press the [M] button → swipe the
screen → select [Video Mode] to enter
video mode.
2. Half-press the shutter button to
autofocus
3. Press the shutter button fully to start
recording.
4. Press the shutter button again to stop
recording.
7
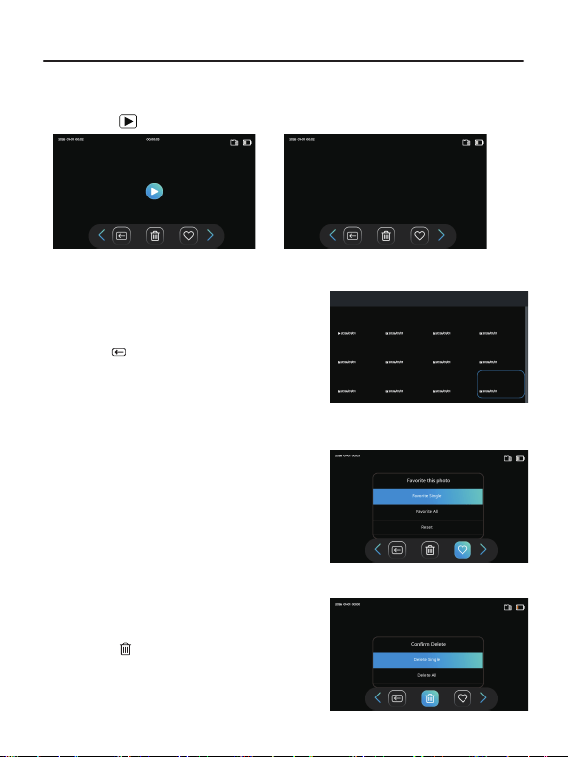
Click the [ ] icon in the bottom right corner → Enter the interface:
Click the [ ♥ ] icon → you can see 3
options[ Favorites Single/Favorite
All/Reset]→Click [Favorites Single] to
favorite this file, click [Favorite All] to
favorite all files, click [Reset] to reset
favorites.
Click [>] to view the next file, click [<]
to view the previous file.
Clicking [ ] will show all 12 files at
once.
▶ Viewing images
▶ Delete images
▶ Collect images
Quick Start Guide
[Video]
[Photo]
Click the [ ] icon→ you can see 2
options [Delete Single/ Delete All]→
Click [ Delete Single] to delete a single
file, click [Delete All ] to delete all files.
8
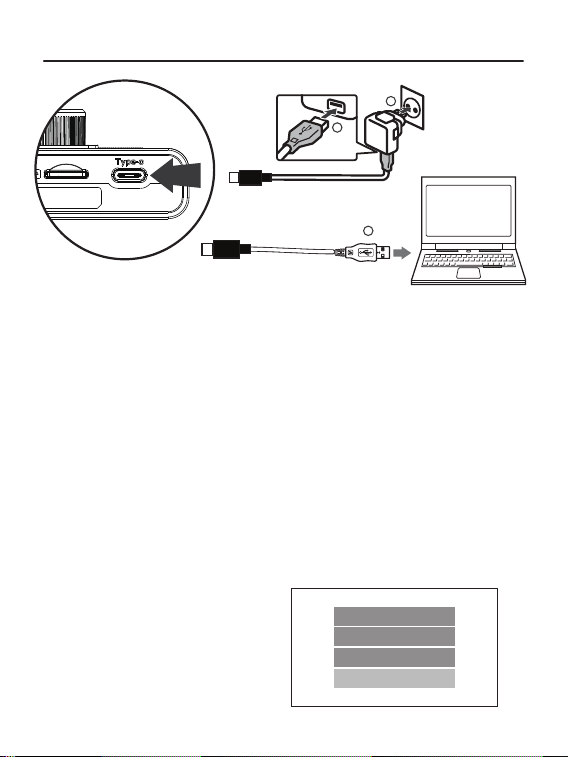
▶ Charging the battery
1. Connect the camera to the AC Adaptor, using the dedicated
USB cable(Supplied).
2. Connect the AC Adaptor to the wall outlet.
3. Connect the camera to the computer using the dedicated USB
data cable to charge it.
Turn off the camera while charging the battery.
3
2
1
▶ To charge by connecting to a computer
The battery can be charged by connecting the camera to a
computer using the dedicated USB cable.
USB
Mass Storage
PC Camera
Charge
Connect the camera to the
computer using a data cable →
Briefly press the Power button to
power on → Three options will
appear → Select [Charge].
Quick Start Guide
9
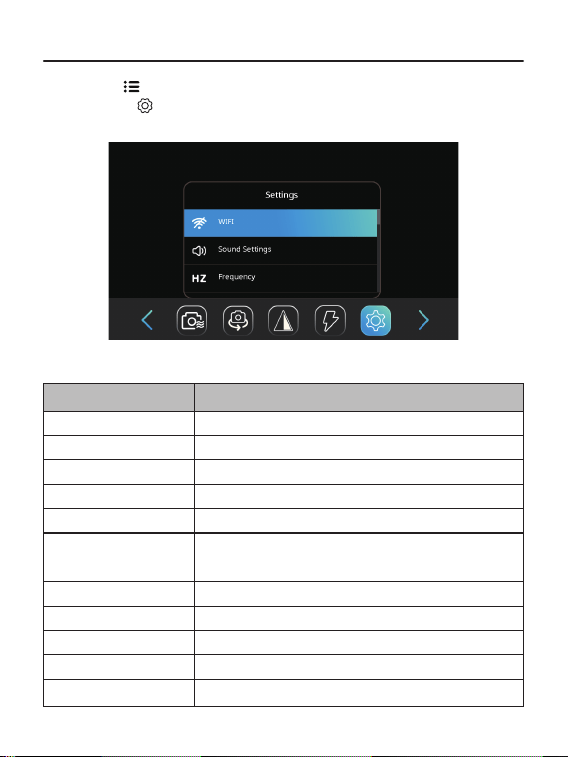
Tap the [ ] icon in the bottom left corner → swipe left or right
to find the [ ] icon → Settings can be configured
System Settings
繁體中文, Español, 简体中文, Português, 日本語,
Italiano, 한국인, Deutsch, English, Français
Menu Name Explanation
Language
Wifi
Sound Settings
Frequency
Auto Poweroff Off, 5Minutes, 3Minutes, 1Minute
Off, On
Off, 1Minute, 3Minutes, 5Minutes
Off, Low, Middle/High
50 Hz, 60 Hz
Yes, No
Screen Saver
LCD Birghtness
Reset
Current version number
Format
Firmware Version
Yes, No
YY, MM, DD, hr, min, sec
2, 1, Normal, -1, -2
Date & Time
10
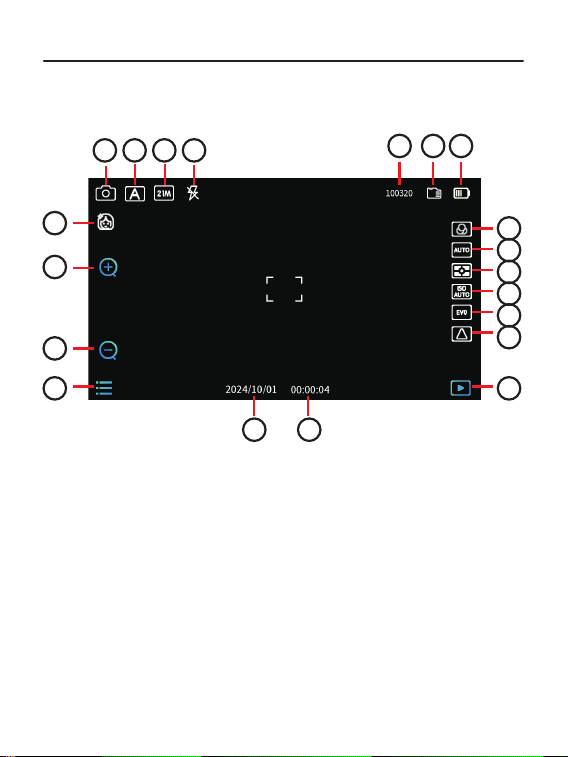
Press the [M] button → swipe the screen → select [Photo Mode] to
enter photo mode:
1 2 3 4
5
6
7
8
9 10 11
12
13
14
15
16
17
18
19 20
1. Photo Mode
2. Current selected scene
3. Current photo resolution settings
4. Current LED Light settings
5. Current Face Beauty
6. Zoom in
7. Zoom out
8. Setting
9. Recordable page count
10. SD card inserted
11. Current battery level or battery status
12. Current Filter
13. Current White Balance
14. Current Metering Mode
15. Current ISO settings
16. Current exposure value
17. Image Sharpness
18. Playback mode
19. Current date
20. Current time
Photo Mode & Setting
11
Normal, Retro, Black and White, Sepia/Vivid, Lomo,
Sketch, Colored Pencils, Negative, Dreamy, Salon,
Japanese Style, Dopamine, Cream, Warm, Cool,
Gothic, Single Red, Singe Yellow, Singe Bule, Singe
Green
64M 9248x6913(4:3); 64M 10560x5921(16:9);
48M 8000x6000(4:3); 48M 9120x5129(16:9);
36M 6928x5184(4:3); 21M 5248x3930(4:3);
21M 6144x3454(16:9); 16M 4640x3480(4:3);
12M 4000x3000(4:3); 8M 3264x2448(4:3);
5M 2592x1944(4:3)
Tap the [ ] icon in the bottom left corner → Settings can be
configured
+0.7EV, +0.3EV, +0.0EV, -0.3EV, -0.7EV, -1.0EV,
-1.3EV, -1.7EV, -2.0EV, -2.3EV, -2.7EV, -3.0EV
Menu Name Explanation
Exposure
Filter
Metering Mode
Image Size
White Balance AWB, Daylight, Cloudy, Tungsten Lamp, Fluorescent
Auto, 100, 200, 400, 800, 1600
Average, Spot, Center
Single, 3 Shots, 5 Shots, 10 Shots
ISO
Macro
Date Imprint
Self-timer Off, Self-timer 2sec, Self-timer 5sec,
Self-timer 10sec
Soft, Standard, Starp
Off/On/Auto
Continuous Shot
Self-timer
Sharpness
Flash
Off, Date, Date/Time
On, Off
Macro On, Macro Off
Face Beauty
Photo Mode & Setting
12
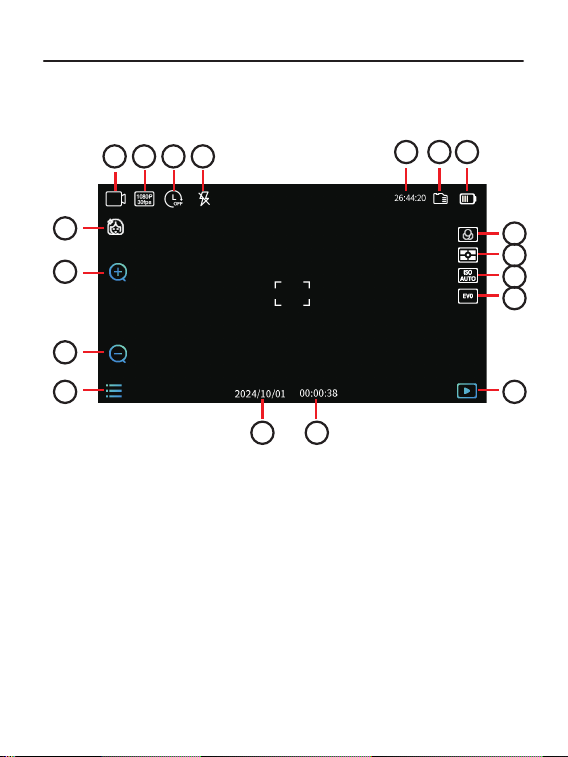
Press the [M] button → swipe the screen → select [Video Mode] to
enter video mode:
1 2 3 4
5
6
7
8
9 10 11
12
13
14
15
16
17 18
1. Video Mode
2. Current video resolution settings
3. Time-lapse Video
4. Current LED Light settings
5. Current Face Beauty
6. Zoom in
7. Zoom out
8. Setting
9. Remaining recording time
10. SD card inserted
11. Current battery level or battery status
12. Current Filter
13. Current White Balance
14. Current Metering Mode
15. Current ISO settings
16. Playback mode
17. Current date
18. Current time
Video Mode & Setting
13
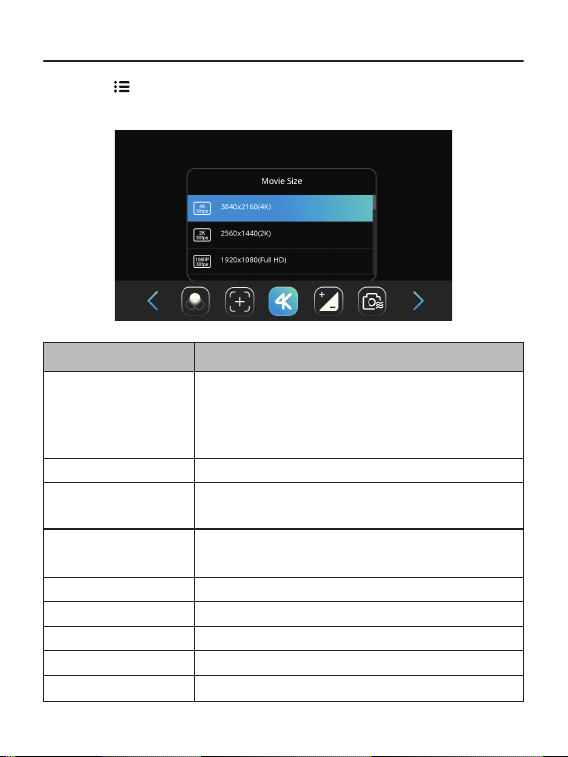
Normal, Retro, Black and White, Sepia/Vivid, Lomo,
Sketch, Colored Pencils, Negative, Dreamy, Salon,
Japanese Style, Dopamine, Cream, Warm, Cool,
Gothic, Single Red, Singe Yellow, Singe Bule, Singe
Green
4K 3840x2160; 2K 2560x1440;
FHD 1920X1080; HD 1280X720
Tap the [ ] icon in the bottom left corner → Settings can be
configured
+0.7EV, +0.3EV, +0.0EV, -0.3EV, -0.7EV, -1.0EV,
-1.3EV, -1.7EV, -2.0EV, -2.3EV, -2.7EV, -3.0EV
Menu Name Explanation
Exposure
Filter
Metering Mode
Movie Size
Time-lapse Video Off, 1 fps, 2 fps, 5 fps
Average, Spot, Center
Recording Audio
Date Imprint
On/Off
On/Off
Flash
Off, Date, Date/Time
On, OffFace Beauty
Video Mode & Setting
14
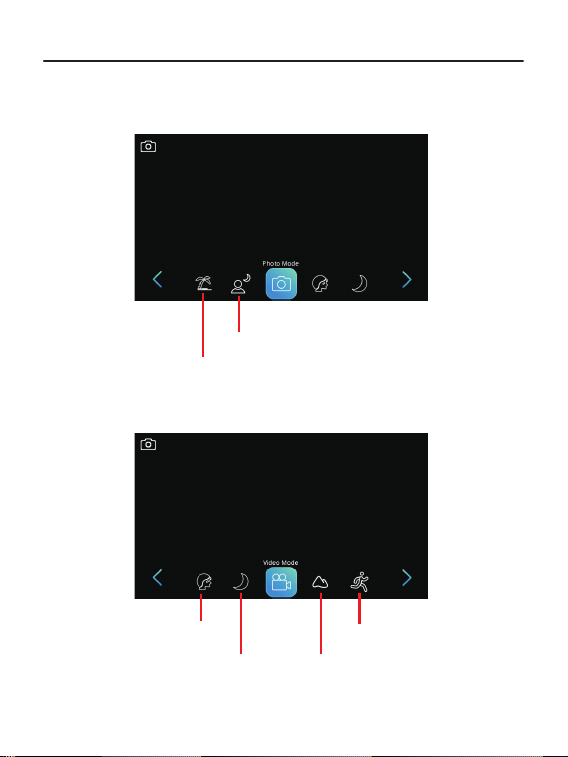
Night Landscape Mode
Backlight Portrait Mode
Beach Mode
Sport Mode
Landscape Mode
Portrait Mode
Press the [M] button → swipe the screen, You can see these eight
shooting modes
Other Mode
15
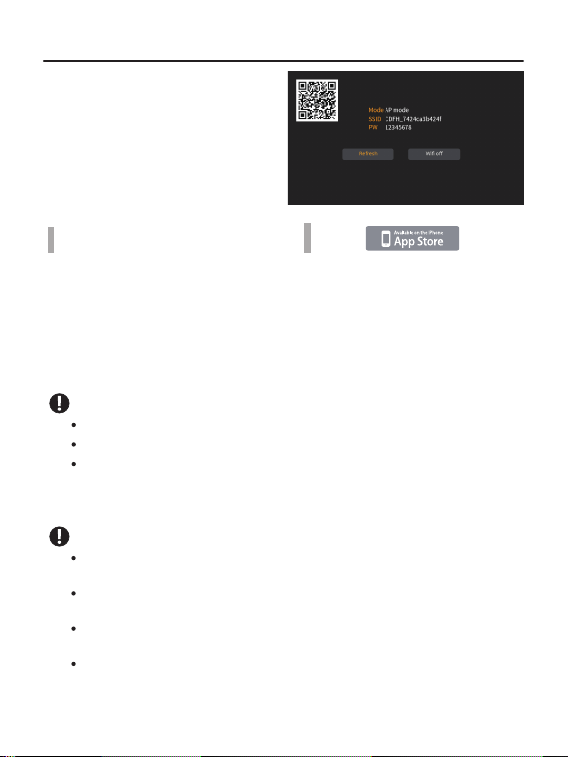
Using the Wi-Fi Function
Android OS IOS
Available ways to download & install
"iMEKE" APP.
1.Scan the QR code in the upper left
corner of the screen.
2.Search "iMEKE" on Google Play .
Available ways to download & install
"iMEKE" APP.
1.Scan the QR code in the upper left
corner of the screen.
2.Search "iMEKE" on App Store
Android 6.0 or higher is required.
IOS 8.0 or higher is required.
You may not be able to download "iMEKE" from Google play or App Store
depending on the country or the region. In that case, connect to the seller
for help.
Attention:
If "iMEKE" is already installed in your smartphone, update the software to
the latest version.
The Wi-Fi function described here is not guaranteed to work on all
smartphones and tablets.
The Wi-Fi function of the camcorder cannot be used connected to a public
wireless LAN.
The operation methods and display screens foe the application are subject
to change without notice by future upgrades.
Notes:
1. Download APP Installing
iMEKE on your smartphone/
tablet pc
16
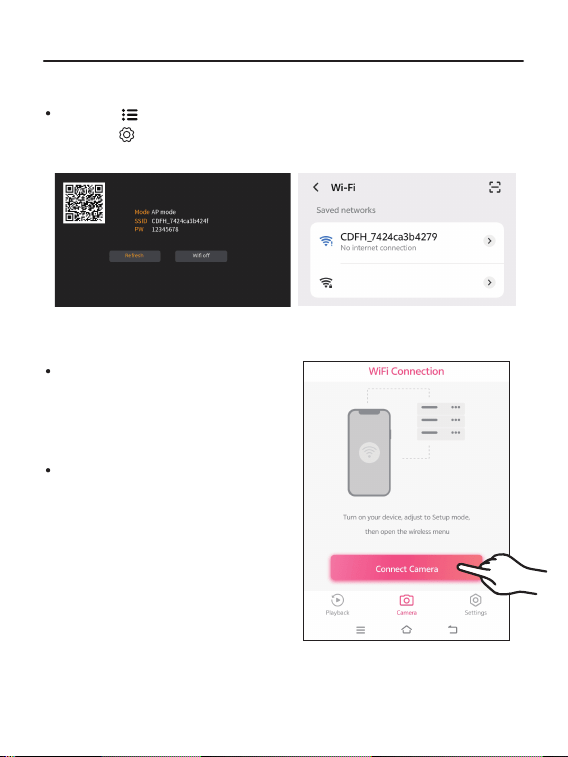
Tap the [ ] icon in the bottom left corner → swipe left or right to
find the [ ] icon → swipe up or down to find [Wifi] →Click [Wifi] →
Click[On] → You can see:
Using the Wi-Fi Function
2. Connect to a Wi-Fi network
On smartphone, select [Settings]
→ select [WLAN] → Select the
SSID of the camcorder and enter
password displayed on
camcorder to connect.
Go back to home and start up
"iMEKE" APP.
Connect Camera→ Enter camera
17
Using the Wi-Fi Function
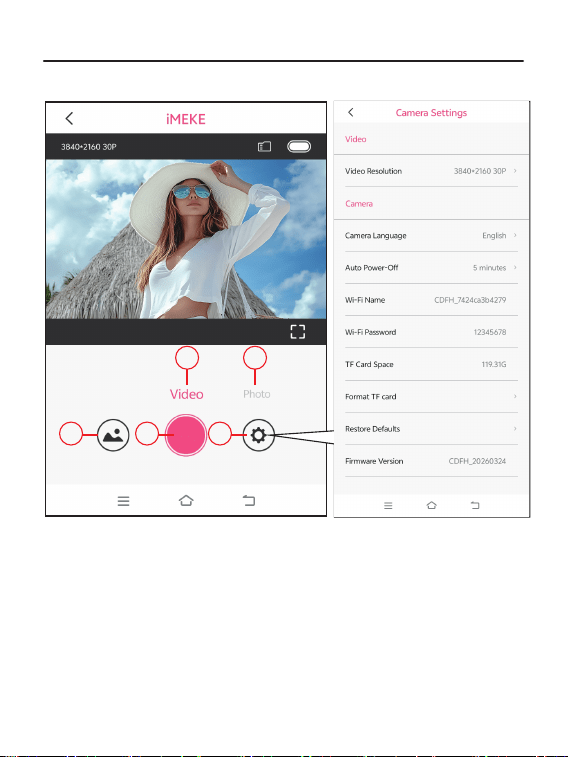
3. Using your smartphone as a wireless remote commander
①: Can be downloaded to smartphones/tablets, or deleted.
②: Watch the live view images and remote control the camcorder to
take photos and record movies.
③: Setting the camera
④: Switch Video Camera
⑤: Switch Photo Camera
1 2 3
54
18
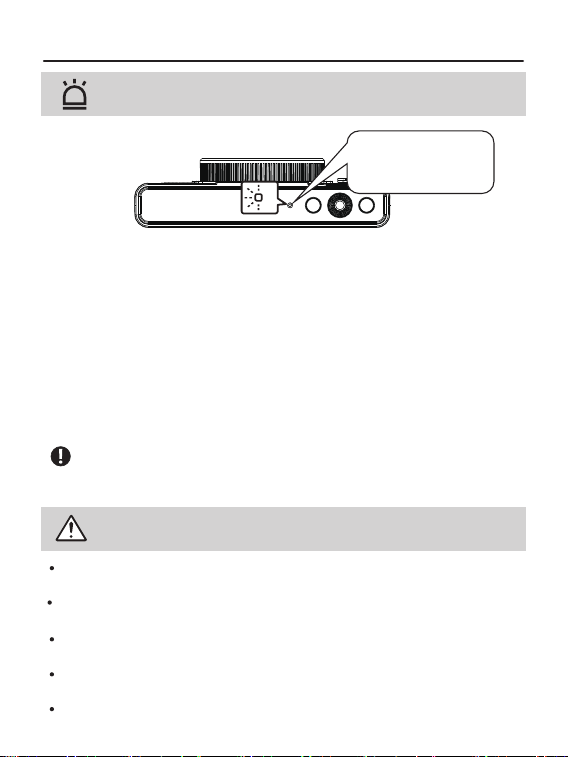
[Green Indicator Light]
[Red Indicator Light]
1. [Operation Indicator]
The green indicator light remains constantly on after power-on; it will
flash when taking photos or recording videos.
2. [Charging Indicator]
The red indicator light remains constantly on when the device is
connected to the charger.
The red indicator light will gradually turn off after the battery is fully
charged.
Note: If the battery is not installed or has poor contact while
charging, the charging indicator light will flash frequently.
Do not drop the camera, impact it with hard objects (such as rocks), or throw
it into water.
If moisture (such as water droplets) adheres to the exterior of the camera or
the inside of the battery cover, wipe it clean immediately with a soft, dry cloth.
If foreign objects adhere to the exterior of the camera or the inside of the
battery cover, remove them immediately with a hairdryer or a soft cloth.
Do not expose the camera to cold environments or temperatures of 40°C
(104°F) or higher for extended periods.
Do not use the camera in hot springs.
NOTES for Using the camera
Indicator light description
For Your Safety
19
For Your Safety
To prevent property damage or injury to yourself or others, please read the
"Safety Instructions" in full before using this product.
Do not disassemble or modify this product. Never touch any internal parts
exposed due to malfunction or other accident. Failure to follow these
precautions may result in fire, burns, or other injuries.
If you notice any abnormalities, such as smoke, heat, or unusual odor
emanating from the product, immediately disconnect the battery or power
source. Continued operation may cause fire, burns, or other injuries.
Do not handle plugs with wet hands. Failure to comply with this precaution
may result in fire or electric shock.
Do not use this product in the presence of flammable dust or gases (such as
propane, gasoline, or aerosols). Failure to comply with this precaution may
result in an explosion or fire.
When using this product with batteries, chargers, AC adapters, and USB
cables, do not damage, modify, forcibly pull or twist the cables, place them
under heavy objects, or expose them to high temperatures or flames. Failure
to comply with these precautions may result in fire or electric shock.
If this product will not be used for an extended period, please remove the
batteries and disconnect the AC adapter. Failure to follow this precaution may
result in fire or product malfunction.
Do not place this product in environments where it will be exposed to
extremely high temperatures for extended periods, such as inside a closed
car or under direct sunlight. Failure to take these precautions may result in fire
or product malfunction.
WARNING
CAUTION
20
For Your Safety
Do not handle the battery improperly. Failure to follow these precautions may
result in battery leakage, overheating, cracking, or fire:
- Use only rechargeable batteries approved for use in this product.
- Do not expose the battery to flames or excessive heat.
- Do not disassemble.
- Do not short-circuit the battery by touching it to a necklace, hairpin, or other
metal object.
- Do not expose the battery or the product into which it is inserted to strong
physical impacts.
Please charge the battery using the specified method. Failure to follow these
precautions may result in battery leakage, overheating, cracking, or fire.
Keep batteries out of reach of children. If a child swallows a battery, seek
immediate medical attention.
Do not immerse this product in water or expose it to rain. Failure to take these
precautions may result in fire or product malfunction. If the product gets wet,
dry it immediately with a towel or similar material.
If you notice any abnormal changes in the battery, such as discoloration or
deformation, stop using it immediately. If the battery cannot be charged within
the specified time, stop charging. Failure to follow these precautions may
result in battery leakage, overheating, cracking, or fire.
Insulate the battery terminals with tape before handling. Contact with metal
objects may cause overheating, cracking, or fire.
Please recycle or dispose of the battery according to local regulations.
If battery fluid comes into contact with skin or clothing, immediately flush the
affected area with plenty of water. Failure to take this precaution may result in
skin irritation.
DANGER for Batteries
WARNING for Batteries
21
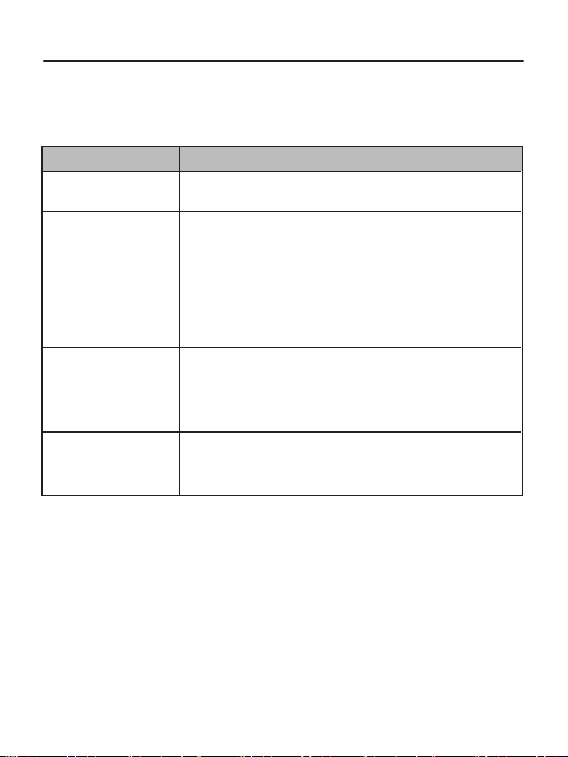
Technical Notes
Question
Causes/Solutions
Camera cannot be
turned on
Camera shuts down
without warning
The monitor displays
no image.
Camera gets hot
- Battery depleted.
- Battery installed incorrectly.
- The camera automatically shuts off to save power
(automatic shutdown function).
- The camera and battery may not function properly in
low temperatures.
- The camera is overheating internally. Please turn off
the camera and allow it to cool down before trying to
turn it back on.
-The camera is off.
-The camera automatically shuts down to save power
(automatic power-off).
-During this period, only one display will be on.
- The camera may get hot during prolonged use (such
as filming) or in high-temperature environments; this is
not a malfunction.
Compatible Memory Cards
This camera supports Micro SD (TF) memory cards.
- It is recommended to use a TF memory card with a speed rating of 6 or higher
for movie recording. Using a lower speed rating memory card may cause movie
recording to stop unexpectedly.
- If you are using a card reader, please ensure it is compatible with your memory
card.
- Please contact the manufacturer for information on features, operation, and
usage limitations.
Troubleshooting:
If your camera is not working as expected, please check the list of frequently
asked questions below before contacting your retailer.
22

FCC Warning
This device complies with Part 15 of the FCC Rules. Operation is
subject to the following two conditions:
(1) This device may not cause harmful interference, and (2) this device
must accept any interference received, including interference that may
cause undesired operation.
NOTE 1: This equipment has been tested and found to comply with the
limits for a Class B digital device, pursuant to part 15 of the FCC Rules.
These limits are designed to provide reasonable protection against
harmful interference in a residential installation. This equipment
generates, uses and can radiate radio frequency energy and, if not
installed and used in accordance with the instructions, may cause
harmful interference to radio communications. However, there is no
guarantee that interference will not occur in a particular installation. If
this equipment does cause harmful interference to radio or television
reception, which can be determined by turning the equipment off and
on, the user is encouraged to try to correct the interference by one or
more of the following measures:
- Reorient or relocate the receiving antenna.
- Increase the separation between the equipment and receiver.
-Connect the equipment into an outlet on a circuit different from that to
which the receiver is connected.
-Consult the dealer or an experienced radio/TV technician for help.
NOTE 2: Any changes or modifications to this unit not expressly
approved by the party responsible for compliance could void the user's
authority to operate the equipment.
The device has been evaluated to meet general RF exposure
requirement. The device can be used in portable exposure condition
without restriction.
23