Digital Cameras
Simple Guide
Please read me before use!
Retain the manual and all related information for future reference.

content
Warning.....................................................................................................1
Precautions................................................................................................ 1
About the camera.......................................................................................2
System requirements..................................................................................2
Camera Parts............................................................................................. 2
Charge the battery......................................................................................5
Turn camera on/off.................................................................................... 6
Setting up your camera.............................................................................. 6
Insert and format the memory card............................................................ 8
Formatting a memory card.........................................................................8
Using the Camera...................................................................................... 9
Focus function......................................................................................... 11
Fully automatic focus.............................................................................. 11
Manual focus........................................................................................... 11
Macro mode.............................................................................................11
Fill light...................................................................................................11
Media Playback....................................................................................... 12
Connect to a computer............................................................................. 13
Mass Storage Mode................................................................................. 13
PC Camera.............................................................................................. 13
Charging mode........................................................................................ 13
WIFI APP User Guide............................................................................. 14
Camera Cleaning and Maintenance..........................................................14
Troubleshooting.......................................................................................14
Supplementary Notes...............................................................................15

Warning
To reduce the risk of fire or electric shock,
1. Do not expose this device to rain or moisture.
2. Do not place objects filled with liquids (such as vases) on this device.
3. Do not expose the battery to excessive heat, such as sunlight or fire.
4. Do not swallow batteries to avoid chemical burns.
5. Keep new and used batteries out of the reach of children. If the battery
compartment is not securely closed, stop using this product and keep it out of the
reach of children.
6. If you think a battery may have been swallowed or placed in any part of the
body, seek medical attention immediately.
Precautions
If the battery pack is mishandled, it may explode, causing fire or even chemical
burns.
Please observe the following precautions.
1. Do not disassemble.
2. Do not crush the battery pack or subject it to any impact or external force, such
as hammering, dropping, or stepping on it.
3. Do not short-circuit the battery pack, and do not allow metal objects to come
into contact with the battery terminals.
4. Do not expose to temperatures exceeding 60°C (140°F), such as in direct
sunlight or in a car parked in the sun.
5. Do not incinerate or dispose of in fire.
6. Do not dispose of damaged or leaking lithium-ion batteries.
7. Keep the battery pack out of the reach of children.
8. Keep the surface of the battery pack dry.
9. Replace only with the specified type of battery. Failure to do so may result in
explosion, fire, or injury.
10. Dispose of used batteries according to the instructions.
11. When using the AC adapter/battery charger, use a nearby wall outlet. If any
malfunction occurs, unplug the battery pack from the wall outlet. If you are using
a product with a charging light, please note that even if the light turns off, the
product will not be disconnected from the power source.
12. Do not use the AC adapter/battery charger in confined spaces, such as
between walls and furniture.
13. If static electricity or electromagnetic interference causes data transmission to
be interrupted midway, restart the app or disconnect and reconnect the
communication cable (USB, etc.).
1
About the camera
System requirements
Users can transfer videos and photos to a computer with the following
configuration:
Intel Pentium 2.0GHz or higher / Microsoft Windows XP or higher
operating system 2GB RAM 40GB or more available disk memory /
standard USB port / 1GB GPU or higher 1920x1080 pixel or higher
resolution.
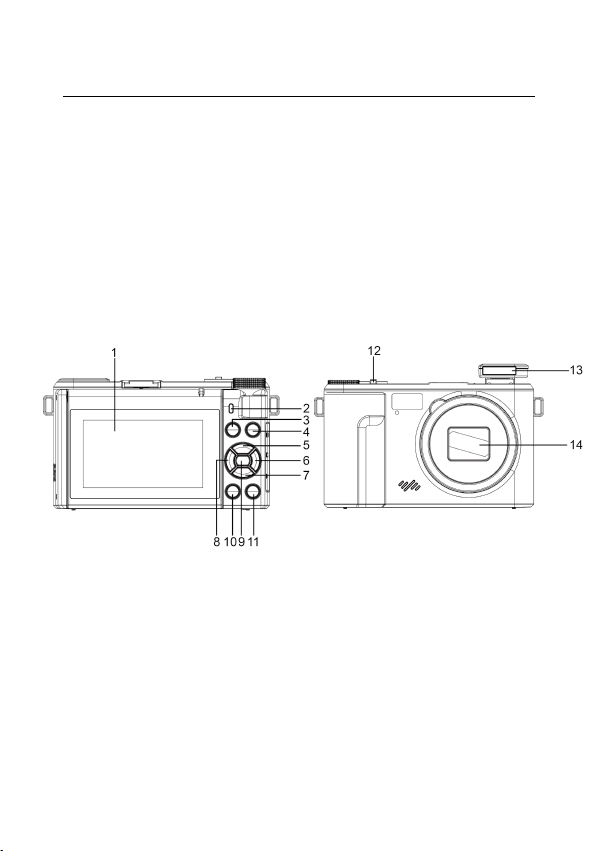
Camera Parts
Rear view Front view
1: Display
2: Charging Indicator/Working Indicator
3: AE/AF Lock Butto
12: Optical zoom toggle button
13: Fill light
14: Rear camera
n
(Auto Exposure/Focus Lock)
4: Wi-Fi Button
5: Up Button/Fill Light Shortcut
6: Right Button/Change Filter/Change EV Value
7: Down Button/DISP Button
8: Left Button/Change Filter/Macro Mode
9: OK Button
10: Playback Button
11: Menu Button
2
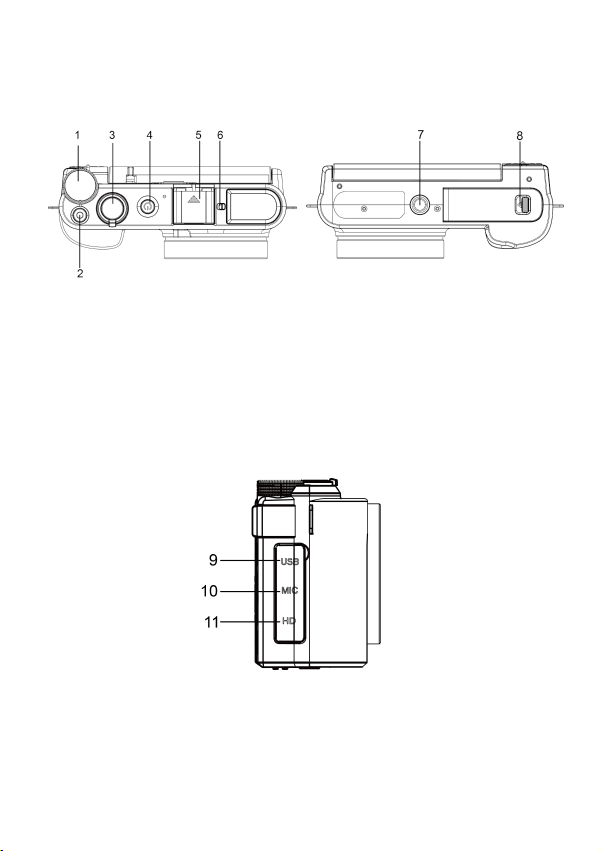
Top view Bottom View
Left side view
9: Type-C USB port
10: Microphone port
11: HD port
1: Mode dial
2: Record video button
3: Photo button
4: Power button
5: Cold shoe jack
6: Fill light mechanical lock
7: Tripod port
8:Battery compartment/memory card slot
3

Button/Indicator Function
Power button
Power on/off
Short press to pause the video while recording
Camera button Take a photo/half-press to focus
Record button Start recording/Stop recording
Mode dial Switch shooting mode
Cold shoe mount
Place the external microphone and fill light
connector
Fill light mechanical lock Turn on the built-in fill light
Optical zoom in/volume +
Optical zoom out/volume-
Indicator light
Red charging indicator light/blue working
indicator light
AE/AF LOCK button Auto exposure/focus lock
WIFI button Turn on Wi-Fi
Up button
Select Up
Short press to turn on/off the fill light
When WIFI is on, short press to exit WIFI
Right button
Select right
Short press to switch filter mode
Long press to switch EV value
Down button
Select Down
Short press once to clear the screen, short press
twice to lock the screen
Left button
Select Left
Short press to switch filter mode
Long press to turn on/off macro
OK button Confirm
Playback button Open/Exit Media Library
MENU button On/Off Menu Settings
USB
USB cable charging
Connect the computer with a USB cable
MIC External microphone interface (3.5mm)
HD HD line interface
4
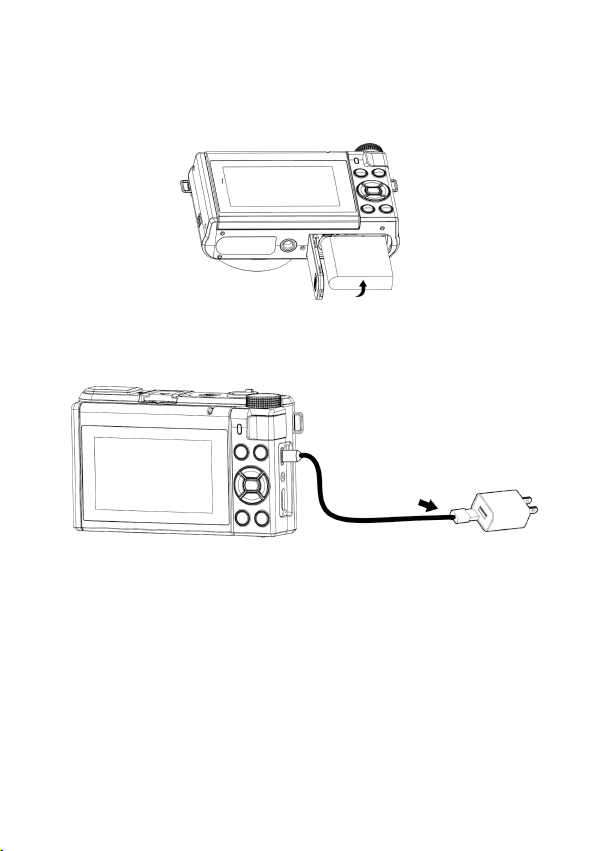
Charge the battery
1. Turn on the camera, open the battery cover, insert the battery as shown in the
figure below, and then close the battery cover.
2. You can use the provided USB cable to charge your camera via the adapter
(5V/1A~5V/2A).
*The charging indicator lights up red while the camera is charging.
*When the camera is fully charged, the charging indicator turns off
automatically.
A typical full charge of the battery takes about 1.5 hours.
A fully charged battery provides approximately 60 minutes of recording time.
5
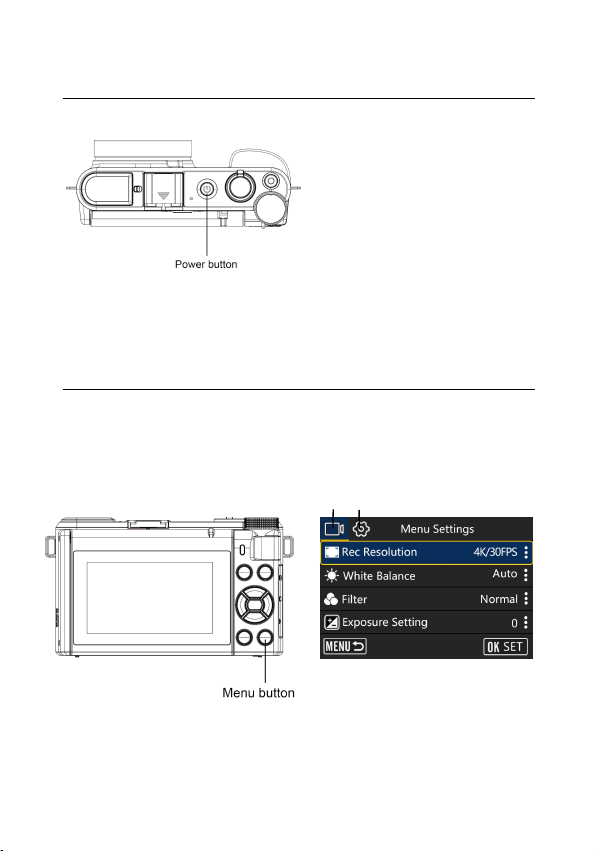
Turn camera on/off
Press the power button and the camera will turn on automatically.
To turn off the camera, press and hold the power button for 3 seconds.
Note: When using the camera for the first time, you need to press and hold the
power button to turn it on.
Setting up your camera
You can customize your camera settings.
After turning on the camera, press the Menu button to open the Mode menu and
enter System Settings.
Menu Settings
1 2
1: Current Mode Submenu
2: System Settings
6

Submenu Menu Contents
Macro mode Turn off/Turn on
AE-L+AF-L AE-L/AF-L/AE-L+AF-L
Icon display Turn off/Turn on
Wi-Fi Turn off/Turn on
APP Usage Guide Scan the QR code to view the tutorial
Light source frequency Auto/50Hz/60Hz
LED indicators Turn off/Turn on
AF Assist Lamp Turn off/Turn on
Auto screen saver Turn Off/30S/1 minute/2 minutes
Auto Power Off Turn Off/3 minutes/5 minutes/10 minutes
Display brightness High/Medium/Low
Button Prompt High/Medium/Low/Turn Off
Startup Music Turn off/Turn on
Language
Simplified Chinese/Traditional Chinese/English/
Japanese/Korean/Russian/German/French/Italian/S
panish/Portuguese/Thai/Dutch/Polish/Swedish/Rom
anian/Indonesian/Turkish/Greek
Time format YYYY/MM/DD MM/DD/YYYY DD/MM/YYYY
Time Set Hour/Minute/Second
Date Set Year/Month/Day
Format Format/Cancel
Device Info Product model and version
Factory Rest Confirm/Cancel
7
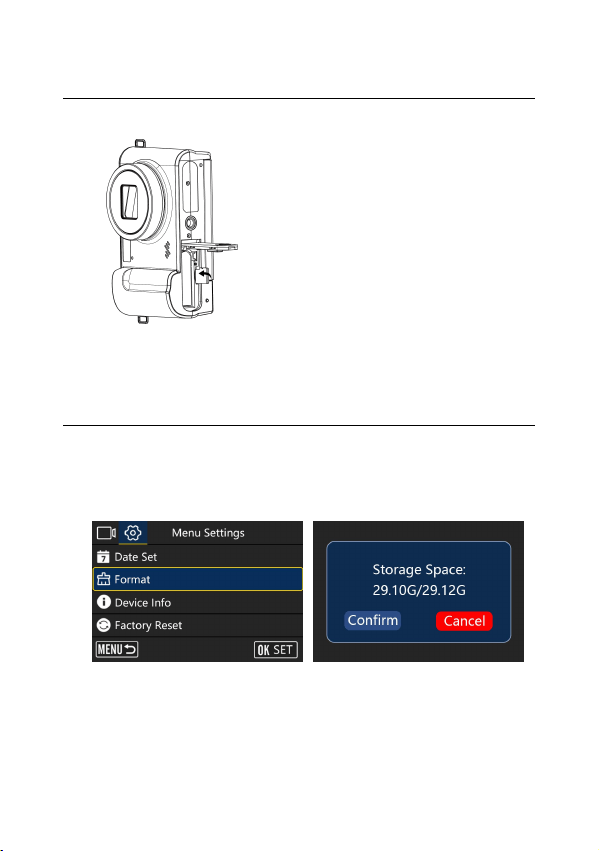
Insert and format the memory card
We recommend using a Class 10 or higher memory card for proper operation.
1. Insert the memory card until you hear a click.
Insert the card in the direction shown
in the picture for storage, paying
attention to the edges and corners.
2. Remove the memory card: Open the battery cover, push the memory card in,
it will pop out automatically.
Formatting a memory card
It's recommended to format the memory card before first use.
To format a memory card, press the Menu button to open the menu system. Then,
press the left or right arrow key to navigate to System Settings. Press the up or
down arrow key to find "Format," then press the OK button to enter the submenu.
Select "Confirm" to format the memory card.
Note:
If the file system on the memory card is not supported, a prompt will appear:
"Unsupported file system, format?" Please format the memory card as described
above.Formatting the memory card will delete all data stored on it, making it
irrecoverable.
Before formatting, please save important data on a PC.
8
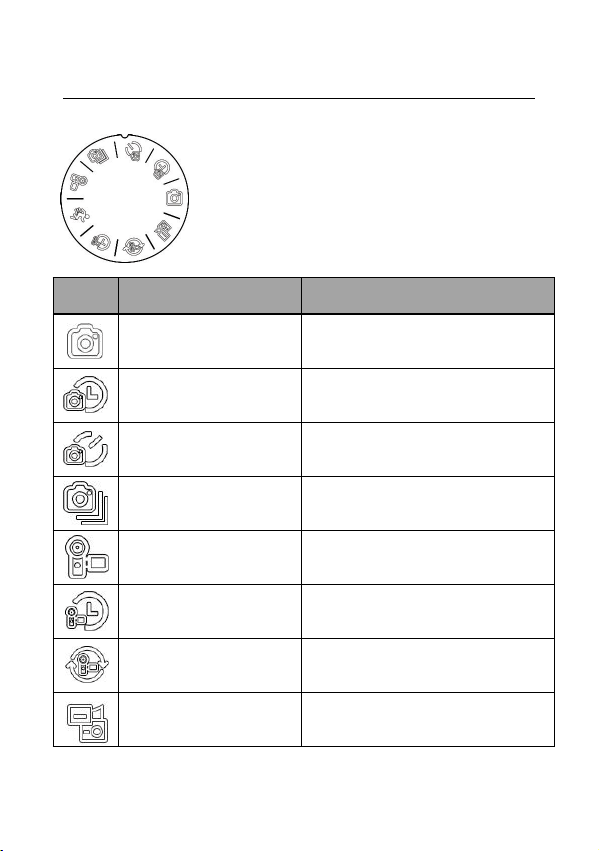
Using the Camera
After turning on the camera, rotate the mode dial to select the desired mode.
Icon Model Illustrate
Normal photo taking Take a single photo normally
Automatic photo taking
Automatic loop shooting after a
specified number of seconds
Timed photo taking
Take a single photo after a specified
number of seconds
Continuous photography
Take a specified number of photos
continuously
Normal video Record video in normal mode
Time-lapse video Compressed time recording video
Loop recording Record video in an infinite loop
Video recording + photo
taking
While recording a video, you can
capture a single photo at a set interval.
9

Note: The camera supports different modes with different menu settings.
After selecting the desired mode, press the Menu button to open the menu and
select the desired settings.
Press the Photo button to take a photo, which will automatically be saved to the
memory card.
Press the Record button to start video recording, and then press the Record
button to end it. While recording a video, you can press Power to pause or
resume video recording.
1: Photo button (takes photo/focuses)
2: Video button (starts/stops recording)
3: Optical zoom toggle button
Optical zoom in/ Optical zoom out
4: Indicator light
The active indicator light flashes while recording
10

Focus function
This function includes two focus modes: fully automatic focus and manual focus.
Press the Menu button to open the menu, then press the left/right button to switch
to system settings. Press the up/down button to find "Focus Mode", press the OK
button to enter the focus mode, and select the mode you want.
Fully automatic focus
In this mode, simply hold the camera steady while taking a photo or video, and it
will automatically focus. When you're done, press the capture button.
Manual focus
In this mode, when taking a photo or recording a video, half-press the photo
button and a focus frame will appear on the display until the camera is in focus.
Then press the photo button fully to take the clearest photo or start recording
with the clearest image.
Macro mode
In this mode, point the camera at the subject (at least 5cm away). When the
subject is clearly visible on the camera screen, hold the camera steady and press
the capture button to take photos and videos.
Fill light
In video mode, pressing the up button quickly toggles the fill light on and off.
In photo mode, the fill light has three flash modes, and pressing the up button
quickly switches between them.
Note: When the fill light is in auto-flash mode, it will only flash when taking
pictures in dark environments. When switched to forced flash mode, the flash
will always be on.
11

Media Playback
Press the Playback button to open the media library.
Select the video or photo file you want to view, then press OK to access the
corresponding file to view the videos and images stored on the camera's memory
card.
Current/total number of images
Photo playback/video playback
1: To view the details of the photo you took, turn
Note: After zooming in, you can scroll up/down/left/right to see more details.
2: Press the OK button to play/pause the video.
3: Press the Menu button to delete the photo/video.
Note: Once deleted, it cannot be restored.
4: Press the Play button to exit the video/photo playback.
12
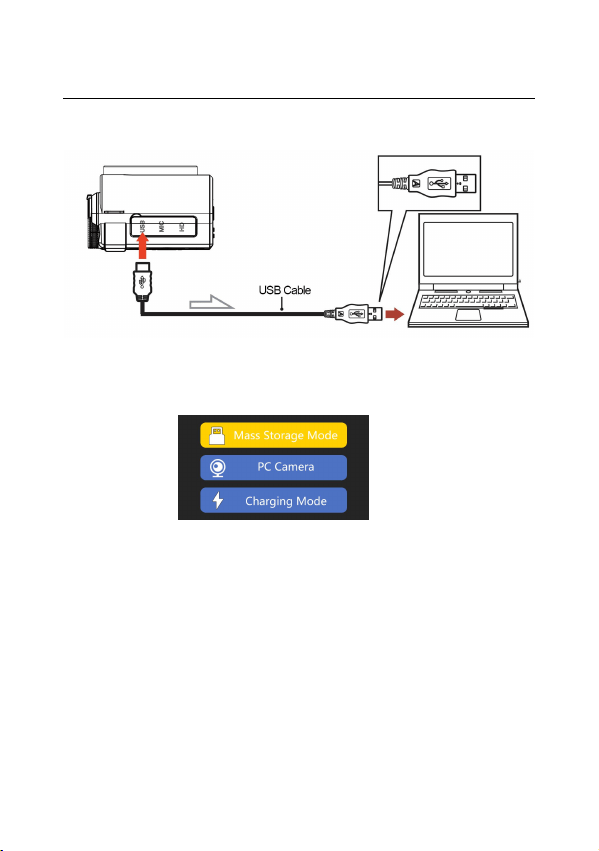
Connect to a computer
1. Use the provided USB cable to connect the camera's Type-C USB port to a
USB port on your computer.
2. With the camera powered on, the screen will display available options.
Press the Up/Down button, then press the OK button to confirm your settings.
Mass Storage Mode
Select "Mass Storage Mode" and the computer will display the camera's memory
card tray, allowing you to transfer files from the memory card to the computer.
PC Camera
Select "PC Camera" mode to use the camera as a webcam, live stream, and more.
Note: When using the camera as a PC Camera, only the optical zoom button on
the camera can be used; other functions are unavailable.
Charging Mode
Select charging mode, and the camera will support normal video recording.
Turning off the camera's power will fully charge faster than leaving it on.
13

WIFI APP User Guide
Press the MENU button to enter the menu. Press the left/right button to enter the
system settings. Then press the up/down button to find the "APP User Guide"
submenu. Press OK to scan and view the tutorial. To download the app, scan the
QR code below.
WIFI APP User Guide QR Code WIFI APP download QR code
Camera cleaning and maintenance
(1) If the camera is not to be used for an extended period, remove the battery and
store it in a dust-free, dry environment at a temperature not exceeding 30°C.
(2) To extend the battery life, fully discharge the battery before storage.
(3) After the battery is fully charged, fully discharge it at least once every three
months.
(4) If there is dust or dirt on the lens or screen, gently wipe it with a clean, soft
lens cloth.
(5) As this is a precision instrument, do not drop it or subject it to strong shock or
vibration.
Troubleshooting
If you are experiencing problems with your camera, refer to this section.
1. The camera does not turn on after installing the battery
(1) The battery is low. Please replace it with a new one or recharge it.
(2) The battery is installed upside down. Please make sure that the battery is
installed upside down.
(3) The battery insulation paper is not removed.
14

2. The battery is not charging
(1) If the charging indicator light flashes red, it means that the battery is not in
place or the contact is poor. Please reinstall the battery until the indicator light
comes on (the indicator light will go off when the battery is fully charged).
(2) If the charging indicator light does not come on, the charger is not properly
connected. Please check whether the charger is properly connected.
(3) If the ambient temperature is below 10℃, charging may be slow or
impossible.
3. Camera freezes
Pressing the camera buttons rapidly may cause it to freeze. If it freezes, remove
the battery and restart it.
Tip: Do not press the camera buttons rapidly while it is recording or taking a
photo. Normally, the camera will display a waiting icon.
4. Memory card cannot be recognized:
(1) Please check whether the memory card complies with the SD card (Class 10)
standard and does not exceed 256GB.
(2) Please check whether the memory card is inserted upside down.
(3) When using a memory card with a camera for the first time, it is
recommended to format it first.
Supplementary Notes
(1) Do not insert any objects other than the memory card into the slot.
(2) The camera may display an unstable image for a few seconds after turning on
the power. This is not a malfunction.
(3) Due to the optical characteristics of the lens, there may be color dispersion
(chromatic aberration amplification) at the edges of the image. This is not a
malfunction of the camera.
(4) It is normal for the memory card to heat up after prolonged use.
(5) It is normal for the camera screen to heat up after prolonged use.
15

NOTE: This equipment has been tested and found to comply with the limits for a
Class B digital
device, pursuant to Part 15 of the FCC Rules. These limits are designed to provide
reasonable
protection against harmful interference in a residential installation. This equipment
generates,
uses and can radiate radio frequency energy and, if not installed and used in
accordance with
the instructions, may cause harmful interference to radio communications.
However, there is no
guarantee that interference will not occur in a particular installation.
If this equipment does cause harmful interference to radio or television reception,
which can be
determinedbyturningtheequipmentoffandon,theuserisencouragedtotrytocorrectthe
interferenceby one or more of the followingmeasures:
--Reorient or relocate the receiving antenna.
-- Increase the separation between the equipment and receiver.
oe
connected.
-- Consult the dealer or an experienced radio/TV technician for help.
Warning: changes or modifications not expressly approved by the party responsible
for
compliance could void the user's authority to operate the equipment
Radiation Exposure Statement
This equipment complies with FCC radiation exposure limits set forth for an
uncontrolled
environment.
The device has been evaluated to meet general RF exposure requirement. The
device can be used in portable exposure condition without restriction.
This device complies with Part 15 of the FCC Rules. Operation is subject to the
following two conditions:
(1) This device may not cause harmful interference;
(2) This device must accept any interference received, including interference that
may cause undesired operation.