Digital Camera
User manual
Read before use!
Keep the manual and all relevant information for future reference.

Contents
WARNING..................................................................................................1
CAUTION...................................................................................................1
About the camera.......................................................................................2
System requirements ...................................................................................2
Parts and controls.........................................................................................2
Charging the battery.....................................................................................5
Power on/o the camera ............................................................................6
Set the camera ............................................................................................6
Insert and format the memory card.........................................................8
Format the memory card..............................................................................8
Using the camera........................................................................................9
Focus function..............................................................................................11
Fully automatic focus...................................................................................11
Manual focus................................................................................................11
Fixed focus ..................................................................................................11
Fill light........................................................................................................11
Playback......................................................................................................12
Connect to computer..................................................................................13
Charging mode ............................................................................................13
Mass Storage mode......................................................................................13
PC camera ...................................................................................................14
WIFI APP User Guide ................................................................................14
Camera cleaning and maintenance...............................................................15
Troubleshooting ...........................................................................................16
Additional notes...........................................................................................16

1
If the battery is mishandled, the battery pack can burst, causing a re or even
chemical burns. Observe the following cautions
Do not disassemble.
Do not crush and do not expose the battery pack to any shock or force such as
hammering,dropped or stepping on it.
Do not short circuit and do not allow metal objects to come into contact with the
battery terminals.
Do not expose to high temperature above 60°C (140°F) such as in direct sunlight or
in a car parked in the sun.
Do not incinerate or dispose of in re.
Do not handle damaged or leaking lithium ion batteries.
Keep the battery pack out of the reach of small children.
Keep the battery pack dry.
Replace the battery with the specied type only. Otherwise, bursting, re or injury
may result.
Dispose of used batteries according to the instructions.
Use a nearby wall outlet(wall socket) when using the AC Adapter/Battery charger.
If any malfunction occurs, disconnect the plug from the wall outlet immediately
to disconnect from the power source. If you use the product with a charge lamp,
note that the product is not disconnected from the power source even if the
lamp turns o.
Do not use the AC adapter/Battery charger placing in a narrow space, such as
between a wall and furniture.
If static electricity or electromagnetism cause data transfer to discontinue midway
(fair), restart the application or disconnect and reconnect the communication cable
To reduce the r
isk o
f
re or electric shock:
1. Do not expose the unit to rain or moisture.
2. Do not place objects lled with liquids, such as vases, on the apparatus.
3. Do not expose the batteries to excessive heat, such as sunshine, re or the like.
4.Do not ingest batteries, chemical burn hazard.
5.Keep new and used batteries away from children. If the battery compartment does
not close securely, stop using the product and keep it away from children.
6.If you think batteries might have been swallowed or placed inside any part of the
body, seek immediate medical attention.
(USB, etc.) again.
WARNING
CAUTION
:
2
About the camera
System requirement
Users can transfer videos and photos to computers with the following
congurations:
Intel Pentium 2.0GHz or higher/ Microsoft Windows XP or higher operating
system 2GB RAM 40GB or more available disk memory/ Standard USB interface /
1GB GPU or higher 1920x1080 pixels or higher resolution.
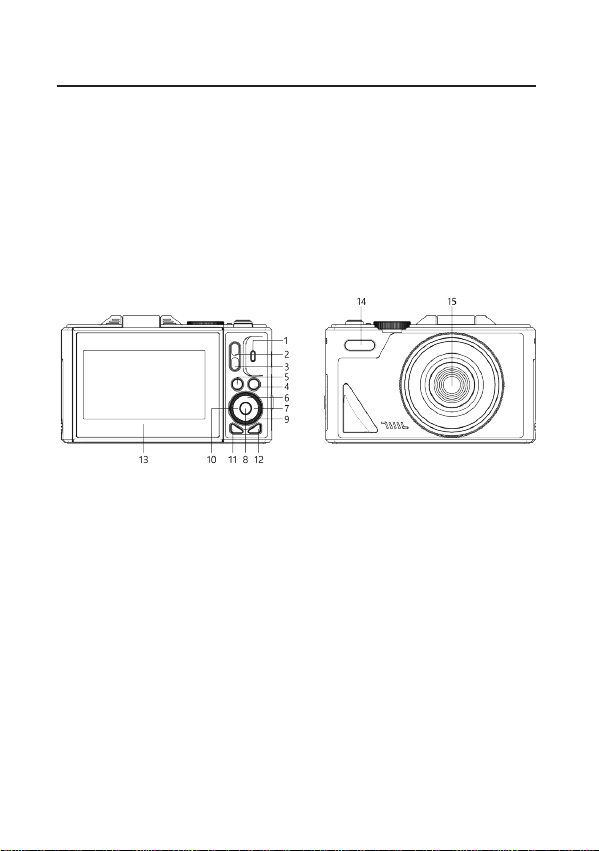
Parts and controls
Rear view Front view
1: Charging/working indicator light
2: Digital zoom in
3: Digital zoom out
4: Delete button
5: Playback button
6: Up button/shortcut button for ll light
7: Right button
8: OK button
9: Down button
10: Left button
11: DISP button
12: Menu button
13: Display screen
14: Fill light
15: Lens
3
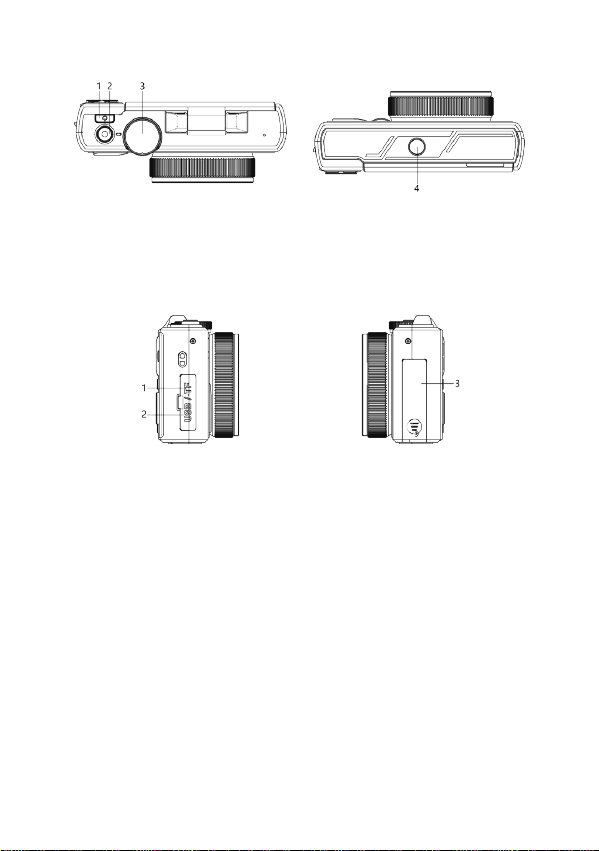
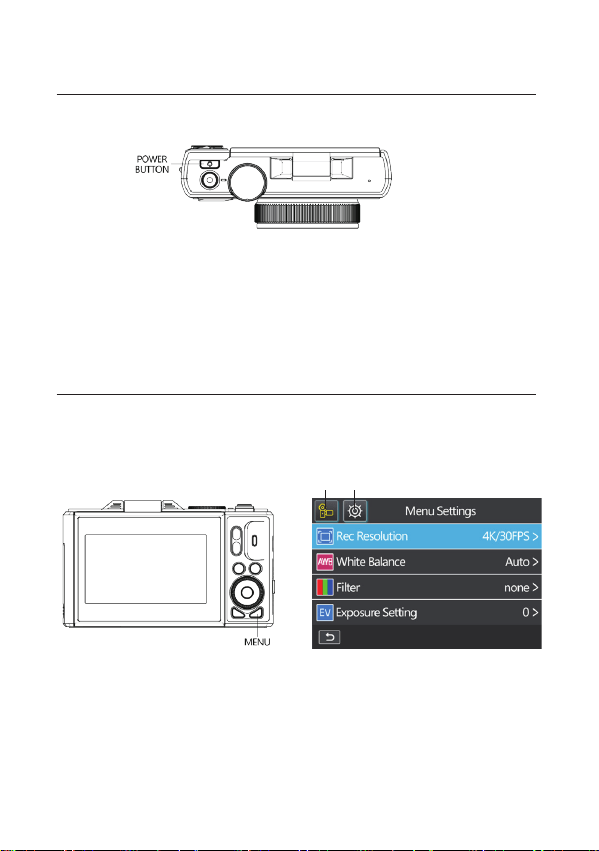
Top side view Bottom side view
1:POWER button
2:Photo button
Left side view Right side view
1: Memory card slot
2: Type-C USB interface
3: Battery compartment
3:Mode Dial
4 : T r i p o d h o l e

4
Buttons/ Indicators Functions
POWER Power on / o
PHOTO
Take photo
Pause of recording
Mode dial Switch shooting mode
T digital zoom in
W Digital zoom out
Indicator light Working / Charging indicator light
Playback button Open/Exit Media Playback
Up
Upward
Turn on/o the ll light
Right Rightward
Down
Downward
Delete photo/video
Left Leftward
OK Conrm
DISP Turn on/o the display
MENU Open / Close menu settings
USB
USB cable charging
Connect the computer with USB cable
5
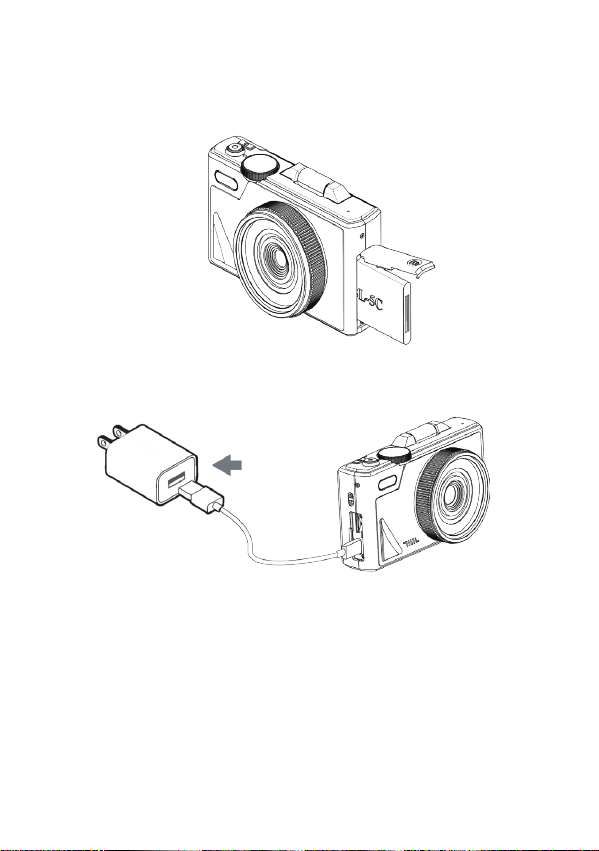
Charging the battery
1.Power o your camera, open the battery cover, and insert the battery in the
direction shown in the following picture, then close the battery cover.
2.You can use supplied USB cable to charge your camera via an adapter
(5V/1A~5V/2A) .
* The charging indicator will be turned on in red when the battery is in charging.
* The charging indicator will be turned o automatically when the battery is fully
charged.
Normally it takes around 2 hours to full charging of the battery.
When the battery is fully charged, the battery life is around 60 minutes for
recording.
6
Power on/o the camera
Press the power button, the camera will turn on automatically.
To turn o the camera, press and hold the power button for 3 seconds.
Note: When you turn on the camera for the rst time, you need to press and hold
the power button to turn it on.
When there is no battery in the battery compartment, you need to press and hold the
power button to turn on the camera after you put the battery in.
Set the camera
You can make custom settings of the camera.
After the camera is turned on, press the menu button to open the menu settings.
1 :Sub-menu for current mode
2 :System settings
Menu Settings
1 2
7
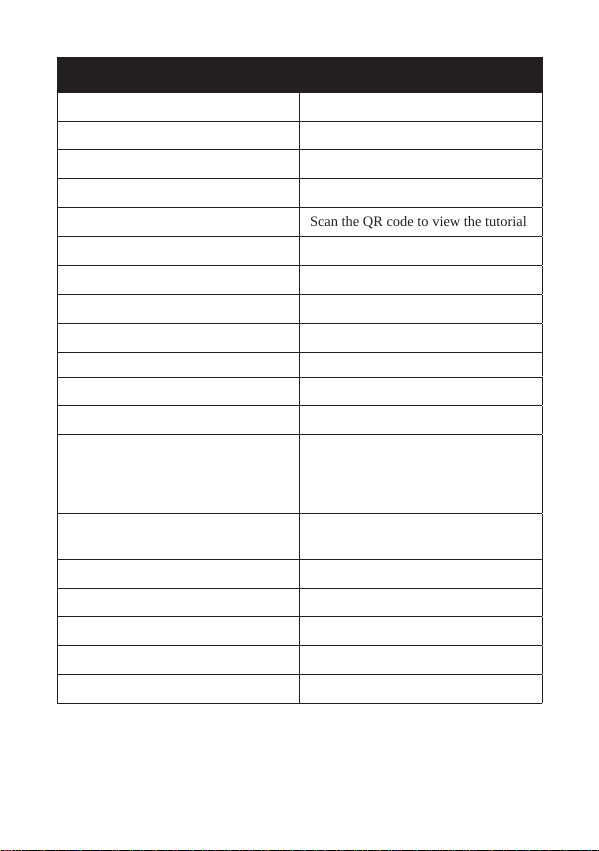
Sub-menu Menu content
Image Rotation Turn On/Turn O
Icon Display Turn On/Turn O
Video Focus Mode Auto focus/Manual focus/Fixed focus
Wi-Fi Turn On/Turn O
Light Source Frequency Auto/50Hz/60Hz
LED Indicator Turn On/Turn O
Auto Screen Saver T u r n O / 3 0 s / 1 M i n u t e / 2 M i n u t e
Auto Power O Turn O/3Minute /5Minute /10Minute
Button Prompt High/Middle/Low/Turn O
Startup Music Turn On/Turn O
Language
Simplied Chinese/Traditional
Chinese/English/ Japanese/Korean/
Russian/German/French/Italian/
Spanish/Portuguese/Thai
Time Format
YYYY/MM/DD MM/DD/YYYY
DD/MM/YYYY
Time Set hour minute second
Date Set year month day
Format (Micro SD Card)Format/Cancel
Device Info Product model and version number
Factory Reset Conrm/Cancel
APP Usage Guide
Scan the QR code to view the tutorial
Display Brightness
High/Middle/Low
`

8
Insert and format the memory card
A class 10 or higher speed memory card is recommended to normal use.
1.Insert the memory card into the memory card slot until you hear a "click".
Insert the memory card in the direction
shown in the diagram, paying attention
to the edges and corners.
2.To remove the memory card:Push the memory card in and it will automatically
pop out.
Format the memory card
It is recommended to format the memory card before the rst use.
To format the memory card, press the menu button to open the menu system.Then
press the left or right button to switch to system settings. Press Up or Down to nd
"Format" and press OK to get the sub-menu. Select "Format" to format the memory
card.
Note:If the memory card is not native format, the screen will pop-up a prompt:
“Unsupported le system,do you want to format?” please format the memory card
as above operation.
Formatting the memory card will erase all the data stored on it and the data will be
irrecoverable. Save your important data on PC before formatting.
9
Using the camera
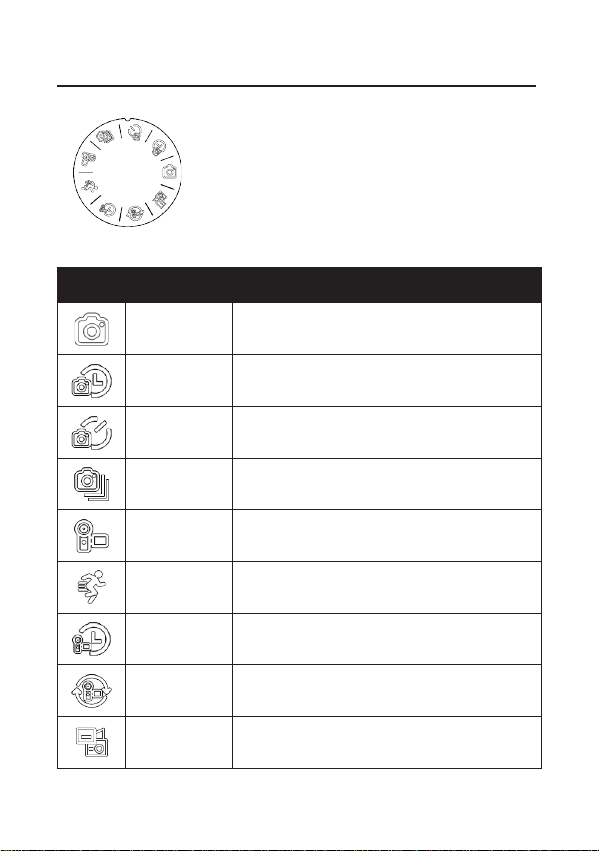
After the camera is turned on, it defaults to video shooting mode.
Rotate the mode dial to select the desired mode
icon Mode illustrate
Photo Take a single photo normally
Auto
Automatically cycle take photos after a specied
number of seconds
Timed
Take a single photo after a specied number of
seconds
Burst Take a specied number of photos in succession
Video Normal recording mode
Slowly Slow motion shooting
Compress time to record video
Loop Recording innite loop
Video+Photo
During the recording video, you can capture
according to the set capture interval single photo
Lapse
10
Note: The camera supports setting the corresponding mode menu in dierent modes.
After selecting the desired mode, press the menu button to open the menu and
select the desired setting if desired.
Press the photo button to take a photo, and the photo will be automatically saved to
the memory card.
In video recording mode, press the photo button to start recording, and then press
to end recording. You can also press the power button to pause/continue recording
while recording.
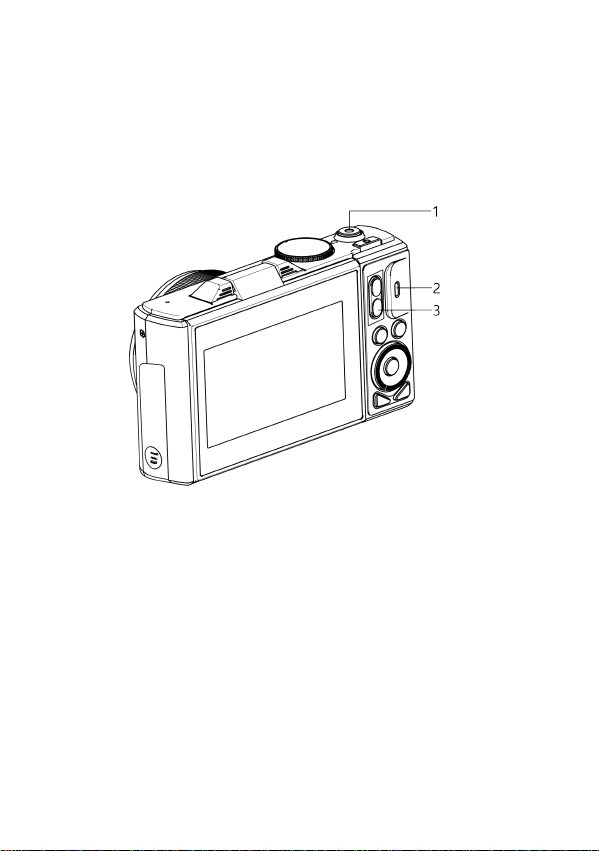
1: Photo button (video start/end button)
Press to start recording, then press to end recording
2: Indicator light
The working indicator light ashes when recording
3: Digital zoom button
T button digital zoom zoom in/W button digital zoom zoom out

11
Focus function
This function includes 3 focus modes: automatic focus/manual focus mode/fixed focus.
Press menu button Open the menu, then press the left/right button to switch to system
settings, press the up/down button to nd "Video Focus Mode", press OK button to
enter focus mode. Select the mode you need.
Fully automatic focus
In this mode, you only need to keep the camera steady when taking pictures or videos,
and the camera will automatically focus. Once done, press the capture button.
Manual focus
In this mode, when taking a photo or recording a video, half-press the photo button and
the focus frame will appear on the display until the camera focuses clearly.
Then press the photo button all the way down to take the clearest photo or start
recording with the clearest image.
Fixed focus
In this mode, you need to press the shooting button halfway to focus when taking
pictures or videos, and the screen will clearly show the image of the object being
shot, and then press the shooting button to the end. If you release the capture button to
take pictures or record videos, the pictures and videos will not be clear.
Fill light
In video mode, pressing the up button can quickly turn on or o the ll light.
In photo mode, the ll light has three ash modes and pressing the up button can
quickly switch between the three modes.
Note: When the ll light is in automatic ash mode, it will only ash when taking
photos in a relatively dark environment. When switched to forced ash mode, the
ll light will always be on.
12
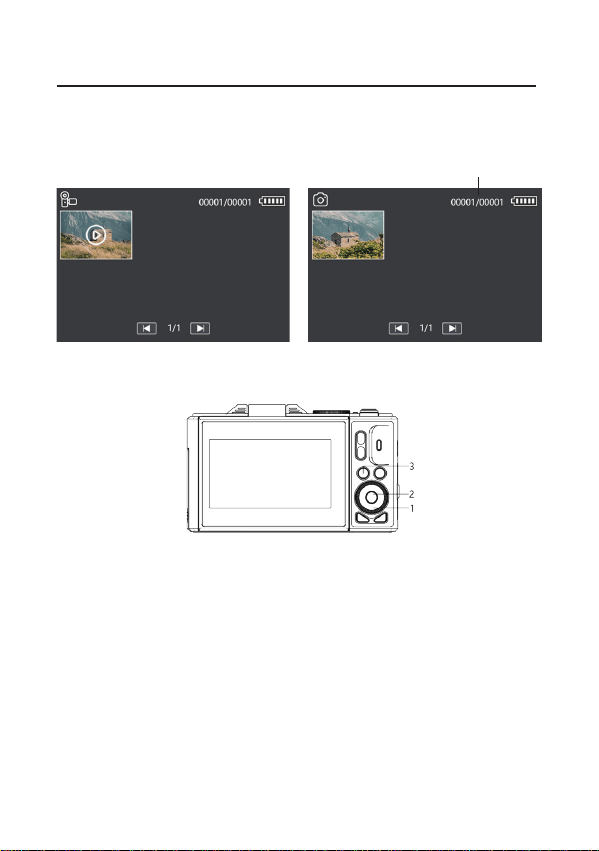
Playback
Press the playback button to enter the media library. Select the video or photo le
you want to view, then press the OK button to enter the corresponding le to view
the video and image stored in the camera memory card.
Current/total number of images
Figure 1: Video playback Figure 2: Photo playback
1:Press the down button to delete a photo/video.
Note: Once deleted, it cannot be recovered.
2: Press the OK button to play/pause the video
3: Press the playback button to exit video/photo playback
13
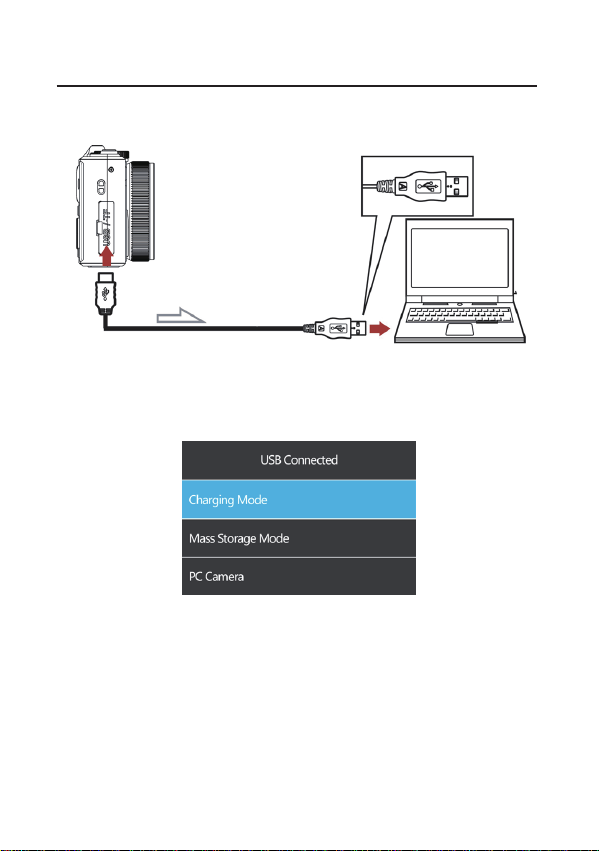
Connect to computer
1. Connect the Type-C USB port of the camera and the USB port of the computer
with supp lied USB cable.
2. The camera will turn on automatically and the screen will display the available
options.
Press the Up/Down button to select the desired option, then press the OK button to
conrm the option.
Charging Mode
Select the charging mode, the camera supports the function of recording normally.
Power o the camera would be fully charged faster then keep powering on.
Mass Storage Mode
Select “Mass Storage Mode” and the computer will display the camera’s
memory card drive. You can transfer les from the storage to the computer on the
computer.

14
PC Camera
Select the “PC Camera” mode, the camera can be used as a webcam, live
streaming, etc.
Note: When the camera is used as a webcam, only the digital zoom button can be
WIFI APP User Guide
P
ress the MENU button to enter the menu, press the left/right button to enter the
system settings, then press the up/down button to find the "APP Usage Guide"
submenu bar, and finally press OK to scan and view the tutorial. To download WiFi,
you can scan the QR code on the right below.
operated on the camera and other functions cannot be used.
WIFI APP User Guide QR Code
WIFI APP Download QR Code

15
Camera cleaning and maintenance
(1) If you do not use the camera for a long time, take out the camera battery and
place it in a dust-free, dry environment with a temperature no higher than 30 ℃ .
(2) In order to extend the service life of the battery, please discharge it completely
before storage.
(3)Please fully discharge the battery at least once every 3 months after it has been
fully charged.
(4) If there is dust or dirt on the lens or screen, gently wipe it with a clean, soft lens
cleaning cloth.
(5) As this machine is a precision instrument, please do not drop it or suer from
strong impact or vibration.
Troubleshooting:
If you encounter problems with the camera, please refer to this section.
1. The camera cannot be turned on after installing the battery
(1) The battery power is insucient, please replace the battery with a new one or
charge the battery.
(2) The battery is installed in reverse, please conrm that the battery is installed in
the correct way.
(3) The battery insulating paper is not removed.
2. The battery is not charging
(1) If the red light of the charging indicator ashes, the battery is not in place or
the contact is poor. Please re-install the battery until the indicator light is on (the
indicator light goes out when the battery is fully charged)
(2) The charging indicator light is o and the charger is not plugged in properly.
Please check whether the charger is connected normally.
(3) The ambient temperature is lower than 10℃, which may lead to slow charging
or failure to charge.

3. Camera crashes
Quickly pressing each button of the camera may cause the camera to freeze. After
it crashes, unplug the battery and reboot.
Tip: When the camera is recording or taking pictures, do not quickly press the
camera button. Under normal circumstances, the camera will display a waiting
icon.
Additional notes
(1)Do not insert any object into the slot except the memory card.
(2)After the power is turned on, the camera may show an unstable image about for
a few seconds, but this is not a fault.
(3)Due to the optical properties of the lens, there may be color dispersion
(magnication of chromatic aberration) at the edges of the image. This is not a
camera fault.
(4)It is normal for the memory card to get hot after a long period of use.
4. The memory card cannot be recognized:
(1) Please check whether the memory card complies with Micro SD card (class10),
(2) Please check whether the memory card is inserted backwards.
(3) When the memory card is used on the camera for the rst time, it is
recommended to format it rst.
(5)It is normal for the camera’s screen to heat up after a long period of use.
16

NOTE: This equipment has been tested and found to comply with the limits for a
Class B digital
device, pursuant to Part 15 of the FCC Rules. These limits are designed to
provide reasonable
protection against harmful interference in a residential installation. This
equipment generates,
uses and can radiate radio frequency energy and, if not installed and used in
accordance with
the instructions, may cause harmful interference to radio communications.
However, there is no
guarantee that interference will not occur in a particular installation.
If this equipment does cause harmful interference to radio or television
reception, which can be
determinedbyturningtheequipmentoffandon,
theuserisencouragedtotrytocorrectthe
interferenceby one or more of the followingmeasures:
--Reorient or relocate the receiving antenna.
-- Increase the separation between the equipment and receiver.
oe
connected.
-- Consult the dealer or an experienced radio/TV technician for help.
Warning: changes or modifications not expressly approved by the party
responsible for
compliance could void the user's authority to operate the equipment
Radiation Exposure Statement
This equipment complies with FCC radiation exposure limits set forth for an
uncontrolled
environment.
RF Exposure Information
The device has been evaluated to meet general RF exposure requirement.
The device can be used in portable exposure
condition without restriction.
This device complies with Part 15 of the FCC Rules. Operation is subject to
the following two conditions:
(1) This device may not cause harmful interference;
(2) This device must accept any interference received, including interference
that may cause undesired operation.