©2024 Shop-Vac
®
Williamsport, PA 17701
All rights reserved
Shop-Vac® is a registered trademark of Shop-Vac.
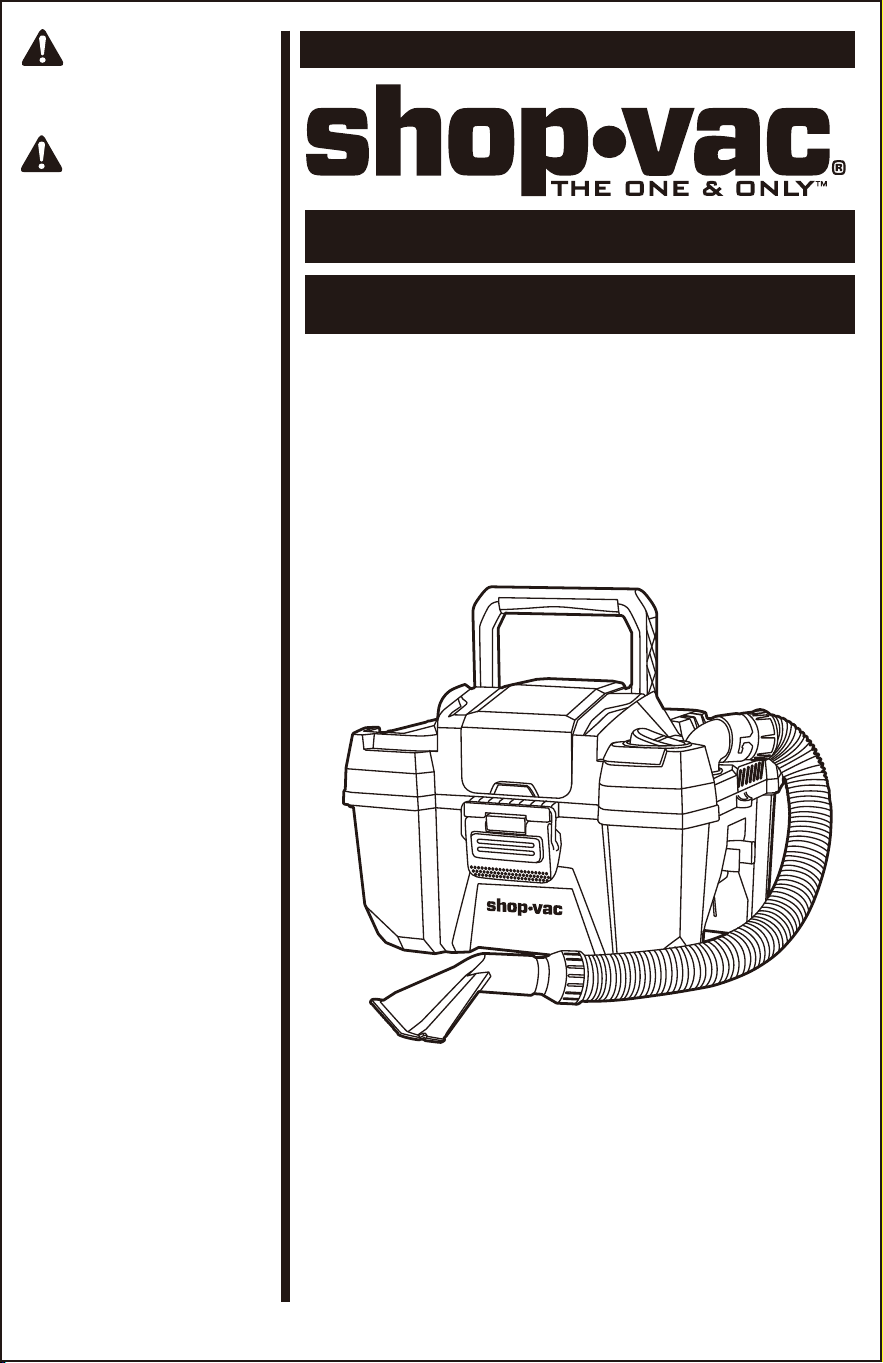
OPERATOR’S MANUAL
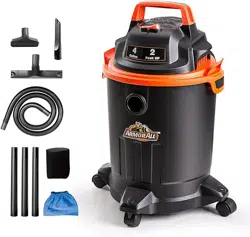
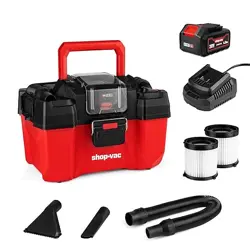
2.5 GALLONS CORDLESS WET/DRY VACUUM
HOUSEHOLD AND WORKSHOP USE
SV5430122
ATTENTION!
Read all safety rules carefully
before attempting to operate.
Retain for future reference.
DANGER!
Never operate this unit when
flammable materials or
vapors are present because
electrical devices produce
arcs or sparks that can cause
a fire or explosion.
NEVER OPERATE
UNATTENDED!
User manual
Please review before operating vac.
87401-51

1-English
GENERAL POWER TOOL SAFETY RULES
WARNING! Read all safety warnings, instructions, illustrations and specifications
provided with this power tool. Failure to follow all instructions listed below may result in
electric shock, fire and/or serious injury.
Save all warnings and instructions for future reference.The term “power tool” in the warnings refers to your mains-
operated (corded) power tool or battery-operated (cordless) power tool.
WORK AREA SAFETY
■ Keep work area clean and well lit. Cluttered or dark areas invite accidents.
■ Do not operate power tools in explosive atmospheres, such as in the presence of flammable liquids, gases or dust.
Power tools create sparks which may ignite the dust or fumes.
■ Keep children and bystanders away while operating a power tool. Distractions can cause you to lose control.
ELECTRICAL SAFETY
■ Power tool plugs must match the outlet. Never modify the plug in any way. Do not use any adapter plugs with
earthed (grounded) power tools. Unmodified plugs and matching outlets will reduce risk of electric shock.
■ Avoid body contact with earthed or grounded surfaces such as pipes, radiators, ranges and refrigerators. There is
an increased risk of electric shock if your body is earthed or grounded.
■ Do not expose power tools to rain or wet conditions. Water entering a power tool will increase the risk of electric
shock.
■ Do not abuse the cord. Never use the cord for carrying, pulling or unplugging the power tool. Keep cord away from
heat, oil, sharp edges or moving parts. Damaged or entangled cords increase the risk of electric shock.
■ When operating a power tool outdoors, use an extension cord suitable for outdoor use. Use of a cord suitable for
outdoor use reduces the risk of electric shock.
■ If operating a power tool in a damp location is unavoidable, use a ground fault circuit interrupter (GFCI) protected
supply. Use of a GFCI reduces the risk of electric shock.
PERSONAL SAFETY
■ Stay alert, watch what you are doing and use common sense when operating a power tool. Do not use a power tool
while you are tired or under the influence of drugs, alcohol or medication. A moment of inattention while operating
power tools may result in serious personal injury.
■ Use personal protective equipment. Always wear eye protection. Protective equipment such as dust mask, non-skid
safety shoes, hard hat, or hearing protection used for appropriate conditions will reduce personal injuries.
■ Prevent unintentional starting. Ensure the switch is in the off-position before connecting to power source and/or
battery pack, picking up or carrying the tool. Carrying power tools with your finger on the switch or energizing power
tools that have the switch on invites accidents.
■ Remove any adjusting key or wrench before turning the power tool on. A wrench or a key left attached to a rotating
part of the power tool may result in personal injury.
■ Do not overreach. Keep proper footing and balance at all times. This enables better control of the power tool in
unexpected situations.
■ Dress properly. Do not wear loose clothing or jewelry. Keep your hair, clothing and gloves away from moving parts.
Loose clothes, jewelry or long hair can be caught in moving parts.
■ If devices are provided for the connection of dust extraction and collection facilities, ensure these are connected and
properly used. Use of dust collection can reduce dust related hazards.
■ Do not let familiarity gained from frequent use of tools allow you to become complacent and ignore tool safety
principles. A careless action can cause severe injury within a fraction of a second.
POWER TOOL USE AND CARE
■ Do not force the power tool. Use the correct power tool for your application. The correct power tool will do the job
better and safer at the rate for which it was designed.
■ Do not use the power tool if the switch does not turn it on and off. Any power tool that can not be controlled with
the switch is dangerous and must be repaired.
■ Disconnect the plug from the power source and/or the battery pack from the power tool before making any
adjustments, changing accessories, or storing power tools. Such preventative safety measures reduce the risk of
starting the power tool accidentally.
■ Store idle power tools out of the reach of children and do not allow persons unfamiliar with the power tool or these
instructions to operate the power tool. Power tools are dangerous in the hands of untrained users.

2-English
GENERAL POWER TOOL SAFETY RULES(CONT.)
■ Maintain power tools. Check for misalignment or binding of moving parts, breakage of parts and any other condition
that may affect the power tool’s operation. If damaged, have the power tool repaired before use. Many accidents are
caused by poorly maintained power tools.
■ Use the power tool, accessories and tool bits etc. in accordance with these instructions, taking into account the
working conditions and the work to be performed. Use of the power tool for operations different from those
intended could result in a hazardous situation
■ Keep handles and grasping surfaces dry, clean and free from oil and grease. Slippery handles and grasping surfaces
do not allow for safe handling and control of the tool in unexpected situations.
BATTERY TOOL USE AND CARE
■ Recharge only with the charger specified by the manufacturer. A charger that is suitable for one type of battery pack
may create a risk of fire when used with another battery pack.
■ Use power tools only with specifically designated battery packs. Use of any other battery packs may create a risk of
injury and fire.
■ When battery pack is not in use, keep it away from other metal objects, like paper clips, coins, keys, nails, screws or
other small metal objects, that can make a connection from one terminal to another. Shorting the battery terminals
together may cause burns or a fire.
■ Under abusive conditions, liquid may be ejected from the battery; avoid contact. If contact accidentally occurs, flush
with water. If liquid contacts eyes, additionally seek medical help. Liquid ejected from the battery may cause irritation
or burns.
■ Do not use a battery pack or tool that is damaged or modified. Damaged or modified batteries may exhibit
unpredictable behaviour resulting in fire, explosion or risk of injury.
■ Do not expose a battery pack or tool to fire or excessive temperature. Exposure to fire or temperature above 265°F
may cause explosion.
■ Follow all charging instructions and do not charge the battery pack or tool outside the temperature range specified in
the instructions. Charging improperly or at temperatures outside the specified range may damage the battery and
increase the risk of fire.
SERVICE
■ Have your power tool serviced by a qualified repair person using only identical replacement parts. This will ensure
that the safety of the power tool is maintained.
■ Never service damaged battery packs. Service of battery packs should only be performed by the manufacturer or
authorized service providers.
■ When servicing a power tool, use only identical replacement parts. Follow instructions in the Maintenance section of
this manual. Use of unauthorized parts or failure to follow maintenance instructions may create a risk of shock or injury.

3-English
VACUUM CLEANER SAFETY WARNINGS
■ Do not run vacuum unattended.
■ Do not use without filters in place.
■ Do not use to pick flammable or combustible liquids, such as gasoline, or use in areas where they may be present.
■ Do not pick up anything that is burning or smoking, such as cigarettes, matches, or hot ashes. To reduce the risk of
health hazards from vapors or dusts, do not vacuum toxic materials.
■ Do not use or store near hazardous materials.
■ If vacuum is not working as it should, has been dropped, damaged, left outdoors, or dropped into water, return it to a
service center.
■ Do not allow to be used as a toy, Close attention is necessary when used by or near children.
■ Do not put any project into openings. Do not use with any opening blocked. Keep free of dust, lint, hair, and anything
that may reduce air flow.
■ Keep hair, loose clothing, fingers, and all parts of body away from openings and moving parts.
■ Use extra care when cleaning on stairs.
■ Do not handle vacuum, charger, charger plug, or charger terminals with wet hands.
■ Turn off all controls before removing the battery pack.
■ Turn off the vauum and remove the battery pack before connecting the hose or other accessories.
■ Prevent unintentional starting. Ensure the switch is in the off-postion before connnecting to battery pack, picking up or
carrying the vacuum.
■ Carrying the vacuum with your finger on the switch or energizing vacuum that has the switch on invites accidents.
■ Disconnect the battery pack from the vacuum before making any adjustments, changing accessories, or storing
vacuum, such preventive safety measures reduce the risk of starting the vacuum accidentally.
■ Use vacuum only with specifically designed battery packs. Use of any other battery packs may create a risk of injury
and fire.
■ Under abusive conditions, liquid may be ejected from the battery , avoid contact. If contact accidentally occurs, flush
with water. If liquid contacts eyes, additionally seek medical help. Liquid ejected from the battery may cause irritation or
burns.
■ Have servicing preformed by a qualified repair person using only identical replacement parts.
■ Do not modify or attempt to repair the vacuum or the battery pack except as indicated in the instructions for use and
care.
■ Use only as described in this manual. Use only manufacturer’s recommended attachments.
■ Do not expose to rain, store indoors. Use the vacuum at a temperature between 23°F and 104°F.
When using as blower:
■ Direct air discharge only at work area.
■ Do not use wet/dry vacuum as a sprayer.
■ Do not direct air at bystanders.
■ Keep children away when blowing.
■ Use safety googles.
■ Never put the connector and adaptors into your mouth, ear or eye. They are not toys.
WARNING! When using an vacuum, basic precautions should always be followed,
including the following, failure to follow the warnings and instructions may result in
explosion, fire and/or serious injury.
4-English
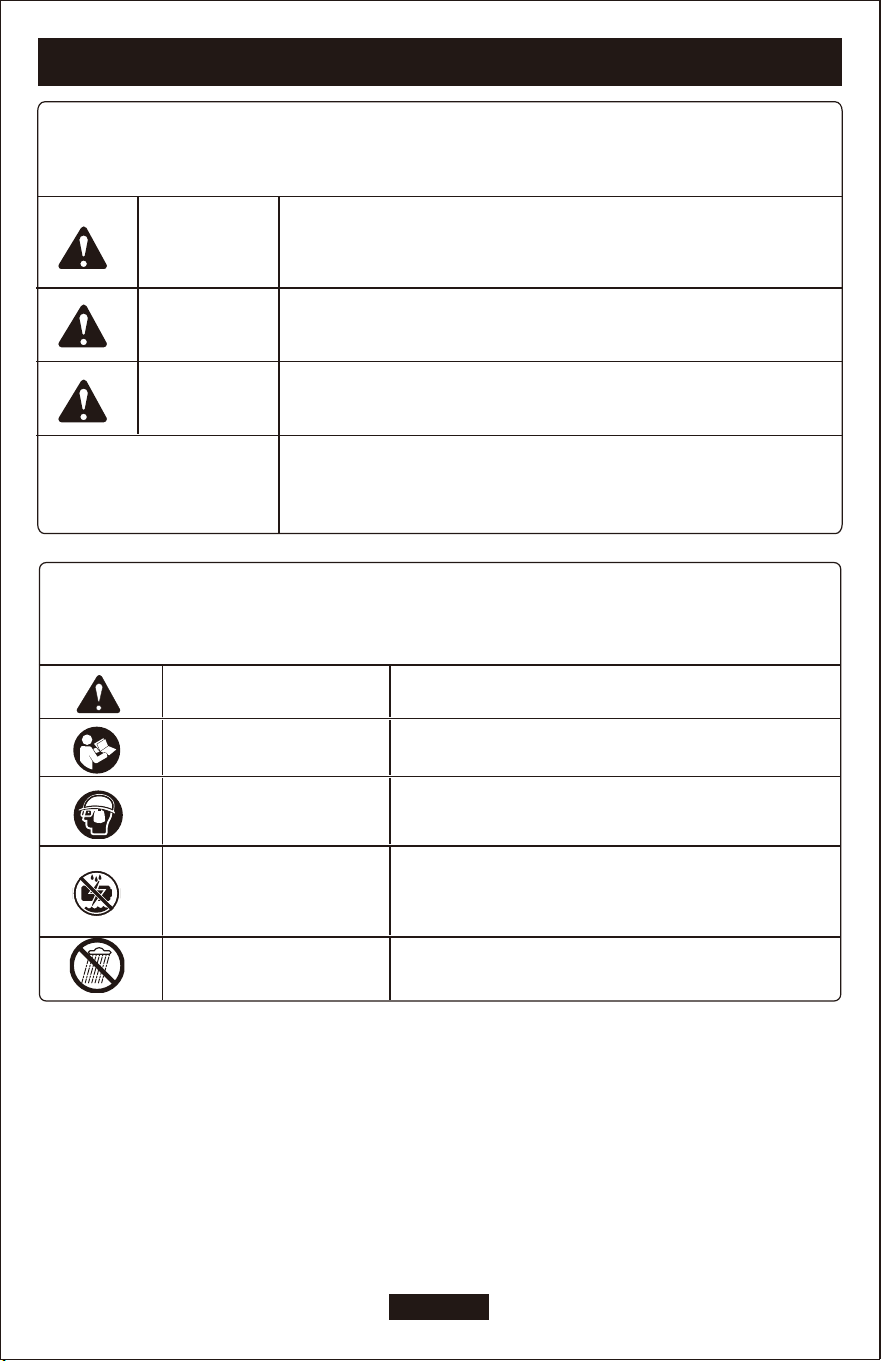
SYMBOLS
Safety Alert
Indicates a potential personal injury hazard.
Read Operator’s Manual
To reduce the risk of injury, user must read and
understand operator’s manual before using this product.
Wear Eye, Hearing, and
Head Protection
Wear eye protection with side shields marked to
comply with ANSI Z87.1 as well as hearing and head
protection when operating this equipment.
Wet Conditions Alert
Do not expose battery, battery compartment, or
electronic components to rain, water, or liquids. Do
not charge battery or expose product to rain or damp
locations.
Rain Symbol
Do not expose to rain.
SYMBOL SIGNAL MEANING
SYMBOL SIGNAL
MEANING
DANGER:
WARNING:
CAUTION:
NOTICE:
The following signal words and meanings are intended to explain the levels of risk associated with this product .
Indicates a hazardous situation, which, if not avoided, will result in death or
serious injury.
Indicates a hazardous situation, which, if not avoided, will result in death or
serious injury.
Indicates a hazardous situation, which, if not avoided, will result in death or
serious injury.
(Without Safety Alert Symbol) Indicates information considered important, but not
related to a potential injury (e.g. messages relating to property damage).
Some of the following symbols may be used on this product. Please study them and learn their meaning. Proper
interpretation of these symbols will allow you to operate the product better and safer.
5-English
KNOW YOUR PRODUCT
SPECIFICATIONS
Working Voltage: 20VDC
Tank Capacity: 2.5 Gallons
Max Airflow: 1.1m /min
3
Suction Lift: 17Kpa
Hose: 0.45m(1-1/4)
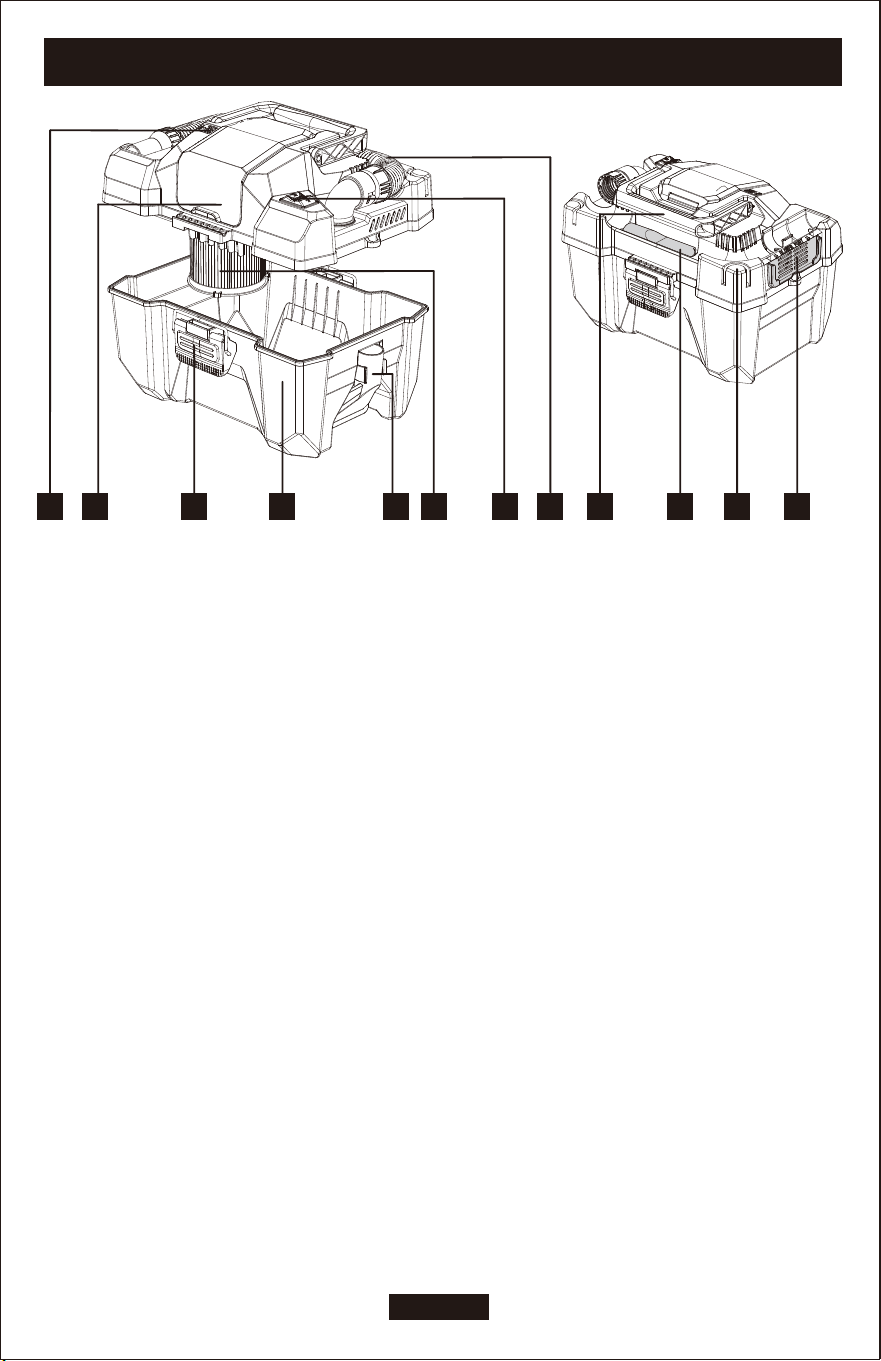
1 2 3 4 5 6 7 8 9 10 11 12
1. Battery Indicator
2. Battery Compartment Lid
3. Lid Locking Clips
4. Collection Container
5. Wide Nozzle
6. Cartridge Filter (Fixed On Machine)
7. On/off Switch
8. Flexible Hose
9. Carry Handle
10. Crevice Tool
11. Accessory Storage Slots
12. Blower Port
6-English
ASSEMBLY
Carefully remove the tool and any accessories from the box.
Make sure that all items listed on the packaging are included.
To prevent accidental starting that could cause serious personal injury, always remove the
battery pack from the tool when assembling parts.
WARNING
WARNING! Do not use this product if it not completely assembled or if any parts
appear to be missing or damaged. Use of a product that is not properly and completely
assembled or with damaged or missing parts could result in serious personal injury.
UNPACK AND SET-UP
BEFORE ASSEMBLING AND OPERATING THIS VAC, PLEASE TAKE EVERYTHING SUCH AS NOZZLES, OWNER
MANUAL ETC. FROM THE COLLECTION CONTAINER.
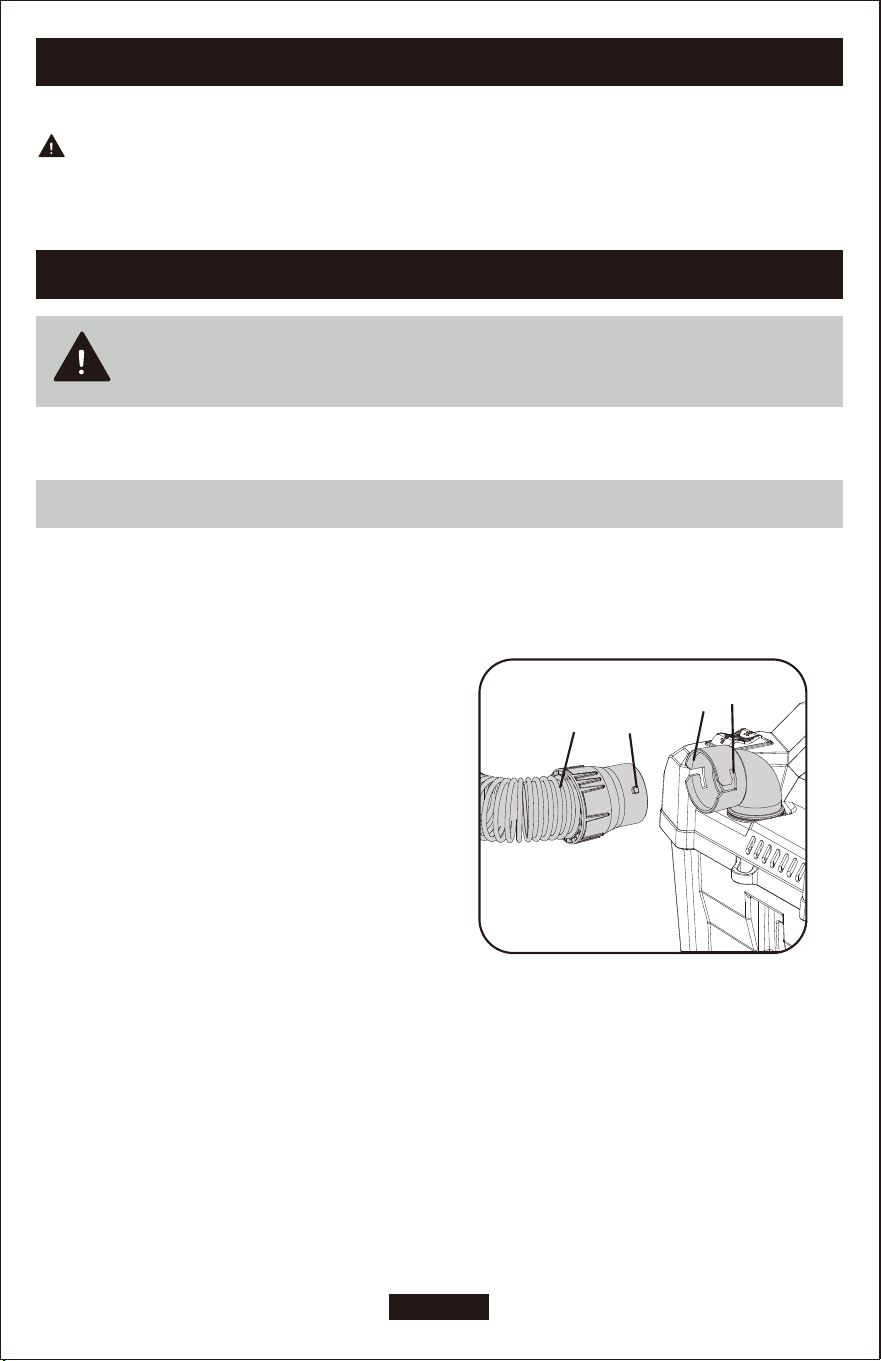
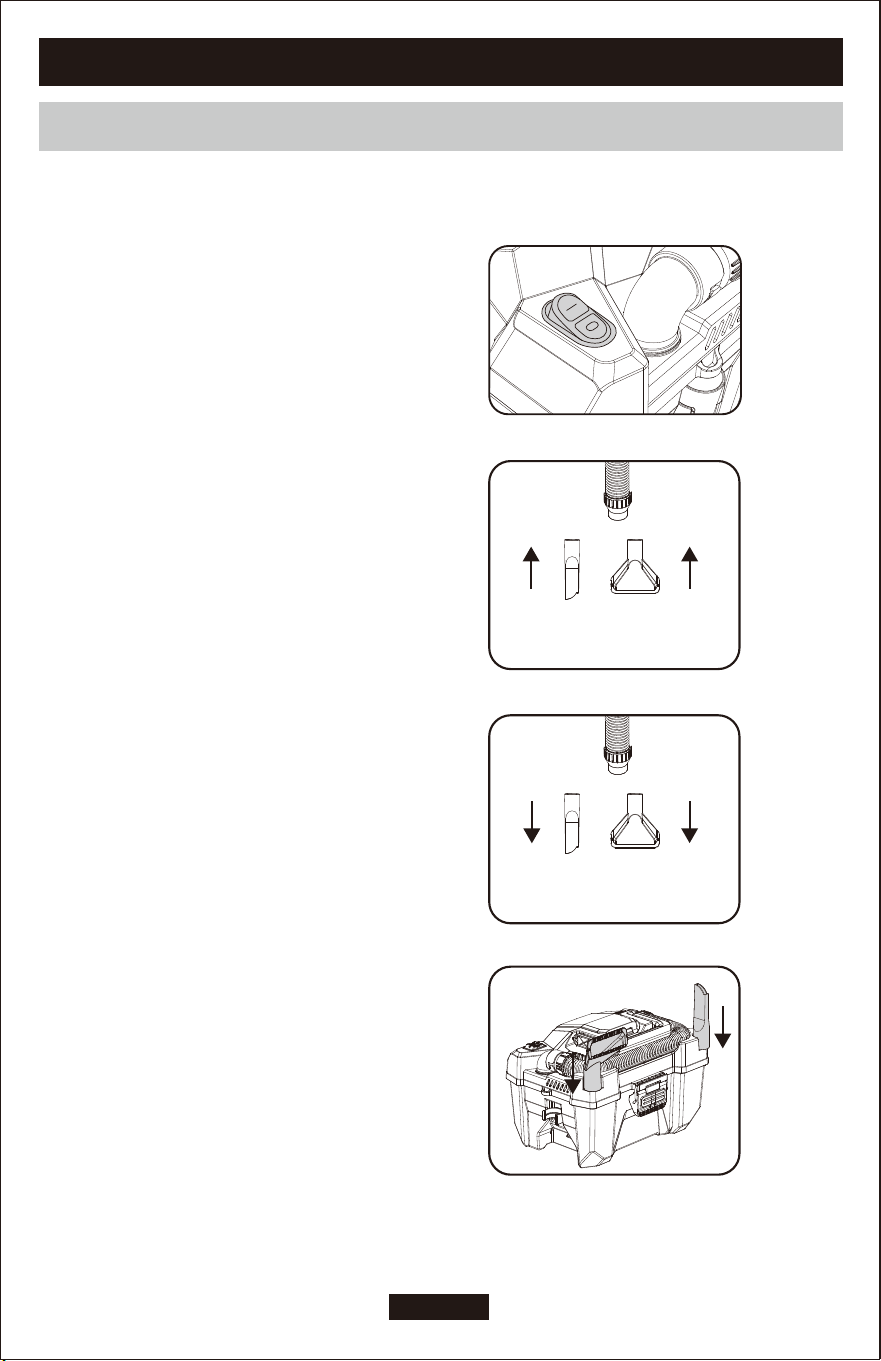
INSTALLING/REMOVING THE FLEXIBLE HOSE
Caution: To avoid the accidental start up, be sure that the switch is set to OFF position before attaching or
removing any accessories.
Step 1.
Align the raised locking tab on the end of the flexible hose with the slot on
the vacuum port. Push in and twist counterclockwise to lock.
Step 2.
Insert the tapered end of the flexible hose into accessory.
Step 3.
To disassemble, remove the accessory from the flexible hose.
Step 4.
Rotate the other end of the flexible hose clockwise to unlock
and pull away from the vacuum port.
A
B
C
D
A: Flexible hose
B: Raised locking tab
C: Vacuum port
D: Slot
7-English
UNPACK AND SET-UP(CONT.)
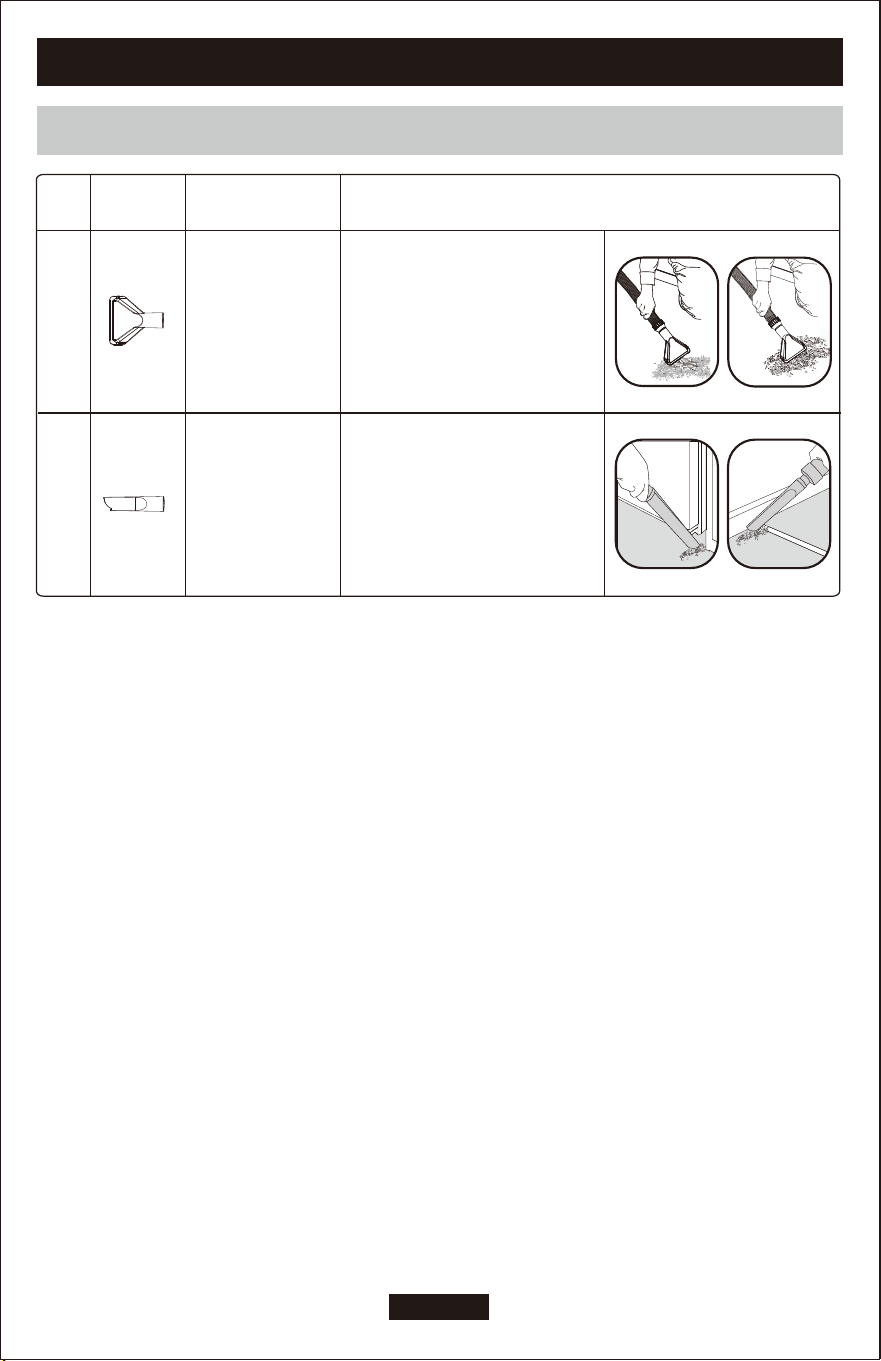
ATTACHMENT SELECTION AND APPLICATIONS
NO.
2.
Picture Main Function
Dry Vacuuming or
Blowing
1.
Dry & Wet Vacuum
or Blower(attached
to the blowing port)
Suitable for wide area dry or wet
vacuuming. Or attahced to blowing
port as blower.
Suitable for narrow area dust
vacuuming or blowing, clean hard to
reach cracks.
Application For
8-English
UNPACK AND SET-UP(CONT.)
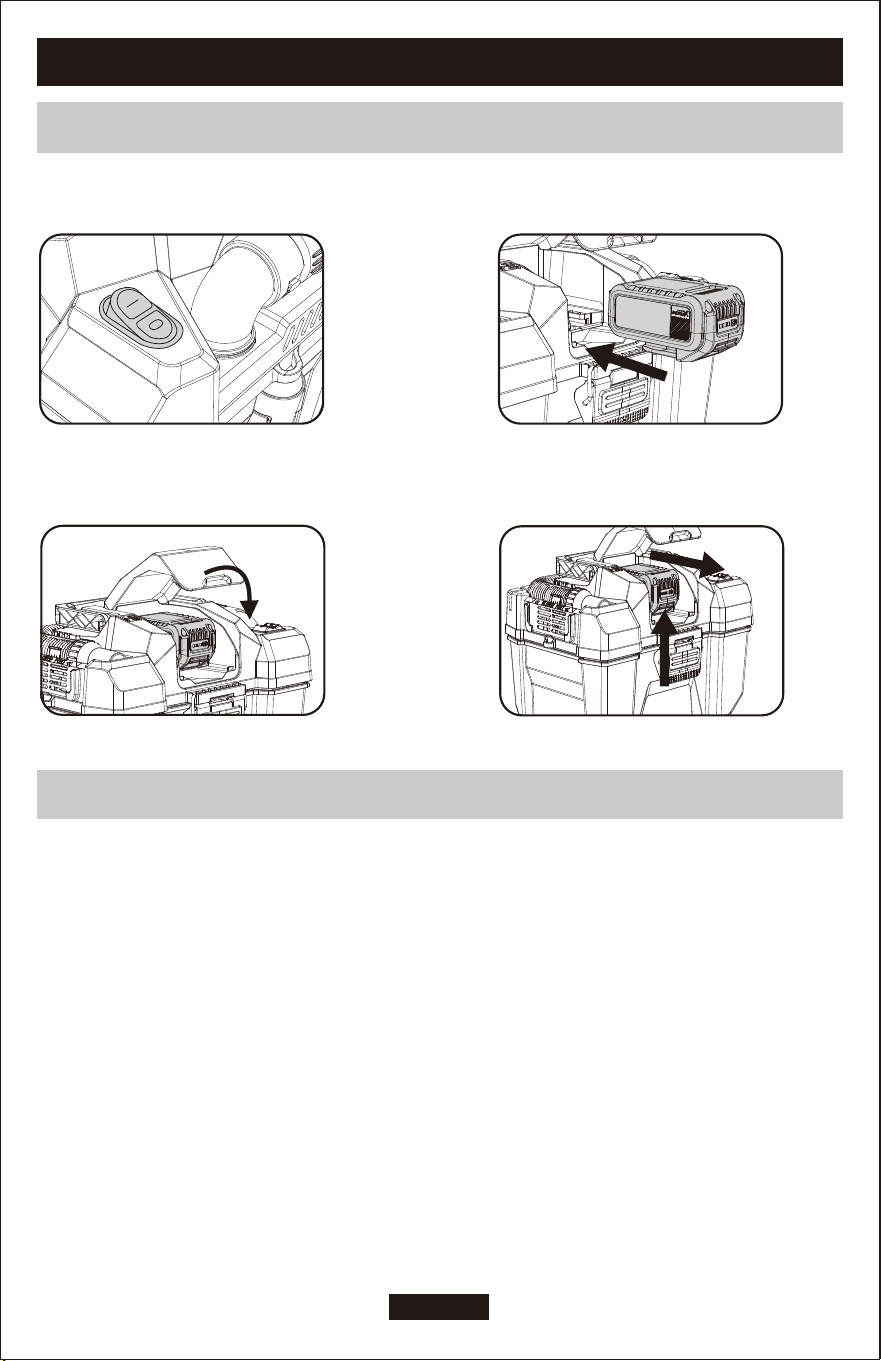
INSTALLING/REMOVING BATTERY PACK
1. Set the ON/OFF switch to the OFF position.
3. Slide the battery pack into the battery port
until the battery pack is firmly seated in the
battery port and ensure that it does not
disengage before beginning operation.
2. Raise the battery compartment lid over. Align the
battery pack with the rails inside the vacuum’s
battery port.
4. Depress the latch on the battery, then pull
out the battery pack.
BATTERY GAUGE INDICATOR
· During normal operation, the indicator light is green.
· When the battery is low, the indicator light flashes green rapidly until power runs out.
9-English
UNPACK AND SET-UP(CONT.)
INSTALLING/REMOVING ATTACHMENTS
Vacuuming can be performed with only the flexible hose or the hose with vacuum attachments.
Place the crevice tool into the hose, pull out the hose, and then remove it by pulling it out.
The wide nozzle is located on the side of the vacuum cleaner and can be pulled outwards to remove it.
The gulper nozzle and crevice tool are inside the vacuum collection container.
1. Turn off the vacuum cleaner.
2. Insert the attachment onto the flexible
hose, making sure the attachment is firmly in place.
3. To remove, hold the attachment and pull from
the hose.
or
or
Tip: You can insert the accessories into the slots on the
top cover of the vacuum.
When the liquid in the collection tank reaches a predetermined
level, the float mechanism will rise automatically to cut off air-flow.
This will cause the suction to stop and a higher motor noise.
When this happens:
1.Turn off the machine.
2.Remove the battery pack.
3.Empty the collection tank.
10-English
OPERATION
WARNING! Never use the wet and dry vacuum without a filter. Always ensure that the
filters are perfectly secure.
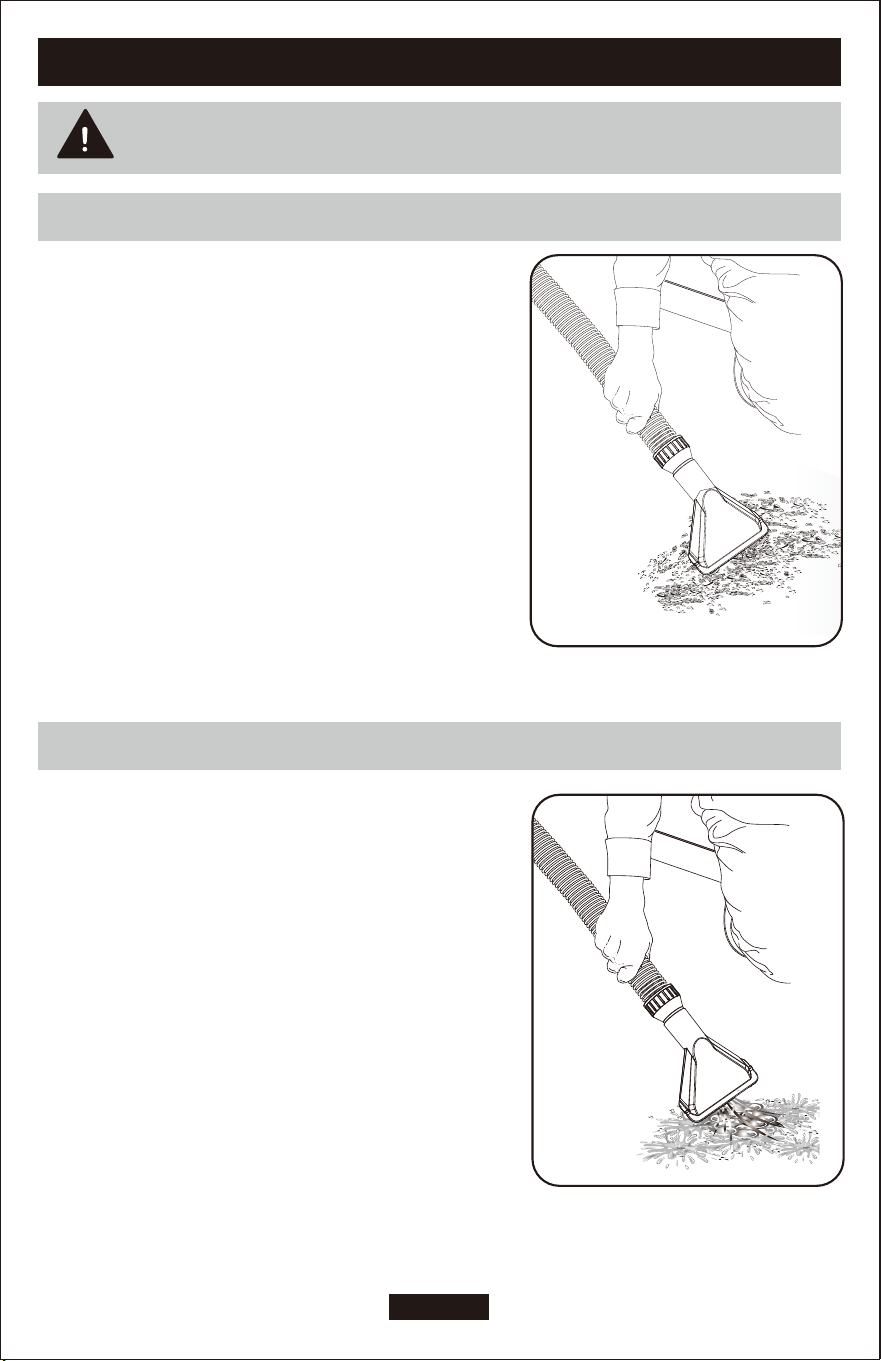
DRY VACUUMING
WET VACUUMING
Vacuum only items small enough to fit through the hose or the
attachment. When vacuuming, make sure that the filter
stays in place.
When emptying the collection container, check to see if the filter
needs cleaned or replaced.
CAUTION: In low relative humidity conditions, vacuuming fine debris with the wet/dry vac can cause a static charge
resulting in static shock. To reduce static shock while using, add moisture to the air with a humidifier.
When wet vacuuming, be ware that the wet/dry vac is equipped with a
float mechanism inside. When the collection container reaches to full wet
capacity, then the float mechanism will work and suction stop
automatically. When the collection container is full, turn the
wet / dry vac OFF and empty the collection container immediately.
WARNING! When vacuuming liquid, always keep the battery
compartment cover closed and make sure the canister vac does
not get submerged or used in liquid, which could cause shock,
vacuum failure, or personal injury.
Caution! Do not tilt vacuum when in use. If vacuum has liquid
in the tank, it may spill out from the collection container.
NOTE: The pitch of the motor will change and the suction will reduce
when the collection container is getting full.
11-English
OPERATION (CONT.)
WARNING! Always wear eye protection with side shields marked to comply with
ANSI Z87.1. Failure to do so could result in objects being thrown into your eyes and
other possible injuries.
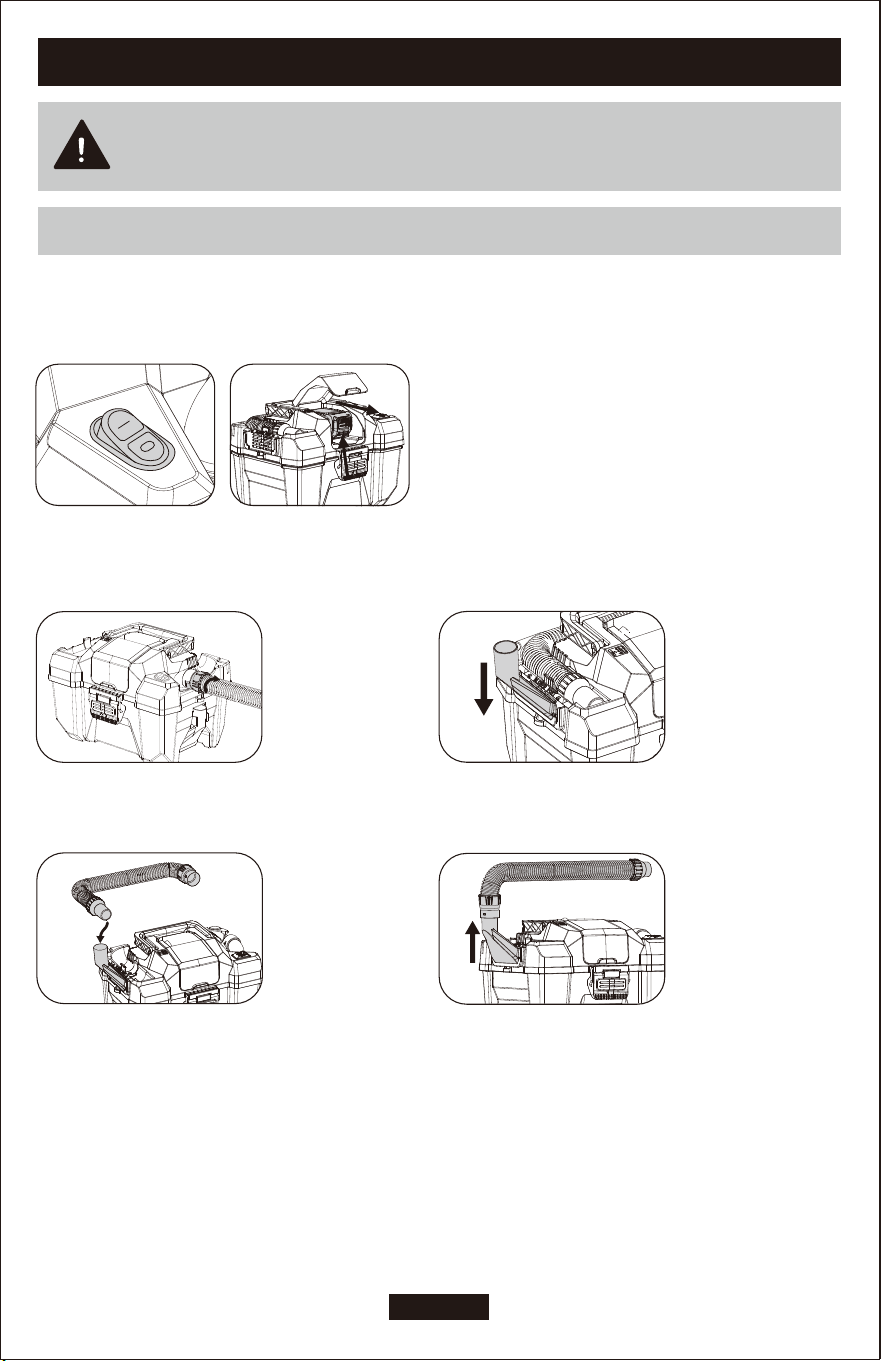
USING THE VACUUM CLEANER AS A BLOWER
At all times, the wet/dry vac blows air through the blower port as part of the exhaust system. However you can use the
wet/dry vac as a blower by attaching the wide nozzle to the bower port.
1. Turn off the wet/dry vac and remove the battery pack.
2. Rotate the hose clockwise to separate the locking
tab at the end of the hose from the groove on the
vacuum port, and then pull the hose outwards.
3.Remove the wide nozzle from the side of the
vacuum cleaner, align it with the slot on the blower port,
and lock it into place
4. Connect the hose to the wide nozzle.
NOTE:
To keep from scattering debris, blow around the outer edges of a debris pile.
Never blow directly into the center of a pile.
Use rakes and brooms to loosen debris before blowing. In dusty conditions, slightly dampen surfaces when water is
available.Watch out for children, pets, open windows, or freshly washed cars, and blow debris safely away.
After using blowers or other equipment, CLEANUP! Dispose of debris properly.
5. To remove the hose, simply pull it out directly from
the blower port.
12-English
OPERATION (CONT.)
WARNING!
Always wear eye protection with side shields marked to comply with
ANSI Z87.1.Failure to do so could result in objects being thrown into your eyes and other
possible injuries.
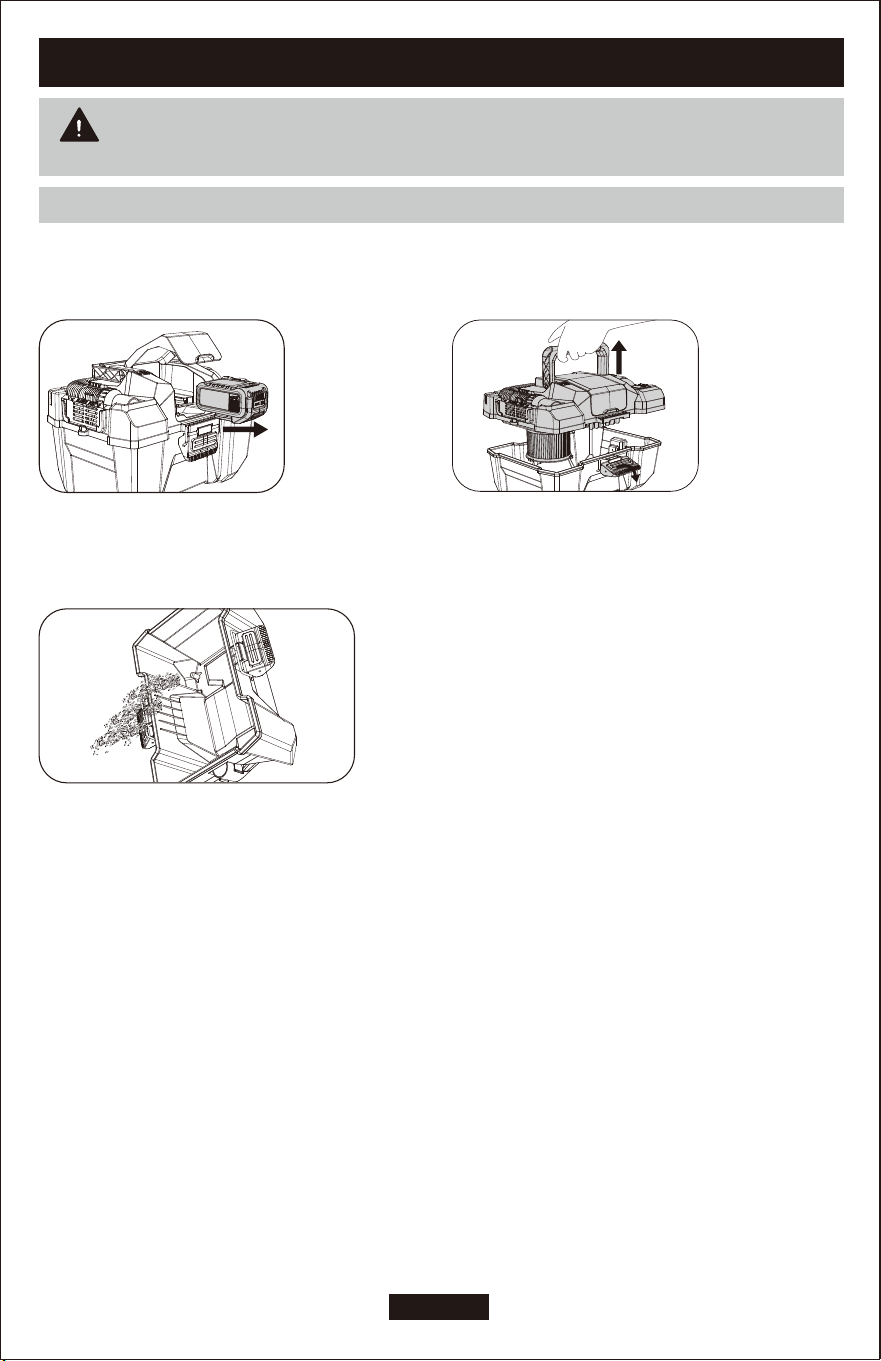
REMOVING WASTE FROM THE COLLECTION CONTAINER
The collection container should be checked, emptied, and cleaned periodically to obtain maximum efficiency.
1. Open the battery compartment cap and
remove the battery pack.
2. Unlock the locking latches and remove the lid.
3. Empty the collection container, wash out if necessary.
CAUTION: Do not allow liquid pick up to remain in the collection container for extended periods of time.
Moisture can develop in the motor compartment and shorten the life of the motor. Do not turn the unit upside down,
as liquid may enter the motor unit.
NOTE: Before reassembling the vac, be sure that all pieces are completely dry.
13-English
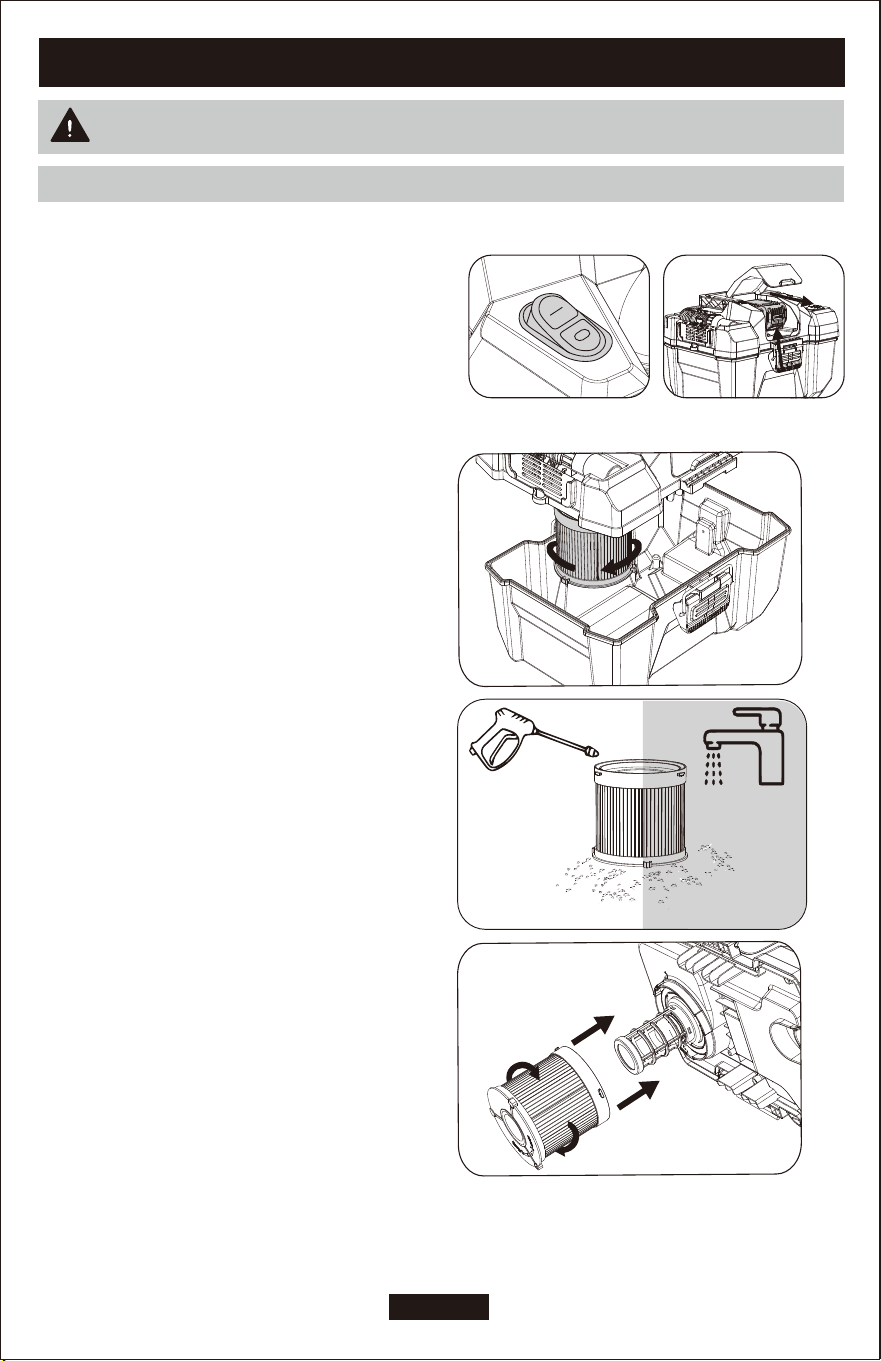
MAINTENANCE
CLEANING/REPLACING THE FILTER
WARNING!
Before cleaning your vacuum cleaner or carrying out any maintenance
procedure, ensure the unit is switched off and disconnect from the battery pack.
NOTE
BEFORE REINSTALLING THE FILTER TO THE VAC,
MAKE SURE THE FILTER IS COMPLETELY DRY!
NOTE: Make sure the filter is seated properly for dry
vacuuming.
Before starting to maintenance, make sure that the switch is OFF.
Remove the battery pack.
Unlock the two locking latches and remove the lid.
Use the air blow gun to blow any dusts from the filter,
or use cold water to clean and remove the dirt on the filter.
TO CLEAN THE FILTER
Reinstall the filter by aligning the raised locking tab on the
filter with the slot on the filter housing on the underside
of the lid. Rotate the filter clockwise to lock into place.
Rotate the filter counterclockwise to remove it.

14-English
MAINTENANCE(CONT.)
CLEANING/REPLACING THE FILTER
WARNING!
Before cleaning your vacuum cleaner or carrying out any maintenance
procedure, ensure the unit is switched off and disconnect from the battery pack.
Before starting maintenance, make sure that the switch is OFF.
Remove the battery pack.
Unlock the two locking latches and remove the lid.
Remove the filter by turning it counter clockwise.
NOTE: Make sure the filter is seated properly.
WARNING!
Do not attempt to modify this product or create accessories or attachments not recommended for use with this
product. Any such alteration or modification is misuse and could result in a hazardous condition leading to
possible serious injury.
TO REPLACE
STORAGE
Clean all foreign material from the wet/dry vac.
Clean the outside of the collection container with warm water and mild soap.
Empty and clean the collection container, flexible hose, nozzles, and attachments with warm water
and mild soap and allow them to completely dry before storage.
Store flexible hose and attachments inside the collection container or on the lid.
The collection container should be disinfected as needed and before prolonged storage.
Store indoors in a place that is inaccessible to children.
Keep away from corrosive agents such as garden chemicals and de-icing salts.
15-English
CARING FOR ENVIORNMENT
WARNING!
Ensure the tool is switched off and the battery is removed before
performing any of the following tasks.
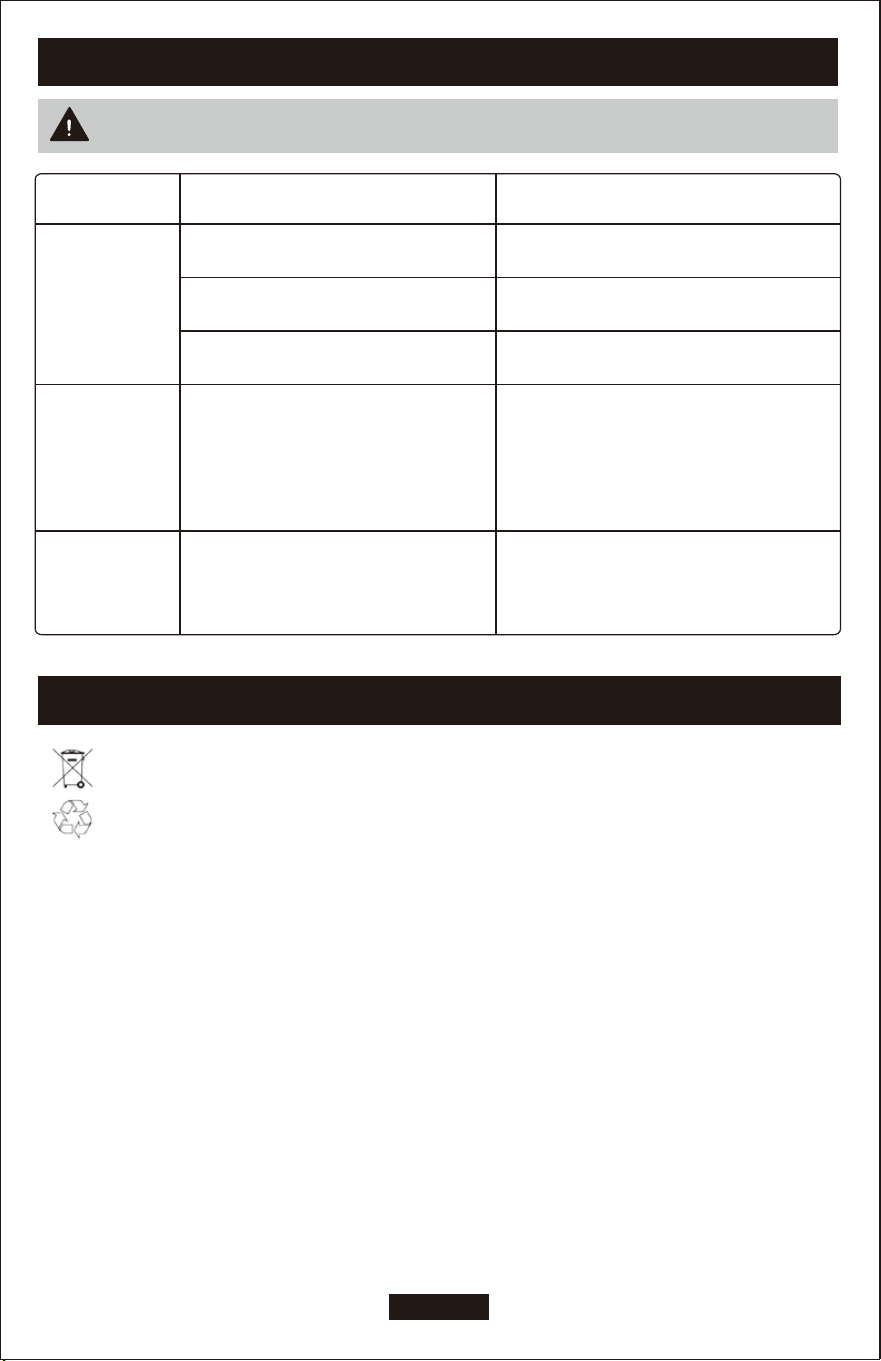
TROUBLES SHOOTING
Problem
Cause
Remedy
Vacuum is not
starting
Vacuum is not
operating at full
capacity
Motor stops while
vacuuming
Battery charge is low
Battery not inserted properly
Possible clogging
Possible clogging
Charge battery
Insert battery pack correctly
Empty the debris container and clean the filter
Empty the debris container and clean the filter
Battey has no power
Water is full
Charge battery
Needs Emptied
Power tools that are no longer usable should not be disposed of with household waste but in an
environmentally friendly way. Please recycle where facilities exist. Check with your local council authority
for recycling advice.
Recycling packaging reduces the need for landfill and raw materials. Reuse of recycled material decreases
pollution in the environment. Please recycle packaging where facilities exist. Check with your local council
authority for recycling advice.
16-English
This product has a Limited 1-Year Warranty.
For Warranty Policy and Vacuum Registration details go to:
https://www.shopvac.com/warranty https://shopvac.com/register
1-YEAR WARRANTY
Shop-Vac Customer Service:
www.shopvac.com/support
Contact Shop-Vac
®
Customer Service if any parts are
missing or damaged.
SHOP-VAC
2323 Reach Road Williamsport, PA 17701
www.shopvac.com
© 2024 Shop-Vac
USA, LLC. All Rights Reserved.
Visit www.shopvac.com for your vacuum's parts list schematic.
WARRANTY
YOUR PRODUCT IS GUARANTEED FOR A MAXIMUM PERIOD OF 24 MONTHS FROM THE ORIGINAL DATE OF
PURCHASE AND IS INTENDED FOR DIY (DO IT YOURSELF) USE ONLY.
Warranty excludes consumable parts, (For example, bearings and O-rings, etc.)
WARNING! The following action will result in the warranty becoming void.
● If the tool has been operated on a supply voltage other than that specified on the tool.
● If the tool shows signs of damage or defects caused by or resulting from abuse, accidents
or alterations.
● Failure to perform maintenance as set out within the user manual.
● If the product is disassembled or tampered with in any way.