1
EN
Scan for
further support
INSTRUCTION
MANUAL
2
EN
CONTENTS
Important Safety Instructions
Appliance Details
Outdoor Installation Guide
Battery Installation
Pizza Stone Fitting
Gas Connections
Operating Instructions
Cooking Hints & Tips - KILN P Series
Use of the Screen Guide - KILN P Series
Care & Maintenance
Troubleshooting
Specications
Warranty
3
5
6
7
8
9
12
13
14
15
16
18
21
Note; In this instruction manual, the Everdure Kiln will be referred to as an appliance.
* All products, specications and data are subject to change without notice to improve reliability, function, design, or otherwise.
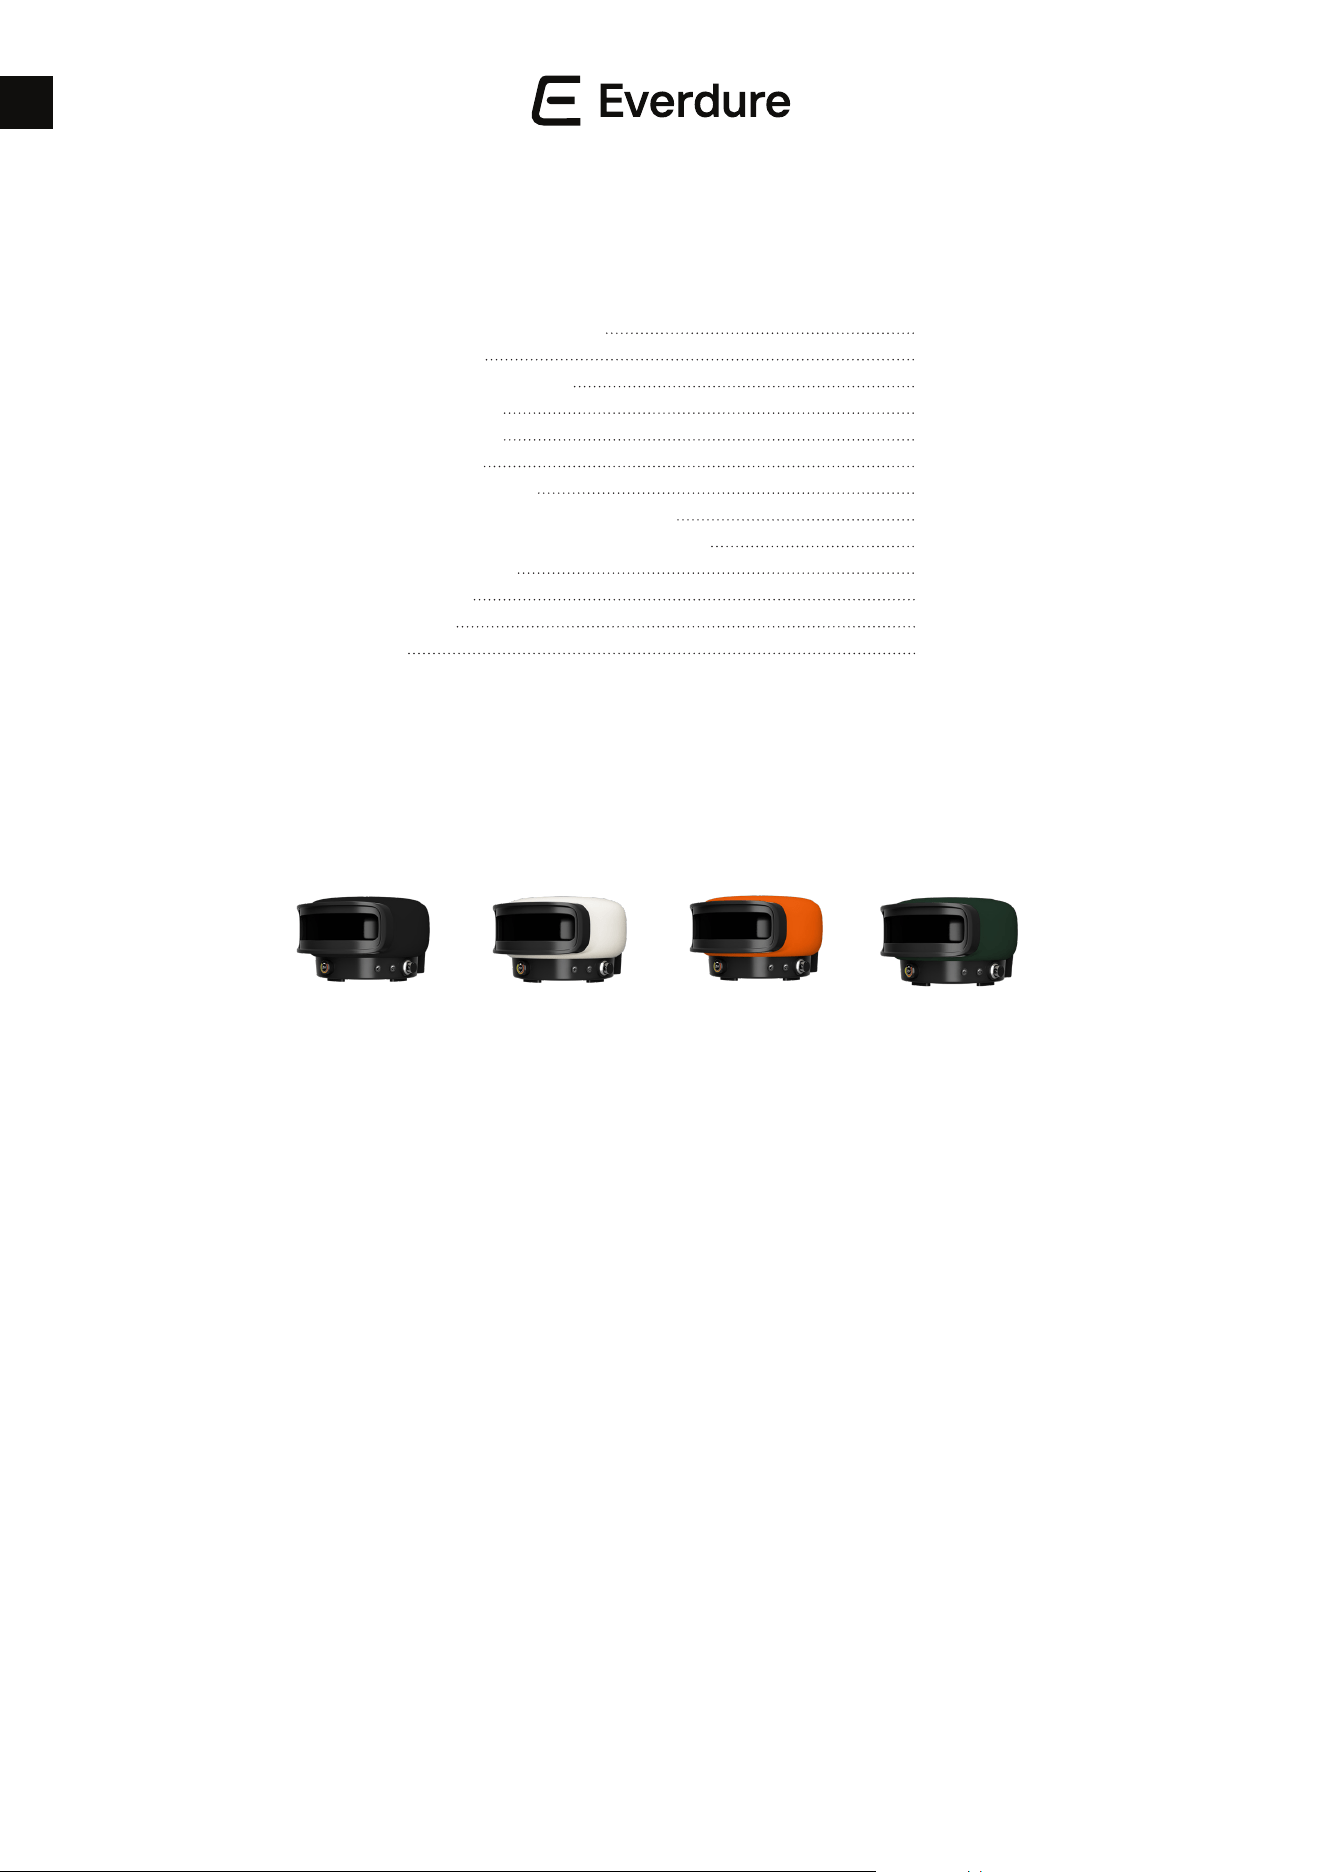
KILN P
BLACK
EKILNPB
KILN P
STONE
EKILNPS
KILN P
TERRACOTTA
EKILNPT
KILN P
GREEN
EKILNPGR

3
EN
IMPORTANT SAFETY INSTRUCTIONS:
DO NOT operate this appliance before reading the instruction booklet.
DO NOT place articles on or against this appliance.
DO NOT store chemical or ammable materials or spray aerosols near this appliance.
DO NOT operate this appliance indoors.
Remove all packaging materials and dispose of thoughtfully before rst use.
IMPORTANT SAFETY INSTRUCTIONS
IMPORTANT: Read the safety precautions of this booklet carefully before removing the appliance from its carton or connecting the
appliance to its gas supply. If you are unsure about anything regarding your appliance, please contact Worldwide Appliances in Australia on
1300 694 583 or in New Zealand, please contact Monaco Corporation on (09) 415 6000 before operating your appliance.
1. This gas appliance is intended for OUTDOOR USE ONLY. This appliance must NOT be used indoors.
2. For your safety and enjoyment, read all operating instructions before lighting.
3. Ensure that all gas connections are tight before operating this appliance (refer to leak testing procedure in this manual). Always check for
leaks when a gas cylinder / bottle is replaced or reconnected.
4. Unsupervised children or pets should not be near an appliance while cooking or during warm up or cool down. Ensure children or pets are
kept a distance well away from the appliance whilst it is in use. Ensure that young children do not play with the appliance. This appliance is
not intended for use by young children or inrm persons.
5. Turn gas valve/control knob and gas cylinder valve o after use/remove bottle after use. Do not allow build-up of unburned gas.
6. Never leave the burners on high for more than 30 minutes unless cooking.
7. Do not move this appliance while in use or directly after use, as accessible parts may be very hot. The appliance. Take care that undue
pressure will not be placed on the gas hose, or turn o the gas supply & remove the hose from the cylinder or gas source (not at the
appliance).
8. People with ammable clothing such as nylon etc. should keep well away from the appliance when it is operating.
9. Do not use this appliance for any purpose other than what it is intended for.
10. Ensure that the product has adequate clearance from combustible materials. The appliance is designed so that heat will not aect the
stand. All combustible materials must be kept more than 510mm from the sides and rear of the appliance and more than 900mm above the
cooking surface of the appliance.
11. If a burner makes a hissing sound when lit, it may be burning inside. Turn the burner o, allow to cool, and try ignition again. Keep your
appliance protected against strong wind – if this cannot be avoided, always check that the burners remain alight if operating the appliance in
windy conditions.
12. Do not carry out any servicing on the gas manifold of the appliance yourself – this must only be done by authorised technicians.
13. We recommend that you regularly maintain your appliance and keep it in good condition. This can be achieved by following the cleaning
and maintenance suggestions in this booklet.
14. The appliance is designed to be used with either 4kg or 9kg gas cylinders / or approved 500g gas bottle. Keep the cylinder as far away as
the hose will allow without undue tension on the hose, in a protected spot (so it cannot be accidently knocked over).
15. Do not use or store this appliance in areas of high salt content (a marine environment) or an area with caustic fumes or liquids (such as a
domestic pool), as these chemicals can cause the appliance materials to deteriorate (and void the warranty). Regular cleaning and covering
with a cover can help to reduce this.
16. The appliance is not to be used by persons (including children) with reduced physical, sensory, or mental capabilities, or lack of experience
and knowledge, unless they have been given supervision or instruction.
17. The appliance is only to be used with the adaptor provided with the appliance.
18. DO NOT MODIFY THIS APPLIANCE.
19. This appliance shall ONLY be used with a propane cartridge certied to DOT-39 NRC 232/290 M1110, OR a ULPG rellable cylinder
certied to AS 2469. IT MAY BE HAZARDOUS TO ATTEMPT TO FIT OTHER TYPES OF GAS CONTAINERS.
4
EN
FOR GAS SUPPLY CONNECTION:
SAFETY WARNING
Please read these instructions before using your appliance.
• Keep the gas supply hose away from any heated surfaces.
• Ensure the hose shall not be installed in a manner that will allow it to come into contact with the hot surface of the appliance while in use
or in storage.
• Only use the gas hose and regulator supplied in this kit.
• For gas hose replacement or spare, contact Everdure (see Page 16).
• Do NOT store a spare LPG cylinder / canister under or near this appliance.
• Do NOT connect a gas cylinder / bottle to an appliance that is not secured on a stable raised surface.
Using a Propane Canister (500g)
• The regulator must be rst connected to the appliance inlet.
• Do NOT connect a gas bottle to the appliance that is not secured on a stable raised surface.
• Before connecting gas supply, take care that all gas control knobs are in the OFF position.
• Align the gas cylinder with the gas regulator input and screw the cylinder onto the gas regulator until hand tight.
• Allow the cylinder to rest on the same supporting surface as the appliance.
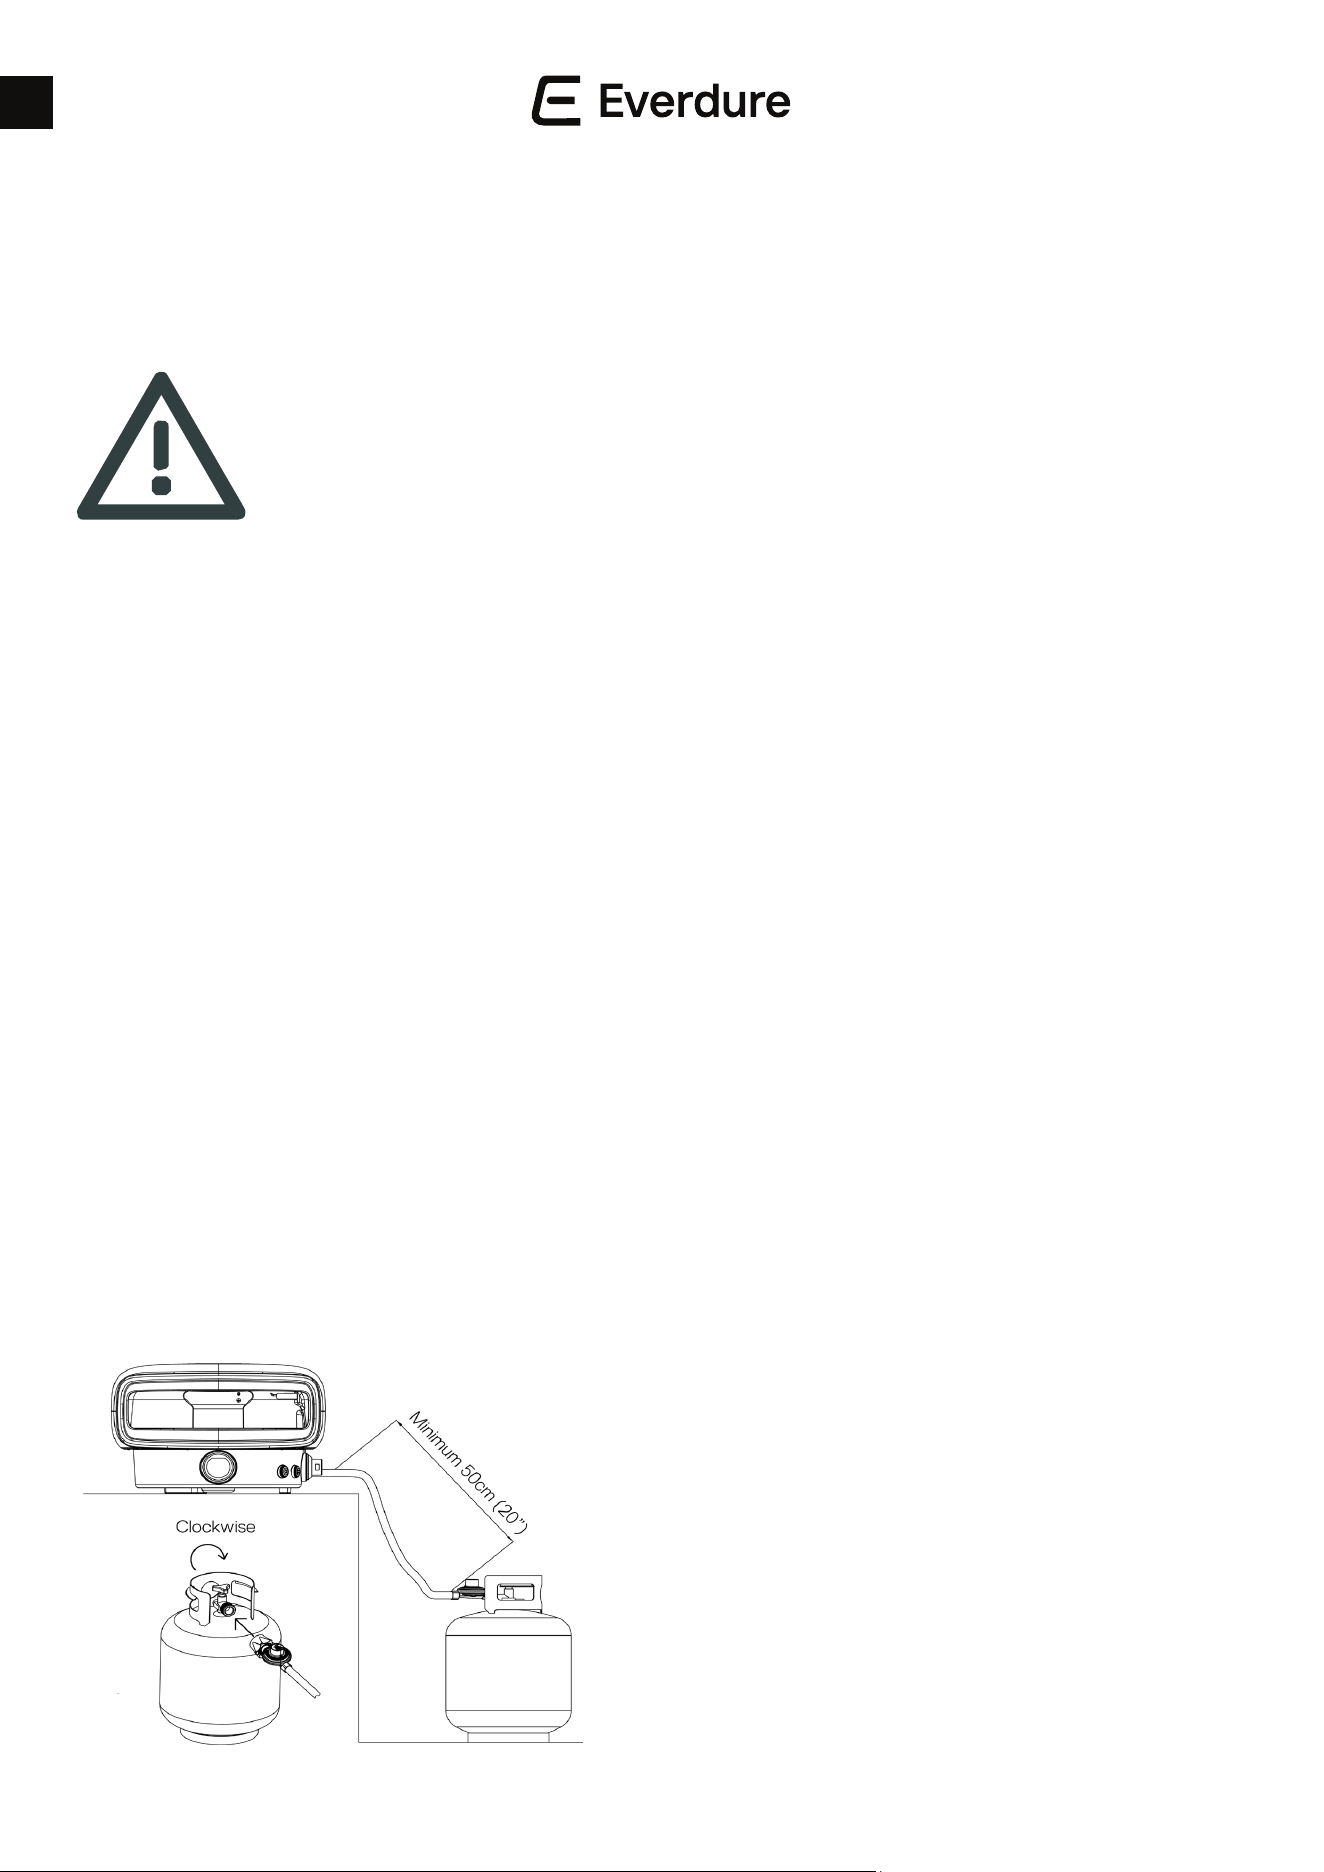
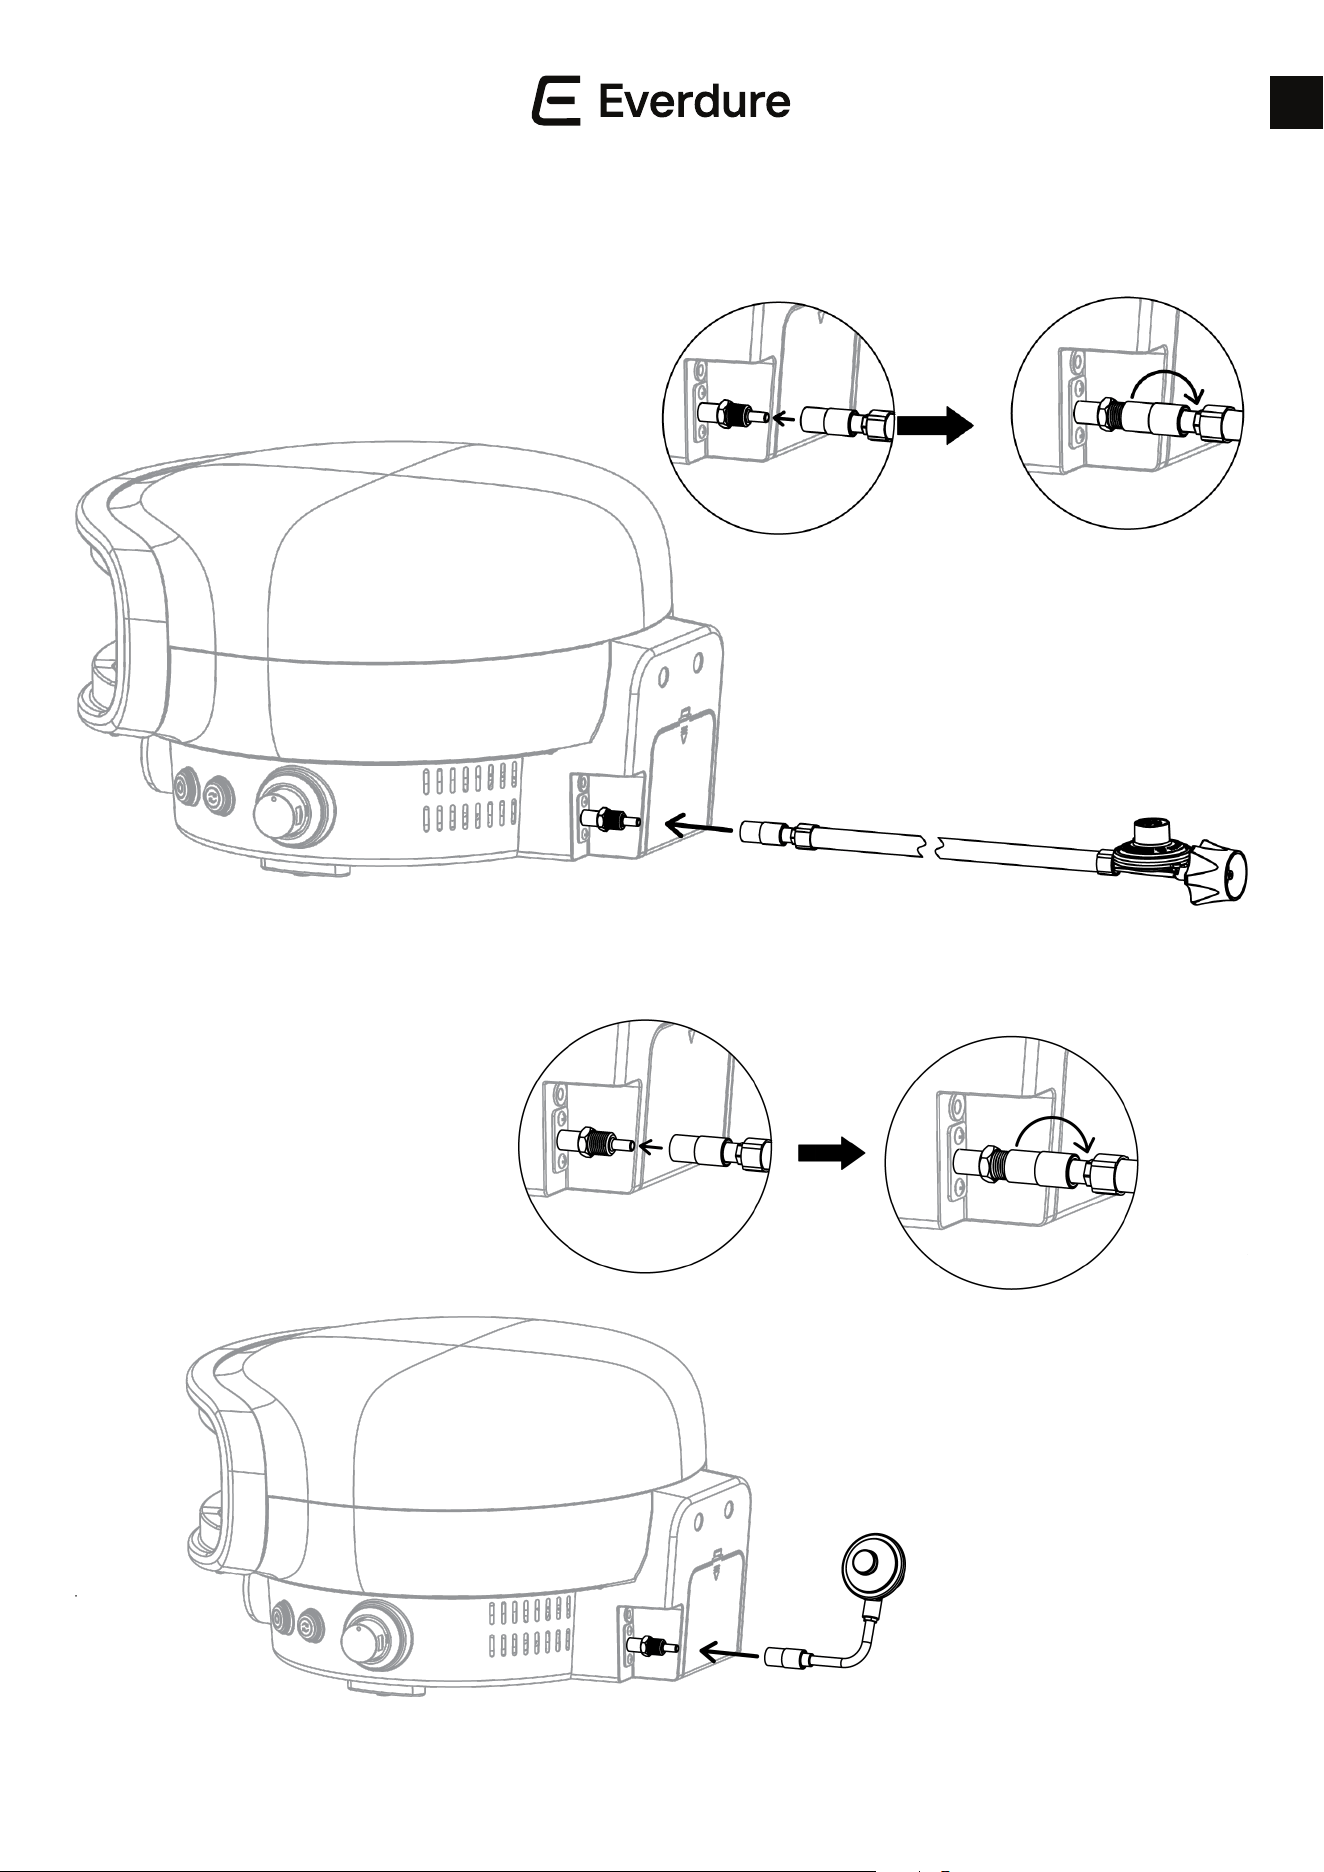
Using an LPG Re-llable Cylinder (4kg or 9kg) Hose and Regulator Kit
• Unscrew the propane regulator from the gas inlet of your appliance if installed, and connect the supplied LPG hose and regulator assembly and
screw onto the gas cylinder.
• Place the appliance on a stable surface with the gas cylinder positioned as per the below diagram.
• Connect the cylinder to the appliance, via the hose and regulator. Firmly tighten joints, but do not overtighten and do not twist. Take care not to
damage the regulator tting. Check that ALL appliance valves are in the O position before opening the gas cylinder.
• When changing cylinders, ensure the gas is turned o before disconnecting the hose & regulator assembly from the cylinder only (not from the
appliance manifold).
• To achieve the optimum performance from your appliance, an approved gas cylinder (Type 27 tting) of 4kg or 9kg capacity must be used.
• The Length of the hose must not exceed 1.5m.
• Regulator hose must be kept away from sharp objects and heat sources.
WHEN USING AND COOKING IN YOUR EVERDURE KILN OVEN
Do NOT leave the burner on HIGH setting for over 30 minutes after ignition. Please refer to COOKING HINTS and TIPS KILN
P SERIES page in the instruction manual before use, on preheating, cooking, and after cooking instructions.
5
EN
PRODUCT DETAILS EKILNP
Dimensions (mm) 570 x 510 x 370
Weight NW/GW (kg) 13.1 / 17.5
APPLIANCE DETAILS:
Note: the size of the injector diameter is stamped on the hexagon faces (109 = Ø1.09mm injector).
Appliance inlet connection: 9/16”-18 UNF thread.
LEAK TESTING
• Make sure the gas control knob is O and turn the cylinder valve On.
• Check for leaking joints by brushing with solution of half-liquid detergent and half water. If a leak is present, bubbles will appear (or you may
hear a hissing sound). Retightening connections can generally repair a leaking joint. You must also check the gas hose and connection at the
gas cylinder. If a leak cannot be resolved, do not proceed.
NOTE: Make sure the gas cylinder/bottle is fully protected from the elements. Do not fully enclose the cylinder.
APPLIANCE EKILNP
GAS TYPE ULPG
BURNER PRESSURE
2.75KPA
INJECTOR DIAMETER 1.09mm
HEAT INPUT 14.8MJ
6
EN
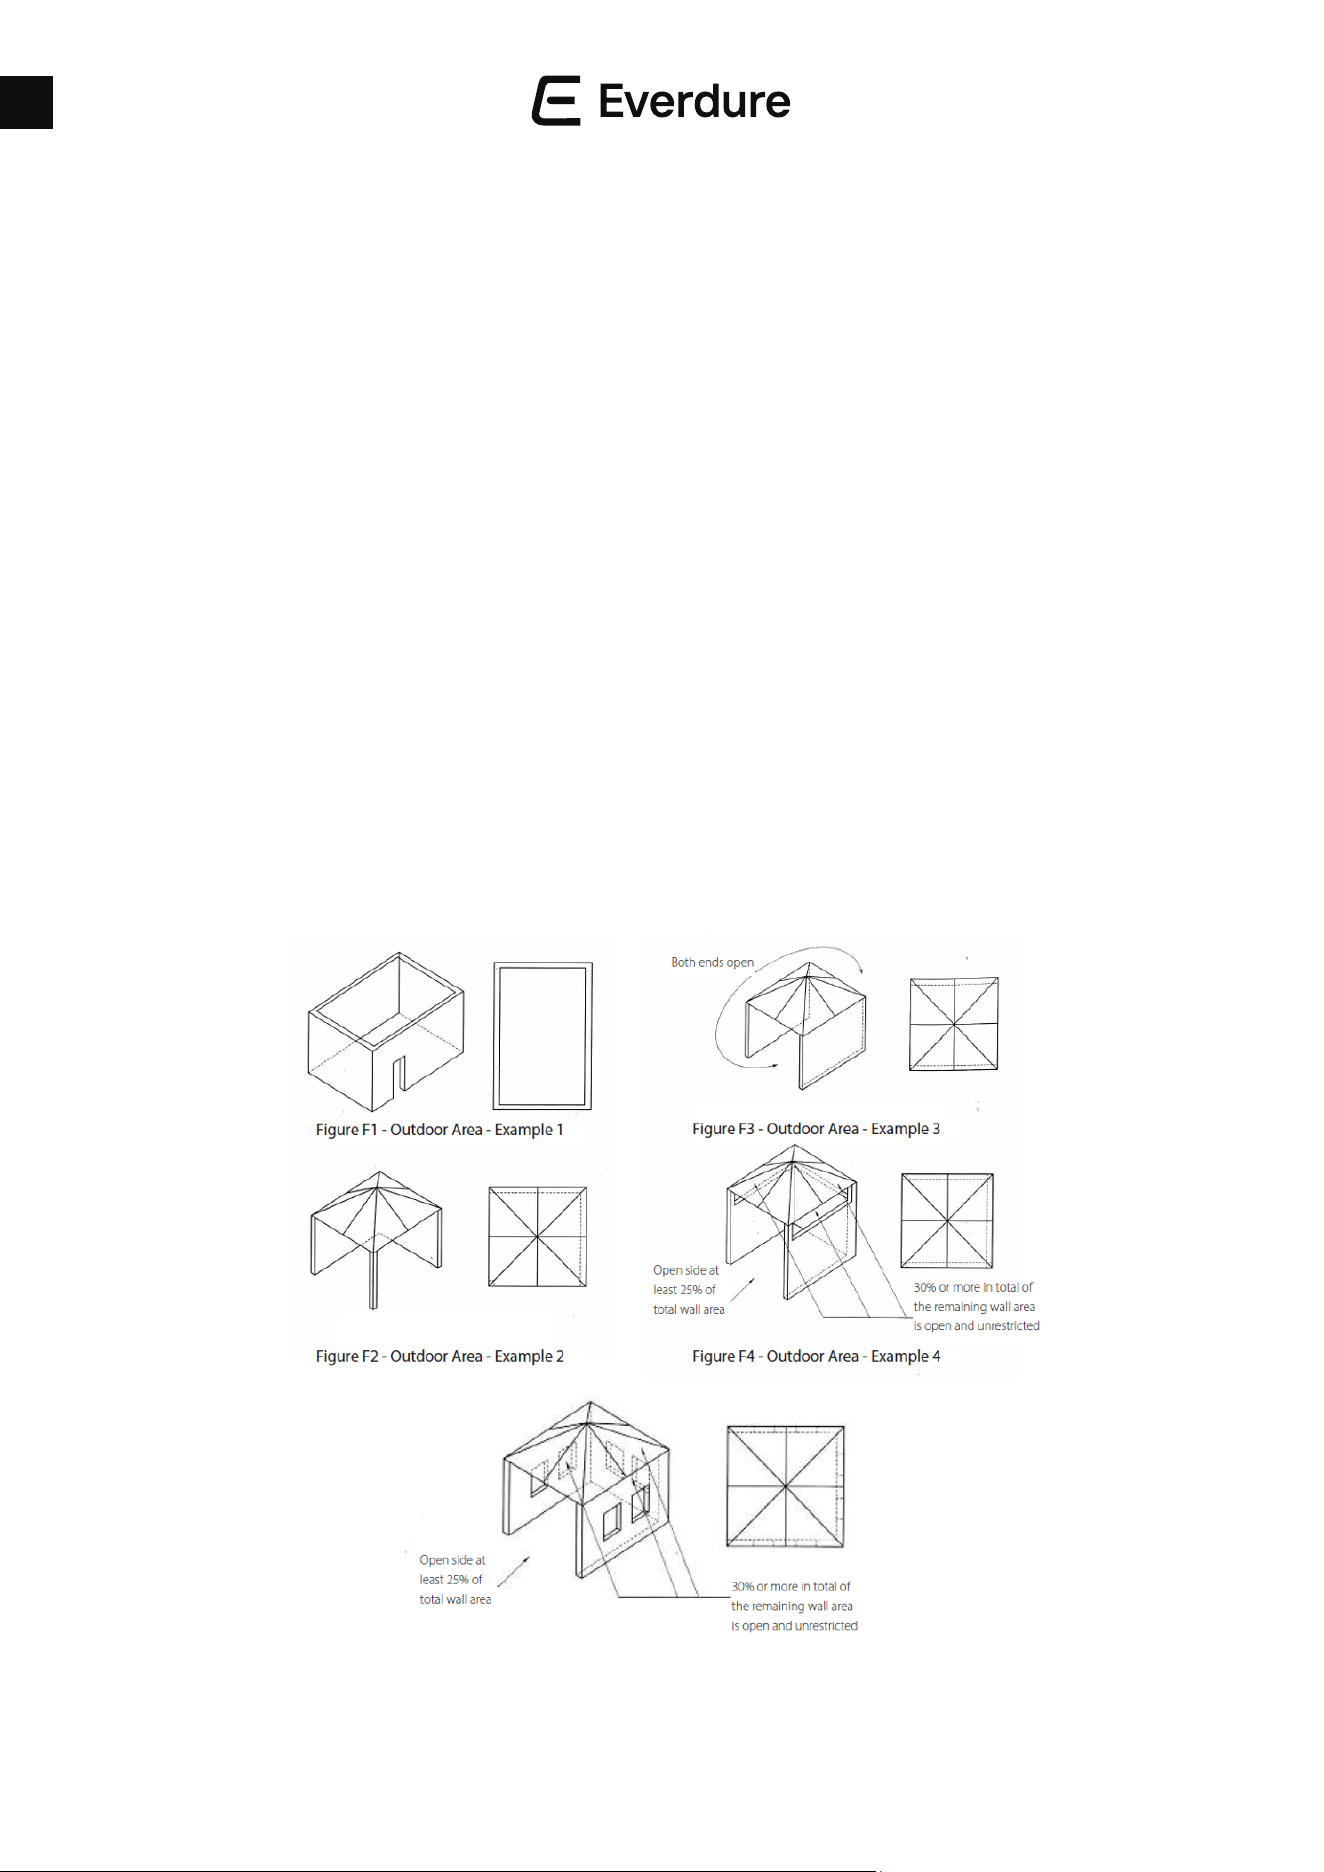
OUTDOOR INSTALLATION GUIDE:
This appliance shall only be used in an above ground open-air situation with natural ventilation, without stagnant areas, where
gas leakage and products of combustion are rapidly dispersed by wind and natural convection. Please note in windy conditions,
the pizza oven should be carefully placed so the wind hits the back of the oven to assist with the cooking performance and
minimise any possibility of the burner being extinguished.
This appliance must not be used indoors. Do not use your appliance in garages, porches, sheds, or other enclosed areas. The
appliance is not intended to be installed in or used on recreational vehicles (e.g., boats, camping vans) and should not be placed
close to or under any surfaces that will burn or are sensitive to heat. Do not block/obstruct the ow of air and combustion
around the appliance housing while in use.
Any enclosure in which the appliance is used shall comply with one of the following:
• An enclosure with walls on all sides, but at least one permanent opening at ground level and no overhead cover.
• Within a partial enclosure that includes an overhead cover and no more than two walls
• Within a partial enclosure that includes an overhead cover and more than two walls, the following shall apply:
a. at least 25% of the total wall area is completely open: and
b. at least 30% of the remaining wall area is open and unrestricted.
In the case of balconies, at least 20% of the total of the side, back and front wall areas shall be and remain open and
unrestricted.
Minimum clearance from combustible materials:
• Horizontal: 510mm
• Vertical: 900mm
7
EN
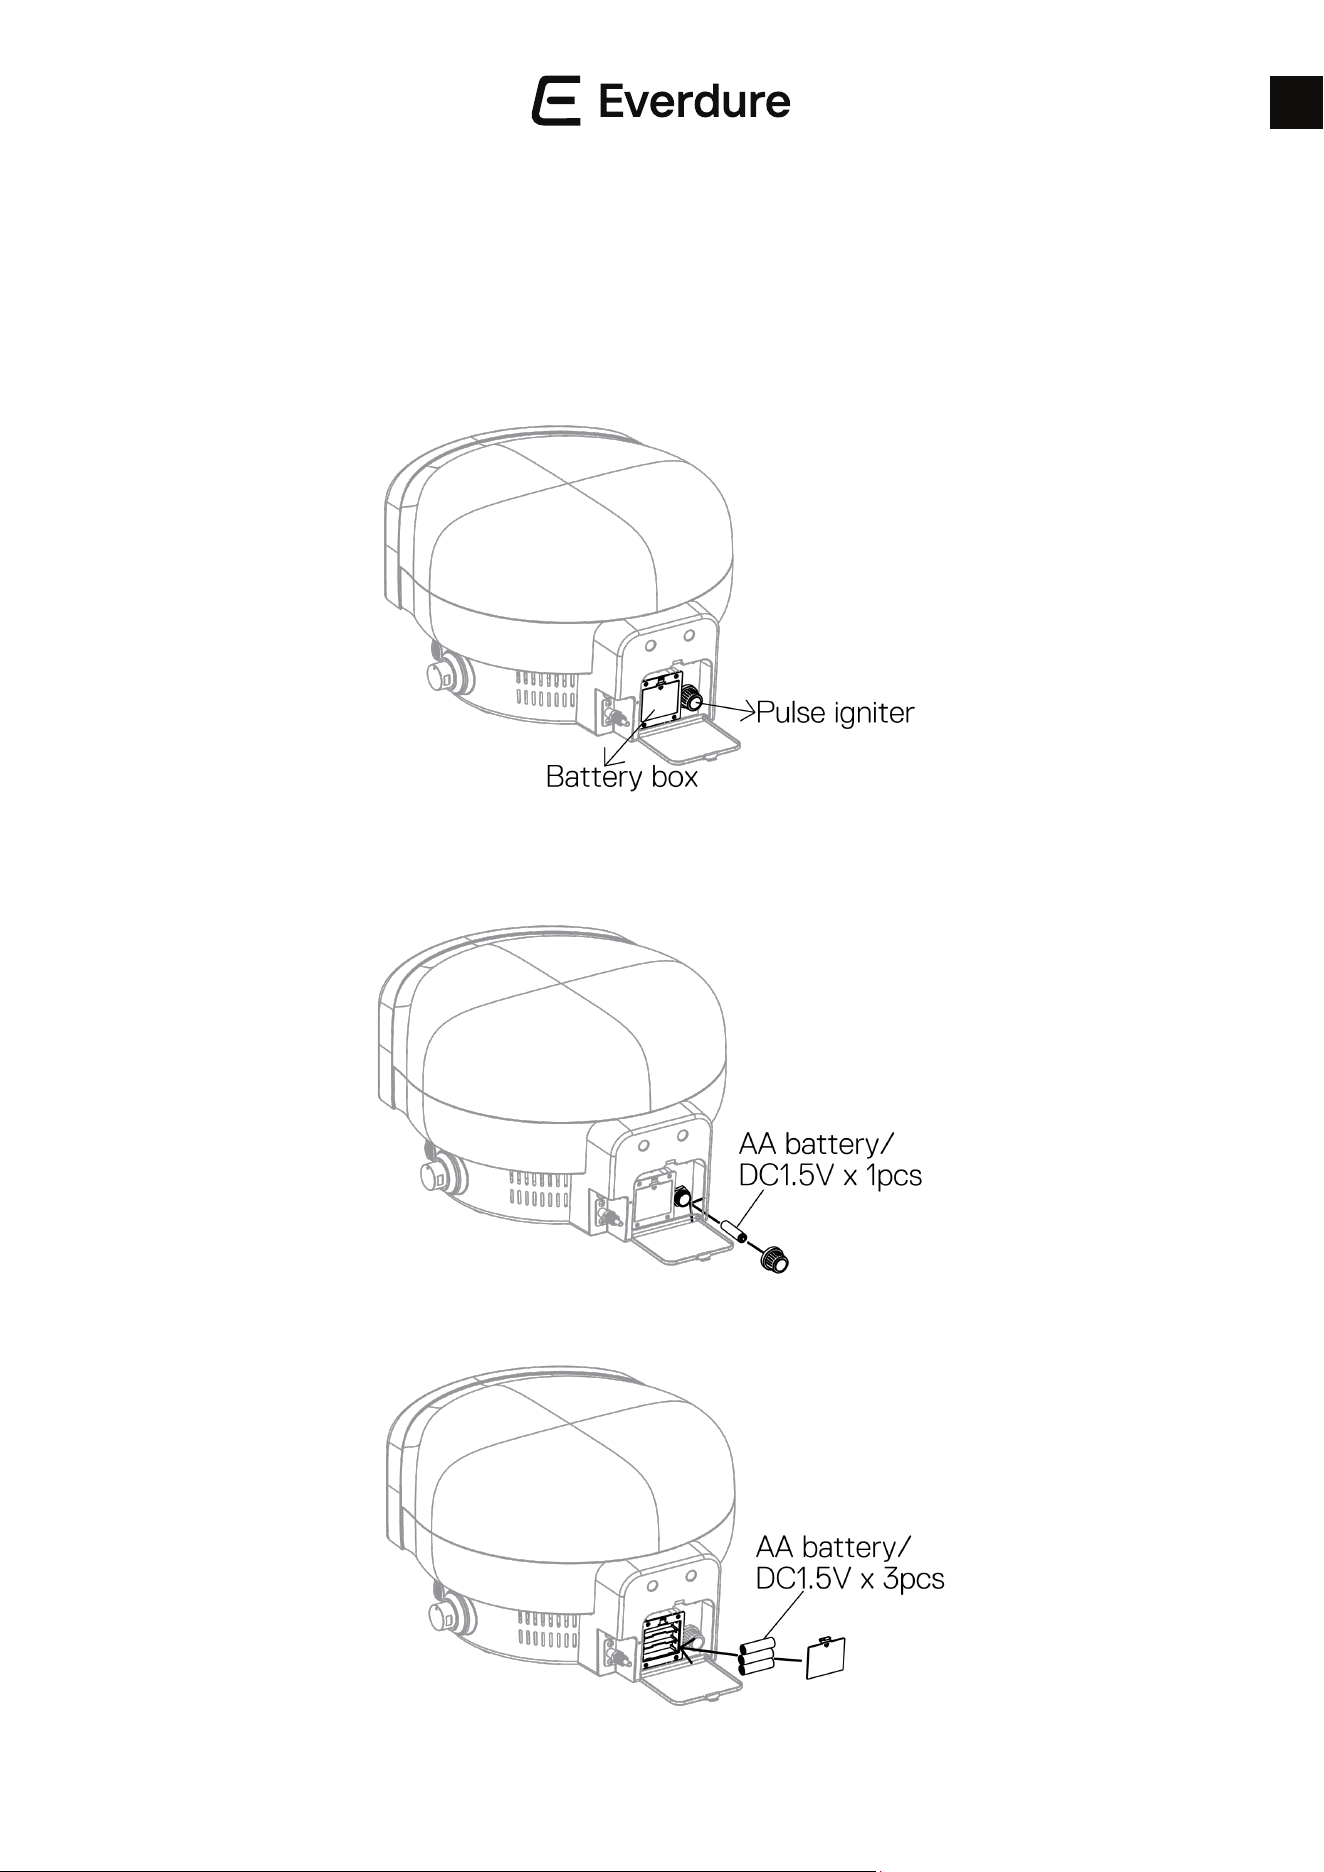
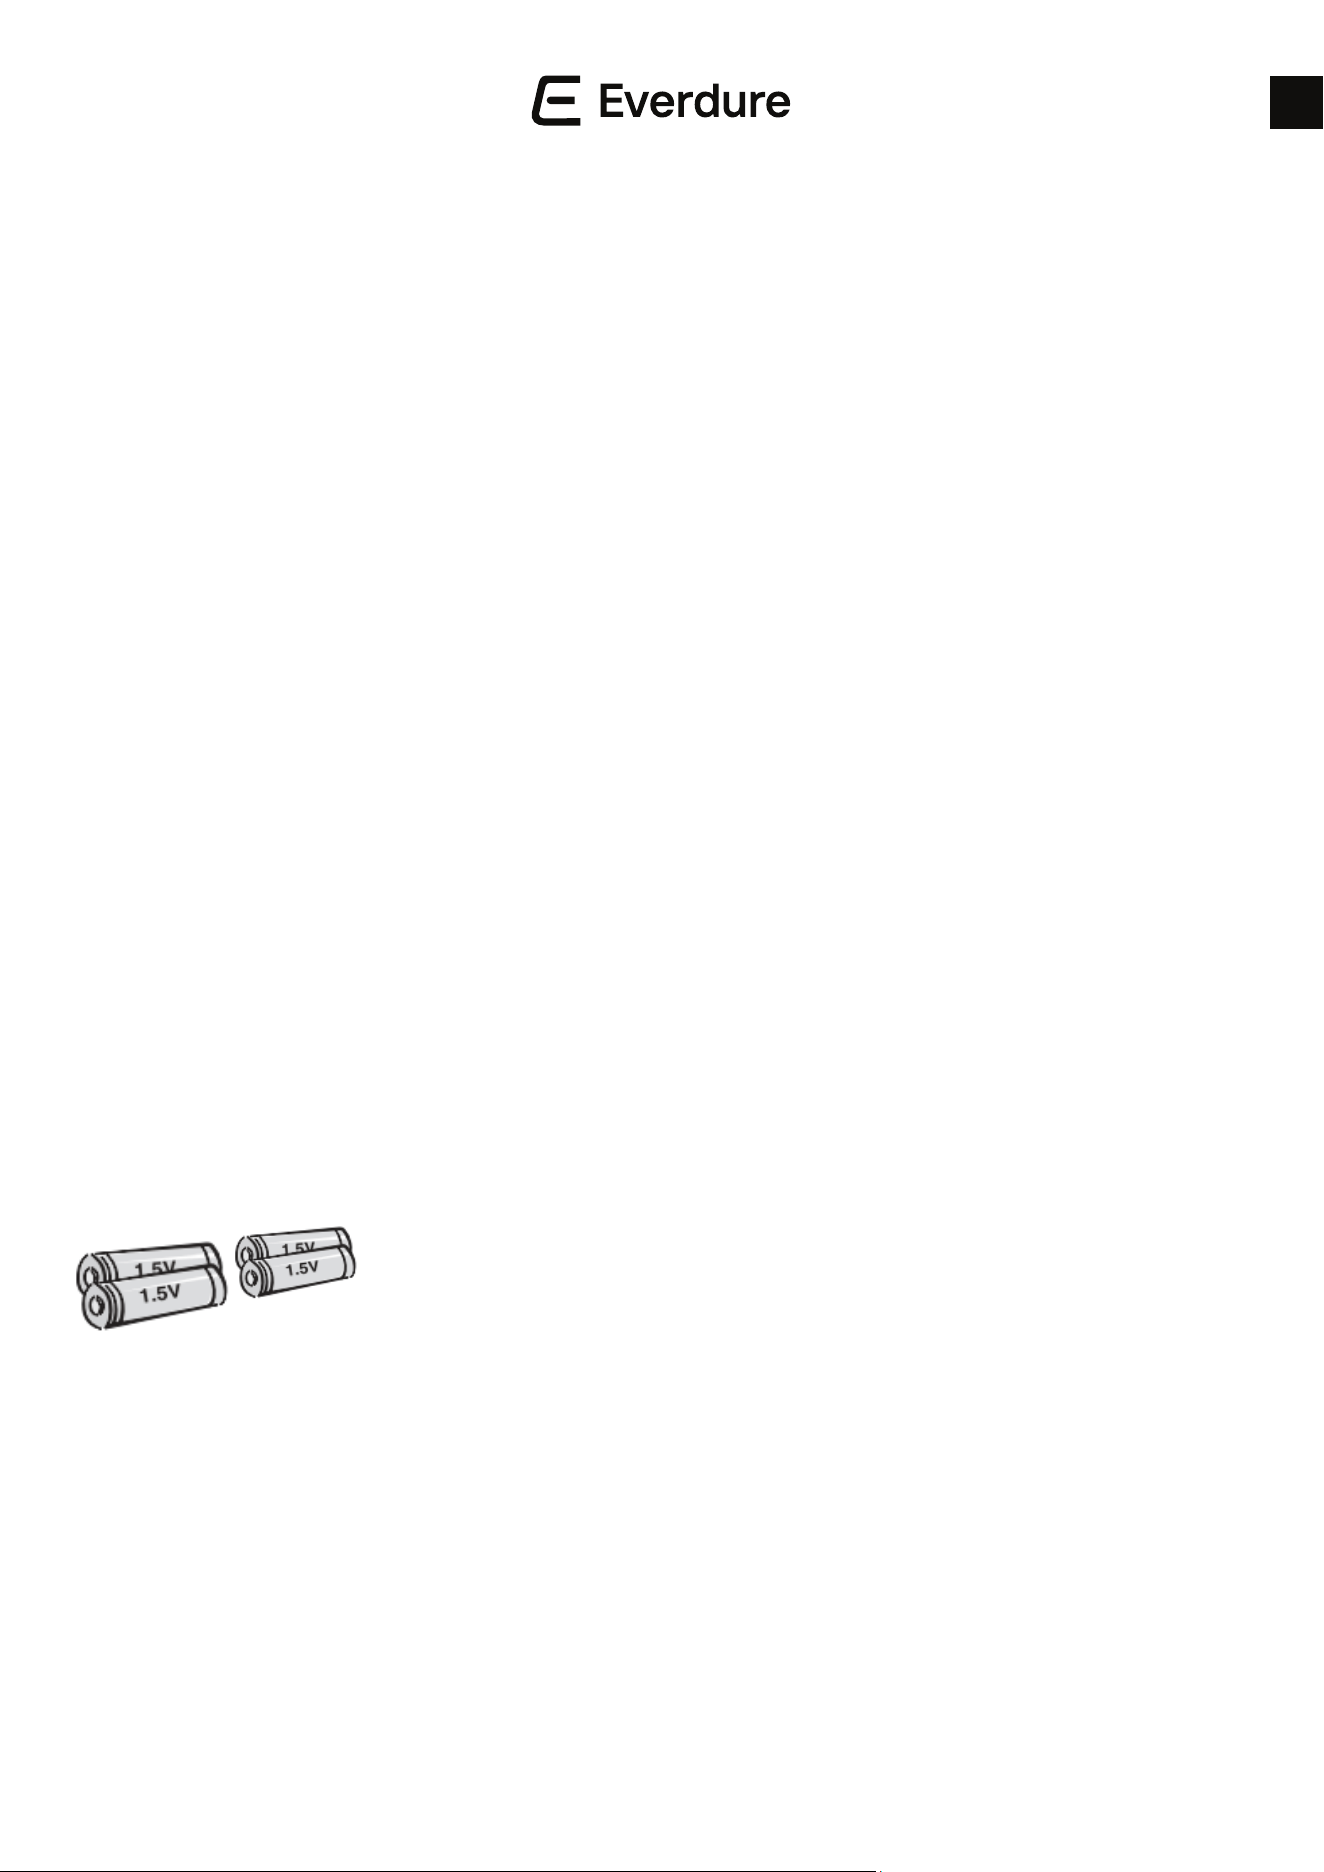
BATTERY INSTALLATION
1. Unscrew pulse igniter cap and t one new AA battery note the (+) and (–) marking ret the cap.
2. Remove the battery compartment cover. Load a set of three new “AA” type batteries so that their plus (+) and minus (–)
ends are facing as indicated by the markings. Ret battery compartment cover.
3. Do not short circuit the supply terminals.
8
EN
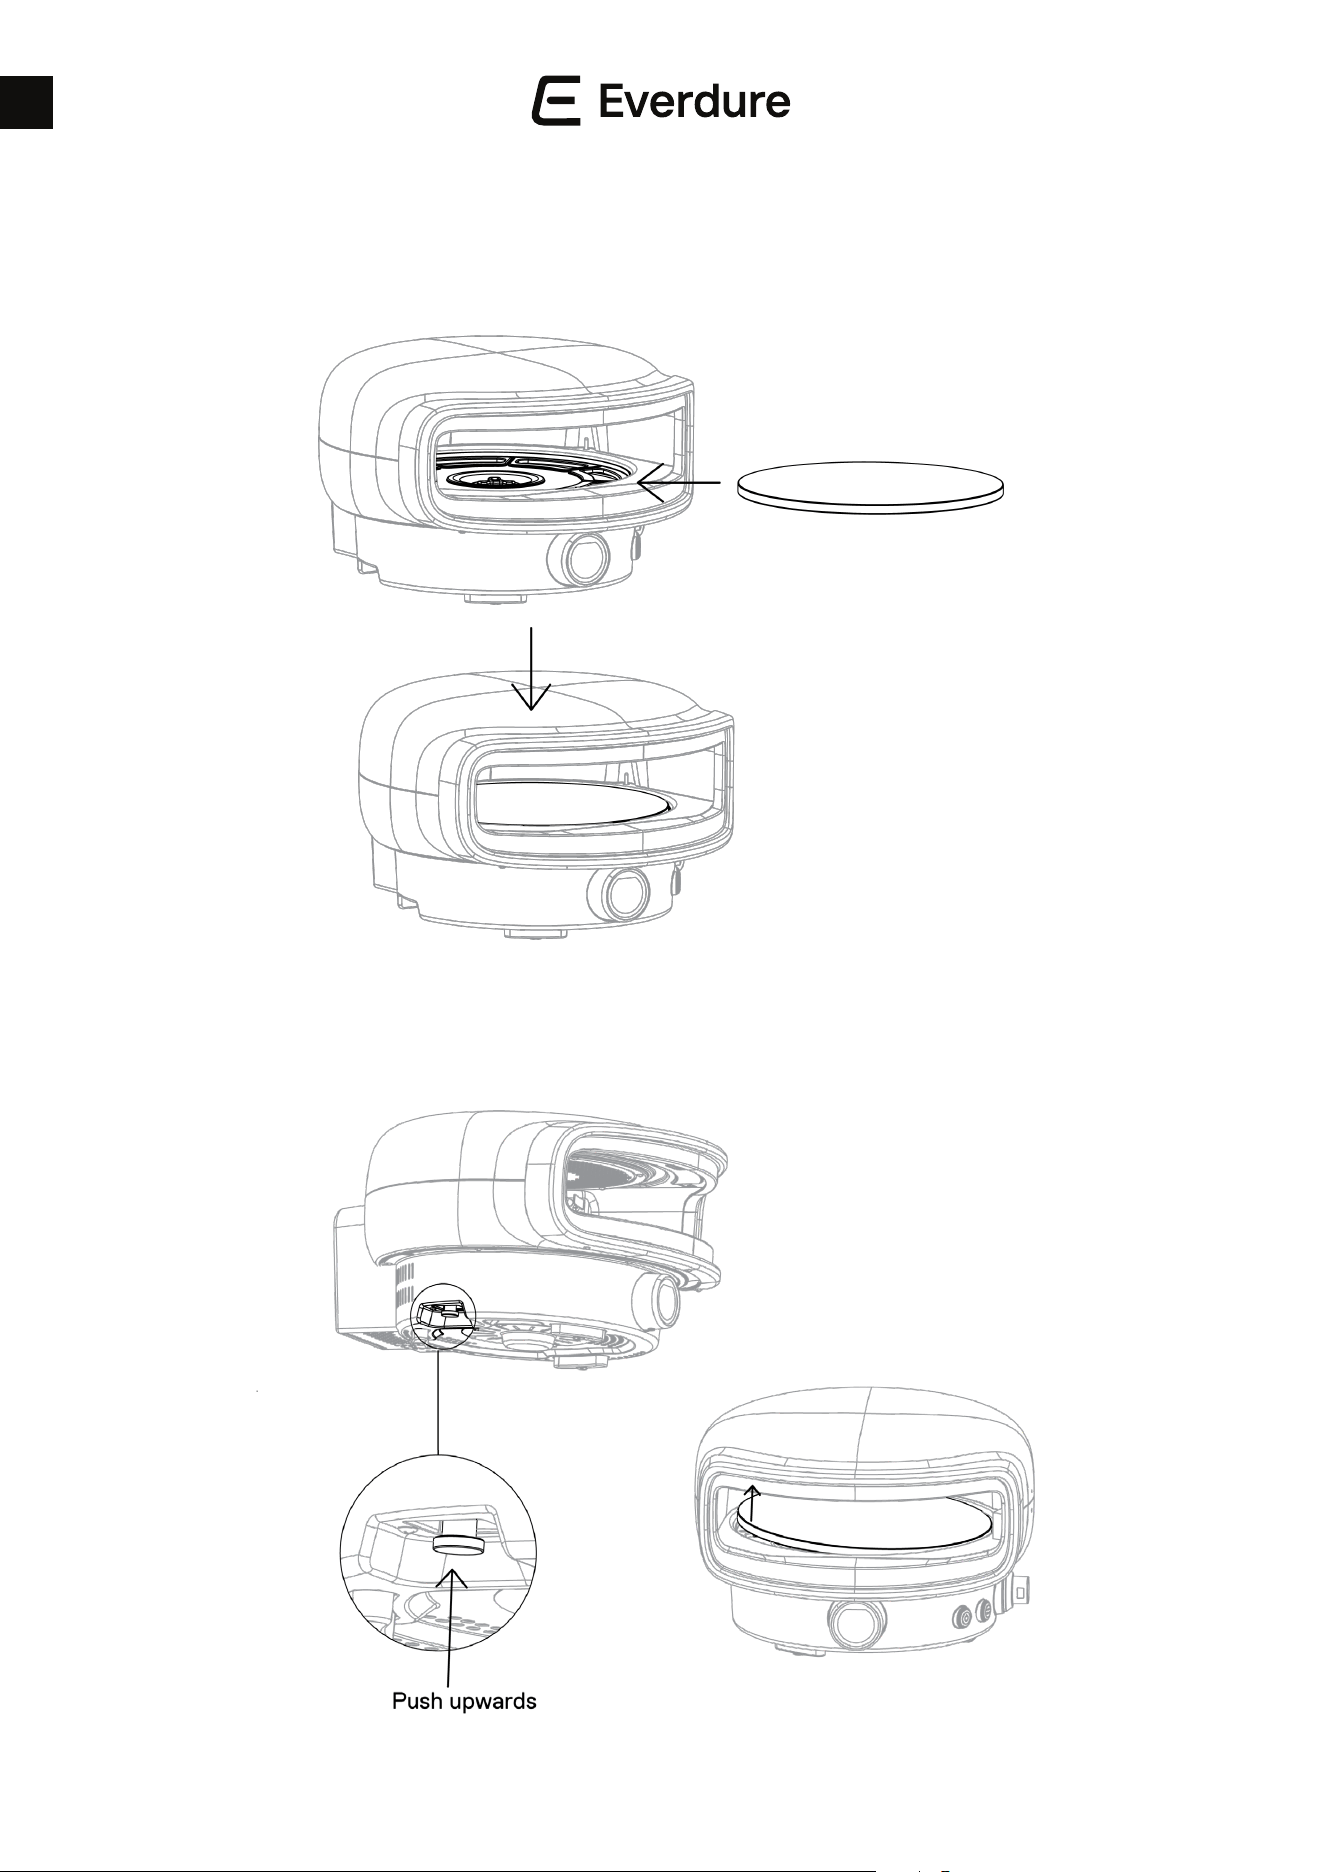
PIZZA STONE FITTING
ASSEMBLY
Remove pizza stone from the packaging and t to the turntable. Included are 3 silicon pizza stone protectors. Please keep
these for future use when transporting the stone in the oven.
RELEASE MECHANISM
Hold the button located underneath the pizza oven housing to lift the pizza stone, before removing from the housing. (Please
note the turntable tray for the stone could impede the lifting of the stone. If so, please turn on the rotating stone for 3
seconds and try again).
9
EN
GAS CONNECTIONS
FOR GAS HOSE / CYLINDER CONNECTION
• Only use the hose assembly as supplied for connection to the cylinder - DO NOT USE ADAPTORS.
FOR GAS CANISTER CONNECTION
• Before connecting gas supply, take care that the gas control knob is in the OFF position.
• Connect the supplied regulator before screwing on an approved gas canister.
10
EN
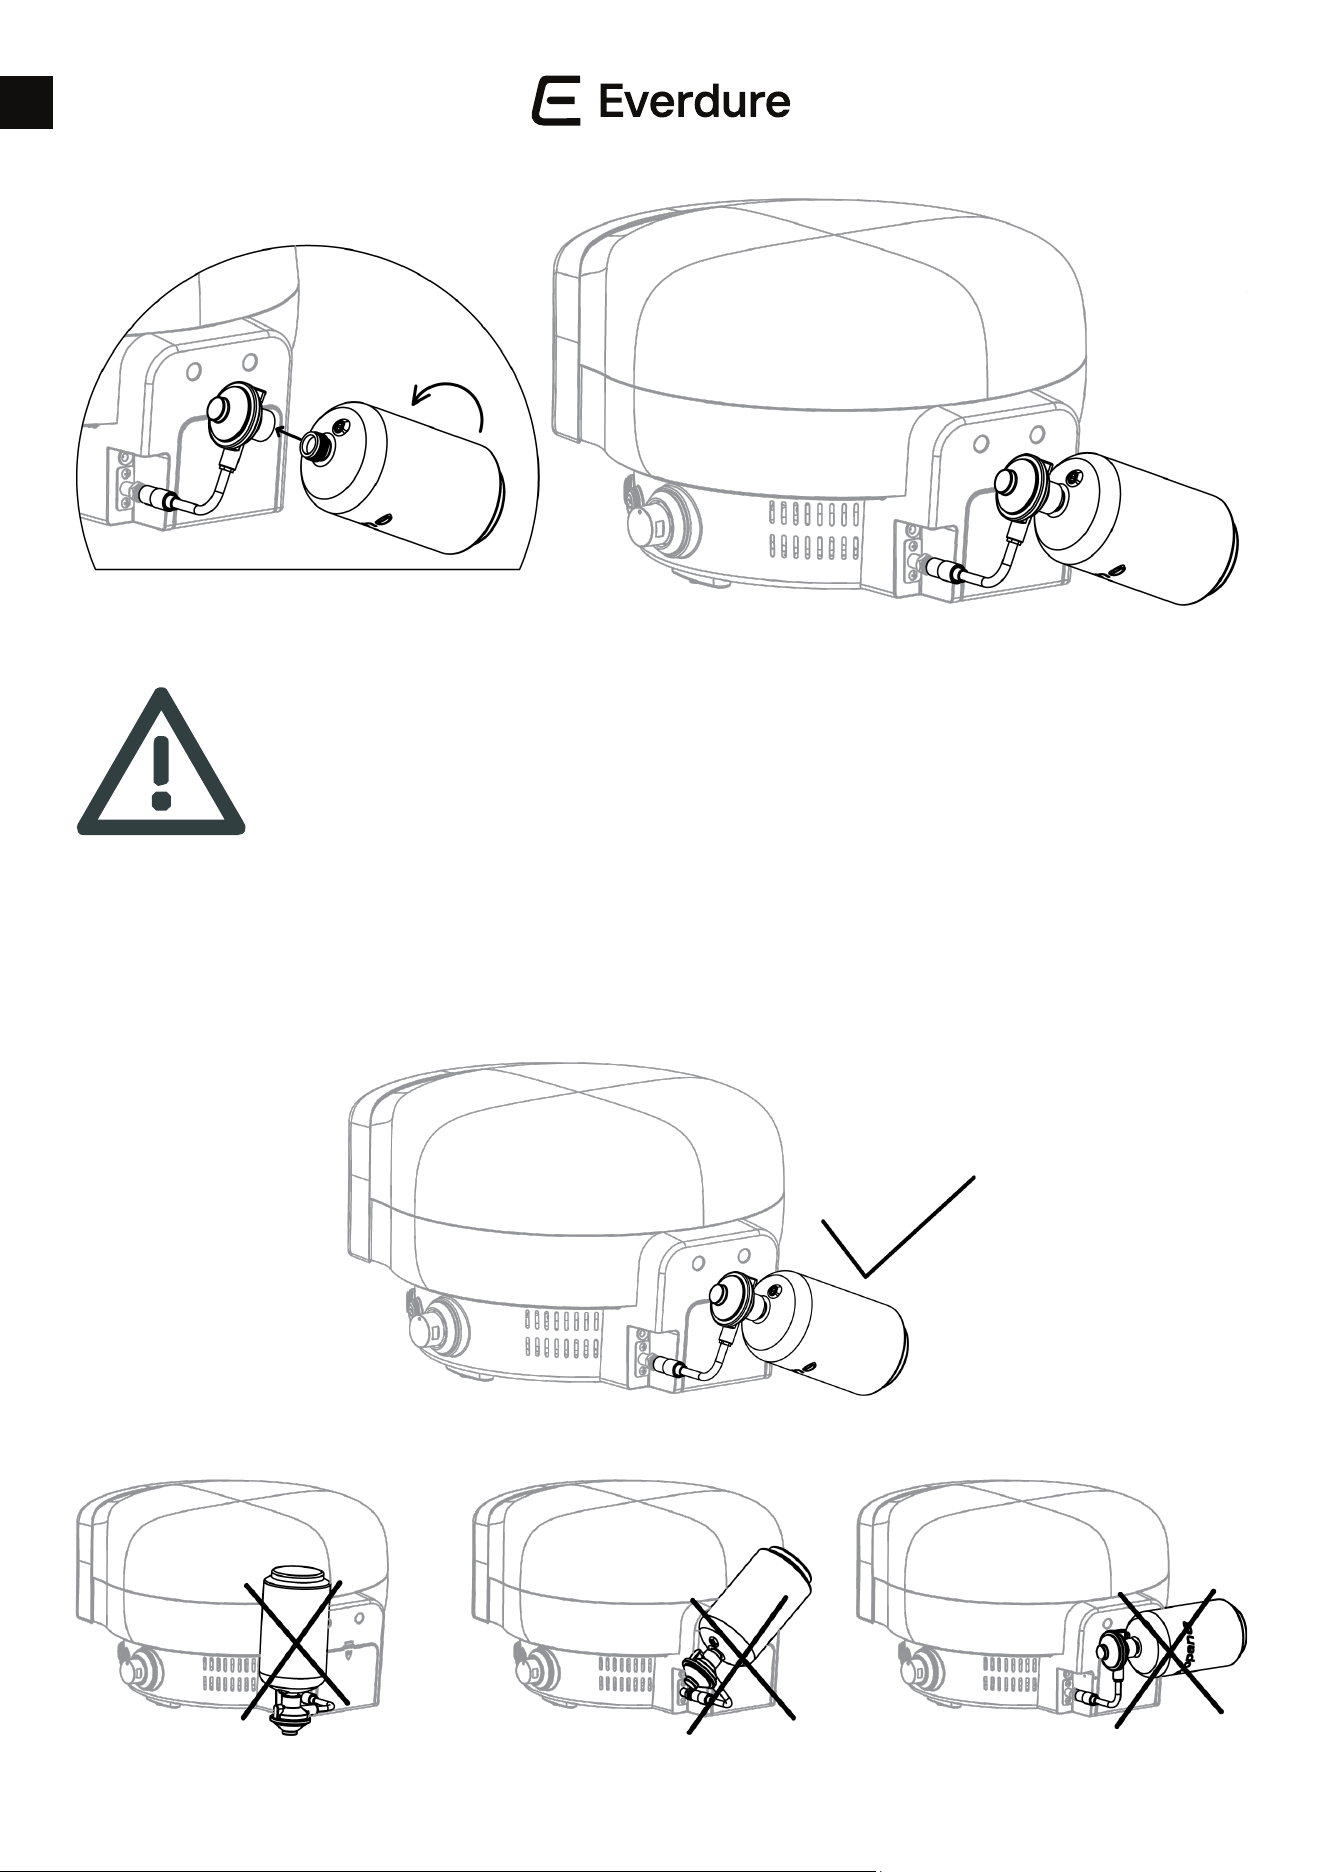
SAFETY WARNING
Please read these instructions before using your appliance.
• The conguration of the small gas canister shown (as per below diagram) is the ONLY position in which it is to be used.
• The cylinder MUST be supported by a at surface and cannot be suspended in the air, as per below diagram.
CORRECT USAGE
INCORRECT USAGE

11
EN
SAFETY WARNING
Please read these instructions before using your appliance.
This appliance has been tted with the latest design safety device: a Flow Limiting Gas Regulator. This regulator helps protect the
user by reducing the gas ow into the appliance in the case of a gas leak.
For optimum ease of use, please follow the following instructions:
1. Before turning the gas cylinder on, ensure that the burner control knob is at the OFF position.
2. Slowly turn the gas cylinder on until the valve is fully open, and then ignite the appliance as directed in the appliance instruction
booklet.
3. If using a gas bottle, ensure the supplied regulator is securely attached to the appliance and that the burner control knob is at
the OFF position, before attaching the gas bottle to the regulator.
Failure to observe these instructions may result in the ow limiting device to lock up at a reduced gas ow rate. This is
generally observed as a reduced ame from the burners or an increase in the cooking time.
If the appliance is found to be operating at a reduced rate, check the following items:
1. Check that there are no gas leaks (follow the instructions in the appliance instruction booklet).
2. Check that the gas cylinder is turned on.
3. Check that the gas cylinder is not empty.
If all three points are ok, these are the following instructions to reset the ow limiting device:
1. Turn the appliance control to OFF.
2. Turn the gas cylinder fully o.
3. Wait 30 seconds for the ow limiting device inside the regulator to reset.
4. Slowly turn the gas cylinder back on until fully open, and then ignite the appliance as directed in your appliance instruction
booklet.
If after following these instructions, you are still having problems with the appliance running at a reduced capacity, please contact
Everdure in Australia on
1300 694 583
or in New Zealand on (09) 415 6000 before operating your appliance.
12
EN
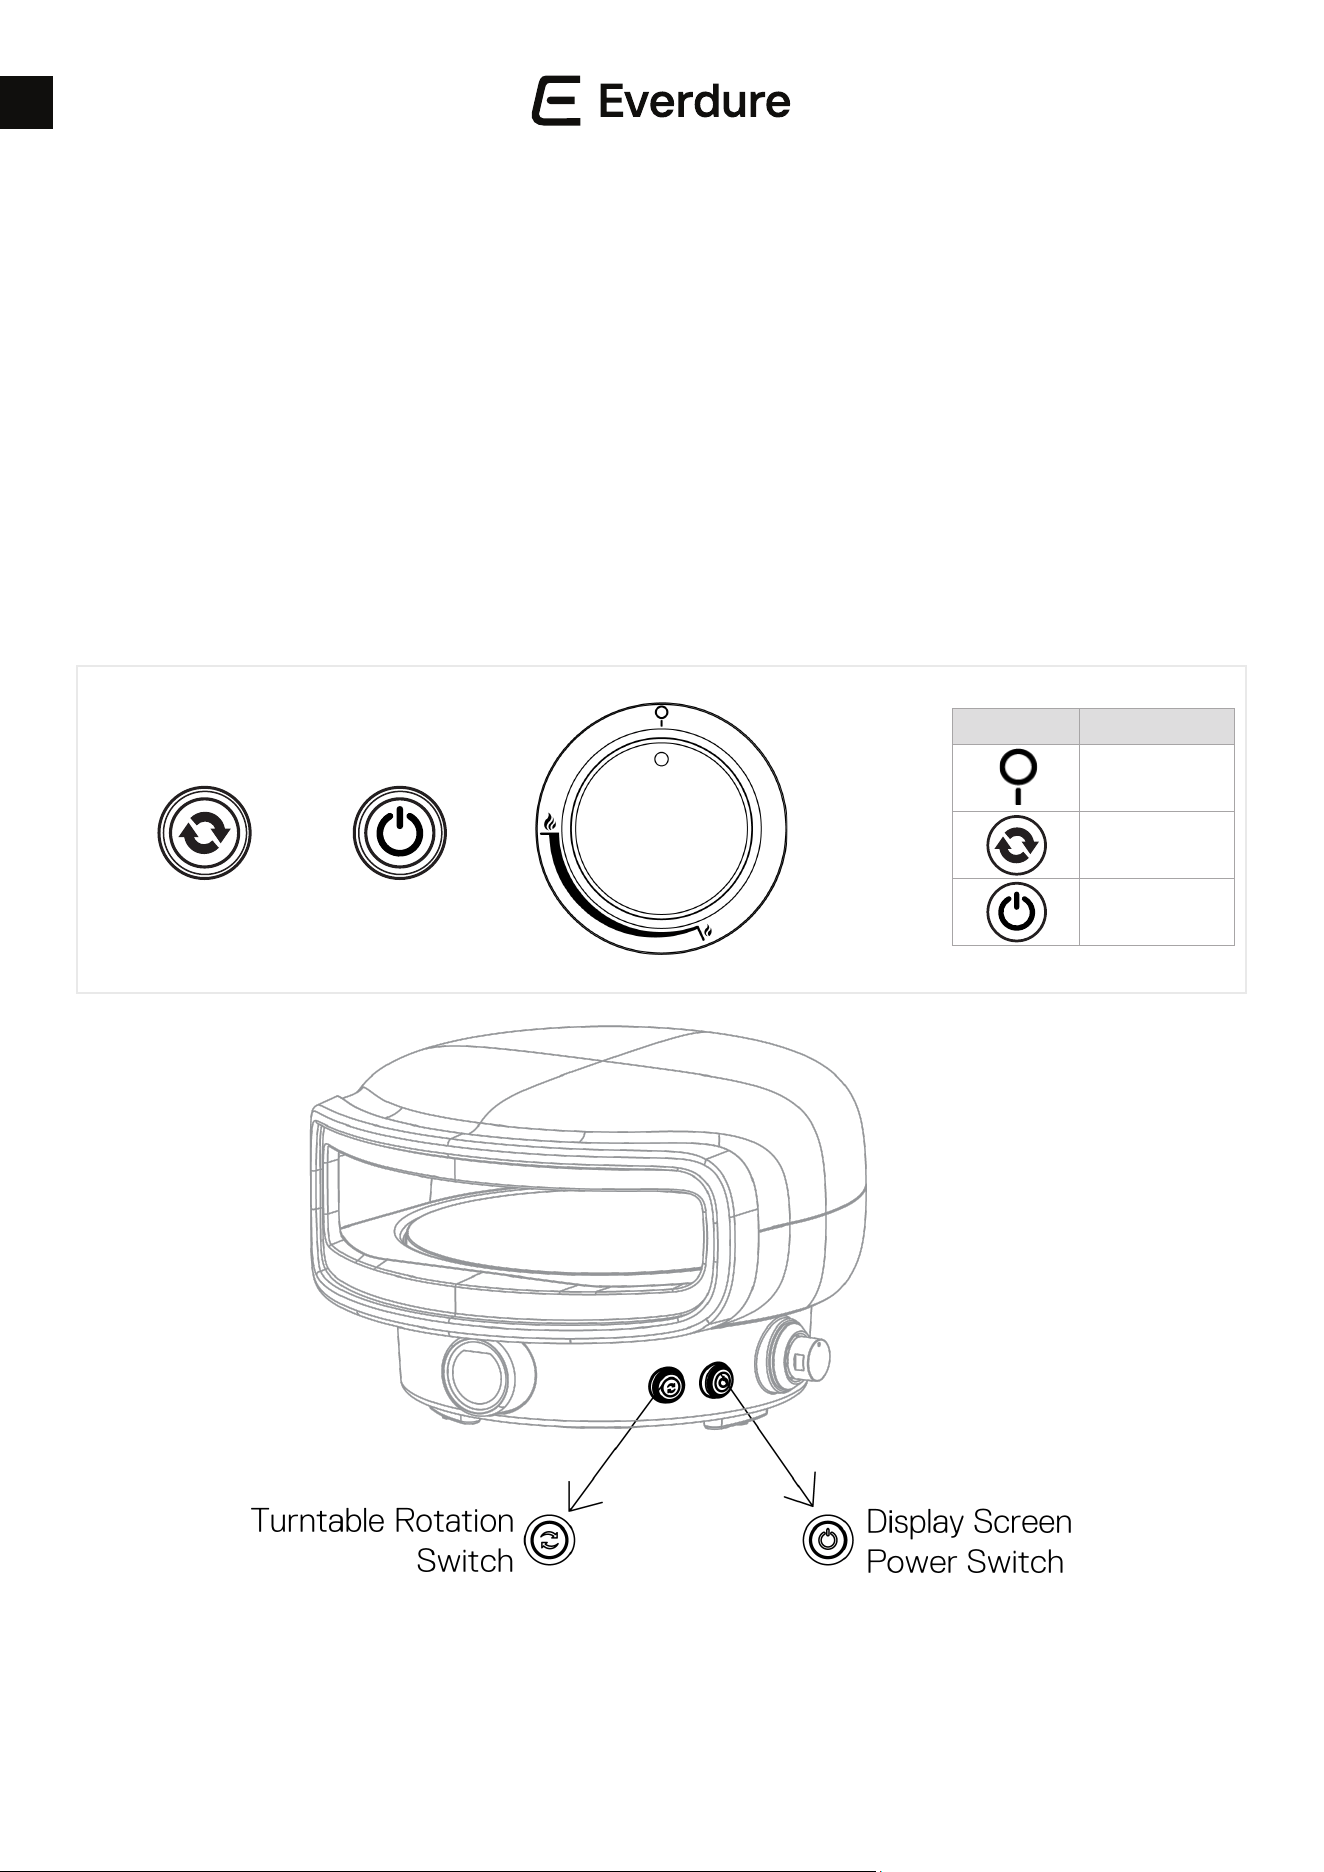
Symbol Description
OFF Position
Turntable Rotation
Power Button
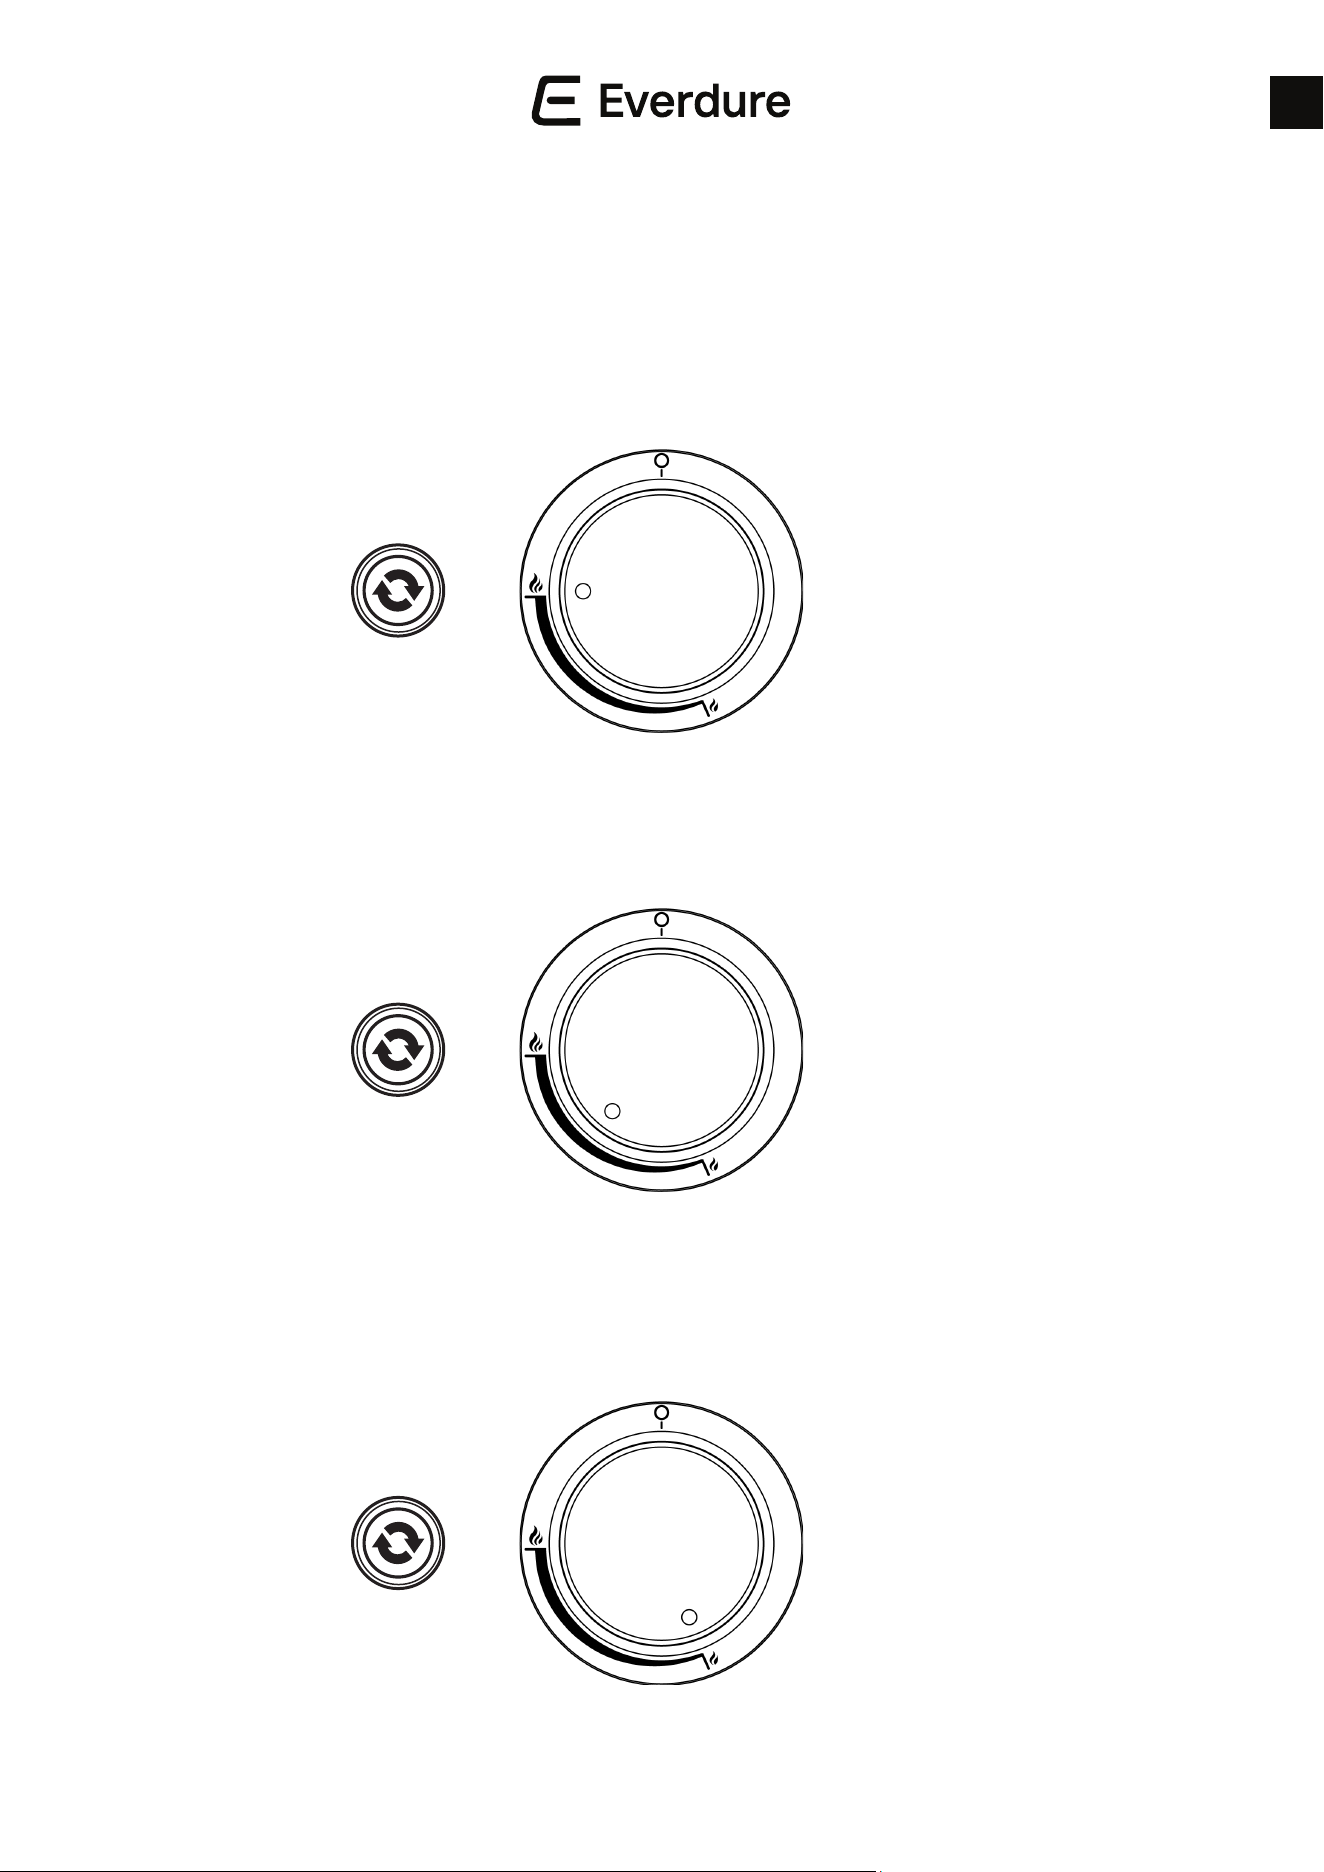
OPERATING INSTRUCTIONS:
Once your regulator is connected, open the gas from your gas cylinder. If using a canister attach to the supplied tting.
First-time use
It is highly recommended prior to cooking on your appliance for the rst time that you conduct a burn-o. Turn the burner on
high for 30 minutes. You may notice smoke coming from the oven, this is normal and part of the burn-o process. Afterwards,
turn o the burner and let the oven cool down naturally. Once the appliance has cooled, use a paper towel to wipe the inside
of the appliance to remove any soot from the burn-o.
Be careful the oven may still be hot in some places.
KILN P Series
To ignite the burner, push the knob in and slowly turn it anti-clockwise until you hear a clicking of the ignition. This should take
at least 8-10 seconds as you allow the gas to ow into the burner inside the appliance. Hold in for another 10 seconds after
ignition, then release. Set the burner to your desired requirement. Press the button for the turntable to begin rotating inside
the appliance. If the burner does not light, leave the knob at OFF and wait 5 minutes before retrying. WARNING: Do not leave
the burner activated for an extended period of time without the turntable running, as this may cause damage to the stone.
13
EN
COOKING HINTS AND TIPS - KILN P SERIES
Preheating
Press the turntable switch and ignite the burner. It is recommended to leave the burner on high for a minimum of 10 minutes to
allow your oven and stone to heat up. To determine if the stone has reached the desired temperature, refer to the information
shown on the appliance display. Do not leave the burner on without the turntable rotating.
Cooking
When the appliance has reached your desired cooking temperature, turn the burner knob to halfway.
After Cooking
Once you have cooked on the appliance, just before you go to eat and if you are continuing to cook more, turn the burner
down to the low setting. If you have nished cooking on the appliance, turn the burner o. Running the appliance for an
extended period of time with the burner on high setting could result in damage to your appliance.
14
EN
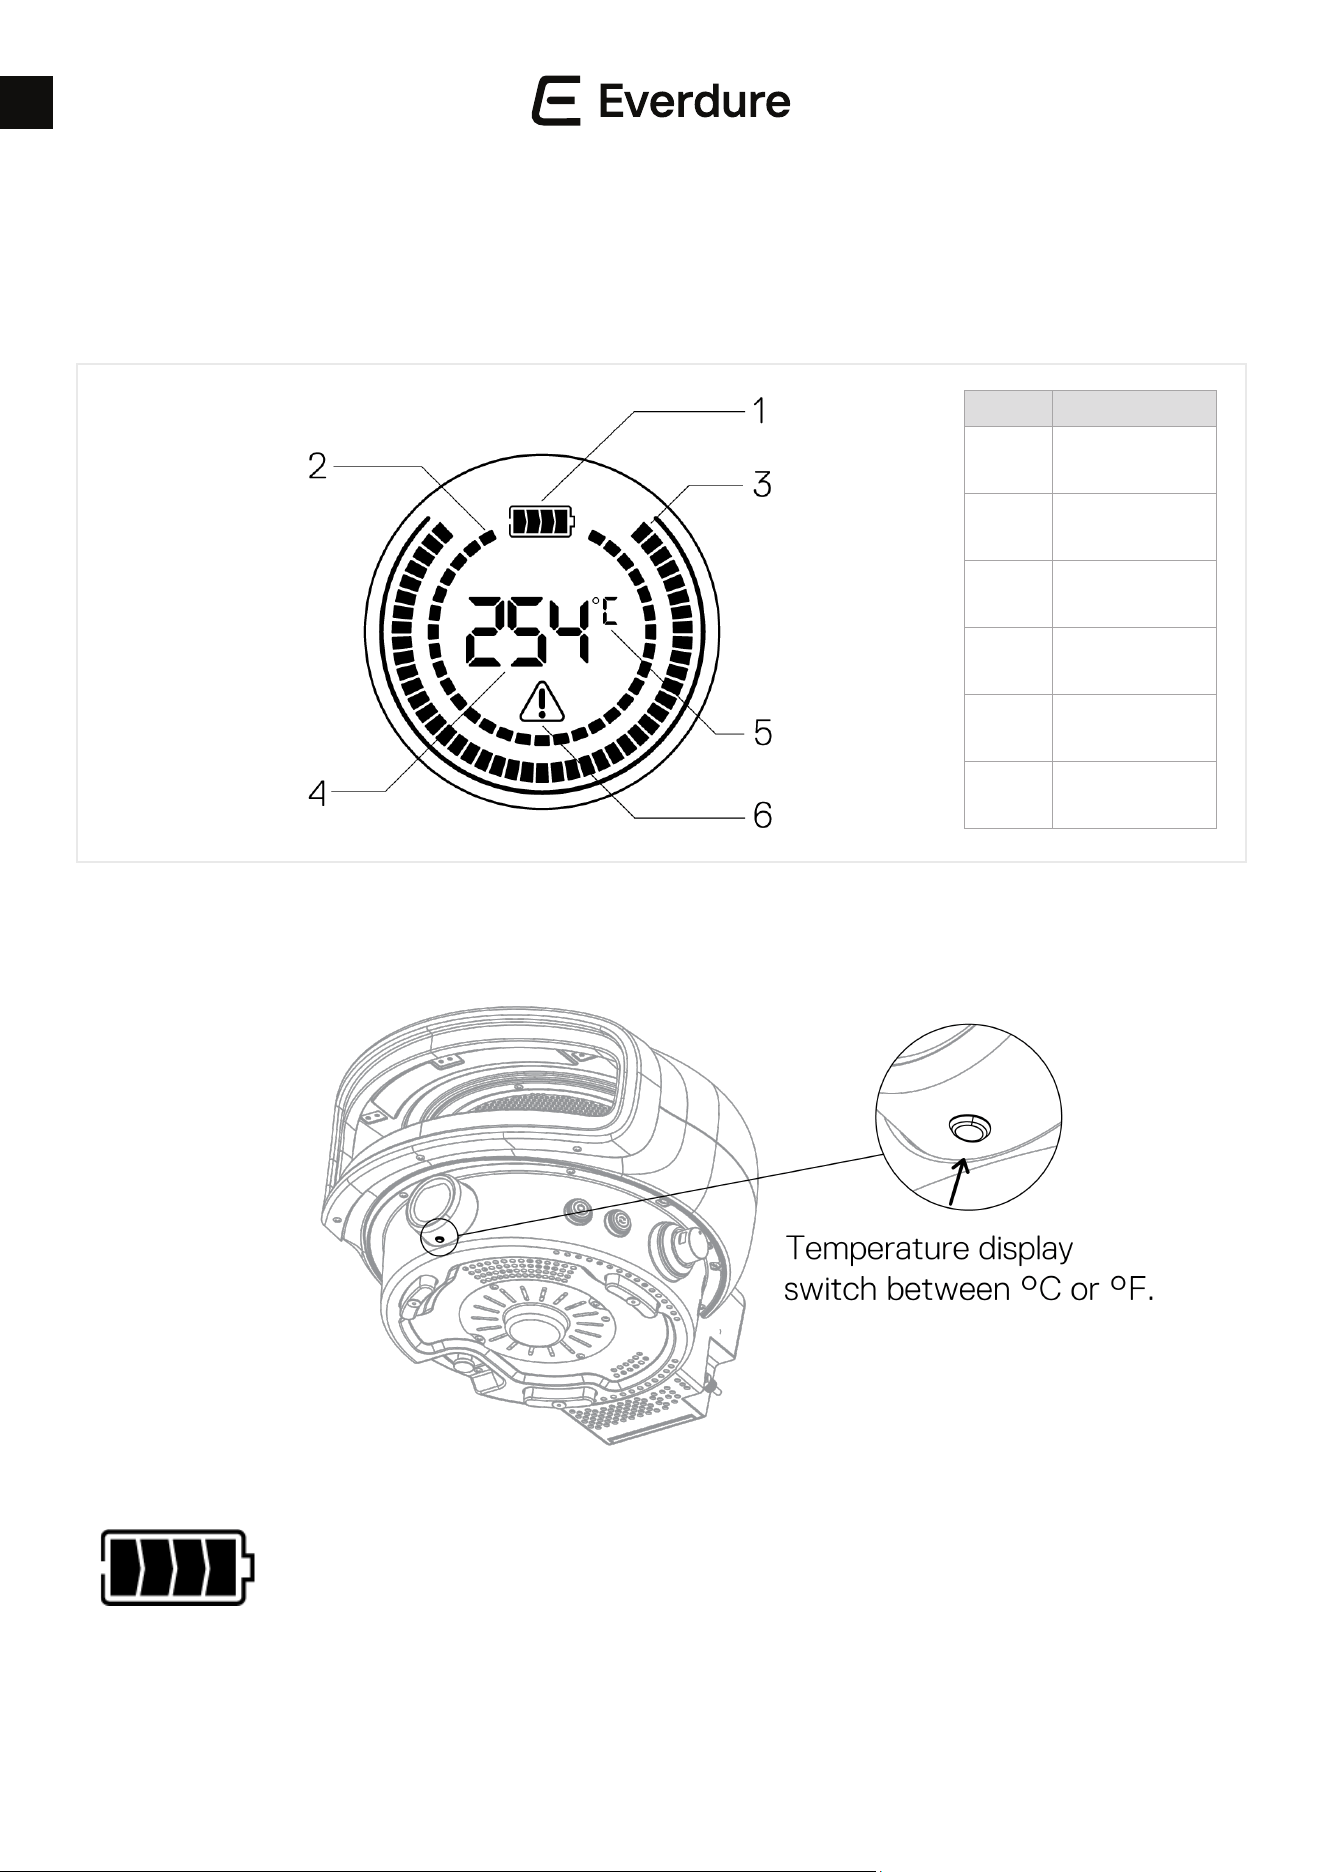
USE OF THE SCREEN GUIDE - KILN P SERIES
Once your screen power is on, the screen operates accordingly:
Screen Layout
Temperature Display
• To change between degrees CELSIUS and FAHRENHEIT, press the button situated underneath the LCD screen housing.
Battery Status Icon
• Battery indicator represents the battery level status and will ash the last segment when batteries need to be changed.
(Function may be reduced when batteries are low)
Item No. Description
1
Battery
2
Turntable Rotation
Segments
3
Temperature
Segments
4
Digital Temperature
Display
5
Temperature Units
6
Error Symbol
15
EN
BATTERIES DO’S & DO NOT’S
• Dispose of used batteries carefully to ensure that a small child does not consume them.
Please seek medical attention immediately if batteries are consumed.
• DO NOT mix new batteries with old batteries. This may cause the batteries to overheat and leak.
• DO NOT place non-rechargeable batteries in a charging device.
• DO NOT disassemble, crush, puncture, or otherwise damage batteries. This can result in leakage or rupture.
• DO preserve battery life by switching o a device and removing the batteries when it’s not being used and is not expected
to be used for extended periods of time.
• DO use the specied type of battery (AA Batteries).
• DO insert the batteries properly. Follow the symbols showing the correct way to position the positive (+) and negative (-)
ends of the batteries.
• DO immediately remove exhausted batteries from your device and dispose of them properly.
EXTERNAL CLEANING
• Before cleaning the exterior, ensure the appliance has cooled and is safe to touch.
• Painted and plastic surfaces can be cleaned using a mild household detergent or cleaner and a clean cloth (do not use
scourers or harsh detergents).
• It is advisable to test cleaners on a small section of the appliance rst. NEVER use paint thinners or similar solvents for
cleaning, and NEVER pour cold water over hot surfaces.
• Dry the surface afterwards.
INTERNAL CLEANING
• Before cleaning the internal parts, ensure the appliance has cooled and is safe to touch.
• The inside of the appliance can be cleaned by using some water, mild detergent and a sponge or mild scouring pad.
• For hard-to-clean areas, use a little baking soda on a wet sponge. DO NOT use abrasive cleaners.
CORDIERITE PIZZA STONE CARE
• This pizza stone is designed to be used in the Everdure Kiln only.
• Only use water to clean the pizza stone. DO NOT submerge in water, using soap will leave residue in the pores of the
stone.
• Take care of the pizza stone as it is fragile and could break if bumped or dropped.
• Be careful handling the pizza stone as it can retain heat for many hours after cooking.
• DO NOT cool the stone with water when the stone is hot; this could crack and damage the pizza stone.
• After cleaning the pizza stone with water, thoroughly dry the stone before use.
• When transporting your appliance, please use the 3 silicon pizza stone protectors to ensure the stone is safe and secure.
(Please ensure the stone has cooled down before tting these protectors).
LCD DISPLAY CARE
• DO NOT use soapy liquids to clean the contacts or screen.
• Wipe screen glass with a clean cloth or gentle rag DO NOT use abrasive materials or cleaning solvents.
MAINTENANCE
• Regularly check all gas hose and line connections for damage, cuts or cracks each time before use of the appliance.
• Leak test with soapy water before rst use and at least annually. Always check when replacing the gas cylinder/bottle.
• Check the burners regularly for insect mess from spiders, ants etc, if any signs clean before operation.
CARE & MAINTENANCE:
16
EN
Burner will not ignite when using the igniter:
TROUBLESHOOTING:
Burner ame is erratic:
Gas is leaking from connections:
Turntable not working:
Cylinder valve is not on Turn cylinder valve on
Cylinder is empty Replace with a full cylinder
Igniter button is not working Check battery
Igniter is not sparking Contact the Service Centre
Flame is burning inside burner
(hissing sound)
Turn o burner, allow to cool and re-ignite
Regulator is faulty Contact the Service Centre
Injector is partially blocked
Clean injector with a toothbrush. Do not drill out or use wire.
Do not remove the injector. Contact the Service Centre
Connections are loose
Tighten loose connections (do not over-tighten) and leak test under pressure with a
soapy water solution (page 2)
Hose has deteriorated Replace hose (Contact the Service Centre)
Gas valve is faulty Contact the Service Centre
Threads are damaged Contact the Service Centre
Turntable not turning
Check if batteries are tted and are properly installed in the battery compartment.
Check if batteries are full of charge and replace if needed.
Turntable is broken Contact the Service Centre
Switch or wiring damaged Contact the Service Centre
17
EN
The screen has no display:
TROUBLESHOOTING:
Error codes indicated on LCD display:
The screen is not on Turn on the screen at the power button.
The screen does not turn on
Make sure that the batteries are inserted correctly into the battery compartment.
Check that the batteries are fully charged and replace if necessary.
Screen is damaged Contact Everdure.
The screen is faulty Check that the batteries are fully charged and replace if necessary.
Error symbol, indicated on
temperature display as:
Temperature sensor (located in main oven enclosure) may be faulty.
Contact Everdure.
18
EN
SPECIFICATIONS:
PRODUCT KILN P
Dimensions (mm) 570 x 510 x 370 (mm)
Weight NW / GW 13.1 / 17.5 (kg)
Power supply KILN P Series
MODEL SPECIFICATION REMARK
Battery Power –
Main Power: 4.5VDC (3x AA), 300mA
Ignition: 1.5VDC (1x AA)
19
EN
KILN P SERIES - AU
20
EN
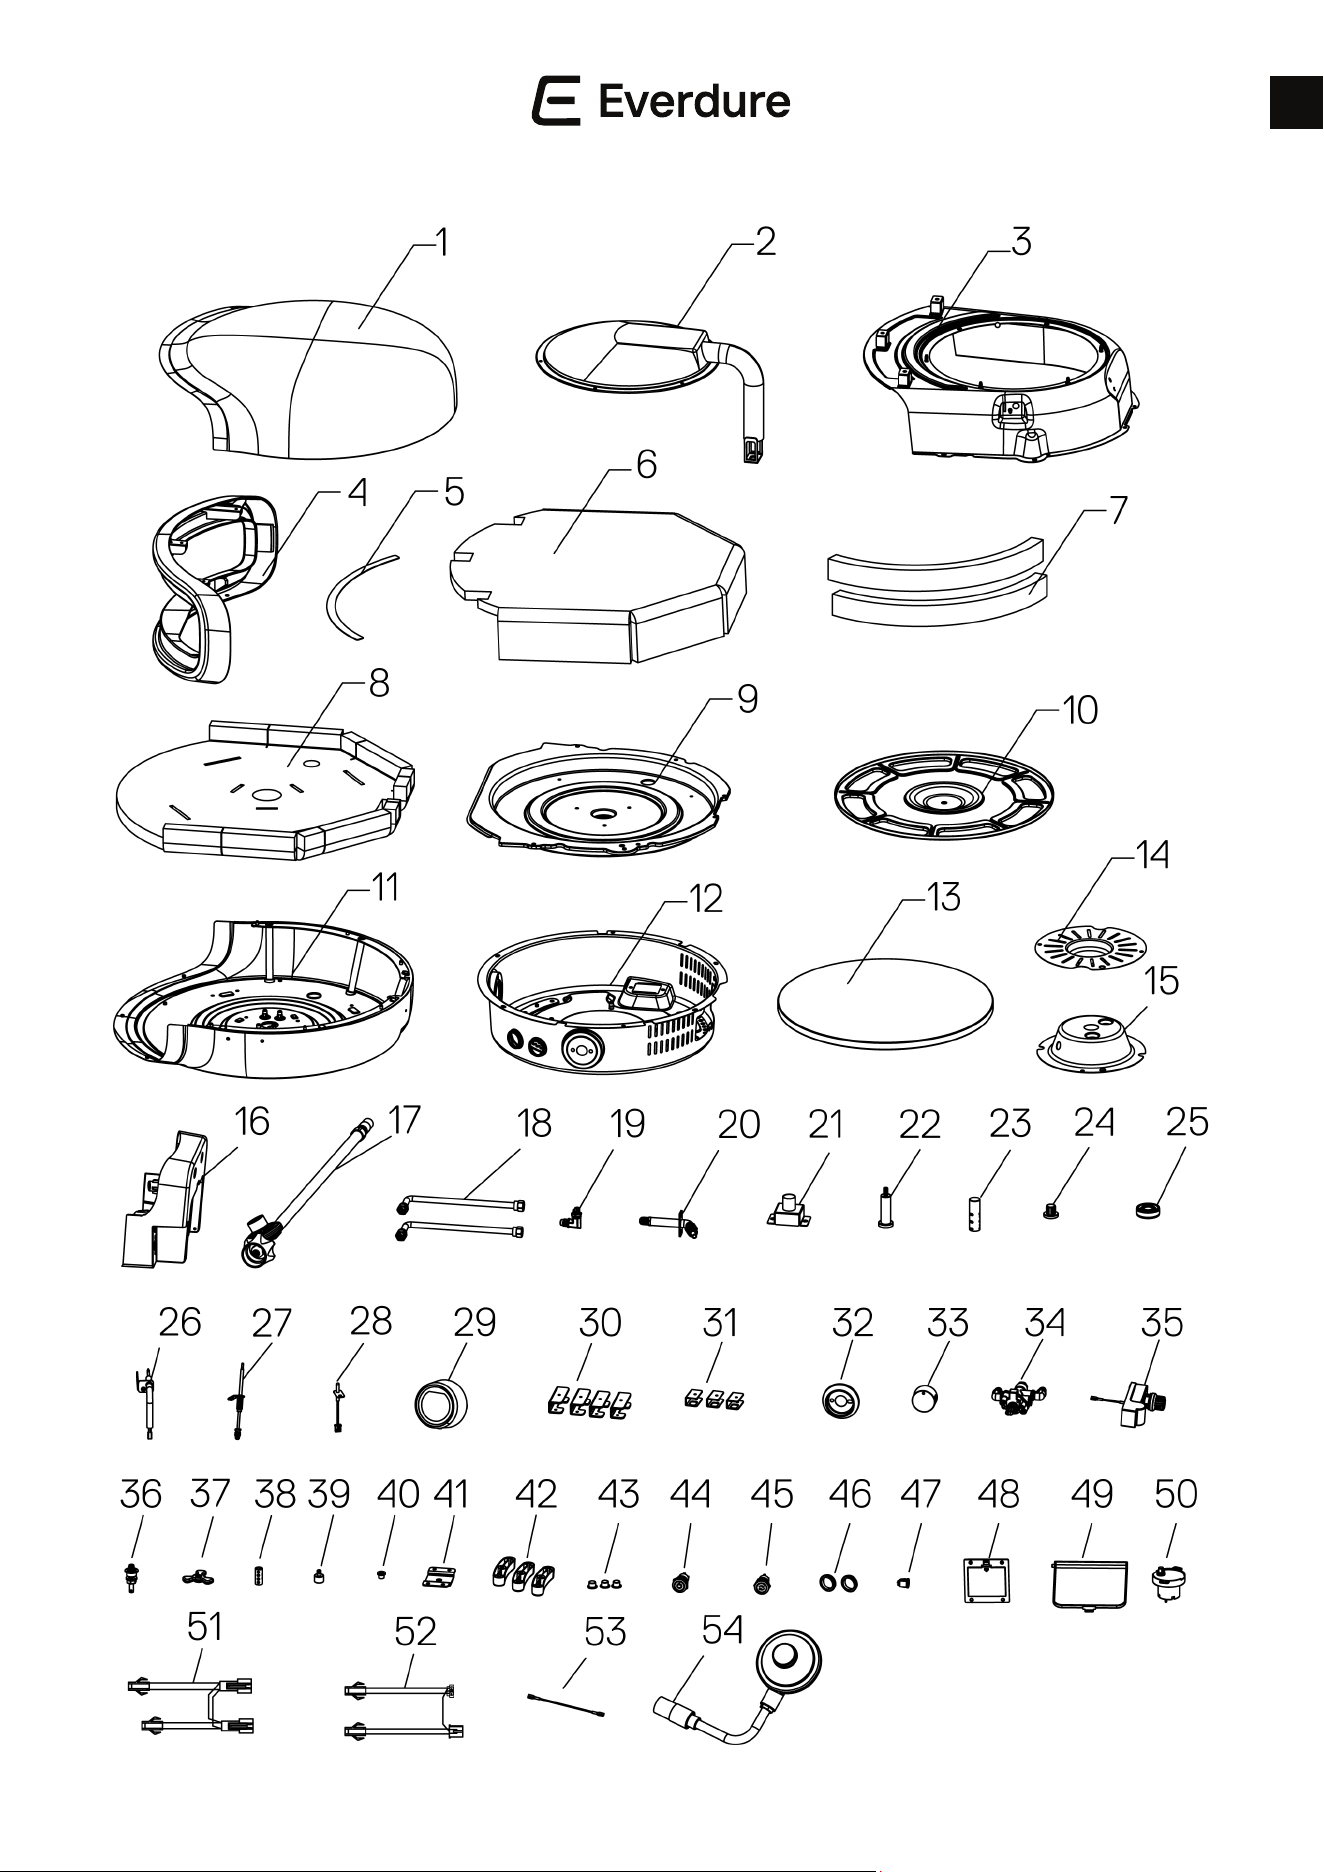
NO. PART NAME NO. PART NAME
1 Upper housing 28 Temperature probe
2 Burner assembly 29 Digital display
3 Upper rebox 30 Lower rebox bracket
4 Fascia 31 Inner rebox bracket
5 Upper fascia insulation 32 Bezel
6 Upper housing insulation 33
Knob
7 Lower rebox insulation 34 Valve body assembly
8 Lower housing insulation 35 Pulse igniter
9 Lower rebox 36 Support shaft
10 Turntable 37 Locking nut
11 Lower housing 38 Shaft
12 Base cover 39 Coupling
13 Pizza stone 40 Bearing Housing
14 Inspection cover 41 Slide bracket
15 Motor mounting plate 42 Foot
16 Rear housing 43 Foot grommet
17 Gas hose & regulator (Type 27) 44 Power switch
18 Gas pipe 45 Turntable switch
19 Gas jet 46 Power cable grommet
20 Connection assembly 47 Power socket
21 Control box bracket assembly 48 Battery box
22 Stone ejection extension 49 Rear cover
23 Support tube 50 Motor
24 Stone ejection button 51 Wire harness display & motor
25 Bearing 52 Switch harness power & turntable
26 Ignition electrode 53 Ignition wire
27 Thermocouple 54 Gas regulator (BOM Fitting)
KILN P SERIES - AU

21
EN
PRIVACY POLICY
Privacy policy: Everdure is committed to protecting your personal privacy. Your personal information that you have provided in
this form (e.g., name, street address, e-mail address and telephone/mobile number) is used solely by Everdure for the express
purpose for which it was collected (e.g., to respond to your enquiry regarding your product). Your personal information will
be processed by Everdure in accordance with the guidelines and requirements of the Privacy Laws of Australia (Privacy Act
1998).
For a full copy of Everdure’s Privacy Policy, please e-mail marketing@worldwideappliances.com.au in Australia or
customercare@monacocorp.co.nz in New Zealand or call 1300 694 583 in Australia or (09) 415 6000 in New Zealand.
AUSTRALIAN CUSTOMERS
Our goods come with guarantees that cannot be excluded under the Australian Consumer Law.
You are entitled to a replacement or refund for a major failure and compensation for any other reasonably foreseeable loss or
damage.
You are also entitled to have the goods repaired or replaced if the goods fail to be of acceptable quality and the failure does not
amount to a major failure.
NEW ZEALAND CUSTOMERS
Nothing herein contained shall be construed in any way as excluding or limiting your rights under the Consumer Guarantee Act
1993.
OUR WARRANTY
Subject to the following conditions, this product is also covered by the manufacturer’s warranty from the date of purchase,
covering all parts and labour for the period listed below (Our Warranty). Our Warranty (which is subject to the conditions
below) covers rectication free of charge of any fault arising from defected materials or components, or faulty workmanship.
The product will be repaired or replaced at the option of Everdure, but all costs of installation, removal, cartage, freight, travel
expenses and insurance are to be paid by the claimant. Our Warranty is subject to products being used for domestic household
use.
Our warranty opeartes in addition to (and does not exclude, restrict, or modify) any rights or remedies to which you may
already be entitled to under the Australian Consumer Law or any consumer guarantee law relating to this product.
WARRANTY
22
EN
WHAT IS NOT COVERED: BY OUR WARRANTY
1. Any defect or failure caused by the product not being assembled or used in accordance with the instruction/installation
manual provided with the product.
2. Normal fair wear and tear (e.g., surface rust, stone chipping, heat discolouration)
3. Insect or vermin infestation.
4. Unauthorised repairs or use of non-genuine Everdure parts.
5. Products scratches & damage as a result of delivery, installation, or assembly
6. Claims to product surface coatings due to accidental damage, improper or lack of maintenance, damage from cleaning
products not recommended by Everdure.
HOW TO CLAIM WARRANTY
You will need to contact Everdure in Australia or New Zealand using the enclosed contact details.
Please make sure you have the following information on hand:
• Product Name/Model Number
• Serial Number
• Purchase Date (as per invoice, or proof of purchase)
• Place of Purchase
WHAT IS COVERED: By Our Warranty
During the warranty period your appliance will be repaired free of charge by Everdure, or its authorised service centre provided
your appliance is delivered to and picked up from Everdure or its authorised service centre, subject to terms and conditions
below.
It is recommended that exposure of the appliance to the elements should be minimised. After your appliance has cooled and has
been cleaned, store it under cover with a weatherproof cover over it.
APPLIANCE COMPONENT WARRANTY PERIOD
Stainless Steel Parts 2 years
Enameled Parts
Powder Coated Panels
Cooking Stone & All Other Assemblies / Parts
2 years
IN AUSTRALIA
Worldwide Appliances Pty Limited
ABN 45 868 077 422
Customer care: 1300 694 583
Web: https://wwa.com.au/#asr
IN NEW ZEALAND
Monaco Corporation Ltd
Phone: (09) 415 6000
Email: customercare@monacocorp.co.nz

IM REF: EKILN P AU REV2.0
www.everdure.au