Press and release the Learn
button on the garage door
opener.
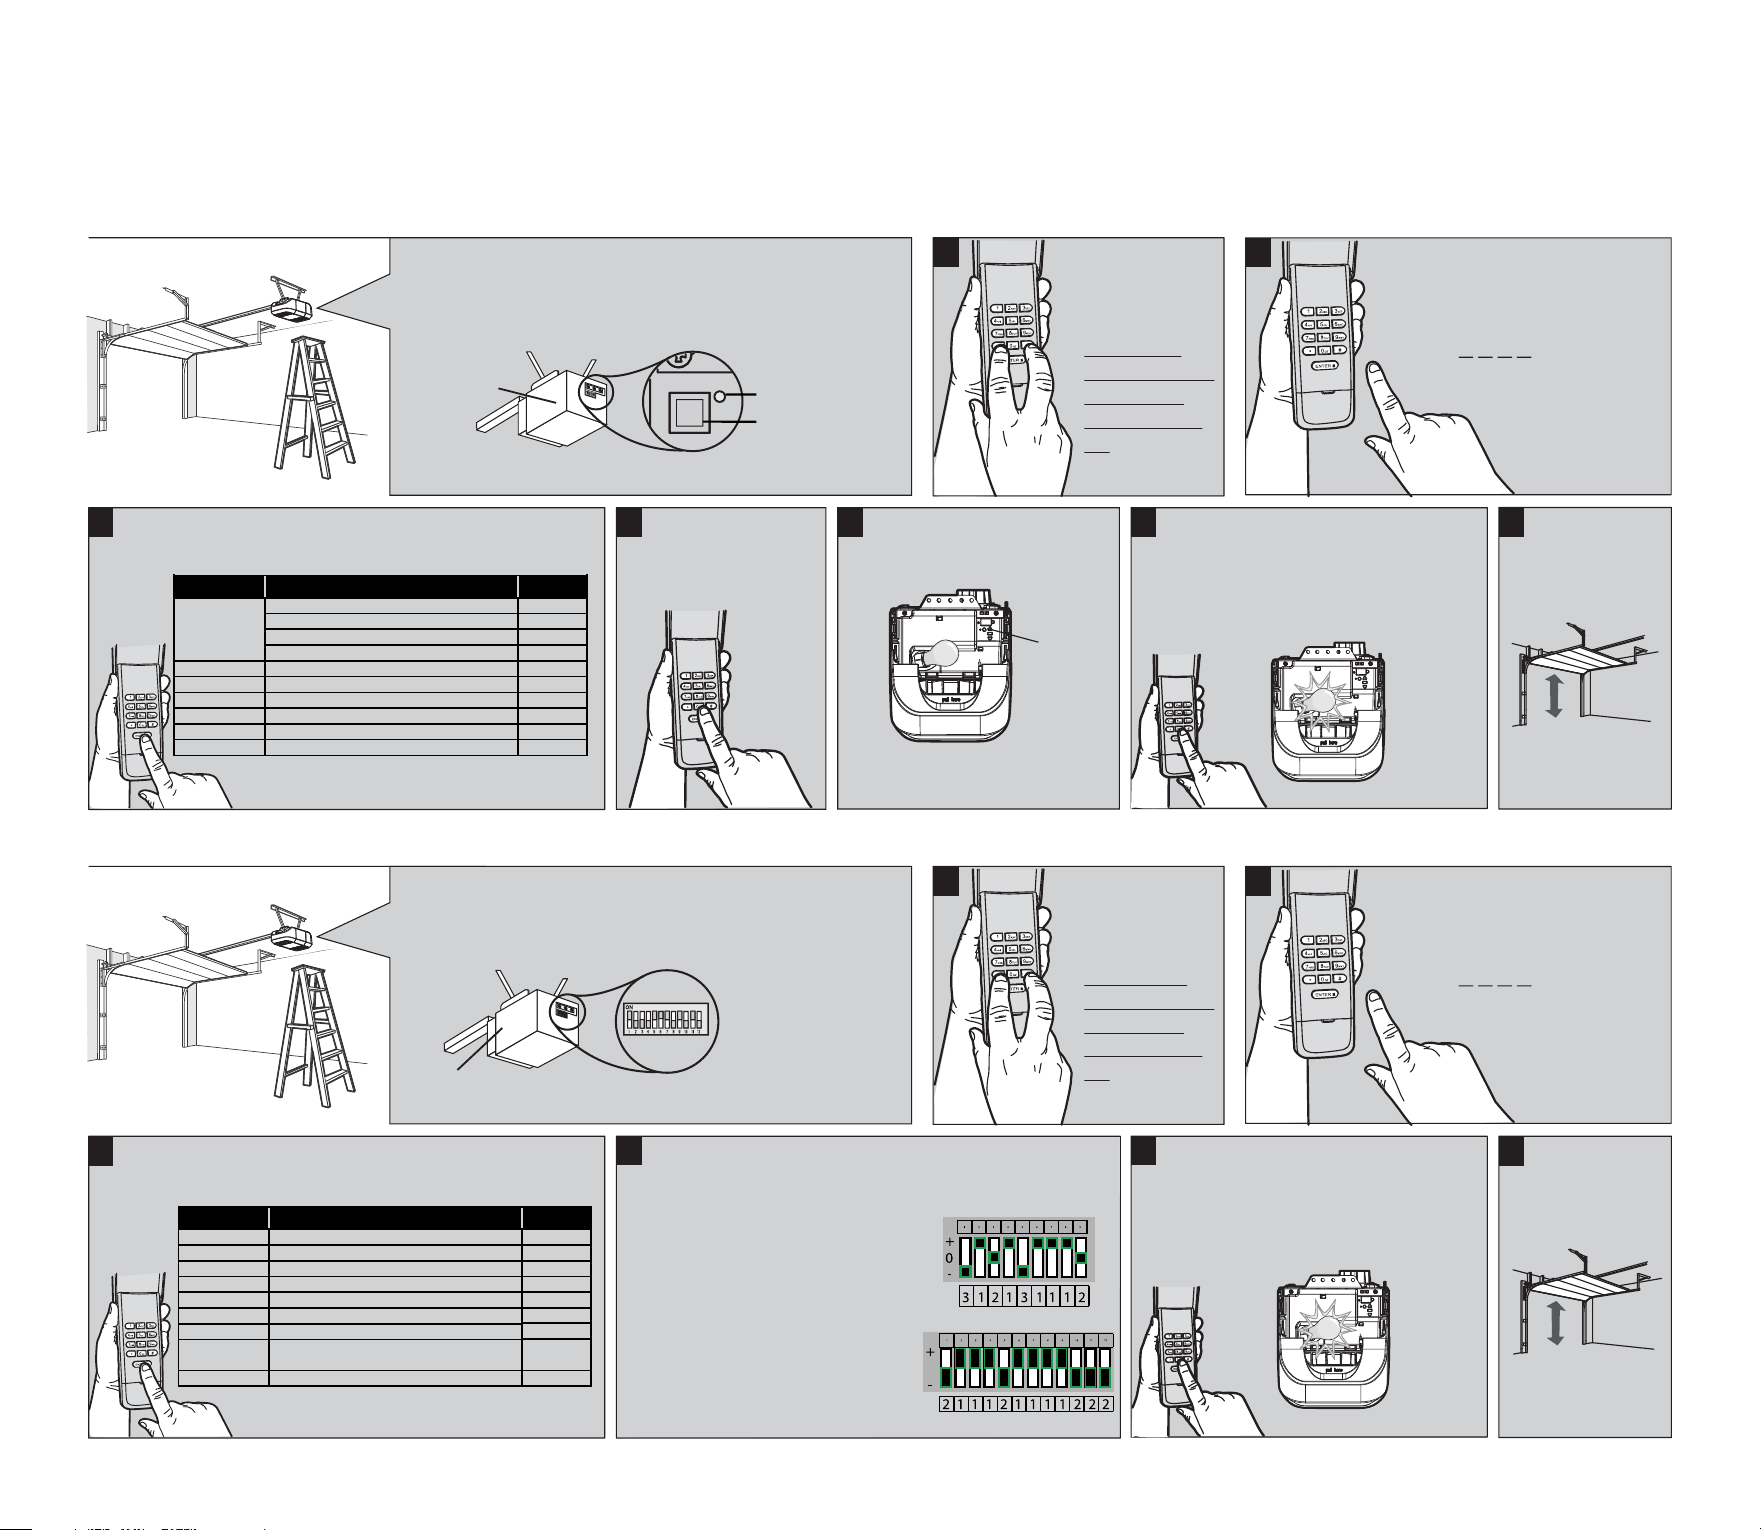
PROGRAMMING TYPE1
1
Press and hold
the * and #
buttons until
the lights on
the keypad stop
blinking and
remain to stay
on.
2
Enter a 4-digit personal identification
number (PIN) of your choice:
Then press the # button.
? ? ? ?
4
To exit programming
mode, press the
0 button.
5
Learn
Button
Within 30 seconds...
The Learn LED will light.
6
Enter the 4-digit personal identification
number (PIN) programmed in step 2
then press and release the Enter button
until the garage door opener lights flash
or two clicks are heard.
Click
Click
7
To test, press
the PIN, then
press the ENTER
button.
The garage door
opener will activate.
To program the Keyless Entry to more than one garage door opener, repeat the steps above using a new PIN for each additional garage door opener.
NOTE: Factory set PIN Code 1111+ENTER for 1st channel (liftMaster yellow learn button), 2222+ENTER for 2nd channel (liftMaster purple learn button), 3333+ENTER for 3rd channel (liftMaster orange/
red learn button), 4444+ENTER for 4th channel (liftMaster green learn button).
WIRELESS KEYLESS ENTRY
Chamberlain, LiftMaster, Sears Craftsman, Genius Echo TX4,
Genie Overhead Door I, Stanley, Linear, Wayne Dalton and
Genie Overhead Door II garage door openers with: Smart/Learn
Button.
Opener
Learn Button
Learn LED
3
Press and release the Enter button the number of times that
corresponds with the garage door opener type:
Genius® Echo TX4
Genie®
Overhead Door
®
I
Chamberlain®
LiftMaster®
CraftsMan®
Stanley®
Linear®
Wayne Dalton®
Genie
® Overhead Door® II
Brand Name
1
2
3
4
5
6
7
8
9
10
# of Presses
Yellow Learn Button, Security+2.0 ®, 2011-current
Purple Learn Button, Security+®, 2006-2014, 315MHz
Orange/Red Learn Button, Security+®, 1996-2005, 390MHz
Green Learn Button, Billion Code®, 1993-1995, 390MHz
Genius Echo TX4433.92mhz
315/390MHz, Intellicode® I, 1995-current
Security Code 310MHz 1998-current
MegaCode 318MHz 1997-current
Rolling Code 372.5MHz 1999-current
315/390MHz, Intellicode® II, 1995-current
Garage Door Opener Type
PROGRAMMING TYPE2
1
Press and hold
the * and #
buttons until
the lights on
the keypad stop
blinking and
remain to stay
on.
2
Enter a 4-digit personal identification
number (PIN) of your choice:
Then press the # button.
? ? ? ?
4
5
Enter the 4-digit personal identification
number (PIN) programmed in step 2
then press and release the Enter button
until the garage door opener lights flash
or two clicks are heard.
Click
Click
6
To test, press
the PIN, then
press the ENTER
button.
The garage door
opener will activate.
Chamberlain, Liftmaster, Genie, Linear Multi Code, Stanley
Multi Code, and Moore-O-Matic garage door openers with:
DIP Switches.
Opener
If the opener has a group of 7-9 switches with
3 positions per switch(TRINARY):
*Switch in the UP(+) position =Press button 1
*Switch in the MIDDLE (0) position = Press button 2
*Switch in the DOWN (-) position = Press button 3
In this example, the code would be:
If the opener has a groupof 8-12 switches
with 2 positions per switch(BINARY):
*Switch in the UP(+) position=Press button 1
*Switch in the DOWN (-) position = Press button 2
In this example, the code would be:
2 Position DIP Switch
3 Position DIP Switch
OR
3
Press and release the Enter button the number of times that Enter the converted code and press the ENTER button.
The DIP SWITCHES will be located on the garage door opener motor head
or inside the remote control.
corresponds with the garage door opener type:
Chamberlain®
Chamberlain®
Genie®
Linear® Multi Code
Chamberlain®
Stanley® Multi Code
Genie®
Chamberlain®
Brand Name
11
12
13
14
15
16
17
18
19
# of Presses
390MHz, 9 Switch/ 3 Position Dip Switch*
315MHz, 9 Switch/ 3 Position Dip Switch*
390MHz, 12 Switch/ 2 Position Dip Switch*
300MHz, 10 Switch/ 2 Position Dip Switch*
390MHz, 8 Switch/ 3 Position Dip Switch*
310MHz, 10 Switch/ 2 Position Dip Switch*
390MHz, 9 Switch/ 2 Position Dip Switch*
310MHz, 8 Switch/ 2 Position Dip Switch*
390MHz, 7 Switch/ 3 Position Dip Switch*
Garage Door Opener Type
Linear®
Moore-O-Matic
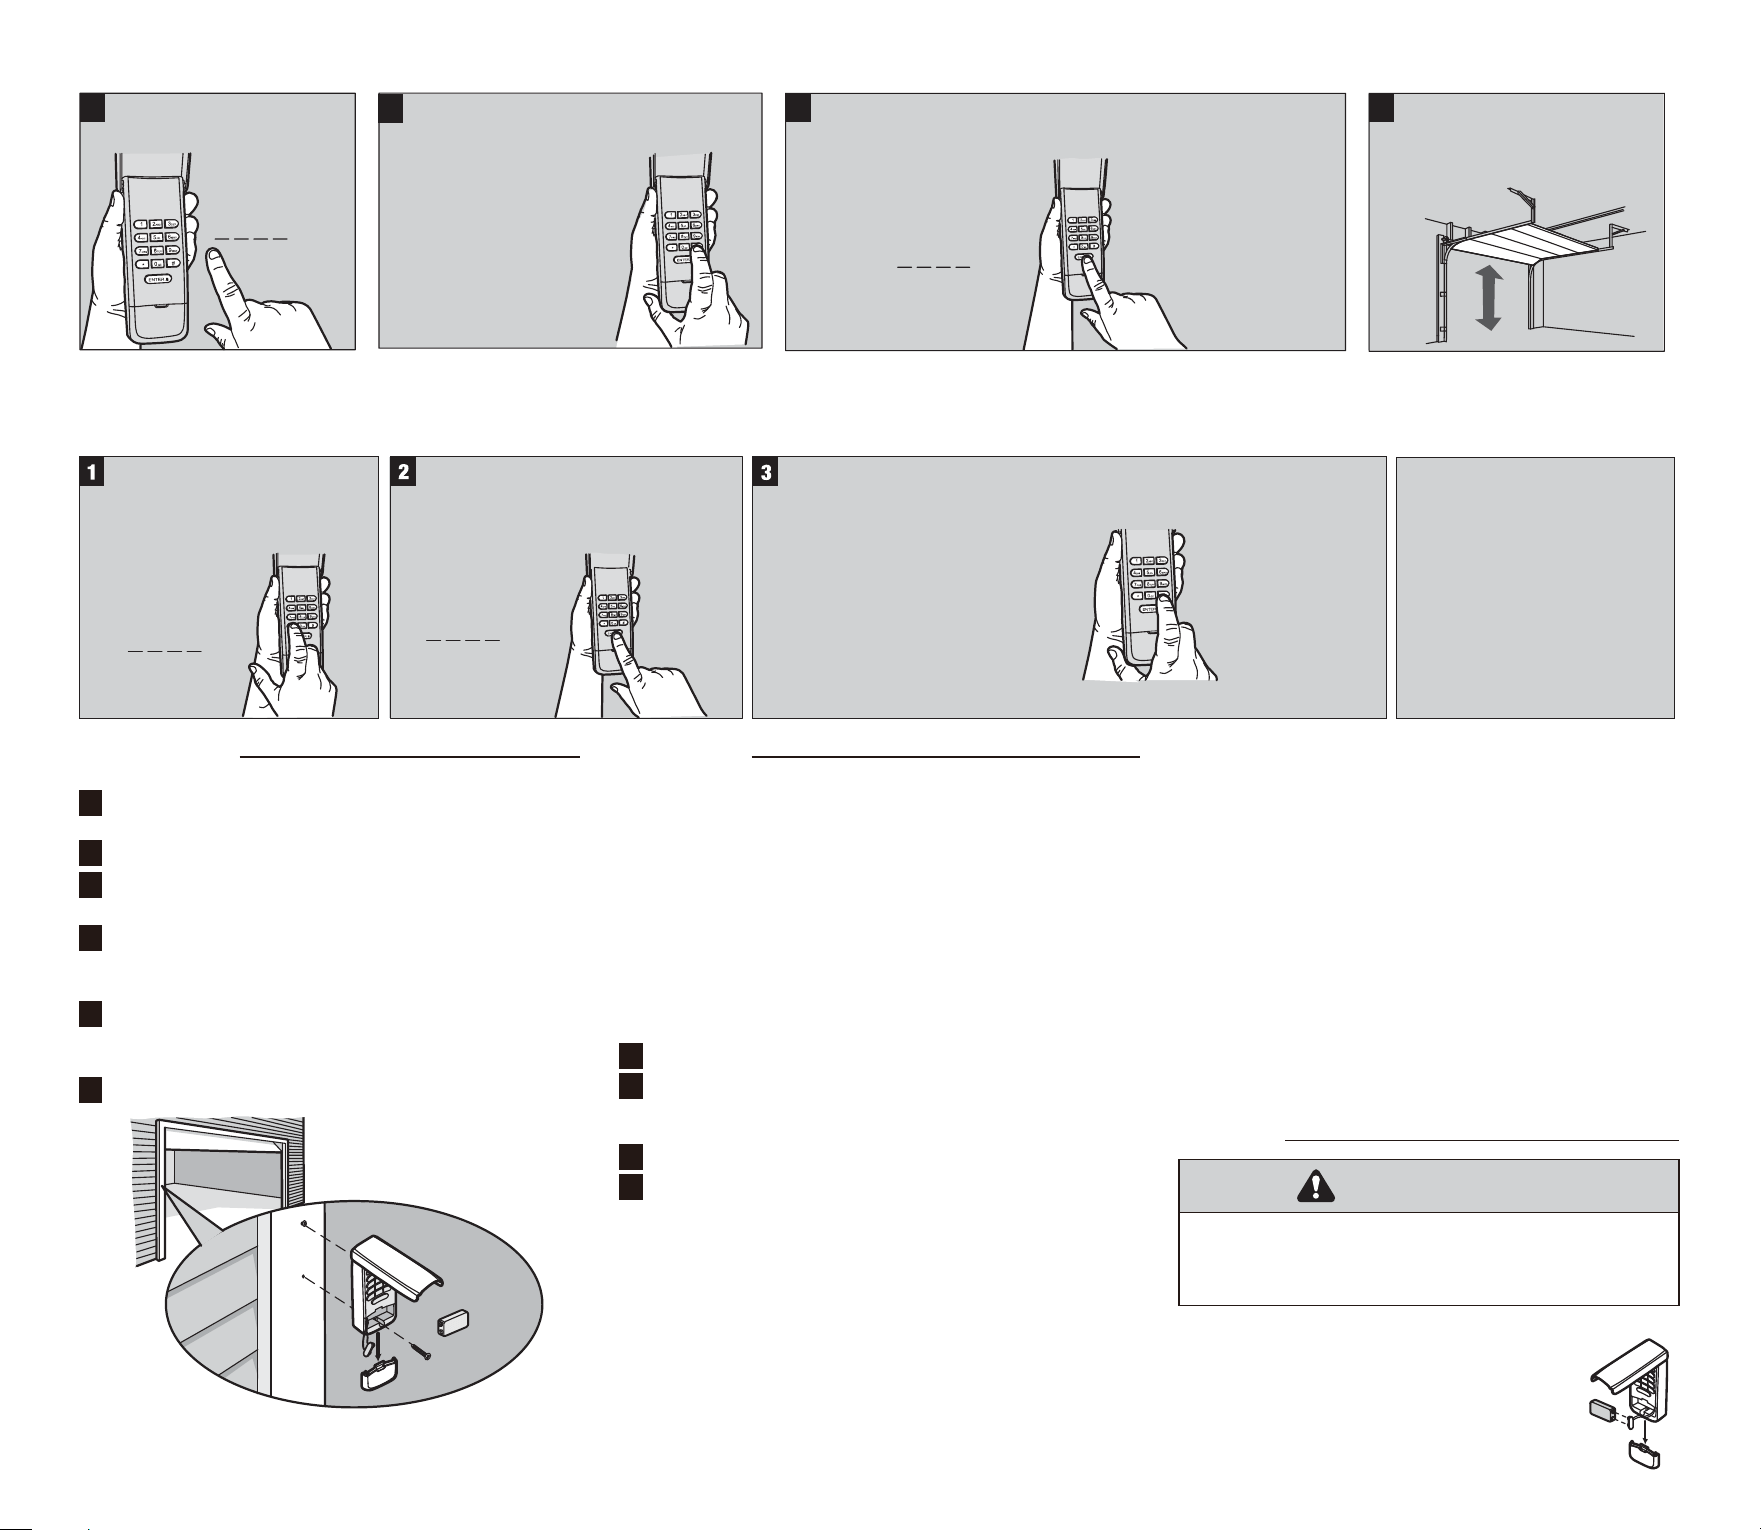
CHANGE AN EXISTING PIN*
1
Press the programmed PIN
that you want to change.
? ? ? ?
3
+
? ? ? ?
new PIN
Enter the new 4-digit PIN of your choice, keyboard buzzer will
sound 1 time and LED flash 1 time. Then press the ENTER
button.
4
To test, input the new PIN,
then press the ENTER button.
The garage door opener
will activate.
2
Press and hold the # button until you hear
keyboard buzzer sounds 2 times and LED
flashes 2 times.
PROGRAM A TEMPORARY PIN
A temporary 4-digit PIN can be programmed to allow access to visitors. Each programmed PIN can program one temporary PIN. The temporary PIN can be set for a number of door openings. The
temporary PIN cannot be the same as any previously programmed PIN.
+
? ? ? ?
PIN
Press any programmed PIN, then
press and hold the * button until
you hear keyboard buzzer sounds
3 times.
+
? ? ? ?
Temporary PIN
Enter the temporary 4-digit PIN of your
choice, then press the ENTER button.
You will hear keyboard buzzer sounds
2 times.
NUMBER OF OPENINGS
Then press
Your will hear
keyboard buzzer
sounds 1 time to
confirm it.
the # button.
+
Press the number
of openings times.
(The temporary
PIN
will work up
to 255 times.)
To test, press the temporary
PIN, then press the ENTER
button. The garage door opener
will activate. If the temporary
PIN was set for a number of
openings, the test will use up
one opening.
INSTALLATION
1
2
3
4
5
6
Select a location to mount the Keyless Entry at a minimum
height of 5 feet (1.5 m) out of the reach of children.
Remove battery cover and battery.
Mark the top mounting hole and drill 1/8 inch (3.2mm)
pilot hole.
Install the top screw, allowing 1/8 inch (3.2mm) to
Mark the bottom hole and drill 1/8 inch (3.2 mm) pilot
hole. Install the bottom screw. Do not overtighten to avoid
cracking the plastic housing.
protrude above the surface. Position the Keyless Entry
over the top screw.
Reinstall battery and replace cover.
The garage door opener activates when the PIN and ENTER
button are pressed. The keypad will blink for 15 seconds, during
that time the ENTER button can be used to stop, start or reverse
the door.
If the wrong number is accidentally pressed, press the correct
PIN then the ENTER button. The Keyless Entry will transmit only
the last four digits that were pressed before the ENTER button.
Opener can be closed by pressing only the ENTER button Within
30 seconds if the one button close feature has been activated.
ONE BUTTON CLOSE:
TURN ON/OFF THE KEYBOARD BUZZER:
FACTORY RESET:
PASSWORD ANTI TAILGATING:
OPERATION
To activate the one button close feature:
Press and hold the 1 and 9 buttons for 10 seconds.
To prevent people entering with you from seeing the password
you entered, you can enter the interference code when you
enter the password. Enter the interference code. During this
process, you can press any number (0 – 9 *) (except the # key)
in the keyboard at will. After multiple interference codes are
pressed, press the correct 4-digit password and end with the #
button. The keyboard will automatically ignore all the invalid
interference codes you entered after the "#" is entered, and
transmit the code corresponding to the correct password.
If you get something wrong when program or entry PIN Code
and can not proceed with any operation, you could reset the
keypad PIN code for long press 0 and Enter buttons for 15
seconds till you hear a long sound to comfirm it.
Press and hold the 1 and 9 buttons for 10 seconds.
Each key pressed on the keyboard is accompanied by a beep
confirmation. However, you can set the keyboard to silent mode
as follows:
a. Turn on, long press 2 and 9 button,till you hear the voice of
keyboard buzzer.
b. Close, long press 2 and 9 button,till you hear the voice of
keyboard buzzer.
Note: The buzzer is turned on by defauil when the system leaves
the factory.
The keypad will blink four times when the one button close
feature is deactivated.
The keypad will blink twice when the one button close feature
is activated.
1
2
1
2
To deactivate the one button close feature:
BATTERY
To prevent possible SERIOUS INJURY or DEATH:
• NEVER allow small children near batteries.
• If battery is swallowed, immediately notify doctor.
WARNING
9V Battery
Replace the battery when the keypad
becomes dim or does not light after a
button is pressed.
Dispose of old battery properly.