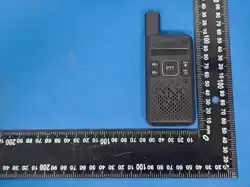

Two-way radio
USER’S MANUAL
Sa
fety and General Information
WARNING:
C
hanges or modifications to this unit not expressly approved by the party responsible for compliance could void the user’s
authority to operate the equipment. This device complies with Part 15 of the FCC Rules. Operation is subject to the following
two conditions: 1) This device may not cause harmful interference, and 2) this device must accept any interference received,
including interference that may cause undesired operation.
N
OTE:
C
hanges or modifications to this unit not expressly approved by the party responsible for compliance could void the
user's authority to operate the equipment.
T
hese limits are designed to provide reasonable protection against harmful interference in a residential installation. This
equipment generates, uses and can radiate radio frequency energy and, if not installed and used in accordance with the
instructions, may cause harmful interference to radio communications. However, there is no guarantee that interference will
not occur in a particular installation.
If this equipment does cause harmful interference to radio or television reception, which can be determined by turning the
equipment off and on, the user is encouraged to try to correct the interference by one or more of the following measures:
• Reorient or relocate the receiving antenna.
• Increase the separation between the equipment and receiver.
• Connect the equipment into an outlet on a circuit different from that to which the receiver is connected.
• Consult the dealer or an experienced radio/TV technician for help.
Radiation Exposure Statement
To control your exposure and ensure compliance with the Population /uncontrolled environmental exposure limits,
always adhere to the following procedures.
Guidelines:
●
Do not remove the Label from the device.
● User awareness instructions should accompany device when transferred to other users.
● Do not use this device if the operational requirements described herein are not met.
Operating Instructions:

● Transmit no more than the rated duty factor of 75% of the time. To transmit (talk), press the Push-to-Talk (PTT) key. To
receive calls, release the PTT key. Transmitting 75% of the time, or less, is important because the radio generates measurable
RF energy only when transmitting (in terms of measuring for standards compliance).
● Keep the radio unit at least 2.5 cm away from the face. Keeping the radio at the proper distance is important as RF
exposure decreases with distance from the antenna. The antenna should be kept away from the face and eyes.
● When worn on the body, always place the radio in an approved holder, holster, case, or body harness or by use of the
correct clip for this product. Use of non-approved accessories may result in exposure levels which exceed the FCC's
occupational/controlled environmental RF exposure limits.
● Use of non-approved antennas, batteries, and accessories causes the radio to exceed the FCC RF exposure guidelines.
● Contact your local dealer for the product's optional accessories.
Safety Information for Radios
Your wireless handheld portable transceiver contains a low power transmitter. When the talk key is pushed, it sends out
radio frequency (RF) signals. The device is authorized to operate at a duty factor not to exceed 75%. In August 1996, the
Federal Communications Commissions(FCC) adopted RF exposure guidelines with safety levels for handheld wireless devices.
Important
FCC RF Exposure Requirements: For body-worn operation, this radio has been tested and meets the FCC RF exposure
guidelines when used with Pofung accessories supplied or designated for this product. Use of other accessories may not
ensure compliance with FCC RF exposure guidelines. Use only the supplied antenna. Unauthorized antennas, modifications
or attachments could damage the transmitter and may violate FCC regulations.
Precautions for Radios
Operating Prohibitions
To protect you against any property loss, bodily injury or even death, be sure to observe the following safety instructions:
1. Do not operate the product in a location containing fuels, chemicals, explosive atmospheres and other flammable or
explosive materials. In such location, only an approved Ex-protection model is allowed for use, but any attempt to
assemble or disassemble it is strictly prohibited.
2. Do not operate the product near or in any blasting area.
3. Do not operate the product near any medical or electronic equipment that is vulnerable to RF signals.
4. Do not hold the product while driving.
5. Do not operate the product in any area where use of wireless communication equipment is completely prohibited.
Important Tips
To help you make better use of the product, be sure to observe the following instructions:
1. Do not use any unauthorized or damaged accessory.
2. Keep the product at least 2.5 centimeters away from your body during transmission.
3. Do not keep the product receiving at high volume for a long time.
4. For vehicles with an air bag, do not place the product in the area over the air bag or in the air bag deployment area.
5. Keep the product and its accessories out of reach of children and pets.
6. Please operate the product within the specified temperature range.
7. Continuous transmission for a long time may lead to heat accumulation within the product. In this case, please keep it at
a proper location for cooling.
8. Handle the product with care.
9. Do not disassemble, modify or repair the product and its accessories without authorization.
Precautions for Batteries
Charging Prohibitions
To protect you against any property loss, bodily injury or even death, be sure to observe the following safety instructions:
1. Do not charge or replace your battery in a location containing fuels, chemicals, explosive atmospheres and other
flammable or explosive materials.
2. Do not charge your battery that is wet. Please dry it with a soft and clean cloth prior to charge.
3. Do not charge your battery suffering deformation, leakage and overheat.
4. Do not charge your battery with an unauthorized charger.
5. Do not charge your battery in a location where strong radiation is present.
6. Overcharge shall always be prohibited for it may shorten the life of your battery.
Maintenance Instructions
To help your battery work normally or prolong its life, be sure to observe the following instructions:
1. Accumulated dust on charging connector may affect normal charging. Please use a clean and dry cloth to wipe it on a
regular basis.
2. It is recommended to charge the battery under 5℃~40℃. Violation of the said limit may cause battery life reduction or
even battery leakage.
3. To charge a battery attached to the product, turn it off to ensure a full charge.
4. Do not remove the battery or unplug the power cord during charging to ensure a smooth charging process.
5. Do not dispose of the battery in fire.
6. Do not expose the battery to direct sunlight for a long time nor place it close to other heating sources.
7. Do not squeeze and penetrate the battery, nor remove its housing.
Battery recharge
Using the Type-C USB Charger
The Type-C USB charger is a handy port that allows you to conveniently charge your Li-ion battery pack.
1. Plug the Type-C USB cable into the Type-C USB charging port on your battery. The other end of the data line is connected
to the output port of the power bank or the adapter of the mobile phone.
2. An empty battery will be fully charged in 4 hours.
• For optimal battery life, remove the radio from the charger within 6 hours. Do not store the radio while connected to the
charger.
• If battery power is low, you cannot operate the radio even using external power. Allow the batteries to charge before
using.
*If you try to transmit while power is low, the radio will automatically turn off.
Main characteristics
•462.5500-462.7250MHz, 467.5625-467.7125MHz
• Channel spacing: 12.5 KHz
• Vocal tuning • Battery save
• Channel Monitor • Squelch
• Li-Ion 1000mAh battery pack
• TOT (Time out timer) • 2pin Kenwood accessory jack
• Scramble function • Frequency scanning function
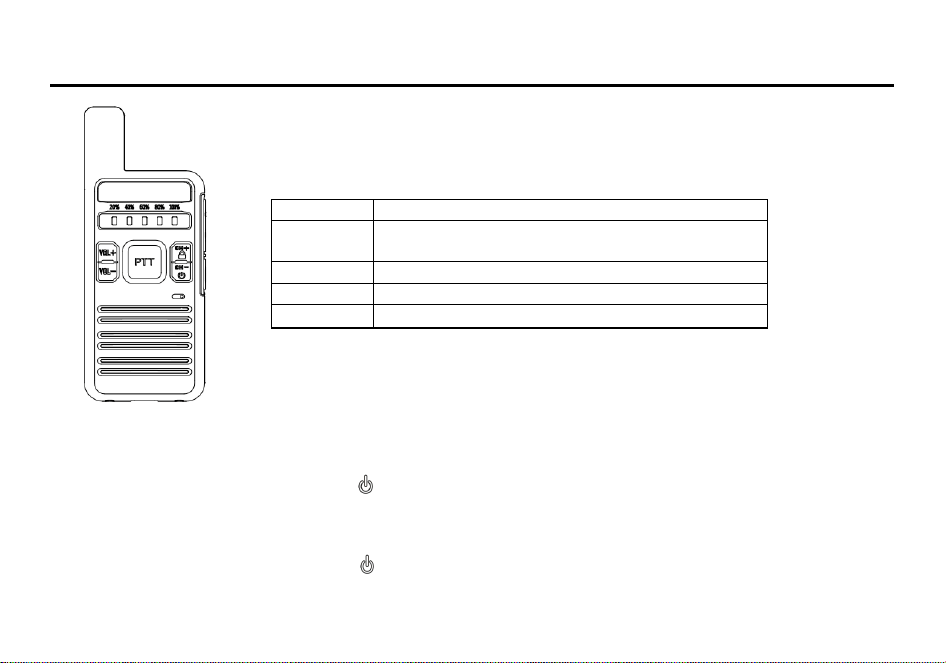
Main controls and parts of the radio
Programmed Key
In PC software, different functions can be set for the [VOL+] and [VOL -] keys. This part allows
users to assign your desired features as shortcut to some keys of the radio. Every key
corresponds to two kinds of operations: long press or short press.
Basic Operations
In order to get the most out of your new radio, read this reference guide completely before attempting to operate the unit.
Power on/off and volume adjustment
To turn the radio on, keep pressed the [CH-/ ] key.
To adjust the volume level as you prefer, press the [VOL+ ] or [VOL-] key.
In case the radio does not pick up any signal, activate momentarily the Monitor function that allows to detect also weak
signals. Then, adjust the volume to the desired level.
To turn the radio off, keep pressed the [CH-/
] key until a switch off tone is heard.
Keypad Lock
Off No feature is assigned to the key.
Monitor To switch between Monitor Squelch Mode and Rx Squelch
Mode
Scan To enable or disable the Scan feature.
VOX To enable or disable the VOX feature
Emergency To initiate or end an emergency alarm.

To avoid accidentally changing the radio settings, press the [CH+/ ] key for 3 seconds.
Repeat the same procedure to unlock the keypad.
Channel selection
Unlock the radios, press the [CH+/ ] / [CH-/ ] key to step down or down to select the channel. Press and hold the
[CH+/
] / [CH-/ ] key to quickly switch channels down or up. When the voice prompt function is turned on, the
corresponding channel is broadcast by voice.
Talking on Your Radio
To communicate, all radios in your group must be set to the same channel.
• Initiate a call: After selecting a good channel, press and hold the [PTT] key to place a call to the current channel.
Speak into the microphone with normal tone. When the call is initiated, the red LED is always on.
• Receive a call: After releasing the [PTT] key, you can answer it without any action.
When receiving a call, the green LED is always on.
To ensure the best reception volume, keep the distance between the microphone and the mouth at the time of transmission
from 2.5 cm to 5 cm.
Only one user at a time can talk during radio communications. Therefore, it is important not to transmit when you are
receiving a communication and use the transmission mode sparingly to allow other users to talk. Transmission consumes a
significant amount of energy and should therefore be used sparingly to prolong the battery life. If you are unable to contact a
station that you have no problems in receiving, the station may be using CTCSS tones or DCS codes.
Monitor
Note: To use this, pre program the [VOL+ ] or [VOL-] keys as Monitor function keys.
The Monitor feature is for excluding (opening) the Squelch, in order to listen to signals that are too weak to keep the Squelch
permanently opened. Hold down the [MONI] key to enable such function.
Scan function
The Scan feature allows you to listen to activities on a channel, keeping track of your team members. With this feature
enabled, the radio searches the scan list preset for the current channel and stays on a channel with activities.

Selected intercom channel 22, after opening the scan, the terminal will scan according to the scan list, the channel scanning
when there is an event; will stay on the channel to listen to understand the current status of activities related members.
General CPS programming software set the Scan Add option of the frequency list, the setting range: Yes/No. Select YES to
activate the channel scan function and No to cancel the channel scan function. The factory default set of channels 22 open
to a scanning function
When there are less than 2 scan cable channels, the radio cannot scan.
Voice Operated Transmit(VOX)
Note: To use this, pre program the [VOL+ ] or [VOL-] keys as VOX function keys.
The Voice Operated Transmit (VOX) feature allows you to transmit voice without pressing and holding the [PTT] key. The
radio automatically transmits voice when the volume reaches the preset level. A higher gain level indicates lower sensitivity,
which requires higher volume for triggering transmission.
You can set the sensitivity of the microphone voice emitted by voice gain. The higher the voice-activated gain level, the lower
the sensitivity and the louder the volume of voice required for the terminal to transmit. Please set the gain level correctly
according to the current environment and the volume of the speech, etc., so as to avoid frequent accidental triggering of
voice control (high sensitivity) or difficulty in triggering voice control (low sensitivity).
Voice is used to control the gain sensitivity of the microphone voice emitted, arranged by the dealer.
General CPS programming software, set Vox Lever option, setting range: off / 1/2 / 3 / 4 / 5 / 6 / 7 / 8 / 9. Select off to
turn
Squelch
The Squelch function suppresses noises on free channels and allows receiving even weak signals. M9 has 10 different
Squelch levels that can be set by programming software: 0 means that the Squelch is turned off; from level 1 to level 9 you
will have different levels of noise reduction. The higher is the level, the louder will be the Squelch. By default, the Squelch
level of M9 is set on level 4. Make sure you do not set an excessively high squelch level because in this case you may not be
able to receive weaker signals. On the other hand an excessively low Squelch value could enable the Squelch even when no

signals are present. Squelch must always be adjusted when no signals are present.
Emergency Alert
The Emergency Alert feature can be used to signal members in your group for help.
To use this, pre program the [VOL+ ] or [VOL-] keys as Emergency function keys.
Press the [Emergency] key to activate the emergency alarm function。The radio will send out a loud siren sound.
Press the [Emergency] key to exit the emergency alert function.
WARNING: The Emergency Alert feature should only be used in the even of an actual emergency.
Automatic power save feature
Your radio has a unique circuit designed to dramatically extend the life of the battery. If you do not transmit and do not
receive an incoming call,or no button and knob operation within 3 seconds, your radio switches to the Power Save mode.
The radio is still able to receive transmissions in this mode.
Time-out Timer (TOT)
The Time-out Timer (TOT) feature allows the radio to stop transmission automatically and keep beeping when the period
reset by your dealer expires. To stop beeping, release the [PTT] key. You need to wait for a certain period (also preset by
your dealer) to start transmission again. This feature aims to prevent a radio user from occupying a channel for an extended
period and to avoid radio damage due to overheating.
General CPS programming software, set the Time Out Timer option, the setting range: off / 30 / 60 / 90 / 120 / 150 / 180 /
210 / 240 / 270 / 300 (s). Selecting off turns off the TOT function and does not limit the launch time. The factory default is 60
(S).
Scrambler
The scrambler is designed to protect communications. This feature prevents parties of other networks from hearing and
understanding your voice communications.
Set the scrambler function on or off through programming software.
CTCSS/DCS tones

CTCSS and DCS tones are similar to access codes and enable the radio to communicate only with the users that are tuned on
the same channel and have set the same code. For each channel, you can set up to 50 CTCSS tones and 210 DCS codes. The
CTCSS/DCS tones are a sort of “access codes” and enable the radio to communicate only with the other users set on the
same frequency and on the same CTCSS/DCS tone. Undesired signals coming from other stations set on the same
frequency but with different CTCSS/DCS tones won’t be received.
Fast frequency matching
Select channel to channel 1, press and hold the [VOL+] and key to turn on the radio. The voice will announce "Power On"
to enter the sweep function and the green light will flash; Press the [VOL+] key to prompt a "beep" sound and the green light
remains on, and start scanning. After scanning, it will be automatically stored and prompted with two beeps. (The green light
remains on during scanning, and the green light flashes when scanning is stopped)
Rotate to channel 2, press the [VOL+] key to continue scanning. After scanning, it will be automatically stored and prompted
with a "beep" sound, with the indicator light as described above;
Rotate to channel 3 and press the [VOL+] key to continue scanning. After scanning, it will be automatically stored and
prompted with a "beep" sound; Operate in sequence until channel 22.
Complete the frequency sweep task, shut down and restart to exit the frequency sweep mode, and the frequency sweep
task ends.
Wireless Replication
Select channel to channel 2, press and hold the [VOL+] and key to turn on both the transmitter and receiver. The receiver
and transmitter prompt "beep" to enter wireless replication. When the transmitter presses the [PTT] key, the red light
remains on, and the receiver green light automatically remains on. Copy all the configuration parameters of channels 1-22 of
the transmitter, and the receiver prompts "beep" twice to complete the replication. Both prompt lights turn off and
automatically restart, the replication task has ended.
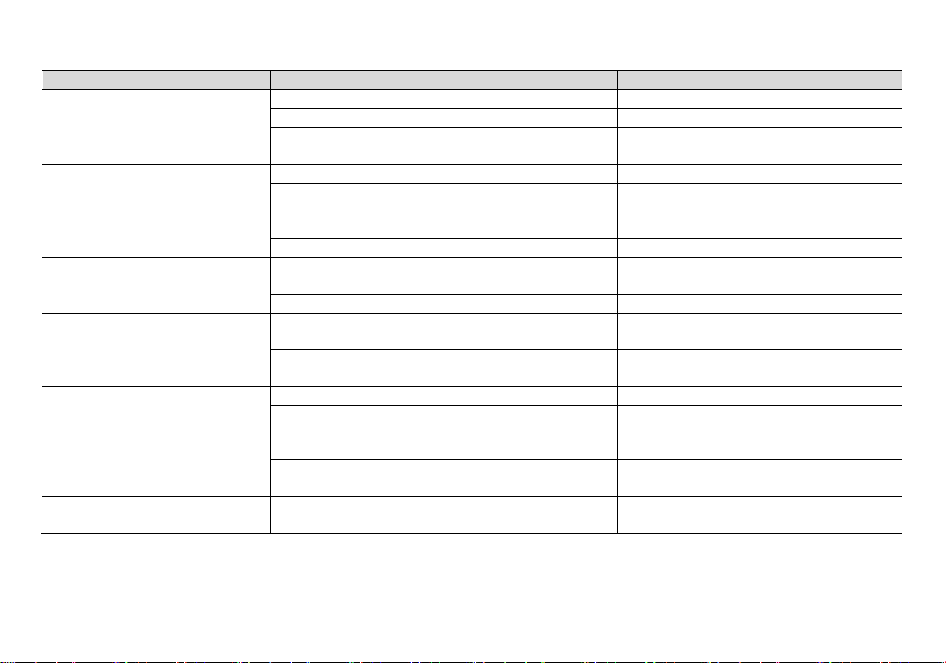
Appendix A. – Trouble shooting guide
Phenomena Analysis Solution
You cannot turn on the radio.
The battery may be installed improperly. Remove and reattach the battery.
The battery power may run out. Recharge or replace the battery.
The battery may suffer from poor contact caused by
dirty or damaged battery contacts.
Clean the battery contacts or replace the
battery.
During receiving, the voice is
weak or intermittent.
The battery voltage maybe low. Recharge or replace the battery.
The volume level may be low. Increase the volume.
The speaker maybe blocked. Clean the surface of the speaker.
You cannot communicate with
other group members.
The frequency or signaling type maybe inconsistent
with that of other members.
Verify that your TX/RX frequency and
signaling type are correct.
You may be too far away from other members. Move towards other members.
You hear unknown voices or
noise.
You may be interrupted by radios using the same
frequency.
Change the frequency, or adjust the
squelch level.
The radio in analog mode maybe set with no
signaling.
Request your dealer to set signaling for
the current channel to avoid interference
You are unable to hear anyone
because of too much noise and
hiss.
You may be too far away from other members. Move towards other members.
You may be in an unfavorable position. For example,
your communication may be blocked by high
buildings or blocked in an underground area.
Move to an open and flat area, restart the
radio, and try again.
It may be the result of external disturbance (such as
electromagnetic interference).
Stay away from equipment that may cause
interference.
The radio keeps transmitting.
VOX may be turned on or the headset is not installed
in place
Turn off the VOX function. Check that the
headphones are in place.
NOTE: If the above solutions cannot fix your problems, or you may have some other queries, please contact your dealer
for more technical support.

Appendix B. - Technical Specifications
Frequency Range 462.5500-462.7250MHz, 467.5625-467.7125MHz
Memory Channel 22
Power
462.5500-462.7250MHz: 28.27dBm,
467.5625-467.7125MHz: 26.88dBm
Operation Voltage DC 3.7 V ±10%
Battery Capacity 1000mAh (Li-Ion)
Transmission current ≤1200mA
Receive Sensitivity 0.25μV (12dB SINAD)
Emission Designator 11K0F3E
Audio Power Output 1W @8 ohms
Receive current ≤380mA
Rated Audio Distortion ≤5%
Connection for accessories 2 pin Kenwood jack
Antenna impedance 50 Ohm
NOTE: All specifications may be modified without prior notice or liability. Thank you.

