
Technical Support and E-Warranty Certificate
www.vevor.com/support
TRAILER HITCHES
We continue to be committed to provide you tools with competitive price.
"Save Half", "Half Price" or any other similar expressions used by us only
represents an estimate of savings you might benefit from buying certain tools
with us compared to the major top brands and does not necessarily mean to cover
all categories of tools offered by us. You are kindly reminded to verify carefully
when you are placing an order with us if you are actually Saving
Half in comparison with the top major brands.
- 1 -
MODEL:NT-1601
NEED HELP? CONTACT US!
Have product questions? Need technical support? Please feel free to
contact us:
Technical Support and E-Warranty Certificate
www.vevor.com/support
This is the original instruction, please read all manual instructions
carefully before operating. VEVOR reserves a clear interpretation of our
user manual. The appearance of the product shall be subject to the
product you received. Please forgive us that we won't inform you again if
there are any technology or software updates on our product.
TRAILER HITCHES

- 2 -
IMPORTANT SAFEGUARDS
Read and understand this entire manual before operating and
servicing this product. Failure to follow these warnings and
instructions can cause death, personal injury or damage to valuable
property.
Base safety rules
1. Please tighten the installation; damage or danger can be done to loosen
it. The warranty does not cover this damage.
2. Adhere to all Department of Transportation (D.O.T.) requirements when
using this product.
3. Use common sense when working. Stay alert and concentrate when
setting up and using this product. Never operate while under the influence
of alcohol, drugs, or medications.
4. This product is not a toy. Keep it out of reach of children. While using this
product, keep the work area clean and well-lighted. Keep children out of
the work area.
5. Dress appropriately. Never wear loose-fitting clothing or jewelry when
using. Contain long hair, and keep hair, clothing, and gloves away from
moving parts.
SAVE THESE INSTRUCTIONS

- 3 -
SPECIFICATIONS
MODEL
NT-1601
Weight Carrying Capacity(Product
linear traction)
6000lbs
Suitable for
Honda CR-V
Year
2012-2016
Parts List
Part
Description
Qty
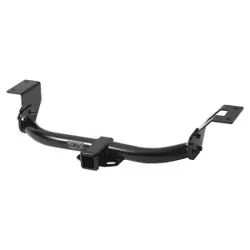
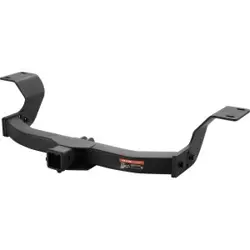
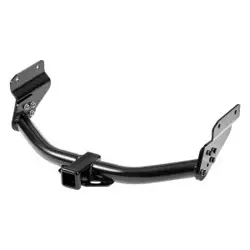
1
Trailer hitch bar
1
2
Side plate 1
1
3
Side plate 2
1
4
M10-1.25 x 35mm Hex bolt
4
5
Conical-toothed washer, 7/16"
4
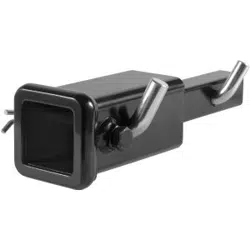
6
U bolt
1
7
M12 Flange nut
8
8
M12*30 hex bolt
8
9
Flat Washer( M12 )
8

- 4 -
Installation Guide
Step 1
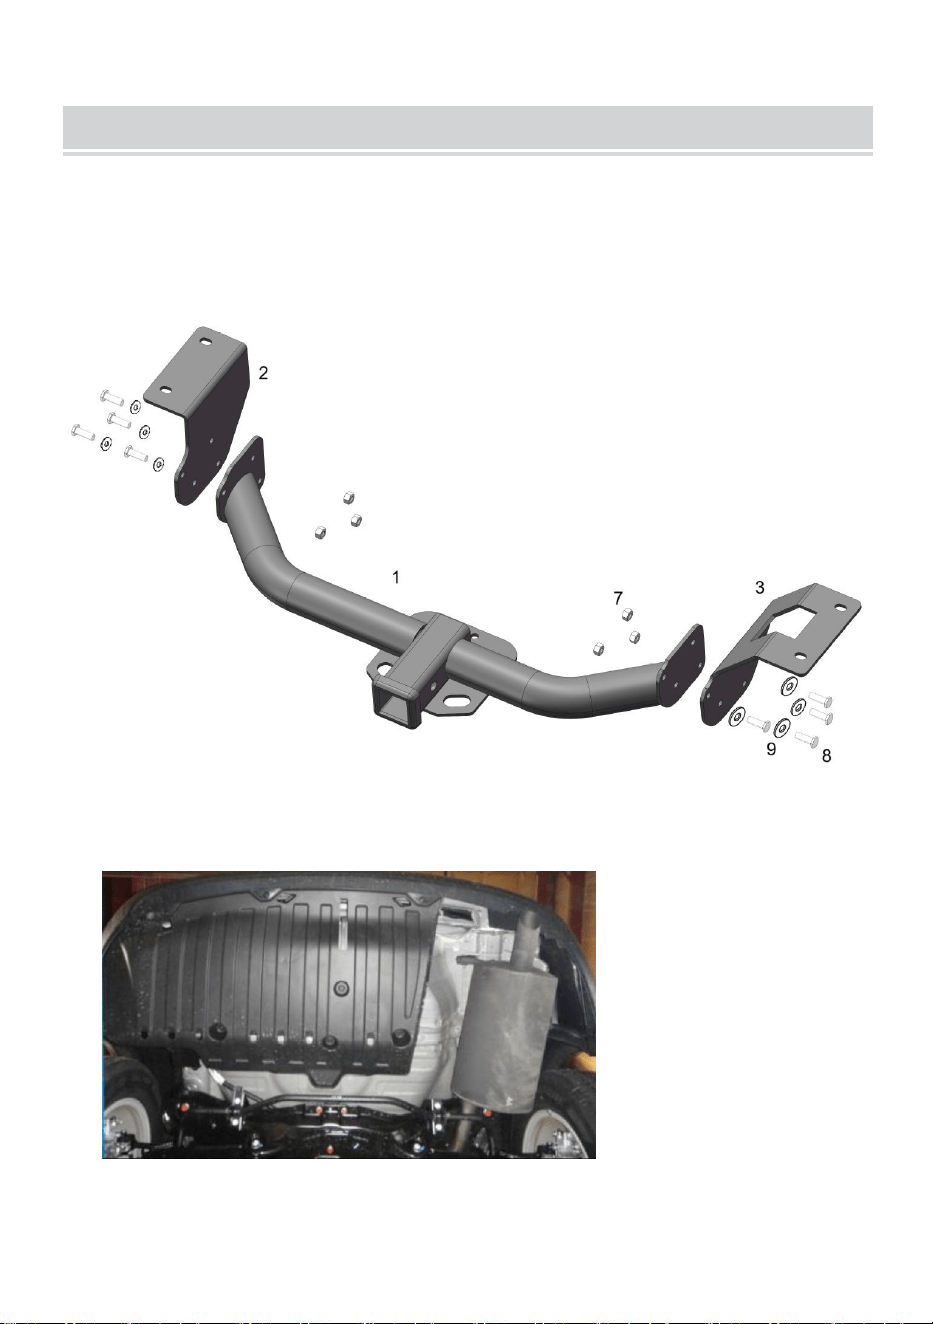
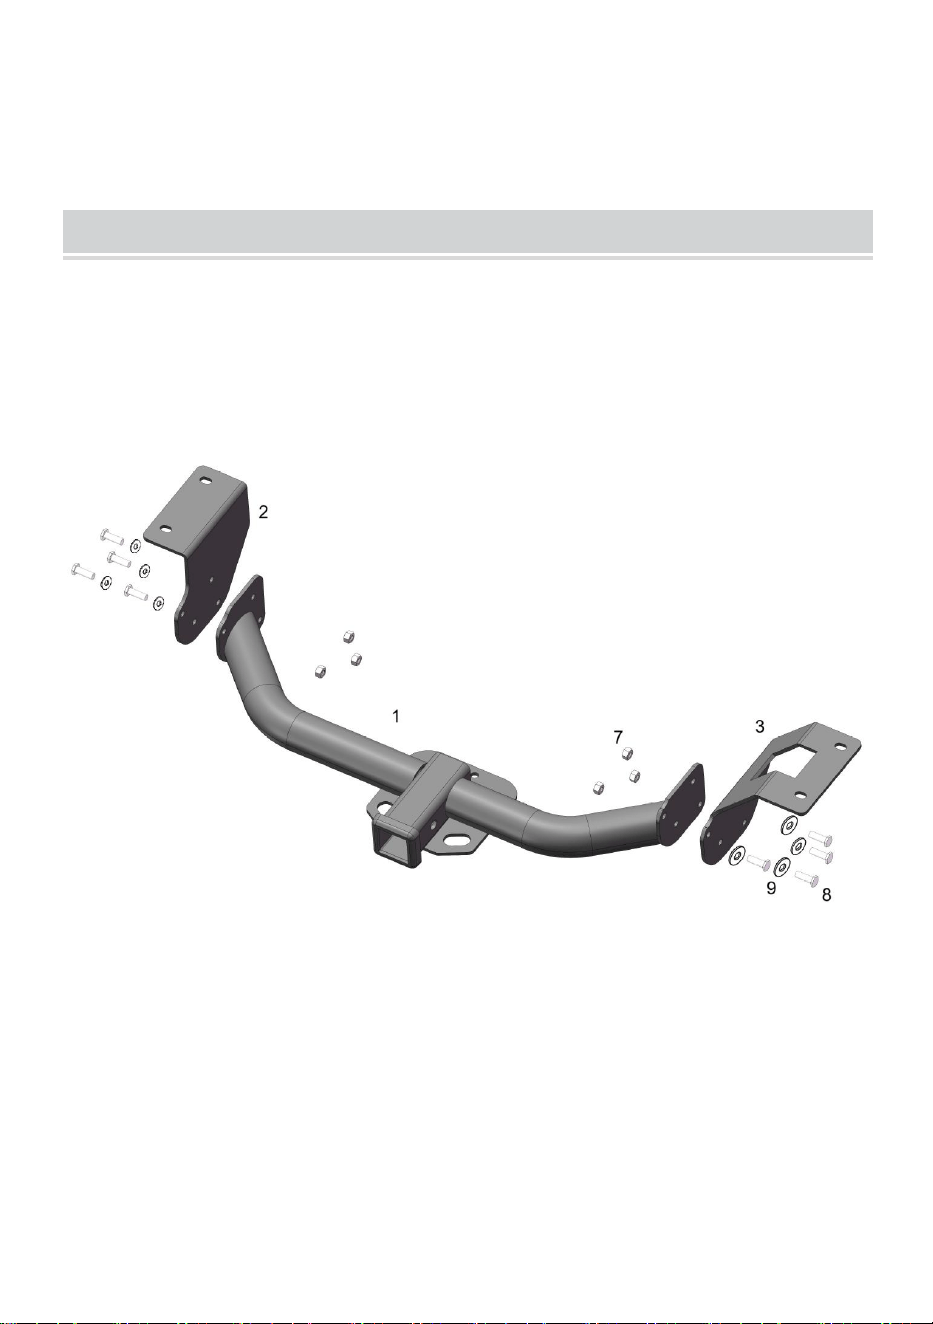
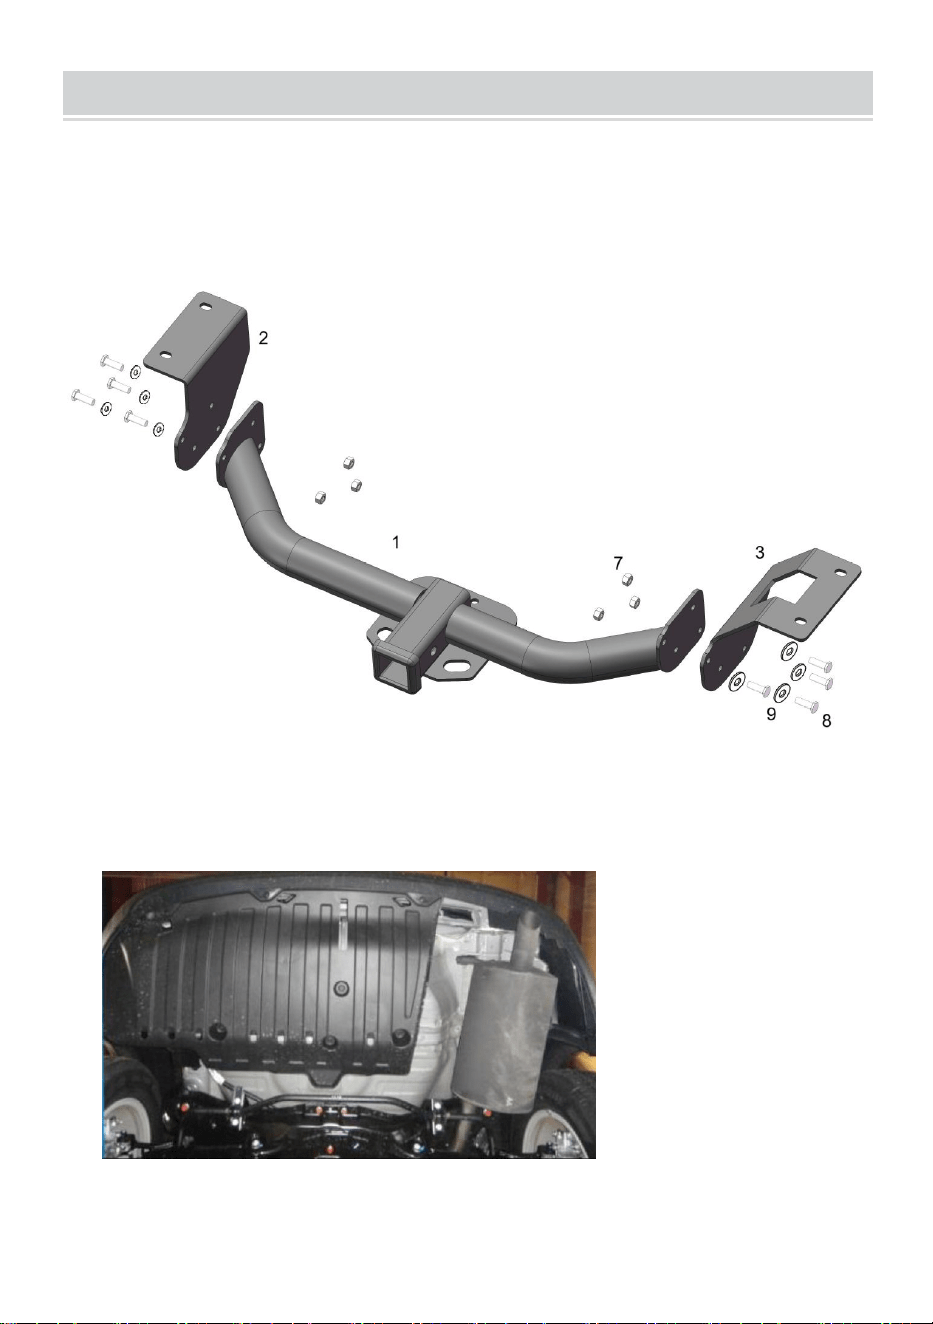
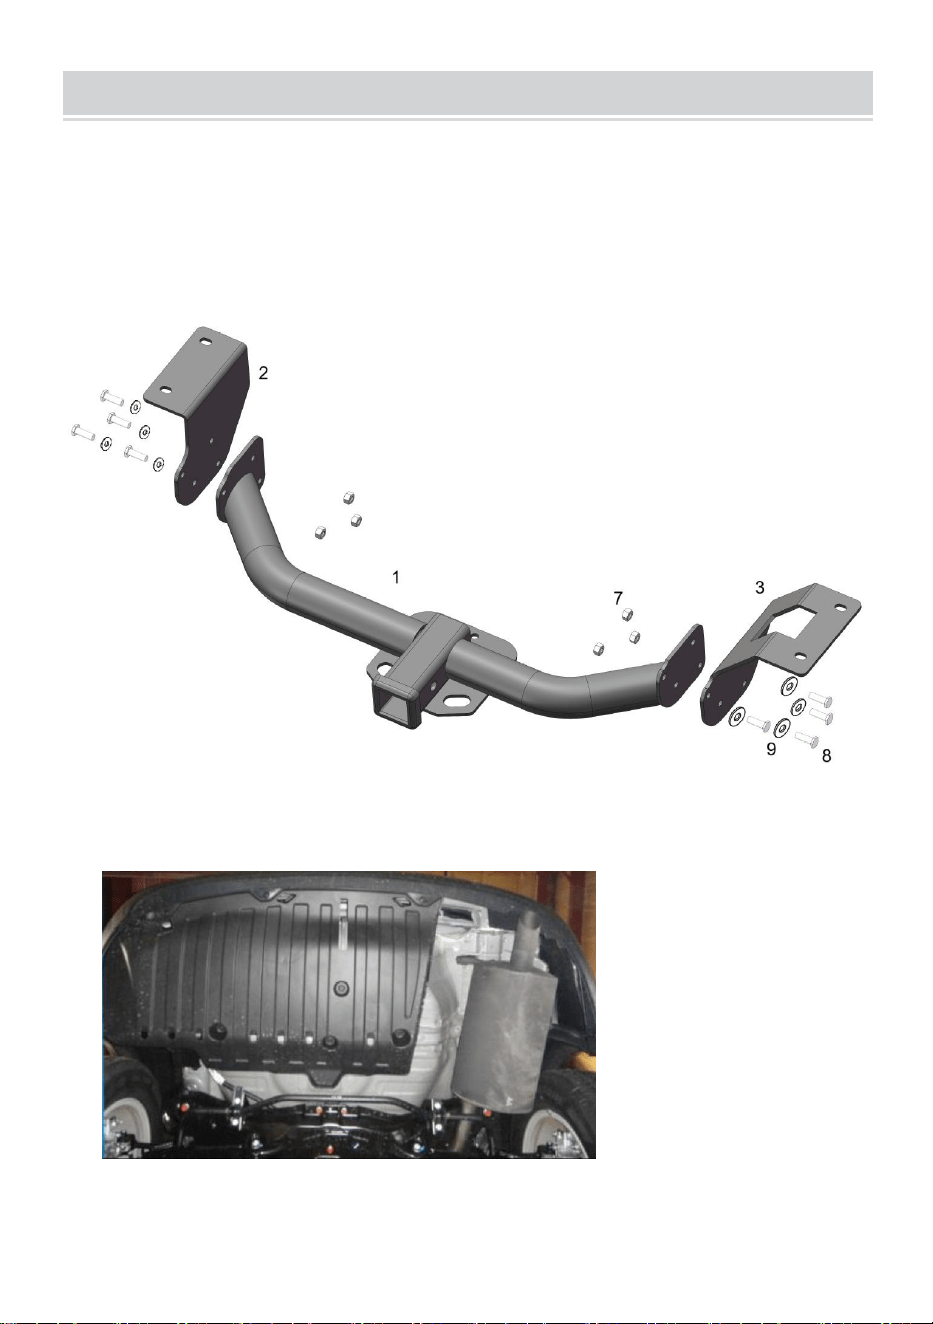
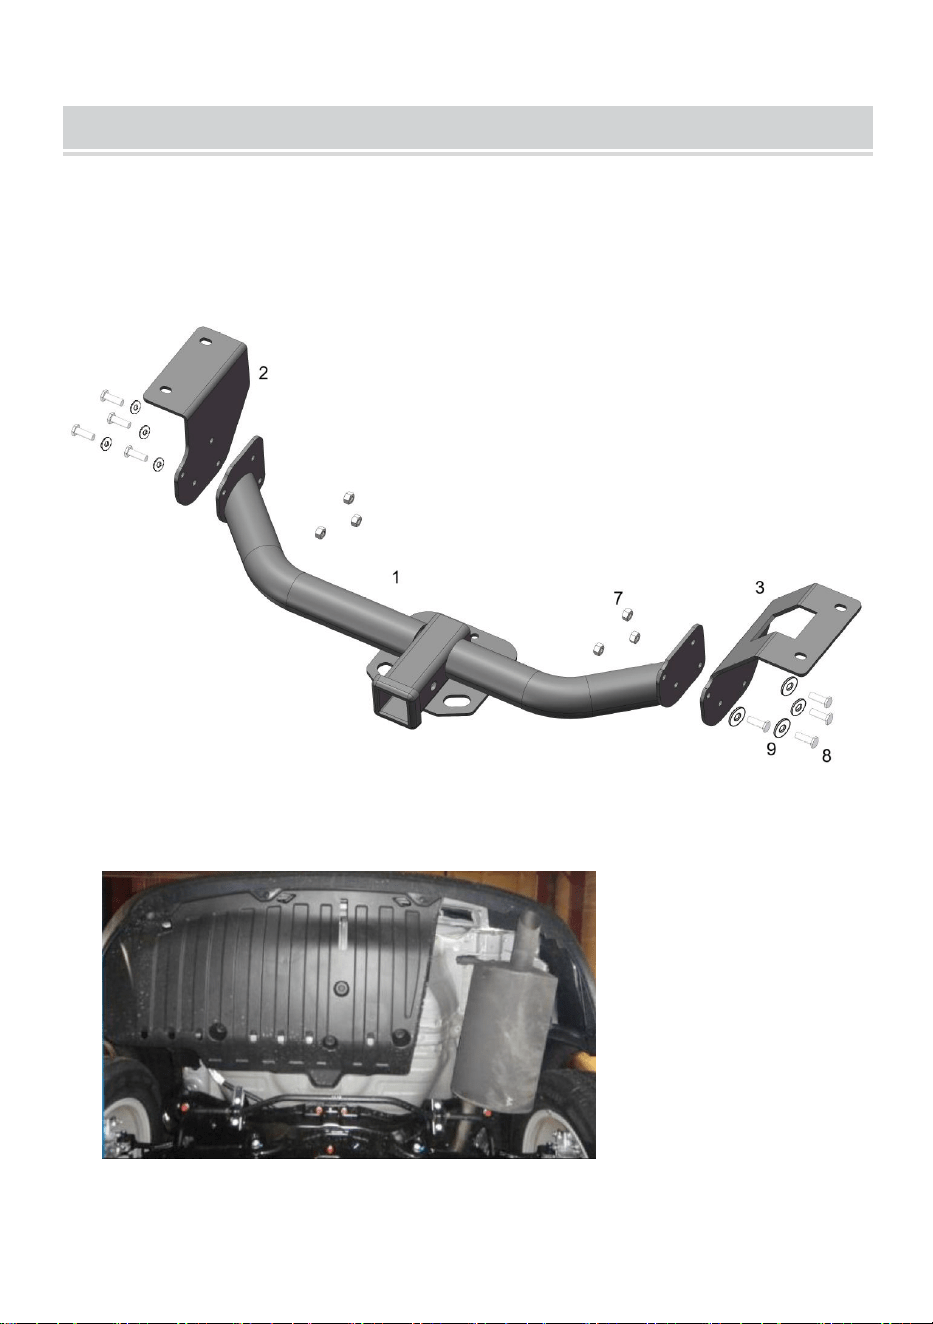
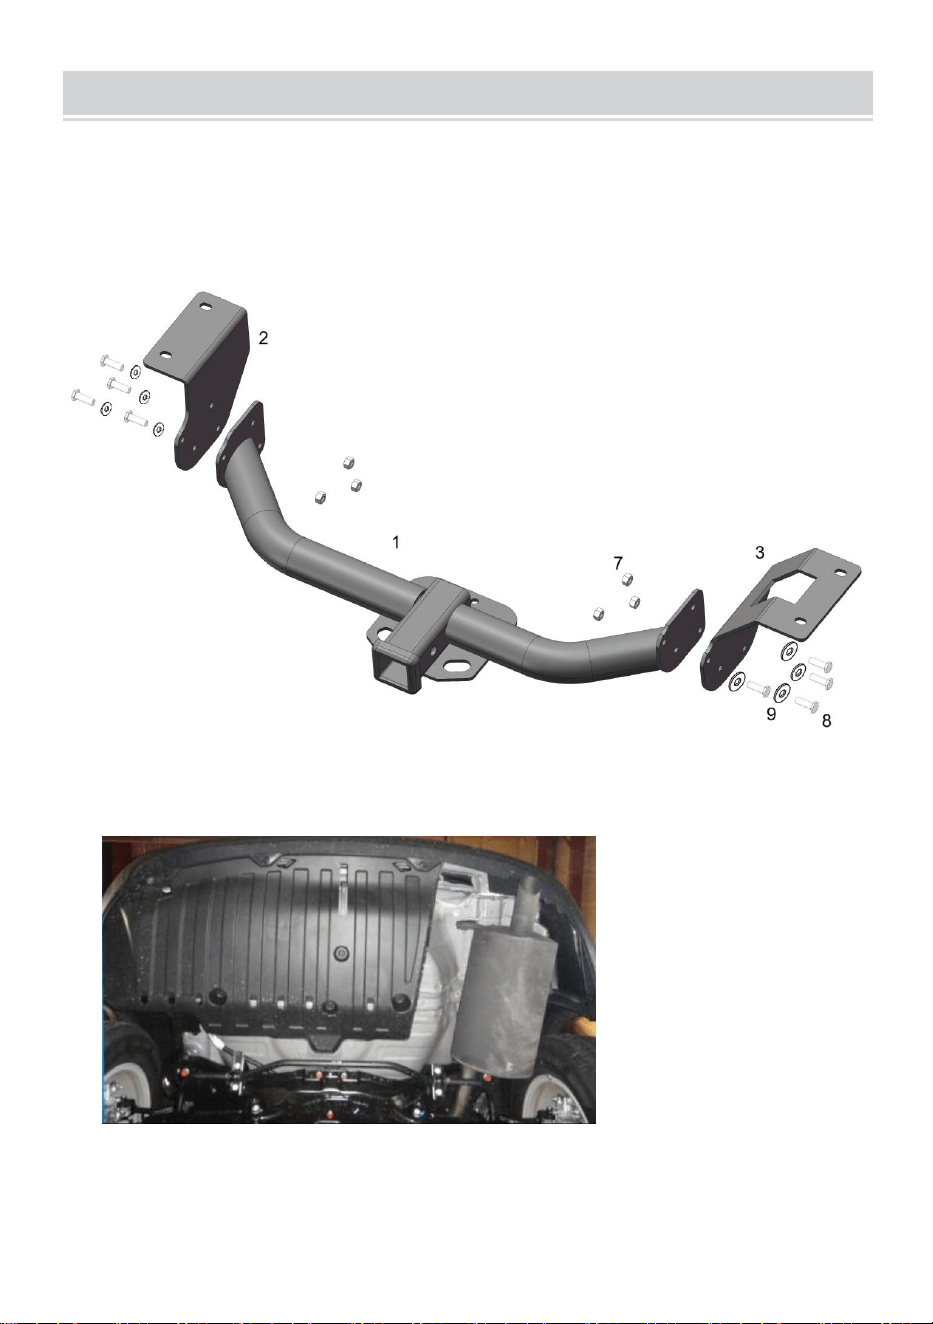
Assemble the trailer hitches using the 1. 2. 3 part by tools(not including). Torque 8
pcs M12*30(8),8 pcs washers(9), 6 pcs flange nuts(7) as below, and tighten;
please note do not over tighten.
Step 2 Assembly the trailer hitches on the automobile chassis
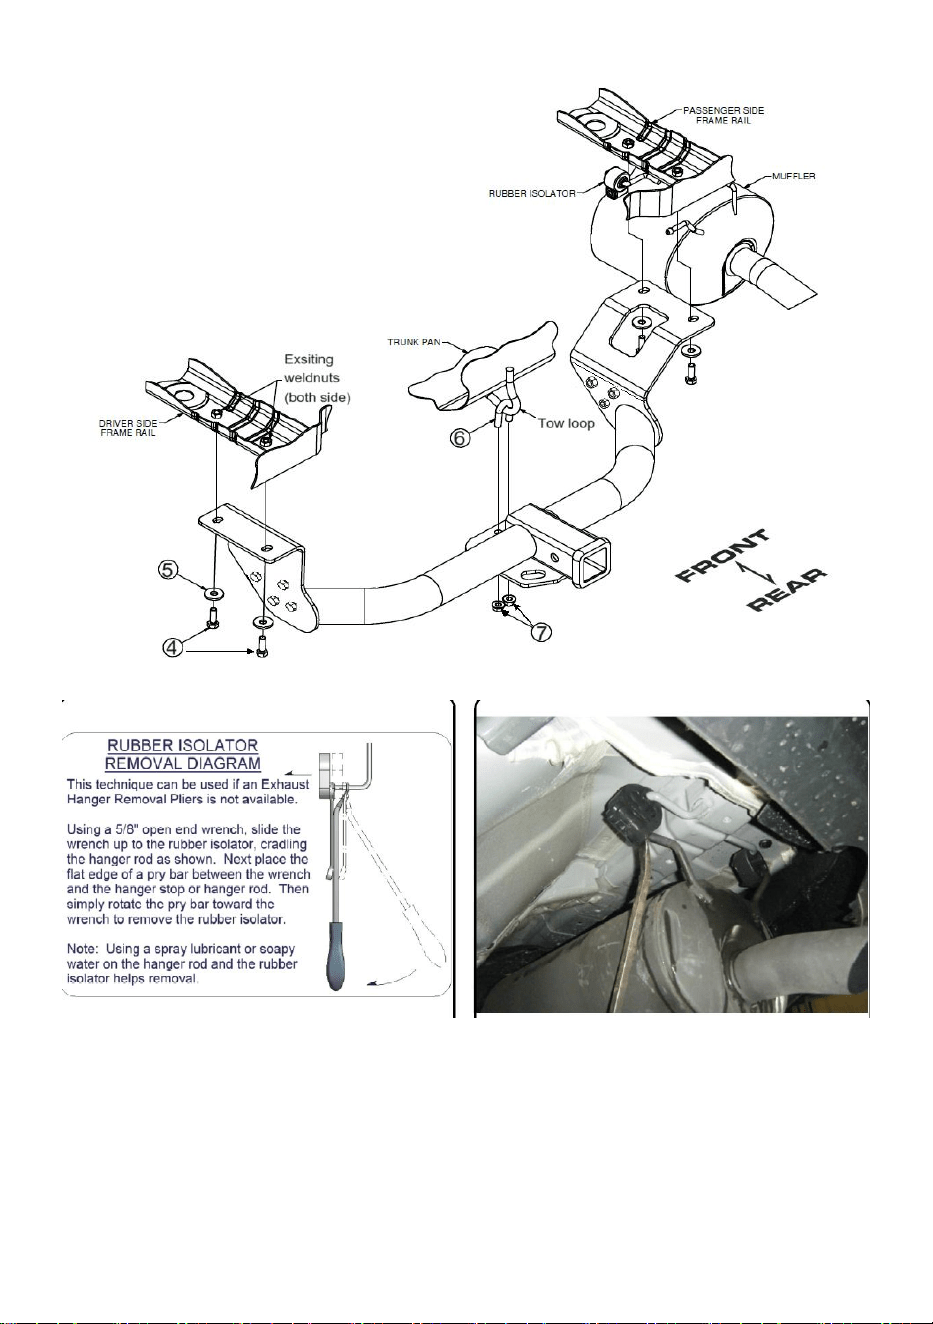
1. Remove (10) fasteners and lower underbody panel.
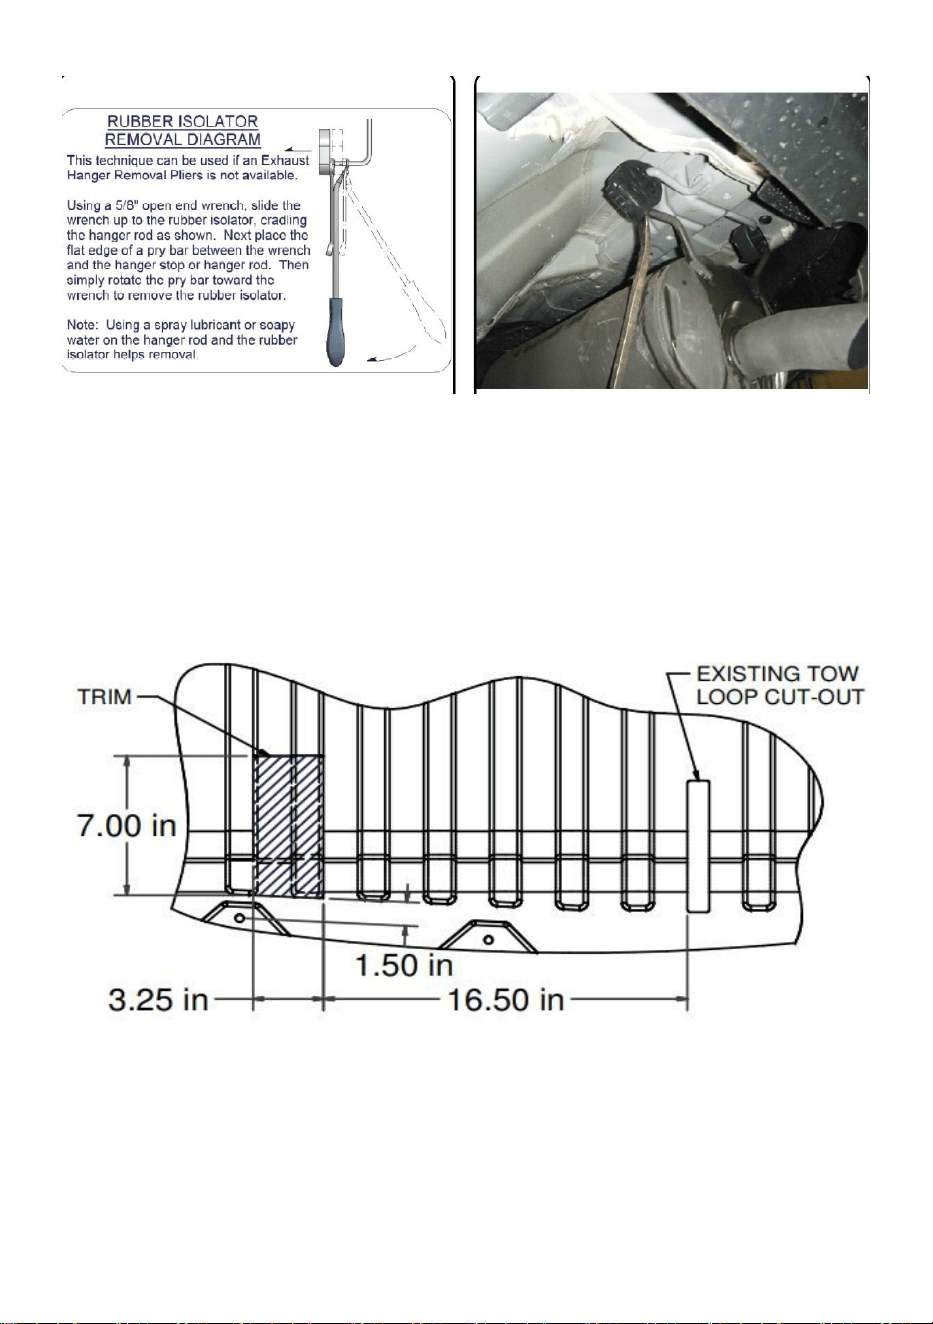
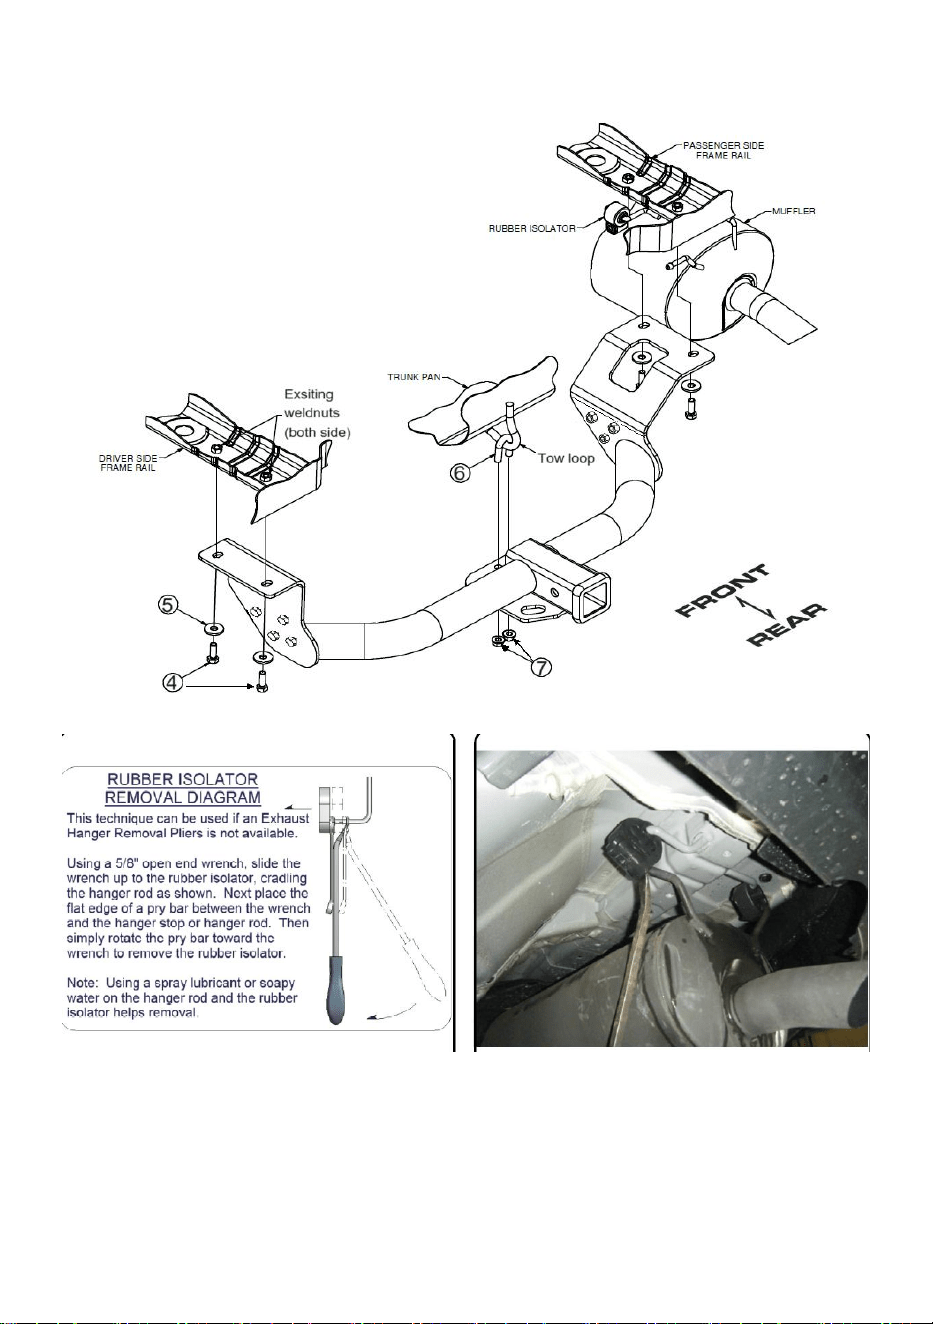
2. Lower exhaust by removing (2) rubber isolators from the hangers attached
to the exhaust.
(See RUBBER ISOLATOR REMOVAL DIAGRAM)

- 5 -
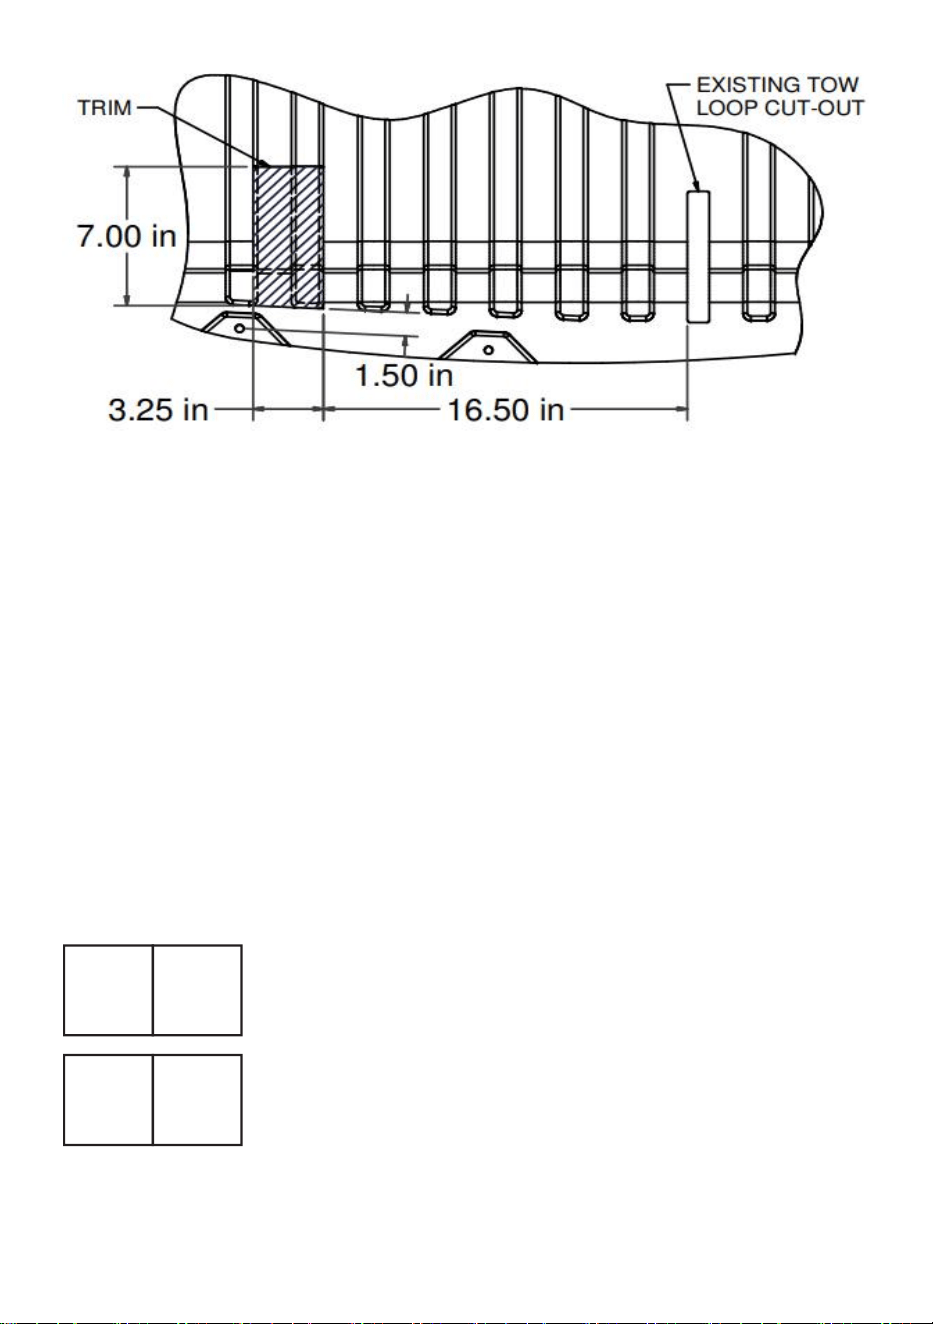
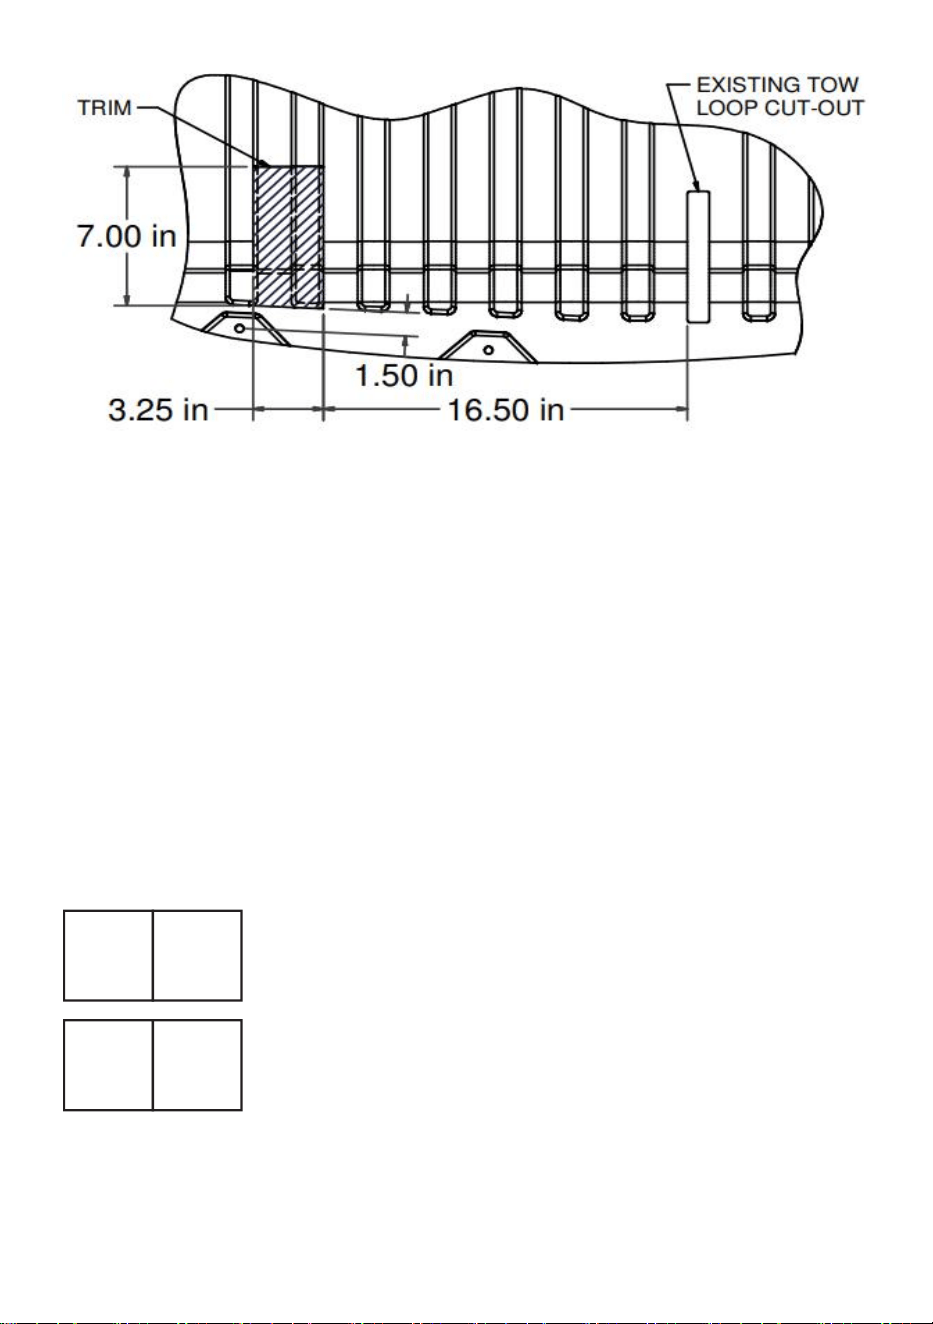
3. Mark and trim the underbody panel. Reattach the underbody panel using
the fasteners removed in Step (1).
Note: Dimensions are approximate; confirm fit prior to trimming. Use the ribs
of the underbody panel as cutting guides. (See Underbody panel trim diagram)

- 6 -
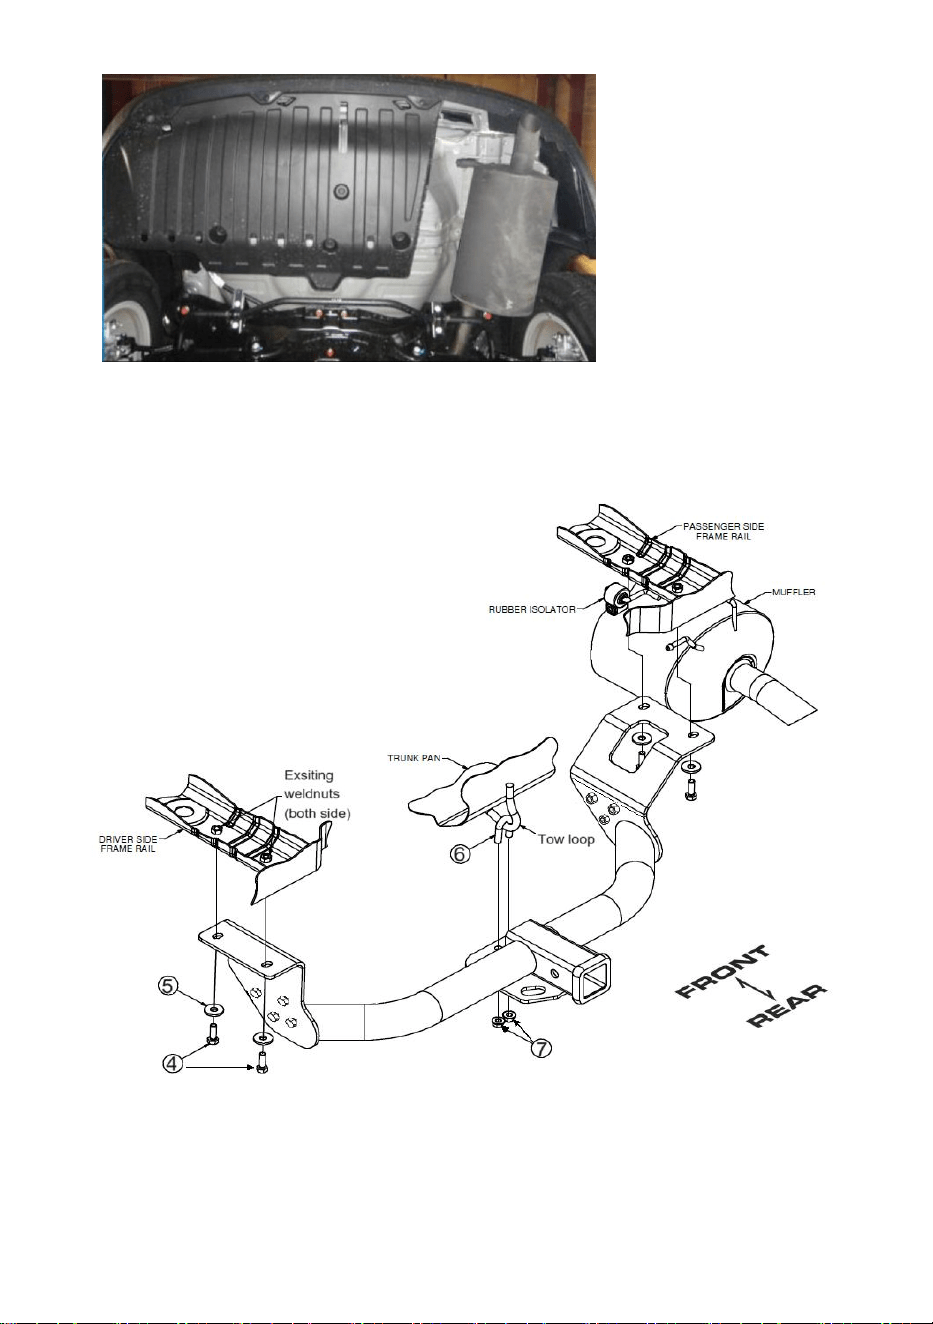
4. Insert the U-bolt (part 6) through the tow hook, as shown.
Raise the hitch into position and secure using flange nuts(part 7) to the U-bolt
and 10mm bolts with 7/16" conical toothed washers to the weld nuts in the
frame rails.
Manufacturer: Shanghaimuxinmuyeyouxiangongsi
Address: Shuangchenglu 803nong11hao1602A-1609shi, baoshanqu,
shanghai 200000 CN.
Imported to AUS: SIHAO PTY LTD. 1 ROKEVA STREETEASTWOOD NSW
2122 Australia
Imported to USA: Sanven Technology Ltd. Suite 250, 9166 Anaheim Place,
Rancho Cucamonga, CA 91730
REP
EC
E-CrossStu GmbH
Mainzer Landstr.69, 60329 Frankfurt am Main.
REP
UK
YH CONSULTING LIMITED.
C/O YH Consulting Limited Office 147, Centurion House,
London Road, Staines-upon-Thames, Surrey, TW18 4AX


- 8 -
Technique Certificat d'assistance et de garantie électronique
www.vevor.com/support
ATTELAGE DE REMORQUE ES
Nous continuons à nous engager à vous fournir des outils à des prix compétitifs.
« Économisez la moitié », « Moitié prix » ou toute autre expression similaire utilisée par
nous uniquement
représente une estimation des économies que vous pourriez réaliser en achetant certains
outils
avec nous par rapport aux grandes marques et ne signifie pas nécessairement couverture
Toutes les catégories d'outils que nous proposons. Veuillez vérifier soigneusement
lorsque vous passez une commande chez nous si vous êtes réellement Économie
Moitié en comparaison avec les plus grandes marques.

- 9 -

- 1 -
MODÈLE : NT-1601
NEED HELP? CONTACT US!
Des questions sur nos produits ? Besoin d'assistance technique ?
N'hésitez pas à nous contacter :
Assistance technique et certificat de garantie électronique
www.vevor.com/support
Ceci est le mode d'emploi d'origine. Veuillez lire attentivement toutes les
instructions du manuel avant utilisation. VEVOR se réserve le droit
d'interpréter clairement ce manuel d'utilisation. L'apparence du produit
dépend du produit que vous avez reçu. Veuillez nous excuser pour le
retard dans la publication de toute mise à jour technologique ou logicielle
concernant notre produit.
TRAILER HITCHES

- 2 -
MESURES DE SÉCURITÉ IMPORTANTES
Veuillez lire attentivement ce manuel avant d'utiliser et
d'entretenir ce produit. Le non-respect de ces avertissements et
instructions peut entraîner la mort, des blessures corporelles ou des
dommages matériels.
Règles de sécurité de base
1. Veuillez serrer l'installation ; un desserrage peut entraîner des
dommages ou un danger. La garantie ne couvre pas ces dommages.
2. Respectez toutes les exigences du ministère des Transports (DOT) lors
de l'utilisation de ce produit.
3. Faites preuve de bon sens lorsque vous travaillez. Restez vigilant et
concentré lors de l'installation et de l'utilisation de ce produit. N'utilisez
jamais ce produit sous l'influence de l'alcool, de drogues ou de
médicaments.
4. Ce produit n'est pas un jouet. Tenir hors de portée des enfants. Lors de
l'utilisation, maintenir la zone de travail propre et bien éclairée . Tenir les
enfants hors de la zone de travail.
5. Habillez-vous convenablement. Ne portez jamais de vêtements amples
ni de bijoux lors de l'utilisation. Attachez les cheveux longs et tenez vos
cheveux, vêtements et gants éloignés des pièces mobiles.
CONSERVEZ CES INSTRUCTIONS

- 3 -
CARACTÉRISTIQUES
MODÈLE
NT-160 1
Capacité de charge (traction linéaire
du produit)
6000 livres
Convient pour
Honda CR-V
Année
2012-2016
Liste des pièces
Partie
Description
Qté
1
Barre d'attelage de remorque
1
2
Assiette latérale 1
1
3
Assiette latérale 2
1
4
M1 0 -1,25 x 35 mm boulon hexagonal
4
5
Rondelle à dents coniques, 7/16 "
4
6
boulon en U
1
7
Écrou à bride M12
8
8
Boulon hexagonal M12*30
8
9
Rondelle plate ( M 12 )
8
- 4 -
Installation Guide
Étape 1
Assembler les attelages de remorque en utilisant les pièces 1. 2. 3 avec des outils
(non inclus). Serrez 8 pièces M12 * 30 (8), 8 rondelles (9), 6 écrous à bride (7)
comme ci-dessous, et serrez ; veuillez noter de ne pas trop serrer .
Étape 2 Assemblez les attelages de remorque sur le châssis de l'automobile
2. Retirez les (10) fixations et le panneau inférieur du soubassement.
2. Abaissez l’échappement en retirant (2) isolateurs en caoutchouc des
supports fixés à l’échappement.

- 5 -
(Voir SCHÉMA DE RETRAIT DE L'ISOLATEUR EN CAOUTCHOUC)
3. Marquez et découpez le panneau de soubassement. Refixez- le à l'aide des
fixations retirées à l'étape (1).
Remarque : Les dimensions sont approximatives ; vérifiez l'ajustement avant
de découper. Utilisez les nervures du panneau de soubassement. comme
guides de coupe. (Voir schéma de garniture du panneau de soubassement)

- 6 -
4. Insérez le boulon en U (pièce 6) dans le crochet de remorquage, comme
illustré.
Soulevez l' attelage en position et fixez-le à l'aide d'écrous à bride (pièce 7) au
boulon en U et aux boulons de 10 mm avec des vis de 7/16" rondelles dentées
coniques à souder écrous dans les longerons du châssis.
Fabricant : Shanghaimuxinmuyeyouxiangongsi
Adresse : Shuangchenglu 803nong11hao1602A-1609shi, baoshanqu,
shanghai 200000 CN.
Importé en Australie : SIHAO PTY LTD. 1 ROKEVA STREET, ASTWOOD
NSW 2122, Australie
Importé aux États-Unis : Sanven Technology Ltd. Suite 250, 9166 Anaheim
Place, Rancho Cucamonga, CA 91730
REP
EC
E-CrossStu GmbH
Mainzer Landstr.69, 60329 Frankfurt am Main.
REP
UK
YH CONSULTING LIMITED.
C/O YH Consulting Limited Office 147, Centurion House,
London Road, Staines-upon-Thames, Surrey, TW18 4AX


- 8 -
Technisch Support- und E-Warranty-Zertifikat
www.vevor.com/support
ANHÄNGERKUPPLUNG ES
Wir sind weiterhin bestrebt, Ihnen Werkzeuge zu wettbewerbsfähigen Preisen anzubieten.
"Sparen Sie die Hälfte", "Halber Preis" oder andere ähnliche Ausdrücke, die wir nur
verwenden
stellt eine Schätzung der Einsparungen dar, die Sie durch den Kauf bestimmter Werkzeuge
erzielen könnten
bei uns im Vergleich zu den großen Top-Marken und bedeutet nicht unbedingt Abdeckung
alle Kategorien von Werkzeugen, die wir anbieten. Wir erinnern Sie freundlich daran, zu
überprüfen sorgfältig
wenn Sie bei uns eine Bestellung aufgeben, wenn Sie tatsächlich Speichern
Hälfte im Vergleich mit den Top-Großmarken.

- 9 -

- 1 -
MODELL: NT-1601
NEED HELP? CONTACT US!
Haben Sie Fragen zu unseren Produkten? Benötigen Sie technische
Unterstützung? Kontaktieren Sie uns gerne:
Technischer Support und E-Garantie-Zertifikat
www.vevor.com/support
Dies ist die Originalanleitung. Bitte lesen Sie alle Anweisungen sorgfältig
durch, bevor Sie das Gerät in Betrieb nehmen. VEVOR behält sich das
Recht vor , die Bedienungsanleitung klar und deutlich zu interpretieren.
Das Aussehen des Produkts hängt vom gelieferten Produkt ab. Bitte
haben Sie Verständnis dafür, dass wir Sie nicht erneut über Technologie-
oder Software-Updates informieren.
TRAILER HITCHES

- 2 -
WICHTIGE SICHERHEITSHINWEISE
Lesen Sie die gesamte Anleitung sorgfältig durch, bevor Sie
das Produkt bedienen und warten. Die Nichtbeachtung dieser
Warnungen und Anweisungen kann zu Todesfällen, Verletzungen
oder Sachschäden führen.
Grundlegende Sicherheitsregeln
1. Bitte ziehen Sie die Installation fest. Das Lösen kann Schäden oder
Gefahren verursachen. Diese Schäden werden nicht von der Garantie
abgedeckt.
2. Halten Sie bei der Verwendung dieses Produkts alle Anforderungen des
Department of Transportation (DOT) ein.
3. Arbeiten Sie mit gesundem Menschenverstand. Seien Sie beim
Einrichten und Verwenden dieses Produkts aufmerksam und konzentriert.
Arbeiten Sie niemals unter dem Einfluss von Alkohol, Drogen oder
Medikamenten.
4. Dieses Produkt ist kein Spielzeug. Bewahren Sie es außerhalb der
Reichweite von Kindern auf. Halten Sie den Arbeitsbereich während der
Arbeit sauber und gut beleuchtet . Halten Sie Kinder vom Arbeitsbereich
fern.
5. Tragen Sie angemessene Kleidung. Tragen Sie bei der Benutzung
niemals weite Kleidung oder Schmuck. Halten Sie lange Haare und
Kleidung sowie Handschuhe von beweglichen Teilen fern.
BEWAHREN SIE DIESE ANWEISUNGEN AUF

- 3 -
SPEZIFIKATIONEN
MODELL
NT-160 1
Tragfähigkeit (lineare Traktion des
Produkts)
6000 Pfund
Passend für
Honda CR-V
Jahr
2012–2016
Teileliste
Teil
Beschreibung
Menge
1
Anhängerkupplung
1
2
Seitenplatte 1
1
3
Seitenplatte 2
1
4
M1 0 -1,25 x 35 mm Sechskantschraube
4
5
Kegelzahnscheibe, 7/16 "
4
6
U-Bolzen
1
7
M12 F Langmutter
8
8
M12*30 Sechskantschraube
8
9
Unterlegscheibe ( M 12 ) )
8
- 4 -
Installation Guide
Schritt 1
Anhängerkupplungen montieren Verwenden Sie die Teile 1, 2 und 3 mit Werkzeug
(nicht im Lieferumfang enthalten). Ziehen Sie 8 Stück M12 * 30 (8), 8 Stück
Unterlegscheiben (9) und 6 Stück Flanschmuttern (7) wie unten angegeben an
und ziehen Sie sie fest . Bitte beachten Sie, dass Sie sie nicht zu fest anziehen .
Schritt 2 Montage der Anhängerkupplungen am Fahrzeugchassis
3. (10) Befestigungselemente und untere Unterbodenverkleidung entfernen.
- 5 -
2. Senken Sie den Auspuff ab, indem Sie (2) Gummiisolatoren von den am
Auspuff befestigten Aufhängern entfernen.
(Siehe Diagramm zum Entfernen des Gummiisolators)
- 6 -
3. Markieren und schneiden Sie die Unterbodenverkleidung zu. Befestigen Sie
die Unterbodenverkleidung mit den in Schritt (1) entfernten
Befestigungselementen wieder.
Hinweis: Die Maße sind ungefähre Angaben . Überprüfen Sie vor dem
Zuschneiden die Passform. Verwenden Sie die Rippen der
Unterbodenverkleidung als Schnittführungen. (Siehe Diagramm der
Unterbodenverkleidung)
4. Führen Sie den U-Bolzen (Teil 6) wie gezeigt durch den Abschlepphaken.
Heben Sie die Anhängerkupplung in Position und befestigen Sie sie mit
Flanschmuttern (Teil 7) an der U-Bolzen und 10mm Bolzen mit 7/16" konische
Zahnscheiben an der Schweißnaht Muttern in den Rahmenschienen.

- 7 -
Hersteller: Shanghaimuxinmuyeyouxiangongsi
Adresse: Shuangchenglu 803nong11hao1602A-1609shi, baoshanqu,
Shanghai 200000 CN.
Importiert nach AUS: SIHAO PTY LTD. 1 ROKEVA STREETEASTWOOD
NSW 2122 Australien
Importiert in die USA: Sanven Technology Ltd. Suite 250, 9166 Anaheim
Place, Rancho Cucamonga, CA 91730
REP
EC
E-CrossStu GmbH
Mainzer Landstr.69, 60329 Frankfurt am Main.
REP
UK
YH CONSULTING LIMITED.
C/O YH Consulting Limited Office 147, Centurion House,
London Road, Staines-upon-Thames, Surrey, TW18 4AX


- 9 -
Tecnico Supporto e certificato di garanzia elettronica
www.vevor.com/support
GANCIO DI TRAINO ES
Continuiamo a impegnarci per fornirvi strumenti a prezzi competitivi.
"Risparmia la metà", "Metà prezzo" o altre espressioni simili utilizzate solo da noi
rappresenta una stima dei risparmi che potresti ottenere acquistando determinati strumenti
con noi rispetto ai principali marchi top e non significa necessariamente copertina
tutte le categorie di strumenti da noi offerti. Ti ricordiamo di verificare accuratamente
quando effettui un ordine con noi se sei effettivamente Risparmio
Metà rispetto ai marchi più grandi.

- 1 -
MODELLO: NT-1601
NEED HELP? CONTACT US!
Hai domande sui prodotti? Hai bisogno di supporto tecnico? Non
esitare a contattarci:
Supporto tecnico e certificato di garanzia elettronica
www.vevor.com/support
Queste sono le istruzioni originali, si prega di leggere attentamente tutte
le istruzioni del manuale prima di utilizzare il prodotto. VEVOR si riserva la
piena interpretazione del manuale utente. L'aspetto del prodotto
dipenderà dal prodotto ricevuto. Vi preghiamo di non informarvi
ulteriormente in caso di aggiornamenti tecnologici o software relativi al
nostro prodotto.
TRAILER HITCHES

- 2 -
IMPORTANTI MISURE DI SICUREZZA
Leggere attentamente e comprendere l'intero manuale prima
di utilizzare e manutenere il prodotto. La mancata osservanza di
queste avvertenze e istruzioni può causare morte, lesioni personali o
danni a beni di valore.
Regole di sicurezza di base
1. Si prega di serrare l'installazione; allentarla può causare danni o
situazioni pericolose. La garanzia non copre questo tipo di danni.
2. Rispettare tutti i requisiti del Dipartimento dei Trasporti (DOT) quando si
utilizza questo prodotto.
3. Usare il buon senso durante il lavoro. Mantenere la concentrazione e
l'attenzione durante l'installazione e l'utilizzo del prodotto. Non utilizzare
mai il prodotto sotto l'effetto di alcol, droghe o farmaci.
4. Questo prodotto non è un giocattolo. Tenerlo fuori dalla portata dei
bambini. Durante l'utilizzo del prodotto, mantenere l'area di lavoro pulita e
ben illuminata . Tenere i bambini fuori dall'area di lavoro.
5. Vestirsi in modo appropriato. Non indossare mai abiti larghi o gioielli
durante l'uso. Tenere i capelli lunghi e tenere capelli, abiti e guanti lontani
dalle parti in movimento.
CONSERVARE QUESTE ISTRUZIONI

- 3 -
SPECIFICHE
MODELLO
NT-160 1
Capacità di carico (trazione lineare
del prodotto)
6000 libbre
Adatto per
Honda CR-V
Anno
2012-2016
Elenco delle parti
Parte
Descrizione
Quantità
1
Barra di traino del rimorchio
1
2
Piatto laterale 1
1
3
Piatto laterale 2
1
4
M1 0 -1,25 x 35 mm bullone esagonale
4
5
Rondella conica dentata, 7/16 "
4
6
bullone a U
1
7
Dado flangiato M12
8
8
Bullone esagonale M12*30
8
9
Rondella piatta ( M 12) )
8
- 4 -
Installation Guide
Passo 1
Montare i ganci di traino Utilizzando i punti 1. 2. 3 con gli utensili (non inclusi).
Serrare 8 pezzi M12 * 30 (8), 8 pezzi rondelle (9), 6 pezzi dadi flangiati (7) come di
seguito e serrare ; si prega di notare che non serrare eccessivamente .
Fase 2 Montare i ganci di traino sul telaio dell'automobile
4. Rimuovere (10) elementi di fissaggio e il pannello inferiore del
sottoscocca.
2. Abbassare lo scarico rimuovendo (2) isolatori in gomma dai ganci fissati allo
scarico.

- 5 -
(Vedi SCHEMA DI RIMOZIONE DELL'ISOLATORE IN GOMMA)
3. Segnare e rifinire il pannello del sottoscocca. Riattaccare il pannello del
sottoscocca utilizzando gli elementi di fissaggio rimossi nel passaggio (1).
Nota: le dimensioni sono approssimative ; verificare la compatibilità prima del
taglio. Utilizzare le nervature del pannello sottoscocca. come guide di taglio.
(Vedi schema di rivestimento del pannello sottoscocca)

- 6 -
4. Inserire il bullone a U (parte 6) attraverso il gancio di traino, come mostrato.
Sollevare il gancio in posizione e fissarlo utilizzando i dadi flangiati (parte 7) al
bullone a U e bulloni da 10 mm con 7/16" rondelle coniche dentate alla
saldatura dadi nei longheroni del telaio.
Produttore: Shanghaimuxinmuyeyouxiangongsi
Indirizzo: Shuangchenglu 803nong11hao1602A-1609shi, baoshanqu,
shanghai 200000 CN.
Importato in AUS: SIHAO PTY LTD. 1 ROKEVA STREETEASTWOOD NSW
2122 Australia
Importato negli USA: Sanven Technology Ltd. Suite 250, 9166 Anaheim
Place, Rancho Cucamonga, CA 91730
REP
EC
E-CrossStu GmbH
Mainzer Landstr.69, 60329 Frankfurt am Main.
REP
UK
YH CONSULTING LIMITED.
C/O YH Consulting Limited Office 147, Centurion House,
London Road, Staines-upon-Thames, Surrey, TW18 4AX


- 8 -
Técnico Certificado de soporte y garantía electrónica
www.vevor.com/support
ENGANCHE DE REMOLQUE ES
Seguimos comprometidos a brindarle herramientas a precios competitivos.
"Ahorra la mitad", "Mitad de precio" o cualquier otra expresión similar utilizada únicamente
por nosotros
Representa una estimación de los ahorros que podría obtener al comprar ciertas
herramientas.
con nosotros en comparación con las principales marcas líderes y no significa
necesariamente cubrir
Todas las categorías de herramientas que ofrecemos. Le recordamos que debe verificar
con cuidado
Cuando realiza un pedido con nosotros, si realmente está Ahorro
Medio en comparación con las principales marcas principales.

- 9 -

- 1 -
MODELO: NT-1601
NEED HELP? CONTACT US!
¿Tiene preguntas sobre el producto? ¿Necesita asistencia técnica? No
dude en contactarnos:
Soporte técnico y certificado de garantía electrónica
www.vevor.com/support
Estas son las instrucciones originales; lea atentamente todas las
instrucciones del manual antes de utilizarlo. VEVOR se reserva el
derecho de interpretar su manual de usuario. La apariencia del producto
dependerá del producto que haya recibido. Le rogamos que nos disculpe
si no le informamos de nuevo si hay actualizaciones tecnológicas o de
software en nuestro producto.
TRAILER HITCHES

- 2 -
MEDIDAS DE SEGURIDAD IMPORTANTES
Lea y comprenda este manual completo antes de operar y
realizar tareas de mantenimiento en este producto. El incumplimiento
de estas advertencias e instrucciones puede causar la muerte,
lesiones personales o daños a bienes valiosos.
Normas básicas de seguridad
1. Apriete la instalación; aflojarla puede causar daños o peligro. La
garantía no cubre estos daños.
2. Cumpla con todos los requisitos del Departamento de Transporte (DOT)
al utilizar este producto.
3. Use el sentido común al trabajar. Manténgase alerta y concentrado al
instalar y usar este producto. Nunca lo opere bajo los efectos del alcohol,
drogas o medicamentos.
4. Este producto no es un juguete. Manténgalo fuera del alcance de los
niños. Mientras lo utilice, mantenga el área de trabajo limpia y bien
iluminada . Mantenga a los niños fuera del área de trabajo.
5. Vístase apropiadamente. Nunca use ropa holgada ni joyas al usar el
producto. Contenga el cabello largo y mantenga el cabello, la ropa y los
guantes alejados de las piezas móviles.
GUARDE ESTAS INSTRUCCIONES

- 3 -
PRESUPUESTO
MODELO
NT-160 1
Capacidad de carga (tracción lineal
del producto)
6000 libras
Adecuado para
Honda CR-V
Año
2012-2016
Lista de piezas
Parte
Descripción
Cantidad
1
Barra de enganche del remolque
1
2
Placa lateral 1
1
3
Placa lateral 2
1
4
M1 0 -1,25 x 35 mm Perno hexagonal
4
5
Arandela dentada cónica, 7/16 "
4
6
Perno en U
1
7
Tuerca de brida M12 F
8
8
Perno hexagonal M12*30
8
9
Arandela plana ( M 12 ) )
8
- 4 -
Installation Guide
Paso 1
Ensamblar los enganches del remolque Utilice las piezas 1, 2 y 3 con
herramientas (no incluidas). Apriete las 8 tuercas M12 x 30 (8), las 8 arandelas (9)
y las 6 tuercas de brida (7) como se indica a continuación. Tenga cuidado de no
apretar demasiado .
Paso 2 Ensamble los enganches del remolque en el chasis del automóvil
5. Retire los (10) sujetadores y baje el panel inferior de la carrocería.
2. Baje el escape quitando (2) aisladores de goma de los ganchos fijados al
escape.

- 5 -
(Ver DIAGRAMA DE EXTRACCIÓN DEL AISLADOR DE GOMA)
3. Marque y recorte el panel inferior. Vuelva a colocarlo con los sujetadores
que retiró en el paso (1).
Nota: Las dimensiones son aproximadas ; confirme el ajuste antes de recortar.
Utilice las nervaduras del panel inferior. Como guías de corte. (Ver diagrama
de la moldura del panel inferior)
- 6 -
4. Inserte el perno en U (parte 6) a través del gancho de remolque, como se
muestra.
Levante el enganche a su posición y asegúrelo con tuercas de brida (parte 7)
al perno en U y pernos de 10 mm con 7/16" Arandelas cónicas dentadas para
soldar Tuercas en los rieles del bastidor.
Fabricante: Shanghaimuxinmuyeyouxiangongsi
Dirección: Shuangchenglu 803nong11hao1602A-1609shi, baoshanqu,
shanghai 200000 CN.
Importado a AUS: SIHAO PTY LTD. 1 ROKEVA STREET, EASTWOOD,
NSW 2122, Australia
Importado a EE. UU.: Sanven Technology Ltd. Suite 250, 9166 Anaheim
Place, Rancho Cucamonga, CA 91730
REP
EC
E-CrossStu GmbH
Mainzer Landstr.69, 60329 Frankfurt am Main.
REP
UK
YH CONSULTING LIMITED.
C/O YH Consulting Limited Office 147, Centurion House,
London Road, Staines-upon-Thames, Surrey, TW18 4AX


- 8 -
Techniczny Wsparcie i certyfikat e-gwarancji
www.vevor.com/support
ZACZEP PRZYCZEPY ES
Nadal staramy się oferować Państwu narzędzia w konkurencyjnych cenach.
„Oszczędź połowę”, „Połowa ceny” lub jakiekolwiek inne podobne wyrażenia używane
wyłącznie przez nas
przedstawia szacunkowe oszczędności, jakie możesz uzyskać kupując określone
narzędzia
z nami w porównaniu do głównych, najlepszych marek i niekoniecznie oznacza to okładka
wszystkie kategorie narzędzi oferowanych przez nas. Przypominamy o sprawdzeniu
ostrożnie
gdy składasz u nas zamówienie, jeśli faktycznie Oszczędność
Połowa w porównaniu z wiodącymi markami.

- 9 -

- 1 -
MODELE: NT-1601
NEED HELP? CONTACT US!
Masz pytania dotyczące produktu? Potrzebujesz wsparcia
technicznego? Skontaktuj się z nami:
Wsparcie techniczne i certyfikat e-gwarancji
www.vevor.com/support
To jest oryginalna instrukcja, przed użyciem należy uważnie przeczytać
wszystkie instrukcje. VEVOR zastrzega sobie jasną interpretację naszej
instrukcji obsługi. Wygląd produktu będzie zależał od produktu, który
otrzymałeś. Prosimy o wybaczenie, że nie poinformujemy Cię ponownie,
jeśli w naszym produkcie pojawią się jakiekolwiek aktualizacje
technologiczne lub oprogramowania.
TRAILER HITCHES

- 2 -
WAŻNE ZABEZPIECZENIA
Przeczytaj i zrozum całą instrukcję przed rozpoczęciem
obsługi i serwisowania tego produktu. Nieprzestrzeganie tych
ostrzeżeń i instrukcji może spowodować śmierć, obrażenia ciała lub
uszkodzenie cennego mienia.
Podstawowe zasady bezpieczeństwa
1. Proszę dokręcić instalację; poluzowanie może spowodować
uszkodzenie lub niebezpieczeństwo. Gwarancja nie obejmuje tego
uszkodzenia.
2. Stosując ten produkt należy stosować się do wszystkich wymagań
Departamentu Transportu (DOT).
3. Podczas pracy zachowaj zdrowy rozsądek. Zachowaj czujność i
koncentrację podczas ustawiania i używania tego produktu. Nigdy nie
obsługuj pod wpływem alkoholu, narkotyków lub leków.
4. Ten produkt nie jest zabawką. Trzymaj go poza zasięgiem dzieci.
Podczas korzystania z tego produktu utrzymuj miejsce pracy w czystości i
dobrze oświetlone . Trzymaj dzieci z dala od miejsca pracy.
5. Ubierz się odpowiednio. Nigdy nie zakładaj luźnej odzieży ani biżuterii
podczas użytkowania. Trzymaj długie włosy i trzymaj włosy, odzież i
rękawiczki z dala od ruchomych części.
ZAPISZ TE INSTRUKCJE

- 3 -
SPECYFIKACJE
MODEL
NT-160 1
Nośność (liniowa przyczepność
produktu)
6000 funtów
Nadaje się do
Honda CR-V
Rok
2012-2016
Lista części
Część
Opis
Ilość
1
Belka zaczepowa przyczepy
1
2
Talerz boczny 1
1
3
Talerz boczny 2
1
4
M1 0 -1,25 x 35 mm Śruba sześciokątna
4
5
Podkładka zębata stożkowa 7/16 "
4
6
Śruba U
1
7
Nakrętka kołnierzowa M12 F
8
8
Śruba sześciokątna M12*30
8
9
Podkładka płaska ( M 12) )
8
- 4 -
Installation Guide
Krok 1
Złóż zaczepy przyczepy używając części 1. 2. 3 za pomocą narzędzi (nie
wliczając). Dokręć 8 szt. M12 * 30 (8), 8 szt. podkładek (9), 6 szt. nakrętek
kołnierzowych (7) jak poniżej i dokręć ; pamiętaj, nie dokręcaj zbyt mocno .
Krok 2 Montaż zaczepów przyczepy na podwoziu samochodu
6. Zdejmij (10) elementów mocujących i dolny panel podwozia.
2. Obniżyć wydech poprzez usunięcie (2) gumowych izolatorów z wieszaków
przymocowanych do wydechu.
- 5 -
(Zobacz schemat usuwania izolacji gumowej)
3. Zaznacz i przytnij panel podwozia. Ponownie przymocuj panel podwozia za
pomocą elementów mocujących usuniętych w kroku (1).
Uwaga: Wymiary są przybliżone ; przed przycięciem należy potwierdzić
dopasowanie. Użyj żeber panelu podwozia jako prowadnice tnące. (Zobacz
schemat wykończenia panelu podwozia)

- 6 -
4. Przełóż śrubę U (część 6) przez hak holowniczy , jak pokazano.
Podnieś zaczep do pozycji i zabezpiecz nakrętkami kołnierzowymi (część 7)
śrubę U i śruby 10 mm z łbem walcowym 7/16". podkładki zębate stożkowe do
spoiny nakrętki w szynach ramy.
Producent: Shanghaimuxinmuyeyouxiangongsi
Adres: Shuangchenglu 803nong11hao1602A-1609shi, baoshanqu, szanghaj
200000 CN.
Importowane do AUS: SIHAO PTY LTD. 1 ROKEVA STREETEASTWOOD
NSW 2122 Australia
Importowane do USA: Sanven Technology Ltd. Suite 250, 9166 Anaheim
Place, Rancho Cucamonga, CA 91730
REP
EC
E-CrossStu GmbH
Mainzer Landstr.69, 60329 Frankfurt am Main.
REP
UK
YH CONSULTING LIMITED.
C/O YH Consulting Limited Office 147, Centurion House,
London Road, Staines-upon-Thames, Surrey, TW18 4AX


- 8 -
Technisch Ondersteuning en E-garantiecertificaat
www.vevor.com/support
AANHANGWAGENKOPPELING ES
Wij streven er voortdurend naar om u gereedschappen te leveren tegen concurrerende
prijzen.
"Bespaar de helft", "halve prijs" of andere soortgelijke uitdrukkingen die alleen door ons
worden gebruikt
geeft een schatting weer van de besparingen die u kunt behalen door bepaalde
gereedschappen te kopen
bij ons vergeleken met de grote topmerken en betekent niet per se dat omslag
alle categorieën gereedschappen die wij aanbieden. Wij verzoeken u vriendelijk om dit te
controleren. voorzichtig
wanneer u een bestelling bij ons plaatst, als u daadwerkelijk Besparing
Half in vergelijking met de grote topmerken.

- 9 -

- 1 -
MODEL: NT-1601
NEED HELP? CONTACT US!
Heeft u vragen over het product? Heeft u technische ondersteuning
nodig? Neem dan gerust contact met ons op:
Technische ondersteuning en e-garantiecertificaat
www.vevor.com/support
Dit is de originele handleiding. Lees alle instructies zorgvuldig door
voordat u het product gebruikt. VEVOR behoudt zich het recht voor om de
gebruiksaanwijzing duidelijk te interpreteren. Het uiterlijk van het product
is afhankelijk van het product dat u hebt ontvangen. Neemt u het ons niet
kwalijk dat we u niet meer op de hoogte stellen van eventuele
technologische of software-updates voor ons product.
TRAILER HITCHES

- 2 -
BELANGRIJKE VEILIGHEIDSMAATREGELEN
Lees deze volledige handleiding zorgvuldig door voordat u dit
product bedient en onderhoudt. Het niet opvolgen van deze
waarschuwingen en instructies kan leiden tot overlijden, persoonlijk
letsel of schade aan waardevolle eigendommen.
Basisveiligheidsregels
1. Draai de installatie goed vast; losdraaien kan schade of gevaar
opleveren. Deze schade valt niet onder de garantie.
2. Houd u aan alle vereisten van het Department of Transportation (DOT)
bij gebruik van dit product.
3. Gebruik uw gezond verstand tijdens het werken. Blijf alert en
geconcentreerd tijdens het installeren en gebruiken van dit product.
Gebruik het product nooit onder invloed van alcohol, drugs of medicijnen.
4. Dit product is geen speelgoed. Houd het buiten bereik van kinderen.
Houd de werkruimte schoon en goed verlicht tijdens het gebruik van dit
product. Houd kinderen uit de buurt van de werkruimte.
5. Draag gepaste kleding. Draag nooit loszittende kleding of sieraden
tijdens gebruik. Houd lang haar in bedwang en houd haar, kleding en
handschoenen uit de buurt van bewegende onderdelen.
BEWAAR DEZE INSTRUCTIES

- 3 -
SPECIFICATIES
MODEL
NT-160 1
Draagvermogen (lineaire
producttractie)
6000 pond
Geschikt voor
Honda CR-V
Jaar
2012-2016
Onderdelenlijst
Deel
Beschrijving
Aantal
1
Aanhangwagen trekhaak
1
2
Zijplaat 1
1
3
Zijplaat 2
1
4
M1 0 -1,25 x 35 mm Zeskantbout
4
5
Conische tandring, 7/16 "
4
6
U-bout
1
7
M12 flensmoer
8
8
M12*30 zeskantbout
8
9
Platte ring ( M 12 ) )
8
- 4 -
Installation Guide
Stap 1
Monteer de trekhaken Gebruik het 1. 2. 3-onderdeel met gereedschap (niet
meegeleverd). Draai 8 stuks M12 * 30 (8), 8 stuks ringen (9), 6 stuks flensmoeren
(7) vast zoals hieronder, en draai vast ; let op: niet te vast draaien .
Stap 2 Monteer de trekhaken op het chassis van de auto
7. Verwijder (10) bevestigingsmiddelen en laat het onderpaneel zakken.
2. Laat de uitlaat zakken door (2) rubberen isolatoren te verwijderen van de
hangers die aan de uitlaat zijn bevestigd.
(Zie SCHEMA VOOR HET VERWIJDEREN VAN RUBBEREN ISOLATOREN)

- 5 -
3. Markeer en trim het onderpaneel. Bevestig het onderpaneel opnieuw met de
bevestigingsmiddelen die u in stap (1) hebt verwijderd.
Let op: Afmetingen zijn bij benadering ; controleer de pasvorm voordat u gaat
trimmen. Gebruik de ribben van het onderpaneel. als snijgeleiders. (Zie
diagram van de onderzijde van het paneel)
- 6 -
4. Steek de U-bout (onderdeel 6) door de trekhaak, zoals afgebeeld.
Breng de trekhaak op zijn plaats en bevestig deze met flensmoeren
(onderdeel 7) aan de U-bout en 10 mm bouten met 7/16" conische getande
ringen aan de las moeren in de frame rails.
Fabrikant: Shanghaimuxinmuyeyouxiangongsi
Adres: Shuangchenglu 803nong11hao1602A-1609shi, baoshanqu, shanghai
200000 CN.
Geïmporteerd naar AUS: SIHAO PTY LTD. 1 ROKEVA
STREETEASTWOOD NSW 2122 Australië
Geïmporteerd naar de VS: Sanven Technology Ltd. Suite 250, 9166 Anaheim
Place, Rancho Cucamonga, CA 91730
REP
EC
E-CrossStu GmbH
Mainzer Landstr.69, 60329 Frankfurt am Main.
REP
UK
YH CONSULTING LIMITED.
C/O YH Consulting Limited Office 147, Centurion House,
London Road, Staines-upon-Thames, Surrey, TW18 4AX


- 8 -
Teknisk Support och e-garanticertifikat
www.vevor.com/support
DRAGKROK ES
Vi fortsätter att sträva efter att erbjuda dig verktyg till konkurrenskraftiga priser.
"Spara hälften", "Halv priset" eller andra liknande uttryck som endast används av oss
representerar en uppskattning av de besparingar du kan göra genom att köpa vissa verktyg
hos oss jämfört med de stora toppmärkena och betyder inte nödvändigtvis att täcka
alla kategorier av verktyg som erbjuds av oss. Vi ber dig vänligen att kontrollera försiktigt
när du gör en beställning hos oss om du faktiskt Sparande
Halv i jämförelse med de största varumärkena.

- 1 -
MODELL: NT-1601
NEED HELP? CONTACT US!
Har du frågor om produkten? Behöver du teknisk support? Kontakta
oss gärna:
Teknisk support och e-garanticertifikat
www.vevor.com/support
Detta är originalinstruktionerna, vänligen läs alla instruktioner noggrant
innan du använder produkten. VEVOR förbehåller sig en tydlig tolkning av
vår användarmanual. Produktens utseende ska vara beroende av den
produkt du mottagit. Vi ber om ursäkt för att vi inte kommer att informera
dig igen om det finns några teknik- eller programuppdateringar för vår
produkt.
TRAILER HITCHES

- 2 -
VIKTIGA SÄKERHETSÅTGÄRDER
Läs och förstå hela denna manual innan du använder och
utför service på denna produkt. Underlåtenhet att följa dessa
varningar och instruktioner kan orsaka dödsfall, personskador eller
skador på värdefull egendom.
Grundläggande säkerhetsregler
1. Dra åt installationen; lossning kan orsaka skador eller fara. Garantin
täcker inte dessa skador.
2. Följ alla krav från transportdepartementet (DOT) när du använder denna
produkt.
3. Använd sunt förnuft när du arbetar. Var uppmärksam och koncentrera
dig när du installerar och använder produkten. Använd aldrig produkten om
du är påverkad av alkohol, droger eller mediciner.
4. Denna produkt är inte en leksak. Förvara den utom räckhåll för barn.
Håll arbetsområdet rent och väl upplyst när du använder produkten. Håll
barn borta från arbetsområdet.
5. Klä dig lämpligt. Använd aldrig löst sittande kläder eller smycken när du
använder apparaten. Håll långt hår och hår, kläder och handskar borta från
rörliga delar.
SPARA DESSA INSTRUKTIONER

- 3 -
SPECIFIKATIONER
MODELL
NT-160 1
Viktbärande kapacitet (produktens
linjära dragkraft)
6000 pund
Lämplig för
Honda CR-V
År
2012-2016
Dellista
Del
Beskrivning
Antal
1
Dragkrok
1
2
Sidoplatta 1
1
3
Sidoplatta 2
1
4
M1 0-1,25 x 35 mm Sexkantsbult
4
5
Konisk tandad bricka, 7/16 "
4
6
U-bult
1
7
M12 F -längdsmutter
8
8
M12*30 sexkantsbult
8
9
Platt bricka ( M 12) )
8

- 4 -
Installation Guide
Steg 1
Montera släpvagnsdragen Använd 1, 2, 3-delade verktyg (exklusive). Dra åt 8 st
M12 * 30 (8), 8 st brickor (9), 6 st flänsmuttrar (7) enligt nedan och dra åt ;
observera att de inte dras åt för hårt .
Steg 2 Montera dragkrokarna på bilens chassit
8. Ta bort (10) fästelement och den nedre undersidan av karossen.
2. Sänk avgasröret genom att ta bort (2) gummiisoleringar från
upphängningarna som är fästa vid avgasröret.
(Se DIAGRAM FÖR BORTTAGNING AV GUMMISOLERARE)
- 5 -
3. Markera och skär av underredet . Sätt tillbaka underredet med hjälp av
fästelementen som togs bort i steg (1).
Obs: Måtten är ungefärliga ; kontrollera passformen innan du kapar. Använd
ribborna på undersidan av panelen. som skärguider. (Se diagram över
undersidans inredning)

- 6 -
4. För in U-bulten ( del 6) genom dragkroken , som visas.
Lyft dragkroken i läge och fäst den med flänsmuttrar (del 7) på U-bulten och 10
mm bultar med 7/16" koniska tandade brickor till svetsen muttrar i
ramskenorna.
Tillverkare: Shanghaimuxinmuyeyouxiangongsi
Adress: Shuangchenglu 803nong11hao1602A-1609shi, baoshanqu,
shanghai 200000 CN.
Importerad till Australien: SIHAO PTY LTD. 1 ROKEVA
STREETEASTWOOD NSW 2122 Australien
Importerad till USA: Sanven Technology Ltd. Suite 250, 9166 Anaheim Place,
Rancho Cucamonga, CA 91730
REP
EC
E-CrossStu GmbH
Mainzer Landstr.69, 60329 Frankfurt am Main.
REP
UK
YH CONSULTING LIMITED.
C/O YH Consulting Limited Office 147, Centurion House,
London Road, Staines-upon-Thames, Surrey, TW18 4AX