HD20S-50 HD20S-50TT HD20S-50T2T
User Manual/Benutzerhandbuch/Manuel de l'utilisateur/Manuale dell'utente/
Manual del Usuario/Gebruikershandleiding/Manualul utilizatorului/Felhasználói kézikönyv/
Οδηγίες χρήσης/
H
ướ
ng d
ẫ
n s
ử
d
ụ
ng
CORDLESS HAMMER DRILL
AKKU-SCHLAGBOHRER
PERCEUSE À PERCUSSION SANS FIL
TRAPANO A PERCUSSIONE A BATTERIA
TALADRO PERCUTOR SIN CABLES
ACCUKLOPBOORMACHINE
CIOCAN DE GAURIT CU ACUMULATOR
AKKUMULÁTOROS FÚRÓKALAPÁCS
ΣΦΥΡΟΤΡΥΠΑΝΟ ΜΠΑΤΑΡΊΑΣ
MÁY KHOANG KHÔNG DÂY
12
13
1 2 3
4
5
6
7
9
8
10
11
A1
A3
B2
A2
B1
D E1
E2 F
G
C
H1
Red light
Green light
100%
0%
I
J
H2
a
b
c
1
2
OPEN
CLOSE
A1
A3
B2
A2
B1
D E1
E2 F
G
C
H1
Red light
Green light
100%
0%
I
J
H2
a
b
c
1
2
OPEN
CLOSE

5
EN
ORIGINAL INSTRUCTIONS
PRODUCT SAFETY
GENERAL POWER TOOL
SAFETY WARNINGS
WARNING! Read all safety warnings,
instructions, illustrations and
specifications provided with this power tool.
Failure to follow all instructions listed below may
result in electric shock, fire and/or serious injury.
Save all warnings and instructions for future
reference.
The term "power tool" in the warnings refers
to your mains-operated (corded) power tool or
battery-operated (cordless) power tool.
1. Work area safety
a) Keep work area clean and well lit. Cluttered
or dark areas invite accidents.
b) Do not operate power tools in explosive
atmospheres, such as in the presence of
flammable liquids, gases or dust. Power
tools create sparks which may ignite the dust
or fumes.
c) Keep children and bystanders away while
operating a power tool. Distractions can
cause you to lose control.
2. Electrical safety
a) Power tool plugs must match the outlet.
Never modify the plug in any way. Do not use
any adapter plugs with earthed (grounded)
power tools. Unmodified plugs and matching
outlets will reduce risk of electric shock.
b) Avoid body contact with earthed or
grounded surfaces, such as pipes, radiators,
ranges and refrigerators. There is an
increased risk of electric shock if your body is
earthed or grounded.
c) Do not expose power tools to rain or wet
conditions. Water entering a power tool will
increase the risk of electric shock.
d) Do not abuse the cord. Never use the cord
for carrying, pulling or unplugging the power
tool. Keep cord away from heat, oil, sharp
edges or moving parts. Damaged or entangled
cords increase the risk of electric shock.
e) When operating a power tool outdoors, use
an extension cord suitable for outdoor use.
Use of a cord suitable for outdoor use reduces
the risk of electric shock.
f) If operating a power tool in a damp location
is unavoidable, use a residual current device
(RCD) protected supply. Use of an RCD
reduces the risk of electric shock.
3. Personal safety
a) Stay alert, watch what you are doing and
use common sense when operating a power
tool. Do not use a power tool while you are
tired or under the influence of drugs, alcohol
or medication. A moment of inattention while
operating power tools may result in serious
personal injury.
b) Use personal protective equipment. Always
wear eye protection. Protective equipment
such as dust mask, non-skid safety shoes,
hard hat, or hearing protection used for
appropriate conditions will reduce personal
injuries.
c) Prevent unintentional starting. Ensure
the switch is in the off-position before
connecting to power source and/or battery
pack, picking up or carrying the tool.
Carrying power tools with your finger on the
switch or energising power tools that have the
switch on invites accidents.
d) Remove any adjusting key or wrench before
turning the power tool on. A wrench or a key
left attached to a rotating part of the power
tool may result in personal injury.
e) Do not overreach. Keep proper footing and
balance at all times. This enables better
control of the power tool in unexpected
situations.
f) Dress properly. Do not wear loose clothing or
jewellery. Keep your hair and clothing away
from moving parts. Loose clothes, jewellery
or long hair can be caught in moving parts.
g) If devices are provided for the connection
of dust extraction and collection facilities,
ensure these are connected and properly
used. Use of dust collection can reduce dust-
related hazards.
h) Do not let familiarity gained from frequent
use of tools allow you to become
complacent and ignore tool safety principles.
A careless action can cause severe injury
within a fraction of a second.
SAFETY INFORMATION

HYUNDAI
6
CORDLESS HAMMER DRILL
EN
4. Power tool use and care
a) Do not force the power tool. Use the correct
power tool for your application. The correct
power tool will do the job better and safer at
the rate for which it was designed.
b) Do not use the power tool if the switch
does not turn it on and off. Any power tool
that cannot be controlled with the switch is
dangerous and must be repaired.
c) Disconnect the plug from the power
source and/or remove the battery pack,
if detachable, from the power tool before
making any adjustments, changing
accessories, or storing power tools. Such
preventive safety measures reduce the risk of
starting the power tool accidentally.
d) Store idle power tools out of the reach of
children and do not allow persons unfamiliar
with the power tool or these instructions
to operate the power tool. Power tools are
dangerous in the hands of untrained users.
e) Maintain power tools and accessories.
Check for misalignment or binding of moving
parts, breakage of parts and any other
condition that may affect the power tool’s
operation. If damaged, have the power tool
repaired before use. Many accidents are
caused by poorly maintained power tools.
f) Keep cutting tools sharp and clean. Properly
maintained cutting tools with sharp cutting
edges are less likely to bind and are easier to
control.
g) Use the power tool, accessories and tool bits
etc. in accordance with these instructions,
taking into account the working conditions
and the work to be performed. Use of the
power tool for operations different from those
intended could result in a hazardous situation.
h) Keep handles and grasping surfaces dry,
clean and free from oil and grease. Slippery
handles and grasping surfaces do not allow
for safe handling and control of the tool in
unexpected situations.
5. Battery tool use and care
a) Recharge only with the charger specified by
the manufacturer. A charger that is suitable
for one type of battery pack may create a risk
of fire when used with another battery pack.
b) Use power tools only with specifically
designated battery packs. Use of any other
battery packs may create a risk of injury and fire.
c) When battery pack is not in use, keep it away
from other metal objects, like paper clips,
coins, keys, nails, screws or other small metal
objects, that can make a connection from
one terminal to another. Shorting the battery
terminals together may cause burns or a fire.
d) Under abusive conditions, liquid may be
ejected from the battery; avoid contact. If
contact accidentally occurs, flush with water.
If liquid contacts eyes, additionally seek
medical help. Liquid ejected from the battery
may cause irritation or burns.
e) Do not use a battery pack or tool that is
damaged or modified. Damaged or modified
batteries may exhibit unpredictable behaviour
resulting in fire, explosion or risk of injury.
f) Do not expose a battery pack or tool to
fire or excessive temperature. Exposure to
fire or temperature above 130 °C may cause
explosion.
g)
Follow all charging instructions and do not
charge the battery pack or tool outside
the temperature range specified in the
instructions. Charging improperly or at
temperatures outside the specified range may
damage the battery and increase the risk of fire.
6. Service
a) Have your power tool serviced by a
qualified repair person using only identical
replacement parts. This will ensure that the
safety of the power tool is maintained.
b) Never service damaged battery packs.
Service of battery packs should only be
performed by the manufacturer or authorized
service providers.
DRILL SAFETY WARNINGS
1. Safety instructions for all operations
a) Wear ear protectors when impact drilling.
Exposure to noise can cause hearing loss.
b) Hold the power tool by insulated gripping
surfaces, when performing an operation
where the cutting accessory or fasteners
may contact hidden wiring. Cutting accessory
or fasteners contacting a "live" wire may make
exposed metal parts of the power tool "live"
and could give the operator an electric shock.

7
EN
SAFETY INFORMATION
2. Safety instructions when using long drill bits
a) Never operate at higher speed than the
maximum speed rating of the drill bit. At
higher speeds, the bit is likely to bend if
allowed to rotate freely without contacting the
workpiece, resulting in personal injury.
b) Always start drilling at low speed and with
the bit tip in contact with the workpiece.
At higher speeds, the bit is likely to bend if
allowed to rotate freely without contacting the
workpiece, resulting in personal injury.
c) Apply pressure only in direct line with the bit
and do not apply excessive pressure. Bits
can bend causing breakage or loss of control,
resulting in personal injury.
SAFETY WARNINGS FOR
BATTERY PACK
a) Do not dismantle, open or shred cells or
battery pack.
b) Do not short-circuit a battery pack. Do not
store battery packs haphazardly in a box or
drawer where they may short-circuit each
other or be short-circuited by conductive
materials. When battery pack is not in use,
keep it away from other metal objects, like
paper clips, coins, keys, nails, screws or
other small metal objects, that can make a
connection from one terminal to another.
Shorting the battery terminals together may
cause burns or a fire.
c) Do not expose battery pack to heat or fire.
Avoid storage in direct sunlight.
d) Do not subject battery pack to mechanical
shock.
e) In the event of battery leaking, do not allow
the liquid to come into contact with the skin
or eyes. If contact has been made, wash the
affected area with copious amounts of water
and seek medical advice.
f) Keep battery pack clean and dry.
g) Wipe the battery pack terminals with a clean
dry cloth if they become dirty.
h) Battery pack needs to be charged before
use. Always refer to this instruction and use
the correct charging procedure.
i) Do not maintain battery pack on charge
when not in use.
j) After extended periods of storage, it may
be necessary to charge and discharge
the battery pack several times to obtain
maximum performance.
k) Recharge only with the charger specified by
manufacturer. Do not use any charger other
than that specifically provided for use with
the equipment.
l) Do not use any battery pack which is not
designed for use with the equipment.
m) Keep battery pack out of the reach of
children.
n) Retain the original product literature for
future reference.
o) Remove the battery from the equipment
when not in use.
p) Dispose of properly.
q) Do not mix cells of different manufacture,
capacity, size or type within a device.
r) Keep the battery away from microwaves and
high pressure.
s) Warning! Do not use non-rechargeable
batteries.
SAFETY WARNINGS FOR
CHARGER
WARNING! Read all safety warnings and
all instructions. Failure to follow all
instructions listed below may result in electric
shock, fire and/or serious injury.
Save all warnings and instructions for future
reference.
This appliance can be used by children aged
from 8 years and above and persons with
reduced physical, sensory or mental capabilities
or lack of experience and knowledge if they
have been given supervision or instruction
concerning use of the appliance in a safe way
and understand the hazards involved. Children
shall not play with the appliance. Cleaning and
user maintenance shall not be made by children
without supervision.
If the supply cord is damaged, It must be
replaced by the manufacturer, its service agent
or similarly qualified persons in order to avoid a
hazard.
1. Before charging, read the instructions.
2. Do not charge a leaking battery.
3. Do not use chargers for works other than
HYUNDAI
8
CORDLESS HAMMER DRILL
EN
those for which they are designed.
4. Before charging, ensure your charger is
matching the local AC supply.
5. For indoor use, or do not expose to rain.
6. The charging device must be protected from
moisture.
7. Do not use the charging device outdoors.
8. Do not short out the contacts of battery or
charger.
9. Respect the polarity “+/-“ when charging.
10. Do not open the unit and keep it out of the
reach of children.
11. Do not charge the batteries of other
manufactures or ill-suited models .
12. Ensure that the connection between the
battery charger and battery is correctly
positioned and is not obstructed by foreign
bodies.
13. Keep battery charger’s slots free of foreign
objects and protect against dirt and humidity.
Store in a dry and frost-free place.
14. When charging batteries, ensure that the
battery charger is in a well-ventilated area
and away from inflammable materials.
Batteries can get hot during charging. Do not
overcharge any batteries. Ensure that batteries
and chargers are not left unsupervised during
charging.
15. Do not recharge non-rechargeable batteries,
as they can overheat and break.
16. Longer life and better performance can be
obtained if the battery pack is charged when
the air temperature is between 18
o
C and
24
o
C. Do not charge the battery pack in air
temperatures below 0
o
C, or above 40
o
C. This
is important as it can prevent serious damage
to the battery pack.
17. Charge only battery pack of the same model
provided by manufacturer and of models
recommended by manufacturer.
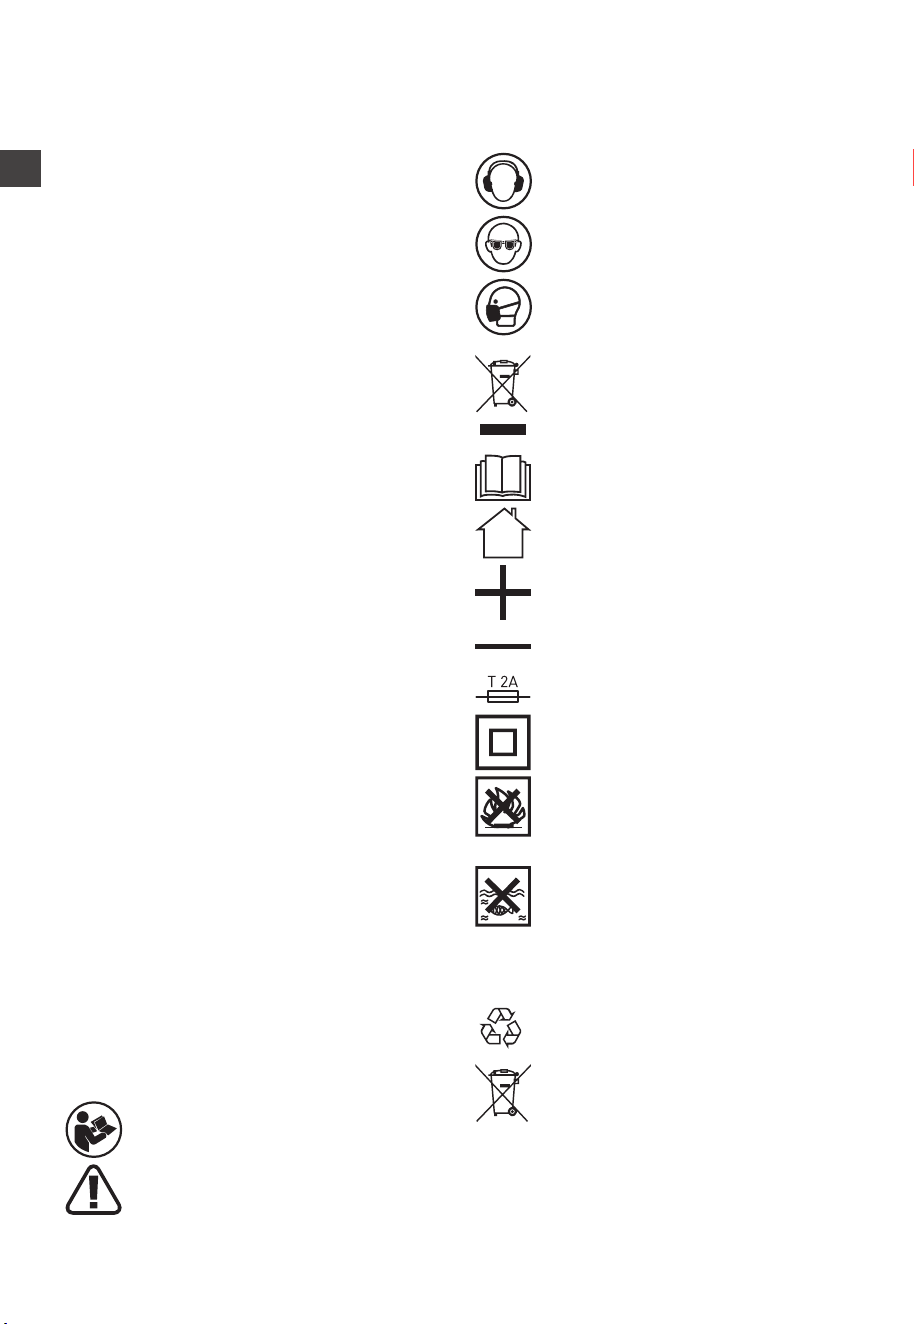
SYMBOLS
To reduce the risk of injury, user must
read instruction manual
Warning
Wear ear protection
Wear eye protection
Wear dust mask
Waste electrical products must not
be disposed of with household waste.
Please recycle where facilities exist.
Check with your local authorities or
retailer for recycling advice.
Read operator's manual
For indoor use only
Positive terminal
Negative terminal
Fuse
Double insulation
Do not burn
Batteries may enter water cycle if
disposed improperly, which can be
hazardous for ecosystem. Do not
dispose of waste batteries as unsorted
municipal waste.
Li-I on
Li-Ion battery This product has been
marked with a symbol relating to
‘separate collection’ for all battery
packs and battery pack. It will then
be recycled or dismantled in order to
reduce the impact on the environment.
Battery packs can be hazardous
for the environment and for human
health since they contain hazardous
substances.
9
EN
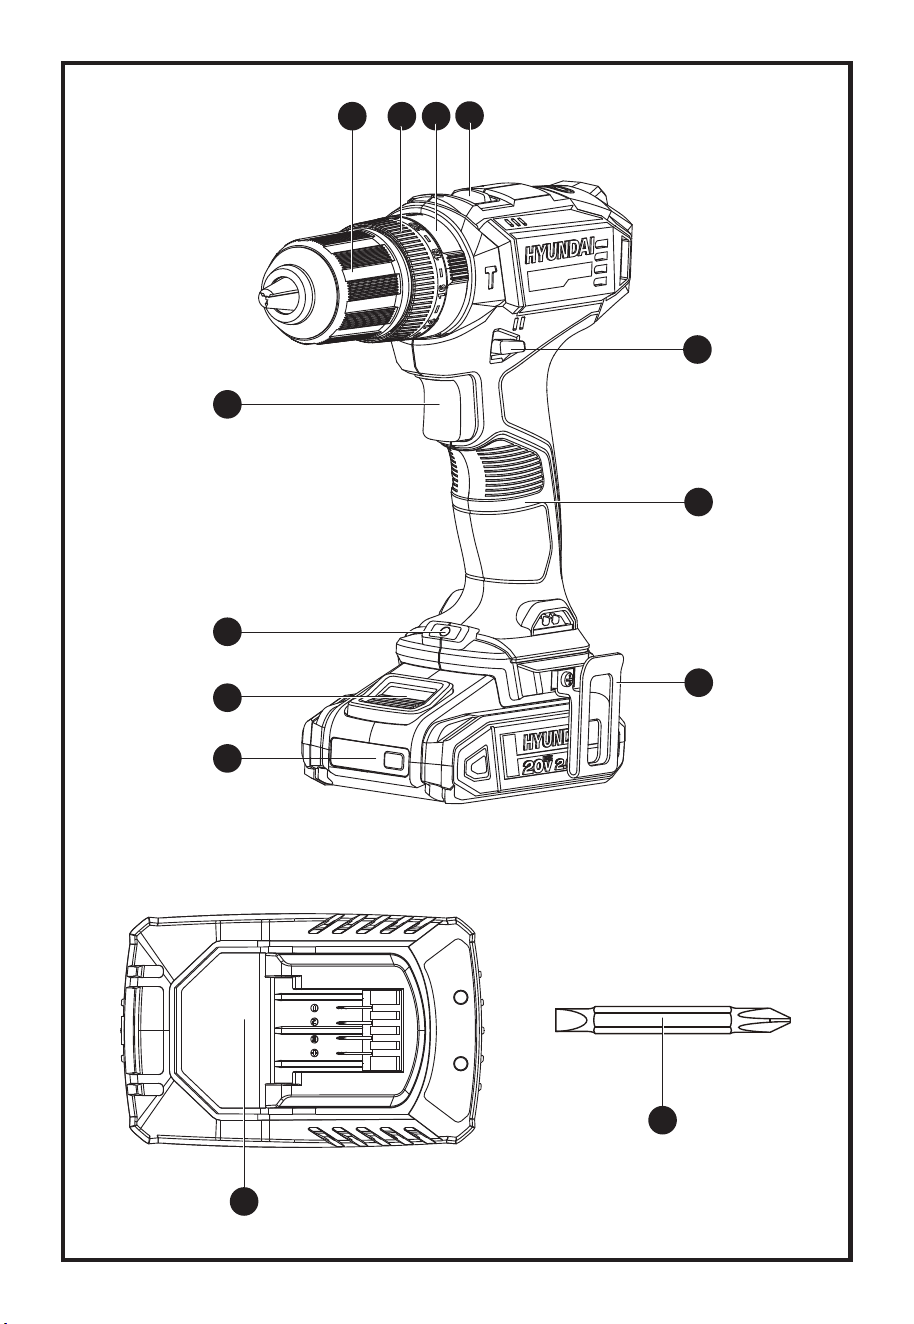
COMPONENT LIST
1. KEYLESS CHUCK
2. TORQUE ADJUSTMENT RING
3. FUNCTION ADJUSTMENT RING
4. TWO-SPEED GEAR CONTROL
5. FORWARD/REVERSE ROTATION CONTROL
6. SOFT GRIP HANDLE
7. BELT CLIP
8. BATTERY PACK *
9. BATTERY PACK RELEASE BUTTON *
10. LED LIGHT
11. ON/OFF SWITCH
12. CHARGER *
13. DOUBLE ENDED BIT *
* Not all the accessories illustrated or described are included in standard delivery.
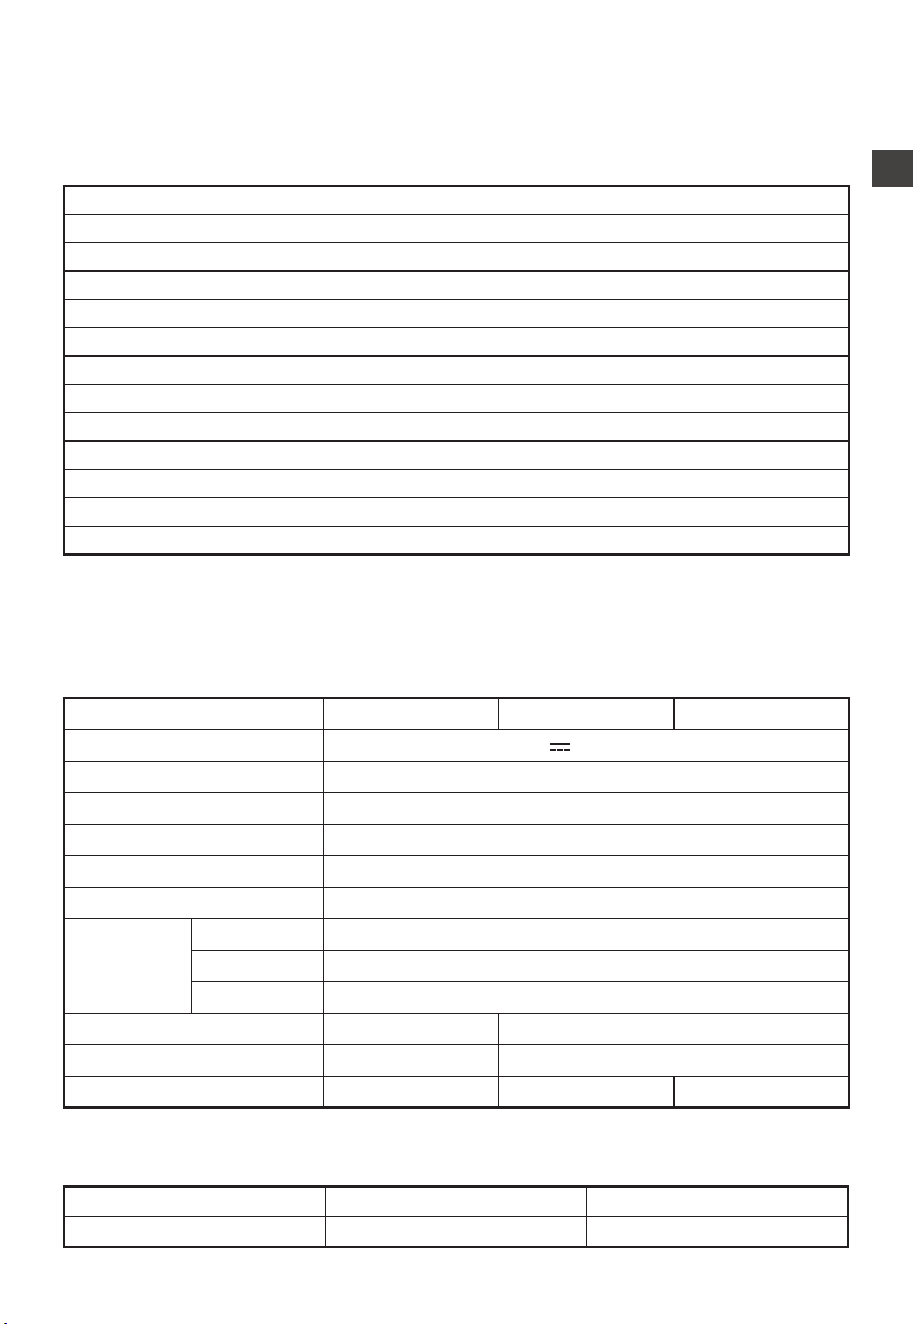
TECHNICAL DATA
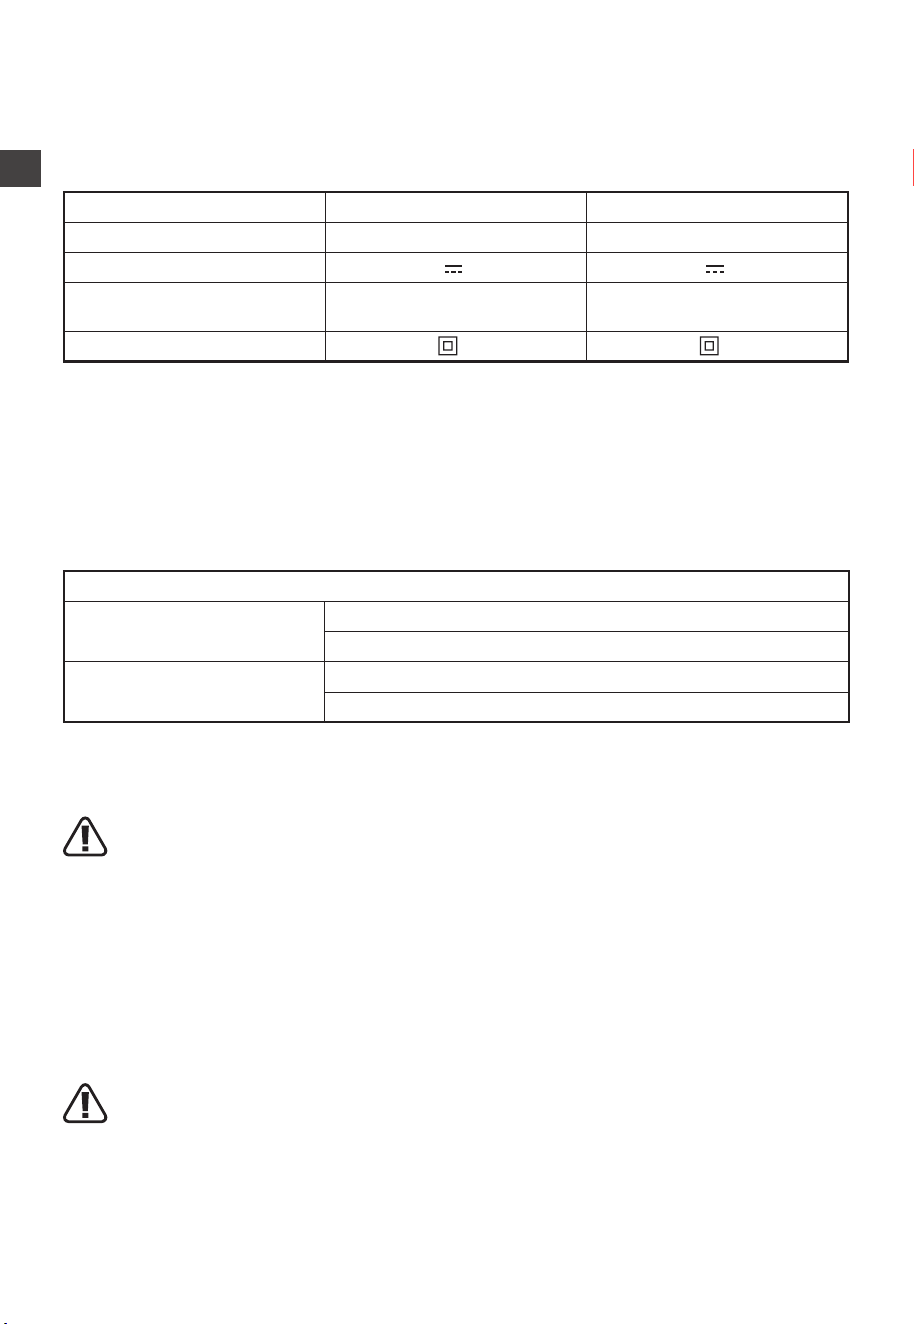
Type HD20S-50 HD20S-50TT HD20S-50T2T (HD20S-50-designation of machinery, representative
of hammer drill)
HD20S-50 HD20S-50TT HD20S-50T2T
Voltage 18V
(20V Max.)
No load speed 0-400/0-1600 /min
Impact rate 0-6800/0-27200 bpm
Number of clutch positions 20+1+1
Max. torque 50 N.m
Chuck capacity 13 mm
Max. drilling
capacity
Steel 13 mm
Concrete 13 mm
Wood 35 mm
Battery pack / BI20-2 (2.0Ah)
Charger / C20-2 (2.0A)
Machine weight 1.14 kg 1.5 kg 1.5 kg
SUITABLE BATTERY PACKS
Item number BI20-2 BI20-4
Battery capacity 2.0Ah 4.0Ah
YOUR PRODUCT
HYUNDAI
10
CORDLESS HAMMER DRILL
EN
SUITABLE CHARGERS
Item number C20-2 C20-4
Charger input 100-240V~50/60Hz, 55W 100-240V~50/60Hz, 95W
Charger output 20V
2.0A 20V 4.0A
Charging time (approx.)
1hr (2.0 Ah)
2hrs (4.0 Ah)
30mins (2.0 Ah)
60mins (4.0 Ah)
Charger protection class
/II /II
NOISE INFORMATION
A weighted sound pressure: L
pA
= 89.2 dB(A) K
pA
= 5 dB(A)
A weighted sound power: L
wA
= 97.2 dB(A) K
wA
= 5 dB(A)
Wear ear protection.
VIBRATION INFORMATION
Vibration total values (triax vector sum) determined according to EN 62841:
Drilling into metal
Vibration emission value: a
h,D
= 3.987 m/s²
Uncertainty K = 1.5 m/s²
Impact drilling into concrete
Vibration emission value: a
h,ID
= 12.14 m/s²
Uncertainty K = 1.5 m/s²
The declared vibration total value and the declared noise emission value have been measured in
accordance with a standard test method and may be used for comparing one tool with another.
The declared vibration total value and the declared noise emission value may also be used in a
preliminary assessment of exposure.
WARNING! The vibration and noise emissions during actual use of the power tool can differ
from the declared value depending on the ways in which the tool is used especially what
kind of workpiece is processed dependant on the following examples and other variations on how
the tool is used:
How the tool is used and the materials being cut or drilled.
The tool being in good condition and well maintained.
The use of the correct accessory for the tool and ensuring it is sharp and in good condition.
The tightness of the grip on the handles and if any anti vibration and noise accessories are used.
And the tool is being used as intended by its design and these instructions.
This tool may cause hand-arm vibration syndrome if its use is not adequately managed.
WARNING! To be accurate, an estimation of exposure level in the actual conditions of use
should also take account of all parts of the operating cycle such as the times when the tool
is switched off and when it is running idle but not actually doing the job. This may significantly
reduce the exposure level over the total working period.
Helping to minimise your vibration and noise exposure risk.
Always use sharp chisels, drills and blades.

11
EN
YOUR PRODUCT
Maintain this tool in accordance with these instructions and keep well lubricated (where appropriate).
If the tool is to be used regularly then invest in anti vibration and noise accessories.
Plan your work schedule to spread any high vibration tool use across a number of days.
ACCESSORIES
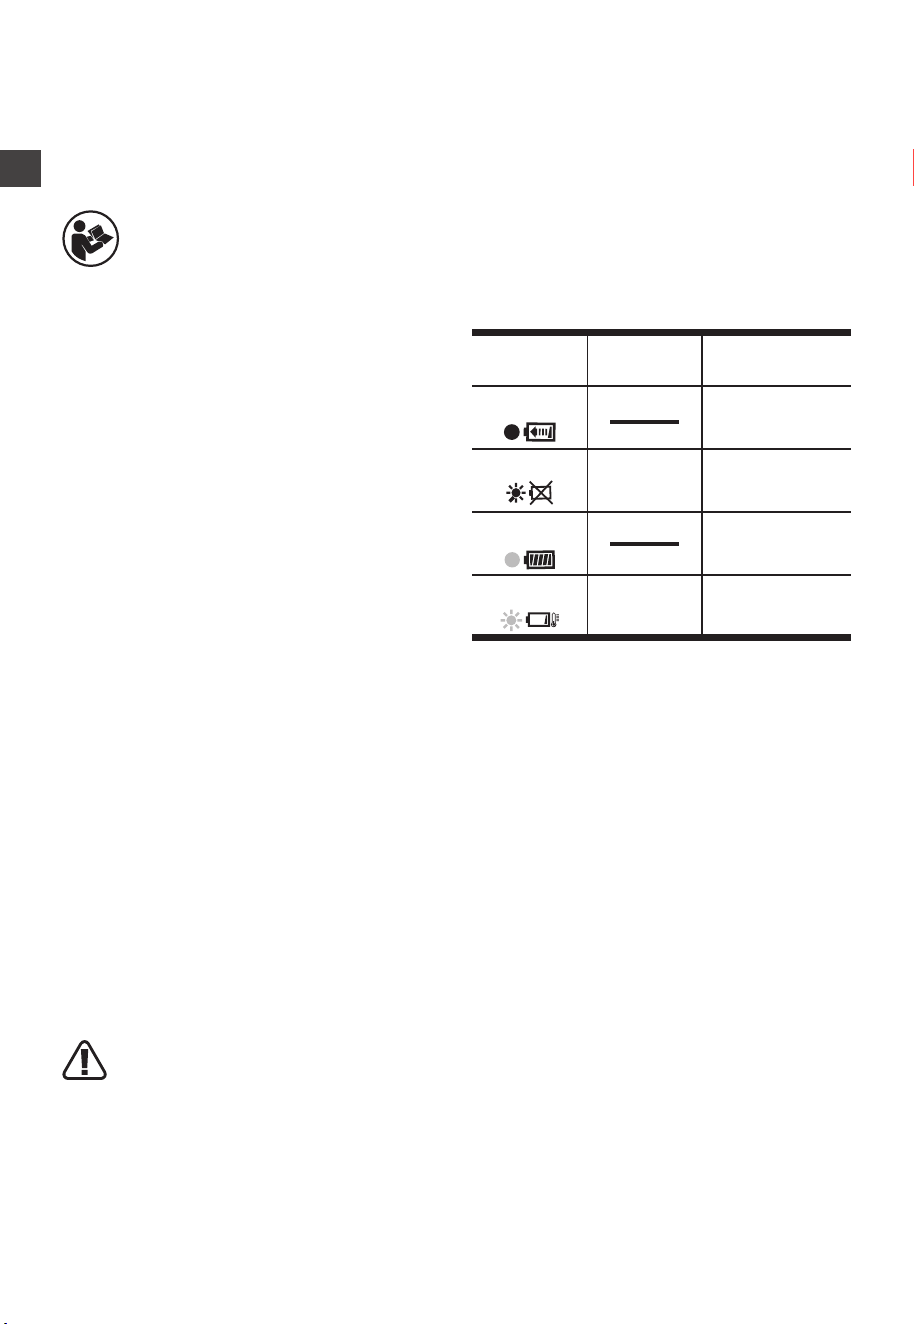
HD20S-50 HD20S-50TT HD20S-50T2T
Battery pack / 1 2
Charger / 1 1
Belt clip 1 1 1
Double ended bit (PH2/SL5.5) 1 1 1
We recommend that you purchase your accessories from the same store that sold you the tool. Refer to
the accessory packaging for further details. Store personnel can assist you and offer advice.
HYUNDAI
12
CORDLESS HAMMER DRILL
EN
OPERATING
INSTRUCTIONS
NOTE: Before using the tool, read the
instruction book carefully.
INTENDED USE
The machine is intended for screwdriving or
drilling into a variety of materials and impact
drilling into brick and masonry.
BEFORE PUTTING INTO OPERATION
1. TO CHARGE THE BATTERY PACK
Do not use any charger other than that
specifically provided for use with the
equipment.
If the battery pack is very hot you must remove
your battery pack from the charger and allow
time for the battery to cool down before
recharging.
Please charge the battery to reach full before
storage. If the tool will not be used for long
periods of time, charge the battery every 3
months.
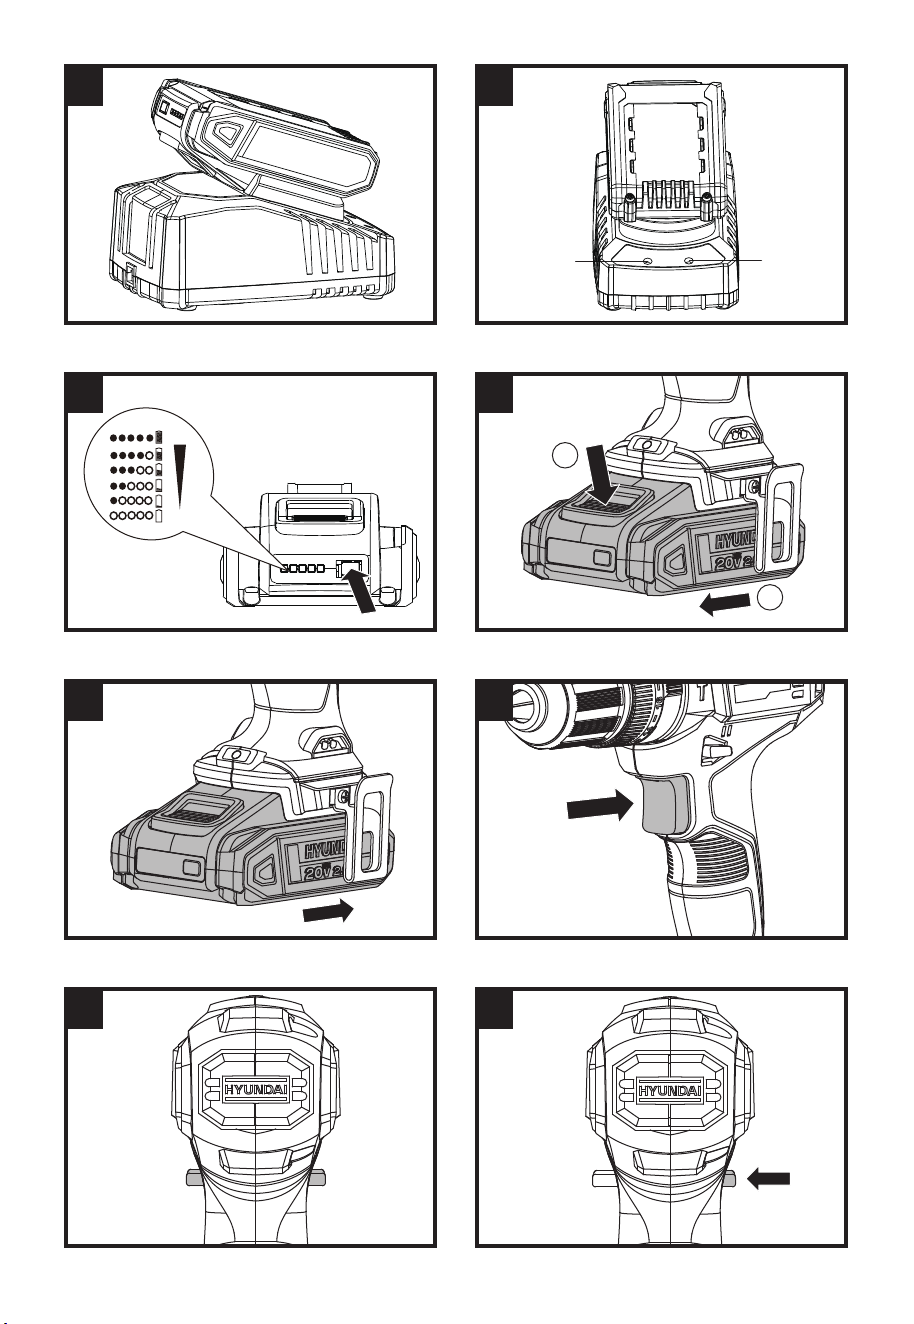
- CHARGING PROCEDURE (SEE FIG. A1)
1) Plug the charger into an appropriate outlet.
The green light will illuminate.
2) Slide the battery pack into the charger, make
sure the battery is in the correct charge
position firmly. The green light will be off
and red light will illuminate to indicate the
charging process has started.
3) When charging is completed, the red light
turn off and green light will illuminate.
4) After fully charged, unplug the charger and
remove the battery pack.
NOTE: If the battery pack is locked in the
charger, press the battery pack release button
and remove it.
WARNING! When battery charge runs
out after continuously use or exposure
to direct sunlight or heat, allow time for the
tool to cool down before re-charging to
achieve the full charge.
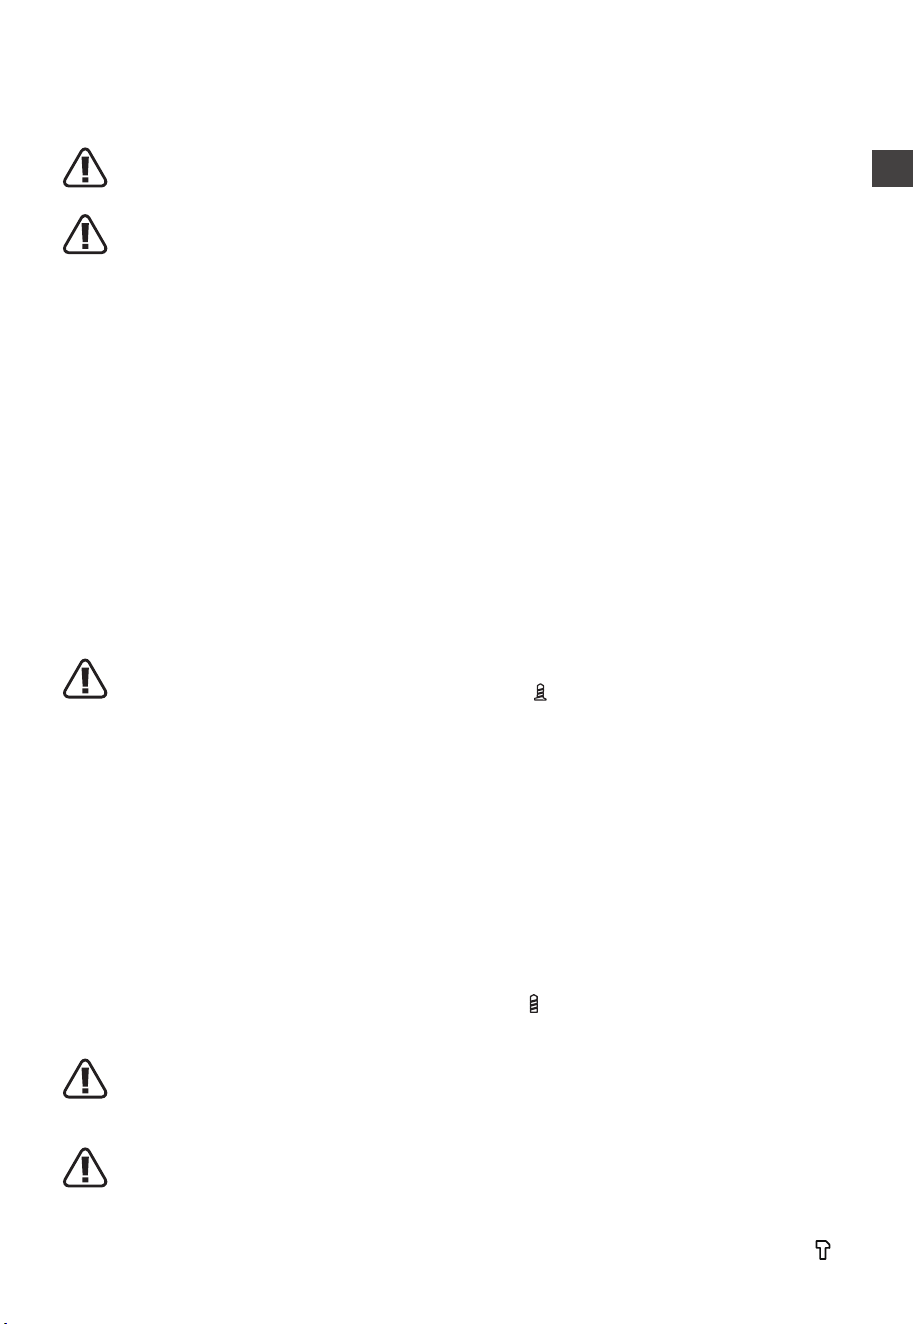
- CHARGING INDICATOR (SEE FIG. A2)
This charger is designed to detect some
problems that can arise with battery packs.
Indicator lights indicate problems (see table
below). If this occurs, insert a new battery
pack to determine if the charger is ok. If the
new battery charges correctly, then the original
pack is defective and should be returned to a
service center or recycling service center. If the
new battery pack displays the same problem
as the original battery pack, have the charger
tested at an authorized service center.
Light
ON/OFF
flash
Status
Red on
Charging
Red flash
- - - - - Defective Battery
Green on
Fully Charged
Green flash
- - - - -
Battery too Hot/
Cold
- TO CHECK THE POWER CONDITION OF
BATTERY PACK (SEE FIG. A3)
The battery level can be known from the battery
indicator light by pressing the button beside the
lights.
2. TO REMOVE OR INSTALL THE BATTERY
PACK INTO THE TOOL (SEE FIG. B1, B2)
To remove the battery pack, depress the battery
pack release button firmly first, then slide the
battery pack out from your tool.
To install the battery pack, slide the fully charged
battery pack onto the tool with sufficient force
until it clicks into position.
OPERATION
1. ON/OFF SWITCH (SEE FIG. C)
Depress the on/off switch to start and release
it to stop your drill. The on/off switch is fitted
with a brake function which stops your chuck
immediately when you quickly release the
switch.
It is also a variable speed switch that delivers
higher speed and torque with increased trigger
pressure. Speed is controlled by the amount of
switch trigger depression.
13
EN
OPERATION
WARNING! Do not operate for long
periods at low speed because excess
heat will be produced internally.
WARNING! When overload occurs,
release the on/off switch immediately to
avoid the motor overheating.
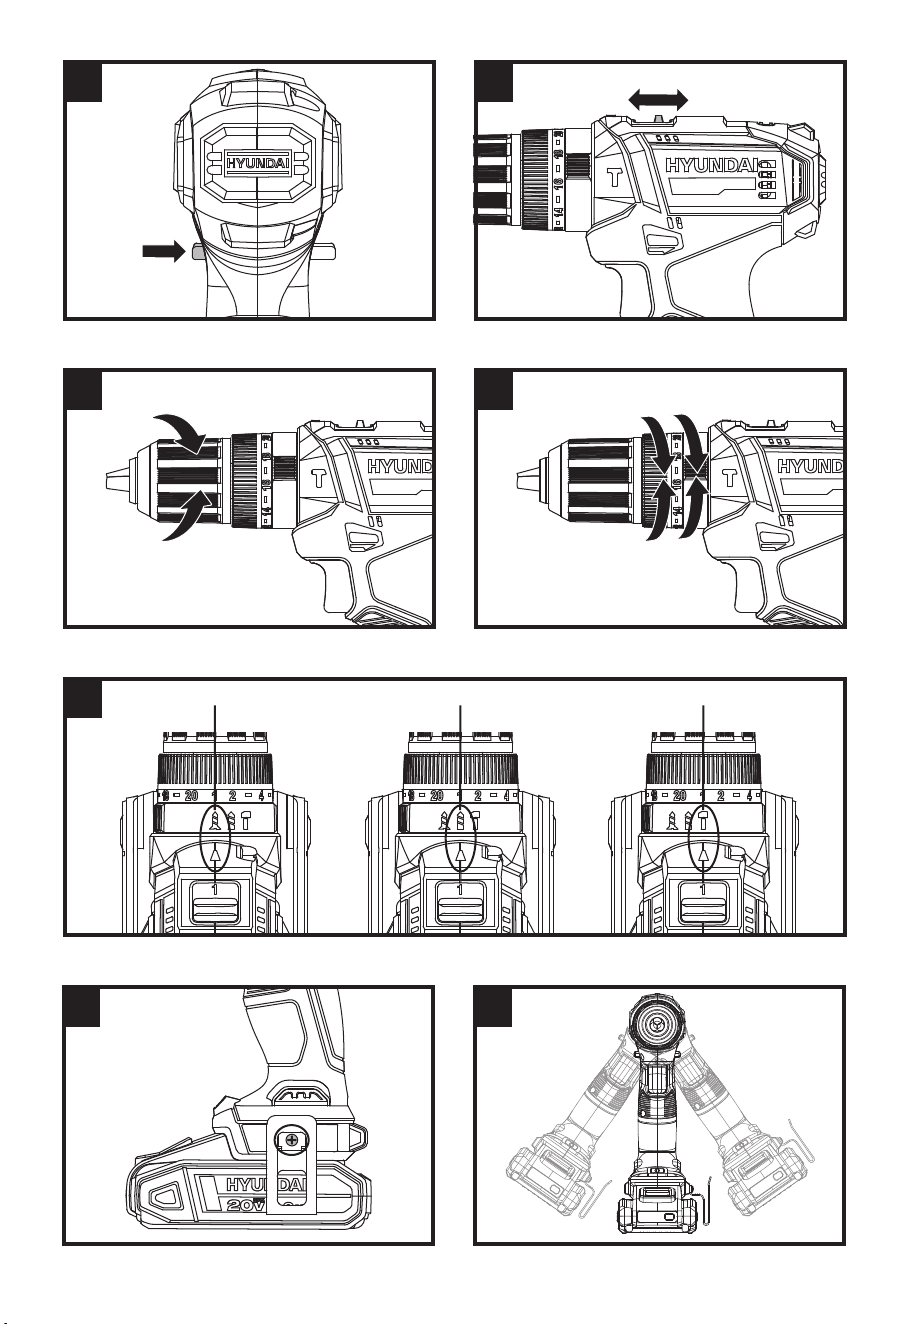
2. SWITCH LOCK (SEE FIG. D)
The switch trigger can be locked in the OFF
position. This helps to reduce the possibility of
accidental starting when not in use. To lock the
switch trigger, place the forward/reverse rotation
control in the center position.
3. FORWARD/REVERSE ROTATION CONTROL
(SEE FIG. E1, E2)
Forward rotation: push the forward/reverse
rotation control to the left (the drill points away
from you). It is used for drilling and screw driving.
Reverse rotation: push the forward/reverse
rotation control to the right (the drill points
away from you). It is used to remove screws or
release a jammed drill bit.
WARNING! Never change the direction
of rotation when the chuck is rotating,
wait until it has stopped!
4. TWO-SPEED GEAR CONTROL (SEE FIG. F)
The drill has a two-speed gear control designed
for drilling or driving at LO (mark is 1) or HI (mark
is 2) speeds. A slide switch is located on top of
the drill to select either LO or HI speed.
When using the drill in the LO speed range, the
speed will decrease and the drill will have
greater power and torque. When using the drill
in the HI speed range, the speed will increase
and the drill will have less power and torque.
GEAR I: Low speed range: for screwdriving or
working with large drilling diameter.
GEAR II: High speed range: for working with
small drilling diameter.
WARNING! To prevent gear damage,
always allow the chuck to come to a
complete stop before changing the direction
of rotation or the two-speed gear control.
WARNING! When overload occurs
frequently on the high speed gear,
switch to the low speed gear to avoid the
motor overheating.
5. CHUCK ADJUSTMENT (SEE FIG. G)
To open the chuck jaws, rotate the front section
of the chuck. Insert the drill bit between the
chuck jaws and rotate the front section in the
opposite direction.
Ensure the drill bit is in the center of the chuck
jaws. Finally, firmly rotate the front chuck
section in the opposite directions. Your drill bit
is now clamped in the chuck.
6. TORQUE ADJUSTMENT (SEE FIG. H1, H2)
The torque settings are controlled and adjusted
by rotating the torque adjustment ring (See
Fig. H1), but only affects the output when the
screwdriving function is selected (See Fig. H2-
a).
The screwdriving function (Fig. H2-a), drilling
function (Fig. H2-b) and impact driling function
(Fig. H2-c) are all selected by using the function
adjustment ring.
a. For the screwdriving function
To select the screwdriving function, rotate the
function adjustment ring so to align the screw
symbol with the triangular indicator on the
top of the drill housing (See Fig. H2-a).
To adjust the torque setting, rotate the torque
adjustment ring to align the required torque
setting number with the triangular indicator on
the top of the drill . The higher the number, the
higher the output torque.
b. For the drilling function
NOTE: When using the drilling function, the
torque control has no effect to the output of the
drill.
To select the drilling function, rotate the
function adjustment ring so the symbol of the
drill bit
aligns with the triangular indicator on
the top of the drill housing (See Fig. H2-b).
The drilling function is used to drill holes in
metal, non ferrous material, wood, plastic and
similar materials.
c. For the impact drilling function
NOTE:
When using the impact drilling function,
the torque control has no effect to the output of
the drill.
To select the impact drilling function, rotate
the function adjustment ring so the symbol
HYUNDAI
14
CORDLESS HAMMER DRILL
EN
function aligns with the triangular indicator on
the top of the drill housing (See Fig. H2-c).
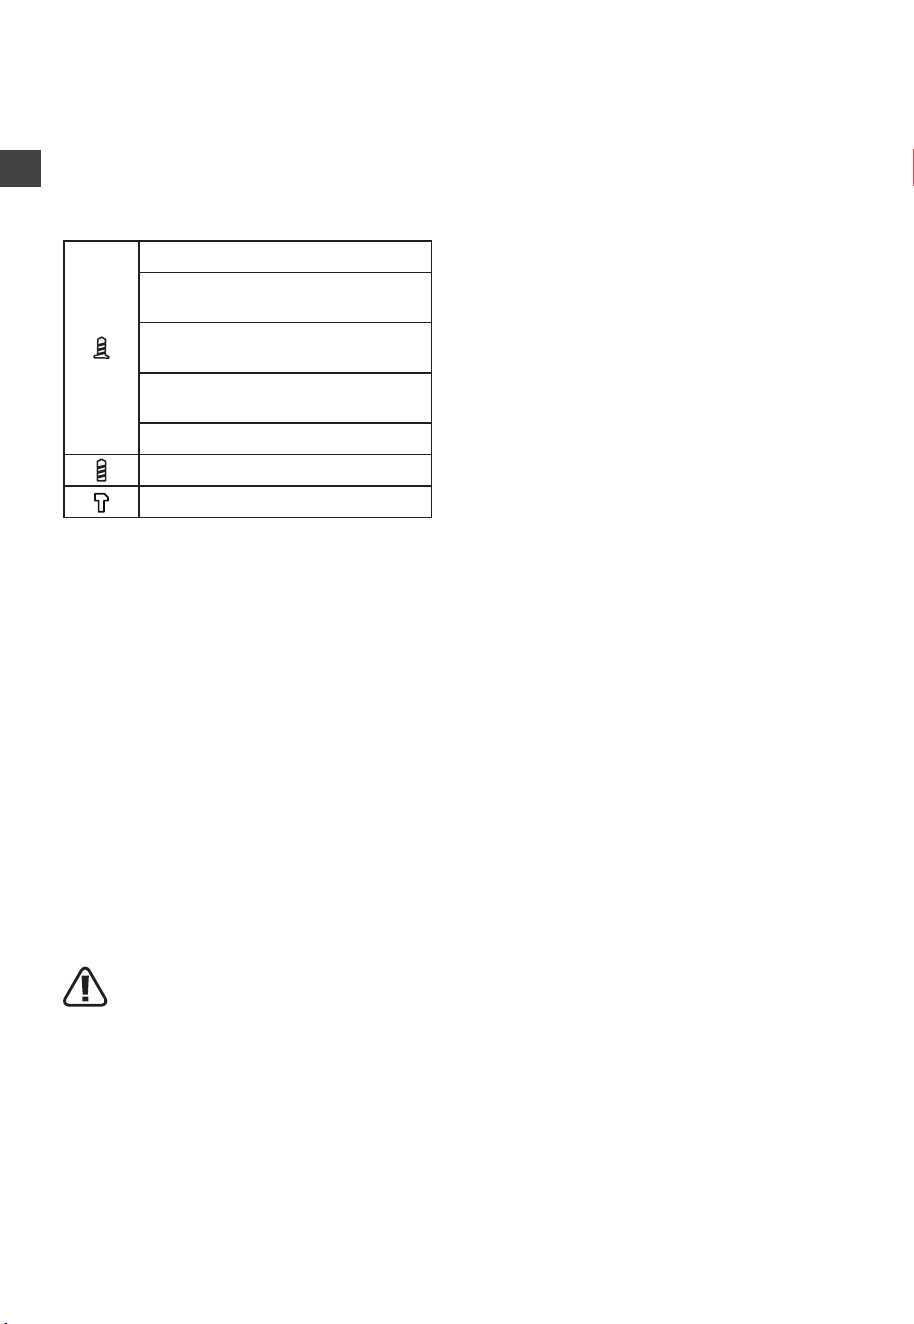
Our recommended settings are following:
1 - 4 for driving small screws
5 - 8 for driving screws into soft
material
9-12 for driving screws into soft
and hard material
13-16 for driving screws into hard
wood
17-20 for driving larger screws
for drilling
for drilling in brick and masonry
7. USING THE LED LIGHT
The LED light allows you to keep a clear view
under less illuminated circumstances. To turn
on the light simply press the on/off switch.
When you release the on/off switch, the light
will be off.
8. DRILLING
When drilling into a hard smooth surface, use a
center punch to mark the desired hole location.
This will prevent the drill bit from slipping off
center as the hole is started. Hold the tool
firmly and place the tip of the bit at the point to
be drilled. Depress the switch trigger to start
the tool.
Move the drill bit into the workpiece, applying
only enough pressure to keep the bit cutting.
Do not force or apply side pressure to elongate
a hole.
WARNING! Tungsten carbide drill bits
should always be used for concrete and
masonry. When drilling in metal, only use HSS
drill bits in good condition. Always use a
magnetic bit holder (not included) when using
short screwdriver bits. When screw-driving,
apply a small quantity of liquid soap or similar
to the screw threads to ease insertion.
9. USING BELT CLIP (SEE FIG. I)
Screw the belt clip on the tool with the screw.
The belt clip can be hooked on your belt or
pocket, etc.
10. AUTOMATIC SPINDLE LOCK (SEE FIG. J)
The automatic spindle lock allows you to use it
as a regular screwdriver. You can give an extra
twist to firmly tighten a screw, loosen a very tigt
screw or continue working when the battery
energy has expired. For manual screwdriver
purposes, the chuck is automatically locked
when the tool is off.
11. OVERLOAD PROTECTION
When overloaded, the motor comes to a stop.
Relieve the load on the machine immediately
and allow cooling for approx. 30 seconds at the
highest no-load speed.
12. TEMPERATURE DEPENDENT OVERLOAD
PROTECTION
When using as intended for the power tool
cannot be subject to overload. When the load
is too high or the allowable battery temperature
is too hot, the electronic control switches off
the power tool until the temperature is in the
optimum temperature range again.
13. PROTECTION AGAINST DEEP
DISCHARGING
The Li-ion battery is protected against deep
discharging by the “Discharging Protection
System”.
When the battery is empty, the machine is
switched off by means of a protective circuit:
The inserted tool no longer rotates.
WORKING HINTS FOR
YOUR DRILL
1. WHY DOES THE DRILL NOT TURN ON
WHEN YOU PRESS THE SWITCH?
The forward/reverse rotation control, which is
on top of the trigger, is positioned in the lock
function. Unlock the forward/reverse rotation
control by putting it into the required rotation
position. Push the trigger and the drill will start
to rotate. Check that the battery is charged and
properly connected to the tool.
2. THE DRILL STOPS BEFORE THE SCREW
IS COMPLETELY TIGHTENED. WHY?
Verify the torque position of the torque adjusting
ring, you can find the torque adjustment ring

15
EN
OPERATION
between the chuck and the drill body. Position
1 is the lowest torque (screw driving force) and
position 20 is the highest torque (screw driving
force). Position
is for drill operation. Position
is for impact drilling operation. Regulate the
torque adjustment ring to a higher position to
reach the best result.
3. I CANNOT FIT THE BATTERY INTO THE
BATTERY CHARGER. WHY?
The battery can be inserted into the charger
only in one direction. Turn the battery around
until it can be inserted into the slot.
4. REASONS FOR DIFFERENT BATTERY
PACK WORKING TIMES
Charging time problems, as above, and having
not used a battery pack for a prolonged time
will reduce the battery pack working time.
This can be corrected after several charge and
discharge operations by charging & working
with your drill. Heavy working conditions such
as large screws into hard wood will use up the
battery pack energy faster than lighter working
conditions. Do not re-charge your battery pack
below 0°C and above 40°C as this will affect
performance.
MAINTENANCE
Remove the battery pack from the tool before
carrying out any adjustment, servicing or
maintenance.
Your power tool requires no additional
lubrication or maintenance. There are no user
serviceable parts in your power tool. Never
use water or chemical cleaners to clean your
power tool. Wipe clean with a dry cloth. Always
store your power tool in a dry place. Keep the
motor ventilation slots clean. Keep all working
controls free of dust. Occasionally you may
see sparks through the ventilation slots. This is
normal and will not damage your power tool.
FOR BATTERY TOOLS
The ambient temperature range for tool and
battery use and storage is 0°C-45°C.
The recommended ambient temperature range
for the charging system during charging is
0°C-40°C.
ENVIRONMENTAL
PROTECTION
Waste electrical products must not be
disposed of with household waste.
Please recycle where facilities exist.
Check with your local authorities or retailer for
recycling advice.
HYUNDAI
16
CORDLESS HAMMER DRILL
EN
EC
Declaration of
Conformity
We: HYUNDAI Corporation Holdings Europe
Am Kronberger Hang 2A, 65824, Schwalbach am Taunus
Germany
Declare that the product detailed below :
Cordless hammer drill
MODEL : HD20S-50 HD20S-50TT HD20S-50T2T
FUNCTION : Drilling
Satisfies the requirements of the Council Directives :
2006/42/EC, 2011/65/EU & (EU)2015/863, 2014/30/EU, (EU) 2023/1542,
2014/35/EU
Standards Conform to:
EN IEC 55014-1, EN IEC 55014-2, EN 62841-1, EN 62841-2-1, EN IEC
63000, EN 62133-2, EN 60335-1, EN 60335-2-29, EN 62233, EN IEC
61000-3-2, EN 61000-3-3
The person authorized to compile the technical file,
Name : Hyundae Kim
Address : HYUNDAI Corporation Holdings Europe
65824 Schwalbach am Taunus, Germany
General Manager
Jaiwon Hur
Project Manager
Sungwoo Hong
Date : 2024.xx.xx