
CORDLESS POLE SAW
HY20CPS
INSTRUCTION MANUAL
WARNING: READ THE INSTRUCTIONS CAREFULLY BEFORE USE. ISS: NOV/24

www.hyundaipowerproducts.co.uk
2
Introduction.......................................................................................................................3
Safety Information............................................................................................................4
Unboxing.........................................................................................................................15
In The Box.........................................................................................................................16
Features...........................................................................................................................18
Assembly..........................................................................................................................20
Operation........................................................................................................................30
Maintenance & Care....................................................................................................33
Technical Data...............................................................................................................36
Recycling & Disposal......................................................................................................37
EU Declaration Of Conformity.......................................................................................39
Notes................................................................................................................................40
Useful Information...........................................................................................................41
Product Record..............................................................................................................42
Contact Us......................................................................................................................43
Contents

3
www.hyundaipowerproducts.co.uk
Introduction
Thank You For Purchasing Your HYUNDAI Product
Important!
We work very hard to give all of our customers the best possible service.
If you have any problems, before leaving negative feedback, please
contact us to give us a chance to resolve the issue. We would be
delighted if you left us positive feedback! Thank you for purchasing this
product.
WARNING: READ THE INSTRUCTION BOOKLET THOROUGHLY BEFORE
USING THE MACHINE. Keep for future reference and pass it on if
the machine is loaned or sold to another user.
This manual has been produced by Hyundai Power Products and should
be kept with the product. Please read and understand these instructions
before you use your product. Failure to do this may result in personal
injury or damage to the product.
The safety precautions and warnings are to ensure your safety and
protect you from harm or damage to the product.
The information contained in this manual was accurate at the time of
production, however HYUNDAI Power Products may make modications
to the product without notication.

www.hyundaipowerproducts.co.uk
4
Safety Information
General Power Tool Safety Warnings
WARNING Read all safety warnings, instructions, illustrations and
specifications provided with this power tool. Failure to follow all
instructions listed below may result in electric shock, fire and/or serious
injury.
Save all warnings and instructions for future reference.
The term "power tool" in the warnings refers to your mains-operated
(corded) power tool or battery-operated (cordless) power tool.
Work Area Safety
a) Keep work area clean and well lit. Cluttered or dark areas invite
accidents.
b) Do not operate power tools in explosive atmospheres, such as in the
presence of ammable liquids, gases or dust. Power tools create sparks
which may ignite the dust or fumes.
c) Keep children and bystanders away while operating a power tool.
Distractions can cause you to lose control.
Electrical Safety (With Charger)
a) Power tool plugs must match the outlet. Never modify the plug in any
way. Do not use any adapter plugs with earthed (grounded) power tools.
Unmodied plugs and matching outlets will reduce risk of electric shock.
b) Avoid body contact with earthed or grounded surfaces, such as pipes,
radiators, ranges and refrigerators. There is an increased risk of electric
shock if your body is earthed or grounded.
c) Do not expose power tools to rain or wet conditions. Water entering a
power tool will increase the risk of electric shock.
d) Do not abuse the cord. Never use the cord for carrying, pulling or
unplugging the power tool. Keep cord away from heat, oil, sharp edges
or moving parts. Damaged or entangled cords increase the risk of
electric shock.
e) When operating a power tool outdoors, use an extension cord suitable
for outdoor use. Use of a cord suitable for outdoor use reduces the risk of
electric shock.
f) If operating a power tool in a damp location is unavoidable, use a
residual current device (RCD) protected supply. Use of an RCD reduces
the risk of electric shock.

5
www.hyundaipowerproducts.co.uk
Safety Information
Personal Safety
a) Stay alert, watch what you are doing and use common sense when
operating a power tool. Do not use a power tool while you are tired
or under the influence of drugs, alcohol or medication. A moment of
inattention while operating power tools may result in serious personal
injury.
b) Use personal protective equipment. Always wear eye protection.
Protective equipment such as a dust mask, non-skid safety shoes, hard
hat, or hearing protection used for appropriate conditions will reduce
personal injuries.
c) Prevent unintentional starting. Ensure the switch is in the off-position
before connecting to power source and/or battery pack, picking up or
carrying the tool. Carrying power tools with your nger on the switch or
energising power tools that have the switch on invites accidents.
d) Remove any adjusting key or wrench before turning the power tool on.
A wrench or a key left attached to a rotating part of the power tool may
result in personal injury.
e) Do not overreach. Keep proper footing and balance at all times. This
enables better control of the power tool in unexpected situations.
f) Dress properly. Do not wear loose clothing or jewellery. Keep your hair
and clothing away from moving parts. Loose clothes, jewellery or long
hair can be caught in moving parts.
g) If devices are provided for the connection of dust extraction and
collection facilities, ensure these are connected and properly used. Use
of dust collection can reduce dust-related hazards.
h) Do not let familiarity gained from frequent use of tools allow you to
become complacent and ignore tool safety principles. A careless action
can cause severe injury within a fraction of a second.
Power Tool Use and Care
a) Do not force the power tool. Use the correct power tool for your
application. The correct power tool will be more effective and safer at
the rate for which it was designed.
b) Do not use the power tool if the switch does not turn it on and off. Any
power tool that cannot be controlled with the switch is dangerous and
must be repaired.
c) Disconnect the plug from the power source and/or remove the battery
pack, if detachable, from the power tool before making any adjustments,
changing accessories, or storing power tools. Such preventive safety

www.hyundaipowerproducts.co.uk
6
measures reduce the risk of starting the power tool accidentally.
d) Store idle power tools out of the reach of children and do not allow
persons unfamiliar with the power tool or these instructions to operate the
power tool. Power tools are dangerous in the hands of untrained users.
e) Maintain power tools and accessories. Check for misalignment or
binding of moving parts, breakage of parts and any other condition that
may affect the power tool’s operation. If damaged, have the power tool
repaired before use. Many accidents are caused by poorly maintained
power tools.
f) Keep cutting tools sharp and clean. Properly maintained cutting tools
with sharp cutting edges are less likely to bind and are easier to control.
g) Use the power tool, accessories and tool bits etc. in accordance with
these instructions, taking into account the working conditions and the
work to be performed. Use of the power tool for operations different from
those intended could result in a hazardous situation.
h) Keep handles and grasping surfaces dry, clean and free from oil and
grease. Slippery handles and grasping surfaces do not allow for safe
handling and control of the tool in unexpected situations.
Battery Tool Use and Care
a) Recharge only with the charger specified by the manufacturer. A
charger that is suitable for one type of battery pack may create a risk of
re when used with another battery pack.
b) Use power tools only with specically designated battery packs. Use
of any other battery packs may create a risk of injury and re.
c) When battery pack is not in use, keep it away from other metal
objects, like paper clips, coins, keys, nails, screws or other small metal
objects, that can make a connection from one terminal to another.
Shorting the battery terminals together may cause burns or a re.
d) Under abusive conditions, liquid may be ejected from the battery;
avoid contact. If contact accidentally occurs, flush with water. If liquid
contacts eyes, additionally seek medical help. Liquid ejected from the
battery may cause irritation or burns.
e) Do not use a battery pack or tool that is damaged or modified.
Damaged or modified batteries may exhibit unpredictable behaviour
resulting in re, explosion or risk of injury.
f) Do not expose a battery pack or tool to re or excessive temperature.
Exposure to re or temperature above 130 °C may cause explosion.
g) Follow all charging instructions and do not charge the battery pack or
tool outside the temperature range specied in the instructions. Charging
improperly or at temperatures outside the specied range may damage
Safety Information
7
www.hyundaipowerproducts.co.uk
Safety Information
the battery and increase the risk of re.
Service
a) Have your power tool serviced by a qualied repair person using only
identical replacement parts. This will ensure that the safety of the power
tool is maintained.
b) Never service damaged battery packs. Service of battery packs
should only be performed by the manufacturer or authorized service
providers.
Pole Saw Safety Warnings
a) Keep the pole saw a sufficient distance away from overhead
electrical power lines.
b) Be aware of the dangerous of operating positions, as well as the risk of
being struck by falling branches or branches that, having hit the ground,
rebound, the operator may be struck by falling branches or by those that
rebound after hitting the ground. Remove the branches in sections.
c) Keep bystanders at a safe distance from the machine during its
operation.
d) Keep rm footing and balance during operation, including the need
to use the harness provided.
e) Use PPE when operating, including hearing protection, eye protection
(visor or glasses) and head protection and clothing.
Safety Warnings for Lithium Battery Pack
WARNING: DO NOT use these batteries if they become damaged, swollen
or hot during charging or use.
WARNING: DO NOT charge these batteries overnight when unattended.
a) Do not dismantle, open or shred cells or battery pack.
b) Do not short-circuit a battery pack. Do not store battery packs
haphazardly in a box or drawer where they may short-circuit each other
or be short-circuited by conductive materials. When battery pack is not
in use, keep it away from other metal objects, like paper clips, coins, keys,
nails, screws or other small metal objects, that can make a connection
from one terminal to another. Shorting the battery terminals together
may cause burns or a re.
c) Do not expose battery pack to heat or fire. Avoid storage in direct
sunlight.

www.hyundaipowerproducts.co.uk
8
d) Do not subject battery pack to mechanical shock.
e) In the event of battery leaking, do not allow the liquid to come into
contact with the skin or eyes. If contact has been made, wash the
affected area with copious amounts of water and seek medical advice.
f) Keep battery pack clean and dry.
h) Wipe the battery pack terminals with a clean dry cloth if they become
dirty.
g) Battery pack needs to be charged before use. Always refer to this
instruction and use the correct charging procedure.
h) Do not maintain battery pack on charge when not in use.
i) After extended periods of storage, it may be necessary to charge
and discharge the battery pack several times to obtain maximum
performance.
j) Recharge only with the charger specied by Hyundai. Do not use any
charger other than that specically provided for use with the equipment.
k) Do not use any battery pack which is not designed for use with the
equipment.
l) Keep battery pack out of the reach of children.
m) Retain the original product literature for future reference.
n) Remove the battery from the equipment when not in use.
o) Dispose of properly.
p) Do not mix cells of different manufacture, capacity, size or type within
a device.
q) Keep the battery away from microwaves and high pressure.
r) Warning! Do not use non-rechargeable batteries.
SAFETY WARNINGS FOR CHARGER
WARNING! Read all safety warnings and all instructions. Failure to
follow all instructions listed below may result in electric shock, re and/or
serious injury.
Save all warnings and instructions for future reference.
WARNING! Never allow children or people unfamiliar with these
instructions to use the product. Local regulations can restrict the minimum
age of the operator.
Keep children, pets, and other people not using the unit a sensible
distance away from the work area. Be alert and shut off the unit if
anyone enters work area. Keep children under the watchful care of a
responsible adult.
Safety Information

9
www.hyundaipowerproducts.co.uk
If the supply cord is damaged, It must be replaced by the manufacturer,
its service agent or similarly qualied persons in order to avoid a hazard.
a
)
Before charging, read the instructions.
b
)
Do not charge a leaking battery.
c
)
Do not use chargers for works other than those for which they are
designed.
d
)
Before charging, ensure your charger is matching the local AC supply.
e
)
For indoor use, or do not expose to rain.
f
)
The charging device must be protected from moisture.
g
)
Do not use the charging device outdoors.
h
)
Do not short out the contacts of battery or charger.
i
)
Respect the polarity “+/-“ when charging.
j
)
Do not open the unit and keep it out of the reach of children.
k
)
Do not charge the batteries of other manufacturers or ill-suited models
l
)
Ensure that the connection between the battery charger and battery is
correctly positioned and is not obstructed by foreign bodies.
m
)
Keep battery charger’s slots free of foreign objects and protect
against dirt and humidity. Store in a dry and frost-free place.
n
)
When charging batteries, ensure that the battery charger is in a well-
ventilated area and away from inflammable materials. Batteries can
get hot during charging. Do not overcharge any batteries. Ensure that
batteries and chargers are not left unsupervised during charging.
o
)
Do not recharge non-rechargeable batteries, as they can overheat
and break.
p
)
Longer life and better performance can be obtained if the battery
pack is charged when the air temperature is between 18
o
C and 24
o
C.
Do not charge the battery pack in air temperatures below 0
o
C, or above
40
o
C. This is important as it can prevent serious damage to the battery
pack.
q
)
Charge only battery pack of the same model provided by
manufacturer and of models recommended by manufacturer.
Safety Information

www.hyundaipowerproducts.co.uk
10
Noise & Vibrations (Where Applicable)
The declared vibration total value and the declared noise emission value
have been measured in accordance with a standard test method and
may be used for comparing one tool with another.
The declared vibration total value and the declared noise emission value
may also be used in a preliminary assessment of exposure.
WARNING: The vibration and noise emissions during actual use of the
power tool can differ from the declared value depending on the ways
in which the tool is used especially. Please consider the following the
factors:
• How the tool is used and the materials being cut.
• The tool being in good condition and well maintained.
• The use of the correct accessory for the tool and ensuring it is sharp
and in good condition.
• The tightness of the grip on the handles and if any anti vibration and
noise accessories are used.
• The tool is being used as intended by its design and these instructions.
This tool may cause hand-arm vibration syndrome if its use is not
adequately managed.
WARNING: For an accurate estimation of exposure level during normal
working conditions, please consider all parts of the operating cycle such
when the tool is switched off or running idle. This may signicantly reduce
the exposure level over the total working period.
Best practices to minimise your exposure:
• Always use sharp chisels, drills and blades (where applicable).
• Maintain this tool in accordance with these instructions and keep well
lubricated (where applicable).
• If the tool is to be used regularly then invest in anti vibration and noise
accessories.
• Plan your work schedule to spread any high vibration tool use across
a number of days.
Safety Information

11
www.hyundaipowerproducts.co.uk
Residual Risks
Even when tool is used as prescribed it is not possible to eliminate all
residual risk factors. The following hazards may arise in connection with
the tool’s construction and design:
1. Damage to lungs if an effective dust mask is not worn.
2. Damage to hearing if effective hearing protection is not worn.
Health defects resulting from vibration emission if the power tool is being
used over longer period of time or not adequately managed and
properly maintained.
WARNING: This machine produces an electromagnetic field during
operation. This eld may under some circumstances interfere with active
or passive medical implants. To reduce the risk of serious or fatal injury,
we recommend persons with medical implants to consult their physician
and the medical implant manufacturer before operating this machine.
Safety Information

www.hyundaipowerproducts.co.uk
12
Safety Information
Intended Use
The HY20CPS is an battery powered pole saw from HYUNDAI.
This machine is a garden tool. The machine is manufactured according
to the latest safety requirements. Every precaution is only effective when
it is followed exactly.
Intended Use
The pole saw is intended to take care of trees and bushes in the private
sector.
The pole saw is designed for cutting tree branches and trunks up to a
diameter that is no longer than the 8''(20cm). DO NOT use for cutting tree
trunks or branches larger than 8''(20cm) in diameter.
User Types
This product is for personal domestic DIY use only.
It is not suitable for commercial, industrial, or trade use.
Improper Use
The pole saw is suitable for cutting wood only. DO NOT use it to saw
plastic, masonry, building materials, or any other items which are not
made of wood.
13
www.hyundaipowerproducts.co.uk
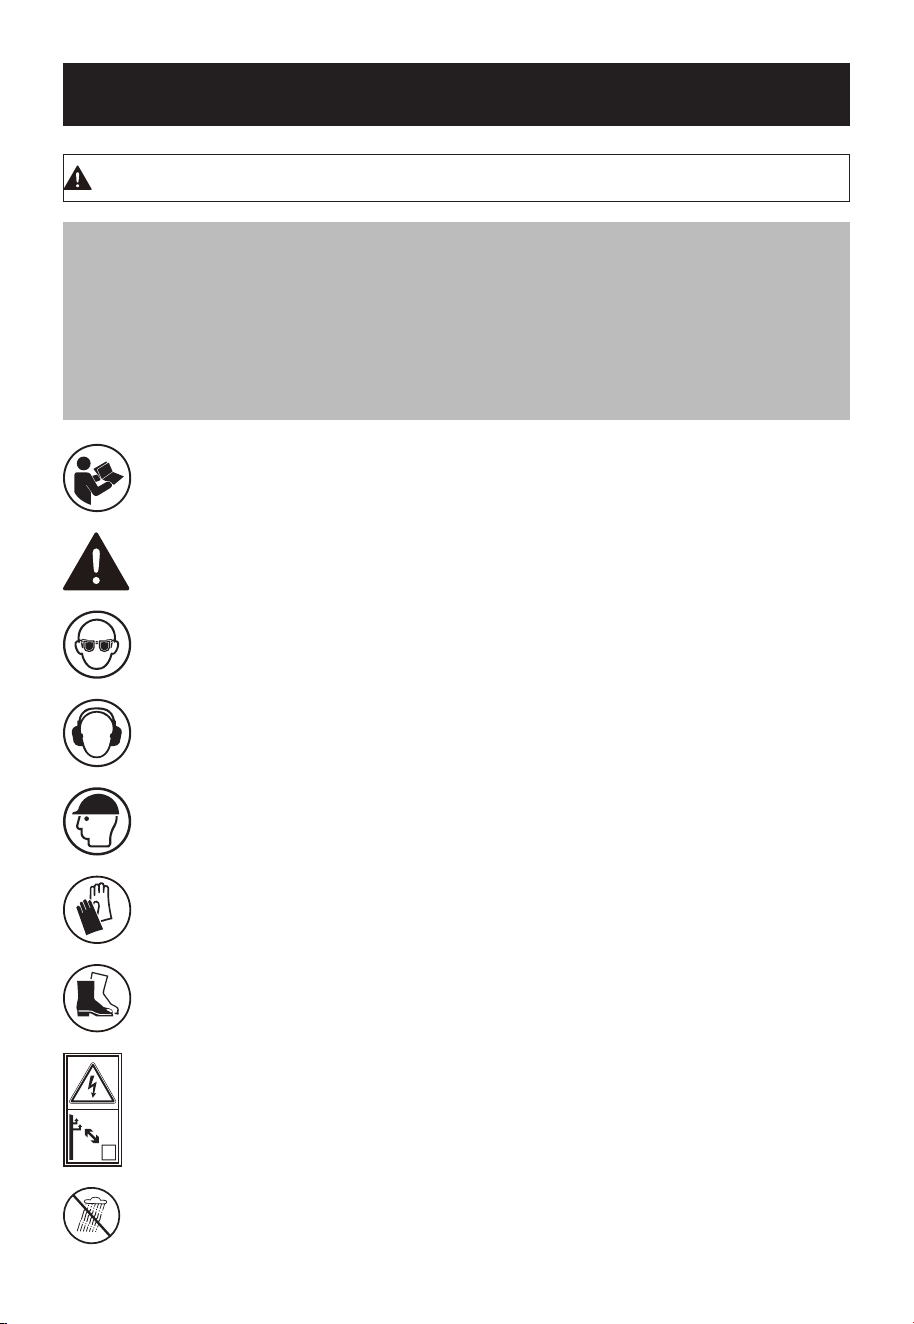
Symbol
Read the operating instructions and store them in a safe
place.
Warning
Wear eye protection
Wear ear protection
Wear head protection
Protective gloves
Protective footwear
Keep sufcient distance away from electrical power lines
Do not expose to moisture
Safety Information
Appropriate Personal Protective Equipment (PPE), MUST be worn at all
times when operating or repairing the machine. No protective equipment
can ensure 100% protection.
When selecting PPE, make sure it’s CE marked and it suits the user in
terms of size, fit, etc. If more than one item of PPE is worn at the same
time, make sure they can be used together, e.g. wearing safety glasses
may disturb the seal of a respirator, causing air leaks.
www.hyundaipowerproducts.co.uk
14
Safety Information
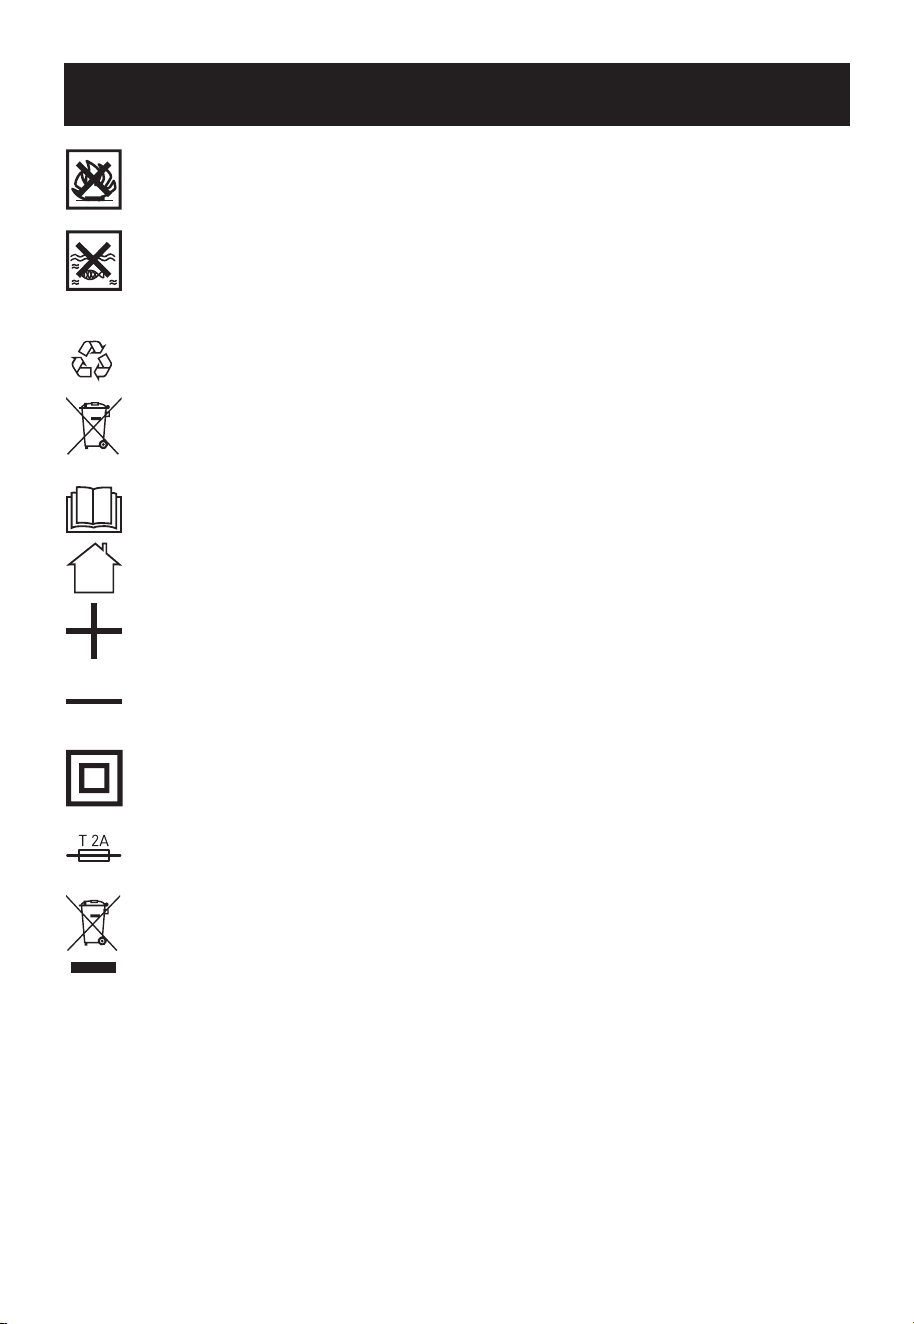
Do not burn
Batteries may enter water cycle if disposed improperly,
which can be hazardous for ecosystem. Do not dispose of
waste batteries as unsorted municipal waste.
Li-I on
Li-Ion battery This product has been marked with a symbol
relating to ‘separate collection’ for all battery packs and
battery pack. It will then be recycled or dismantled in
order to reduce the impact on the environment. Battery
packs can be hazardous for the environment and for
human health since they contain hazardous substances.
Read operator's manual
For indoor use only
Positive terminal
Negative terminal
Double insulation
Fuse
Waste electrical products must not be disposed of with
household waste. Please recycle where facilities exist.
Check with your local authorities or retailer for recycling
advice.

15
www.hyundaipowerproducts.co.uk
Unboxing
WARNING: Unboxing and assembling the machine should be done on
a at, surface with enough room. Disposal of the packaging should be
done in accordance with the local regulations in force.
WARNING: Some of the packaging material may be harmful to
children. Keep out of reach of children.
1. Carefully remove the product from the packaging and examine it for
any sign of damage caused during shipping.
2. Lay the contents out and check them. If any part is damaged or
missing, you must not use the machine. Contact HYUNDAI POWER
PRODUCTS immediately.
3. You must keep the packaging material in case the machine needs to
be returned or repaired.
4. Ensure that you have all the accessories and tools you need for
assembly and operation including the suitable personal protective
equipment.
www.hyundaipowerproducts.co.uk
16
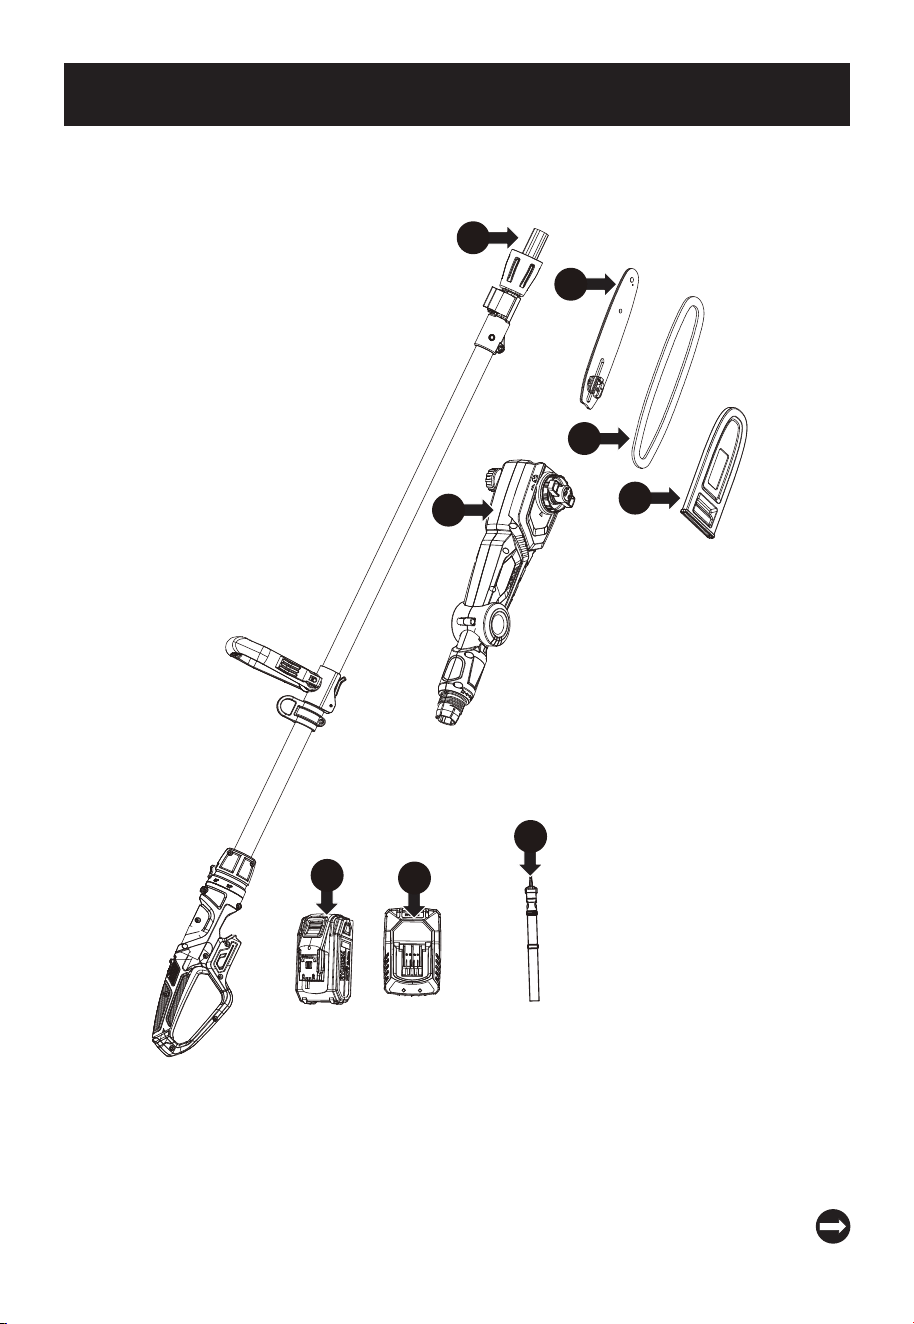
*Not To Scale
In The Box
Descriptions on next page
A
B
C
D
E
F
G
H

17
www.hyundaipowerproducts.co.uk
In The Box
AA
Handle assembly
BB
Chain bar
CC
Chain
DD
Chain bar sheath
EE
Saw head assembly
FF
Battery pack
GG
Charger
HH
Shoulder strap
www.hyundaipowerproducts.co.uk
18
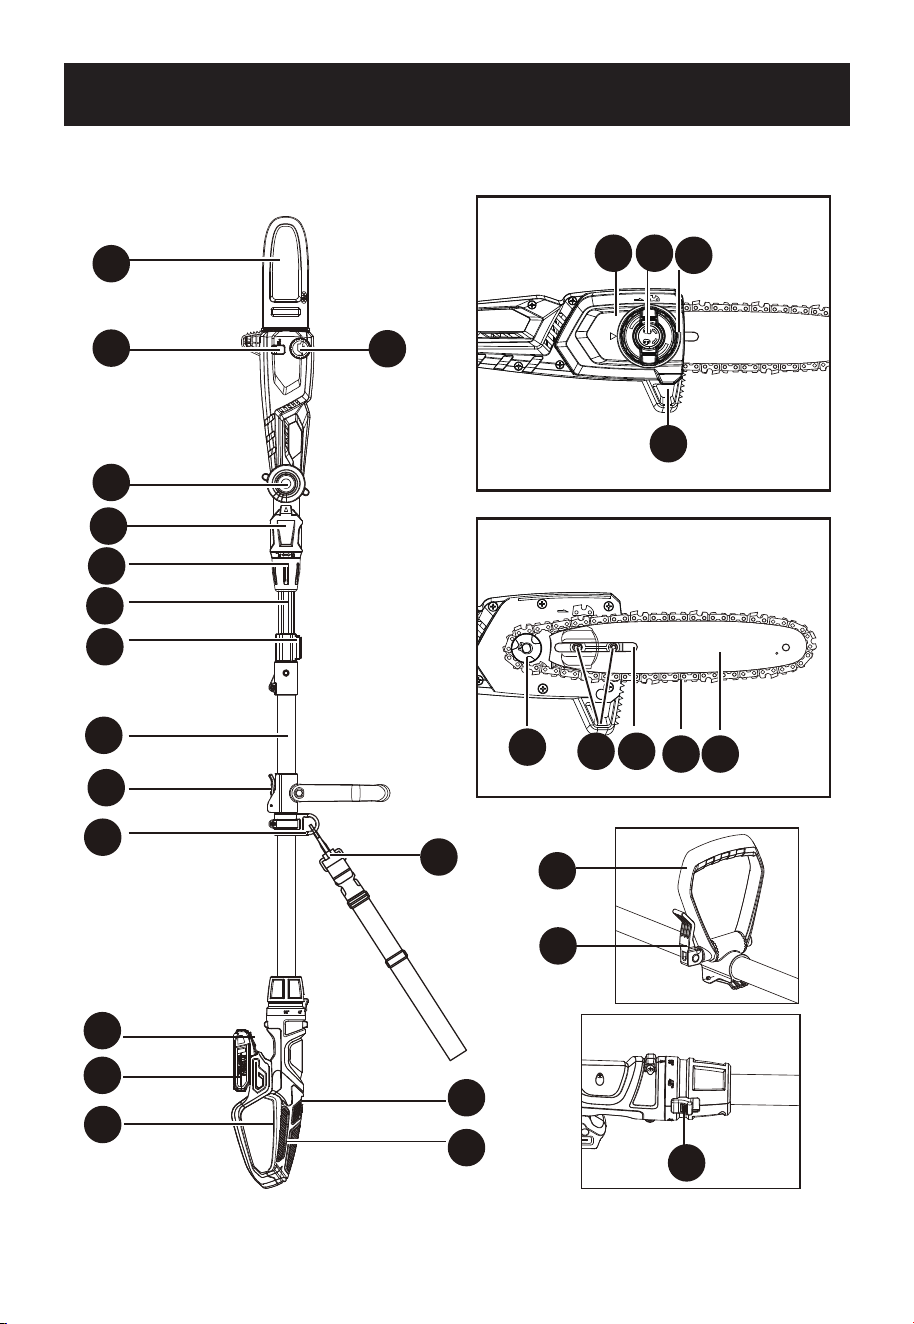
Features
A
R S
T
U
V
AA
BB
cc
W X
Y Z
C
D
E
F
G
H
I
J
L
K
M
N
O
P
Q
B

19
www.hyundaipowerproducts.co.uk
Features
AA
Oil filler cap
BB
Chain bar sheath
CC
Oil level window
DD
Release button for head angle adjusting
EE
Saw head assembly
FF
Collar
GG
Upper telescopic pole
HH
Clamping lever for extending / shortening the telescopic pole
II
Lower telescopic pole
JJ
Auxiliary handle lock knob
KK
Shoulder strap
LL
Shoulder strap connector
MM
Battery pack release button
NN
Battery pack
OO
On/Off switch
PP
Hand grip area
QQ
Trigger safety lock button
RR
Chain sprocket cover
SS
Chain sprocket cover tensioning knob
TT
Saw chain tensioning knob
UU
Spiked bumper
VV
Drive sprocket
WW
Two guide pins
XX
Slotted hole
YY
Saw chain
ZZ
Guide bar
AAAA
Auxiliary handle
BBBB
Quick release knob for auxiliary handle
CCCC
Main handle rotary control button
www.hyundaipowerproducts.co.uk
20
Assembly
Assembly Overview
There are 12 steps to the assembly:
STEP 1. Installing the Pole Saw Attachment
STEP 2. Fitting the Saw Chain and Guide Bar
STEP 3. Tensioning the Saw Chain
STEP 4. Chain Lubrication
STEP 5. Filling Saw Bar and Chain Oil
STEP 6. Attaching/Setting the Shoulder Strap
STEP 7. Adjusting the Telescopic Pole
STEP 8. Tilt Saw Head
STEP 9. Adjusting the Angle of the Auxiliary Handle
STEP 10. Adjusting the Position of the Auxiliary Handle
STEP 11. Adjusting the Main Handle
STEP 12. Battery Charging and Installation
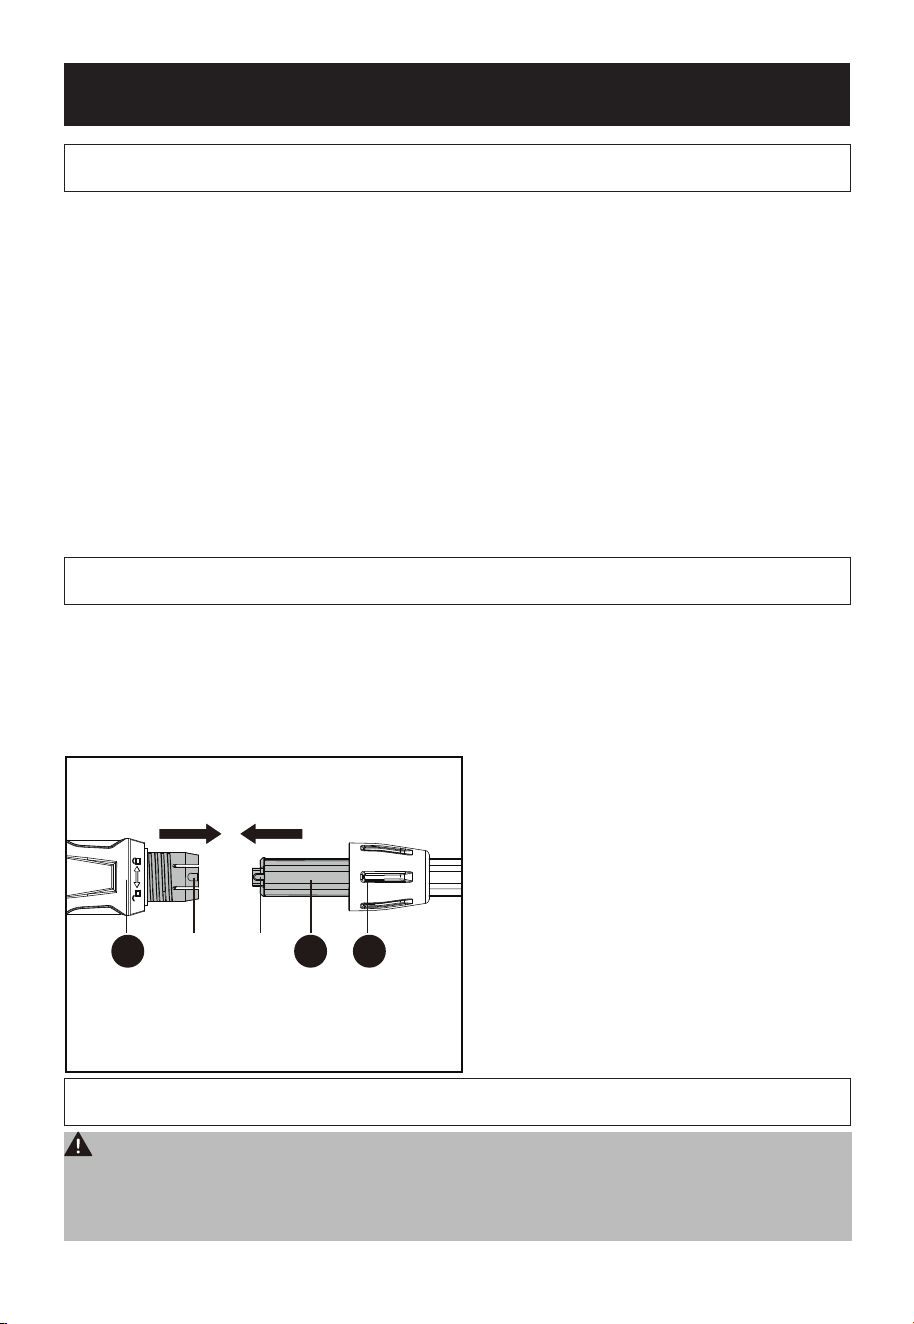
STEP 1 : Installing the Pole Saw Attachment
1. Slide the end of the hexagonal aluminum pipe on the upper telescopic
pole (G) into the saw head assembly (E) until it reaches the stop. Ensure
that the nose (b) of the hexagonal aluminum pipe aligns properly
with the nut (a) on the saw head assembly (E) during this process.
2. Secure the connection by fastening both parts with the collar (F).
ba
E FG
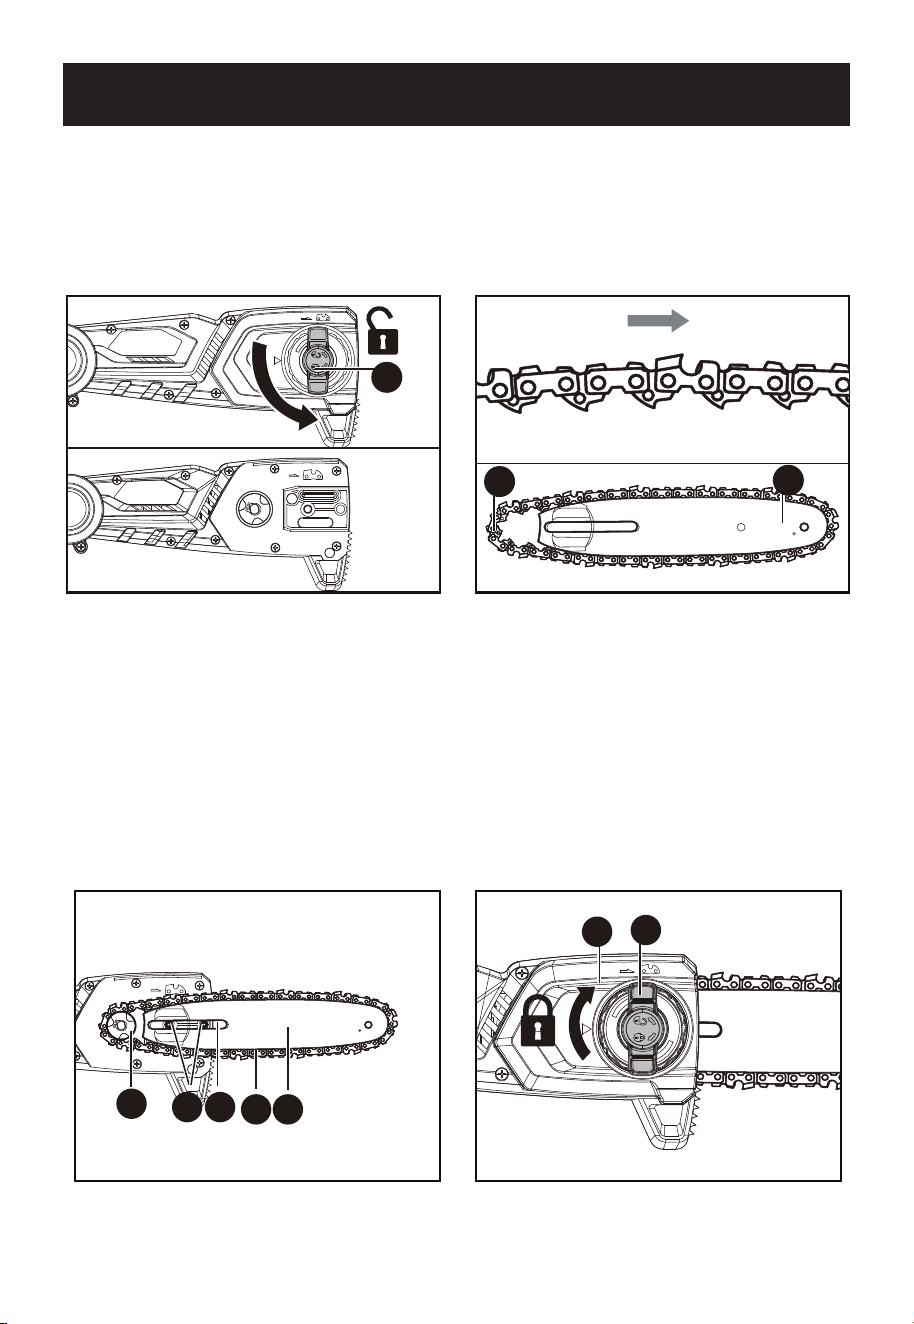
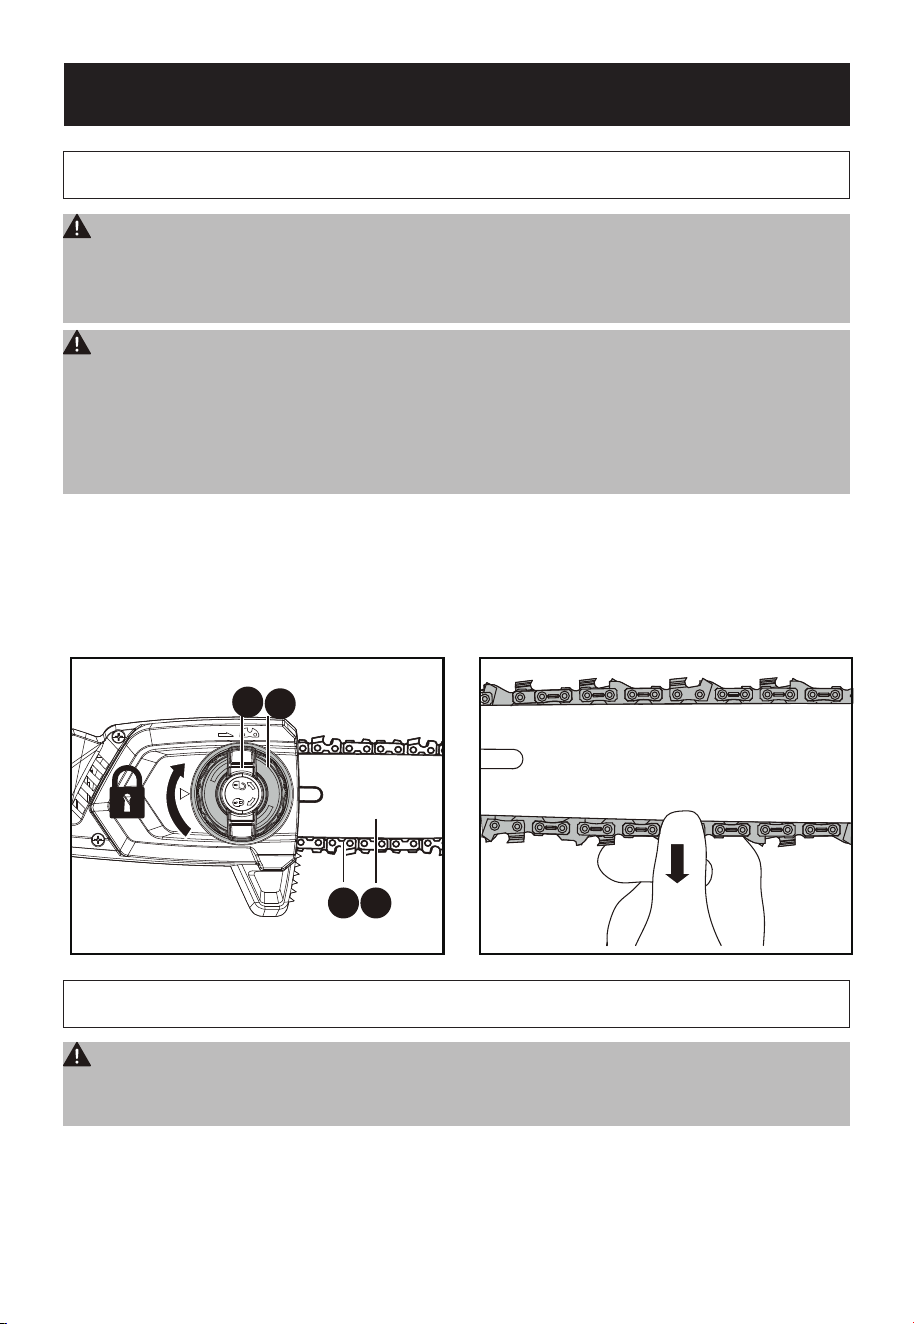
STEP 2 : Fitting the Saw Chain and Guide Bar
WARNING: Danger of laceration injuries. The sharp edges of the saw
chain can cause serious cuts during assembly.
-Always remove the rechargeable battery (N) before assembling.
- Wear safety gloves when handling the saw chain (Y) and guide bar (Z).
21
www.hyundaipowerproducts.co.uk
Assembly
1. Turn the chain sprocket cover tensioning knob (S) anti-clockwise to
loosen it, then remove the chain sprocket cover (R).
2. Arrange the saw chain (Y) in a loop, ensuring the angled cutting edges
of the chain links face clockwise.
3. Fit the saw chain (Y) into the groove of the guide bar (Z).
S
Y
Z
4. Place the guide bar (Z) along with the saw chain (Y) into the open
housing, ensuring the saw chain (Y) is looped around the drive sprocket
(V). Position the guide bar (Z) so that the two guide pins (W) engage with
the slotted hole (X) on the guide bar (Z). Make sure the saw chain (Y)
sits properly within the groove of the guide bar (Z) and around the drive
sprocket (V).
5. Reattach the cover (R) by securing the rear section rst, followed by
the front, ensuring the pin (W) is correctly aligned. Partially tighten the
chain sprocket cover tensioning knob (S), leaving it loose enough to
allow for saw chain (Y) tensioning, which will be performed later.
S
V
W X
Y Z
R
www.hyundaipowerproducts.co.uk
22
Assembly
STEP 3 : Tensioning the Saw Chain
WARNING: Before performing any servicing, turn off the device and
remove the battery (N). Proper tensioning of the saw chain (Y) is crucial
for both your safety and performance of your device. Maintaining correct
chain tension will also extend the lifespan of your equipment.
WARNING: Always wear gloves when tensioning the saw chain (Y).
Before using the chainsaw, after the rst cuts, and periodically during use,
check the saw chain tension to ensure proper performance. New chains
may stretch signicantly during initial operation, which is normal during
the break-in period. Over time, the frequency of tension adjustments will
decrease as the chain settles.
1. Turn the saw chain tensioning knob (T) clockwise until it is securely
hand-tight. The tension is automatically adjusted as the knob is tightened.
2. Make sure the tension set by the automatic saw chain tensioning knob
(T) is suitable for operation. Proper chain tension is achieved when the
chain (Y) can be lifted approximately 0.08’’–0.16’’ (2–4 mm) from the
center of the guide bar (Z).
Y Z
S
T
STEP 4 : Chain Lubrication
WARNING: Always switch off the device and allow the motor to
cool before re-filling bar and chain oil. There is a risk of fire if chain oil
overows.
Guide bar (Z) and saw chain (Y) must always be oiled. Non-observance
of this will result in increased wear on the guide bar (Z) and saw chain (Y).
The device is equipped with an automatic oil system. As soon as the
motor is engaged, the oil ows faster to the guide bar (Z).

23
www.hyundaipowerproducts.co.uk
Assembly
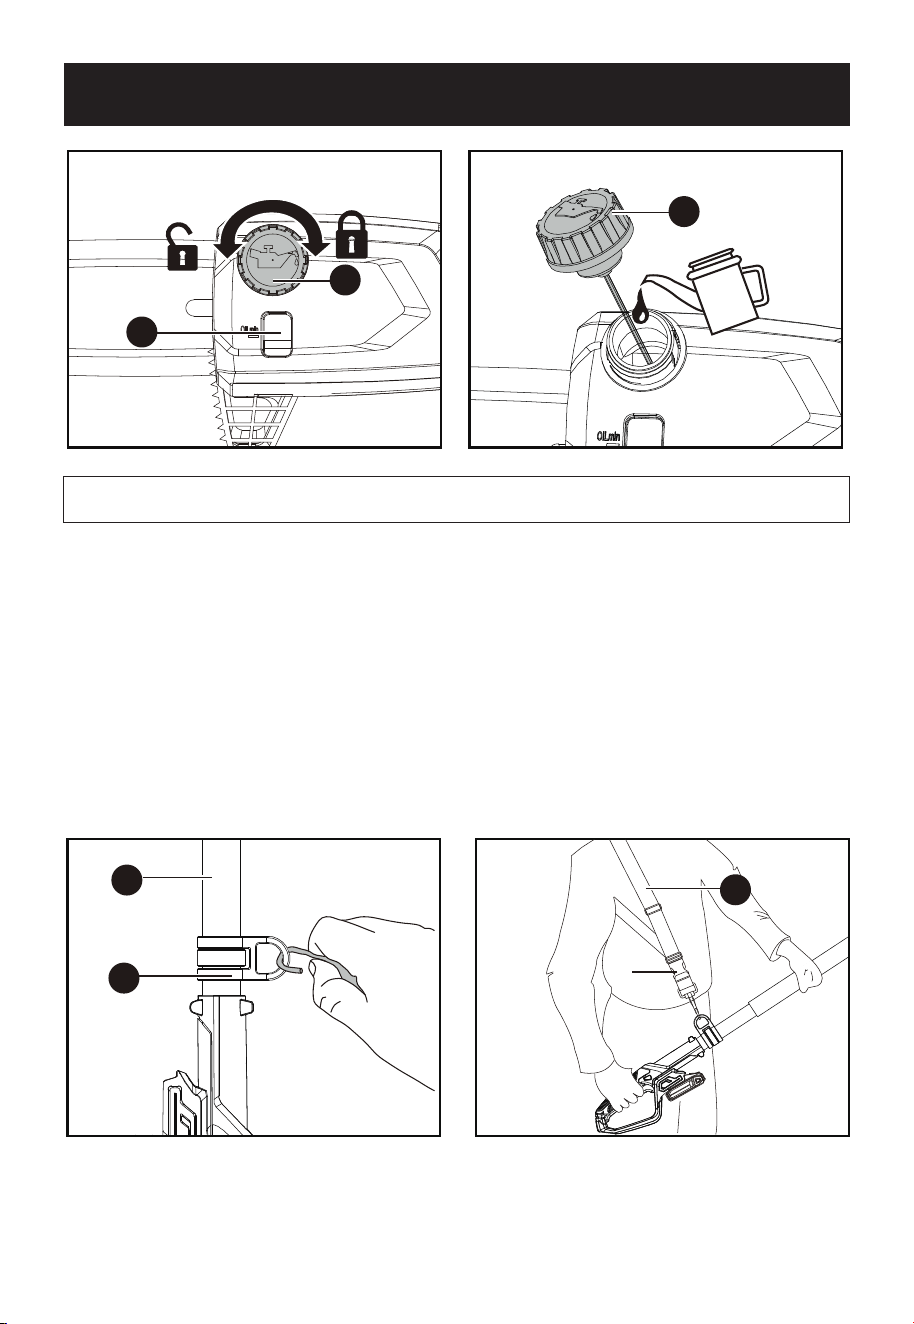
STEP 5 : Filling Saw Bar and Chain Oil
NOTE: Your device is equipped with 100ml lubricating oil.
Use of the device without bar and chain oil will lead to the damage of
the saw chain (Y) and guide bar (Z).
- Never operate the device without bar and chain oil.
- Before starting work, ll the saw bar and chain oil tank.
- Check bar and chain oil level frequently during operation.
- Before starting work each time, ensure that the chain lubrication system
is functioning properly.
The service life and cutting performance of the saw chain (Y) are reliant
on proper lubrication. During operation, the saw chain (Y) is automatically
lubricated with oil.
Using used oil is strongly discouraged, as it contains metallic abrasives
and other contaminants that can cause premature wear to both the
guide bar (Z) and the saw chain (Y). Additionally, using used oil will
void the warranty. Always avoid using used oil. Instead, exclusively use
biodegradable bar and chain oil.
Using mineral oil for chain lubrication causes signicant environmental
harm. Avoid using mineral oil entirely. Instead, opt for biodegradable bar
and chain oil.
Before beginning work or replacing the battery (N), always inspect the oil
level. Rell the bar and chain oil as needed to ensure proper operation.
WARNING: Use a funnel to facilitate easier lling. Do not allow any dirt
to get into the oil tank.
1. Check the oil level through the oil level window (C). Oil should always
be visible within the window, and the oil level must remain between the
minimum and maximum marks.
2. To check the oil level, place the device on a rm, horizontal surface
and hold it steady.
3. Clean the area around the oil ller cap (A) to ensure no debris enters
when opened.
4. Unscrew the oil ller cap (A).
5. Add biodegradable bar and chain oil to the oil tank. While lling,
monitor the oil level in the oil level window (C) and ensure it does not
overow.
6. Once the desired oil level is reached, securely screw the oil ller cap (A)
back in place.
www.hyundaipowerproducts.co.uk
24
OIL
A
A
C
STEP 6 : Attaching/Setting the Shoulder Strap
1. The supplied shoulder strap (K) transfers the load onto your upper
body.
Attach the carabiner hook of the shoulder strap (K) to the shoulder strap
connector (L) on the lower telescopic pole (I) of the device.
2. To quickly release the shoulder strap, press the buckle (c) on the strap.
3. Drape the shoulder strap (K) over your shoulder.
4. Adjust the length of the shoulder strap (K) by sliding the buckle to a
comfortable position, ensuring the device is easy to carry.
5. Perform several work movements with the device turned off to assess the
comfort of the shoulder strap (K). If necessary, make further adjustments to
the strap's length.
L
I
H
D
c
K
Assembly

25
www.hyundaipowerproducts.co.uk
Assembly
STEP 7 : Adjusting the Telescopic Pole
The telescopic pole can be easily adjusted using the quick release
mechanism.
1. Open the clamping lever (H).
2. Hold the device and adjust the pole length by pushing or pulling.
3. Close the clamping lever (H) to securely lock the telescopic pole in
place.
STEP 8 : Tilt Saw Head
The saw head can be tilted into four positions, allowing for cutting of
angled or crooked branches. To adjust, press and hold the release button
(D) while tilting the saw head. Once the desired position is reached,
release the button (D) to lock the saw head in place.
L
I
H
D
c
K
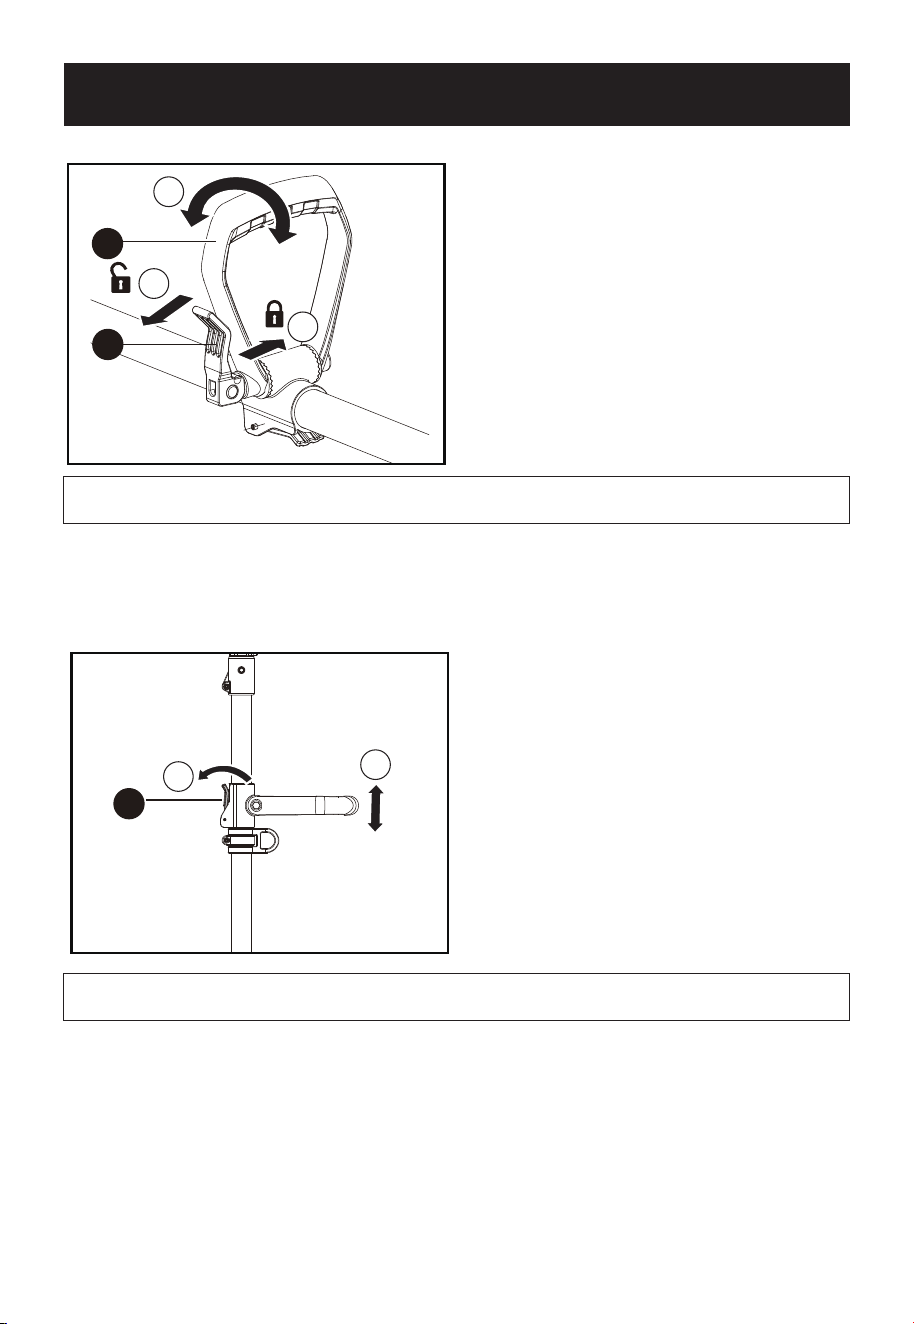
STEP 9 : Adjusting the Angle of the Auxiliary Handle
1. Pull the quick release knob (BB) outward to disengage the auxiliary
handle (AA) from the handlebar.
2. Adjust the angle of the auxiliary handle by moving it forwards or
backwards.
3. Push the quick release knob (BB) inward to secure the auxiliary handle
(AA) in place.
NOTE: If the quick release knob is difcult to fold, loosen it and then fold it
again. If the knob is too loose, tighten it by turning it clockwise.
www.hyundaipowerproducts.co.uk
26
2
1
1
2
1
2
3
AA
BB
J
CC
CC
3
STEP 10 : Adjusting the Position of the Auxiliary Handle
1. Pull the auxiliary handle lock knob (J) outward to release the handle.
2. Adjust the auxiliary handle's position by sliding it forwards or backwards.
3. Push the auxiliary handle lock knob (J) inward to securely lock the
handle in place.
2
1
1
2
1
2
3
AA
BB
J
CC
CC
3
STEP 11 : Adjusting the Main Handle
The main handle features a swivel function with a 90-degree range of
motion from left to right (-90°, -45°, 0°, 45°, 90°). To adjust the handle, press
the rotary control button (CC) on the main handle, rotate the handle to
the desired position, then release the rotary control button (CC) to lock
the handle in place.
Assembly

27
www.hyundaipowerproducts.co.uk
2
1
1
2
1
2
3
AA
BB
J
CC
CC
3
STEP 12 : Battery Charging and Installation
1. Charge the battery pack
Use only the charger specically provided for use with this equipment.
If the battery pack becomes very hot you must remove your battery
pack from the charger and allow time for the battery to cool down
before recharging.
Fully charge the battery before storing it. For prolonged storage,
recharge the battery every three months to maintain its performance
2. To Remove or Install the Battery Pack
To remove the battery pack, rmly press the release button (M) and then
slide the battery pack (N) out from your tool.
After recharging, slide the battery pack back into tool’s battery port. A
simple push with light pressure will be sufcient to secure it into place.
1
2
M
M
N
N
Assembly

www.hyundaipowerproducts.co.uk
28
3. Charging procedure
1) Plug the charger into the correct power supply. The green light will
illuminate.
2) Slide the battery pack into the charger, ensuring it is securely
positioned in the correct charging orientation. The green light will turn off,
and the red light will illuminate to indicate that charging has begun.
Once charging is complete, the red light will turn off, and the green light
will illuminate.
After the battery is fully charged, unplug the charger and remove the
battery pack.
NOTE:NOTE: If the battery pack is locked in the charger, press the
battery pack release button to release and remove it.
WARNING: If the battery charge is depleted after continuous use or
exposure to direct sunlight or heat, allow the tool to cool down before
recharging to ensure a full charge is achieved.
Red light
Green light
Charger
2
M
N
1
4. Charging indicator
This charger is equipped to detect potential issues with battery packs.
Indicator lights signal any problems (refer to the table below). If a
problem arises, insert a new battery pack to verify if the charger is
functioning properly.
• If the new battery charges correctly, the original battery pack is
defective and should be returned to a service centre or recycling
facility.
• If the new battery pack exhibits the same issue as the original, have
the charger inspected and tested at an authorised service centre.
Assembly

29
www.hyundaipowerproducts.co.uk
Assembly
Light
ON/OFF ash Status
Red on
Charging
Red ash
- - - - - Defective battery
Green on
Fully charged
Green ash
- - - - - Battery too hot/cold
5. To remove or install the battery pack into the tool
Press the battery pack release button rmly, while simutaneously sliding
the battery pack out from your tool.
Slide the fully charged battery pack onto the tool with sufficient force
until it clicks into position.
Red light
Green light
Charger
2
M
N
1
Checking the power condition of battery pack
The battery level can be known from the battery indicator light by
pressing the button beside the lights.
www.hyundaipowerproducts.co.uk
30
Operation
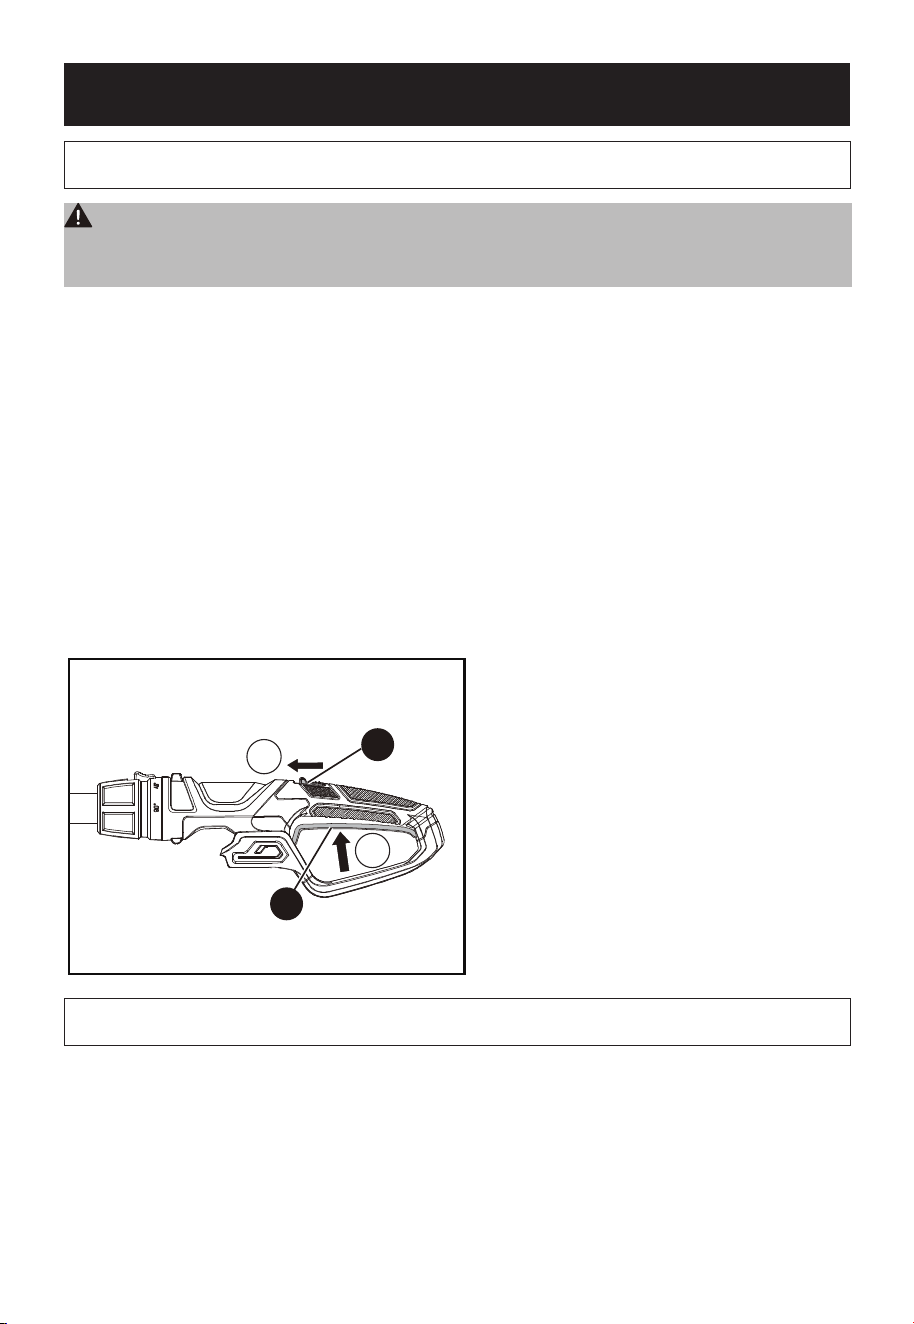
On / Off Switch
WARNING: Ensure you are standing in a stable position with both hands
rmly gripping the device, keeping it away from your body. Ensure that
the device is not in contact with any other objects before turning it on.
Switching on the device
1. Bring the device into the working position.
2. Insert the battery pack (N).
3. Press and hold the trigger safety lock button (Q) on the device.
4. Press and hold the on/off switch (O).
5. Once the saw is engaged, the trigger safety lock button (Q) can be
released. It is not necessary to keep the trigger safety lock button (Q)
pressed once the device has started. The trigger safety lock button (Q) is
intended to prevent inadvertent starting of the device.
Switching off the device
1. Release the on/off switch (O).
1
2
Q
O
Checking the Automatic Oil Function
Before starting work, check the oil level in the automatic oil system.
1. Switch the device on and hold it above clear ground. The device
should not touch the ground.
2. If a trace of oil appears, the device is working as expected.
3. If no trace of oil appears, clean the oil outlet channel or have the
device repaired by our customer service department.

31
www.hyundaipowerproducts.co.uk
Operation
4. To clean, wipe the residues from the oil outlet channel using a brush or
a rag.
Operation Safety
• Maintain the equipment, cutting attachments, and chain bar sheath
in good condition to prevent injury.
• If the equipment is dropped, inspect it for any damage or defects
• Ensure the specied working angle of 60° ± 10° is observed to
guarantee safe operation.
• Never use the device while standing on a ladder or in any unsafe
position.
• Avoid making unplanned cuts, as they could endanger both you and
others.
• Children must be supervised to prevent them from playing with the
device. KEEP OUT OF REACH OF CHILDREN.
• Change your working position regularly. Prolonged use of the
equipment can cause vibration-related circulatory disorders in the
hands. However, you can extend working time by using appropriate
gloves or taking regular breaks. Keep in mind that personal factors
such as poor circulation, cold outdoor temperatures, or excessive
gripping forces can reduce the amount of time you can safely use
the device.
Correct Operation/Tree Trimming Technique
WARNING:
Elevated positions increase the risk of falling. There is a
higher likelihood of falls when working at height.
Always begin work from the ground, ensuring that you are standing
securely. Follow all safety instructions carefully.
• When possible, position yourself so that the cut is made at a 90° angle
to the branch.
• For thicker branches, make the cut in sections to maintain better
control over the point of impact.
• Never saw into the are at the base of the branch. This helps promote
proper wound healing and reduces the risk of rot.
• Use the tree grip to press the pole saw against the branch while
sawing, which will stabilize the saw.
• Prior to sawing off the branch, make a relief cut on the underside.
This helps prevent the bark from tearing and causing difcult-to-heal
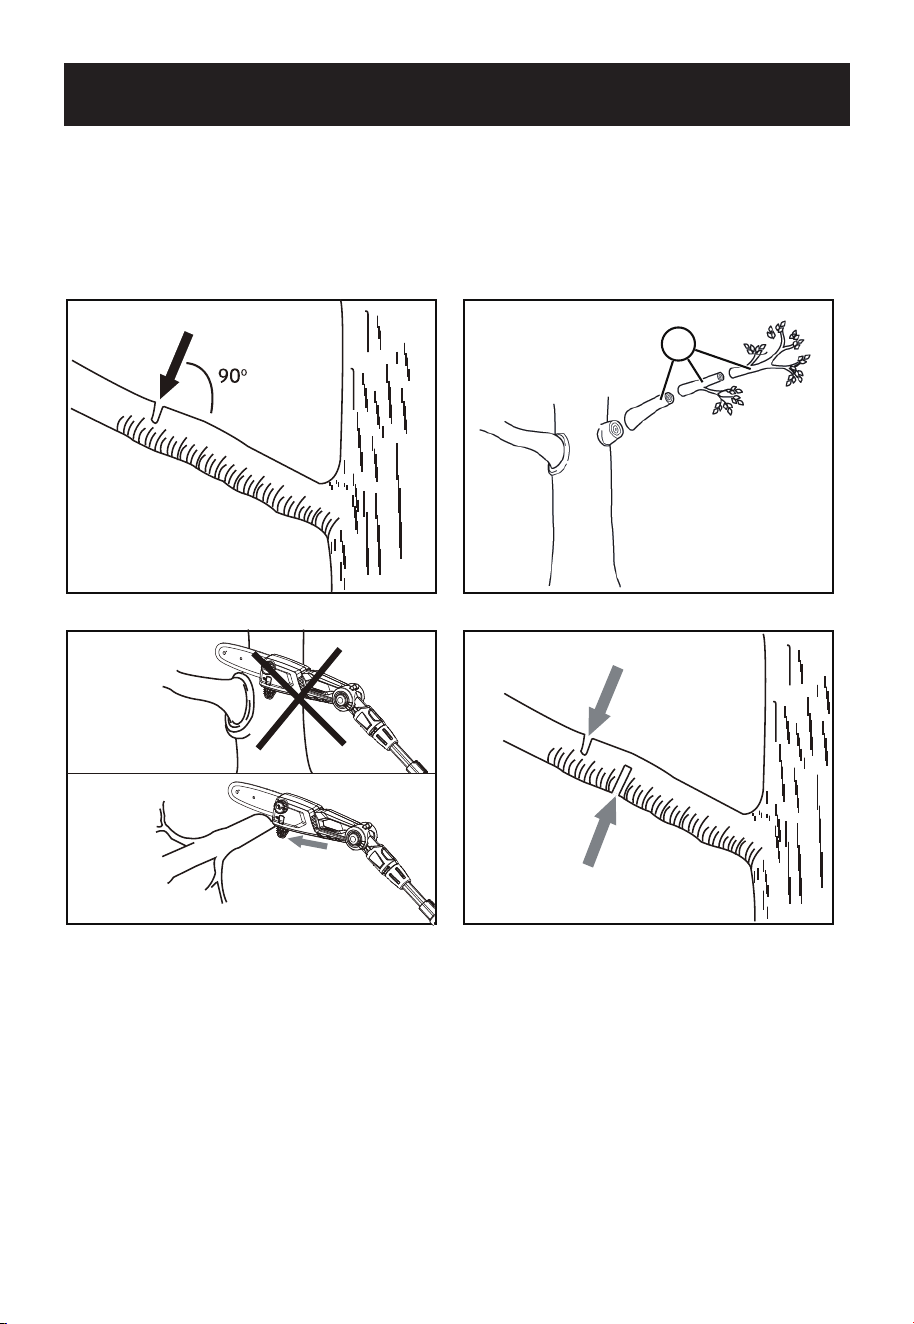
www.hyundaipowerproducts.co.uk
32
damage. Ensure the relief cut does not exceed 1/3 of the branch
thickness to avoid trapping the pole saw.
• Always pull the pole saw with the rotating saw chain out of the
branch to prevent it from becoming trapped.
1
a
a
b
Operation

33
www.hyundaipowerproducts.co.uk
Maintenance & Care
Cleaning
Do not use cleaning agents or solvents. These may cause severe
damage to the tool.
•
Regularly clean the ventilation slots, motor housing, and handles of
the device using a damp cloth or brush.
•
Clean the saw chain only with a dry cloth. After cleaning, lightly oil
the saw chain with chain oil by applying individual drops to the joints
and the teeth of each chain link.
•
Frequently clean the guide bar, including its groove and oil outlet
openings.
•
Use a at le to remove any burrs that have formed on the guide bar
from the saw chain.
Maintenance
Regular maintenance of your equipment extends the lifespan of the
equipment. You will also achieve optimum cutting performances and
avoid accidents.
For Battery Tools
The ambient temperature range for tool and battery use and storage is
32
o
F - 113
o
F (0
o
C-45
o
C).
The recommended ambient temperature range for the charging system
during charging is 32
o
F - 104
o
F (0
o
C-40
o
C).
Storage & Transport
• Clean the equipment before putting it away.
• Put on chain bar sheath.
• It is normal for oil to seep from the saw when not in use. To prevent
seepage, as well as prevent resin buildup, it is recommended to empty
the oil tank after each use. When storing the unit for longer periods (3
months or longer), be sure the chain is lightly lubricated to prevent rust
from developing on the chain and bar sprocket.
• Store the device in a dry, frost-free, and dust-protected place, and out
of reach of children.
• Store the battery only in a partially charged state. The state of charge

www.hyundaipowerproducts.co.uk
34
should be 40 – 60 % over a longer storage period.
• During longer storage periods, check the state of charge of the
battery and recharge if necessary (every 2 to 3 months).
• In order to keep the battery well charged, avoid exposing the device
to extreme heat or cold in storage.
• Store the equipment between 50
o
F (10°C) and 77
o
F (25° C). During
storage, avoid extreme cold or heat so the battery does not lose
power.
Maintenance & Care

35
www.hyundaipowerproducts.co.uk
Troubleshooting
NOTE:
All corrective actions should be carried out by suitably
qualied person/s.
Problem Possible cause Fault correction
Appliance won‘t
start
Battery discharged Recharge battery
Battery not inserted Insert battery
Trigger safety lock button
not pressed properly
Press trigger safety lock
button
Defective On/Off switch Send to Service Center for
repair
Device runs with
interruptions
Internal loose electrical
connection
Send to Service Center for
repair
On/Off switch defective
Telescopic pole
cannot be locked
Defective clamping
lever for extending /
shortening the telescopic
pole
Send to Service Center for
repair
Inferior cutting
performance
Incorrectly mounted saw
chain
Mount saw chain
correctly
Saw chain blunt Place on new chain
Chain tension insufcient Check chain tension
Saw runs with
difculty, chain
comes off
Chain tension insufcient Check chain tension
Chain becomes
hot, smoke
development
during sawing,
discoloration of
the rail
Too little chain oil Check oil level and,
where appropriate, rell
with chain oil, check
automatic oil system and,
where appropriate, clean
oil outow duct or have
repaired by customer
service
Maintenance & Care

www.hyundaipowerproducts.co.uk
36
Specication
Rated voltage:
20 V
Max.
Cutting length: 180mm (7 in.)
Chain speed: 5 m/s
Chain and bar: 200 mm (8 in.)
Chain pitch: 9.5mm (0.375 in.)
Chain gauge: 1.27mm (0.050 in.)
Chain drive links: 33
Oil tank capacity: 100 ml
Bar model: AP08-33-507P
Chain model: 3/8.050X33DL
Battery capacity (BI20-2): 2.0 Ah
Charger input (C20-2): 100-240V~50/60Hz, 55W
Charger output (C20-2):
20V
2.0A
Charging time: 1Hour
Charger protection class:
/II
Machine weight (with battery): 3.7 kg
A weighted sound pressure L
pA
= 77 dB(A), K
pA
= 3 dB(A)
A weighted sound power L
wA
= 90 dB(A), K
wA
= 3 dB(A)
Vibration total values (triax vector sum) determined according to EN
62841:
Vibration emission value
a
h
=1.651 m/s² (Front handle),
a
h
=3.419 m/s² (Rear handle),
K = 1,5 m/s²
Technical Data

37
www.hyundaipowerproducts.co.uk
Recycling & Disposal
Recycling & Disposal
We do not offer a takeback scheme for the recovery of Waste Electrical
Electronic Equipment (WEEE) & Batteries. Instead the responsibility to
dispose of WEEE and/or Batteries is passed onto you by us.
So when it becomes necessary to dispose of your machine you must take
it to your local Civic Amenity Site. For further information please contact
your local Authority for disposal advice.
You MUST make sure that all unused oil and fuel is disposed of correctly
either beforehand or at your local Civic Amenity Site.
• Under NO circumstances must any fuel or oil be put down any drains.
• Certain products contain WEEE waste which should not be disposed of
in your domestic waste.
• You MUST recycle WEEE in accordance with your local authority or
recycling centre.
• Certain products contain batteries which should not be disposed of in
your domestic waste.
• You MUST recycle batteries in accordance with your local authority or
recycling centre.
• Unwanted packaging and materials should be stored and taken
to a recycling centre so it can be disposed of in a manner which is
compatible with the environment.
We are a Member of the VALPAK National Compliance Scheme and our
registration number is RM08660. For further information about disposal
please contact your Local Authority.
You can also get more advice and guidance about recycling at the
following website http://www.recycle-more.co.uk
Should you pass this product on to another user either sold or loaned,
you MUST pass on this user manual. This will make sure that all other users
can use and maintain this machine safely.

www.hyundaipowerproducts.co.uk
38
Environmental Protection
1. Environmental protection should be a priority of considerable
importance when using the machine, for the benefit of both social
coexistence and the environment in which we live. Try not to cause any
disturbance to the surrounding area.
2. You must comply with local regulations and provisions for the disposal
of packaging, oils, fuel, filters, damaged parts or any elements which
have a strong impact on the environment. This waste must not be
disposed of as normal waste. It needs to be separated and taken to
specied waste disposal centres where the material will be recycled.
3. You must comply with local regulations for the disposal of waste
materials after mowing.
4. When disposing, do not pollute the environment with the machine, but
hand it over to a disposal centre, in accordance with the local laws in
force.
Recycling & Disposal

39
www.hyundaipowerproducts.co.uk
EU Declaration Of Conformity
Importer and Authorised Representative
Genpower Ltd
Isaac Way, Pembroke Dock, SA72 4RW
Country of Origin: China
Description: 20V Pole saw
SKU Code: HY20CPS
Date of Issue: 20/12/2024
Regulations and Directives of Compliance
2006/42/EC, 2014/30/EU, 2014/35/EU, 2011/65/EU&(EU)2015/863,
2000/14/EC amended by 2005/88/EC & (EU)2024/1208, (EU)2023/1542
The notied body involved
Name: SGS Fimko Ltd
Address: Takomotie 8, FI-00380 Helsinki, Finland
Certication No.: MD-413
2000/14/EC amended by 2005/88/EC:
- Conformity Assessment Procedure as per Annex V
- Measured Sound Power Level 90 dB(A)
- Declared Guaranteed Sound Power Level 96 dB(A)
Statement of Declaration
We the importer and authorised representative of the product described
confirm conformity within the provisions of applicable regulations and
directives listed within this document.
Standards conform to
EN 62841-1, EN ISO 11680-1, EN ISO 3744, EN IEC 55014-1, EN IEC 55014-
2, EN IEC 63000, EN 62133-2, EN 60335-1, EN 60335-2-29, EN 62233, EN IEC
61000-3-2, EN 61000-3-3
Signed on Behalf of Genpower Ltd
Place of Issue: Genpower Ltd
Signatory Name: Roland Llewellin
Position: Managing Director
……………………………………

www.hyundaipowerproducts.co.uk
40
Notes

41
www.hyundaipowerproducts.co.uk
Useful Information
Check Out Our YouTube Channel
Our videos on YouTube include:
Unboxing
Assembly of your machine
How to service your machine
Products in use
‘How To’ videos
Product features
Go to YouTube and search ‘Hyundai Power Products’.
Warranty
Proof of purchase will be required before you make a warranty claim.
Full warranty terms and conditions can be found on the HYUNDAI POWER
PRODUCTS website:
www.hyundaipowerproducts.co.uk
Manual Updates
Our manuals are constantly being reviewed and updated. Should
you find an error, omission or something unclear, please contact us for
assistance. We reserve the right to make any modications without prior
notice whenever necessary.
Our latest manuals are also placed online. All our manuals can be
downloaded at: www.hyundaipowerproducts.co.uk
Returning Your Product
If you are returning your product, please contact the dealer for their
returns policy.
Leaving A Review
We work very hard to give all of our customers the best possible service.
If you have any problems, before leaving negative feedback, please
contact us to give us a chance to resolve the issue. We would be
delighted if you left us positive feedback! To leave a review, please go
to: uk.trustpilot.com/review/hyundaipowerequipment.co.uk
Ordering Spare Parts
You can nd the spare part you are looking for at power-spares.co.uk

www.hyundaipowerproducts.co.uk
42
Product Record
Information
As soon as you have purchased the machine, we recommend that
you ll out the following. If you need to contact an authorised dealer or
customer service for information on servicing, you may need to provide
the following information.
Date Of Purchase:………………………………………………………………….
..
Dealer Name:…………………………………………………………………………
Dealer Phone:…………………………………………………………………………
Model Number:………………………………………………………………………
Serial / Batch Number:………………………………………………………………

43
www.hyundaipowerproducts.co.uk
Contact Us
Need Help? Talk To Our Experts
Our friendly aftersales team will be more than happy to help you.
Phone
Call our team on 01646 687 880
Email
Online Live Chat
Go to www.hyundaipowerproducts.co.uk
Post
Genpower Ltd, Isaac Way, Pembroke Dock, Pembrokeshire, SA72
4RW.
Hyundai Support Website
Go to hyundaisupport.co.uk

For Inquiries, Please Contact:
GENPOWER LTD
Isaac Way, London Road,
Pembroke Dock, UK, SA72 4RW.
T: +44 (0) 1646 687 880
www.hyundaipowerproducts.co.uk
Imported / Distributed by Genpower Ltd
for the United Kingdom & Ireland
Licensed by Hyundai Corporation
Holdings, Korea