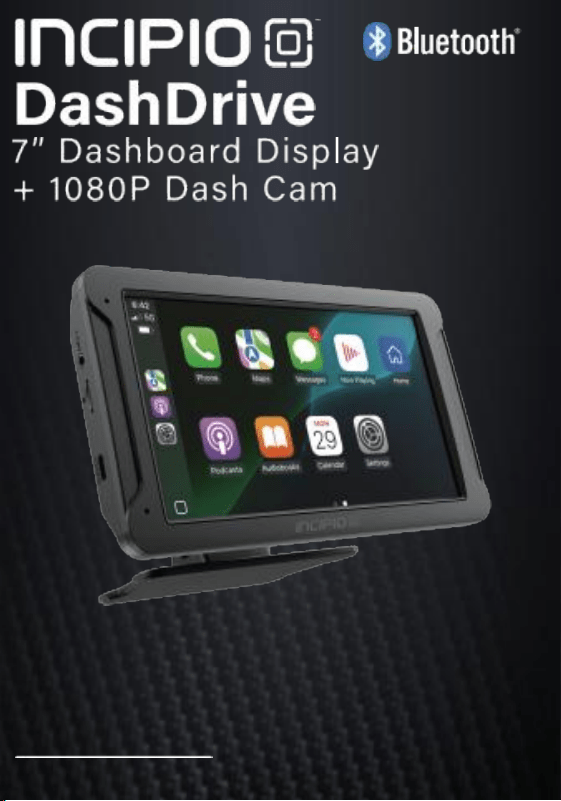
INC700-BLK
USER’S MANUAL

1
Important Safety Precautions
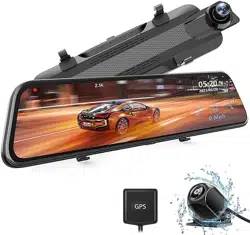
When using your Incipio Dashdrive 7” Dashboard + 1080P
Dash Cam, basic safety precautions should always be followed,
including the following:
1. READ ALL INSTRUCTIONS BEFORE USING YOUR DISPLAY.
2. Do not use your product near water. Do not expose to
any moisture or water. Clean using a dry soft cloth or paper
towel.
3. Do not place the product on any wet surfaces.
4. Do not aIIow chiIdren or the infirm to pIay with the
product without adult supervision.
5. Do not expose the product to excessive heat, fiames or fire.
6. Always press all buttons or switches carefully. Do not
manhan- dle the product.
7. Do not use in extremely dry environments, as this can lead
to static discharge during usage.
8. Do not expose to temperatures above 60°C. Do not expose
to direct sunlight.
9. Do not attempt to repair this product yourself.
Contact a quaIified service center if the product is in need
of service.
10. Do not drop, puncture or expose the product to
excessive trauma.
11. The product is not intended for commercial use.
12. Do not place near objects that generate a strong
magnetic fieId.

1
13. Unplug this device when not in use for long periods of time
or during lightning storms.
14. The product is intended to be used in an automobile.
When installing, make sure it does not block the driver’s view
or any passenger’s airbag deployment.
15. Do not operate the product while you are driving
your automobile.
2
Table of Contents
lntroduction, Features, package contents, specifications
3
A Quick Look
4-5
Mounting
6
Powering
7
Home Interface Operation
8
Inserting a Memory Card
9
Live View Operation
10-11
Connecting to an iPhone
12-13
Connecting to an Android Device
14-15
Shortcut Guide, Bluetooth Rename
16
IPhone Mirror
17-18
Android Device Mirror
19
Setting Audio Output
20
Wi-Fi Video
21
Settings
22
Troubleshooting
23
Maintenance and Care
24
FCC Compliance Statement
25
One Year Warranty
26

3
Introduction
Thank you for purchasing your Incipio Dashdrive 7” Dashboard
+ 1080P Dash Cam, item INC700-BLK. To get the best
results,
please read this manual first.
Features
-7” IPS Dashboard Display
-1080P Dash Cam
-Mirror Link to Mobile
-Built-in Apps and Navigation
-Built-in Voice Control
-Works With Android + iOS
Package Contents
-7” Dashboard Display
-8 GB memory Card
-USB-C to 12 V/24 V Car Power Cable
-Mounting Bracket
-3.5 mm AUX Cable
-User’s Manual With Warranty Information
Specifications
-Bluetooth pairing name: INC700_XXXXXX
-Wi-Fi pairing name: CP70_xxxxxx
-Wi-Fi pairing password: 12345678
-Display: 7’’ Touchscreen
-AUX OUT connection: 3.5mm
-Car adaptor power input: 12 V/24 V
4
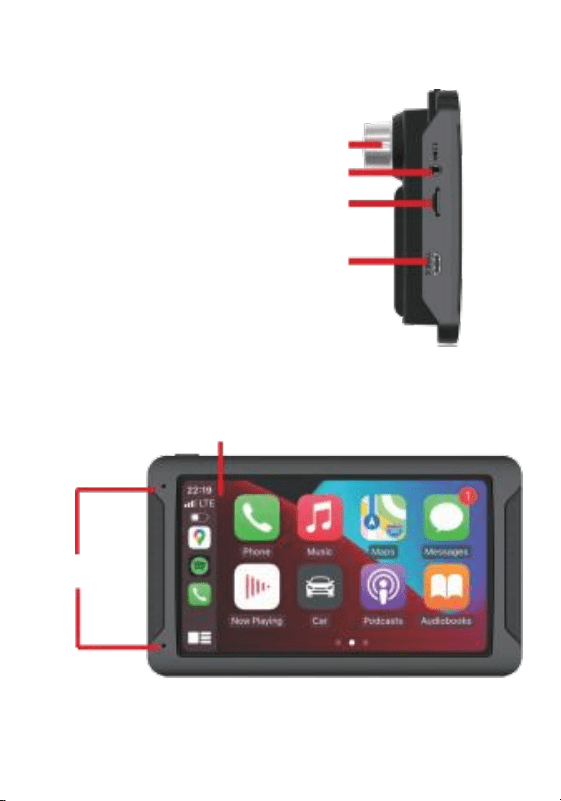
A Quick Look
Camera
AUX Port
Memory Card Slot
Power Port
Touchscreen
Microphone
5
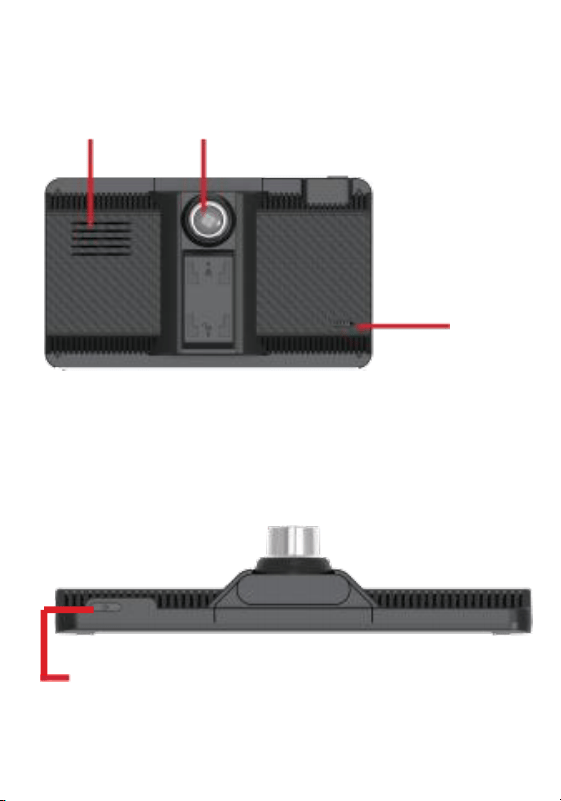
A Quick Look (Continued)
Camera
Reset
Hole
Speaker
Power Button
Lens
6
Mounting
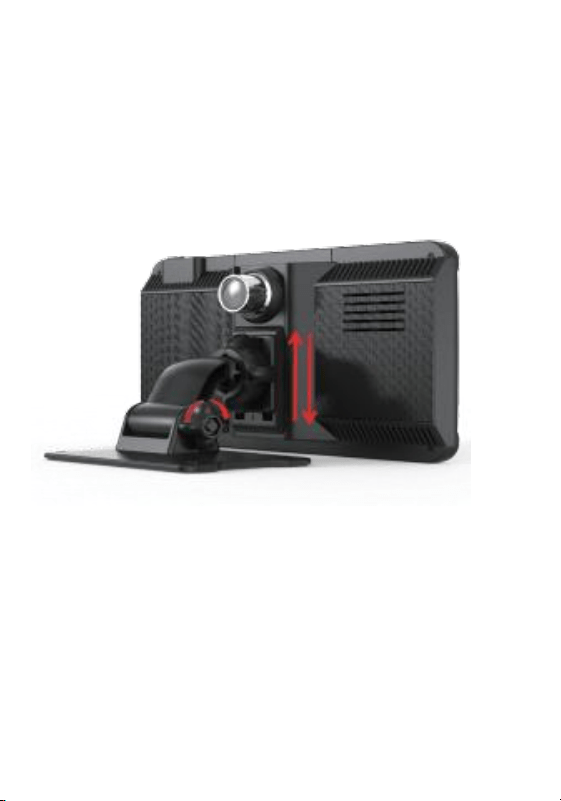
The Dashboard Display includes a mounting bracket. Connect
the Dashboard Display to the mounting bracket. Push the
bracket up to secure the connection. Ensure the device is
properly connect- ed and securely in place, as shown in the
image below.
Un lock
Lock
counter-clockwise to loosen the mounting bracket’s neck and
adjust the angle. Rotate the knob clockwise to lock the angle
into place.
At the bottom of the mounting bracket is a protective film that
covers an adhesive coating. Clean the installation site on the
car dashboard of any dust. Remove the protective film and
press the mounting bracket onto the center of the car
dashboard.
On the side of the mounting bracket is a knob. Rotate the

6
CAUTION: Never install the touchscreen in a location that
blocks your view of the road, interferes with the mirror or
controls, or
obstructs the airbag.
7
Powering
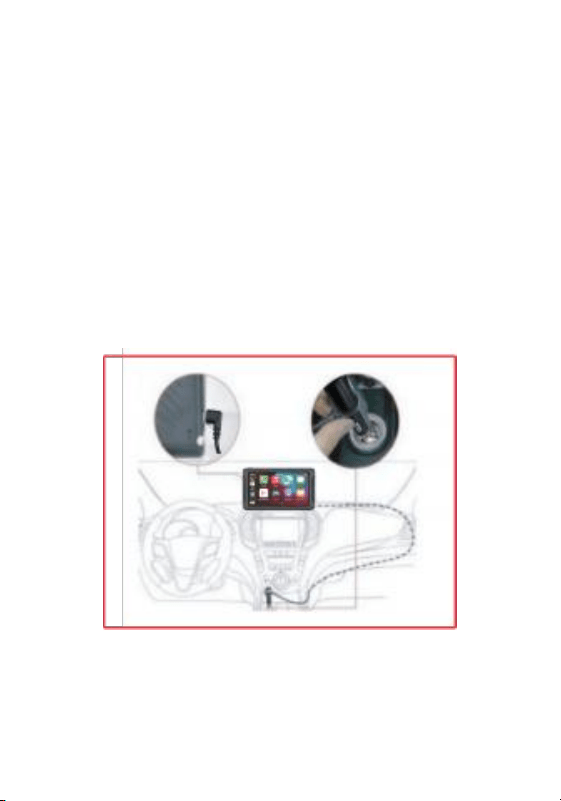
The Dashboard Display relies on an external power source to
operate.
Plug the power cable into your car’s cigarette lighter socket or a
compatible 12V/24V power port. Connect the other end to the
Power Port at the side of the Dashboard Display.
If the touchscreen does not power on automatically after you
connect it to a power source, press and hold the Power button to
turn it on/o仟.
8
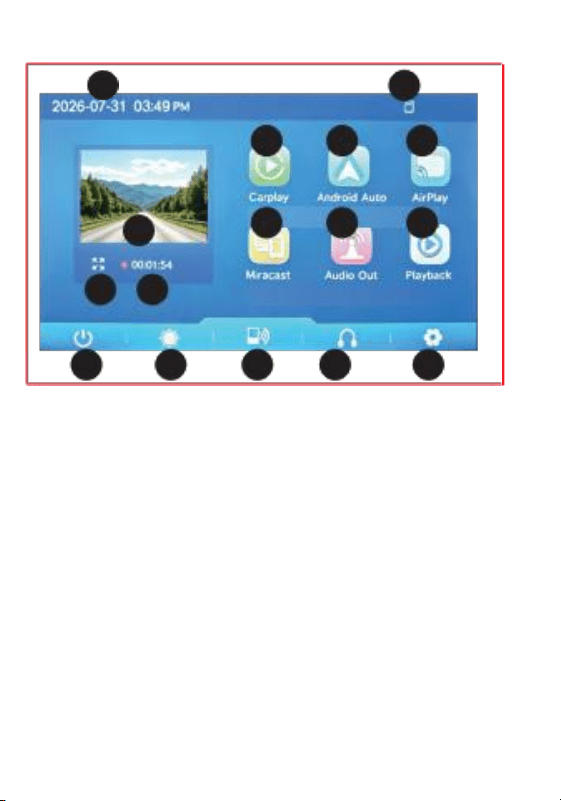
Home Interface Operation
12 13 14
15 16
3
4
5
7
1
0
8
1
1
6
9
2
1. Date and Time
2. SD Card Status
3. Live View of the Camera
4. Enlarge Live View
5. Recording Status and Time
6. Carplay
7. Android Auto
8. Airplay
9. Miracast
10. Audio Out
11. Playback
12. screen off
13. Brightness
14. Connection
15. Audio Out
16. Setting
1

9
Inserting A Memory Card
An 8 GB memory card comes preinstalled. You can replace the
SD memory card following the steps below. To avoid damage,
do not insert or remove a memory card while the device is ON.
The memory card slot is spring-loaded. To correctly insert
the memory card:
1) Push the SD memory card into the slot in the direction
shown on the dash cam.
2) Push the SD memory card until you hear a clicking sound.
This indicates the card is inserted correctly.
To remove a memory card from the memory card slot, push
the edge of the card until it pops out, and then pull it from
the slot.
NOTE: To ensure smooth performance and plenty of room for
recording long journeys, use an SD memory card rated Class 10
or above, with at least 4GB.
CAUTION:
We do not guarantee compatibility with memory
cards from all manufacturers. Use only good-quality memory
cards from reliable sources.
It is recommended to insert a new card or, if it is not new, to
format the memory card before first using it. Formatting will
permanently delete all data on the memory card, so be sure to

9
copy the data you want to keep to another storage device
before formatting.
10
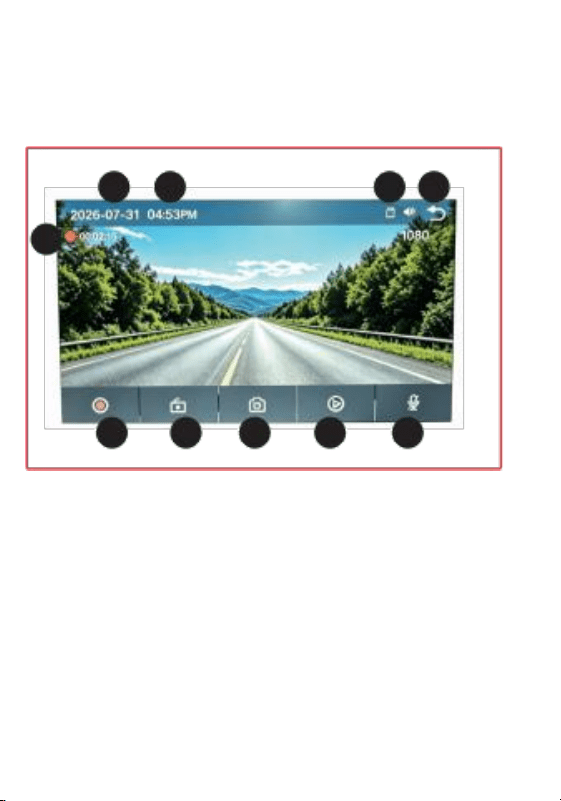
Live View Operation
To enter Live View mode and use the camera, press the
Enlarge Live View icon on the home interface.
5
6 7 8 9
10
1 2
3 4
1. Date
2. Time
3. Memory Card Status
4. Return
5. Recording Status and Time
6. Start/Stop Recording
7. Lock/Unlock
8. Photo
9. Playback Menu
10. Mute/Unmute
Recording Videos

10
Depending on your settings, the dashboard may start
recording automatically. To start/stop recording manually,
press the
Start/Stop Recording icon. While recording, the
Start/Stop Recording icon will display red. If the product
is recording a locked video, the icon will be yellow.
Live View Operation (Cont.)
11
Locking/Unlocking Recordings
As the dashboard camera records videos and takes photos, it
overwrites older videos as it uses the inserted memory card. To
prevent a video from being overwritten, press the Lock/Unlock
icon. While a video is locked, the Start/Stop Recording icon
will turn yellow. To stop recording locked videos, press the
Lock/Un- lock icon. The Start/Stop Recording icon will turn
red for
standard recording.
Take a Photo
Press the photo icon to take a photo.
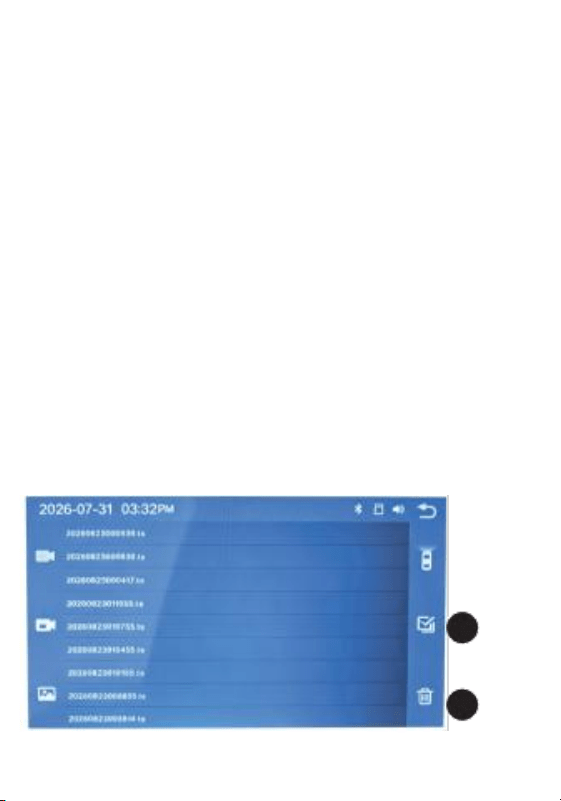
Playback Menu
To enter the playback menu, press the Playback Menu icon.
You can view the photos or videos you have already taken.
1
2

Live View Operation (Cont.)
11
1. Select: Press to select a photo or video. Press twice to select all.
2. Delete: After selecting a photo or video, press to delete
the selected file.
Mute/Unmute
press the Mute/un mute icon to turn the microphone on/off.
12
Connecting to an iPhone
To connect the touchscreen to an iPhone, follow the steps below.
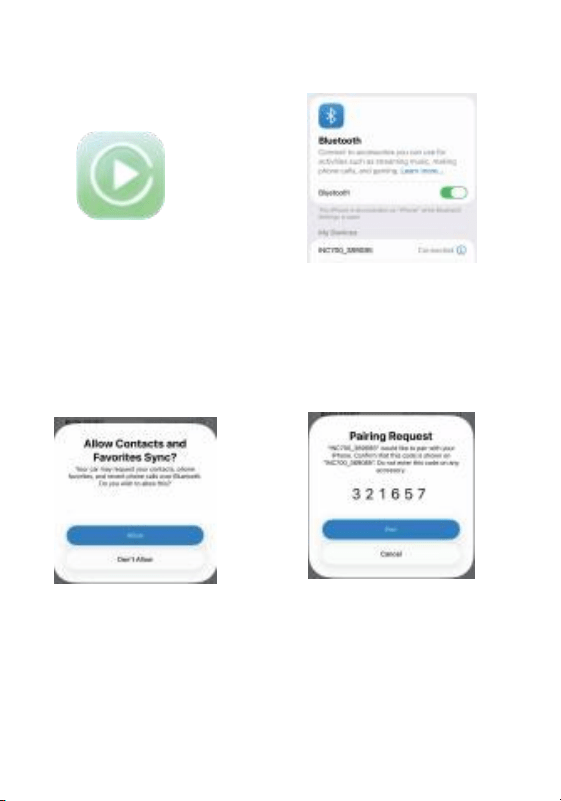
1. Select CarPlay from the
main menu of the Home
Interface.
2. Turn on Wi-Fi and Bluetooth on
your mobile device. Connect to the
device listed as
“INC700_XXXXXX”. The last six
digits of the pairing
name are unique to each device.
3. A pop-up will display
on your mobile device
asking to pair. Select
“Pair” in the options.
4. For full functionality,
select “Allow” when asked to
sync contacts and favorites.

12
5. Select “Use CarPlay” and select “Connect”.

13
Connecting to an iPhone (Continued)
When paired with the dashboard display, the mobile device will
use the touchscreen’s built-in Wi-Fi to stay connected and
disconnect from Bluetooth. Do not connect to any other Wi-Fi.
While connected, do not turn o仟 the Wi-Fi function on your
mobile device.
Your mobile device may attempt to pair with other Bluetooth
devices after pairing with the touchscreen. Disconnect from the
additional devices. Connecting additional devices can cause audio
issues and limit key touchscreen functions.
NOTE: Some versions of the IOS system may be incompatible
with the touchscreen. Ensure you are using the most up-to-date
version of the IOS system.
The touchscreen will automatically reconnect to previously paired
devices if those devices have Bluetooth and Wi-Fi enabled.

14
Connecting to an Android Device
To connect the touchscreen to an Android mobile device,
follow these steps.
1. Select Android Auto from the main menu of the
Dashboard Display.
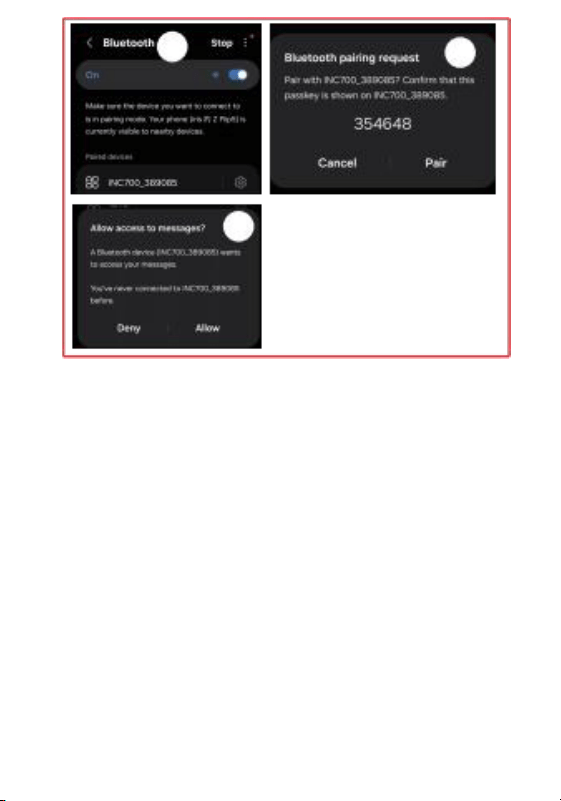
2. Turn on Wi-Fi and Bluetooth on your mobile device. Connect
to the device listed as “INC700_-xxxxxx” . The last six digits of
the
pairing name are unique to each device.
3. A pop-up will display on your mobile device asking to pair.
Select “Pair” in the options.
4. For full functionality, select “Allow” when asked to
allow messages.
14
2
3
4

15
Connecting to an Android Device (Continued)
Your mobile device may attempt to pair with other Bluetooth
devices after pairing with the touchscreen. Disconnect from the
additional devices. Connecting additional devices can cause audio
issues and limit key touchscreen functions.
NOTE: Supported models include Android 11.0 and above;
Google or Samsung phones running Android 10.0; and
Samsung Galaxy S8, Galaxy S8+, and Note 8 with Android
9.0 or above.
The touchscreen will automatically reconnect to previously
paired devices if those devices have Bluetooth and Wi-Fi enabled.
16
Shortcut Guide
When using Apple Carplay or Android Auto, a white circle
icon will appear on the right of the application, allowing for
access to shortcut selection.
Select to open shortcut menu.
Select to open the default home screen menu.
Select to adjust the volume.
Select to adjust the brightness.
Select to enter video recording interface.
Bluetooth Rename
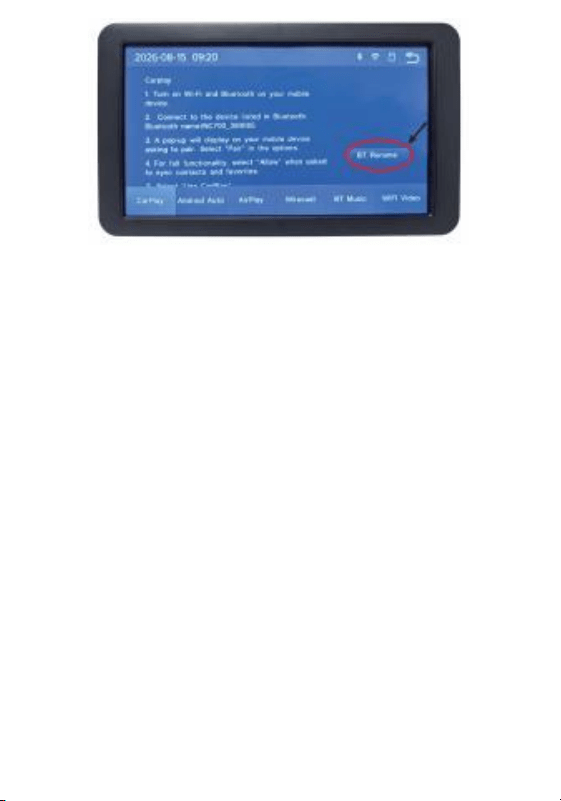
When using Apple Carplay or Android Auto, you can
customize the Bluetooth pairing name as shown in the image
below.
16

17
IPhone Mirror
Mirroring your device will display your mobile device’s
screen onto the touchscreen. To do so, follow the steps
below.
1. Select Airplay in the home interface.
2. Enable Wi-Fi on your mobile device Ensure no other device
is connected to the touchscreen.
3. Connect the mobile device to the Wi-Fi named
“CP70_-xxxxxx”. The last six digits of the pairing name
are unique to each device. If a password is requested,
enter
“12345678”.
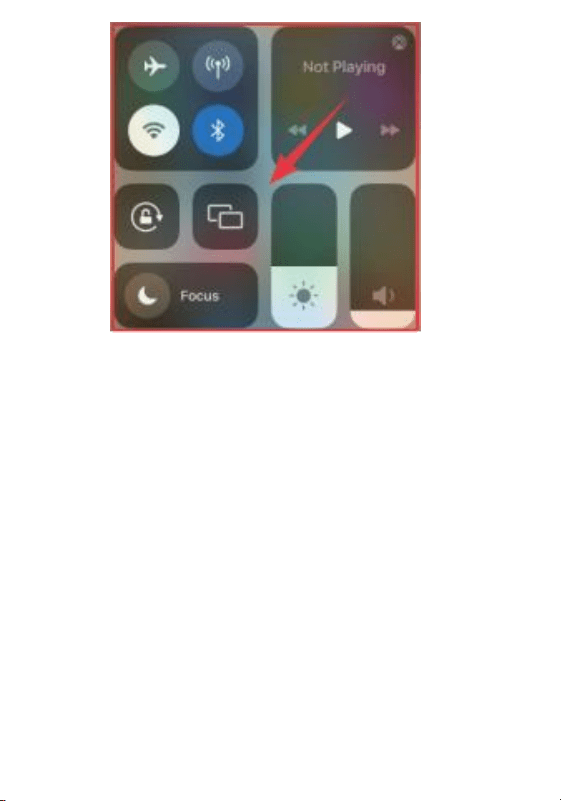
4. Enable screen mirroring on the mobile device.
17
18
IPhone Mirror (Continued)
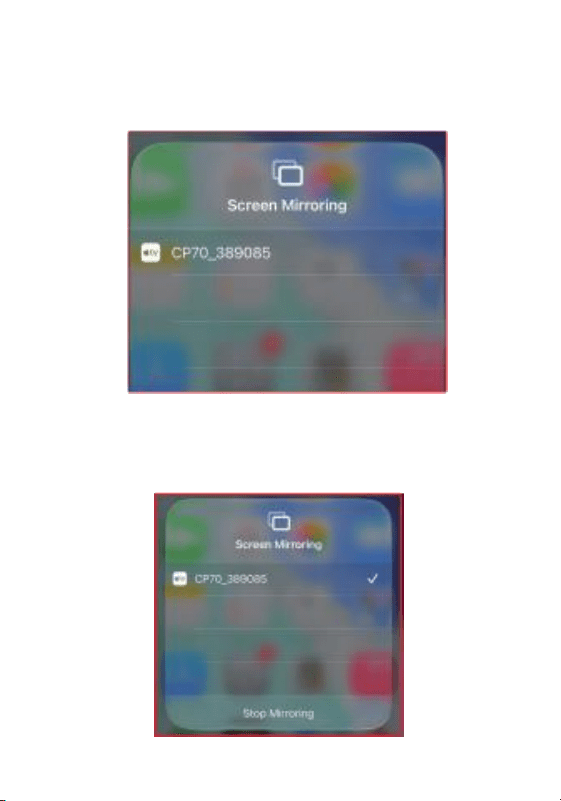
5. Select “CP70_-xxxxxx” in the screen mirroring menu
options.
6. To disconnect, in the screen mirroring menu, click
“stop Mirroring”.

19
Android Device Mirror
Mirroring your device will display your mobile device’s
screen onto the touchscreen. To do so, follow the steps
below.
1. Select Miracast in the home interface.
2. Enable Wi-Fi on your mobile device Ensure no other device
is connected to the touchscreen.
3. Download the required App “MirrorHelper” through the QR
code on the touchscreen or by searching for it on the Google
Play Store.
4. Connect the mobile device to the Wi-Fi named
“CP70_-xxxxxx”. The last six digits of the pairing name
are unique to each device. If a password is requested,
enter
“12345678”.
5. Enable Floating Window Permissions for the
“MirrorHelper” App.
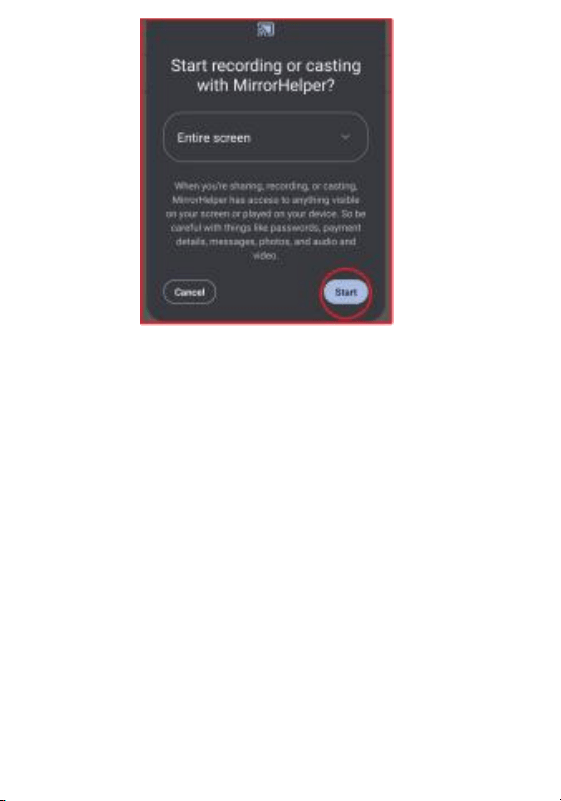
6. Open the “Mirror Helper” App and select “Start” to enable
messages.
19

20
Setting Audio Output
After connecting your mobile device to the touchscreen,
select Audio Output in the home interface. By default, the
audio will be output by touchscreen's speaker.
You can select between four audio outputs.
Speaker: Select to play audio through the touchscreen’s speaker.
Carplay/Audio: Select to output audio through the car’s
speakers using Bluetooth.
FM Transmit: Select to output audio through the car’s speakers
using FM radio signals. To use, set the connected device to an
unused frequency. Set the car radio to the selected unused
frequency. In locations with multiple radio sources, the audio
may be obstructed.
NOTE: The FM Transmit only works with compatible devices.
AV IN: Select to switch to AUX. This option requires connecting
the touchscreen to the car’s AUX port using a compatible AUX
cable.
21
Wi-Fi Video
You can view videos and photos on the dashboard remotely
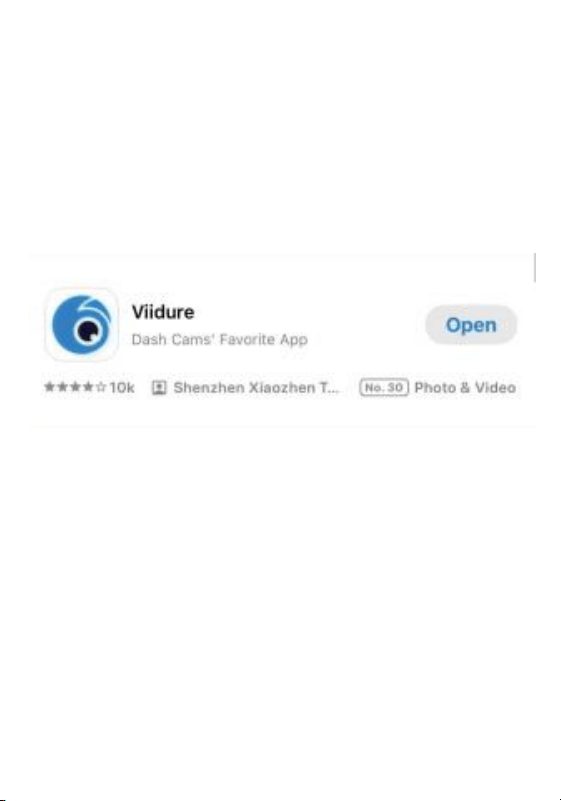
through your mobile device using the “Viidure” App. To do
so, follow the steps below.
1. Select the Connection icon on the home interface.
2. Scan the QR code on the touchscreen or search for the
“Viidure” App on the Apple App Store or Google Play Store.
3. Connect to the dashboard's Wi-Fi. If prompted for a
password, enter “12345678”.
4. Enter the “Viidure” App and connect the dashboard. In the
app, you can view the live video from the camera as long as the
dashboard is powered on.

22
Settings
Select Settings from the home interface to access the
touchscreen’s settings. Below is a list of possible settings.
Resolution: 1080P
Loop Record: 1 Min/ 3 Mins/ 5 Mins
Audio: OFF/ON
Beep Sound: OFF/ON
Assistive Touch: OFF/ON
Screen Save: OFF/ 1 Min/ 3 Mins / 5 Mins
Driving Side: Left-Hand Drive /Right-Hand Drive
Language: Language Options
Date & Time: MM/DD/YYYY
HH:MM G-Sensor: OFF /Low/
Middle/ High
Frequency: 50Hz/60Hz
Forget Connection (Use to forget previous device connections)
Format (Permanently deletes files from an inserted memory
card) Default Setting (Resets to factory settings)
Version (Displays version number)

23
Troubleshooting
Mobile device is not successfully pairing with the Display Screen:
-Ensure the mobile device supports Apple CarPlay or Android Auto.
-Ensure both Bluetooth and Wi-Fi are enabled on the mobile device.
-Turn o仟/on the touchscreen and/or the mobile device.
-The mobile device’s operating system may need to be updated to the latest
version.
-Bring the mobile device closer to the touchscreen for a stronger signal.
-If the touchscreen‘s Bluetooth pairing name does not display on your device,
refresh the list and wait up to one minute.
-If the touchscreen shows two dots on either side, the touchscreen is already
paired with another device. Unpair the touchscreen from the device and then
attempt to pair again.
Car stereo does not have sound:
-Enter Audio Output through the main menu and set the preferred audio
output.
-Ensure the volume on the mobile device or touchscreen is not muted or set
to zero.
The volume of the touchscreen’s speaker is not loud enough:
-Set the Audio Output to the car’s speakers or to the phone.
Screen is frozen/unresponsive:
-Located on the back of the touchscreen is a reset button. Using a pin, press
and hold the reset button. You can also remove the touchscreen from the
power source and reconnect.
No sound or distorted sound using FM transmission:
-After you confirm to Switch to the FM transmission function, make sure your
car’s original radio tunes to the same band frequency to receive sound. Set
the transmission frequency to the same on both the touchscreen and your
original car radio. Also, make sure not to use the frequency band used by local
radio stations.

24
Maintenance and Care
Before using your dashboard display, inspect the ports to
ensure that they are free of dust and debris before inserting
any cables.
-Use a soft cloth to clean your touchscreen. Never use
harsh chemicals or detergents. Make sure your touchscreen
is dry before using it.
-When your device is not used, it should be stored in a cool,
dry place.
-Never tug or yank on the power cable while it is connected
to your device. Connect and disconnect all cables as carefully
as possible.
-Never expose the device to extremely high temperatures,
extreme cold, high humidity, or excessive moisture or water.
Please recycle or dispose of your device properly according to
your municipality's laws and rules. For further information,
contact local recycling facilities and/or the manufacturer of
your dashboard display.

25
FCC Compliance Statement
changes or modifications not expressIy approved by the
party responsible for compliance could void the user’s
authority to operate the equipment.
This device complies with Part 15 of the FCC Rules. Operation
is subject to the following two conditions: (1) this device may
not cause harmful interference, and (2) this device must
accept any interference received, including interference that
may cause
undesired operation.
This equipment has been tested and found to comply with the
limits for a Class B digital device, pursuant to Part 15 of the
FCC
Rules. These limits are designed to provide reasonable
protection against harmful interference in a residential
installation. This
equipment generates, uses and can radiate radio frequency
energy and, if not installed and used in accordance with the
instructions, may cause harmful interference to radio
communica- tions. However, there is no guarantee that
interference will not
occur in a particular installation.
If this equipment does cause harmful interference to radio or
television reception, which can be determined by turning the

25
equipment off and on, the user is encouraged to try to correct
the interference by one or more of the following measures:
-- Reorient or relocate the receiving antenna.
-- Increase the separation between the equipment and receiver.
-- Connect the equipment into an outlet on a circuit different
from that to which the receiver is connected.
-- Consult the dealer or an experienced radio/TV technician
for help.

26
One Year Warranty
This warranty covers the original consumer purchaser only and
is not transferable.
This warranty covers products that fail to function properly
UNDER NORMAL USAGE, due to defects in material or
workman- ship. Your product will be repaired or replaced at
no charge for
parts or labor for a period of one year.
What Is Not Covered by Warranty
Damages or malfunctions not resulting from defects in material
or workmanship and damages or malfunctions from other than
normal use, including but limited to, repair by
unauthorized parties, tampering, modification or accident.
To Obtain Warranty Service and Troubleshooting Information:
Call 1-800-592-9541 or visit our website at www.incipio.com.
To receive Warranty service along with the name and address
of an authorized product service center, the original consumer
purchaser must contact us for problem determination and
service procedures. Proof of purchase in the form of a bill of sale
or
receipted invoice, evidencing that the product is within the
applicable Warranty period(s), MUST be presented in order to
obtain the requested service. It is your responsibility to
properly package and send any defective products along with
a dated

26
copy of proof of purchase, a written explanation of the
problem, and a valid return address to the authorized service
center at
your expense. Do not include any other items or accessories
with the defective product. Any products received by the
authorized service center that are not covered by warranty will
be returned unrepaired.

26
FCC Statement
This equipment has been tested and found to
comply with the limits for a Class B digital device,
pursuant to part 15 of the FCC Rules. These
limits are designed to provide reasonable
protection against harmful interference in a
residential installation. This equipment generates,
uses and can radiate radio frequency energy and,
if not installed and used in accordance with the
instructions, may cause harmful interference to
radio communications. However, there is no
guarantee that interference will not occur in a
particular installation. If this equipment does
cause harmful interference to radio or television
reception, which can be determined by turning
the equipment off and on, the user is encouraged
to try to correct the interference by one or more
of the following measures:
•Reorient or relocate the receiving antenna.
•Increase the separation between the equipment
and receiver.
•Connect the equipment into an outlet on a
circuit different from that to which the receiver is
connected.

26
•Consult the dealer or an experienced radio/TV
technician for help.
Caution: Any changes or modifications to this
device not explicitly approved by manufacturer
could void your authority to operate this
equipment.
This device complies with part 15 of the FCC
Rules. Operation is subject to the following two
conditions: (1) This device may not cause
harmful interference, and (2) this device must
accept any interference received, including
interference that may cause undesired operation.
RF Exposure Information
This equipment complies with FCC radiation
exposure limits set forth for an uncontrolled
environment. This equipment should be installed
and operated with minimum distance 20cm
between the radiator and your body.