
Technical Support and E-Warranty Certificate www.vevor.com/support
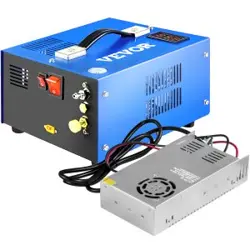
COMPRESSOR PUMP
MODEL: G220V110V12V-DULIV1
We continue to be committed to provide you tools with competitive price.
"Save Half", "Half Price" or any other similar expressions used by us only represents an
estimate of savings you might benefit from buying certain tools with us compared to the
major top brands and does not necessarily mean to cover all categories of tools offered by
us. You are kindly reminded to verify carefully when you are placing an order with us if you
are actually saving half in comparison with the top major brands.
Have product questions? Need technical support? Please feel free to
contact us:
Technical Support and E-Warranty Certificate
www.vevor.com/support
NEED HELP? CONTACT US!
This is the original instruction, please read all manual instructions
carefully before operating. VEVOR reserves a clear interpretation of our
user manual. The appearance of the product shall be subject to the
product you received. Please forgive us that we won't inform you again if
there are any technology or software updates on our product.
COMPRESSOR
PUMP
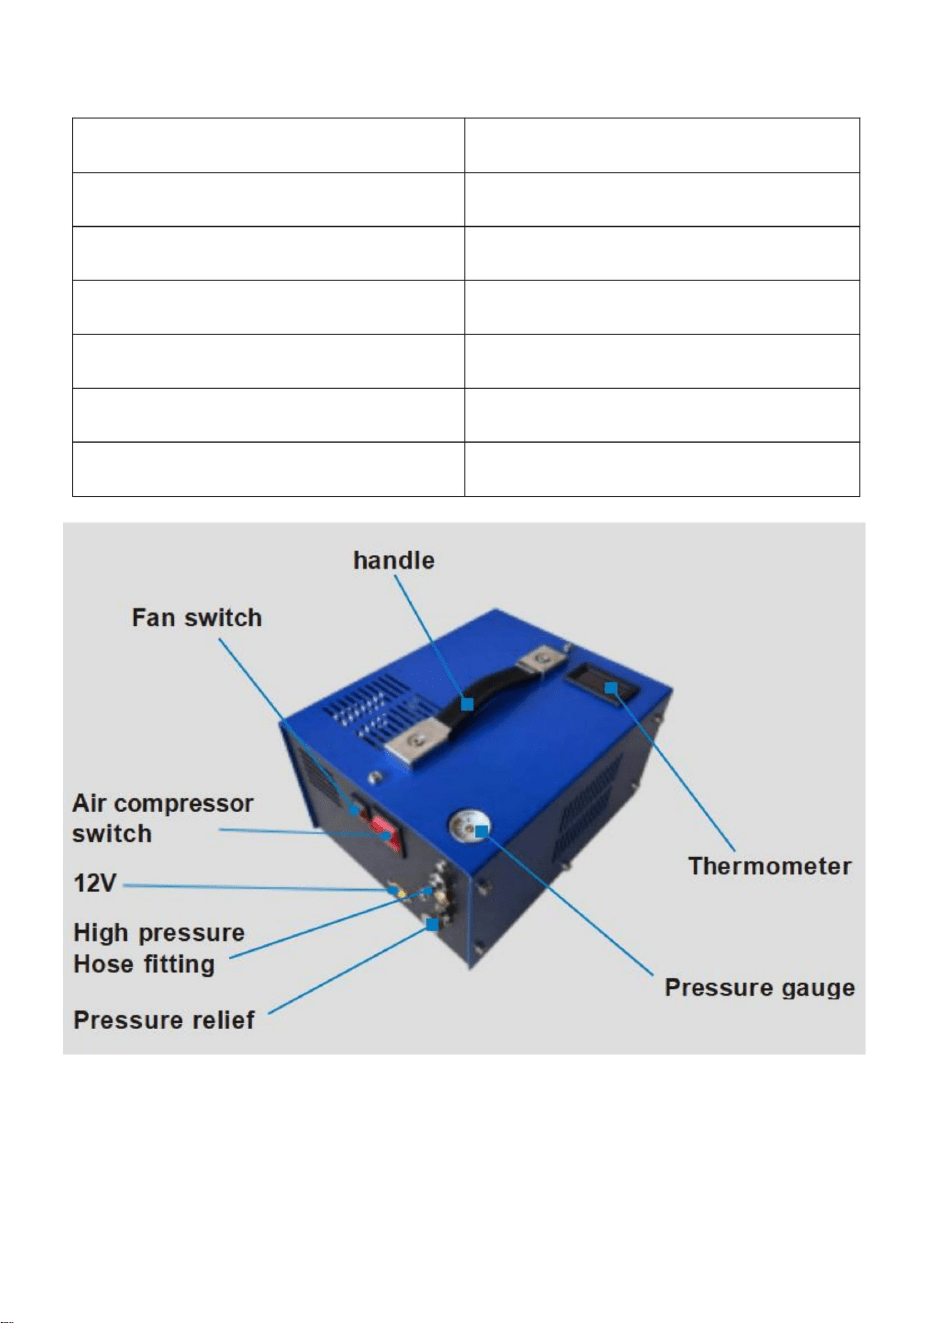
Technical parameters:
Model number
220V- 110V- 12V
Volume
L21. 5 ×W17. 5 × H13 (CM)
Weight
5.2Kg
Working pressure
4500PSI/ 30Mpa/ 300Bar
Cooling system
Fan cooling
Charging rate
18min/0.45L tank
Motor power rating
250W
1. Description of Test Machine:
1. Test machine: many tests has already been performed for the machine
before leaving the factory. Connect the hose quick joint and plug , turn on the
power supply, and press the start switch to start the machine. ( Note:
The vehicle- mounted inflating pump must connect the positive pole to the
red line and the negative pole to the black line) Whether the fan operates
normally after the machine is started , and whether there are any
abnormalities in the sound of the machine (such as friction sound , uneven
operation sound and air leakage sound) and whether there are loose
fasteners in various parts . Tighten the pressure release valve and observe
the running speed of the pressure gauge indicator needle . The test state of
the hose plug from 0 to 30Mpa should be about 20 s (see Fig. 1 )
.
see Fig. 1
2. Instructions For Use
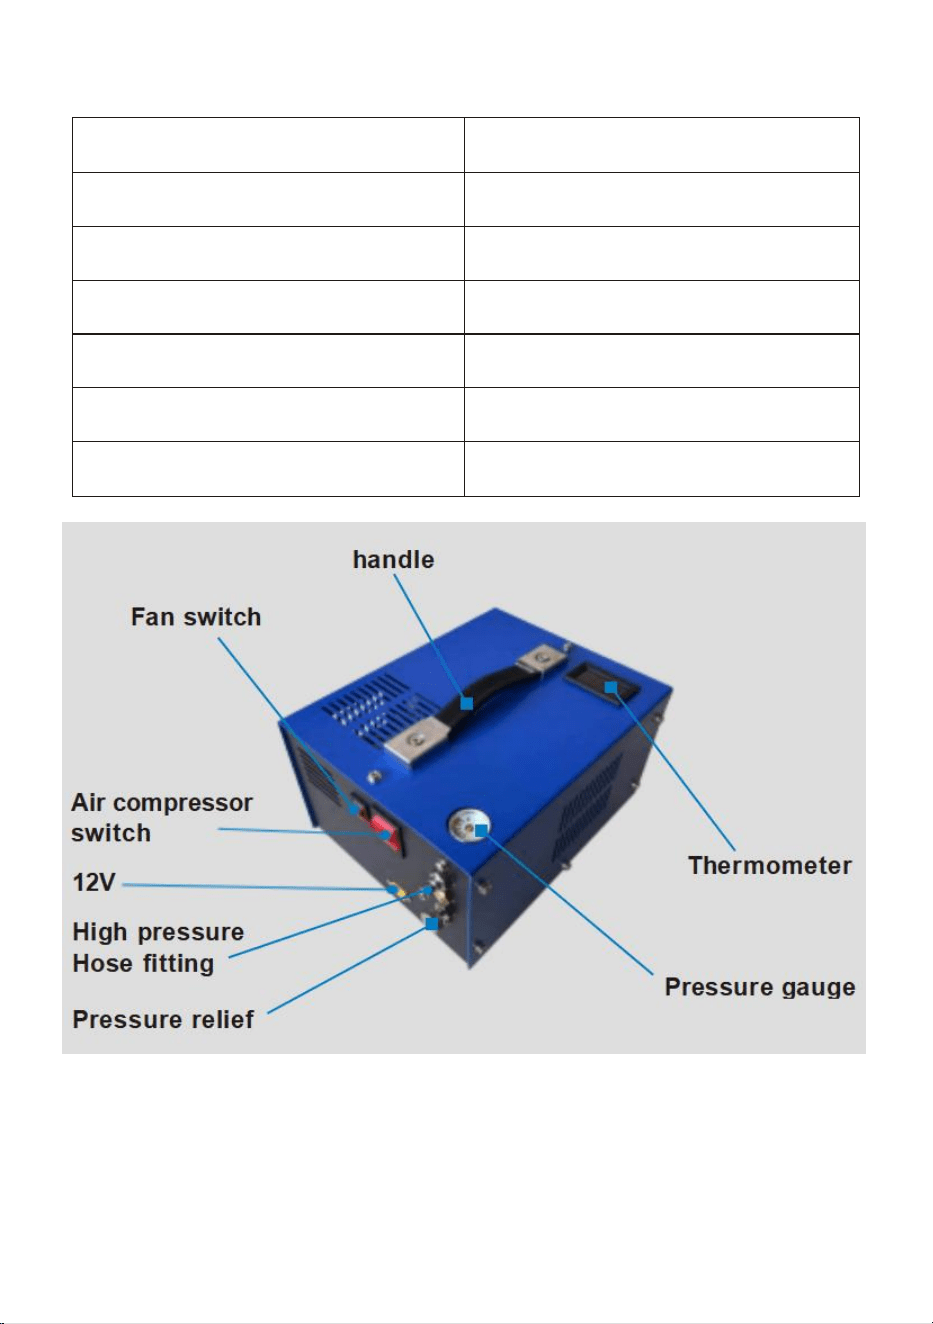
1. 11 .5- 14V DC power supply is required for normal operation of this
machine. Connect the power line to the machine , make sure the machine
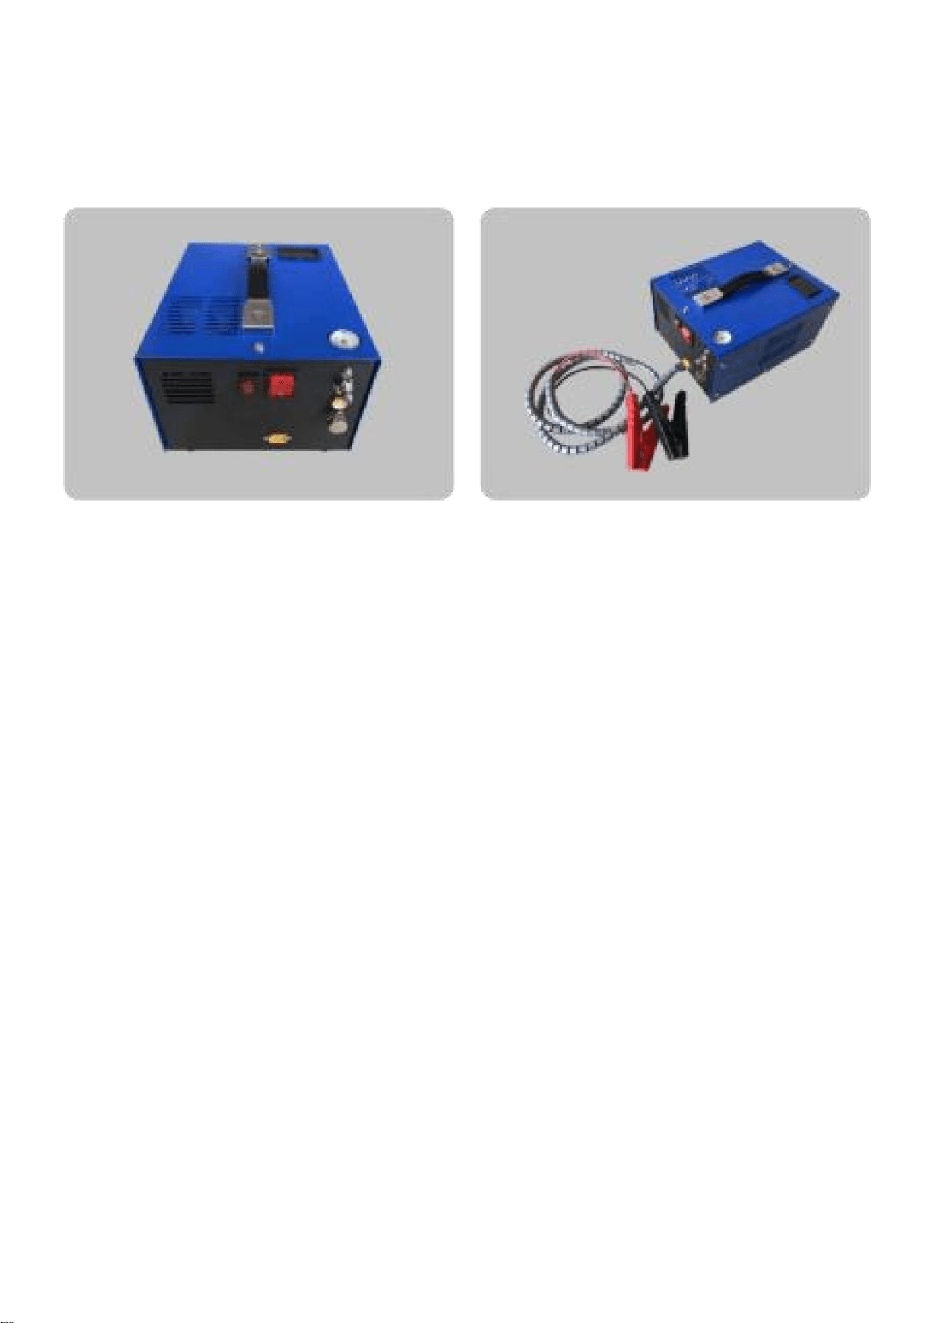
switch is shutdown , and release the vent valve. (See Fig. 2 )
see Fig. 2
2. First find the battery position of the car, determine the positive and
negative poles of the battery, clamp the red clamp on the positive pole of
the battery (corresponding to the battery +) , clamp the black clamp on the
negative pole of the battery (corresponding to the battery- ) , and then start
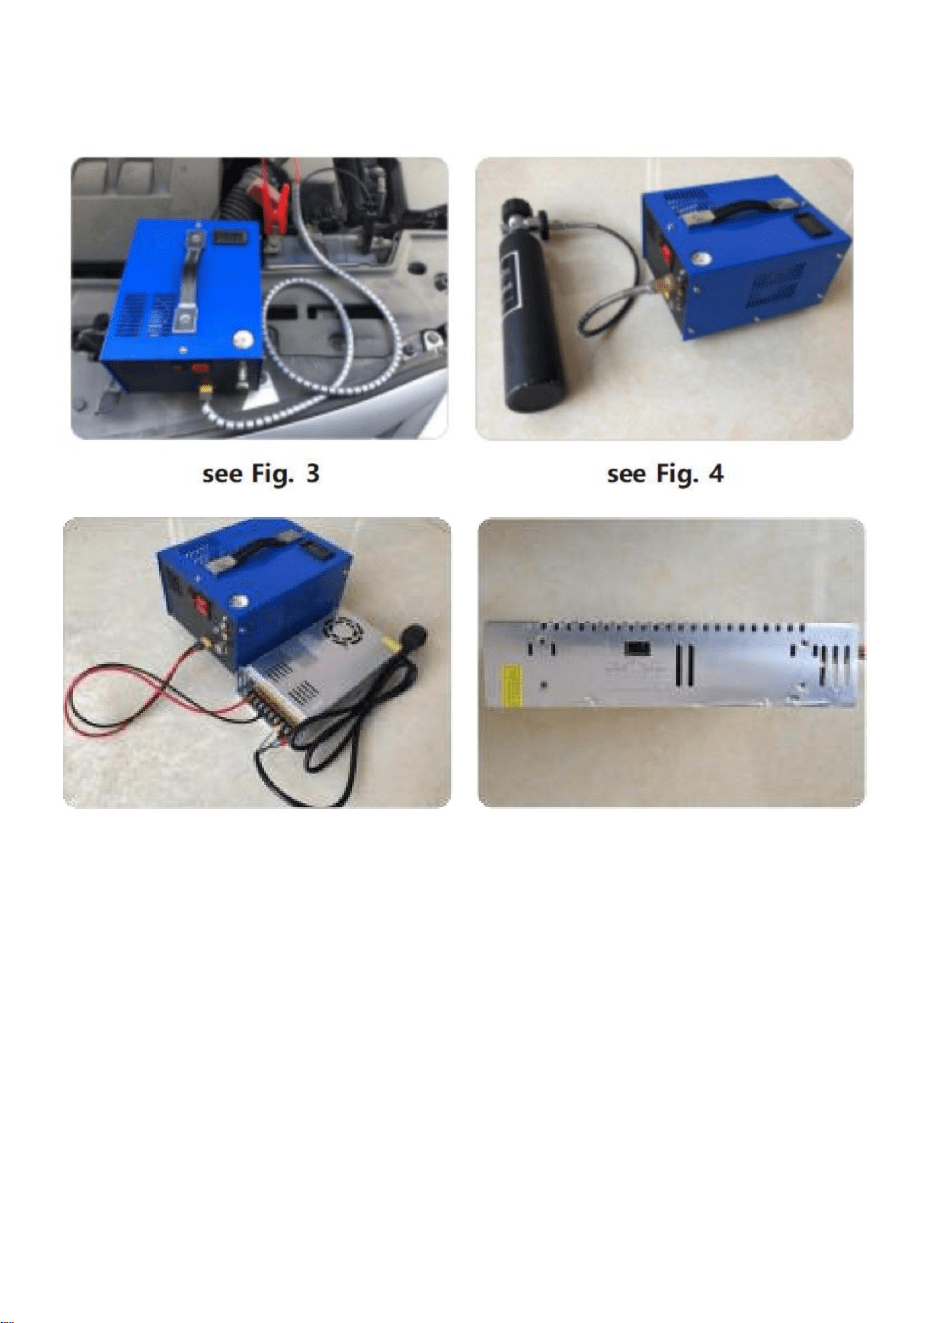
the car. (See Fig. 3)
3. Pull out the test plug and store it for use by the testing machine (the test
plug is an important part for checking and analyzing machine faults ). Link
the hose quick connector to the inflation container, turn the switch to start
the machine , and tighten the bleeder valve to start inflation after ensuring
everything is normal. During the inflation process, the operator should not
be too close to the inflation container, please keep a certain safe distance .
Closely observe the indicated pressure of the pressure gauge. The
maximum design pressure of this machine is 30Mpa. When the pressure is
expressed to the required pressure value, please close the switch in time ,
then open the vent valve , and disassemble the quick connector after
draining all the air and water. (See Fig. 4 )
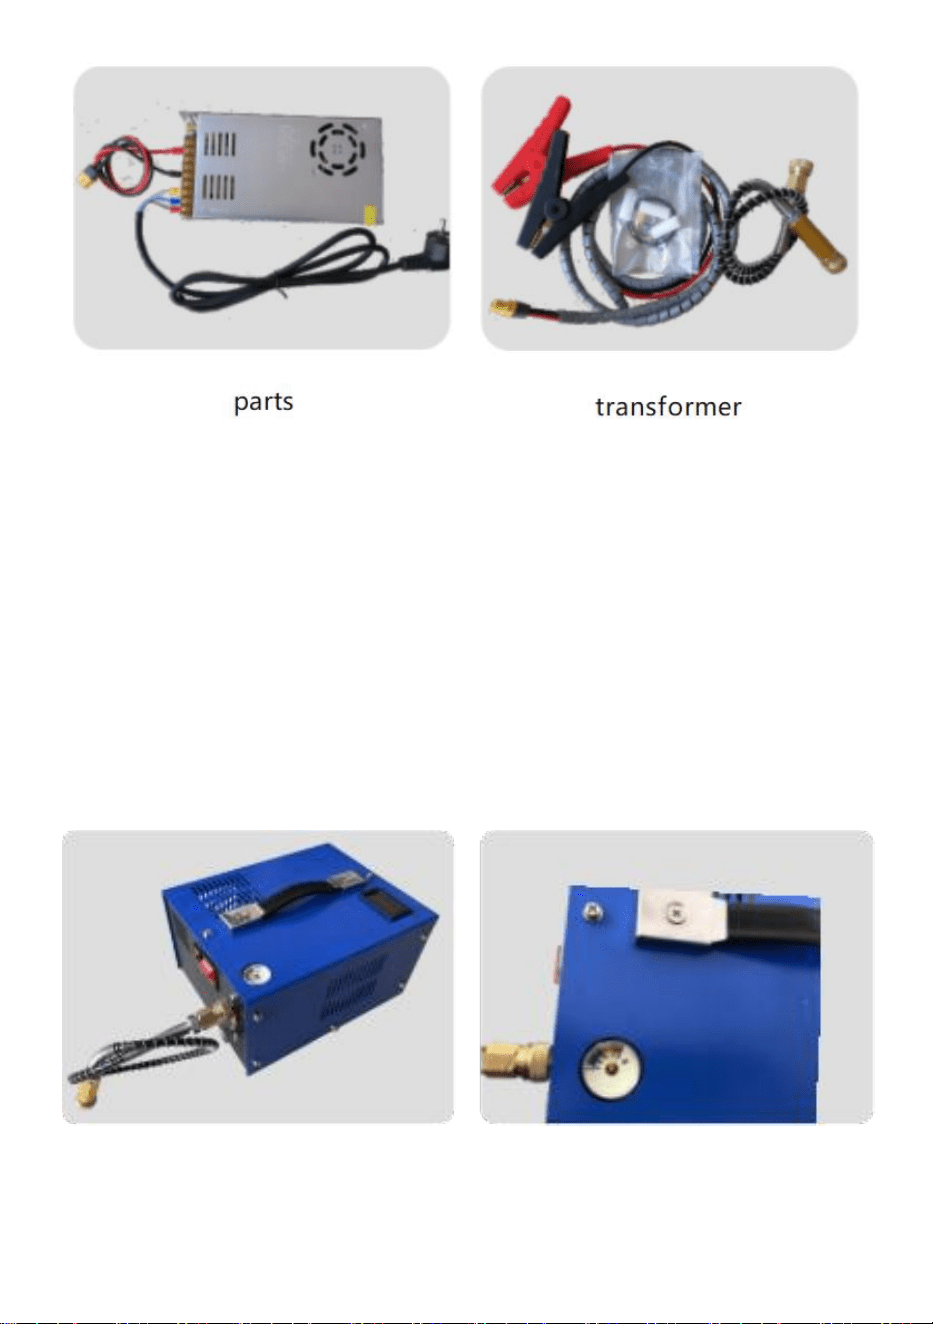
4. If you need to use the machine under the voltage of 110V-220V, please
use our optional conversion power supply device . There is a built-in toggle
switch (110V and 220V indicators) on the side of the power supply device .
The switch should be toggle according to the voltage of the place where it
is used ( if the place is 110V, turn the switch to 110V, if the place is 220V,
turn the switch to 220V) . If the direction is wrong, the power supply
converter will be damaged. Make sure the power supply is correct before
using the machine normally. The operation is carried out according to the
previous usage process. (See Fig. 5 )
see Fig. 5
3. Precautions:
1. This machine adopts piston ring with automatic friction compensation
function, and there is a short preheating process for each work , and the
sealing capacity can be restored. The pressure measuring plug attached to
the machine can be used to block the air outlet of the high-pressure hose
for each start of work , and a pressure test of 1-25Mpa can be carried out ,
namely the machine can be preheated quickly and the possible abnormal
work of the machine can be found at the first time .
2. Professionals must be on duty during the use process. If any abnormal
situation is found , stop the machine and loosen the pressure relief valve

immediately. It is recommended to normally use the maximum safety index
below 30Mpa and prolong the service life of the machine .
3. It is normal that the working temperature of this machine will rise at the
beginning. It is necessary to pay attention to the one-time working time with
less than 30 min or 90 ℃ in daily use , so as to avoid the damage of motors
and parts caused by long-term load work .
4. The maximum charging pressure of this machine shall not exceed 30Mpa
, and the use of over pressure will cause the mechanical life to drop sharply.
This machine has over pressure protection over 30Mpa and automatic
blasting of anti-bursting discs. Considering all aspects , it is recommended
that the safety pressure is below 30Mpa .
5. Do not turn off the fan immediately after the machine is finished. The fan
can only be turned off when the machine is cooled to below 50 degrees
Celsius .
6. Turn on the pressure relief valve to discharge the pressure of the high-
pressure hose as soon as the machine is inflated , so as to prevent the
deformation of the high-temperature and high-pressure check valve for a
long time. Do not forcibly disassemble the inflation head without emptying
the pressure , which will cause the female head sealing ring to fly out and
cannot be used next time .
4. Maintenance and storage:
1. Replace the hose filter cotton regularly. After using it for many times , it
is necessary to disassemble the machine for cleaning and replace the
piston ring , seal and one-way valve when it is found that the pumping
speed obviously decreases .
2. When it is placed in the car, try to avoid relying on hard objects , so as to
avoid damaging the machine . Try not to put it in a damp place when
placing it at home , so as to prevent electrical appliances from being
affected with damp and burning out.

CORRECT DISPOSAL
This product is subject to the provision of european Directive
2012/19/EU. The symbol showing a wheelie bin crossed through
indicates that the product requires separate refuse collection in the
European Union. This applies to the product and all accessories
marked with this symbol. Products marked as such may not be
discarded with normal domestic waste, but must be taken to a
collection point for recycling electrical and electronic devices.
Indoor use only
FCC Information
CAUTION: Changes or modifications not expressly approved by the party
responsible for compliance could void the user's authority to operate the
equipment!
This device complies with Part 15 of the FCC Rules. Operation is subject to the
following two conditions:
1) This product may cause harmful interference.
2)This product must accept any interference received, including interference that
may cause undesired operation.
WARNING: Changes or modifications to this product not expressly approved by
the party.responsible for compliance could void the user's authority to operate the
product.
Note: This product has been tested and found to comply with the limits for a
Class B digital device pursuant to Part 15 of the FCC Rules, These limits are
designed to provide reasonable protection against harmful interference in a
residential installation.
This product generates, uses and can radiate radio frequency energy, and if not
installed and used in accordance with the instructions, may cause harmful
interference to radio communications. However, there is no guarantee that
interference will not occur in a particular installation. If this product does cause
harmful interference to radio or television reception,which can be determined by
turning the product off and on, the user is encouraged to try to correct the
interference by one or more of the following measures.
· Reorient or relocate the receiving antenna.
· Increase the distance between the product and receiver.
· Connect the product to an outlet on a circuit different from that to which the
receiver is connected.
· Consult the dealer or an experienced radio/TV technician for assistance.
MADE IN CHINA


MODÈLE:G220V110V12VDULIV1
«Économisezlamoitié»,«Moitiéprix»outouteautreexpressionsimilaireutiliséeparnousnereprésente
qu'uneestimationdeséconomiesquevouspourriezréaliserenachetantcertainsoutilscheznouspar
rapportauxgrandesmarquesetnecouvrepasnécessairementtouteslescatégoriesd'outilsquenous
proposons.Nousvousrappelonsdebienvouloirvérifiersoigneusementlorsquevouspassezunecommande
cheznoussivouséconomisezréellementlamoitiéparrapportauxgrandesmarques.
Nouscontinuonsànousengageràvousfournirdesoutilsàdesprixcompétitifs.
POMPEACOMPRESSEUR
Assistancetechniqueetcertificatdegarantieélectroniquewww.vevor.com/support
Machine Translated by Google

Ils'agitdelanoticed'utilisationd'origine.Veuillezlireattentivementtouteslesinstructionsdu
manuelavantdel'utiliser.VEVORseréserveledroitd'interpréterclairementnotremanueld'utilisation.
L'apparenceduproduitdépendduproduitquevousavezreçu.Veuilleznousexcuser,nousne
vousinformeronsplusencasdemiseàjourtechnologiqueoulogicielledenotreproduit.
Vousavezdesquestionssurnosproduits?Vousavezbesoind'assistancetechnique?N'hésitezpasà
nouscontacter:
Assistancetechniqueetcertificatdegarantie
électroniquewww.vevor.com/support
BESOIND'AIDE?CONTACTEZNOUS!
COMPRESSEUR
POMPE
Machine Translated by Google

5,2kg
Refroidissementparventilateur
L21.5×W17.5×H13(CM)
Tauxdecharge
Volume
4500PSI/30Mpa/300Bar
220V110V12VNumérodemodèle
Circuitderefroidissement
Pressiondetravail
250W
Puissancenominaledumoteur
Poids
Réservoirde18min/0,45L
Paramètrestechniques:
Machine Translated by Google
lignerougeetlepôlenégatifàlalignenoire)Sileventilateurfonctionne
fixationsdansdiversespièces.Serrezlasoupapededéchargedepressionetobservez
Lapompedegonflagemontéesurvéhiculedoitconnecterlepôlepositifàla
inégal
avantdequitterl'usine.Connectezleraccordrapidedutuyauetlebouchon,allumezle
normalement,aprèsledémarragedelamachine,
desanomaliesdanslebruitdelamachine(commeunbruitdefrottement,unbruitde
fonctionnementetunbruitdefuited'air)ets'ilyadespiècesdesserrées
alimentationélectriqueetappuyezsurl'interrupteurdedémarragepourdémarrerlamachine.(Remarque:
1.Machinedetest:denombreuxtestsontdéjàétéeffectuéssurlamachine
,
ets'ilyena
.
,
lebouchondutuyaude0à30Mpadoitêtred'environ20s(voirFig.1)
lavitessedefonctionnementdel'aiguilleindicatricedumanomètre.L'étatdetestde
1.Descriptiondelamachined'essai:
voirFig.1
Machine Translated by Google

,
Lapriseestunélémentimportantpourvérifieretanalyserlesdéfautsdelamachine.Lien
,
convertisseurseraendommagé.Assurezvousquel'alimentationestcorrecteavant
expriméàlavaleurdepressionrequise,veuillezfermerl'interrupteuràtemps,puisouvrirlavanne
deventilationetdémonterleconnecteurrapideaprès
assurezvousquelamachine
lavoiture.(VoirFig.3)
interrupteur(voyants110Vet220V)surlecôtédudispositifd'alimentation.
estutilisé(sil'endroitestà110V,mettezl'interrupteursur110V,sil'endroitestà220V,
soyeztropprèsdurécipientdegonflage,veuillezgarderunecertainedistancedesécurité.
utiliseznotredispositifd'alimentationdeconversionenoption.Ilyaunebasculeintégrée
pôlesnégatifsdelabatterie,fixezlapincerougesurlepôlepositifde
lamachineet
serrezlavannedepurgepourdémarrerlegonflageaprèsvousêtreassuré
,
etrelâchezlasoupapedeventilation.(VoirFig.2)
(mettrel'interrupteursur220V).Silesensestincorrect,l'alimentation
3.Retirezlafichedetestetconservezlapourpouvoirl'utiliseraveclamachinedetest(lamachinedetest).
évacuanttoutl'airetl'eau.(VoirFig.4)
L'interrupteurdoitêtrebasculéenfonctiondelatensiondel'endroitoùilsetrouve.
pôlenégatifdelabatterie(correspondantàlabatterie),puisdémarrer
machine.Connectezlaligned'alimentationàl'interrupteurdela
machineestarrêté
Lapressiondeconceptionmaximaledecettemachineestde30Mpa.Lorsquelapressionest
1.Unealimentation11,514VCCestnécessairepourlefonctionnementnormaldecetappareil.
labatterie(correspondantau+delabatterie),serrezlapincenoiresurle
Observezattentivementlapressionindiquéeparlemanomètre.
4.Sivousdevezutiliserlamachinesousunetensionde110V220V,veuillez
2.Trouvezd'abordlapositiondelabatteriedelavoiture,déterminezlesbornespositiveet
toutestnormal.Pendantleprocessusdegonflage,l'opérateurnedoitpas
,
leconnecteurrapidedutuyauaurécipientdegonflage,tournezl'interrupteurpourdémarrer
,
2.Moded'emploi
voirFig.2
Machine Translated by Google

voirFig.5
lamachinepeutêtreutiliséepourbloquerlasortied'airdutuyauhautepression
pourchaquedémarragede
travailetuntestdepressionde1à25Mpapeutêtreeffectué,àsavoir
quelamachinepeutêtrepréchaufféerapidementetleséventuellesanomalies
lacapacitéd'étanchéitépeutêtrerestaurée.Lebouchondemesuredepressionfixéà
,
1.Cettemachineadopteunsegmentdepistonaveccompensationautomatiquedufrottement
fonction,etilyauncourtprocessusdepréchauffagepourchaquetravailetle
processusd'utilisationprécédent.(VoirFig.5)
utiliserlamachinenormalement.L'opérationesteffectuéeselonles
, ,
2.Desprofessionnelsdoiventêtreenservicependantleprocessusd'utilisation.Encasd'anomalie
letravaildelamachinepeutêtretrouvédupremiercoup.
lasituationestdétectée,
arrêtezlamachineetdesserrezlasoupapedesurpression
3.Précautions:
Machine Translated by Google

4.Entretienetstockage:
etlespiècescauséesparuntravaildechargeàlongterme.
nepeutêtreéteintquelorsquelamachineestrefroidieàmoinsde50degrés
il
,
,
début.Ilfautfaireattentionautempsdetravailponctuelavec
quelapressiondesécuritéestinférieureà30Mpa.
Évitezd'endommagerlamachine.Essayezdenepaslaplacerdansunendroithumidelorsque
leplacerdansune
maisonaffectéeparl'humiditéetlesbrûlures.
lapression,qui
ferasortirlabagued'étanchéitédelatêtefemelleet
2.Lorsqu'ilestplacédanslavoiture,essayezd'éviterdevousappuyersurdesobjetsdurs,afinde
immédiatement.Ilestrecommandéd'utilisernormalementl'indicedesécuritémaximal
,
6.Ouvrezlasoupapedesurpressionpourdéchargerlapressiondutuyauhautepressiondèsquela
machineestgonfléedéformationduclapetantiretourhaute
températureethautepressionpendantune
4.Lapressiondechargemaximaledecettemachinenedoitpasdépasser30Mpa
segmentdepiston,jointetclapetantiretourlorsqu'ilestconstatéquelepompage
moinsde30minou90enutilisationquotidienneafind'éviterd'endommagerlesmoteurs
,
5.N'éteignezpasleventilateurimmédiatementaprèsquelamachineaterminé.Leventilateur
sablagedesdisquesantiéclatement.Comptetenudetouslesaspects,ilestrecommandé
3.Ilestnormalquelatempératuredefonctionnementdecettemachineaugmenteàla
afind'empêcherla
afind'éviterquelesappareilsélectriquesnesoient
endessousde30Mpaetprolongerladuréedeviedelamachine.
Cettemachineestdotéed'uneprotectioncontrelessurpressionsdeplusde30Mpaetd'unréglageautomatique.
nepeutpasêtreutilisélaprochainefois.
lavitessediminueévidemment.
etl'utilisationd'unesurpressionentraîneraunediminutionbrutaledeladuréedeviemécanique.
pendantunelonguepériode.Nedémontezpasdeforcelatêtedegonflagesanslavider
,
Celsius.
1.Remplacezrégulièrementlefiltreencotondutuyau.Aprèsplusieursutilisations,ilestnécessaire
dedémonterlamachinepourlanettoyeretdelaremplacer.
Machine Translated by Google

installéetutiliséconformémentauxinstructions,peutcauserdesdommages
peutprovoquerunfonctionnementindésirable.
indiquequeleproduitnécessiteunecollecteséparéedesdéchetsdansle
équipement!
enéteignantetenrallumantleproduit,l'utilisateurestencouragéàessayerdecorrigerleproblème.
lerécepteurestconnecté.
ATTENTION:Leschangementsoumodificationsnonexpressémentapprouvésparlapartie
Ceproduitestsoumisauxdispositionsdeladirectiveeuropéenne
lapartieresponsabledelaconformitépourraitannulerl'autoritédel'utilisateuràexploiterle
jetéaveclesorduresménagèresnormales,maisdoitêtreapportédansun
1)Ceproduitpeutprovoquerdesinterférencesnuisibles.
installationrésidentielle.
∙Augmenterladistanceentreleproduitetlerécepteur.
Unioneuropéenne.Cecis'appliqueauproduitetàtouslesaccessoires
interférenceparuneouplusieursdesmesuressuivantes.
Cetappareilestconformeàlapartie15desrèglesdelaFCC.Sonfonctionnementestsoumisaux
AppareilnumériquedeclasseBconformémentàlapartie15desrèglesdelaFCC.Ceslimitessont
interférencenuisibleàlaréceptionradiooutélévision,quipeutêtredéterminéepar
responsabledelaconformitépourraitannulerl'autoritédel'utilisateuràexploiterle
2012/19/UE.Lesymbolereprésentantunepoubelleàroulettesbarrée
produit.
∙Consultezlerevendeurouuntechnicienradio/TVexpérimentépourobtenirdel’aide.
AVERTISSEMENT:Leschangementsoumodificationsapportésàceproduitnonexpressémentapprouvéspar
interférencesaveclescommunicationsradio.Cependant,iln'yaaucunegarantieque
2)Ceproduitdoitacceptertouteinterférencereçue,ycomprislesinterférencesqui
pointdecollectepourlerecyclagedesappareilsélectriquesetélectroniques.
Ceproduitgénère,utiliseetpeutémettredel'énergieradiofréquence,ets'ilnel'estpas
∙Branchezleproduitsuruneprised'uncircuitdifférentdeceluiauquelle
marquésdecesymbole.Lesproduitsmarquéscommetelsnepeuventpasêtre
lesdeuxconditionssuivantes:
conçupourfourniruneprotectionraisonnablecontrelesinterférencesnuisiblesdansun
∙Réorienteroudéplacerl’antennederéception.
aucuneinterférenceneseproduiradansuneinstallationparticulière.Siceproduitprovoque
FABRIQUÉENCHINE
Remarque:Ceproduitaététestéetjugéconformeauxlimitesd'un
ÉLIMINATIONCORRECTE
InformationsdelaFCC
Utilisationenintérieuruniquement
Machine Translated by Google


MODELL: G220V110V12V-DULIV1
KOMPRESSORPUMPE
Technischer Support und E-Garantie-Zertifikat www.vevor.com/support
„Sparen Sie die Hälfte“, „Halber Preis“ oder andere ähnliche Ausdrücke, die wir verwenden, stellen nur eine
Schätzung der Ersparnis dar, die Sie beim Kauf bestimmter Werkzeuge bei uns im Vergleich zu den großen
Topmarken erzielen können, und decken nicht unbedingt alle von uns angebotenen Werkzeugkategorien ab.
Wir möchten Sie freundlich daran erinnern, bei Ihrer Bestellung bei uns sorgfältig zu prüfen, ob Sie im Vergleich
zu den großen Topmarken tatsächlich die Hälfte sparen.
Wir sind weiterhin bestrebt, Ihnen Werkzeuge zu wettbewerbsfähigen Preisen anzubieten.
Machine Translated by Google

Dies ist die Originalanleitung. Bitte lesen Sie alle Anweisungen sorgfältig durch, bevor Sie
das Gerät in Betrieb nehmen. VEVOR behält sich eine klare Auslegung unserer Bedienungsanleitung
vor. Das Erscheinungsbild des Produkts richtet sich nach dem Produkt, das Sie erhalten
haben. Bitte verzeihen Sie uns, dass wir Sie nicht erneut informieren, wenn es Technologie- oder
Software-Updates für unser Produkt gibt.
Sie haben Fragen zu unseren Produkten? Sie benötigen technischen Support? Dann kontaktieren
Sie uns gerne:
Brauchen Sie Hilfe? Kontaktieren Sie uns!
PUMPE
KOMPRESSOR
Technischer Support und E-Garantie-Zertifikat
www.vevor.com/support
Machine Translated by Google
Technische Parameter:
Lüfterkühlung
L21. 5 ×W17. 5 × H13 (CM)
4500PSI/ 30Mpa/ 300Bar
18 Min./0,45 l Tank
Volumen
5,2 kg
220 V - 110 V - 12 VModellnummer
Gewicht
Arbeitsdruck
Motorleistung
Ladestrom
250 W
Kühlsystem
Machine Translated by Google

siehe Abb. 1
1. Beschreibung der Testmaschine:
Befestigungselemente in verschiedenen Teilen. Das Druckablassventil festziehen und beobachten
Die fahrzeugmontierte Luftpumpe muss den Pluspol mit dem
normalerweise nach dem Start der Maschine
Anomalien im Geräusch der Maschine (wie Reibungsgeräusche, Betriebsgeräusche
und Luftleckgeräusche) und ob es lose gibt
die Laufgeschwindigkeit der Manometer-Anzeigenadel. Der Prüfzustand von
Stromversorgung und drücken Sie den Startschalter, um die Maschine zu starten. (Hinweis:
rote Leitung und Minuspol an schwarze Leitung) Ob der Lüfter läuft
bevor Sie das Werk verlassen. Verbinden Sie den Schlauchschnellverbinder und den Stecker, schalten Sie das
1. Testmaschine: Für die Maschine wurden bereits viele Tests durchgeführt
der Schlauchstopfen von 0 auf 30Mpa sollte ca. 20 s lang sein (siehe Abb. 1 )
und ob es welche gibt
uneben
,
.
,
Machine Translated by Google

siehe Abb. 2
2. Gebrauchsanweisung
alles ist normal. Während des Aufpumpvorgangs sollte der Bediener nicht
4. Wenn Sie die Maschine unter einer Spannung von 110V-220V verwenden müssen, bitte
Stellen Sie sicher, dass die Maschine
das Auto. (Siehe Abb. 3)
auf den erforderlichen Druckwert ausgedrückt, schließen Sie bitte den Schalter rechtzeitig, öffnen Sie
dann das Entlüftungsventil und demontieren Sie den Schnellverbinder nach
wird verwendet (wenn der Ort 110V hat, schalten Sie den Schalter auf 110V, wenn der Ort 220V hat,
Schalter (Anzeigen für 110 V und 220 V) an der Seite des Netzteils.
,
Konverter beschädigt wird. Stellen Sie sicher, dass die Stromversorgung korrekt ist, bevor
,
Stecker ist ein wichtiger Bestandteil zur Überprüfung und Analyse von Maschinenfehlern). Link
die Maschine und
ziehen Sie das Entlüftungsventil fest, um mit dem Aufpumpen zu beginnen, nachdem Sie sichergestellt haben
,
Wenn Sie sich zu nahe am Aufblasbehälter befinden, halten Sie bitte einen gewissen Sicherheitsabstand ein.
Verwenden Sie unser optionales Umrüstnetzteil. Es gibt einen eingebauten Schalter
Minuspole der Batterie, klemmen Sie die rote Klemme an den Pluspol der
Maschine. Schließen Sie die Stromleitung an den Maschinenschalter an,
wenn dieser ausgeschaltet ist.
Minuspol der Batterie (entspricht dem Batterie- ) , und starten Sie dann
Der maximale Auslegungsdruck dieser Maschine beträgt 30 MPa. Wenn der Druck
Der Schalter sollte entsprechend der Spannung des Ortes, an dem er
3. Den Prüfstecker herausziehen und für die Verwendung mit der Prüfmaschine aufbewahren (die Prüfvorrichtung
Lassen Sie die gesamte Luft und das gesamte Wasser ab. (Siehe Abb. 4)
schalten Sie den Schalter auf 220V). Wenn die Richtung falsch ist, die Stromversorgung
und lassen Sie das Entlüftungsventil los. (Siehe Abb. 2)
,
den Schlauchschnellverbinder an den Aufblasbehälter an, drehen Sie den Schalter zum Starten
,
1. Für den normalen Betrieb dieses Geräts ist eine DC-Stromversorgung von 11,5-14 V erforderlich.
der Batterie (entspricht dem Batterie +), klemmen Sie die schwarze Klemme an die
Beobachten Sie genau den angezeigten Druck des Manometers.
2. Finden Sie zuerst die Batterieposition des Autos, bestimmen Sie den positiven und
Machine Translated by Google
siehe Abb. 5
Mit der Maschine kann der Luftauslass des Hochdruckschlauchs blockiert werden
Dichtfähigkeit wiederhergestellt werden kann. Der Druckmessstopfen an
für jeden Arbeitsbeginn und
ein Drucktest von 1-25Mpa kann durchgeführt werden, nämlich die
Maschine kann schnell vorgewärmt werden und die mögliche abnormale
,
1. Diese Maschine verwendet einen Kolbenring mit automatischer Reibungskompensation
Funktion, und es gibt einen kurzen Vorheizvorgang für jede Arbeit und die
vorheriger Nutzungsvorgang. (Siehe Abb. 5)
normaler Verwendung der Maschine. Der Vorgang wird gemäß den
,
,
Situation gefunden
wird, stoppen Sie die Maschine und lösen Sie das Druckbegrenzungsventil
2. Während des Einsatzes müssen Fachkräfte im Einsatz sein. Bei anormalen
Die Funktionsweise der Maschine kann sofort überprüft werden.
3. Vorsichtsmaßnahmen:
Machine Translated by Google

4. Wartung und Lagerung:
lange Zeit. Demontieren Sie den Aufblaskopf nicht gewaltsam, ohne ihn zu entleeren
Anfang. Es ist notwendig, auf die einmalige Arbeitszeit mit zu achten
dass der Sicherheitsdruck unter 30 MPa liegt.
,
Die Geschwindigkeit nimmt offensichtlich ab.
Wenn es in einem
feuchten Zuhause aufgestellt wird und ausbrennt,
vermeiden Sie Schäden an der Maschine. Stellen Sie die Maschine nicht an einen feuchten Ort, wenn
Es
,
und Teile, die durch langfristige Belastungsarbeit verursacht werden.
kann nur ausgeschaltet werden, wenn die Maschine auf unter 50 Grad abgekühlt ist
4. Der maximale Ladedruck dieser Maschine darf 30 MPa nicht überschreiten
6. Drehen Sie das Druckbegrenzungsventil auf, um den Druck des Hochdruckschlauchs abzulassen,
sobald die Maschine aufgeblasen ist. Verformung des Hochtemperatur-
und Hochdruck-Rückschlagventils für eine
Kolbenring, Dichtung und Einwegventil, wenn festgestellt wird, dass die Pumpe
der Druck, der
dazu führt, dass der Dichtring des Innenkopfes herausfliegt und
2. Wenn es im Auto platziert wird, versuchen Sie, sich nicht auf harte Gegenstände zu verlassen, um
sofort. Normalerweise wird empfohlen, den maximalen Sicherheitsindex zu verwenden
,
3. Es ist normal, dass die Betriebstemperatur dieser Maschine ansteigt.
Strahlen von Berstscheiben. Unter Berücksichtigung aller Aspekte wird empfohlen
um zu verhindern, dass
um zu verhindern, dass elektrische Geräte
5. Schalten Sie den Ventilator nicht sofort aus, wenn die Maschine fertig ist. Der Ventilator
,
weniger als 30 min oder 90 ÿ im täglichen Gebrauch, um Schäden an Motoren zu vermeiden
,
Celsius.
1. Ersetzen Sie die Schlauchfilterwatte regelmäßig. Nach mehrmaligem Gebrauch ist es notwendig,
die Maschine zur Reinigung zu zerlegen und die
unter 30 MPa und verlängert die Lebensdauer der Maschine.
Diese Maschine verfügt über einen Überdruckschutz über 30Mpa und eine automatische
kann beim nächsten Mal nicht verwendet werden.
und die Anwendung von Überdruck führt zu einer drastischen Verkürzung der mechanischen Lebensdauer.
Machine Translated by Google

nicht gemäß den Anweisungen installiert und verwendet wird, kann dies zu
weist darauf hin, dass das Produkt einer getrennten Müllentsorgung im
Ausrüstung!
Hinweis: Dieses Produkt wurde getestet und entspricht den Grenzwerten für eine
Nach dem Aus- und Einschalten des Produkts wird dem Benutzer empfohlen, das Problem zu beheben.
Empfänger ist angeschlossen.
Störungen treten bei einer bestimmten Installation nicht auf. Wenn dieses Produkt dennoch Störungen verursacht,
IN CHINA HERGESTELLT
wurde entwickelt, um einen angemessenen Schutz gegen schädliche Störungen in einem
· Empfangsantenne neu ausrichten oder verlegen.
gekennzeichnet. Produkte, die mit diesem Symbol gekennzeichnet sind, dürfen nicht
die folgenden zwei Bedingungen:
Sammelstelle für das Recycling von elektrischen und elektronischen Geräten.
2) Dieses Produkt muss alle empfangenen Störungen akzeptieren, einschließlich Störungen, die
Dieses Produkt erzeugt, verwendet und kann Hochfrequenzenergie ausstrahlen.
· Schließen Sie das Produkt an eine Steckdose eines anderen Stromkreises an als den, an den das
ACHTUNG: Änderungen oder Modifikationen an diesem Produkt, die nicht ausdrücklich von
Störungen des Funkverkehrs. Es gibt jedoch keine Garantie dafür, dass
· Wenden Sie sich an den Händler oder einen erfahrenen Radio-/Fernsehtechniker.
2012/19/EU. Das Symbol einer durchgestrichenen Mülltonne
Konformitätsverantwortung kann zum Erlöschen der Berechtigung des Benutzers zum Betrieb des
Produkt.
schädliche Störungen des Radio- oder Fernsehempfangs, die festgestellt werden können durch
Dieses Gerät entspricht Teil 15 der FCC-Bestimmungen. Der Betrieb unterliegt den
Digitales Gerät der Klasse B gemäß Teil 15 der FCC-Bestimmungen. Diese Grenzwerte sind
Störungen durch eine oder mehrere der folgenden Maßnahmen.
Europäische Union. Dies gilt für das Produkt und alle Zubehörteile
· Vergrößern Sie den Abstand zwischen Produkt und Empfänger.
nicht mit dem normalen Hausmüll entsorgt werden, sondern müssen an einen
1) Dieses Produkt kann schädliche Störungen verursachen.
Installation im Wohnbereich.
ACHTUNG: Änderungen oder Modifikationen, die nicht ausdrücklich von der Partei genehmigt wurden
Dieses Produkt unterliegt den Bestimmungen der europäischen Richtlinie
Die für die Einhaltung verantwortliche Partei kann die Berechtigung des Benutzers zum Betrieb des
kann zu unerwünschtem Betrieb führen.
FCC-Informationen
KORREKTE ENTSORGUNG
Nur für den Innenbereich geeignet.
Machine Translated by Google


POMPA COMPRESSORE
MODELLO: G220V110V12V-DULIV1
Supporto tecnico e certificato di garanzia elettronica www.vevor.com/support
"Risparmia la metà", "Metà prezzo" o qualsiasi altra espressione simile da noi utilizzata rappresenta
solo una stima del risparmio che potresti ottenere acquistando determinati utensili con noi rispetto
ai principali marchi principali e non significa necessariamente coprire tutte le categorie di utensili da
noi offerti. Ti ricordiamo gentilmente di verificare attentamente quando effettui un ordine con noi se
stai effettivamente risparmiando la metà rispetto ai principali marchi principali.
Continuiamo a impegnarci per fornirvi strumenti a prezzi competitivi.
Machine Translated by Google

Questa è l'istruzione originale, si prega di leggere attentamente tutte le istruzioni del
manuale prima di utilizzare. VEVOR si riserva una chiara interpretazione del nostro manuale
utente. L'aspetto del prodotto sarà soggetto al prodotto ricevuto. Vi preghiamo di
perdonarci se non vi informeremo di nuovo se ci sono aggiornamenti tecnologici o software sul
nostro prodotto.
Hai domande sui prodotti? Hai bisogno di supporto tecnico? Non esitare a contattarci:
HAI BISOGNO DI AIUTO? CONTATTACI!
COMPRESSORE
POMPA
Supporto tecnico e certificato di garanzia
elettronica www.vevor.com/support
Machine Translated by Google
L21. 5×L17. 5×H13 (CM)
4500 PSI/ 30 MPa/ 300 bar
Raffreddamento tramite ventolaSistema di raffreddamento
Volume
5,2 kg
220V- 110V- 12VNumero di modello
Peso
Tasso di ricarica
Potenza nominale del motore
Serbatoio da 18 min/0,45 l
Pressione di lavoro
250W
Parametri tecnici:
Machine Translated by Google

La pompa di gonfiaggio montata sul veicolo deve collegare il polo positivo al
normalmente dopo l'avvio della macchina si
verificano anomalie nel suono della macchina (come il suono di attrito, il suono di
funzionamento e il suono di perdita d'aria) e se ci sono parti allentate
elementi di fissaggio in varie parti. Serrare la valvola di rilascio della pressione e osservare
la velocità di corsa dell'ago indicatore del manometro. Lo stato di prova di
prima di lasciare la fabbrica. Collegare il giunto rapido del tubo e la spina, accendere
linea rossa e il polo negativo alla linea nera) Se la ventola funziona
alimentazione elettrica e premere l'interruttore di avvio per avviare la macchina. (Nota:
1. Macchina di prova: sono già stati eseguiti molti test sulla macchina
il passaggio del tubo flessibile da 0 a 30 MPa dovrebbe avvenire in circa 20 s (vedere Fig. 1)
e se ce ne sono
,
irregolare
.
,
1. Descrizione della macchina di prova:
vedi Fig. 1
Machine Translated by Google
,
il connettore rapido del tubo al contenitore di gonfiaggio, girare l'interruttore per avviare
Osservare attentamente la pressione indicata sul manometro.
,
1. Per il normale funzionamento di questo apparecchio è richiesta un'alimentazione da 11,5-14 V CC.
la batteria (corrispondente al + della batteria), agganciare il morsetto nero sul
4. Se è necessario utilizzare la macchina sotto la tensione di 110 V-220 V, si prega di
2. Per prima cosa, trova la posizione della batteria dell'auto, determina il polo positivo e
tutto è normale. Durante il processo di gonfiaggio, l'operatore non deve
polo negativo della batteria (corrispondente al polo negativo della batteria), quindi avviare
macchina. Collegare la linea di alimentazione all'interruttore della
macchina è spento
la pressione massima di progetto di questa macchina è di 30 MPa. Quando la pressione è
L'interruttore dovrebbe essere a levetta in base alla tensione del luogo in cui si trova
girare l'interruttore su 220V). Se la direzione è sbagliata, l'alimentazione
3. Estrarre la spina di prova e conservarla per l'uso da parte della macchina di prova (la
e rilasciare la valvola di sfiato. (Vedi Fig. 2)
drenando tutta l'aria e l'acqua. (Vedi Fig. 4)
la macchina e
stringere la valvola di spurgo per avviare il gonfiaggio dopo essersi assicurati
,
essere troppo vicino al contenitore di gonfiaggio, mantenere una certa distanza di sicurezza.
utilizzare il nostro dispositivo di alimentazione di conversione opzionale. C'è un interruttore incorporato
poli negativi della batteria, agganciare il morsetto rosso al polo positivo della
espresso al valore di pressione richiesto, chiudere l'interruttore in tempo, quindi aprire la valvola di
sfiato e smontare il connettore rapido dopo
assicurarsi che la macchina
la macchina. (Vedi Fig. 3)
viene utilizzato (se il posto è 110V, girare l'interruttore su 110V, se il posto è 220V,
interruttore (indicatori 110V e 220V) sul lato del dispositivo di alimentazione.
,
,
la spina è una parte importante per il controllo e l'analisi dei guasti della macchina). Link
convertitore verrà danneggiato. Assicurarsi che l'alimentazione sia corretta prima
2. Istruzioni per l'uso
vedi Fig. 2
Machine Translated by Google

vedi Fig. 5
la capacità di tenuta può essere ripristinata. Il tappo di misurazione della pressione collegato a
la macchina può essere utilizzata per bloccare l'uscita dell'aria del tubo flessibile ad alta pressione
per ogni avvio di lavoro e può
essere effettuato un test di pressione di 1-25 Mpa vale a dire la macchina
può essere preriscaldata rapidamente e l'eventuale anomalia
,
processo di utilizzo precedente. (Vedi Fig. 5)
funzione, e c'è un breve processo di preriscaldamento per ogni lavoro e il
1. Questa macchina adotta un anello del pistone con compensazione automatica dell'attrito
utilizzando la macchina normalmente. L'operazione viene eseguita secondo la
,
il funzionamento della macchina può essere trovato la prima volta.
2. I professionisti devono essere in servizio durante il processo di utilizzo. Se si verificano anomalie
viene rilevata la
situazione, fermare la macchina e allentare la valvola di sicurezza
,
3. Precauzioni:
Machine Translated by Google

4. Manutenzione e conservazione:
meno di 30 min o 90 ÿ nell'uso quotidiano per evitare danni ai motori
,
5. Non spegnere la ventola subito dopo aver terminato il lavoro della macchina. La ventola
sabbiatura dei dischi anti-scoppio. Considerando tutti gli aspetti, si raccomanda
3. È normale che la temperatura di lavoro di questa macchina aumenti
in modo da impedire la
per evitare che gli apparecchi elettrici vengano
non potrà essere utilizzato la prossima volta.
Questa macchina ha una protezione da sovrapressione superiore a 30 MPa e automatica
la velocità ovviamente diminuisce.
e l'uso di una pressione eccessiva causerà una brusca riduzione della durata meccanica.
al di sotto di 30 MPa e prolungare la durata utile della macchina.
lungo. Non smontare forzatamente la testa di gonfiaggio senza svuotarla
,
Centigrado.
1. Sostituire regolarmente il filtro in cotone del tubo. Dopo averlo utilizzato per molte volte è
necessario smontare la macchina per pulirla e sostituire il
e parti causate da carichi di lavoro a lungo termine.
può essere spento solo quando la macchina è raffreddata a meno di 50 gradi
Esso
,
,
inizio. È necessario prestare attenzione al tempo di lavoro una tantum con
che la pressione di sicurezza sia inferiore a 30 MPa.
evitare di danneggiare la macchina. Cercare di non metterla in un luogo umido quando
collocandolo in una
casa umida e bruciata.
la pressione, che
farà sì che l'anello di tenuta della testa femmina voli fuori e
2. Quando lo si ripone in macchina, cercare di evitare di appoggiarsi su oggetti duri, in modo da
immediatamente. Si consiglia di utilizzare normalmente l'indice di sicurezza massimo
,
6. Accendere la valvola di sicurezza per scaricare la pressione del tubo flessibile ad alta pressione
non appena la macchina è gonfiata deformazione della valvola di
ritegno ad alta temperatura e alta pressione per un
4. La pressione massima di carica di questa macchina non deve superare i 30 MPa
anello del pistone, guarnizione e valvola unidirezionale quando si riscontra che il pompaggio
Machine Translated by Google

smaltito insieme ai normali rifiuti domestici, ma deve essere portato in un
1) Questo prodotto può causare interferenze dannose.
installazione residenziale.
· Aumentare la distanza tra il prodotto e il ricevitore.
ATTENZIONE: Cambiamenti o modifiche non espressamente approvati dalla parte
Questo prodotto è soggetto alle disposizioni della Direttiva Europea
installato e utilizzato in conformità alle istruzioni, può causare danni
potrebbe causare un funzionamento indesiderato.
la parte responsabile della conformità potrebbe annullare l'autorità dell'utente di utilizzare il
il ricevitore è collegato.
responsabile della conformità potrebbe invalidare l'autorità dell'utente di utilizzare il
2012/19/UE. Il simbolo raffigurante un bidone della spazzatura barrato
prodotto.
interferenze dannose alla ricezione radiofonica o televisiva, che possono essere determinate da
Unione Europea. Ciò si applica al prodotto e a tutti gli accessori
interferenza mediante una o più delle seguenti misure.
Questo dispositivo è conforme alla Parte 15 delle Norme FCC. Il funzionamento è soggetto a
Dispositivo digitale di classe B ai sensi della Parte 15 delle Norme FCC. Questi limiti sono
2) Questo prodotto deve accettare qualsiasi interferenza ricevuta, comprese le interferenze che
punto di raccolta per il riciclaggio di apparecchiature elettriche ed elettroniche.
Questo prodotto genera, utilizza e può irradiare energia a radiofrequenza e, se non
· Collegare il prodotto a una presa di corrente su un circuito diverso da quello a cui è collegato il
· Per assistenza, consultare il rivenditore o un tecnico radio/TV esperto.
ATTENZIONE: Cambiamenti o modifiche a questo prodotto non espressamente approvati da
interferenza alle comunicazioni radio. Tuttavia, non vi è alcuna garanzia che
Nota: questo prodotto è stato testato e ritenuto conforme ai limiti per un
indica che il prodotto richiede una raccolta differenziata dei rifiuti
attrezzatura!
interferenze non si verificheranno in una particolare installazione. Se questo prodotto causa
spegnendo e riaccendendo il prodotto, si incoraggia l'utente a provare a correggere l'
MADE IN CHINA
contrassegnati con questo simbolo. I prodotti contrassegnati come tali non possono essere
seguendo due condizioni:
progettato per fornire una protezione ragionevole contro interferenze dannose in un
· Riorientare o riposizionare l'antenna ricevente.
Informazioni FCC
SMALTIMENTO CORRETTO
Solo per uso interno
Machine Translated by Google


MODELO:G220V110V12VDULIV1
"Ahorrelamitad","mitaddeprecio"ocualquierotraexpresiónsimilarqueutilicemossolorepresenta
unaestimacióndelahorroquepodríaobteneralcomprarciertasherramientasconnosotrosen
comparaciónconlasprincipalesmarcasynonecesariamentesignificaquecubratodaslascategoríasde
herramientasqueofrecemos.Lerecordamosque,alrealizarunpedidoconnosotros,verifique
cuidadosamentesirealmenteestáahorrandolamitadencomparaciónconlasprincipalesmarcas.
Seguimoscomprometidosabrindarleherramientasaprecioscompetitivos.
BOMBACOMPRESORA
Soportetécnicoycertificadodegarantíaelectrónicawww.vevor.com/support
Machine Translated by Google

¿Tienepreguntassobreelproducto?¿Necesitaasistenciatécnica?Nodudeenponerseencontacto
connosotros:
Estassonlasinstruccionesoriginales,leaatentamentetodaslasinstruccionesdelmanual
antesdeutilizarelproducto.VEVORsereservaunainterpretaciónclaradenuestromanualde
usuario.Laaparienciadelproductoestarásujetaalproductoquerecibió.Perdónenosporno
informarlenuevamentesihayactualizacionesdetecnologíaosoftwareennuestroproducto.
Soportetécnicoycertificadodegarantía
electrónicawww.vevor.com/support
¿NECESITAAYUDA?¡CONTÁCTENOS!
COMPRESOR
BOMBA
Machine Translated by Google

5,2kg
Refrigeraciónporventilador
L21.5×ancho17.5×H13(CM)
Sistemadeenfriamiento
220V110V12V
4500PSI/30Mpa/300Bar
Volumen
Númerodemodelo
Peso
Tasadecarga
Potencianominaldelmotor
Tanquede18min/0,45l
Presióndetrabajo
250W
Parámetrostécnicos:
Machine Translated by Google

línearojayelpolonegativoalalíneanegra)Sielventiladorfunciona
sujetadoresenvariaspartes.Aprietelaválvuladeliberacióndepresiónyobserve
Labombadeinfladomontadaenelvehículodebeconectarelpolopositivoal
lavelocidaddefuncionamientodelaagujaindicadoradelmanómetro.Elestadodepruebade
fuentedealimentaciónypresioneelinterruptordeinicioparaencenderlamáquina.(Nota:
Normalmente,despuésdequeseponeen
marchalamáquina,seproducenanomalíasenelsonidodelamáquina(comoruidode
fricción,ruidodefuncionamientoyruidodefugadeaire)ysihaypiezassueltas.
Antesdesalirdefábrica,conectelaconexiónrápidadelamanguerayeltapón,enciendael
1.Máquinadeprueba:yasehanrealizadomuchaspruebasparalamáquina.
Eltapóndelamanguerade0a30Mpadebedurarunos20s(verFig.1)
ysihayalguna
,
desigual
,
.
1.Descripcióndelamáquinadeprueba:
verfigura1
Machine Translated by Google

4.Sinecesitautilizarlamáquinaconunvoltajede110V220V,
2.Primeroencuentrelaposicióndelabateríadelautomóvil,determineelpositivoy
Todoesnormal.Duranteelprocesodeinflado,eloperadornodebe
Elcoche.(VerFig.3)
Asegúresedequelamáquina
seutiliza(siellugaresde110V,gireelinterruptora110V,siellugaresde220V,
1.Serequiereunafuentedealimentaciónde11,5a14VCCparaelfuncionamientonormaldeeste
labatería(correspondientealabatería+),sujetelapinzanegraenla
Observeatentamentelapresiónindicadaenelmanómetro.
,
elconectorrápidodelamangueraalrecipientedeinflado,gireelinterruptorparainiciar
,
ysueltelaválvuladeventilación.(VerFig.2)
Gireelinterruptora220V).Siladirecciónesincorrecta,lafuentedealimentación
3.Extraigaeltapóndepruebayguárdeloparaqueloutilicelamáquinadeprueba(eltapóndeprueba)
drenandotodoelaireyelagua.(VerFig.4)
Elinterruptordebealternarsedeacuerdoconelvoltajedellugardondeseencuentra.
polonegativodelabatería(correspondientealabatería),yluegoempezar
máquina.Conectelalíneadealimentaciónalamáquina.El
interruptorestáapagado.
Lapresiónmáximadediseñodeestamáquinaesde30Mpa.Cuandolapresiónes
polosnegativosdelabatería,coloquelapinzarojaenelpolopositivode
estardemasiadocercadelcontenedordeinflado,mantengaunaciertadistanciadeseguridad.
Utilicenuestrodispositivodefuentedealimentacióndeconversiónopcional.Hayuninterruptorincorporado
lamáquinay
aprietelaválvuladepurgaparainiciarelinfladodespuésdeasegurarse
,
,
Elenchufeesunaparteimportanteparaverificaryanalizarfallasdelamáquina).Enlace
,
Elconvertidorsedañará.Asegúresedequelafuentedealimentaciónsealacorrectaantesde
interruptor(indicadoresde110Vy220V)enellateraldeldispositivodealimentación.
Expresadoalvalordepresiónrequerido,cierreelinterruptoratiempo,luegoabralaválvulade
ventilaciónydesmonteelconectorrápidodespués
2.Instruccionesdeuso
verfigura2
Machine Translated by Google

verfigura5
Lamáquinasepuedeutilizarparabloquearlasalidadeairedelamangueradealtapresión.
Paracadainiciodetrabajo
sepuederealizarunapruebadepresiónde125Mpa,esdecir,lamáquina
sepuedeprecalentarrápidamenteysepuedendetectarposiblesvaloresanormales.
Sepuederestaurarlacapacidaddesellado.Eltapóndemedicióndepresiónconectadoa
,
Procesodeusoanterior.(VerFig.5)
función,yhayunbreveprocesodeprecalentamientoparacadatrabajoyel
1.Estamáquinaadoptaunanillodepistónconcompensaciónautomáticadefricción.
Utilizandolamáquinaconnormalidad.Laoperaciónserealizasegúnlasinstrucciones.
,
,
Siseencuentraesta
situación,detengalamáquinayaflojelaválvuladealiviodepresión.
Elfuncionamientodelamáquinasepuedecomprobarlaprimeravez.
2.Duranteelprocesodeusodebehaberprofesionalesdeguardia.Siseobservananomalías
3.Precauciones:
Machine Translated by Google

4.Mantenimientoyalmacenamiento:
Lavelocidadobviamentedisminuye.
yelusodesobrepresiónprovocaráquelavidamecánicadisminuyadrásticamente.
largotiempo.Nodesmontealafuerzaelcabezaldeinfladosinvaciarlo.
comienzo.Esnecesarioprestaratenciónaltiempodetrabajoúnicocon
quelapresióndeseguridadseainferiora30Mpa.
colocándoloencasa
afectadoconhumedadyquemándose.
pordebajode30Mpayprolongarlavidaútildelamáquina.
Estamáquinatieneproteccióncontrasobrepresióndemásde30Mpaysistemaautomático.
Nosepodráutilizarlapróximavez.
,
Celsius.
1.Reemplaceelfiltrodealgodóndelamangueraconregularidad.Despuésdeusarlovarias
veces,esnecesariodesmontarlamáquinaparalimpiarlayreemplazarelfiltro.
Menosde30mino90enusodiarioparaevitardañosalosmotores.
,
5.Noapagueelventiladorinmediatamentedespuésdequelamáquinahayaterminado.Elventilador
Limpiezaconchorrodearenadelosdiscosantiestallidos.Teniendoencuentatodoslosaspectos,serecomienda
3.Esnormalquelatemperaturadetrabajodeestamáquinaaumenteenel
paraevitarla
paraevitarquelosaparatoseléctricosse
Inmediatamente.Serecomiendautilizarnormalmenteelíndicedeseguridadmáximo.
,
lapresión,que
haráqueelanillodeselladodelacabezahembrasalgavolandoy
2.Cuandolocoloqueenelautomóvil,tratedeevitarapoyarseenobjetosduros,paraque
6.Abralaválvuladealiviodepresiónparadescargarlapresióndelamangueradealtapresióntan
prontocomoseinflelamáquina.Deformacióndelaválvulade
retencióndealtatemperaturayaltapresiónparauna
4.Lapresiónmáximadecargadeestamáquinanodebesuperarlos30Mpa.
Anillodepistón,selloyválvulaunidireccionalcuandoseencuentraqueelbombeo
ypiezasocasionadasportrabajosdecargadelargaduración.
Sólosepuedeapagarcuandolamáquinaseenfríaamenosde50grados.
él
,
Evitedañarlamáquina.Tratedenocolocarlaenunlugarhúmedocuando
,
Machine Translated by Google

instaladoyutilizadodeacuerdoconlasinstrucciones,puedecausardaños
Puedeprovocarunfuncionamientonodeseado.
indicaqueelproductorequiererecogidaselectivaderesiduosenel
¡equipo!
Alapagaryencenderelproducto,serecomiendaalusuarioqueintentecorregirelproblema.
Elreceptorestáconectado.
EsteproductoestásujetoalasdisposicionesdelaDirectivaeuropea
PRECAUCIÓN:Loscambiosomodificacionesnoaprobadosexpresamenteporlaparte
Laparteresponsabledelcumplimientopodríaanularlaautoridaddelusuarioparaoperarel
desecharseconlabasuradomésticanormal,sinoquedebenllevarseaun
1)Esteproductopuedecausarinterferenciasdañinas.
Instalaciónresidencial.
∙Aumentarladistanciaentreelproductoyelreceptor.
UniónEuropea.Estoseaplicaalproductoyatodoslosaccesorios.
interferenciamedianteunaomásdelassiguientesmedidas.
EstedispositivocumpleconlaParte15delasNormasdelaFCC.Sufuncionamientoestásujetoalas
DispositivodigitaldeclaseBdeconformidadconlaParte15delasNormasdelaFCC.Estoslímitesson
interferenciaperjudicialalarecepciónderadiootelevisión,quepuededeterminarsemediante
responsabledelcumplimientopodríaanularlaautoridaddelusuarioparaoperarel
2012/19/UE.Elsímboloquemuestrauncontenedordebasuratachado
producto.
∙Consultealdistribuidoroauntécnicoderadio/TVexperimentadoparaobtenerayuda.
ADVERTENCIA:Loscambiosomodificacionesaesteproductonoaprobadosexpresamentepor
interferenciasenlascomunicacionesporradio.Sinembargo,nohaygarantíadeque
2)Esteproductodebeaceptarcualquierinterferenciarecibida,incluidalainterferenciaque
Puntoderecogidaparaelreciclajedeaparatoseléctricosyelectrónicos.
Esteproductogenera,utilizaypuedeirradiarenergíaderadiofrecuenciay,sino
∙Conecteelproductoaunatomadecorrientedeuncircuitodiferentedeaquelalqueestáconectado.
marcadosconestesímbolo.Losproductosmarcadoscomotalnopueden
siguientesdoscondiciones:
diseñadoparaproporcionarunaprotecciónrazonablecontrainterferenciasperjudicialesenun
∙Reorientaroreubicarlaantenareceptora.
Noseproduciráninterferenciasenunainstalaciónenparticular.Siesteproductocausa
HECHOENCHINA
Nota:Esteproductohasidoprobadoysehadeterminadoquecumpleconloslímitesparaun
ELIMINACIÓNCORRECTA
InformacióndelaFCC
Usoeninterioresúnicamente
Machine Translated by Google


MODEL: G220V110V12V-DULIV1
„Oszczędź połowę”, „Połowa ceny” lub inne podobne wyrażenia używane przez nas stanowią
jedynie szacunkowe oszczędności, jakie możesz uzyskać, kupując u nas określone narzędzia w
porównaniu z głównymi markami i niekoniecznie oznaczają one objęcie wszystkich kategorii narzędzi
oferowanych przez nas. Uprzejmie przypominamy, aby dokładnie sprawdzić, czy składając u nas
zamówienie faktycznie oszczędzasz połowę w porównaniu z głównymi markami.
Nadal staramy się oferować Państwu narzędzia w konkurencyjnych cenach.
POMPA KOMPRESOROWA
Wsparcie techniczne i certyfikat gwarancji elektronicznej www.vevor.com/support
Machine Translated by Google
Masz pytania dotyczące produktu? Potrzebujesz wsparcia technicznego? Skontaktuj się z
nami:
To jest oryginalna instrukcja, przed użyciem należy uważnie przeczytać wszystkie
instrukcje. VEVOR zastrzega sobie jasną interpretację naszej instrukcji obsługi. Wygląd
produktu będzie zależał od produktu, który otrzymałeś. Prosimy o wybaczenie, że nie
poinformujemy Cię ponownie, jeśli w naszym produkcie pojawią się jakiekolwiek aktualizacje
technologiczne lub oprogramowania.
Wsparcie techniczne i certyfikat gwarancji
elektronicznej www.vevor.com/support
POTRZEBUJESZ POMOCY? SKONTAKTUJ SIĘ Z NAMI!
POMPA
KOMPRESOR
Machine Translated by Google

4500PSI/ 30Mpa/ 300Bar
Chłodzenie wentylatorem
5,2 kg
18 min/zbiornik 0,45 l
220V-110V-12V
L21. 5 ×W17. 5 × H13 (CM)
Tom
Numer modelu
Waga
Ciśnienie robocze
Moc znamionowa silnika
Układ chłodzenia
250 W
Stawka ładowania
Parametry techniczne:
Machine Translated by Google

zwykle po uruchomieniu maszyny występują
nieprawidłowości w dźwięku maszyny (takie jak dźwięk tarcia, dźwięk pracy i dźwięk
wycieku powietrza) oraz czy występują luzy
zapięcia w różnych częściach. Dokręć zawór upustowy ciśnienia i obserwuj
czerwona linia i biegun ujemny do czarnej linii) Czy wentylator działa
prędkość obrotowa igły wskaźnika ciśnienia. Stan testowy
zasilanie i naciśnij przycisk start, aby uruchomić maszynę. (Uwaga:
Pompka do pompowania zamontowana w pojeździe musi łączyć biegun dodatni z
przed opuszczeniem fabryki. Podłącz szybkozłączkę węża i wtyczkę, włącz
1. Maszyna testowa: dla maszyny wykonano już wiele testów
korek węża od 0 do 30Mpa powinien wynosić około 20 s (patrz rys. 1)
i czy są jakieś
,
,
.
nierówny
1. Opis maszyny testowej:
zobacz rys. 1
Machine Translated by Google

biegun ujemny akumulatora (odpowiadający akumulatorowi-), a następnie rozpocznij
maszyna. Podłącz linię zasilania do przełącznika maszyny, który
jest wyłączony
maksymalne ciśnienie projektowe tej maszyny wynosi 30Mpa. Gdy ciśnienie wynosi
Przełącznik należy przełączać zgodnie z napięciem w miejscu, w którym się znajduje.
i zwolnij zawór odpowietrzający. (Patrz rys. 2)
(przełącz przełącznik na 220V). Jeśli kierunek jest zły, zasilanie
usuwając całe powietrze i wodę. (Zobacz rys. 4)
3. Wyciągnij wtyczkę testową i przechowuj ją do wykorzystania przez maszynę testową (maszynę testową)
,
szybkozłącze węża do pojemnika na pompę, przekręć przełącznik, aby rozpocząć
,
4. Jeśli chcesz używać urządzenia pod napięciem 110 V-220 V,
2. Najpierw znajdź położenie akumulatora w samochodzie, określ biegun dodatni i
wszystko jest w normie. Podczas procesu pompowania operator nie powinien
1. Do normalnej pracy urządzenia wymagane jest zasilanie prądem stałym o napięciu 11,5–14 V.
akumulator (odpowiadający + akumulatora) należy zacisnąć czarny zacisk na
Dokładnie obserwuj ciśnienie wskazane przez manometr.
przełącznik (wskaźniki 110V i 220V) z boku urządzenia zasilającego.
wyrażone do wymaganej wartości ciśnienia, proszę zamknąć przełącznik na czas, a następnie otworzyć
zawór odpowietrzający i zdemontować szybkozłącze po
upewnij się, że maszyna
samochód. (Zobacz rys. 3)
jest używany (jeśli w miejscu jest 110 V, przełącz przełącznik na 110 V, jeśli w miejscu jest 220 V,
,
wtyczka jest ważną częścią do sprawdzania i analizowania usterek maszyn). Link
,
konwerter zostanie uszkodzony. Upewnij się, że zasilanie jest prawidłowe przed
maszynę i
dokręć zawór odpowietrzający, aby rozpocząć pompowanie po upewnieniu się, że
,
bieguny ujemne akumulatora, zaciskamy czerwony zacisk na biegunie dodatnim akumulatora
znajdować się zbyt blisko pojemnika na ładunek wybuchowy, należy zachować bezpieczną odległość.
użyj naszego opcjonalnego urządzenia do konwersji zasilania. Jest wbudowany przełącznik
2. Instrukcja użytkowania
zobacz rys. 2
Machine Translated by Google

zobacz rys. 5
można przywrócić szczelność. Wtyczka pomiarowa ciśnienia przymocowana do
przy każdym rozpoczęciu
pracy można przeprowadzić próbę ciśnieniową 1-25Mpa, co oznacza, że
maszynę można szybko podgrzać i wykluczyć ewentualne nieprawidłowości
funkcja, a dla każdej pracy przewidziano krótki proces podgrzewania wstępnego i
pracę maszyny można zobaczyć po raz pierwszy.
poprzedni proces użytkowania. (Zobacz rys. 5)
maszynę można wykorzystać do zablokowania wylotu powietrza węża wysokociśnieniowego
1. Maszyna ta wykorzystuje pierścień tłokowy z automatyczną kompensacją tarcia
używając maszyny normalnie. Operacja jest wykonywana zgodnie z
,
,
2. Profesjonaliści muszą być na służbie podczas procesu użytkowania. W przypadku jakichkolwiek nieprawidłowości
jeśli sytuacja jest taka,
zatrzymaj maszynę i poluzuj zawór bezpieczeństwa
,
3. Środki ostrożności:
Machine Translated by Google

4. Konserwacja i przechowywanie:
umieszczając go w domu
dotkniętym wilgocią i wypaleniem.
prędkość wyraźnie spada.
a zastosowanie nadciśnienia spowoduje gwałtowne skrócenie żywotności mechanicznej.
Maszyna ta posiada zabezpieczenie przed przeciążeniem powyżej 30Mpa i automatyczne
poniżej 30Mpa i wydłuża żywotność maszyny.
długi czas. Nie należy siłą demontować głowicy pompującej bez opróżnienia
Nie będzie można użyć następnym razem.
,
Celsjusz.
1. Regularnie wymieniaj bawełniany filtr węża. Po wielokrotnym użyciu konieczne jest
rozmontowanie urządzenia w celu wyczyszczenia i wymiany.
,
5. Nie wyłączaj wentylatora natychmiast po zakończeniu pracy maszyny. Wentylator
mniej niż 30 min lub 90 ℃ w codziennym użytkowaniu, aby uniknąć uszkodzenia silników
piaskowanie tarcz antywybuchowych. Biorąc pod uwagę wszystkie aspekty, zaleca się
3. Normalnym jest, że temperatura robocza tej maszyny wzrośnie
aby zapobiec
aby zapobiec uszkodzeniu urządzeń elektrycznych
natychmiast. Zaleca się normalne stosowanie maksymalnego wskaźnika bezpieczeństwa
,
ciśnienie, które
spowoduje wyskoczenie żeńskiego pierścienia uszczelniającego głowicę i
2. Podczas umieszczania w samochodzie należy unikać opierania go na twardych przedmiotach, aby
6. Włącz zawór bezpieczeństwa, aby uwolnić ciśnienie z węża wysokociśnieniowego, gdy tylko
maszyna zostanie napompowana, aby zapobiec odkształceniu
zaworu zwrotnego wysokiej temperatury i wysokiego ciśnienia.
4. Maksymalne ciśnienie ładowania tej maszyny nie może przekraczać 30Mpa
pierścień tłokowy, uszczelkę i zawór jednokierunkowy, gdy okaże się, że pompowanie
To
oraz części powstałe w wyniku długotrwałej pracy pod dużym obciążeniem.
można wyłączyć tylko wtedy, gdy temperatura urządzenia spadnie poniżej 50 stopni
,
unikaj uszkodzenia maszyny. Staraj się nie umieszczać jej w wilgotnym miejscu, gdy
,
początek. Należy zwrócić uwagę na jednorazowy czas pracy z
że ciśnienie bezpieczeństwa wynosi poniżej 30Mpa.
Machine Translated by Google

szkodliwe zakłócenia w odbiorze radia lub telewizji, które można określić na podstawie
OSTRZEŻENIE: Zmiany lub modyfikacje tego produktu, które nie zostały wyraźnie zatwierdzone przez
zakłócenia w komunikacji radiowej. Nie ma jednak gwarancji, że
· Aby uzyskać pomoc, należy zwrócić się do sprzedawcy lub doświadczonego technika radiowo-telewizyjnego.
2) Produkt ten musi akceptować wszelkie odbierane zakłócenia, w tym zakłócenia,
punkt zbiórki sprzętu elektrycznego i elektronicznego przeznaczonego do recyklingu.
Ten produkt generuje, wykorzystuje i może emitować energię o częstotliwości radiowej, a jeżeli nie
· Podłączyć produkt do gniazdka w innym obwodzie niż ten, do którego jest podłączony.
zaprojektowane w celu zapewnienia rozsądnej ochrony przed szkodliwymi zakłóceniami w
oznaczone tym symbolem. Produkty oznaczone w ten sposób nie mogą być
spełniając dwa warunki:
· Zmiana orientacji lub położenia anteny odbiorczej.
wyłączając i włączając produkt, zachęcamy użytkownika do podjęcia próby skorygowania
sprzęt!
oznacza, że produkt wymaga oddzielnej zbiórki odpadów w
Uwaga: Ten produkt został przetestowany i uznany za zgodny z limitami dla
WYKONANO W CHINACH
zakłócenia nie wystąpią w konkretnej instalacji. Jeśli ten produkt powoduje
Niniejszy produkt podlega postanowieniom dyrektywy europejskiej
UWAGA: Zmiany lub modyfikacje, na które strona nie wyraziła wyraźnej zgody
strona odpowiedzialna za zgodność może unieważnić prawo użytkownika do korzystania z usługi
zainstalowane i używane zgodnie z instrukcją, mogą powodować szkodliwe
może powodować niepożądane działanie.
Odbiornik jest podłączony.
· Zwiększ odległość między produktem a odbiornikiem.
wyrzucać razem z normalnymi odpadami domowymi, lecz należy je oddać do punktu zbiórki odpadów.
1) Produkt ten może powodować szkodliwe zakłócenia.
instalacja mieszkaniowa.
zakłócenia spowodowane przez jeden lub więcej z następujących środków.
Urządzenie cyfrowe klasy B zgodnie z częścią 15 przepisów FCC. Niniejsze ograniczenia są następujące:
Unia Europejska. Dotyczy produktu i wszystkich akcesoriów
To urządzenie jest zgodne z częścią 15 przepisów FCC. Eksploatacja podlega
odpowiedzialny za zgodność może unieważnić prawo użytkownika do korzystania z urządzenia
2012/19/UE. Symbol przedstawiający przekreślony kosz na śmieci na kółkach
produkt.
PRAWIDŁOWA UTYLIZACJA
Informacje FCC
Tylko do użytku wewnątrz pomieszczeń
Machine Translated by Google


MODEL: G220V110V12V-DULIV1
COMPRESSORPOMP
Technische ondersteuning en e-garantiecertificaat www.vevor.com/support
"Save Half", "Half Price" of andere soortgelijke uitdrukkingen die wij gebruiken, geven alleen een schatting weer
van de besparingen die u kunt behalen door bepaalde gereedschappen bij ons te kopen in vergelijking met de
grote topmerken en betekent niet noodzakelijkerwijs dat alle categorieën gereedschappen die wij aanbieden, worden
gedekt. Wij herinneren u eraan om zorgvuldig te controleren of u daadwerkelijk de helft bespaart in vergelijking met
de grote topmerken wanneer u een bestelling bij ons plaatst.
Wij streven er voortdurend naar om u gereedschappen tegen concurrerende prijzen te leveren.
Machine Translated by Google

Dit is de originele instructie, lees alle handleidingen zorgvuldig door voordat u het product
gebruikt. VEVOR behoudt zich een duidelijke interpretatie van onze gebruikershandleiding voor.
Het uiterlijk van het product is afhankelijk van het product dat u hebt ontvangen. Vergeef ons
dat we u niet opnieuw zullen informeren als er technologie- of software-updates voor ons product zijn.
Heeft u vragen over het product? Heeft u technische ondersteuning nodig? Neem dan gerust
contact met ons op:
HULP NODIG? NEEM CONTACT MET ONS OP!
COMPRESSOR
POMP
Technische ondersteuning en e-
garantiecertificaat www.vevor.com/support
Machine Translated by Google

4500 PSI / 30 MPa / 300 Bar
Ventilatorkoeling
5,2 kg
18min/0,45L tank
220V- 110V- 12V
L21. 5×W17. 5 × H13 (CM)
Volume
Modelnummer
Gewicht
Werkdruk
Koelsysteem
Motorvermogen
Laadsnelheid
250W
Technische parameters:
Machine Translated by Google

normaal gesproken nadat de machine is gestart,
zijn er afwijkingen in het geluid van de machine (zoals wrijvingsgeluid, bedrijfsgeluid en
lucht lekgeluid) en of er losse onderdelen zijn
bevestigingsmiddelen in verschillende onderdelen. Draai het drukventiel vast en observeer
(rode lijn en de negatieve pool aan de zwarte lijn) Of de ventilator werkt
de loopsnelheid van de drukmeterindicatornaald. De teststatus van
voordat u de fabriek verlaat. Sluit de slang snelkoppeling en de stekker aan, zet de
De op het voertuig gemonteerde opblaaspomp moet de positieve pool op de
voeding en druk op de startschakelaar om de machine te starten. (Opmerking:
1. Testmachine: er zijn al veel testen uitgevoerd voor de machine
de slangplug van 0 tot 30Mpa moet ongeveer 20 s zijn (zie Afb. 1)
en of er sprake is van
,
,
.
ongelijk
1. Beschrijving van de testmachine:
zie figuur 1
Machine Translated by Google

wordt gebruikt (als de plaats 110V is, zet de schakelaar dan op 110V, als de plaats 220V is,
4. Als u de machine onder een spanning van 110V-220V wilt gebruiken,
2. Zoek eerst de batterijpositie van de auto, bepaal de positieve en
1. Voor de normale werking van dit apparaat is een voeding van 11,5-14 V DC vereist.
de batterij (overeenkomend met de batterij +), klem de zwarte klem op de
alles is normaal. Tijdens het opblaasproces mag de operator niet
Let goed op de aangegeven druk van de manometer.
,
de slang snelkoppeling naar de opblaascontainer, draai de schakelaar om te starten
,
draai de schakelaar naar 220V). Als de richting verkeerd is, is de voeding
3. Trek de testplug eruit en bewaar deze voor gebruik door de testmachine (de testplug).
en laat de ontluchtingsklep los. (Zie Afb. 2)
alle lucht en water weg laten lopen. (Zie Afb. 4)
negatieve pool van de batterij (overeenkomend met de batterij- ), en begin dan
machine. Sluit de stroomkabel aan op de machineschakelaar is
uitgeschakeld
maximale ontwerpdruk van deze machine is 30Mpa. Wanneer de druk is
De schakelaar moet worden omgeschakeld op basis van de spanning van de plaats waar deze wordt gebruikt.
negatieve polen van de batterij, klem de rode klem op de positieve pool van
Als u te dicht bij de opblaascontainer bent, houd dan een veilige afstand.
gebruik ons optionele conversievoedingsapparaat. Er is een ingebouwde schakelaar
de machine en
draai het ontluchtingsventiel vast om te beginnen met oppompen nadat u ervoor hebt gezorgd
,
,
stekker is een belangrijk onderdeel voor het controleren en analyseren van machinestoringen). Link
,
converter zal beschadigd raken. Controleer of de voeding correct is voordat u
schakelaar (110V en 220V indicatoren) aan de zijkant van het voedingsapparaat.
uitgedrukt in de vereiste drukwaarde, sluit dan op tijd de schakelaar, open vervolgens de
ontluchtingsklep en demonteer de snelkoppeling na
zorg ervoor dat de machine
de auto. (Zie Afb. 3)
2. Gebruiksaanwijzing
zie figuur 2
Machine Translated by Google

zie figuur 5
afdichtingscapaciteit kan worden hersteld. De drukmeetplug die aan
voor elke start van het werk
en een druktest van 1-25Mpa kan worden uitgevoerd, dat wil zeggen
dat de machine snel kan worden voorverwarmd en de mogelijke abnormale
functie, en er is een kort voorverwarmproces voor elk werk en de
,
1. Deze machine gebruikt een zuigerveer met automatische wrijvingscompensatie
de machine kan worden gebruikt om de luchtuitlaat van de hogedrukslang te blokkeren
vorig gebruiksproces. (Zie Afb. 5)
de machine normaal gebruiken. De handeling wordt uitgevoerd volgens de
het werk van de machine kan bij de eerste keer worden gevonden.
,
2. Professionals moeten tijdens het gebruiksproces aanwezig zijn. Als er abnormale
,
Als de situatie zich
voordoet, stop dan de machine en draai het overdrukventiel los.
3. Voorzorgsmaatregelen:
Machine Translated by Google

4. Onderhoud en opslag:
het in huis plaatsen
heeft last van vocht en verbranding.
De snelheid neemt duidelijk af.
en het gebruik van overdruk zal de mechanische levensduur sterk doen afnemen.
onder 30Mpa en verlengt de levensduur van de machine.
Deze machine heeft een overdrukbeveiliging van meer dan 30 MPa en een automatische
lange tijd. Demonteer de opblaaskop niet met geweld zonder deze leeg te maken.
kan de volgende keer niet meer gebruikt worden.
,
Celsius.
1. Vervang de slangfilterkatoen regelmatig. Na veelvuldig gebruik is het noodzakelijk om de
machine te demonteren voor reiniging en de
,
5. Zet de ventilator niet meteen uit nadat de machine klaar is. De ventilator
minder dan 30 min of 90 ÿ bij dagelijks gebruik om schade aan motoren te voorkomen
stralen van anti-bursting schijven. Gezien alle aspecten is het aan te raden
3. Het is normaal dat de werktemperatuur van deze machine op de
om te voorkomen dat de
om te voorkomen dat elektrische apparaten worden
onmiddellijk. Het wordt aanbevolen om normaal gesproken de maximale veiligheidsindex te gebruiken
,
de druk, waardoor
de vrouwelijke kopafdichtingsring eruit vliegt en
2. Probeer bij het plaatsen in de auto te voorkomen dat u op harde voorwerpen vertrouwt, zodat
6. Draai het overdrukventiel open om de druk van de hogedrukslang af te voeren zodra de machine
is opgeblazen. Vervorming van het hogetemperatuur- en hogedruk-
terugslagventiel voor een
4. De maximale laaddruk van deze machine mag niet hoger zijn dan 30 MPa
zuigerveer, afdichting en eenrichtingsklep wanneer blijkt dat de pomp
Het
kan alleen worden uitgeschakeld als de machine is afgekoeld tot onder de 50 graden
en onderdelen die door langdurige belasting zijn ontstaan.
,
vermijd schade aan de machine. Probeer hem niet op een vochtige plaats te zetten wanneer
,
begin. Het is noodzakelijk om aandacht te besteden aan de eenmalige werktijd met
dat de veiligheidsdruk lager is dan 30Mpa.
Machine Translated by Google

Als u het product uit- en weer inschakelt, wordt de gebruiker aangemoedigd om te proberen het probleem te verhelpen.
geïnstalleerd en gebruikt in overeenstemming met de instructies, kan schadelijke
kan een ongewenste werking veroorzaken.
Dit product is onderworpen aan de bepalingen van de Europese richtlijn
LET OP: Wijzigingen of aanpassingen die niet uitdrukkelijk door de partij zijn goedgekeurd
de partij die verantwoordelijk is voor de naleving, kan de bevoegdheid van de gebruiker om de
ontvanger is aangesloten.
· Vergroot de afstand tussen het product en de ontvanger.
weggegooid met het normale huisvuil, maar moet naar een afvalverwerkingsbedrijf worden gebracht.
1) Dit product kan schadelijke interferentie veroorzaken.
residentiële installatie.
verstoring door een of meer van de volgende maatregelen.
Dit apparaat voldoet aan Deel 15 van de FCC-regels. De werking is onderworpen aan de
Europese Unie. Dit geldt voor het product en alle accessoires
Digitaal apparaat van klasse B volgens Deel 15 van de FCC-regels. Deze limieten zijn
verantwoordelijk voor naleving kan de bevoegdheid van de gebruiker om de
2012/19/EU. Het symbool met een kliko-afvalbak doorkruist
product.
schadelijke interferentie met de radio- of televisieontvangst, die kan worden vastgesteld door
WAARSCHUWING: Wijzigingen of aanpassingen aan dit product die niet uitdrukkelijk door ons zijn goedgekeurd.
interferentie met radiocommunicatie. Er is echter geen garantie dat
· Raadpleeg de dealer of een ervaren radio-/tv-technicus voor hulp.
2) Dit product moet alle ontvangen interferentie accepteren, inclusief interferentie die
inzamelpunt voor het recyclen van elektrische en elektronische apparaten.
Dit product genereert, gebruikt en kan radiofrequentie-energie uitstralen, en indien niet
· Sluit het product aan op een stopcontact op een ander circuit dan dat waarop het product is aangesloten.
ontworpen om redelijke bescherming te bieden tegen schadelijke interferentie in een
volgende twee voorwaarden:
gemarkeerd met dit symbool. Producten die als zodanig gemarkeerd zijn, mogen niet
· Heroriënteer of verplaats de ontvangstantenne.
Gemaakt in China
interferentie zal niet optreden in een bepaalde installatie. Als dit product wel interferentie veroorzaakt
Let op: Dit product is getest en voldoet aan de limieten voor een
geeft aan dat het product gescheiden afvalinzameling vereist in de
apparatuur!
FCC-informatie
CORRECTE VERWIJDERING
Alleen voor gebruik binnenshuis
Machine Translated by Google


MODELL: G220V110V12V-DULIV1
KOMPRESSORPUMP
Teknisk support och e-garanticertifikat www.vevor.com/support
"Spara hälften", "halva priset" eller andra liknande uttryck som används av oss representerar
bara en uppskattning av besparingar du kan dra nytta av att köpa vissa verktyg hos oss jämfört
med de stora toppmärkena och betyder inte nödvändigtvis att täcka alla kategorier av verktyg som
erbjuds av oss. Du påminns vänligen om att noggrant kontrollera när du gör en beställning hos oss
om du faktiskt sparar hälften i jämförelse med de främsta stora varumärkena.
Vi fortsätter att vara engagerade i att ge dig verktyg till konkurrenskraftiga priser.
Machine Translated by Google

Detta är den ursprungliga instruktionen, läs alla instruktioner noggrant innan du
använder den. VEVOR reserverar sig för en tydlig tolkning av vår användarmanual. Utseendet
på produkten är beroende av den produkt du fått. Ursäkta oss att vi inte kommer att
informera dig igen om det finns någon teknik eller mjukvaruuppdateringar på vår produkt.
Har du produktfrågor? Behöver du teknisk support? Kontakta oss gärna:
BEHÖVER HJÄLP? KONTAKTA OSS!
PUMP
KOMPRESSOR
Teknisk support och e-garanticertifikat
www.vevor.com/support
Machine Translated by Google

Tekniska parametrar:
Fläktkylning
L21. 5 × W17. 5 × H13 (CM)
4500PSI/30Mpa/300Bar
18min/0,45L tank
Volym
5,2 kg
220V- 110V- 12VModellnummer
Vikt
Arbetstryck
Motoreffekt
Laddningshastighet
250W
Kylsystem
Machine Translated by Google

se fig. 1
1. Beskrivning av testmaskin:
fästelement i olika delar. Dra åt tryckavlastningsventilen och observera
Den fordonsmonterade uppblåsningspumpen måste ansluta den positiva polen till
normalt efter att maskinen startats avvikelser i
maskinens ljud (såsom friktionsljud driftljud och luftläckageljud) och om det finns löst
körhastigheten för tryckmätarens indikatornål. Testtillståndet för
strömförsörjning och tryck på startknappen för att starta maskinen. (Obs:
röd linje och minuspolen till den svarta linjen) Om fläkten fungerar
innan de lämnar fabriken. Anslut slangens snabbkoppling och plugg, slå på
1. Testmaskin: många tester har redan utförts för maskinen
slangpluggen från 0 till 30Mpa bör vara ca 20 s (se fig. 1 )
och om det finns några
,
,
ojämn
.
Machine Translated by Google

se fig. 2
2. Bruksanvisning
4. Om du behöver använda maskinen under spänningen 110V-220V, vänligen
allt är normalt. Under uppblåsningsprocessen bör operatören inte
uttryckt till önskat tryckvärde, stäng strömbrytaren i tid och öppna sedan avluftningsventilen och
demontera snabbkopplingen efter
se till att maskinen
bilen. (Se fig. 3)
används (om platsen är 110V, vrid omkopplaren till 110V, om platsen är 220V,
omkopplare (110V och 220V indikatorer) på sidan av strömförsörjningsenheten .
,
omvandlaren kommer att skadas. Se till att strömförsörjningen är korrekt innan
pluggen är en viktig del för att kontrollera och analysera maskinfel). Länk
,
maskinen och
dra åt avluftningsventilen för att starta uppblåsningen efter att ha kontrollerat
,
vara för nära uppblåsningsbehållaren, håll ett visst säkert avstånd.
använd vår valfria strömförsörjningsenhet. Det finns en inbyggd växel
negativa poler på batteriet, klämma fast den röda klämman på den positiva polen av
maskin. Anslut strömledningen till maskinens omkopplare är
avstängd
batteriets negativa pol (motsvarande batteri-) och starta sedan
maximalt designtryck för denna maskin är 30Mpa. När trycket är
Omkopplaren ska växlas i enlighet med spänningen på den plats där den är
3. Dra ut testpluggen och förvara den för användning av testmaskinen (testet
tömma all luft och vatten. (Se fig. 4)
vrid omkopplaren till 220V). Om riktningen är fel, strömförsörjningen
och släpp avluftningsventilen. (Se fig. 2)
,
slangens snabbkoppling till uppblåsningsbehållaren, vrid omkopplaren för att starta
,
batteriet (motsvarande batteriet +), klämma fast den svarta klämman på
1. 11 ,5- 14V DC strömförsörjning krävs för normal drift av denna
Observera noga det angivna trycket på tryckmätaren. De
2. Hitta först bilens batteriläge, bestäm den positiva och
Machine Translated by Google

se fig. 5
maskinen kan användas för att blockera högtrycksslangens luftutlopp
tätningskapaciteten kan återställas. Tryckmätpluggen fäst vid
för varje start av arbetet och
ett trycktest på 1-25Mpa kan utföras, nämligen att maskinen kan förvärmas
snabbt och eventuellt onormalt
maskinens arbete kan hittas vid första gången.
1. Denna maskin antar kolvring med automatisk friktionskompensation
funktion, och det finns en kort förvärmningsprocess för varje arbete och
tidigare användningsprocess. (Se fig. 5)
använder maskinen normalt. Operationen utförs enligt
,
,
2. Fackmän måste vara i tjänst under användningsprocessen. Om något onormalt
situation upptäcks,
stoppa maskinen och lossa övertrycksventilen
,
3. Försiktighetsåtgärder:
Machine Translated by Google

4. Underhåll och förvaring:
lång tid. Ta inte isär uppblåsningshuvudet med tvång utan att tömma det
,
början. Det är nödvändigt att uppmärksamma engångsarbetstiden med
att säkerhetstrycket är under 30Mpa.
hastigheten minskar uppenbarligen.
placera den hemma
drabbad av fukt och utbrändhet.
undvik att skada maskinen. Försök att inte ställa den på en fuktig plats när
det
,
kan endast stängas av när maskinen är kyld till under 50 grader
och delar orsakade av långvarigt lastarbete .
4. Det maximala laddningstrycket för denna maskin får inte överstiga 30Mpa
6. Slå på övertrycksventilen för att släppa ut trycket från högtrycksslangen så snart maskinen
är uppblåst deformation av högtemperatur- och
högtrycksbackventilen under en
kolvring, tätning och envägsventil när det visar sig att pumpningen
trycket , vilket
gör att tätningsringen för honhuvudet flyger ut och
2. När den placeras i bilen, försök att undvika att förlita sig på hårda föremål, så att
omedelbart. Det rekommenderas att normalt använda det maximala säkerhetsindexet
,
3. Det är normalt att arbetstemperaturen för denna maskin kommer att stiga vid
sprängning av anti-sprängskivor. Med tanke på alla aspekter rekommenderas det
för att förhindra
för att förhindra att elektriska apparater finns
5. Stäng inte av fläkten direkt efter att maskinen är klar. Fläkten
,
mindre än 30 min eller 90 ÿ vid daglig användning för att undvika skador på motorer
,
Celsius .
1. Byt ut slangfiltrets bomull regelbundet. Efter att ha använt den många gånger är det
nödvändigt att ta isär maskinen för rengöring och byta ut den
under 30Mpa och förlänger maskinens livslängd.
Denna maskin har övertrycksskydd över 30Mpa och automatisk
kan inte användas nästa gång.
och användningen av övertryck kommer att göra att den mekaniska livslängden minskar kraftigt.
Machine Translated by Google

installeras och används i enlighet med instruktionerna, kan orsaka skadliga
Obs: Denna produkt har testats och befunnits följa gränserna för a
indikerar att produkten kräver separat sophämtning i
utrustning!
stänger av och sätter på produkten, uppmanas användaren att försöka korrigera
mottagaren är ansluten.
störningar kommer inte att inträffa i en viss installation. Om denna produkt orsakar
GJORT I KINA
utformad för att ge rimligt skydd mot skadlig störning i en
· Rikta om eller flytta mottagningsantennen.
följande två villkor:
märkt med denna symbol. Produkter märkta som sådana kanske inte är det
insamlingsställe för återvinning av elektriska och elektroniska apparater.
2) Denna produkt måste acceptera alla mottagna störningar, inklusive störningar som
Denna produkt genererar, använder och kan utstråla radiofrekvensenergi, och om inte
· Anslut produkten till ett uttag på en annan krets än den till vilken
VARNING: Ändringar eller modifieringar av denna produkt som inte uttryckligen godkänts av
störningar på radiokommunikation. Det finns dock ingen garanti för det
· Kontakta återförsäljaren eller en erfaren radio/TV-tekniker för hjälp.
2012/19/EU. Symbolen som visar en soptunna på hjul korsad
ansvarig för efterlevnad kan ogiltigförklara användarens behörighet att använda
produkt.
skadliga störningar på radio- eller tv-mottagning, vilket kan fastställas av
Denna enhet uppfyller del 15 av FCC-reglerna. Driften är föremål för
Klass B digital enhet i enlighet med del 15 av FCC-reglerna. Dessa gränser är
störning av en eller flera av följande åtgärder.
Europeiska unionen. Detta gäller produkten och alla tillbehör
· Öka avståndet mellan produkten och mottagaren.
kasseras med vanligt hushållsavfall, men måste tas till en
1) Denna produkt kan orsaka skadliga störningar.
bostadsinstallation.
VARNING: Ändringar eller modifieringar som inte uttryckligen godkänts av parten
Denna produkt omfattas av bestämmelserna i det europeiska direktivet
parten som är ansvarig för efterlevnaden kan ogiltigförklara användarens behörighet att använda
kan orsaka oönskad funktion.
KORREKT AVFALLSHANTERING
FCC-information
Endast inomhusbruk
Machine Translated by Google