Please read this instruction manual carefully before use
and keep it for future reference.
User Manual
DUAL-CHANNEL DASHCAM
FANTTIK LUMA K10 APEX

Table of Contents
1. Product Parts & Interface
1.1 LED Indicator Guide
1.2 Buttons & Touchscreen Controls
1.3 Screen Icons & Status
1.4 Specs
1.5 FCC WARNING
01~05
2. Installation Guide
2.1 MicroSD Card Instructions
2.2 Formatting the MicroSD Card
2.3 Installing the Front Camera
2.4 Installing the Rear Camera
2.5 Installation & Usage Precautions (Disclaimer)
06~11
4. Managing Your Videos
4.1 Playback on Dash Cam
4.2 Playback via App
4.3 File Storage Guide (For PC Access)
14~08
5. Using the Mobile App
5.1 Connecting to the Fanttik App
5.2 App Interface Overview
01~08
3. How to Use
3.1 Initial Setup & App Download
3.2 Menu Settings & Safety Tips
3.3 Powering On/Off
3.4 Recording Modes Explained
3.5 Quick Controls (Snapshot / Mic / Switch Views)
3.6 System Settings (Video / Display / Time)
Loop Recording (Daily Mode)
Emergency Recording (Locked Mode)
Parking Monitoring (Requires Hardwire Kit)
11~14

6. Firmware Update 01~08
7. Warranty CustomerSupport 01~08
Table of Contents
- 01 -
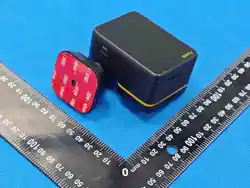
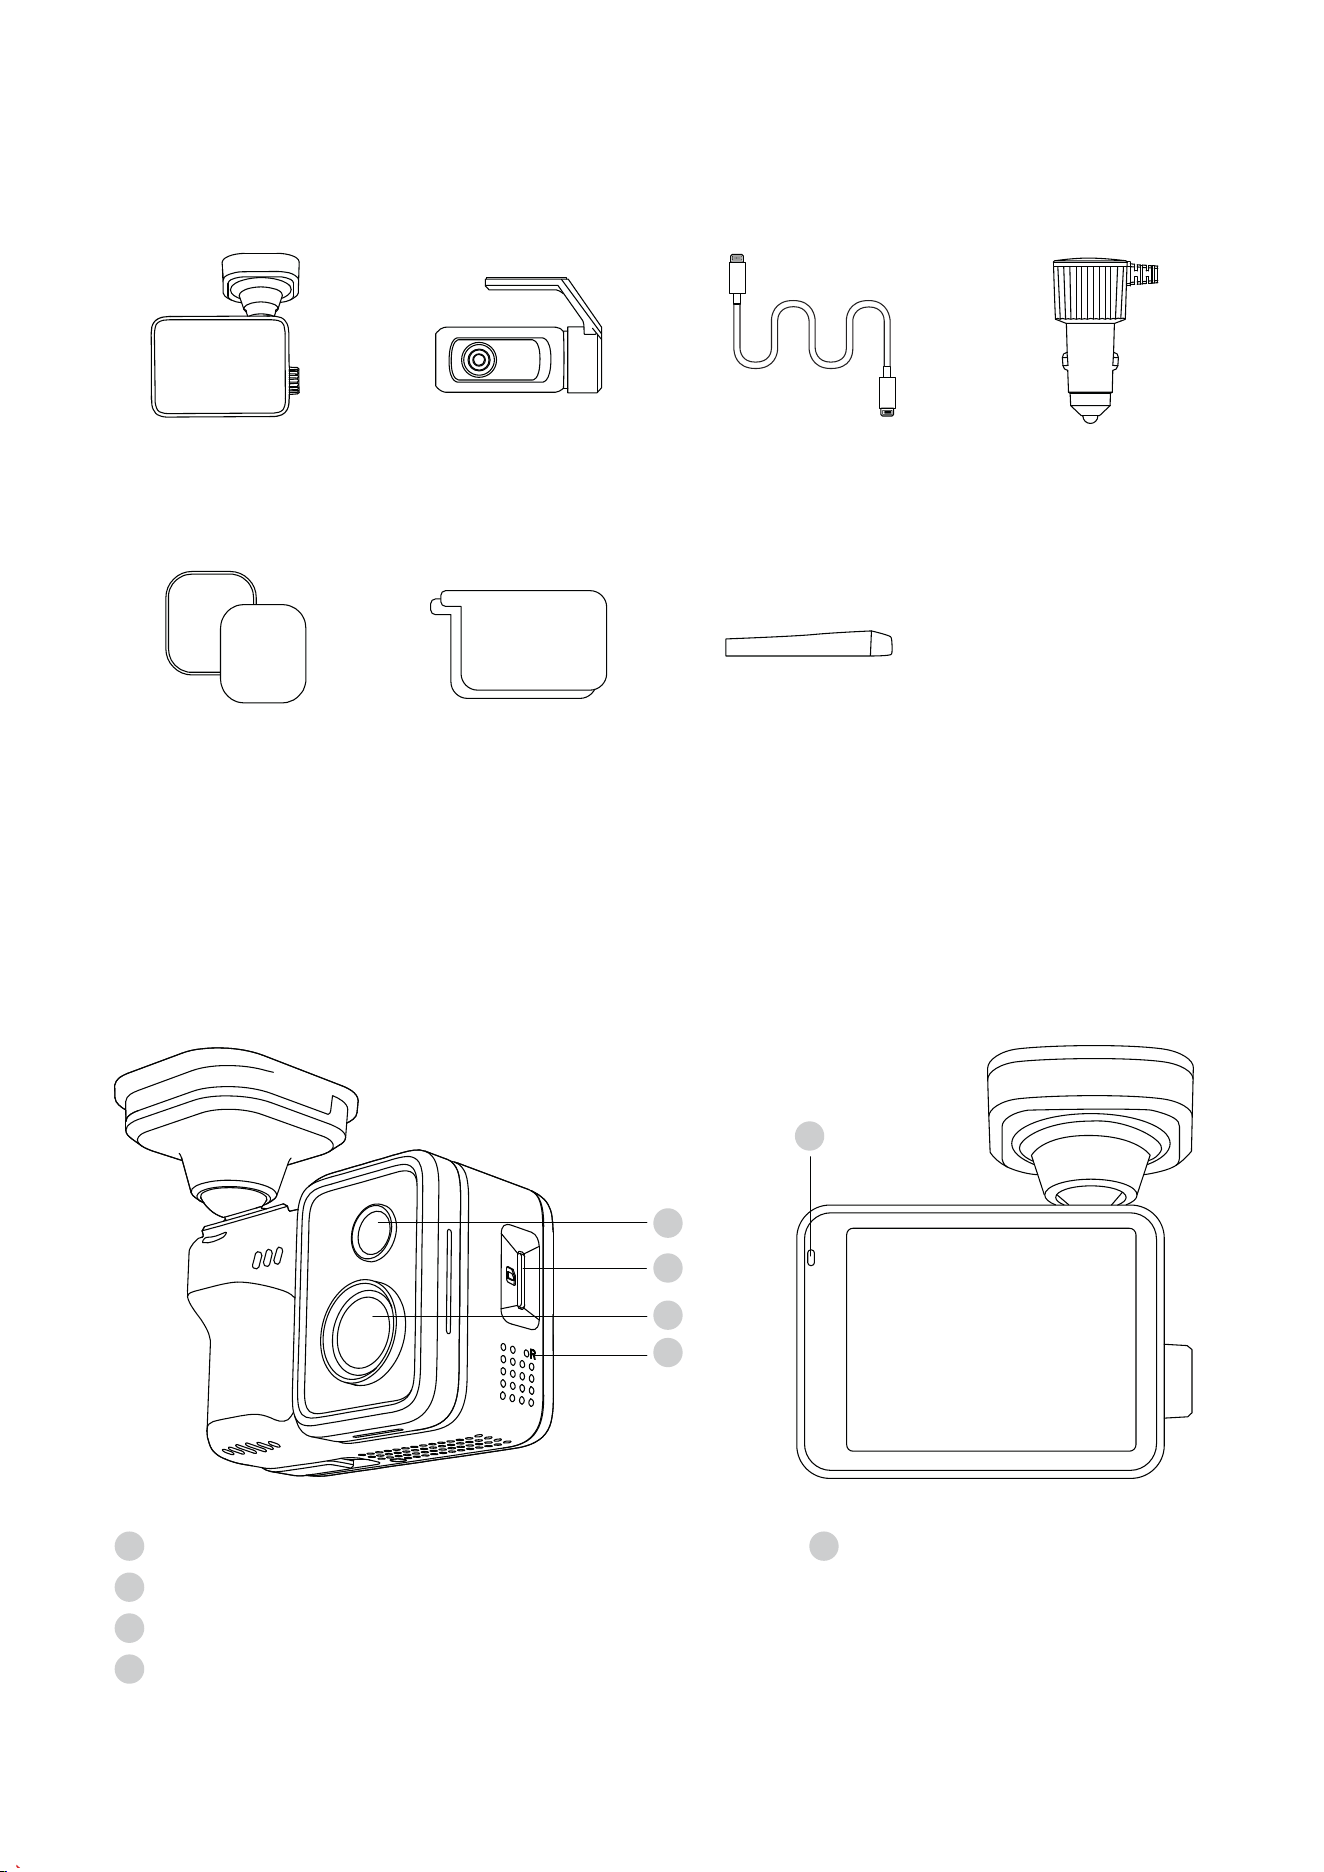
What's in the Box
1. Overview
Cable Routing
Tool x1
Dash Cam
x1
Rear Camera
x1
Rear Camera
Cable x1
Car Charger
x1
3M Adhesive
Mounts x1
Electrostatic
Stickers x2
1
2
3
4
Speaker
MicroSD Card Slot
Front Lens
Reset Button
1
2
3
4
Status LED
5
5
- 02 -
1
2
4
3
Rear Lens
Connection Port
1
2
Rear Status LED
3
1 2
Power / Data Port
4
Rear Camera Port
5
Back / Screen-off Button
Menu / Select Dial
Microphone
1
2
3
5
3

1.1 LED Indicator Guide
- 03 -
Device
Component
Dash Cam
(Main Unit)
Rear Camera
Device Status
Power On / System Boot
The "REC" icon
turns red.
Solid Green LED
Recording
Parking Mode
Emergency Recording
App Connected
Firmware Update
Normal Operation Solid Red LED
Pulsing Green LED
Pulsing Red LED
Solid Blue LED
Solid Purple LED
Fast Flashing
Red LED
-
-
-
-
-
-
Indicator Light
Behavior
Screen Display
1.2 Buttons Touchscreen Controls
Operation
Method
Control Dial
Back Button
Touchscreen
Applicable
Screen
On the Live View
Screen
In the Menu
Enter the Settings MenuPress
Rotate
Press
Press
Press
Press and Hold
Swipe Down
Tap
Tap
Press and Hold
Rotate
On the Live View
Screen
In the Menu
On the Live View
Screen
In the Menu
Go back to the previous page
Turn off the screen
Enter the Settings Menu
Hide / Show screen icons
Select / Enter settings
Digital Zoom in / out
Confirm / Select
Turn off the screen
Hide screen icons
(Clean View)
Scroll up / down through
options
Interaction
Action
Function Performance
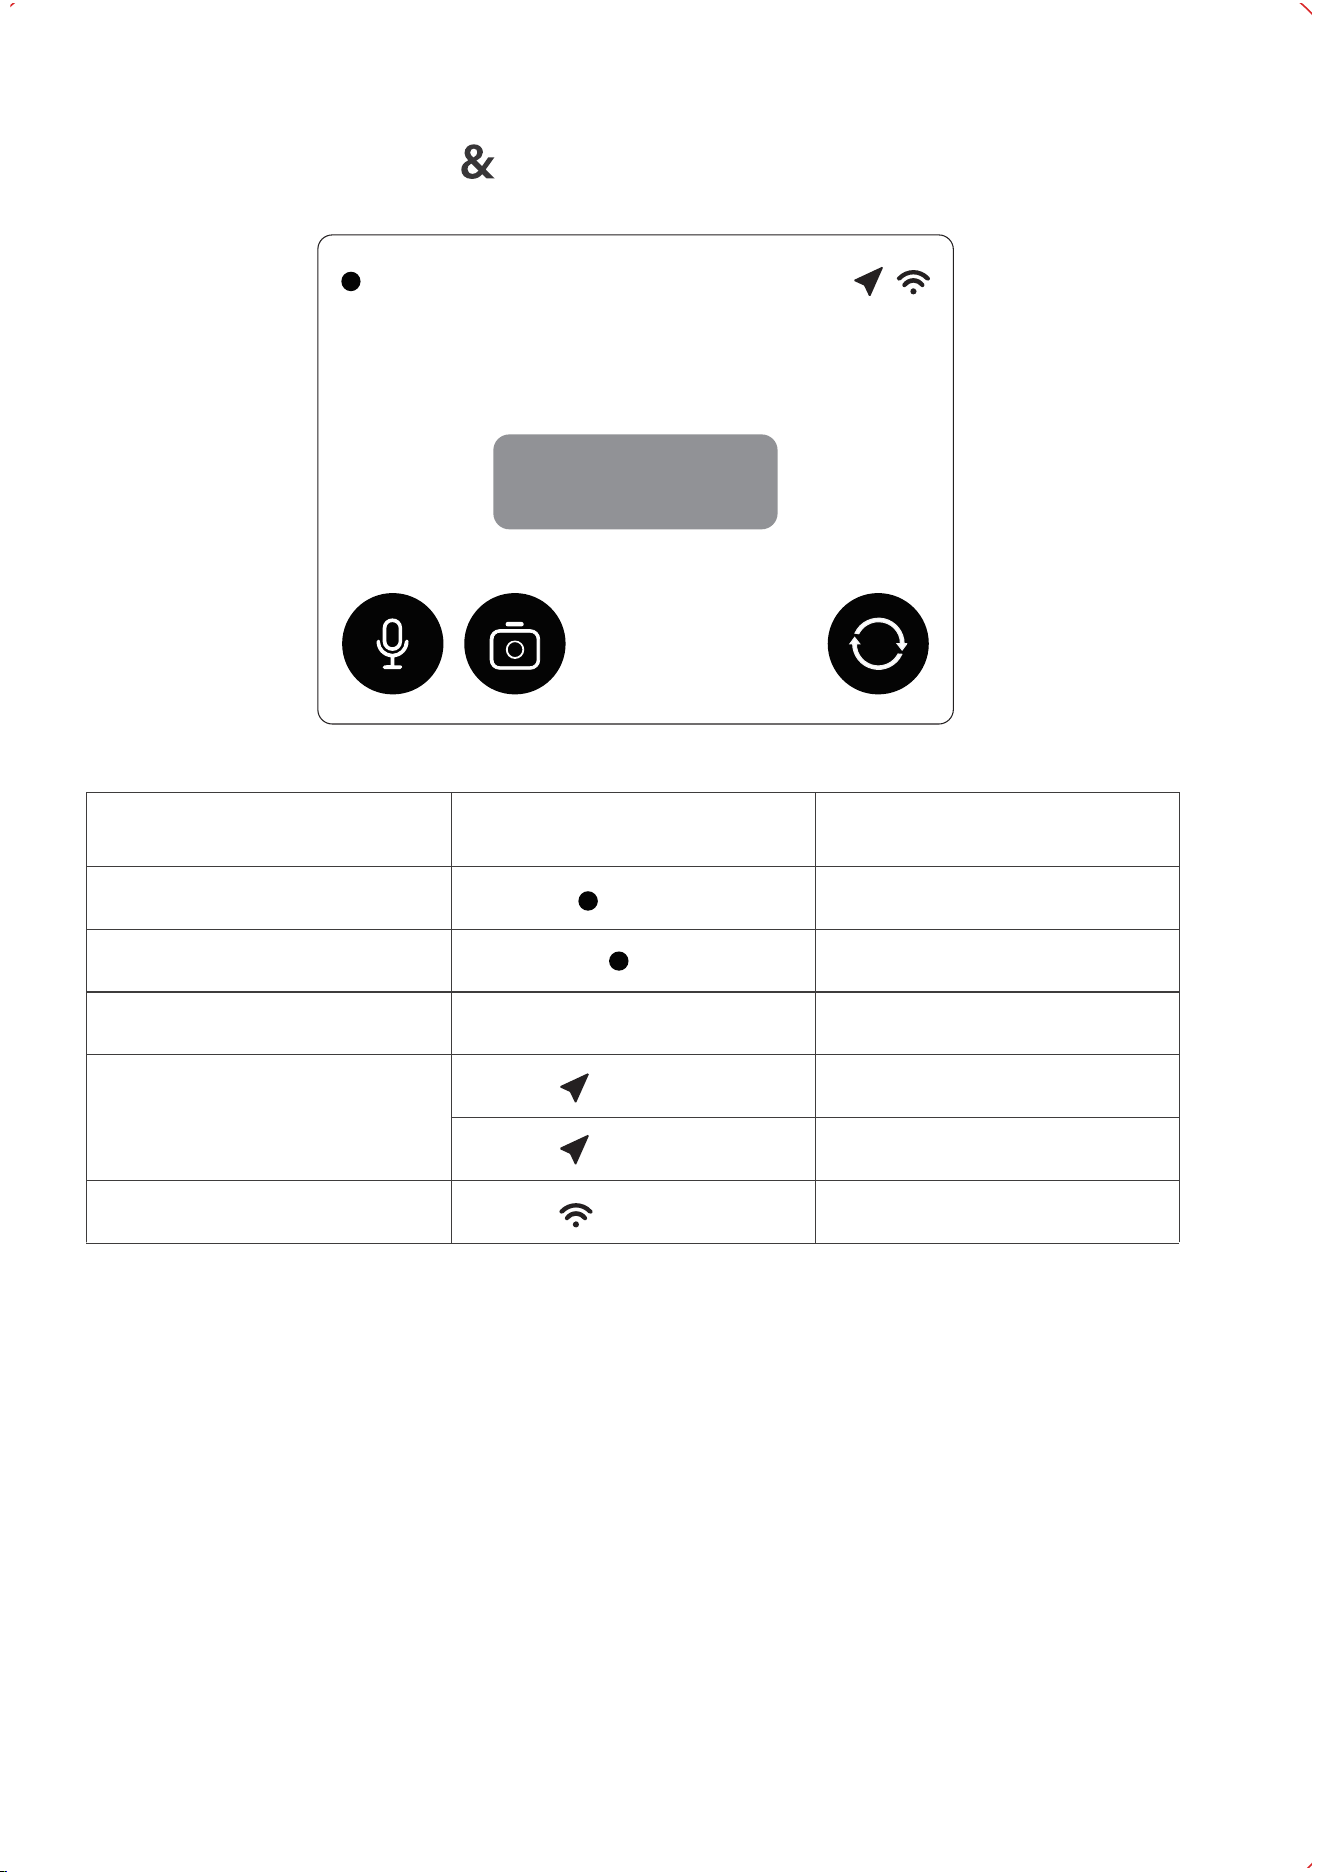
1.3 Screen lcons Status
- 04 -
REC 2000-01-01 00:00:00
Audio is on
Icon Name
Recording Status
Standby
Date / Time
GPS Status
Wi-Fi Status
Screen Display
REC
Flashing
Recording
2000-01-01 00:00:00
Not Recording
-
Solid Blue LED
Wi-Fi is enabled
Searching for GPS signal
Status Description
Solid
Icon On

1.4 Specs
1.5 FCC WARNING
- 05 -
This device complies with part 15 of the FCC Rules. Operation is subject to the following
two conditions: (1) This device may not cause harmful interference, and (2) this device
must accept any interference received, including interference that may cause undesired
operation.
This equipment complies with FCC radiation exposure limits set forth for an uncontrolled
environment. This equipment should be installed and operated with minimum distance
20cm between the radiator & your body.
Any Changes or modifications not expressly approved by the party responsible for
compliance could void the user's authority to operate the equipment.
Note: This equipment has been tested and found to comply with the limits for a Class
B digital device, pursuant to part 15 of the FCC Rules. These limits are designed to
provide reasonable protection against harmful interference in a residential
installation. This equipment generates uses and can radiate radio frequency energy
and, if not installed and used in accordance with the instructions, may cause harmful
interference to radio communications. However, there is no guarantee that
interference will not occur in a particular installation. If this equipment does cause
harmful interference to radio or television reception, which can be determined by
turning the equipment off and on, the user is encouraged to try to correct the
interference by one or more of the following measures:
Reorient or relocate the receiving antenna.
Increase the separation between the equipment and receiver.
Consult the dealer or an experienced radio/TV technician for help.
Reorient or relocate the receiving antenna.Increase the separation between the
equipment and receiver.
Product name
Model
Input
Dimensions
Weight
Touchscreen
Supported SD Cards
Operating temperature
FCC ID:2BMPX-K10
Dash camera
Luma K10 Apex
5V 2A
75x62.2x81 mm
208g
2.8 inches
Micro SD(up to 512GB)
-20° to 70 (-4° to 158 )
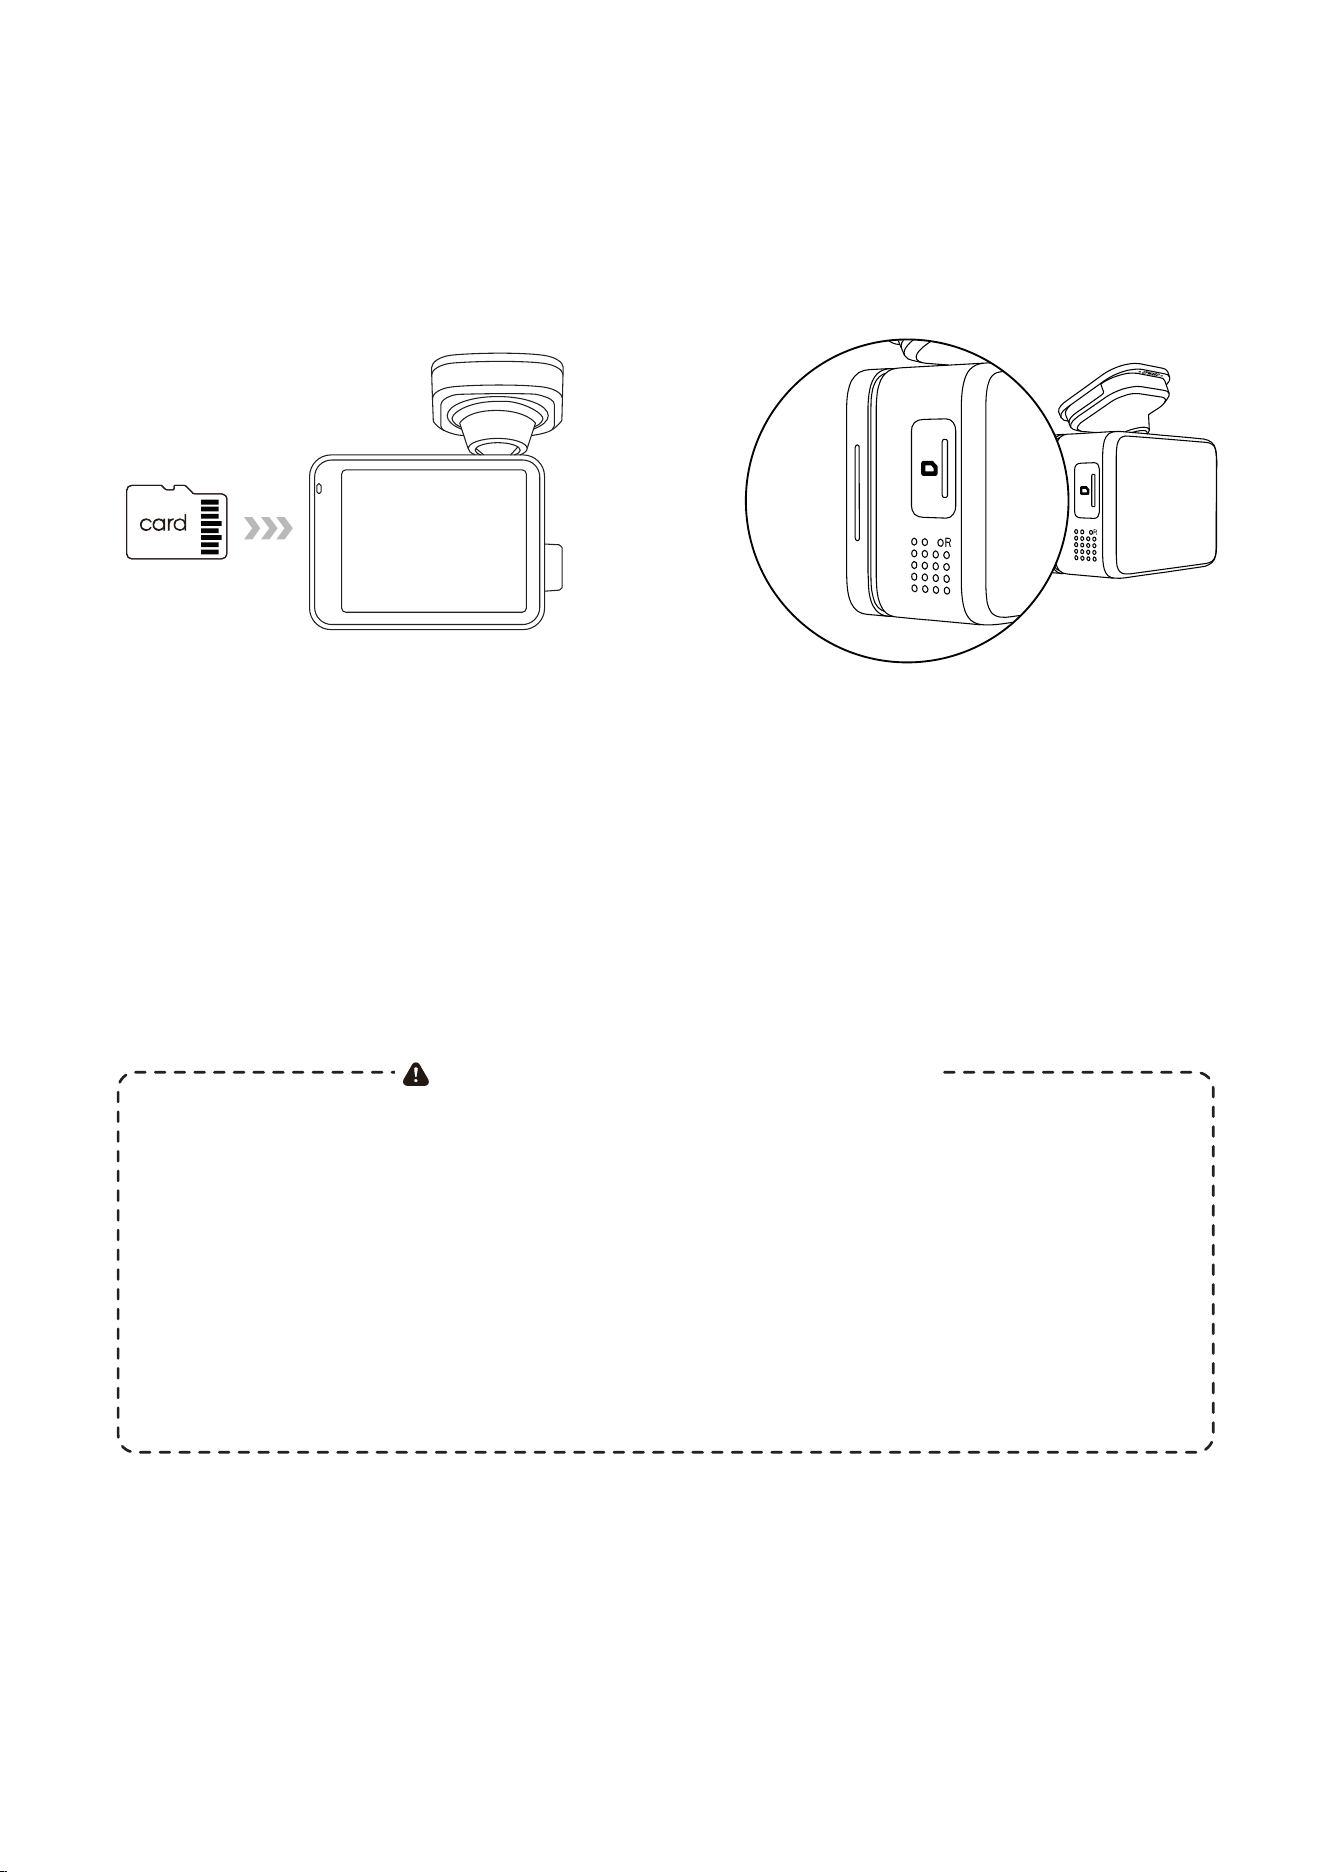
2.2 Formatting the MicroSD Card
Removing the MicroSD Card
2. Installation Guide
- 06 -
Ensure the dash cam is turned off.
Gently press the edge of the Micro
SD card inward. It will pop out,
allowing you to remove it easily.
Important MicroSD Card Guidelines
Requirements: A MicroSD card is not included and must be purchased separately. You must use a
High Endurance MicroSD card. The dash cam supports capacities up to 512GB.
Recommended Brand: We highly recommend purchasing a Fanttik industrial-grade High Endurance
MicroSD card. It is specifically designed for continuous read/write cycles, ensuring superior stability and
durability.
Routine Formatting: To maintain optimal read/write performance, we recommend formatting your
MicroSD card regularly.
Data Backup: Formatting will permanently delete all data on the card. Always back up your important
videos before formatting.
The MicroSD card must be formatted before its first use (FAT32 or exFAT formats are
recommended). When you insert a new card and turn on the device, a "Format" prompt
may appear on the screen. Simply tap confirm to proceed.
First-Time Use:
(Logo side facing
outward)
Inserting / the Micro SD Card
Ensure the dash cam is turned off.
With the logo side facing outward,
gently push the MicroSD card into
the slot until you hear a "click,"
indicating it is securely locked in
place.
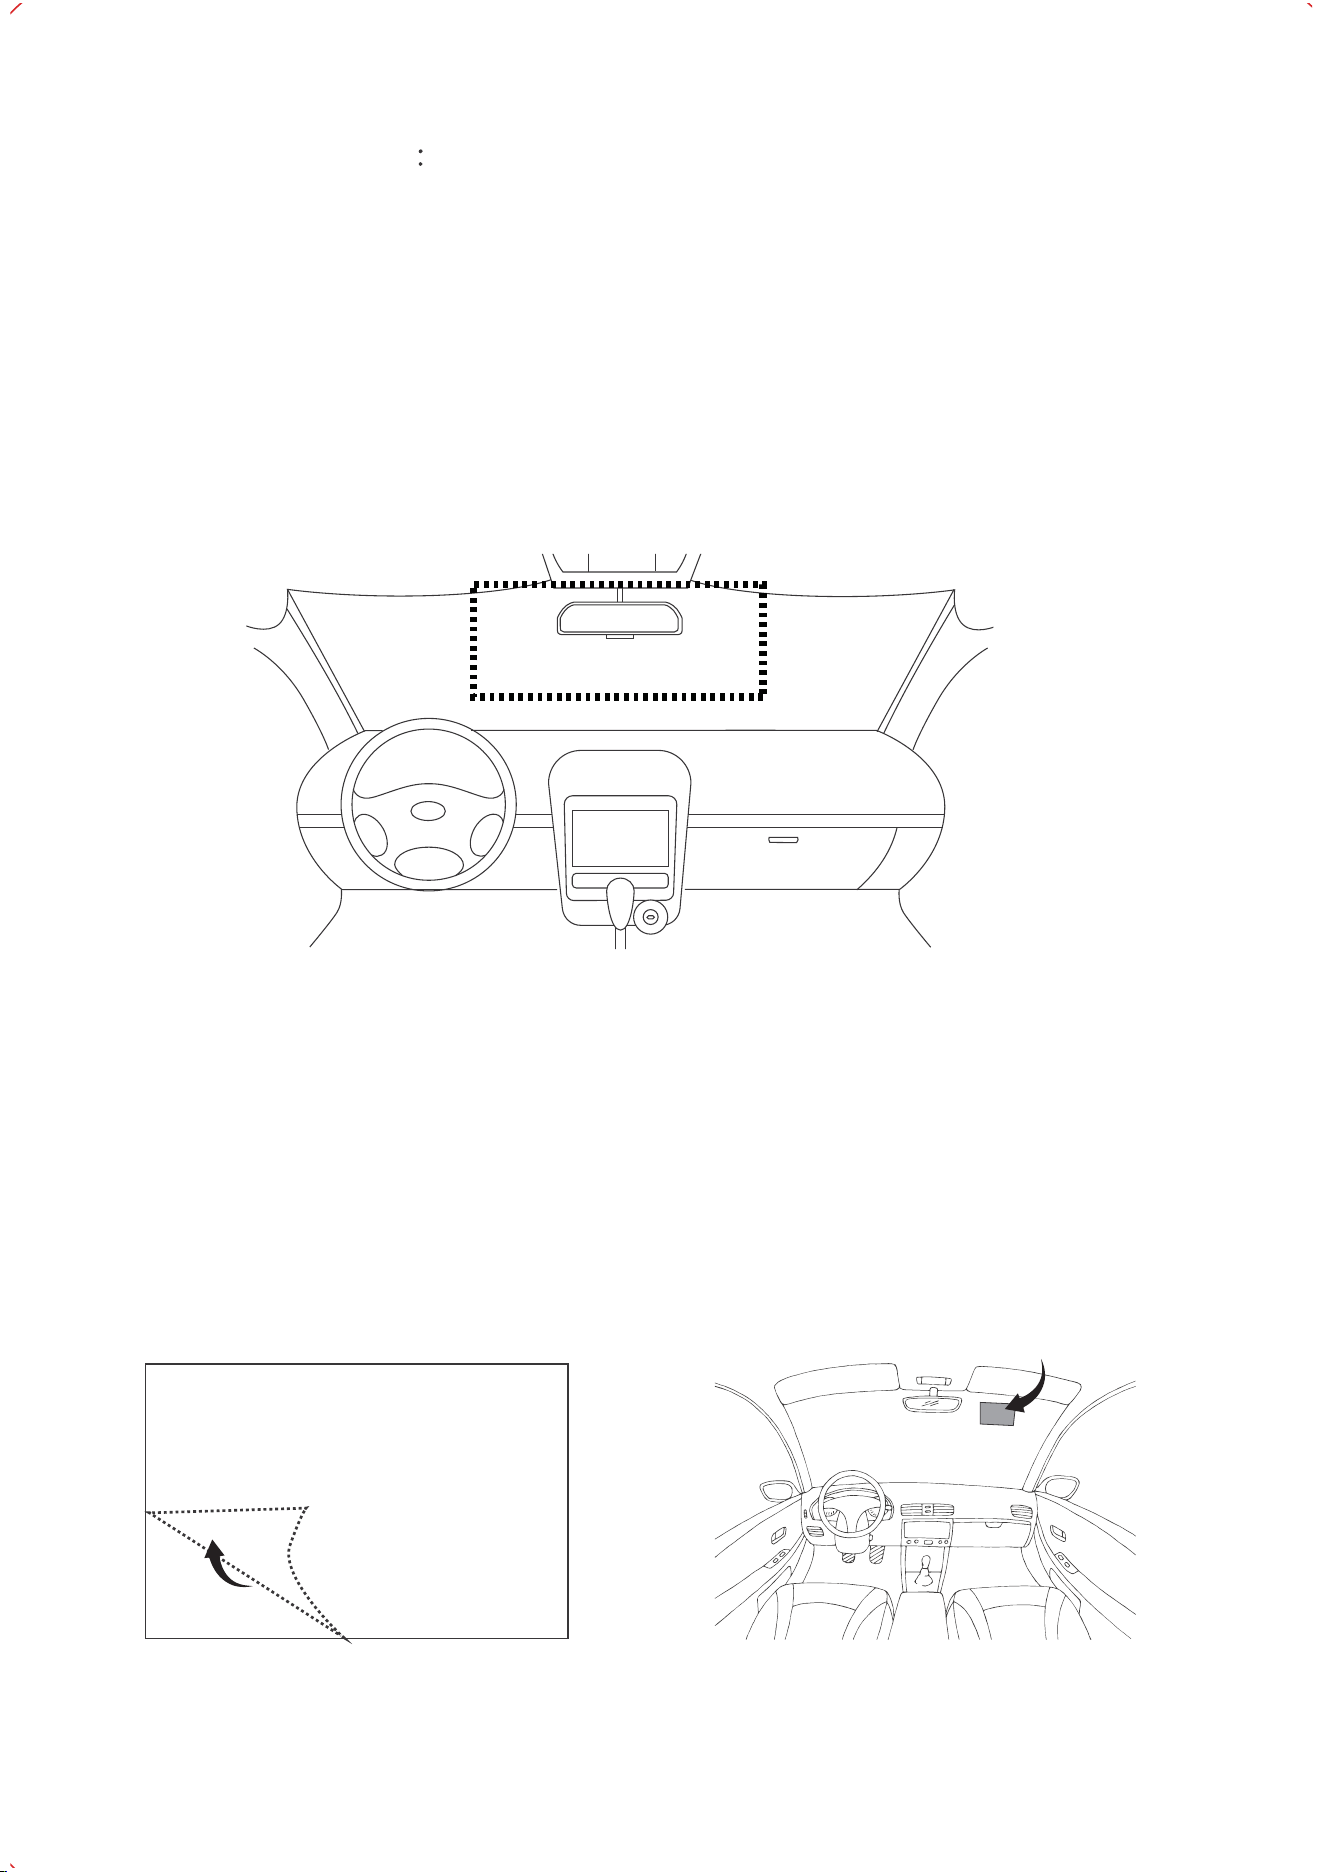
2.3 Installing the Front Camera
- 07 -
Step 1 | Choose a Location
Step 2 | Clean the Surface
Step 3 | Apply the Electrostatic Sticker
On the Dash Cam: Go to Menu > General > Format SD Card, and follow the on-screen
prompts.
Via the App: Turn on Wi-Fi in the dash cam menu and connect your phone to the
Fanttik App. Go to the App's Settings menu and select Format SD Card.
Formatting Manually
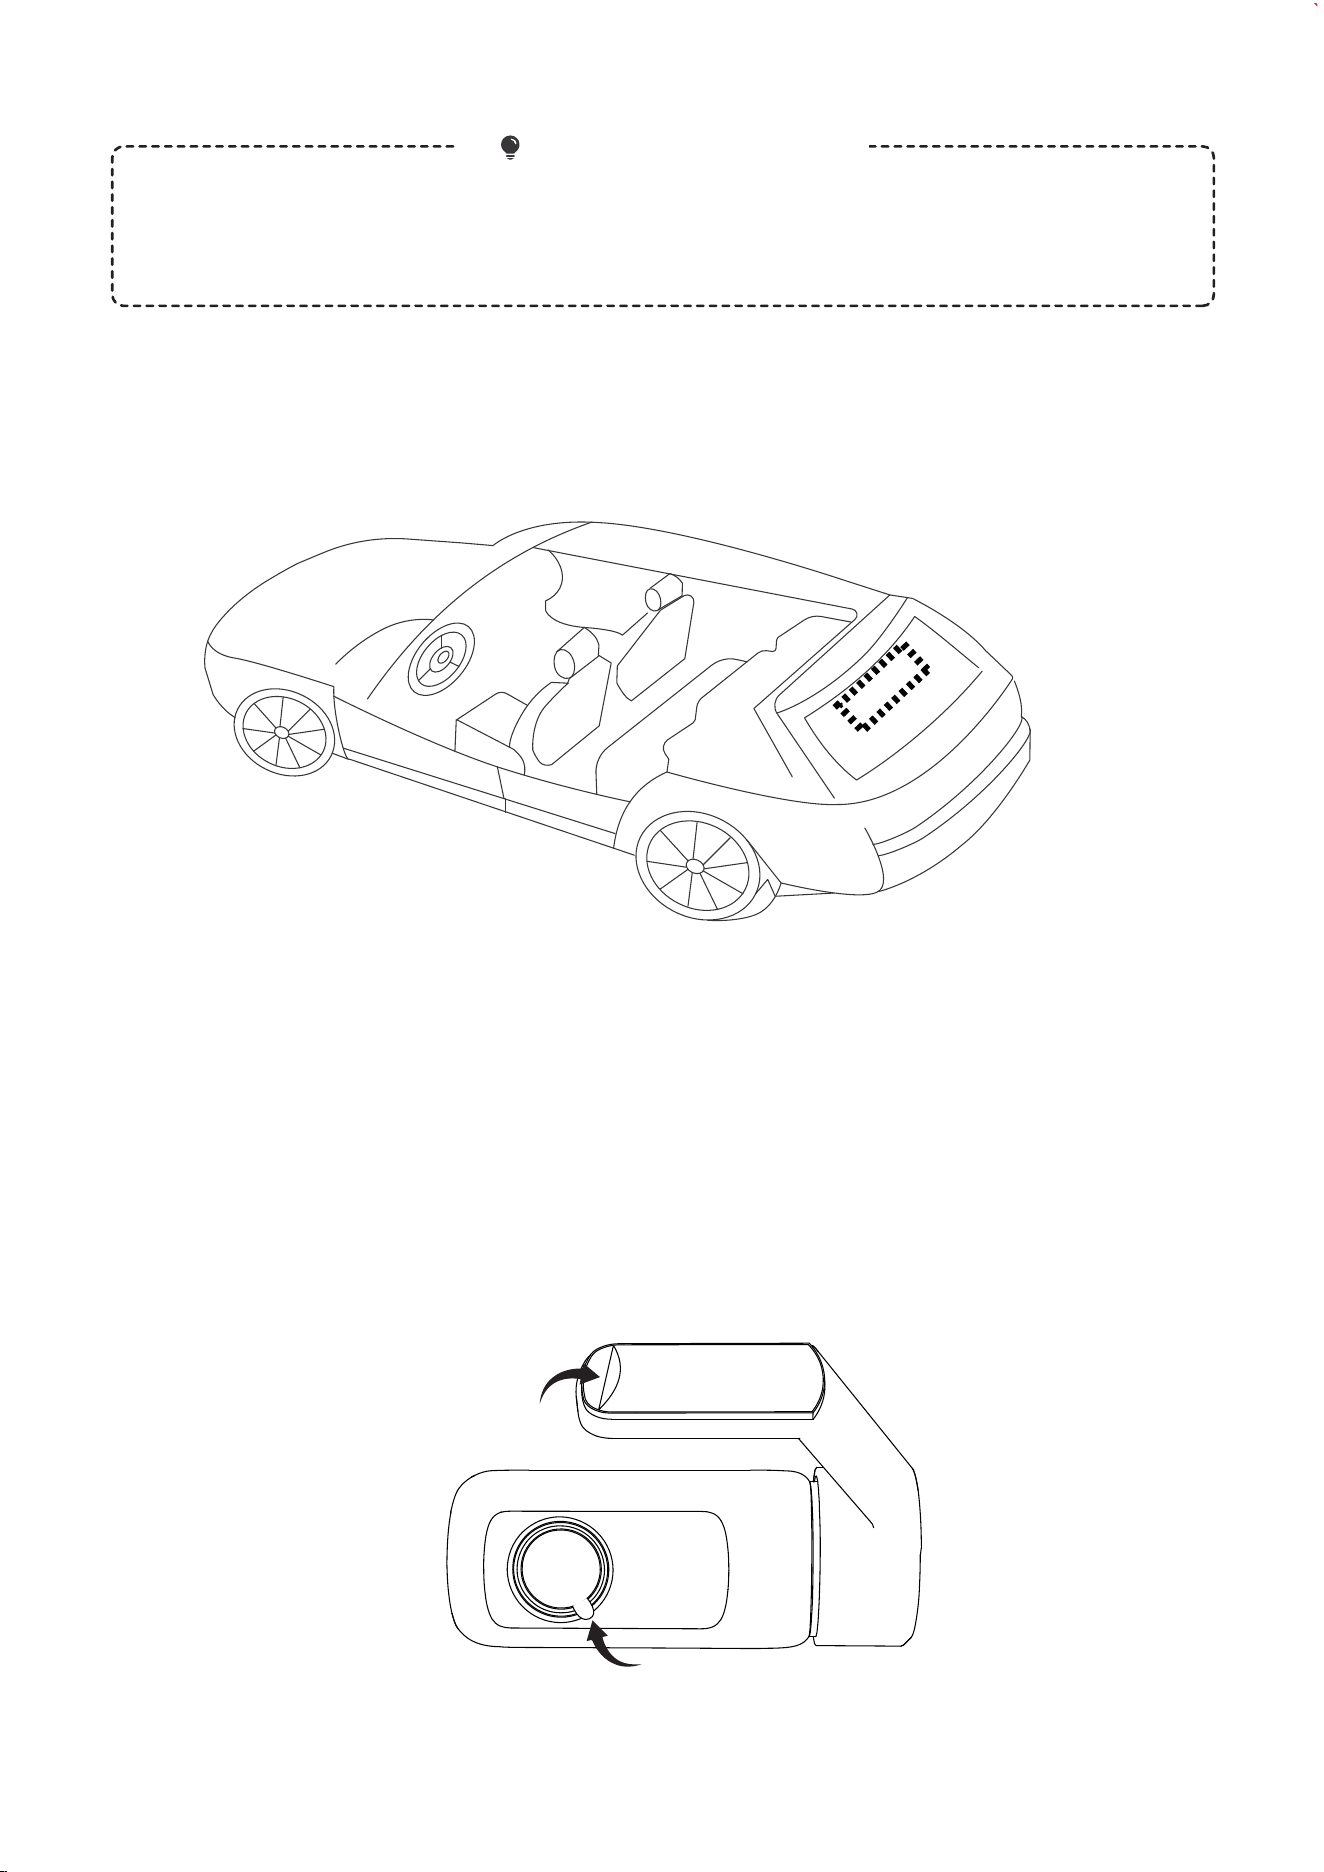
Select an appropriate spot on the windshield, ideally right behind the rearview mirror.
Ensure the dash cam does not obstruct the driver's field of view.
Thoroughly clean the chosen area on the windshield with a dry cloth. Ensure the
surface is completely free of oil, moisture, dirt, and fingerprints.
Peel the protective film off the included electrostatic sticker. Apply it smoothly to
the cleaned area and press firmly to push out any air bubbles.
Attach to the glass
Optimal Installation
Location
Attach the device to the electrostatic sticker.
- 08 -
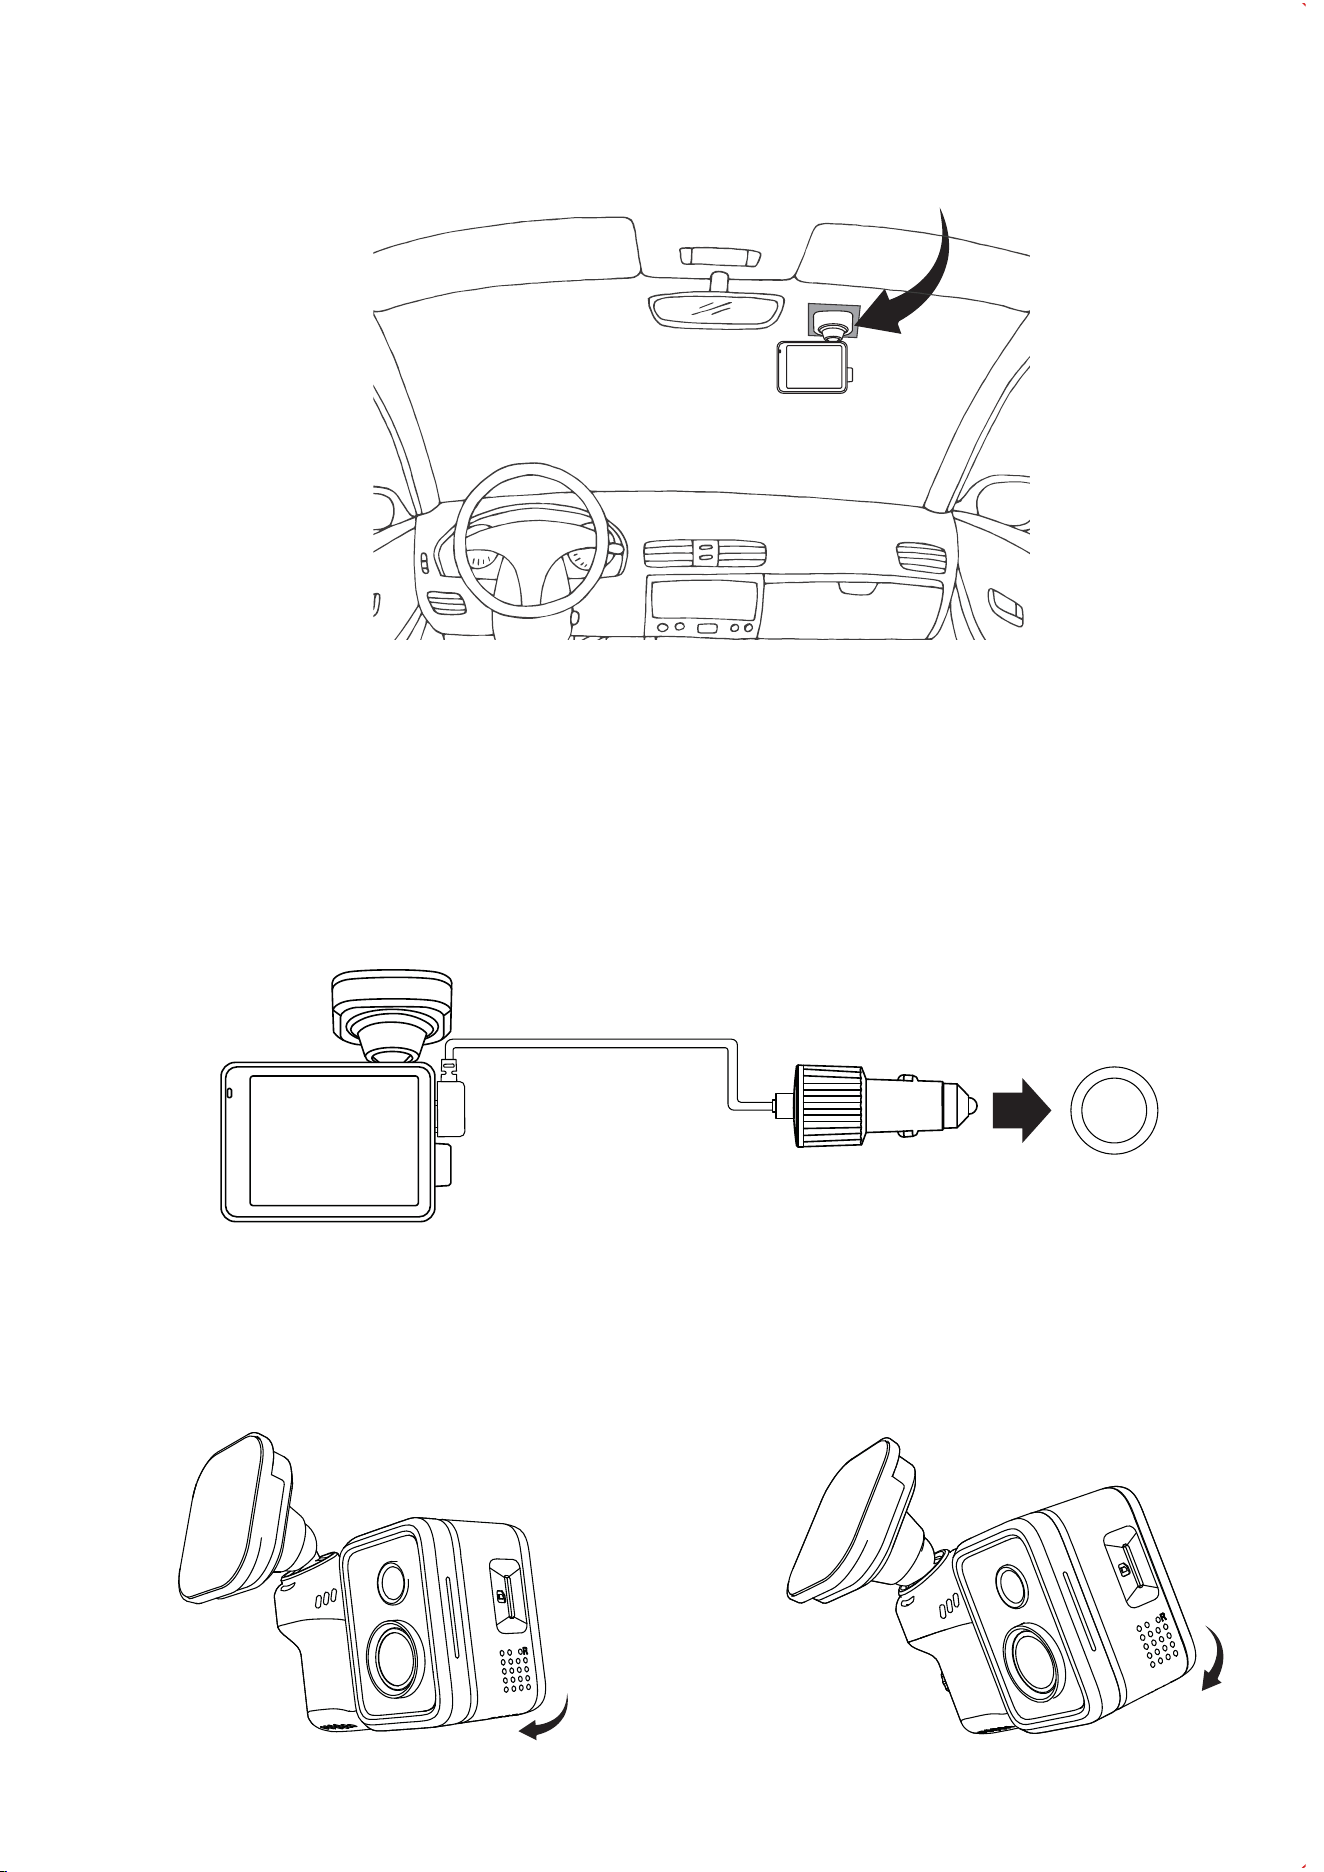
Step 4 | Mount the Dash Cam
Step 5 | Connect to Power
Remove the protective film from the 3M adhesive on the dash cam mount. Align the
mount with the center of the electrostatic sticker, attach it, and press firmly for several
seconds to ensure a secure hold.
Plug the Type-C end of the power cable into the dash cam's power port. Then, plug
the car charger into your vehicle's 12V/24V power outlet (cigarette lighter socket).
Step 6 | Adjust the Viewing Angle
Once the vehicle is powered on and the dash cam boots up, check the live view on
the screen. Rotate the lens up or down to adjust the angle.
2.4 Installing the Rear Camera
Go to Menu > enable Installation Guide Lines, then return to the live view screen. Adjust the lens until
the on-screen guide lines align perfectly with the horizon ahead to achieve the optimal viewing angle.
Pro Tip for Alignment
Step 1 | Choose a Location
- 09 -
Step 2 | Clean the Surface
Step 3 | Mount the Camera
Wipe the selected area thoroughly with a clean, dry cloth. Ensure the surface is free of
oil, moisture, dirt, and fingerprints.
Peel the protective film from the 3M adhesive pad on the rear camera mount. Attach it
precisely to the chosen location and press firmly for several seconds to secure it.
Select an appropriate location on the inside of the rear windshield. Avoid mounting it
directly over the defroster grid lines to ensure a clear, unobstructed view of the rear.
Optimal Installation
Location
- 10 -
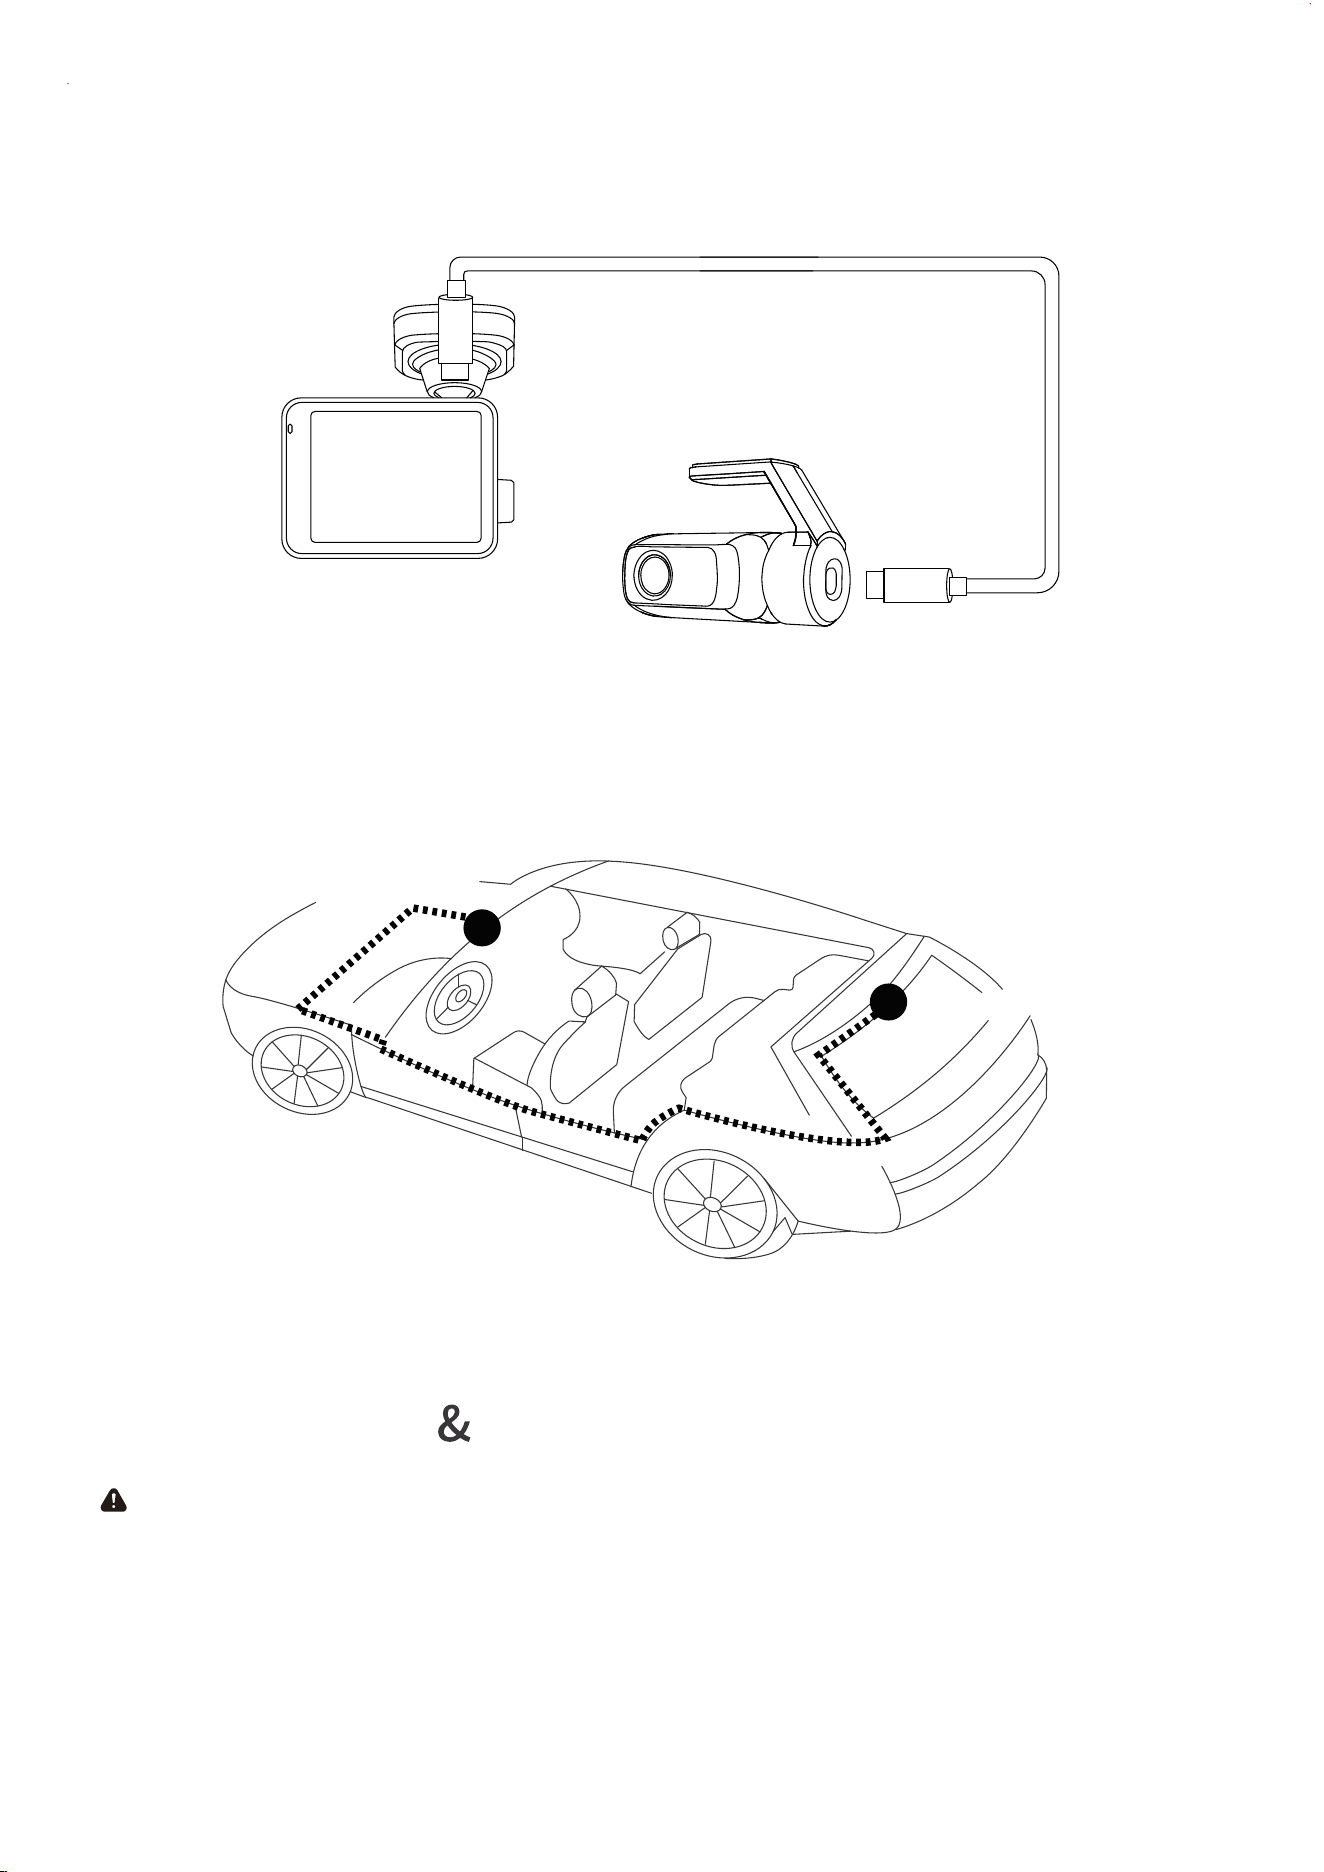
Step 4 | Connect to the Main Unit
Step 5 | Route the Cable
Ensure the dash cam is turned off before proceeding. Use the provided rear camera
cable to connect the rear camera to the main dash cam unit.
Follow the routing diagram provided. Tuck and hide the long cable under the roof
headliner and along the rubber door seals until it reaches the front windshield.
2.4 Installation Usage Precautions
Important MicroSD Card Guidelines
Optimal View: We recommend mounting the main dash cam near the rearview
mirror. For clear recordings in rain or snow, try to position the lens within the area swept
by the windshield wipers.
Do Not Obstruct: Never install the device where it blocks the driver's line of sight or
interferes with safe driving.
Front Camera
1
2
Rear Camera
3. How to Use
3.1 Initial Setup
Important Safety Notes
Settings Pause Recording: To ensure optimal system performance, the dash cam will automatically
stop recording when you enter the sub-menus. Recording will automatically resume as soon as you exit
the settings and return to the Live View screen.
Park Before Operating: For your safety, strictly operate the device only when the vehicle is safely
parked. The manufacturer assumes no responsibility for any accidents or injuries caused by operating
the dash cam while driving.
When turning on the dash cam for the first time, please follow the on-screen prompts to
set the date and time. We highly recommend scanning the QR code on the screen with
your smartphone to download the companion App for a smoother initial setup
experience.
3.2 Menu Settings Safety Tips
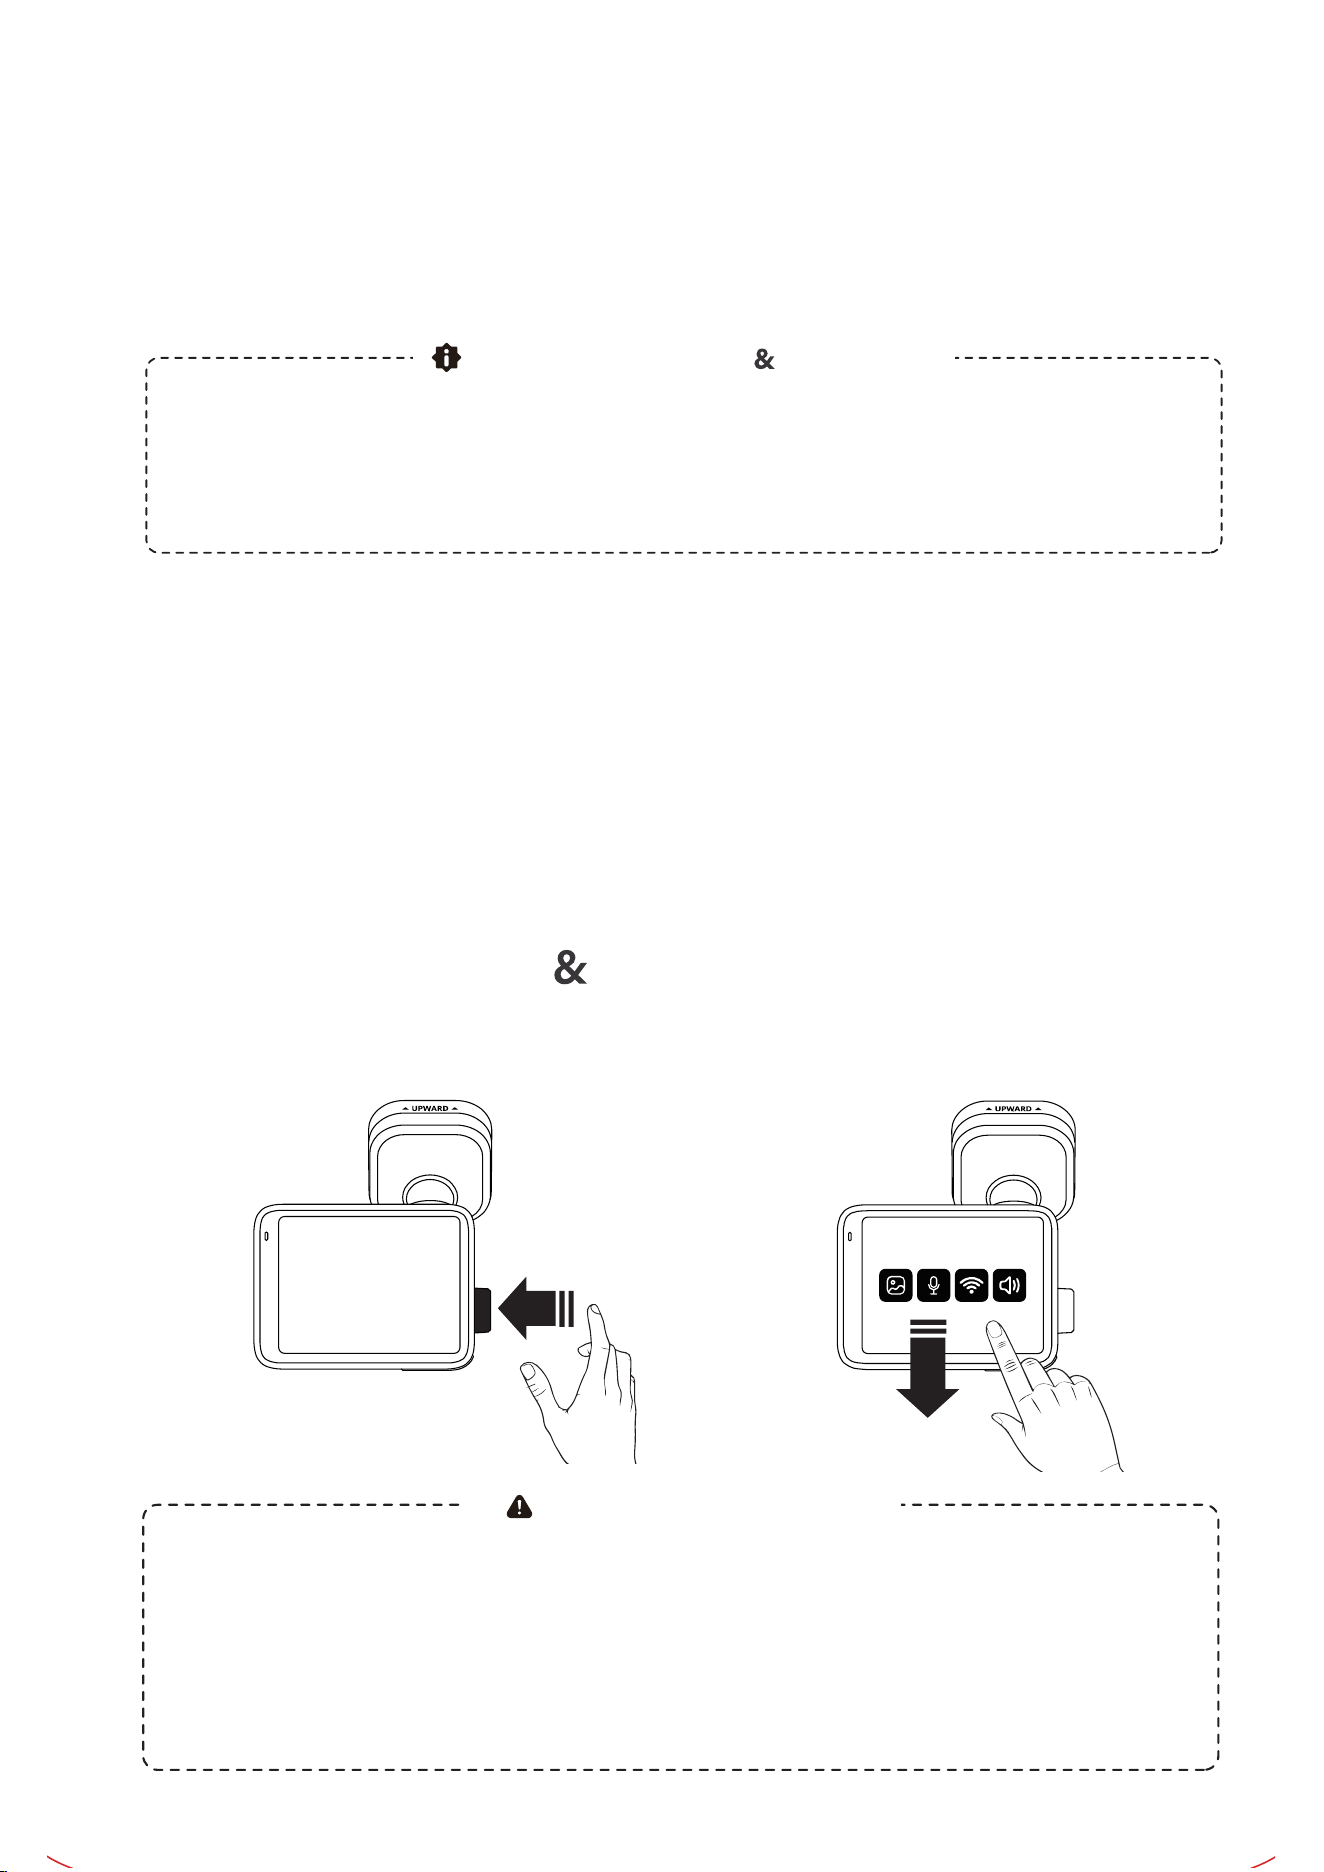
How to Access: On the Live View screen, [Swipe Down] on the touchscreen or [Press
the Control Dial] to enter the Settings Menu.
- 11 -
WARNING - Airbag Safety: Ensure the main dash cam, rear camera, and all cables are NEVER
installed on, near, or within the deployment zone of any airbags. The manufacturer assumes no
liability for any injuries or damages resulting from improper installation that obstructs airbag
deployment or causes secondary injuries.
Core Safety Warning Disclaimer
Prevent Interference: If your windshield has heavy tinting or a sun visor, ensure it
does not block the camera lens. To maintain optimal performance, avoid placing other
strong electronic devices nearby to prevent signal interference.
Swipe down
PRESS

Hardware Requirement: This feature requires continuous power and must be used with
the Fanttik OBD Hardwire Kit. This specific hardwire kit features a built-in low-voltage
protection module to effectively prevent draining your car battery.
3.3 Power On/Off Logic
Auto Power On:
The dash cam will automatically power on and start recording
immediately when the car engine starts (or when connected to power).
Auto Power Off:
The dash cam will automatically stop recording and safely power off
when the car engine is turned off (or when the power supply is disconnected).
3.4 Recording Modes Explained
- 12 -
The device automatically splits daily recorded videos into 1-minute segments.
When the MicroSD card reaches its storage capacity, the system automatically
enables loop recording. New videos will overwrite the oldest unprotected files one by
one to ensure continuous recording.
Loop Recording (Daily Mode)
Trigger Condition: After the vehicle is turned off, the dash cam automatically enters
Parking Monitoring mode and continuously records in "Time-Lapse" mode at 1 frame
per second (1fps).
Monitoring Duration: You can set the duration of Parking Monitoring (24h / 48h / 72h)
directly on the device or within the App settings.
Collision Wake-up: If a collision is detected during Parking Monitoring, the dash cam
will immediately record a 1-minute emergency video. Once the recording is complete,
it will automatically revert to Time-Lapse mode.
Parking Monitoring (Requires Hardwire Kit)
When the vehicle experiences sudden braking, a collision, or a severe impact, the
built-in G-Sensor is triggered, and the dash cam will automatically lock the current
video segment.
Emergency videos are specially protected and will not be overwritten by the Loop
Recording feature.
Emergency Recording (Locked Mode)
Tip: You can adjust the collision detection sensitivity by going to Menu >
General Settings > G-Sensor Sensitivity.
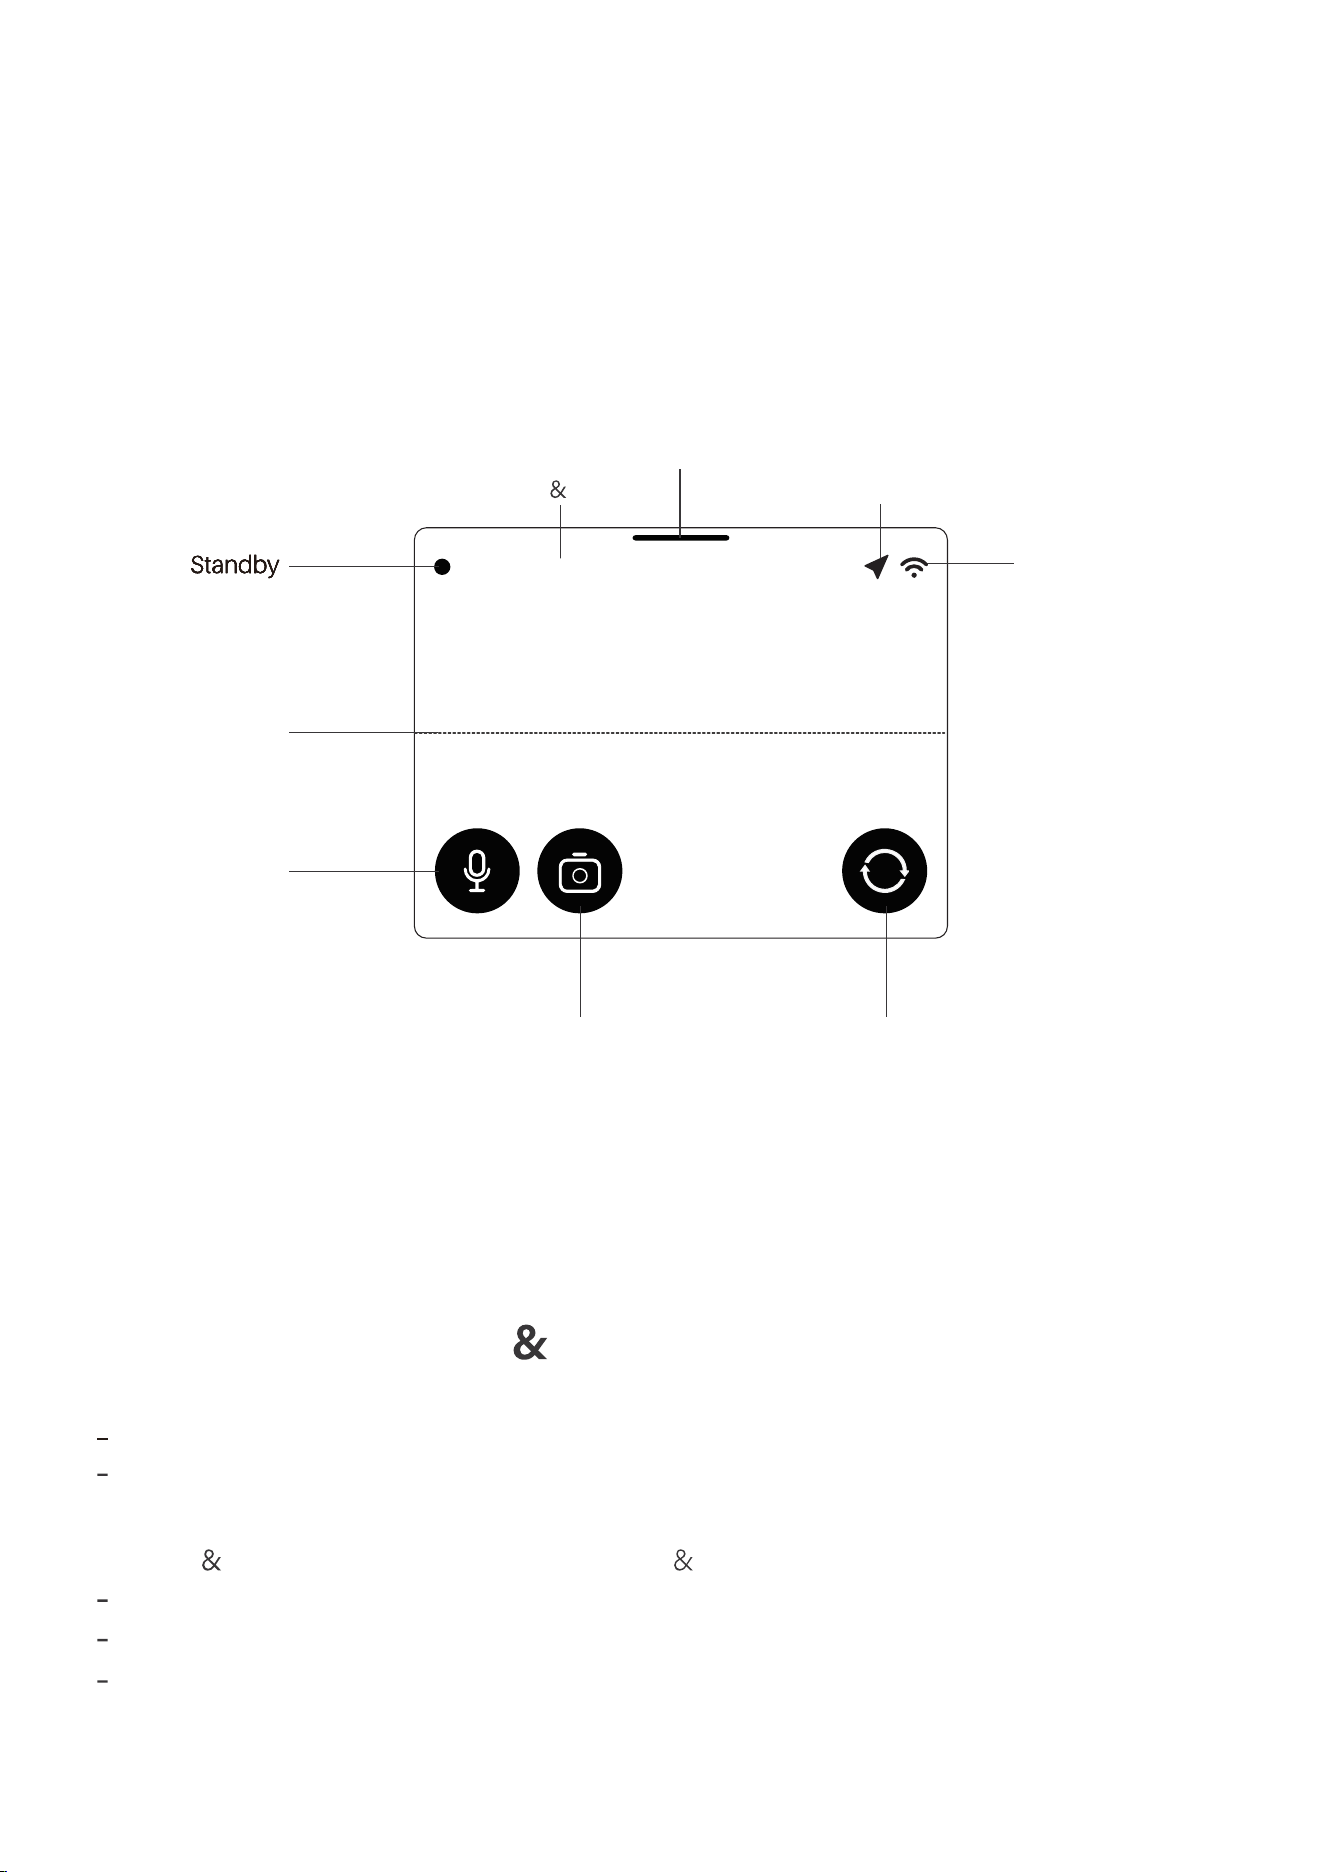
Standby
Tap to Hide Icons (Clean View)
Take a Snapshot : Tap the [Camera] icon on the screen to instantly capture a photo.
Toggle Audio Recording : During recording, tap the [Microphone] icon to quickly
mute or unmute the in-cabin audio.
Switch Views : Tap the [Switch View] icon to toggle between the front and rear
camera live views.
Note: This action only changes the live view on the display and does not affect the
actual recording. Both the front and rear cameras will continue to record and save
footage simultaneously in the background.
3.5 Quick Controls
Video Settings: Go to Menu > Video Settings.
3.6 Video, Display System Settings
- 13 -
REC 2000-01-01 00:00:00
Level Guide
(Appears when
enabled in settings)
Date Time
Audio Recording
Take a Photo
(Tap once to capture)
Switch Between Front
/Rear Cameras
GPS: Flashing (Searching)
/ Solid (Locked)
Wi-Fi: Icon shows
when enabled
Resolution : Choose your preferred front camera video quality (4K / 2K / 1080P).
High Compression : Enable this to significantly reduce video file size while
maintaining the same image quality.
Display Brightness: Go to Menu > Display Brightness.
Brightness : Adjust the screen brightness.
Screen Timeout : Set the idle time before the screen automatically turns off.
Screen Saver : When enabled, the display will show a screen saver (styles are
customizable) instead of going completely black during standby.

4. Managing Your Videos
4.1 Playback on the Dash Cam
Go to Menu > Album (or Gallery) to categorize, view, play, or delete Loop Recordings,
Emergency Videos, Parking Monitoring videos, and Snapshots.
4.3 File Storage Guide (For PC Access)
When you insert the MicroSD card into your computer using a card reader, you can
quickly locate your files using the folder paths below. Front and rear camera files are
saved separately. Rear camera videos and photos will have an "_E"suffix in their
filenames (e.g., Movie_E).
- 14 -
Time Settings: Go to Menu > General.
Daylight Saving Time (DST) : Manually toggle DST on or off.
4.2 Playback via the App
Go to Menu > Wi-Fi on the dash cam to turn on the Wi-Fi hotspot.
Open the Fanttik App on your phone and tap "Connect Device".
Once connected to the dash cam's Wi-Fi, you can seamlessly stream, download,
or batch-delete media files directly from your phone.
File Type
Loop Recordings
Emergency Videos
Parking Monitoring
Snapshots
SD Card Root
Directory Path
Novatek\Movie
Novatek\EMR
Novatek\Photo
Oldest files auto- overwritten when full
Oldest files auto- overwritten when full
Oldest files auto- overwritten when full
Novatek\Park
Protected files, will not be overwritten
File Overwrite Rule

This product is covered by a 12-month warranty for manufacturing defects.
7. Warranty Customer Support
- 15 -

