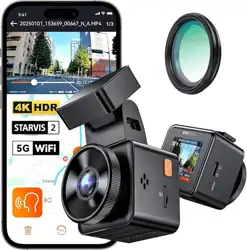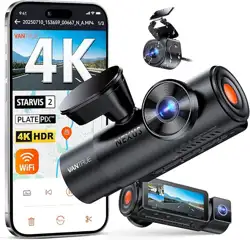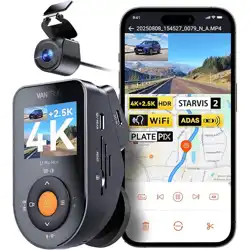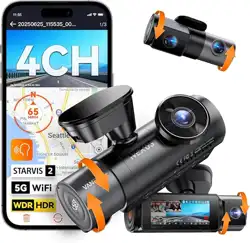
vantrue.com
truly driven.
USER MANUAL V9.4
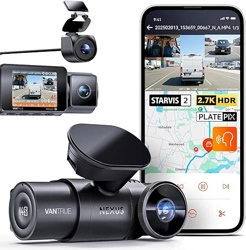
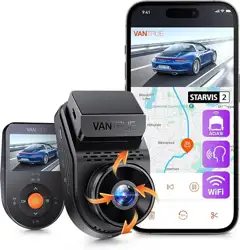
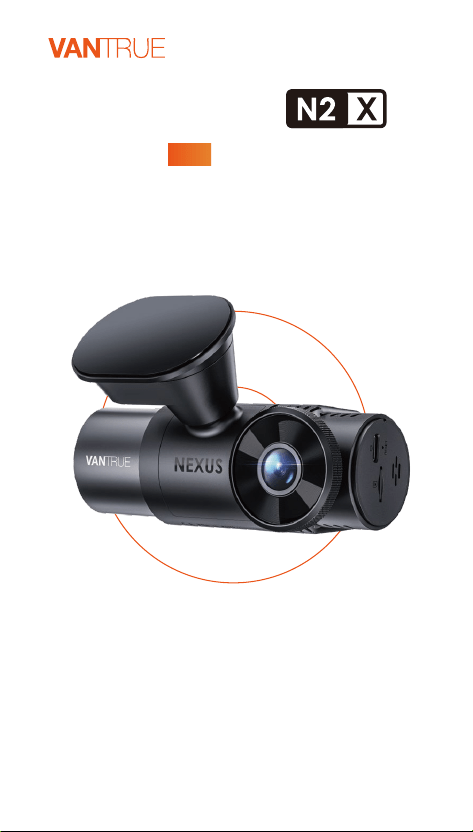
Nexus 2X


Join Our Community
Contact Us

CONTENTS
1. Quick Sta Guide
1.1 What's in the box?
1.2 Installation of adhesive mount and memo card
1.3 Installation Camera and Setup
2. Basic Operation
2.1 Camera Oveiew
2.2 Screen Oveiew
2.3 Operation Guide
2.4 Menu Settings
3. Specications & Warnings
3.1 Specications
3.2 Safety Warnings
4. Warranty & Suppo
02
02
03
04
06
06
08
09
31
37
37
38
40
INHALTSVERZEICHNIS
1. Schnellsta
1
.1 Was liegt im Paket?
1.2 Installation der Klebehalterung und
Speicherkae
1.3 Installation und Einstellung der Dashcam
2. Grundlegende Bedienung
2.1 Überblick über die Dashcam
2.2 Überblick über den Bildschirm
2.3 Gebrauchsanweisung
2.4 Einstellungen
3. Spezikationen & Sicherheitshinweise
3.1 Spezikationen
3.2 Sicherheitshinweise
4. Herstellergarantie & Suppo
42
42
43
43
46
46
49
50
74
82
82
84
86

CONTENU
1. Guide rapide d'utilisation
1.1 Ce qu'il y a dans la boîte
1.2 Installation du suppo adhésif et cae mémoire
1.3 Installation de la caméra et conguration
2. Fonctionnement de base
2.1 Vue d'ensemble de la caméra
2.2 Aperçu de l'écran
2.3 Guide d'utilisation
2.4 Paramètres du menu
3. Spécications et aveissements
3.1 Spécications
3.2 Aveissements de sécurité
4. Garantie et suppo
88
88
89
90
92
92
95
96
118
124
124
126
127
SPIS TREŚCI
1. Skrócona instrukcja obsługi
1.1 Co jest w pudełku?
1.2 Instalacja uchwytu samoprzylepnego i kay pamięci
1.3 Instalacja kame i konguracja
2. Podstawowe funkcje
2.1 Budowa kame
2.2 Przegląd ekranu
2.3 Funkcje
2.4 Ustawienia menu
3. Specykacje i ostrzeżenia
3.1 Dane techniczne
3.2 Ostrzeżenia dotyczące bezpieczeństwa
4. Gwarancja i wsparcie
129
129
130
131
133
133
136
137
161
168
168
170
172

- 1 -
EN
Please read the manual carefully before use;
The dash camera must always be connected to a
power source in order to work;
For safe driving, please do not set up products or
use your phone to watch driving videos while
driving.
This product requires an micro SD card to be
inseed in order to record video.
Please do not disassemble the camera shell or repair
it by yourself. If the product malfunctions, please
contact VANTRUE ocial.
Please do not install the dash cam in a position that
may block your driving vision;
Please use the product away from high temperature
and humid environment;
In order to continuously improve our customers'
experience with our products, we will update the
rmware from time to time. If you need, you can
update the rmware;
Do not install the camera directly in front of the
occupants to prevent accidental dislodgement
causing a safety hazard;
Please note that you may not be able to connect to
the Vantrue app when using wireless CarPlay or
Android Auto;
Please use this product as permitted by law.
Warm tips:
- 2 -
EN
1. Quick Sta Guide
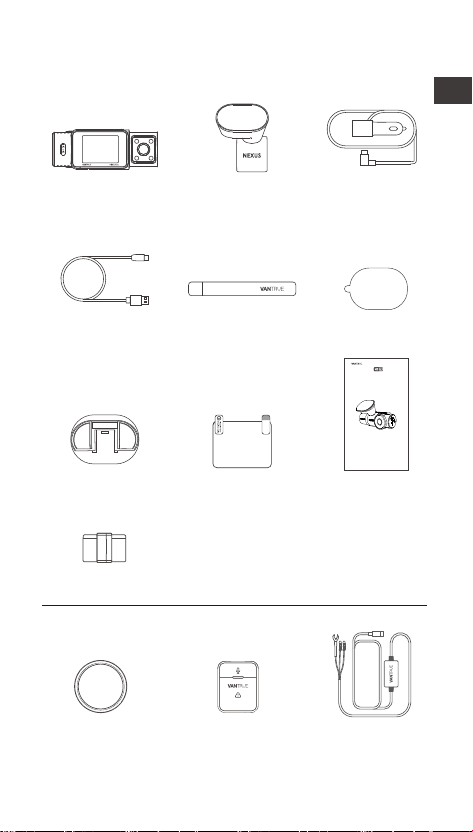
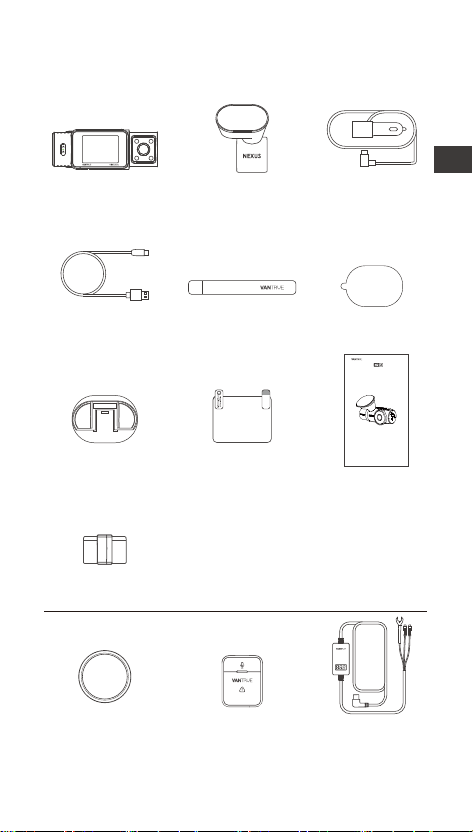
1.1 What's in the Box?
Optional Accessories
A. Vantrue N2X
Dash Cam
B. GPS Adhesive
Mount
C. Car Charger
with Built-in
Type C Cable
(11.5ft)
D. Type C Data
Cable (3.3ft,
for transferring
les only)
E. Crowbar F. Adhesive
Stickers*2
G. Base for
Adhesive Mount
H. Electrostatic
stickers*2
I. User Manual
K. CPL Filter L. Wireless
Remote
Control
M. Vantrue
Hardwire Kit
J. Cable Clip
vantrue.com
truly driven.
USER MANUAL
Nexus 2 X
- 3 -
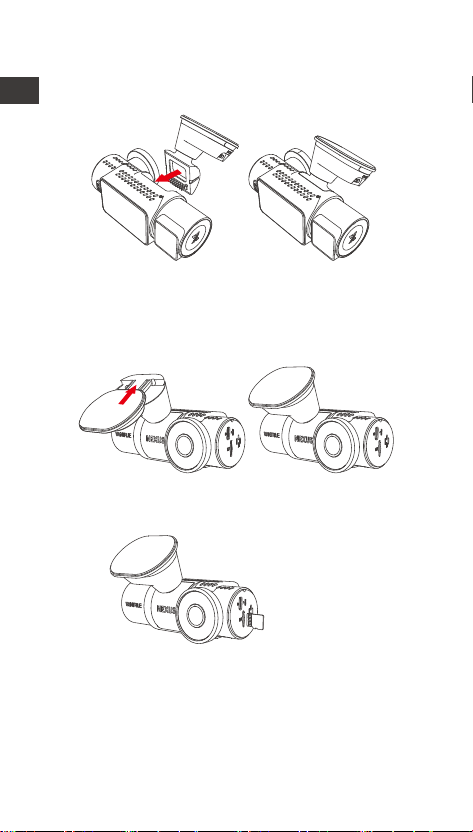
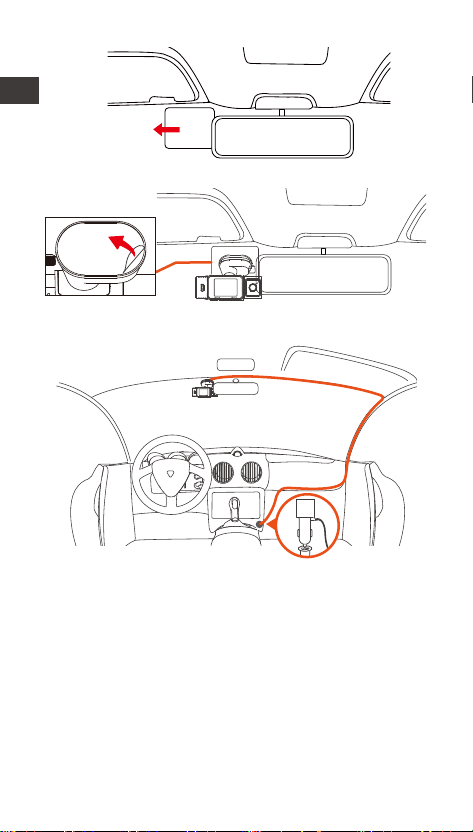
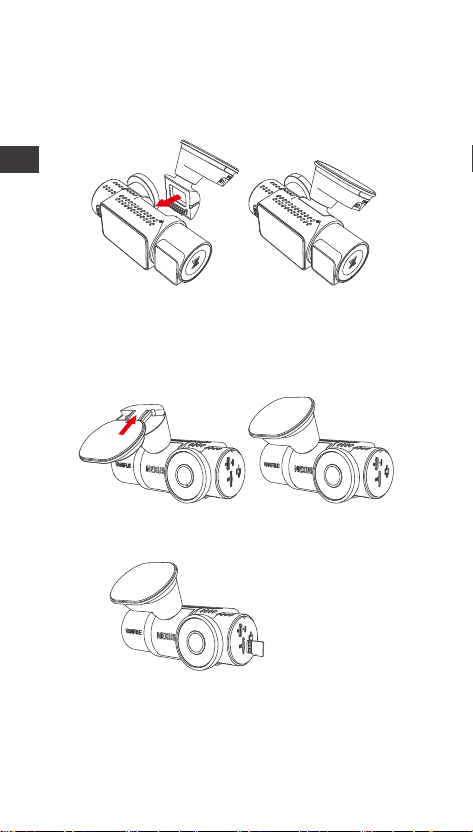
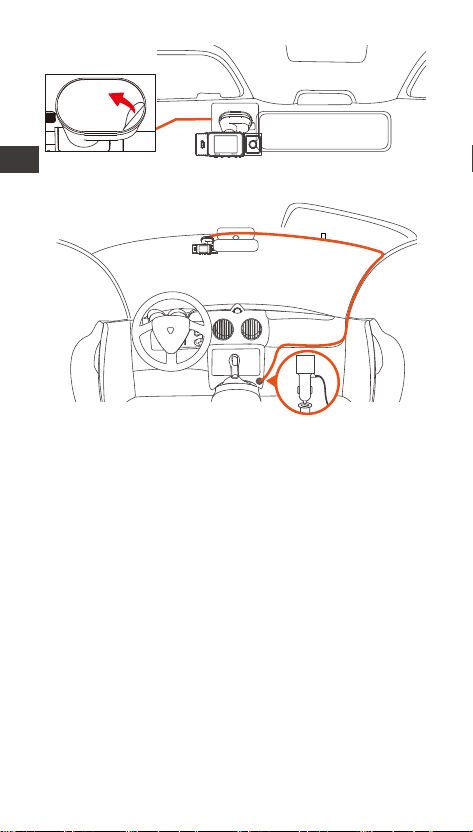
1.2 Installation of adhesive mount and memo card
Align the mount with the dash cam mount inteace
then push in until the mount is installed.
The N2X's adhesive mount features a new removable
construction. Instead of disassembling the entire
adhesive mount, users can simply separate the main
body of the mount from the base of the mount.
Please format the memo card rst after turning on
the dash cam.
Inse a
memo card
EN
- 4 -
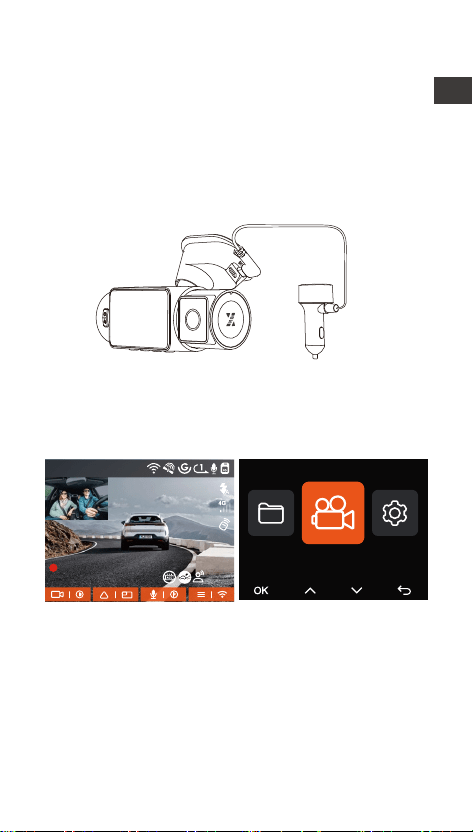
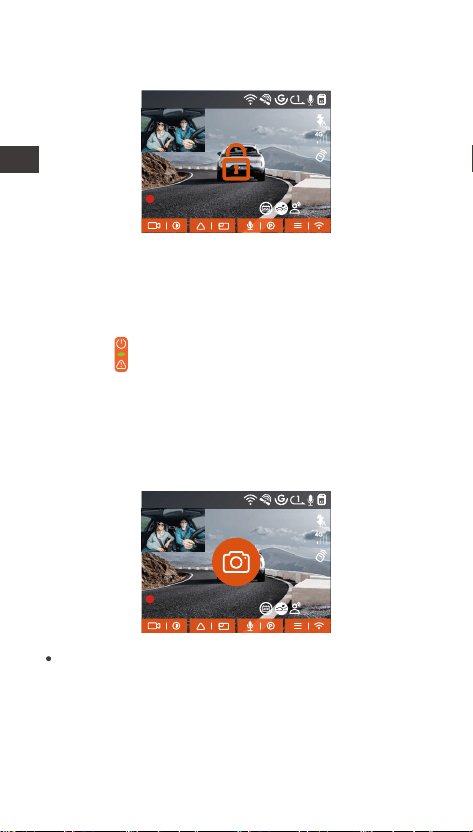
1.3 Installation Camera and Setup
Please power on and turn on the camera, then
complete the camera menu settings, and nally install
the camera on the front windshield of your car.
Power on: Connect one end of the original USB
power adapter to the power supply, and plug the
other end into the power connector of the N2X GPS
mount to test if the camera can power on normally.
Installation completed: Ensure that the dash camera
is properly mounted on the vehicle's windshield and
does not block the driver's view, and that the front
camera is shooting in the direction of the road.
Settings: After you use it for the rst time, or after
each rmware update or after restoring the facto
settings, you need to reset some basic settings such
as date and time, language and region.
1440P +1080P 30FPS
00:00:37
05-05-2025 AM 10:09:07
MP/H
Record Setup
45
EN
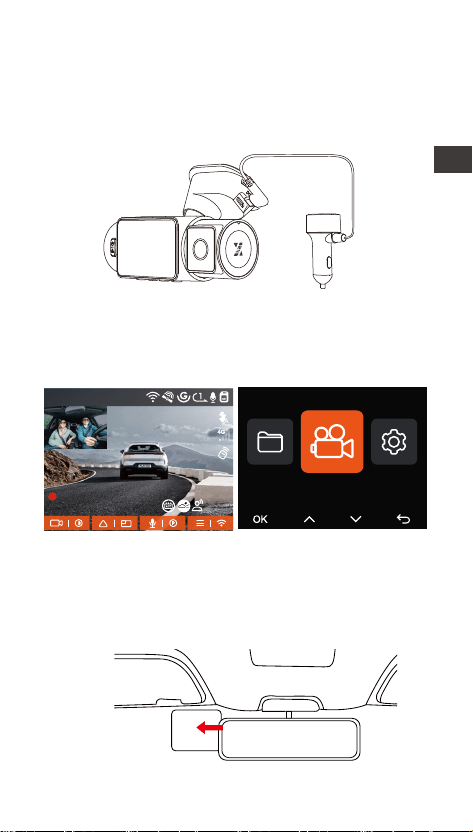
- 5 -
Electrostatic
sticker
Install a Dash Camera
Inse a Car Charger
When organizing or storing car charger cables wires,
cable clips can be used for securing them in place.
After attaching the cable clip to a suitable spot, simply
fasten the cables within the clip.
Record Video: After installation, once the car is
staed, the car camera will sta recording video
automatically.
Power o: When not using it, long press the power
button to turn o.
EN
- 6 -
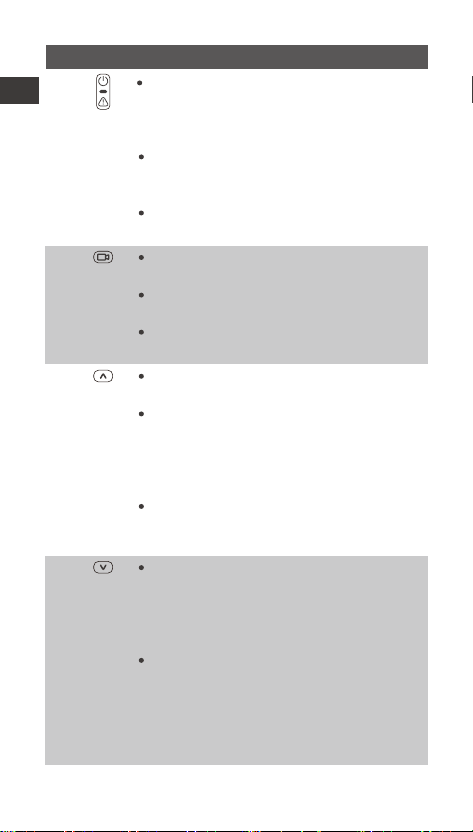
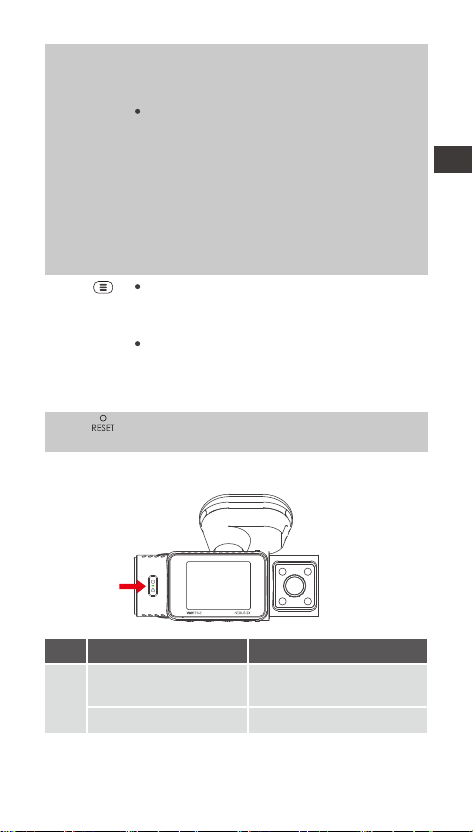
2. Basic Operation
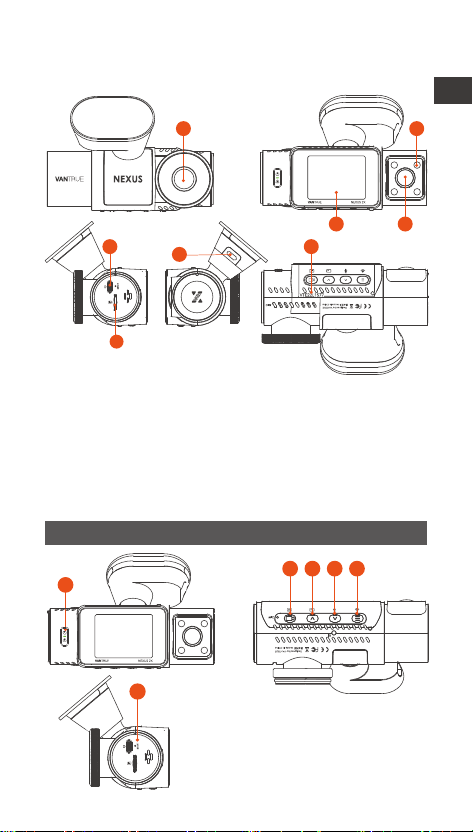
2.1 Camera Oveiew
1 2
4
1. Front Camera
2. Infrared Lights for Cabin Camera
3. 2" IPS screen
4. Cabin Camera
5. TYPE-C Po for Transferring Data
6. TYPE-C Po for Charging
7. Serial Number
8. Memo Card Slot
Buttons and Functions
3
7
6
5
8
1
2 3 4 5
6
EN
- 7 -
2.
4.
In the recording screen, sho press to
turn on or pause the recording.
In the menu settings, sho press to
conrm the option.
In the playback video, sho press to
play the video or pause the video.
During video recording, sho press to
switch the video window;
In the menu setting and le browsing
screen, sho press to select the
previous option or le, and long press
to scroll through the above options or
les.
When playing back the le, sho press
to play back the video at 2X and 4X
times speed.
During video recording, sho press to
turn on/o the microphone; Long
press to enter parking mode (this
operation can be done with parking
mode on)
In the menu settings and le browsing
screen, sho press to select the next
option or le and long press to scroll
through the options or les below.
When playing a le, sho press to pop
up a menu for deleting les.
3.
1.
In the power-on state, long press to
turn o the camera; in the power-o
state, sho press to turn on the
camera.
In the recording inteace, sho press
to turn on emergency recording and
snapshot.
In le browsing, sho press to pop up
the menu for deleting les.
No. Buttons Instruction
EN
- 8 -
During video recording, long press to
turn on/o Wi-Fi;
In the menu setting and le browsing
inteace, sho press to return to the
previous inteace.
5.
6.
Sho press to resta the camera
LED Indicator
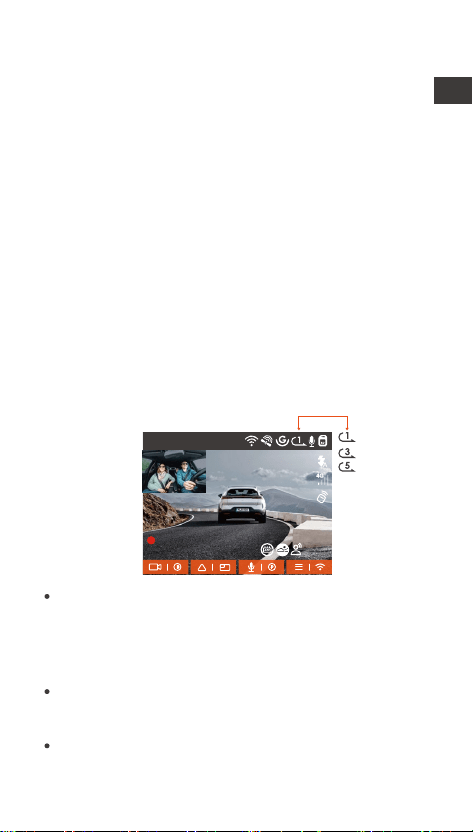
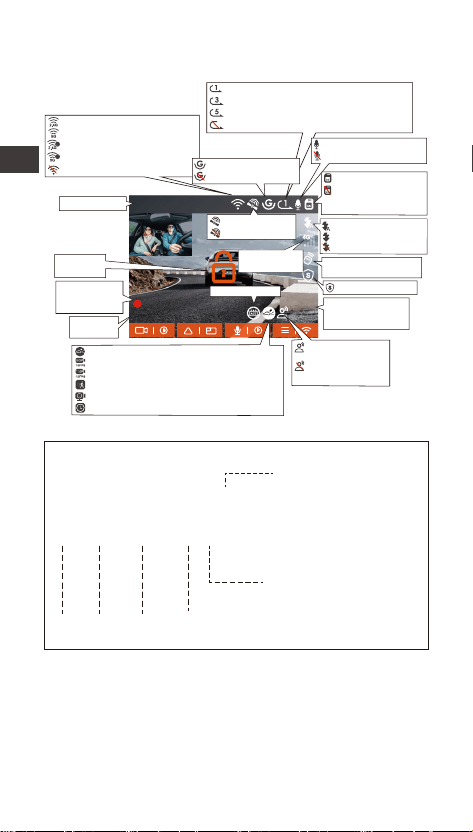
2.2 Screen Oveiew
REC
DescriptionLED Status
Steady green light
Blinking green light
Instandby
Camera is recording
LED
1440P +1080P 30FPS
00:00:37
12-01-2024 AM 10:09:07
MP/H
45
Loop recording for 1 min
Loop recording for 3 mins
Loop recording for 5 mins
Loop recording OFF
2.4G Wi-Fi is ON
5G Wi-Fi is ON
2.4G Wi-Fi is Connected
5G Wi-Fi is Connected
Wi-Fi is Turned OFF
G-Sensor is ON
G-Sensor is OFF
Memo card
inseed
NO Memo card/SD
card error
Network
Signal Icon
Recorded Driving
Speed (KMH/MPH)
Collision Detection ON
1080P Low Bitrate Recording ON 15FPS
720P Low Bitrate Recording ON 15FPS
Motion Detection
Low Framerate Mode
Time Lapse ON
ACC Connected
Recording Time
(Current Clip)
Current Date
and Time
Video Resolution
GPS is located
GPS is OFF
Mic is ON
Mic is O
Emergency
File Locked
Voice control is ON
Voice control is OFF
IR Automatic Mode
IR Always On Mode
IR Mode is O
Remote Control
connected
Privacy Mode
EN
- 9 -
2.3 Operation Guide
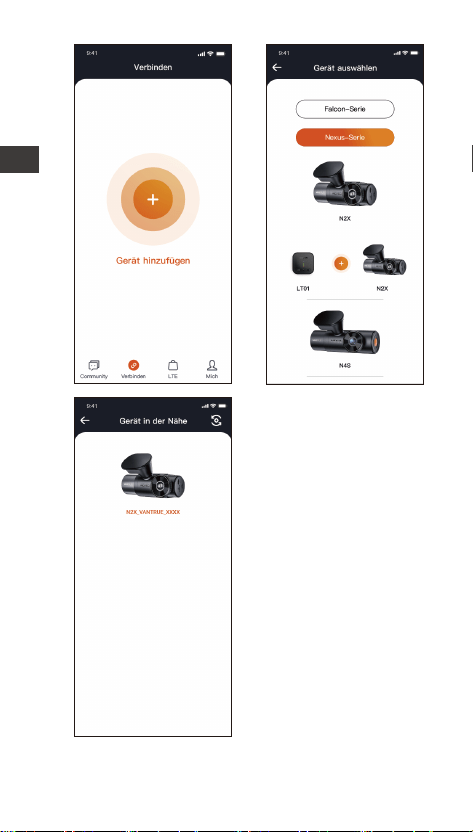
2.3.1 APP Operation Guide
--APP Download
Please scan the QR code for the relevant version
below to download the app and install it.
Search for the "Vantrue" app in App Store or Google
Play Store to nd the app and then download and
install it on your phone.
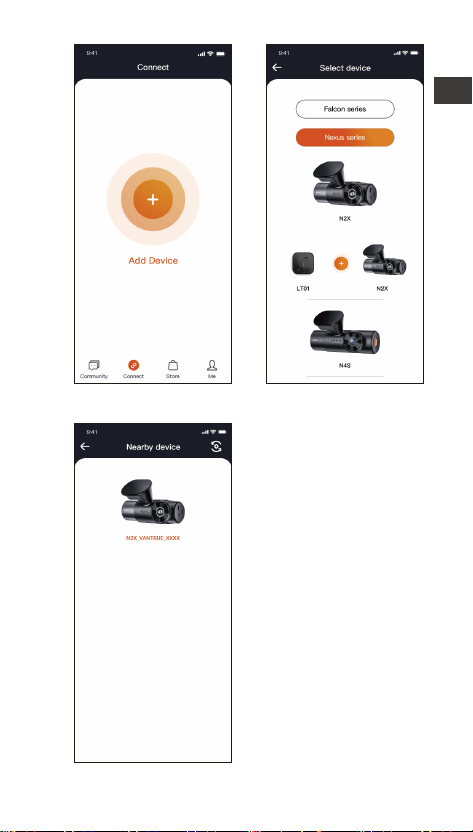
--Add a Device
Wi-Fi is automatically turned on when the N2X dash
cam is turned on. After turning o Wi-Fi, users can
turn on Wi-Fi again by using the shocut keys, the
voice control function, or by going to the menu
settings.
After the N2X camera’s Wi-Fi is turned on, click "Add
Device" on Vantrue App, select Nexus series, choose
N2X model, conrm the corresponding Wi-Fi name,
and nally click to conrm the Wi-Fi connection.
File Format Denition
20250505_140933_00008_N_A.MP4
20250505_140833_00007_P_B.MP4
20250505_140733_00006_T_B.MP4
20250505_140633_00005_E_A.MP4
A for the front camera
B for cabin camera
P for the video recorded
in the parking mode
N for loop recording
T for time lapse video
E for event recording
Year Date Time
Sequence
Number
EN
- 10 -
EN
- 11 -
Please check whether the Wi-Fi function of your
phone is turned on rst.
The initial password for this device is only used for
initial login. In order to prevent potential security
risks, please be sure to change the initial password
after the initial login to prevent others from logging
into your device without authorization or other
adverse consequences.
If you forget the password you set, you can go to
the camera's "System Settings" and choose Restore
Default Settings. After the camera restores the
default settings, the Wi-Fi password is the initial
password (12345678).
Please note that the camera's Wi-Fi password can
only be changed via the Vantrue app.
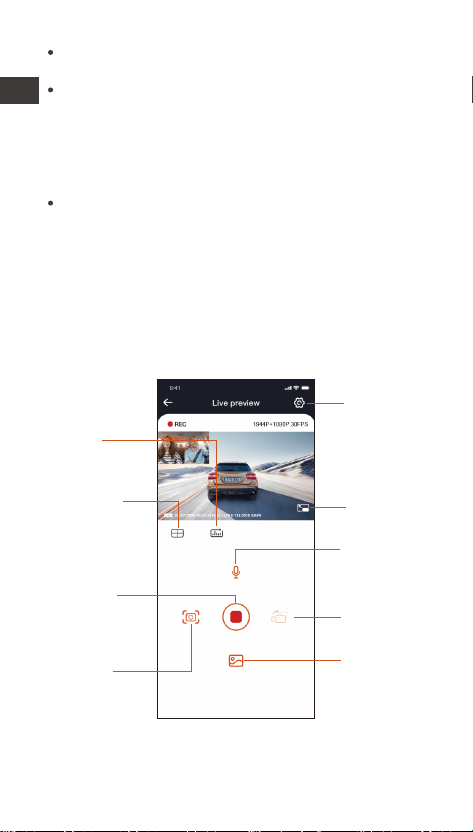
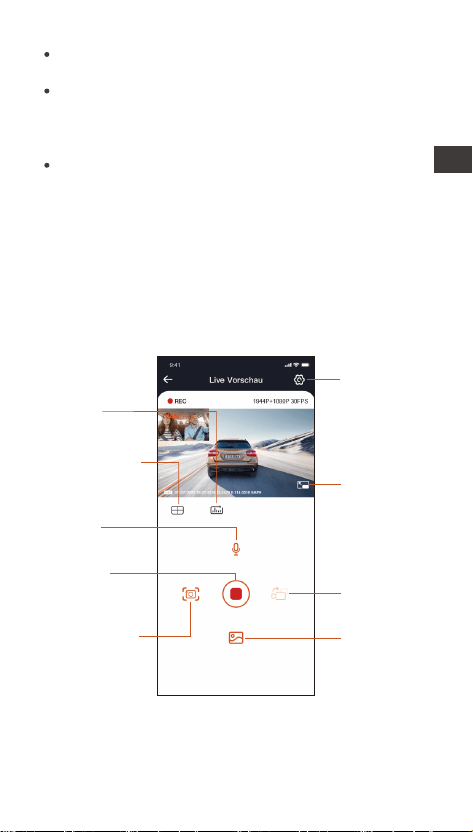
Camera
Correction
Line
Stop/Sta
Recording
Icon
Mileage
Statistics
Full-screen
Icon
Microphone
ON/OFF
Camera
Displays
Switch
Camera
Setting
Snapshot
Album
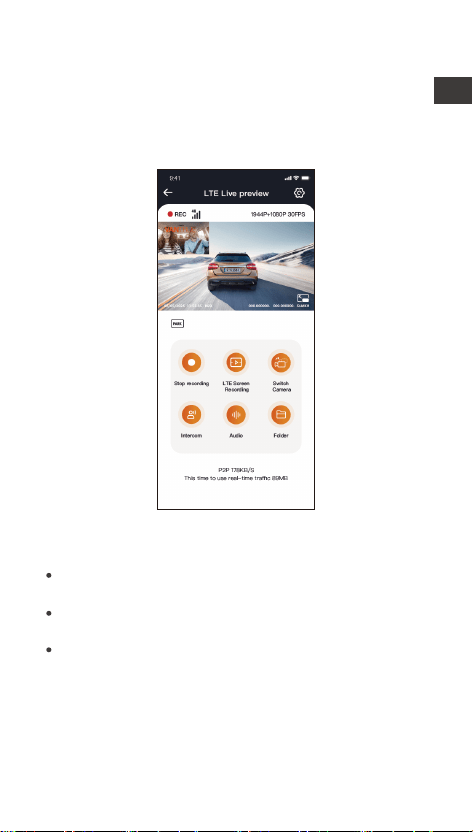
After entering the APP real-time preview, you can do
the following operations.
--Guidelines for the use of the APP
EN

- 12 -
Video Preview: After the APP connects to the
camera successfully, the camera enters the
real-time preview page, click the full screen button
or cell phone horizontal playback, the real-time
screen automatically switches to full screen preview
mode. Click the window switch button to switch the
front, and cabin video windows, but only multi-
channel recording mode can use this function.
Playback Video: You can view the recorded video or
photo les in the micro SD card in the APP, click
"File" and then select the video to play back.
Video Download: You can choose to download
videos or pictures in the micro SD card browse le
inteace or in the video playback. After download-
ing the video, you can play it in the App local le
and view the GPS track of the video.
Picture Capture: In the application's live preview
screen, you can capture the current picture.
Mileage Statistics: Users can click to download the
mileage information according to their needs. The
mileage information will be saved in the APP as a
picture or PDF le.
Camera Correction Line: The lens balance is
corrected by the accurate cross line, so that the
recording image will not be skewed.
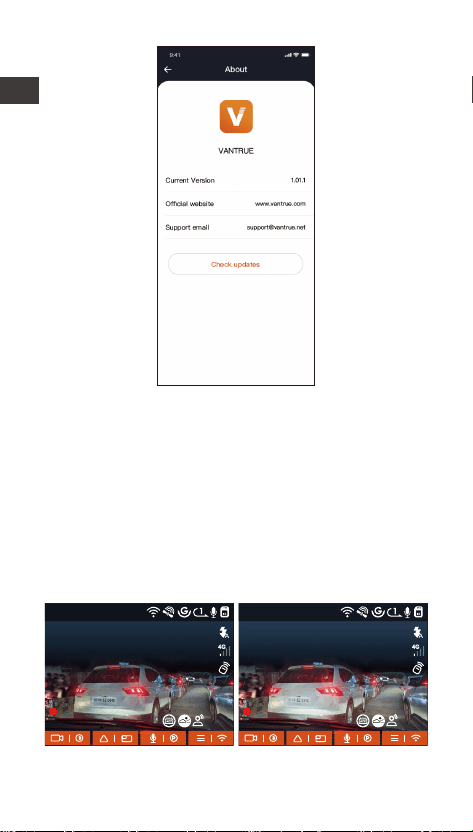
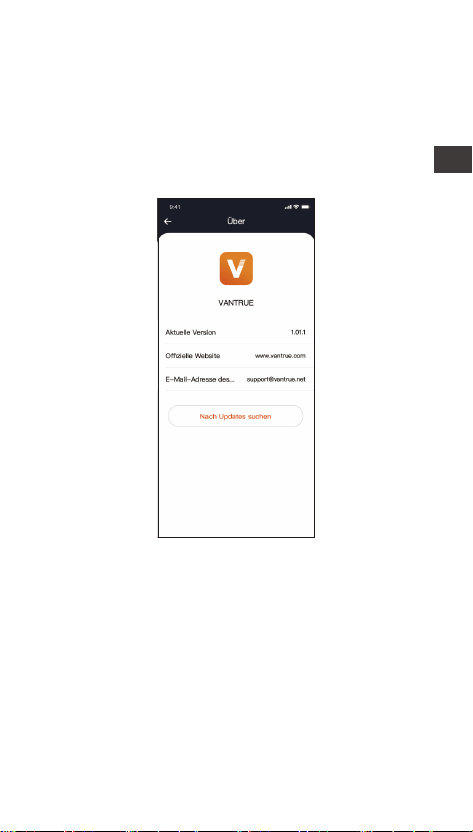
--APP Upgrade
Open the "Vantrue" App, go to "Me > About > Check
Updates", then the App will automatically detect
whether the App version is the latest.
If there is a new version of the App, follow the
Instructions of the App to operate and upgrade to the
new version.
EN
- 13 -
2.3.2 Basic Operation
--Video Quality and PlatePix™ Timer
The default video mode is Standard Quality. Users
can turn on PlatePix™ mode according to their needs
and set the automatic on/o time with the PlatePix™
timer. This mode prioritizes enhancing license plate
clarity and reducing blur caused by lighting
conditions to ensure reliable evidence in incident
scenarios.
1440P +1080P 30FPS
00:00:37
05-05-2025 AM 10:09:07
MP/H
45
1440P +1080P 30FPS
00:00:37
05-05-2025 AM 10:09:07
MP/H
45
PlatePix™ ON PlatePix™ OFF
EN
- 14 -
--Loop Recording
After inseing the memo card and connecting the
power, the N2X dash cam will automatically turn on
and enter loop recording. The duration of each
recorded video will be saved based on the loop
recording time you set, saved in the Normal Video
folder.
When the capacity of the Normal Video folder
reaches 70% of the total capacity, the new loop
recording le will automatically overwrite the original
loop recording les. After this function is enabled, the
video le will automatically overwrite the loop, so as
not to stop recording during the driving process.
Note: While PlatePix™ enhances brightness in the
foreground, the overall image may appear darker. In
low-light environments, it is recommended to disable
or schedule PlatePix™ mode to maintain optimal
recording quality.
Note:
The normal operation of the loop recording function
is ve dependent on the speed of the memo card,
so please format the memo card regularly to avoid
problems such as excessive memo card les and
card aging that aect the normal loop recording.
Please check the loop recording video regularly to
avoid the necessa videos being overwritten by
loop.
After loop recording is turned o, the lock video
function will no longer work.
1440P +1080P 30FPS
00:00:37
05-05-2025 AM 10:09:07
MP/H
45
EN

- 15 -
When the loop recording setting is turned o, the
length of each recording is 20 minutes. When the
memo card is full, the camera will stop recording
and prompt "card is full!"
--Event Recording
When driving, the user can lock manually or the dash
cam automatically locks the recording if special
circumstances are encountered.
To manually lock the video, just press the
button to lock the current video and capture it.
During the lock video period, you can press the
button to capture multiple times.
After the event recording is nished, the video will be
automatically saved in the event video folder and the
photo will be saved in the photo folder.
Auto-lock event recording: When the car is hit by a
collision or vibration, the dash camera will automati-
cally trigger and lock the current video when it senses
the vibration. You can also press the button to
capture pictures during the locking recording period.
After the emergency recording is nished, the video
will be automatically saved in the Event video folder
and the photo will be saved in the photo folder.
1440P +1080P 30FPS
00:00:37
05-05-2025 AM 10:09:07
MP/H
45
EN

- 16 -
Note:
The sensitivity of the automatic locking video trigger
is determined by the sensitivity of the collision. The
higher the sensitivity setting, the greater the
probability of being triggered.
When the total capacity of the event video les is
30% of the total capacity of the current memo
card, the new event video les will automatically
overwrite the old event video les.
We recommend checking and saving event video
les regularly to avoid losing them.
Lock recording will not trigger in either of the
following situations: Loop recording is o or Time
lapse recording is on. When loop recording is turned
o/time-lapse recording is turned on, only pictures
can be captured when locking the recording.
1440P +1080P 30FPS
00:00:37
05-05-2025 AM 10:09:07
MP/H
45
Parking Mode
Please note the following precautions when using the
parking mode:
To ensure that the dash camera can use the parking
mode function normally, please use the VANTRUE
hardwire kit cable or other stable and continuous
power supply for the camera.
It is recommended to use VANTRUE ACC hardwire
kit cable. If you use other brands of ACC hardwire
kit cable, you may not be able to use the ACC
function due to the dierent location of the ACC
detection PIN pin.
In the hot and sunny environment of summer, we
EN

- 17 -
recommend you to choose the parking mode of
collision detection. When the ambient temperature
in the car reaches 60℃, we recommend you to turn
o the camera to avoid the camera working
abnormally due to high temperature.
Time-lapse recording and parking mode (including
collision detection, motion detection, low bit rate
recording, low frame rate mode) can only be turned
on one of the two. If one of them is turned on, the
other one will be turned o automatically.
All the les recorded in parking mode will be saved
in the parking video folder, in order to avoid the
parking mode les being overwritten by the loop,
please check them regularly to avoid losing them.
The parking mode function will be improved with
the rmware upgrade of the N2X dash camera.
Please pay attention to the rmware description
announcement on VANTRUE website for specic
changes, or consult with customer seice sta.
Parking Mode Introduction
Ent/Exit Mode
Auto
ACC
G-Sensor
Parking Monitor Settings
Ent/Exit Mode
Parking Mode Camera Sele...
Low Light Night Vision in P...
EN
Parking Mode Activation/Deactivation Methods:
1. Auto Mode (Default)
Without ACC (G-Sensor Mode): Enters automatically
after 5 minutes of vehicle inactivity; exits
automatically upon seconda collision detected by
G-Sensor.
With ACC connected: Enters automatically when the
vehicle is turned o (ACC OFF); exits automatically
when the vehicle is staed (ACC ON).

- 18 -
2. ACC Mode
Enters automatically when the vehicle is turned o
(ACC OFF); exits automatically when the vehicle is
staed (ACC ON). Requires proper wiring via an ACC
hardwire kit cable.
4. Manual Mode
Press and hold the shocut button to enter; press
any button to exit.
3. G-Sensor Mode
Enters automatically after 5 minutes of vehicle
inactivity; exits automatically when the G-Sensor
detects a seconda collision.
EN
Without ACC (G-Sensor Mode): Enters automatically
after 5 minutes of vehicle inactivity; exits
automatically upon seconda collision detected by
G-Sensor.
With ACC connected: Enters automatically when the
vehicle is turned o (ACC OFF); exits automatically
when the vehicle is staed (ACC ON).
- 19 -
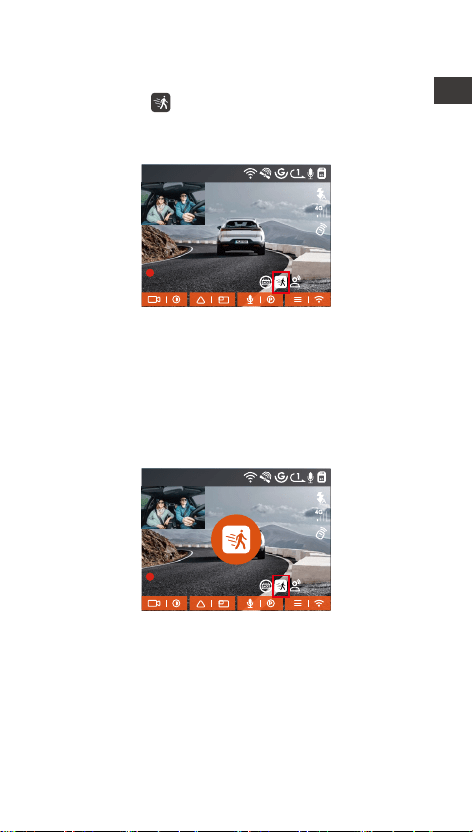
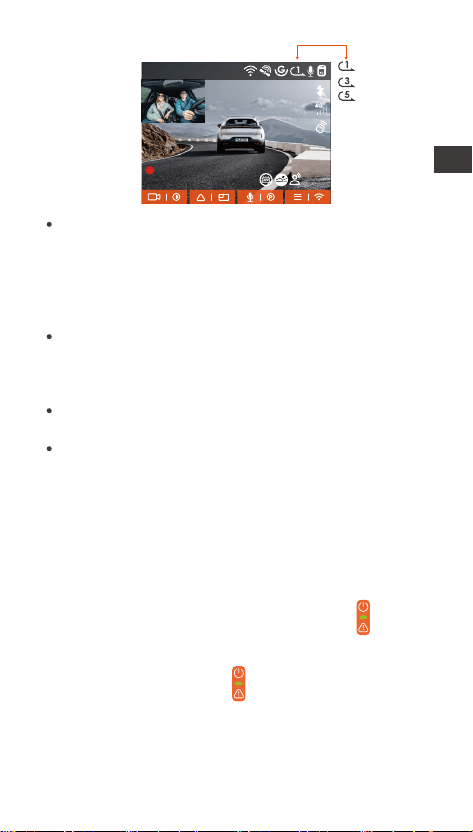
Collision Detection
When the Collision Detection setting is on, the
Collision Detection icon will be displayed in the
recording inteace, indicating that the recorder is
currently using the Collision Detection mode.
The sensitivity of Collision Detection value can be
selected as 1/2/3/4/5. The higher the sensitivity level,
the easier it is to trigger Event recording. Collision
Detection is most sensitive when set to 5.
After entering the collision detection mode, once the
dash cam detects a collision, it will trigger the
recording for 30 seconds and save the le in the
parking video folder. You can watch the video back
via APP or computer Vantrue player.
1440P +1080P 30FPS
00:00:37
05-05-2025 AM 10:09:07
MP/H
45
1440P +1080P 30FPS
00:00:37
05-05-2025 AM 10:09:07
MP/H
45
EN
- 20 -
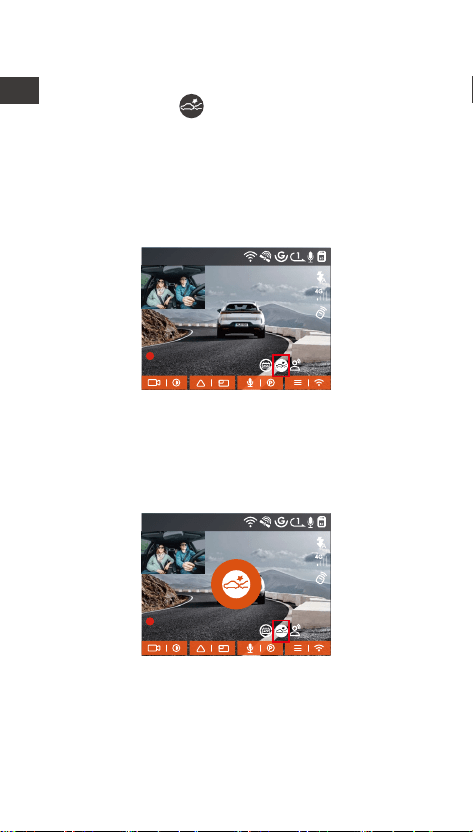
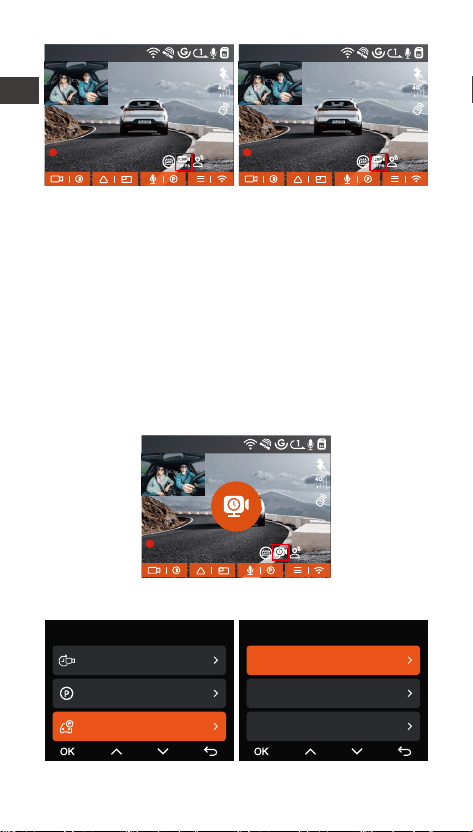
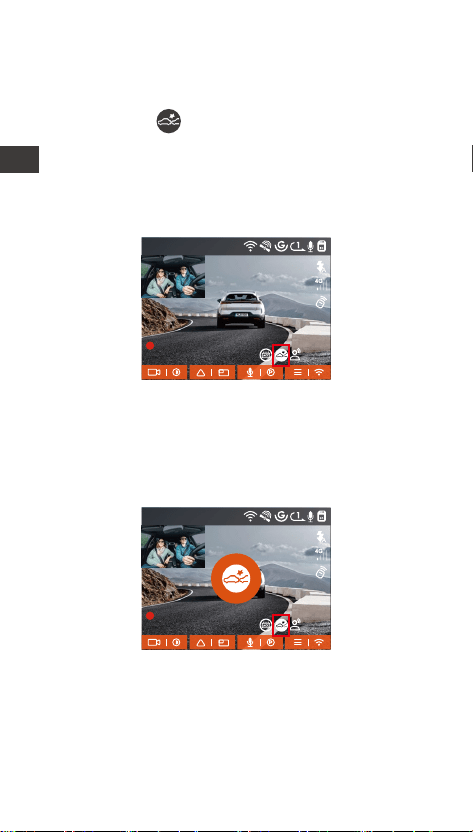
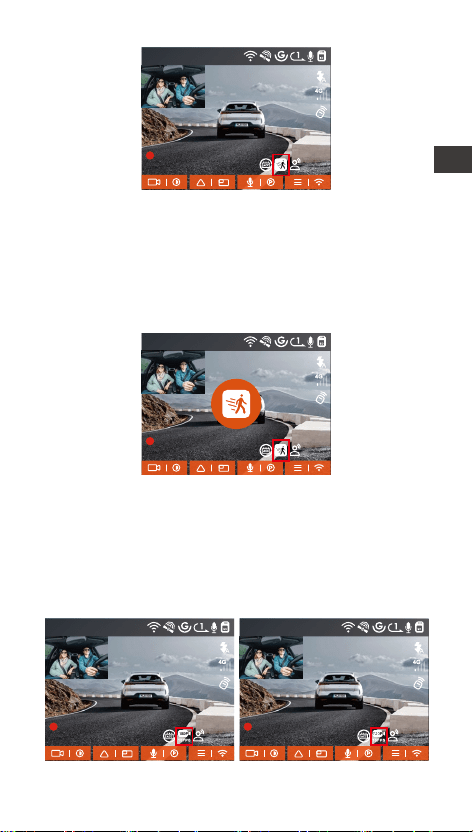
Motion Detection
When the Motion Detection setting is on, the Motion
Detection icon will be displayed in the recording
inteace, indicating that the recorder is currently
using the Motion Detection mode.
After entering the motion detection mode, once an
object is found to be moving within the set detection
range, the dash cam will be triggered to record video
for 30 seconds and retain the 15 seconds of footage
before the triggering of the recording together to
make up a 45-second motion detection recording
video, which will be saved in the Parking Video folder.
1440P +1080P 30FPS
00:00:37
05-05-2025 AM 10:09:07
MP/H
45
1440P +1080P 30FPS
00:00:37
05-05-2025 AM 10:09:07
MP/H
45
Low Bitrate Recording
After entering the low bitrate recording mode, the
resolution of all cameras will be automatically
switched to 1080P 15FPS or 720P 15FPS for
recording, and the recording time is 3 minutes, and
the le is saved in the parking video folder.
EN
- 21 -
Low Frame Rate Recording
When entering the low frame rate recording mode,
the dash cam will compress the recording time to
extend the integrity of the recording le. Each low
frame rate recording le is displayed for 1 minute and
the le will be saved in the parking video folder.
For example, if the user selects the 1FPS low frame
rate mode, the recorder will record the video in
seconds during parking monitoring, and eve 30
minutes of recording will be compressed to 1 minute
and saved.
1440P +1080P 30FPS
00:00:37
05-05-2025 AM 10:09:07
MP/H
45
1440P +1080P 30FPS
00:00:37
05-05-2025 AM 10:09:07
MP/H
1440P +1080P 30FPS
00:00:37
05-05-2025 AM 10:09:07
MP/H
45 45
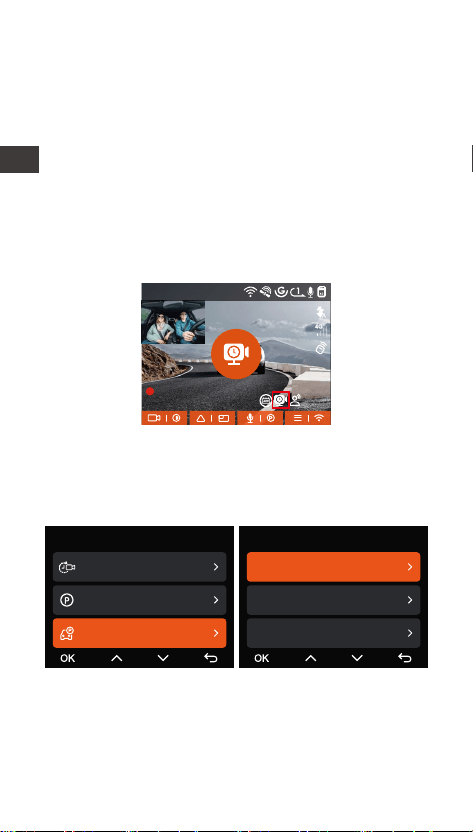
Parking Monitor Setup
Record Setup
Time Lapse
Parking Mode
Parking Monitor Settings
17/20
Parking Monitor Settings
Parking Mode Camera Selec...
Low Light Night Vision in Par...
Collision Detection in Parking...
EN

- 22 -
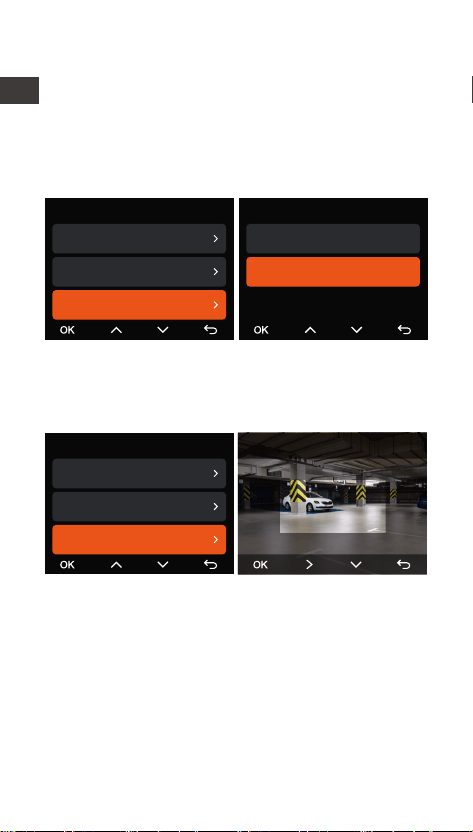
Camera settings for detection
Adjust the recording screen under all parking
monitoring functions, you can choose front + cabin
camera together or single front camera recording.
Low Light Night Vision in Parking Mode
In order to enhance the safety of parking at night, we
make full use of the lens peormance combined with
the low light Night Vision technology to improve the
night vision eect in parking mode.
This feature is on by default and will only be triggered
when entering parking mode, and will not aect
normal recording.
Parking Monitor Settings
Parking Mode Camera Selec...
Low Light Night Vision in Par...
Collision Detection in Parking...
Detection Lens Setting
Front+Cabin
Front
Low-light Night Vision OLow-light Night Vision On
1440P +1080P 30FPS
00:00:37
05-05-2025 AM 10:09:07
MP/H
1440P +1080P 30FPS
00:00:37
05-05-2025 AM 10:09:07
MP/H
45 45
EN
- 23 -
The detection range of the front camera and inside
camera can be set on the N2X dash cam, and the set
range can be adjusted up and down as well as left
and right.
Collision detection in parking
This function allows you to adjust the staup mode of
collision detection. In power saving mode, the dash
cam will turn o and then turn on to record after the
trigger; in fast sta mode, the dash cam will be in
standby mode and sta recording immediately after
the trigger.
Collision Detection in Parking Mode
Power Saving Mode
Quick Sta Mode
Parking Monitor Settings
Parking Mode Camera Selec...
Low Light Night Vision in Parkin...
Collision Detection in Parking M...
Parking Monitor Settings
Low Light Night Vision in Parkin...
Collision Detection in Parking M...
Motion Detection Area
Front Area Detection
Voice Control
You can control the camera with voice command, such
as take photo, video sta, turn on/o Wi-Fi, lock the
video, etc. Currently suppoed languages are English,
Japanese, Russian, and Chinese. For more detailed
voice commands, please go to System Settings > Voice
Content to view them.
EN

- 24 -
Voice recognition has options of low sensitivity
/standard/high sensitivity/o. The default is standard
sensitivity.
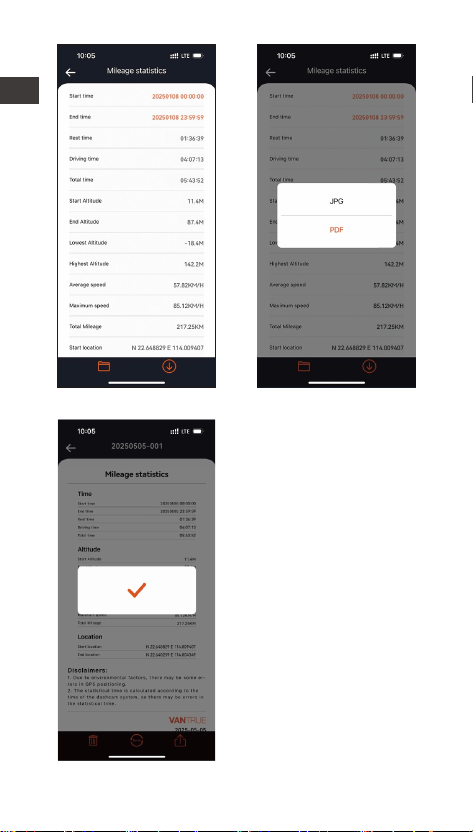
Mileage Statistics
N2X dash cam uses GPS information to analyze
mileage statistics such as driving time, driving
mileage, altitude, driving speed, etc. during the
driving process. Mileage les can be expoed via APP.
In the APP real-time preview inteace, you can select
the sta time and end time, click OK, then you can
download the mileage statistics le in PDF or JPG
format and save it in the APP local folder.
Turn on voice control
1440P +1080P 30FPS
00:00:37
05-05-2025 AM 10:09:07
MP/H
45
EN
- 25 -
EN
- 26 -
LTE Settings (must be used with LTE Module)
To facilitate users to remotely check parking
conditions, Vantrue has launched an LTE module
(LT01). Users can inse a SIM card into the LTE
module and connect it to a driving recorder for remote
monitoring.
Within the LTE settings, users can customize:
Adjust these congurations based on your cellular plan
(e.g., unlimited vs. tiered data) to ensure ecient data
usage and optimal remote monitoring peormance.
Notication Settings – Manage real-time ales and
system messages.
SIM Card Data Usage Cap – Set monthly data limits
to avoid overages.
Collision Video Upload Quality – Prioritize
resolution (e.g., 1080p/720p) for emergency event
footage.
EN
- 27 -
12:20
KM/H
120
N
NE
E
SE
S
SW
W
NW
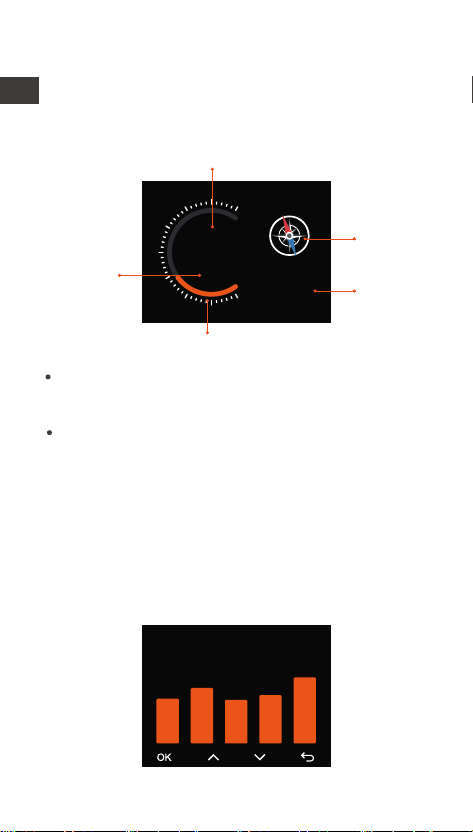
HUD Speed and Time
When this function is on and after each successful
GPS x, the camera screen displays the zoomed-in
current travel speed, current travel direction and
current time.
Current speed
Compass
Time
Speed indicator
Unit of
speed
When this feature is turned on at the same time as
the screen saver feature, the screen saver feature
takes precedence.
When GPS is not successfully located or GPS is not
turned on, the device cannot access the HUD speed
and time display function.
GPS Function
GPS is enabled by default. The N2X dash camera
receives GPS signals via a GPS mount. It automatically
corrects the time and date in your area, records the
location where the video was taken and the speed of
the vehicle at the time.
GPS Information
40
46
39
43
48
EN

- 28 -
The GPS connection will be completed within 1
minute after you turn on the device. If the GPS
connection is not successful within 1 minute, please
check whether the DEVICE has turned on the GPS
function, whether the GPS bracket is properly
connected, and whether your environment
(underground parking lot, densely populated
residential area, subway, tunnel, etc.) is aecting the
reception of GPS signal.
GPS information is recorded along with the video. To
view it, please download and install the VANTRUE
App and VANTRUE GPS Player (available for
download at www.vantrue.net).
Note:
Automatic time correction via GPS
The default setting of GPS auto time correction for
N2X is on. If your location is Los Angeles, you can
select GMT-08:00. If you don't know the time zone of
your location, you can connect your phone to the
Wi-Fi of the camera, and turn on the automatic time
correction function in Vantrue APP, so the camera will
correct the time zone of the camera according to the
time zone of your phone.
GPS automatic time correction needs to set the
correct time zone, you can refer to the representa-
tive cities of each time zone.
Automatic switching between Winter Time and
Summer Saving Time is available for Noh America
only.
Note:
Time & Date
GPS Automatic Update
Set Date/Time Manually
ST/WT Auto Switch
EN
- 29 -
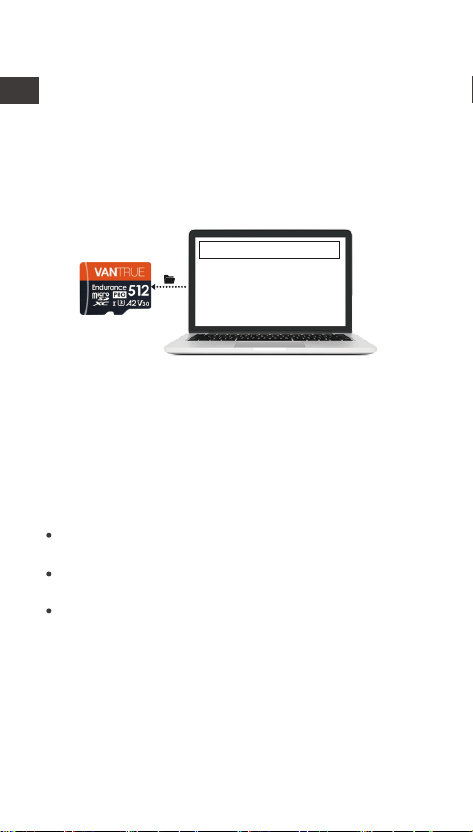
N2X Dash Cam Firmware Update
Upgrade method 1: Updates via les
Go to VANTRUE website to download the latest N2X
dashcam rmware, copy the rmware le to the root
directo of the memo card, then inse the memo
card back into the N2X camera, the system will
automatically upgrade with the updated rmware of
the Micro SD card after the dash cam is turned on.
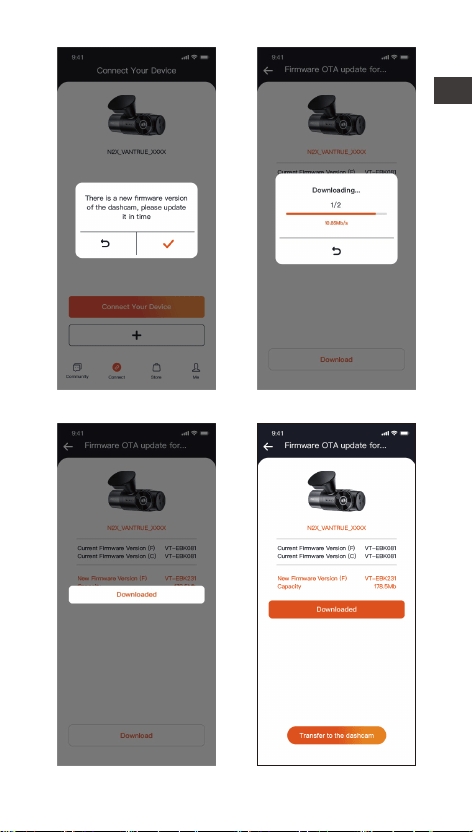
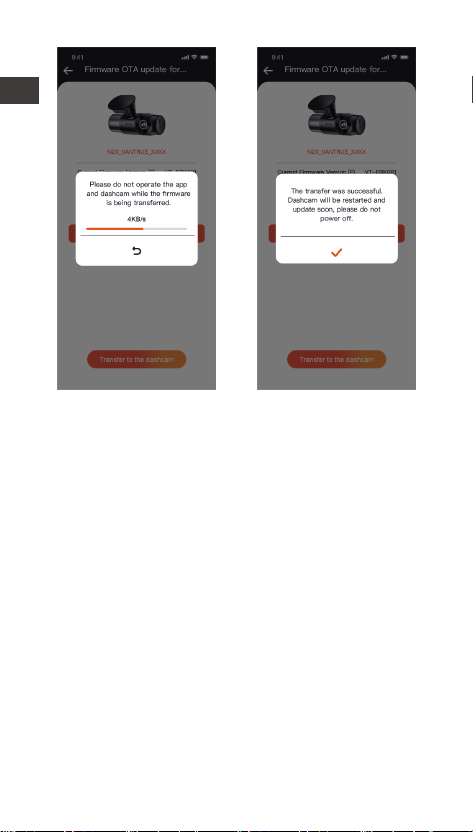
Upgrade method 2: OTA (Over the Air) Firmware
Update
After opening the APP, if you receive an update
reminder of the dashcam software, please conrm the
upgrade, and then it will jump to the OTA upgrade
inteace, and then upgrade according to the APP
guidelines.
To upgrade rmware via le or OTA upgrade, N2X
camera needs to keep power on.
To upgrade via OTA, internet data trac is required
to download the upgrade le.
If you upgrade the rmware by le, you need to
format the memo card on the N2X dash camera ,
and then copy the upgrade le to the memo card
to upgrade the rmware.
Upgraded Files
EN
- 30 -
EN
- 31 -
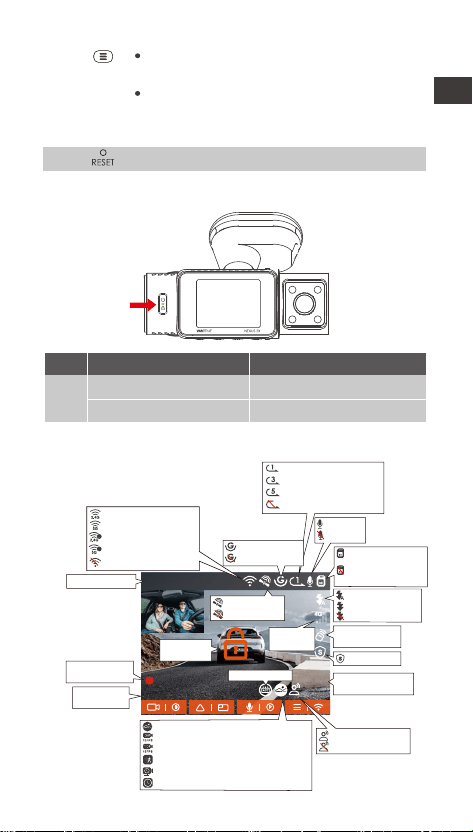
2.4 Menu Settings
The N2X camera function setup has three sections,
Record Setup, System Setup, and File Browsing. You
can set your dash cam according to your require-
ments with these function setting.
2.4.1 Record Setup
-Resolution: The N2X camera has 2 resolution
modes:
Front +Cabin Recording Mode:
1944P +1080P 30FPS
1944P +720P 30FPS
1440P +1080P 30FPS
1440P +720P 30FPS
1440P 60FPS+1080P 30FPS
1440P 60FPS+720P 30FPS
1080P+1080P 30FPS
1080P+720P 30FPS
720P+720P 30FPS
EN

- 32 -
Front Recording Mode:
2592x1944P 30FPS
2560x1440P 30FPS
2560x1440P 60FPS
1920x1080P 30FPS
1280x720P 30FPS
-Video Quality: The default is ON; You can choose
Standard or PlatePix™.
-Loop Recording: Default setting is 1 min. You can
choose the options among 1/3/5 min and OFF.
-IR LEDs: The default setting is Auto. You can set it
to auto/o/on.
-G-Sensor: Select the level of G-sensor you need,
then you can set 3 directions (Front + Rear/Left +
Right/Up + Down). The G-sensor value in each
direction can be selected as 1/2/3/4/5/O. The higher
the sensitivity level, the easier it is to trigger event
recording. G-sensor is most sensitive when set to 5.
-Privacy Mode: The default setting is o. You can
choose to turn it on, and it will record in private mode
after turning it on.
-Audio Recording: The default setting is on. Set
recording to on or o.
-Audio Noise Reduction: The default setting is on. It
adjusts the audio eect of recording by dynamic
noise reduction. You can choose to turn it on or o.
-Exposure: You can set the camera exposure value of
the front or cabin camera of the car separately. The
default is +0.0.
-REC Status Light: Default setting is ON. You can
choose to turn on/o the recording status light.
-HDR: The default setting is on. You can adjust the
HDR on or o of the front and cabin cameras
separately.
-HDR Timer: Default setting is O. When it's on, you
can choose when HDR is automatically turned on and
o.
-PlatePix™ Timer: The default is o. You can choose
to automatically sta and stop the time after turning
EN

- 33 -
it on.
-Rotate Display: Default setting is O. You can set
the video screens of the front camera and cockpit
camera to ip up and down (180 degrees) separately.
-Mirror: Default setting is ON. When it is on, the
screen of the cabin camera is displayed in mirror
mode.
-Number Plate: Select the number or letter to be set.
After setting, your license plate number can be
displayed in the recorded video.
-Stamp: Enable or disable the watermark stamp on
video and photos. The watermark stamp includes
time and date label, VANTRUE label, license plate
number, GPS location information, and speed label.
All enabled by default.
-Time Lapse: The default value is disabled. You can
choose to enable 1FPS/5FPS/10FPS/15FPS.
-Parking Mode: You can choose the parking mode
you need, including Collision Detection/Motion
Detection/Low Bitrate Recording/Low Frame Rate
Mode/OFF. the default is OFF.
-Area settings for parking monitoring: There are
parking monitoring area, low-light night vision in
parking mode, motion detection area, detection area,
recognition frame line, parking collision detection
mode adjustment.
-Mileage statistics: Default setting is O. Turn on
this function, the dash cam will record the mileage
information, and you can expo the mileage statistics
through the mileage statistics function in Vantrue
APP.
-HUD speed and time: Default setting is O. It can
be set to enter after 1/3/5 minutes, and the current
speed and time will be displayed after entering.
-GPS Settings: GPS is enabled by default. GPS
ON/OFF settings, speed unit settings, and GPS
information are all set here.
EN

- 34 -
EN
2.4.2 System Setup
-Language: Available languages are Engish
/Français/Español/Deutsch/Italiano/简体中文
/русский/日本語/Polski / 한국어/Türkçe/Čeština.
-Wi-Fi: You can choose Wi-Fi mode, view Wi-Fi
information, etc.
The Wi-Fi auto-on option means that the Wi-Fi will
automatically turn o after 10 minutes of turning on.
If you choose on, Wi-Fi will always stay on; if you
choose o, Wi-Fi needs to be turned on manually.
Wi-Fi mode is 5G by default.
Wi-Fi information displays the Wi-Fi name and Wi-Fi
password.
-Voice Control: The default sensitivity is Standard.
Voice commands can be recognized after the option
is turned on. You can choose options such as low
sensitivity/high sensitivity /standard/o.
-Voice Content: You can use dierent commands to
remote control the camera to work.
-Format SD Card: Format all data on the memo
card.
-Format Reminder Setup: Select the reminder
options: 15 Days, 1 Month, and O. Default is o.
To prevent you from forgetting to format the memo
card regularly, we have added a format reminder time
setting. You can choose to be reminded after 15 days
or 1 month, and calculate 15 days or 1 month from
the set date. When the time is up, you can choose
"OK" to format, or choose "Next."
Note: If you changing the format reminder option,
the timing will resta as soon as the option is
changed.
-Date & Time: There are two ways to set the time
and date:
① GPS auto update: GPS will update the time
automatically when it is turned on by default. GPS
auto update date and time is based on the time zone
where you set, so you need to choose the correct
time zone rst;

- 35 -
EN
② Manual set date/time: Turn o GPS auto update
and set date and time manually.
Summer/Winter time auto switch: The default setting
is o. When turned on, it will switch automatically
according to the daylight saving time and winter time
dates.
*This feature is only available in Noh America, if
used in other regions, it may cause time errors.
The date format and time zone settings are also set in
this menu.
-Auto LCD O: Set the time to automatically turn o
the LCD display after no operation.
If you set the Auto LCD O to 3 min, the camera’s
LCD screen will auto light o after 3 min but
recording will continue. If the setup is O, the screen
will not turn o. You can choose the options among
30s, 1Min, 3Min and OFF.
-Device Sound: Set the volume of the device. The
default volume level is 2, the lowest is 0, and the
highest is 5.
-Warning Tone: According to dierent situations, the
dash cam is set with 5 kinds of prompt tones, which
are power-on/o sound, keys sound, le locked
sound, format sound, and abnormal stop recording
reminder. All prompt tones are turned on by default.
-Frequency: Dierent countries have dierent
frequencies. In order to avoid aecting the video, you
can choose 50Hz or 60Hz frequency according to
dierent regions.
-System Info: Check the current model, rmware
version, and the VANTRUE ocial website.
-Ceication Info: You can view the ceication
information of N2X dash cam.
-Default Settings: Reset the device back to facto
settings.
-Notication Push: The default is o. You can choose
real-time/3 minutes delay or o.
SIM card Upload Daily Trac Control: The default is
OFF. You can choose among

- 36 -
EN
100MB/200MB/300MB/500MB/800MB/1000MB/o.
-Collision Video Upload: The default is Save Trac
Upload. You can choose between O, original video
upload, and original video upload.
-Event: Critical event videos detected by G-Sensor
activity or manually locked by user.
20241201_140633_00008_E_A.MP4
20241201_140633_00008_E_B.MP4
-Normal: Standard videos recorded. This folder saves
loop recording video and time-lapse video.
The le name format of Loop Recording video is:
20241201_140933_00008_N_A.MP4;
the le name format of Time-Lapse video is:
20241201_140733_00006_T_A.MP4;
-Files in Parking Mode:The le name format of Loop
Recording video is:
20241201_140833_00002_P_A.MP4
-Photo: Photos les. The le name format of Loop
-Recording video is:
20241201_140633_00005_A.JPG;
20241201_140633_00005_B.JPG.
-All Files: All the videos and photos recorded.
Note: The sux A represents the les recorded by
the Front camera, the sux B represents the les
recorded by the Cabin camera.
2.4.3 Files
Review the video and photo les recorded by the
camera.
Files
Event Video
Parking Video
Normal Video
1/5
Files 5/5
Normal Video
Photo
All Files

- 37 -
3. Specications & Warnings
3.1 Specications
The specications of this product may change without
prior notice due to product improvements.
N2XModel
Chips
Sony Sensor
3-Axis G-sensor
Built-in 2.4GHz&5GHz
2'' IPS Screen
Image Sensor
G-sensor
Wi-Fi
Screen
Novatek high-peormance
processor
Front: 158° wide viewing angle;
Cabin: 165° wide viewing angle
Engish / Français / Español /
Deutsch / Italiano / 简体中文 /
русский / 日本語/ Polski / 한국어/
Türkçe / Čeština
Camera Angle
Front: F/1. 8 wide apeure
Cabin: F/1. 8 wide apeure
Apeure
Languages
Front + Cabin
1944P +1080P 30FPS;
1944P +720P 30FPS
1440P +1080P 30FPS;
1440P +720P 30FPS
1440P 60FPS+1080P 30FPS;
1440P 60FPS+720P 30FPS
1080P+1080P 30FPS;
1080P+720P 30FPS
720P+720P 30FPS
Single front recording mode:
2592x1944P 30FPS
2560x1440P 30FPS;
2560x1440P 60FPS
1920x1080P 30FPS;
1280x720P 30FPS
Video Resolution
MP4
Video File Format
EN

- 38 -
Picture File Format
JPG
Built-in microphone and speakerAudio
Type C
Built-in super capacitor
DC 5V 2.4A
USB Po
Power Source
Memo Storage External: 32GB-512GB Micro SD
Card, U3, Class 10(not included
in the package)
Power
Supply
voltage current
6W
-4°F to 140°F(-20°C to 60°C)
Working
Temperature
Storage
Temperature
-4°F to 158°F(-20°C to 70°C)
3.2 Safety Warnings
This product is an auxilia device for the purpose
of recording exterior images of vehicles, and some
functions may not be suppoed due to dierent
driving and vehicle environments.
Firmware upgrade will be carried out from time to
time to fuher improve the product, please pay
attention to the ocial notice of VANTRUE
according to the specic upgrade.
This product can record and save images of vehicle
accidents, but it does not guarantee that all
accident images can be recorded. The image may
not be recorded in a special folder because the
crash sensor cannot be activated for minor crashes.
Be sure to turn o the power when inseing or
removing the memo card.
For stable use of the product, please format the
memo card at least once a month.
Generally, memo cards have a life span, and
long-term use of memo cards may result in data
not being saved. In this case, it is recommended to
purchase a new memo card for use. If the data is
destroyed due to the long-term use of the memo
card, the company will not be held responsible.
Do not install or operate this product while the
vehicle is running.
Do not subject the product to strong shocks or
vibrations, which may damage the product and
cause malfunction or inoperability.
Do not use chemical solvents or cleaning agents to
clean the product.
The ambient temperature range for normal use of
this device is -20 degrees Celsius to 60 degrees
Celsius. Exceeding this ambient temperature range
may cause the product to malfunction.
Do not place the product in an open ame. Do not
use the product in high temperature and high
humidity areas, as this may cause electric shock,
sho circuit, and other hazards and damage the
product.
It is forbidden to disassemble or modify the car
charger by yourself, or use a sho-circuit car
charger, otherwise it will cause personal inju,
electric shock, re and other dangers or damage the
product.
EN

- 39 -
This product is an auxilia device for the purpose
of recording exterior images of vehicles, and some
functions may not be suppoed due to dierent
driving and vehicle environments.
Firmware upgrade will be carried out from time to
time to fuher improve the product, please pay
attention to the ocial notice of VANTRUE
according to the specic upgrade.
This product can record and save images of vehicle
accidents, but it does not guarantee that all
accident images can be recorded. The image may
not be recorded in a special folder because the
crash sensor cannot be activated for minor crashes.
Be sure to turn o the power when inseing or
removing the memo card.
For stable use of the product, please format the
memo card at least once a month.
Generally, memo cards have a life span, and
long-term use of memo cards may result in data
not being saved. In this case, it is recommended to
purchase a new memo card for use. If the data is
destroyed due to the long-term use of the memo
card, the company will not be held responsible.
Do not install or operate this product while the
vehicle is running.
Do not subject the product to strong shocks or
vibrations, which may damage the product and
cause malfunction or inoperability.
Do not use chemical solvents or cleaning agents to
clean the product.
The ambient temperature range for normal use of
this device is -20 degrees Celsius to 60 degrees
Celsius. Exceeding this ambient temperature range
may cause the product to malfunction.
Do not place the product in an open ame. Do not
use the product in high temperature and high
humidity areas, as this may cause electric shock,
sho circuit, and other hazards and damage the
product.
It is forbidden to disassemble or modify the car
charger by yourself, or use a sho-circuit car
charger, otherwise it will cause personal inju,
electric shock, re and other dangers or damage the
product.
EN

- 40 -
4. Warranty & Suppo
Warranty
The VANTRUE® N2X Dash Cam comes with a full 12
months warranty. If you register your product on our
ocial site (www.vantrue.net/register), you can
extend the warranty to 18 months.
Suppo new
If you have any questions about the product, please
feel free to contact us at suppo@vantrue. net, or
leave us a message through the instant chat box:
www.vantrue.net, or open the VANTRUE APP, and
nd it in the FAQ on the "Me" page Answer.
Your opinion matters
VANTRUE® is rmly committed to always improving
our products, seices, and user experience. If you
have any thoughts on how we can do even better, we
welcome your constructive feedback and suggestions.
Connect with us today at suppo@vantrue.net.
EN

- 41 -
Bitte lesen Sie vor dem Gebrauch der Dashcam das
Benutzerhandbuch sorgfältig durch.
Die Dashcam muss stets an eine stabile Stromquelle
angeschlossen werden, um reibungslos zu
funktionieren.
Um Fahrsicherheit willen bitte vermeiden Sie
während der Fah, die Dashcam zu bedienen oder
Dateien auf dem VANTRUE App zu überprüfen.
Bitte legen Sie eine microSD-Kae mit ausreichen-
den Schreib- und Lesegeschwindigkeiten ein, um die
Dashcam ordnungsmäßig zu bedienen.
Bitte wenden Sie sich an den VANTRUE Kunden-
dienst, wenn das Produkt nicht ordnungsgemäß
funktionie. Es ist NICHT empfohlen, das Gehäuse
der Dashcam zu zerlegen oder das Gerät selbst
reparieren zu versuchen.
Bitte bringen Sie die Dashcam an eine geeignete
Stelle an, damit sie keine Sehstörung während der
Fah darstellt.
Bitte verwenden Sie das Produkt NICHT bei
übermäßig hohen Temperaturen oder in feuchter
Umgebung.
Um Benutzereahrungen kontinuierlich zu
verbessern, wird die Firmware der Dashcam
unregelmäißg aktualisie. Nach Veröentlichung
der Firmware-Datei neuerer Version können Sie bei
Beda die Software aktualisieren.
Bitte montieren Sie die Dashcam NICHT an der
Windschutzscheibesstelle direkt vor Fahrer: innen
um mögliche Beschädigungen im Fall des Lösens der
Dashcam von der Windschutzscheibe zu vermeiden.
Bei der Verwendung eines kabellosen Auto-Displays
für CarPlay und Android Auto ist eine Verbindung
mit der VANTRUE App unbenötigt.
Bitte halten Sie beim Gebrauch der Dashcam
Gesetze und Vorschriften Ihres Staates (oder Landes
oder Provinz) ein.
Bedienungsanweisungen:
DE
- 42 -
DE
1. Schnellsta
1.1 Was liegt im Paket?
Optionales Zubehör
A. VANTRUE
N2X Dashcam
B. GPS Klebe-
halterung
C. Autoladegerät
mit einge-
bautem Typ C
Kabel (3,5m)
D. Type-C Daten-
überagungs-
kabel (1m)
E. Brechstange
zur Kabel-
verlegung
F. Klebesticker
G. Befestigungs-
sockel für
Klebehalterung
H. Elektro-
statische Folie
*2
I. Benutzerhand-
buch
L. Kabellose
Fernbedienung
M. VANTRUE
Hardwire Kit
K. Zirkularer
Polarisations-
lter (CPL Filter)
J. Kabelhalter
vantrue.com
truly driven.
USER MANUAL
Nexus 2 X
- 43 -
1.2 Installation der Klebehalterung und
Speicherkae
Richten Sie die GPS Halterung auf die Schnittstelle an
der Dashcam aus. Drücken Sie die Halterung ein, bis
sie einrastet.
Die Klebehalterung von N2X veügt über eine neu
entwickelte abnehmbare Konstruktion. Anstatt die
gesamte Klebehalterung zu demontieren, lässt sich
das Hauptgerät der Halterung einfach von dem
Befestigungssockel für Klebehalterung trennen.
Bitte formatieren Sie zuerst die Speicherkae nach
dem Einschalten der Dashcam.
1.3 Installation und Einstellung der Dashcam
Bitte schalten Sie die Dashcam ein, passen Einstellun-
gen im Menü an und installieren die Kamera an der
Frontscheibe Ihres Fahrzeugs.
Einsetzen einer
Speicherkae
Einschalten: Schließen Sie das eine Ende des
mitgeliefeen USB C Stromkabels an die Stromver-
sorgung, und stecken das andere Ende in den
Stromanschluss an der GPS-Halterung, um zu testen,
ob sich die N2X Dashcam ordnungsmäßig einschalten
lässt.
DE
- 44 -
1.3 Installation und Einstellung der Dashcam
Bitte schalten Sie die Dashcam ein, passen Einstellun-
gen im Menü an und installieren die Kamera an der
Frontscheibe Ihres Fahrzeugs.
Installation abgeschlossen: Bitte vergewissern Sie
sich: Die Dashcam soll ordnungsgemäß an der
Windschutzscheibe des Fahrzeugs angebracht
werden, um die Sicht des Fahrers nicht zu stören, und
die Frontkamera soll auf die Straße gerichtet werden.
Einstellungen: Bei der Verwendung das erste Mal oder
nach Firmware-Aktualisierung oder Werkseinstellung
müssen Sie einige Grundeinstellungen wie Datum und
Uhrzeit, Sprache und Region erneut anpassen.
Elektrostatische
Folie)
1440P +1080P 30FPS1440P +1080P 30FPS
00:00:37
05-05-2025 AM 10:09:07
MP/H
Video Einstellung
45
Einschalten: Schließen Sie das eine Ende des
mitgeliefeen USB C Stromkabels an die Stromver-
sorgung, und stecken das andere Ende in den
Stromanschluss an der GPS-Halterung, um zu testen,
ob sich die N2X Dashcam ordnungsmäßig einschalten
lässt.
DE
- 45 -
Um das Autoladekabel oder das Verbindungskabel für
die Heckkamera ordentlich zu verlegen und zu
befestigen, kann man die mitgeliefeen Kabelhalter
benutzen. Platzieren und kleben Sie die Kabelhalter
zuerst an gewünschten Stellen im Fahrzeug, dann
führen Sie das Kabel durch die dafür vorgesehene
Önung in jedem Kabelhalter.
Videoaufzeichnung: Nach dem Abschluss der
Installation beginnt die Dashcam automatisch mit der
Videoaufzeichnung, sobald der Fahrzeugmotor
staet.
Ausschalten: Bei Nichtgebrauch drücken Sie lange
auf die Power-Taste, um die Dashcam auszuschalten.
Installation der Dashcam
Einstecken des Autoladegeräts
DE
- 46 -
2. Grundlegende Bedienung
2.1 Überblick über die Dashcam
1. Frontkamera
2. Infrarotlicht für Kamera nach innen
3. 2" IPS Bildschirm
4. Kamera nach innen
5. TYPE-C Anschluss zur Datenüberagung
6. TYPE-C Anschluss zur Stromversorgung
7. Serienummer
8. Steckplatz der Speicherkae
Tasten und Funktionen
1
2 3 4 5
6
1 2
43
7
6
5
8
DE

- 47 -
2.
4.
In der Benutzerobeläche der
Aufnahme: Kurz drücken, um
Aufnehmen zu staen oder stoppen.
Im Einstellungsmenü: Kurz drücken,
um die Option zu bestätigen.
Beim Wiedergeben einer Aufnahme:
Kurz drücken, um die Wiedergabe des
Videos zu staen oder stoppen.
Bei der Videoaufzeichnung: Kurz
drücken, um Aufzeichnungsperspektiven
umzuschalten.
Im Einstellungsmenü oder beim
Durchsuchen von Dateien: Kurz drücken,
um die obige Option oder Datei zu
wählen; Lange gedrückt halten, um
durch die Optionen oder Dateien oben
zu blättern.
Beim Wiedergeben einer Aufnahme:
Kurz drücken, um das Video mit 2- und
4-facher Geschwindigkeit wiederzu-
geben.
Bei der Videoaufzeichnung: Kurz
drücken, um das Mikrophone ein und
auszuschalten; Lange gedrückt halten,
um die Dashcam auf den Parkmodus zu
3.
1.
Im eingeschalteten Zustand: Lange
gedrückt halten, um die Kamera
auszuschalten; im ausgeschalteten
Zustand: Kurz drücken, um sie
einzuschalten.
In der Benutzerobeläche der
Aufnahme: Kurz drücken, um Eventauf-
nahme und Schnappschuss einzu-
schalten.
Beim Durchsuchen von Dateien: Kurz
drücken, um das Menü zum Löschen von
Dateien aufzurufen.
No. Tasten Anweisungen zur Tastenbedienung
schalten (Dieser Vorgang kann nur
beim aktivieen Parkmodus durchge-
füh werden.)
Im Einstellungsmenü oder beim
Durchsuchen von Dateien: Kurz
drücken, um die nächste Option oder
Datei zu wählen; Lange gedrückt
halten, um durch die Optionen oder
Dateien unten zu blättern.
Beim Wiedergeben einer Datei: Kurz
drücken, um das Menü zum Löschen
von Dateien aufzurufen.
DE
- 48 -
Bei der Videoaufzeichnung: Lange
gedrückt halten, um Wi-Fi zu aktivieren
oder deaktivieren.
Im Einstellungsmenü oder beim
Durchsuchen von Dateien: Kurz
drücken, um zur vorherigen Benutzer-
obeläche zurückzukehren.
Bei der Videoaufzeichnung: Kurz
drücken, um das Mikrophone ein und
auszuschalten; Lange gedrückt halten,
um die Dashcam auf den Parkmodus zu
5.
6.
Kurz drücken, um die Dashcam auf die
Werkeinstellungen zurückzusetzen.
REC
Status der Dashcam
LED Indikator
LED Status
Leuchtet
durchgängig grün
Im Stand-by-Modus
LED
schalten (Dieser Vorgang kann nur
beim aktivieen Parkmodus durchge-
füh werden.)
Im Einstellungsmenü oder beim
Durchsuchen von Dateien: Kurz
drücken, um die nächste Option oder
Datei zu wählen; Lange gedrückt
halten, um durch die Optionen oder
Dateien unten zu blättern.
Beim Wiedergeben einer Datei: Kurz
drücken, um das Menü zum Löschen
von Dateien aufzurufen.
Blinkt grün Die Kamera nimmt auf
DE
- 49 -
2.2 Überblick über den Bildschirm
20250505_140933_00008_N_A.MP4
20250505_140833_00007_P_B.MP4
20250505_140733_00006_T_B.MP4
20250505_140633_00005_E_A.MP4
A steht für Aufnahmen
der Kamera nach vorne
B steht für Aufnahmen
der Kamera nach innen
P steht für Aufnahmen im
Parkmodus
N steht für Videos der
Loop-Aufnahme
T steht für Aufnahmen im
Zeitraermodus
E steht für
Eventaufnahme
Jahr Datum Uhrzeit Sequenz-
nummer
Datei Format
1440P +1080P 30FPS
00:00:37
12-01-2024 AM 10:09:07
MP/H
45
Jede Sequenz der Loop-Aufnahme auf 1 Minute
Jede Sequenz der Loop-Aufnahme auf 3 Minute
Jede Sequenz der Loop-Aufnahme auf 5 Minute
Loop-Aufnahme-Modus ist deaktivie
2.4G Wi-Fi ist aktivie
5G Wi-Fi ist aktivie
2.4G Wi-Fi-Verbindung hergestellt
5G Wi-Fi-Verbindung hergestellt
Wi-Fi ist deaktivie
G-Sensor ist aktivie
G-Sensor ist deaktivie
Speicherkae eingelegt
KEINE Speicherkae
eingelegt/
Speicherkaenfehler
Wird mit Fernbedienung
verbunden
Aufgezeichnete
Fahrgeschwindigkeit
(KMH/MPH)
ACC is connected
Aufnahmedauer
(die aktuelle
Sequenz)
Datum und
Uhrzeit
Videoauösung
GPS in Betrieb
GPS ist deaktivie
Mikrofon ist eingeschaltet
Mikrofon ist ausgeschaltet
Das Video
ist gesper
Kollisionserkennung aktivie
1080P 15FPS Niedrige-Auösung Modus aktivie
720P 15FPS Niedrige-Auösung Modus aktivie
Bewegungserkennung aktivie
Niedrige-Bildrate Modus aktivie
Zeitraer AN
Signalstärke
des Netzwerks
IR Automatischer Modus
IR-Dauerbetrieb Modus
IR Modus ist deaktivie
Sprachsteuerung ist
aktivie
Sprachsteuerung ist
deaktivie
Privatsphärenmodus
DE

- 50 -
2.3 Gebrauchsanweisung
2.3.1 APP Bedienungsanleitung
--APP herunterladen
Bitte scannen Sie den QR-Code für die entsprechende
Version unten, um die VANTRUE App herunterzuladen
und zu installieren.
Suchen Sie nach der App „VANTRUE“ im App Store
oder Google Play Store. Laden Sie sie dann herunter
und installieren sie auf Ihrem Smaphone.
--Ein neues Gerät hinzufügen
Das WLAN wird automatisch aktivie, nachdem die
N2X Dashcam eingeschaltet wird. Um das deaktiviee
WLAN zu aktivieren, kann man beim Aufnehmen die
Menü-Taste drücken, den Sprachbefehl „Turn On
Wi-Fi“ geben oder die entsprechende Option im
Einstellungsmenü betätigen.
Nachdem das WLAN der N2X Dashcam aktivie ist,
tippen Sie in der VANTRUE App auf „Gerät hinzufü-
gen“. Wählen Sie die Nexus Serie und dann das N2X
Modell aus. Tippen Sie auf den entsprechenden Wi-Fi
Namen und schließlich auf „Bestätigen“, um die Wi-Fi
Verbindung herzustellen.
DE
- 51 -
DE
- 52 -
Bitte überprüfen Sie zunächst, ob die WLAN auf
Ihrem Smaphone aktivie ist.
Das Initialkennwo für dieses Gerät soll nur für die
erste Anmeldung verwendet werden. Um
Datenschutz willen ist es empfohlen, danach das
Kennwo zu ändern.
Wenn Sie das neue Kennwo vergessen, können Sie
zu „Werkeinstellungen“ der Dashcam gehen und die
Option „Einstellungen auf Standard zurück-
setzen“ betätigen. Danach wird das Kennwo für
Wi-Fi erneut zum Initialkennwo (12345678).
Bitte beachten Sie, dass nur über die VANTRUE App
das Passwo für Wi-Fi der Dashcam geände
werden kann.
Hilfslinien zur
Einstellung des
Objektivwinkels
Mikrofon
Ein / Aus
Kilometer-
standstatistik
Perspektiven
wechseln
Album
Einstellungen
Vollbild
Aufnehmen
stoppen /
staen
Schnappschuss
Auf der Benutzerobeläche „Live Vorschau“ der
VANTRUE App können Sie folgende Vorgänge
durchführen.
--Anweisungen zur Verwendung der VANTRUE APP
DE

- 53 -
Vorschau der Aufnahme: Nach eolgreicher
Verbindung mit der Dashcam wird die App auf die
Benutzerobeläche „Live Vorschau“ geschaltet.
Tippen Sie auf die Vollbildtaste rechts unten auf
dem Vorschau, oder drehen Sie das Smaphone
waagerecht, um die Live-Ansicht in den Vollbild-
Modus zu schalten. Beim Aufnehmen mit zwei
Kameras (nach vorne und innen) können Sie auf die
Taste rechts unten auf der App tippen, um
Perspektiven zwischen Vorne und Innen zu
wechseln.
Videos und Fotos wiedergeben: Sie können sich
die in der microSD Kae gespeicheen Dateien
(Videos und Fotos) anschauen. Tippen Sie die Taste
unten, um bestimmte Aufnahmen auszuwählen und
wiederzugeben.
Dateien herunterladen: Sie können die in der
microSD Kae gespeicheen Dateien (Videos und
Fotos) herunterladen und sie im lokalen Ordner auf
Ihrem Smaphone speichern. Danach können Sie sie
einfach wiedergeben und die veranschaulichten
GPS-Daten in Aufnahmen überprüfen.
Schnappschüsse machen: Auf der Benutzerober-
äche „Live Vorschau“ können Sie Schnappschüsse
der Live-Ansicht machen.
Kilometerstatistik: Die Kilometerstandsinforma-
tionen lassen sich nach Beda herunterladen und
werden in der VANTRUE APP als Bild oder
PDF.-Datei gespeiche.
Hilfslinien zur Einstellung des Objektivwinkels:
Dank Hilfslinien auf dem „Live Vorschau“ können Sie
sehr einfach überprüfen, ob die Objektive der N2X
Dashcam richtig gerichtet sind, und sie bei Beda
anpassen.
DE
- 54 -
--APP Aktualisierung
Önen Sie die Vantrue App und gehen Sie zu „Mich >
Um > Nach Updates suchen“. Die App erkennt
automatisch, ob es sich um die neueste Version
handelt. Wenn eine neue Version der App veügbar
ist, folgen Sie den Anweisungen der App, um die
Version zu aktualisieren.
2.3.2 Gebrauchsanweisungen zu bedeutenden
Features
--Bildqualität und PlatePix™-Timer
Der Standardbildqualitätsmodus ist Standardqualität.
Benutzer können den PlatePix™-Modus nach Beda
aktivieren und die automatische Ein-/Ausschaltzeit
mit dem PlatePix™-Timer einstellen. Bei dieser
Funktion steht die Verbesserung der Klarheit des
Nummernschilds im Vordergrund, um eine Unschäe
des Nummernschilds aufgrund von
Beleuchtungsproblemen zu vermeiden, die die
Beweisaufnahme bei einem Unfall beeinträchtigen
würde.
DE

- 55 -
--Loop-Aufnahme
Nach dem Einlegen der Speicherkae und dem
Anschließen der Stromversorgung schaltet sich die
N2X Dashcam automatisch ein und beginnt mit der
Loop-Aufnahme. Die Aufnahmen werden im Ordner
„Gewöhnliche Videos“ gespeiche. Die Dauer jeder
Sequenz kann man nach Beda einstellen.
Wenn 70% der Speicherung schon besetzt wird, wird
die älteste ungeschützte Aufnahme automatisch
überschrieben, um neueren Aufnahmen Platz zu
machen und die Aufzeichnung bei Fahen nicht zu
unterbrechen.
2.3.2 Gebrauchsanweisungen zu bedeutenden
Features
--Bildqualität und PlatePix™-Timer
Der Standardbildqualitätsmodus ist Standardqualität.
Benutzer können den PlatePix™-Modus nach Beda
aktivieren und die automatische Ein-/Ausschaltzeit
mit dem PlatePix™-Timer einstellen. Bei dieser
Funktion steht die Verbesserung der Klarheit des
Nummernschilds im Vordergrund, um eine Unschäe
des Nummernschilds aufgrund von
Beleuchtungsproblemen zu vermeiden, die die
Beweisaufnahme bei einem Unfall beeinträchtigen
würde.
Hinweis: Der PlatePix™-Modus erhöht die Helligkeit
vor dem Fahrzeug, das Gesamtbild kann jedoch
dunkler sein. In Umgebungen mit wenig Licht wird
empfohlen, diese Funktion auszuschalten oder zu
planen, um eine Beeinträchtigung des
Aufnahmeeekts zu vermeiden.
1440P +1080P 30FPS
00:00:37
05-05-2025 AM 10:09:07
MP/H
45
1440P +1080P 30FPS
00:00:37
05-05-2025 AM 10:09:07
MP/H
45
PlatePix™-Modus aktivieren PlatePix™-Modus ausschalten
DE
- 56 -
-Eventaufnahme
Während der Fah lässt sich die aktuelle Aufnahme
manuell oder automatisch sperren, wenn Voälle
eintreten.
Bei der Aufzeichnung drücken Sie die Taste kurz,
um das Video manuell zu sperren.
Wenn das Video schon gesper wird, drücken Sie
inzwischen dieselbe Taste kurz, um
Schnappschüsse zu machen.
Nach der Aufzeichnung wird diese Sequenz der
Eventaufnahme automatisch im Ordner „Eventvideos“
gespeiche und vorm Überschreiben geschützt,
Hinweise:
Der normale Betrieb der Loop-Aufnahme hängt
stark von Schreib- und Lesegeschwindigkeiten der
Speicherkae ab. Bitte formatieren Sie die
Speicherkae regelmäßig, um übermäßige
unbenötigte Dateien rechtzeitig zu löschen und
Probleme wie Kaenalterung zu vermeiden.
Bitte überprüfen Sie regelmäßig Videos bei der
Loop-Aufnahme und speichern rechtzeitig manche
benötigte Dateien, um zu vermeiden, dass sie
automatisch überschrieben werden.
Wenn die Loop-Aufnahme deaktivie wird,
funktionie die Videosperunktion nicht mehr.
Wenn die Loop-Aufnahme deaktivie wird, beträgt
die Dauer jeder Sequenz 20 Minuten. Wenn die
Speicherkae voll ist, stoppt das Aufnehmen und
die Dashcam meldet: „Kae ist voll“.
während die Schnappschüsse im Ordner „Fotos“
gespeiche werden.
1440P +1080P 30FPS
00:00:37
05-05-2025 AM 10:09:07
MP/H
45
DE
- 57 -
-Eventaufnahme
Während der Fah lässt sich die aktuelle Aufnahme
manuell oder automatisch sperren, wenn Voälle
eintreten.
Bei der Aufzeichnung drücken Sie die Taste kurz,
um das Video manuell zu sperren.
Wenn das Video schon gesper wird, drücken Sie
inzwischen dieselbe Taste kurz, um
Schnappschüsse zu machen.
Nach der Aufzeichnung wird diese Sequenz der
Eventaufnahme automatisch im Ordner „Eventvideos“
gespeiche und vorm Überschreiben geschützt,
Automatische Sperrung der Eventaufnahme: Wenn
eine Kollision oder Erschütterung des Fahrzeugs vom
G-Sensor der Dashcam erkannt wird, wird die
Eventaufnahme automatisch ausgelöst und die
aktuelle Aufnahme gesper. Inzwischen können Sie
die Taste kurz drücken, um Schnappschüsse zu
machen.
Nach der Aufzeichnung wird diese Sequenz der
Eventaufnahme automatisch im Ordner
„ Eventvideos“ gespeiche und vorm Überschreiben
geschützt, während die Schnappschüsse im Ordner
„Fotos“ gespeiche werden.
Hinweise:
Die Empndlichkeit der Kollisionserkennung
beeinusst teilweise, wie häug die automatische
Sperrung der Eventaufnahme ausgelöst wird. Je
höher die Empndlichkeitsstufe, desto weniger ist
die Kraft benötigt, um den G-Sensor zu erwecken
und die automatische Sperrung der Eventaufnahme
während die Schnappschüsse im Ordner „Fotos“
gespeiche werden.
auszulösen.
Wenn 30% der Speicherung schon besetzt wird,
wird die älteste geschützte Eventaufnahme
automatisch überschrieben, um neueren Event-
aufnahmen Platz zu machen und die Aufzeichnung
bei Fahen nicht zu unterbrechen. Es ist
empfohlen, Eventaufnahmen in der Speicherkae
regelmäßig zu überprüfen und manche benötigte
Dateien rechtzeitig zu speichern, um zu vermeiden,
dass sie automatisch überschrieben werden.
Die Sperrung der Aufnahme eolgt NICHT, wenn
Loop-Aufnahme deaktivie oder Zeitraeraufze-
ichnung aktivie ist. Unter beiden Umständen kann
man die aktuelle Aufnahme NICHT sperren sondern
nur Schnappschüsse machen.
1440P +1080P 30FPS
00:00:37
05-05-2025 AM 10:09:07
MP/H
45
1440P +1080P 30FPS
00:00:37
05-05-2025 AM 10:09:07
MP/H
45
DE

- 58 -
Die Empndlichkeit der Kollisionserkennung
beeinusst teilweise, wie häug die automatische
Sperrung der Eventaufnahme ausgelöst wird. Je
höher die Empndlichkeitsstufe, desto weniger ist
die Kraft benötigt, um den G-Sensor zu erwecken
und die automatische Sperrung der Eventaufnahme
auszulösen.
Wenn 30% der Speicherung schon besetzt wird,
wird die älteste geschützte Eventaufnahme
automatisch überschrieben, um neueren Event-
aufnahmen Platz zu machen und die Aufzeichnung
bei Fahen nicht zu unterbrechen. Es ist
empfohlen, Eventaufnahmen in der Speicherkae
regelmäßig zu überprüfen und manche benötigte
Dateien rechtzeitig zu speichern, um zu vermeiden,
dass sie automatisch überschrieben werden.
Die Sperrung der Aufnahme eolgt NICHT, wenn
Loop-Aufnahme deaktivie oder Zeitraeraufze-
ichnung aktivie ist. Unter beiden Umständen kann
man die aktuelle Aufnahme NICHT sperren sondern
nur Schnappschüsse machen.
Parkmodus
Bitte lesen Sie zuerst folgende Hinweise, bevor Sie
den Parkmodus einsetzen:
Um den Parkmodus reibungslos zu verwirklichen, ist
eine stabile Dauerstromversorgung benötigt. Dafür
ist ein VANTRUE Hardwire Kit empfohlen.
Um nach Parken den Parkmodus sofo zu staen,
Ist das VANTRUE Hardwire Kit mit ACC Feature
empfohlen. Aufgrund der möglichen unterschied-
lichen Lage des PIN-Pins für die ACC-Erkennung
könnte das ACC Feature NICHT verwirklicht werden
durch Hardwire Kits anderer Marken.
An heißen sonnigen Tagen im Sommer ist es
empfohlen, den Parkmodus „Kollisionserkennung“
zu benutzen, um eine Überhitzung des Geräts zu
vermeiden. Wenn die Temperatur im Auto 60℃
erreicht, ist es empfohlen, die Kamera auszuschalten,
um abnormalen Betrieb oder Schäden zu vermeiden.
Der Zeitraer-Modus und der Parkmodus
(einschließlich Kollisions-, Bewegungserkennung,
Niedrige-Auösung-, Nierige-Bildrate-Modus)
lassen sich nicht gleichzeitig aktivieren und
benutzen. Wenn der eine Modus aktivie werden,
wird der andere Modus automatisch deaktivie.
Alle Aufnahmen im Parkmodus werden im Ordner
„Eventvideos“ gespeiche. Es ist empfohlen, sie
regelmäßig zu überprüfen und benötige Dateien
rechtzeitig zu speichern, andernfalls könnten
manche Dateien im Fall einer knappen Speicherung
automatisch überschrieben werden.
Mit dem Firmware-Upgrade der N2X Dashcam
könnte der Parkmodus verbesse werden. Bitte
beachten Sie die Ankündigung der Firmware-
Aktualisierung auf der oziellen Website VANTRUEs.
Oder Sie können sich an den Kundendienst
VANTRUEs wenden und danach fragen.
DE

Sta-/Beenden Modus
Autom.
ACC
G-Sensor
Parküberwachungseinstellungen
Sta-/Beenden Modus
Einstellung der Überwachun...
Nachtsicht Parkmodus
- 59 -
Um den Parkmodus reibungslos zu verwirklichen, ist
eine stabile Dauerstromversorgung benötigt. Dafür
ist ein VANTRUE Hardwire Kit empfohlen.
Um nach Parken den Parkmodus sofo zu staen,
Ist das VANTRUE Hardwire Kit mit ACC Feature
empfohlen. Aufgrund der möglichen unterschied-
lichen Lage des PIN-Pins für die ACC-Erkennung
könnte das ACC Feature NICHT verwirklicht werden
durch Hardwire Kits anderer Marken.
An heißen sonnigen Tagen im Sommer ist es
empfohlen, den Parkmodus „Kollisionserkennung“
zu benutzen, um eine Überhitzung des Geräts zu
vermeiden. Wenn die Temperatur im Auto 60℃
erreicht, ist es empfohlen, die Kamera auszuschalten,
um abnormalen Betrieb oder Schäden zu vermeiden.
Der Zeitraer-Modus und der Parkmodus
(einschließlich Kollisions-, Bewegungserkennung,
Niedrige-Auösung-, Nierige-Bildrate-Modus)
lassen sich nicht gleichzeitig aktivieren und
benutzen. Wenn der eine Modus aktivie werden,
wird der andere Modus automatisch deaktivie.
Alle Aufnahmen im Parkmodus werden im Ordner
„Eventvideos“ gespeiche. Es ist empfohlen, sie
regelmäßig zu überprüfen und benötige Dateien
rechtzeitig zu speichern, andernfalls könnten
manche Dateien im Fall einer knappen Speicherung
automatisch überschrieben werden.
Mit dem Firmware-Upgrade der N2X Dashcam
könnte der Parkmodus verbesse werden. Bitte
beachten Sie die Ankündigung der Firmware-
Aktualisierung auf der oziellen Website VANTRUEs.
Oder Sie können sich an den Kundendienst
VANTRUEs wenden und danach fragen.
Vorstellung der Parkmodi
Die Parkmodi der VANTRUE N2X Dashcam werden
erweite und bezüglich der Herangehensweisen
veeine, um vielfältige Bedünisse der Benutzer:
innen zu eüllen.
DE
Nachdem der Parkmodus aktivie ist, die
Eingabe-/Ausgabemethoden:
1. Automatischer Modus (standardmäßig
empfohlen)
Ohne ACC-Anschluss (d. h. G-Sensor-Modus): Das
Fahrzeug geht automatisch nach 5-minütiger
Stillstandsphase ein; der G-Sensor beendet
automatisch nach einer Sekundärcollision;
Mit ACC-Anschluss (d. h. ACC-Modus): Das Fahrzeug
geht automatisch nach dem Ausschalten (ACC OFF)
ein; das Fahrzeug staet (ACC ON) und beendet
automatisch.

- 60 -
2. ACC-Modus
Installieren Sie die ACC-Hardwire-Kit korrekt und
schalten Sie die Stromversorgung ein. Das Fahrzeug
geht automatisch nach dem Ausschalten (ACC OFF)
ein; das Fahrzeug staet (ACC ON) und beendet
automatisch.
3. G-Sensor-Modus
Das Ein- und Ausschalten der Parküberwachung wird
durch den G-Sensor gesteue. Das heißt, das
Fahrzeug geht automatisch nach 5-minütiger
Stillstandsphase ein; der G-Sensor beendet
automatisch nach einer Sekundärcollision;
Hinweis: Wenn der ACC-Leitung nicht
ordnungsgemäß ausgelöst werden kann, kann der
G-Sensor-Modus verwendet werden.
4. Manueller Modus
Drücken Sie die Shocut-Taste lange, um manuell
einzuzugehen; ein beliebiges Klicken auf die Taste
beendet automatisch.
DE
Ohne ACC-Anschluss (d. h. G-Sensor-Modus): Das
Fahrzeug geht automatisch nach 5-minütiger
Stillstandsphase ein; der G-Sensor beendet
automatisch nach einer Sekundärcollision;
Mit ACC-Anschluss (d. h. ACC-Modus): Das Fahrzeug
geht automatisch nach dem Ausschalten (ACC OFF)
ein; das Fahrzeug staet (ACC ON) und beendet
automatisch.
- 61 -
Kollisionserkennung
Wenn die Kollisionserkennung aktivie wird, erscheint
auf dem Bildschirm beim Aufnehmen das entspre-
chende Symbol . Für die Kollisionserkennung sind
5 Empndlichkeitsstufen zur Auswahl. Bei der Stufe 5
bendet sich der G-Sensor der Dashcam in dem am
meisten empndlichen Zustand. Man kann je nach
Beda die Empndlichkeitsstufe der Kollisionser-
kennung anpassen.
Bei aktivieer Kollisionserkennung nimmt die
Dashcam nach Erkennung der Kollisionen ein 30
Sekunden Ereignisvideo auf. Das Video lässt sich im
Ordner „Eventvideos“ speichern und unterstützt eine
Wiedergabe über die VANTRUE App oder den
VANTRUE Player.
Bewegungserkennung
Wenn die Bewegungserkennung aktivie wird,
erscheint im unteren Teil der Obeläche beim
Aufnehmen das entsprechende Symbol.
1440P +1080P 30FPS
00:00:37
05-05-2025 AM 10:09:07
MP/H
45
1440P +1080P 30FPS
00:00:37
05-05-2025 AM 10:09:07
MP/H
45
DE
- 62 -
Bei aktivieer Bewegungserkennung nimmt die
Dashcam nach Erkennung der Bewegung von
Personen oder Gegenständen ein 30-Sekunden
Eventvideo auf. Zusammen mit einem 15-Sekunden
Video vor der erkannten Bewegung wird eine
Aufnahme von insgesamt 45 Sekunden erstellt und im
Ordner „Eventvideos“ gespeiche.
Modus mit niedriger Auösung
Im Modus mit niedriger Auösung wird die Videoauf-
lösung beider Kameras automatisch auf 1080P 15FPS
oder 720P 15FPS geschaltet. Die Dauer jeder Sequenz
beträgt 3 Minuten. Alle Dateien in diesem Modus
werden im Ordner „Eventvideos“ gespeiche.
1440P +1080P 30FPS
00:00:37
05-05-2025 AM 10:09:07
MP/H
45
1440P +1080P 30FPS
00:00:37
05-05-2025 AM 10:09:07
MP/H
45
1440P +1080P 30FPS
00:00:37
05-05-2025 AM 10:09:07
MP/H
1440P +1080P 30FPS
00:00:37
05-05-2025 AM 10:09:07
MP/H
45 45
DE
- 63 -
▲Parküberwachungseinstellungen
Für eine prägnantere, exiblere Parüberwachung der
N2X Dashcam lassen sich verschiede Aspekte der
Parküberwachung hier nach Beda einstellen.
Einstellung der Überwachungskameras
Die Anzahl der Überwachungskameras für alle
Parkmodi lassen sich hier anpassen. Man kann beide
Kameras oder nur die Kamera nach vorne zur
Aufzeichnung einstellen
Modus mit niedriger Bildrate
Im Modus mit niedriger Bildrate verdichtet die
Dashcam Aufnahmesdauer, um Länge und Vollstän-
digkeit der Aufnahmen gleichzeitig zu garantieren.
Die Dauer jeder Sequenz beträgt 1 Minute. Alle
Dateien in diesem Modus werden im Ordner
„Eventvideos“ gespeiche.
Beispiel: Man stellt den Modus mit niedriger Bildrate
auf 1FPS ein. Die Dashcam zeichnet dann während
der Parküberwachung sekundenschnell auf.
Aufnahmen von 30 Minuten werden komprimie und
als 1-Minute-Videos gespeiche.
1440P +1080P 30FPS
00:00:37
05-05-2025 AM 10:09:07
MP/H
45
Video Einstellung
Zeitraer
Parkmodus
Parküberwachungseinste...
17/20
Parküberwachungseinstellungen
Einstellung der Überwachun...
Nachtsicht Parkmodus
Kollisionserkennung beim Par...
DE
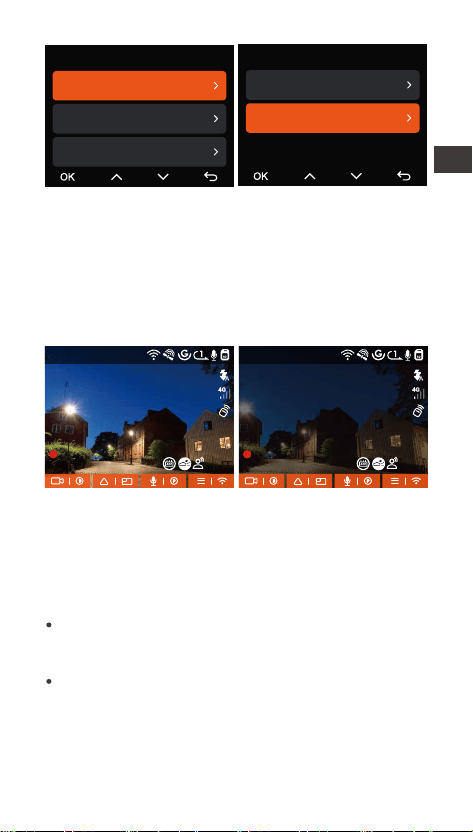
- 64 -
Nachtsicht Parkmodus
Um die Fahrsicherheit bei Nacht zu erhöhen, ist die
leistungsstarke Kamera mit einer foschrittlichen
Nachtsicht-Technologie ausgestattet. Das Feature ist
standardgemäß aktivie und lässt sich nur im
Parkmodus auslösen. Es beeinusst die gewöhnliche
Aufzeichnung bei der Loop-Aufnahme NICHT.
Kollisionserkennung beim Parken
Hier sind zwei Stamodi der Kollisionserkennung zur
Auswahl.
Nachtsicht Parkmodus
deaktivie
Nachtsicht Parkmodus
aktivie
Stromsparmodus:Die Dashcam schaltet sich
komplett aus und nach Kollisionserkennung erneut
ein.
Schnellstamodus:Die Dashcam bendet sich im
Stand-by-Modus und beginnt gleich nach der
Kollisionserkennung mit der Aufnahme.
1440P +1080P 30FPS
00:00:37
05-05-2025 AM 10:09:07
MP/H
1440P +1080P 30FPS
00:00:37
05-05-2025 AM 10:09:07
MP/H
45 45
Parküberwachungseinstellungen
Einstellung der Überwachun...
Nachtsicht Parkmodus
Kollisionserkennung beim Par...
Einstellung der Überwachungskameras
Vorne + Innen
Vorne
DE
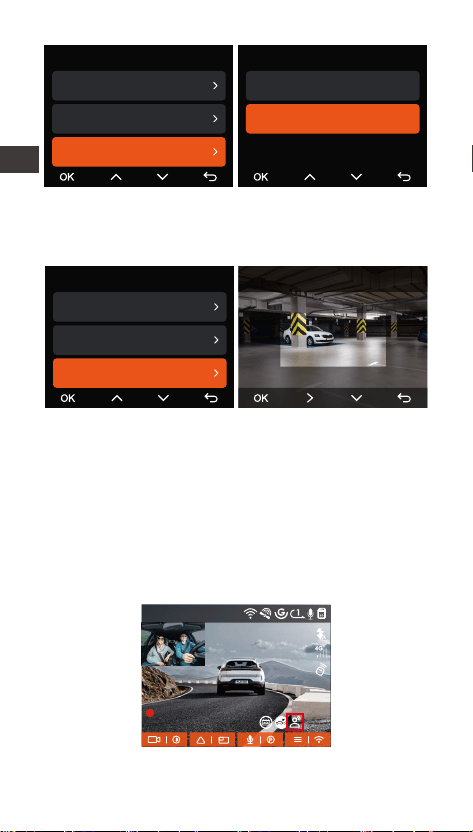
- 65 -
Überwachungsbereich bei der Bewegungserkennung
Hier können Sie Überwachungsbereich einstellen, um
nach Beda bestimmte Bereiche zu überwachen
Sprachsteuerung
Sie können die Dashcam per Sprachbefehle steuern,
um Schnappschüsse zu machen, eine Aufnahme zu
staen, Wi-Fi aktivieren oder deaktivieren, die
aktuelle Aufnahme zu sperren und noch mehr. Die
derzeit unterstützten Sprachen zur Sprachsteuerung
sind Englisch, Japanisch, Russisch und Chinesisch.
Alle Sprachbefehle nden Sie unter „System
Einstellungen“ > „Sprachbefehle“.
Sprachsteuerung aktivieren
Parküberwachungseinstellungen
Parküberwachungsbereich
Nachtsicht Parkmodus
Kollisionserkennung beim Par...
Kollisionserkennung beim Parken
Stromsparmodus
Schnellstamodus
1440P +1080P 30FPS
00:00:37
05-05-2025 AM 10:09:07
MP/H
Parküberwachungseinstellungen
Nachtsicht Parkmodus
Kollisionserkennung beim Par...
Überwachungsbereich bei de...
Überwachungsbereich - Vorne
DE
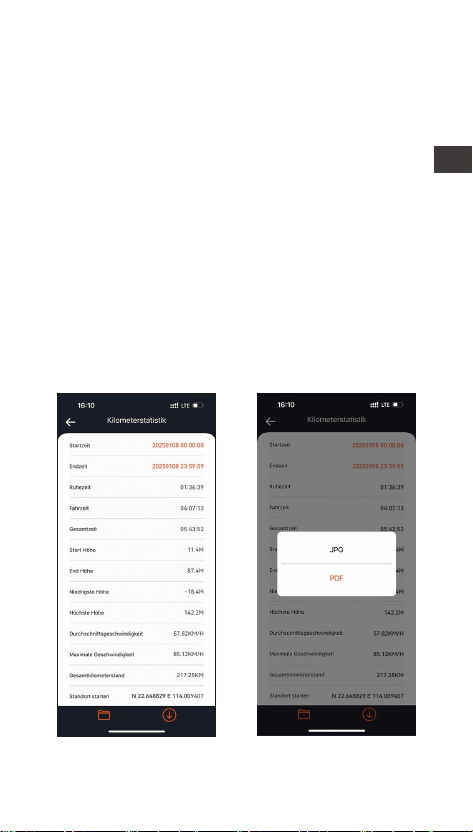
- 66 -
Sprachsteuerung aktivieren
Für die Spracherkennung sind vier Empndlichkeits-
stufen zur Auswahl: „AUS“, „Niedrige Empndlich-
keit“, „Standard“ und „Hohe Empndlichkeit“.
Standardeinstellung: Die Option „Standard“.
Kilometerstatistik
Die N2X Dashcam nutzt GPS Informationen bei
Fahen, um Statistiken wie Fahrzeit, -kilometer,
-höhe, -geschwindigkeit usw. zu analysieren.
Kilometerstandsdateien können über die VANTRUE
APP expoie werden.
Im Live-Vorschau von VANTRUE App können Sie die
Sta- und Endzeit auswählen und auf „OK“ tippen.
Dann können Sie die Kilometerstandsdateien im PDF-
oder JPG-Format herunterladen und sie im lokalen
Ordner von VANTRUE App speichern.
DE
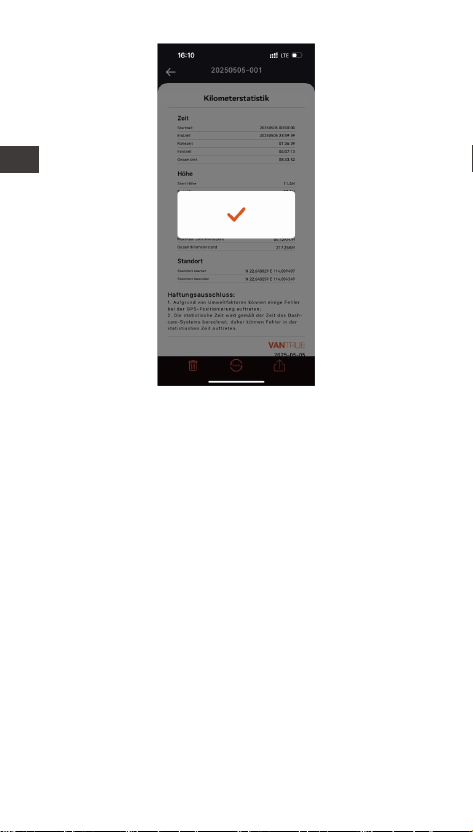
- 67 -
LTE-Einstellungen (müssen mit LTE-Modul
verwendet werden)
Um es Benutzern zu erleichtern, den Parkstatus aus der
Ferne zu überprüfen, hat Vantrue ein LTE-Modul
eingefüh. Benutzer können eine SIM-Kae in das
LTE-Modul einlegen und es zur Fernüberwachung mit
einem Dashcam verbinden.
DE
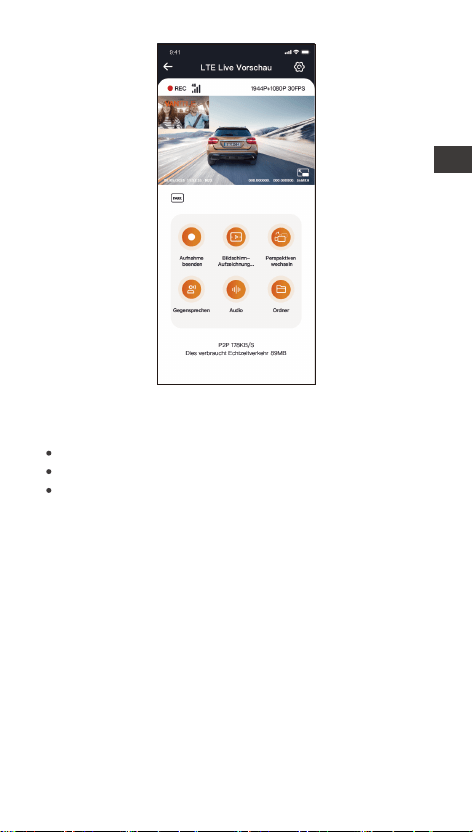
- 68 -
In den LTE-Einstellungen können Benutzer Folgendes
anpassen:
Benutzer können je nach SIM-Kaenpaket exible
Anpassungen vornehmen, um eine eziente Nutzung
des Datenverkehrs und der Fernüberwachungsfunk-
tionen sicherzustellen.
Nachrichten-Push-Einstellungen
Datennutzungslimit der SIM-Kae
Qualität des Kollisionsvideo-Uploads
DE

- 69 -
12:20
KM/H
120
N
NE
E
SE
S
SW
W
NW
HUD Geschwindigkeit und Uhrzeit
Nachdem diese Funktion aktivie ist, werden mit jeder
eolgreichen GPS-Oung auf dem Bildschirm die
aktuelle Fahrgeschwindigkeit, -richtung und Uhrzeit
vergröße angezeigt.
Die aktuelle Geschwindigkeit
Kompass
Uhrzeit
Geschwindigkeitszeiger
Einheit der
Geschwindig-
keit
Wenn diese Funktion und der Bildschirmschoner
gleichzeitig aktivie werden, hat die zweite Funktion
Vorrang.
Wenn GPS nicht aktivie wird oder GPS-Signale nicht
ordnungsgemäß empfangen werden, lässt sich diese
Funktion ebenfalls nicht richtig einsetzen.
Hinweise
DE

- 70 -
GPS Funktion
GPS ist standardmäßig aktivie. Die N2X Dashcam
empfängt GPS-Signale über eine mitgeliefee GPS-
Halterung. Sie korrigie je nach Region automatisch
Uhrzeit und Datum, zeichnet Standoe und
Fahrgeschwindigkeiten des Fahrzeugs beim
Aufnehmen auf.
Nach Einschalten der Dashcam wird GPS-Verbin
dung normalerweise innerhalb von 1 Minute
hergestellt. Andernfalls überprüfen Sie bitte, ob GPS
im Einstellungsmenü der Dashcam aktivie wird, ob
die GPS-Halterung ordnungsgemäß angeschlossen
ist, ob der Empfang der GPS-Signale gestö wird.
Zum reibungslosen Empfang der GPS-Signale soll
sich das Fahrzeug mit der Dashcam NICHT an
folgenden Stellen benden: Tiefgarage, dicht
besiedeltes Wohngebiet, U-Bahn, Tunnel usw.
GPS-Informationen werden in die Aufnahme
eingeschrieben und gespeiche. Um Aufnahmen
mit GPS-Daten anzusehen, laden Sie bitte die
VANTRUE App und den VANTRUE GPS Player unter
www.vantrue.net herunter und installieren Sie sie.
Hinweise:
GPS Information
40
46
39
43
48
DE

- 71 -
Automatische Zeitsynchronisierung über GPS
Automatische Zeitsynchronisierung über GPS ist
standardgemäß aktivie. Wählen Sie je nach Region
die entsprechende Zeitzone. Wenn Sie sich über die
genaue Zeitzone Ihres Standos unsicher sind,
können Sie Ihr Smaphone mit Wi-Fi der Dashcam
verbinden und die automatische Zeitsynchronisierung
in der VANTRUE APP aktivieren, dadurch wird die
Zeitzone der Dashcam entsprechend korrigie.
Die Zeitzone soll man richtig einstellen, um die
automatische Zeitsynchronisierung über GPS zu
verwirklichen. Mehr Informationen über die
Zeitzone können Sie im Internet recherchieren.
Die automatische Umschaltung zwischen Winter-
und Sommerzeit lässt sich momentan nur für
Nordamerika verwirklichen.
Hinweise:
Firmware-Aktualisierung der N2X Dashcam
Aktualisierungsweise 1: Update mittels Firmware-
Datei neuester Version
Besuchen Sie die ozielle Website von VANTRUE,
um die neueste Firmware-Datei der N2X Dashcam
herunterzuladen. Kopieren Sie diese Datei in die
Speicherkae und legen Sie die microSD-Kae
erneut in die Dashcam ein. Nachdem die Dashcam
eingeschaltet wird, lässt sich das System der
Dashcam automatisch aktualisieren.
Uhrzeit & Datum
Automatische Zeitsynchronisi...
Datum / Uhrzeit manuell eins...
Automatische ST/WT-Umsch...
DE
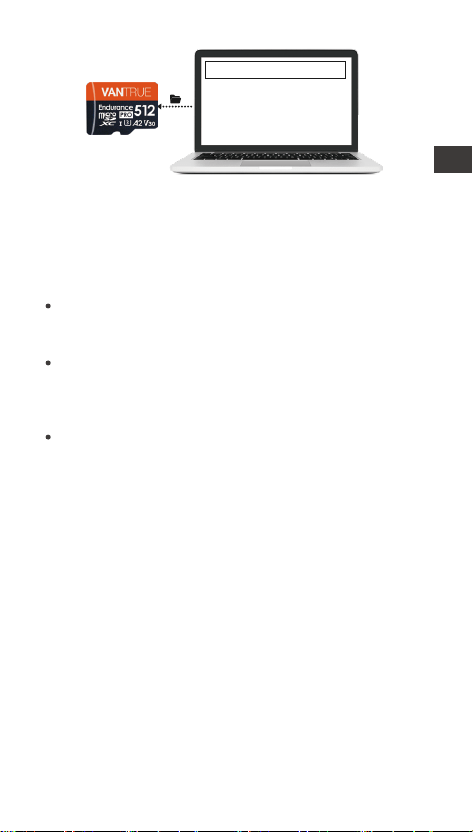
- 72 -
Um die Firmware reibungslos zu aktualisieren, muss
die N2X Dashcam mit einem stabilen Dauerstrom
versorgt werden.
Vor der Firmware-Aktualisierung über OTA soll
„Mobile Daten“ auf dem Smaphone aktivie
werden, um die Aktualisierungsdatei
herunterzuladen.
Um die Firmware per Datei zu aktualisieren, müssen
Sie zuerst die Speicherkae der N2X Dashcam
formatieren und dann die Aktualisierungsdatei auf
die Speicherkae kopieren.
Datei-Upgrade
Aktualisierungsweise 2: Über OTA (Over the Air)
Wenn beim Önen der VANTRUE App eine Meldung
über die Firmware-Aktualisierung auftaucht, ist es
empfohlen, den Anweisungen in der App zu folgen,
um die Firmware zu aktualisieren
DE
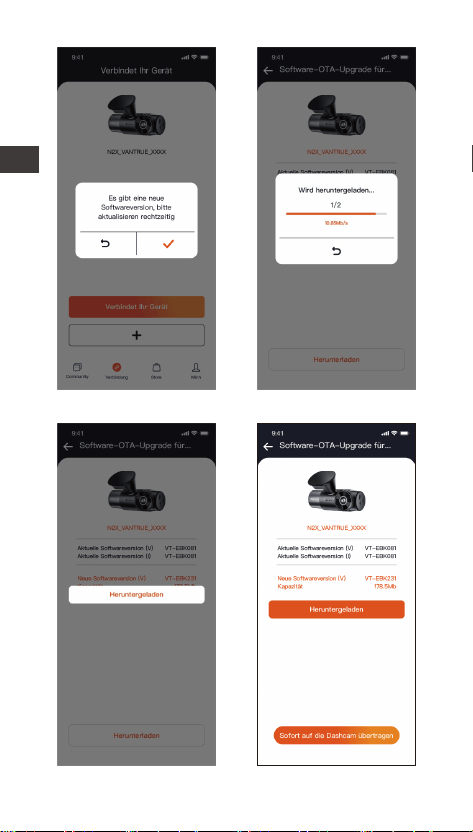
- 73 -
DE
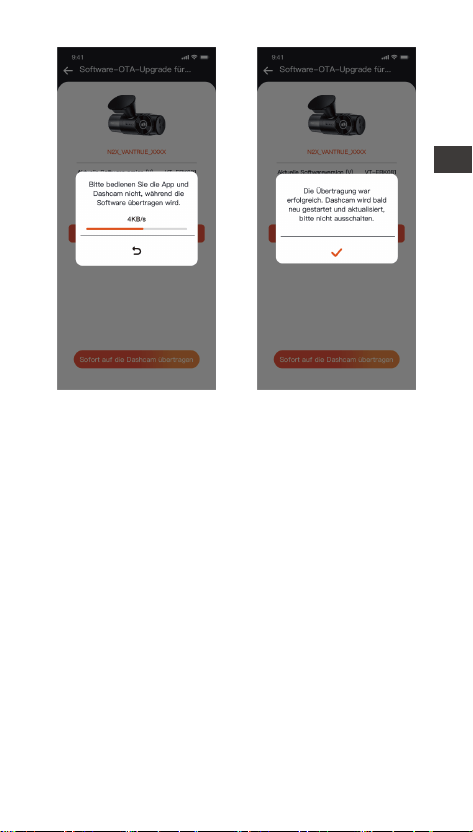
- 74 -
2.4 Einstellungen
Das Einstellungsmenü der N2X Kamera besteht aus
drei Teilen: „Video Einstellung“, „System Einstellung“
und „Datei“. Sie können Ihre Dashcam nach Ihren
Beda und Vorlieben einstellen.
2.4.1 Video Einstellung
-Auösung: Die N2X Dashcam veügt über zwei
Aufzeichnungsmodus mit verschiedenen
Auösungsoptionen:
Vorne+Innen Aufzeichnungsmodus:
1944P+1080P 30FPS
1944P+720P 30FPS
1440P+1080P 30FPS
1440P+720P 30FPS
1440P 60FPS + 1080P 30FPS
1440P 60FPS + 720P 30FPS
1080P+1080P 30FPS
1080P+720P 30FPS
720P+720P 30FPS
DE

- 75 -
Vorne Aufzeichnungsmodus:
2592x1944P 30FPS
2560x1440P 30FPS
2560x1440P 60FPS
1920x1080P 30FPS
1280x720P 30FPS
-Bildqualität: Standard, PlatePix™.
-Loop-Aufnahme: „1 Minute“ standardgemäß
eingestellt. Optionen zur Auswahl: Aus, 1 Minute, 3
Minuten und 5 Minuten.
-Infrarot LED: „Autom.“ standardgemäß eingestellt.
Optionen zur Auswahl: Autom, Aus, An.
-G-Sensor: Wählen Sie je nach Richtung (Vorne +
Hinten, Links + Rechts, Oben + Unten) benötigte
Empndlichkeitsstufen des G-Sensors aus. Die
Empndlichkeitsstufe des G-Sensors für jede
Richtung kann als 1, 2, 3, 4, 5 oder Aus eingestellt
werden. Je höher die Empndlichkeitsstufe, desto
weniger ist die Kraft benötigt, um den G-Sensor zu
erwecken und die automatische Sperrung der
Eventaufnahme auszulösen. Der G-Sensor ist mit
Stufe 5 am empndlichsten.
-Privatsphäre-Modus: Es ist standardmäßig
deaktivie. Wenn diese Option eingeschaltet ist,
eolgt die Videoaufnahme in einem Drei-Seg-
ment-Loop-Modus.
-Tonaufnahme: „An“ standardgemäß eingestellt.
Optionen zur Auswahl: Aus, An.
-Geräuschunterdrückung: „An“ standardgemäß
eingestellt. Die Audioqualität der Aufnahme wird
durch dynamische Rauschunterdrückung angepasst.
Optionen zur Auswahl: Aus, An.
-Belichtung: „+0.0“ standardgemäß eingestellt. Die
Belichtungswee für Kameras nach vorne und innen
lassen sich separat einstellen.
-LED Indikator: „An“ standardgemäß eingestellt. Die
Statusanzeige der Aufnahme lässt sich ein- und
ausschalten. Optionen zur Auswahl: Aus, An.
-HDR: „An“ standardgemäß eingestellt. Das
DE

- 76 -
HDR-Feature für Kameras nach vorne und innen
lassen sich separat einstellen.
-HDR Timer: „Aus“ standardgemäß eingestellt. Wenn
der HDR Timer aktivie ist, lässt sich einstellen, wann
HDR automatisch ein- und ausgeschaltet wird.
-PlatePix™ Timer: Standardmäßig deaktivie. Beim
Einschalten können Sie die automatische Sta- und
Stoppzeit auswählen.
-Bildschirm Drehen: „Aus“ standardgemäß
eingestellt. Man kann den Bildschirm der Dashcam
umdrehen und die Ansicht auf den Kopf stellen. Die
Kamera nach vorne und die nach innen lassen sich
separat anpassen.
-Spiegelbild: „An“ standardgemäß eingestellt. Wenn
das Spiegelbild aktivie ist, wird der Bildschirm der
Kamera nach innen im Spiegelmodus angezeigt.
-Nummernschild: Geben Sie die einzustellende
Ziern oder Buchstaben ein, um das Nummernschild
Ihrers Fahrzeugs auf dem Bildschirm und im
aufgezeichneten Videos anzuzeigen.
-Stempel: Zeigen Sie bei Beda benötigte Stempel
bzw. Wasserzeichen auf Aufnahmen und Fotos.
Optionen zur Auswahl: Datum/Uhrzeit, Hersteller /
Modell, Nummernschild, Geschwindigkeit, GPS
Stando. Alle Optionen sind standardmäßig aktivie.
-Zeitraer: „Aus“ standardgemäß eingestellt. Der
Zeitraer-Modus ermöglicht, mit 1FPS, 5FPS, 10FPS
oder 15FPS aufzunehmen. Optionen zur Auswahl:
Aus, 1FPS, 5FPS, 10FPS, 15FPS.
-Parkmodus: Unterschiedliche Parkmodi lassen sich
je nach Beda einstellen: Kollisionserkennung,
Bewegungserkennung, Modus mit niedriger
Auösung, Modus mit niedriger Bildrate, Aus. „Aus“
standardgemäß eingestellt.
-Parküberwachungseinstellungen:
Optionen zur Einstellung:
Einstellung der Überwachungskameras
Nachtsicht Parkmodus
Hochladen der Eventvideos zum Cloud-Speicher
DE

- 77 -
Kollisionserkennung beim Parken
Überwachungsbereich bei der Bewegungserkennung
-Kilometerstatistik: „Aus“ standardgemäß
eingestellt. Wenn diese Funktion aktivie wird,
zeichnet die Dashcam Kilometerstandsdateien auf.
Sie können sie auf die VANTRUE App überagen und
überprüfen.
-HUD Geschwindigkeit und Uhrzeit: „Aus“
standardgemäß eingestellt. Sie können einstellen, wie
lange daue es nach eolgreicher GPS-Oung, bis
die aktuelle Geschwindigkeit und Uhrzeit angezeigt
wird. Optionen zur Auswahl: Aus, 1 Minute, 3 Minuten,
5 Minuten.
-GPS Einstellung: „GPS An“ standardgemäß
eingestellt. Optionen zur Einstellung: GPS (An / Aus),
Geschwindigkeitseinheit (KMH / MPH), GPS
Information.
2.4.2 System Einstellung
-Sprache: Folgende Sprachen sind momentan
unterstützt: English/Français/Español/Deutsch/Ital-
iano/简体中文/русский/日本語/Polski /
한국어/Türkçe/Čeština.
-WLAN: „WLAN Option“ und „WLAN Geschwind-
igkeit“ lassen sich einstellen und die „WLAN
Infomation“ lässt sich überprüft werden.
WLAN Option: AUS, AN, AUS Nach 10 Min. Wenn Sie
„Aus“ wählen, muss das WLAN manuell aktivie
werden. Wenn Sie „An“ wählen, bleibt es immer
aktivie. Wenn Sie die Option „AUS Nach 10 Min“
wählen, wird es erst nach 10 Minuten automatisch
deaktivie.
WLAN Geschwindigkeit: Als „5G“ standardgemäß
eingestellt.
WLAN Infomation: Der Titel und das Passwo des
WLAN sind hier sichtbar.
-Spracherkennung: „Standard“ standardgemäß
eingestellt. Bestimmte Sprachbefehle können erkannt
werden, nachdem diese Option aktivie wurde.
DE

- 78 -
Optionen zur Einstellung: AUS, Niedrige Empndlich-
keit, Standard, Hohe Empndlichkeit.
-Sprachbefehle: Sie können bestimmte Sprachebefe-
hle geben, um mit Ihrer Stimme die Dashcam zu
bedienen.
-MicroSD Kae Formatieren: Formatieren Sie alle
Daten auf der Speicherkae. Es ist empfohlen, vor
der Formatierung benötige Dateien in der
Speicherkae am Computer zu speichern.
-Formatierungserinnerung: Erinnerungsoptionen: 15
Tage, 1 Monat, Aus. „Aus“ standardgemäß eingestellt.
Um die Speicherkae regelmäßig zu formatieren und
dadurch langfristiger zu funktionieren, ist eine
Erinnerungsfunktion für die Formatierung integrie.
Sie können einstellen, alle 15 Tagen oder jeden Monat
zur Formatierung erinne zu werden. Zu jedem
Zeitpunkt erscheint auf der Benutzerobeläche der
Dashcam eine Formatierungsmeldung. Drücken Sie
dann die Option „OK“, um die Speicherkae zu
formatieren.
Hinweis: Wenn Sie eine andere Option in der
„Formatierungserinnerung“ bestätigen, wird die
Zeitabstand bis zur nächsten Erinnerung erneut
gezählt.
-Datum & Uhrzeit: Uhrzeit und Datum lässt sich auf
zwei Weisen anpassen.
① Automatische Zeitsynchronisierung über GPS: Die
automatische Aktualisierung über GPS wird
standardgemäß aktivie, sodass Datum und Uhrzeit
rechtzeitig automatisch aktualisie wird. Die
Aktualisierung basie auf die eingestellte Zeitzone. Es
ist empfohlen, eine dem Stando entsprechende
Zeitzone einzustellen.
② Manuelle Einstellung: Deaktivieren Sie die
automatische Aktualisierung über GPS und stellen
dann Datum und Uhrzeit manuell ein.
③ Automatische Umstellung zwischen Sommer- und
Winterzeit: „Aus“ standardgemäß eingestellt. Wenn
diese Funktion aktivie wird, lässt sich Datum und
DE

- 79 -
Uhrzeit entsprechend der Sommer- oder Winterzeit
automatisch aktualisieren.
*Diese Funktion lässt sich momentan nur für
Nordamerika verwirklichen. Bei Verwendung in
anderen Regionen könnte es zu Fehlern bezüglich
Datum und Uhrzeit kommen.
Datumsformat, Uhrzeitformat und Zeitzone lassen
sich hier einstellen.
-Bildschirmschoner: Stellen Sie ein, wie lange daue
es, bis der LCD-Bildschirm der Dashcam automatisch
ausgeschaltet wird, wenn keine Bedienung an der
Dashcam betätigt wird. Optionen zur Auswahl: Aus,
30 Sekunden, 1 Minute, 3 Minuten. Wenn Sie den
Bildschirmschoner auf „3 Minuten“ einstellen, wird
der Bildschirm der Dashcam ohne Bedienung nach 3
Minuten automatisch ausgeschaltet, während die
Aufnahme weiter läuft. Wenn Sie die Option „Aus“
bestätigen, schaltet sich der Bildschirm nicht
automatisch aus.
-Lautstärke: Lautstärke der Warntöne lassen sich
anpassen. Optionen zur Auswahl: AUS, 1, 2, 3, 4, 5. Je
höher die Stufe, desto lauter eönen Warntöne. Die
Stufe „2“ standardgemäß eingestellt.
-Warntöne: Je nach Situation eönt ein
entsprechender Ton von der Dashcam. Fünf Tonaen
lassen sich ein und ausschalten: Stasound,
Tastenton, Datei-Sperren-Ton, Formatierungston und
Warnton beim ungewöhnlichen Beenden einer
Aufnahme. Alle Warntöne sind standardmäßig
eingeschaltet.
-Frequenz: Die anwendbare Frequenz hängt von der
Region ab, in der Sie sich benden. Um eine
Beeinträchtigung der Videoqualität zu vermeiden,
können Sie je nach Region eine Frequenz von 50Hz
oder 60Hz wählen.
-System Info: Sie können das aktuelle Modell, die
Firmware-Version und die ozielle Website von
VANTRUE überprüfen.
DE
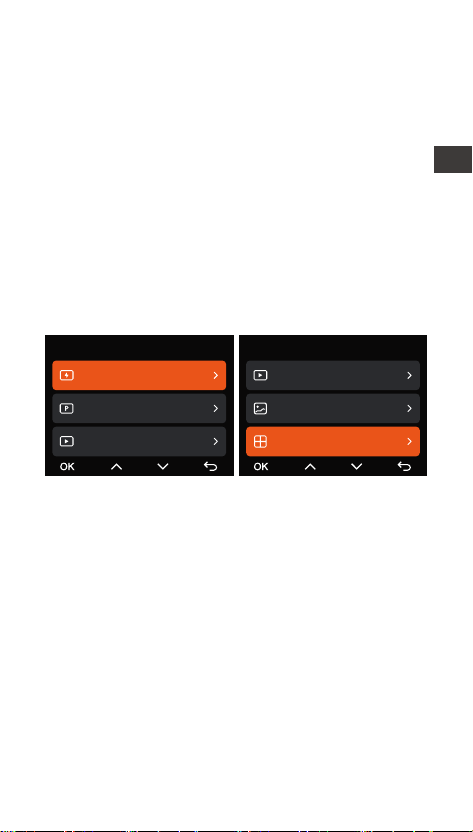
- 80 -
-Zeizierungsinfo: Sie können die Zeizierungs-
informationen der N2X Dashcam überprüfen.
-Werkeinstellungen: Setzen Sie das Gerät auf die
Werkseinstellungen zurück.
-LTE-Einstellungen: Diese Funktion muss mit dem
LTE-Modul verbunden sein. Standardmäßig werden
Nachrichten-Push in Echtzeit, 200 MB täglicher
Datenverkehr und Kollisionsvideo-Upload verwendet.
Benutzer können die Einstellungen nach Beda
ändern.
2.4.3 Datei
Sie können sich hier die von der Dashcam aufge-
zeichneten Videos und Fotos (Schnappschüsse)
anschauen.
Datei
Eventvideos
Videos im Parkmodus
Gewöhnliche Videos
1/5
Datei 5/5
Gewöhnliche Videos
Fotos
Alle Dateien
-Eventvideos: Eventvideos, die durch G-Sensor
automatisch erkannt oder manuell gesper wurden.
Das Dateinamenformat für Eventvideos lautet:
20241201_140633_00008_E_A.MP4
20241201_140633_00008_E_B.MP4
-Gewöhnliche Videos: Aufgenommene Standardvid-
eos. In diesem Ordner werden Aufnahmen bei der
Loop-Aufnahme, im Parkmodus und im
Zeitraermodus gespeiche.
Das Dateinamenformat für Videos bei der Loop-Auf-
nahme lautet: 20241201_140933_00008_N_A.MP4;
Das Dateinamenformat für Videos im Zeitraermodus
lautet: 20241201_140733_00006_T_A.MP4;
DE

- 81 -
-Dateien im Parkmodus: Das Dateinamenformat für
Videos im Parkmodus lautet:
20241201_140833_00002_P_A.MP4
-Fotos: Schnappschüsse. Das Dateinamenformat für
Fotos lautet:
20241201_140633_00005_A.JPG;
20241201_140633_00005_B.JPG.
-Alle Dateien: Alle Videos und Fotos sind hier
sichtbar.
Hinweis: Alle Dateien mit dem Buchstaben „A“ im
Namen sind von der Kamera nach vorne
aufgezeichnet, während die anderen Dateien mit dem
Buchstaben „B“ im Namen von der Kamera nach
innen aufgezeichnet werden.
DE

- 82 -
-Dateien im Parkmodus: Das Dateinamenformat für
Videos im Parkmodus lautet:
20241201_140833_00002_P_A.MP4
-Fotos: Schnappschüsse. Das Dateinamenformat für
Fotos lautet:
20241201_140633_00005_A.JPG;
20241201_140633_00005_B.JPG.
-Alle Dateien: Alle Videos und Fotos sind hier
sichtbar.
Hinweis: Alle Dateien mit dem Buchstaben „A“ im
Namen sind von der Kamera nach vorne
aufgezeichnet, während die anderen Dateien mit dem
Buchstaben „B“ im Namen von der Kamera nach
innen aufgezeichnet werden.
3. Spezikationen & Sicherheitshinweise
3.1 Spezikationen
Aufgrund von Produktverbesserungen können sich
die Spezikationen dieses Produkts ohne vorherige
Ankündigung ändern. Wir bitten um Ihr Verständnis.
N2XModell
Chips
Sony Sensor
3-Achsen G-Sensor
Eingebautes 2.4GHz & 5GHz
Modul
2 Zoll IPS Bildschirm
Bildsensor
G-Sensor
Wi-Fi
Bildschirm
Leistungsstarker Prozessor
Novateks
Kamera nach vorne:
158° Weitwinkel
Kamera nach innen:
165° Weitwinkel
Blickwinkel der
Kameras
Kamera nach vorne: F/1.8 große
Blende
Kamera nach innen: F/1.8 große
Blende
Blende
Engish / Français / Español /
Deutsch / Italiano / 简体中文 /
русский / 日本語/ Polski /
한국어 / Türkçe / Čeština
Sprachen
Videoauösung Vorne + Innen:
1944P+1080P 30FPS
1944P+720P 30FPS
1440P+1080P 30FPS
1440P+720P 30FPS
1440P 60FPS + 1080P 30FPS
1440P 60FPS + 720P 30FPS
1080P+1080P 30FPS
1080P+720P 30FPS
720P+720P 30FPS
Nur vorne:
2592x1944P 30FPS
2560x1440P 30FPS
2560x1440P 60FPS
1920x1080P 30FPS
1280x720P 30FPS
DE

- 83 -
FR
JPG
Vorne + Innen:
1944P+1080P 30FPS
1944P+720P 30FPS
1440P+1080P 30FPS
1440P+720P 30FPS
1440P 60FPS + 1080P 30FPS
1440P 60FPS + 720P 30FPS
1080P+1080P 30FPS
1080P+720P 30FPS
720P+720P 30FPS
Dateiformat der
Videos
MP4
Eingebaute Mikrofone und
Lautsprecher
Dateiformat der
Fotos
Ton
Speicherung
Unterstützt erweitee
Speicherung: microSD Kae von
32 bis zu 512GB, U3, Klasse 10
(NICHT im Lieferumfang
enthalten)
Type C
Eingebauter Superkondensator
Stromversorgung
Betriebsspannung
& -strom
Leistung
Betriebstemperatur
Lageemperatur
6W
-20°C bis 60°C (-4°F bis 140°F)
-20°C bis 70°C (-4°F bis 158°F)
Nur vorne:
2592x1944P 30FPS
2560x1440P 30FPS
2560x1440P 60FPS
1920x1080P 30FPS
1280x720P 30FPS
DC 5V 2.4A
USB Anschluss
DE

- 84 -
3.2 Sicherheitshinweise
Das Produkt stellt ein Zusatzgerät zur Aufzeichnung
der Szenen vor und in dem Fahrzeug dar. Ein Teil
der Funktionen könnte aufgrund unterschiedlicher
Fahrbedingungen und Fahrzeugtypen nicht
unterstützt werden.
Um Benutzereahrungen kontinuierlich zu
verbessern, wird die Firmware der Dashcam
unregelmäßig aktualisie. Bitte beachten Sie die
Veröentlichung der Firmware-Datei neuerer
Version auf der oziellen Webseite von VANTRUE.
Dieses Produkt ermöglicht normalerweise, Dateien
von Fahrzeugunfällen automatisch aufzuzeichnen
und zu speichern. Allerdings es könnte sein, dass
ein Teil der Szenen oder Momente NICHT
aufgezeichnet und gespeiche wird, insbesondere
wenn Bewegungen oder Kollisionen nicht stark
genug sind, um den G-Sensor der Dashcam
auszulösen und Ereigniserkennung zu aktivieren.
Bitte schalten Sie zuerst die Dashcam aus, bevor die
Speicherkae eingelegt oder entfernt wird.
Andernfalls könnte bedeutende Dateien verloren
gehen.
Um üssig und stabil aufzunehmen, ist es
empfohlen, die Speicherkae regelmäßig -
zumindest jeden Monat - zu formatieren.
Speicherkaen haben normalerweise eine
beschränkte Lebensdauer.
Nach Ablauf dieser Frist könnten sie Dateien NICHT
ordnungsgemäß speichern. In diesem Fall ist es
empfohlen, eine neue Speicherkae zu erwerben
und benutzen. Für mögliche Datenverluste unter
diesen Umständen sind wir nicht verantwolich.
Um Fahrsicherheit willen bitte vermeiden Sie
während der Fah, die Dashcam zu reinstallieren
und zu bedienen.
Setzen Sie das Produkt keinen starken Kollisionen
oder Vibrationen aus, um mögliche Schäden am
Gerät oder Fehlfunktionen zu vermeiden.
DE

- 85 -
Es ist NICHT empfohlen, chemische Lösungs- oder
Reinigungsmittel zum Reinigen des Geräts zu
verwenden.
Man soll die Dashcam bei Temperaturen von -20℃
bis 60℃ bedienen. Eine Bedienung außerhalb dieses
Temperaturbereichs könnte zu Fehlfunktionen des
Geräts führen.
Dieses Produkt sollte vom Feuer ferngehalten
werden. Verwenden Sie das Produkt bitte NICHT bei
hohen Temperaturen oder in feuchtiger Umgebung,
um Stromschläge, Kurzschlüsse und andere Risiken
zu vermeiden.
Es ist verboten, das mitgeliefee Autoladegerät
selbst zu zerlegen oder modizieren, und ein
Ladegerät mit Risiken vom Kurzschluss sollte
ebenfalls nicht verwendet werden, um mögliche
Verletzungen und andere Risiken zu vermeiden.
DE

- 86 -
4. Herstellergarantie & Suppo
Herstellergarantie
Die VANTRUE® N2X Dashcam haben eine Garantie von
einem Jahr ab Kaufdatum auf
Material- und Verarbeitungsfehler. Es ist empfohlen,
sich auf unserer oziellen Webseite (www.vantrue.net
/register) zu melden und Fans-Gruppe von VANTRUE
beizutreten, dann können Sie zusätzlich eine
verlängee Garantie von 18 Monaten genießen!
Suppo
Hätten Sie Fragen nach unseren Produkten, kontak-
tiere Sie bitte unseren Kundendienst auf entsprech-
ender Einkaufsplattform oder via unsere ozielle
E-Mail-Adresse (suppo@vantrue.net). Außerdem
können Sie die VANTRUE® APP önen und mögliche
Antwoen im Teil „FAQ“ auf der Seite „Mich“ nden.
Ihre Meinungen gelten
VANTRUE® setzt sich unermüdlich für Erhöhung der
Produktqualität, Verbesserung der Dienstleistungen
sowie Optimierung der Benutzereahrungen ein. Sie
sind herzlich willkommen, Ihre wevollen Vorschläge
an uns (suppo@vantrue.net) zu schreiben.
DE

- 87 -
FR
Veuillez lire attentivement le manuel avant d'utiliser
l'appareil ;
La caméra de bord doit toujours être connectée à
une source d'alimentation pour fonctionner ;
Pour une conduite en toute sécurité, veuillez ne pas
installer de produits ou utiliser votre téléphone pour
regarder des vidéos de conduite pendant que vous
conduisez.
Ce produit nécessite l'inseion d'une cae micro SD
pour enregistrer des vidéos.
Ne démontez pas la coque de la caméra et ne la
réparez pas vous-même. En cas de dysfonctionne-
ment du produit, veuillez contacter le responsable
VANTRUE.
N'installez pas la caméra dans une position qui
pourrait bloquer votre vision de la conduite ;
Ne pas utiliser ce produit à des températures
élevées et à l'abri de l'humidité.
De temps en temps, nous mettons à jour le
micrologiciel an d'améliorer l'expérience du
produit. Vous pouvez choisir d'eectuer la mise à
jour le cas échéant
N'installez pas la caméra directement devant les
occupants an d'éviter qu'elle ne se déplace
accidentellement et ne présente un risque pour la
sécurité ;
Veuillez noter qu'il est possible que vous ne puissiez
pas vous connecter à l'application Vantrue lorsque
vous utilisez CarPlay sans l ou Android Auto ;
Veuillez utiliser ce produit dans les limites
autorisées par la loi.
Conseils d'aveissement :
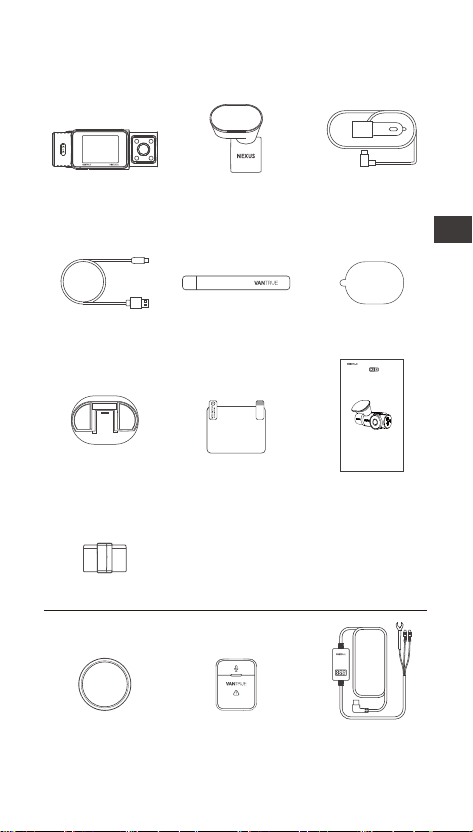
- 88 -
FR
1. Guide rapide d'utilisation
1.1 Ce qu'il y a dans la boîte
Accessoires en option
A. Vantrue N2X
Dash Cam
B. GPS Suppo
Adhésif
C. Câble de
chargement
pour voiture
USB C (6m)
D. Câble de
données
USB C (1m)
E. Pied-de-biche F. Autocollants
*2
G. Base pour
montage
adhésif
H. Autocollants
électrostatiques
*2
I. Manuel de
l'utilisateur
J. Filtre CPL K. Télécommande
sans l
L. Câble du kit
de câblage
Vantrue
J. Clip de câble
vantrue.com
truly driven.
USER MANUAL
Nexus 2 X
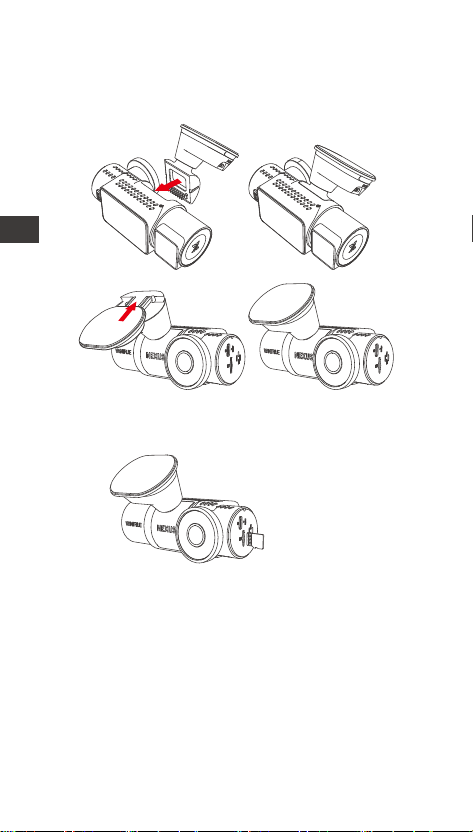
- 89 -
1.2 Installation du suppo adhésif et cae mémoire
Alignez le suppo avec l'inteace de montage de la
caméra, puis poussez jusqu'à ce que le suppo soit
installé.
Insérez la cae mémoire et formatez-la en priorité
après avoir allumé la caméra
Insérer une
cae mémoire
FR
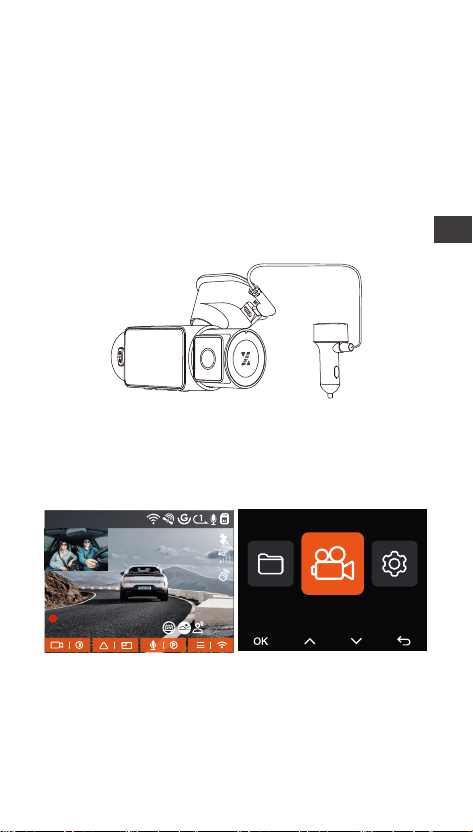
- 90 -
1.3 Installation de la caméra et conguration
Veuillez allumer et mettre en marche la caméra, puis
eectuer les réglages du menu de la caméra, et enn
installer la caméra sur le pare-brise avant de votre
voiture.
Mise sous tension : Connectez une extrémité de
l'adaptateur d'alimentation USB d'origine à la source
d'alimentation, et branchez l'autre extrémité dans le
connecteur d'alimentation de la monture GPS N2X
pour tester si la caméra peut s'allumer normalement.
Installation terminée : Assurez-vous que la caméra
de tableau de bord est correctement montée sur le
pare-brise du véhicule et qu'elle ne bloque pas la vue
du conducteur, et que la caméra frontale lme dans le
sens de la route.
Paramètres : Après la première utilisation, ou après
chaque mise à jour du micrologiciel ou après avoir
restauré les paramètres d'usine, vous devez
réinitialiser ceains paramètres de base tels que la
date et l'heure, la langue et la région.
1440P +1080P 30FPS1440P +1080P 30FPS
00:00:37
05-05-2025 AM 10:09:07
MP/H
Paramètres Vidéo
45
FR
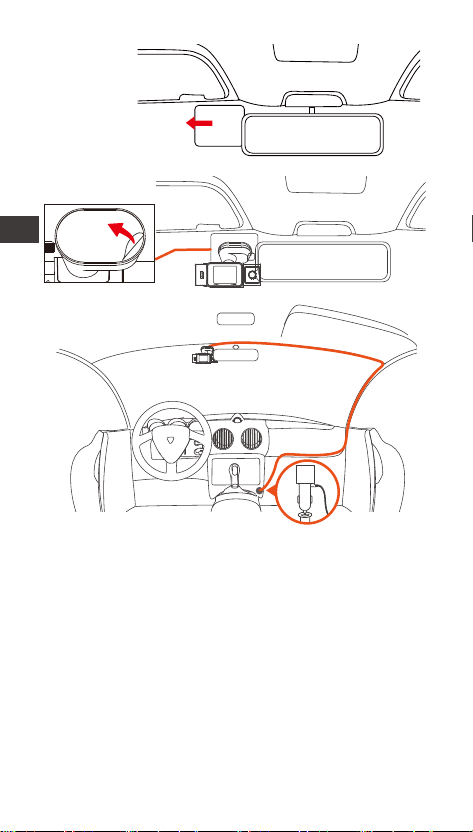
- 91 -
Installer la caméra
embarquée
Le clip de câble peut être utilisé pour xer et ranger
le câble du chargeur de voiture ou le câble de
l'objectif arrière après l'avoir xé dans une position
appropriée.
Enregistrement vidéo: Après l'installation, une fois la
voiture démarrée, la caméra de voiture commencera
à enregistrer des vidéos automatiquement.
Mise hors tension: Lorsque vous ne l'utilisez pas,
appuyez longuement sur le bouton d'alimentation
pour l'éteindre.
Insérer la chargeur de voiture
FR
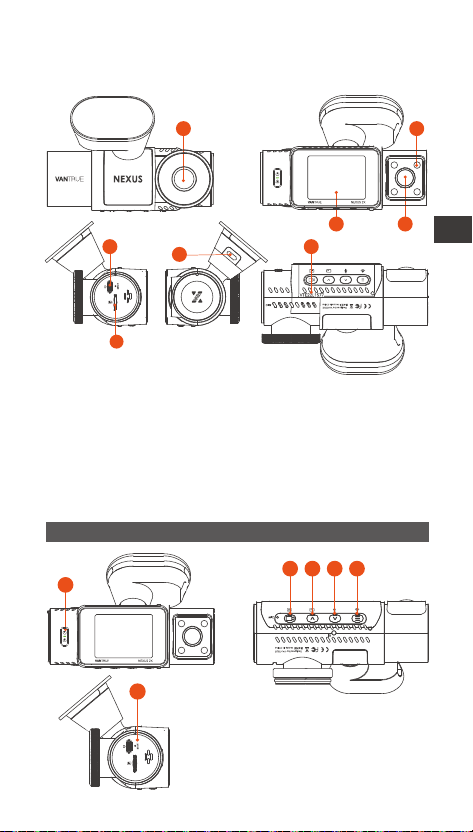
- 92 -
2. Fonctionnement de base
2.1 Vue d'ensemble de la caméra
1. Caméra frontale
2. Écran IPS 2 pouces
3. Caméra intérieure
4. Lumières infrarouges pour la caméra intérieure
5. Po USB-C pour le chargement
6. Po USB-C pour le transfe de données
7. Numéro de série
8. Fente pour cae mémoire
Boutons et fonctions
1
2 3 4 5
6
1 2
43
7
6
5
8
FR

- 93 -
2.
4.
Dans l'inteace d'enregistrement,
appuyez brièvement pour démarrer ou
mettre en pause l'enregistrement;
Dans le réglage du menu, appuyez
brièvement pour conrmer l'option;
Dans l'état de lecture, appuyez
brièvement pour lire la vidéo ou mettre
en pause la vidéo.
Dans l'inteace d'enregistrement,
appuyez brièvement pour changer
l'achage de la fenêtre vidéo;
Dans l'inteace de navigation, appui
cou pour sélectionner l'option
précédente, appui long pour faire déler
Lors de la lecture de chiers, appuyez
brièvement pour accélérer.
Dans l'inteace d'enregistrement,
appuyez brièvement pour régler le
microphone;
Appuyez longuement pour entrer en
mode parking (* lorsque le mode parking
est activé)
Dans l'inteace de navigation, appui
cou pour sélectionner l'option suivante,
appui long pour faire déler
3.
1.
Appui long pour allumer/éteindre la
caméra
Dans l'inteace d'enregistrement et WiFi,
un appui cou permet d'activer
l'enregistrement d'urgence et la capture
d'images.
Dans l'inteace de navigation des
chiers, un appui cou permet d'ouvrir le
menu de suppression des chiers.
N° Boutons Instruction
Dans l'inteace d'enregistrement,
appuyez longuement pour activer ou
5.
FR
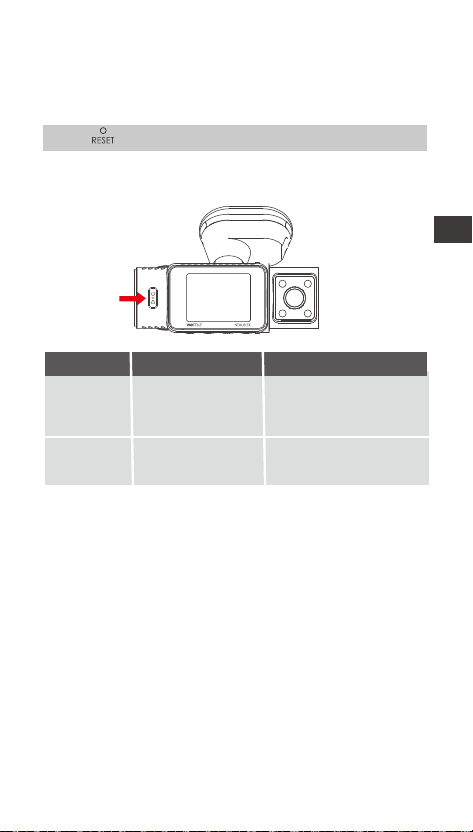
- 94 -
6.
Appui cou pour redémarrer la dashcam
Enregistre-
ment
Indicateur LED
Lumière vee
xe
lumière vee
clignotante
La caméra est en train
d'enregistrer.
désactiver le WiFi;
Dans l'inteace de paramétrage et de
navigation, un appui cou permet de
revenir à l'inteace précédente.
Enétat de veille ou le
voyant d'enregitre-
ment est désactivé
DescriptionÉtat des voyantsLED
FR
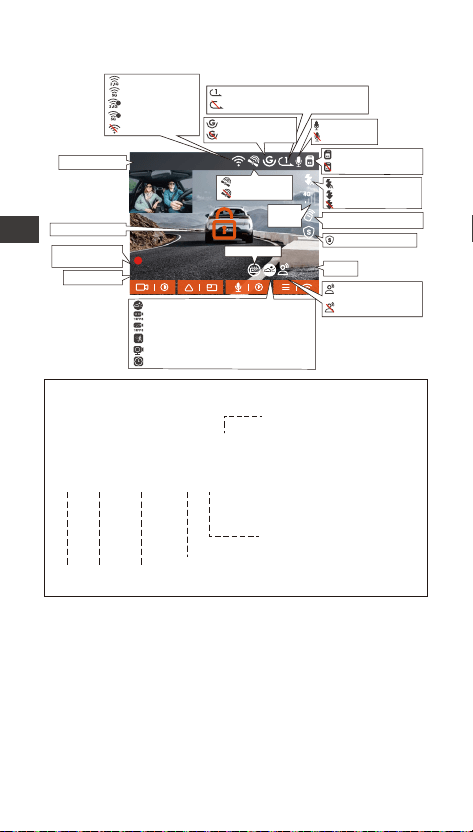
- 95 -
1440P +1080P 30FPS
00:00:37
12-01-2024 AM 10:09:07
MP/H
45
2.2 Aperçu de l'écran
Enregistrement en Boucle
Enregistrement en boucle désactivé
2.4G WiFi activé
5GWiFi activé
2.4GWiFi connecté
5GWiFi connecté
WiFi désactivé
G-sensor activé
G-sensor désactivé
Cae mémoire insérée
Sans cae mémoire
Télécommande connecté
Signal
Réseau
Vitesse
ACC Normal
Durée
d'enregistrement
Heure et date
Résolution vidéo
GPS verrouillé
GPS désactivé
MIC activé
MIC désactivé
Assistant vocal
désactivé
Assistant vocal activé
Détection de collision
1080P Enregistrement à faible débit Activé
720P Enregistrement à faible débit Activé
Détection de mouvement
Faible fréquence d'images Activé
Enregistrement accéléré Activé
Lumière IR auto
Lumière IR allumée
Lumière IR désactivé
20250505_140933_00008_N_A.MP4
20250505_140833_00007_P_B.MP4
20250505_140733_00006_T_B.MP4
20250505_140633_00005_E_A.MP4
A pour la caméra frontale
B pour la caméra interne
Année Date Temps
P pour la vidéo enregistrée
en mode parking
N pour l'enregistrement en
boucle
T pour vidéo en accéléré
E pour l'enregistrement
d'événements
Numéro de
séquence
Dénition du format de chier
Verrouillage vidéo
Mode condentialité
FR

- 96 -
2.3 Guide d'utilisation
2.3.1 Guide d'utilisation de l'APP
--Téléchargement de l'APP
Veuillez scanner le code QR de la version correspon-
dante ci-dessous pour télécharger l'application et
l'installer.
Recherchez l'application « Vantrue » dans l'App Store
ou le Google Play Store pour trouver l'application,
puis téléchargez-la et installez-la sur votre téléphone.
--Ajouter un appareil
Le Wi-Fi est automatiquement activé lorsque la
caméra de sueillance N2X est allumée. Après avoir
désactivé le Wi-Fi, les utilisateurs peuvent le réactiver
en utilisant les touches de raccourci, la fonction de
commande vocale ou en accédant aux paramètres du
menu.
Une fois le Wi-Fi de la caméra N2X activé, cliquez sur
« Ajouter un appareil » dans l'application Vantrue,
sélectionnez la série Nexus, choisissez le modèle N2X,
conrmez le nom Wi-Fi correspondant, et enn
cliquez pour conrmer la connexion Wi-Fi.
FR
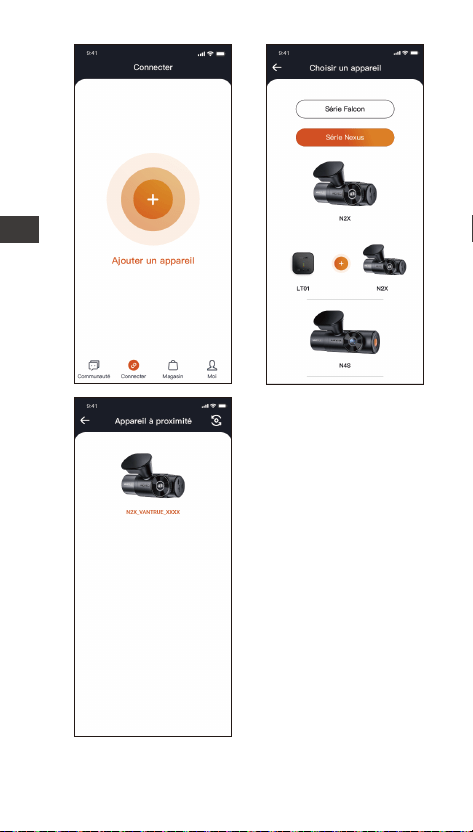
- 97 -
FR
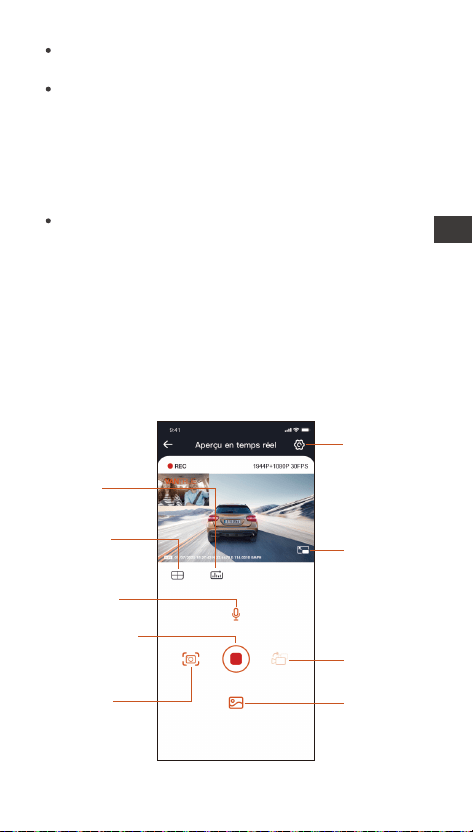
- 98 -
Veuillez d'abord vérier si la fonction Wi-Fi de votre
téléphone est activée.
Le mot de passe initial de cet appareil n'est utilisé
que pour la connexion initiale. An de prévenir les
risques de sécurité potentiels, veillez à modier le
mot de passe initial après la connexion initiale pour
empêcher d'autres personnes de se connecter à
votre appareil sans autorisation ou d'autres
conséquences négatives.
Si vous oubliez le mot de passe que vous avez
déni, vous pouvez aller dans les « Paramètres du
système » de la caméra et choisir de restaurer les
paramètres par défaut. Une fois que l'appareil photo
a restauré les paramètres par défaut, le mot de
passe Wi-Fi est le mot de passe initial (12345678).
Veuillez noter que le mot de passe Wi-Fi de la
caméra ne peut être modié que via l'application
Vantrue.
-Lignes directrices pour l'utilisation de l'APP
Album
Instantané
Réglage
Statistiques
kilométriques
Ligne de
correction
de l'objectif
Microphone
Commutateur
de vitre avant
et arrière
Bouton plein
écran
Bouton démarrer
/interrompre
l'enregistrement
FR

- 99 -
FR
Aperçu vidéo : une fois l'appareil connecté avec
succès à l'APP, l'enregistreur accède à la page
d'aperçu en temps réel, cliquez sur le bouton plein
écran ou placez le téléphone horizontalement,
l'image en temps réel passera automatiquement
mode aperçu plein écran.
Cliquez sur le bouton commutation pour basculer
les fenêtres vidéo avant et arrière.
Lecture vidéo : vous pouvez visualiser le chier
vidéo ou photo enregistré sur la cae micro SD
dans l'APP, et cliquer sur le chier pour lire la vidéo.
Téléchargement vidéo : vous pouvez choisir de
télécharger des vidéos ou des images dans
l'inteace de navigation des chiers de la cae
micro SD ou dans la lecture vidéo. Après avoir
téléchargé la vidéo, elle peut être lue dans le chier
local de l'application et la trace GPS de la vidéo peut
être visualisée.
Capture vidéo : vous pouvez capturer l'image
actuelle dans l'inteace de prévisualisation en
temps réel de l'application. Veuillez cliquer sur le
bouton d'instantané pour le prendre.
Statistiques de kilométrage: vous pouvez
télécharger les informations de kilométrage selon
vos besoins, et elles seront enregistrées dans
l'application sous forme d'images ou de chiers PDF.
Ligne de correction de l'objectif : Corrigez
l'équilibre de l'objectif grâce à la ligne transversale
précise, de soe que l'image vidéo ne soit pas
faussée.
FR
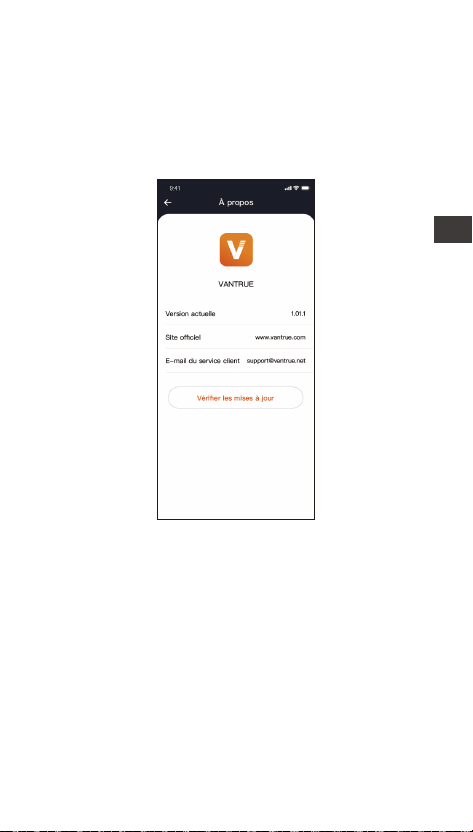
- 100 -
2.3.2 Opération de base
Fonction de qualité d'image et minuterie PlatePix™
Le mode de qualité d'image par défaut est standard,
les utilisateurs peuvent activer le mode PlatePix™ si
nécessaire et dénir le temps d'activation/désactiva-
tion automatique avec la minuterie PlatePix™. Cette
fonction priorise l'amélioration de la claé des plaques
d'immatriculation, évitant le ou des plaques
d'immatriculation dû à des problèmes d'éclairage, ce
qui pourrait aecter la preuve des accidents.
-Mise à niveau de l'application
Ouvrez l'application Vantrue, allez dans « Moi > À
propos > Vérier les mises à jour ». L'application
détectera automatiquement si une nouvelle version
est disponible. Si une mise à jour existe, suivez les
instructions pour procéder à la mise à niveau.
FR
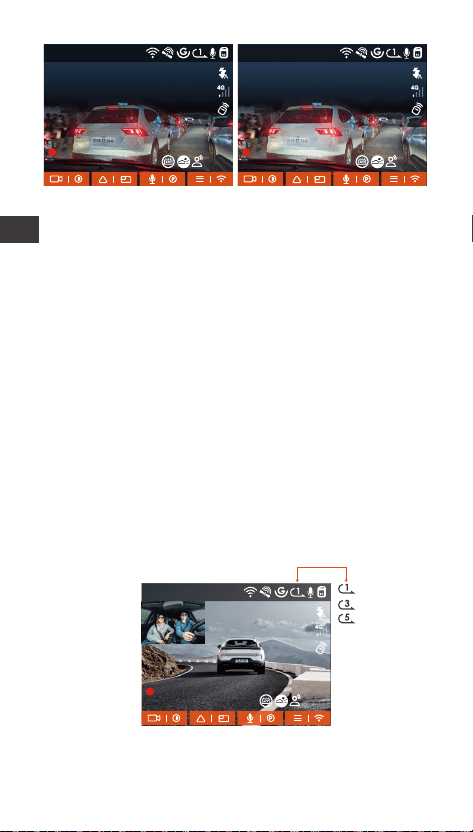
- 101 -
Enregistrement en Boucle
Avec une cae mémoire insérée, la caméra démarre
(par défaut) immédiatement l'enregistrement vidéo en
boucle lorsqu'elle est connectée à une source
d'alimentation.
Selon la taille de la cae mémoire actuelle, une fois
que l'enregistrement atteint le réglage (70 % de la
capacité totale), le nouvel enregistrement écrasera
automatiquement le plus ancien. L'activation de cette
fonction peut éviter d'arrêter l'enregistrement lorsque
le chier est plein pendant la conduite.
Remarque: Le mode PlatePix™ augmentera la
luminosité devant le véhicule, mais l'image globale
peut être sombre. Dans des environnements à faible
luminosité, il est recommandé de désactiver cette
fonction pour éviter d'aecter les résultats de
l'enregistrement.
1440P +1080P 30FPS
00:00:37
05-05-2025 AM 10:09:07
MP/H
45
1440P +1080P 30FPS
00:00:37
05-05-2025 AM 10:09:07
MP/H
45
Activé Désactivé
1440P +1080P 30FPS
00:00:37
05-05-2025 AM 10:09:07
MP/H
45
FR

- 102 -
Vidéo d'urgence
L'enregistrement d'urgence est déclenché par G-Sensor,
qui peut être divisé en déclenchement automatique et
verrouillage manuel.
Remarquer:
Le fonctionnement normal de cette fonction dépend
en grande paie de la vitesse de la cae mémoire.
Veuillez donc formater la cae mémoire
régulièrement pour éviter des problèmes tels qu'un
trop grand nombre de chiers sur la cae mémoire
et le vieillissement de la cae qui aectent le cycle
d'enregistrement normal.
Veuillez vérier régulièrement la vidéo
d'enregistrement en boucle pour éviter de boucler
sur la vidéo nécessaire.
Lorsque l'enregistrement en boucle est désactivé, la
caméra enregistrera la vidéo en 20 minutes chaque
clip, mais n'écrasera pas les anciennes vidéos
lorsque la cae de stockage est pleine.
Si l'enregistrement en boucle est désactivé, la
fonction de verrouiller les vidéos ne fonctionnera
plus.
1440P +1080P 30FPS
00:00:37
05-05-2025 AM 10:09:07
MP/H
45
Verrouillage manuel : Cliquez sur l'icône pour
commencer à verrouiller l'enregistrement et la vidéo
est enregistrée dans le dossier vidéo d'urgence.
Verrouillage automatiquement: Lorsque la voiture
est heuée par une collision, le capteur G détecte la
vibration et verrouille automatiquement la vidéo
actuelle et l'enregistre dans le dossier vidéo
d'urgence.
Pendant la période de verrouillage de la vidéo, vous
pouvez appuyer sur le bouton pour capturer
plusieurs fois. Après l'enregistrement, la vidéo sera
automatiquement enregistrée dans le dossier vidéo
de l'événement et la photo sera enregistrée dans le
dossier photo.
FR
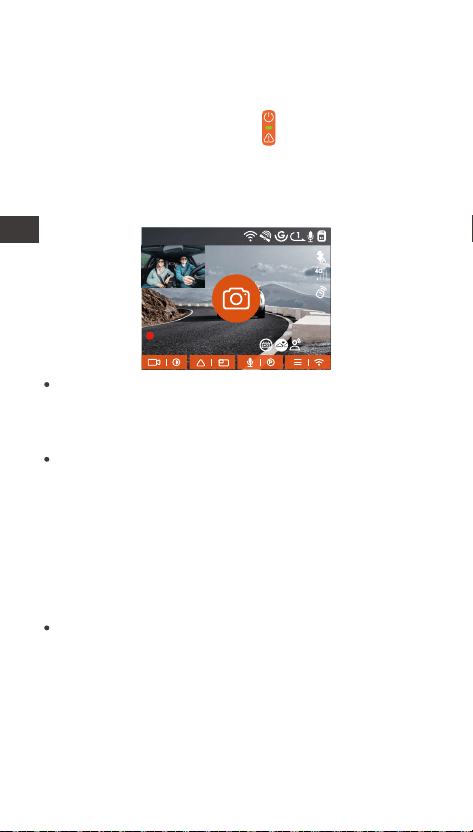
- 103 -
La sensibilité du déclencheur vidéo à verrouillage
automatique est déterminée par la sensibilité de la
collision. Plus le réglage de sensibilité est élevé, plus
la probabilité d'être déclenché est grande.
La capacité totale du chier vidéo d'événement
représente 30% de la capacité totale de la cae
mémoire actuelle. Lorsque le chier vidéo
d'événement atteint la limite supérieure, le nouveau
chier vidéo d'événement écrasera automatique-
ment le chier vidéo d'événement d'origine. Il est
recommandé de vérier et d'enregistrer périodique-
ment vos chiers vidéo d'événement pour éviter
toute pee.
La situation qui ne déclenchera pas l'enregistrement
verrouillé : désactivez le mode d'enregistrement en
boucle ou activez le mode d'enregistrement en
accéléré. Dans les deux cas, vous ne pouvez prendre
que des photos
1440P +1080P 30FPS
00:00:37
05-05-2025 AM 10:09:07
MP/H
45
Verrouillage manuel : Cliquez sur l'icône pour
commencer à verrouiller l'enregistrement et la vidéo
est enregistrée dans le dossier vidéo d'urgence.
Verrouillage automatiquement: Lorsque la voiture
est heuée par une collision, le capteur G détecte la
vibration et verrouille automatiquement la vidéo
actuelle et l'enregistre dans le dossier vidéo
d'urgence.
Pendant la période de verrouillage de la vidéo, vous
pouvez appuyer sur le bouton pour capturer
plusieurs fois. Après l'enregistrement, la vidéo sera
automatiquement enregistrée dans le dossier vidéo
de l'événement et la photo sera enregistrée dans le
dossier photo.
FR

- 104 -
Mode Parking
Veuillez noter les précautions suivantes lors de
l'utilisation du mode parking :
Pour garantir que la caméra de tableau de bord
peut utiliser la fonction de mode parking
normalement, veuillez utiliser le câble du kit de
câblage VANTRUE ou une autre source
d'alimentation stable et continue pour la caméra.
Il est recommandé d'utiliser le kit de câblage ACC
VANTRUE. Si vous utilisez un kit de câblage ACC
d'une autre marque, il se peut que vous ne puissiez
pas utiliser la fonction ACC en raison de
l'emplacement diérent de la broche PIN de
détection ACC.
Dans l'environnement chaud et ensoleillé de l'été,
nous vous recommandons de choisir le mode
parking de la détection de collision. Lorsque la
température ambiante dans la voiture atteint 60℃,
nous vous recommandons d'éteindre l'appareil
photo pour éviter qu'il ne fonctionne anormalement
en raison de la température élevée.
L'enregistrement par intealles et le mode parking
(y compris la détection de collision, la détection de
mouvement, l'enregistrement à faible débit , le
mode à faible fréquence d'images) ne peuvent être
activés que l'un des deux. Si l'un d'entre eux est
activé, l'autre sera automatiquement désactivé.
Tous les chiers enregistrés en mode parking
seront sauvegardés dans le dossier vidéo parking,
an d'éviter que les chiers du mode parking ne
soient écrasés par la boucle, veuillez les vérier
régulièrement pour éviter de les perdre.
La fonction de mode parking sera améliorée avec la
mise à jour du micrologiciel de la caméra de
sueillance N2X. Veuillez prêter attention à
l'annonce de la description du micrologiciel sur le
site Web de VANTRUE pour les changements
spéciques, ou consultez le personnel du seice
clientèle.
FR

Mode Démarrage & Soie
Auto
ACC
Capteur G
Réglages du Moniteur de Parking
Mode Démarrage & Soie
Lentille de détection
Mode Parking à Faible Lumi...
- 105 -
Pour garantir que la caméra de tableau de bord
peut utiliser la fonction de mode parking
normalement, veuillez utiliser le câble du kit de
câblage VANTRUE ou une autre source
d'alimentation stable et continue pour la caméra.
Il est recommandé d'utiliser le kit de câblage ACC
VANTRUE. Si vous utilisez un kit de câblage ACC
d'une autre marque, il se peut que vous ne puissiez
pas utiliser la fonction ACC en raison de
l'emplacement diérent de la broche PIN de
détection ACC.
Dans l'environnement chaud et ensoleillé de l'été,
nous vous recommandons de choisir le mode
parking de la détection de collision. Lorsque la
température ambiante dans la voiture atteint 60℃,
nous vous recommandons d'éteindre l'appareil
photo pour éviter qu'il ne fonctionne anormalement
en raison de la température élevée.
L'enregistrement par intealles et le mode parking
(y compris la détection de collision, la détection de
mouvement, l'enregistrement à faible débit , le
mode à faible fréquence d'images) ne peuvent être
activés que l'un des deux. Si l'un d'entre eux est
activé, l'autre sera automatiquement désactivé.
Tous les chiers enregistrés en mode parking
seront sauvegardés dans le dossier vidéo parking,
an d'éviter que les chiers du mode parking ne
soient écrasés par la boucle, veuillez les vérier
régulièrement pour éviter de les perdre.
La fonction de mode parking sera améliorée avec la
mise à jour du micrologiciel de la caméra de
sueillance N2X. Veuillez prêter attention à
l'annonce de la description du micrologiciel sur le
site Web de VANTRUE pour les changements
spéciques, ou consultez le personnel du seice
clientèle.
Introduction au mode stationnement
Méthodes d’activation/désactivation du mode
stationnement :
1. Auto Mode (Default)
Sans câble de stationnement (mode G-Sensor) :
Activation automatique après 5 minutes d’inactivité
du véhicule ;
désactivation automatique en cas de second choc
détecté.
Avec câble de stationnement (ACC) :
Activation automatique lorsque le véhicule est éteint
(ACC OFF) ;
désactivation automatique au démarrage (ACC ON).
FR
2. Mode ACC
Activation automatique quand le véhicule est éteint
(ACC OFF) ; désactivation au démarrage (ACC ON).
Nécessite le câble de stationnement (ACC)
correctement installé.
3. Mode G-Sensor
Activation et désactivation contrôlées par le capteur
G. Le mode s’active automatiquement après 5
minutes d’immobilité du véhicule, et se désactive en
cas de second choc détecté.
Remarque : en cas de dysfonctionnement du câble de
stationnement (ACC), vous pouvez utiliser ce mode
en alternative.
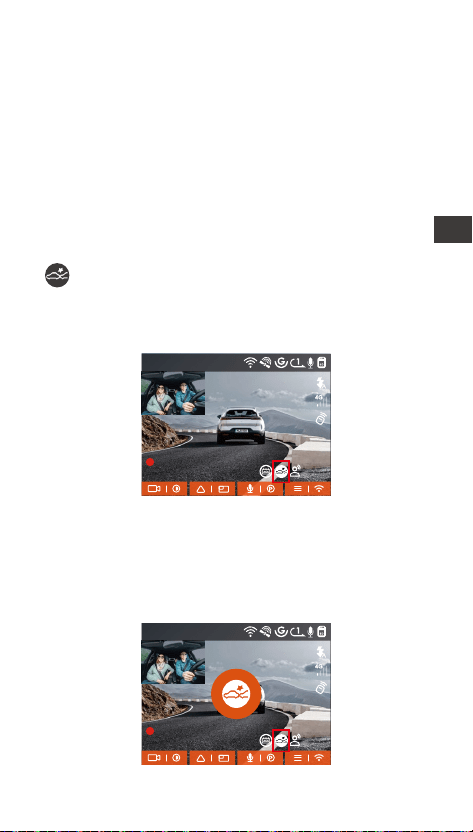
- 106 -
Détection de Collision
Lorsque la détection de collision est activée, son icône
s'ache à l'écran. La sensibilité de détection de
collision peut être ajustée de 1 à 5 niveaux, Une
sensibilité élevée signie qu'une légère collision peut
facilement déclencher l'enregistrement.
1440P +1080P 30FPS
00:00:37
05-05-2025 AM 10:09:07
MP/H
45
4. Mode manuel
Appuyez longuement sur le bouton de raccourci pour
activer ; appuyez sur n’impoe quel bouton pour
quitter.
FR
Activation et désactivation contrôlées par le capteur
G. Le mode s’active automatiquement après 5
minutes d’immobilité du véhicule, et se désactive en
cas de second choc détecté.
Remarque : en cas de dysfonctionnement du câble de
stationnement (ACC), vous pouvez utiliser ce mode
en alternative.
Une fois la détection de collision eectuée, la
dashcam se déclenche pour enregistrer une vidéo
pendant 30 secondes après la collision et sauvegarde
le chier dans le dossier vidéo du parking, qui peut
être visionné par l'utilisateur via l'application ou le
lecteur de l'ordinateur.
1440P +1080P 30FPS
00:00:37
05-05-2025 AM 10:09:07
MP/H
45
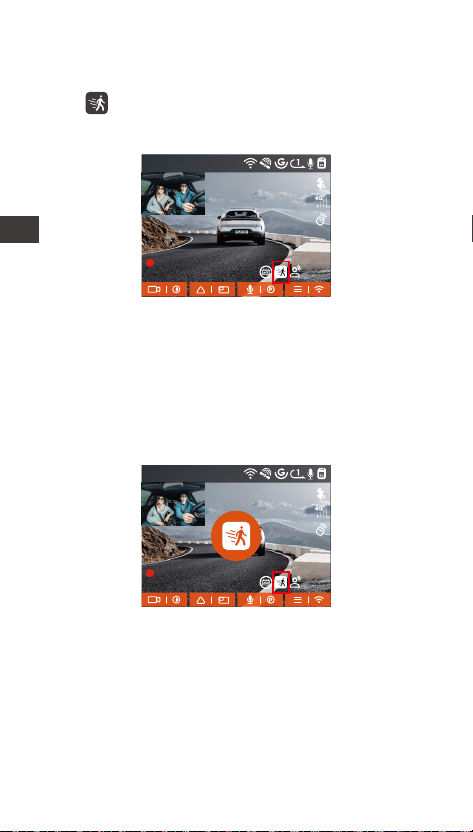
- 107 -
Détection de Mouvement
Lorsque la détection de mouvement est activée, son
icône s'ache à l'écran, indiquant que la caméra
utilise actuellement le mode de détection de
mouvement.
Une fois la détection de mouvement activée, dès
qu'un objet se déplace dans la zone de détection,
l'enregistrement est déclenché pendant 30 secondes
et les 15 secondes précédant le déclenchement de
l'enregistrement sont conseées pour former une
vidéo d'enregistrement de détection de mouvement
de 45 secondes, qui sera sauvegardée dans le dossier
Parking Video (vidéo de stationnement).
1440P +1080P 30FPS
00:00:37
05-05-2025 AM 10:09:07
MP/H
45
FR
1440P +1080P 30FPS
00:00:37
05-05-2025 AM 10:09:07
MP/H
45
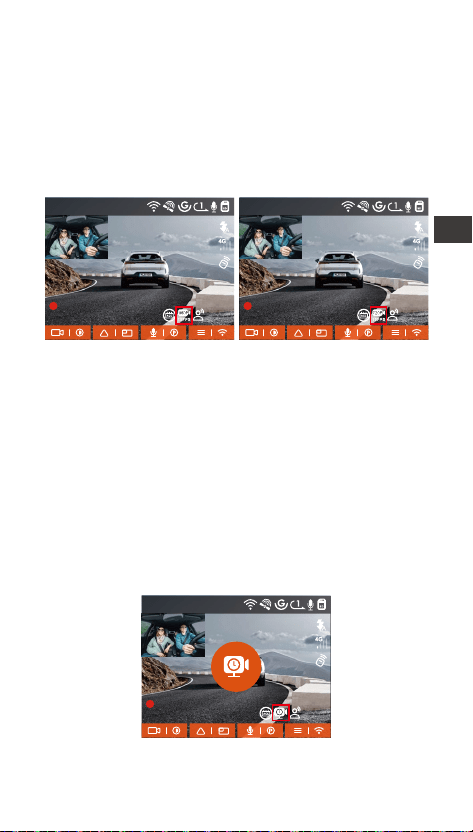
- 108 -
Enregistrement à faible débit
Après avoir sélectionné l'enregistrement à faible
débit, la résolution de toutes les séquences passe
automatiquement à 1080P 15FPS ou 720P 15FPS
pour l'enregistrement, la durée de l'enregistrement
est de 3 minutes et le chier est enregistré dans le
dossier Parking Video.
Enregistrement à faible fréquence d'images
Lors de l'enregistrement à faible fréquence d'images,
la dashcam compresse la durée d'enregistrement pour
prolonger l'intégrité du chier d'enregistrement.
Chaque chier d'enregistrement à faible fréquence
d'images est aché pendant une minute et le chier
est sauvegardé dans le dossier vidéo du parking.
Par exemple, si l'utilisateur sélectionne le mode 1FPS
low frame rate, l'enregistreur enregistrera la vidéo en
secondes pendant la sueillance du parking, et
toutes les 30 minutes d'enregistrement seront
compressées en 1 minute et sauvegardées.
1440P +1080P 30FPS
00:00:37
05-05-2025 AM 10:09:07
MP/H
1440P +1080P 30FPS
00:00:37
05-05-2025 AM 10:09:07
MP/H
45 45
FR
1440P +1080P 30FPS
00:00:37
05-05-2025 AM 10:09:07
MP/H
45
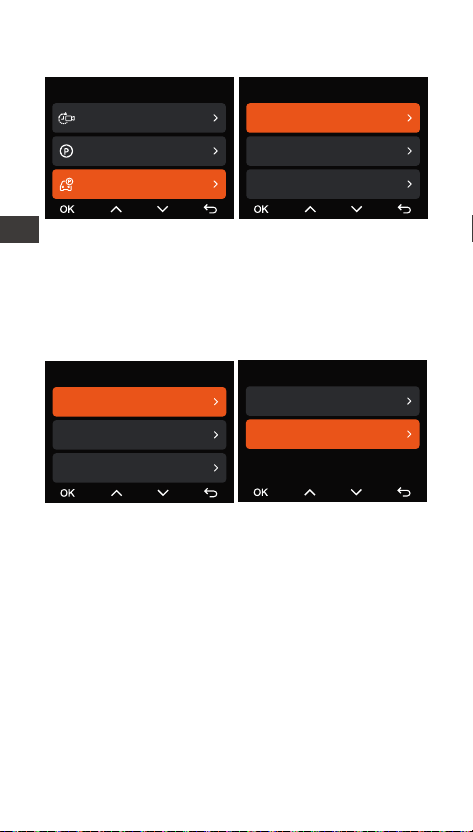
- 109 -
Réglages du Moniteur de Parking
Réglages de l'objectif de détection
Réglez l'objectif d'enregistrement pour toutes les
fonctions de sueillance du stationnement, vous
pouvez choisir l'objectif avant + l'objectif intérieur
ensemble, ou l'enregistrement avec un seul objectif
avant.
Vision Nocturne à faible luminosité
Lorsque la voiture est garée dans un endroit peu
éclairé, cette fonction permet d'améliorer la
luminosité ambiante.
Le mode par défaut est activé, il ne se déclenche
qu'après le passage en mode parking, il n'aecte pas
l'enregistrement normal.
Paramètres Vidéo
Enregistrement en accélé...
Mode Parking
Réglages du Moniteur de...
17/20
Réglages du Moniteur de Parking
Lentille de détection
Mode Parking à Faible Lumin...
Mode Parking à Détection de...
Réglages du Moniteur de Parking
Lentille de détection
Mode Parking à Faible Lumin...
Mode Parking à Détection de...
Lentille de détection
Avant+Cabine
Avant
FR
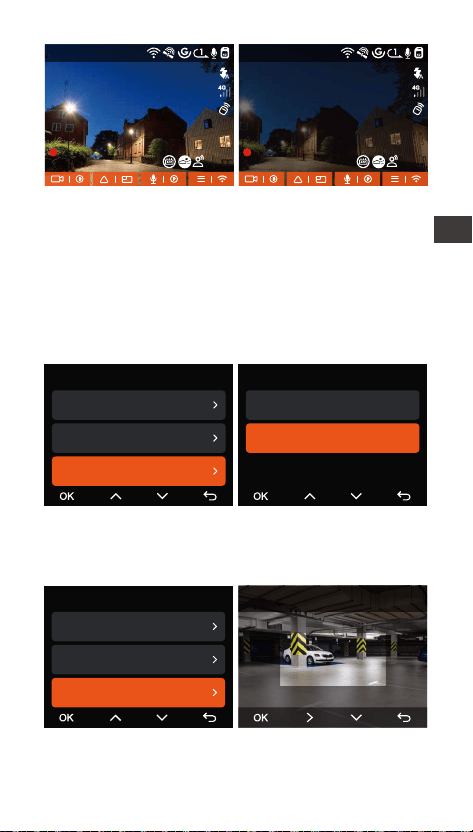
- 110 -
Parking-Détection de collision
En mode économie d'énergie, la dashcam est éteinte
et, après déclenchement, elle se met en marche pour
enregistrer des vidéos. En mode démarrage rapide, la
dashcam est en mode veille et, après déclenchement,
elle commence immédiatement à enregistrer des
vidéos.
Zone de détection de mouvement
Ajustez pour sélectionner la plage de détection de la
zone mobile que vous souhaitez.
(Désactivé)(Activé)
Mode Parking à Détection de Collision
Mode économie d'énergie
Mode de démarrage rapide
Réglages du Moniteur de Parking
Lentille de détection
Mode Parking à Faible Lumin...
Mode Parking à Détection de...
Réglages du Moniteur de Parking
Mode Parking à Faible Lumin...
Mode Parking à Détection de...
Zone de Détection de Mouve...
Détection de la Zone Avant
1440P +1080P 30FPS
00:00:37
05-05-2025 AM 10:09:07
MP/H
1440P +1080P 30FPS
00:00:37
05-05-2025 AM 10:09:07
MP/H
45 45
FR

- 111 -
Commande Vocal en Français
En plus de contrôler la caméra avec la télécommande,
vous pouvez également contrôler la caméra avec la
commande vocale. Comme capturer des images,
démarrer l'enregistrement vidéo, activer/désactiver le
WiFi, verrouiller la vidéo, etc. Pour des commandes
vocales plus détaillées, veuillez vérier Paramètres
système > Contenu vocal.
Contrôle Vocale Activé
Le réglage par défaut est la sensibilité standard. La
reconnaissance vocale propose des options telles que
faible sensibilité/standard/haute sensibilité/désactivé.
Vous pouvez contrôler la caméra avec des
commandes vocales.
Statistiques Kilométriques
La caméra embarquée N2X utilise les informations
GPS pour analyser les statistiques kilométriques telles
que le temps de conduite, le kilométrage, l'altitude, la
vitesse de conduite, etc. pendant le processus de
conduite. Les chiers de kilométrage peuvent être
expoés via l'APP.
Dans l'inteace de prévisualisation en temps réel de
l'APP, vous pouvez sélectionner l'heure de début et
l'heure de n, cliquer sur OK, puis télécharger le
chier de statistiques kilométriques au format PDF ou
JPG et l'enregistrer dans le dossier local de l'APP.
1440P +1080P 30FPS
00:00:37
05-05-2025 AM 10:09:07
MP/H
FR
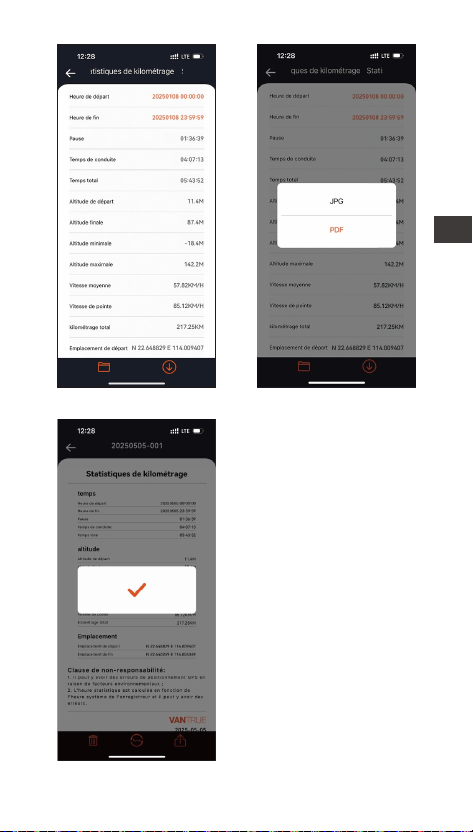
- 112 -
FR
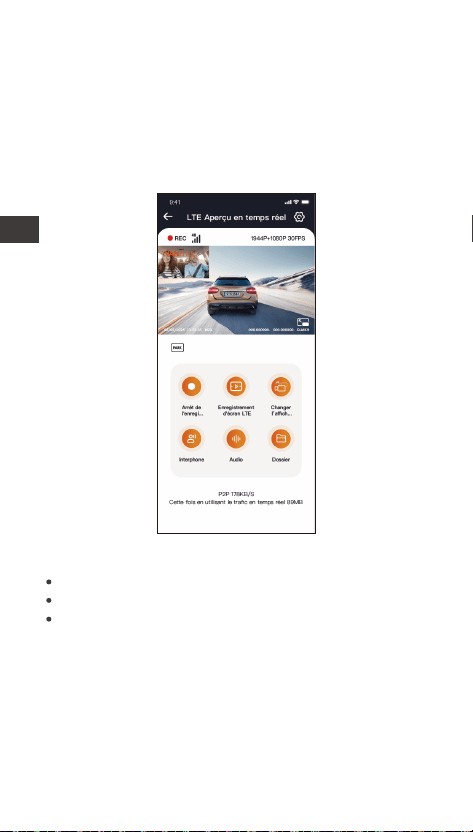
- 113 -
Conguration LTE (Doit être connecté avec le
module LTE)
Pour faciliter la vérication à distance des conditions
de stationnement, Vantrue a développé le module
LTE. Les utilisateurs peuvent insérer la cae SIM dans
le module LTE et connecter le dash cam pour une
sueillance à distance.
Les paramètres LTE suivants sont personnalisables :
Le module LTE doit être acheté séparément.
Paramètres de notication push
Limite de consommation de données de la cae SIM
Qualité de téléchargement des vidéos de collision
Les utilisateurs peuvent personnaliser les
paramètres en fonction de leur foait de données
SIM, assurant une utilisation ecace des données et
des fonctionnalités de sueillance à distance.
FR

- 114 -
12:20
KM/H
120
N
NE
E
SE
S
SW
W
NW
Vitesse et heure HUD
Lorsque cette fonction est activée et après chaque
localisation GPS réussie, l'écran de la caméra ache
la vitesse, la direction et l'heure de déplacement
actuelles avec un zoom.
Fonction GPS
La fonction GPS est également l'une des fonctions
impoantes de la caméra de tableau de bord. Le GPS
est activé par défaut et la caméra reçoit des signaux
GPS via le suppo GPS. Il peut corriger
automatiquement l'heure et la date de votre région,
en enregistrant l'endroit où la vidéo a été enregistrée
et la vitesse de la voiture à ce moment-là.
Vitesse actuelle
Boussole
Temps
Pointeur de vitesse
Unité de
vitesse
Lorsque cette fonction est activée en même temps
que l'économiseur d'écran, c'est l'économiseur
d'écran qui a la priorité.
Lorsque le GPS n'est pas localisé avec succès ou que
le GPS n'est pas activé, l'appareil ne peut pas
accéder à la fonction d'achage de la vitesse et de
l'heure HUD.
FR

- 115 -
La connexion GPS sera établie dans la minute qui
suit la mise sous tension de l'appareil. Si la
connexion GPS échoue dans la minute qui suit,
veuillez vérier si l'appareil a activé la fonction GPS,
si le suppo GPS est correctement connecté et
votre environnement (parking souterrain, zone
résidentielle densément peuplée, métro, tunnel,
etc. ) aectera également la réception du signal
GPS.
Les informations GPS sont enregistrées dans la
vidéo que vous avez enregistrée. Pour le voir,
veuillez télécharger et installer VANTRUE Cam APP
et VANTRUE GPS Player (disponibles en
téléchargement sur www.vantrue.net.
Remarque:
Correction Automatique de l'heure par GPS
Par défaut, Dashcam active la correction automatique
de l'heure GPS, veuillez sélectionner votre fuseau
horaire, comme Paris, vous pouvez choisir GMT+2. Si
vous ne connaissez pas le fuseau horaire de votre
emplacement, vous pouvez utiliser le Wi-Fi pour vous
connecter à l'application Vantrue Cam et conrmer
que la fonction de réglage automatique de l'heure
dans l'application est activée. Une fois la connexion
établie, le fuseau horaire du l'enregistreur sera corrigé
de force en fonction du fuseau horaire de votre
téléphone mobile.
Paramétrage du GPS
40
46
39
43
48
FR
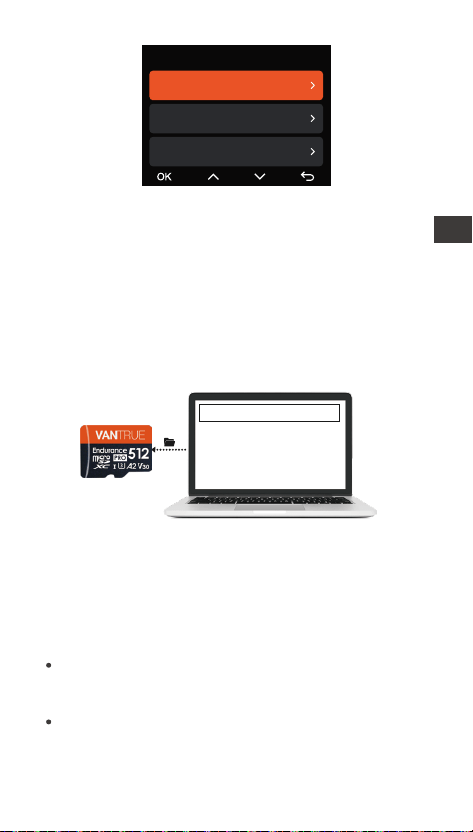
- 116 -
Mettre à niveau le chier
Pour mettre à jour le micrologiciel via un chier ou
une mise à jour OTA, la caméra N2X doit rester sous
tension.
Pour la mise à niveau par OTA, le trac de données
Internet est nécessaire pour télécharger le chier de
mise à niveau.
Chemin 2: Mise à niveau OTA
Après avoir ouve l'Appli, si vous recevez un rappel de
mise à jour du logiciel de la dashcam, veuillez
conrmer la mise à jour, puis l'inteace de mise à jour
OTA s'achera, et la mise à jour s'eectuera
conformément aux directives de l'APP.
Remarque: la correction automatique de l'heure par
le GPS doit dénir le bon fuseau horaire
Mise à niveau du logiciel
Chemin 1: Mise à niveau de chier
Une fois que l'utilisateur a téléchargé le dernier
logiciel à pair du site Web ociel de VANTRUE,
placez le chier dans le répeoire racine de la cae
mémoire, puis rebranchez-le sur l'hôte et allumez-le
pour une mise à niveau.
Heure & Date
Mise à jour automatique du G...
Régler manuellement la datel...
Commutation Automatique S...
Si vous mettez à jour le micrologiciel par chier,
vous devez formater la cae mémoire de la caméra
N2X, puis copier le chier de mise à jour sur la cae
mémoire pour mettre à jour le micrologiciel.
FR
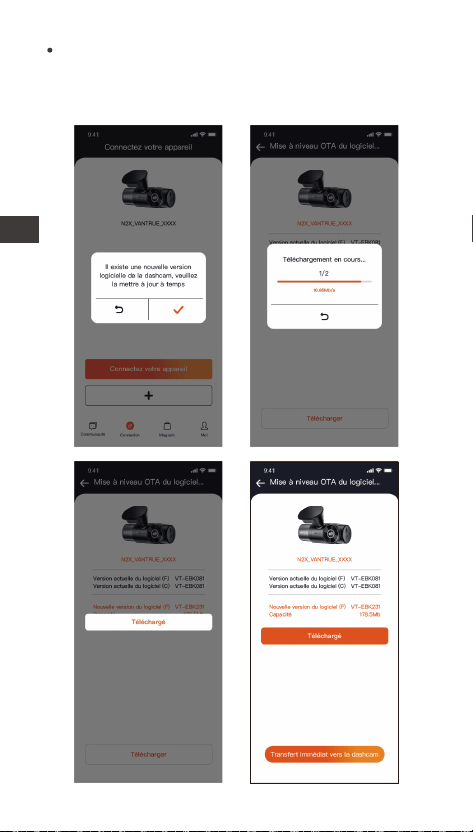
- 117 -
Pour mettre à jour le micrologiciel via un chier ou
une mise à jour OTA, la caméra N2X doit rester sous
tension.
Pour la mise à niveau par OTA, le trac de données
Internet est nécessaire pour télécharger le chier de
mise à niveau.
Si vous mettez à jour le micrologiciel par chier,
vous devez formater la cae mémoire de la caméra
N2X, puis copier le chier de mise à jour sur la cae
mémoire pour mettre à jour le micrologiciel.
FR
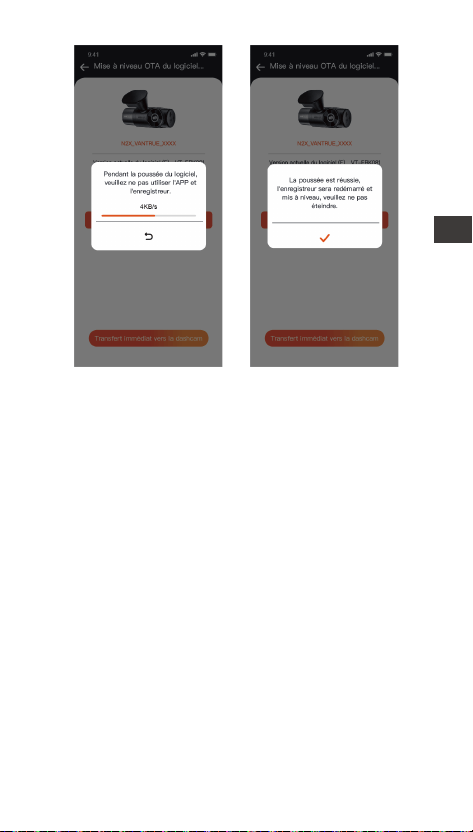
- 118 -
2.4 Paramètres du menu
La conguration des fonctions de la caméra N2X
compoe trois sections : Conguration de l'enregis-
trement, Conguration du système et Navigation
dans les chiers. Vous pouvez congurer votre
caméra de sueillance en fonction de vos besoins
grâce à ces réglages de fonctions.
2.4.1 Conguration de l'enregistrement
-Résolution :
Avant + intérieur :
1944P +1080P 30FPS
1944P +720P 30FPS
1440P +1080P 30FPS
1440P +720P 30FPS
1440P 60FPS+1080P 30FPS
1440P 60FPS+720P 30FPS
1080P+1080P 30FPS
1080P+720P 30FPS
720P+720P 30FPS
-Avant :
2592x1944P 30FPS
2560x1440P 30FPS
2560x1440P 60FPS
1920x1080P 30FPS
1280x720P 30FPS
FR

- 119 -
-Qualité d'image:Le mode par défaut est Standard,
avec l'option d'activer le mode PlatePix™.
-Enregistrement en Boucle: Par défaut 1 minutes.
Sélectionner les options de la durée: 1,3,5, Désactive.
-LEDs IR : Le réglage par défaut est Auto. Vous
pouvez le régler sur auto/désactivé/activé.
-Capteur G : Sélectionnez le niveau de capteur G
dont vous avez besoin, puis vous pouvez dénir 3
directions (avant + arrière/gauche + droite/haut +
bas). La valeur du capteur G dans chaque direction
peut être sélectionnée comme 1/2/3/4/5/O. Plus le
niveau de sensibilité est élevé, plus il est facile de
déclencher l'enregistrement d'un événement.
-Mode condentialité:Le paramètre par défaut est
désactivé, lorsqu'il est activé, l'enregistrement vidéo
sera en mode boucle triple.
-Enregistrement Audio: Activé par défaut. Vous
pouvez choisir de le désactiver si vous ne voulez pas
enregistrer le son environnant.
-Réduction du Bruit Audio : Le réglage par défaut
est activé. Il permet de régler l'eet audio de
l'enregistrement par une réduction dynamique du
bruit. Vous pouvez choisir de l'activer ou de le
désactiver.
-Exposition: Par défaut est +0,0 valeur d'exposition.
Réglez l'exposition de l'objectif.
-Indicateur d'enregistrement : Le réglage par défaut
est Actif, vous pouvez choisir de activer/ désactiver le
voyant d'état de l'enregistrement.
-HDR : Le réglage par défaut est activé. Vous pouvez
activer ou désactiver le HDR pour les caméras de
l'avant et de l'habitacle séparément.
-Minuterie HDR : Le réglage par défaut est désactivé.
Vous pouvez dénir l'heure à laquelle vous l'activez.
-Minuterie PlatePix™:Le paramètre par défaut est
désactivé, lorsqu'il est activé, il activera et désactivera
le mode PlatePix™ selon l'heure dénie.
-Rotation de l'écran: Désactive par défaut. Vous
pouvez choisir de faire pivoter la caméra, l'écran vidéo
sera inversé de 180°
FR

- 120 -
-Miroir : Le réglage par défaut est activé. L'écran de
la caméra cabine s'ache en mode miroir.
-Plaque d'immatriculation: Après le réglage, votre
numéro de plaque d'immatriculation peut être aché
dans la vidéo enregistrée
-Filigrane: Tout sont activés par défaut. Vous pouvez
choisir de activer : Date et heure, modèle et logo,
numéro de plaque d'immatriculation, étiquette de
vitesse, localisation GPS.
-Enregistrement en accéléré: Désactivé par défaut.
Il existe actuellement 4 options: 1FPS/5FPS/10F-
PS/15FPS. Selon votre choix, la vidéo est enregistrée à
1 image/5 images/10 images/ 15 images par seconde.
-Mode de stationnement : Vous pouvez choisir le
mode de stationnement dont vous avez besoin. Il y a
détection de mouvement / détection de collision /
détection d'événement / enregistrement à faible débit
d'images / désactivé. Le réglage par défaut est
Désactivé.
-Statistiques de kilométrage: activé par défaut, il
enregistrera les informations de kilométrage de
conduite, et les statistiques de kilométrage peuvent
être analysées et expoées via l'APP.
-Vitesse et durée HUD : Le réglage par défaut est
désactivé. Il peut être réglé pour entrer après 1/3/5
minutes, et la vitesse et l'heure actuelles seront
achées après l'entrée.
-GPS: Activé par défaut. Les paramètres de
commutation GPS, les paramètres d'unité de vitesse,
les informations GPS sont tous dénis ici.
Paramètres Système
-Langue: English / Français / Italiano / Deutsch /
Español / Русский язык / Polskie / 日本語 / 简体中文/
한국인 / Türkçe / Čeština
-Wi-Fi : L'option Wi-Fi activé “Auto” signie que le
Wi-Fi s'éteint automatiquement après 10 minutes. Si
vous choisissez l'option “Activé” , le Wi-Fi restera
toujours; si vous choisissez l'option” Désactivé”, le
Wi-Fi devra être activé manuellement.
FR

- 121 -
-Miroir : Le réglage par défaut est activé. L'écran de
la caméra cabine s'ache en mode miroir.
-Plaque d'immatriculation: Après le réglage, votre
numéro de plaque d'immatriculation peut être aché
dans la vidéo enregistrée
-Filigrane: Tout sont activés par défaut. Vous pouvez
choisir de activer : Date et heure, modèle et logo,
numéro de plaque d'immatriculation, étiquette de
vitesse, localisation GPS.
-Enregistrement en accéléré: Désactivé par défaut.
Il existe actuellement 4 options: 1FPS/5FPS/10F-
PS/15FPS. Selon votre choix, la vidéo est enregistrée à
1 image/5 images/10 images/ 15 images par seconde.
-Mode de stationnement : Vous pouvez choisir le
mode de stationnement dont vous avez besoin. Il y a
détection de mouvement / détection de collision /
détection d'événement / enregistrement à faible débit
d'images / désactivé. Le réglage par défaut est
Désactivé.
-Statistiques de kilométrage: activé par défaut, il
enregistrera les informations de kilométrage de
conduite, et les statistiques de kilométrage peuvent
être analysées et expoées via l'APP.
-Vitesse et durée HUD : Le réglage par défaut est
désactivé. Il peut être réglé pour entrer après 1/3/5
minutes, et la vitesse et l'heure actuelles seront
achées après l'entrée.
-GPS: Activé par défaut. Les paramètres de
commutation GPS, les paramètres d'unité de vitesse,
les informations GPS sont tous dénis ici.
Paramètres Système
-Langue: English / Français / Italiano / Deutsch /
Español / Русский язык / Polskie / 日本語 / 简体中文/
한국인 / Türkçe / Čeština
-Wi-Fi : L'option Wi-Fi activé “Auto” signie que le
Wi-Fi s'éteint automatiquement après 10 minutes. Si
vous choisissez l'option “Activé” , le Wi-Fi restera
toujours; si vous choisissez l'option” Désactivé”, le
Wi-Fi devra être activé manuellement.
-Commande Vocale en Français : La sensibilité par
défaut est Standard. Vous pouvez choisir des options
telles que faible/haute/standard/désactivé.
-Contenu vocal: Commandes de reconnaissance
vocale. Vous pouvez utiliser diérentes commandes
pour contrôler à distance la caméra pour qu'elle
fonctionne.
-Paramètres LTE:Cette fonction doit être utilisée
après avoir connecté le module LTE(Ce module doit
être acheté en plus), les paramètres par défaut sont
l'activation des notications push en temps réel,
l'utilisation de 200 Mo de trac de données quotidien,
la sauvegarde du trac des vidéos de collision pour le
téléchargement, les utilisateurs peuvent changer les
paramètres selon leurs besoins.
-Formater la cae mémoire: Choisir de formater la
cae micro SD.
-Rappel de format: Désactivé par défaut. Sélection-
ner les options de rappel: 15 jours, 1 mois et
désactivé.
-Heure & Date: Il existe deux méthodes de réglage
①Mise à jour automatique du GPS, ② Réglage
manuel de la date/heure.
Mise à jour automatique par défaut. La première
méthode est basée sur votre fuseau horaire, vous
devez donc choisir le bon ; vous pouvez également
choisir de le désactiver et de corriger manuellement
l'heure de la date vous-même.
La fonction de commutation automatique été/hiver
n'est disponible qu'en Amérique du Nord, sinon elle
peut entraîner des erreurs d'heure.
-LCD s'éteint Auto: 30 seconds /1minute/3
minute/désactivé sont disponibles. Par défaut est
désactivé.
-Volume de Son: Réglez le volume de l'appareil. Le
niveau de volume par défaut est 2, le plus bas est 0 et
le plus élevé est 5.
FR

- 122 -
-Rappel Sonore: Selon diérentes situations, la
caméra est réglée avec 5 types de rappel sonore, qui
sont: Son de mise en marche, Son des touches, Son
du chier verrouillé, Son du Format, Rappel d'arrêt
d'enregistrement anormal. Tous sont activées par
défaut.
-Fréquence de la source lumineuse: 50Hz / 60Hz
sont disponibles. Choisissez la bonne fréquence selon
les diérentes régions.
-Informations système: Vériez le modèle de la
machine, la version du logiciel, l'URL du site ociel
-Ceication: Vous pouvez acher les informations
de ceication de la caméra N2X.
-Paramètres Défaut: Vous pouvez restaurer les
paramètres d'usine.
FR

- 123 -
2.4.3 Parcourir les Documents
Passez en revue et supprimez les vidéos stockées
dans des dossiers de chiers.
-Vidéo d’urgencel: Les chiers vidéo d'urgence sont
enregistrés dans ce dossier. Le nom du chier:
20241201_140633_00008_E_A.MP4
20241201_140633_00008_E_B.MP4
-Vidéo Normal: Ce dossier enregistre la vidéo en
boucle courants, la vidéo en mode parking, la vidéo en
accéléré. Les noms de chiers sont respectivement:
20241201_140633_00008_N_A.MP4 Vidéo
d'enregistrement en boucle
20241201_140633_00007_T_A.MP4 Vidéo en
accéléré
20241201_140633_00007_P_A.MP4 Vidéo du mode
parking
-Photo: Le chier capturé est enregistré ici.
-TOUS: Vous pouvez acher tous les chiers sur la
dashcam.
Remarque : Le suxe A représente les chiers
enregistrés par la caméra avant, B représente la
caméra interne.
Fichier
Vidéo Événement
Vidéo Parking
Vidéo Normale
1/5
Fichier 5/5
Vidéo Normale
Photo
Tous les chiers
FR

- 124 -
3. Spécications et aveissements
3.1 Spécications
Les spécications de ce produit peuvent être
modiées sans préavis en raison d'améliorations
appoées au produit.
N2XModèle
Processeur de
puce
Capteur à trois axes intégré
Capteur Sony
IPS 2 pouces
2.4GHz & 5GHz intégré
G-capteur
Capteur d'image
Écran
WiFi
Processeur Novatek haute
peormance
Avant: Objectif grand angle F1.8,
158 degrés
Interne: Objectif grand angle F1.8,
165 degrés
Lentille
English、简体中文、日本語、
Deutsch、Italiano、Español、
Français、Русский язык、Polski、
Türkçe、Čeština
Langues
Résolution avant+Interne:
1944P +1080P 30FPS;
1944P +720P 30FPS
1440P +1080P 30FPS;
1440P +720P 30FPS
1440P 60FPS+1080P 30FPS;
1440P 60FPS+720P 30FPS
1080P+1080P 30FPS;
1080P+720P 30FPS
720P+720P 30FPS
Résolution avant:
2592x1944P 30FPS
2560x1440P 30FPS;
2560x1440P 60FPS
1920x1080P 30FPS;
1280x720P 30FPS
Résolution vidéo
FR

- 125 -
JPGFormat d’image
Microphone et haut- parleur
intégrés
USB-C (Type-C)
Super condensateur
DC 5V 2.4A
Audio
Mode de
stockage
Type de batterie
Tension et
courant de
l'alimentation
Cae micro SD (U3 ou supérieur,
jusqu'à 512 Go)
Inteace USB
6W
-4-140℉ (-20℃ à 60℃)
-4°F to 158°F(-20°C à 70°C)
Puissance
Température de
stockage
Température de
travail
FR

- 126 -
3.2 Aveissements de sécurité
Ce produit est un dispositif auxiliaire destiné à
l'enregistrement d'images extérieures de véhicules,
et ceaines fonctions peuvent ne pas être prises en
charge en raison des diérents environnements de
conduite et de véhicule.
La mise à jour du micrologiciel sera eectuée de
temps en temps pour améliorer le produit, veuillez
prêter attention à l'avis ociel de VANTRUE en
fonction de la mise à jour spécique.
Ce produit peut enregistrer et sauvegarder des
images d'accidents de véhicules, mais il ne garantit
pas que toutes les images d'accidents puissent être
enregistrées. L'image peut ne pas être enregistrée
dans un dossier spécial parce que le capteur de
collision ne peut pas être activé pour les collisions
mineures.
Veillez à mettre l'appareil hors tension lorsque vous
insérez ou retirez la cae mémoire.
Pour une utilisation stable du produit, veuillez
formater la cae mémoire au moins une fois par
mois.
Généralement, les caes mémoire ont une durée de
vie, et une utilisation à long terme des caes
mémoire peut avoir pour conséquence que les
données ne soient pas sauvegardées. Dans ce cas, il
est recommandé d'acheter une nouvelle cae
mémoire. Si les données sont détruites en raison de
l'utilisation à long terme de la cae mémoire, la
société ne sera pas tenue pour responsable.
FR

- 127 -
4. Garantie et suppo
Garantie
VANTRUE ore une période de seice de garantie de
12 mois, pendant laquelle vous pouvez proter de
seices tels que des réparations rapides, le retour et
l'échange de marchandises endommagées, etc.
Si vous vous inscrivez en tant que membre sur le site
ociel de VANTRUE (www.vantruenet/register), votre
période de seice de garantie peut être étendue à 18
mois.
Suppo
Si vous avez des questions sur le produit, vous pouvez
les résoudre des 3 manières suivantes :
Ouvrez l'application VANTRUE et trouvez la réponse
dans Moi > Foire aux questions
Contactez le seice client de votre canal d'achat
Envoyez un envoyez un e-mail à notre e-mail ociel
suppo@vantrue.net, nous aurons un personnel
dédié pour répondre aux questions dans 24 heures.
Votre opinion compte
VANTRUE® s'engage fermement à toujours améliorer
notre produits, seices et expérience utilisateur. Si tu
as quelque réexions sur la façon dont nous pouvons
faire encore mieux, nous apprécions vos
commentaires et suggestions constructifs.
Connectez-vous avec nous aujourd'hui à
suppo@vantrue.net.
FR

- 128 -
Przed użyciem przeczytaj uważnie instrukcję;
Aby kamera samochodowa mogła działać, musi być
zawsze podłączona do źródła zasilania;
Aby zapewnić bezpieczną jazdę, nie konguruj
produktów ani nie używaj telefonu do oglądania
lmów z jazdy podczas jazdy.
Ten produkt wymaga włożenia kay micro SD w
celu nagwania wideo.
Nie demontuj obudowy kame ani nie naprawiaj jej
samodzielnie. Jeżeli produkt działa nieprawidłowo,
prosimy o kontakt z przedstawicielem rmy
VANTRUE.
Nie instaluj kame samochodowej w pozycji, która
może blokować widoczność podczas jazdy;
Proszę używać produktu z dala od wysokiej
temperatu i wilgotnego środowiska;
Aby stale ulepszać doświadczenia naszych klientów
z naszymi produktami, od czasu do czasu będziemy
aktualizować oprogramowanie sprzętowe. Jeśli
potrzebujesz, możesz zaktualizować
oprogramowanie;
Nie instaluj kame bezpośrednio przed pasażerami,
aby zapobiec przypadkowemu przemieszczeniu i
spowodowaniu zagrożenia bezpieczeństwa;
Należy pamiętać, że połączenie z aplikacją Vantrue
może nie być możliwe podczas korzystania z
bezprzewodowej funkcji CarPlay lub Android Auto;
Proszę używać tego produktu w sposób dozwolony
przez prawo.
Wskazówki:
PL
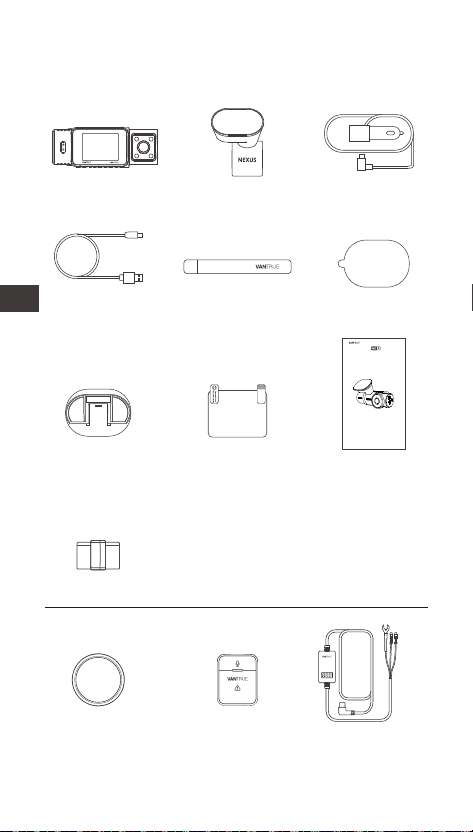
- 129 -
1. Skrócona instrukcja obsługi
1.1 Co jest w pudełku?
Opcjonalne akcesoria
A. Wideorejestrator
N2X
B. Uchwyt
GPS
C. Ładowarka
samochodowa
12V
D. Kabel USBC
do transferu
danych
E. Szpatułka F. Taśmy
samoprzylepne
G. Podstawa do
mocowania
samoprzy-
lepnego
H. Naklejki
elektros-
tatyczne x2
I. Instrukcja
obsługi
J. Filtr CPL K. Pilot
bezprzewodowy
L. Adapter do
tbu
parkingowego
J. Uchwyt na kabel
vantrue.com
truly driven.
USER MANUAL
Nexus 2 X
PL
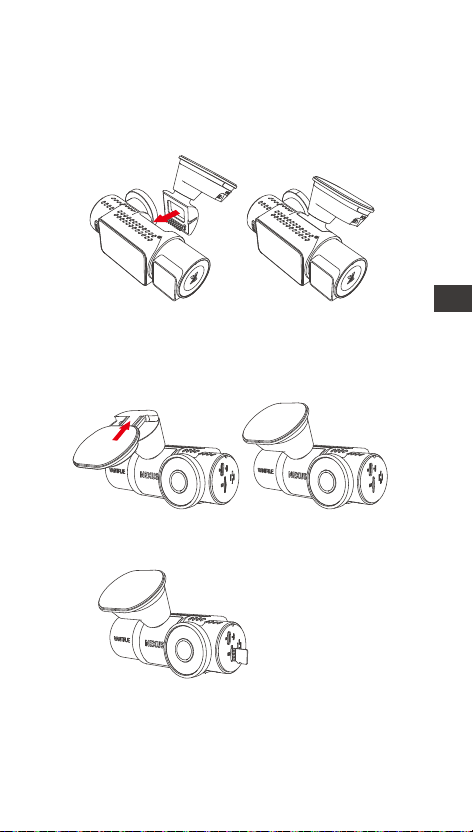
- 130 -
1.2 Instalacja uchwytu samoprzylepnego i kay
pamięci
Wyrównaj uchwyt z inteejsem mocowania kame
samochodowej, a następnie wciśnij, aż uchwyt
zostanie zainstalowany.
Samoprzylepny uchwyt N2X ma nową, zdejmowaną
konstrukcję. Zamiast demontować cały uchwyt
samoprzylepny, użytkownicy mogą po prostu oddzielić
główny korpus uchwytu od podstawy uchwytu.
Najpierw sformatuj kaę pamięci po włączeniu kame
samochodowej.
Włóż kaę pamięci
PL
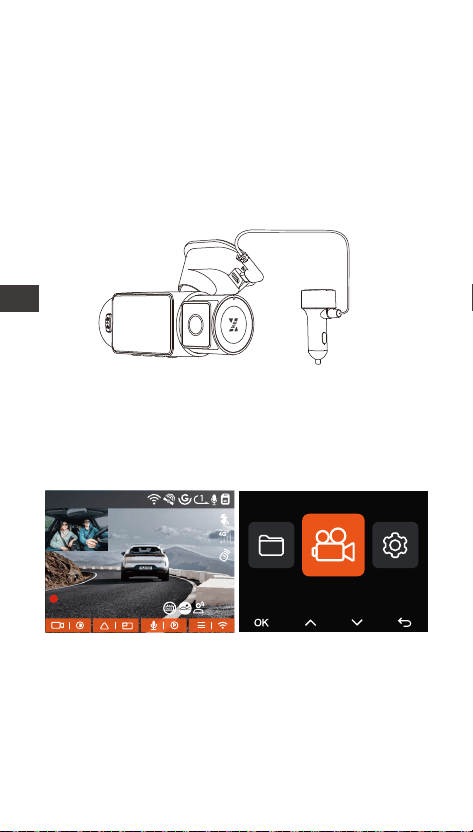
- 131 -
1.3 Instalacja i ustawienia
Podłącz zasilanie I włącz kamerę, następnie dokończ
ustawienia menu kame i na koniec zainstaluj kamerę
na przedniej szybie samochodu.
Zasilanie: podłącz jeden koniec oginalnego
zasilacza USB do źródła zasilania, a drugi koniec do
złącza zasilania uchwytu N2X GPS, aby sprawdzić, czy
kamera może włączyć się normalnie.
Instalacja zakończona: Upewnij się, że kamera
samochodowa jest prawidłowo zamontowana na
przedniej szybie pojazdu i nie zasłania kierowcy pola
widzenia oraz że kamera przednia jest skierowana w
stronę drogi.
Ustawienia: Przy pierwszym użyciu lub po każdej
aktualizacji oprogramowania sprzętowego lub po
przywróceniu ustawień fabcznych należy ponownie
ustawić niektóre podstawowe ustawienia, takie jak
data i godzina, język i region.
Nagwanie
1440P +1080P 30FPS1440P +1080P 30FPS
00:00:37
05-05-2025 AM 10:09:07
MP/H
45
PL
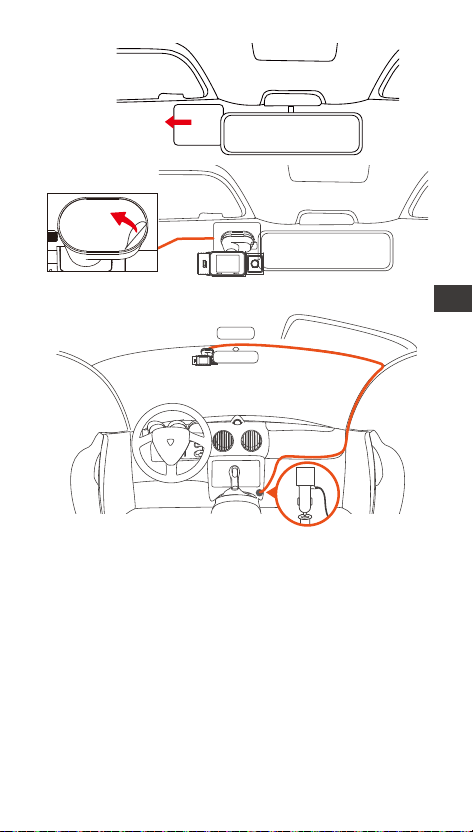
- 132 -
Naklejka
elektrostatyczna
Podczas organizowania lub przechowywania kabli
ładowarki samochodowej lub przewodów tylnej
kame, można użyć uchwytów na kable do ich
zabezpieczenia. Po przymocowaniu uchwytu do
odpowiedniego miejsca, wystarczy umieścić kable w
uchwycie i je zamocować.
Nagraj wideo: Po instalacji, po uruchomieniu
samochodu, kamera samochodowa automatycznie
rozpocznie nagwanie wideo.
Wyłączanie: Gdy nie używasz kame, naciśnij i
przytrzymaj przycisk zasilania, aby ją wyłączyć.
Włóż ładowarkę samochodową
Instalacja wideorejestratora
PL
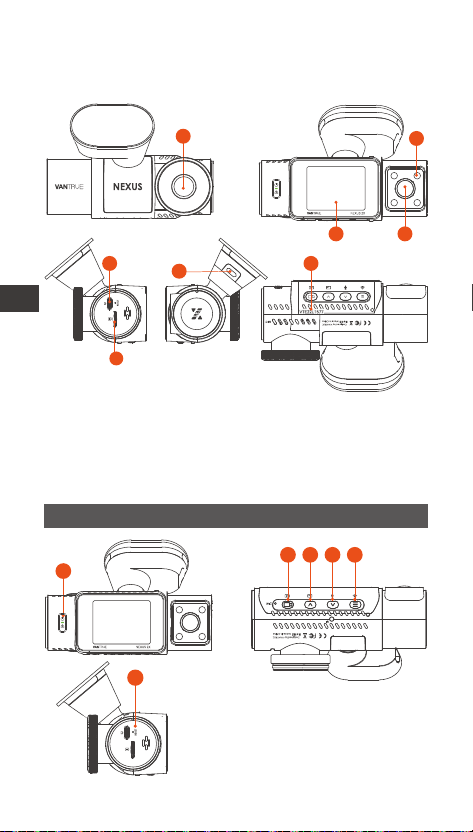
- 133 -
1. Przednia kamera
2. Diody IR LED
3. Ekran 2” IPS
4. Kamera wewnętrzna
5. Po USBC do przesyłu
danych
6. Po USBC do zasilania
7. Numer sejny
8. Slot na kay pamięci
2. Podstawowe funkcje
2.1 Budowa kame
1
7
6
5
8
2
43
Przyciski i funkcje
1
2 3 4 5
6
PL
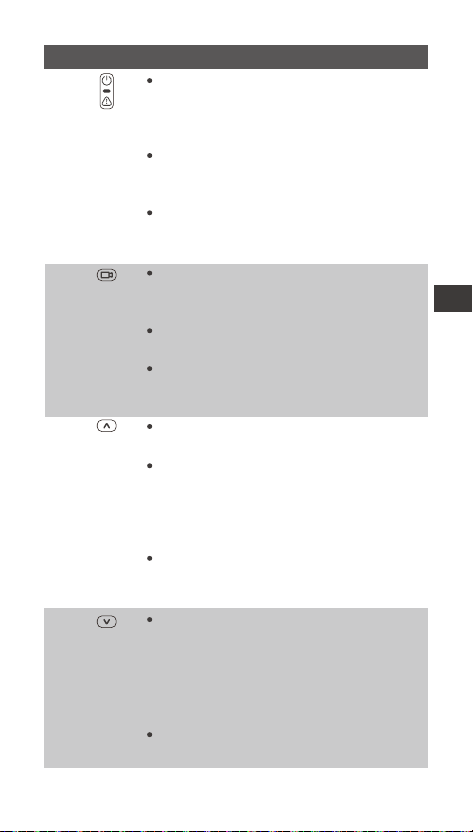
- 134 -
2.
4.
3.
1.
W stanie włączenia naciśnij długo, aby
wyłączyć kamerę; w stanie wyłączenia
naciśnij krótko, aby włączyć
urządzenie.
W inteejsie nagwania naciśnij
krótko, aby włączyć nagwanie
awajne oraz zrobić zdjęcie.
Podczas przeglądania plików naciśnij
krótko, aby wyświetlić menu usuwania
plików.
Na ekranie nagwania naciśnij
krótko, aby włączyć lub wstrzymać
nagwanie.
W ustawieniach menu naciśnij krótko,
aby potwierdzić opcję.
Podczas odtwarzania wideo naciśnij
krótko, aby odtworzyć wideo lub
wstrzymać wideo.
Podczas nagwania wideo naciśnij
krótko, aby przełączyć okno wideo;
Na ekranie ustawień menu i
przeglądania plików naciśnij krótko,
aby wybrać poprzednią opcję lub plik,
a następnie naciśnij długo, aby
przewijać powyższe opcje lub pliki.
Podczas odtwarzania pliku naciśnij
krótko, aby odtworzyć wideo z
szybkością 2X i 4X.
Podczas nagwania wideo naciśnij
krótko, aby włączyć/wyłączyć
mikrofon; Naciśnij długo, aby przejść
do tbu parkowania (tę operację
można wykonać przy włączonym
tbie parkowania)
Na ekranie ustawień menu i
przeglądania plików naciśnij krótko,
No. Przycisk Opis
aby wybrać następną opcję lub plik,
a następnie naciśnij długo, aby
przewijać opcje lub pliki poniżej.
Podczas odtwarzania pliku naciśnij
krótko, aby wyświetlić menu
usuwania plików.
PL
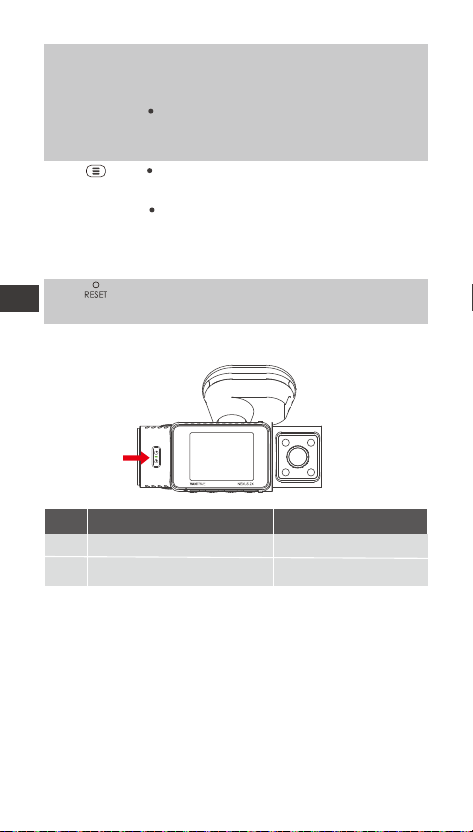
- 135 -
Podczas nagwania wideo naciśnij
krótko, aby włączyć/wyłączyć
mikrofon; Naciśnij długo, aby przejść
do tbu parkowania (tę operację
można wykonać przy włączonym
tbie parkowania)
Na ekranie ustawień menu i
przeglądania plików naciśnij krótko,
5.
6.
Krótkie naciśnięcie powoduje
ponowne uruchomienie N2X
Podczas nagwania wideo naciśnij
długo, aby włączyć/wyłączyć Wi-Fi;
W ustawieniach menu i inteejsie
przeglądania plików naciśnij krótko,
aby powrócić do poprzedniego
inteejsu.
aby wybrać następną opcję lub plik,
a następnie naciśnij długo, aby
przewijać opcje lub pliki poniżej.
Podczas odtwarzania pliku naciśnij
krótko, aby wyświetlić menu
usuwania plików.
Wskaźnik LED
REC
OpisLED StatusLED
Stałe zielone światło
Migające zielone światło
W tbie gotowości
Kamera nagwa
PL
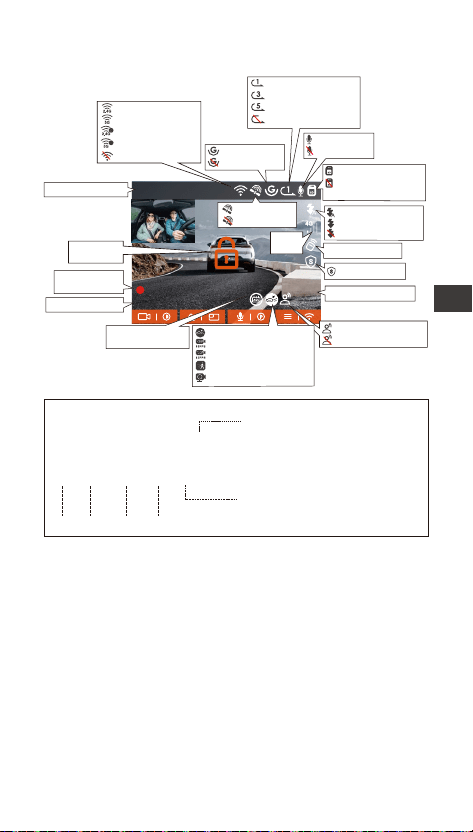
- 136 -
2.2 Przegląd ekranu
A na końcu oznacza przednią
kamerę
B na końcu oznacza wewnętrzną
kamerę
Rok Data Czas Numer sekwencji
20250505_140933_00008_N_A.MP4
20250505_140833_00007_P_B.MP4
20250505_140733_00006_T_B.MP4
20250505_140633_00005_E_A.MP4
Denicja formatu pliku
P to nagrania z tbu parkingowego
N to nagrania z jazdy
T to nagrania z tbu poklatkowego
E to nagrane zdarzenia
1440P +1080P 30FPS
00:00:37
12-01-2024 AM 10:09:07
MP/H
45
2.4G Wi-Fi WŁ
5G Wi-Fi is WŁ
2.4G Wi-Fi połączone
5G Wi-Fi połączone
Wi-Fi WyŁ
G-Sensor WŁ
G-Sensor WYŁ
Kaa pamięci włożona
Brak lub błąd kay
pamięci
Pilot BT połączony
Ikonka
sieci
Prędkość (KMH/MPH)
Bieżąca data I czas
Czas nagwania
(Bieżący klip)
Rozdzielczość wideo
GPS połączony
GPS wyłączony
Mikrofon WŁ
Mikrofon WYŁ
Wideo jest
zablokowane
Komendy głosowe WŁ
Komendy głosowe WYŁ
Detekcja kolizji wł
1080P 15FPS Lowbitrate wł
720P 15FPS Lowbitrate wł
Detekcja ruchu wł
Tb poklatkowy
IR LED AUTO
IR LED WŁ. ZAWSZE
IR LED WYŁ. ZAWSZE
Czas pętli 1 min
Czas pętli 3 min
Czas pętli 5 min
Nagwanie w pętli wył
Adapter stałego
zasilania podłączony
Tb pwatności
PL

- 137 -
2.3 Funkcje
2.3.1 Funkcje APP
--Pobieranie aplikacji
Zeskanuj kod QR odpowiedniej wersji poniżej, aby
pobrać aplikację i ją zainstalować.
Wyszukaj aplikację „Vantrue” w sklepie App Store lub
Google Play Store, aby ją znaleźć, a następnie pobierz
ją i zainstaluj na swoim telefonie.
--Dodaj urządzenie
Wi-Fi włącza się automatycznie po włączeniu kame
samochodowej N2X. Po wyłączeniu Wi-Fi użytkownicy
mogą ponownie włączyć Wi-Fi za pomocą klawiszy
skrótu, funkcji sterowania głosowego lub wchodząc
do ustawień menu.
Po włączeniu Wi-Fi kame N2X kliknij „Dodaj
urządzenie” w aplikacji Vantrue, wybierz serię Nexus,
wybierz model N2X, potwierdź odpowiednią nazwę
Wi-Fi i na koniec kliknij, aby potwierdzić połączenie
Wi-Fi.
PL
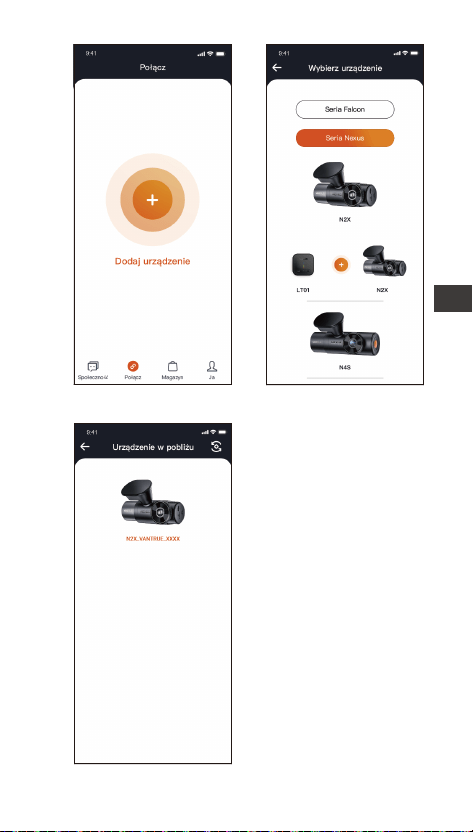
- 138 -
PL
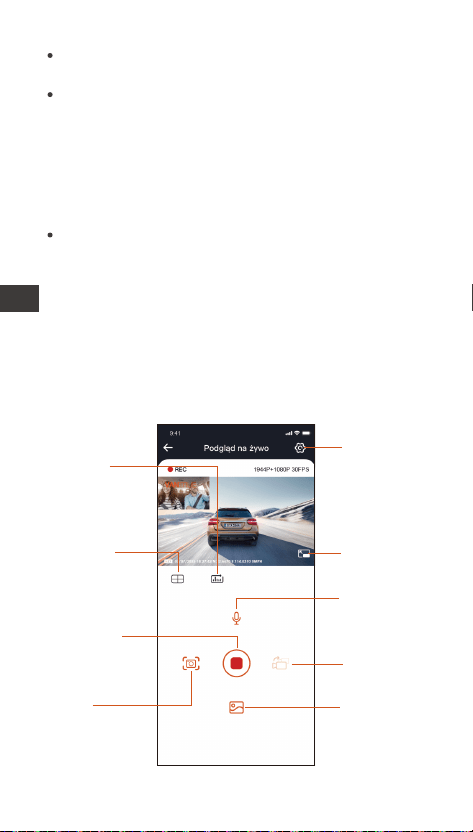
- 139 -
Najpierw sprawdź, czy funkcja Wi-Fi w Twoim
telefonie jest włączona.
Hasło początkowe do tego urządzenia służy
wyłącznie do pierwszego logowania. Aby zapobiec
potencjalnym zagrożeniom bezpieczeństwa,
pamiętaj o zmianie hasła początkowego po
pierwszym logowaniu, aby uniemożliwić innym
zalogowanie się do Twojego urządzenia bez
autozacji lub innych negatywnych konsekwencji.
Jeśli zapomnisz ustawionego hasła, możesz przejść
do „Ustawień systemowych” kame i wybrać opcję
Przywróć ustawienia domyślne. Po przywróceniu
przez kamerę ustawień domyślnych hasło Wi-Fi
staje się hasłem początkowym (12345678).
Należy pamiętać, że hasło Wi-Fi kame można
zmienić wyłącznie za pomocą aplikacji Vantrue.
--Wytyczne dotyczące korzystania z aplikacji
Ustawienia
kame
Linia korekcji
obiektywu
Statystyki
przebiegu
Ikona pełnego
ekranu
WŁ./WYŁ.
mikrofonu
Przełącznik
wyświetlania
kame
Ikona
zatrzymania/
rozpoczęcia
nagwania
Album
Zdjęcie
PL

- 140 -
Po wejściu do podglądu aplikacji w czasie
rzeczywistym możesz wykonać następujące operacje.
Podgląd wideo: Po pomyślnym połączeniu aplikacji
z kamerą, N2X przejdzie do strony podglądu w
czasie rzeczywistym, kliknij przycisk pełnego ekranu
lub poziomego odtwarzania na telefonie komórkow-
ym, ekran czasu rzeczywistego automatycznie
przełączy się w tb podglądu pełnoekranowego.
Kliknij przycisk przełączania okien, aby przełączyć
przednie i okna wideo w kabinie, ale z tej funkcji
można korzystać tylko w tbie nagwania
wielokanałowego.
Odtwarzanie wideo: Możesz wyświetlić nagrane
pliki wideo lub zdjęcia na karcie micro SD w aplikacji,
kliknąć „Plik”, a następnie wybrać wideo do
odtworzenia.
Pobieranie wideo: Możesz wybrać pobieranie
lmów lub zdjęć w inteejsie przeglądania plików na
karcie micro SD lub podczas odtwarzania wideo. Po
pobraniu wideo możesz odtworzyć je w lokalnym
pliku aplikacji i wyświetlić ścieżkę GPS wideo.
Przechwytywanie obrazu: Na ekranie podglądu na
żywo aplikacji możesz przechwycić bieżący obraz.
Statystyki przebiegu: Użytkownicy mogą kliknąć,
aby pobrać informacje o przebiegu zgodnie ze
swoimi potrzebami. Informacje o przebiegu zostaną
zapisane w aplikacji jako zdjęcie lub plik PDF.
Linia korekcji kame: Balans obiektywu jest
kogowany przez dokładną linię krzyżową, dzięki
czemu nagwany obraz nie będzie przekrzywiony.
PL
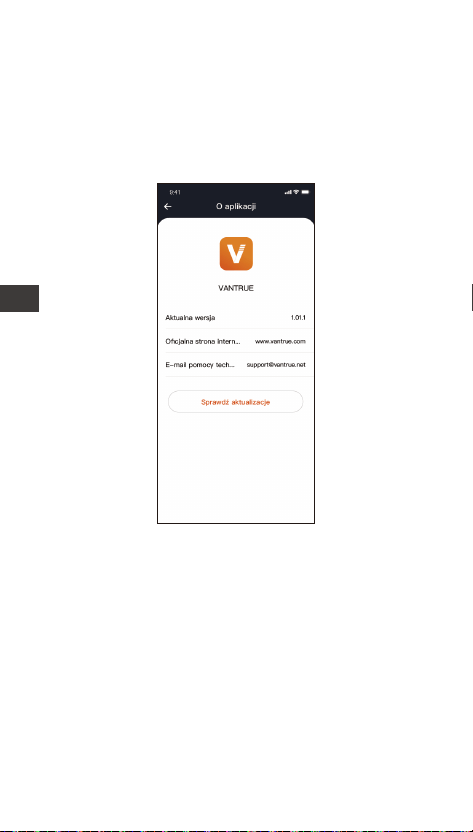
- 141 -
--Aktualizacja aplikacji
Otwórz aplikację Vantrue, przejdź do Ja > O > Sprawdź
aktualizacje. Aplikacja automatycznie sprawdzi, czy jest
dostępna nowa wersja. Jeśli zostanie znaleziona
aktualizacja, postępuj zgodnie z instrukcjami wyświet�
lanymi na ekranie, aby dokonać aktualizacji.
2.3.2 Podstawowe funkcje
Jakość wideo i timer PlatePix™
Domyślnym tbem wideo jest Standard Quality.
Użytkownicy mogą włączyć tb PlatePix™ zgodnie ze
swoimi potrzebami i ustawić automatyczny czas
włączania/wyłączania za pomocą timera PlatePix™.
Ten tb priotetowo traktuje poprawę czytelności
tablic rejestracyjnych i redukcję rozmycia
spowodowanego warunkami oświetleniowymi, aby
zapewnić wiagodne dowody w scenariuszach
incydentów.
PL

- 142 -
--Nagwanie w pętli
Po włożeniu kay pamięci i podłączeniu zasilania
kamera samochodowa N2X włączy się automatycznie
i przejdzie w tb nagwania w pętli. Czas trwania
każdego nagranego lmu zostanie zapisany w
oparciu o ustawiony czas nagwania w pętli i
zapisany w folderze Normal Video.
Kiedy pojemność folderu Normalne osiągnie 70%
całkowitej pojemności, nowy plik nagrania w pętli
automatycznie zastąpi oginalne pliki nagrania w
pętli. Po włączeniu tej funkcji plik wideo automaty-
cznie nadpisze pętlę, aby nie przewać nagwania
w trakcie jazdy.
UWAGA: Podczas gdy PlatePix™ zwiększa jasność na
pierwszym planie, cały obraz może wydawać się
ciemniejszy. W środowiskach o słabym oświetleniu
zaleca się wyłączenie lub zaplanowanie tbu PlatePix
™ w celu utrzymania optymalnej jakości nagwania.
1440P +1080P 30FPS
00:00:37
05-05-2025 AM 10:09:07
MP/H
45
1440P +1080P 30FPS
00:00:37
05-05-2025 AM 10:09:07
MP/H
45
PlatePix™ WŁ PlatePix™ WYŁ
PL
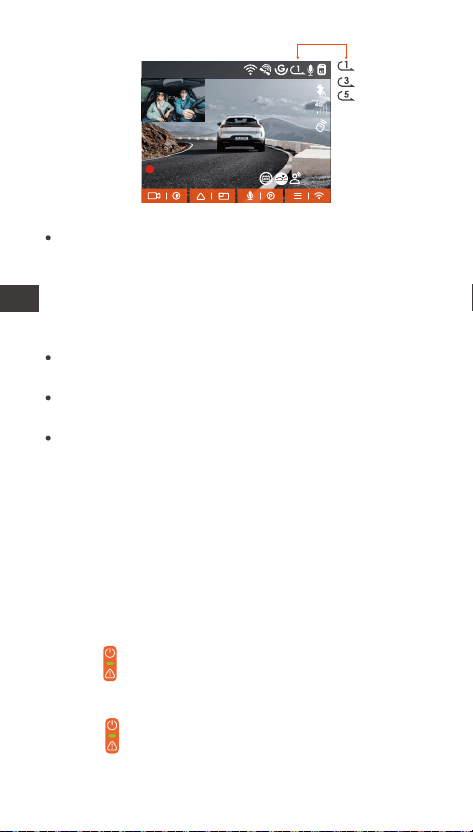
- 143 -
zostanie automatycznie zapisane w folderze wideo
zdarzenia, a zdjęcie zostanie zapisane w folderze zdjęć.
--Nagwanie zdarzeń
Podczas jazdy użytkownik może zablokować kamerę
ręcznie lub kamera samochodowa automatycznie
blokuje nagwanie, jeśli wystąpią szczególne
okoliczności.
Aby ręcznie zablokować wideo, wystarczy nacisnąć
przycisk , aby zablokować bieżący lm i go
przechwycić.
W okresie blokady wideo możesz nacisnąć
przycisk , aby przechwycić wideo wiele razy.
Po zakończeniu nagwania wydarzenia wideo
UWAGA:
Normalne działanie funkcji nagwania w pętli zależy
w dużym stopniu od szybkości kay pamięci,
dlatego należy regularnie formatować kaę pamięci,
aby uniknąć problemów, takich jak nadmierna ilość
plików na karcie pamięci i starzenie się kay, które
mają wpływ na normalne nagwanie w pętli.
Regularnie sprawdzaj nagwanie wideo w pętli, aby
uniknąć nadpisania niezbędnych lmów w pętli.
Po wyłączeniu nagwania w pętli funkcja blokady
wideo nie będzie już działać.
Gdy ustawienie nagwania w pętli jest wyłączone,
długość każdego nagrania wynosi 20 minut. Gdy
kaa pamięci będzie pełna, kamera zatrzyma
nagwanie i wyświetli komunikat „kaa jest pełna!”
1440P +1080P 30FPS
00:00:37
05-05-2025 AM 10:09:07
MP/H
45
PL
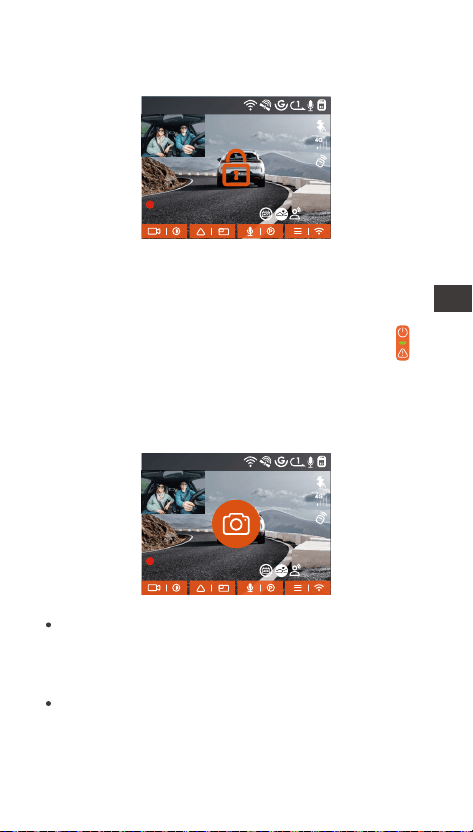
- 144 -
UWAGA:
Czułość wyzwalacza wideo z automatyczną blokadą
zależy od czułości kolizji. Im wyższe ustawienie
czułości, tym większe prawdopodobieństwo
wyzwolenia.
Gdy całkowita pojemność plików wideo z wydarzeń
wynosi 30% całkowitej pojemności bieżącej kay
pamięci, nowe pliki wideo z wydarzeń automaty-
cznie zastąpią stare pliki wideo z wydarzeń.
Zalecamy regularne sprawdzanie i zapisywanie
plików wideo z wydarzeń, aby uniknąć ich utraty.
Nagwanie z blokadą nie zostanie uruchomione w
żadnej z następujących sytuacji: Nagwanie w pętli
jest wyłączone lub włączone jest nagwanie
poklatkowe. Jeśli nagwanie w pętli jest
wyłączone/włączone jest nagwanie poklatkowe,
po zablokowaniu nagwania można robić tylko
zdjęcia.
zostanie automatycznie zapisane w folderze wideo
zdarzenia, a zdjęcie zostanie zapisane w folderze zdjęć.
--Nagwanie zdarzeń
Podczas jazdy użytkownik może zablokować kamerę
ręcznie lub kamera samochodowa automatycznie
blokuje nagwanie, jeśli wystąpią szczególne
okoliczności.
Aby ręcznie zablokować wideo, wystarczy nacisnąć
przycisk , aby zablokować bieżący lm i go
przechwycić.
W okresie blokady wideo możesz nacisnąć
przycisk , aby przechwycić wideo wiele razy.
Po zakończeniu nagwania wydarzenia wideo
Nagwanie zdarzeń z automatyczną blokadą: gdy
samochód zostanie uderzony w wyniku kolizji lub
wibracji, kamera samochodowa automatycznie
uruchomi i zablokuje bieżący obraz wideo, gdy
wykje wibracje. Możesz także nacisnąć przycisk ,
aby robić zdjęcia w okresie nagwania z blokadą.
Po zakończeniu nagwania awajnego wideo
zostanie automatycznie zapisane w folderze Wideo z
wydarzenia, a zdjęcie zostanie zapisane w folderze ze
zdjęciami.
1440P +1080P 30FPS
00:00:37
05-05-2025 AM 10:09:07
MP/H
45
1440P +1080P 30FPS
00:00:37
05-05-2025 AM 10:09:07
MP/H
45
PL

- 145 -
Czułość wyzwalacza wideo z automatyczną blokadą
zależy od czułości kolizji. Im wyższe ustawienie
czułości, tym większe prawdopodobieństwo
wyzwolenia.
Gdy całkowita pojemność plików wideo z wydarzeń
wynosi 30% całkowitej pojemności bieżącej kay
pamięci, nowe pliki wideo z wydarzeń automaty-
cznie zastąpią stare pliki wideo z wydarzeń.
Zalecamy regularne sprawdzanie i zapisywanie
plików wideo z wydarzeń, aby uniknąć ich utraty.
Nagwanie z blokadą nie zostanie uruchomione w
żadnej z następujących sytuacji: Nagwanie w pętli
jest wyłączone lub włączone jest nagwanie
poklatkowe. Jeśli nagwanie w pętli jest
wyłączone/włączone jest nagwanie poklatkowe,
po zablokowaniu nagwania można robić tylko
zdjęcia.
Tb parkingowy
Podczas korzystania z tbu parkowania należy
przestrzegać następujących środków ostrożności:
Aby mieć pewność, że kamera samochodowa będzie
mogła normalnie korzystać z funkcji tbu
parkowania, należy użyć zestawu przewodów
VANTRUE lub innego stabilnego i ciągłego źródła
zasilania kame.
Zaleca się użycie zestawu przewodów VANTRUE
ACC (np. VP03, VP01, VP04, VP05). W przypadku
korzystania z zestawu przewodów ACC innych
marek korzystanie z funkcji ACC może nie być
możliwe ze względu na inną lokalizację styku PIN
wykwania ACC.
W gorące i słoneczne lato zalecamy wybranie tbu
parkowania w celu wykwania kolizji. Gdy
temperatura otoczenia w samochodzie osiągnie
60 ℃, zalecamy wyłączenie kame, aby uniknąć
nieprawidłowego działania kame z powodu
wysokiej temperatu.
Nagwanie poklatkowe i tb parkowania (w tym
wykwanie kolizji, wykwanie ruchu, nagwanie z
niską przepływnością, tb niskiej liczby klatek na
sekundę) można włączyć tylko w jednym z dwóch.
Jeśli jeden z nich zostanie włączony, drugi zostanie
wyłączony automatycznie.
Wszystkie pliki nagrane w tbie parkowania
zostaną zapisane w folderze wideo parkowania.
Aby uniknąć nadpisania plików tbu parkowania w
pętli, należy je regularnie sprawdzać, aby uniknąć
ich utraty.
Funkcja tbu parkowania może zostać ulepszona
wraz z aktualizacją oprogramowania sprzętowego
kame samochodowej N2X. Proszę zwrócić uwagę
na ogłoszenie dotyczące opisu oprogramowania
sprzętowego na stronie internetowej VANTRUE w
celu uzyskania informacji o konkretnych zmianach
lub skonsultować się z obsługą klienta.
PL

Tb wejścia/wyjścia
Auto
ACC
G-Sensor
Ustawienia Tb parkingowy
Tb wejścia/wyjścia
Ustawienie detekcji
Tb nocnego parkowania
- 146 -
Aby mieć pewność, że kamera samochodowa będzie
mogła normalnie korzystać z funkcji tbu
parkowania, należy użyć zestawu przewodów
VANTRUE lub innego stabilnego i ciągłego źródła
zasilania kame.
Zaleca się użycie zestawu przewodów VANTRUE
ACC (np. VP03, VP01, VP04, VP05). W przypadku
korzystania z zestawu przewodów ACC innych
marek korzystanie z funkcji ACC może nie być
możliwe ze względu na inną lokalizację styku PIN
wykwania ACC.
W gorące i słoneczne lato zalecamy wybranie tbu
parkowania w celu wykwania kolizji. Gdy
temperatura otoczenia w samochodzie osiągnie
60 ℃, zalecamy wyłączenie kame, aby uniknąć
nieprawidłowego działania kame z powodu
wysokiej temperatu.
Nagwanie poklatkowe i tb parkowania (w tym
wykwanie kolizji, wykwanie ruchu, nagwanie z
niską przepływnością, tb niskiej liczby klatek na
sekundę) można włączyć tylko w jednym z dwóch.
Jeśli jeden z nich zostanie włączony, drugi zostanie
wyłączony automatycznie.
Wszystkie pliki nagrane w tbie parkowania
zostaną zapisane w folderze wideo parkowania.
Aby uniknąć nadpisania plików tbu parkowania w
pętli, należy je regularnie sprawdzać, aby uniknąć
ich utraty.
Funkcja tbu parkowania może zostać ulepszona
wraz z aktualizacją oprogramowania sprzętowego
kame samochodowej N2X. Proszę zwrócić uwagę
na ogłoszenie dotyczące opisu oprogramowania
sprzętowego na stronie internetowej VANTRUE w
celu uzyskania informacji o konkretnych zmianach
lub skonsultować się z obsługą klienta.
Wprowadzenie do tbu parkowania
PL
Metody aktywacji/dezaktywacji tbu parkowania:
1. Auto Mode (domyślnie)
Bez ACC (tb czujnika przeciążenia): Włącza się
automatycznie po 5 minutach bezczynności
pojazdu; wyłącza się automatycznie po wykciu
kolizji wtórnej przez czujnik przeciążenia.
Z podłączonym ACC: Włącza się automatycznie po
wyłączeniu pojazdu (ACC OFF); wyłącza się
automatycznie po uruchomieniu pojazdu (ACC ON).
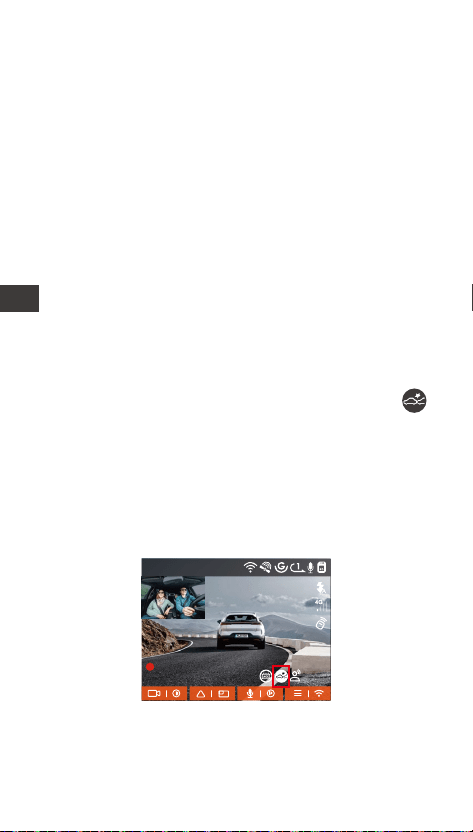
- 147 -
Detekcja kolizji
Gdy ustawienie Wykwanie kolizji jest włączone, w
inteejsie nagwania zostanie wyświetlona ikona
wykwania kolizji, wskazując, że rejestrator aktualnie
korzysta z tego tbu.
Czułość waości wykwania kolizji można wybrać
jako 1/2/3/4/5. Im wyższy poziom czułości, tym
łatwiej jest uruchomić nagwanie zdarzeń.
Wykwanie kolizji jest najbardziej czułe, gdy jest
ustawione na 5.
2. ACC Mode
Automatycznie po wyłączeniu pojazdu (ACC OFF);
automatycznie wyłącza się po uruchomieniu pojazdu
(ACC ON). Wymaga prawidłowego okablowania za
pomocą zestawu ACC.
3. G-Sensor Mode
Włącza się automatycznie po 5 minutach
bezczynności pojazdu; wyłącza się automatycznie,
gdy czujnik G wykje kolizję wtórną.
4. Manual Mode
Naciśnij i przytrzymaj przycisk skrótu, aby wejść;
naciśnij dowolny przycisk, aby wyjść.
PL
1440P +1080P 30FPS
00:00:37
05-05-2025 AM 10:09:07
MP/H
45
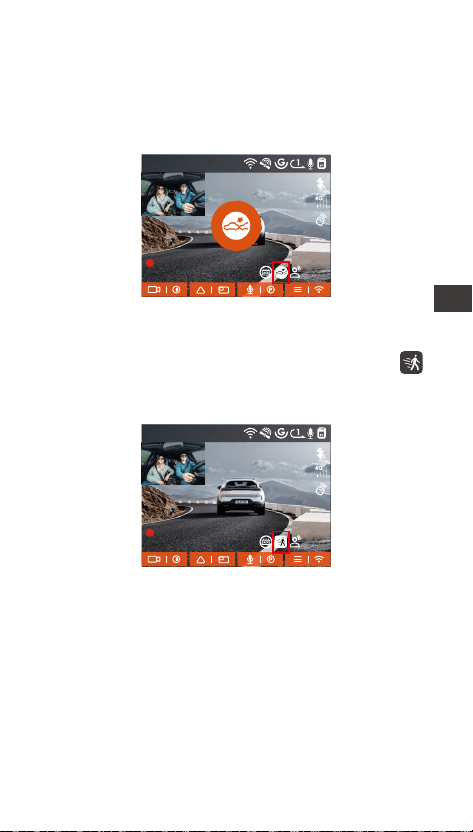
- 148 -
Po wejściu w tb wykwania kolizji, gdy kamera
samochodowa wykje kolizję, uruchomi nagwanie
na 30s i zapisze plik w folderze wideo parkowania.
Możesz obejrzeć wideo za pośrednictwem aplikacji lub
komputerowego odtwarzacza Vantrue.
Detekcja ruchu
Gdy ustawienie wykwania ruchu jest włączone, w
inteejsie nagwania zostanie wyświetlona ikona
wykwania ruchu, wskazując, że rejestrator aktualnie
korzysta z tego tbu parkowania.
1440P +1080P 30FPS
00:00:37
05-05-2025 AM 10:09:07
MP/H
45
1440P +1080P 30FPS
00:00:37
05-05-2025 AM 10:09:07
MP/H
45
PL
Po wejściu w tb wykwania ruchu i po wykciu, że
obiekt porusza się w ustawionym zakresie wykwania,
kamera samochodowa zostanie uruchomiona, aby
nagwać wideo przez 30 sekund i zachować 15
sekund materiału przed uruchomieniem nagwania
razem w celu uzupełnienia 45-sekundowe nagranie
wideo po wykciu ruchu, które zostanie zapisane w
folderze Parking Video.
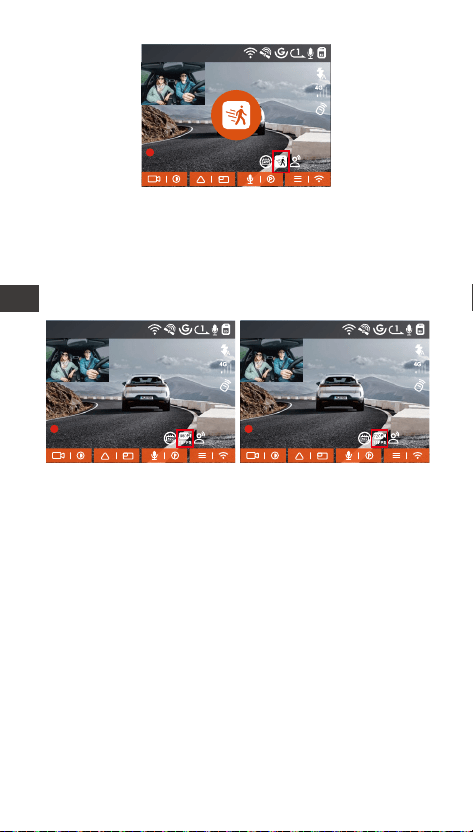
- 149 -
Tb lowbitrate
Po wejściu w tb nagwania lowbitrate kamera
zostanie automatycznie przełączona na 1080P 15FPS
lub 720P 15FPS w celu nagwania, a czas nagwania
wynosi 3 minuty. Plik jest zapisywany w folderze
wideo parkingowego.
1440P +1080P 30FPS
00:00:37
05-05-2025 AM 10:09:07
MP/H
45
1440P +1080P 30FPS
00:00:37
05-05-2025 AM 10:09:07
MP/H
45
1440P +1080P 30FPS
00:00:37
05-05-2025 AM 10:09:07
MP/H
45
PL
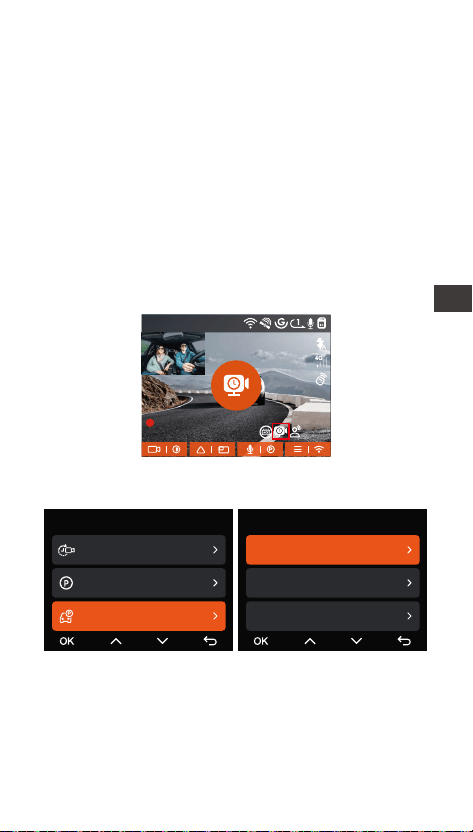
- 150 -
Tb poklatkowy
Po wejściu w tb nagwania z małą liczbą klatek na
sekundę kamera samochodowa skompresuje czas
nagwania, aby zwiększyć integralność pliku
nagrania. Każdy plik nagrania z niską liczbą klatek na
sekundę będzie wyświetlany przez 1 minutę, a plik
zostanie zapisany w folderze wideo z parkingu.
Na przykład, jeśli użytkownik wybierze tb niskiej
liczby klatek na sekundę 1 kl./s, rejestrator będzie
nagwał wideo w ciągu kilku sekund podczas
monitorowania parkowania, a każde 30 minut
nagrania będzie skompresowane do 1 minuty i
zapisane.
Ustawienia obszaru detekcji
Dostosuj ekran nagwania w ramach wszystkich
funkcji monitorowania parkowania, możesz wybrać
razem kamerę przednią i kabinową lub nagwanie z
pojedynczej kame przedniej.
Konguracja parkowania
1440P +1080P 30FPS
00:00:37
05-05-2025 AM 10:09:07
MP/H
45
Nagwanie
Tb poklatkowy
Tb parkingowy
Ustawienia Tb parkingo...
17/20
Ustawienia Tb parkingowy
Ustawienie detekcji
Tb nocnego parkowania
Detekcja kolizji parkowania
PL
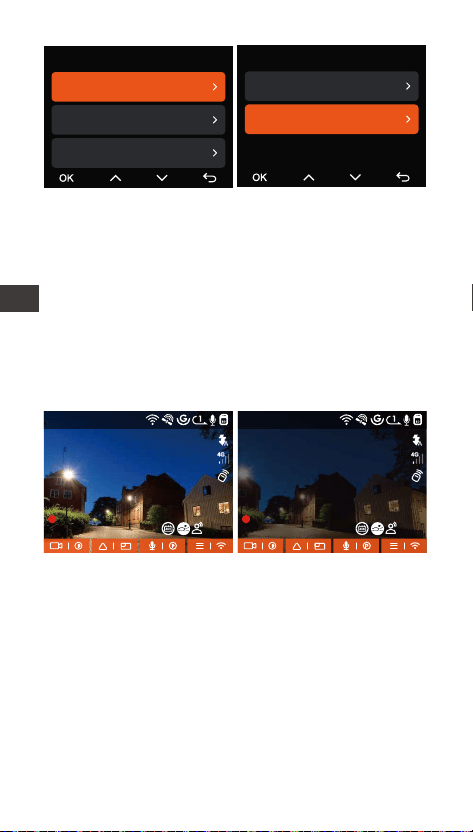
- 151 -
Tb LLNV Low Light Night Vision w tbie
parkingowym
Aby zwiększyć bezpieczeństwo parkowania w nocy, w
pełni wykorzystujemy wydajność obiektywu w
połączeniu z technologią Night Vision przy słabym
oświetleniu, aby poprawić efekt widzenia w nocy w
tbie parkowania.
Ta funkcja jest domyślnie włączona i zostanie
uruchomiona dopiero po wejściu w tb parkowania i
nie będzie miała wpływu na normalne nagwanie.
Tb nocnego
parkowania WŁ
Tb nocnego
parkowania WYŁ
Detekcja kolizji w tbie parkingowym
Funkcja ta umożliwia dostosowanie tbu uruchami-
ania wykwania kolizji. W tbie oszczędzania energii
kamera samochodowa wyłączy się, a następnie
włączy, aby nagwać po uruchomieniu; w tbie
szybkiego stau kamera samochodowa przejdzie w
tb gotowości i rozpocznie nagwanie natychmiast
po uruchomieniu.
Ustawienia Tb parkingowy
Ustawienie detekcji
Tb nocnego parkowania
Detekcja kolizji parkowania
Ustawienie detekcji
Przód + Wnętrze
Przód
1440P +1080P 30FPS
00:00:37
05-05-2025 AM 10:09:07
MP/H
1440P +1080P 30FPS
00:00:37
05-05-2025 AM 10:09:07
MP/H
45 45
PL
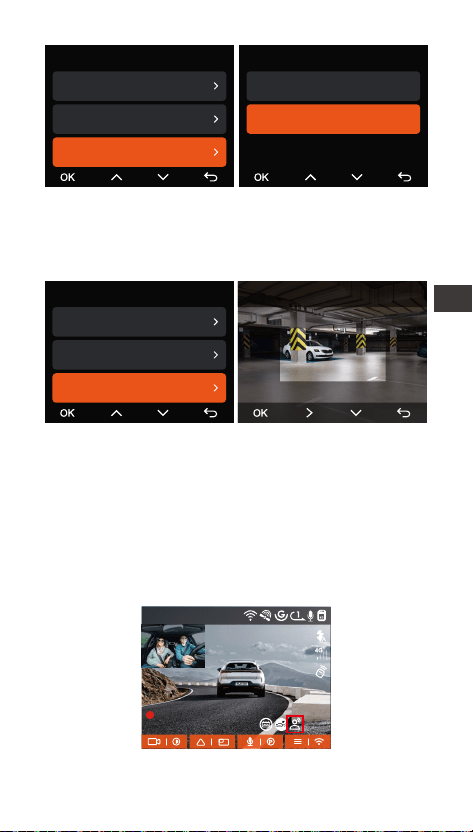
- 152 -
Zasięg wykwania przedniej i tylnej kame można
ustawić w kamerze samochodowej N2X, a ustawiony
zakres można regulować w górę i w dół, a także w
lewo i w prawo.
Komendy głosowe
Możesz sterować kamerą za pomocą poleceń
głosowych, takich jak robienie zdjęć, uruchamianie
wideo, włączanie/wyłączanie Wi-Fi, blokowanie wideo
itp. Obecnie obsługiwane języki to angielski, japoński,
rosyjski i chiński. Aby uzyskać bardziej szczegółowe
polecenia głosowe, przejdź do Ustawień systemowych
> Treści głosowe, aby je wyświetlić.
Detekcja kolizji parkowania
Tb oszczędzania energii
Tb szybkiego uruchamiania
Ustawienia Tb parkingowy
Ustawienie detekcji
Tb nocnego parkowania
Detekcja kolizji parkowania
Ustawienia Tb parkingowy
Tb nocnego parkowania
Detekcja kolizji parkowania
Obszar Detekcja Ruchu
Detekcja Obszaru Przód
Włącz sterowanie głosowe
1440P +1080P 30FPS
00:00:37
05-05-2025 AM 10:09:07
MP/H
PL
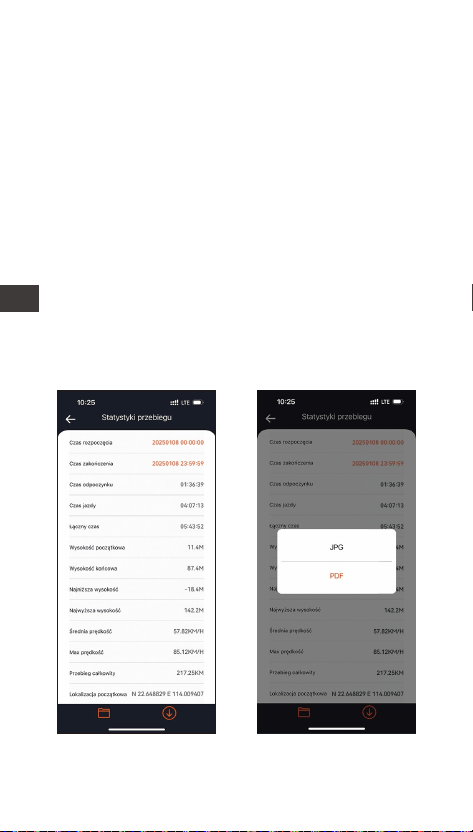
- 153 -
Włączanie komend głosowych
Rozpoznawanie głosu ma opcje niskiej czułości/
standardowej/wysokiej czułości/wyłączone. Waość
domyślna to czułość standardowa.
Statystyki przebiegu
Kamera samochodowa N2X wykorzystuje informacje
GPS do analizy statystyk przebiegu, takich jak czas
jazdy, przebieg, wysokość nad poziomem morza,
prędkość jazdy itp. podczas jazdy. Pliki przebiegu
można ekspoować za pośrednictwem aplikacji.
W inteejsie podglądu aplikacji w czasie rzeczywistym
możesz wybrać godzinę rozpoczęcia i godzinę
zakończenia, kliknąć OK, a następnie pobrać plik
statystyk przebiegu w formacie PDF lub JPG i zapisać
go w folderze lokalnym aplikacji.
PL
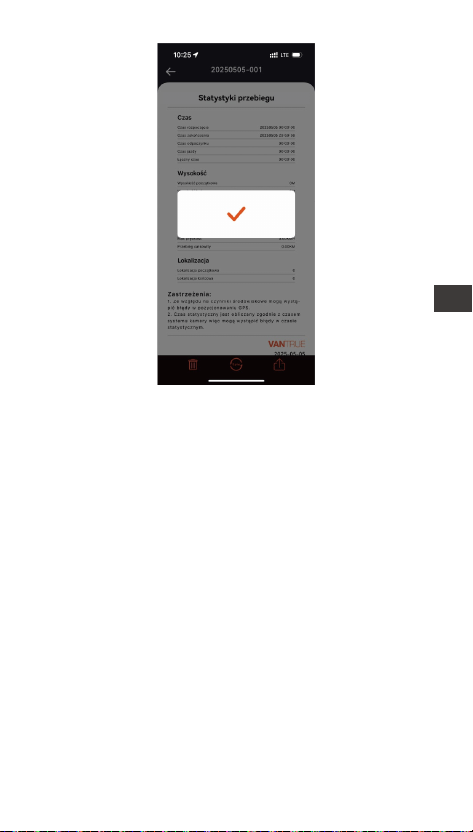
- 154 -
Ustawienia LTE (należy używać z modułem LTE)
Aby ułatwić użytkownikom zdalne sprawdzanie
warunków parkowania, Vantrue wprowadził moduł
LTE (LT01). Użytkownicy mogą włożyć kaę SIM do
modułu LTE i podłączyć go do rejestratora jazdy w
celu zdalnego monitorowania.
PL
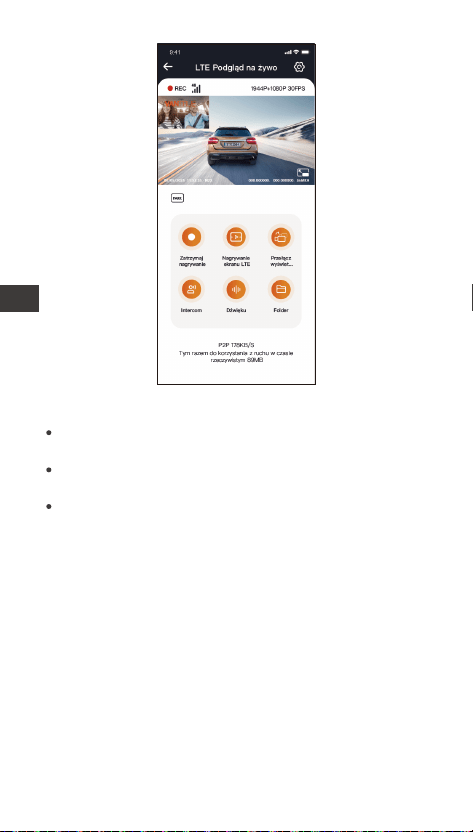
- 155 -
W ustawieniach LTE użytkownicy mogą dostosować:
Dostosuj te konguracje na podstawie swojego planu
komórkowego (np. nielimitowane lub warstwowe
dane), aby zapewnić wydajne wykorzystanie danych i
optymalną wydajność zdalnego monitorowania.
Ustawienia powiadomień – Zarządzaj aleami w
czasie rzeczywistym i wiadomościami systemowymi.
Limit wykorzystania danych kay SIM – Ustaw
miesięczne limity danych, aby uniknąć przekroczeń.
Jakość przesyłania wideo kolizji – Nadaj priotet
rozdzielczości (np. 1080p/720p) dla nagrań z
wydarzeń awajnych.
PL

- 156 -
Kompas
Czas
12:20
KM/H
120
N
NE
E
SE
S
SW
W
NW
HUD Prędkość i czas
Gdy ta funkcja jest włączona i po każdym udanym
namierzeniu GPS, na ekranie kame wyświetlana jest
powiększona aktualna prędkość podróży, aktualny
kierunek podróży i aktualny czas.
Bieżąca prędkość
Wskaźnik prędkości
Jednostka
prędkości
Gdy ta funkcja jest włączona jednocześnie z funkcją
wygaszacza ekranu, funkcja wygaszacza ekranu ma
pierwszeństwo.
Jeśli GPS nie zostanie pomyślnie zlokalizowany lub
GPS nie zostanie włączony, urządzenie nie będzie
miało dostępu do funkcji wyświetlania prędkości i
czasu HUD.
PL

- 157 -
Połączenie GPS zostanie nawiązane w ciągu 1
minuty od włączenia urządzenia. Jeśli połączenie
GPS nie zostanie nawiązane w ciągu 1 minuty,
sprawdź, czy URZĄDZENIE włączyło funkcję GPS,
czy uchwyt GPS jest prawidłowo podłączony i czy
Twoje otoczenie (parking podziemny, gęsto
zaludniona dzielnica mieszkaniowa, metro, tunel
itp.) wpływa na odbiór sygnału GPS.
Informacje GPS są rejestrowane wraz z lmem.
Aby go wyświetlić, pobierz i zainstaluj aplikację
VANTRUE i odtwarzacz GPS VANTRUE (dostępne
do pobrania na stronie www.vantrue.pl/wsparcie).
Funkcje GPS
GPS jest domyślnie włączony. Kamera samochodowa
N2X odbiera sygnały GPS za pośrednictwem uchwytu
GPS. Automatycznie koguje godzinę i datę w Twojej
okolicy, rejestruje lokalizację, w której nakręcono lm
oraz prędkość pojazdu w danym momencie.
UWAGA:
Informacje GPS
40
46
39
43
48
PL
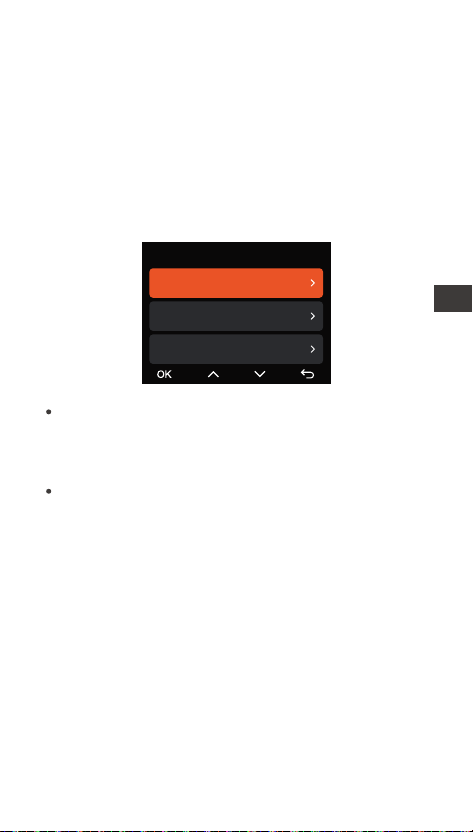
- 158 -
Automatyczny czas z GPS
Domyślne ustawienie automatycznej korekcji czasu
GPS dla N2X jest włączone. Jeśli Twoja lokalizacja to
Los Angeles, możesz wybrać GMT-08:00. Jeśli nie
znasz strefy czasowej swojej lokalizacji, możesz
podłączyć telefon do Wi-Fi kame i włączyć funkcję
automatycznej korekty czasu w aplikacji Vantrue, aby
kamera skogowała strefę czasową kame zgodnie
ze strefą czasową Twojego telefonu.
Automatyczna korekta czasu GPS wymaga
ustawienia właściwej strefy czasowej. Można
odwołać się do reprezentatywnych miast każdej
strefy czasowej.
Automatyczne przełączanie między czasem
zimowym a czasem letnim jest dostępne tylko w
Amece Północnej.
UWAGA:
N2X Aktualizacja oprogramowania
Metoda aktualizacji 1: Aktualizacje za pomocą
plików
Przejdź do witny VANTRUE, aby pobrać najnowsze
oprogramowanie sprzętowe kame samochodowej
N2X, skopiuj plik oprogramowania sprzętowego do
katalogu głównego kay pamięci, a następnie włóż
kaę pamięci z powrotem do kame N2X, system
automatycznie zaktualizuje oprogramowanie
sprzętowe kay Micro SD po włączeniu kame
samochodowej.
Data & czas
Automatyczna aktualizacja G...
Ręcznie ustaw datę i czas
Automatyczny przełącznik ST...
PL

- 159 -
Aby zaktualizować oprogramowanie sprzętowe za
pomocą pliku lub aktualizacji OTA, kamera N2X musi
być włączona.
Aby dokonać aktualizacji poprzez OTA, do pobrania
pliku aktualizacji wymagany jest ruch danych w
Internecie.
Jeśli aktualizujesz oprogramowanie sprzętowe za
pomocą pliku, musisz sformatować kaę pamięci w
kamerze samochodowej N2X, a następnie
skopiować plik aktualizacji na kaę pamięci, aby
zaktualizować oprogramowanie sprzętowe.
Uaktualnione pliki
Metoda aktualizacji 2: Aktualizacja oprogramowania
sprzętowego OTA (Over the Air).
Jeśli po otwarciu aplikacji otrzymasz przypomnienie o
aktualizacji oprogramowania kame samochodowej,
potwierdź aktualizację, a następnie przejdziesz do
inteejsu aktualizacji OTA, a następnie dokonasz
aktualizacji zgodnie z wytycznymi aplikacji.
PL
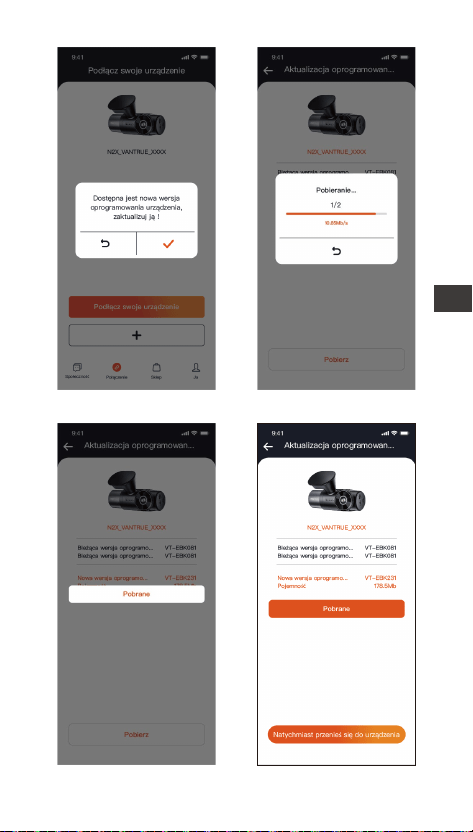
- 160 -
PL
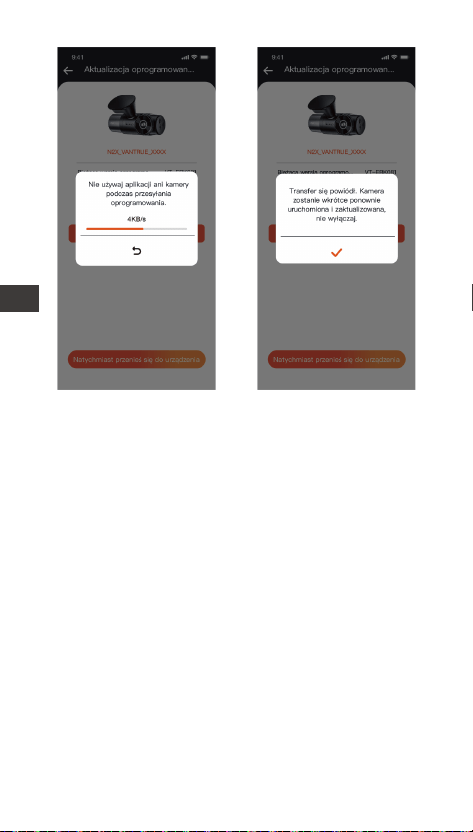
- 161 -
Tb nagwania tylko przód:
2592x1944P 30FPS
2560x1440P 30FPS
2560x1440P 60FPS
1920x1080P 30FPS
1280x720P 30FPS
-Jakość wideo: Domyślnie WŁ.; Możesz wybrać
Standard lub PlatePix™.
-Nagwanie w pętli: ustawienie domyślne to 1 min.
Możesz wybrać opcje pomiędzy 1/3/5 min i WYŁ.
-Diody podczerwieni: ustawienie domyślne to Auto.
Można ustawić opcję auto/wył/wł.
-G-Sensor: wybierz poziom czujnika G, którego
potrzebujesz, a następnie możesz ustawić 3 kierunki
(przód + tył/lewo + prawo/góra + dół). Waość
czujnika G w każdym kierunku można wybrać jako
1/2/3/4/5/Wył. Im wyższy poziom czułości, tym
łatwiej jest wyzwolić zapis zdarzenia. Czujnik G jest
najbardziej czuły, gdy jest ustawiony na 5.
-Tb pwatności: Domyślnie wyłączony. Możesz
wybrać włączenie, a po włączeniu nagwanie będzie
w tbie pwatnym.
-Nagwanie dźwięku: ustawienie domyślne jest
włączone. Włącz lub wyłącz nagwanie.
-Redukcja szumów audio: ustawienie domyślne jest
włączone. Reguluje efekt dźwiękowy nagrania
poprzez dynamiczną redukcję szumów. Możesz to
włączyć lub wyłączyć.
-Ekspozycja: Możesz osobno ustawić waość
ekspozycji kame przedniej lub kame kabinowej
samochodu. Waość domyślna to +0,0.
-Lampka stanu nagwania: Ustawienie domyślne
to WŁ. Możesz włączyć/wyłączyć lampkę stanu
nagwania.
-HDR: ustawienie domyślne jest włączone. Możesz
oddzielnie regulować HDR dla kame przedniej i
2.4 Ustawienia menu
Konguracja funkcji kame N2X składa się z trzech
sekcji: Konguracja nagwania, Konguracja systemu
i Przeglądanie plików. Za pomocą tych ustawień
funkcji możesz ustawić kamerę samochodową zgodnie
ze swoimi wymaganiami.
2.4.1 Ustawienia nagwania
-Rozdzielczość: Kamera N2X ma 2 tby
nagwania:
Tb nagwania z przodu + wnętrze:
1944P +1080P 30FPS
1944P +720P 30FPS
1440P +1080P 30FPS
1440P +720P 30FPS
1440P 60FPS+1080P 30FPS
1440P 60FPS+720P 30FPS
1080P+1080P 30FPS
1080P+720P 30FPS
720P+720P 30FPS
PL

- 162 -
Tb nagwania tylko przód:
2592x1944P 30FPS
2560x1440P 30FPS
2560x1440P 60FPS
1920x1080P 30FPS
1280x720P 30FPS
-Jakość wideo: Domyślnie WŁ.; Możesz wybrać
Standard lub PlatePix™.
-Nagwanie w pętli: ustawienie domyślne to 1 min.
Możesz wybrać opcje pomiędzy 1/3/5 min i WYŁ.
-Diody podczerwieni: ustawienie domyślne to Auto.
Można ustawić opcję auto/wył/wł.
-G-Sensor: wybierz poziom czujnika G, którego
potrzebujesz, a następnie możesz ustawić 3 kierunki
(przód + tył/lewo + prawo/góra + dół). Waość
czujnika G w każdym kierunku można wybrać jako
1/2/3/4/5/Wył. Im wyższy poziom czułości, tym
łatwiej jest wyzwolić zapis zdarzenia. Czujnik G jest
najbardziej czuły, gdy jest ustawiony na 5.
-Tb pwatności: Domyślnie wyłączony. Możesz
wybrać włączenie, a po włączeniu nagwanie będzie
w tbie pwatnym.
-Nagwanie dźwięku: ustawienie domyślne jest
włączone. Włącz lub wyłącz nagwanie.
-Redukcja szumów audio: ustawienie domyślne jest
włączone. Reguluje efekt dźwiękowy nagrania
poprzez dynamiczną redukcję szumów. Możesz to
włączyć lub wyłączyć.
-Ekspozycja: Możesz osobno ustawić waość
ekspozycji kame przedniej lub kame kabinowej
samochodu. Waość domyślna to +0,0.
-Lampka stanu nagwania: Ustawienie domyślne
to WŁ. Możesz włączyć/wyłączyć lampkę stanu
nagwania.
-HDR: ustawienie domyślne jest włączone. Możesz
oddzielnie regulować HDR dla kame przedniej i
2.4 Ustawienia menu
Konguracja funkcji kame N2X składa się z trzech
sekcji: Konguracja nagwania, Konguracja systemu
i Przeglądanie plików. Za pomocą tych ustawień
funkcji możesz ustawić kamerę samochodową zgodnie
ze swoimi wymaganiami.
2.4.1 Ustawienia nagwania
-Rozdzielczość: Kamera N2X ma 2 tby
nagwania:
Tb nagwania z przodu + wnętrze:
1944P +1080P 30FPS
1944P +720P 30FPS
1440P +1080P 30FPS
1440P +720P 30FPS
1440P 60FPS+1080P 30FPS
1440P 60FPS+720P 30FPS
1080P+1080P 30FPS
1080P+720P 30FPS
720P+720P 30FPS
PL

- 163 -
kame kabinowej.
-HDR Timer: ustawienie domyślne to Wył. Gdy jest
włączona, możesz wybrać, kiedy HDR ma być
automatycznie włączany i wyłączany.
-Timer PlatePix™: Domyślnie wyłączony. Możesz
wybrać automatyczne uruchamianie i zatrzymywanie
czasu po jego włączeniu
-Obróć wyświetlacz: ustawienie domyślne to Wył.
Można ustawić ekrany wideo kame przedniej i
kame w kokpicie tak, aby oddzielnie obracały się w
górę i w dół (180 stopni).
-Odbicie lustrzane: Ustawienie domyślne to WŁ. Gdy
jest włączona, ekran kame kabinowej wyświetlany
jest w tbie lustrzanym.
-Tablica rejestracyjna: Wybierz cyfrę lub literę, która
ma zostać ustawiona. Po ustawieniu numer tablicy
rejestracyjnej może zostać wyświetlony w nagranym
lmie.
-Dodaj do nagrania: Włącz lub wyłącz znak wodny na
lmach i zdjęciach. Znaczek wodny zawiera etykietę
godziny i daty, etykietę VANTRUE, numer tablicy
rejestracyjnej, informacje o lokalizacji GPS i etykietę
prędkości. Wszystko domyślnie włączone.
-Tb poklatkowy: Waość domyślna jest wyłączona.
Możesz włączyć opcję 1FPS/5FPS/10FPS /15FPS.
-Tb parkowania: Możesz wybrać tb parkowania,
którego potrzebujesz. Dostępne są opcje Wykwanie
kolizji / Wykwanie ruchu / Nagwanie z niską
szybkością transmisji / Nagwanie z małą szybkością
klatek / Wykwanie kolizji / Wykwanie zdarzeń /
Nagwanie z niską szybkością klatek / Wyłączone.
Ustawienie domyślne to Wyłączone.
-Ustawienia obszaru do monitorowania parkowania:
Dostępny jest obszar monitorowania parkowania, przy
słabym świetle w tbie parkowania, obszar wykwa-
nia ruchu, obszar wykwania, linia ramki rozpoznawa
PL

- 164 -
nia, regulacja tbu wykwania kolizji podczas
parkowania.
-Statystyki przebiegu: ustawienie domyślne to wył.
Włącz tę funkcję, a kamera samochodowa będzie
rejestrować informacje o przebiegu i będziesz mógł
wyekspoować statystyki przebiegu za pomocą
funkcji statystyk przebiegu w aplikacji Vantrue.
Szybkość i czas HUD: Ustawienie domyślne to wył.
Można ustawić wejście po 1/3/5 minutach, a aktualna
prędkość i czas zostaną wyświetlone po wejściu.
-Ustawienia GPS: GPS jest domyślnie włączony. Tutaj
konguruje się ustawienia włączania/wyłączania GPS,
ustawienia jednostek prędkości i informacje GPS.
2.4.2 Konguracja systemu
-Język: Dostępne języki to angielski/français/ español
/deutsch/italiano/简体中文/русский/日本語/polski /
한국어/Türkçe/Čeština.
-Wi-Fi: możesz wybrać tb Wi-Fi, przeglądać
informacje o Wi-Fi itp.
Opcja automatycznego włączania Wi-Fi oznacza, że
Wi-Fi wyłączy się automatycznie po 10 minutach od
włączenia. Jeśli wybierzesz tę opcję, Wi-Fi będzie
zawsze włączone; jeśli wybierzesz tę opcję, Wi-Fi
będzie musiało zostać włączone ręcznie.
Domyślnie tb Wi-Fi to 5G.
Informacje o Wi-Fi wyświetlają nazwę Wi-Fi i hasło
Wi-Fi.
-Sterowanie głosem: Domyślna czułość to Standard.
Polecenia głosowe mogą być rozpoznawane po
włączeniu opcji. Możesz wybrać takie opcje, jak niska
czułość/wysoka czułość/standardowa/wyłączona.
-Treść głosowa: Możesz używać różnych poleceń,
aby zdalnie sterować kamerą.
-Formatuj kaę SD: formatuj wszystkie dane na
karcie pamięci.
-Konguracja przypomnienia w formacie: Wybierz
opcje przypomnienia: 15 dni, 1 miesiąc i wyłączone.
Domyślnie jest wyłączone.
PL

- 165 -
Aby zapobiec zapominaniu o regularnym formatowa-
niu kay pamięci, dodaliśmy ustawienie czasu
przypomnienia o formacie. Możesz wybrać przypom-
nienie po 15 dniach lub 1 miesiącu i obliczyć 15 dni
lub 1 miesiąc od ustawionej daty. Kiedy czas minie,
możesz wybrać „OK”, aby sformatować, lub wybrać
„Dalej”.
Uwaga: jeśli zmienisz opcję przypomnienia o
formacie, odliczanie czasu zostanie wznowione
natychmiast po zmianie tej opcji.
-Data i godzina: Istnieją dwa sposoby ustawienia
godziny i daty:
① Automatyczna aktualizacja GPS: GPS automaty-
cznie zaktualizuje czas, gdy jest domyślnie włączony.
Data i godzina automatycznej aktualizacji GPS
opierają się na ustawionej stree czasowej, dlatego
należy najpierw wybrać właściwą strefę czasową;
② Ręczne ustawianie daty/godziny: wyłącz
automatyczną aktualizację GPS i ręcznie ustaw datę i
godzinę.
Automatyczne przełączanie czasu letniego/zimowego:
ustawienie domyślne jest wyłączone. Po włączeniu
przełącza się automatycznie zgodnie z czasem letnim
i zimowym.
*Ta funkcja jest dostępna tylko w Amece Północnej.
Jeśli jest używana w innych regionach, może
powodować błędy czasu.
W tym menu można również ustawić format daty i
ustawienia strefy czasowej.
-Wygaszacz ekranu: Ustaw czas automatycznego
wyłączania wyświetlacza LCD po bezczynności.
Jeśli ustawisz opcję Wył na 3 minuty, ekran LCD
wyłączy się automatycznie po 3 minutach, ale
nagwanie będzie kontynuowane. Jeśli konguracja
jest wyłączona, ekran nie wyłączy się. Możesz wybrać
opcje spośród 30 s, 1 Min, 3 Min i WYŁ.
PL

- 166 -
-Dźwięk urządzenia: Ustaw głośność urządzenia.
Domyślny poziom głośności to 2, najniższy to 0, a
najwyższy to 5.
-Dźwięk ostrzegawczy: W zależności od sytuacji
kamera samochodowa emituje 5 rodzajów sygnałów
dźwiękowych, do któch należą dźwięk włączania/
wyłączania, dźwięk klawiszy, dźwięk zablokowania
pliku, dźwięk formatowania i przypomnienie o
nieprawidłowym zatrzymaniu nagwania. Wszystkie
dźwięki podpowiedzi są domyślnie włączone.
-Częstotliwość: Różne kraje mają różne częstotliwoś-
ci. Aby uniknąć wpływu na wideo, możesz wybrać
częstotliwość 50 Hz lub 60 Hz w zależności od
regionu. Dla Polski ustaw 50 Hz.
-Informacje o systemie: sprawdź aktualny model,
wersję oprogramowania sprzętowego i ocjalną
stronę VANTRUE.
-Informacje o ceykacie: Możesz wyświetlić
informacje o ceykacie kame samochodowej N2X.
-Ustawienia domyślne: Zresetuj urządzenie do
ustawień fabcznych.
-Powiadomienia: Domyślnie wyłączone. Możesz
wybrać opóźnienie w czasie rzeczywistym/3 minuty
lub wyłączone.
Kaa SIM Upload Daily Trac Control: Domyślnie
wyłączone. Możesz wybrać spośród 100 MB/200
MB/300 MB/500 MB/800 MB/1000 MB/wyłączone.
Collision Video Upload: Domyślnie włączone jest Save
Trac Upload. Możesz wybrać spośród O, original
video upload i original video upload.
PL

- 167 -
2.4.3 Pliki
Przejrzyj pliki wideo i zdjęcia zapisane przez kamerę.
-Zdarzenia: lmy z wydarzeniami ktycznymi
wykte przez aktywność czujnika G lub ręcznie
zablokowane przez użytkownika.
20241201_140633_00008_E_A.MP4
20241201_140633_00008_E_B.MP4
-Normalne: Nagrane standardowe lmy. W tym
folderze zapisywane są nagrania wideo z nagwania
w pętli i lmy poklatkowe.
Format nazwy pliku wideo z nagwaniem w pętli to:
20241201_140933_00008_N_A.MP4;
format nazwy pliku wideo poklatkowego to:
20241201_140733_00006_T_A.MP4;
-Pliki w tbie parkowania: Format nazwy pliku
wideo nagwania w pętli to:
20241201_140833_00002_P_A.MP4
-Zdjęcia: pliki zdjęć. Format nazwy pliku wideo z
nagwaniem w pętli to:
20241201_140633_00005_A.JPG;
20241201_140633_00005_B.JPG.
-Wszystkie pliki: wszystkie nagrane lmy i zdjęcia.
Uwaga: przyrostek A oznacza pliki nagrane przez
kamerę przednią, przyrostek B oznacza pliki nagrane
przez kamerę wewnętrzną.
Pliki
Zdarzenia
Parkingowy
Normalne
1/5
Pliki 5/5
Normalne
Zdjęcia
Wszystkie pliki
PL

- 168 -
3. Specykacje i ostrzeżenia
3.1 Dane techniczne
Specykacje tego produktu mogą ulec zmianie bez
wcześniejszego powiadomienia w związku z
ulepszeniami produktu.
N2XModel
Chips Procesor
Novatek high-peormance
processor
Image Sensor
Sensor obrazu
Sony Sensor
G-sensor
Wi-Fi
Ekran
Kąty widzenia
obiektywów
Jasność
obiektywu
Języki
3-osiowy G-sensor
Wbudowane 2.4GHz&5GHz
2” IPS
Rozdzielczość
Przód: 158° szerokokątny;
Wnętrze: 165° szerokokątny
Przód: F/1. 8
Wnętrze: F/1. 8
Engish / Français / Español /
Deutsch / Italiano / 简体中文 /
русский / 日本語/ Polski / 한국어/
Türkçe / Čeština
Przód + wnętrze:
1944P +1080P 30FPS; 1944P +720P
30FPS
1440P +1080P 30FPS; 1440P +720P
30FPS
1440P 60FPS+1080P 30FPS; 1440P
60FPS+720P 30FPS
1080P+1080P 30FPS; 1080P+720P
30FPS
720P+720P 30FPS
Tylko przód:
2592x1944P 30FPS
2560x1440P 30FPS; 2560x1440P
60FPS
1920x1080P 30FPS; 1280x720P
30FPS
PL

- 169 -
Przód + wnętrze:
1944P +1080P 30FPS; 1944P +720P
30FPS
1440P +1080P 30FPS; 1440P +720P
30FPS
1440P 60FPS+1080P 30FPS; 1440P
60FPS+720P 30FPS
1080P+1080P 30FPS; 1080P+720P
30FPS
720P+720P 30FPS
Tylko przód:
2592x1944P 30FPS
2560x1440P 30FPS; 2560x1440P
60FPS
MP4
Video Format
Format Zdjęć
Audio
Pamięć
USB Po
Rodzaj zasilania
JPG
Wbudowany mikrofon oraz głośnik
Zewnętrzna: 32GB-512GB Micro SD
Card, U3, Class 10( brak w zestawie)
Typ C
Kondensator
DC 5V 2.4A
Prąd napięcia
zasilania
Zasilanie
Temperatura
pracy
Temperatura
pamięci
6W
-4°F to 140°F(-20°C to 60°C)
-4°F to 158°F(-20°C to 70°C)
1920x1080P 30FPS; 1280x720P
30FPS
PL

- 170 -
3.2 Ostrzeżenia dotyczące bezpieczeństwa
Ten produkt jest urządzeniem pomocniczym
służącym do rejestrowania obrazów zewnętrznych
pojazdów i niektóre funkcje mogą nie być
obsługiwane ze względu na różne warunki jazdy i
pojazdu.
Od czasu do czasu będzie przeprowadzana
aktualizacja oprogramowania sprzętowego w celu
dalszego udoskonalenia produktu. Prosimy zwrócić
uwagę na ocjalne zawiadomienie rmy VANTRUE
dotyczące konkretnej aktualizacji.
Ten produkt może rejestrować i zapisywać obrazy
wypadków samochodowych, ale nie gwarantuje, że
możliwe będzie zarejestrowanie wszystkiego. Obraz
może nie zostać zapisany w specjalnym folderze,
ponieważ w przypadku drobnych awarii nie można
aktywować czujnika zderzenia.
Podczas wkładania lub wyjmowania kay pamięci
należy pamiętać o wyłączeniu zasilania.
Aby zapewnić stabilne działanie produktu, należy
formatować kaę pamięci przynajmniej raz w
miesiącu.
Ogólnie rzecz biorąc, kay pamięci mają określoną
żywotność i długotrwałe używanie ka pamięci
może spowodować, że dane nie zostaną zapisane.
W takim przypadku zaleca się zakup nowej kay
pamięci do użytku. Jeżeli dane ulegną zniszczeniu w
wyniku długotrwałego użytkowania kay pamięci,
rma nie ponosi za to odpowiedzialności.
Nie instaluj ani nie obsługuj tego produktu, gdy
pojazd jest uruchomiony.
Nie narażaj produktu na silne wstrząsy lub wibracje,
które mogą spowodować uszkodzenie produktu i
spowodować nieprawidłowe działanie lub utratę
funkcjonalności.
Do czyszczenia produktu nie należy używać
rozpuszczalników chemicznych ani środków
czyszczących.
Zakres temperatu otoczenia podczas normalnego
użytkowania tego urządzenia wynosi od -20 stopni
Celsjusza do 60 stopni Celsjusza. Przekroczenie tego
zakresu temperatur otoczenia może spowodować
nieprawidłowe działanie produktu.
Nie umieszczaj produktu w otwaym ogniu. Nie
używaj produktu w obszarach o wysokiej tempera-
turze i dużej wilgotności, ponieważ może to
spowodować porażenie prądem, zwarcie i inne
zagrożenia oraz uszkodzenie produktu.
Zabronione jest samodzielne demontowanie lub
modykowanie ładowarki samochodowej, a także
używanie ładowarki samochodowej powodującej
zwarcie, gdyż grozi to obrażeniami ciała, poraże-
niem prądem, pożarem i innymi zagrożeniami lub
uszkodzeniem produktu.
PL

- 171 -
Ten produkt jest urządzeniem pomocniczym
służącym do rejestrowania obrazów zewnętrznych
pojazdów i niektóre funkcje mogą nie być
obsługiwane ze względu na różne warunki jazdy i
pojazdu.
Od czasu do czasu będzie przeprowadzana
aktualizacja oprogramowania sprzętowego w celu
dalszego udoskonalenia produktu. Prosimy zwrócić
uwagę na ocjalne zawiadomienie rmy VANTRUE
dotyczące konkretnej aktualizacji.
Ten produkt może rejestrować i zapisywać obrazy
wypadków samochodowych, ale nie gwarantuje, że
możliwe będzie zarejestrowanie wszystkiego. Obraz
może nie zostać zapisany w specjalnym folderze,
ponieważ w przypadku drobnych awarii nie można
aktywować czujnika zderzenia.
Podczas wkładania lub wyjmowania kay pamięci
należy pamiętać o wyłączeniu zasilania.
Aby zapewnić stabilne działanie produktu, należy
formatować kaę pamięci przynajmniej raz w
miesiącu.
Ogólnie rzecz biorąc, kay pamięci mają określoną
żywotność i długotrwałe używanie ka pamięci
może spowodować, że dane nie zostaną zapisane.
W takim przypadku zaleca się zakup nowej kay
pamięci do użytku. Jeżeli dane ulegną zniszczeniu w
wyniku długotrwałego użytkowania kay pamięci,
rma nie ponosi za to odpowiedzialności.
Nie instaluj ani nie obsługuj tego produktu, gdy
pojazd jest uruchomiony.
Nie narażaj produktu na silne wstrząsy lub wibracje,
które mogą spowodować uszkodzenie produktu i
spowodować nieprawidłowe działanie lub utratę
funkcjonalności.
Do czyszczenia produktu nie należy używać
rozpuszczalników chemicznych ani środków
czyszczących.
Zakres temperatu otoczenia podczas normalnego
użytkowania tego urządzenia wynosi od -20 stopni
Celsjusza do 60 stopni Celsjusza. Przekroczenie tego
zakresu temperatur otoczenia może spowodować
nieprawidłowe działanie produktu.
Nie umieszczaj produktu w otwaym ogniu. Nie
używaj produktu w obszarach o wysokiej tempera-
turze i dużej wilgotności, ponieważ może to
spowodować porażenie prądem, zwarcie i inne
zagrożenia oraz uszkodzenie produktu.
Zabronione jest samodzielne demontowanie lub
modykowanie ładowarki samochodowej, a także
używanie ładowarki samochodowej powodującej
zwarcie, gdyż grozi to obrażeniami ciała, poraże-
niem prądem, pożarem i innymi zagrożeniami lub
uszkodzeniem produktu.
PL

- 172 -
4. Gwarancja & wsparcie
Gwarancja
Kamera samochodowa VANTRUE® N2X jest objęta
pełną 18-miesięczną gwarancją.
Wsparcie
Jeśli masz jakiekolwiek pytania dotyczące produktu,
skontaktuj się z nami pod adresem [email protected]
lub otwórz aplikację VANTRUE i znajdź Często
zadawane pytania na stronie „Ja”.
Twoja opinia ma znaczenie
VANTRUE® jest mocno zaangażowane w ciągłe
ulepszanie swoich produktów, usług i komfou
użytkowania. Jeśli masz jakieś przemyślenia, w jaki
sposób możemy działać jeszcze lepiej, czekamy na
Twoje konstruktywne opinie i sugestie. Połącz się z
nami już dziś pod adresem [email protected]
PL

- 173 -
www.vantrue.pl
facebook.com/vantruePolska
PL


English / Deutsch / Français / Polski
truly driven.
www.vantrue.com Made in China