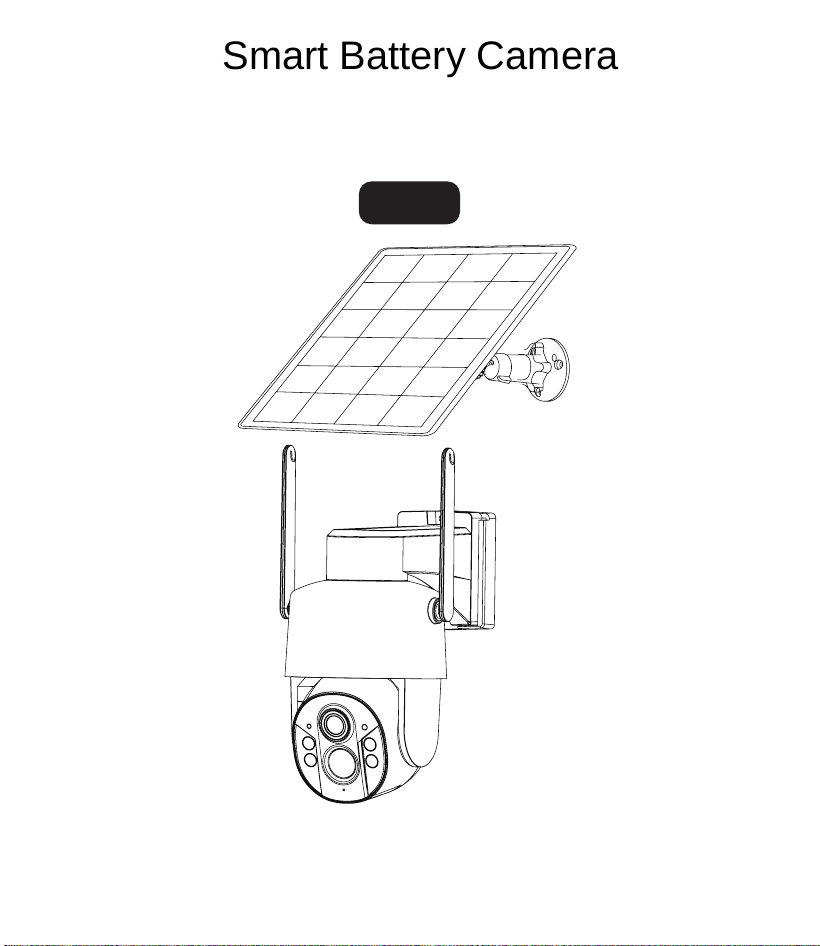
Smart Battery Camera
User Manual
Q41-LL
📞📞
: + 1218-292-2199

Catalog
I.Product introduction
------------------------------------------------------------
01
II.Setup App
--------------------------------------------------------------------------------
02
III.App Function
-------------------------------------------------------------------------
07
IV.Mounting the Camera
---------------------------------------------------------
09
V.FAQS
-------------------------------------------------------------------------------------------
13
VI.Notication of Compliance
----------------------------------------------
19
Contact Us:
If you have any questions about our products or services, please feel free to contact
us.
📞
: + 1218-292-2199
1
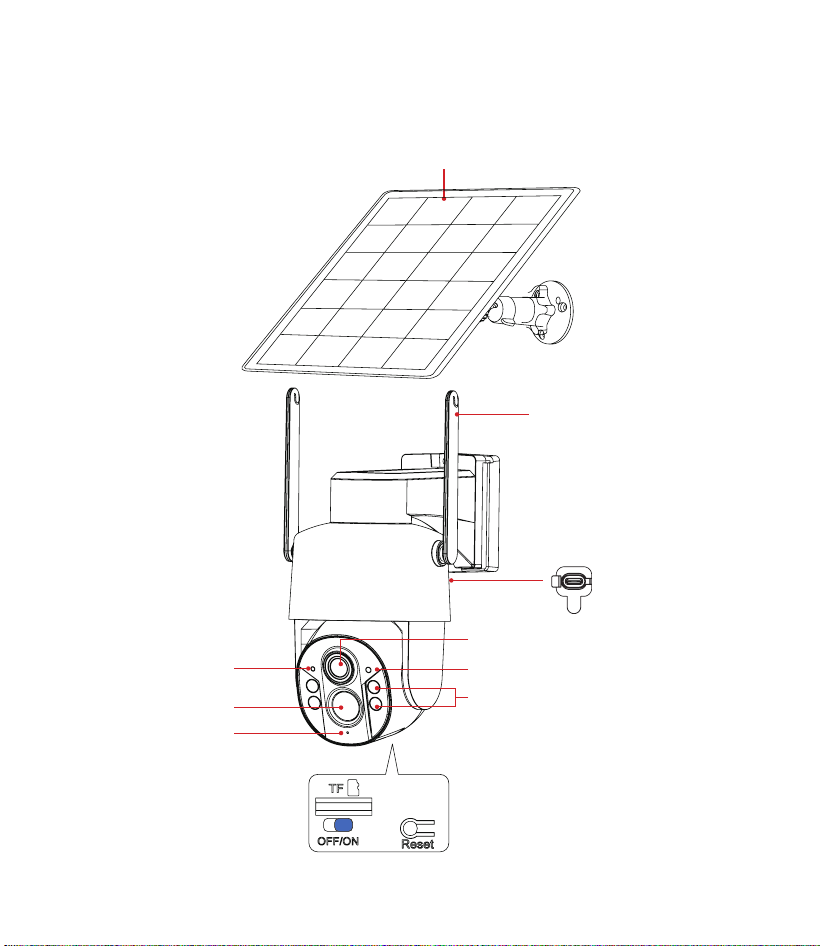
I.Product Introduction
Solar panel
Charge port
Lens
4G Antenna
Indicator Light
White Light LED/Infrared LED
PIR Sensor
Microphone
Light Sensor
2
II.Setup APP
1.Download and install APP
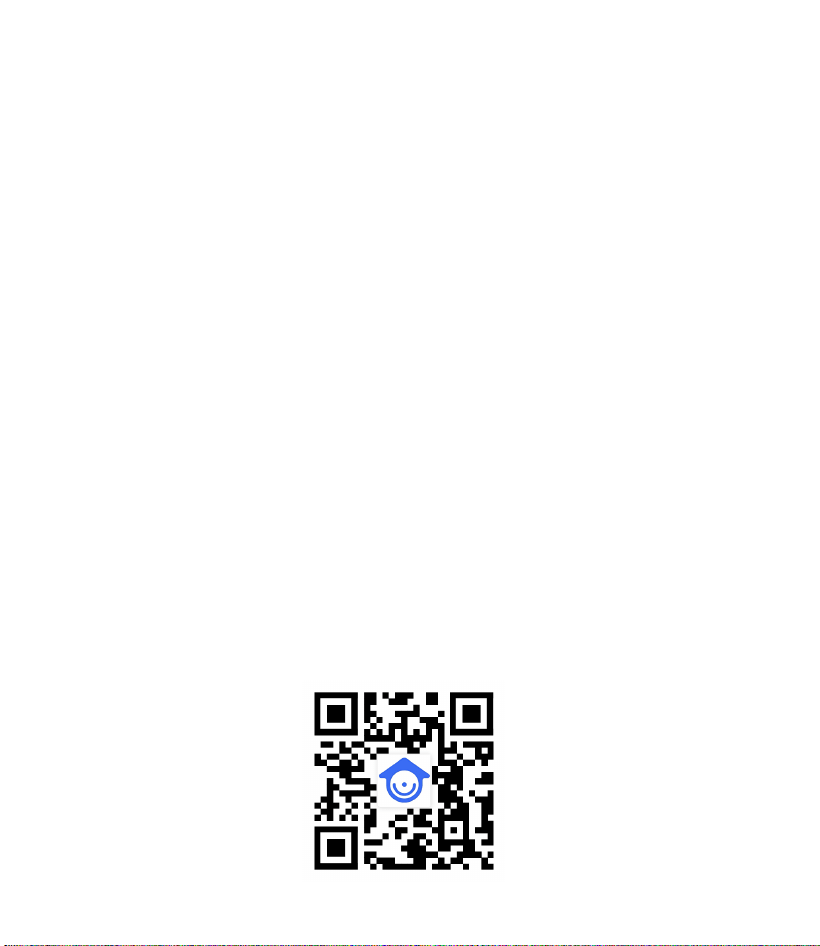
Option1: Scan the QR code below to download the "Arogal" App and set it up on
your mobile phone.
Charge the camera
Please plug the camera into a power source to charge the camera for about 10-13
hours by using the provided USB cable. After adding the camera to the App, the App
will display the battery status.
Storage Options
You can store your event videos on a TF card (not included) or in cloud storage,
based on your preference.
Option 1: TF Card. Please install the TF card only when the camera is powered o,
and use a Class 10 or higher card with 8 GB-128 GB of storage.
Option 2: Cloud Storage. New users get lifetime 8 second free cloud storage with 24
hour rolling retention and complimentary basic person/vehicle/pet recognition in the
cloud.If you want to upgrade your cloud storage, you need to subscribe to a plan.
3
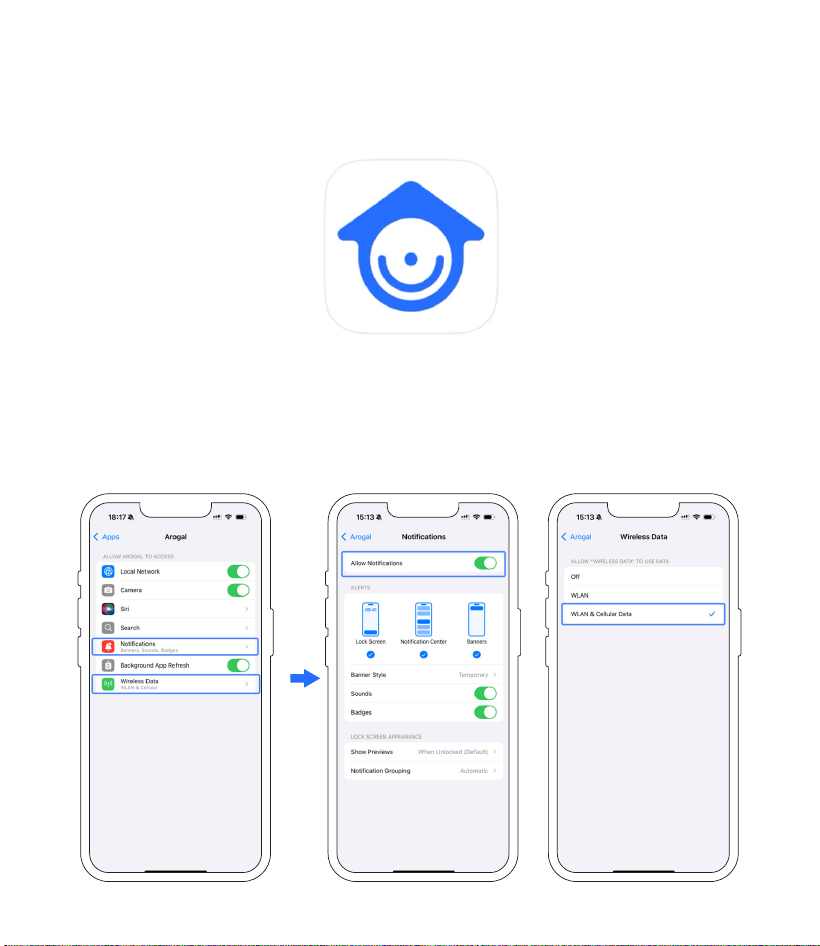
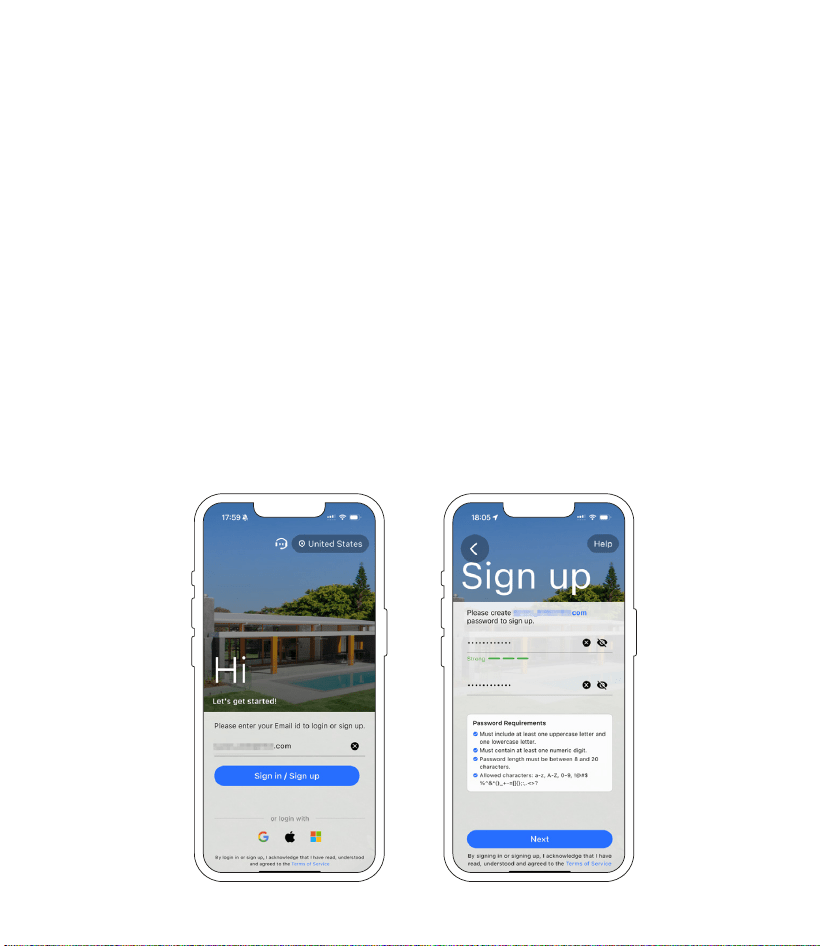
Option 2: Search"Arogal"App and download it from Google Play Store for Android
or App Store for iOS.
· Please conrm the Arogal App icon before downloading it. Otherwise, you can't
add the camera successfully.
· Allow "Arogal" to use mobile cellular data and wireless network. Otherwise, you
may fail to add 4G camera.
· Allow "Arogal" to access phone location and push messages to the phone.
Otherwise, the phone will not receive alerts from the Arogal when motion detection
is triggered.
4
2.Register an account
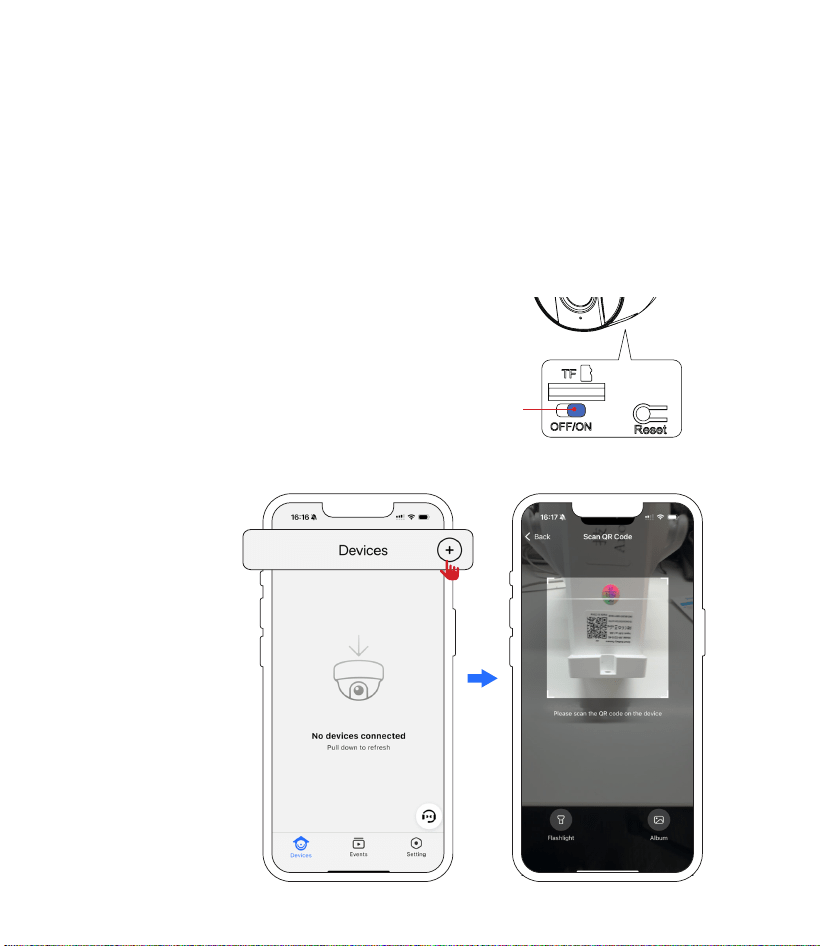
(1) Create an account using your email address, and complete email verication.
(2) Set a password for your account and keep it secure. Follow the app’s on-screen
instructions to complete setup.
Important Notes:
· During download and account setup, tap "Allow" or "Agree" to grant the Arogal
App access to your device’s Camera, Location, Storage, Microphone, Notications,
and Wireless Data. Without these permissions, the camera may have reduced
functionality or incomplete settings.
· Some email providers—such as att.net, msn.com, and hotmail.com—apply
strict ltering to messages from unsubscribed senders. If you do not receive the
verication email, consider using a dierent email address to ensure smooth
delivery.
5
3.Adding the Camera to the App
Important Notes Before Adding Camera:
This camera has a built-in SIM card, so no additional SIM card is required (your
own SIM card is not supported). Simply turn on the camera and wait about one
minute. When the indicator light continues to ash red, it means the camera
has successfully recognized the SIM card.
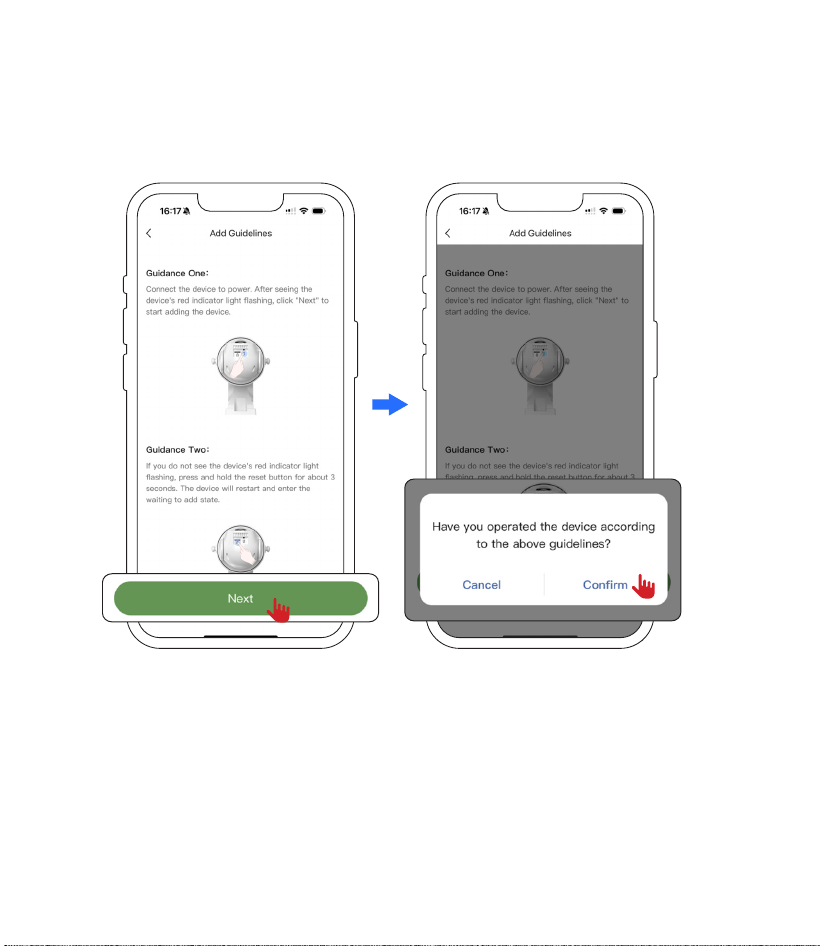
Step 1. Switch on the power button to turn on the camera. When the indicator light
is on, it means the camera has been powered on.
Step 2. Open the"Arogal" APP, click on "+", then use your phone to scan the QR
code on the camera.
Power ON
6
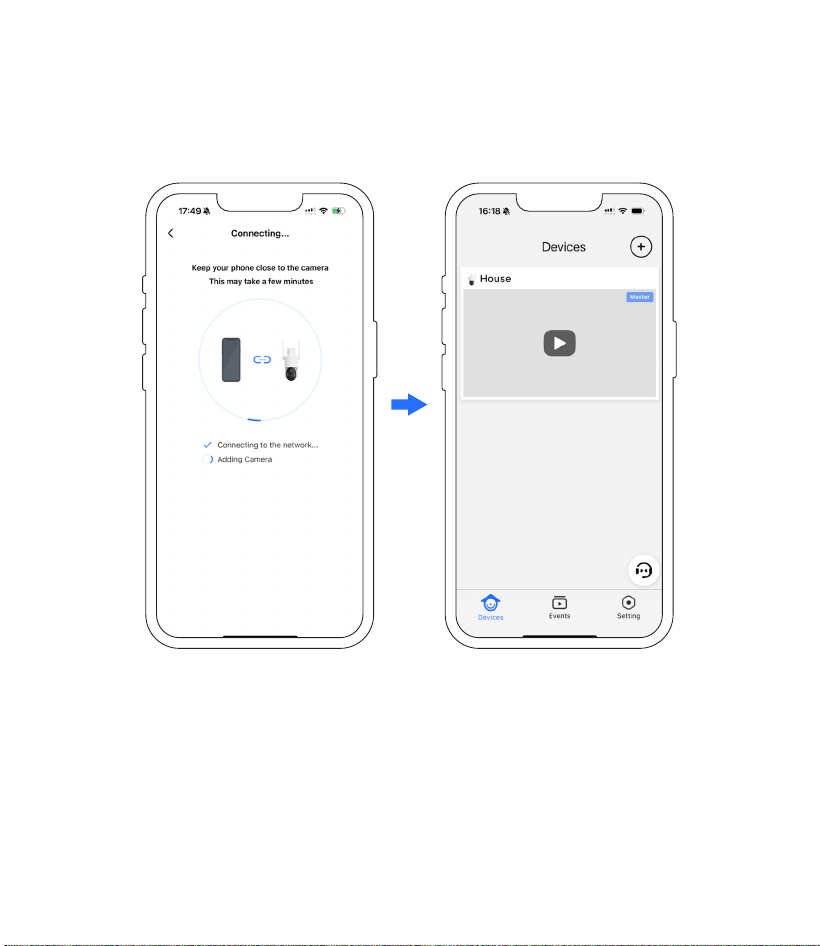
Step 3. When the camera indicator light ashes red continuously, click "Next" to
select "Conrm".
7
Step 4. Bring your phone close to the camera and keep it still until you hear the
sound indicating that the scan is complete. Then wait for the connection to nish.
8
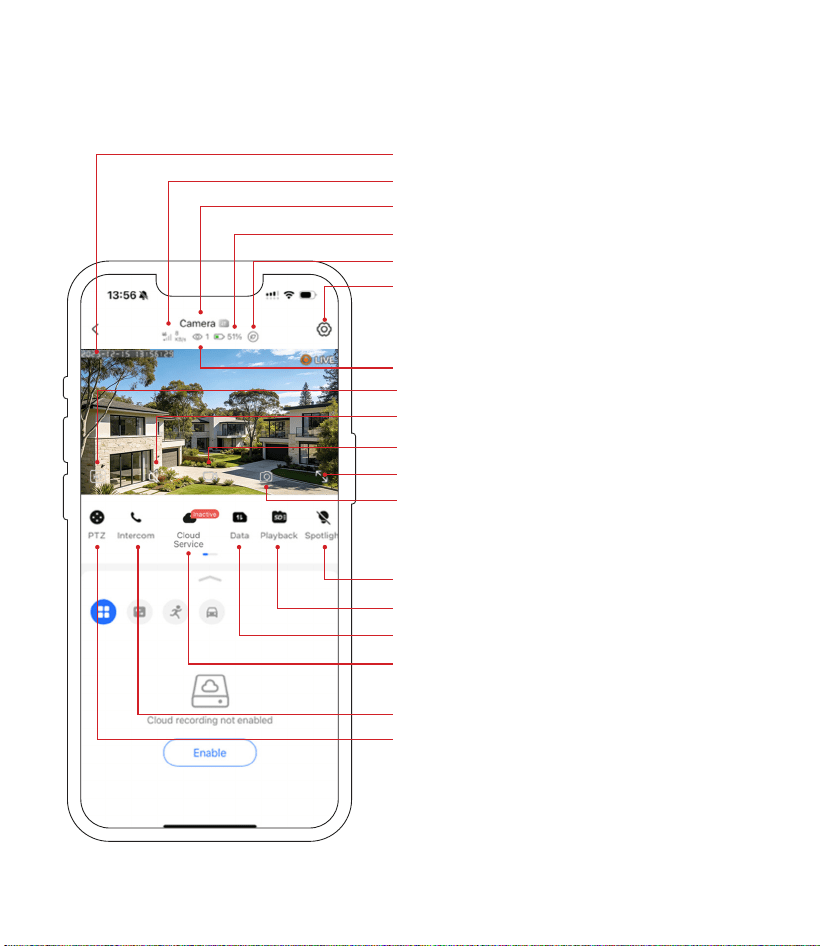
III.APP Introduction
Time of the camera
4G LTE signal strength
Camera Name
Battery level
Working Mode
Device settings
Number of users
Denition of the video (FHD/HD)
Camera sound ON/OFF
Manual Recording
Full screen preview
Screenshot
Spotlight: Spotlight ON/OFF
Playback: TF Card storage
Data: Recharge data
Cloud Service: Subscribe to a plan to
upgrade your cloud storage.
Intercom: Click to enable two-way audio
PTZ: PTZ control of the camera
9
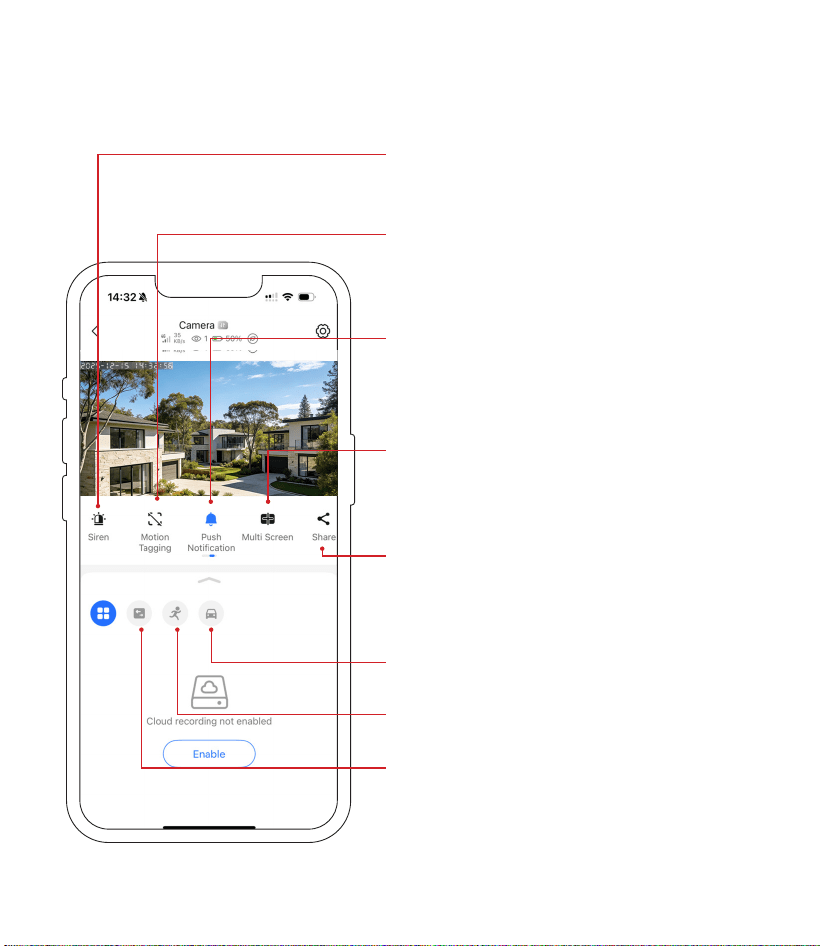
Siren: Click to enable the one-click alert
sound.
Motion Tagging: Enable this option to
show a person detection box in the live
view.
Push Notication: Enable/Disable
Alert Notications, when notication is
disabled, you will not receive any alerts.
Multi Screen: This function is available
only when two or more devices are
connected.
Share the device
Vehicle detected
Person detected
Motion detected
10
IV.Mounting the Camera
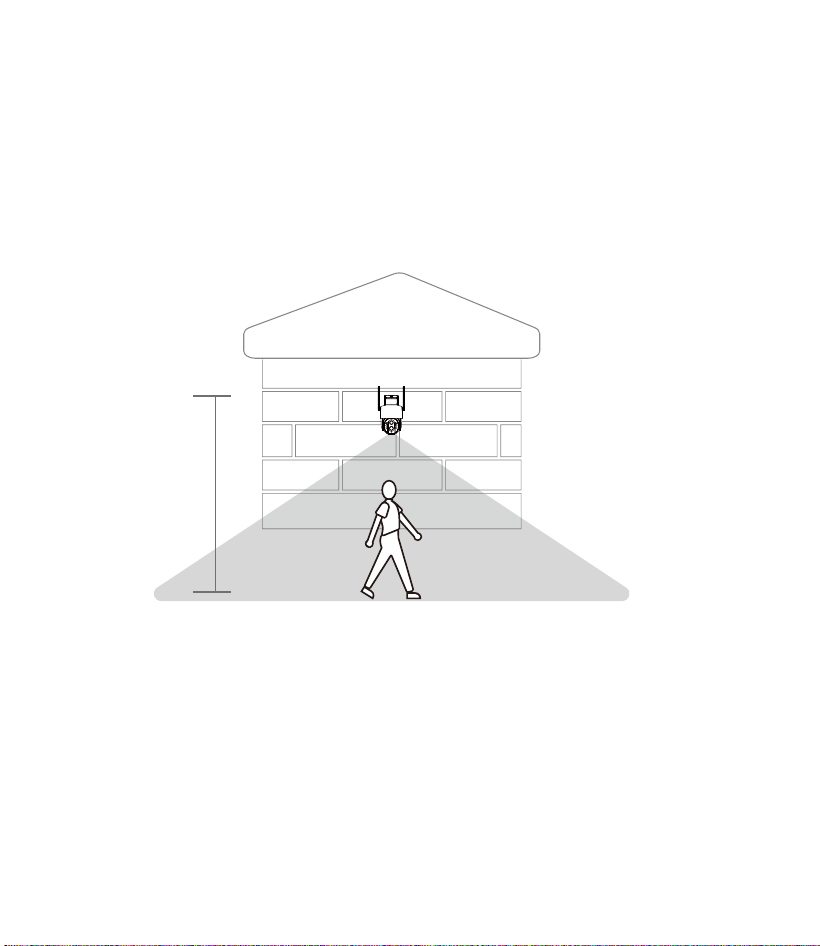
Choose the installation location for the camera.
We suggest installing the camera above 7 feet. You can adjust the camera angle
based on the real-time video on your phone so that the camera focuses on your
activity area, thereby obtaining more accurate motion detection alerts.
above
7 feet
11
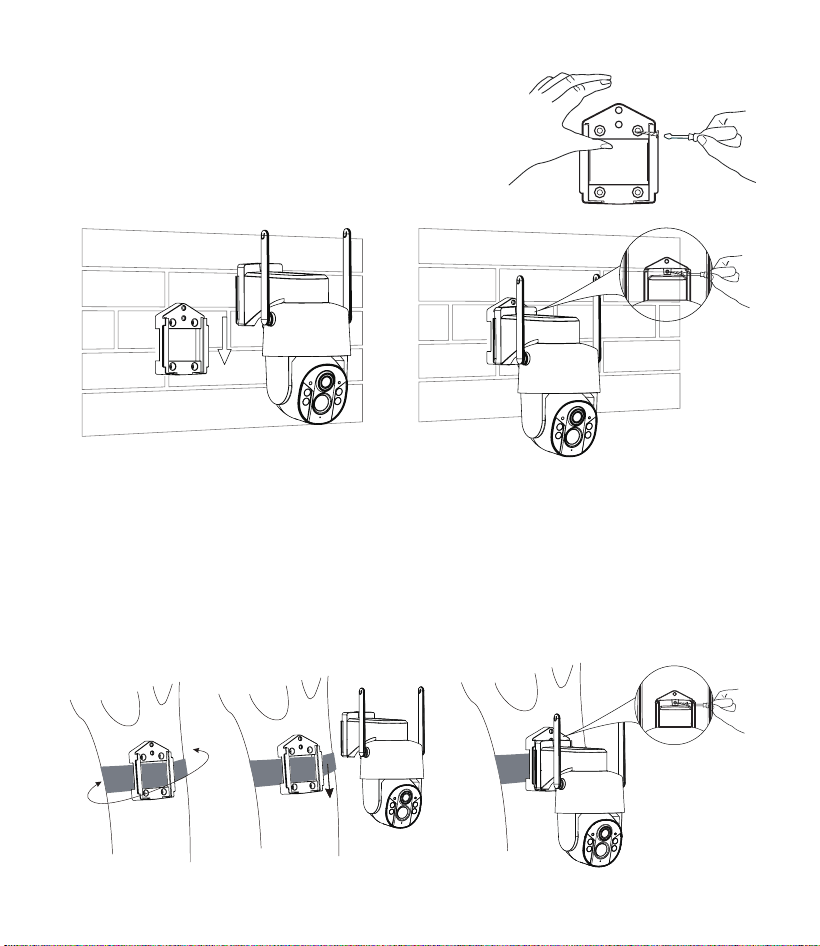
Mount the Camera to the Wall
Step 1. Attach the mounting bracket to the wall.
Step 2. Insert the camera into the camera bracket.
Step 3. Screw the camera into the mounting bracket.
Mount the Camera to Tree (for camo models)
Note: This mount (strap) is only for camouage models.
Step 1. Pass the strap through the holes on both sides of the base and secure the
strap. Then wrap the strap around the tree and tighten it.
Step 2. Mount the camera onto the base and secure it.
Step 3. Screw the camera into the mounting bracket.
①
② ③
12
SUN
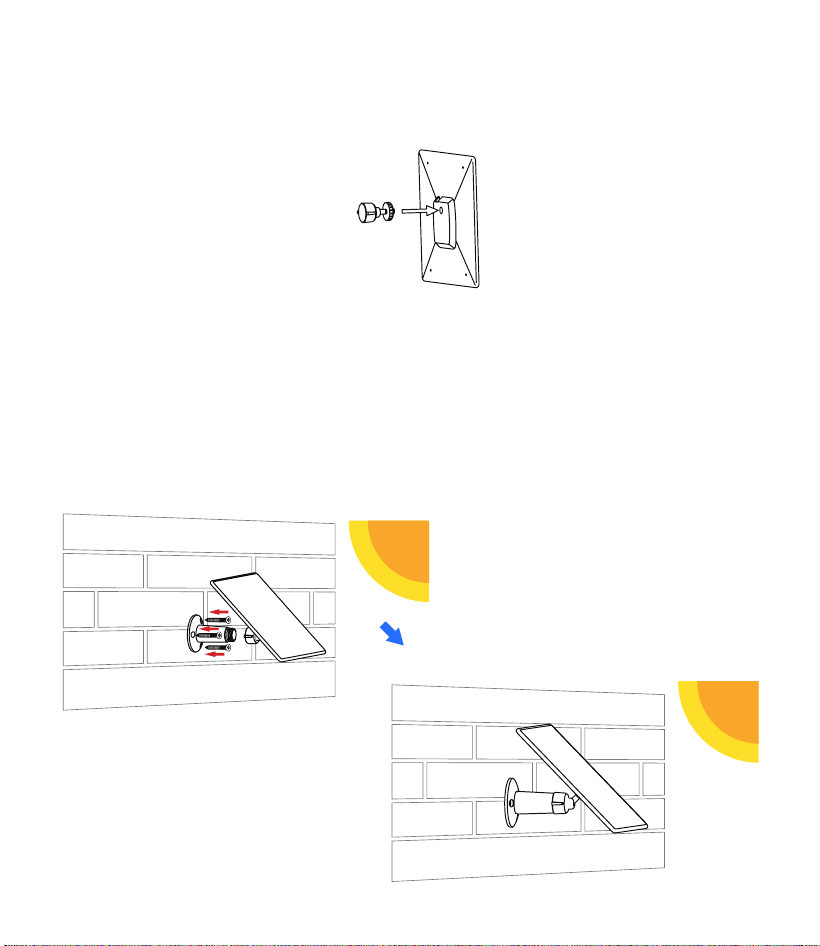
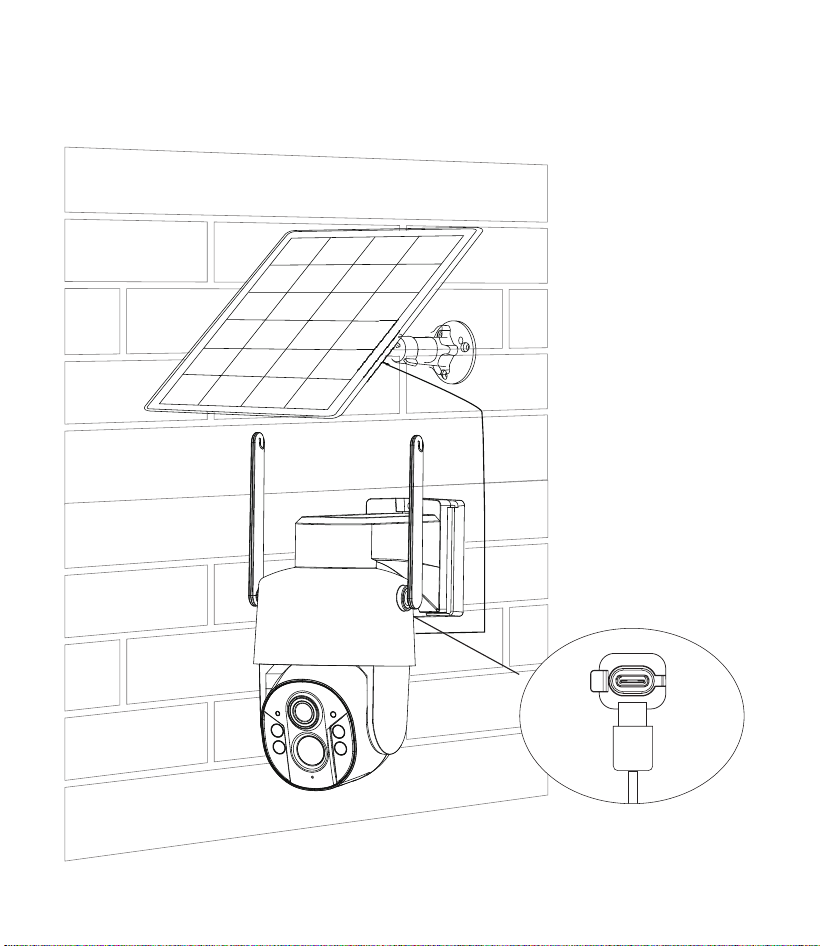
Mount Solar Panels to Camera
Step 1. Secure the solar panel sub-bracket to the mounting holes on the solar panel
using screws.
Step 2. Mount the solar panel bracket on the wall.
Step 3. Mount the solar panel onto the dedicated bracket and tighten all fasteners
to the specied torque.
(Note: Adjust the panel’s tilt angle to the recommended 30–40° (measured from the
horizontal). Ensure the panel receives direct, unobstructed sunlight throughout the
day.)
SUN
13
Please insert the power plug through the rubber plug hole into the socket to
prevent the camera from being damaged by water.

14
V.FAQS
1.The app is unable to successfully connect to the
camera.
(1) Ensure that the location where you have installed the camera has a strong 4G
mobile network.
(2) Please check if your data plan has expired. If it has, please renew your data plan
promptly.
(3) Check the battery level of the camera. The camera can be restarted after charging
for one hour.
(4) After powering on, please wait for about one minute until the conrmation light
ashes red continuously. Then, follow the steps on the 4th page to connect the
camera to the network.
(5) If you want to bind a new app account, you need to reset the camera and then re-
add the device on the app.
2.The device is still offline following a data plan
top-up.
After topping up, you can activate the device manually(please turn o the camera,
and then turn it back on to restart the device)or automatically (waiting for 1hour),
and then wait for the device restore online state.
Note: The unlimited data plan will begin to remind you 7 days before its
expiration.
3.The camera goes oine suddenly.
1. Check the expiration date of your plan. Go to the Live page of the camera, tap
"Data" to check the data plan expiration date or top up.
15
3. Check the camera’s power/charge level. Charge the device for 1 hour, then turn it
on to check whether it is online.
3. Check the 4G network signal. If you installed it in a closed space, it is
recommended to test elsewhere.
4. If the camera is moved to a new location, it is recommended to power it o and
then restart it to connect to the best network signal.
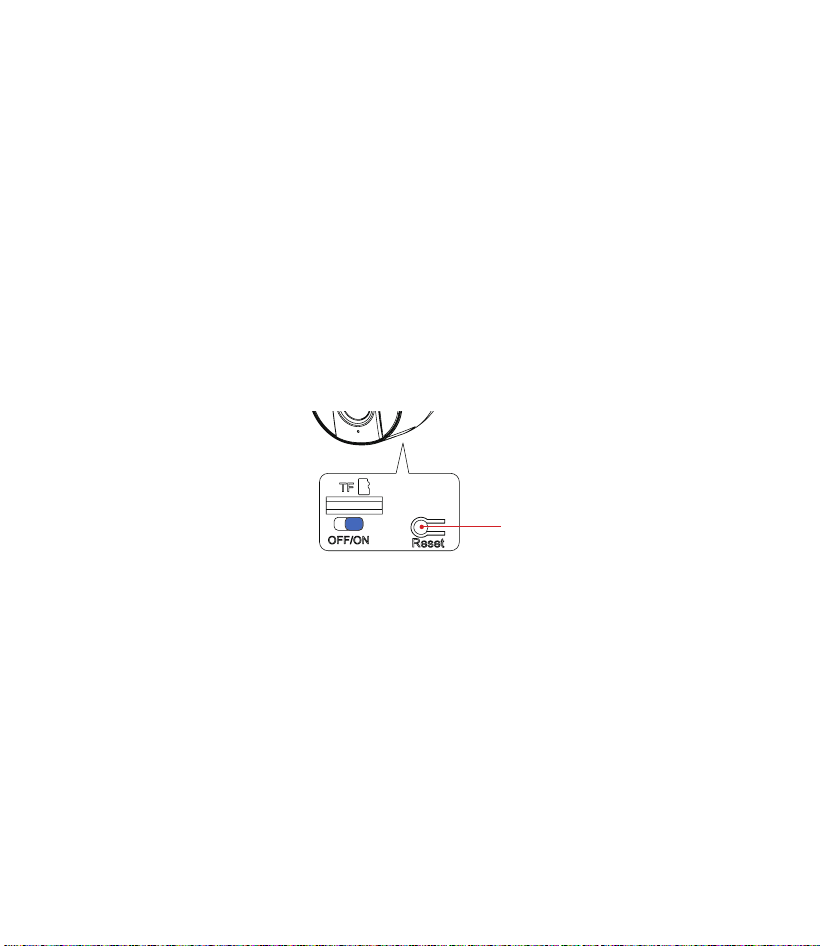
4.How to reset the camera?
Press and hold the reset button for 5 seconds to reset the camera.You need to
release the button when you hear the prompt tone.After resetting the camera, you
must follow all steps to add the camera.(Refer to page 5 for the process of re-adding
the camera)
5. What to do if the camera’s cellular signal is poor?
1. Move the camera to a higher place without any obstruction.
2. Adjust the direction of the antenna.
3. Power the camera o and then restart it to connect to the best network signal.
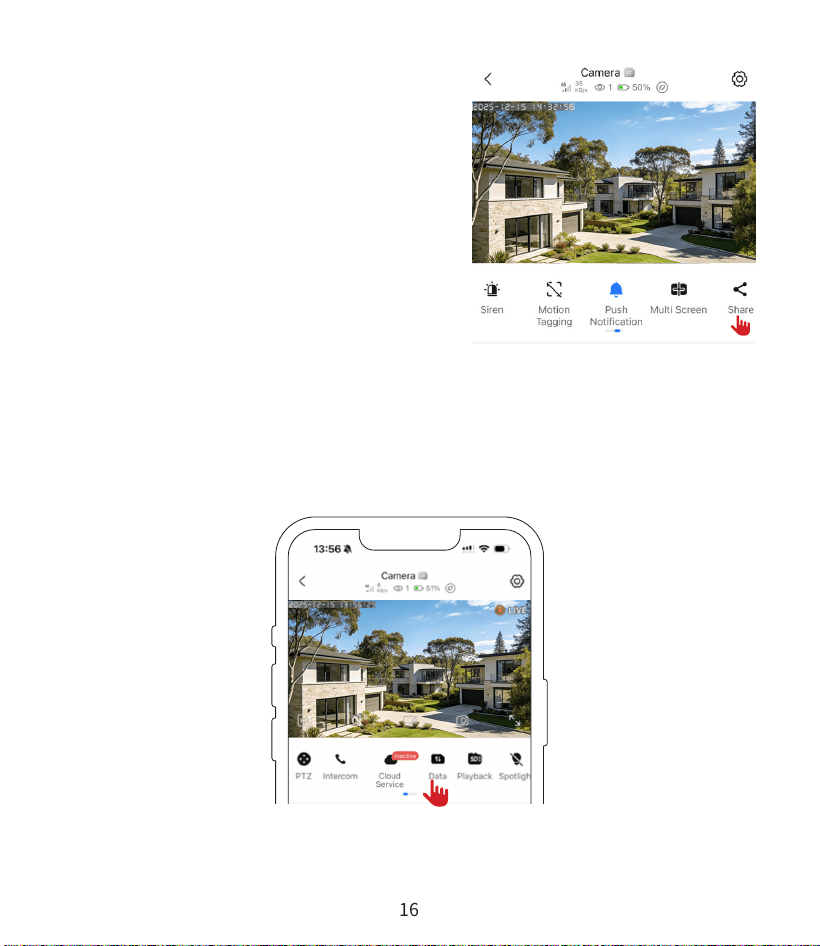
6.How to share your camera ?
(1) Open the camera’s Live page and tap “Share”.
(2) Choose Share via Email, enter the recipient’s email address; or choose Share via
QR Code and have them scan the code to access the shared device.
Reset
button
16
Note:
• The invitee must rst register and log in to an
Arogal account with their email address before
they can receive a share.
• Open the Arogal app and go to: Settings
→ Share List, then tap Accept on the share
invitation.
7.How to top up your data plan ?
Go to the Live page of the camera, tap "Data" to check the data plan expiration date
or top up.

17
8.Why am I receiving too many activity alerts or
missing some alerts?
(1) Adjust the sensitivity of the activity detection to meet your needs: Go to Device
settings → Events → Motion detection sensitivity, and select the appropriate
detection sensitivity for your requirements.
(2) Check whether other objects trigger the PIR sensor incorrectly, such as the
outdoor unit of an air conditioner, leaves, light conditions, passing cars, or
pedestrians. Please adjust the mounting angle of the device to reduce false alarm
triggers.
(3) Set the alarm area to reduce false alarms: Device settings → Events → Detection
Area → select alarm area.
9.What to do if the image is blurry ?
(1) Switch the image mode to HD: Go to Live View → tap HD, then switch to FHD
resolution displayed in the upper-left corner.
(2) Conrm the lens protective lm has been removed.
(3) Check for dirt or smudges on the lens.
10.What to do if there are no video recordings after
subscribing to cloud storage?
(1) Conrm that the cloud storage subscription is active.
(2) Conrm that the cloud storage recording switch is turned on (Device settings
→ More Options → Cloud video). If you have not subscribed to cloud storage,
subscribe rst.

18
11.What to do if the camera does not recognize the
TF Card ?
(1) The camera only supports TF cards with a capacity of 8–128 GB and Class 10 or
higher (U1 or above). It does not support TF cards of 128 GB or above.
(2) Ensure that you insert the TF card correctly, checking that the insertion direction
and position are correct.
(3) Reinsert the TF card. Power o the camera, insert the TF card into the camera's
TF card slot in the correct orientation, and then power on the camera. If the camera
prompts you to format the TF card, click "Format TF Card". If the TF card still
cannot be recognized, use a card reader to format the TF card to FAT32 format on a
computer, then reinsert it into the camera.
(4) If the TF card cannot be recognized during use, power o the camera, remove
and reinsert the TF card to verify whether it can be recognized. If it still cannot be
recognized, reformat the TF card or replace it.
12.What to do if the camera's battery life is short
(1) Check if the solar panel is properly connected to the camera.
(2) Ensure the solar panel is exposed to sunlight and that its surface is free from
debris such as leaves.
(3) Lower the sensitivity to reduce the number of alarms: Go to Device settings-
>Events → Motion detection sensitivity and select the appropriate detection
sensitivity.
13.What to do if the phone cannot display real-time
videos when out of the home
When at home,the phone can view real-time videos by connecting to WiFi.But when
out and using 4G or 5G mobile data, if the phone cannot view real-time videos from
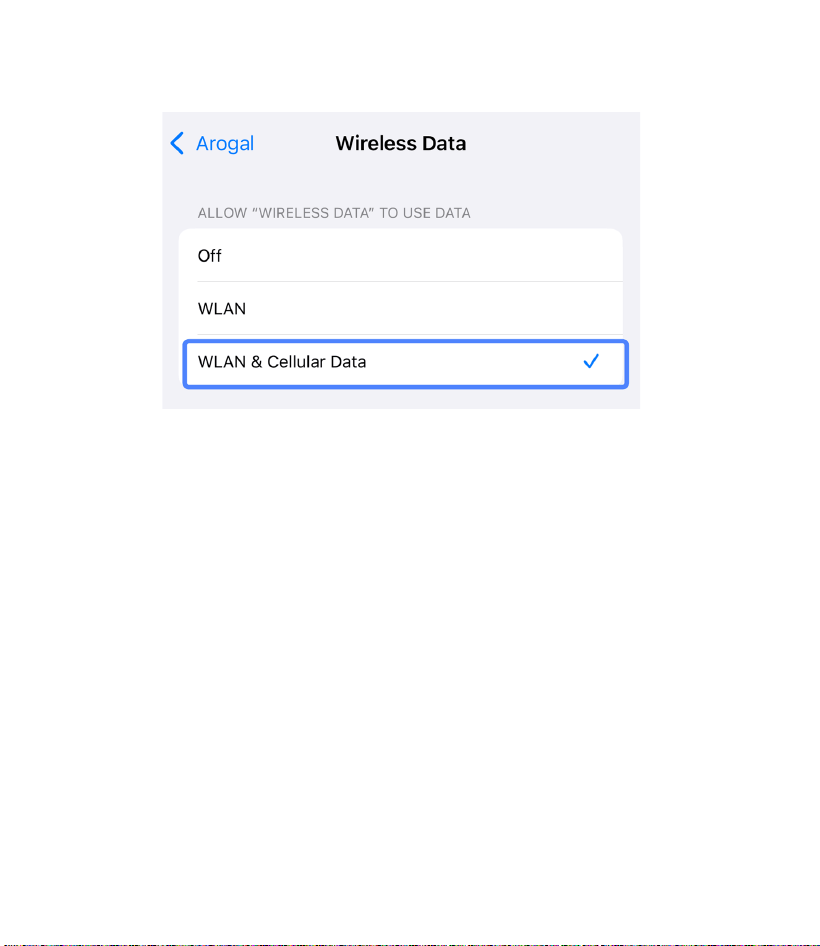
19
the camera,please check whether cellular data permission is granted to the app.
14.What to do if the solar panel is not charging?
(1) Check if there are any foreign objects covering the surface of the solar panel.
(2) Ensure that the solar panel receives direct sunlight and is exposed to sunlight for
as long as possible.
(3) Check if the solar panel connection lines are properly inserted, and reinsert them
if necessary.
If you need further assistance,please contact our customer support.
+ 1218-292-2199

20
VI.Notication of Compliance
FCC Compliance Statement
FCC WARNING:
Any Changes or modications not expressly Approved by the party responsible for
compliance could void the user's authority to operate the equipment. This device
complies with part 15 of the FCC Rules. Operation is subject to the following two
conditions:
(1) This device may not cause harmful interference.
(2) This device must accept any interference received, including interference that
may cause undesired operation.
Note:This equipment has been tested and found to comply with the limits for a
Class B digital device, pursuant to part 15 of the FCC Rules. These limits are designed
to provide reasonable protection against harmful interference in a residential
installation. This equipment generates uses and can radiate radio frequency energy
and, if not installed and used in accordance with the instructions, may cause
harmful interference to radio communications. However, there is no guarantee that
interference will not occur in a particular installation. If this equipment does cause
harmful interference to radio or television reception, which can be determined
by turning the equipment o and on, the user is encouraged to try to correct the
interference by one or more of the following measures:
-Reorient or relocate the receiving antenna.
-Increase the separation between the equipment and receiver.
-Connect the equipment into an outlet on a circuit dierent from that to which the
receiver is connected.
-Consult the dealer or an experienced radio/TV technician for help.
FCC RADIATION EXPOSURE STATEMENT:
This equipment complies with FCC radiation exposure limits set forth for an
21
uncontrolled environment. This equipment should be installed and operated with a
minimum distance of 20cm between the radiator & your body. This transmitter must
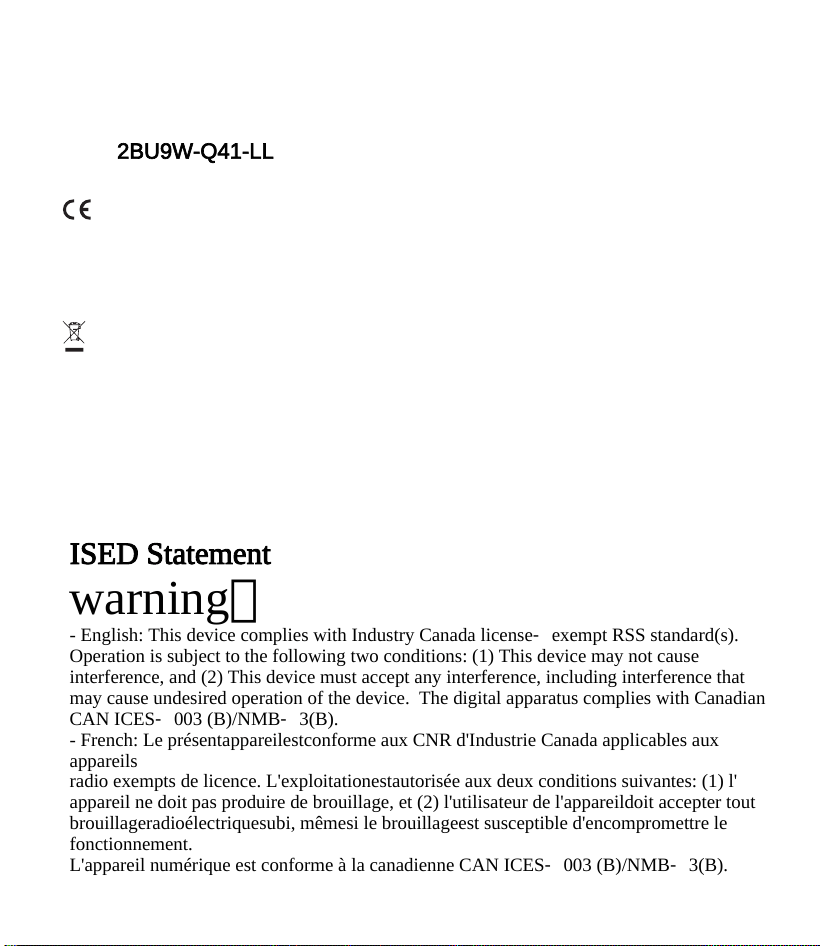
FCCID:
not be co-located or operating in conjunction with any other antenna or transmitter.
2BU9W-Q41-LL
CE Simplied EU Declaration of Conformity
That this device is in compliance with the essential requirements and other relevant
provisions of Directive 2014/53/EU.
Correct Disposal of This Product
This symbol means the product must not be discarded as household waste and
should be delivered to an appropriate collection facility for recycling. Proper
disposal and recycling help protect natural resources, human health, and the
environment. For more information on the disposal and recycling of this product,
contact your local municipality, disposal service, or the shop where you bought this
product.
ISED Statement
warning:
- English: This device complies with Industry Canada license‐exempt RSS standard(s).
Operation is subject to the following two conditions: (1) This device may not cause
interference, and (2) This device must accept any interference, including interference that
may cause undesired operation of the device. The digital apparatus complies with Canadian
CAN ICES‐003 (B)/NMB‐3(B).
- French: Le présentappareilestconforme aux CNR d'Industrie Canada applicables aux
appareils
radio exempts de licence. L'exploitationestautorisée aux deux conditions suivantes: (1) l'
appareil ne doit pas produire de brouillage, et (2) l'utilisateur de l'appareildoit accepter tout
brouillageradioélectriquesubi, mêmesi le brouillageest susceptible d'encompromettre le
fonctionnement.
L'appareil numérique est conforme à la canadienne CAN ICES‐003 (B)/NMB‐3(B).