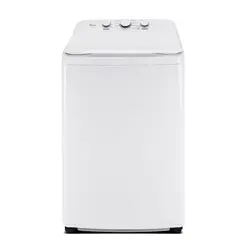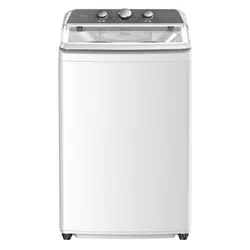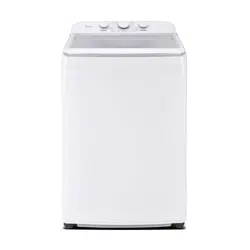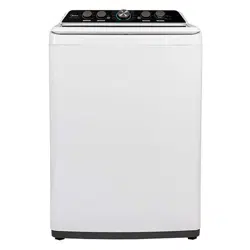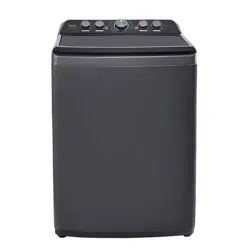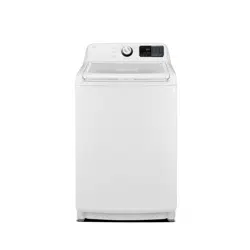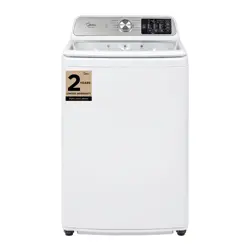
Capacity: 6.1 cu.ft
6.2 cu.ft
Version A
MLTW61A5CWW
MLTW61A5CCG
MLTW62M5CWW
MLTW62M5CCG
MODEL NUMBERS
www.midea.com/ca
Smart control
34
Msmarthome,
App Setup and Operation
Certifications
38
37
Included accessories
www.midea.com/ca
purchase to 1-888-365-2230.
40
40
42
42
45
47
50
Warnings and important safety instructions
which
STATE OF CALIFORNIA PROPOSITION 65 WARNINGS.
THE CALIFORNIA SAFE DRINKING WATER AND TOXIC ENFORCEMENT ACT
REQUIRES THE GOVERNOR OF CALIFORNIA TO PUBLISH A LIST OF
SUBSTANCES KNOWN TO THE STATE OF CALIFORNIA TO CAUSE CANCER,
BIRTH DEFECTS OR OTHER REPRODUCTIVE HARM AND REQUIRES BUSINESSES
TO WARN OF POTENTIAL EXPOSURE TO SUCH SUBSTANCES. THIS PRODUCT
CONTAINS A CHEMICAL KNOWN TO THE STATE OF CALIFORNIA TO CAUSE
CANCER, BIRTH DEFECTS OROTHER REPRODUCTIVE HARM. THIS APPLIANCE
CAN CAUSE LOW-LEVEL EXPOSURE TO SOME OF THE SUBSTANCES LISTED,
INCLUDING BENZENE, FORMALDEHYDE AND CARBON MONOXIDE. CANCER
AND REPRODUCTIVE HARM - WWW.P65WARNINGS.CA.GOV.
SAVE THESE
—To reduce the risk of fire, electric shock, or injury to persons
when using your appliance, follow basic precautions, including the following:
Risk of Suffocation and Injury from Entrapment: Do not allow children
to play on or in the appliance. Close supervision of children is necessary
when the appliance is used near children.
Do not reach into the appliance if the tub or agitator is moving.
Do not repair or replace any part of the appliance or attempt any
servicing unless specifically recommended in the user-maintenance
instructions or in published user-repair instructions that you understand
and have the skills to carry out.
Under certain conditions, hydrogen gas may be produced in a hot-water
system that has not been used for 2 weeks or more. HYDROGEN GAS IS
EXPLOSIVE. If the hot-water system has not been used for such a period,
before using a washing machine, turn on all hot-water faucets and let the
water flow from each for several minutes. This will release any
accumulated hydrogen gas. As the gas is flammable, do not smoke or use
an open flame during this time.
Before the appliance is removed from service or discarded, remove the door.
,
,
Do not use replacement parts that have not been recommended by the
manufacturer (e.g. parts made at home using a 3D printer).
This
,
,
,
place
Warnings and Precautions
.
Start/Pause
Do not load washer with articles above top of basket. Overloading washer
may cause damage or water leakage.
water supply
used
valve
knives,
This appliance must be grounded. In the event of malfunction or breakdown,
grounding will reduce the risk of electric shock by providing a path of least
resistance for the electric current. This appliance is equipped with a cord
that has an equipment-grounding conductor and a grounding plug. The plug
must be plugged into an appropriate outlet that is properly installed and
grounded in accordance with all local codes and ordinances.
GROUNDING INSTRUCTIONS
Improper connection of the equipment-grounding conductor can
result in a risk of electric shock. Check with a qualified electrician
or service representative or personnel if you are in doubt as to
whether the appliance is properly grounded.
Do not modify the plug provided with the appliance: if it will not fit
the outlet, have a proper outlet installed by a qualified electrician
flammable
Do not move the appliance by pulling the power cord or drain outlet hose.
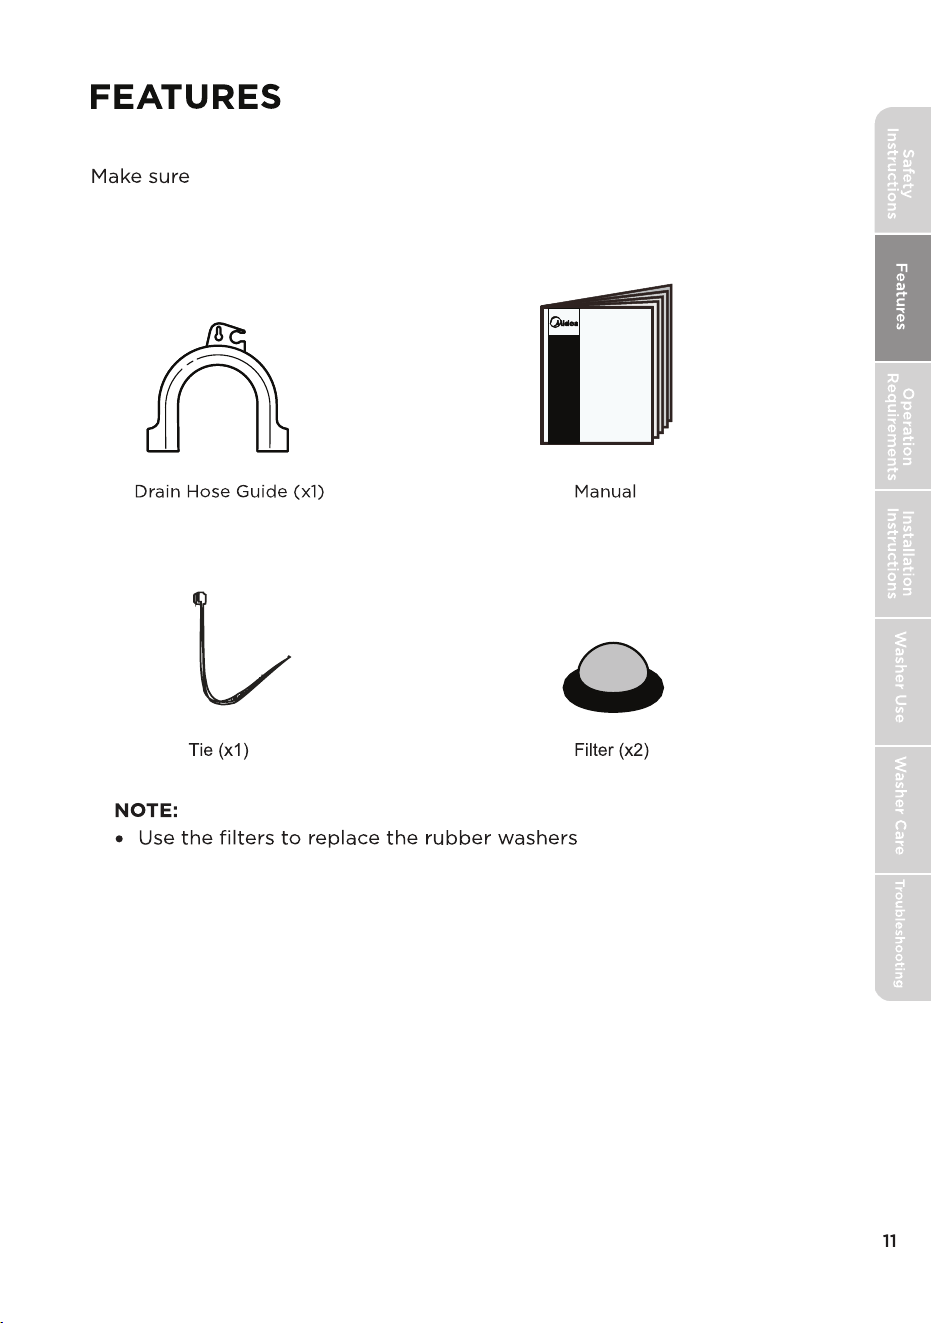
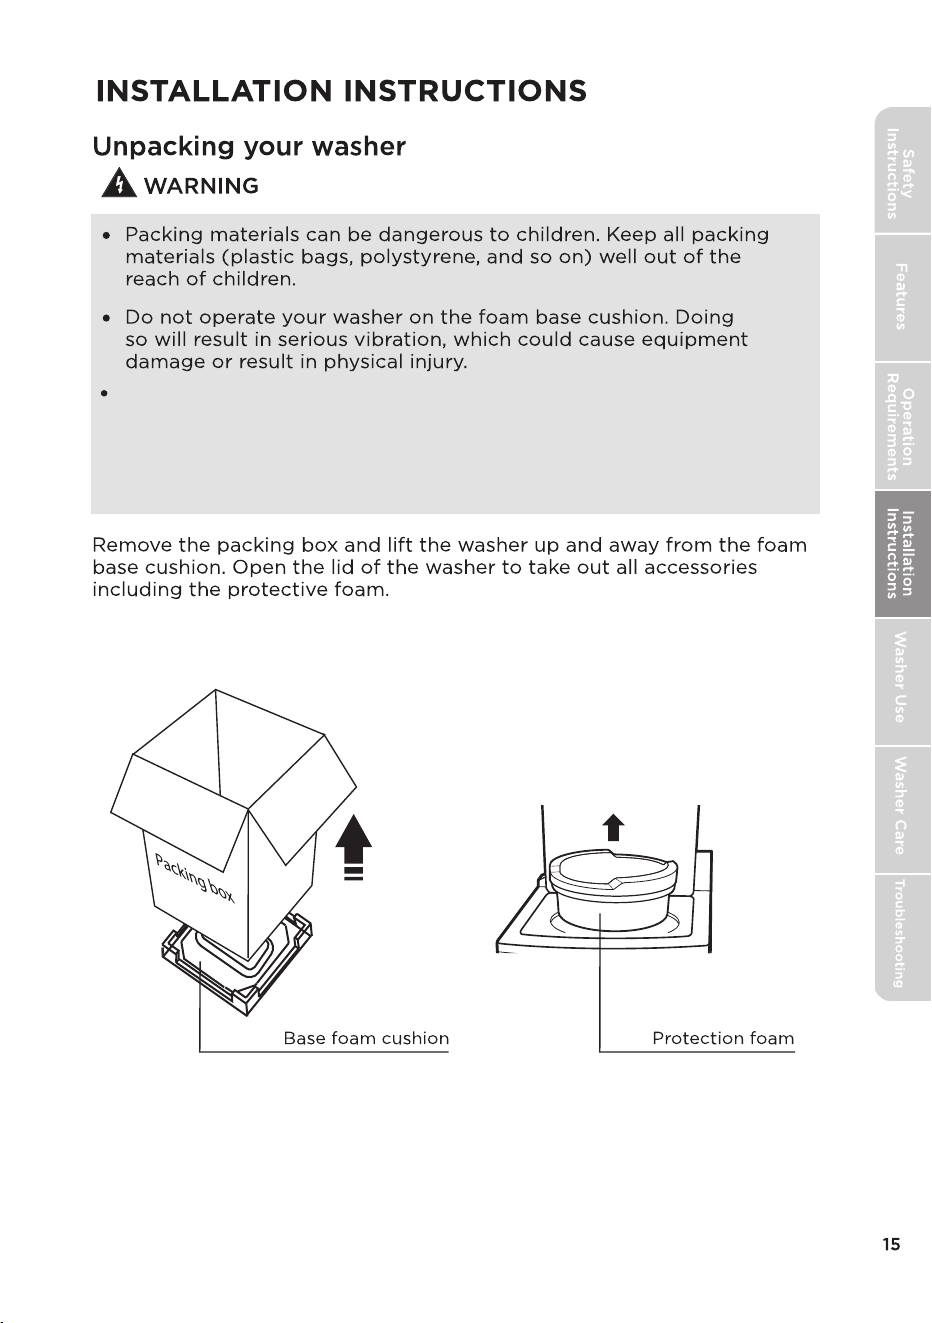
Included accessories
on the faucet side
of the water hoses.
that you have the following items, which should be packaged
with your washer.
Four
and secure it with
a screw
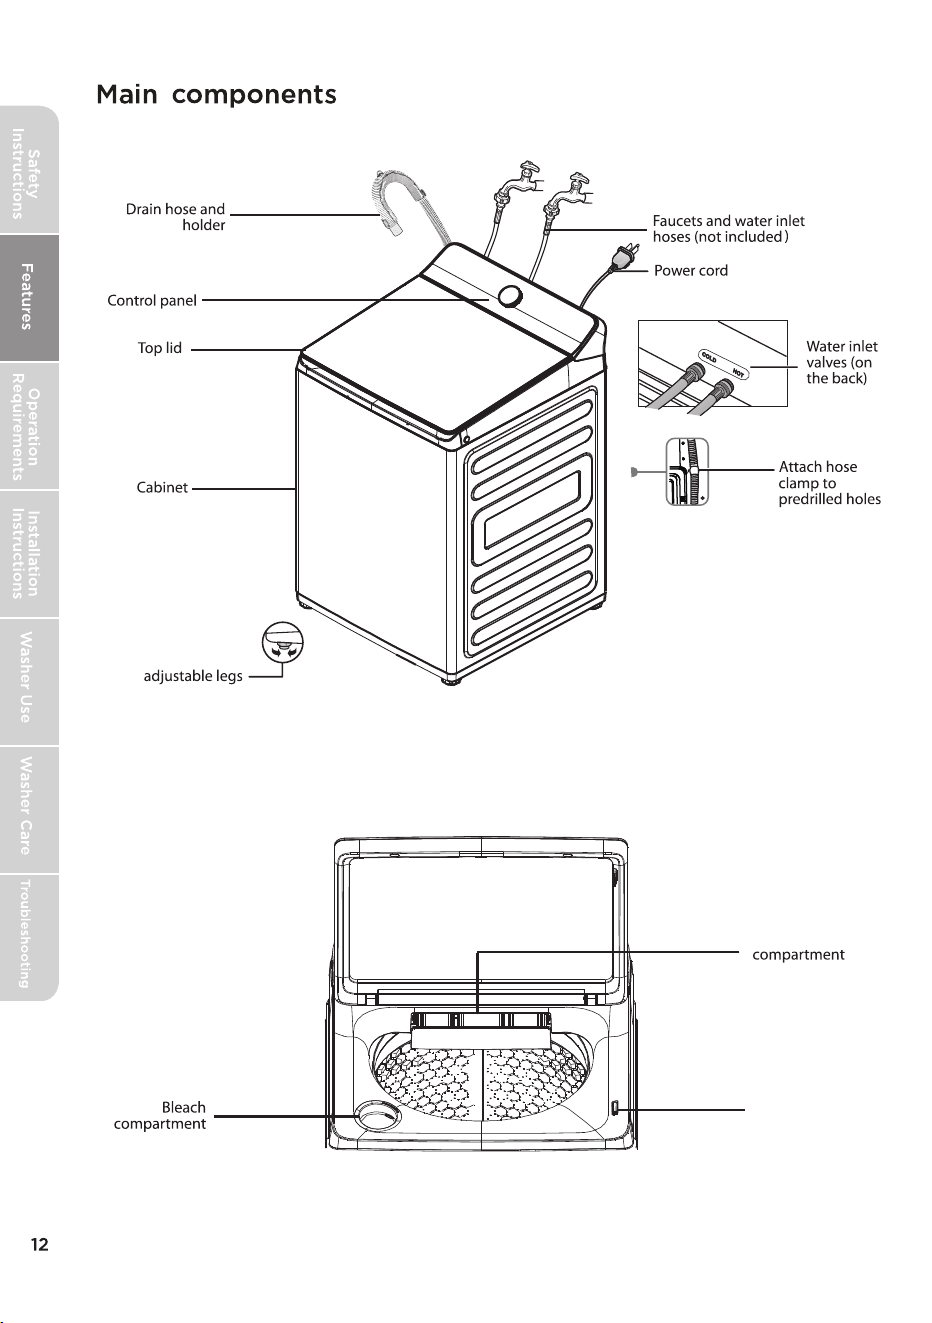
PowerMix
Lid lock
Failure
Do not wash, spin or dry water-proof seats, mats or clothing.
Maximum drain height is 96in.
,
Certain internal parts are intentionally not grounded and may present
a risk of electric shock only during servicing.
Service Personnel – Do not contact the following parts while the
appliance is energized: Electrical Valve, Drain Pump, Main Motor,
Retractor, Capacitor and Controller Cover.
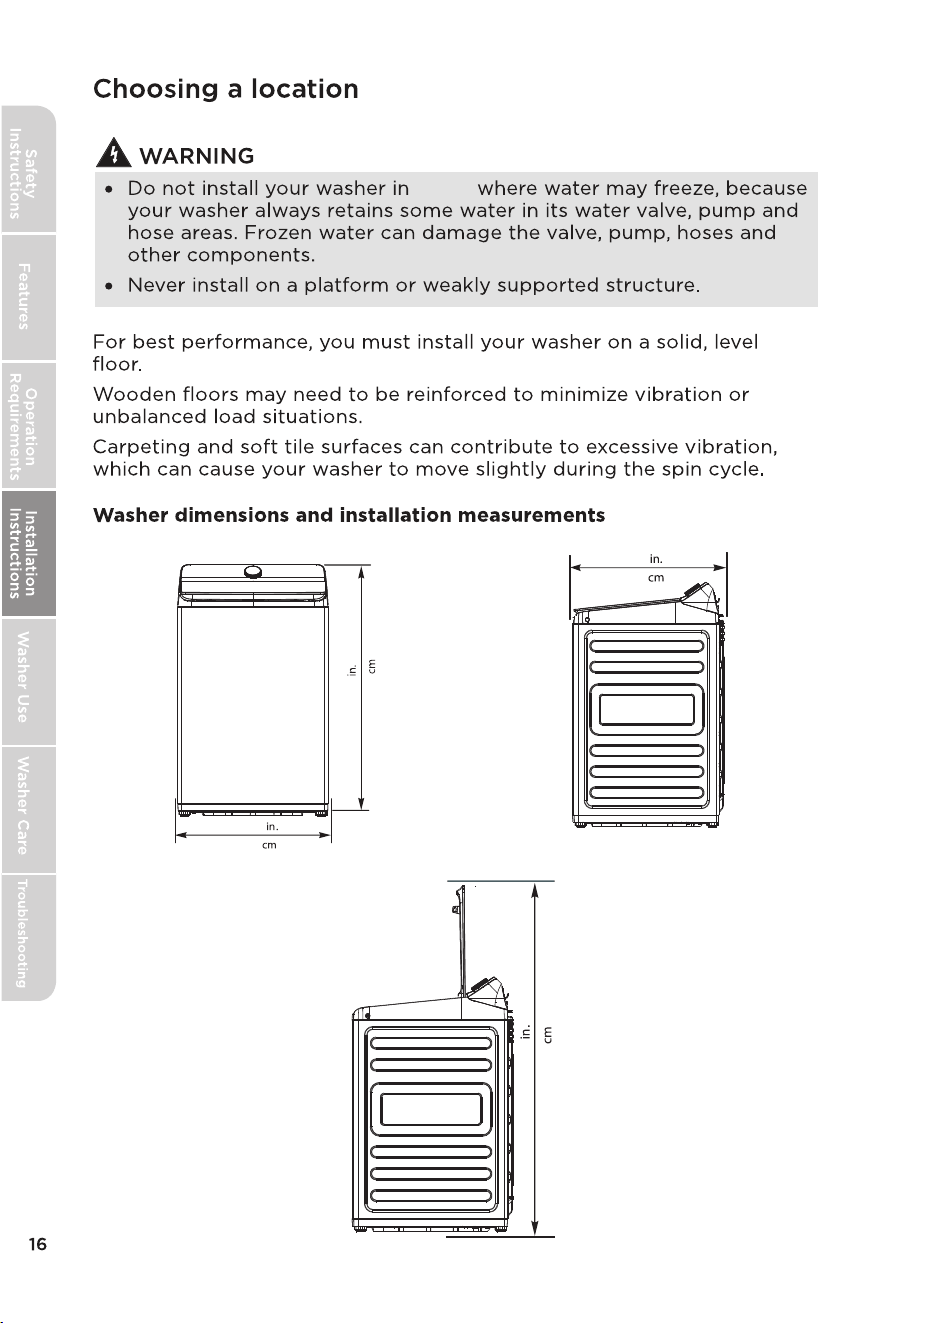
70.2
27.64
70.5
27.76
145.0
57.08
108.0
42.51
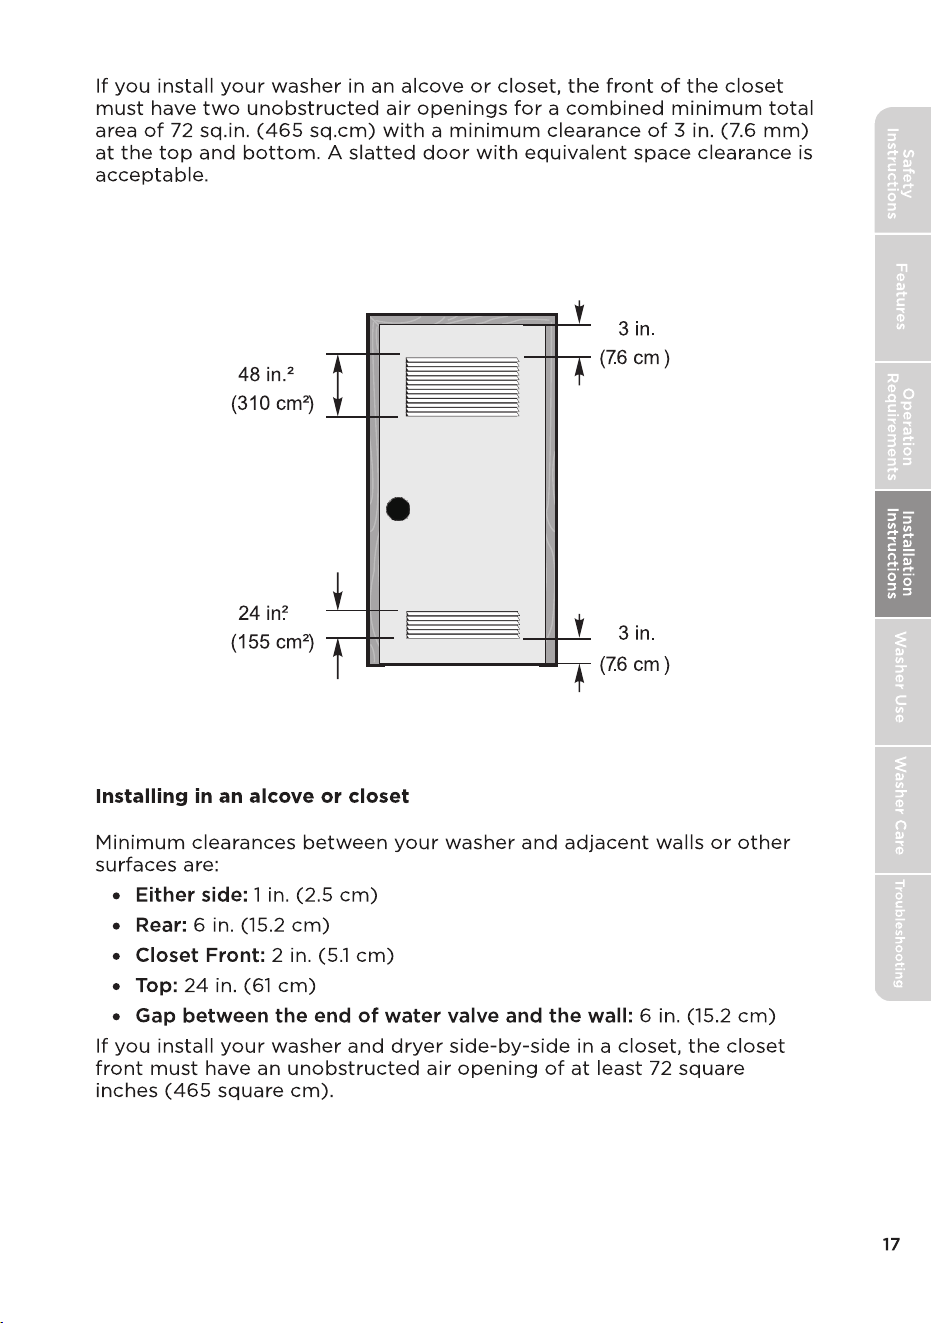
areas
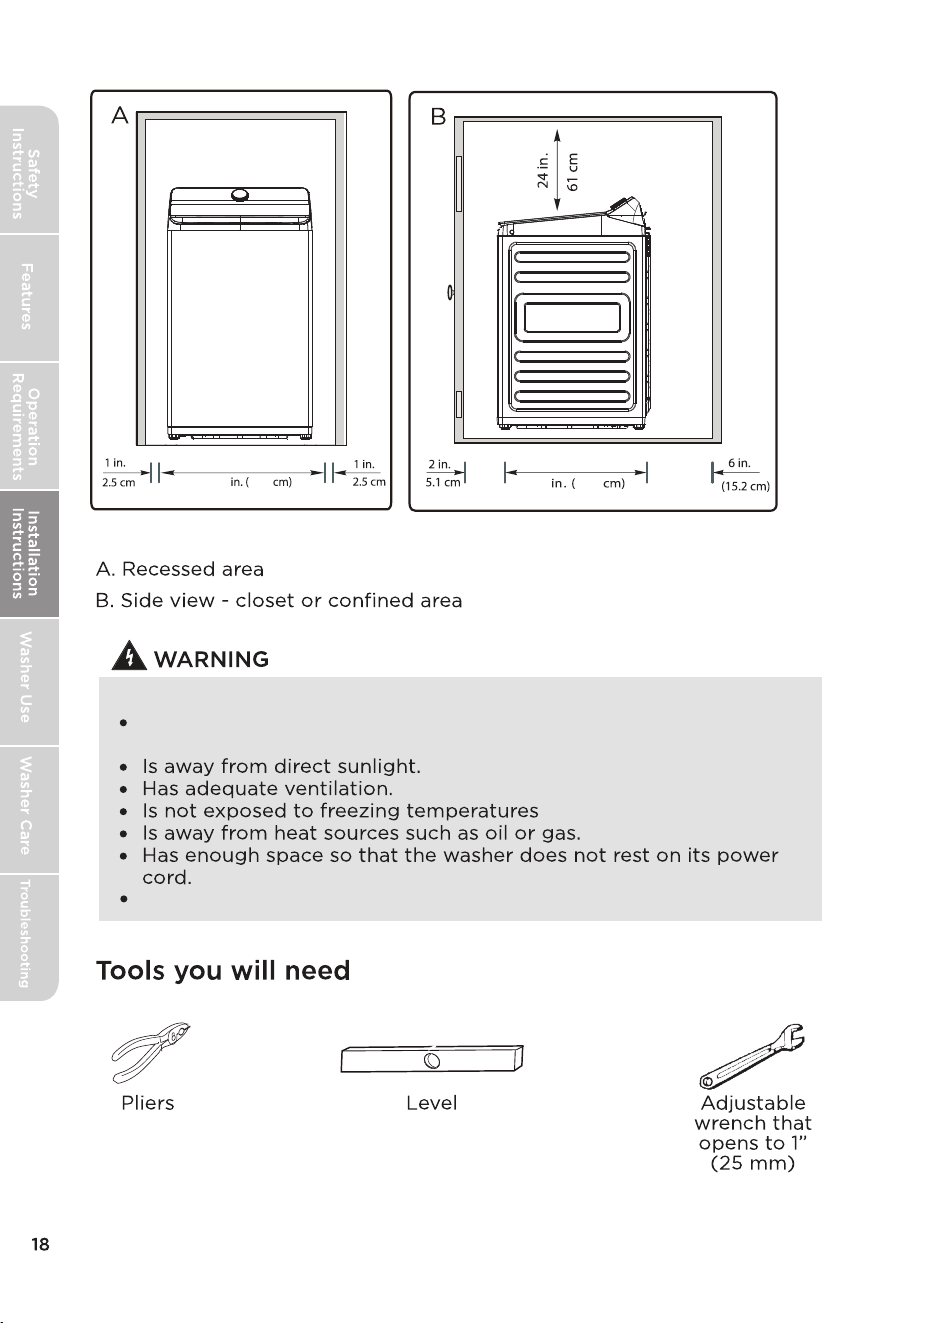
27.64
70.2
70.5
27.76
Has an internal controller cover that is not grounded.
Check to make sure your washer:
Is on a hard, level surface without carpeting or soft flooring that can
(32°F or 0°C).
obstruct ventilation.
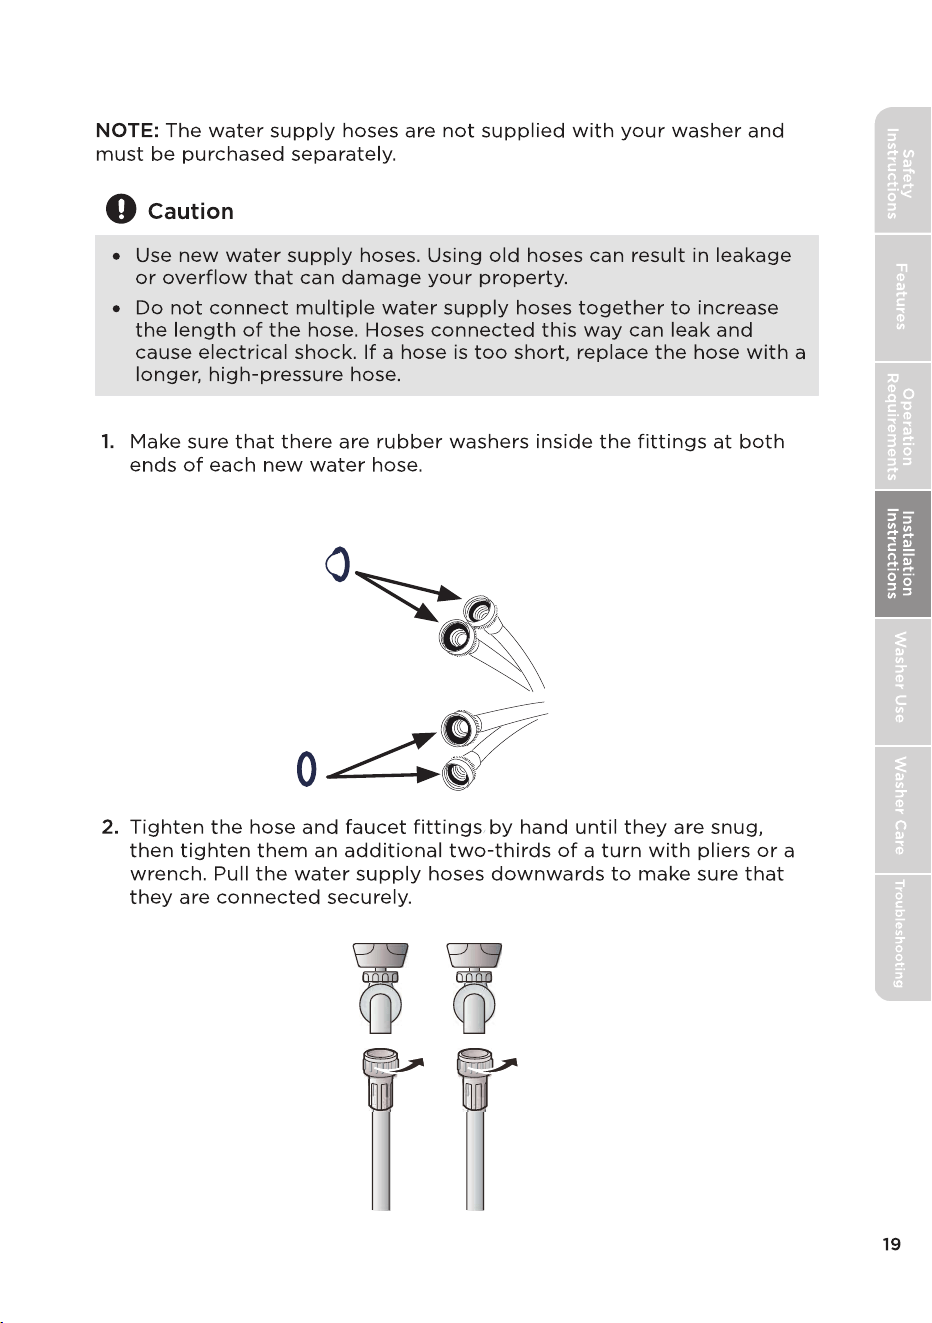
Connect the water hoses
Installing the water supply hoses
without rubber washers can cause water leakage. Remove the rubber
washers on the faucet side and replace with the filters.
Filters on the
faucet side
Rubber washers on
the intake side
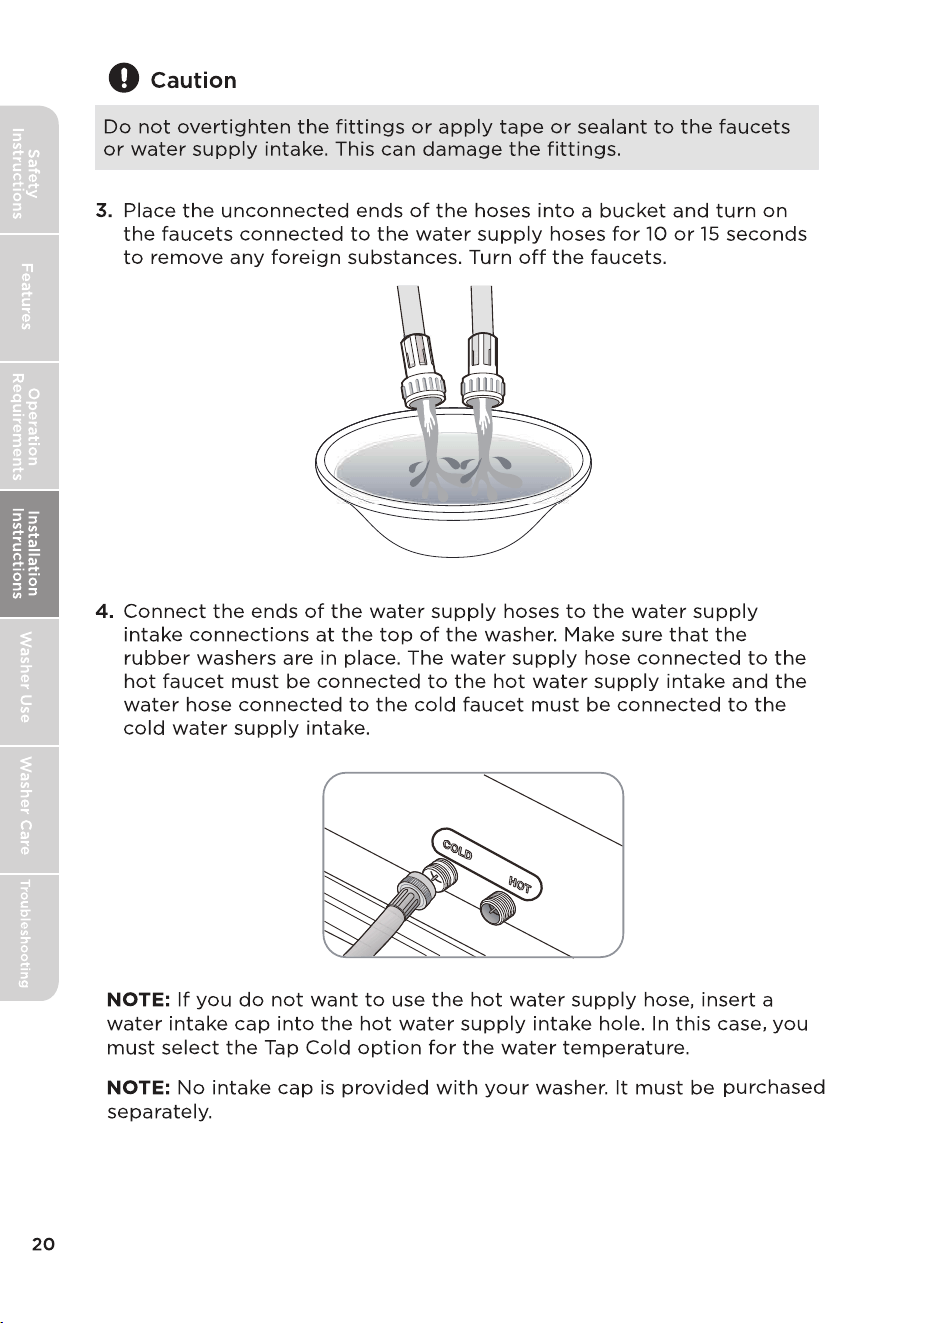
Not using the water intake cap can result in leakage.
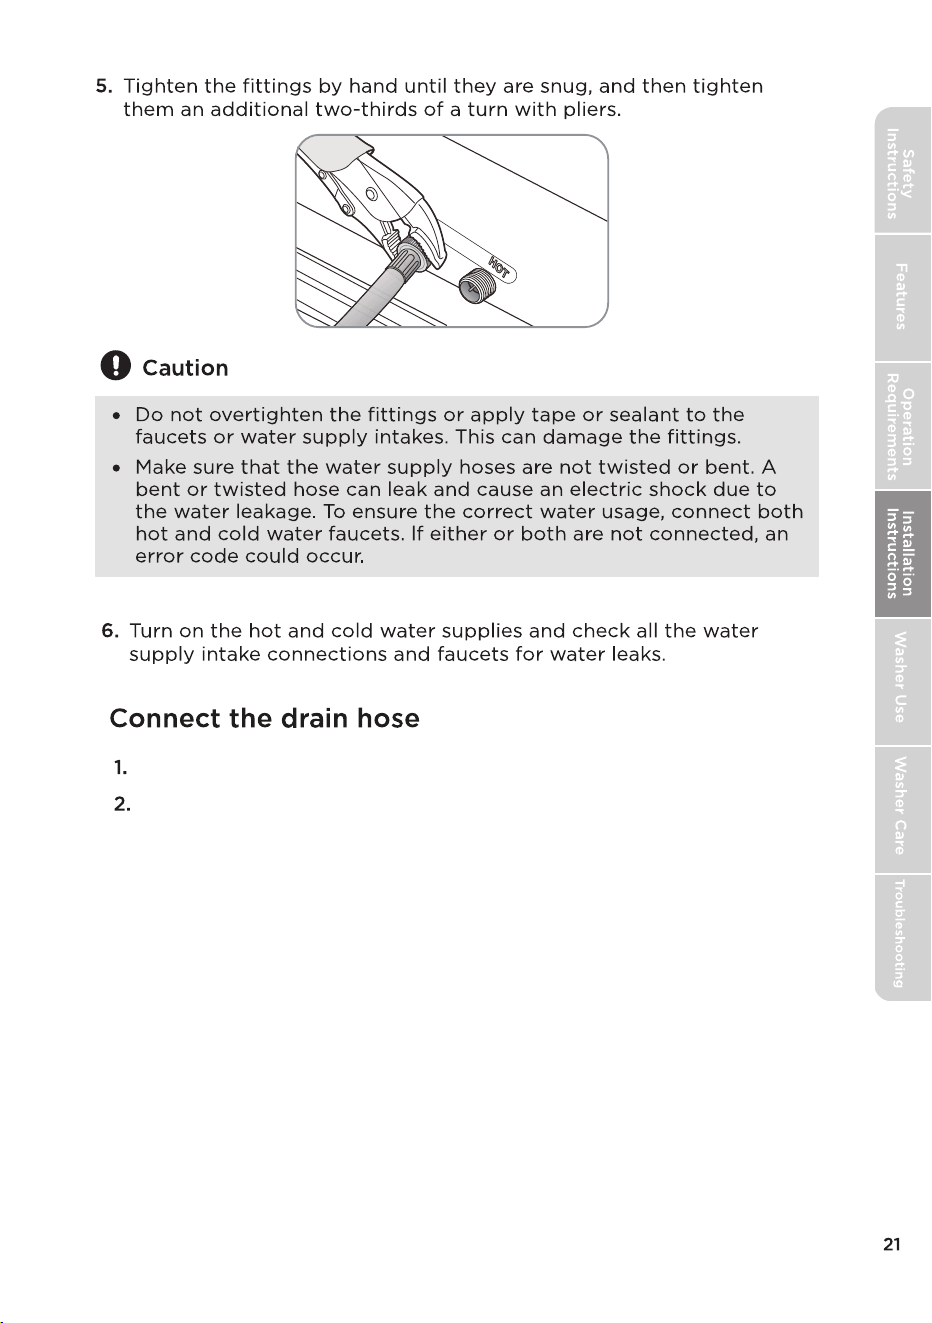
Take the drain hose from the clamp.
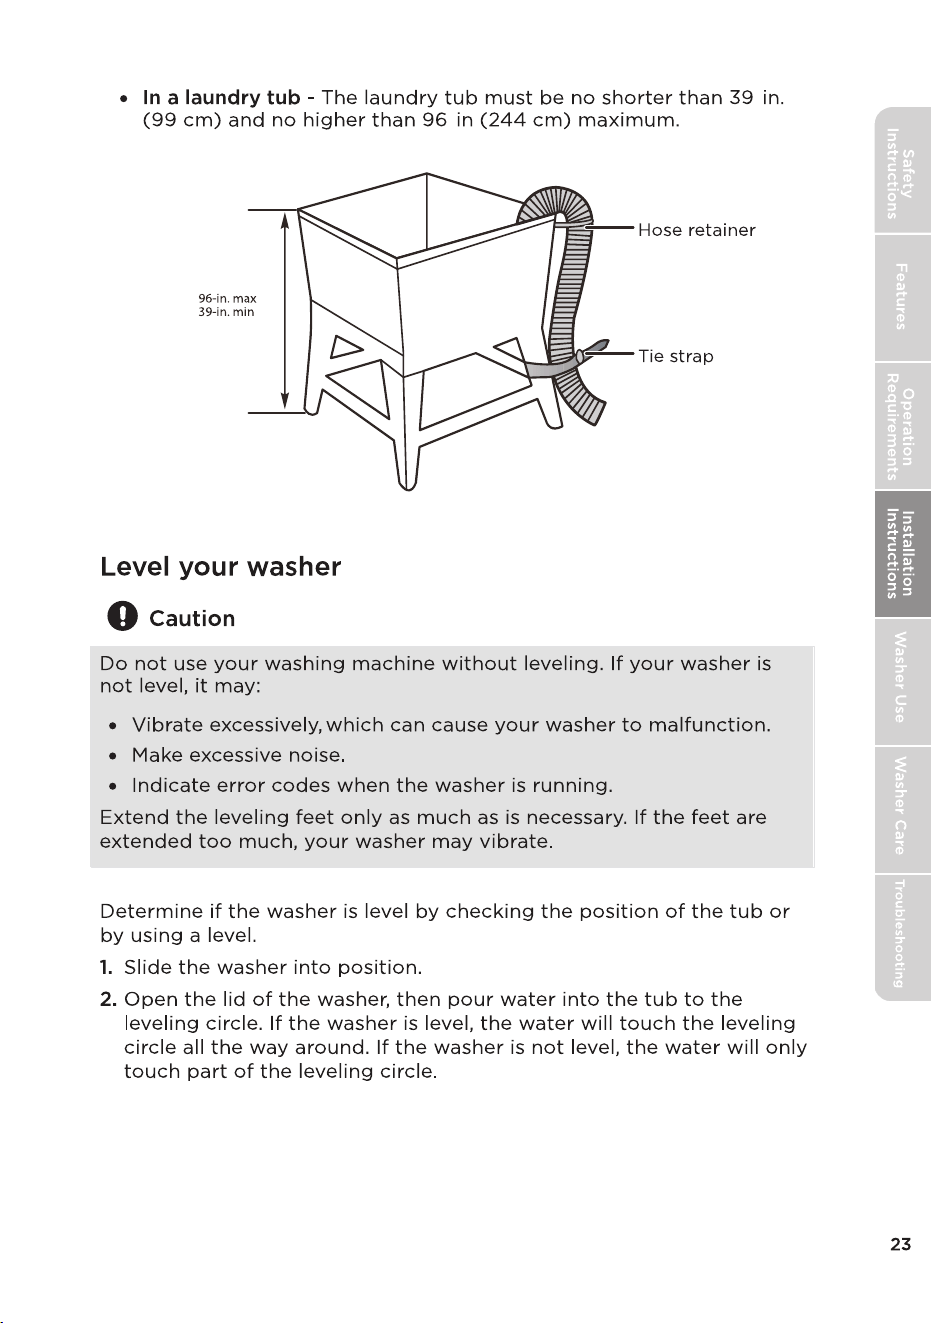
The drain hose can be positioned in three ways.
Position the other end of the drain hose.
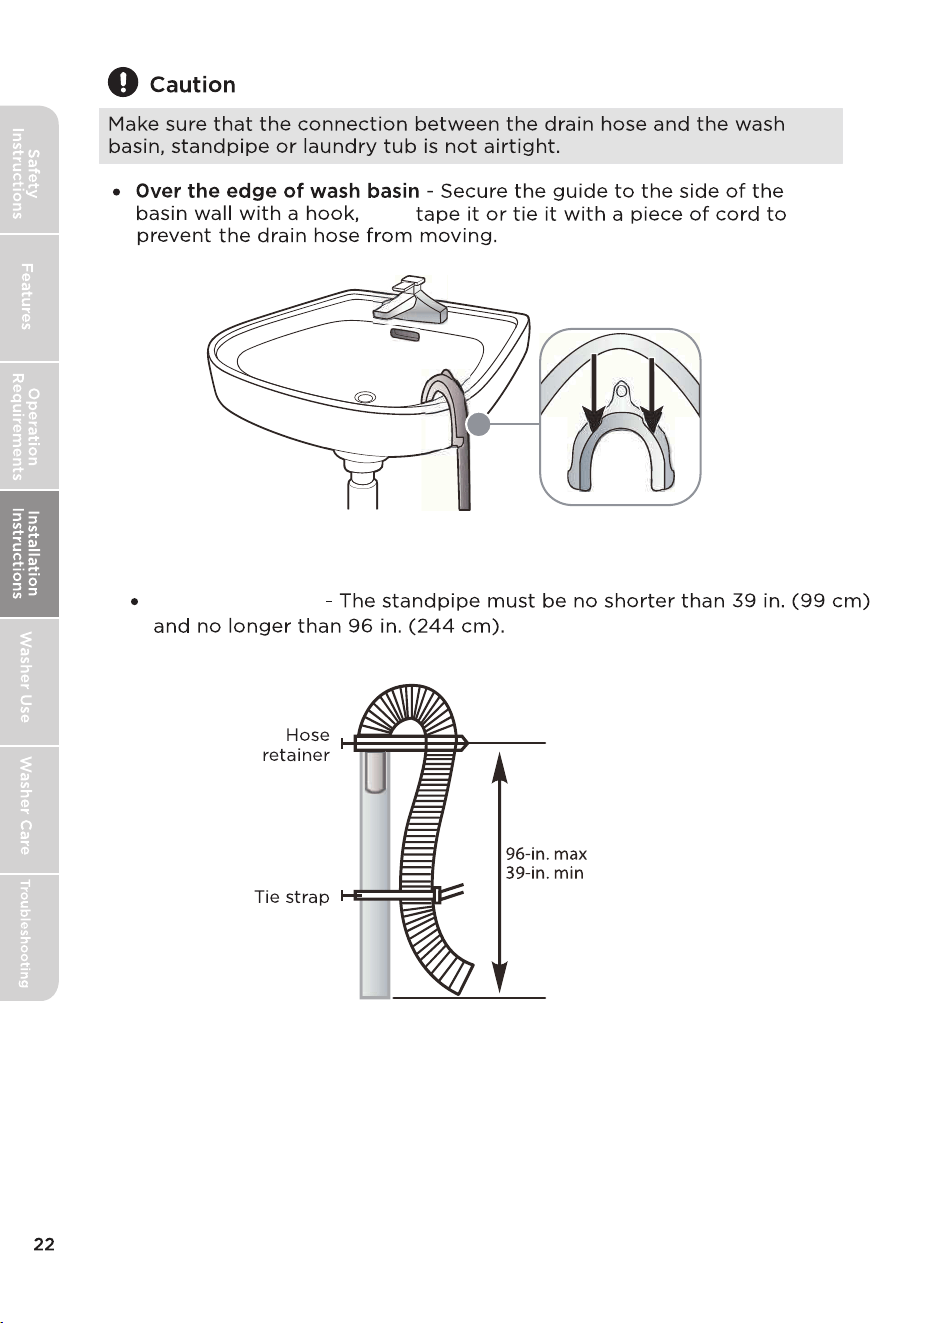
Into a standpipe
then
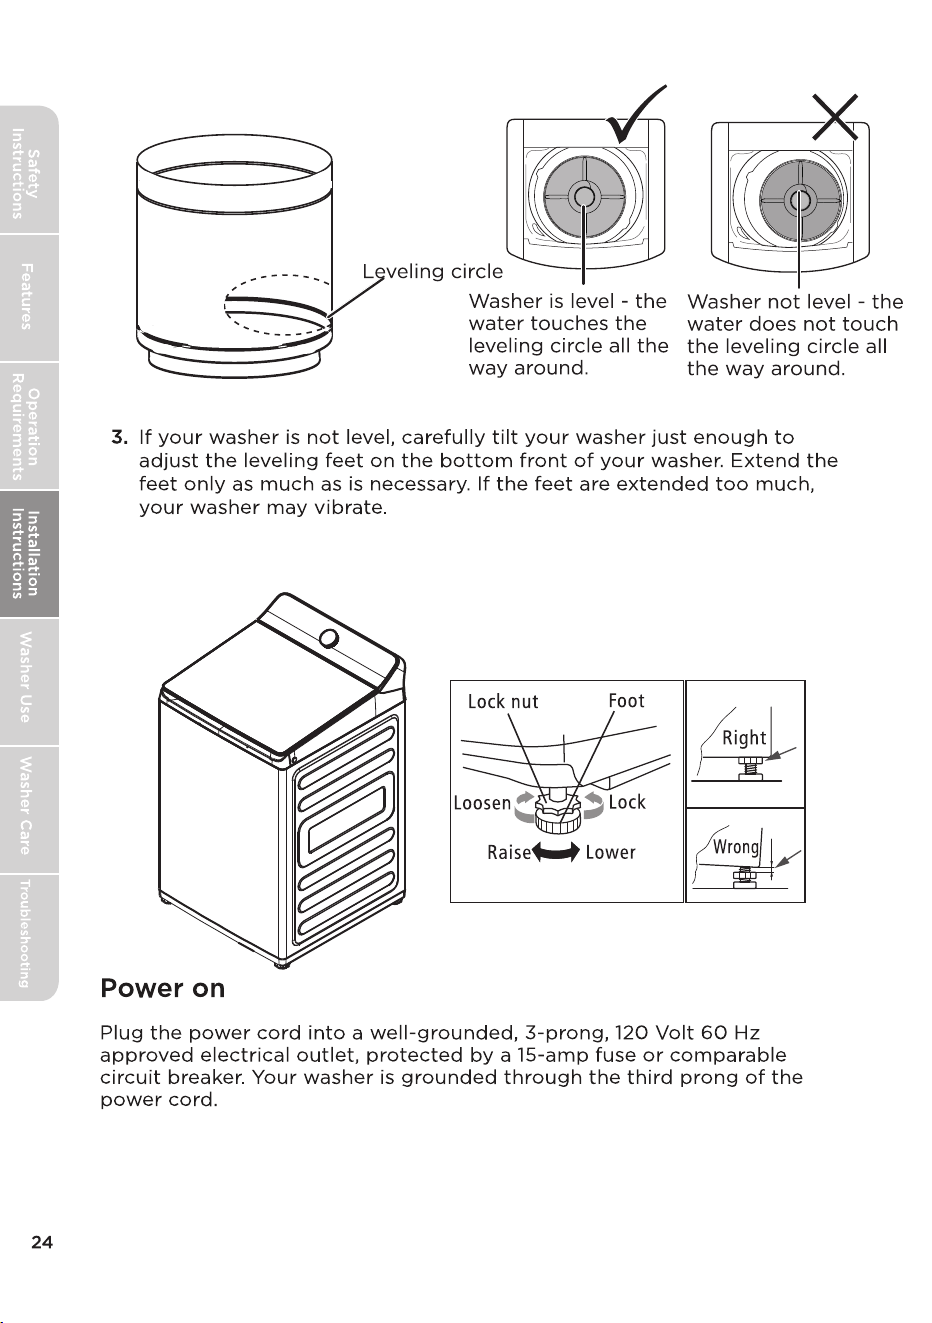
Once unit is level, lock the adjustable legs in place
using the locking nuts on the legs to prevent leg adjustment from vibration
or moving the appliance.
Certain internal parts are intentionally not grounded and may present
a risk of electric shock only during servicing. Service Personnel – Do
not contact the following parts while the appliance is energized:
electrical valve, drain pump, main motor, retractor, capacitor and
controller cover.
1. Fill liquid detergent and softener autodose compartments to the Max
fill line.
2. Power machine and select Quick Wash cycle.
3. Select ‘Deep Fill’ option.
4. Using the Fabric Softener buttons change setting to ‘More’ for both.
5. Run the cycle to completion.
MLTW61A5CWW/MLTW61A5CCG
MLTW62M5CWW/MLTW62M5CCG
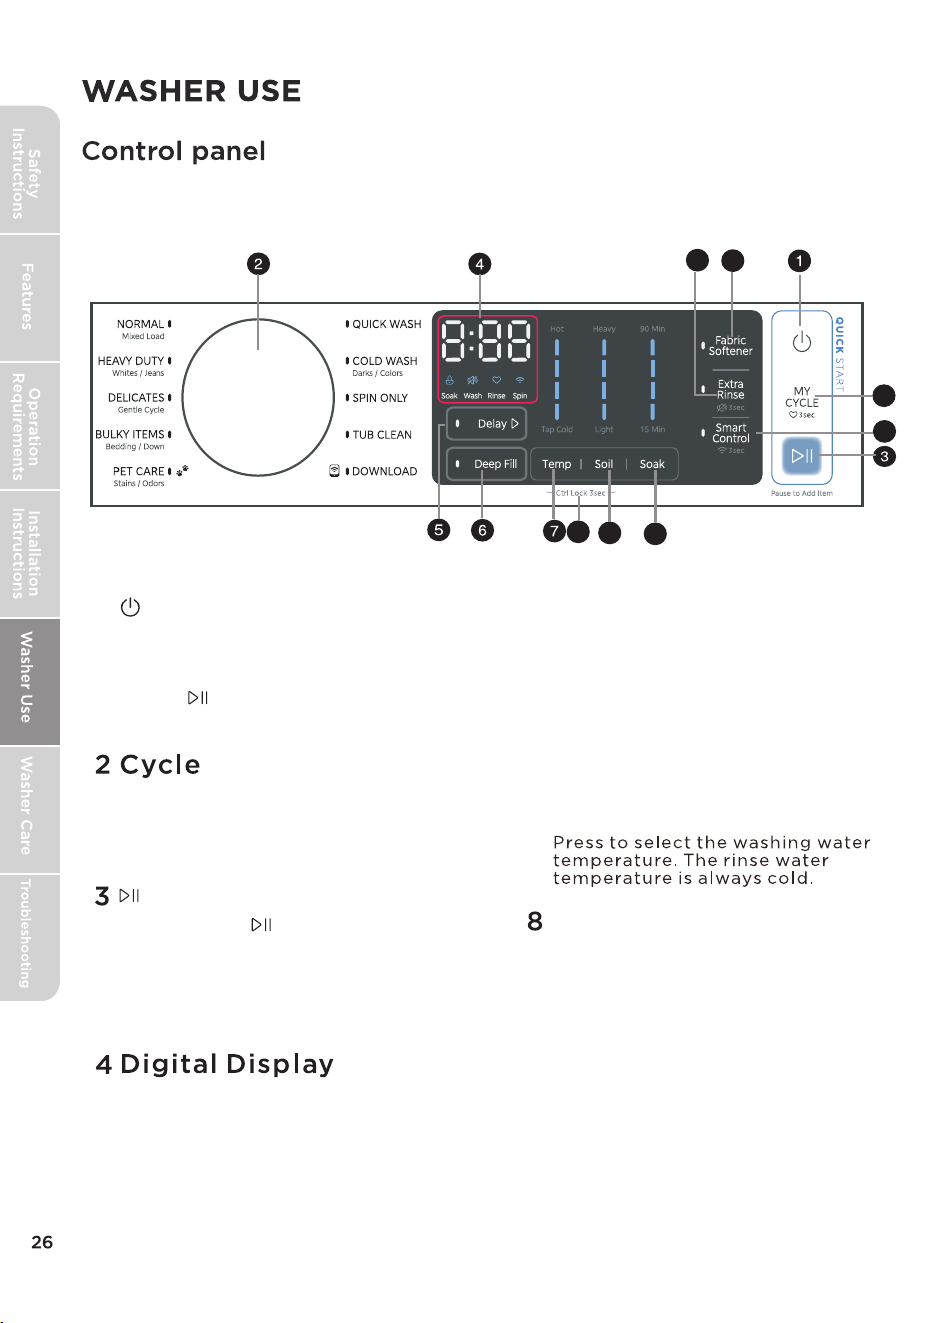
6 Deep Fill
1
POWER
START
5 Delay
7 Temp
Ctrl Lock
Press this button to fill the water
to the highest level.
Press the Power button to your washer.
Press again to turn o your washer. If
you leave your washer on and do not
press within 10 minutes,
your washer automatically turns o.
Press once to start the cycle. Press
again to pause the cycle. If you pause
the cycle, you can add or remove items,
but you cannot change any settings.
Press again to restart the cycle.
When you select a cycle, the digital
display will display the total time for
the cycle and all selected options.
While your washer is running, the
display shows the cycle process and
time remaining in the cycle.
Press to select a time when you want
the cycle to begin.
8
9
10
11
12
13
14
Turn the knob to select a wash cycle.
The cycle you select determines the
wash pattern for the cycle.
Press and hold the
Temp
and
Soil
butt
ons
at the same time
for 3
sec
onds to turn on the control lock
ress and hold these
lock function is turned on, the only
t
on that works is the P
O
WER
button and the buttons used to turn
buttons again for 3 seconds to turn
o the function. When the control
function. P
but
the control lock o.
9 Soil
10 Soak
11 Smart Control
12 MY CYCLE
13 Fabric Softener
14 Extra Rinse
Add liquid fabric softener to the fabric softener
compartment, and
then
re
s
s this button.
The fabric softener will be added to the cycle
at the correct time.
p
Press once to add an extra rinse to the selected cycle.
Press to select the Soil to get dierent soil settings.
Used in situations where clothes need extra cleaning, suitable for heavily
soiled garments.
Press[
Smart
Control
3 se
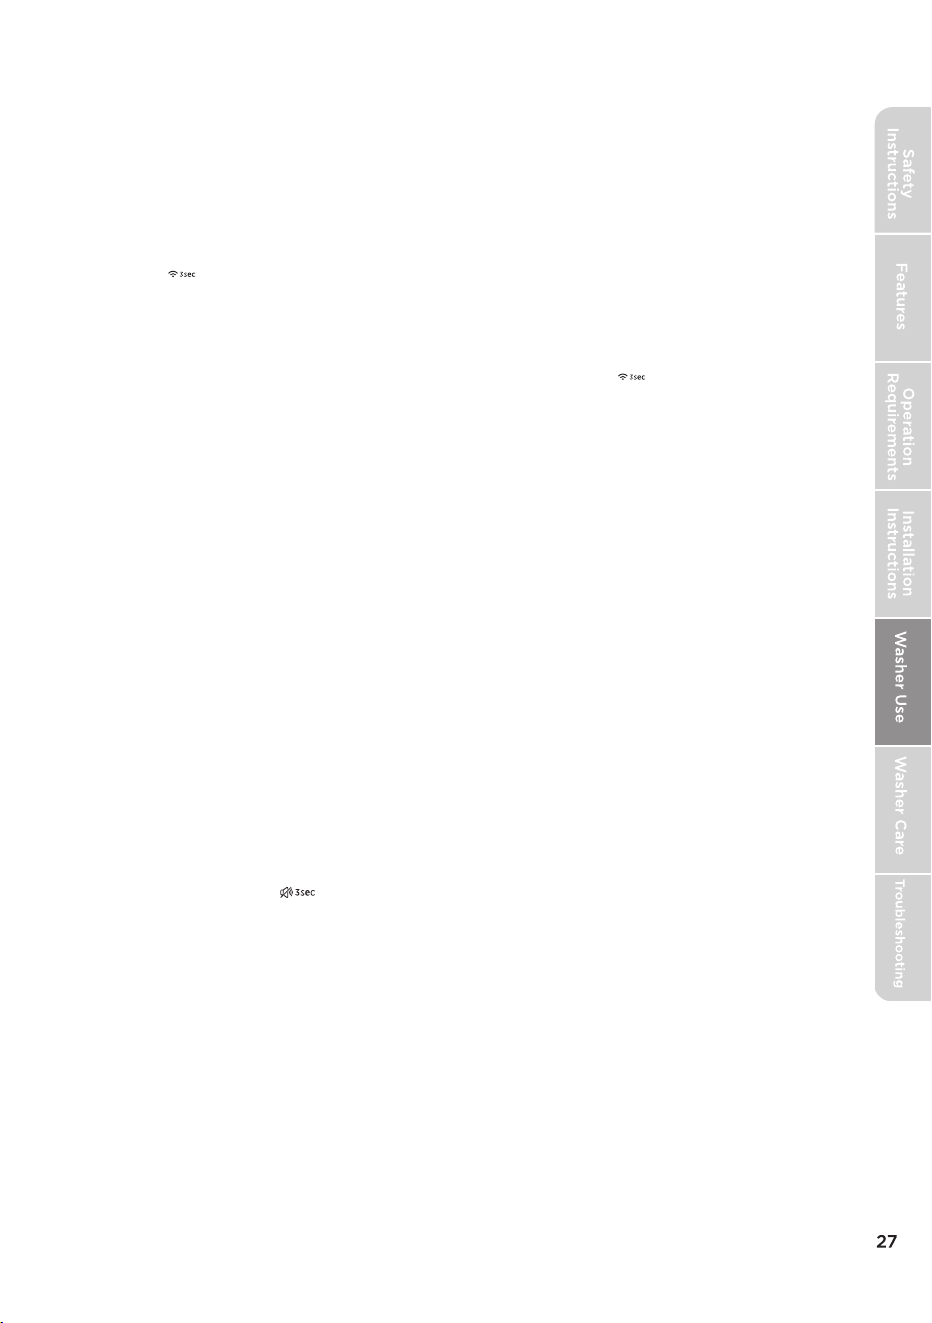
conds to connect your washer to the SmartHome
APP on your phone.
Pressing the Smart Control button allows your device to connect to a
wireless network.
After connecting your device to wireless network, press [
] once to
enter the remote control state.
To use your smartphone as a remote control, you must meet the
following c
onditions:
1. The appliance should connect to the internet;
2.
The door of drum should be closed.
Please note:
Smart
Control
-
The smart control function will not operate if the lid is open.
-
automaticall
y. If
you want to use smart control function again, you
need to turn it on again.
The smart control function is turned o at the end of each cycle
] for
Press and hold for 3 seconds to remember your
current wash cycle settings.
Press once to load your
saved
c
y
cle settings.
Press and hold the Extra Rinse button for 3 seconds to turn the sound on
or o.
non-HE
close zippers and
remove coins, keys, and other hard objects.
Do not wash, spin or dry water-proof seats, mats or clothing.
Failure to closely follow these instructions may result in an abnormal
vibrating and an out-of-balance condition that could result in physical
injury, property damage, and/or appliance damage.
Safety Instructions
Do not wash live pets.
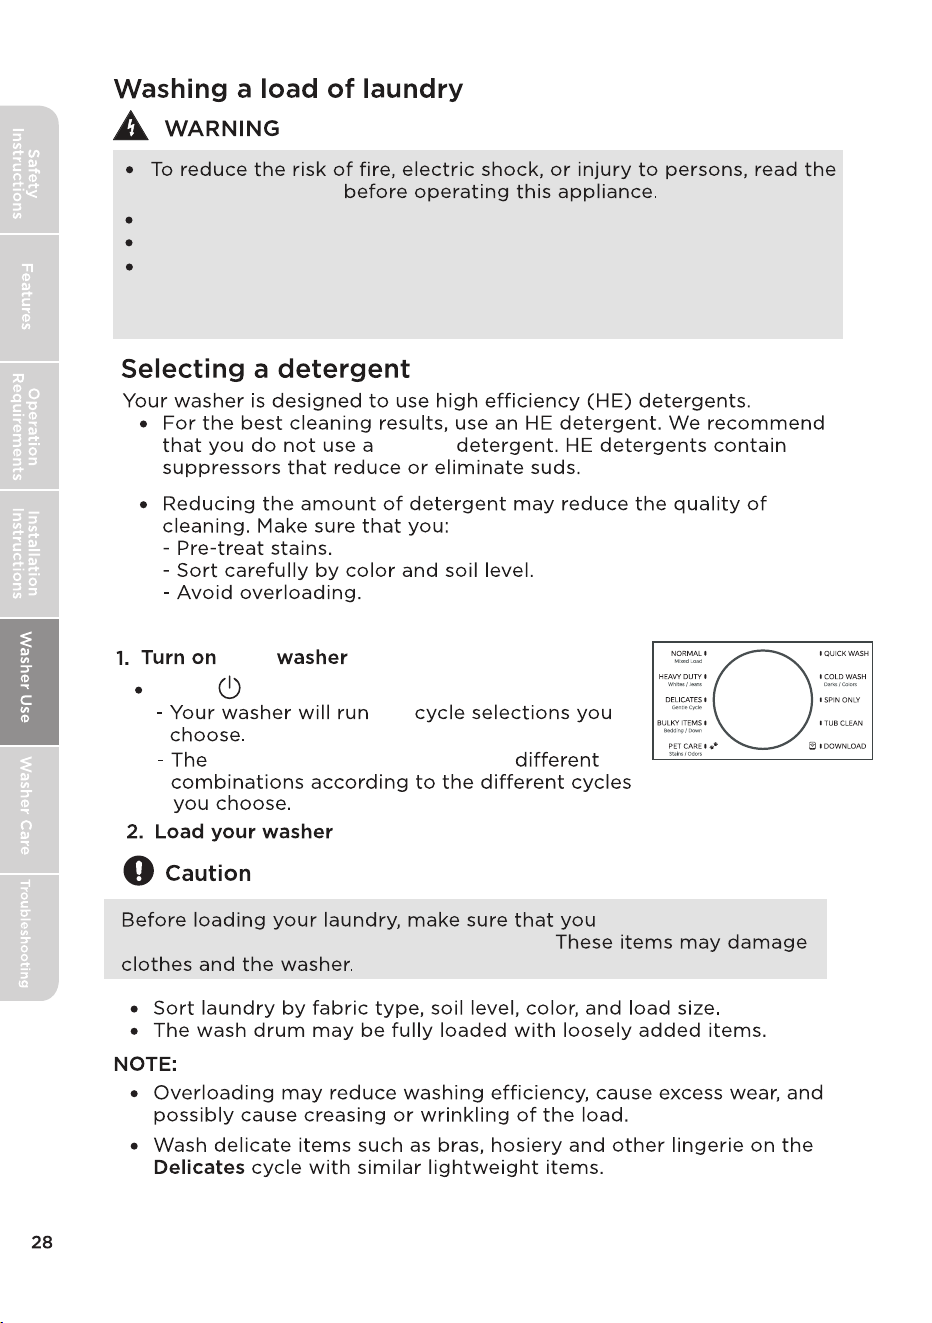
Press to turn on your washer.
your
the
How to use your washer
indicator lights will light up in
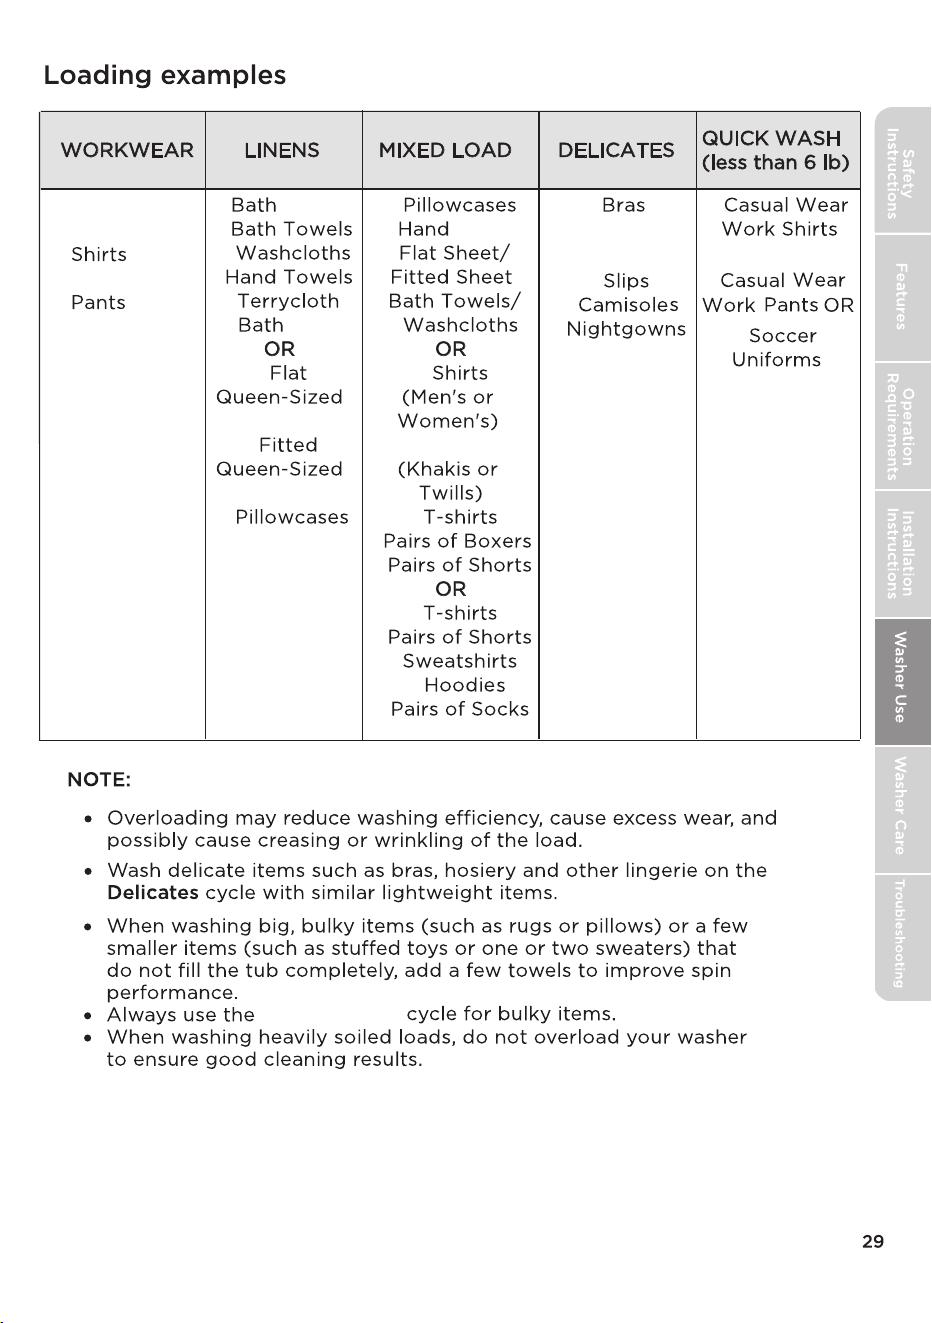
7
7
5
4
10
12
8
4
5
5
3
3
6
6
8
6
6
5
8
5
5
4
10
4
4
6
8
8
5
4
7
6
4
8
Pairs of Jeans
Workwear
Workwear
Sheets
Mats
Sheets
Sheets
Towels
Pairs of
Underwear
Pairs of
6 Pairs of Pants
BULKY ITEMS
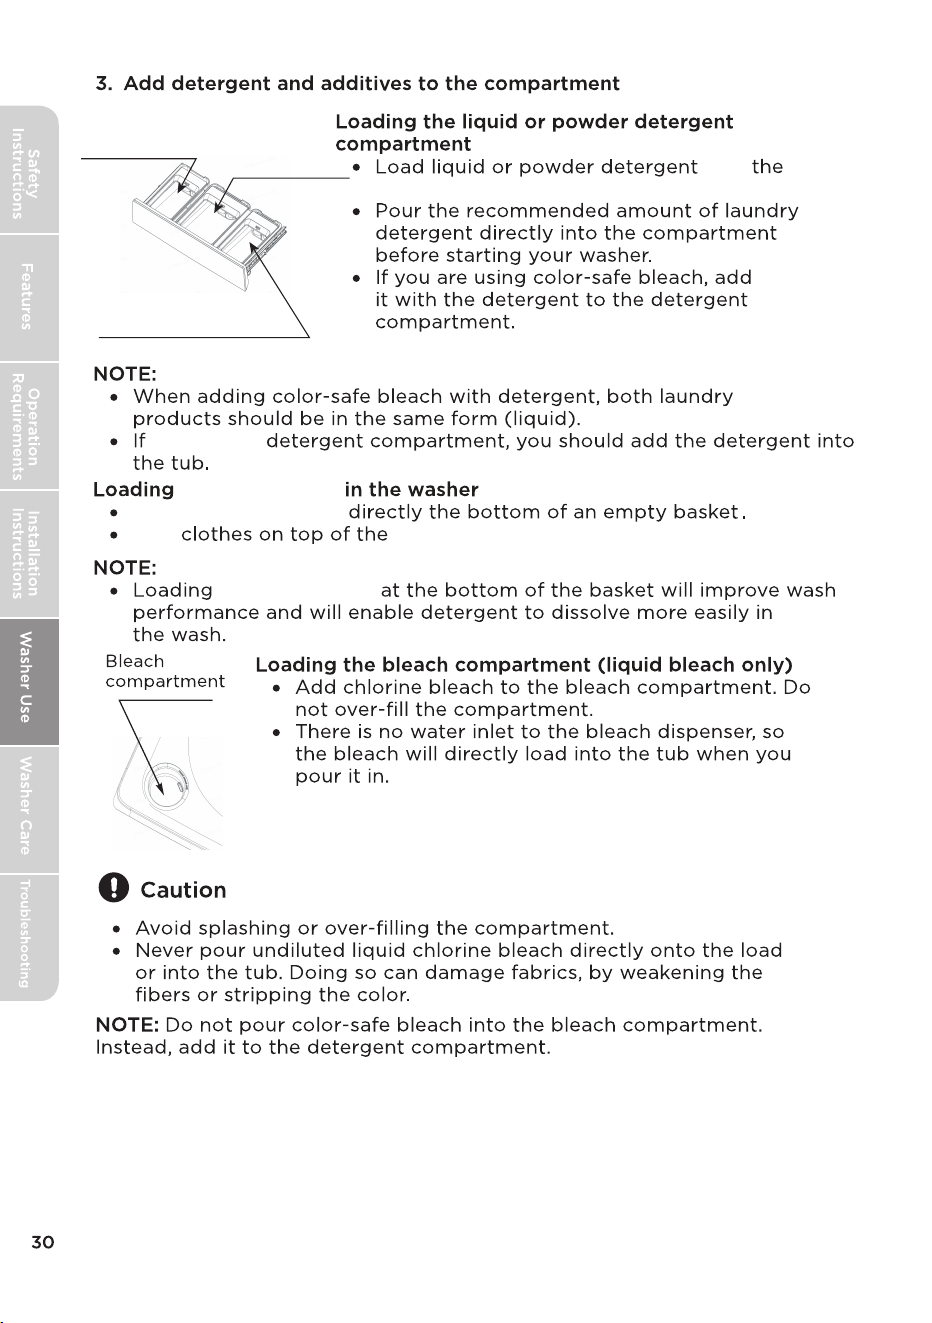
Softener
compartment
Laundry Additives
compartment
Detergent
compartment
into
indicated compartment.
Load
Add
there is no
detergent pods
detergent pods
detergent pods.
detergent pods
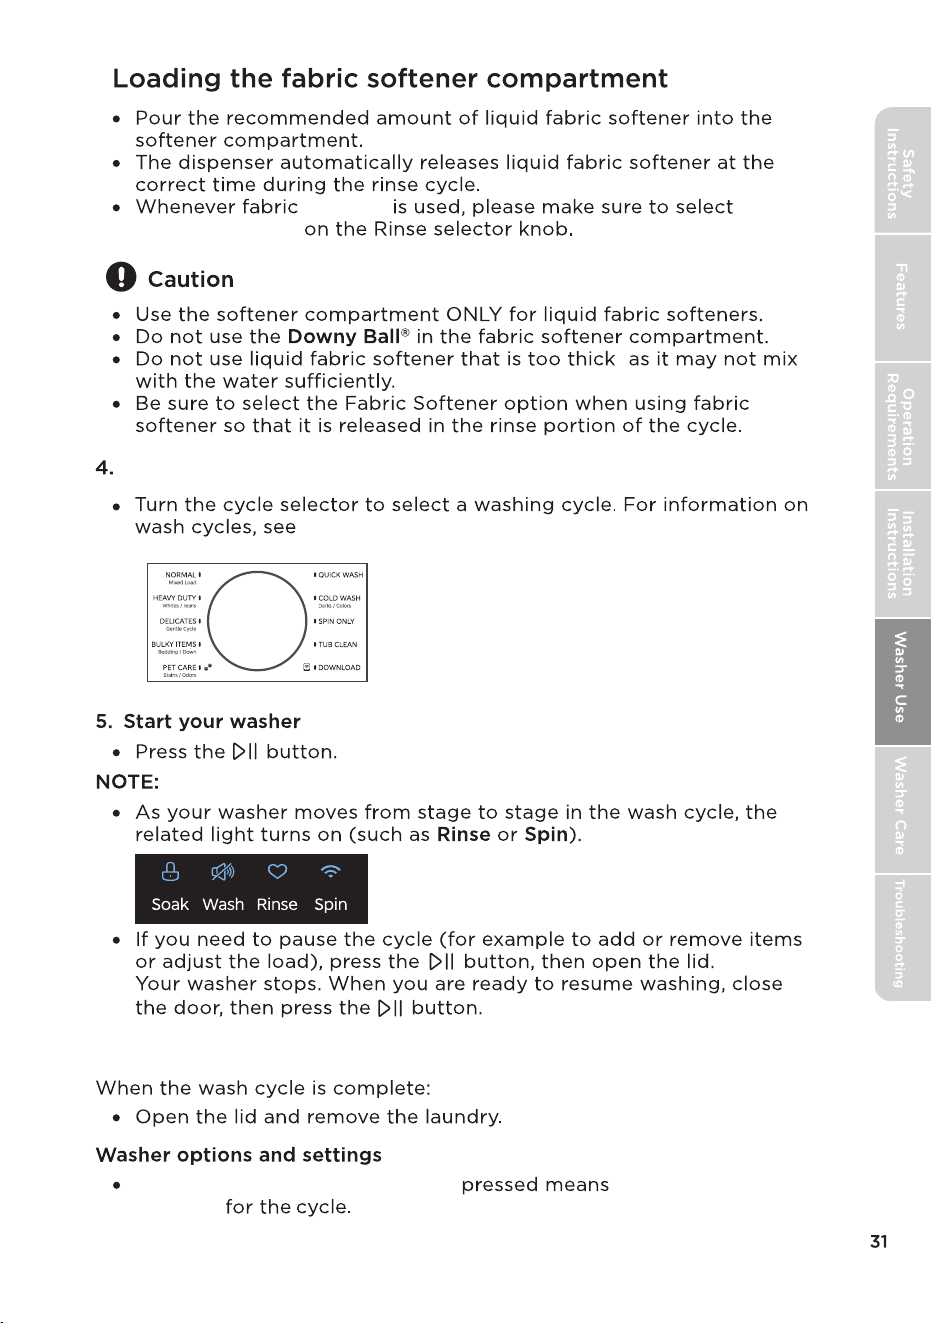
Select the appropriate cycle and options for the load
6. Unload your laundry
Fabric softener
Softener Button
A double beep when a button is the option cannot be
selected
,
the Washer options and settings table.
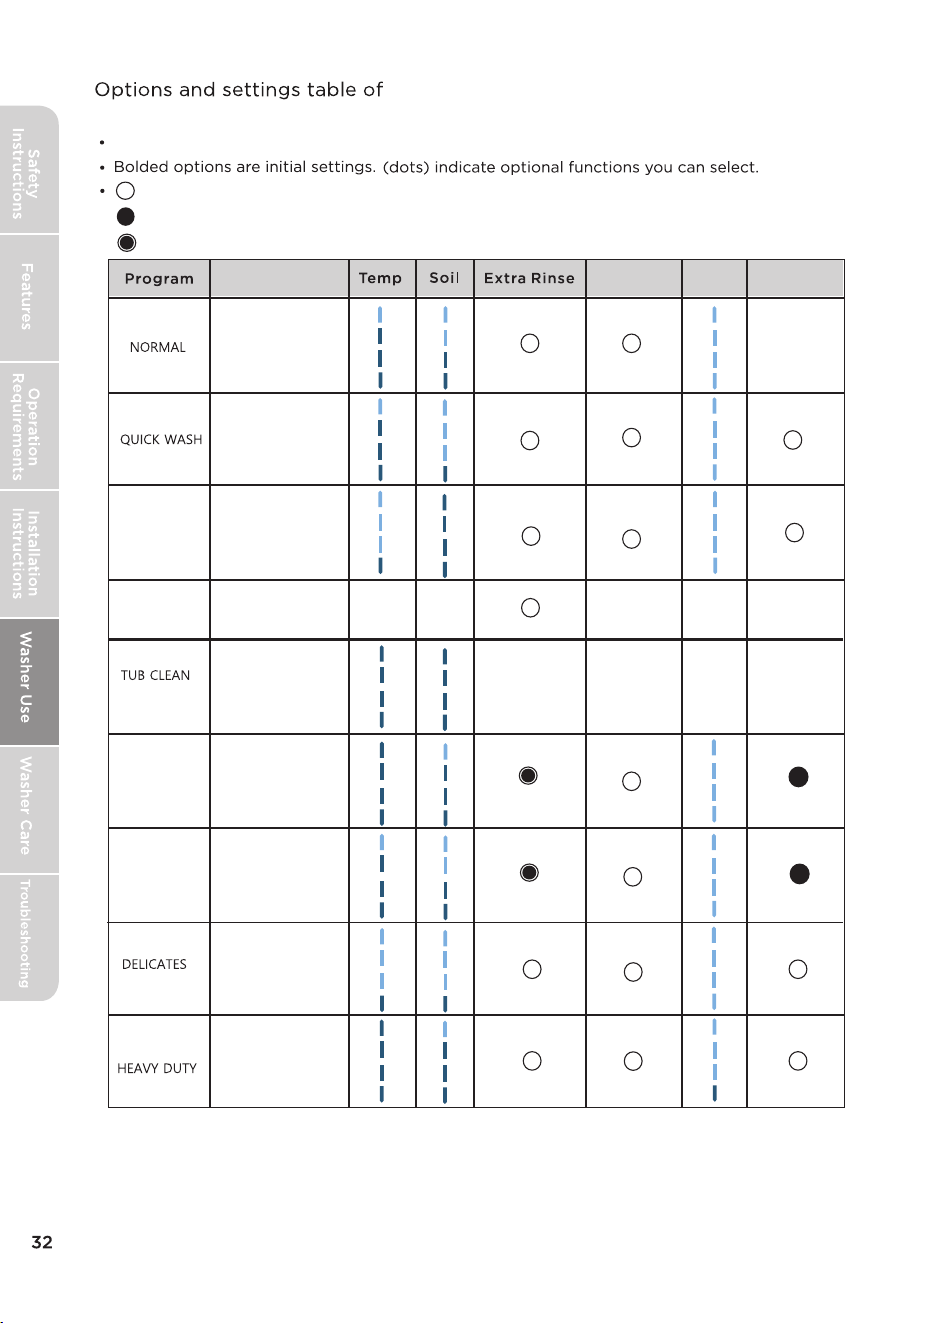
COLD WASH
SPIN ONLY
BULKY ITEMS
Fabric
Softener
Soak
Deep Fill
: Optional, but this function is not selected by default; : Not selectable,
X
X
X
X
X X
X
X
:MLTW61A5CWW/MLTW61A5CCG
MLTW62M5CWW/MLTW62M5CCG
Fabric Type
Cotton,Linen,Towels,
Shirts,Sheet,Jeans,
Mixed loads.
Large items like
blankets and
comforters.
Heavily soiled cotton
fabrics.
Pet clothes, pet toys,
pet mats.
Dress shirts, Blouses,
Nylons,Sheer/lacy.
Lightly soiled and
small loads.
Clothes with prints or
dyed colors.
Clean the inside of the
washing machine.
we suggest the loading be less than the quantities in the table on page 29
PET CARE
: The default selection of this feature cannot be canceled.
X
: Optional, and this function is default.
X
X
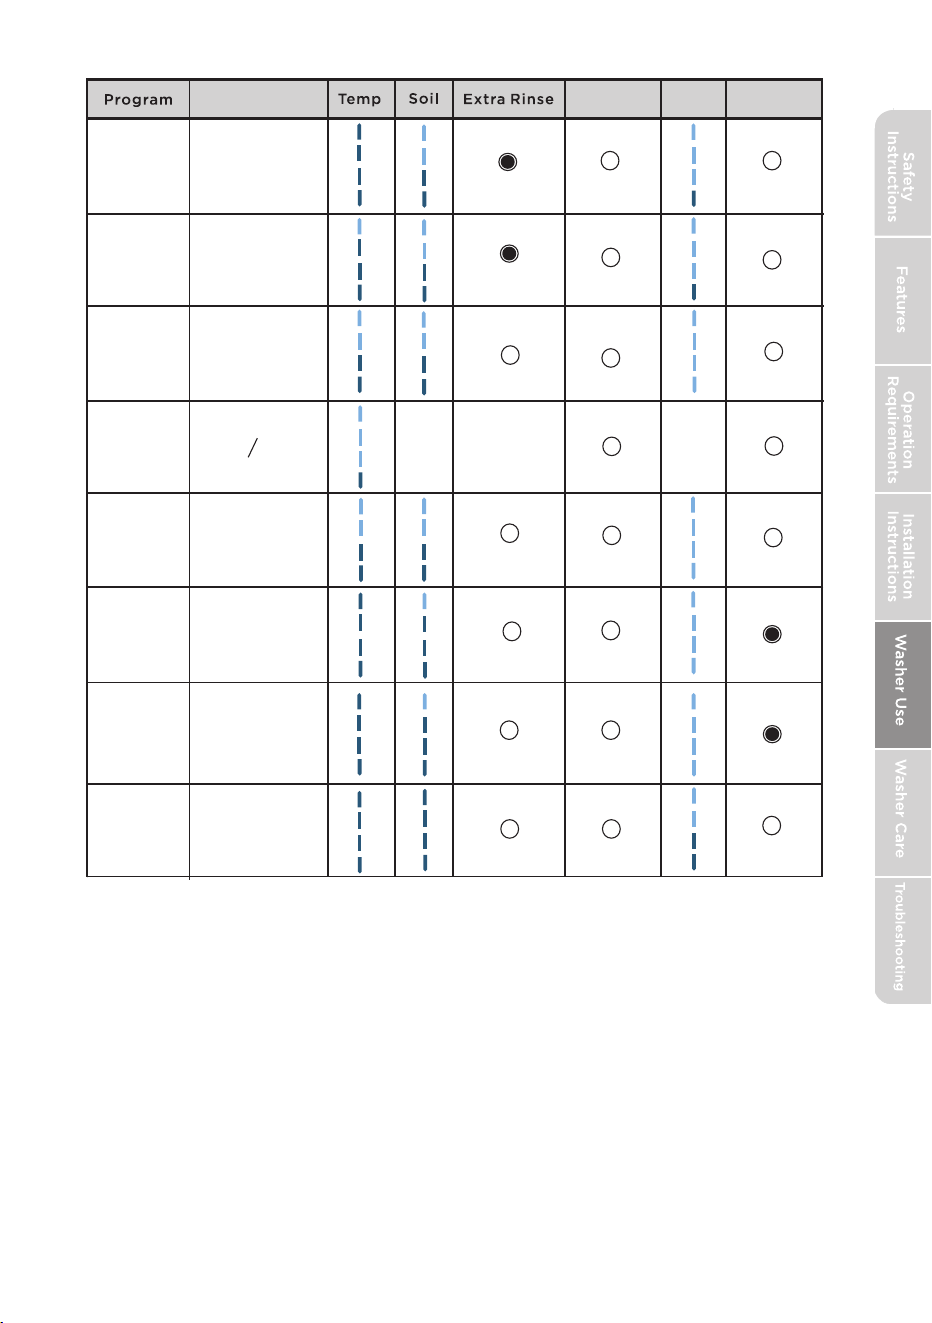
Fabric
Softener
Soak
Deep Fill
X
X
Fabric Type
SHEETS
BABY CARE
PERM PRESS
RINSE AND SPIN
COLOR CARE
WATERPROOF
X
DOWNLOAD-
DOWNLOAD-
DOWNLOAD-
DOWNLOAD-
DOWNLOAD-
DOWNLOAD-
Deep clean towels,
sheets, and bedding
to remove absorbed
oils, dirt, and bacteria,
while keeping fabrics
fluffy and fresh.
Now, suitable for
washing baby clothes,
such as: baby onesies,
bibs, bibs, small towels,
etc.
Wash synthetic fabrics
or wrinkle-prone
clothes with a cycle
designed to reduce
creases and maintain
fabric’s smoothness.
Wash colored and dark
fabrics to preserve their
vibrant hues and
prevent color bleeding,
using a gentle wash
that avoids fading.
Professional outdoor
gear with waterproof
coatings, such as
windbreakers, ski suits,
and climbing outfits.
WHITES
DOWNLOAD-
Stain Fighter
33
White Fabric
Smart control
Use Your Appliance with the SmartHome App
Before you start, make sure that:
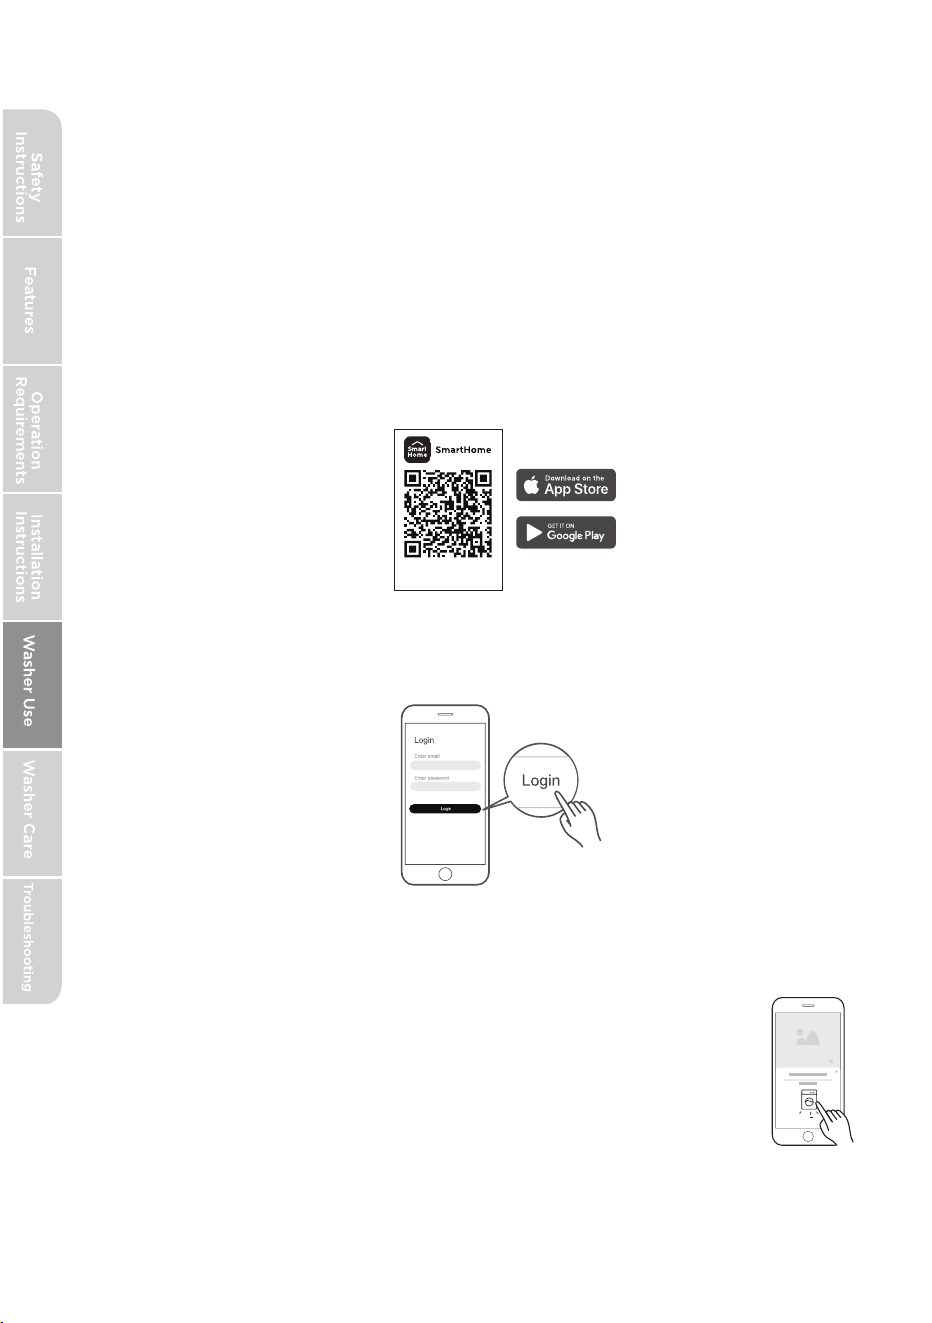
1. Your smartphone is connected to home wireless network, and you know the
network password.
2. Make sure you are near the home appliance.
3. The 2.4GHz band wireless signal is enabled on your wireless router.
Follow the below steps to enter the remote control state
Download the SmartHome app
Register and log in
Open the SmartHome app, and create a new account to start (you can
also register through a third-party account). If you already had an existing
account, use the account to log in.
Download the app
& activate product
34
Connect your devices to the SmartHome APP
1. Please make sure your mobile phone is connected to a wireless network. If
not, go to Settings and turn on the wireless connection, select and connect
to a wireless network. If needed, activate Bluetooth as well.
2. Please power on your devices.
3. Open the SmartHome app on your phone.
4. If a message of "Smart devices discovered nearby" appears,
click to add.
5. If no message appears, select "+" on the page and select your
device in the list of nearby your device is
not listed, please add your device manually by the device category and
device model.
available devices. If
On an app market (Google Play Store, Apple App Store), search for
"MSmartHome" and find the SmartHome app. Download and install it
on your phone. You can also download the app by scanning the QR code
below.
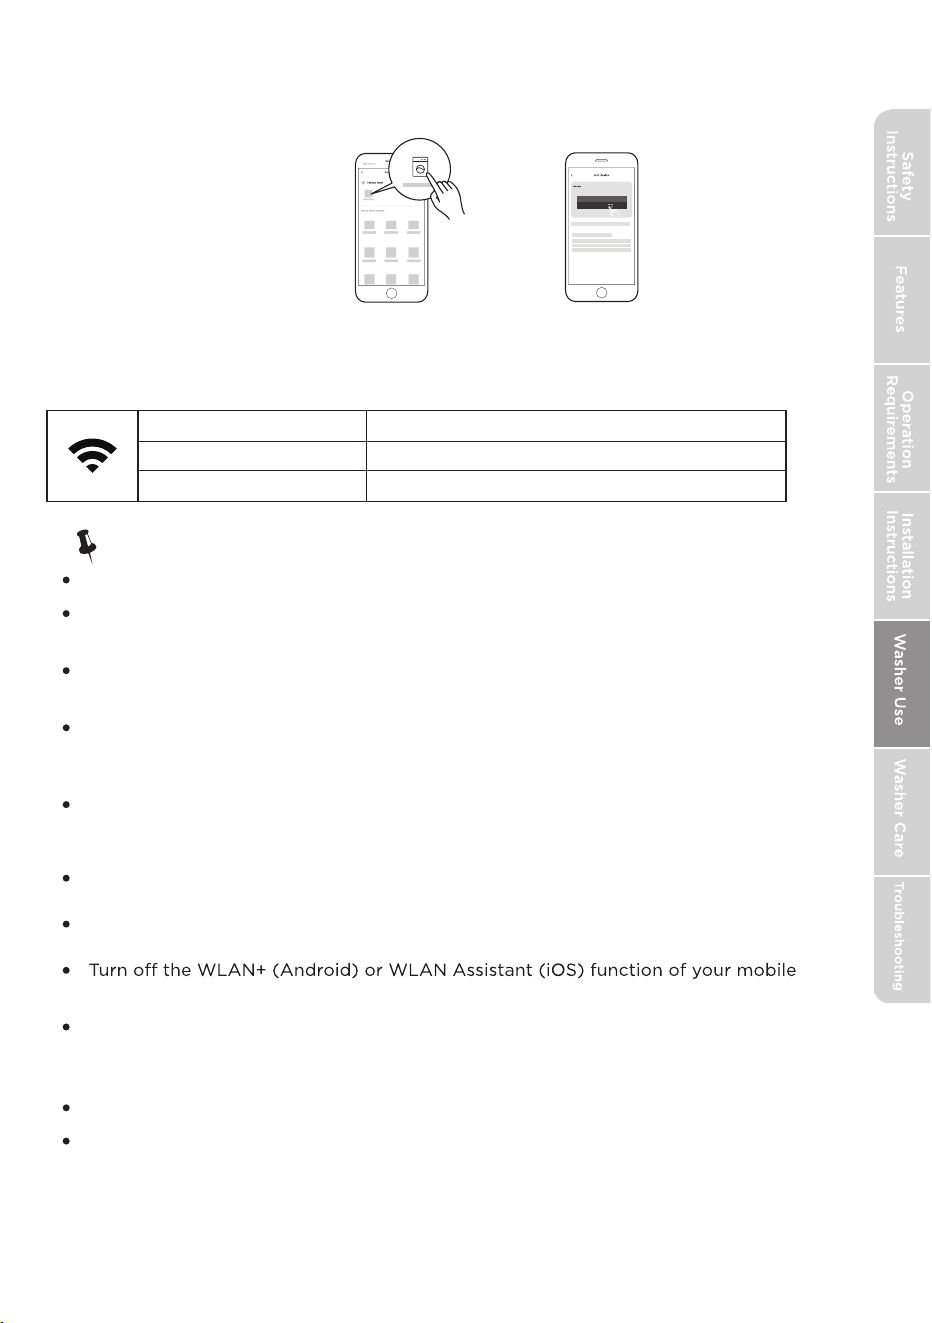
35
8: 88
6. Connect your device to the wireless network according to the instructions on
the app. If the connection fails, please follow the instructions provided by the
app to continue with the operation.
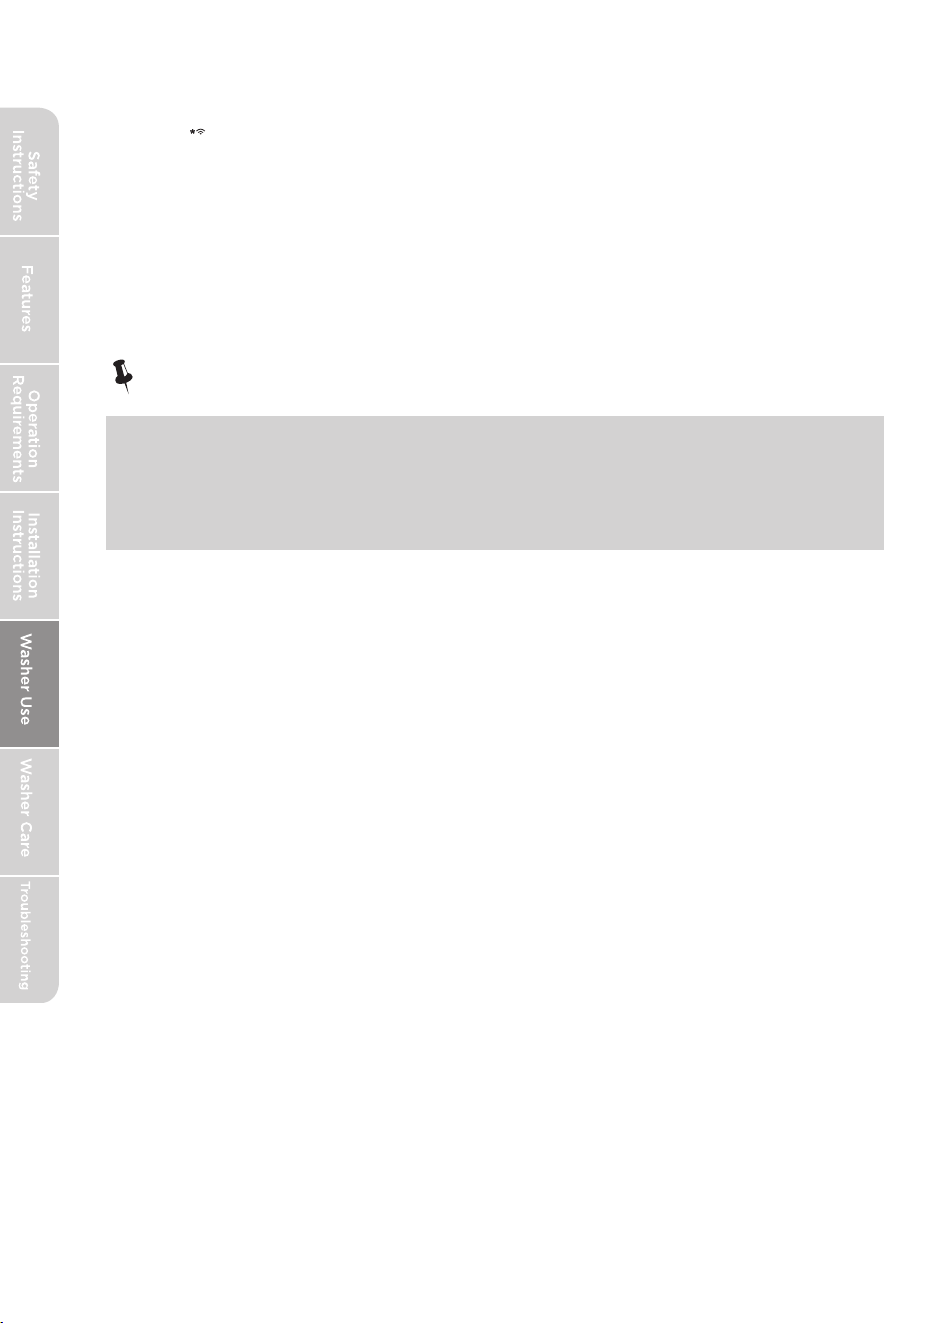
7. To start the remote control
Press machine will enter the remote control state. You will be able to start the
WiFi Status Light
Slowly flashing Waiting for connection
Quickly flashing Connecting
Light is on Connected to your wireless router
Note!
Make sure your devices are powered on.
Keep your mobile phone close enough to your device when you are connecting
your device to your mobile phone.
Connect your mobile phone to the wireless network at home, and make sure you
know the password of the
wireless network.
Check if your router supports 2.4 GHz wireless network band and turn it on. If you
are not sure whether the router supports 2.4 GHz band, please contact the router
manufacturer.
It is recommended to use a wireless network name that only contains letters and
numbers.
If your wireless network name contains special characters, please modify it in the
router.
phone when connecting network to your devices.
In the case that your device connected to wireless network before but it needs to
rec
onnect, please click "+" on the app’s Home page, and add your device again by the
category and model according to the instructions on app.
Operating Temperature: 32F-95F
The Max RF Output Power:wireless network : E.I.R.P.: 18dBm, Bluetooth LE: 10dBm.
Frequency band of operation:2400-2483.5MHz
The device cannot connect to a wireless network that requires authentication,
including many networks in public areas such as hotels, restaurants, etc. Please
connect to a wireless network that does not require authentication.
machine remotely.
36
Procedures to reset the Wireless Network configuration.
1. Press [
Smart
Control
] 3 seconds to turn on the wireless network function and
re-enter the network configuration process.
2.
3. Reconnect to the network based on the content of the previous page.
The letters AP will be displayed on the digital display
Matter
This product is Matter-enabled. To get the most out of this feature, ensure
that your chosen third-party smart home platform or app fully supports the
Matter protocol.
Note!
When using third-party software to operate your appliance, follow the
instructions below if the program options do not appear:�
1. Exit the appliance operation screen and return to the main menu.�
2. Refresh the main menu page.
3. Select your appliance again,The program options should now be available.
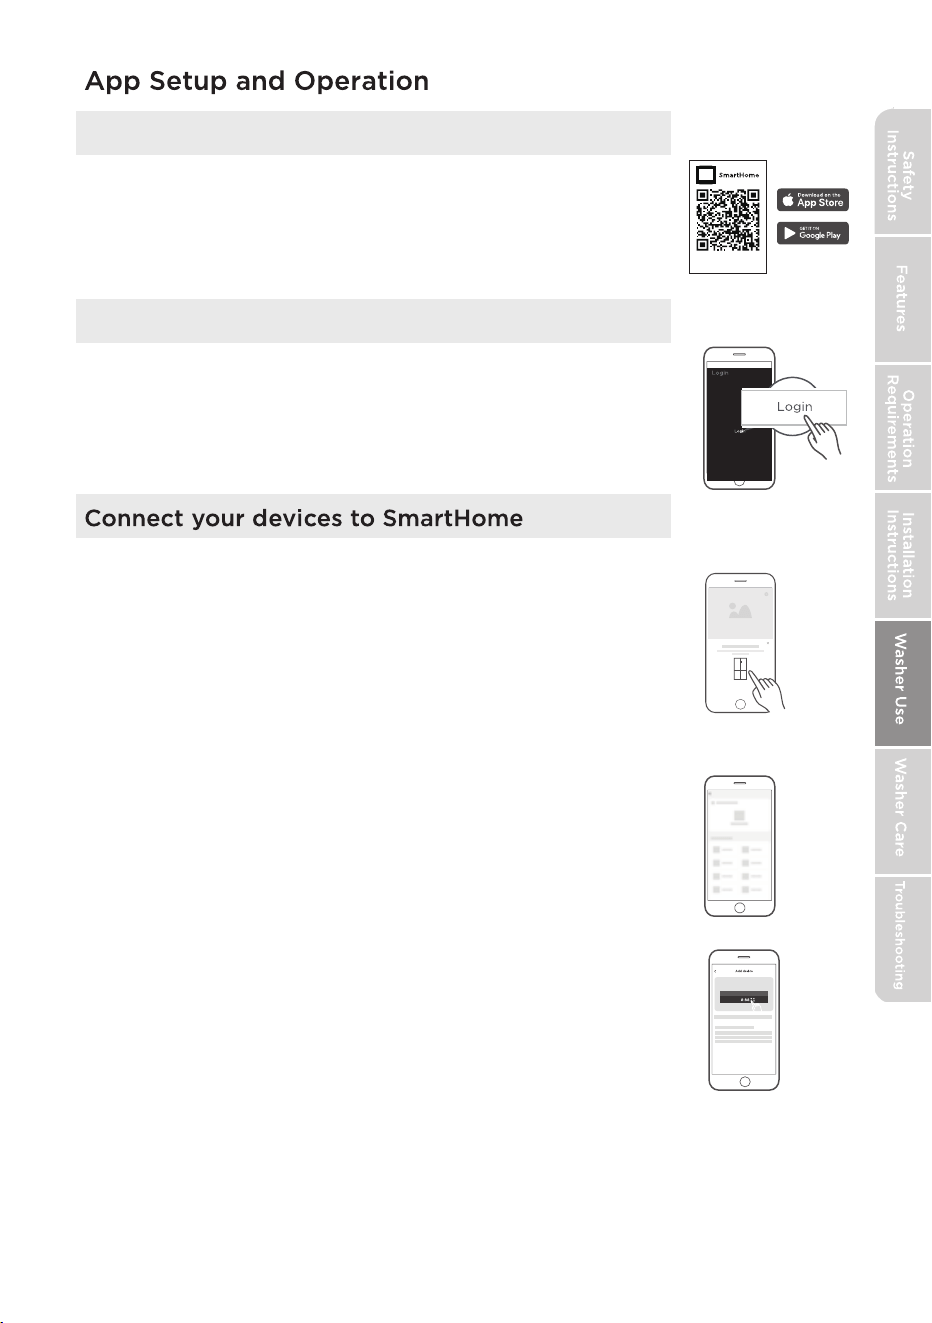
Download the SmartHome App
Download the app
& activate product
Register and log in
Open the SmartHome app, and create a new account
to start (you can also register through a third-party
account). If you already have an existing account, use
the account to log in.
1. Please make sure your mobile phone is connected to a
wireless network. If it is not, go to Settings and enable
wireless networks and Bluetooth.
2. Please power on your devices.
3. Open SmartHome App on your phone.
4. If a message of "Smart devices discovered nearby" appears,
click to add.
5. If no message appears, select “+” on the page and select
your device in the list of nearby devices available. If your
device is not listed, please add your device manually by the
device category and device model.
6. Connect your device to the wireless network according to
instructions on app. If the connection fails, please follow
the instructions provided by the app to continue with the
operation.
37
On an app market (Google Play Store, Apple App Store),
search for “MSmartHome” and find the SmartHome app.
Download and install it on your phone. You can also
download the app by scanning the QR code below.
Please note that changes or modifications of this product is not expressly approved by the party
responsible for compliance could void the user’s authority to operate the equipment.
This equipment complies with FCC’s RF radiation exposure limits set forth for an uncontrolled
environment.
The antenna(s) used for this transmitter must be installed and operated to provide a separation
distance of at least 20 cm from all persons and must not be collocated or operating in conjunction
with any other antenna or transmitter. Installers must ensure that 20cm separation distance will be
maintained between the device (excluding its handset) and users.
This device complies with part 15 of the FCC rules. Operation is subject to the following two conditions:
(1) This device may not cause harmful interference, and (2) this device must accept any interference
received, including interference that may cause undesired operation.
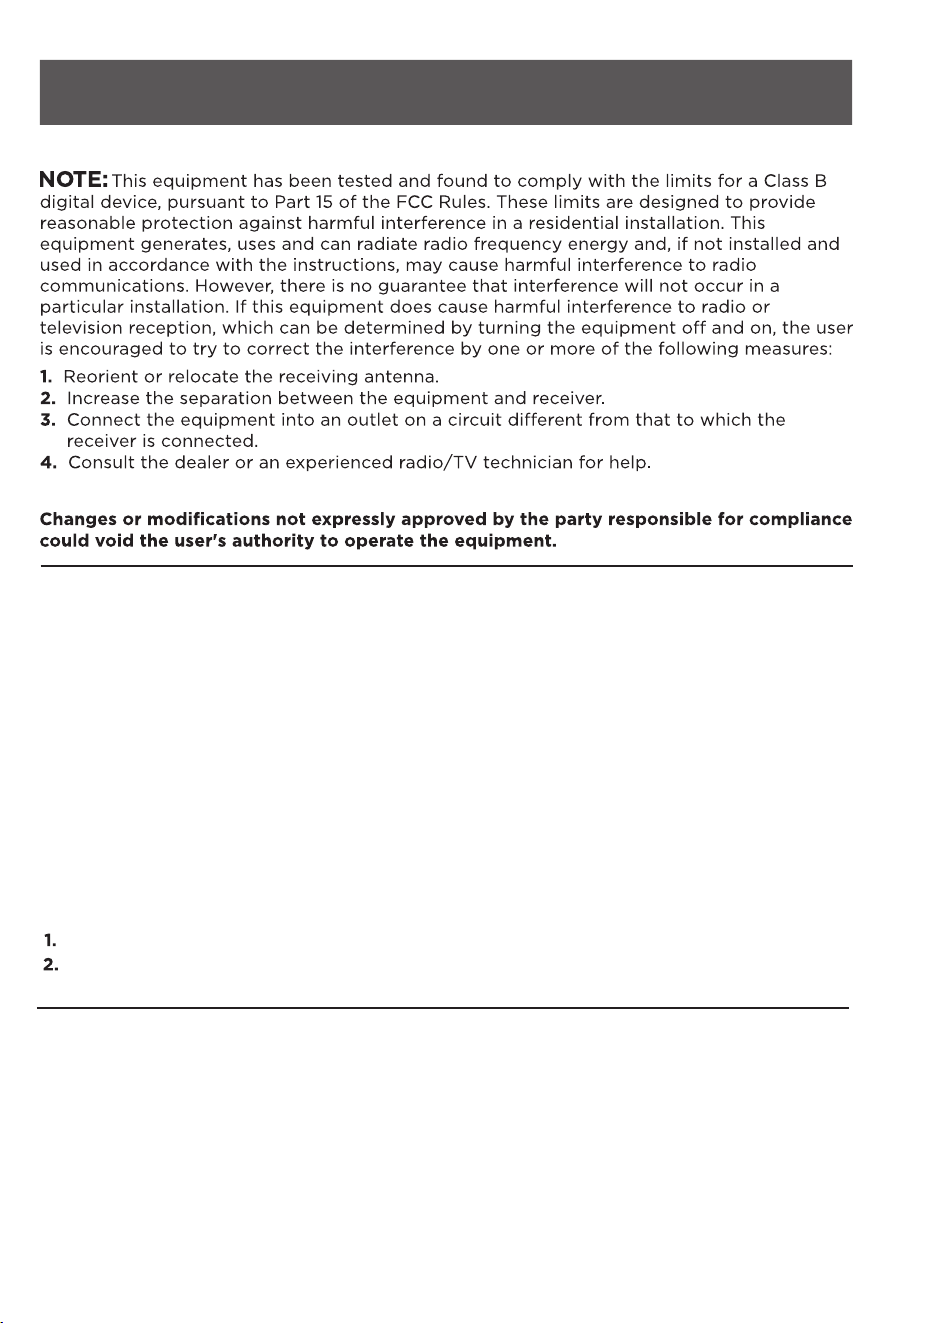
Note: This equipment has been tested and found to comply with the limits for a Class B digital device,
pursuant to part 15 of the FCC Rules. These lim
its are designed to provide reasonable protection
a
gainst harmful interference in a residential installation. This equipment generates, uses and can radiate
radio frequency energy and, if not installed and used in accordance with the instructions, may cause
harmful interference to radio communications. However, there is no guarantee that interference will not
occur in a particular installation. If this e
quipment does cause harm
ful interference to radio or television
reception, which can be determined by turning the equipment o
and on, the user is encouraged to try
to correct the interference by one or more of the following measures:
• Reorient or relocate the receiving antenna.
• Increase the separation between the equipment and receiver.
• Connect the equipment into an outlet on a circuit di erent from that to which the receiver is
connected.
• Consult the dealer or an experienced radio/TV technician for help.
This equipment c
omplies with FCC radiation exposure limits set forth for an uncontrolled environment.
FCC Supplier’s Declaration of Conformity
Product Name:
Washer
Model number:
Suppliers Name: Midea America (Canada) Corp.
Suppliers Address (Canada): Markham, ON L3R 5B4
Suppliers Website: http://midea.com/ca
Contact Email/Telephone: 1-888-365-2230
38
MLTW61A5CWW/MLTW61A5CCG/MLTW62M5CWW/MLTW62M5CCG
This device complies with Industry Canada license-exempt RSS standard(s). Operation is subject to the
following two conditions: (1) this device may not cause interference, and (2) this device must accept
any interference, including interference that may cause undesired operation of the device.
CAN ICES-003(B)/NMB-003(B)
Midea is not responsible for any changes or modifications not expressly approved by Midea. Such
modifications could void the user’s authority to operate the equipment.
For model: MWB-S-WB01
FCC ID: 2ADQOMWB-SWB01
IC ID: 12575A-WB01
39
TUB CLEAN
Certain internal parts are intentionally not grounded and may present a risk
of electric shock only during servicing. Service Personnel – Do not contact
the following parts while the appliance is energized: Electrical Valve, Drain
Pump, Main Motor, Retractor, Capacitor and Controller Cover.
To reduce the risk of electric shock, disconnect this appliance from the power
supply before attempting any user maintenance. Turning the controls to the
OFF position does not disconnect this appliance from the power supply.
control panel.
40
TUB CLEAN.
QUICK WASH
in your washer
Remove filter to remove excess water.
41
empty,
Press the power button to turn on the machine.
Problem Solutions
Washer does not
start
No water or not
enough water
Make sure that both faucets are fully turned on.
Make sure that the water pressure is in the range
listed in Water requirements on page 14.
Make sure that the water inlet hoses are not
kinked. Straighten if necessary.
Disconnect the hoses and clean the screens. The
hose
filter screens may be clogged.
Washer has
excessive
vibration
or noise.
Make sure that your washer is set on a level
surface. If the surface is not level, adjust your
washer's feet to level your washer.
Make sure that the laundry load is balanced.
During the spin process, if clothes are piled to one
side
of the tub, your washer may stop because
of the imbalance. Your washer tries up to three
times to solve the probler automatically. If the
washer cannot solve the problem, try to manually
redistribute clothes inside the tub.
For automatic cycles: After the lid locks, a load-sensing
program starts before the washer can fill with water. The
washer will agitate clothing without water to determine
load type, water level, and cycle time before it fills. This is
normal and can take up to one minute. For non-automatic
cycles, the washer fills after the lid locks.
other object.
42
Problem Solutions
Washer stops
•
Make sure that the power outlet is a working outlet.
•
Check the fuse or reset the circuit breaker.
•
Close the lid, then press the Start Pause button to
start your washer. For your safety, your washer does
not spin unless the lid is closed.
•
Before your washer starts to fill, it makes a series of
clicking noises to make sure that the lid is locked and
to do a quick drain.
•
Sometimes your washer may pause between stages in
the cycle. Wait to see if your washer starts again.
•
Disconnect the inlet hoses and clean the screens
periodically. The hose filter screens may be clogged.
Lid is locked
open
•
•
•
•
Washer does
not fill
•
Check the fuse or reset the circuit breaker.
•
Close the lid, then press the Start Pause button to
start your washer. For your safety, your washer does
not spin unless the lid is closed.
•
Make sure that the drain hose is not kinked.
Straighten as necessary.
•
Make sure that the height of the drain hose is within
specified limits. See Drainage requirements on page
14.
•
The pipes to your sewer system may be clogged.
Contact a plumber or qualified repair professional.
The water
temperature
•
Make sure that you have selected the correct temp.
•
Make sure that the water source faucets are fully
opened.
•
Make sure that the hoses are connected to the
correct faucet and water intake connections on your
washer, then flush the lines. See Connect the water
hoses on page 19.
•
Disconnect the hoses and clean the screens. The
hose filter screens may be clogged.
43
Press the Start Pause button to pause the washer. You
cannot open the lid if the washer is running.
After you pause the washer, it may take a few seconds
for the lid lock to release.
If the lid is locked when your washer is not running,
press the Power button to turn on your washer.
If power fails while your washer is running, the lid
unlocks when power is restored. Your washer may
take up to 6 minutes to reset. It will then then run the
rest of the cycle.
Problem Solutions
Load is too wet
at the end of
the cycle
sudsing. See Selecting a detergent on page 28.
Water leaks
Make sure that all hose connections are tight. See
Connect the water hoses on page 19 and Connect the
drain hose on page 21.
Make sure that the end of the drain hose is correctly
inserted and secured to the drainage system. See
Connect the drain hose on page 21.
Avoid overloading.
sudsing. See Selecting a detergent on page 28.
Oversuds
condition
sudsing. See Selecting a detergent on page 28.
If you have"soft" water, reduce the amount of
detergent.
For small or lightly soiled loads, reduce the amount of
detergent.
Prevent odor
Periodically run a Tub Clean cycle to clean the tub.
See Cleaning the tub on page 40.
sudsing. Excessive suds collect in nooks and crannies
and cause odor. See Selecting a detergent on page
28.
Dry the interior of your washer after the total cycle
has finished.
44
An unbalanced load may not spin out completely and
leave laundry wet.
Very small loads (one or two items)
may become unbalanced and not spin out
completely.
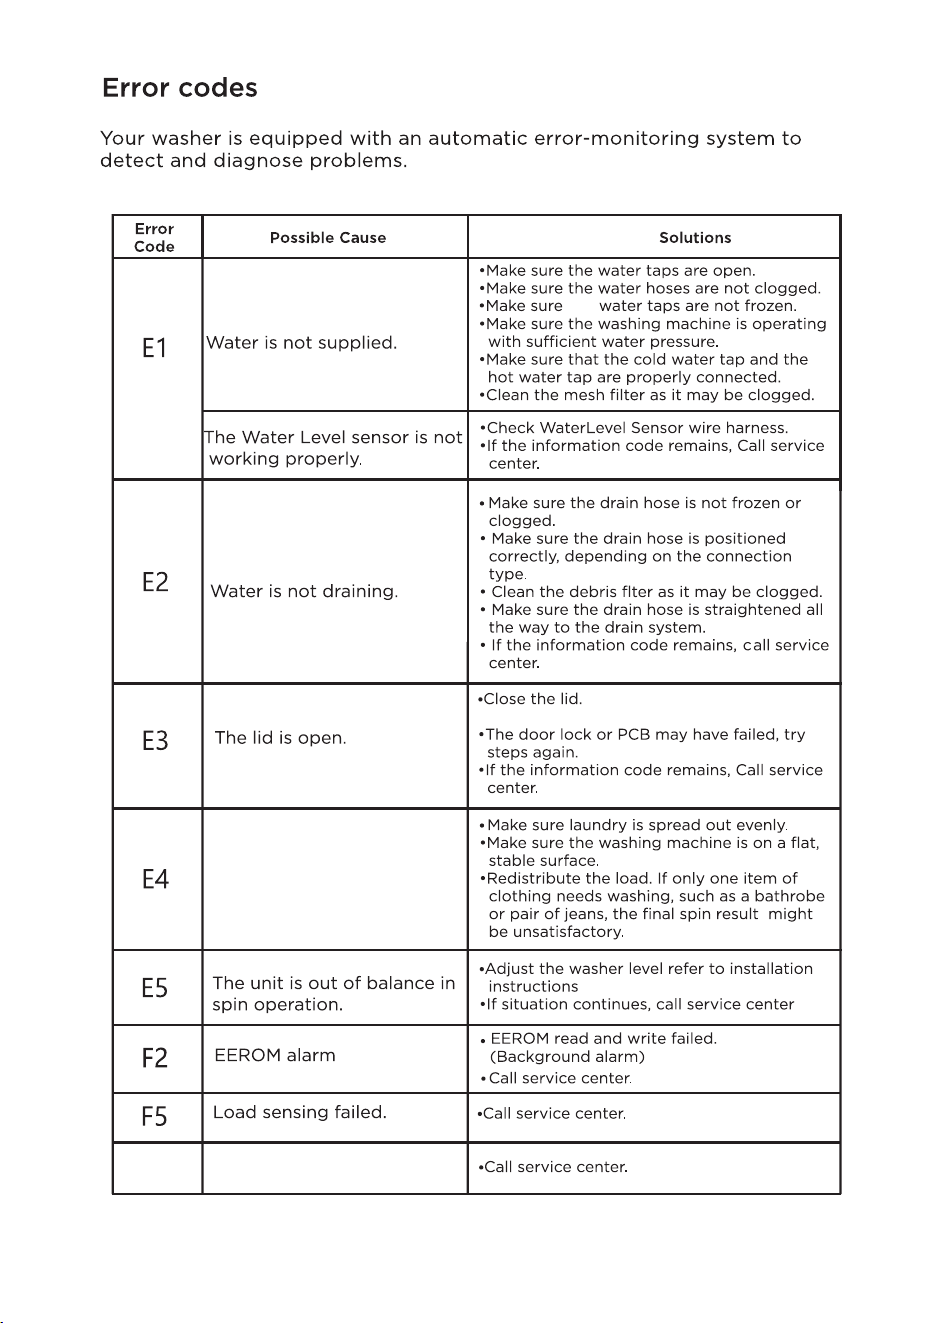
The Hall sensor alarms,
but there is no signal
Washer does not spin.
,evenly redistribute load.
the
,
,
The washer is tilted or otherwise
not level. See Level your washer on page 23.
45
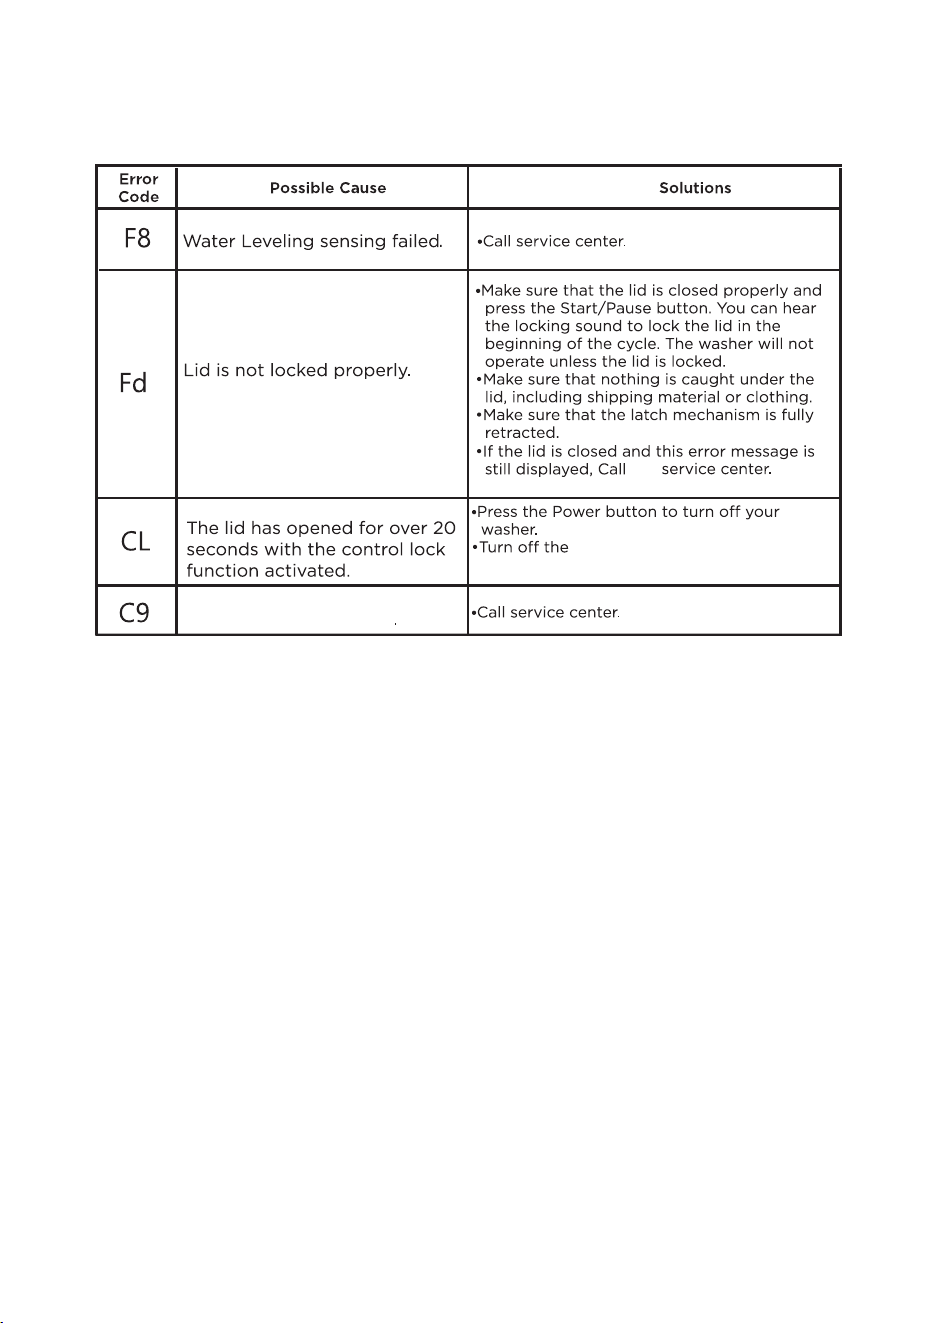
PCB or Display Board
Communication Failure
46
the
see Ctrl Lock in the Washer Use
section for more detailed instructions.
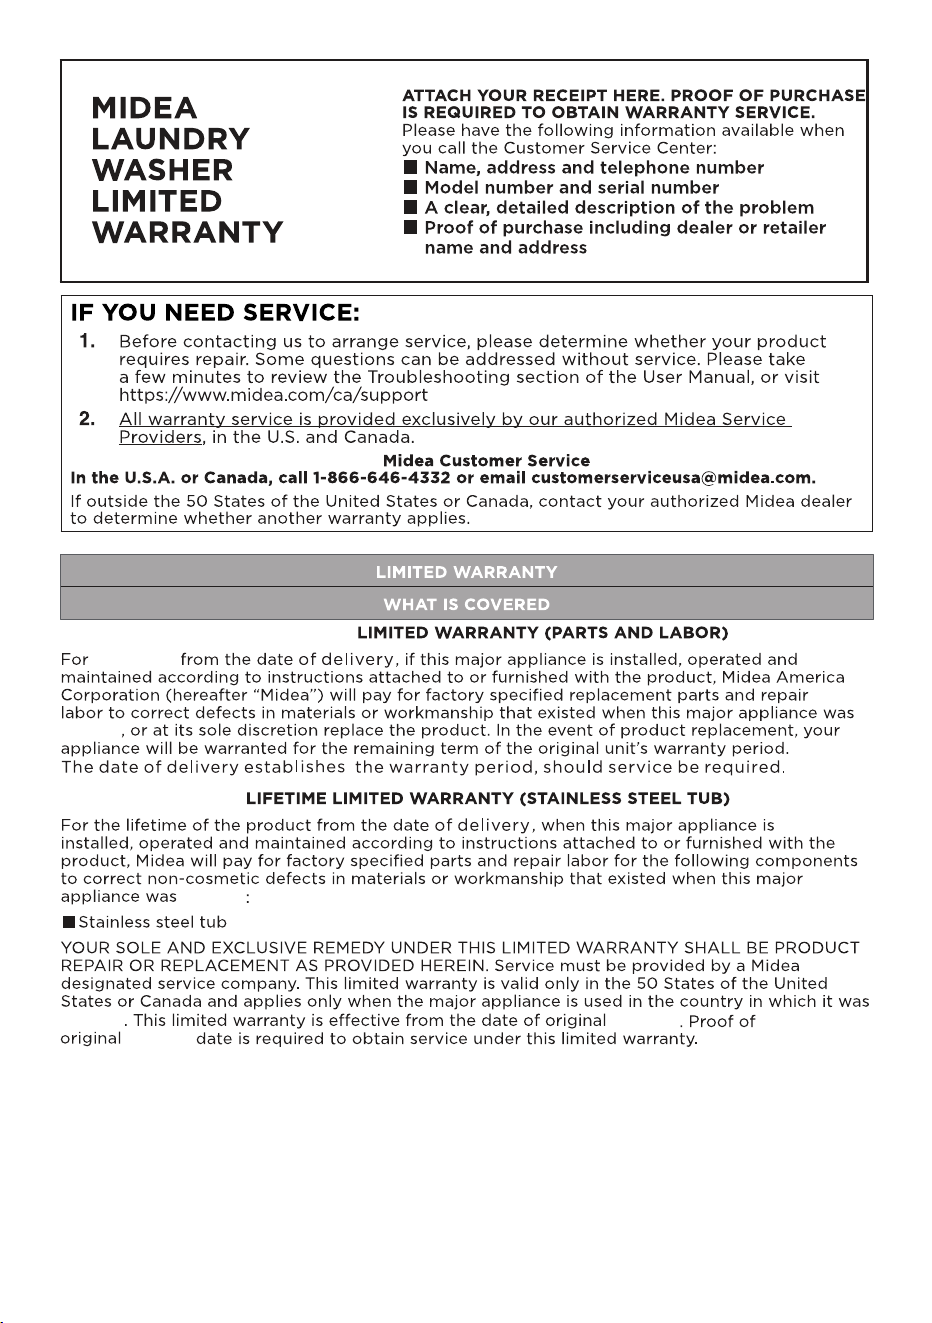
delivery
delivery
delivery
delivery
delivery
two years
TWO YEARS
47
48
CAUTION:
SELF-DECLARATION OF CONFORMITY
47 CFR Pt. 15.21 Compliance Information
47 CFR Pt. 2.1077 Compliance Information
Unique Identifier
Product name: Washer
Product mode: MLTW61A5CWW/MLTW61A5CCG/MLTW62M5CWW/MLTW62M5CCG
FCC ID: 2ADQOMWB-SWB01
Responsible Party-U.S.Contact Information
Midea America (Canada) Corp.
Markham, ON L3R 5B4
1-888-365-2230
https://www.midea.com/ca/support
FCC Compliance Statement
This device complies with part 15 of the FCC Rules. Operation is subject to the following two
This device may not cause harmful interference.
This device must accept any interference received, including interference that may cause
conditions:
undesired operation.
47 CFR. Pt 2.1093 Radiofrequency radiation exposure evaluation: portable devices
This equipment complies with FCC radiation exposure limits set forth for an uncontrolled
environment. This equipment should be installed and operated with a minimum distance
of 20cm between the radiator and your body.
This transmitter must not be co-located or operating in conjunction with any other antenna
or transmitter.
NOTE:
49
Thailand
50
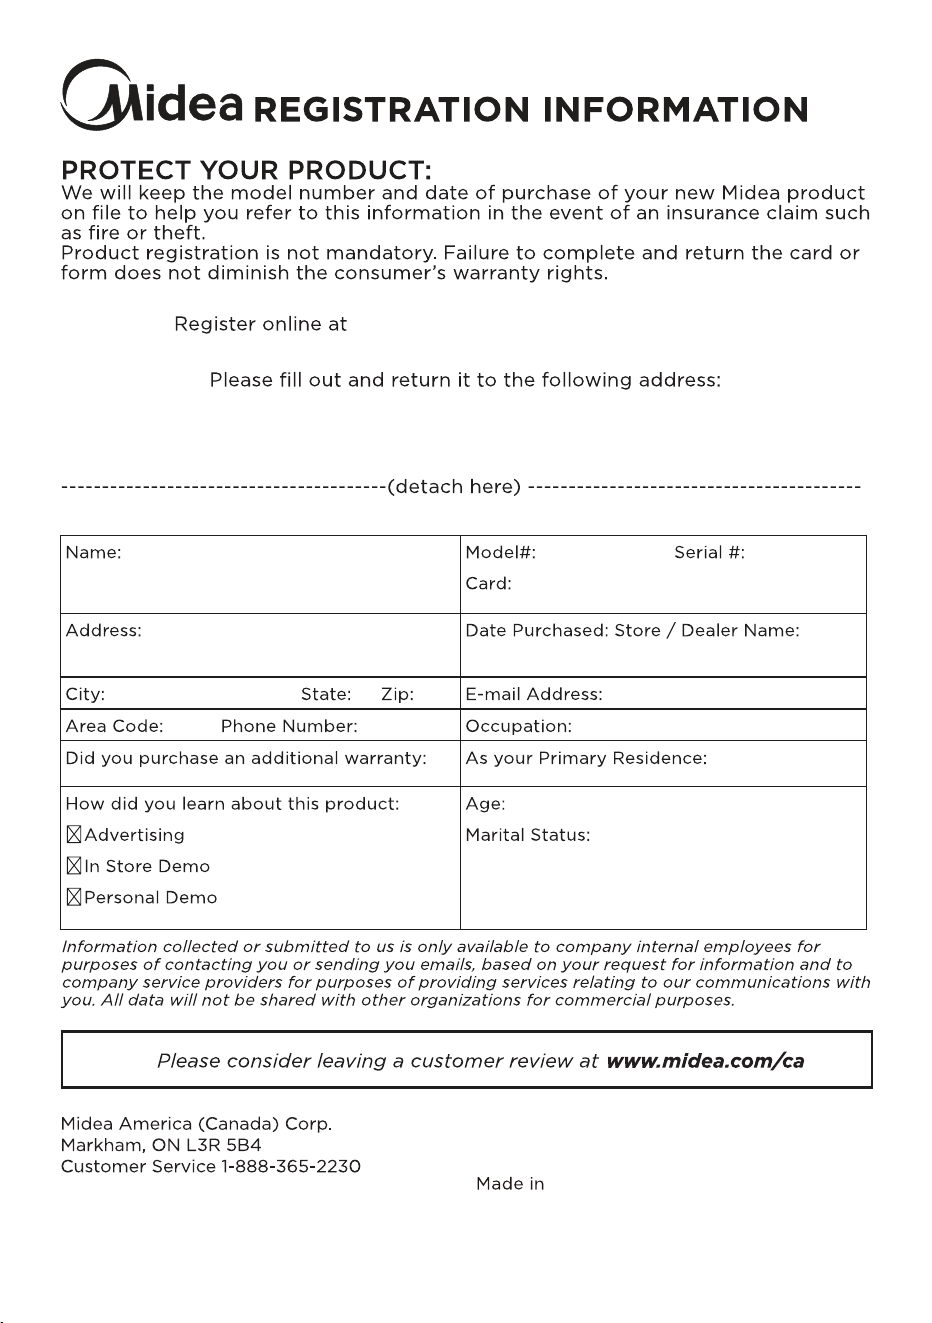
https://www.midea.com/ca/support/
product-registration
Midea America (Canada) Corp. Markham, ON L3R 5B4