5500E_UL
02
01/2025
USER
IT - Istruzioni per l'uso e la manutenzione
EN - Use and maintenance manual
FR - Notice d'emploi et d'entretien
IT
LEGGERE ATTENTAMENTE LE ISTRUZIONI PRIMA DI INSTALLARE LA MACCHINA
READ THE INSTRUCTIONS CAREFULLY BEFORE INSTALLING THE MACHINE
LIRE ATTENTIVEMENT LES INSTRUCTIONS AVANT D'INSTALLER LA MACHINE
LESEN SIE VOR DER INSTALLATION DES GERÄTES AUFMERKSAM DIE VORLIEGENDEN
GEBRAUCHSANLEITUNGEN
LEER ATENTAMENTE LAS INSTRUCCIONES ANTES DE INSTALAR LA MÁQUINA
ВНИМАТЕЛЬНО ПРОЧИТАЙТЕ ЭТИ ИНСТРУКЦИИ, ПРЕЖДЕ ЧЕМ ПРИСТУПАТЬ К УСТАНОВКЕ МАШИНЫ
LER ATENTAMENTE AS INSTRUÇÕES ANTES DE INSTALAR A MÁQUINA
cod. 5500E_UL
USER
ed. 02 - 01/2025

Vi ringraziamo per aver acquistato un nostro apparecchio.
Le istruzioni per l’installazione e la manutenzione nonché il suo impiego, che troverete sulle pagine
che seguono, sono state preparate per assicurare una lunga vita e un perfetto funzionamento del
vostro apparecchio.
Seguite attentamente queste istruzioni.
Noi abbiamo ideato e costruito questo apparecchio secondo le ultime innovazioni tecnologiche. Voi
ora dovrete averne cura.
La vostra soddisfazione sarà la nostra migliore ricompensa.
Thank you for choosing our machine.
The instructions for installation, maintenance and use found on the following pages have been prepared to ensure a long life
and a perfect operation of your unit.
Please, do follow the instructions carefully.
We have designed and built this machine using the latest innovative technologies. Now you shall take good care of it.
Your full satisfaction is our greatest reward.
Nous vous remercions d’avoir choisi notre machine.
Les instructions pour l’installation, l’entretien et l’utilisation qui figure dans les pages suivantes ont été préparées pour assurer
une longue durée de vie et un fonctionnement parfait de votre appareil.
S’il vous plaît, veuillez suivre attentivement les instructions.
Nous avons conçu cette machine, en utilisant les dernières technologies innovantes. Vous devrez maintenant en prendre soin.
Votre satisfaction est notre plus grande récompense.
Wir danken Ihnen für den Kauf dieses Gerätes.
Die Anleitungen zu Installation, Wartung und Betrieb des Gerätes, die Sie auf den folgenden Seiten finden, wurden erstellt, um
Ihrem Gerät eine lange Lebensdauer und einen ordnungsgemäßen Betrieb zu gewähren.
Befolgen Sie diese Anweisungen aufmerksam.
Dieses Gerät wurde nach dem letzten Stand der Technik entwickelt und konstruiert. Diese Anleitung soll Ihnen dabei helfen,
es gebührend zu pflegen.
Ihre Zufriedenheit ist für uns die beste Entlohnung.
Gracias por haber adquirido uno de nuestros productos.
Las instrucciones para la instalación y mantenimiento, así como su uso, que se encuentran en las páginas que siguen, se han
preparado para asegurar una larga vida y un funcionamiento fiable de su unidad.
Sígalas atentamente.
La máquina ha sido proyectada y fabricada con las últimas innovaciones tecnológicas. Por favor, utilícela con cuidado.
Su satisfacción es nuestra mejor recompensa.
Благодарим Вас за выбор нашей продукции.
Инструкции по установке, использованию и обслуживанию, представленные в настоящем руководстве, были
подготовлены для того, чтобы обеспечить долгую и исправную службу Вашего оборудования.
Пожалуйста, точно следуйте приведённым в руководстве указаниям и рекомендациям.
Мы разработали и изготовили это оборудование в соответствии
с самыми последними техническими достижениями.
Теперь его судьба зависит от Вас.
Лучшая награда для нас - Ваше удовольствие от работы с нашим оборудованием.
Obrigado por adquirir um dos nossos aparelhos.
As instruções de instalação, manutenção e utilização que encontrará nas páginas seguintes foram preparadas para garantir
uma longa duração e um perfeito funcionamento do seu aparelho.
Siga estas instruções escrupulosamente.
Idealizámos e construímos este aparelho segundo as últimas inovações tecnológicas. Agora, cabe-lhe a si cuidar dele.
A sua satisfação será a nossa melhor recompensa.

TRANSLATION OF THE ORIGINAL INSTRUCTIONS
Contents Page
WARNINGS 5
1. MACHINE INSTALLATION 7
1.1 Data plate 7
1.2 Handling the product 8
1.3 Reception of the appliance 8
1.4 Storage 8
1.5 Machine equipment 8
1.6 Prepare for installation 8
1.7 Room features 8
1.8 Steam evacuation 8
1.9 Electrical connection - Characteristics 9
1.10 Water supply connection - Characteristics 9
1.11 Water supply characteristics 10
1.12 Positioning the machine 11
1.13 Electrical connection 11
1.14 Hydraulic connection 12
1.15 Starting 12
2. MACHINE DESCRIPTION 13
2.1 Machine description 13
3. CONTROL PANEL AND RELATIVE SYMBOLS 16
4. OPERATION 17
4.1 Machine start-up 17
4.1.1 Start-up 17
4.1.2 Start the wash cycle 17
4.1.3 Switching OFF 18
4.2 Objects loading 18
4.3 Use of detergent 19
4.4 Use of rinse aid 19
4.5 Tank draining 20
4.6 Emptying boiler and break tank (anti-freeze function) 20
4.7 Washing pumps 20
5. PROGRAMMING - SETTING THE PARAMETERS - INFO MENU 22
6. MAINTENANCE 23
6.1 Regular Maintenance 23
6.2 Extraordinary maintenance 24
7. ENVIRONMENTAL ASPECTS 24
7.1 Packing 24
7.2 Disposal 24
8. COMPLIANCE WITH HYGIENE REGULATIONS AND H.A.C.C.P. AND N.S.F. 25
9. ECOLOGICAL ASPECTS 25
9.1 Recommendations for optimum use of energy, water and additives 25
10. SIGNALS AND ALARMS 26
10.1 Signals 26
10.2 Alarms 27
11. TROUBLESHOOTING 28
pag. 3
EN

WARNINGS
This instruction booklet must be kept with the dishwasher for future
consultation. If the dishwasher is sold or transferred to another user,
make sure the booklet always goes with the appliance so that the new
owner can have the necessary information on operation and the relative
instructions.
The dishwasher shall be installed in accordance with local codes, or in the absence
of local codes, installed in accordance with the applicable requirements in the
National Electrical Code, NFPA 70, Canadian Electrical Code (CEC), Part 1, CSA
C22.1, and Standard for Ventilation Control and Fire Protection of Commercial
Cooking Operations, NFPA 96. These warnings are provided to safeguard the user
in conformity with technical standards UL 921 and NSF3.
The instruction booklet must be carefully read before installation and first use of the
dishwasher.
• The user must comply with the following rules:
• Adaptation of the electrical and water systems for dishwasher installation must only be
carried out by qualified operarators.
• This dishwasher must only be used by adults. This is a professional machine to be used
by qualified personnel, and installed and repaired exclusively by a qualified technical
assistance service. The Manufacturer declines any responsibility for improper use,
maintenance or repair.
• This appliance can be used by trained youth aged from 15 years and above. It cannot be
used by persons with reduced physical, sensory or mental capabilities or lack of
experience and knowledge.
• Cleaning and user maintenance shall not be made by children without supervision.
• Children shall not play with the appliance.
• The user must not carry out any repair and/or maintenance operations. In any case
contact qualified personnel.
• Servicing of this dishwasher must be performed by authorized personnel.
Note: Use original replacement parts only. Otherwise the product warranty is
invalidated and the manufacturer is no longer responsible.
pag. 4
EN

• This machine is designed exclusively for washing trays, baking-pans, food containers
and pans in general with human food type of residue. DO NOT wash articles polluted with
petrol, paint, bits of steel or iron, fragile objects or material not resistant to the washing
process. Do not use acidic corrosive chemical products or alkaline and solvents or
chlorine based detergents.
•
This machine must be disconnected from the main electrical supply after use at
the end of the day and for any service/maintenance operation following this
procedure: Switch the machine off from the control panel. Press the Drain Key on
the control panel to drain the wash tank. Disconnect the electrical supply by the
omni-polar switch (main switch located on the wall). Shut the water supply valve(s).
Disregarding the aforesaid prescriptions is a serious misuse and can cause
damages and injures to property and people, and will relieve the manufacturer
from whatever liability.
• Do not use old load pipe, but only new ones.
• Only follow the instructions given in the manufacturer’s booklet for cleaning operations
(see chap. 6. MAINTENANCE).
• The machine has an IP (see data plate on the appliance) protection rating against
accidental water splashes and is not protected against pressurized water jets. Do not use
any jets of water, high pressure or steam cleaning equipment, to clean the machine.
• Do not use water to extinguish fires on electrical parts.
• Do not cover the intake or dissipation grids.
• Water infeed to the machine 90 Psi (600 kPa) maximum.
• It is mandatory to install on the machine feeding line, exclusively dedicated for this
unit:
A fuse protection system with the characteristics shown on the data-plate (or an
equivalent system).
A suitable omni-polar switch, sized according to the absorption shown on the
data plate, in order to disconnect the power network completely. Only such a
switch grants a full warranty of a complete separation from the electric network and it
has to be used, always and strictly, before any intervention on the electrical panel, and
by qualified personnel only.
• An omni-polar circuit-breaker switch is provided, in order to guarantee a complete
disconnection of the branch circuit from the main circuit. This circuit-breaker
switch must be used, always and strictly, to de-energize the machine at the end of
the work session.
• Make sure the appliance is linked to an efficient ground connection.
• Do not open the machine door when operating. After switching the machine off, wait for
at least 15 seconds after the motors stop.
• Only qualified personnel can access the control panel, when the main power switch is
OFF.
pag. 5
EN
• Before using the machine, the personnel shall know the position of the emergency button,
the position of the omni-polar switch that disconnected the machine from the electrical
network, the position of the water connection shut-off valve and the procedures to switch
off and secure the machine.
WARNING:
This machine must be operated with an automatic detergent dosing pump inclu-
ding a visual means to verify that detergents are delivered, or a visual or audible
alarm to signal if detergents are not available for delivery to the washing system.
Please see instructions for electrical and plumbing connections located in this
manual and in the feeder equipment manual.
Note: The manufacturer declines any responsibility for accidents to people or
any damage deriving from failure to observe the above listed instructions.
ATTENTION: DO NOT INSERT HANDS AND/OR TOUCH THE PARTS
LOCATED AT THE BOTTOM OF THE WASH TANK AND/OR AT THE END
OF THE WASH CYCLE.
WARNING: FAILURE TO COMPLY, EVEN PARTIALLY, WITH THE
PRESCRIPTIONS IN THIS MANUAL WILL RENDER THE PRODUCT
WARRANTY NULL, AND THE MANUFACTURER SHALL NOT BE LIABLE.
pag. 6
EN
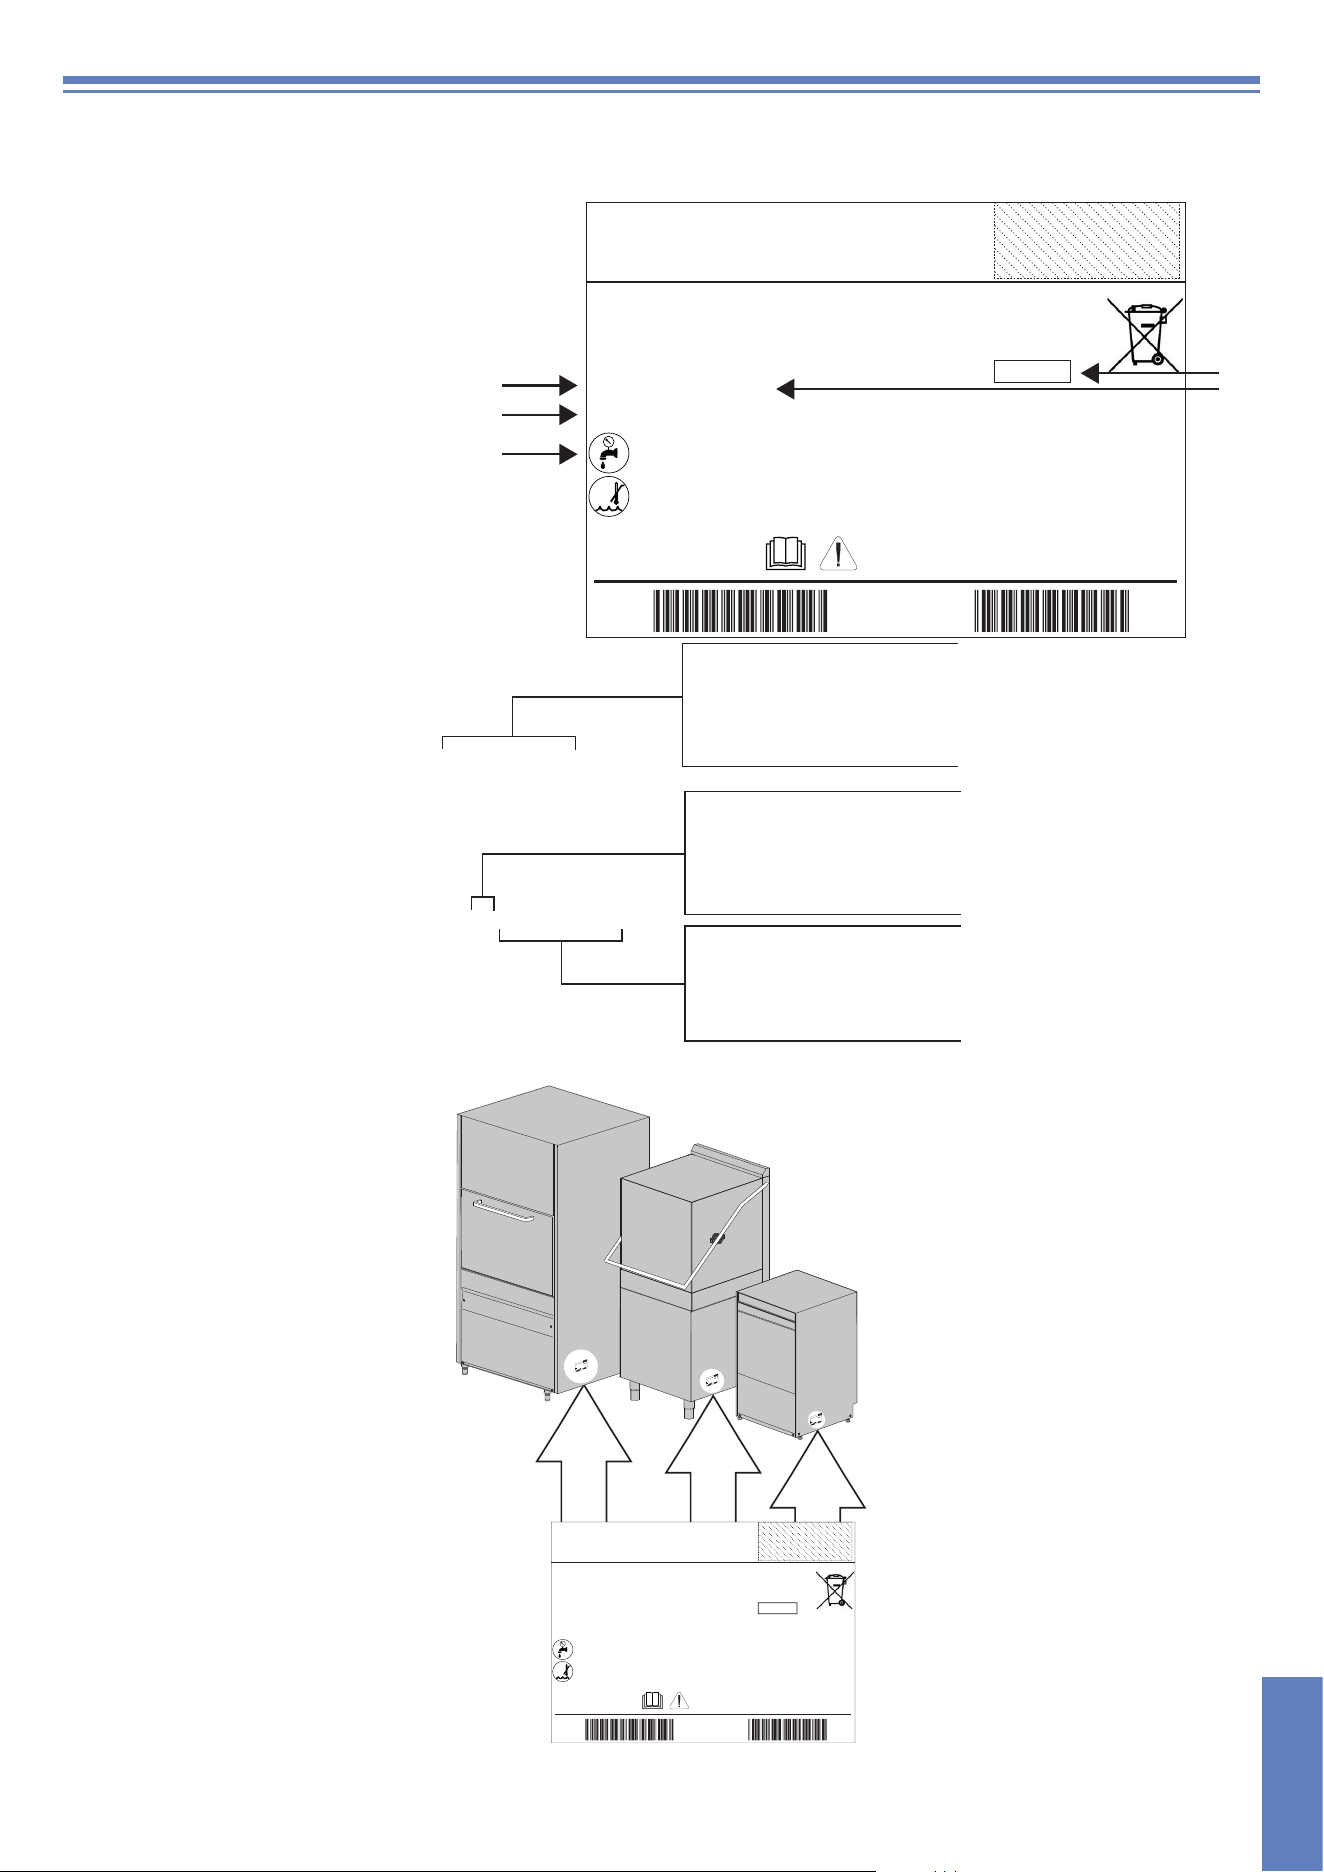
1. MACHINE INSTALLATION
1.1 Data plate
A Power source
B Total power installed
C Dynamic Pressure
D IP code
E Total electricity absorption
RoHS
Maximum rating of supply circuit overcurrent
protective device XXXA xxxxxxxx
Valeur nominale maximale du dispositif de
protection contre le surintensités XXXA xxxxxxxx
Model S/N
/QFGN%QFG
50 6[RG
::°(
::Ä::25+
IPXX
/#&'+0+6#.; ;;;;
/QFGN(COKN[ &9::::
:::9
8RJ*\ ::#
/#:
/#:
*
1
A
D
E
B
C
S/N DW X xxxxxxx
ANNO
YEAR
ANNÉE
AÑO
JAHR
ȽɈȾȼɕɉɍɋɄȺ
180(52',6(5,(
6(5,$/180%(5
180e52',6e5,(
180(52',6(5,(
6(5,(11800(5
ɋȿɊɂɃɇɕɃɇɈɆȿɊ
1
2
3
4 [[[[[[[[
Model DW XXXX
)$0,*/,$352'2772
)$0,/<352'8&7
)$0,//('8352'8,7
)$0,/,$352'8&72
)$0,/,('(6352'8.7(6
ɋȿɊɂəɉɊɈȾɄɌȺ
RoHS
Maximum rating of supply circuit overcurrent
protective device XXXA xxxxxxxx
Valeur nominale maximale du dispositif de
protection contre le surintensités XXXA xxxxxxxx
Model S/N
/QFGN%QFG
50 6[RG
::°(
::Ä::25+
IPXX
/#&'+0+6#.; ;;;;
/QFGN(COKN[ &9::::
:::9
8RJ*\ ::#
/#:
/#:
*
1
RoHS
Ma
ximu
m r
a
tin
g o
f
s
u
p
p
ly
c
i
r
c
u
i
t
o
v
erc
u
rre
n
t
p
r
o
tec
t
i
v
e d
e
v
i
c
e
X
X
X
A
xx
xx
x
x
x
x
V
a
l
eu
r
n
o
m
in
al
e
m
a
x
imal
e
d
u d
is
po
s
it
i
f
d
e
p
r
o
tec
t
io
n
co
n
tr
e
le
s
u
ri
nt
e
n
s
i
t
és
X
X
X
A
x
x
x
x
x
xx
x
M
o
d
el
S
/
N
/
Q
F
G
N
%
Q
F
G
5
0
6
[
R
G
:
:
°
(
:
:
Ä
:
:
2
5
+
I
P
XX
/#
&
'
+
0
+
6
#
.;
;
;;
;
/
Q
F
G
N
(
C
O
K
N
[&
9:
:
:
:
:
:
:
9
8
R
J
*
\
:
:
#
/
#
:
/
#
:
*
1
R
oHS
M
a
ximu
m
ra
t
i
n
g
o
f
supp
l
y c
ir
c
u
i
t
o
ve
rc
u
r
r
e
n
t
p
r
o
t
ec
t
ive
d
e
vi
c
e
X
X
X
A
x
x
xx
x
xx
x
V
a
l
e
u
r
n
o
m
in
a
l
e
m
a
ximal
e
du
d
i
s
p
o
s
it
if d
e
p
r
o
t
ec
t
i
o
n c
o
n
t
r
e
l
e
s
u
rin
t
e
n
s
i
t
é
s
X
X
X
A
x
x
x
x
xxx
x
Mo
d
e
l
S
/
N
/
Q
F
G
N
%
Q
F
G
5
0
6
[
R
G
:
:
°
(
:
:
Ä
:
:
2
5
+
I
P
X
X
/
#
&'
+
0+
6
#.
;
;
;;
;
/
QF
G
N
(
C
O
K
N
[&
9
:
:
:
:
:
:
:
9
8
R
J
*
\
:
:
#
/
#
:
/
#:
*
1
RoHS
M
a
x
im
u
m
r
a
t
i
n
g
o
f
s
u
pp
l
y
c
i
r
c
u
i
t
o
v
e
rcu
r
re
n
t
p
r
o
t
ec
t
iv
e
d
e
v
i
c
e
XXX
A
x
x
xx
x
xx
x
V
al
e
ur
n
o
minal
e max
ima
le
d
u
d
is
p
o
s
itif
d
e
p
r
ot
e
c
t
io
n
c
o
n
t
re
le
s
u
r
in
t
en
s
i
t
és X
X
X
A
x
xx
x
xx
x
x
M
o
d
e
l
S
/
N
/
Q
F
G
N
%
Q
F
G
5
0
6
[
R
G
:
:
°
(
::
Ä
:
:
2
5
+
I
P
X
X
/#
&'
+
0+
6
#.
;
;
;;
;
/
Q
F
G
N
(
C
O
K
N
[
&9
:
:
:
:
:
:
:
9
8
R
J
*
\
:
:
#
/
#
:
/
#
:
*
1
pag. 7
EN
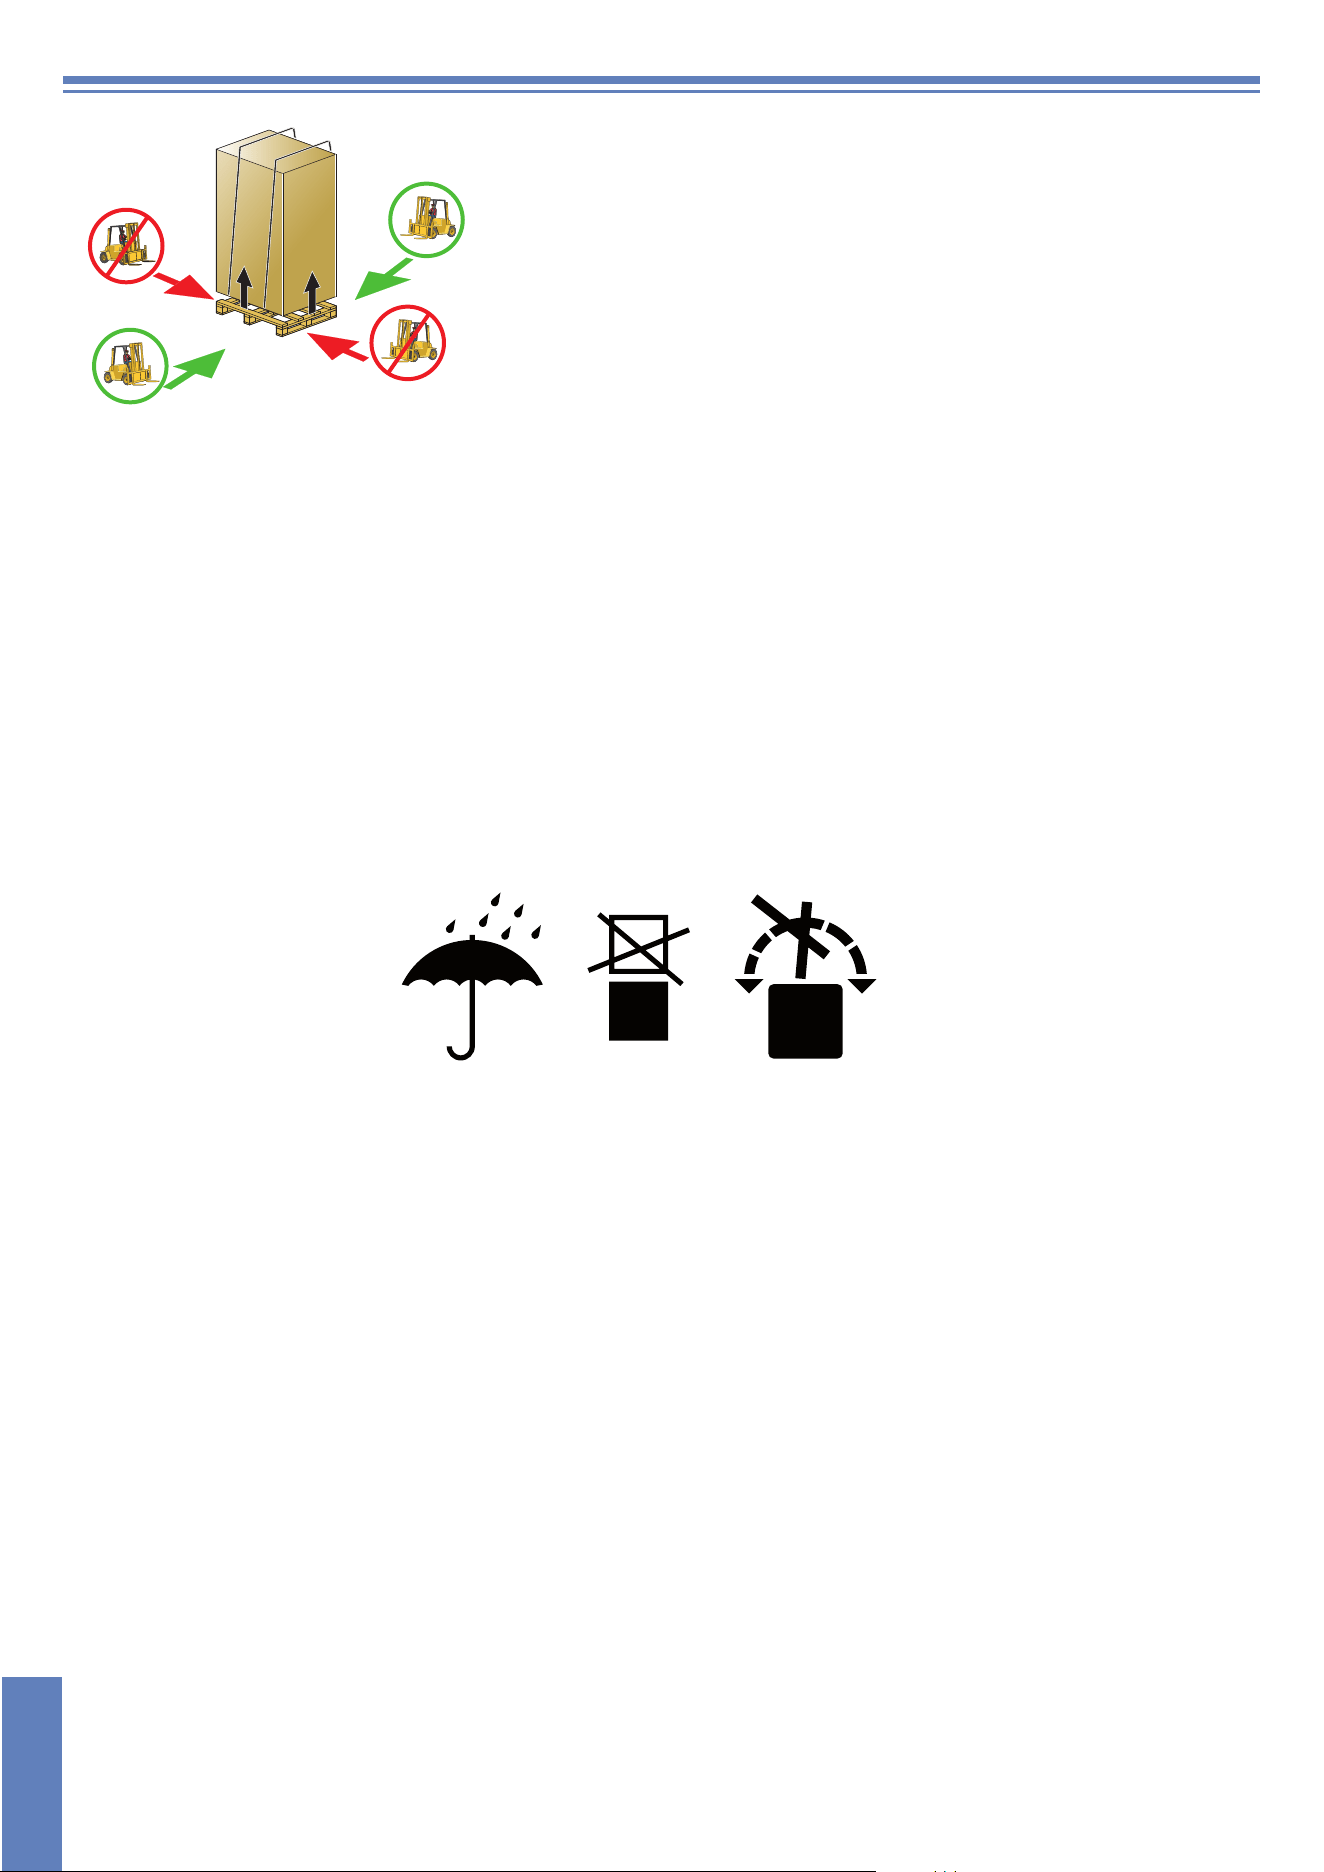
Pic. 1
1.2 Handling the product
The machine must be handled strictly as shown in Pic. 1 regarding the grip
points indicated for the lifting with a lift truck.
Latch the machine in a way that secures no vibrations or shocks during
transportation.
Note: Slinging with ropes not recommended.
1.3 Reception of the appliance
Before accepting the machine, verify that all the data on the data-plate corresponds to the required ones and to the ones of the
available electrical supply (see paragr. 1.1 Data plate).
After removing the packing, ensure that the appliance has not been damaged in transport. If so, do notify the seller immediately
about the problem. If the damage might question the machine safety, do not install it.
The installation and the starting of the machine must be carried out by trained operators only, even if the machine is coming
from another site and it has been used, already.
Double check the firm tightness of all hose-clamps on piping, nuts and bolts, and fasteners, that might come loose
with the transport, to prevent water dripping or leakages, or other damages, during the machine's operation.
For disposal of the packing see paragr. 7.2 Disposal.
1.4 Storage
Storage temperature: min. +40 °F (+4 °C) – max. +122 °F (+50 °C) – humidity <90%.
The stored parts should be checked periodically to detect any sign of deterioration.
Do not store the machine exposing it to atmospheric agents (rain, sun, cold, etc.). Do not place material on the packed machine.
Do not rotate the machine in the storing phase (see Pic. 2).
Pic. 2
1.5 Machine equipment
Use and maintenance manual.
Wiring diagrams.
Plastic coated maintenance diagram.
A copy of the wiring diagrams must be kept inside the electrical board.
1.6 Prepare for installation
This is just a guide-line for the machine installation.
The installation must be performed by a qualified engineer.
1.7 Room features
Install the machine, in a room closed to weather and with a guaranteed temperature-range between 41 °F (5 °C) and 95 °F (35
°C).
The machine is equipped with thermostatic sensors to manage the temperatures. To guarantee a proper functionality
these sensor shall not operate at a room temperature below 41 °F (5 °C).
For this reason, it is fundamental that before starting the machine reaches the room temperature.
1.8 Steam evacuation
In accordance with regulations of environmental hygiene, for the proper functioning of the machine and a healthy environment
for the operator who working in there, it should be at least 10 air volume changes per hour in the room where the machine is
installed.
For small wash rooms we recommend at least 15 air volume changes per hour.
pag. 8
EN
1.9 Electrical connection - Characteristics
Electrical connection must be carried out in compliance with the legislation in force and the relevant technical standards.
Make sure that the supply voltage is the same as reported on the machine plate and that the network can stand the needed
power absorption shown on the same plate.
It is mandatory to install on the machine feeding line, exclusively dedicated for this unit:
A fuse protection system with the characteristics shown on the data-plate (or an equivalent system).
A suitable omni-polar switch, sized according to the absorption shown on the data plate, in order to
disconnect the power network completely. Only such a switch grants a full warranty of a complete
separation from the electric network and it has to be used, always and strictly, before any intervention
on the electrical panel, and by qualified personnel only.
An omni-polar circuit-breaker switch is provided, in order to guarantee a complete disconnection of
the branch circuit from the main circuit. This circuit-breaker switch must be used, always and strictly,
to de-energize the machine at the end of the work session.
Make sure the appliance is linked to an efficient ground connection.
ATTENTION: Check very carefully if the “ground connection” of the machine is properly sized and fully
efficient, and that not too many units are connected to it. An undersized or poor “ground connection”
might lead to corrosion and/or pitting effect on the stainless steel plates, even to perforation.
1.10 Water supply connection - Characteristics
Water connections must be carried out in compliance with the legislation in force and the relevant technical standards.
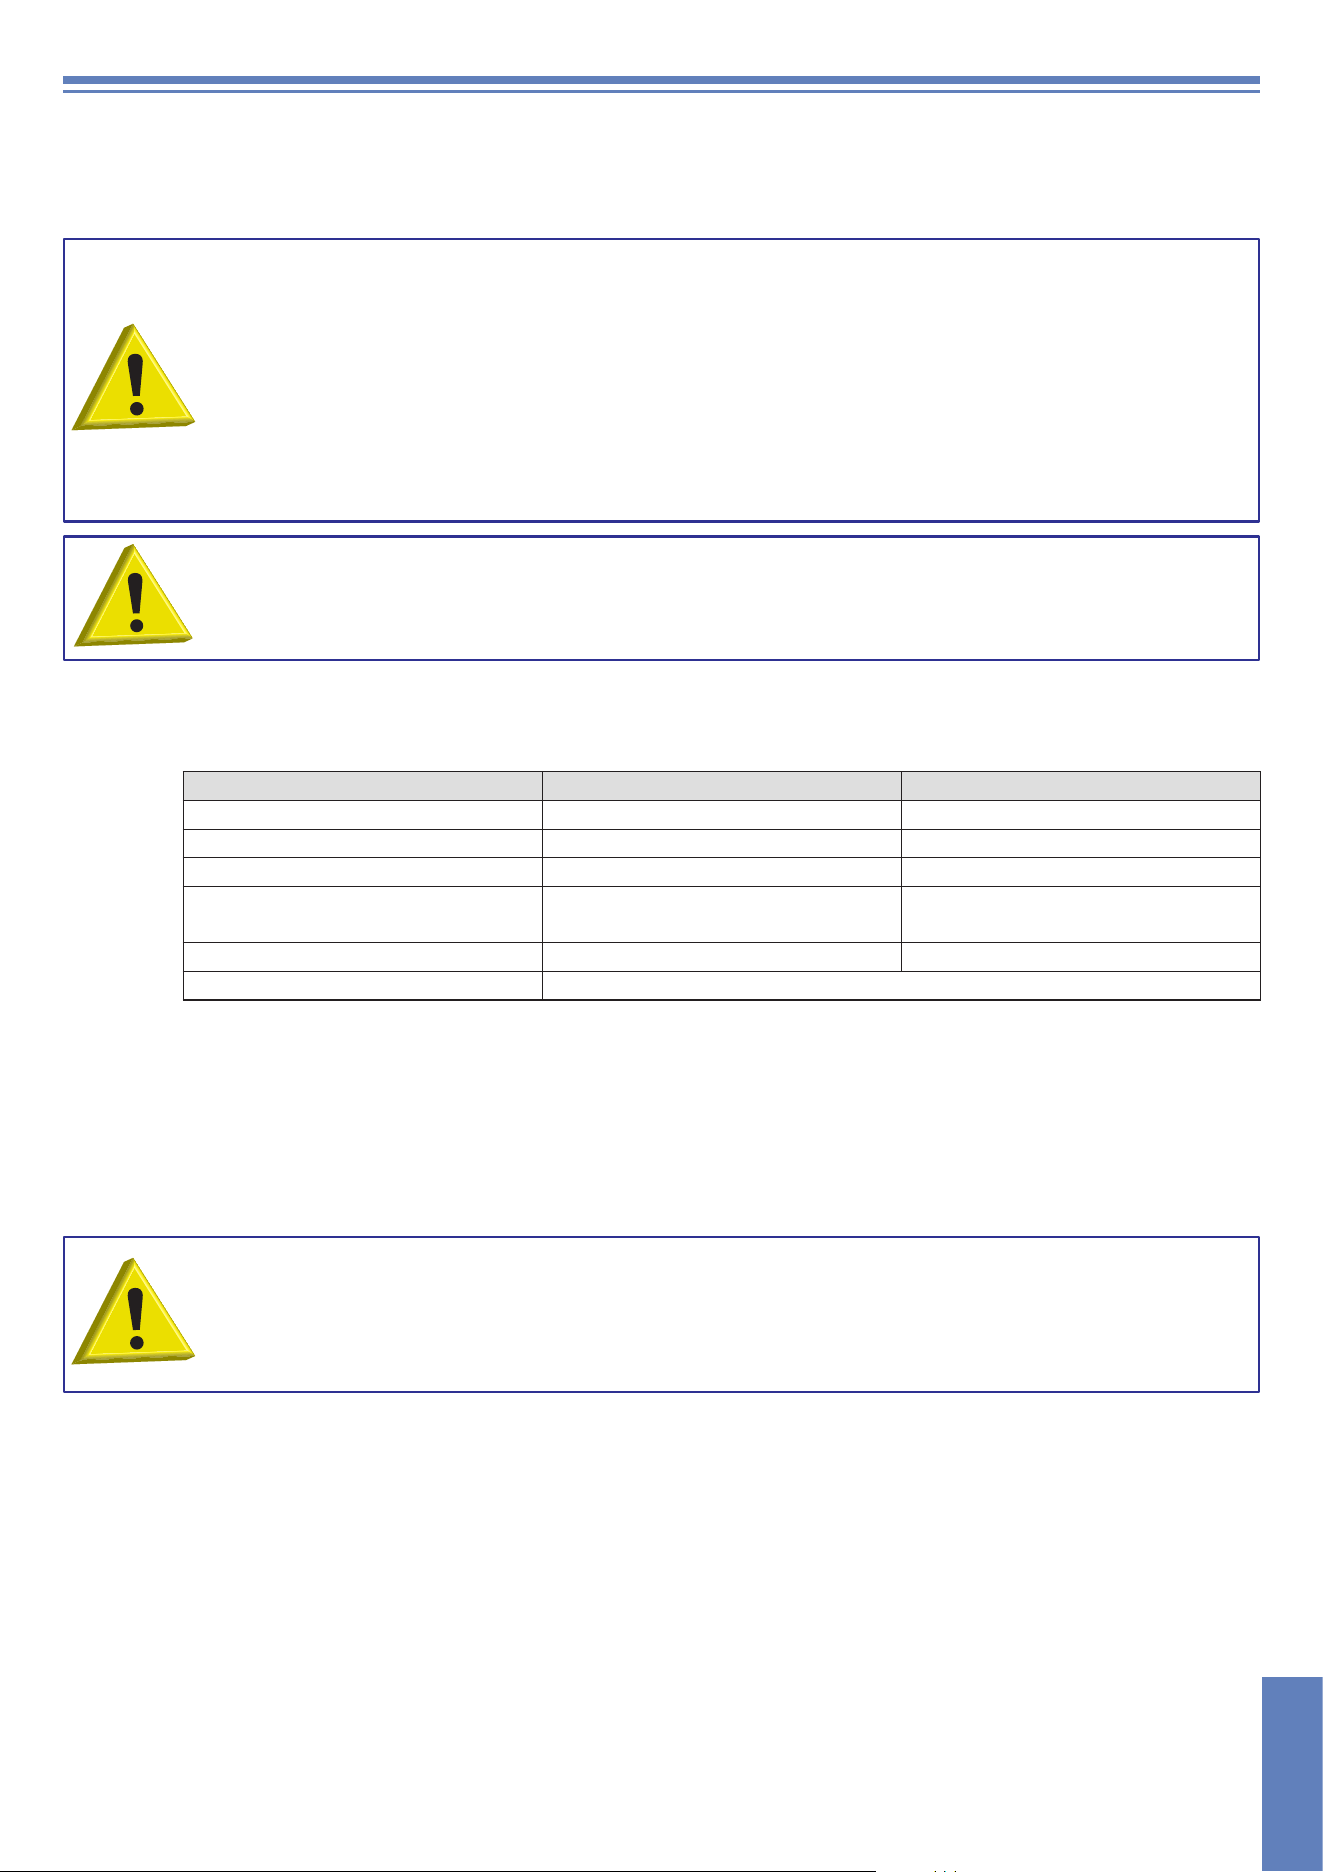
The water system must have characteristics between the parameters specified in table 1
table 1
Water characteristics table Min Max
Static Pressure* 25 PSI (~ 170 kPa) 90 PSI (~ 600 kPa)
Dynamic Pressure 21 PSI (~ 145 kPa) 60 PSI (~ 400 kPa)
Cold water-supply temperature 40 °F (~ 5 °C) 122 °F (~ 50 °C)
Cold water-supply temperature -
with Heat Recovery
50 °F (~ 10 °C) 60 °F (~ 15 °C)
Hot water-supply temperature 122 °F (~ 50 °C) 150 °F (~ 65 °C)
Capacity 4 gpm (~ 15 l/min)
Connect the machine's water supply with an interrupt valve capable of quickly and completely shutting off water
intake.
*If higher than 90 PSI (600 kPa), it is mandatory to install a pressure reducer.
To improve the machine performance keep the temperature intervals indicated.
Use only new flexible pipes for the water connections.
A periodical check of the supplied water hardness is highly recommended.
In order to ensure the optimum performance, the water supply temperature must come within the range given in table table 1.
WARNING: Heat Recovery system and Steam Condenser - installation (optional)
It is strictly forbidden to connect the machine’s vent directly with the outdoor!
Cold weather conditions might seriously damage the Thermal Recovery system or the Steam
Condenser (outside temperatures).
The emptying tube should always be connected to a siphon to prevent odor back-up from the screen.
pag. 9
EN
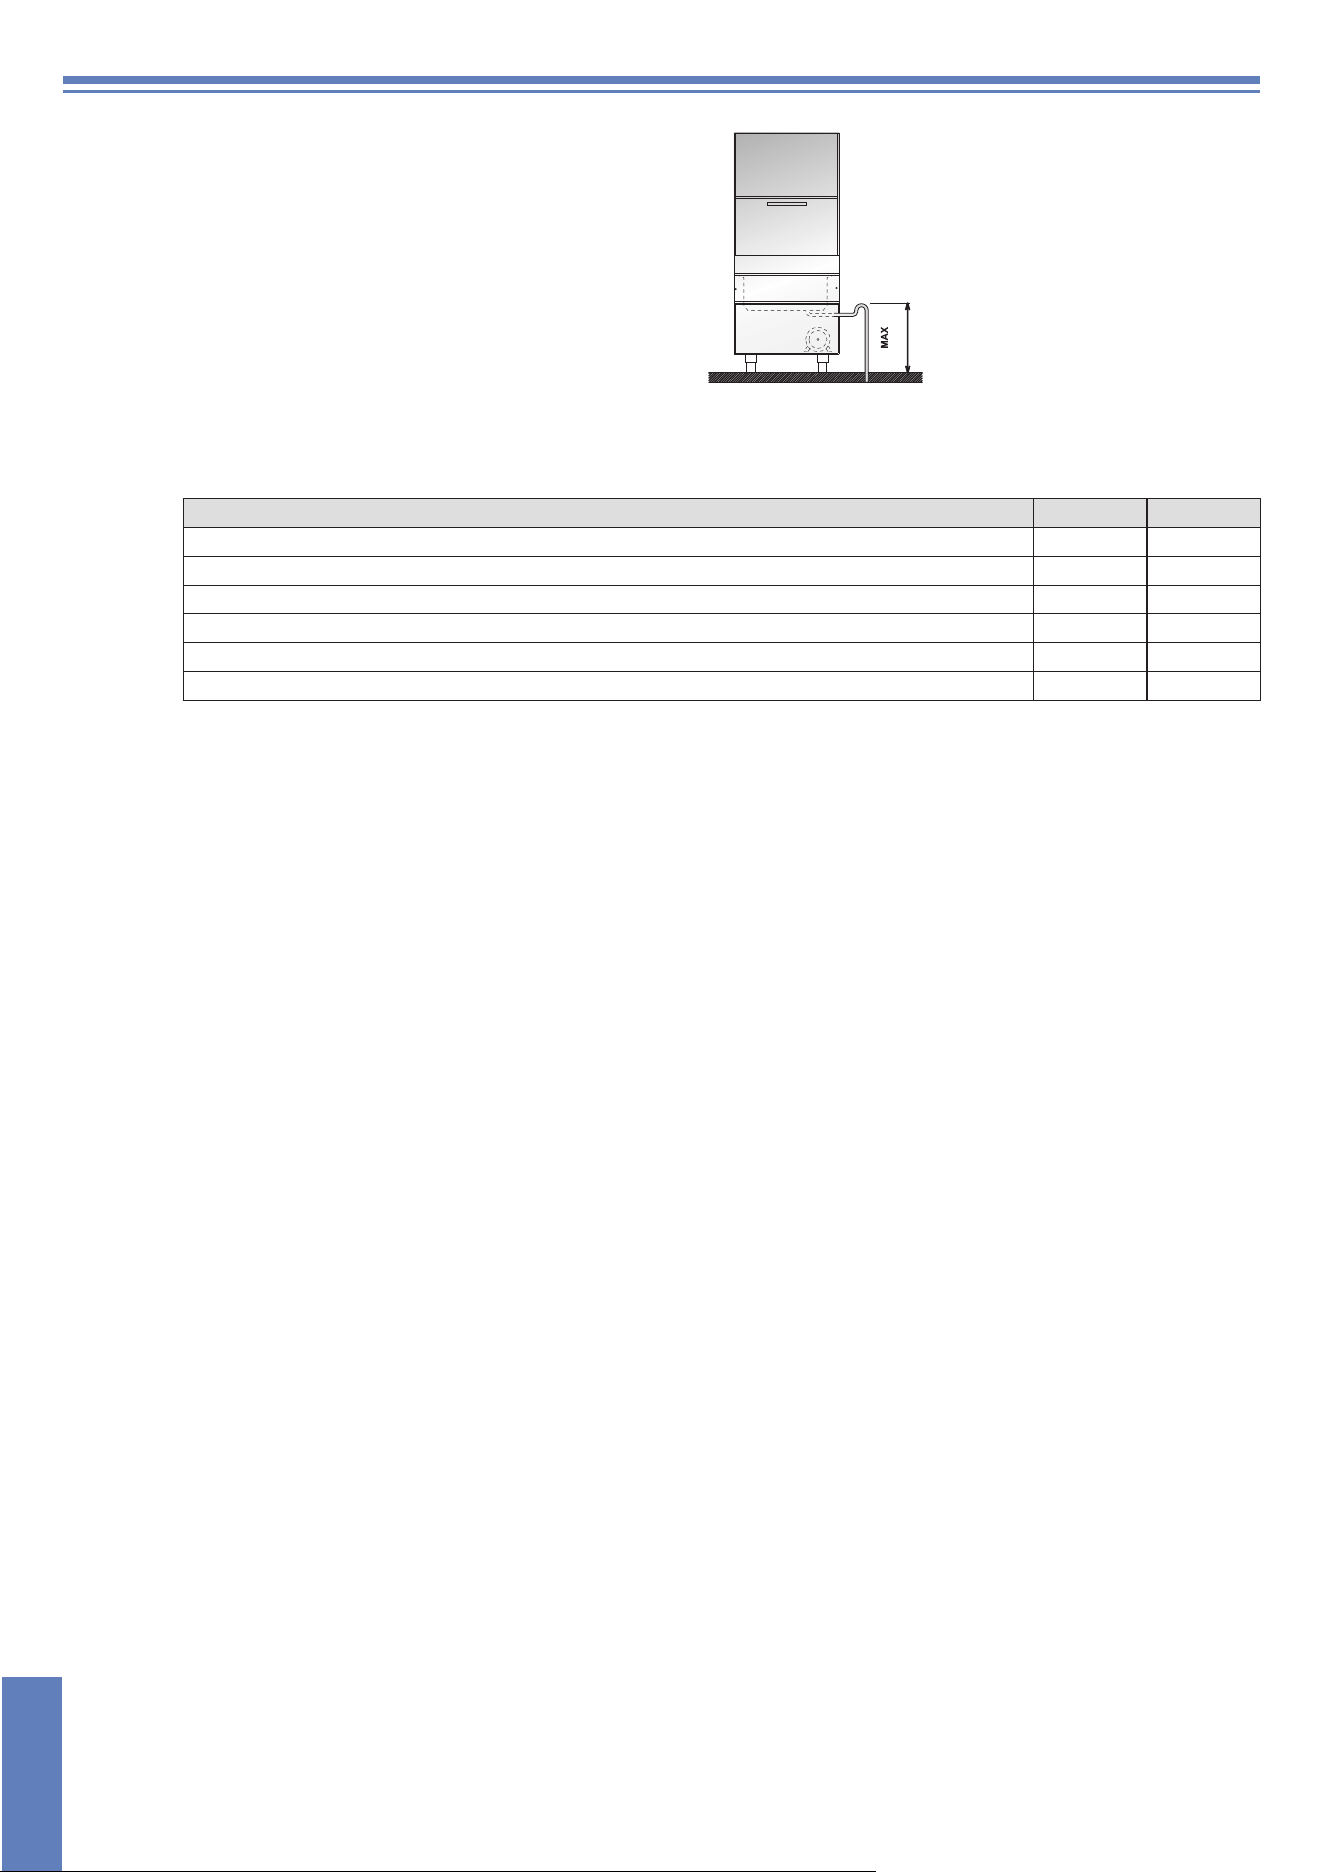
Maximum level of water discharge:
6 inches (15 cm - without drain pump)
39 inches (<1 mt - with drain pump)
max 19
11
/
16
inches
(500 mm)
Pic. 3
1.11 Water supply characteristics
The machine water supply must be potable, in compliance with the legislation in force.
The inlet water must also meet the parameters given in the table 2.
table 2
Water parameters table Min Max
Chlorine
1
2 mg/l
pH 6,5
1
8,5
3
Water hardness 8 °f
2-3
Iron
3
0,2 mg/l
Manganese
4
0,05 mg/l
Conductivity
5
200μS/cm
1
Out of range values might lead to corrosion and jeopardize the life of the machine.
2
Should the water hardness is higher it is compulsory to install a water softener and check periodically its operation.
Note: Any damage caused by limestone (calcareous water higher-up than 8 °f and without water-softener) will not be covered
by warranty.
3
Out of range values might lead scaling and sediments with a consequent lower performance, functionality, and expected life
of the machine.
4
Desired value: Out of range values might lead stainless steel blackening/tarnishing.
5
For machines equipped with Heat Recovery System.
It is recommended a water test once a year.
pag. 10
EN
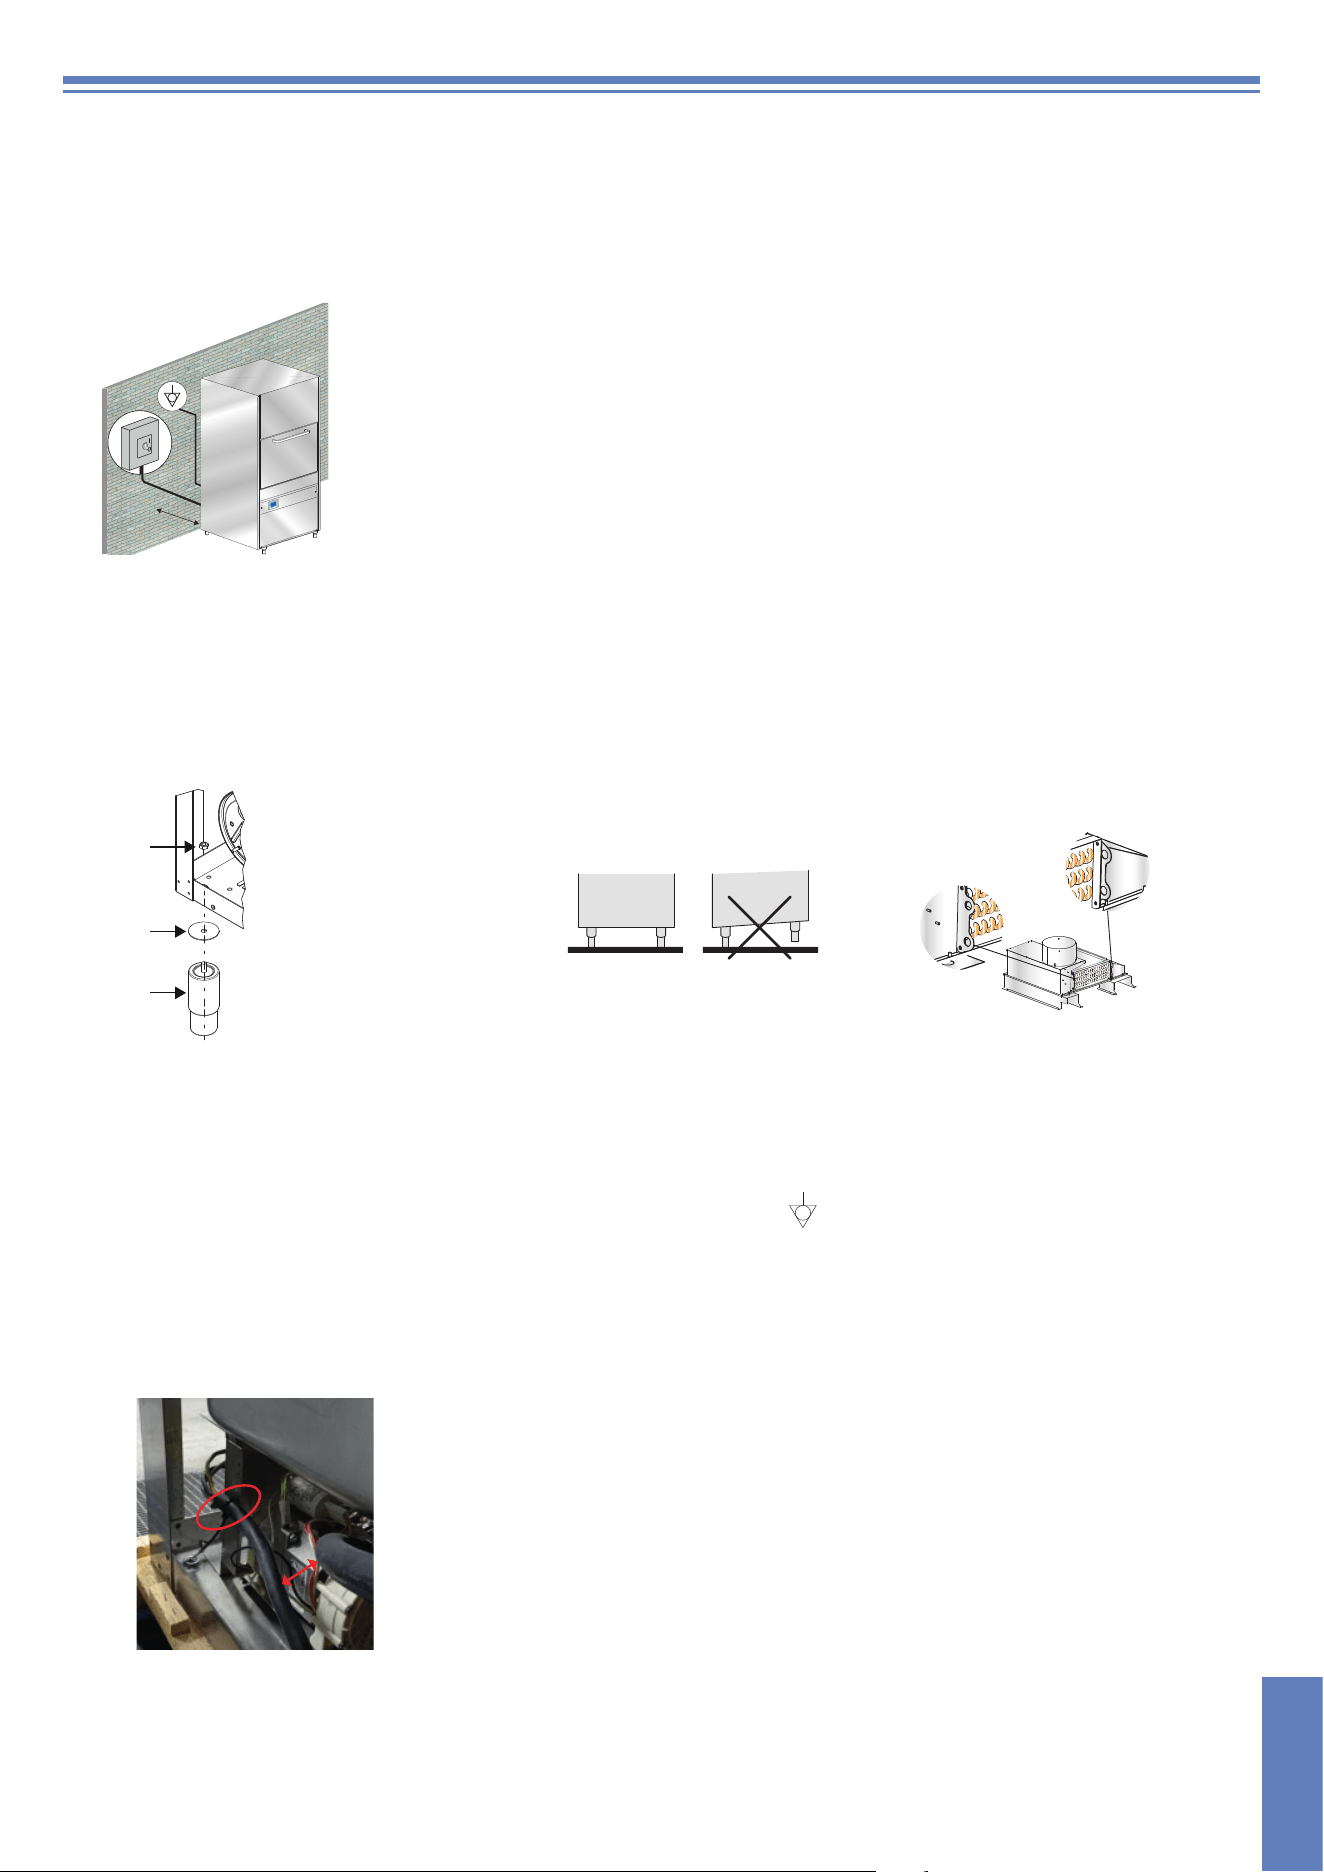
1.12 Positioning the machine
Remove the packing with care.
Lift the machine as described in chap. 1.2 Handling the product.
Position the machine as shown on the installation diagram (lay-out) approved at the time of the offer.
Maintain a minimum distance of about 50 mm from the walls, to assure motors ventilation (see Pic. 4). Install suction hoods to
assure proper ventilation of the room, in order to eliminate steam and excessive humidity.
50 mm
Pic. 4
For machines with 550 x 665 mm basket, the support legs are supplied loose in the package and they must be assembled in
the machine. Proceed with the assembly in following the sequence of
Pic. 5.
Check that the machine is properly levelled, by adjusting the legs (see Pic. 6).
Make sure the machine is not standing on the power cable or on the filling/drain hoses. Level the machine by adjusting the
support feet.
In case of relocation of the machine, DO NOT use the lifting hooks of the heat exchanger (if installed) to lift the whole machine
(see Pic. 7).
Those hooks are designed to bear the weight of the heat exchanger only, not the whole machine.
A
B
C
A Lock nut
B Spacer
C Feet
Pic. 5 Pic. 6 Pic. 7
1.13 Electrical connection
Electrical connection must be carried out in compliance with the legislation in force and the relevant technical standards.
Make sure that the voltage is the same as reported on the appliance data-plate.
Refer to the data reported on the data-plate and on the labels found on the dishwasher to check sizings and electrical
connections.
The machine is also provided with a terminal (marked with the symbol ) placed on the back end. It shall be used to
bond different appliances via the external bonding conductor, in order to avoid the risk of electric shock.
NOTE: Do not modify the protections or remove them. Only if the power supply is cut off from the main switch on the wall it is
possible to work on the dishwasher electric circuits. Lock the main switch on the wall to signal the work in progress on the
dishwasher’s electric circuits. DANGER!
Secure the power cable to the terminal block bracket with a cable tie, as shown in the photo (see photo 1). Check that the cable,
once secured, does not come into contact with the hot parts of the motor.
photo 1
pag. 11
EN

1.14 Hydraulic connection
Connect the water in-feed hose, given with the machine, to a ¾” water supply tap.
1.15 Starting
At installation engineer’s care.
pag. 12
EN
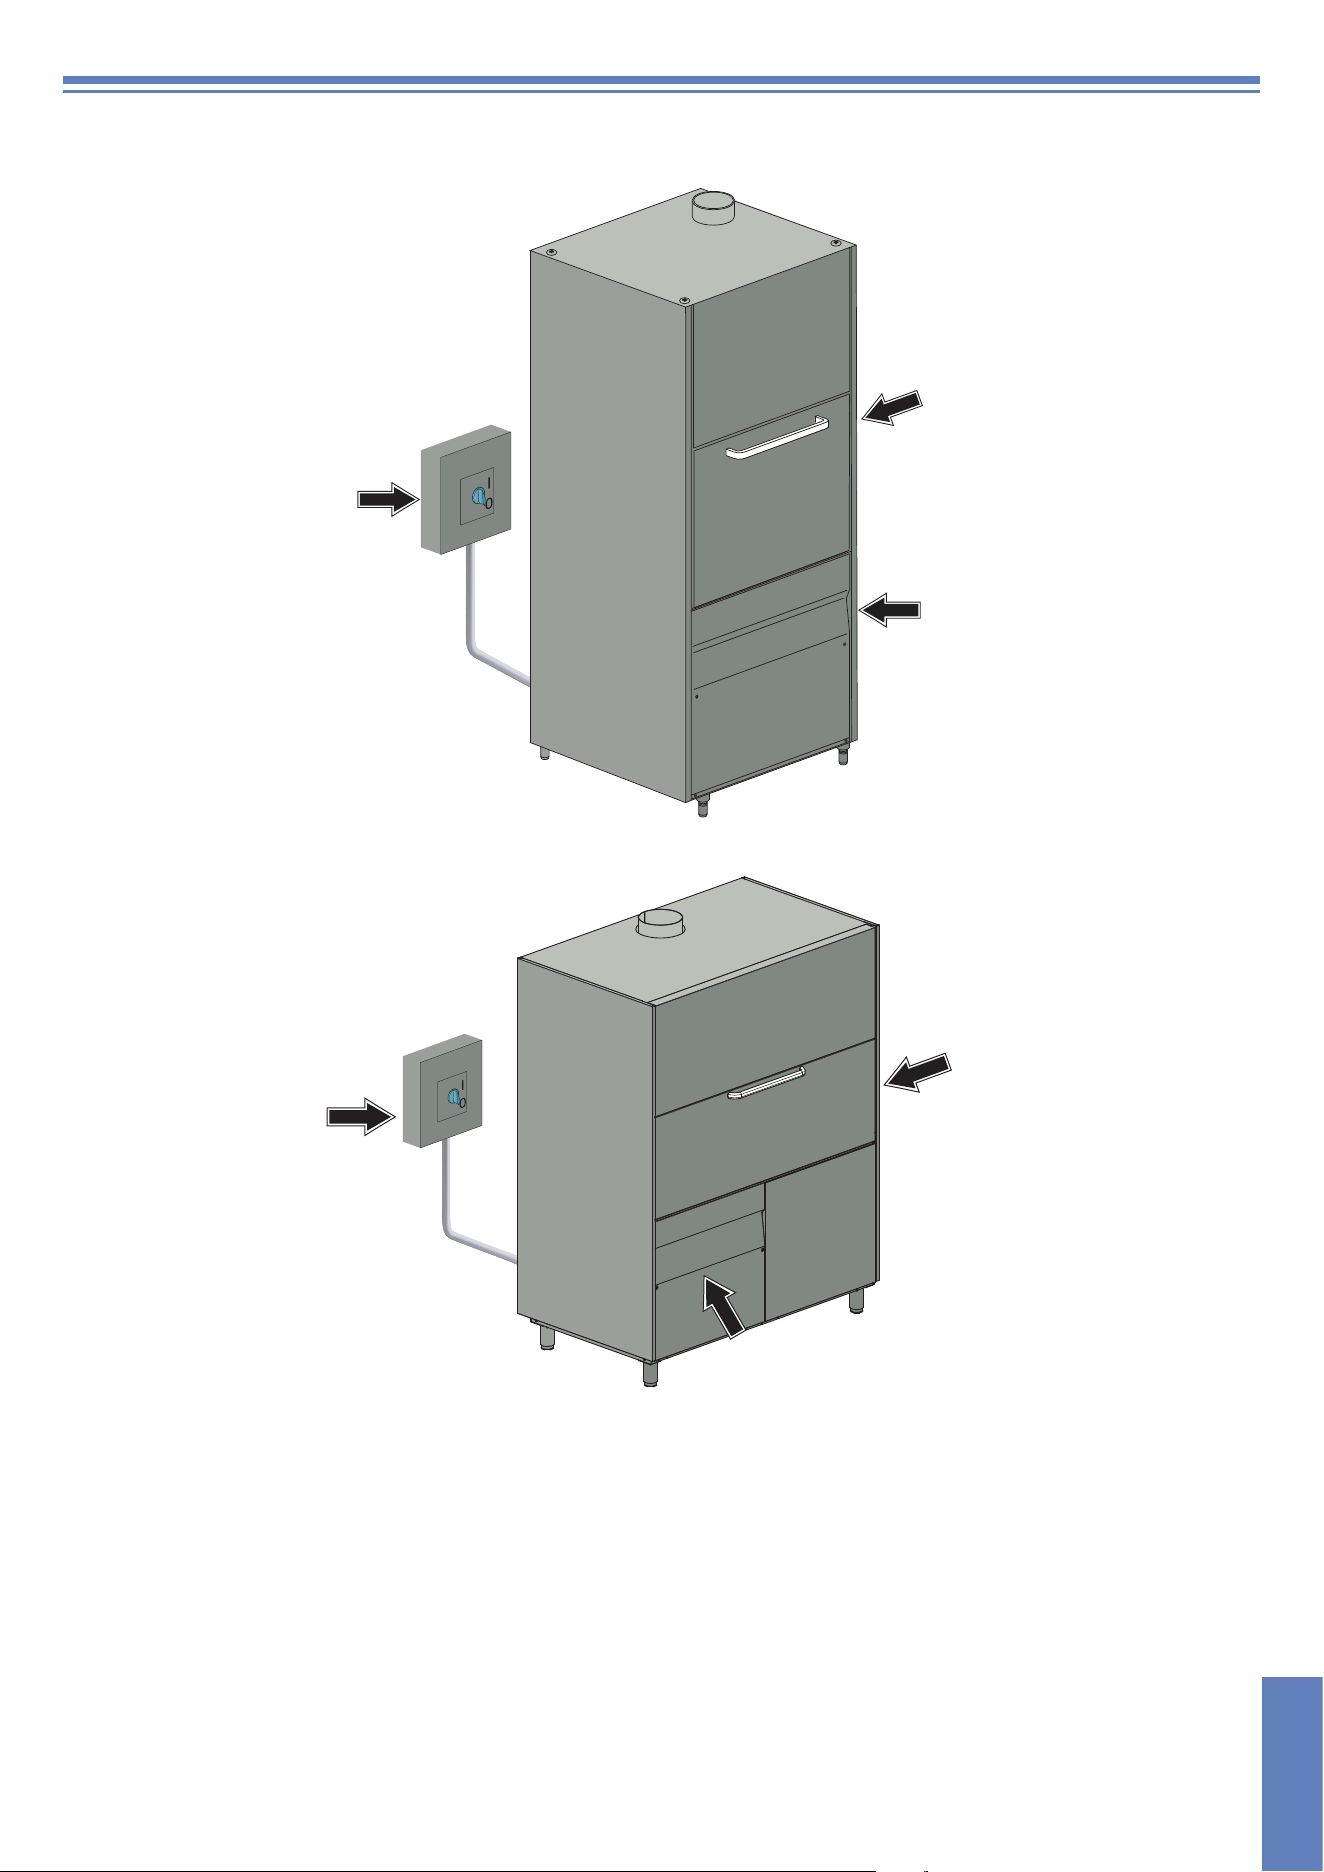
2. MACHINE DESCRIPTION
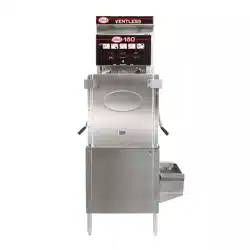
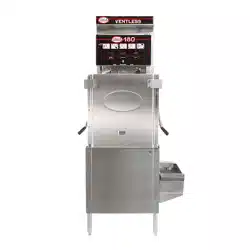
2.1 Machine description
Wall-hung main power
switch:
at installation
serviceman supply
and care, according to
local laws
Door
Control panel
Wall-hung main power
switch:
at installation
serviceman supply
and care, according to
local laws
Door
Control panel
pag. 13
EN
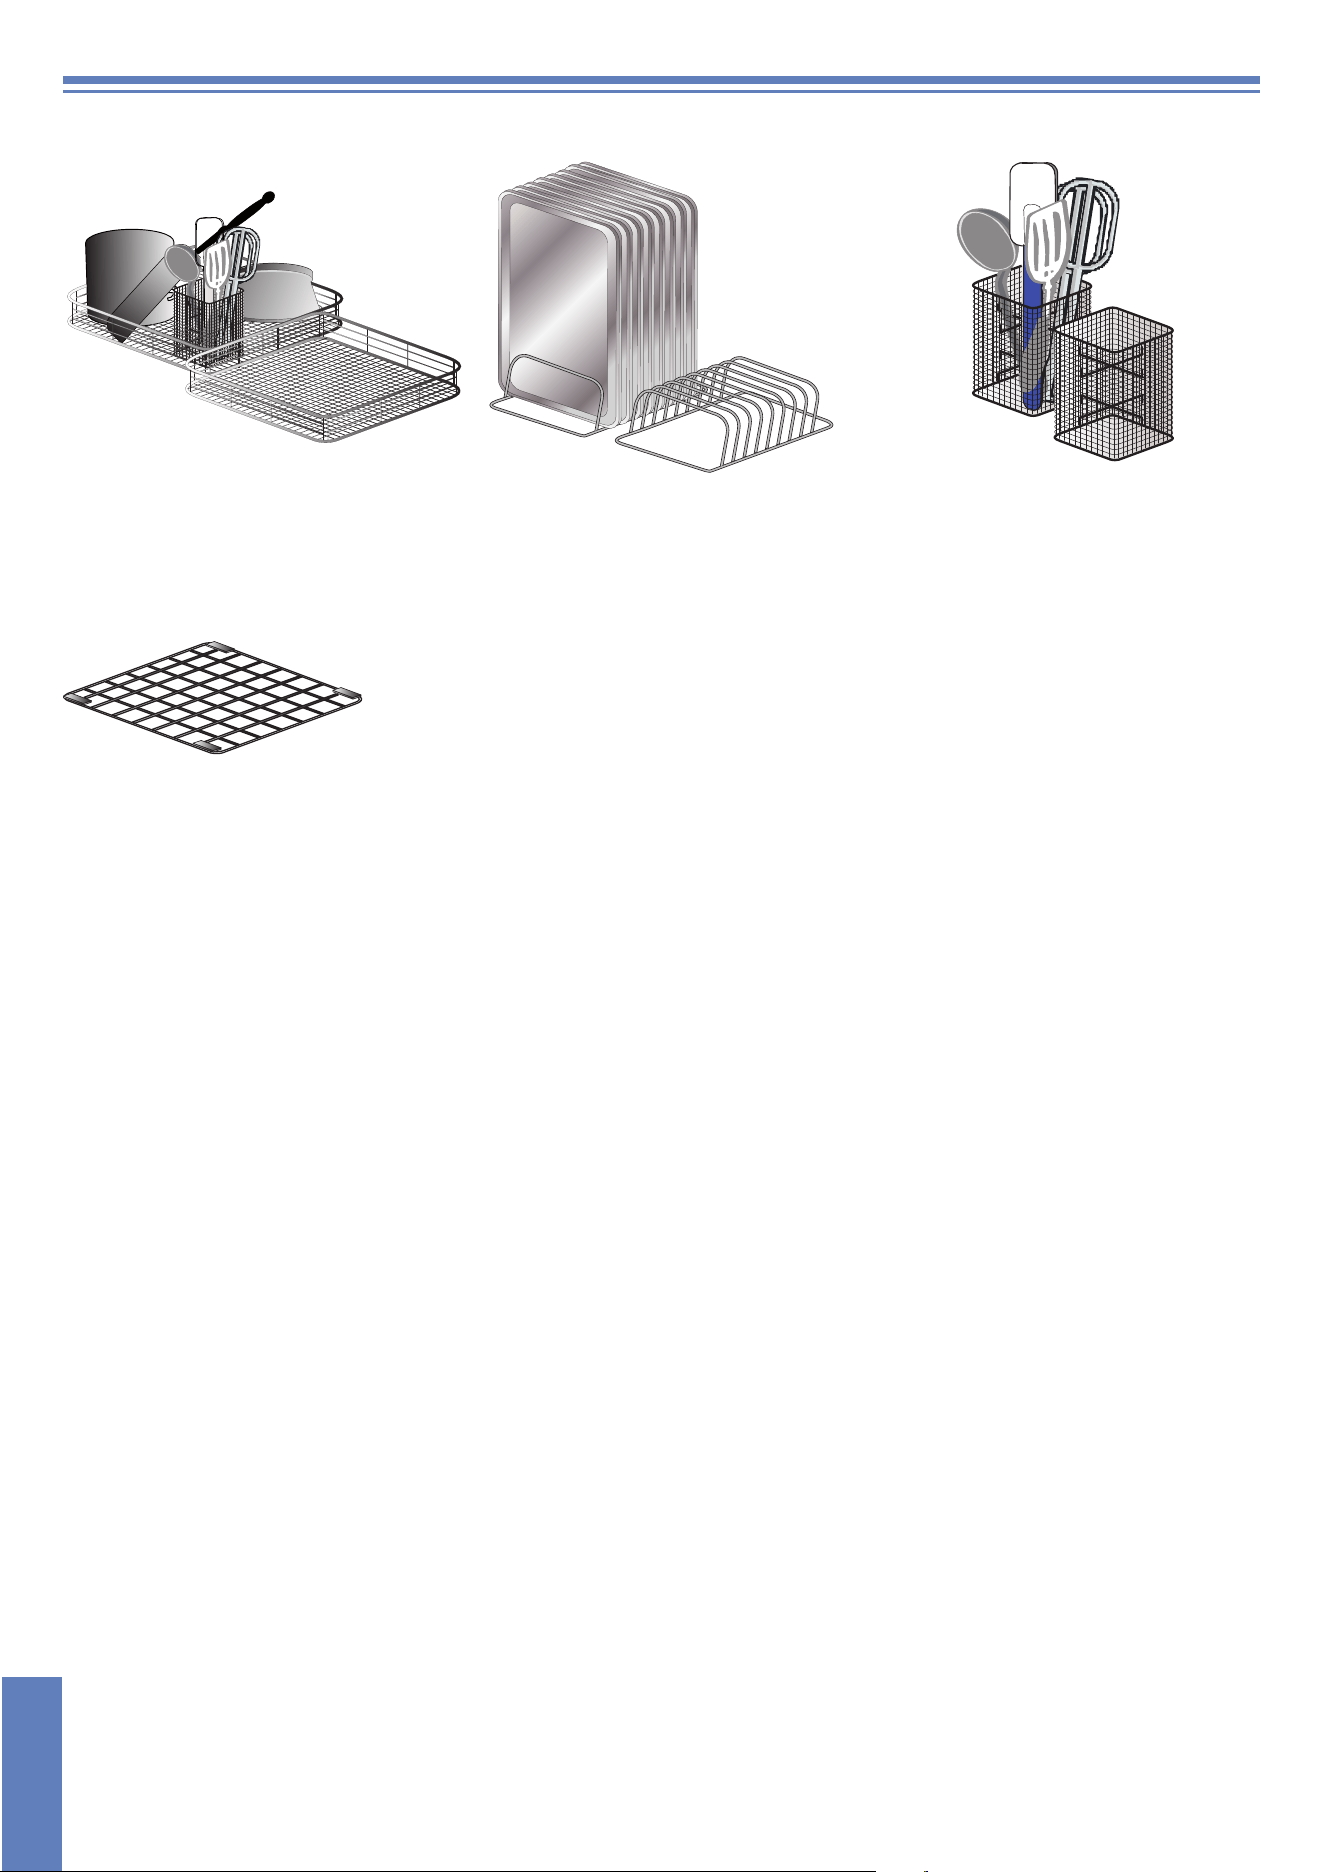
Standard equipment:
nr. 1 Stainless steel rack nr. 1 Trays support (8 pcs) nr. 1 Inox spatulas rack
550 x 550 mm grid
pag. 14
EN
To operate the machine, 3 connections are needed:
• Electrical;
• Water supply;
• Drain.
This is a cycle machine comprising between 159 °F – 165 °F (71 °C – 74°C) wash cycle with detergent, a 185 °F (85 °C) rinse
cycle with injection of rinse-aid.
This machine is designed exclusively for washing trays, baking-pans, food containers and pans in general with
human food type of residue.
Any other use is to be considered improper and prohibited.
Do not wash articles polluted with petrol, paint, chips of steel or iron, fragile objects or material not resistant to the washing
process.
Do not use acidic corrosive chemical products or alkaline and solvents or chlorine based detergents.
Do not open the machine door when operating.
In any case, the machine has a special safety device which immediately stops the unit if the door is open, thus preventing water
spillage
Always switch the machine completely of
f and drain the water tank, before accessing inside.
WARNING: Heat Recovery system and Steam Condenser - installation (optional)
It is strictly forbidden to connect the machine’s vent directly with the outdoor!
Cold weather conditions might seriously damage the Thermal Recovery system or the Steam
Condenser (outside temperatures).
pag. 15
EN
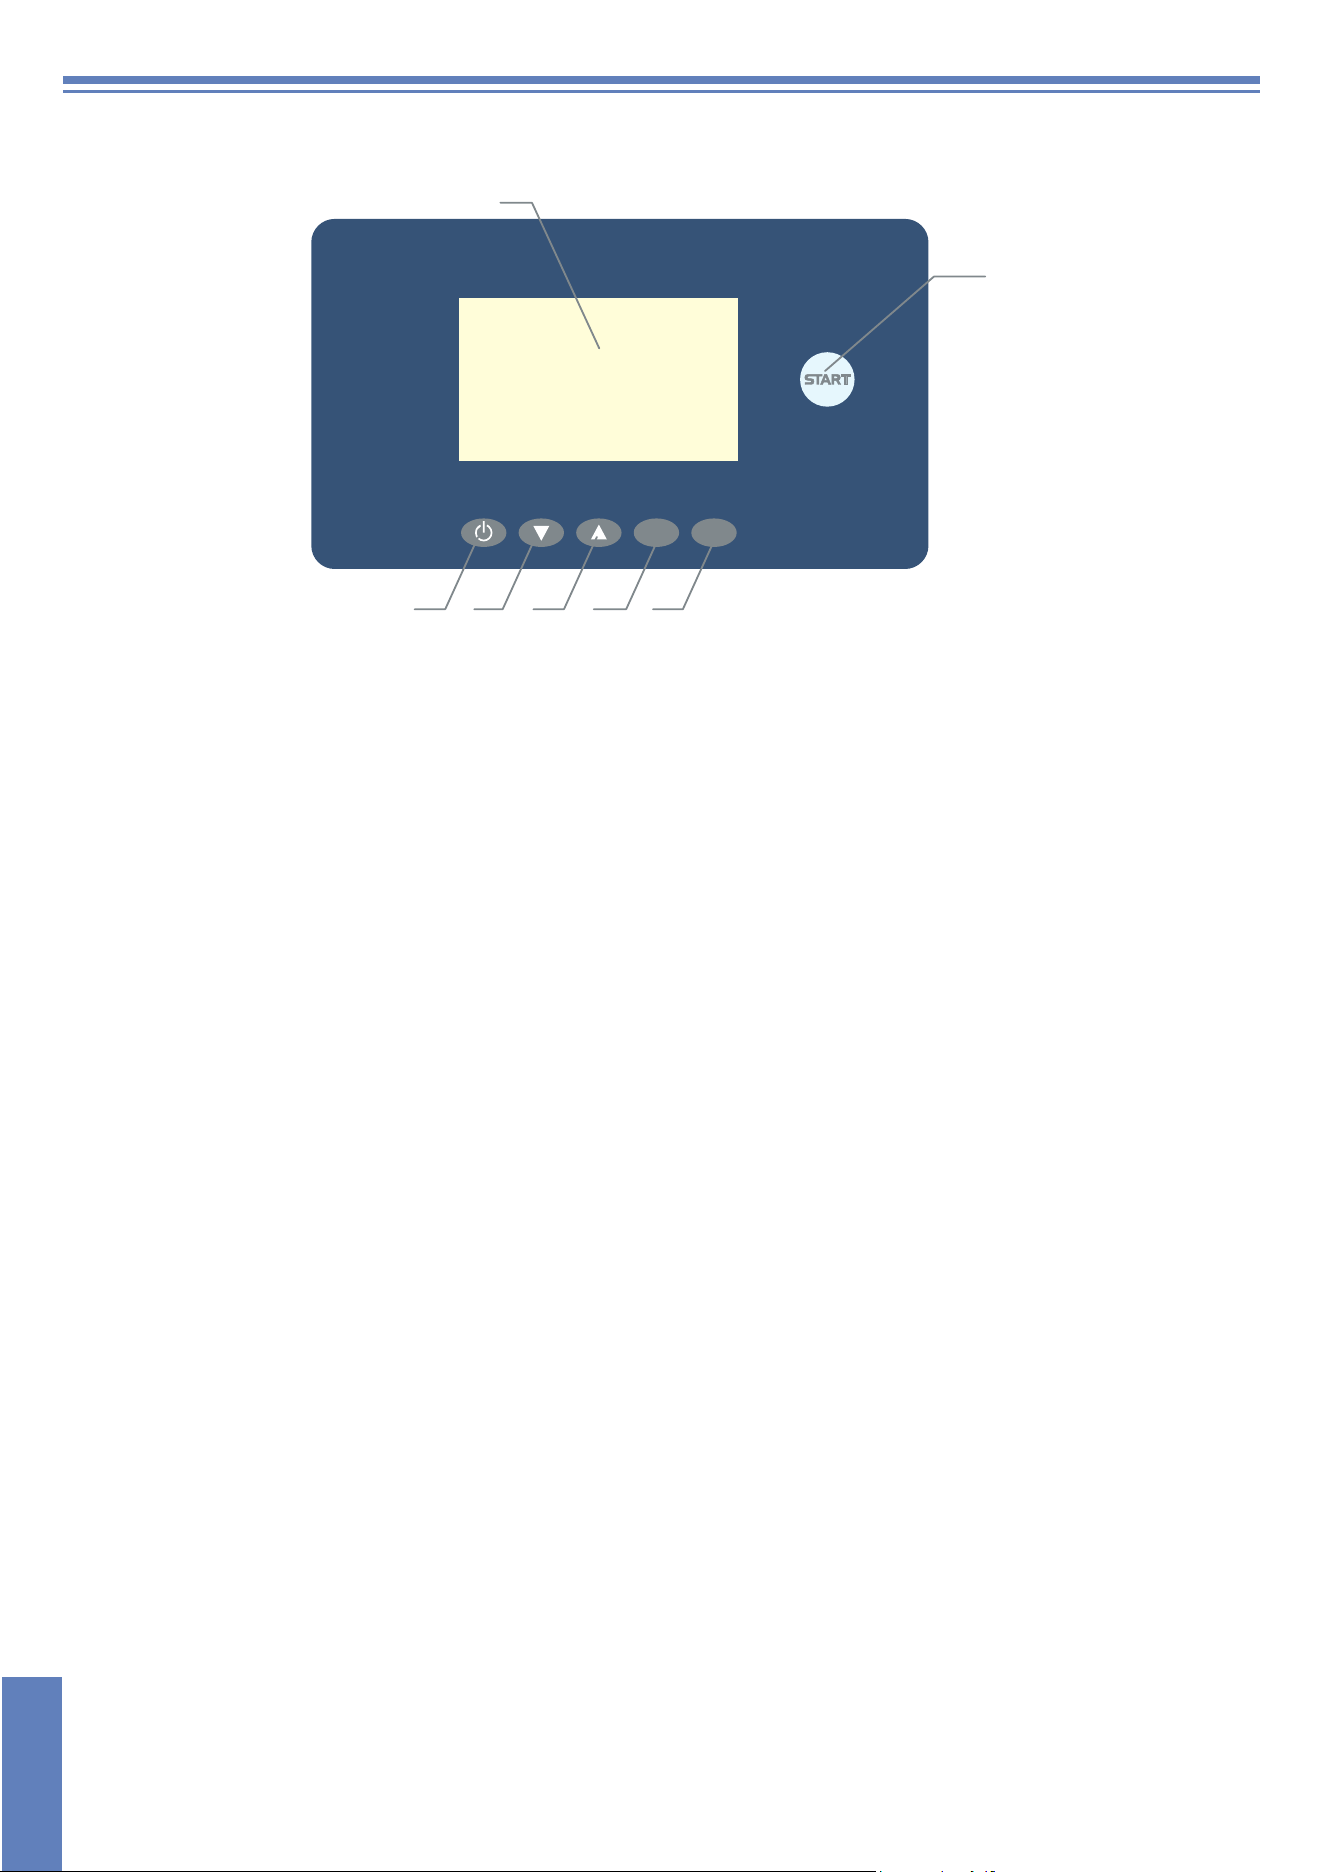
3. CONTROL PANEL AND RELATIVE SYMBOLS
G
A
BDCE F
A: Cycle Start/Stop
Multi-chromatic button:
Firm red light: machine filling/heating;
flashing red light: alarm signal (check the code on the alarm chart);
green light: machine ready. Select cycle;
firm blue light: machine in operation;
flashing blue light: machine in stand-by, anti-freeze function.
B: Machine power ON/OFF (in stand-by only)
C: Cycle Selection
D: Cycle Selection
E: Not used
F: Info
G: Display
pag. 16
EN
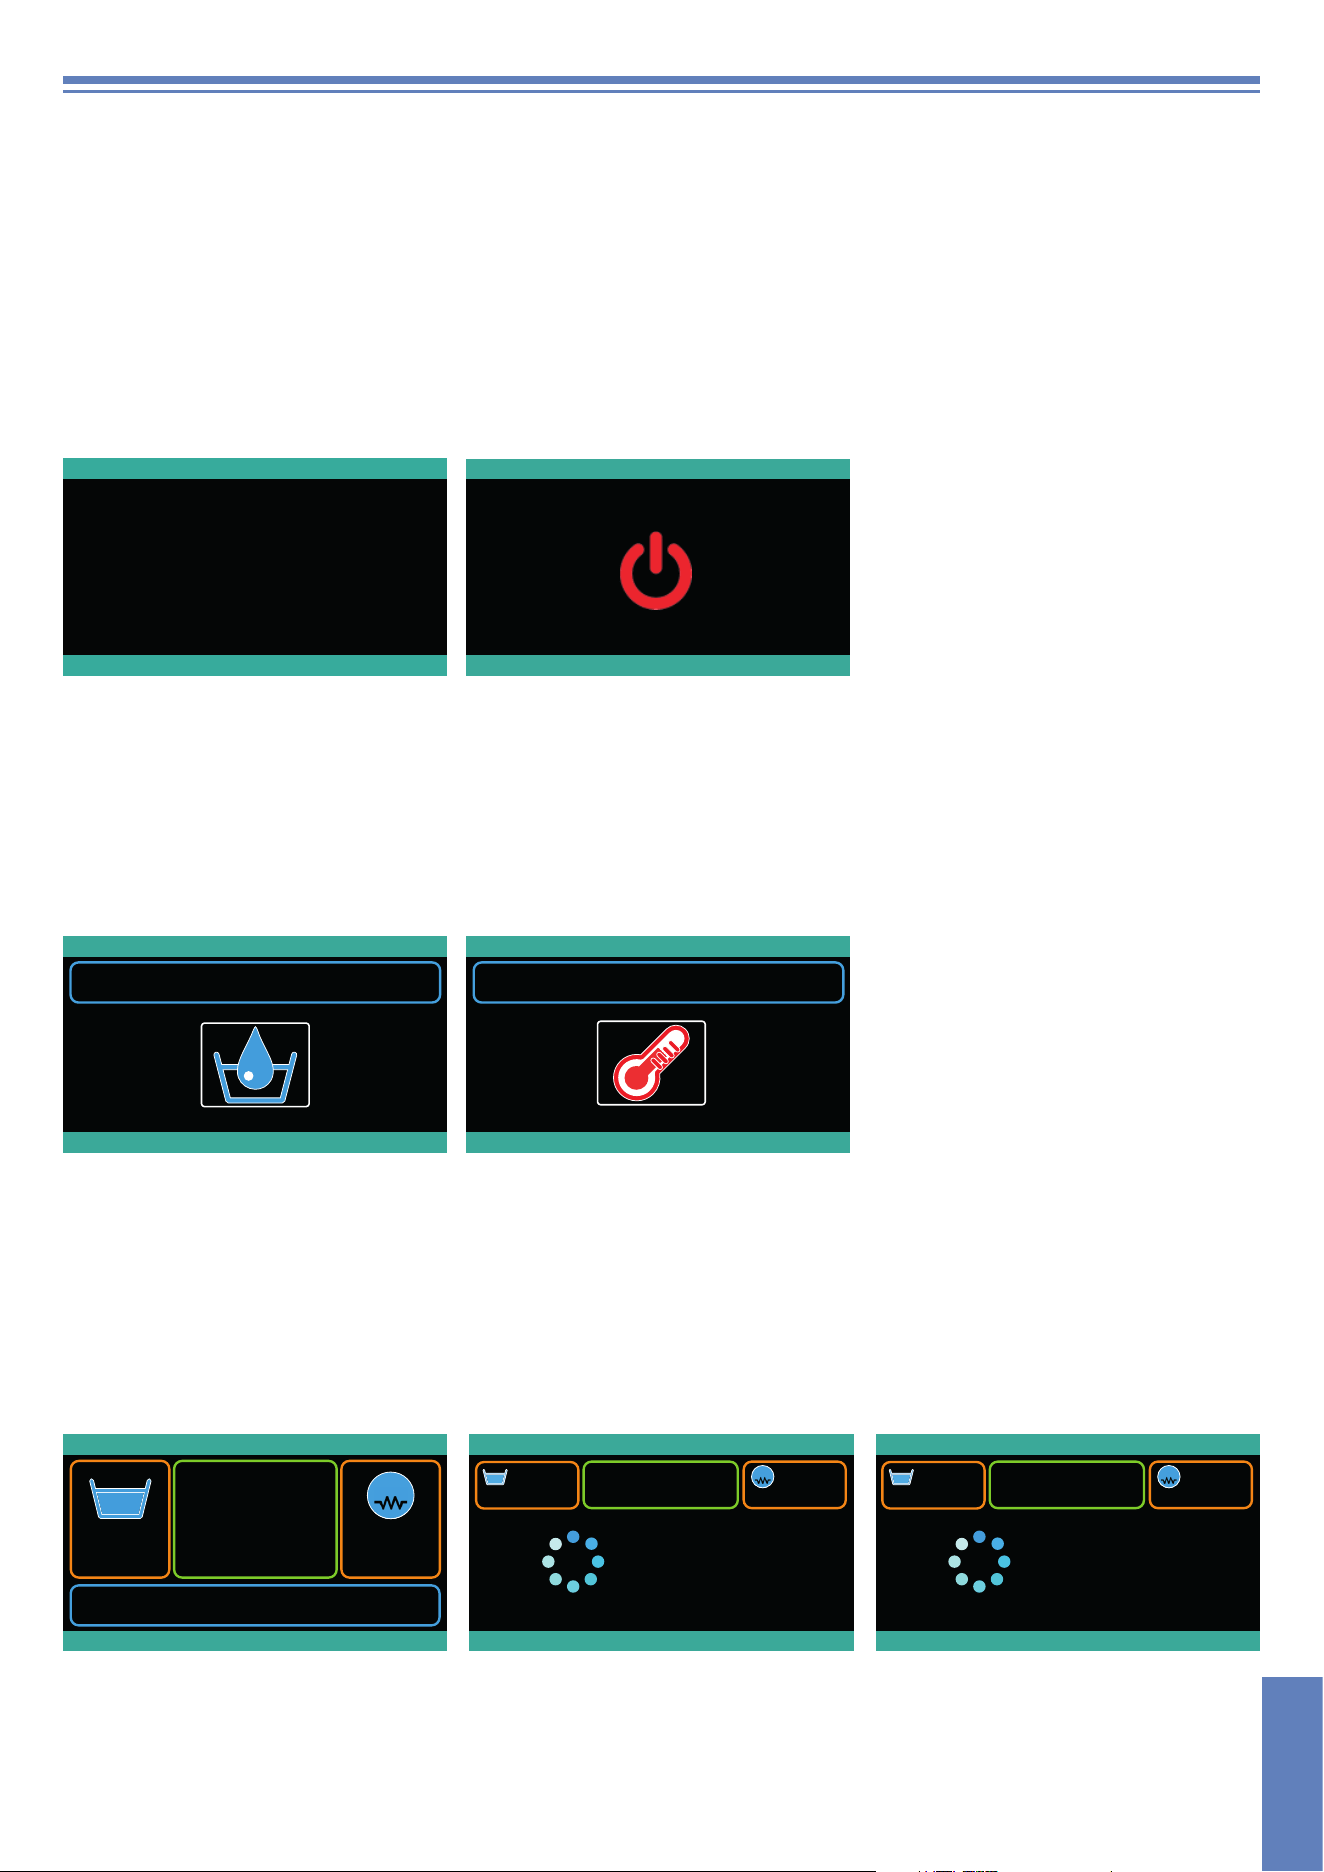
4. OPERATION
4.1 Machine start-up
4.1.1 Start-up
• Put the surface filters in place. DO NOT use the appliance without the filters.
• Insert the overflow pipe in the special seat inside the tank (on machines equipped with 550 x 665 mm basket).
•
Close the dishwasher door.
• Open the water valve.
• Turn the main power switch ON. The message Firmware is displayed for a few seconds.
•
The machine is on stand-by. The display will show STAND-BY or LOGO.
• T
urn the button B.
FW.DISPLAY: .....
FW.POWER: .....
S/N: .....
MODEL: .....
OPTIONAL: .....
12:00 01/01/21
- +
ON
DRAINING
The machine start will be active when the A button will light.
On the display the STAND-BY message will be off.
The button A will light in white for a few seconds, while loading the software. After loading is complete, the button will light in red.
At this moment, the water filling starts. The display will read FILLING WATER.
Once the filling is done, the heating phase will start On the display will appear the reading HEATING. The reading will stay until
both boiler and wash-tank will reach the set temperatures. During this process, the machine will not allow any cycle selection
or start.
During this phase the AUTOMATIC START function can be enabled (see paragr. 4.1.2 Start the wash cycle).
After the filling/heating is completed, the key A and the display will turn green.
12:00 01/01/21
EXIT + -
FILLING WATER
12:00 01/01/21
EXIT + -
HEATING
4.1.2 Start the wash cycle
• Insert the rack filled with dishes to wash (see paragr. 4.2 Objects loading). The plates must be correctly placed in the rack.
• Select the desired wash program by the keys C and D or by keeping pressed the A key. Release the key when the selected
program is selected. T
o start the selected cycle press the A key. the button A will turn blue
• All wash-time long the display will read the wash-tank temperature and the boiler temperature.
Beneath the Temperatures Display will appear the Cycle Progress Bar (in percentage).
At the end of the washing cycle, a hot rinse cycle will take place.
A blue/green flashing on the button A will indicate the cycle ended.
The display shows CYCLE ENDED message.
B
B
12:00 01/01/21
INFO+-EXIT
165°F 185°F
DRAINING
WASHING 1
B
B
165°F 185°F
12:00 01/01/21
+-EXIT
3%
WASHING
WASHING 1
B
B
165°F 185°F
12:00 01/01/21
+-EXIT
100%
WASHING
WASHING 1
pag. 17
EN
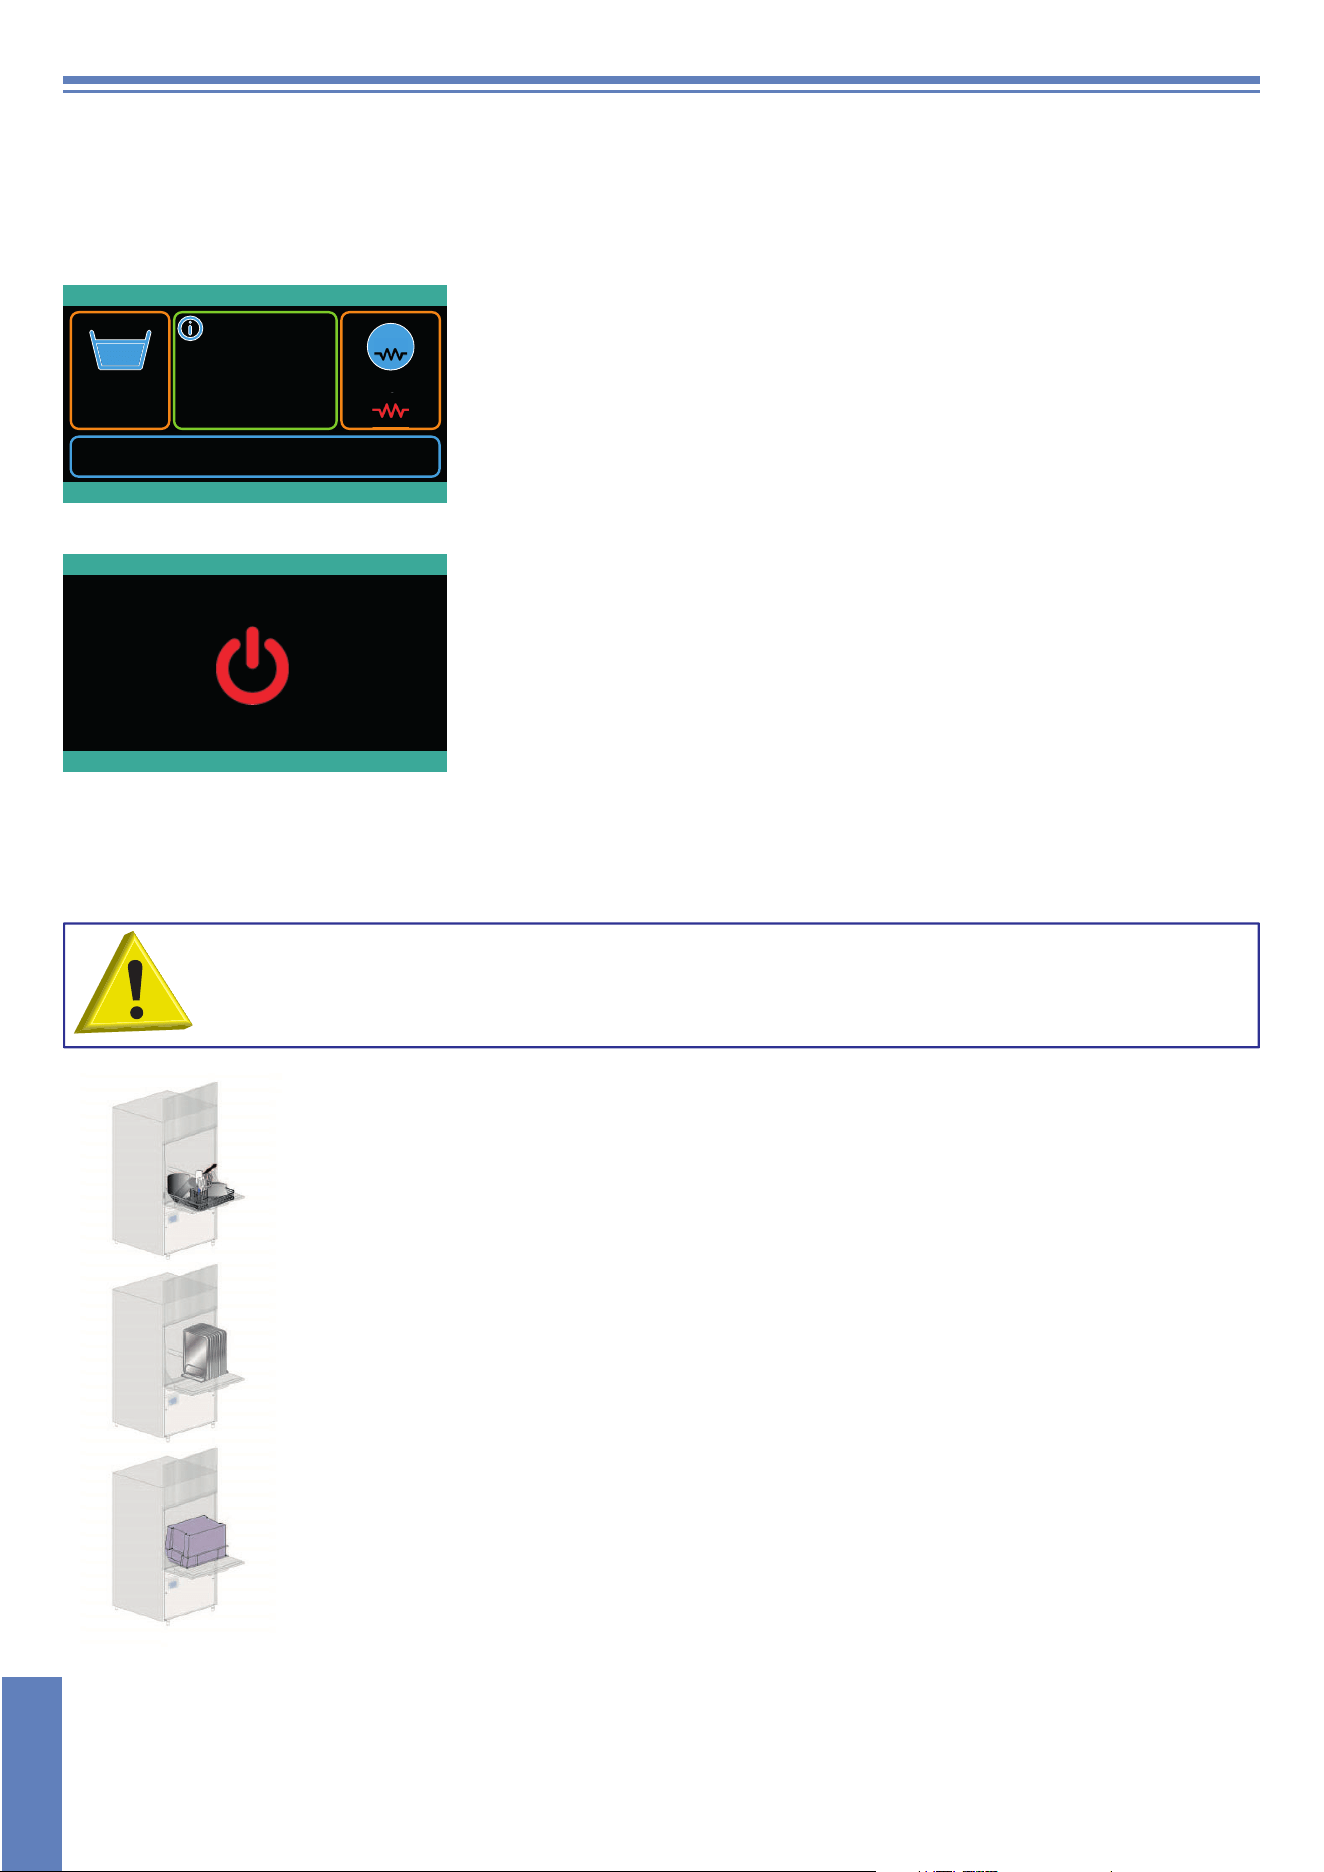
Note: At cycle-end, keeping the door closed, objects will not dry. Extract the rack or keep the door open to allow evaporation,
helping the drying of the objects.
When opening the door, the button A will turn green, indicating that the machine is ready for a new wash-cycle.
Note: The last cycle used remain in the memory of the electronic board.
W
e recommend to change water at least twice a day, or whenever needed.
AUTOMATIC START: This function enables a self-activated wash cycle, when the filling/heating phase is completed.
B
B
12:00 01/01/21
165°F 176°F
7
6
INFO+-EXIT
AUTOMATIC START
WASHING 1
DRAINING
AUTOMATIC START activation:
• Keep pressed for 10 seconds the Key A during the filling or heating phase.
• Within 30 seconds select the wash cycle by pressing either C or D Keys and
confirm by pressing A. The display will show AUTOMATIC START.
•
If this does not happen, repeat the procedure.
4.1.3 Switching OFF
12:00 01/01/21
- +
ON
DRAINING
• Turn the button B. The display will show STAND-BY or LOGO.
• At the end of the day, clean the machine (see chap. 6. MAINTENANCE).
•
Shut the water valve.
• Switch off the main breaker to turn off the power.
• At the end of the day, it is advisable to leave the dishwasher door open.
4.2 Objects loading
Standard version
Before objects loading in the machine, coarsely clean them from the leftover food.
It isn't necessary to rinse the objects under water.
WARNING: Do not wash articles polluted with petrol, paint, chips of steel or iron, ash, sand, wax,
lubricant grease. These substances damage the machine. Do not wash fragile objects or material not
resistant to the washing process.
Note the following recommendations:
• Objects should not be inserted inside one another, covering each other.
• Place the objects in order to all surfaces can be reached by water; otherwise the objects are not
washed.
• Make sure all the objects are in a stable position and that the hollow containers don't overturn
(baskets, pots, pans, bowls, etc.) .
• Place in the rack all the hollow containers such as baskets, pots, pans, bowls, etc. upside-down.
•
Place the objects with deep hollow with upper face downwards, so that water can flow out.
• Make sure the smaller objects do not fall from the rack.
• Check all the wash arms runs freely and they are not blocked by too tall or too prominent crockery.
Eventually, run a manual rotation of the arms to check it.
Some foods, such as carrots, tomatoes, and others, may contain some natural dyes substances, that
in large amounts, can alter the objects and plastic parts colors.
Any discoloration does not mean that the plastic is not heat resistant.
pag. 18
EN
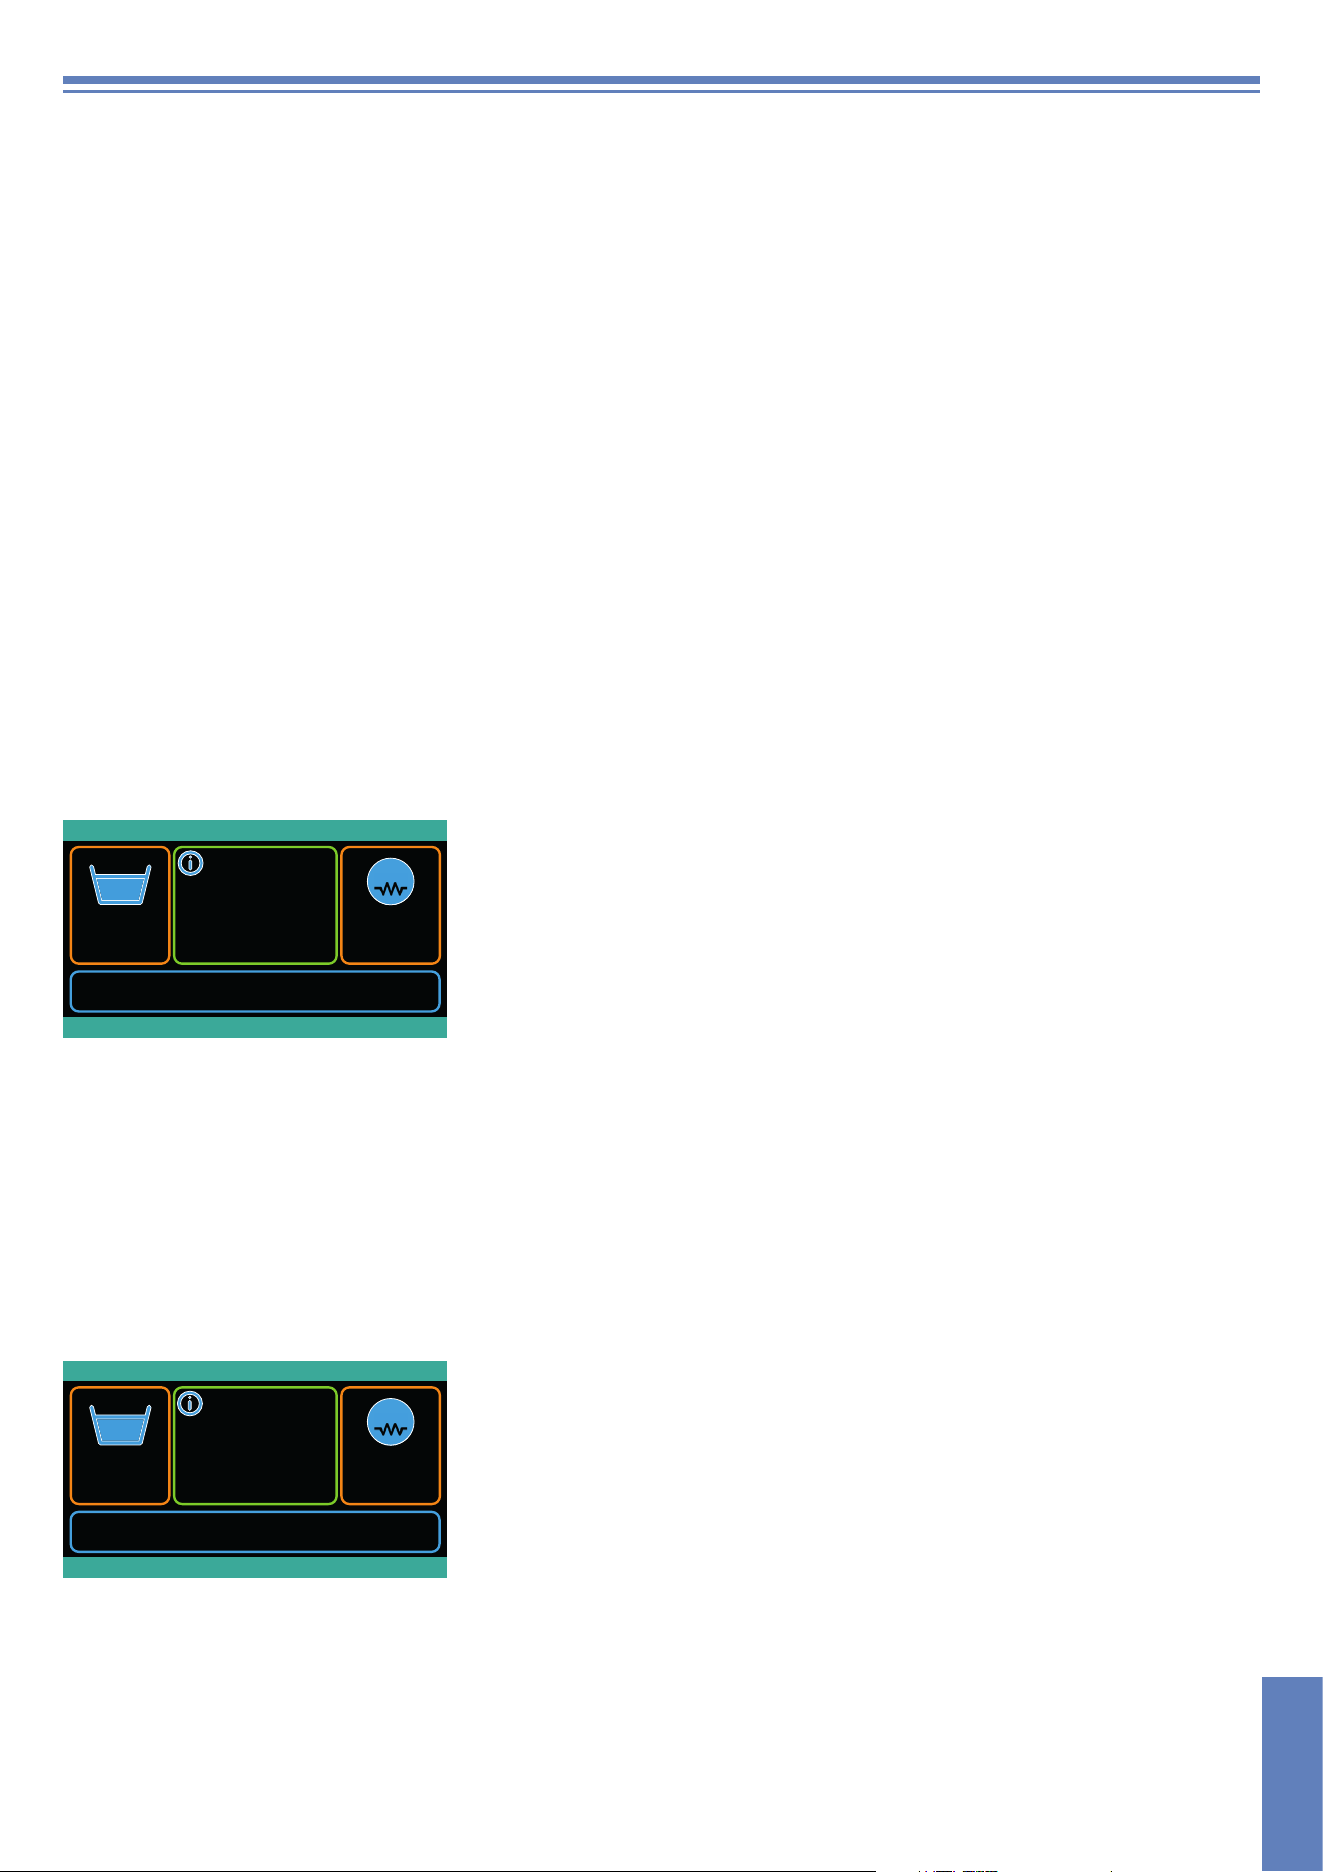
Not suitable for dishwasher:
• Wooden crockery and cutlery or with wooden parts; water at high temperature causes deformation to wood. Also the
adhesives used are not suitable for treatment in the dishwasher; a consequence could be the handles detachment.
• Crafts, precious vases or decorated glasses.
• Not heat-resistant plastic objects.
• Copper, brass, pewter or aluminum objects: they may become discolored or opaque.
• The decorations on glass, after a certain number of washes, can lose gloss.
• Fragile glasses or crystal items, if often washed, can become opaque.
We recommend to buy exclusively objects suitable for dishwashing.
It is mandatory to repeat the washing cycle if at the end of the cycle the objects are not well clean or if there are
washing residues (baskets, pots, pans, bowls, etc. with liquid inside).
4.3 Use of detergent
The detergent must be of good quality, of NON-FOAMING type, specific for the mechanical washing of dishes.
The use of liquid detergents is recommended.
The dosing has to be done following the recommendations of the detergent manufacturer and in accordance with the water
and dishes characteristics.
The detergent has to be inserted only in the wash tank.
Note: It is forbidden to use detergents with chlorine-based reagents.
B
B
12:00 01/01/21
165°F 176°F
INFO+-EXIT
DETERGENT LEVEL
WASHING 1
DRAINING
4.4 Use of rinse aid
It is possible to use the rinse aid to get quicker drying and polishing.
The machine is equipped with a rinse aid dispenser. The machine automatically draws the rinse aid chemical.
The dosing has to be done following the recommendations of the rinse aid manufacturer and in accordance with the water
characteristics.
Note: Too much chemicals produces foam that reduces the effectiveness and lifetime of the washing pumps.
Too much chemicals might leave residuals on the dishes.
3/8 inches (1 cm) of the product drawn into the green tube is equal to about 1/16 Dramme (0,13 g). A correct amount of rinse aid
is very important for a quick and clean drying.
Should the rinse-aid chemical lack, the display will show RINSE-AID LEVEL
(only with optional "Probes lack of detergent/rinse
aid").
B
B
12:00 01/01/21
165°F 176°F
INFO+-EXIT
RINSE-AID LEVEL
WASHING 1
DRAINING
pag. 19
EN
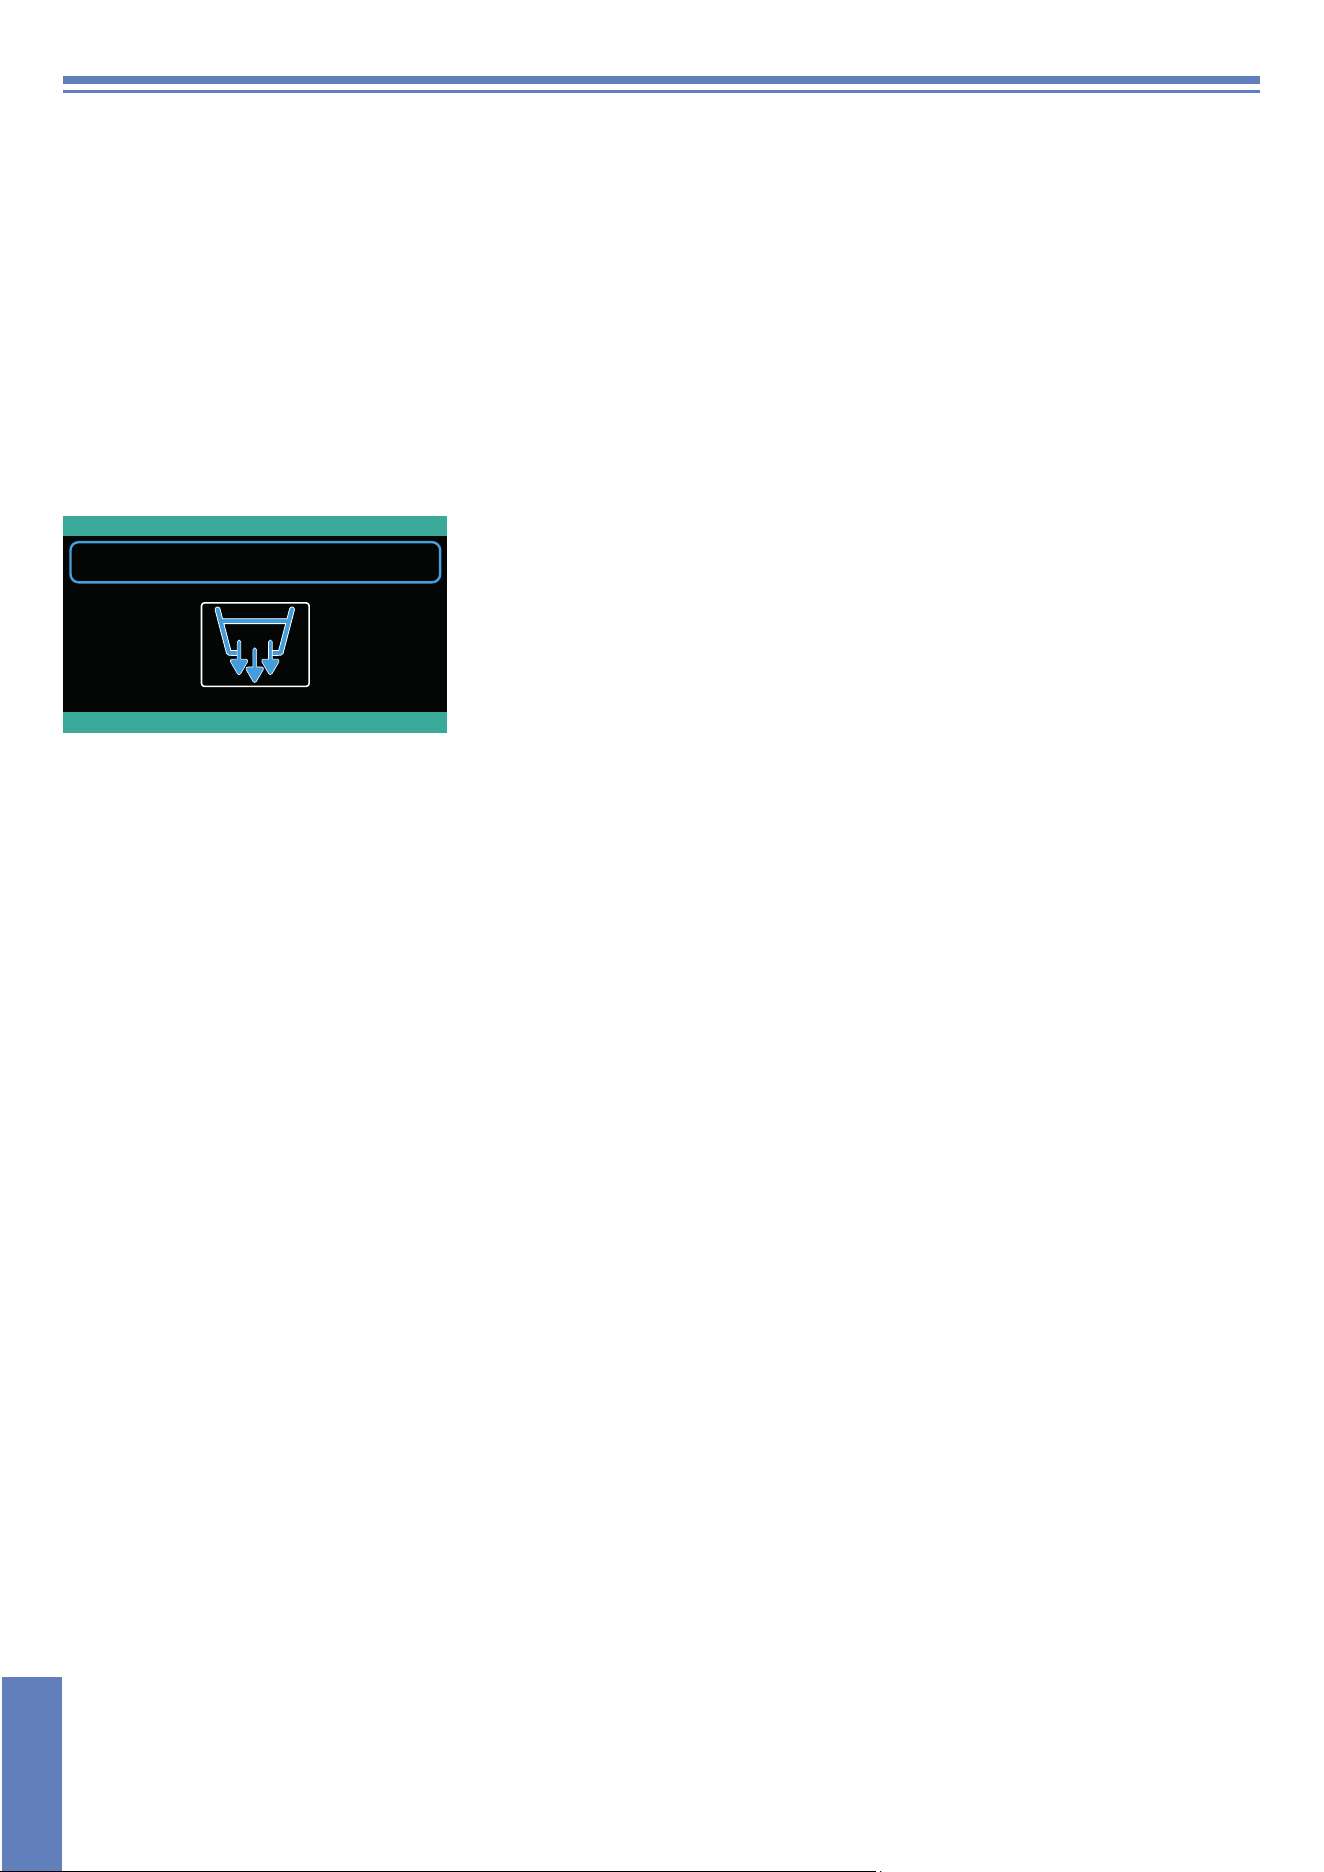
4.5 Tank draining
Machine
switch ON.
Machines equipped with 550 x 665 mm basket
Remove the overflow.
Close the door.
For machines equipped with drain pump, press the key E.
Machines equipped with 1350 x 725 mm basket
Close the door.
If you want to refill the machine for a new cycle, see paragr. 4.1 Machine start-up.
12:00 01/01/21
EXIT + -
TANK DRAINING
4.6 Emptying boiler and break tank (anti-freeze function)
This function permits the draining of the boiler and the break tank for any extraordinary maintenance or emptying function.
• Press key B and make sure that the tank is empty.
• Press the A button for 3 seconds and the boiler e break tank draining will activate. The message SELF-CLEANING will
appear on the display and theA button will flash in blue light. Should the wash-tank be full, the system will not start the
draining phase of the boiler and the display will show DRAIN WATER IN WASH TANK.
•
Once emptying is complete, the machine can be turned back on with key B. This function occurs only with a boiler temperature
over 160 °F
.
4.7 Washing pumps
The washing pumps installed in the machine do not activate simultaneously, but one after the other with a few seconds delay.
In this way, the electric peak is reduced.
Not available on machines with a 550 x 665 mm basket.
pag. 20
EN
WARNINGS
• Do not put material or objects on the machine.
• The machine has an IP (see data plate on the appliance) protection rating against accidental water splashes
and is not protected against pressurized water jets. Do not use any jets of water, high pressure or steam
cleaning equipment, to clean the machine.
• Do not dip bare hands into water containing detergent. If this should occur, wash them immediately with
plenty of water.
• Accompany the door/hood in opening and closing.
• Some important rules must be followed for using this appliance:
Never touch the appliance with wet hands or feet
Never use the appliance when barefoot
Do not install the appliance in places exposed to water sprays.
• Do not cover the intake or dissipation grids.
• Do not use water to extinguish fires on electrical parts.
This machine must be disconnected from the main electrical supply after use at the end of the day and
for any service/maintenance operation. Switch off the main switch located on the wall, which shall be
installed by a professional installer
. Shut the water supply valve(s).
ATTENTION: INTERNAL CLEANING OF THE MACHINE SHALL BE CARRIED OUT AT LEAST 10
MINUTES AFTER THE POWER SWITCH HAS BEEN TURNED OFF.
ATTENTION: DO NOT INSERT HANDS AND/OR TOUCH THE PARTS LOCATED AT THE BOTTOM OF
THE WASH TANK AND/OR AT THE END OF THE WASH CYCLE.
pag. 21
EN
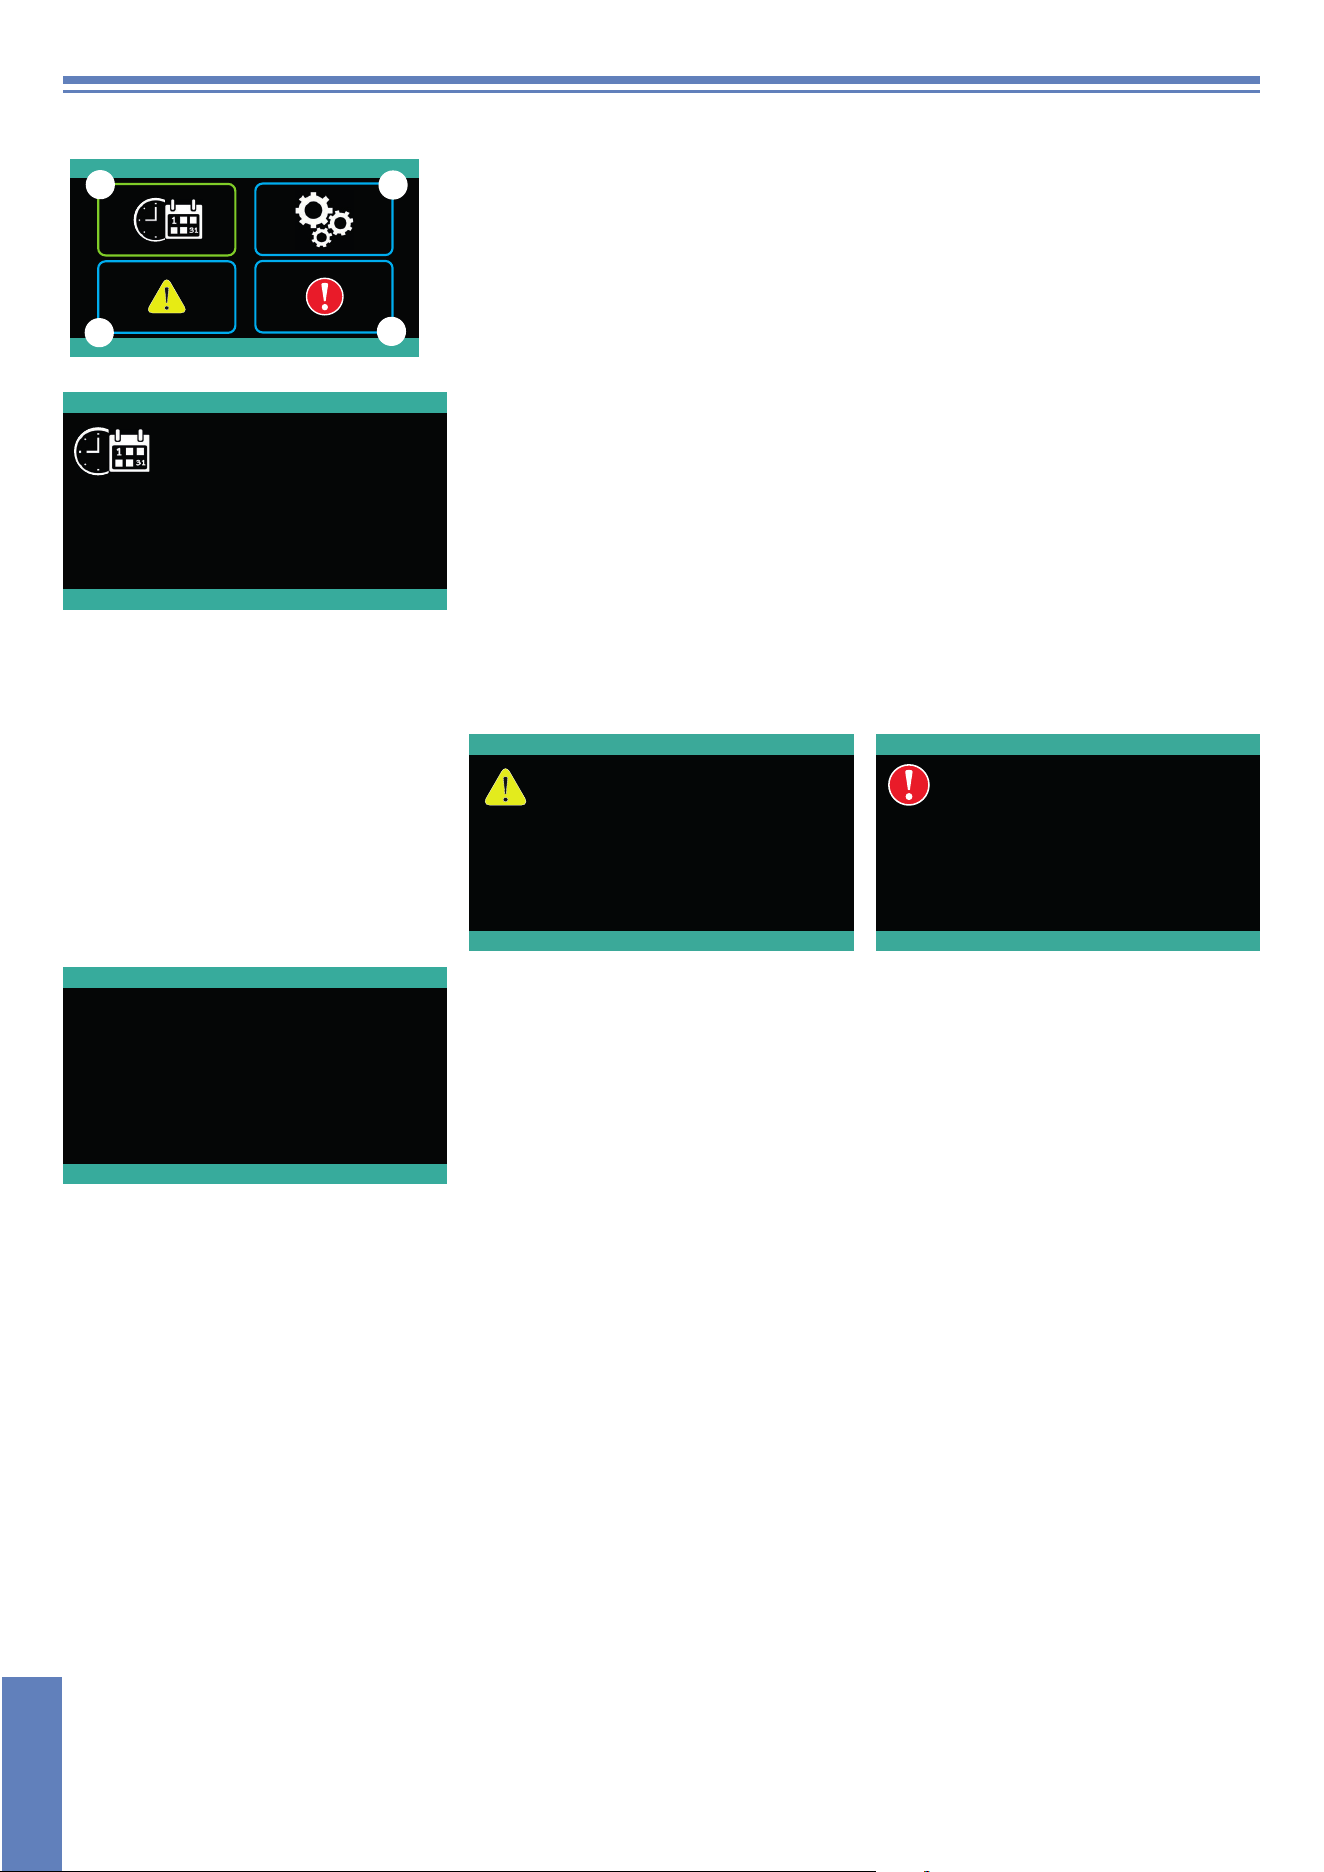
5. PROGRAMMING - SETTING THE PARAMETERS - INFO MENU
A
B
C
D
This section allows visualizing the machine work information.
When the machine is in stand-by or ready, press INFO. It appears the available
menu list.
Use keys C (increase) and D (decrease), to scroll the menu items.
EXIT - +
1 / 1 / 21 - 12 : 00
Menu A
Use keys C (increase) and D (decrease) to select the numerical value desired
(month). Confirm the selection of every digit by pressing key Start A and move to the
following field. Set the other values in the same way (day, year, hour, minutes).
Menu B: Provides information on the probes status. (optional).
Menu C: Provides information on the sensors status.
Menu D: Alarms history. Use keys C (increase) and D (decrease), it is possible to display the last 10 alarms occurred. For each
alarm, a code with a description is displayed, with date and time when the alarm occurred.
EXIT - +
12:00 01/01/21
.............
EXIT - +
12:00 01/01/21
.............
DETERGENT LEVEL
DOOR OPEN
EXIT - +
12:00 01/01/21
01-01-21 14:25 Z4
01-01-21 14:20 B1
01-01-21 14:01 B1
..........
..........
EXIT - +
12:00 01/01/21
01-01-21 14:25 Z4 TANK SENSOR FAILURE
01-01-21 14:20 B1 BOILER FILLING FAIL
01-01-21 14:01 B1 BOILER FILLING FAIL
..........
..........
FW.DISPLAY: .....
FW.POWER: .....
S/N: .....
MODEL: .....
OPTIONAL: .....
Menu Firmware
The screen displays the following information:
FW.DISPLAY: Display firmware
FW.POWER: Power firmware
S/N: Serial number
OPTIONAL: Enabled optional
MODEL: Machine model
pag. 22
EN
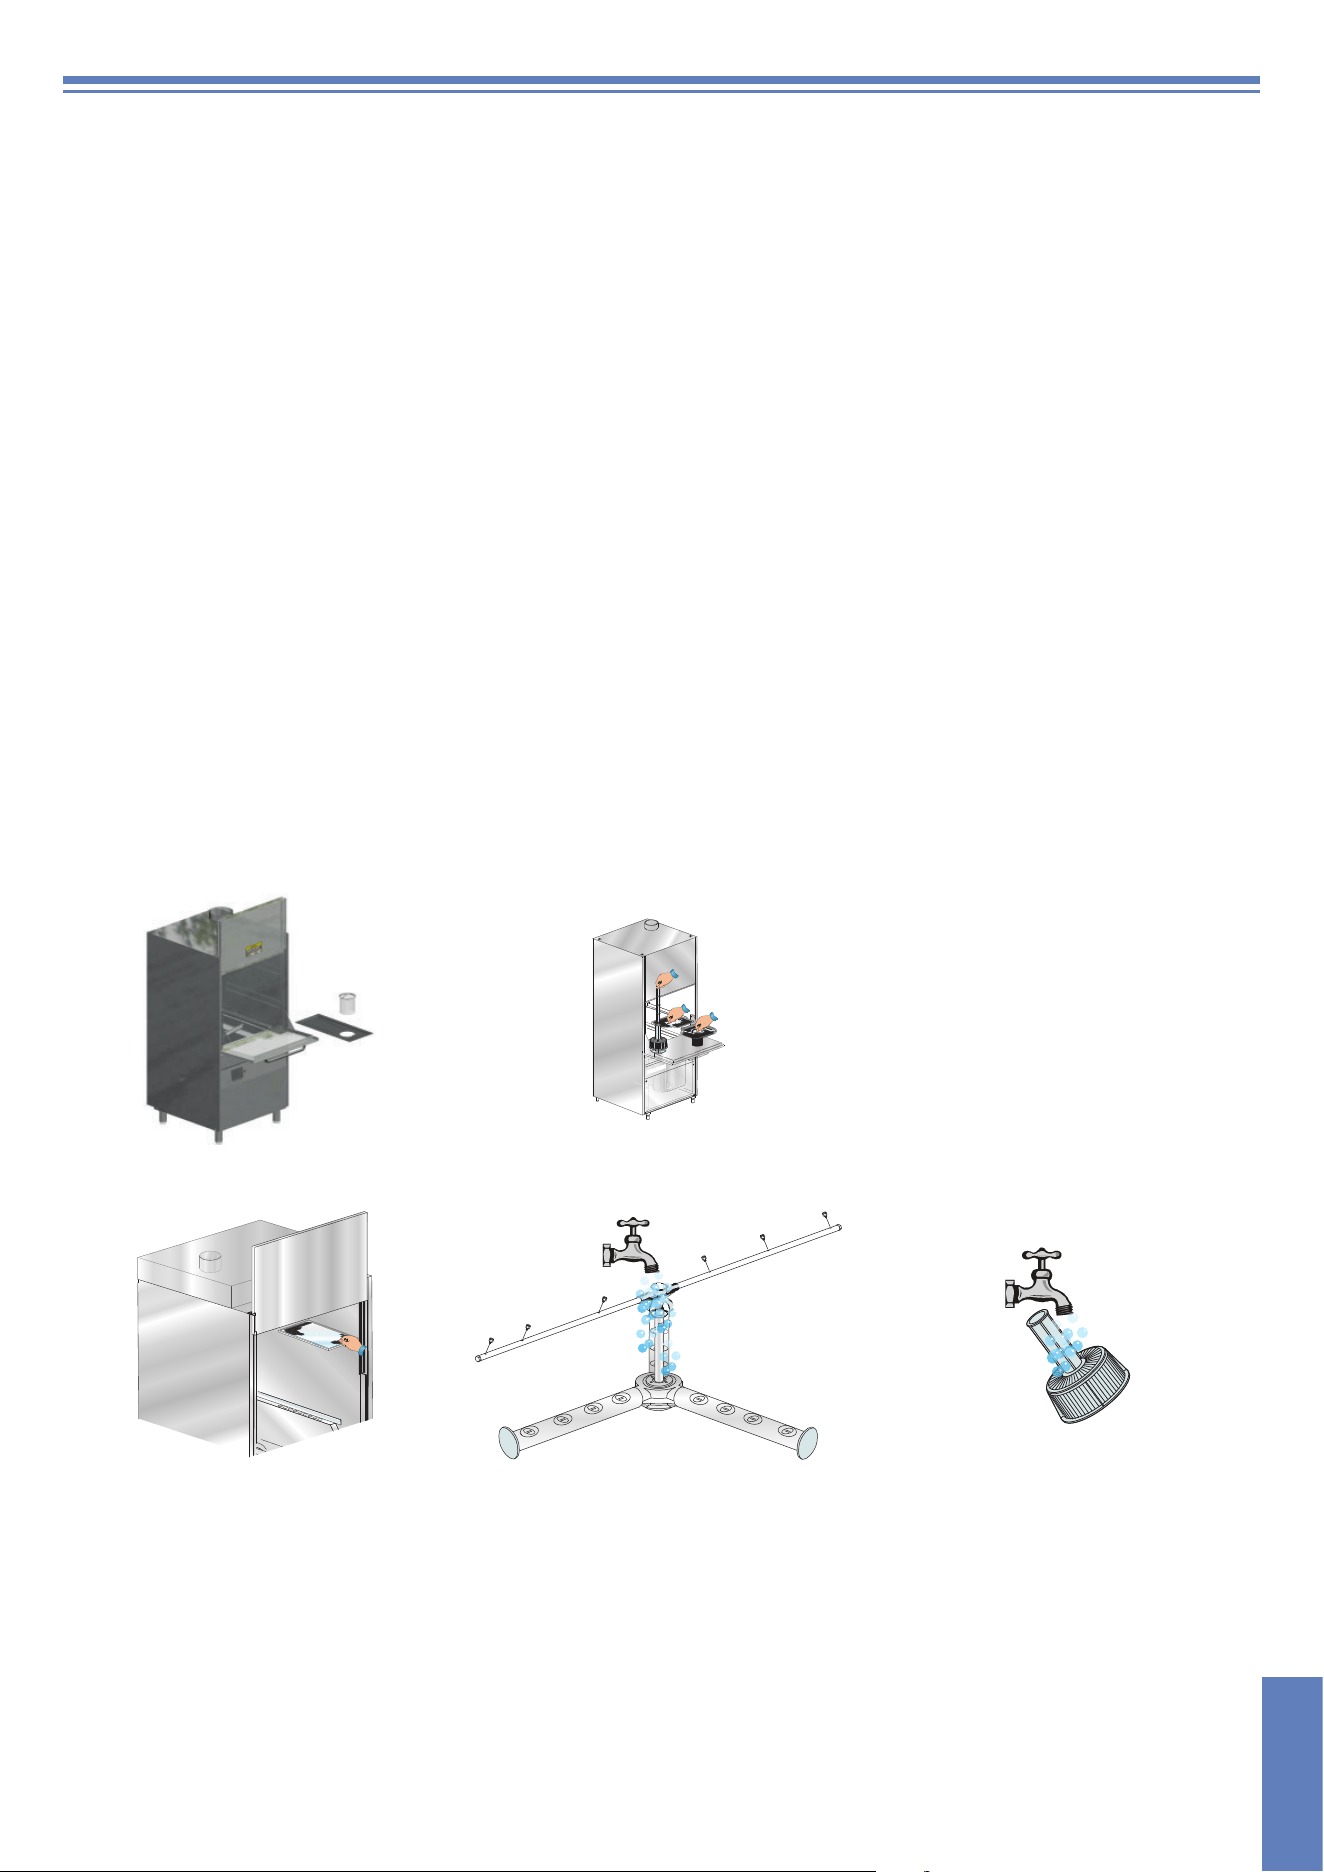
6. MAINTENANCE
WARNING: Do not use any jets of water, high pressure or steam cleaning equipment, to clean the machine.
Contact your cleaning products retailer for detailed instructions on the methods and products to use for periodic
sanitizing of your appliance.
DO NOT use bleach or chlorine-based detergents for cleaning the appliance.
6.1 Regular Maintenance
In order to ensure perfect performance, the appliance must be completely cleaned at least once a day in the following way:
• Turn the machine in STAND-BY mode, by pressing the push-button B of the control panel (see chap. 4. OPERATION).
• Remove the surface filters and clean them under running water (see Pic. 8 and Pic. 9).
•
Drain the sump water 4.5 Tank draining).
• Take off the overflow pipe (on machines equipped with 550 x 665 mm basket). Remove the pump filter and clean with a brush
and a water shower (see Pic. 12).
• Remove the rotors by loosening the fixing screws, and thoroughly clean the nozzles and cleaning and rinsing arms under
running water (see Pic. 11).
•
Remove the heat exchanger filter (if present) and clean it under running water (see Pic. 10).
•
Refit all the parts and arrange the impellers in their seats, securing them with the relative fixing screw. Take extreme care to
re-assemble the nozzles in the right position (open and / or closed nozzles) and that the arms are installed with the right axial
angle.
• Clean the tub thoroughly using specific products.
• At the end of the day, it is advisable to leave the dishwasher door/hood open.
• Automatic cycle of machine self-cleaning/rinsing: recommended at each day end. With the machine on STAND-BY
mode and, when the tank is empty, press the A key. An automatic cycle of 60 seconds will start, after this the machine will be
in STAND-BY mode.
•
Shut off the water supply valve.
• Turn off the machine by switching the main power switch OFF.
Pic. 8 Pic. 9
Pic. 10 Pic. 11 Pic. 12
pag. 23
EN
6.2 Extraordinary maintenance
Once or twice a year have a qualified technician inspect the machine:
• Clean the electrovalve filter.
• To remove residual deposits.
• To check the watertight of the seals for water loading and unloading connections.
• Check the perfect state and/or wear of the components. If a component is damaged or oxidized replace it immediately with
genuine spare parts only.
• Check the efficiency of the dispensers.
• Check the efficiency of the door safety switch.
• Tighten firmly all electrical connections.
Pay attention to do not wet the motor or any electric part.
Perform maintenance with the wall-mounted main switch turned OFF
.
Every 3-4 years of machine use, double-check the tightening and the efficiency of all electrical contacts, with special
attention to the contacts of starters and relays.
Increase controls frequency if the machine is operating in heavy or intensive conditions.
7. ENVIRONMENTAL ASPECTS
7.1 Packing
The packing consists of the following:
• a wood pallet;
• a nylon bag (LDPE);
• multi-layered cardboard;
• polystyrene foam (PS);
• polypropylene support (PP).
All above materials, shall be disposed and treated in accordance with the Local Laws in force.
7.2 Disposal
pic. 13
The equipment is marked with the symbol (see pic. 13).
The symbol indicates that the product should not be discarded as unsorted waste but must
be sent to separate collection facilities for recovery and recycling in compliance with the
legislation in force.
An efficient waste disposal procedure contributes to avoiding any potential environmental or health
hazards as well as promoting the recycling and re-utilization of materials from which our appliances
are constructed.
If the user does not comply with the regulations he/she shall be subject to the penalties foreseen by
each member state.
Disconnect electricity and water before disposal.
Cut the electrical cable to ensure that further use is impossible.
All metal parts are recyclable as they are made of stainless steel.
Recyclable plastic parts are marked with the plastic material symbol.
pag. 24
EN

8. COMPLIANCE WITH HYGIENE REGULATIONS AND H.A.C.C.P. AND N.S.F.
In order to meet the correct H.A.C.C.P. procedures remember to prepare a sheet with tables where the shift operator enters the
date and time the washing starts, the time the washing ends, the tanks and boilers temperatures and any other note/alarms that
have tripped and what he/she has done to ensure sanitary safety.
This is the reason why the machine is equipped with:
Temperature gauges that indicate the boiler and tank temperature.
Malfunctioning gauges.
Possibility to consult the washing parameters.
• When starting the machine ON, no wash-cycle will be starting until the set boiler and wash-tank temperatures are reached.
During operation, the machine will not start the rinse cycle till the set boiler temperature is reached.
• Scrape food from the dishes carefully in order not to clog the filters, nozzles and pipes.
• Unload the wash tub and clean the filters at least twice a day.
• Check that the amount of detergent and rinse aid dispensed is correct (as suggested by the supplier of the product). In the
morning, before starting the machine, check that the quantity of chemicals in the canisters is enough for daily supply.
• Always clean the support floor of the dishes.
• Extract the rack with clean hands or gloves to avoid finger marks.
• Do not dry or polish the dishes with non-sterilized cloths, brushes, or dusters.
9. ECOLOGICAL ASPECTS
9.1 Recommendations for optimum use of energy, water and additives
If possible, use the machine at full load: This will avoid wasting detergent, rinse aid, water and energy.
Detergents and rinse aids: Use detergents and rinse aids having the highest biodegradability so that the environment is better
respected. Have the correct dosage according to the water hardness checked at least once a year. An excess of product
pollutes rivers and seas, whereas an insufficient amount compromises dish washing and/or hygiene.
Tank and boiler temperatures: The temperatures of the tank and boiler are set by the manufacturer so as to get the best
washing results with the majority of detergents on the market. These can be reset by the installer according to the detergent
used.
Cleaning off: Carefully clean off the kitchenware using water at ambient temperature with moderation so as to make removal
of animal fats easier. To remove encrusted matter, soaking in hot water is recommended.
Notes: Wash the objects as soon as possible in order to prevent the deposits from drying and jeopardizing the effectiveness of
the washing.
To get an efficient wash, it is advisable to regularly clean and maintain the dishwasher (see chap. 6. MAINTENANCE).
Non-compliance with the above recommendations or with any and all information within the manual could result in
a waste of energy
, water, and detergent, further causing an increase in user costs and/or a reduction in
performance.
pag. 25
EN
10. SIGNALS AND ALARMS
10.1 Signals
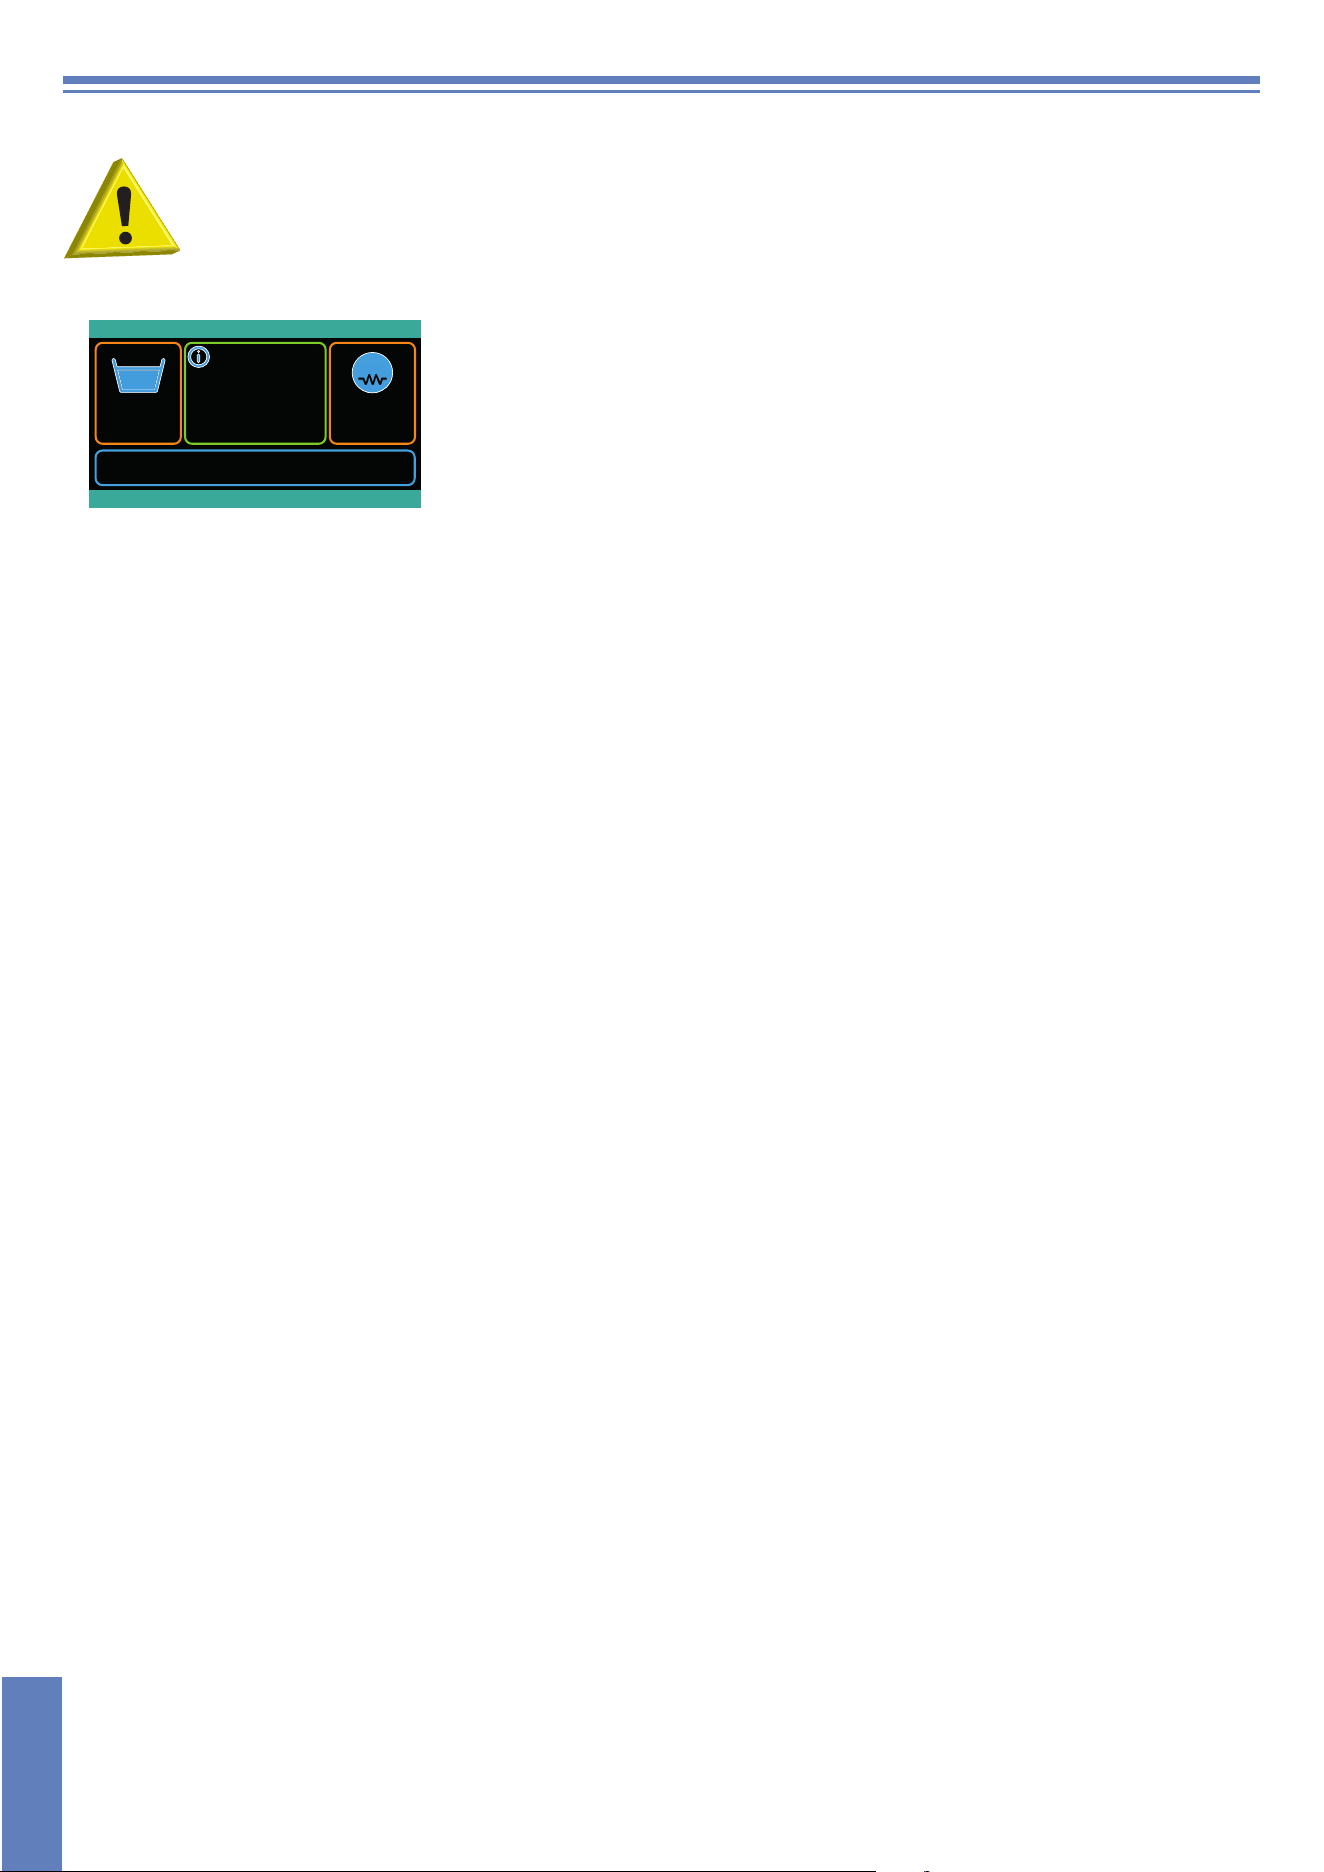
During the operation, the machine signals other situations in addition to alarms that need the operator attention.
In any case the relative information automatically appears on the display and remains visible until the operator execute the
necessary actions.
B
B
12:00 01/01/21
165°F 176°F
INFO+-EXIT
RINSE-AID LEVEL
WASHING 1
DRAINING
Signal screen example.
pag. 26
EN
10.2 Alarms
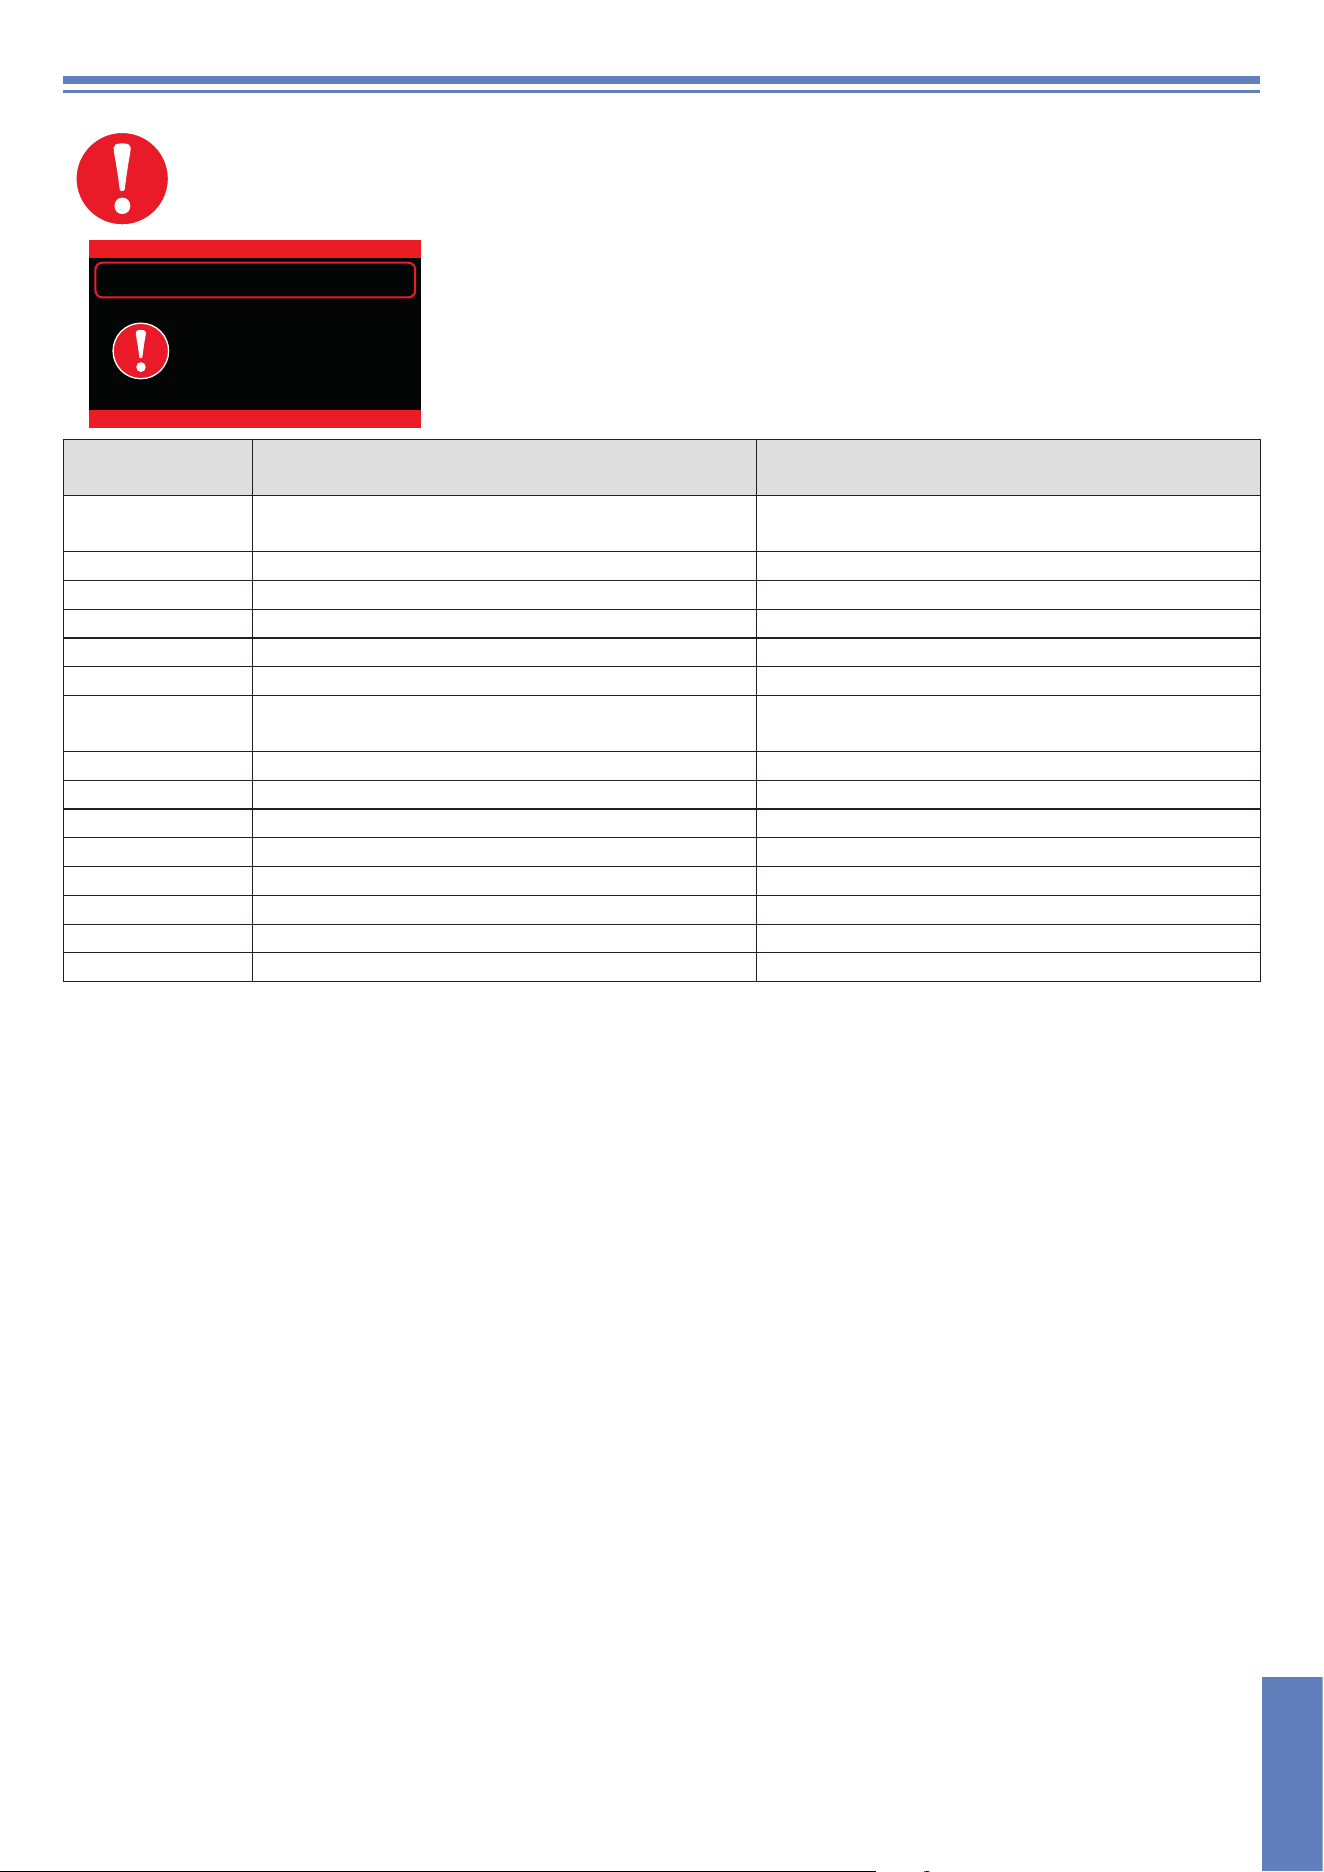
The alarms are displayed on a dedicated screen that overlap the current display at the time the alarm occurs.
Each alarm screen gives precise information about the meaning of the alarm and which are the operation the
operator can run.
12:00 01/01/21
BOILER FILLING FAIL
ALARM B1
Alarm screen example.
TYPE OF
ALARM
CAUSE REMEDIES
B1 BOILER NOT FILLED
Open the water supply valve and verify a proper
water supply flow. Contact Technical Service
B2 BOILER SENSOR FAILURE Contact Technical Service
B3 BOILER NOT HEATED Contact Technical Service
B4 FAILURE IN RINSING Contact Technical Service
B5 BOILER OVERTEMPERATURE Contact Technical Service
B9 BOILER SAFETY THERMOSTAT Contact Technical Service
E1 WASH-TANK NOT FILLED
Open the water supply valve. Contact Technical
Service
E2 WASH-TANK SENSOR FAILURE Contact Technical Service
E3 WASH-TANK NOT HEATED Contact Technical Service
E5 WASH-TANK OVERTEMPERATURE Contact Technical Service
E6 TANK DRAINING FAILURE Contact Technical Service
E7 WASH PUMP THERMAL RELAY 1 Contact Technical Service
E8 TANK SAFETY THERMOSTAT Contact Technical Service
F7* WASH PUMP THERMAL RELAY 2 Contact Technical Service
Z6 TANK LOW LEVEL: Contact Technical Service
*Not available on machines with a 550 x 665 mm basket.
pag. 27
EN
11. TROUBLESHOOTING
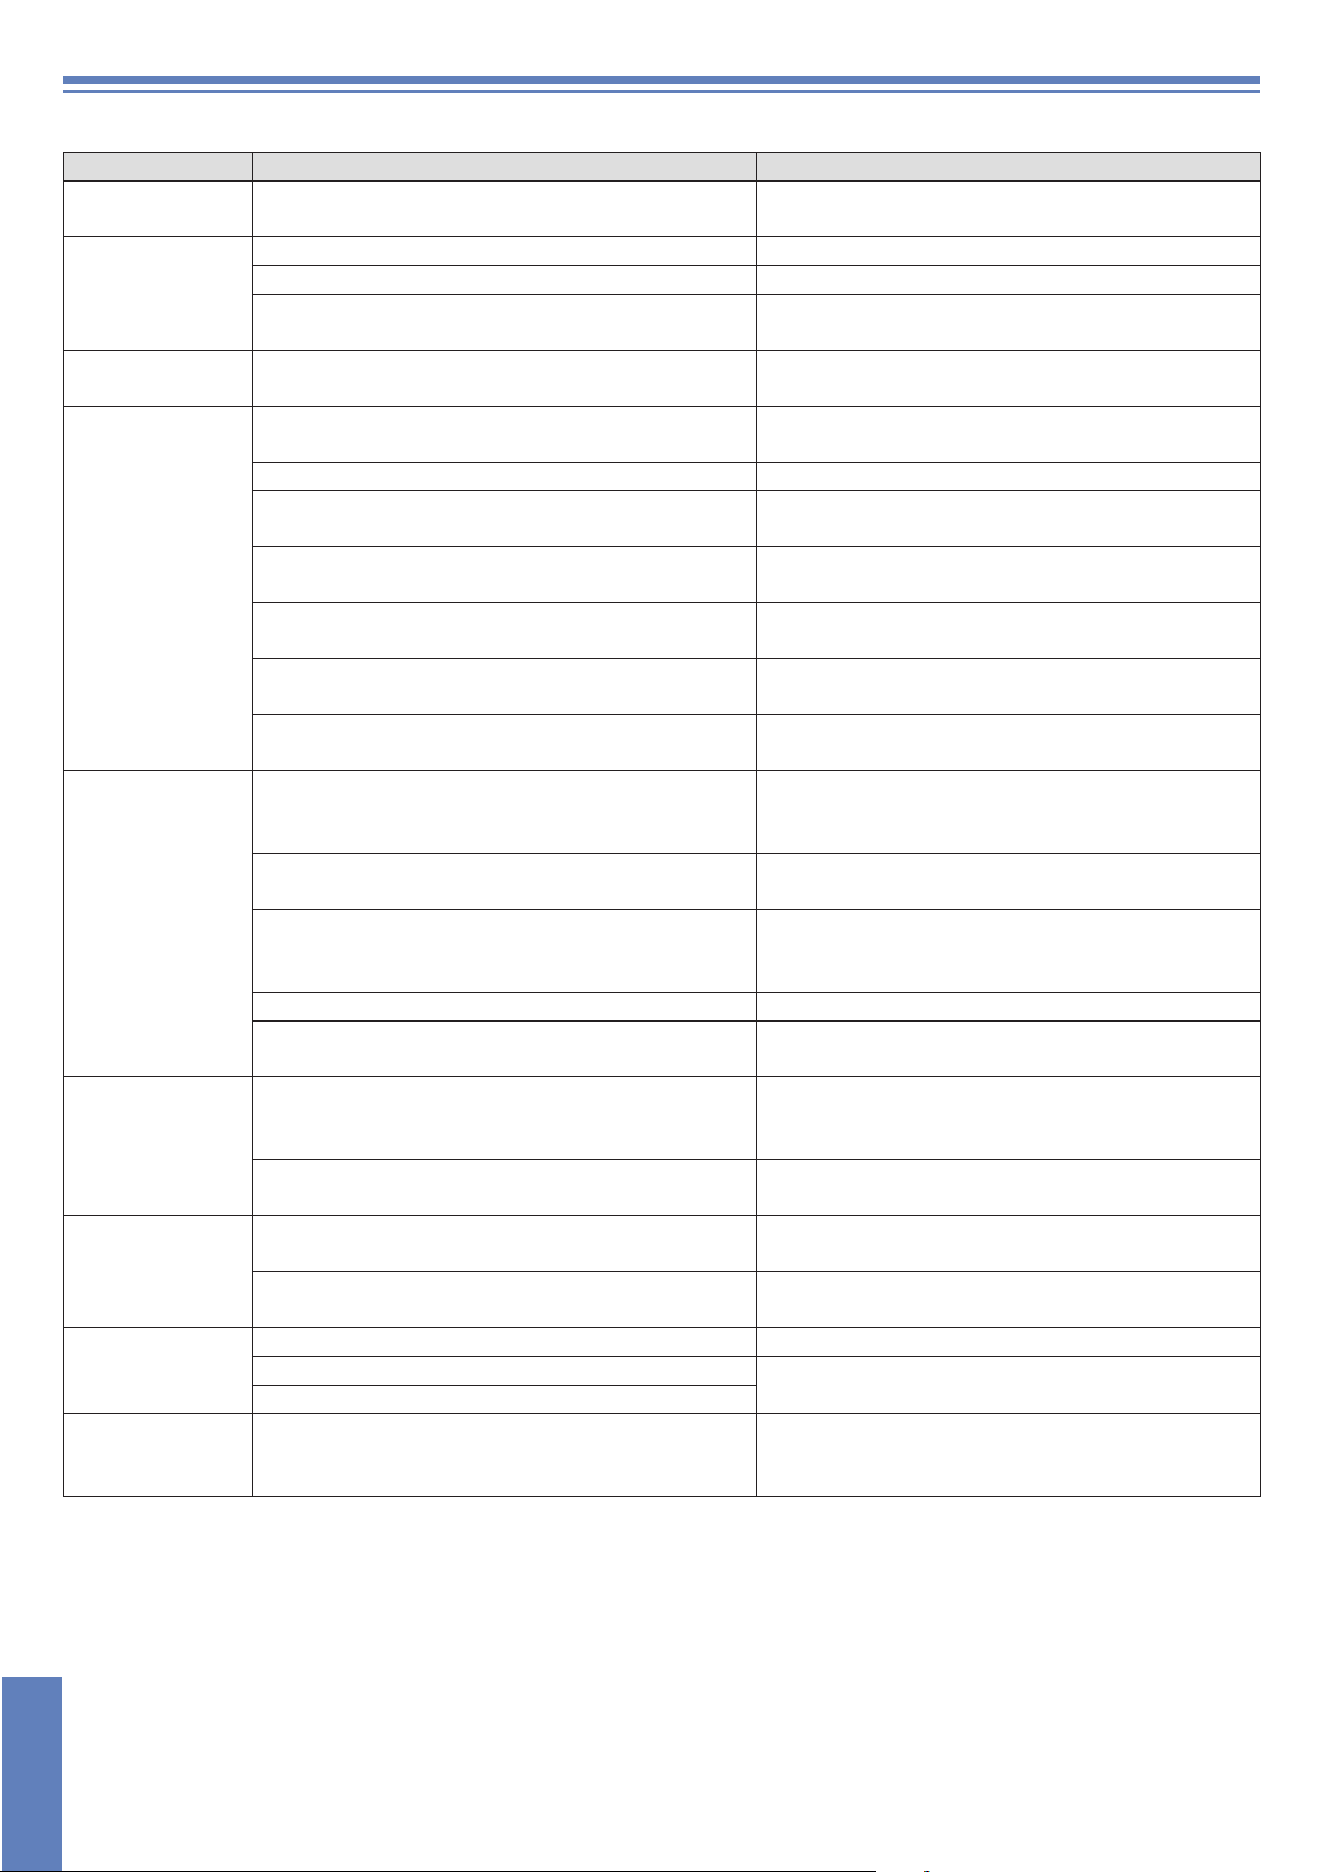
Type of Problem Possible Causes Cure
The appliance
does not start
The main switch is turned off Turn on the switch
The appliance
does not draw
water
The water supply valve is closed Open the water sypply valve
Solenoid-valve filter blocked Clean the filter
Faulty pressure switch
Replace the pressure switch (call the Technical
Assistance service)
Flashing of the
cycle lamp
See chapter "Alarms" ---
Unsatisfactory
washing results
The washing nozzles are clogged or the washing
arms do not rotate
Unscrew and clean the nozzles and the rotating
column, refit them correctly in their seats
Unremoved grease or starch Detergent concentration too low
Presence of foam
Use non-foaming detergent or use less of same
detergent
The filter is too dirty
Remove the filter, clean it with a brush under
running water and refit in its seat
Check tank temperature (which must be between
159 °F and 165 °F - 71 °C and 74 °C)
Adjust the thermostat or check correct heating
element operation
Length of washing cycle inadequate for type of
grime build-up
Choose a longer cycle if possible, otherwise repeat
wash cycle
Wash water too dirty
Empty water from the tub, clean filters; refill the tub
and correctly reposition the filters
The objects are
not properly dried.
Insufficient rinse aid
Increase the amount of rinse aid by turning the
screw on the dispenser (see paragraph
Rinse aid
dispenser)
The rack is not suitable for the objects.
Use the suitable rack which gives the objects an
inclined position so that water can rinse away.
The washed items may have been sitting in the
wash chamber too long.
As soon as the cycle stops, remove the rack with
the objects so that they can dry more quickly in the
air.
Rinse temperature under 185 °F (85 °C) Check the temperature of the boiler thermostat
Surface of objects too rough or porous for material
wear.
Replace type of the objects used.
Streaks and spots
on glasses and
dishes
Too much rinse aid
Decrease the amount of rinse aid by turning the
fine-adjustment screw on the dispenser (see
paragraph
Rinse aid dispenser)
The water is too hard
Check the water quality. Water must not exceed 8
°f (5 °d) in hardness
The appliance
suddenly stops
during the cycle
The appliance is connected to an overloaded
circuit
Connect the appliance separately (call the
Technical Assistance service)
A safety device has been activated
Check safety devices (call the Technical
Assistance service)
During wash cycle
the machine stops
and draws water
Water from the previous day has not been replaced Empty the tub and refill it
The tub water temperature is too high
Have the Technical Assistance service check the
thermostat and the pressure switch
Faulty pressure switch
The washing
pump doesn't
work
The pump is blocked Call the Technical Assistance service
Note: For any other problems, contact the Technical Assistance service.
The manufacturer reserves the right to alter the technical characteristics without prior notice.
pag. 28
EN