
July 2023
QSG1_A_EN
Quick Start Guide
@ReolinkTech https://reolink.com
58.03.001.0359
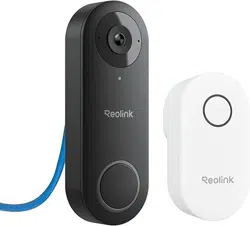
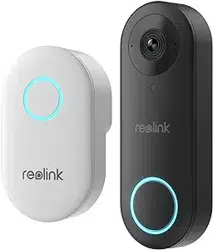
Apply to: Reolink Video Doorbell WiFi / PoE
English English1 2
What's in the Box 2
Doorbell Introduction 3
Set up the Doorbell 5
Set up the Chime 8
Install the Doorbell 10
Remove the Mounting Plate 16
Specication 17
NoticationofCompliance 17
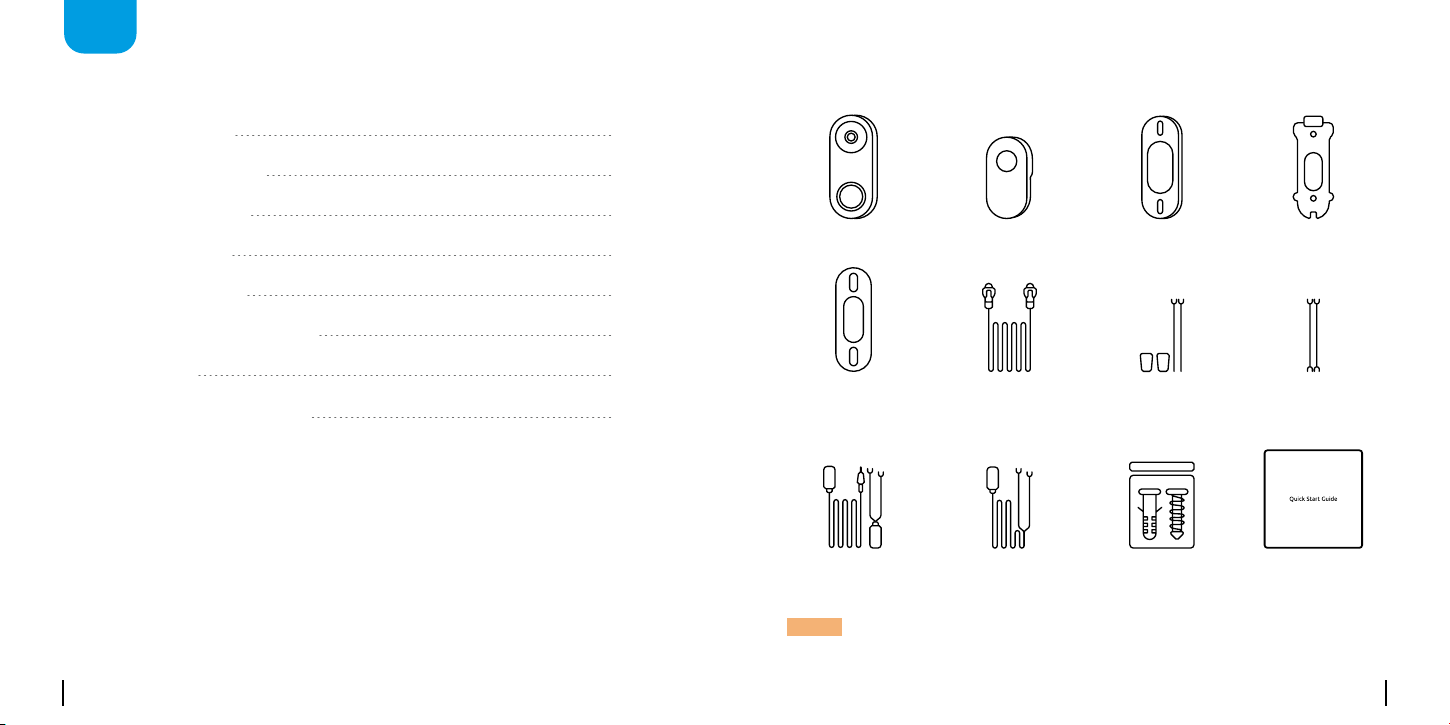
What's in the Box
Quick Start Guide
Doorbell Chime
Mounting
Hole Template
Pack of Screws
Extension Cable
Mounting Plate
1m
Ethernet Cable
Corner Wedge
Jumper Cable
Power Extension
Cable*
Power Adapter*
EN
Content
NOTE: The Reolink Video Doorbell PoE doesn’t come with a power
adapter and power extension cable.
English English3 4
POE Micro SD
RST
LAN Micro SD
RST
Devices
Cloud
You haven't added any device. Please click
the"+"button in the top right corner to add
1
2
1
1
2
2
POE Micro SD
RST
LAN Micro SD
RST
Devices
Cloud
You haven't added any device. Please click
the"+"button in the top right corner to add
1
2
1
1
2
2
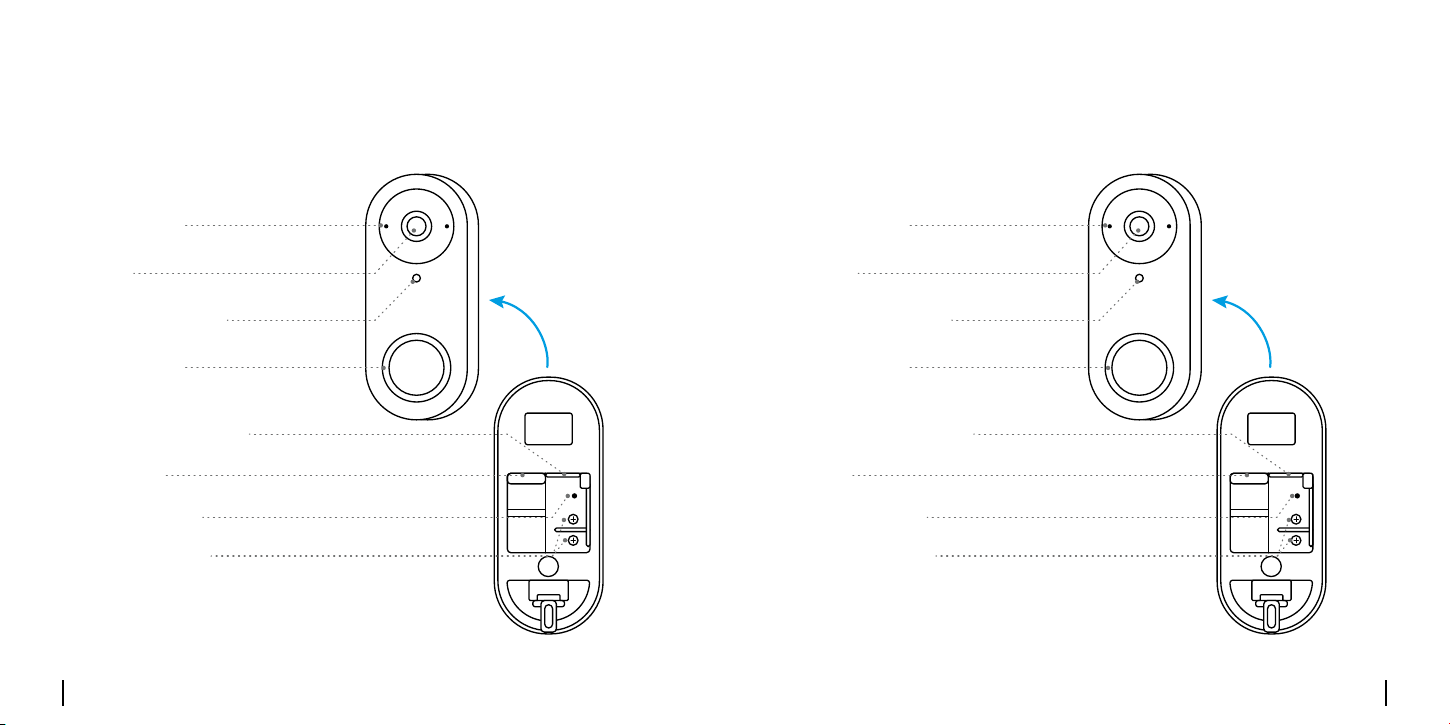
Doorbell Introduction
Built-in Mic Built-in Mic
Daylight Sensor Daylight Sensor
Lens Lens
Micro SD Card Slot Micro SD Card Slot
Reset Button Reset Button
Wiring Screws Wiring Screws
Status LED Status LED
PoE Port LAN
Video Doorbell PoE
Video Doorbell WiFi
English English5 6
POE Micro SD
RST
LAN Micro SD
RST
Devices
Cloud
You haven't added any device. Please click
the"+"button in the top right corner to add
1
2
1
1
2
2
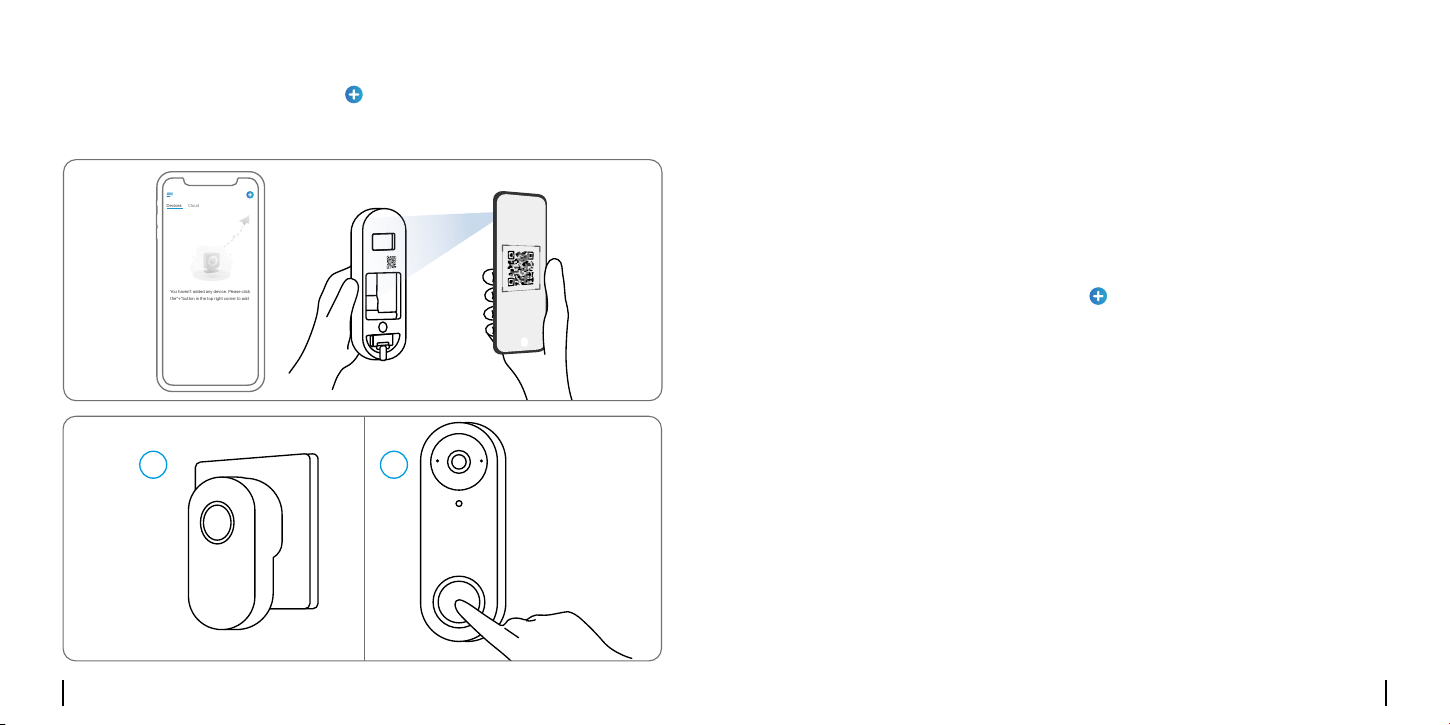
Set up the Doorbell
Set up the Doorbell on Phone
NOTE:IftheReolinkAppisalreadyexisted,pleasecheckifitisthe
newest;ifno,pleaseupdateit.
NOTE:ItisrecommendedtosetuptheInternetbeforetheInstallation.
MakesuretheY-shapeplugsareseparatefromeachother.
Step 1
Scan to download the Reolink
AppfromtheAppStoreor
GooglePlayStore.
RouterPoE Switch
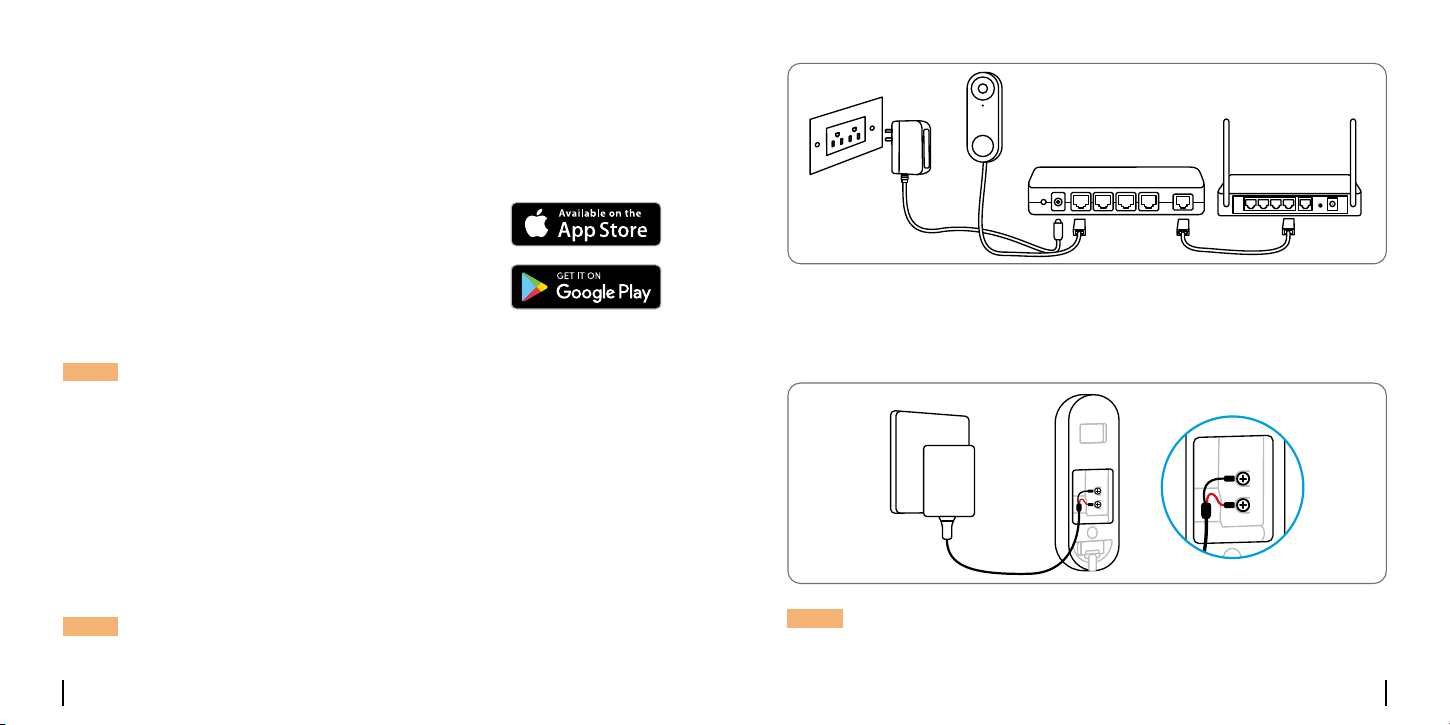
Step 2
Power on the video doorbell.
PoE Version:
1.PowerthedoorbellonbyconnectingittoaPoESwitch/Injectorora
Reolink PoE NVR (not included in the package).
2.ConnectthePoESwitch/Injector/ReolinkPoENVRtotheLANPorton
the router.
NOTE:TheReolinkNVRshouldbeupgradedtothelatestfirmware
version.
WiFiVersion:ConnecttheY-shapeplugstothescrewsonthebackofthe
doorbell,thenpoweritonwiththepoweradapter.
POE Micro SD
RST
LAN Micro SD
RST
Devices
Cloud
You haven't added any device. Please click
the"+"button in the top right corner to add
1
2
1
1
2
2
English English7 8
Step 1
DownloadandinstalltheReolinkClient.Gotohttps://reolink.com>
Support>App&Client
Step 2
Power on the video doorbell.
Step 3
LaunchtheReolinkClient.Clickthe“”buttonandinputtheUID
numberofthedoorbelltoaddit.
Step 4
Followtheonscreeninstructionstofinishtheinitialsetup.
Set up the Doorbell on PC (Optional)
Step 3
LaunchtheReolinkApp.Clickthe“”buttoninthetoprightcornerand
scantheQRcodeonthedoorbellandfollowtheonscreeninstructionsto
finishtheinitialsetup.
POE Micro SD
RST
LAN Micro SD
RST
Devices
Cloud
You haven't added any device. Please click
the"+"button in the top right corner to add
1
2
1
1
2
2
POE Micro SD
RST
LAN Micro SD
RST
Devices
Cloud
You haven't added any device. Please click
the"+"button in the top right corner to add
1
2
1
1
2
2
English English9 10
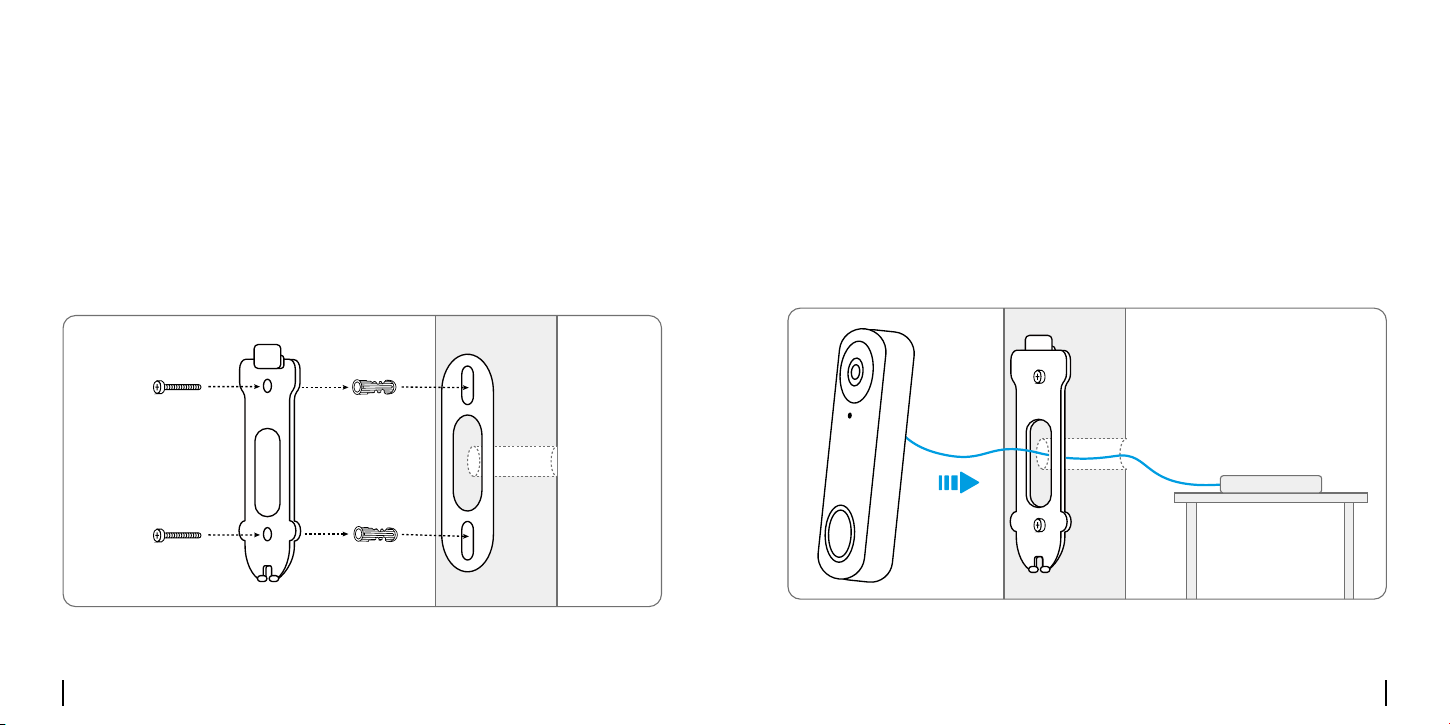
Install the Doorbell
Step 1
Putthemountingholetemplateonthewallbythedooranddrillholesas
shown.
Step 2
Install the mounting plate using the long screws provided through the
two holes.
For the PoE Version:
POE Micro SD
RST
LAN Micro SD
RST
Devices
Cloud
You haven't added any device. Please click
the"+"button in the top right corner to add
1
2
1
1
2
2
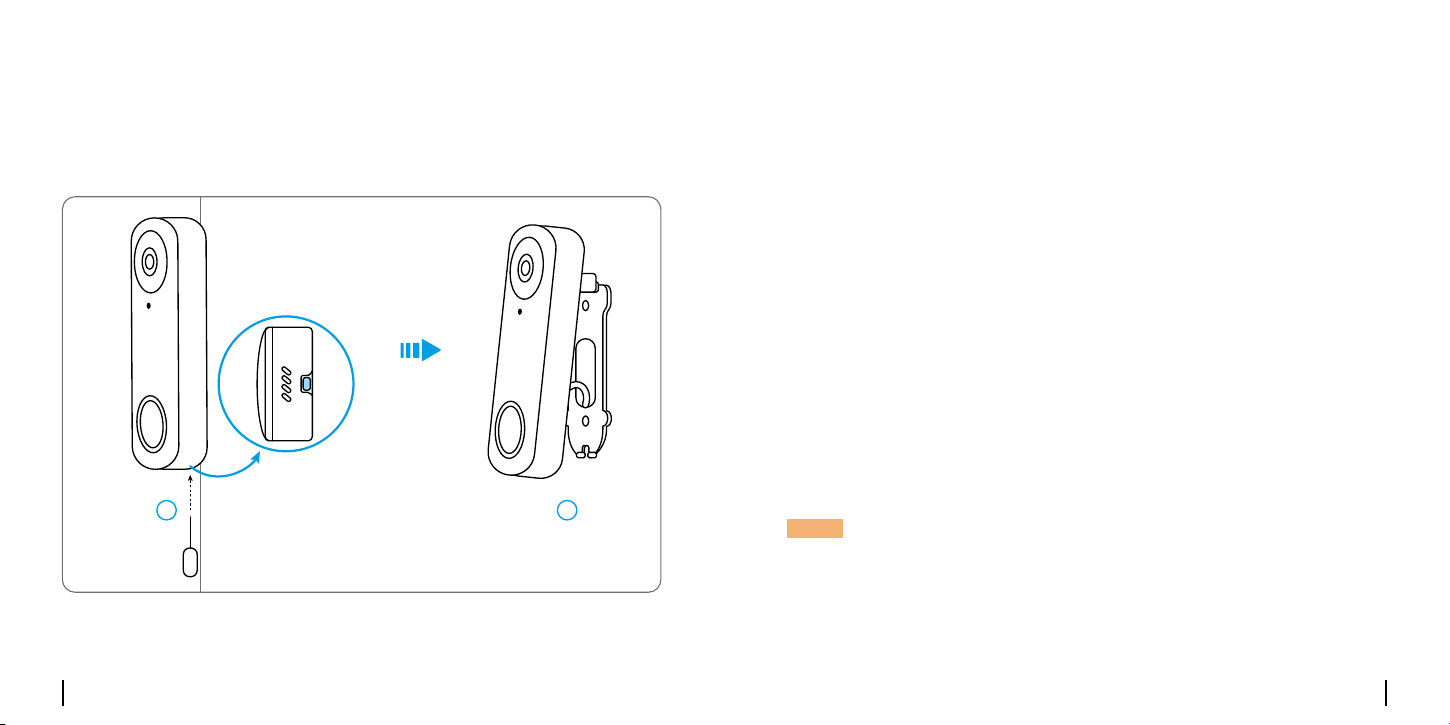
Step 3
Run the Ethernet cable through the mounting plate and the hole on the
walltoconnectittothedoorbell,thenattachthedoorbelltotheplate.
Step 4
ThedoorbellispoweredbyconnectingtheotherendoftheEthernet
cable to a PoE device.
POE Micro SD
RST
LAN Micro SD
RST
Devices
Cloud
You haven't added any device. Please click
the"+"button in the top right corner to add
1
2
1
1
2
2
PoE
English English11 12
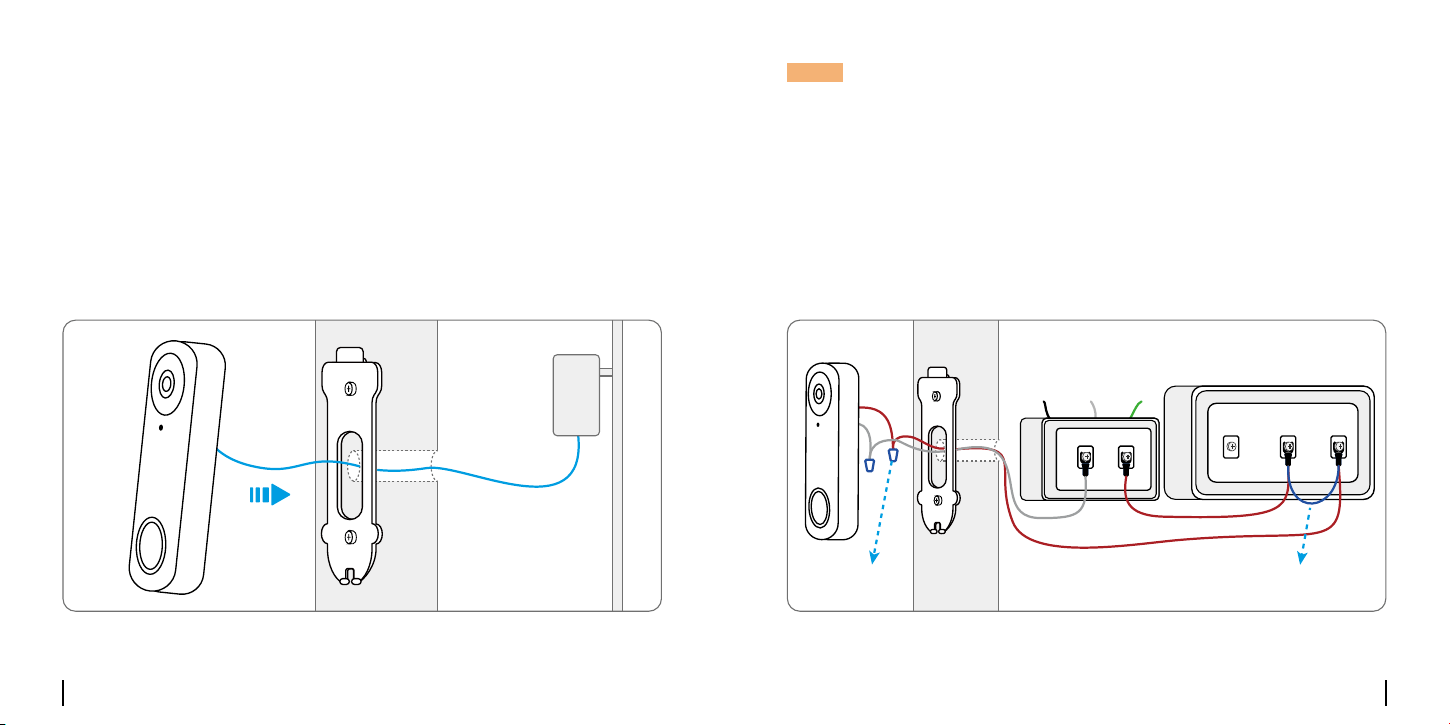
For the WiFi Version:
Step 3
Run the power adapter through the mounting plate and the hole on the
walltoconnectittothedoorbell,thenattachthedoorbelltotheplate.
Step 4
Plugthepoweradapterintoasocketnearthedoor.Usethelongpower
extensioncableifthesocketistoofarawayfromyourdoorbell.
POE Micro SD
RST
LAN Micro SD
RST
Devices
Cloud
You haven't added any device. Please click
the"+"button in the top right corner to add
1
2
1
1
2
2
POE Micro SD
RST
LAN Micro SD
RST
Devices
Cloud
You haven't added any device. Please click
the"+"button in the top right corner to add
1
2
1
1
2
2
NOTE:ReolinkVideoDoorbellPoE&WiFicanalsobepoweredbythe
existingdoorbellwiringsystem.Insuchcase,youarerequiredtofirst
bypasstheexistingmechanicalchimewiththejumpercabletoget
sufficientpower.Withoutsufficientpower,thedoorbellmayrestartand
hasanunstableconnection,andthemechanicalchimemayvibrate
and generate noise.
Ifthewireisnotlongenough,usetheextensioncable,asshownbelow.
Aftertheinstallation,theexistingmechanicalchimewillnotringanymore.
Usetheextensioncabletoextendthelengthoftheexistingpowercable
forthedoorbell,asshownbelow.
Mechanical ChimeDoorbell Transformer
Ground
Jumper cable Extension cable
NeutralAC
Rear FrontTrans
English English13 14
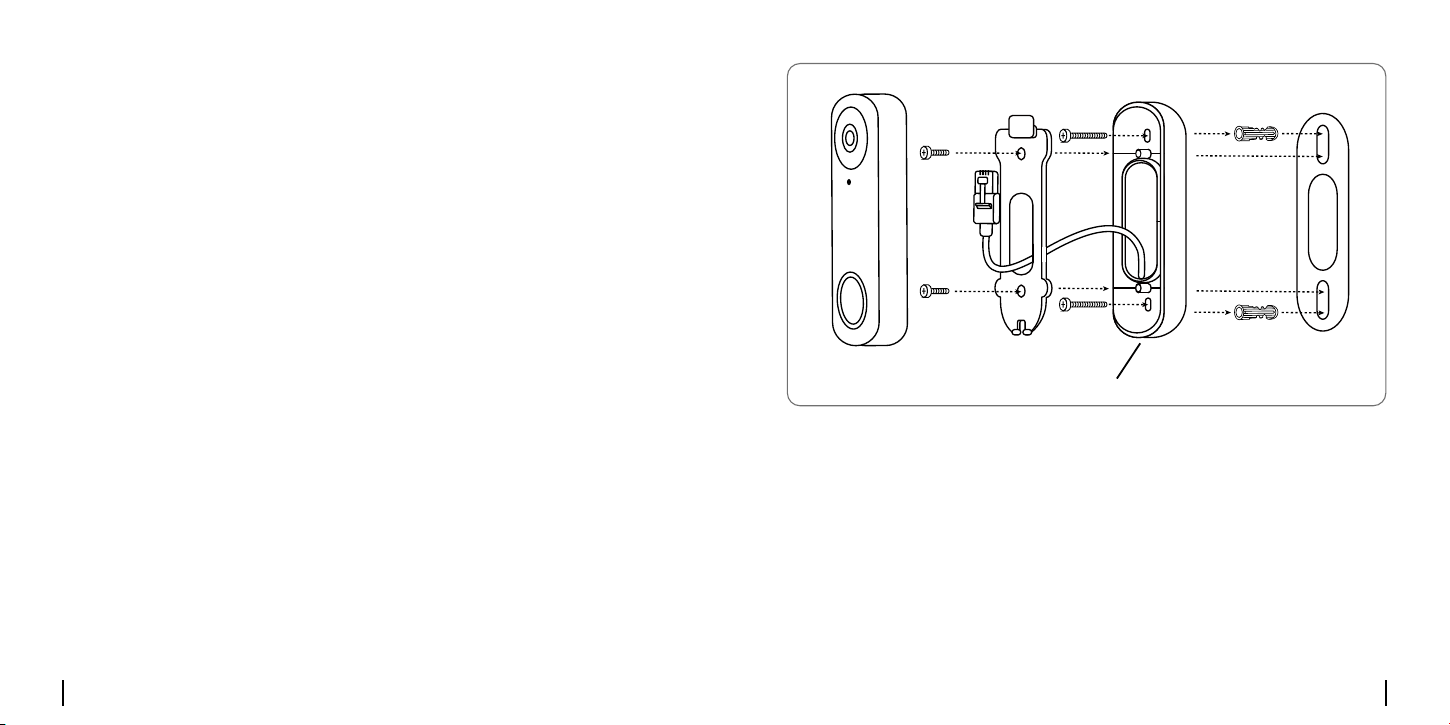
Install a Wedge (Optional)
Ifyouneedtoadjusttheangleofthedoorbell,youcanusethewedge
provided. (The Reolink Video Doorbell PoE is taken as an example)
Step 1
Put the mounting hole template on the wall and drill holes as shown.
Step 2
Install the wedge using the screws provided through the two holes. Ensure
thatthenotchedsideofthewedgeisfacingoutside.
Step 3
Screw the mounting plate to the wedge.
Step 4
RuntheEthernetcablethroughthewedgeandmountingplate,and
attach the doorbell to the plate.
POE Micro SD
RST
LAN Micro SD
RST
Devices
Cloud
You haven't added any device. Please click
the"+"button in the top right corner to add
1
2
1
1
2
2
Notched Side Facing Doorbell
English English15 16
Remove the Doorbell
IfyouwanttoremovetheDoorbellfromthemountingplate,youmay
use the reset needle to poke the bottom.
POE Micro SD
RST
LAN Micro SD
RST
Devices
Cloud
You haven't added any device. Please click
the"+"button in the top right corner to add
1
2
1
1
2
2
Specication
FieldofView:133.6°Horizontal,97.3°Vertical,180.4°Diagonal
Dimension:133x48x23mm
Weight:96g
Hardware Features
Notication of Compliance
ThisdevicecomplieswithPart15oftheFCCRules.Operationissubjectto
thefollowingtwoconditions:
thisdevicemaynotcauseharmfulinterference,andthisdevicemust
acceptanyinterferencereceived,includinginterferencethatmaycause
undesired operation.
FCC Compliance Statement
NOTE:Thisequipmenthasbeentestedandfoundtocomplywiththe
limitsforaClassBdigitaldevice,pursuanttopart15oftheFCCRules.
These limits are designed to provide reasonable protection against
harmfulinterferenceinaresidentialinstallation.Thisequipment
generatesusesandcanradiateradiofrequencyenergyand,ifnot
installedandusedinaccordancewiththeinstructions,maycause
English English17 18
harmfulinterferencetoradiocommunications.However,thereisno
guaranteethatinterferencewillnotoccurinaparticularinstallation.If
thisequipmentdoescauseharmfulinterferencetoradioortelevision
reception,whichcanbedeterminedbyturningtheequipmentoffandon,
theuserisencouragedtotrytocorrecttheinterferencebyoneormore
ofthefollowingmeasures:
• Reorient or relocate the receiving antenna.
•Increasetheseparationbetweentheequipmentandreceiver.
•Connecttheequipmentintoanoutletonacircuitdifferentfromthatto
which the receiver is connected.
•Consultthedealeroranexperiencedradio/TVtechnicianforhelp.
Changesormodificationsnotexpresslyapprovedbytheparty
responsibleforcompliancecouldvoidtheuser’sauthoritytooperatethe
equipment.
Reolink declares that the WiFi camera is in compliance with the essential
requirementsandotherrelevantprovisionsofDirective2014/53/EU,the
Simplified EU Declaration of Conformity
ThisequipmentcomplieswithFCCradiationexposurelimitssetforthfor
anuncontrolledenvironment.Thisequipmentshallbeinstalledand
operatedwithminimumdistance20cmbetweentheradiator&body.
FCC RF Exposure Warning Statements
PoEcameraisincompliancewithDirective2014/30/EU.
Thisproductcomeswitha2-yearlimitedwarrantythatisvalidonlyif
purchasedfromReolinkOfficialStoreoraReolinkauthorizedreseller.
Learnmore:https://reolink.com/warranty-and-return/.
Limited Warranty
NOTE:Wehopethatyouenjoythenewpurchase.Butifyouarenot
satisfiedwiththeproductandplantoreturn,westronglysuggestthat
youresetthecameratofactorydefaultsettingsbeforereturning.
This marking indicates that this product should not be disposed with
otherhouseholdwastes.throughouttheEU.Topreventpossibleharmto
theenvironmentorhumanhealthfromuncontrolledwastedisposal,
recycleitresponsiblytopromotethesustainablereuseofmaterial
resources.Toreturnyouruseddevice,pleaseusethereturnand
collectionsystemsorcontacttheretailerwheretheproductwas
purchased.Theycantakethisproductforenvironmentallysaferecycling.
Correct Disposal of This Product
UseoftheproductissubjecttoyouragreementtotheTermsofService
andPrivacyPolicyatreolink.com.Keepoutofreachofchildren.
Terms and Privacy
English English19 20
Thisdevicecontainslicence-exempttransmitter(s)/re
ceiver(s)thatcomplywithInnovation,ScienceandEconomic
DevelopmentCanada’slicence-exemptRSS(s).Operationissubjectto
thefollowingtwoconditions:
(1)Thisdevicemaynotcauseinterference.
(2)Thisdevicemustacceptanyinterference,includinginterferencethat
maycauseundesiredoperationofthedevice.
L’émetteur/récepteurexemptdelicencecontenudansleprésent
appareilestconformeauxCNRd’Innovation,SciencesetDéveloppement
économiqueCanadaapplicablesauxappareilsradioexemptsdelicence.
L’exploitationestautoriséeauxdeuxconditionssuivantes:
(1)L’appareilnedoitpasproduiredebrouillage;
(2)L’appareildoitacceptertoutbrouillage
radioélectriquesubi,mêmesilebrouillageestsusceptibled’en
compromettrelefonctionnement.
ISED Statements
ByusingtheProductSoftwarethatisembeddedontheReolinkproduct,
youagreetothetermsofthisEndUserLicenseAgreement(“EULA”)
betweenyouandReolink.Learnmore:https://reolink.com/eula/.
End User License Agreement
The device has been evaluated to meet general RF exposure
requirements.Thedevicecanbeusedinmobileexposureconditions.
The min separation distance is 20cm.
Déclarationd’expositionauxradiofréquencespourIC
L’appareilaétéévaluépourrépondreauxexigencesgénéralesen
matièred’expositionauxRF.L’appareilpeutêtreutilisédansdes
conditions d’exposition mobiles.
Ladistancedeséparationminimaleestde20cm.
Radio Frequency Exposure Statement for IC
2412MHz---2472MHz(EIRP<19dBm)
5150MHz---5350MHz(EIRP<18dBm)
5470MHz---5725MHz(EIRP<18dBm)
5745MHz---5825MHz(EIRP<14dBm)
OPERATING FREQUENCY (For WiFi Version)
(the maximum transmitted power)
Ifyouneedanytechnicalhelp,pleasevisitourofficialsupportsiteand
contactoursupportteambeforereturningtheproducts:
https://support.reolink.com.
Technical Support
ThefunctionsofWirelessAccessSystemsincludingRadioLocal
AreaNetworks(WAS/RLANs)withintheband5150-5350MHzfor
thisdevicearerestrictedtoindooruseonlywithinallEuropean
Unioncountries(BE/BG/CZ/DK/DE/EE/IE/EL/ES/FR/HR/IT/CY/LV/LT/
LU/HU/MT/NL/AT/PL/PT/RO/SI/SK/FI/SE/TR/NO/CH/IS/LI/UK(NI)