User Manual
20241203.76
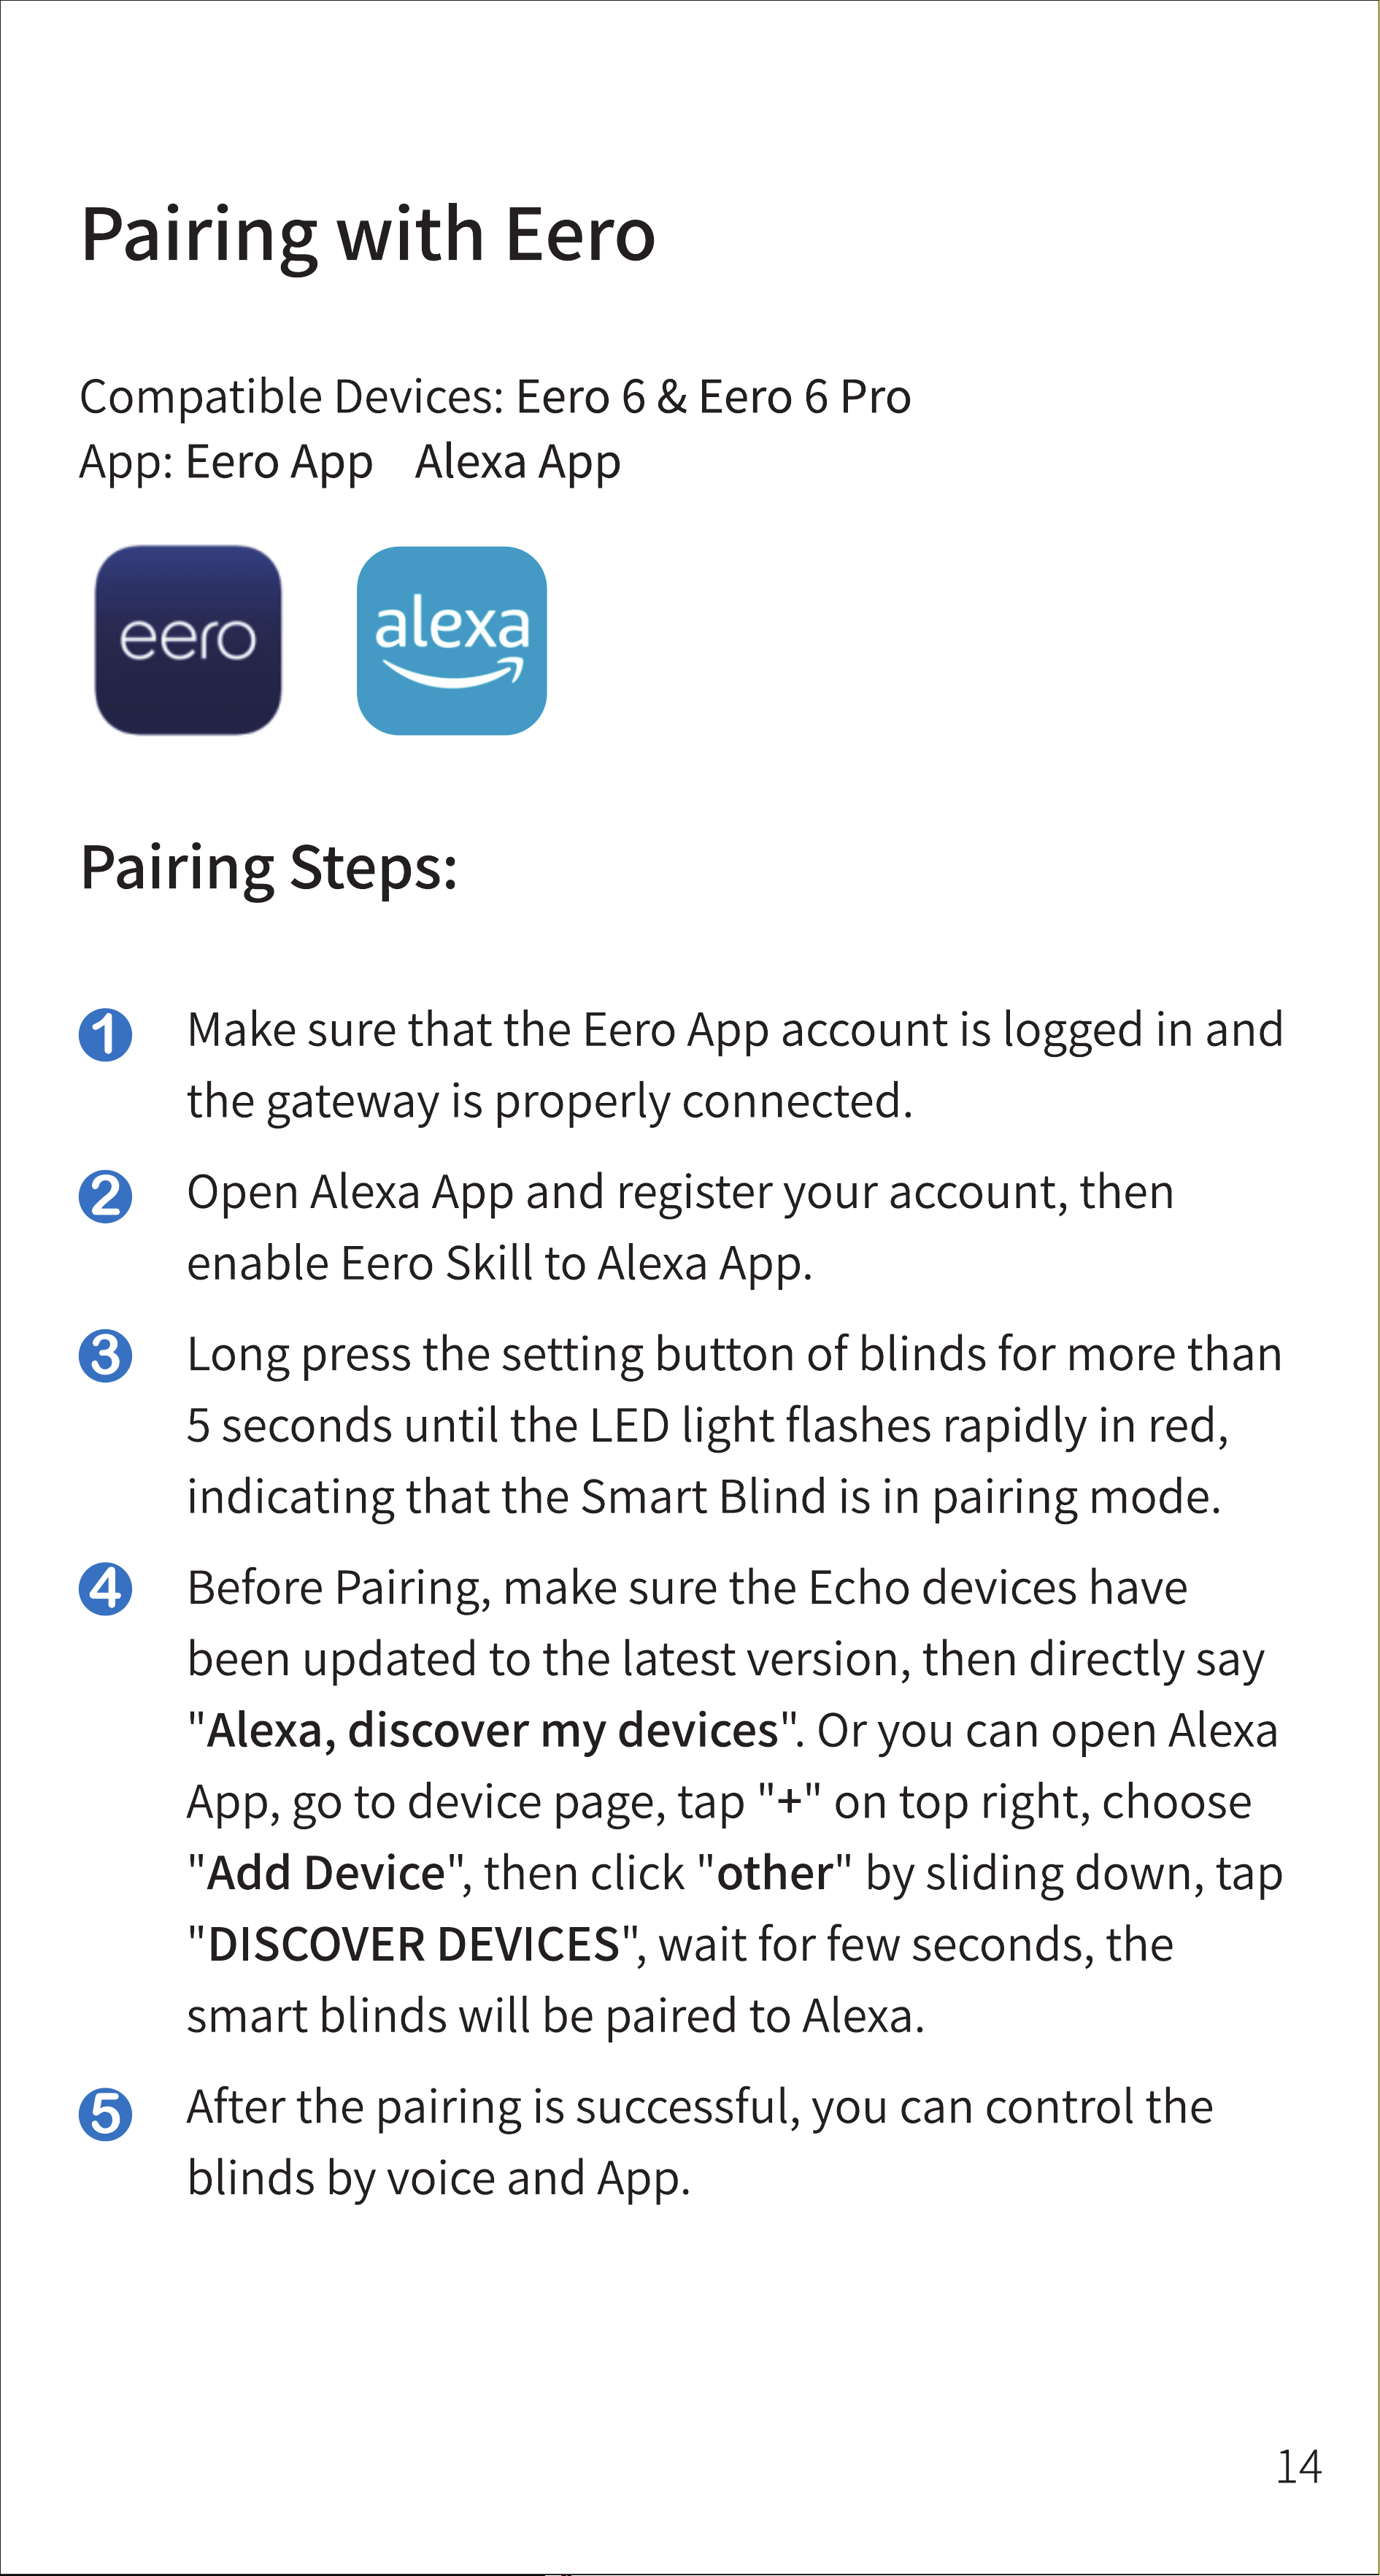
1
1
3
5
11
12
12
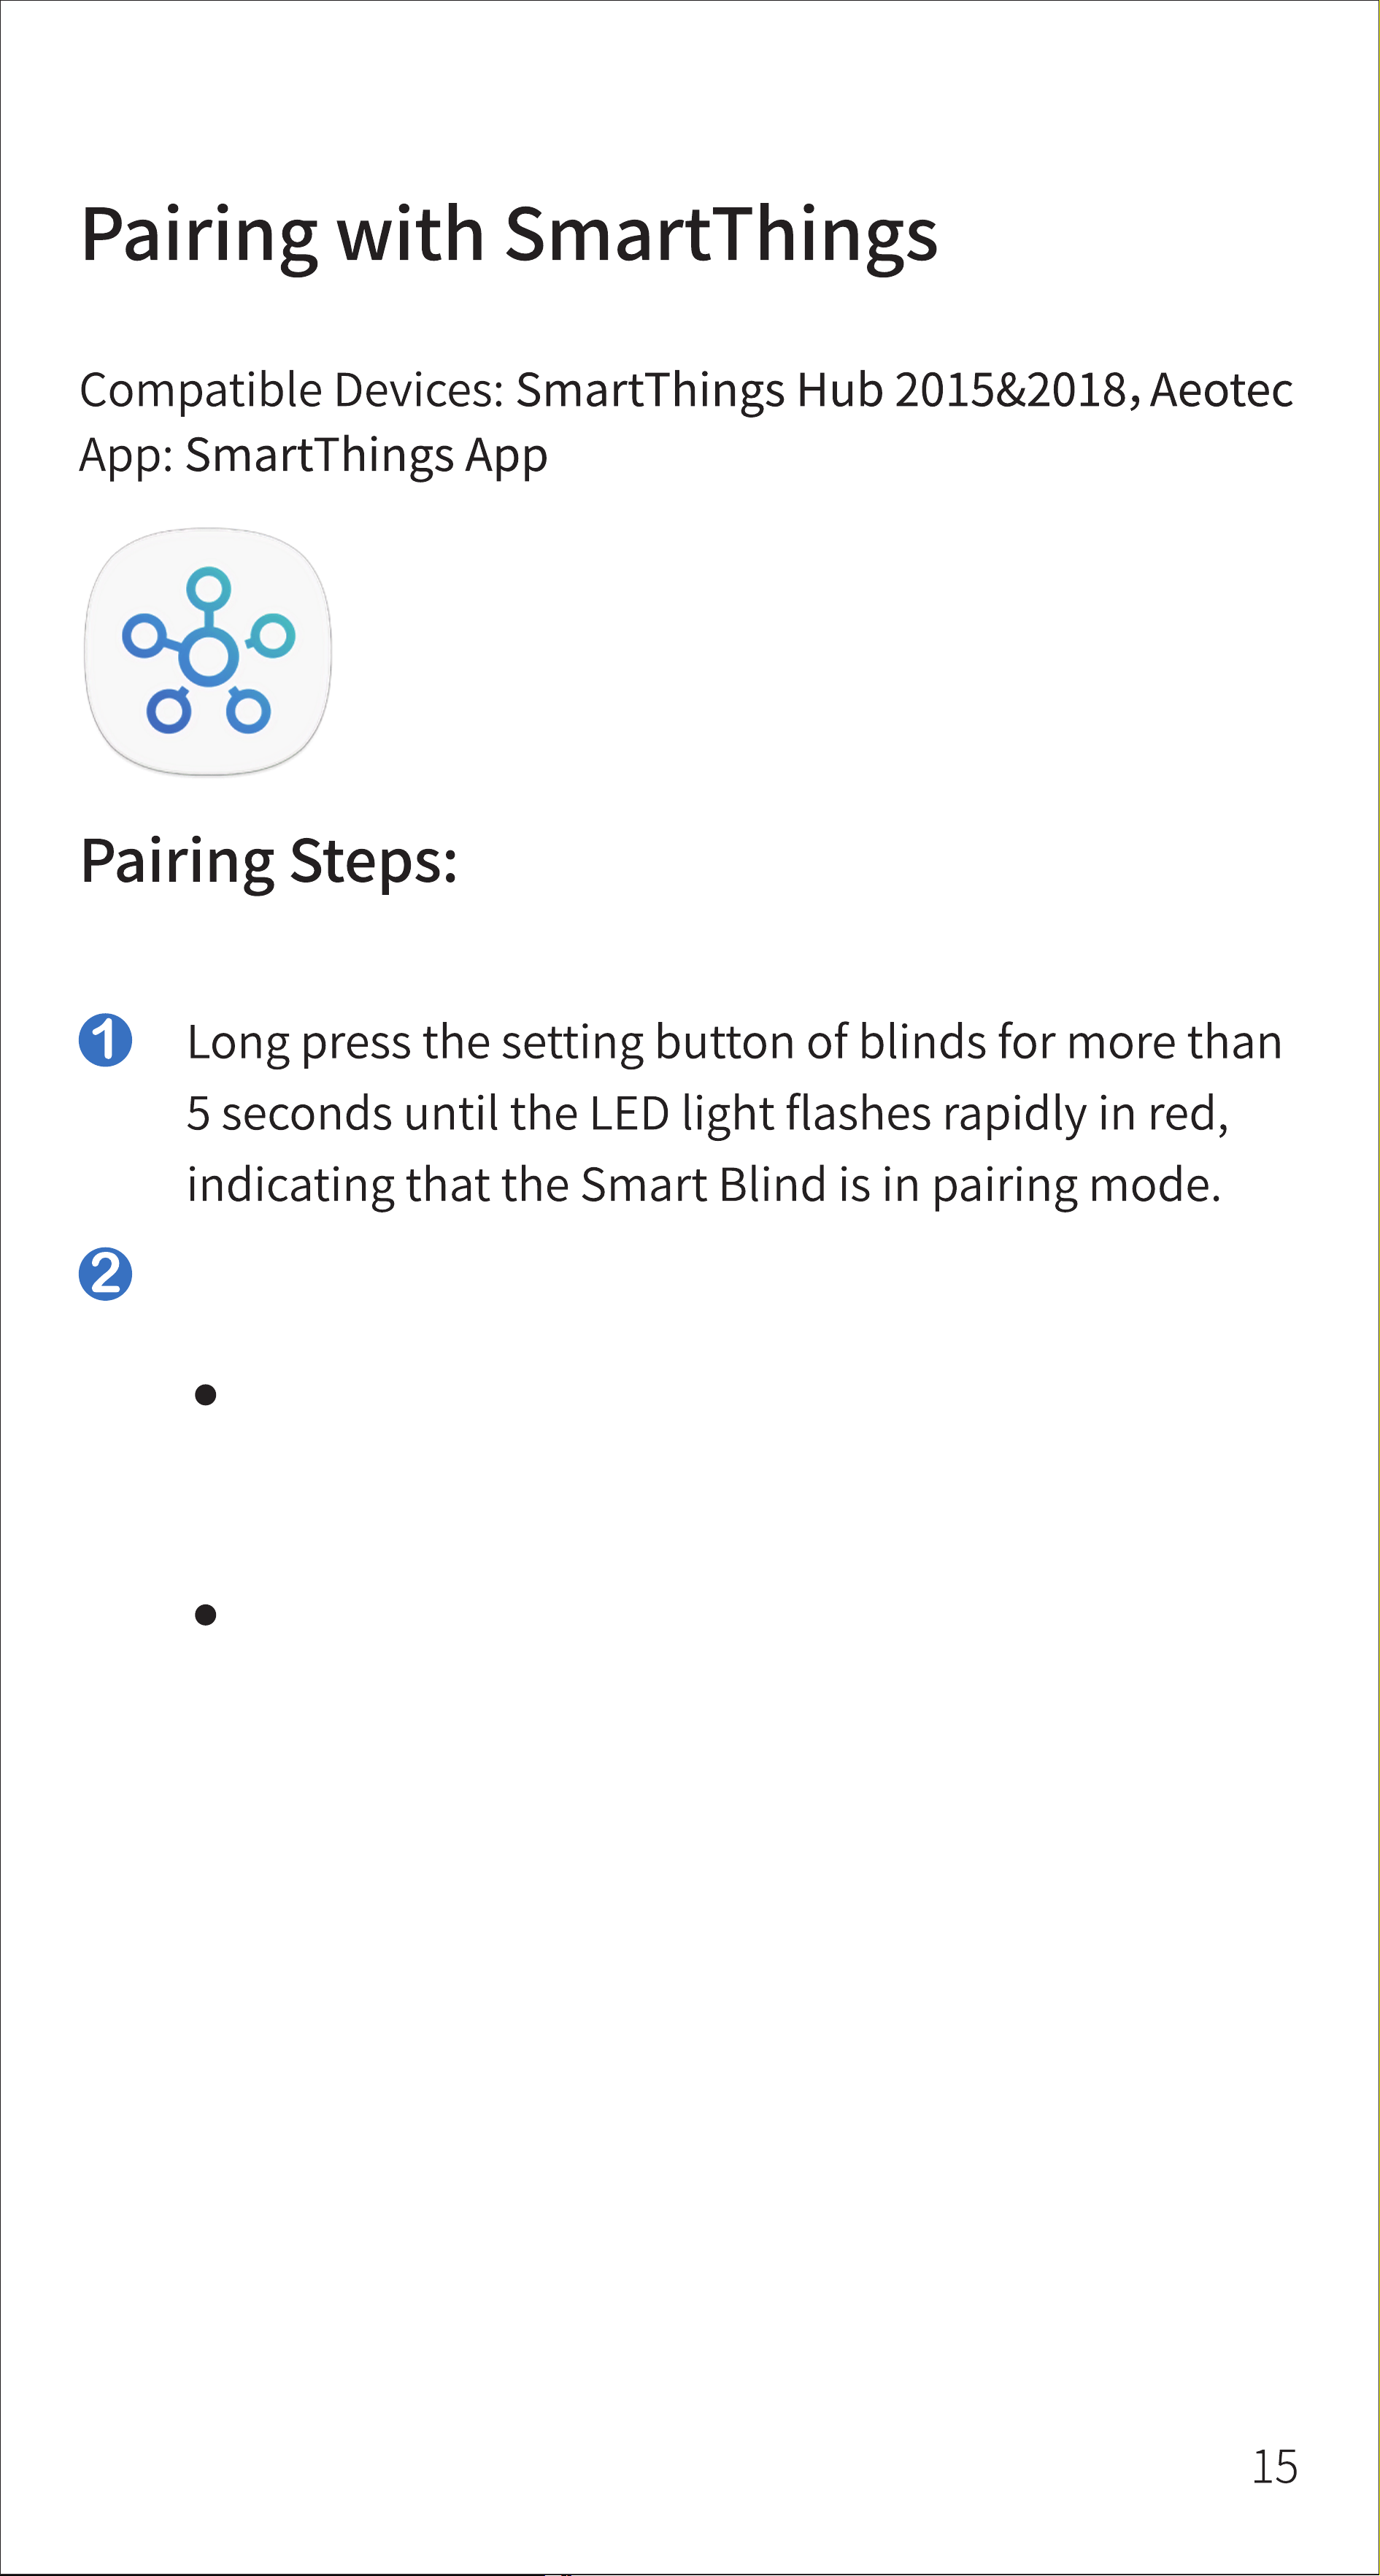
14
15
17
18
19
20
23
23
23
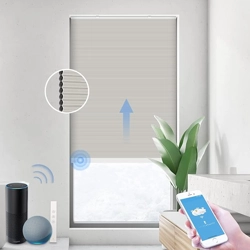
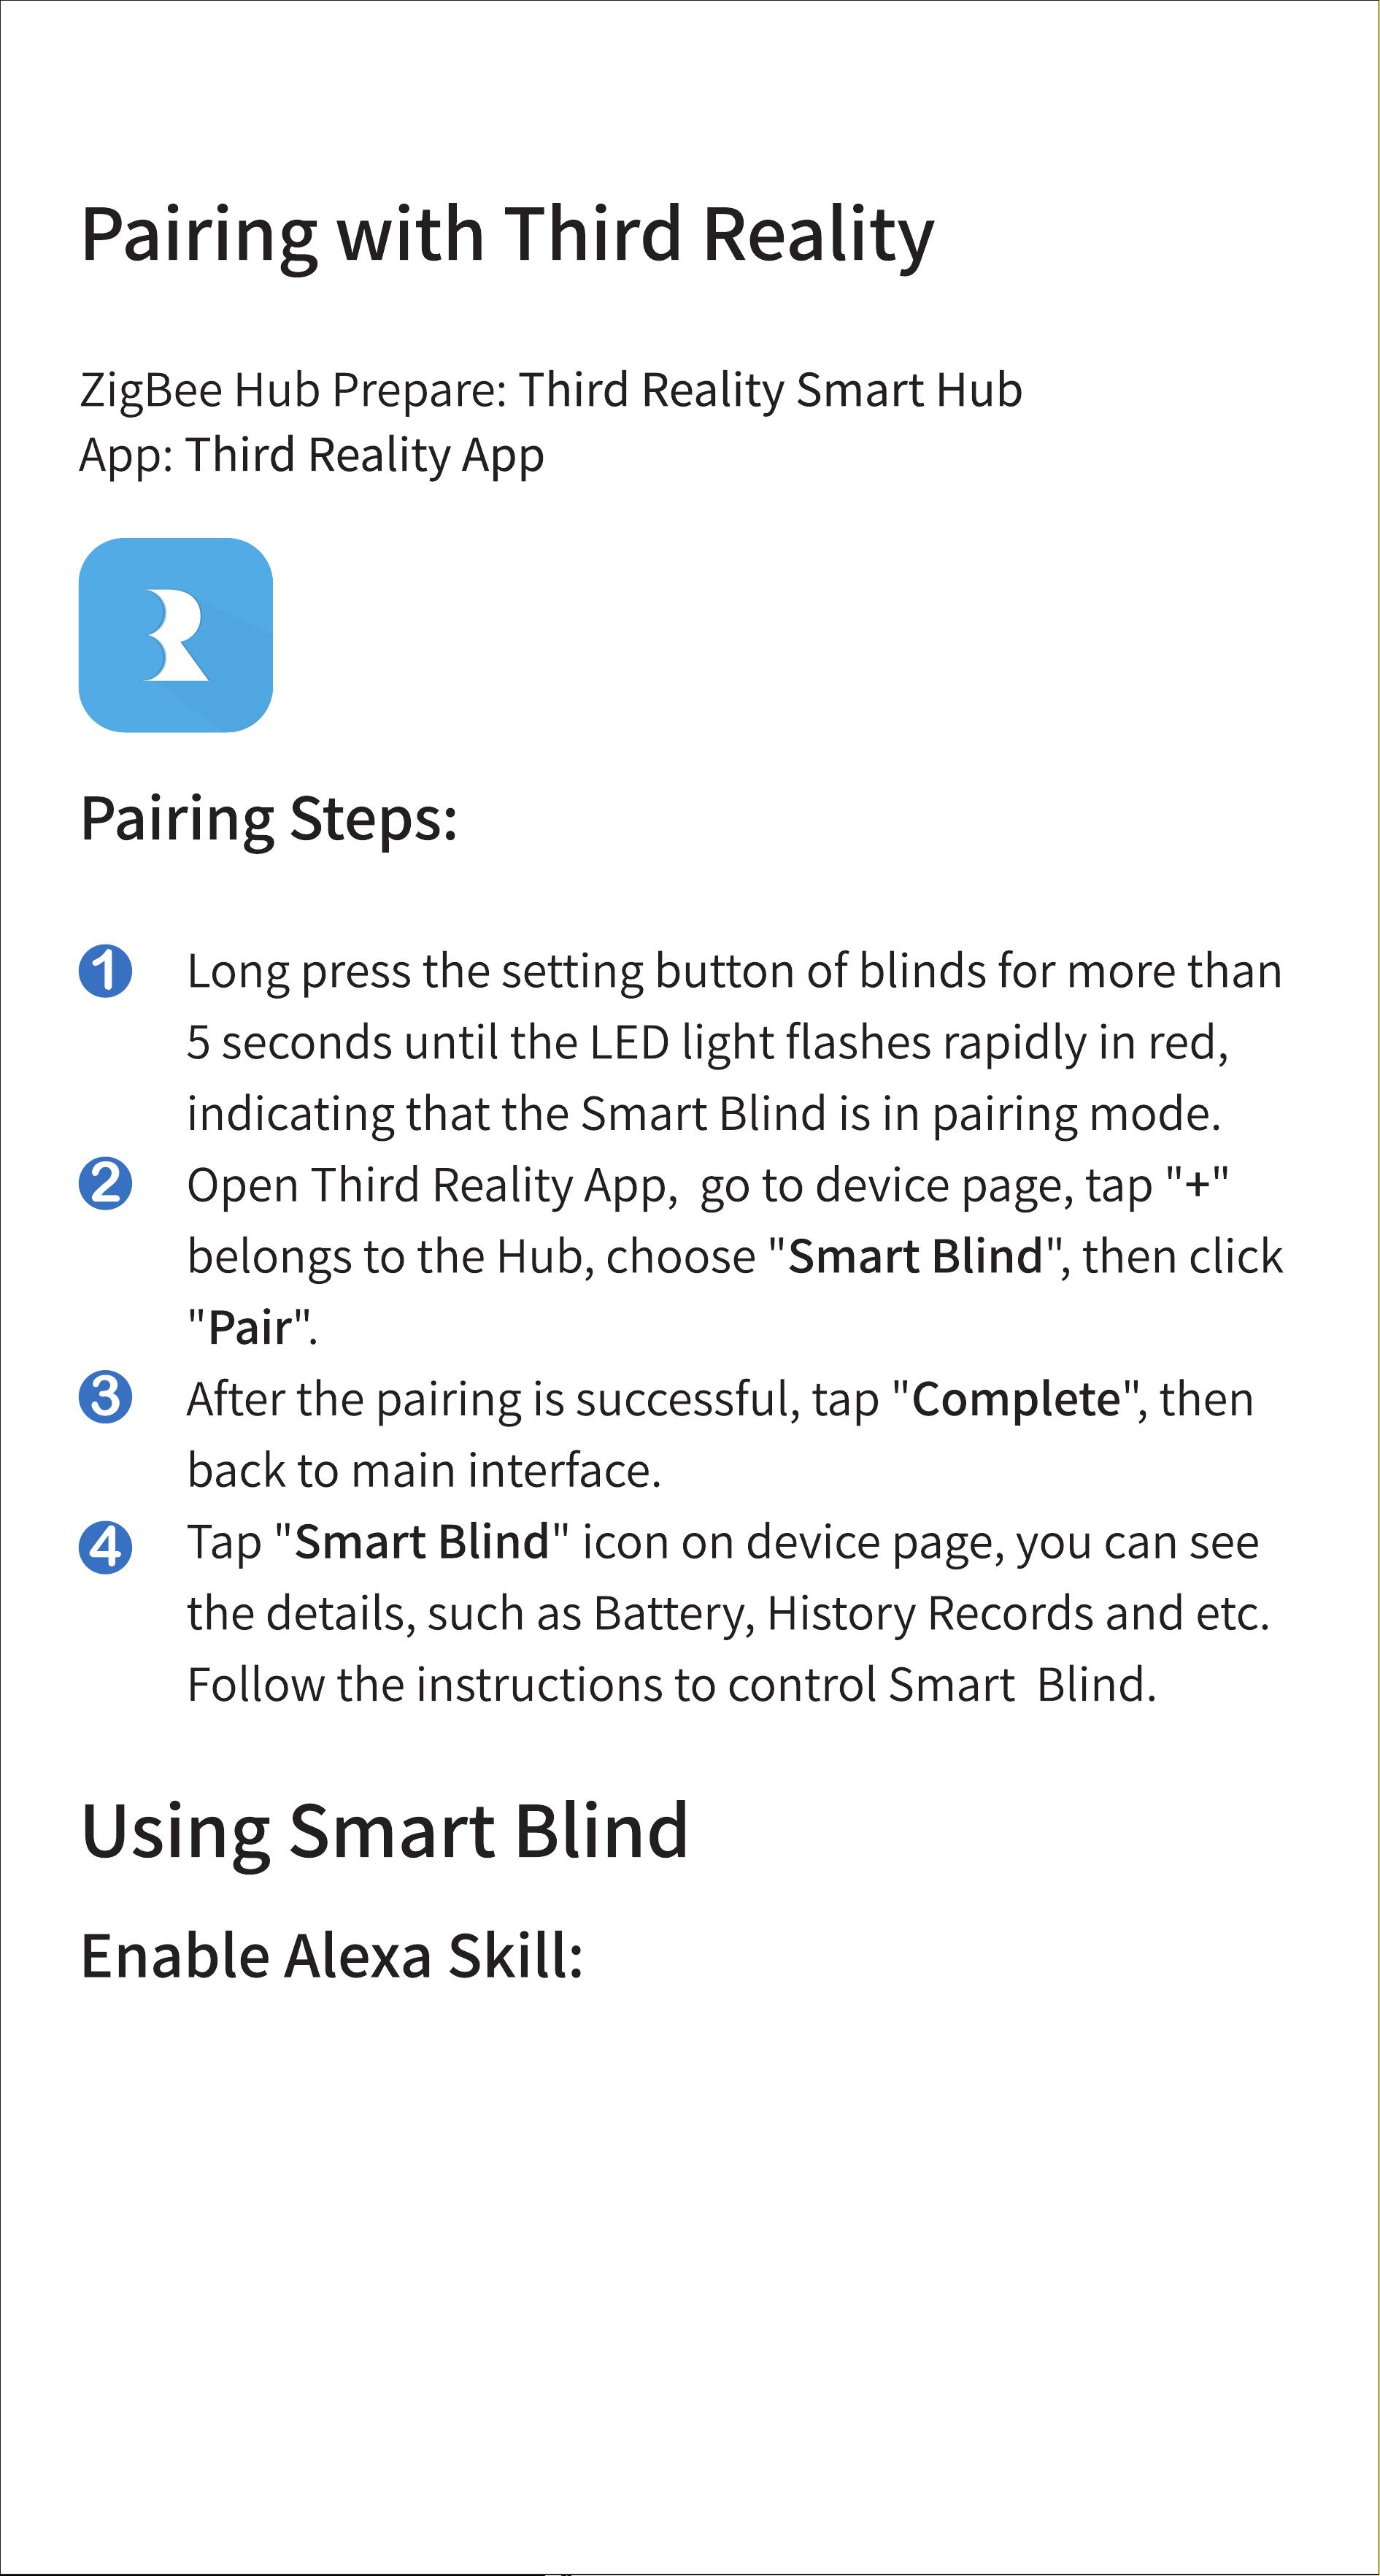
THIRDREALITY ZigBee Smart Blind, a smart honeycomb
curtain with simple installation and convenient control
(both online and offline). We offer 20 sizes, choose the size
according to the width of your window. No worry about
the height. The Smart Blind has a thoughtful design on the
bottom which can automatically detect the window sill
and then stop. Smart Blind is designed to run on Alkaline
Batteries power and the drive units is at the bottom of
blind, let the battery replacement becomes more conve-
nient. Install the battery to realize remote control, local
control. More intelligent control like voice control, app
control, create routines, setting schedules/timers and set-
ting groups can be achieved by connecting to gateways.
Such as compatible Echo devices(which have Zigbee hub
bulit-in), SmartThings, Home Assistant, Eero 6 & Eero 6
Pro, Third Reality Hub and Hubitat.
Directly work with compatible Echo devices
Smart Blind is a standard ZigBee device. It can direct-
ly work with compatible Echo devices with ZigBee
hub built-in (including Echo 4th Gen, Echo Plus 1st
Gen and 2nd Gen, Echo Show 10 2nd Gen and 3rd
Gen and Echo Studio).

Work with multiple platforms.
Smart Blind can also connect with SmartThings,
Home Assistant, Eero 6 & Eero 6 Pro, Third Reality
Hub and Hubitat Elevation.
Unique and novel design
Smart blind uses bottom drive design, which makes
daily operation more convenient and easier to re-
place the battery. With the design of bottom sensor,
it’s easier and more convenient to adjust the height
of the blind within 72-inch at any time.
No worry about power support
With more than 6 months of life support, AA batteries
are cheap and easy to change. No worry about
whether your window is too high to charge or with-
out an outlet. No worry about batteries is dead, but it
is hard to find replacement batteries.
Functions provided by Alexa App
Smart Blind works with Alexa and it has multiple
functions, including schedule, group and routine. Set
your blind on or open according to the sunset or sun-
rise time, etc.
Good shading and cordless design
Non-woven fabric with aluminum foil provides good
thermal insulation and noise absorption, as well as
privacy protection and light control, which makes it
an ideal indoor window treatment for bedroom,
living room, patio sliding door etc. Cordless design
makes it safe for children and pet.
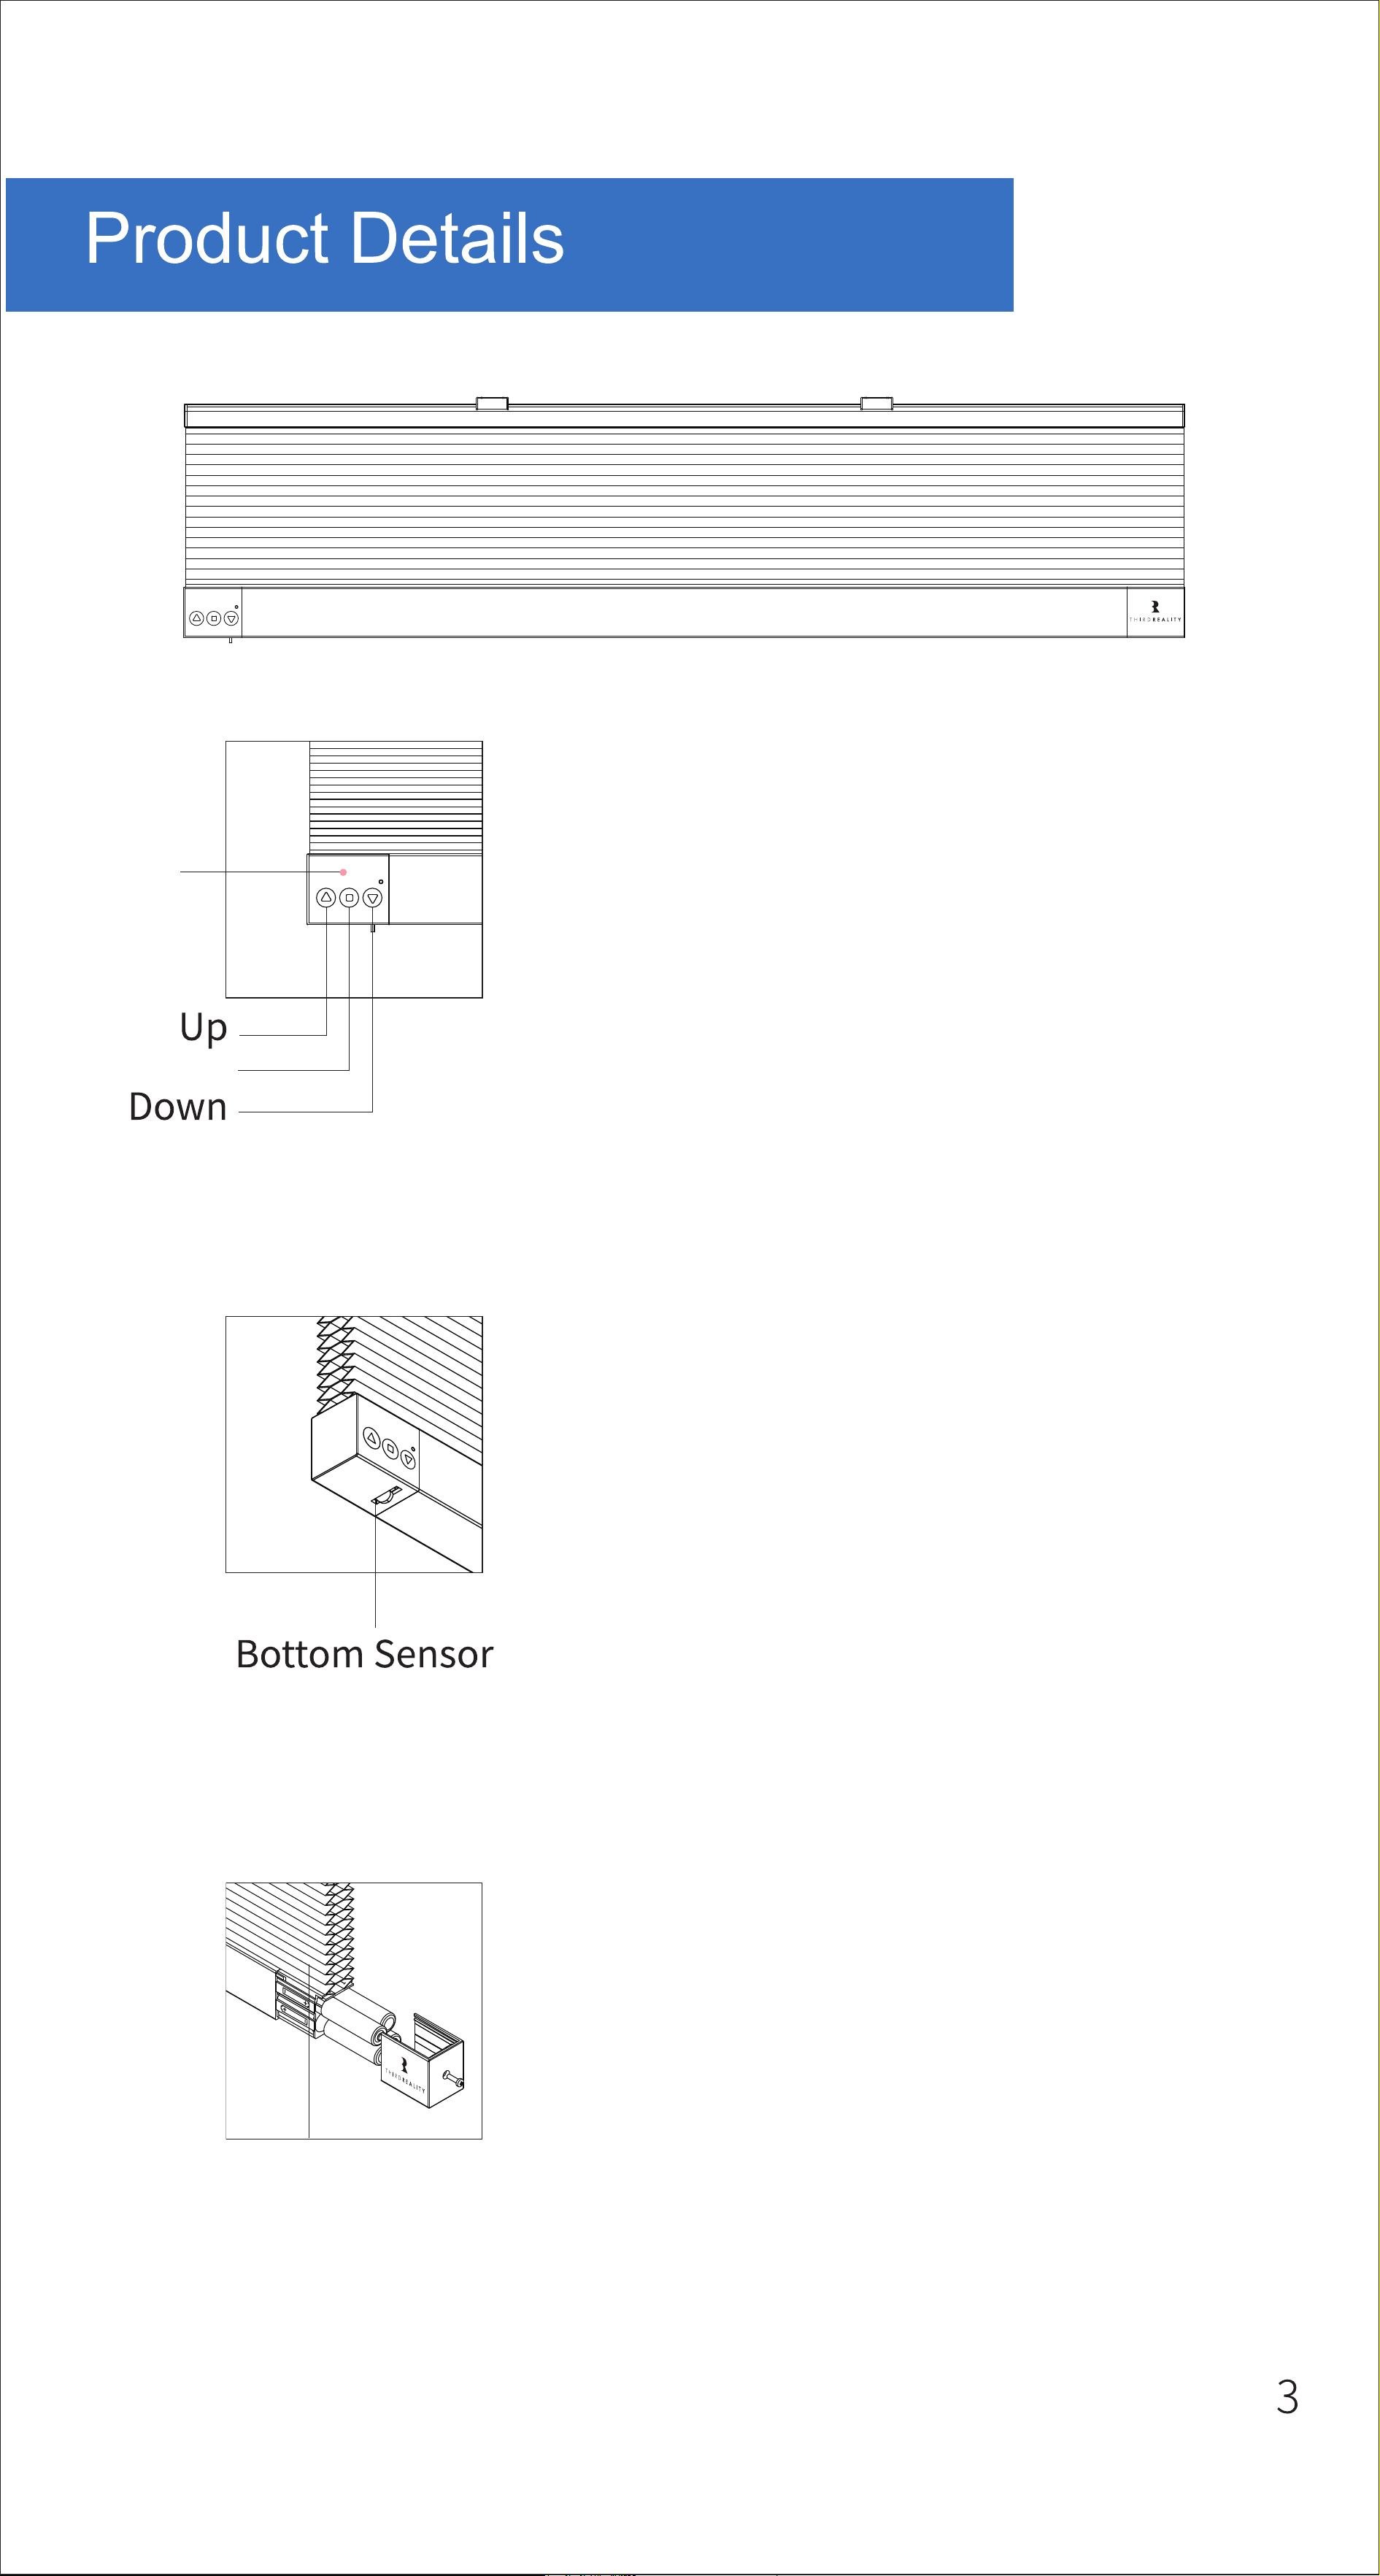
Battery Cover
Pay attention to the positive and
negative terminals of the Batteries.
Battery Cover
(AA Battery
× 4 included)
LED
Indicator
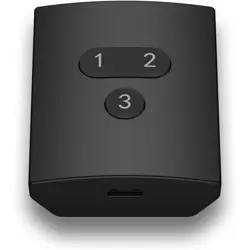
Setting
LED Status & Buttons
Fast blinking : pairing
Slow blinking: off-line
Double blinking: low power
Up: retract
Setting: single press to stop/long
press to enter paring mode
Down: extend
Bottom Sensor
When the Smart Blind is extending,
if the Bottom Sensor hits any sur-
face(like the window sill or your
finger) , it will stop at this position.
The Bottom Sensor is also used to
"Set the position where you want
the bottom of your Smart Blind to
rest".
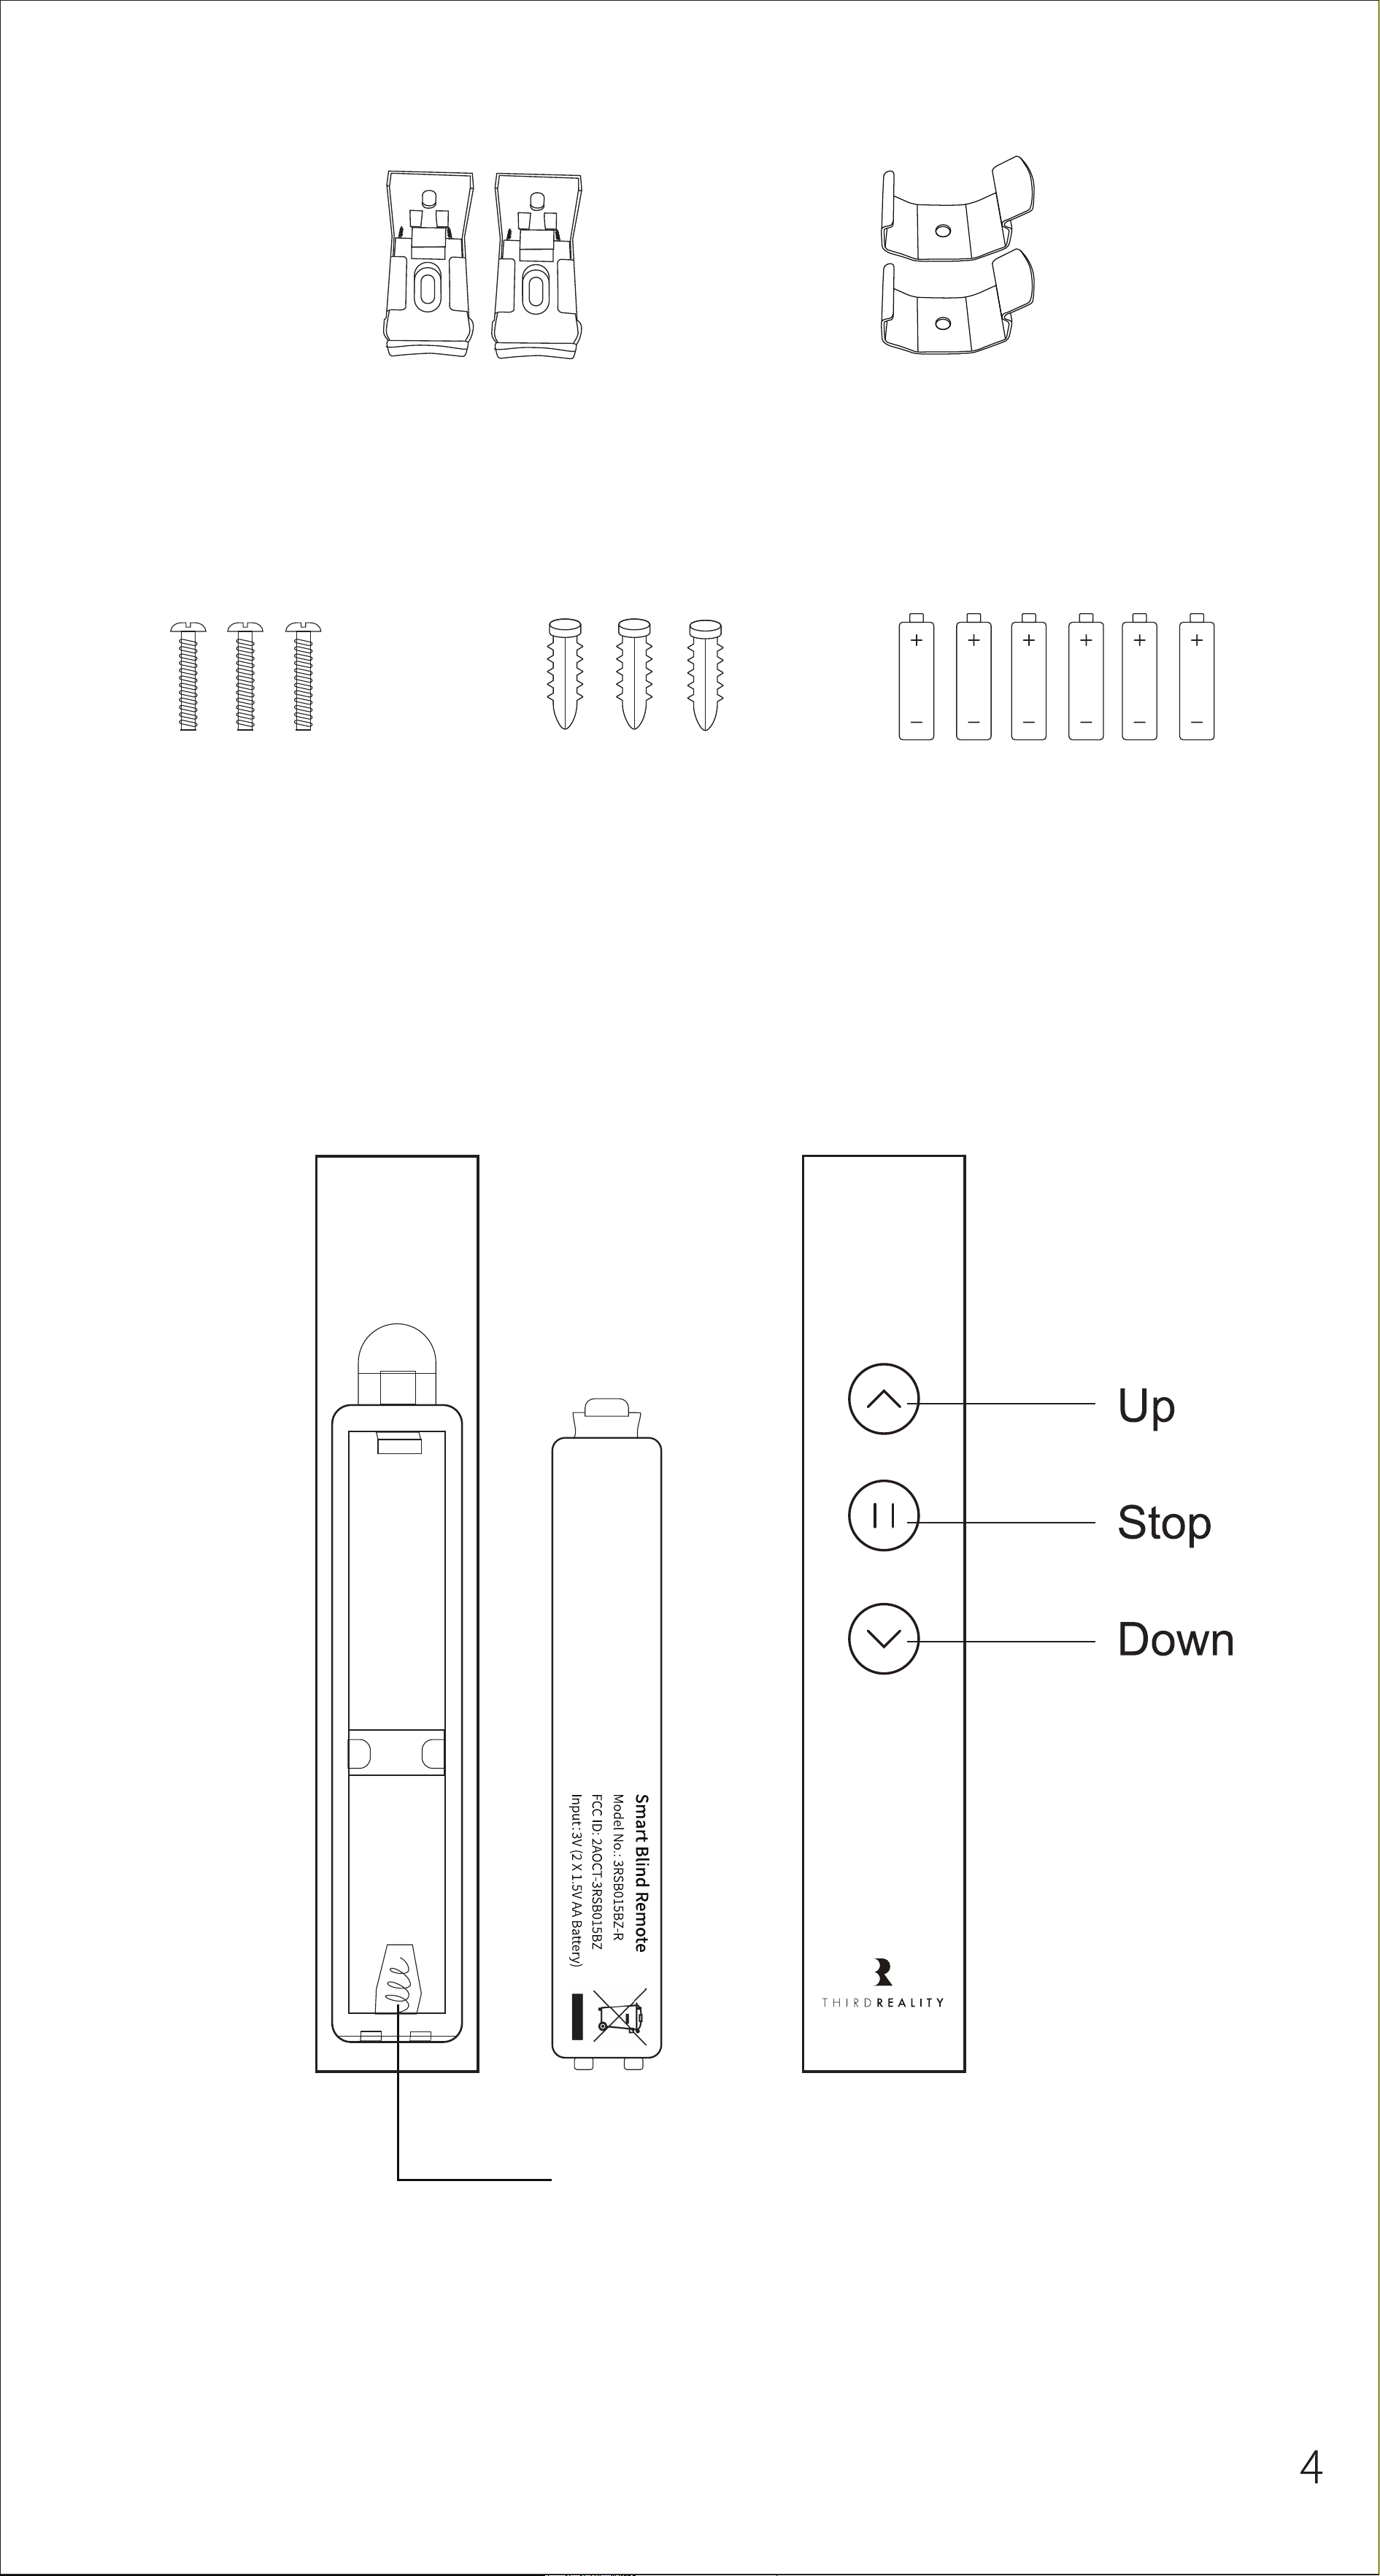
Battery Cover
(AA Battery
× 2 included)
L Bracket × 2
Screw × 3 Plastic Expansion
Bolt × 3
U Bracket × 2
AA Battery × 6
THIRDREALITY Smart Blind supports both inside and out-
side mount, a pair of L brackets and a pair of U brackets,
screws and plastic expansion bolts are provided. Please
prepare a PH2 screwdriver for the mount; For masonry
surface please prepare an electric drill with an M5 drill bit.
Make sure the THIRDREALITY logo of the Smart Blind and
the button of the L brackets or the flange of the U brackets
face in when installed.
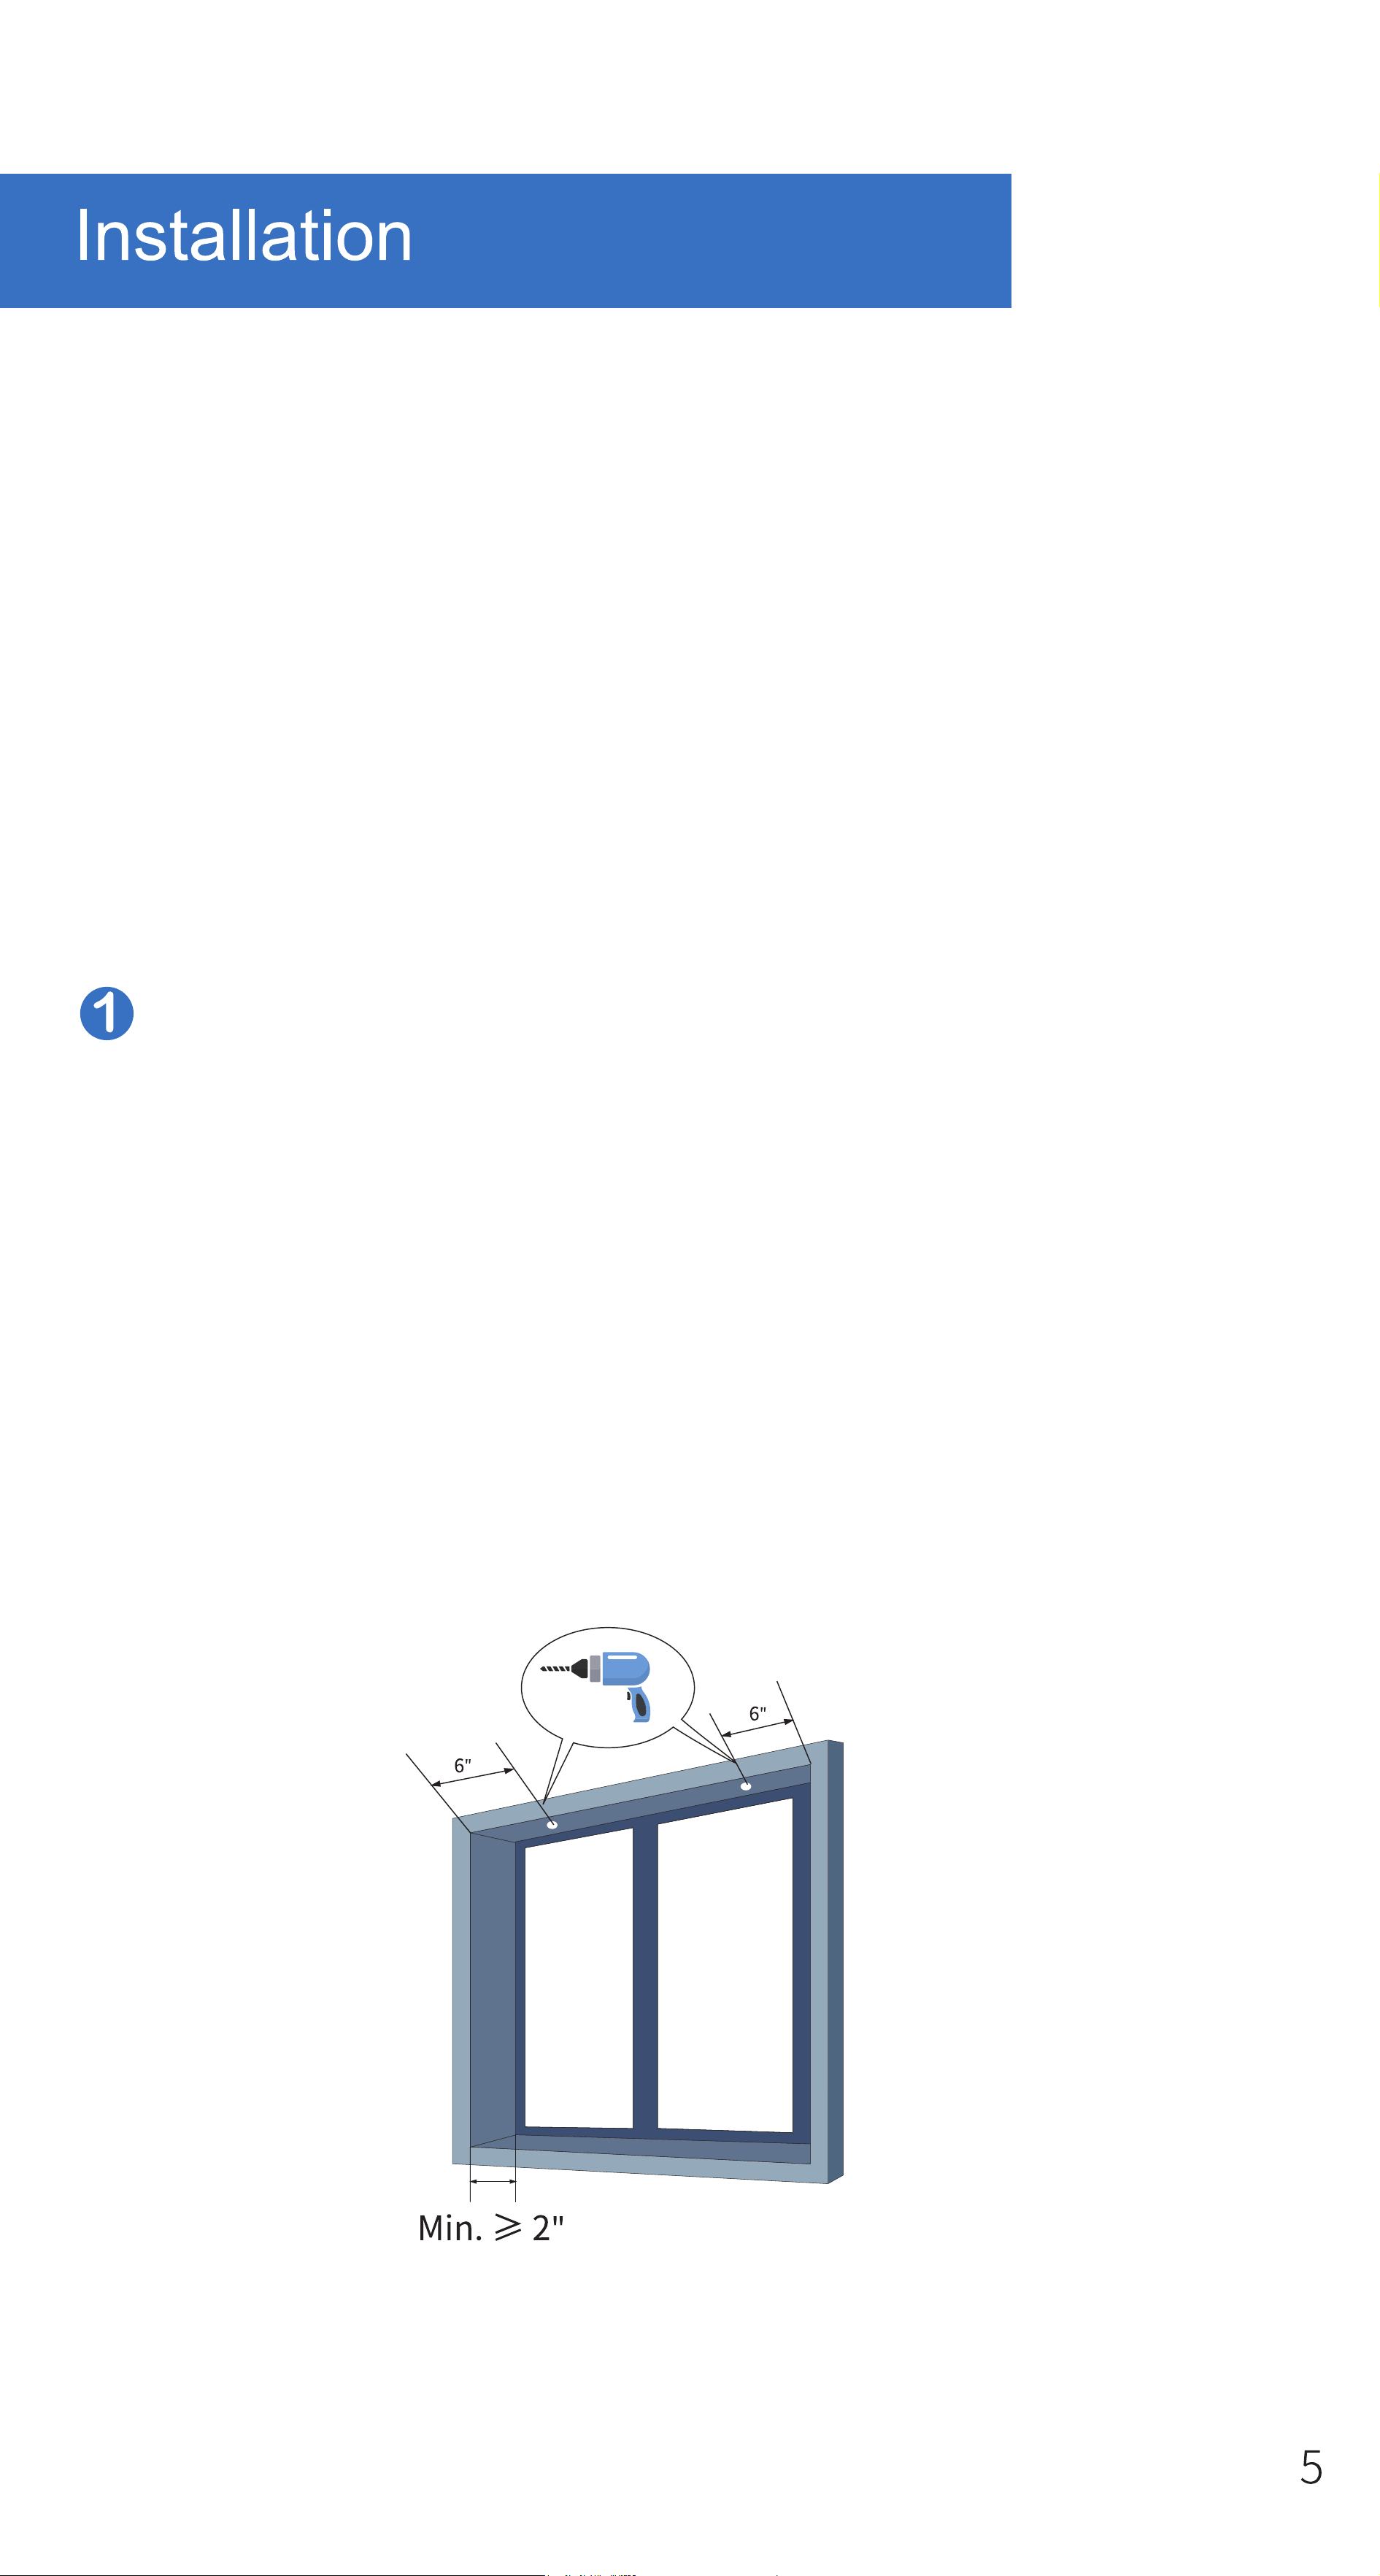
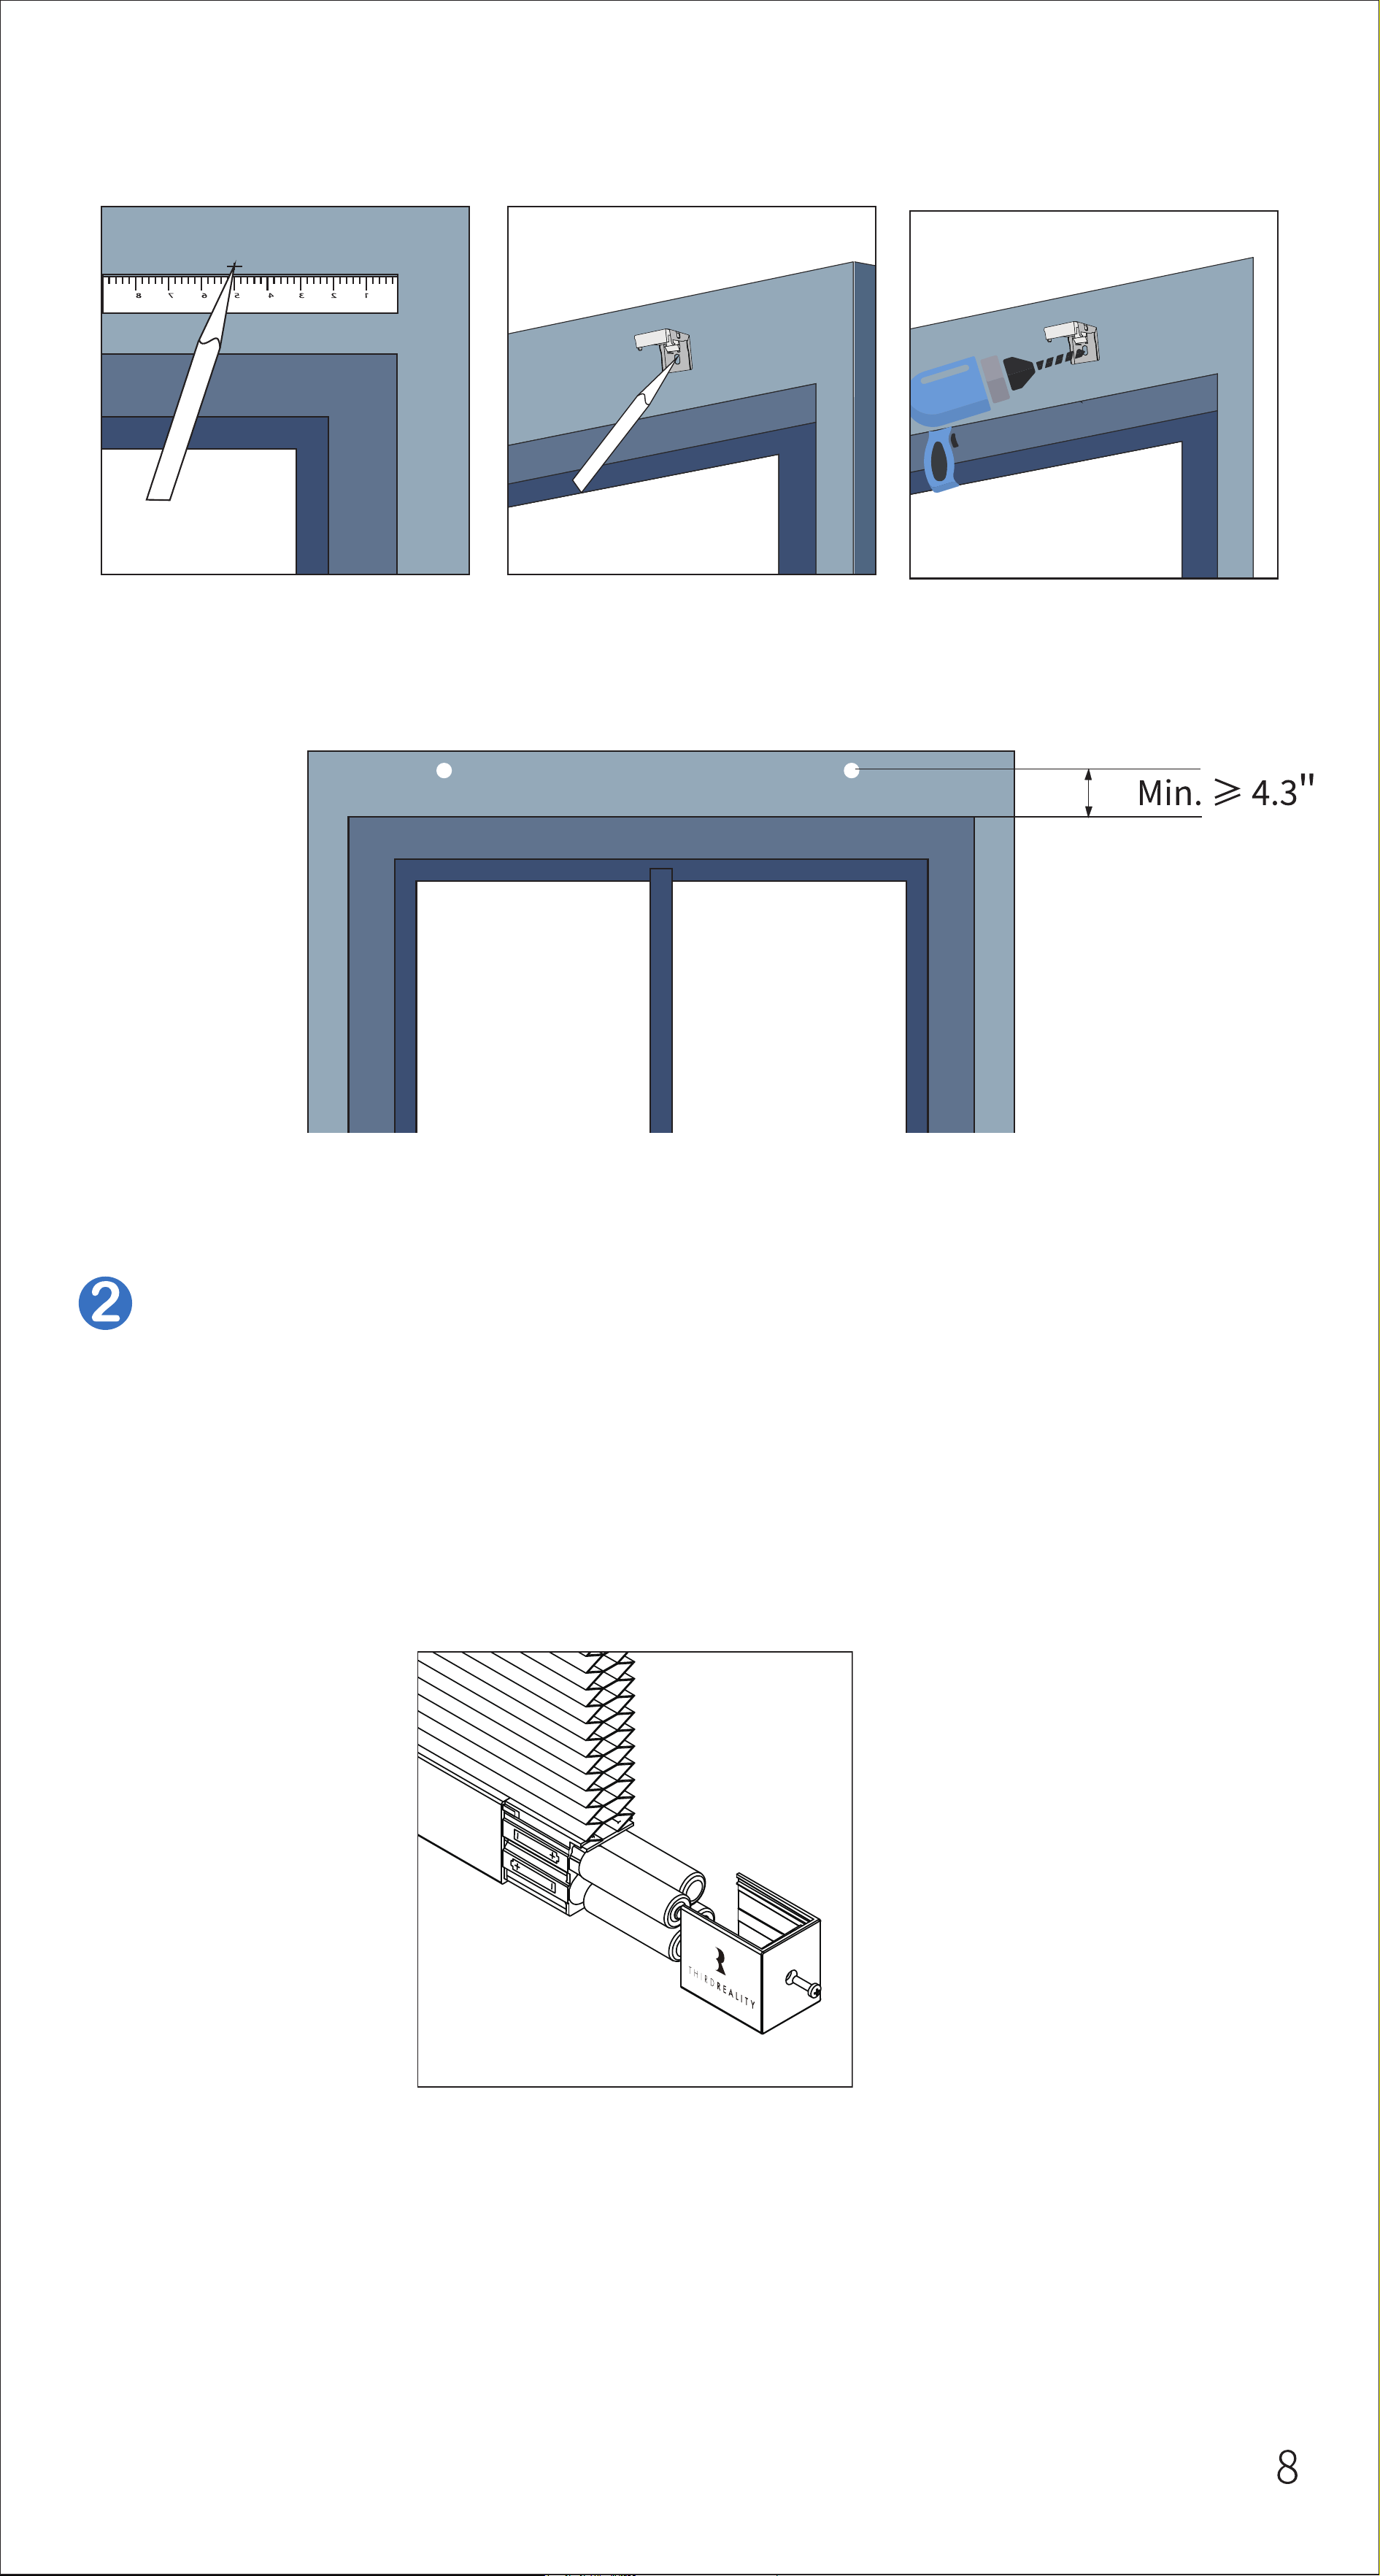
Choose inside or outside mount as needed. Make
sure your window recess meets the minimum
depth requirement of 2" for inside mount. For out-
side mount, if you want to expose the whole
window when the smart blind is fully closed, make
sure you have at least 4.3" of flat space above the
window.
a. Inside Mount
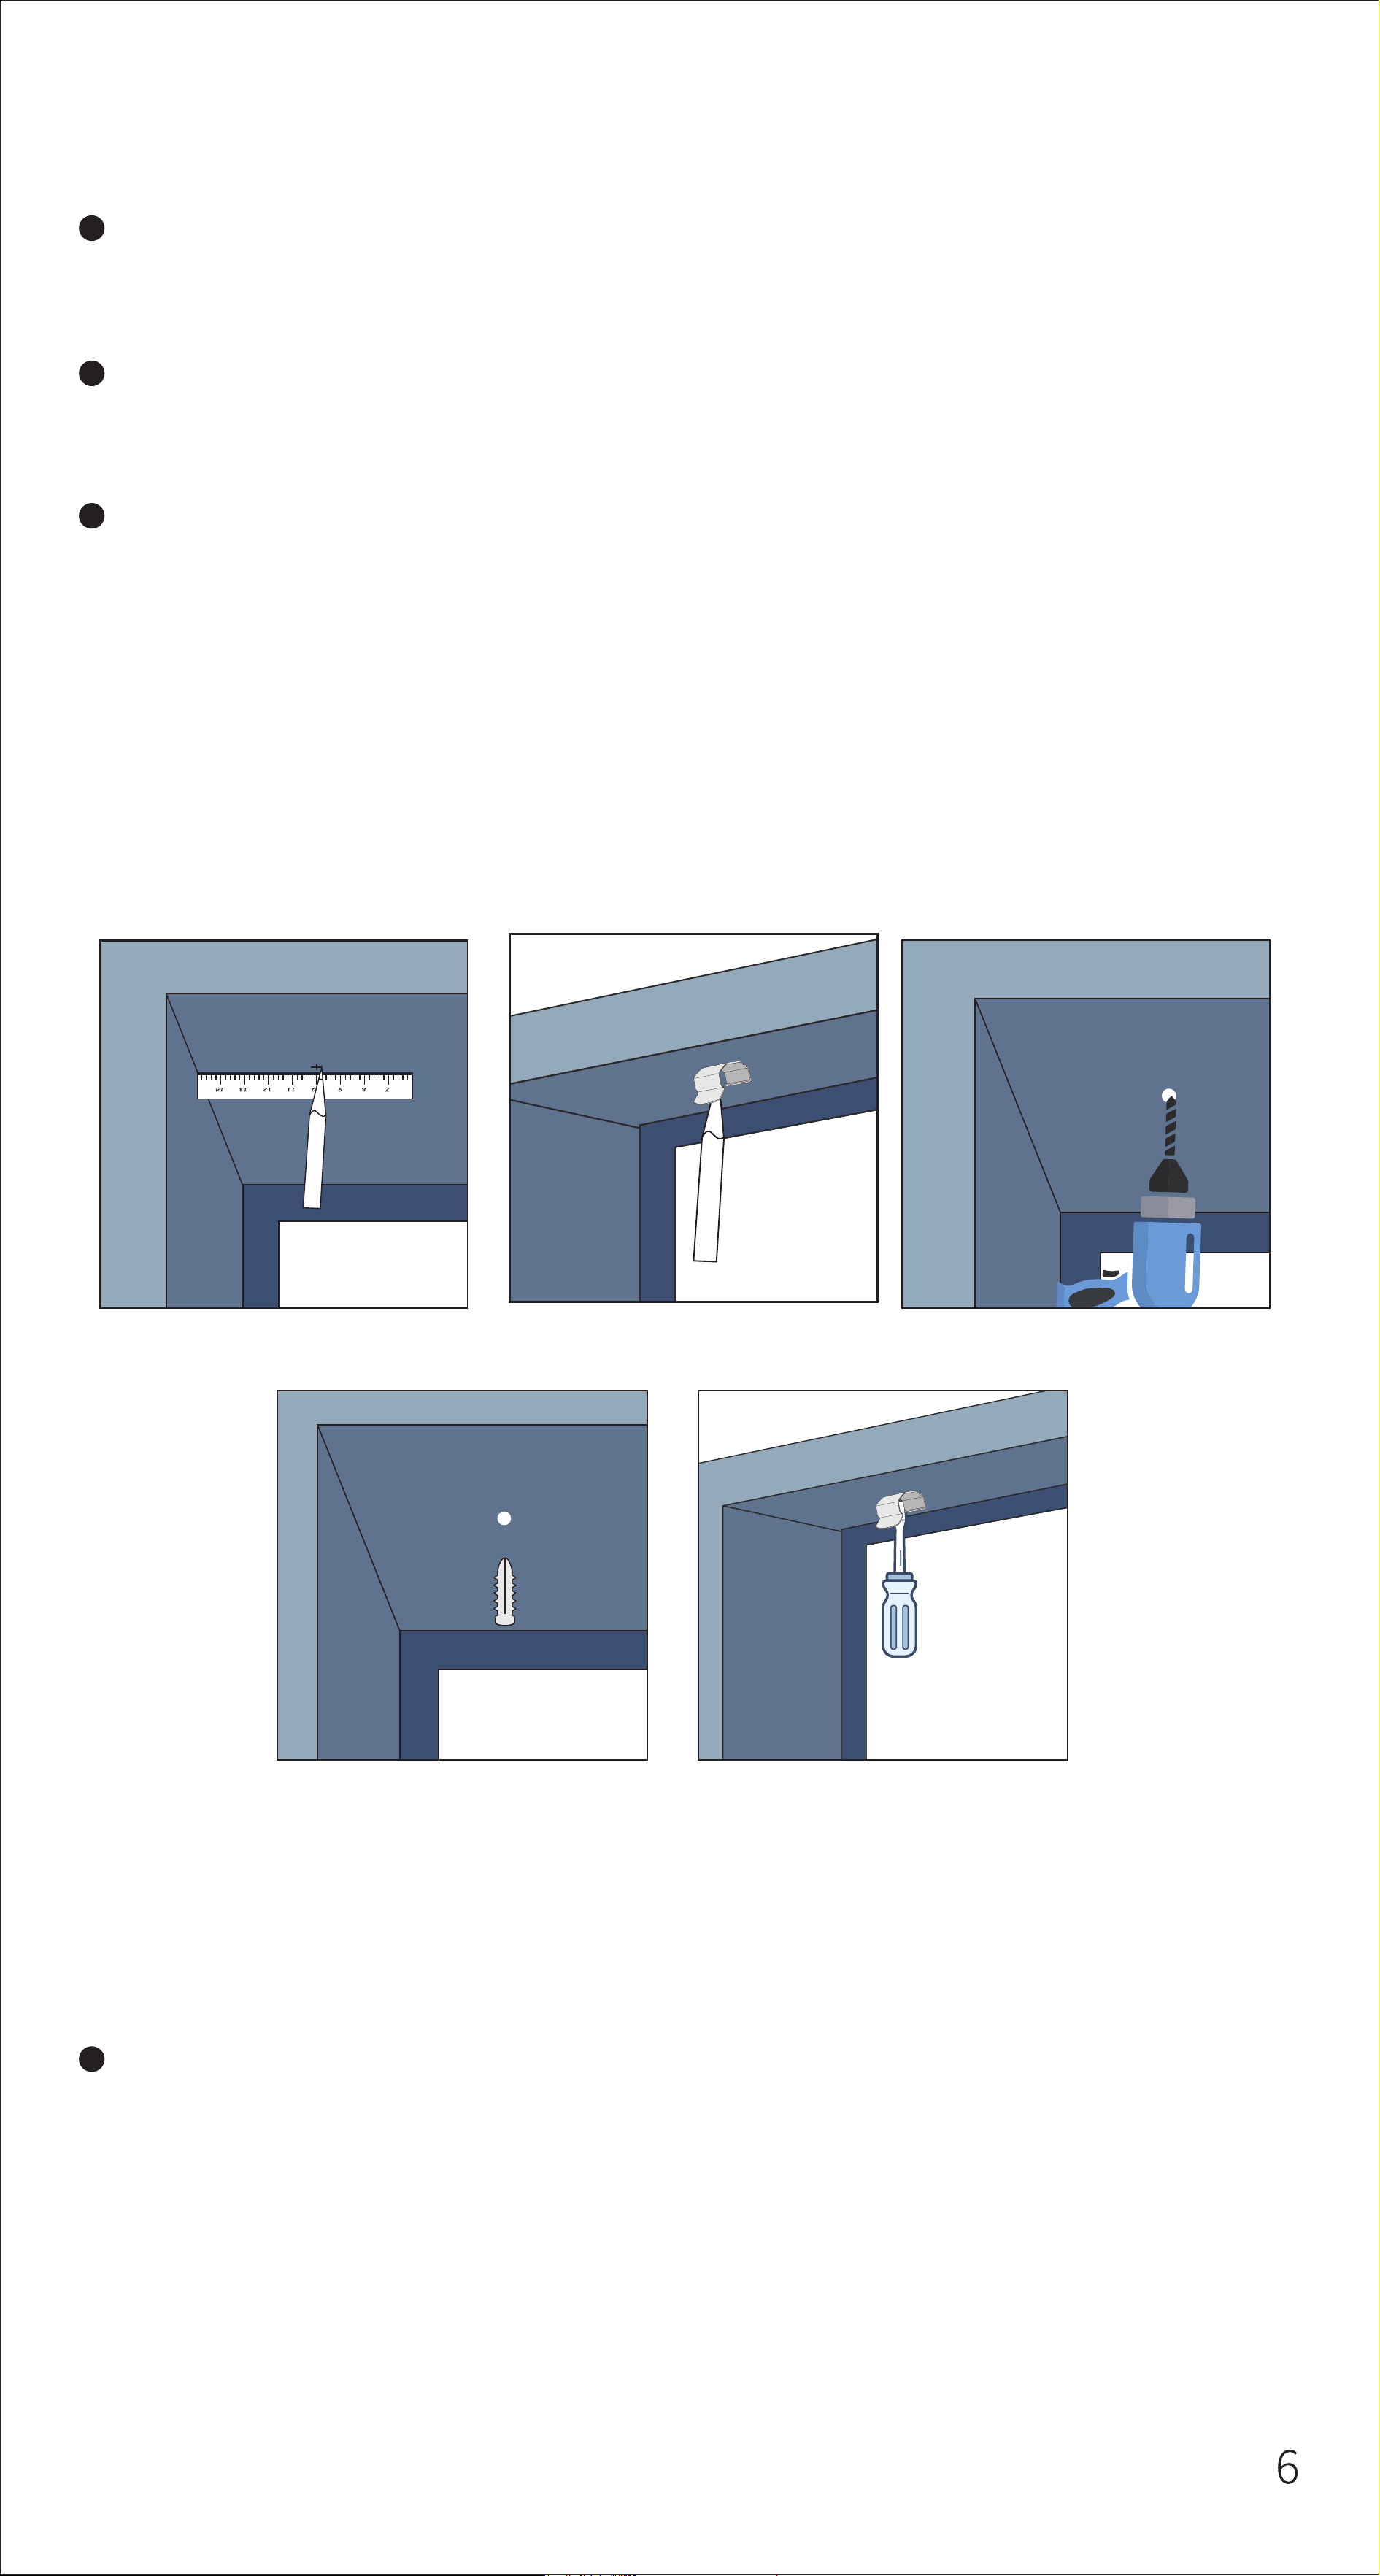
According to the diagram, measure and mark the po-
sition;
For wooden surface use a PH2 screwdriver and the
provided screws to secure the bracket.
For masonry surface use a M5 drill bit to drill a pilot
hole for the provided plastic expansions bolt. Insert
the plastic expansion bolt into the pilot hole, then
use a PH2 screwdriver to secure the bracket with the
provided screw.
According to the diagram, measure and mark the cor-
responding position.
b. Outside Mount
For wooden surface use a PH2 screwdriver and the
provided screw to secure the bracket.
For masonry surface use an M5 drill bit to drill a pilot
hole for the provided plastic expansion bolt. Insert
the plastic expansion bolt into the pilot hole, then
use a PH2 screwdriver to secure the bracket with the
provided screw. Insert the plastic expansion bolt into
the hole, then use a PH2 screwdriver to fasten the
bracket with the provided screw.
Unscrew the screw with the PH2 screwdriver to
open the battery cover, install 4 provided AA batter-
ies, close and secure the battery cover with the
screw.
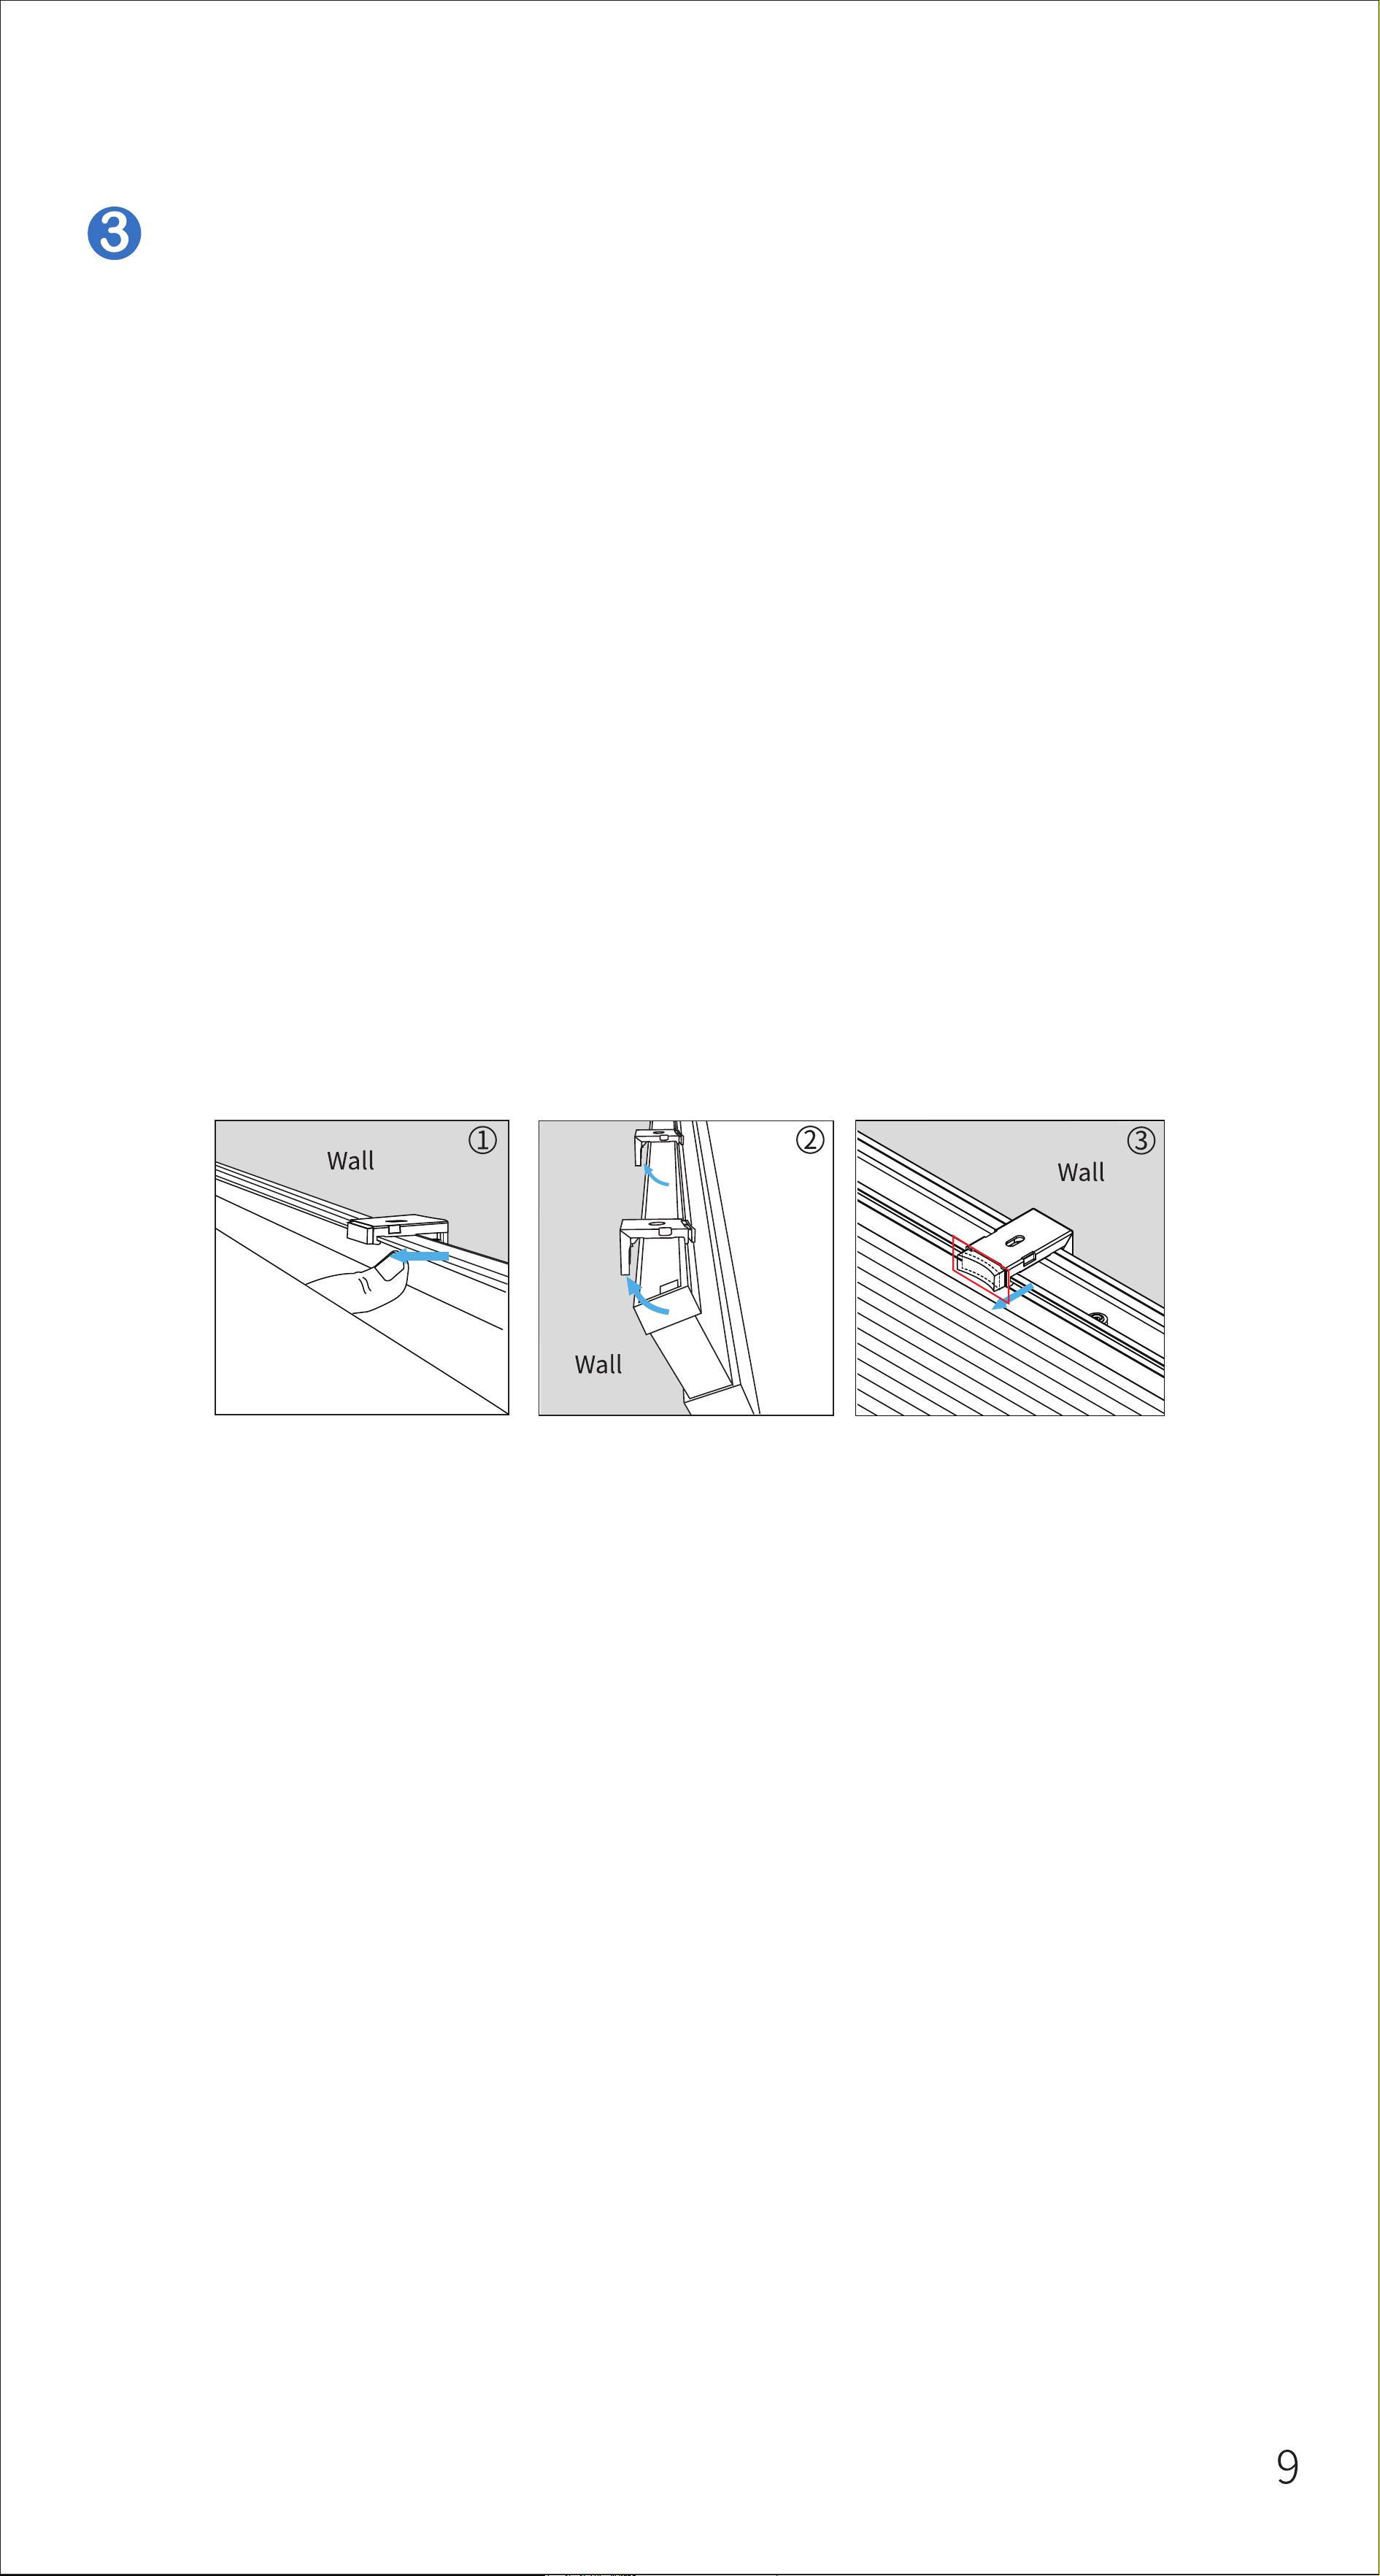
Outside Mount/Inside Mount
Outside Mount: Firstly align the outside of the top rail
with the brackets, then push up the smart blind to
get it into place. The bracket's button pops up and
makes a clicking sound, indicating it is secured. To
uninstall the smart blind, push the button of the
brackets and then pull down the smart blind.
Inside Mount: Firstly align the inside of the top rail
with the brackets, then push up the smart blind to
get into place. To uninstall the smart blind, push the
outside of the brackets and then pull down the smart
blind.
Note: Please shake the blind to ensure the blind and
the Extension Bracket are in close contact.
10
Set the position where you want the bottom of your
Smart Blind to rest
Press the UP button and let the Smart Blind retract to
the highest position, now the Smart Blind returns to
the original zero percent. Pess the DOWN button to
let the Smart Blind extend, stop the bottom rail at
your desired position by pressing the setting/stop
button. Now hold up the bottom sensor with your
finger first, then press the DOWN button, after that
release the DOWN button first, then release the
bottom sensor, now you have set this position as the
preset bottom position, the Smart Blind will stop at
this position automatically next time when extend-
ing.
Note: Press and hold the DOWN button on the smart
blind for 5 seconds to clear the currently set bottom
position.
Scan this QR code with your mobile device to watch
the instruction video on YouTube.
You can use the remote or 3 control buttons on the bottom
rail to control the Smart Blind.
You can create routines in your Alexa App to turn on/off
the Smart Blind or set any open percentage, for example
you can create a routine with a motion sensor as a trigger
to open the Smart Blind when you enter the room, or you
can create a routine to open / close your Smart Blind at
sunrise / sunset.
Note: A voice command
"Alexa, turn on first blind."
cannot be interrupted by a voice command "Alexa, turn
off first blind." vice versa.
A voice command "Alexa, set first blind to 80%." can be
interrupted by another voice command "Alexa, set first
blind to 20%."
"Alexa, turn on / off first blind."
"Alexa, set / turn on / turn off / turn up / turn down /
open / close first blind to 50%."
Voice Control
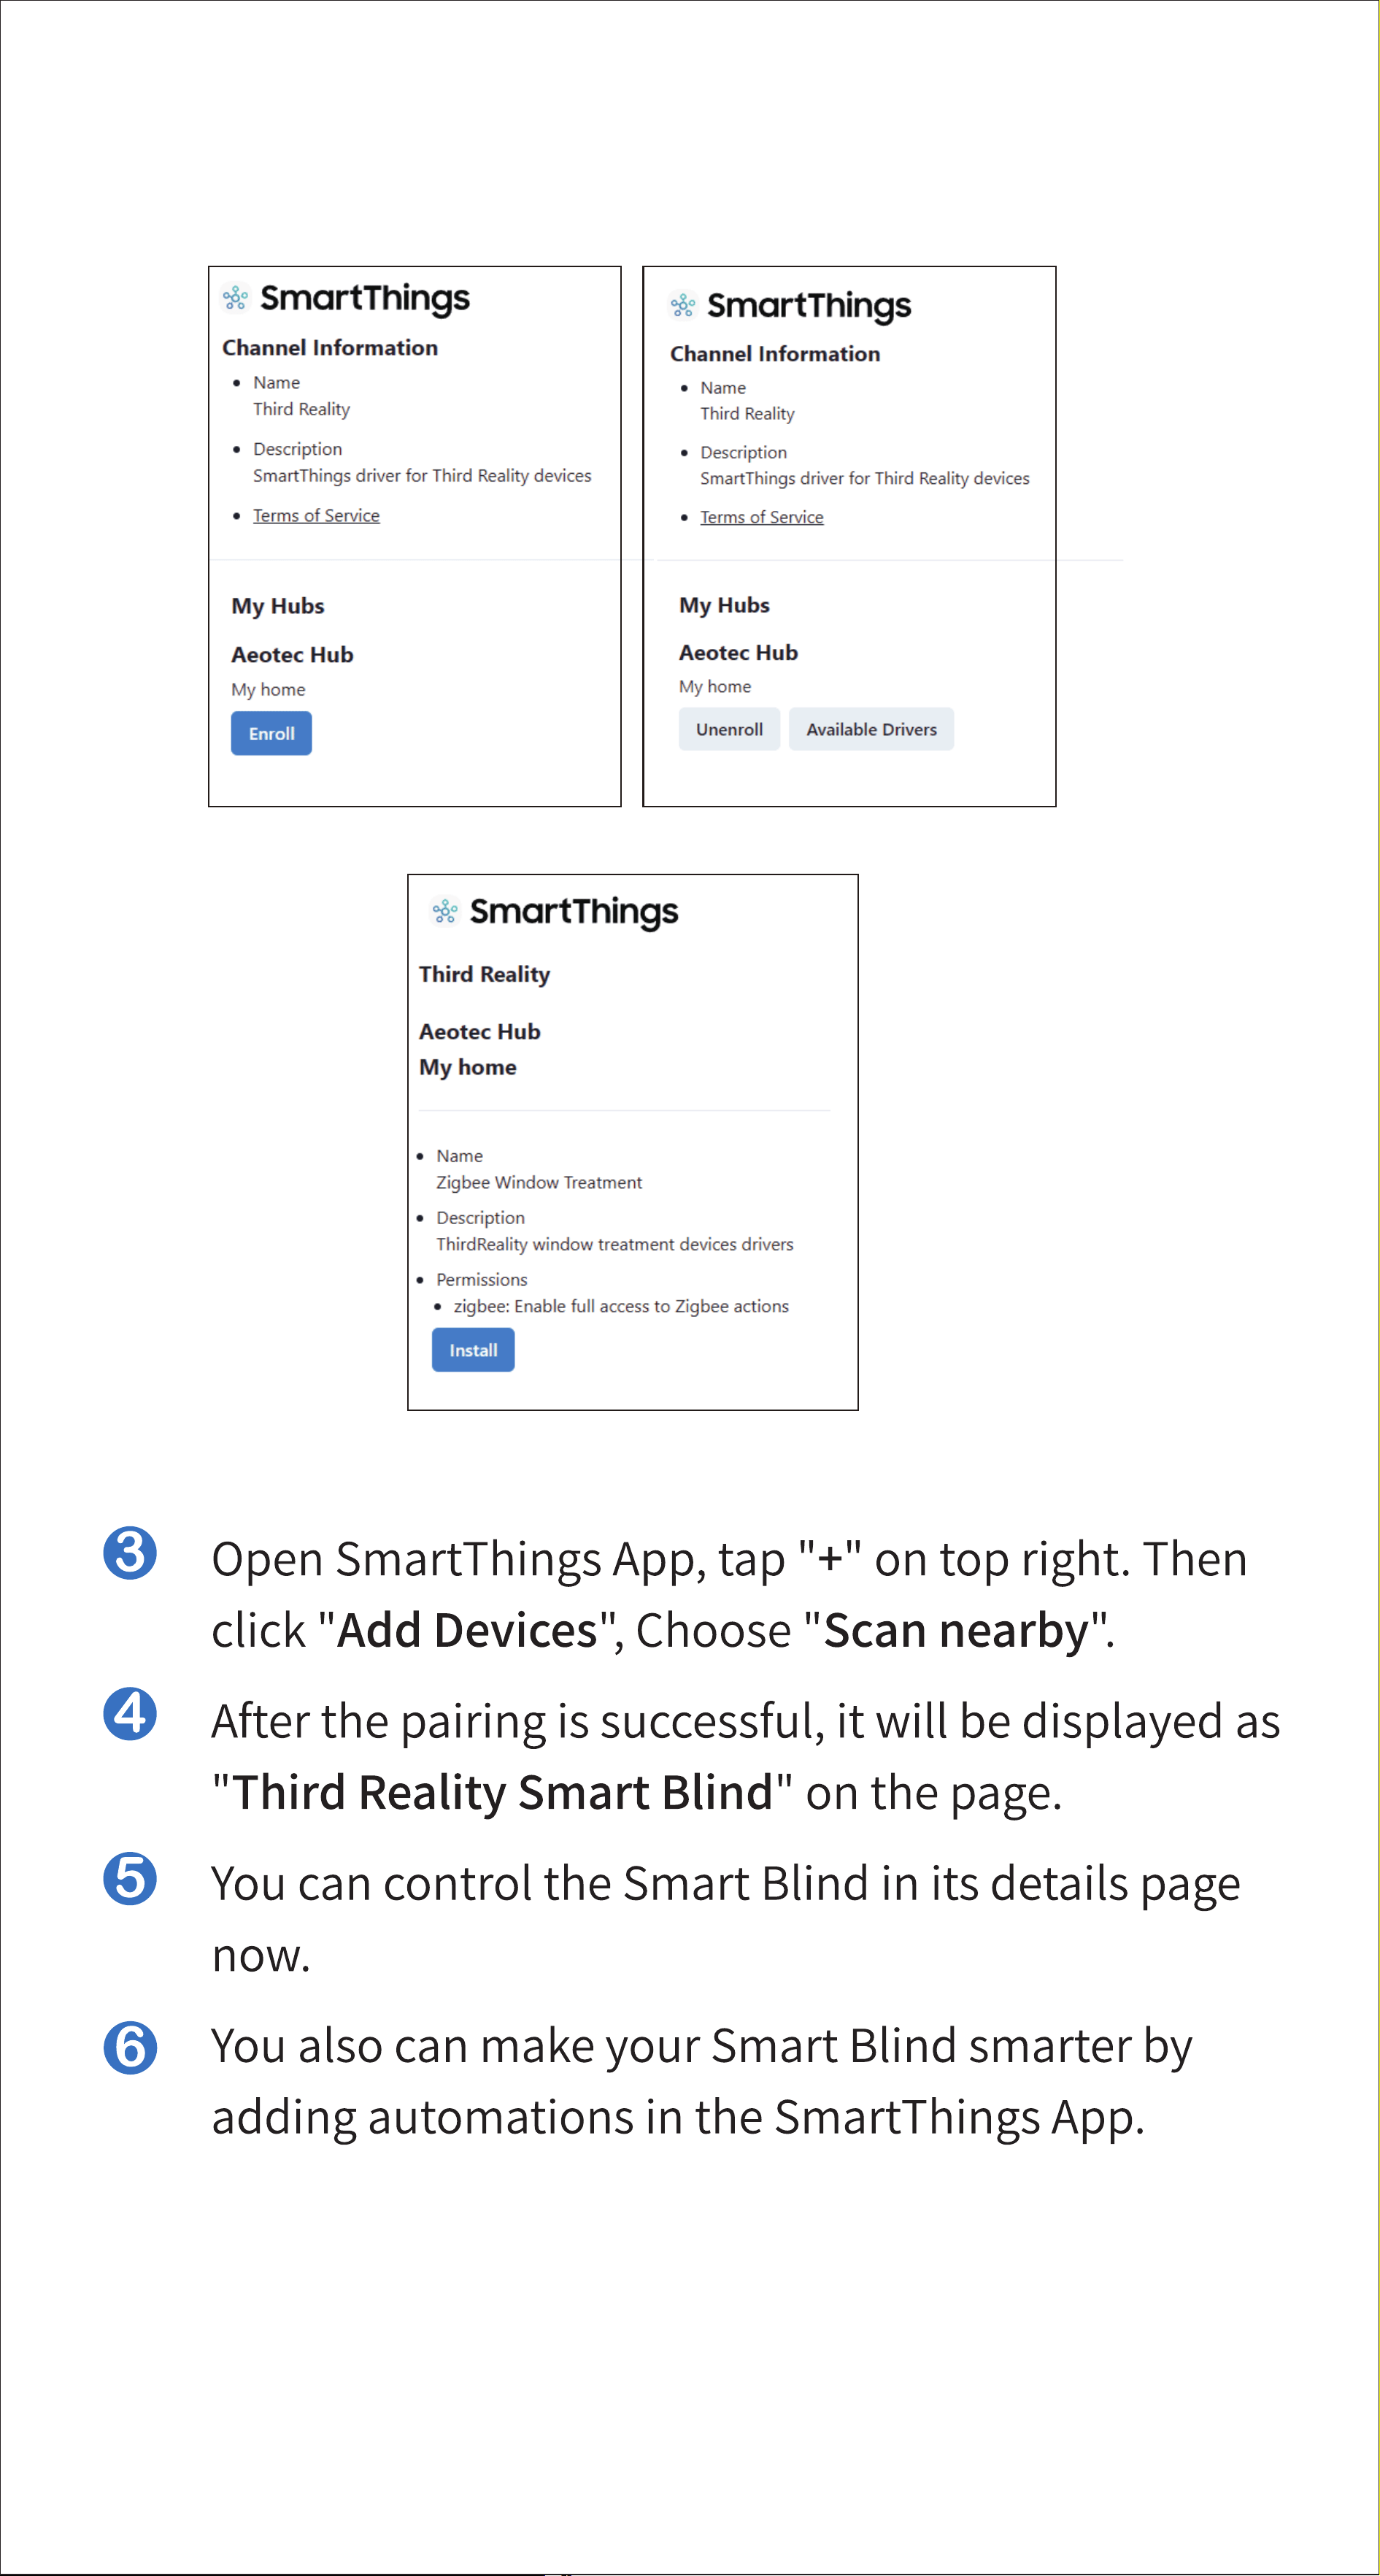
Routines
Add SmartThings drivers for Smart Blind
Open this link in your PC browser. Log in your
SmartThings Account.
https://bit.ly/3BjdrXp
Click "Enroll" --"Available Drivers" -- "Install" to
install the Zigbee Contact driver.
16

17
After adding the Smart Blind to your Third Reality Smart
Hub, enable Third Reality Skill and tap "DISCOVER DEVIC-
ES" in your Alexa App, now you can use the voice assistant
or to create routines in your Alexa App to control the
Smart Blind.
18
19
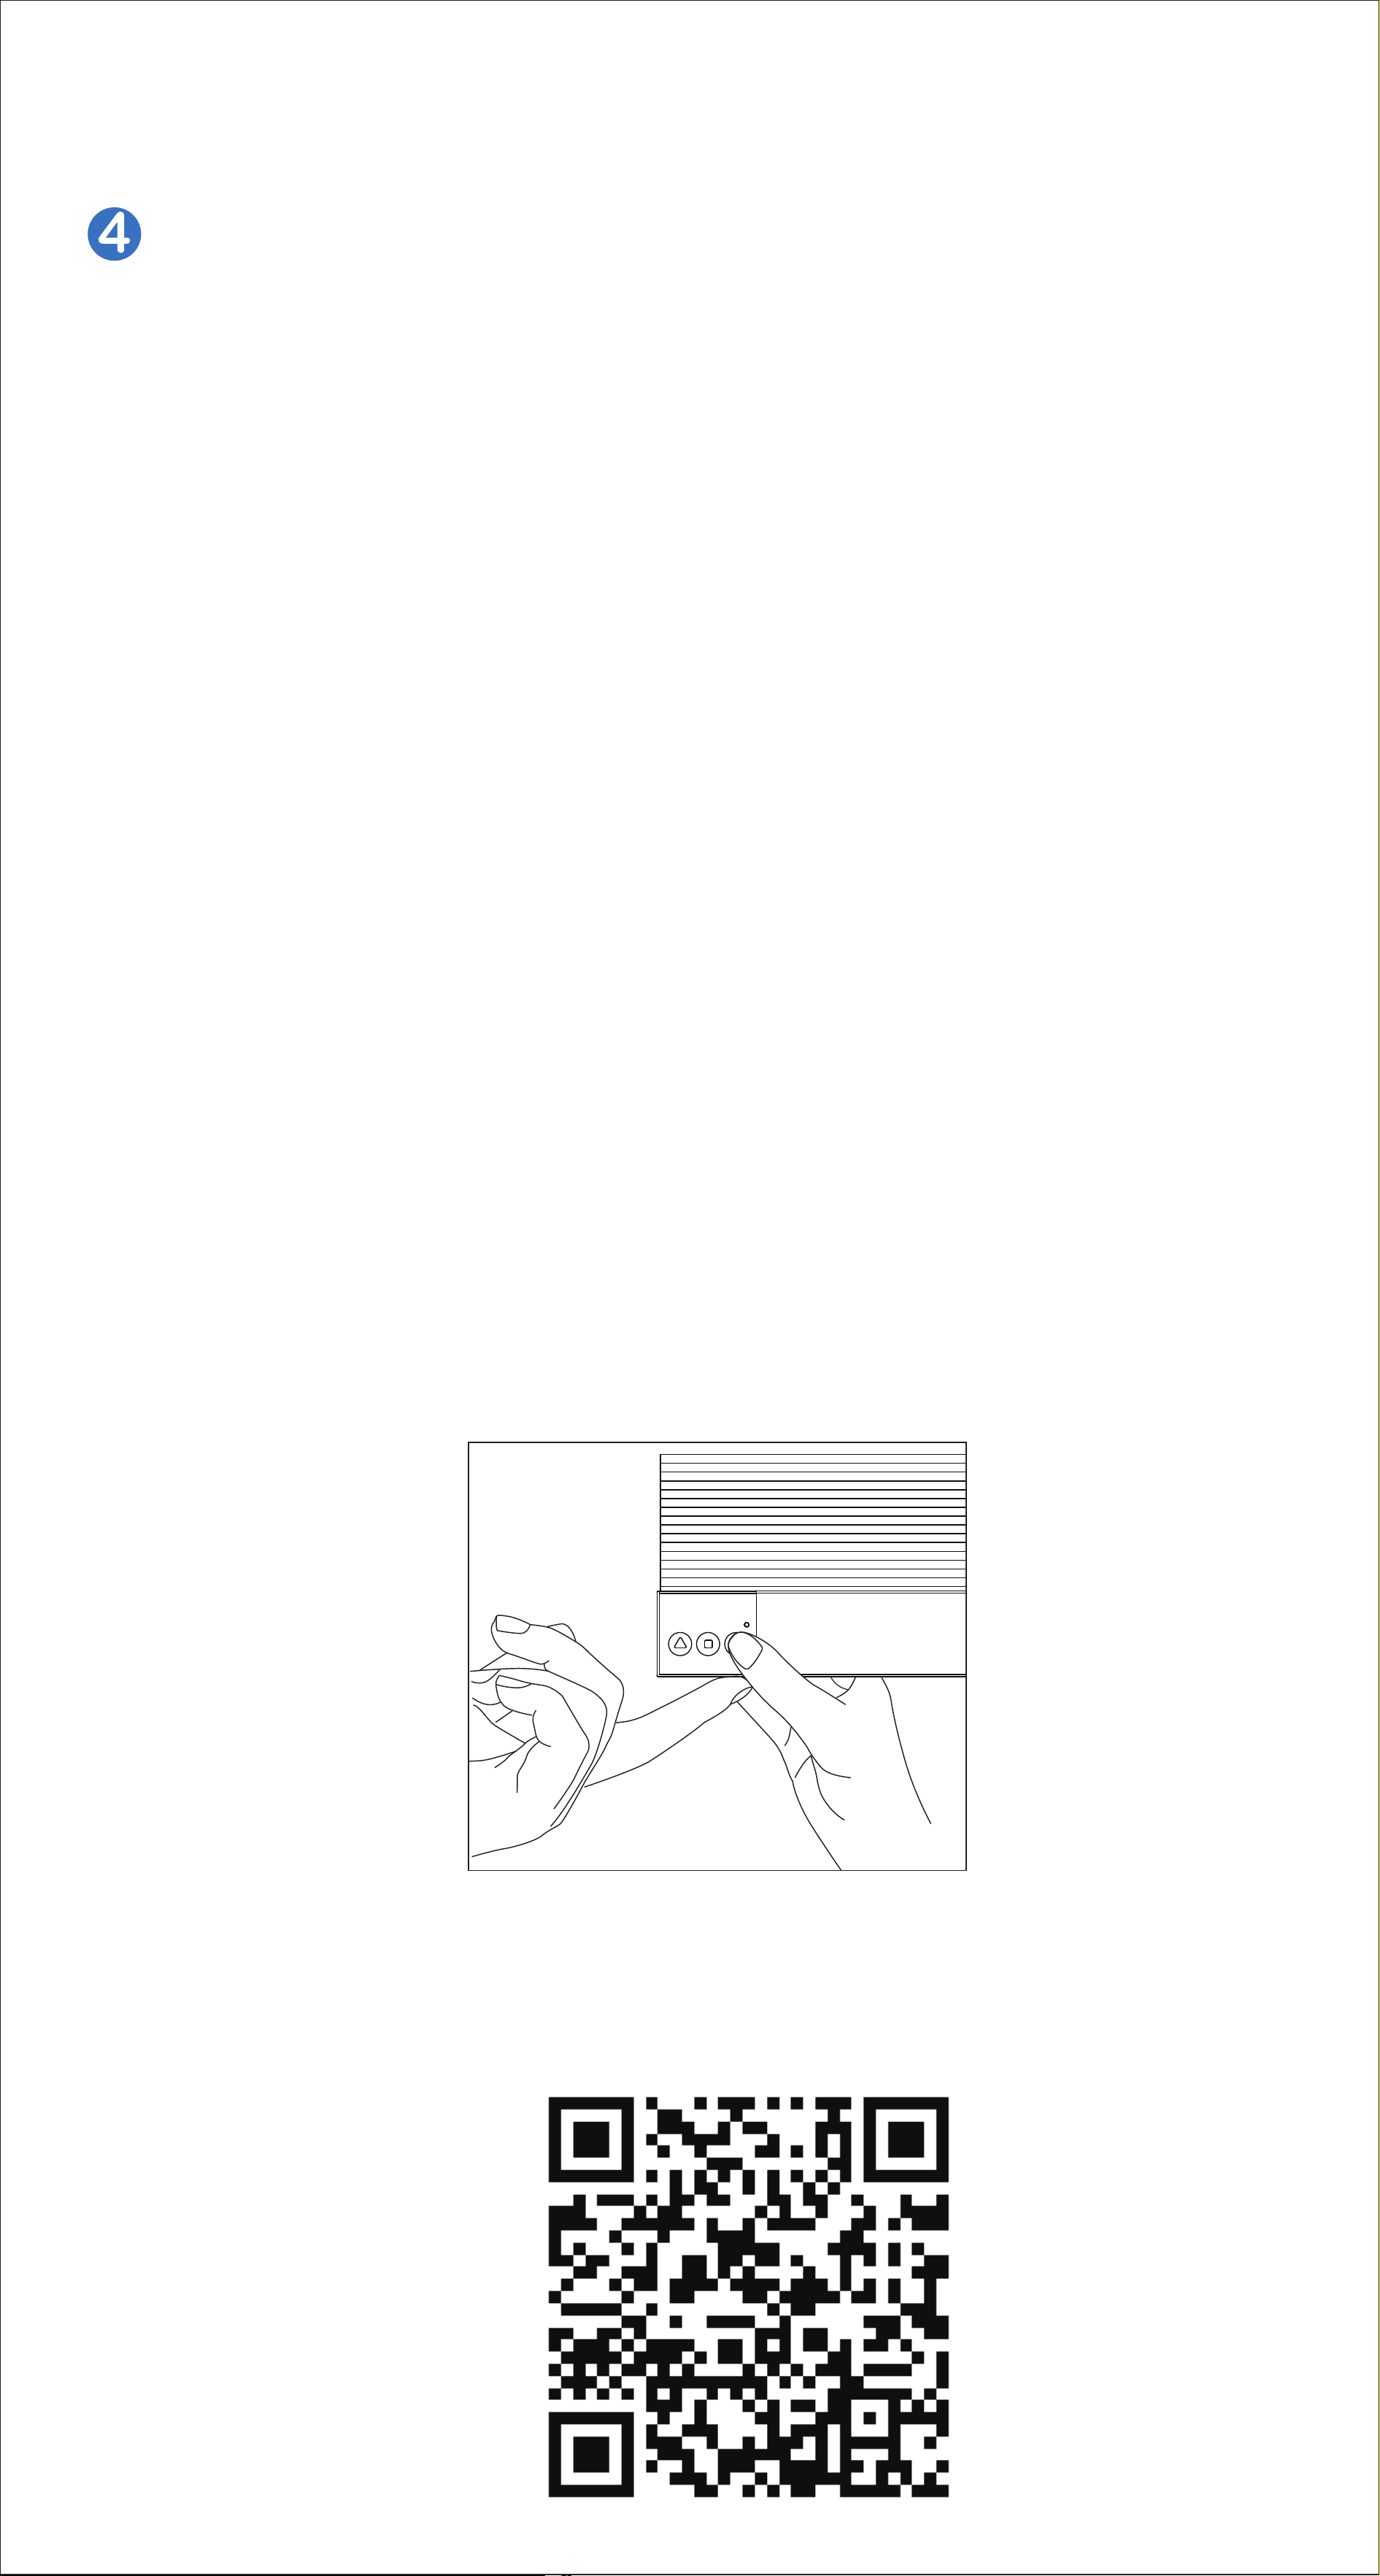
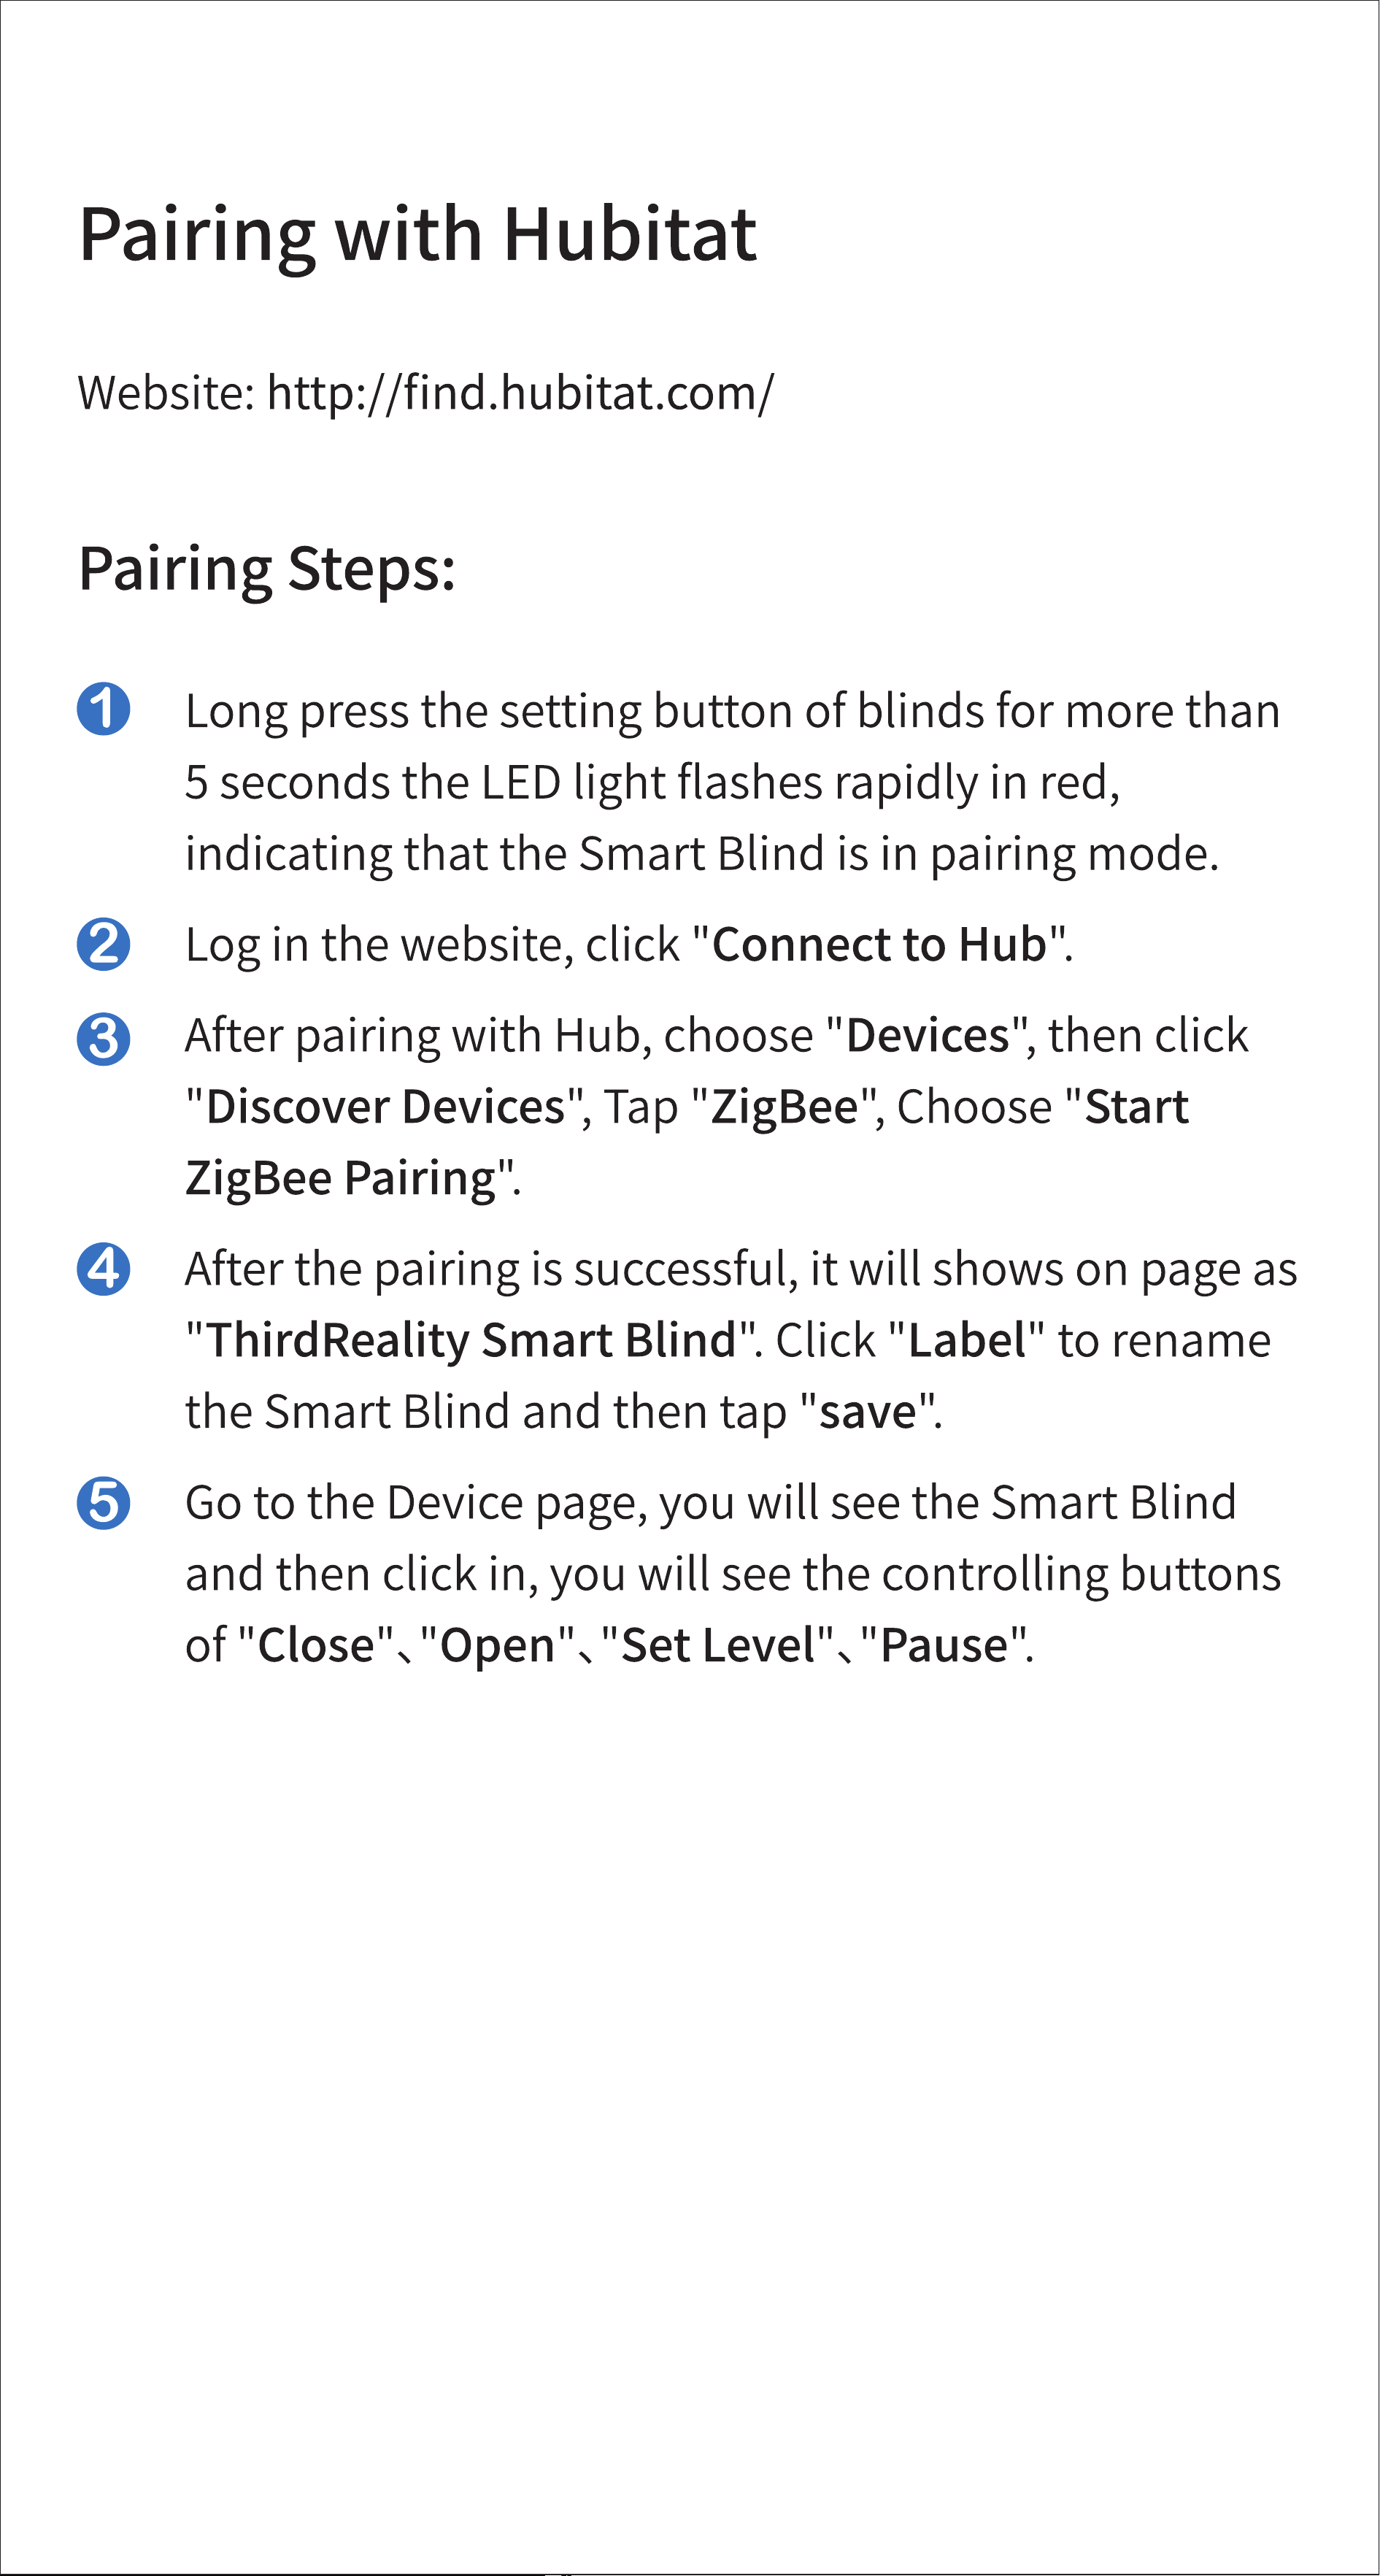
Press and hold the setting " " button of blinds for
more than 5 seconds until the LED light flashes rapid-
ly in red, indicating that the Smart Blind is in pairing
mode. Every time you factory reset the Smart Blind,
your preset bottom position will be reset to de-
fault(72"), you need to reset your desired bottom po-
sition.
20
How to change the bottom position of the
Smart Blind
Press the UP button and let the Smart Blind retract to
the highest position, now the Smart Blind returns to
the original zero percent. Pess the DOWN button to
let the Smart Blind extend, stop the bottom rail at
your desired position by pressing the setting/stop
button. Now hold up the bottom sensor with your
finger first, then press the DOWN button, after that
release the DOWN button first, then release the
bottom sensor, now you have set this position as the
preset bottom position, the Smart Blind will stop at
this position automatically next time when extend-
ing.
21
22
How to stop the Smart Blind when it's extend-
ing/retracting?
You can stop the Smart Blind from extending / re-
tracting with a stop command of pressing the Stop
button on the bottom rail or the remote, or in your
Third Reality App.
You can not stop it from extending / retracting with
commands like pressing Up / Down on the bottom
rail or the remote(or in the App), nor with voice com-
mand like turn On / Off the fisrt blind.
7

23
This device complies with part 15 of the FCC rules. Opera-
tion is subject to the following two conditions: (1) this
device may not cause harmful interference, and (2) this
device must accept any interference received, including
interference that may cause undesired operation.
Changes or modifications not expressly approved by the
party responsible for compliance could
void the user’s authority to operate the equipment.
NOTE: This equipment has been tested and found to
comply with the limits for a Class B digital device, pursu-
ant to part 15 of the FCC Rules. These limits are designed
to provide reasonable protection against harmful interfer-
ence in a residential installation.
This equipment generates uses and can radiate radio fre-
quency energy and, if not installed and used in accordance
with the instructions, may cause harmful interference to
radio communications. However, there is no guarantee
that interference will not occur in a particular installation.
If this equipment does cause harmful interference to radio
or television reception, which can be determined by turn-
ing the equipment off and on, the user is encouraged to
try to correct the interference by one or more of the fol-
lowing measures:

24
‐Reorient or relocate the receiving antenna.
‐Increase the separation between the equipment and re-
ceiver.
‐Connect the equipment into an outlet on a circuit differ-
ent from that to which the receiver is connected.
‐Consult the dealer or an experienced radio/TV techni-
cian for help important announcement.
NOTE: The manufacturer is not responsible for any radio
or TV interference caused by unauthorized modifications
to this equipment. Such modifications could void the
user’s authority to operate the equipment.
This equipment complies with FCC radiation exposure
limits set forth for an uncontrolled environment.
This transmitter must not be co-located or operating in
conjunction with any other antenna or transmitter.