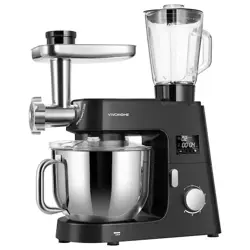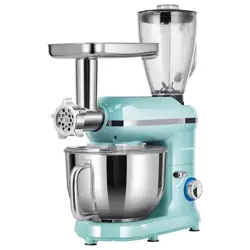
4-IN-1 6 Qt Stand Mixer
USER MANUAL
THANK
YOU!
Thank You for Purchasing from
Made in China
NOTE:
To continuously improve its products, reserves the right to
modify this information without prior notification.
For any questions regarding assembly, please watch the video on the
product page or contact our customer service. Our customer service will
Thank you for using products in your home!

USER MANUAL
HOW-TO
4-IN-1 6 Qt Stand Mixer
CONTENTS
Name of Different Parts .....................................................3
How to Use the Machine ...................................................4
Suggestion ...............................................................................5
Product Specifications ........................................................1
General Safety Instructions ..............................................1
Led Function Description ..................................................6
Recipes ......................................................................................10
Analysis of Common Problems ...................................15
Cleaning ...................................................................................18
Disposal ...................................................................................18
Warranty .................................................................................19

1 2
Model No.: SM-1503T
Rated voltage: 120V
Frequency: 60Hz
Power consumption: 660W
Protection class: II
SECTION A
Product Specifications
Read the operating instructions carefully before putting the appliance
into operation and keep the instructions including the warranty, the
receipt and, if possible, the box with the internal packing. If you give
this device to other people, please also pass on the operating
instructions.
This appliance has a polarized plug (one blade is wider than the
other). To reduce the risk of electric shock. This plug will fit in a
polarized outlet only one way. If the plug is not fully plugged into the
socket,reverse the plug. If it still does not fit, contact a qualified
electrician. Do not modify the plug in any way.
●
●
●
●
●
Read all instructions.
To protect against the risk of electrical shock, do not put the base
in water or other liquid.
This appliance is not intended for use by persons (including
children) with reduced physical, sensory, or mental capabilities, or
lack of experience and knowledge, unless they are closely
supervised and instructed concerning use of the appliance by a
person responsible for their safety. Close supervision is necessary
when any appliance is used by or near children. Children should be
supervised to ensure that they do not play with the appliance.
Turn the appliance OFF, then unplug it from the outlet when not in
use, before assembling or disassembling parts and before cleaning.
To unplug, grasp the plug and pull from the outlet. Never pull from
the power cord.
Avoid contacting moving parts. Donotattempttodefeatanysafety
interlockmechanisms.
●
●
●
●
●
●
●
Do not operate any appliance with a damaged cord or plug or after
the appliance malfunctions or is dropped or damaged in any
manner. Contact the manufacturer at their customer service
telephone number for information on examination, repair, or
adjustment.
The use of attachments not recommended or sold by the
manufacturer may cause fire, electric shock or injury.
Do not use outdoors.
Do not let the cord hang over the edge of the table or counter.
Keep hands, hair, and clothing, as well as spatulas and other uten-
sils away from beaters during operation to reduce the risk of injury
to persons or damage to the mixer.
Remove beaters from mixer before washing.
Household use only.
●
●
●
●
●
Only operate this machine under supervision.
Do not interfere with any safety switches.
Do not insert anything into the rotating hooks while the machine is
working.
Place the machine on a smooth, flat, and stable working surface.
Do not insert the mains plug of the machine into the power socket
without having installed all the necessary accessories.
SECTION B
General Safety Instructions
Special safety Instructions for this Machine
3 4
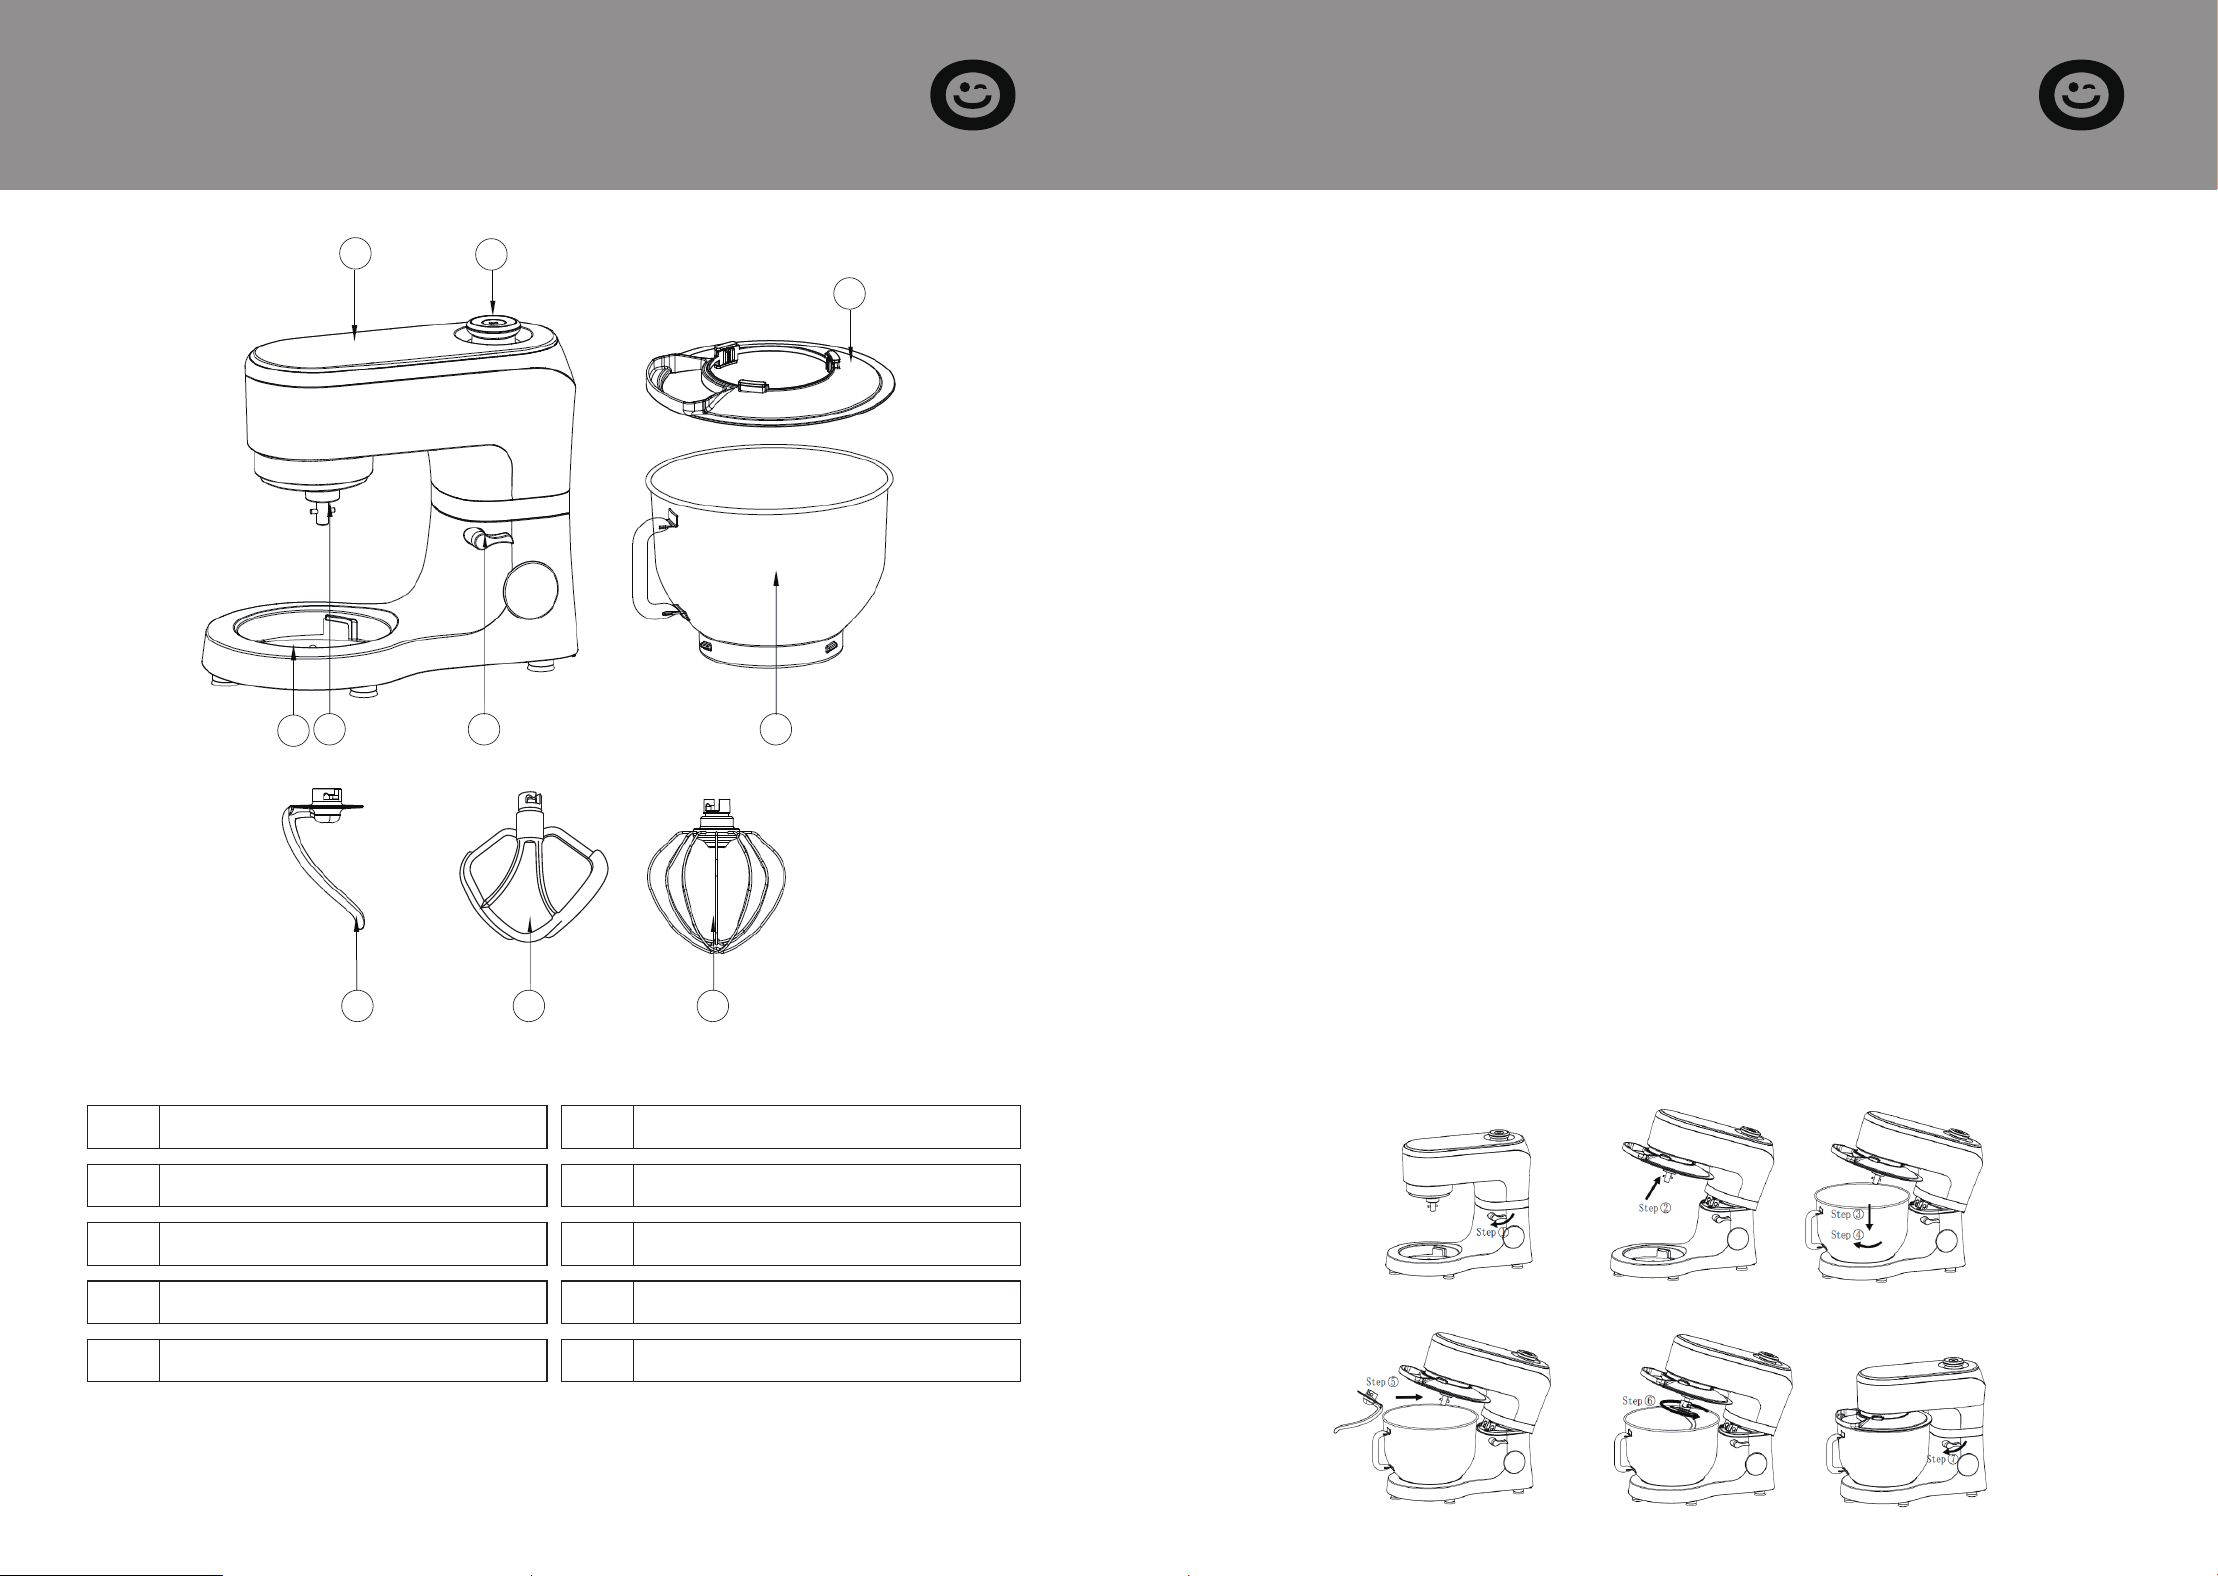
Main parts and standard parts:
SECTION C
Name of Different Parts
1 6Output shaft Beater
2 7Rise button Whisk
3 8Encoder knob Bowl cover
4 9Bowl LED display
10
Heating element5 Dough hook
5 6
10
7
8
1
9
2
3
4
SECTION D
How to Use the Machine
1.
2.
7.
8.
9.
10.
11.
Before use, wash the accessories with clean water, rinse, and dry.
Place the machine on a flat, clean, and dry table. Press the head of
per PG2.
4.
the machine, and turn again (or press down) the head-up knob ②
(Step 1), and the upper body will lift up automatically. (PG1 & PG2)
3.
Install the pot cover into the stirring end (Step 2) of the machine as
Weigh the food and water to be processed into the mixing bowl, then
assemble the mixing bowl ④ on the machine (step 3) and rotate clock-
wise until the buckle is screwed in and locked (step 4). (PG3)
5.
Do not exceed the amount of dough—the total weight can hold up
can be used at a time) onto the head mixing output shaft ① (step 5),
push the accessories to the top, and then turn a quarter turn coun
to 1.5 kg.
6.
Install the required accessories ⑤, ⑥, and ⑦ (only one of the three
-
Press the head of the machine; the machine will automatically lock
Control the encoder knob ③ to the position of 0 to make the appli
terclockwise to the locking position (step 6). (PG4 & PG5)
the head button ② (step 7), which is in the horizontal position.(PG6)
-
ance stop.
Then plug in the plug and turn on the power switch.
Control the encoder knob ③ to the required speed—start mixing.
After the dough meets the requirements, turn the Encoder knob ③
clockwise, lift the upper body, rotate the mixing bowl counter-
back to speed gear 0 to finish.
12.
Press the head of the machine by hand, rotate the lifting knob
clockwise, remove the mixing bowl, and take out the dough.
PG1 PG2 PG3
PG4 PG5 PG6
5 6
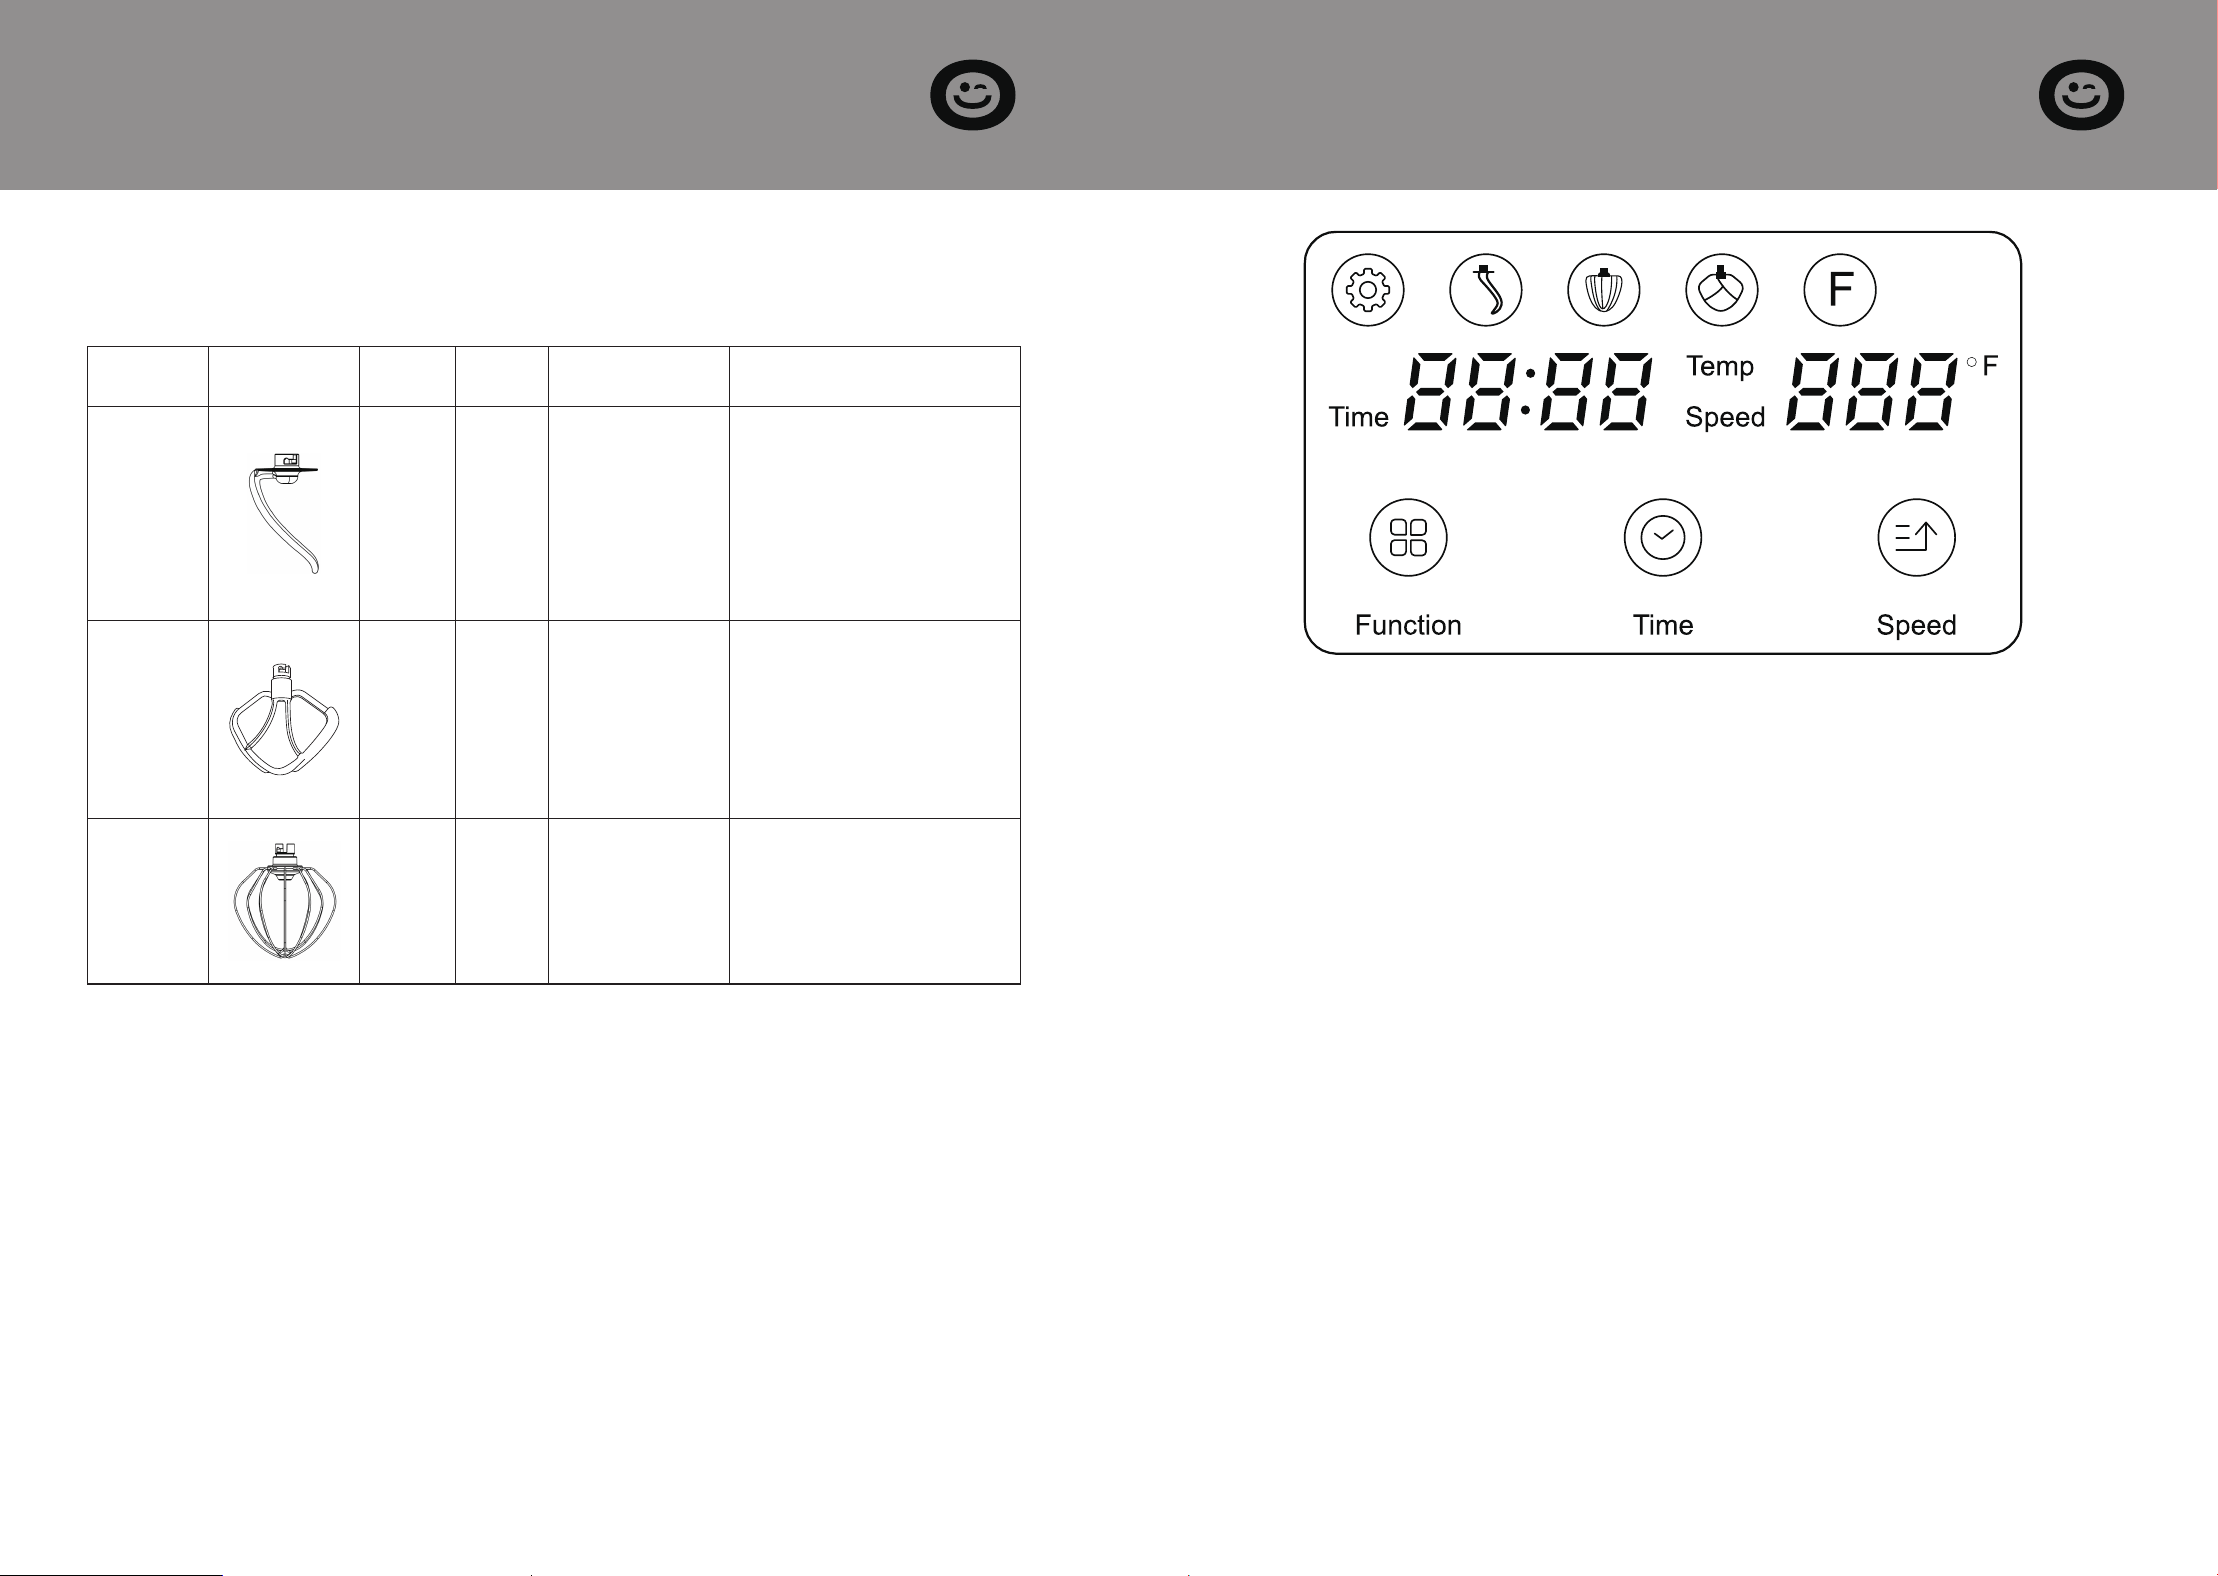
SECTION F
Led Function Description
Adjusting the Levels and Using the Hook for not more than 1.5kg of
1.
When selecting the time and speed gear, you can set the
corresponding time and speed gear by rotating the knob.
(1)
2. When a certain mode is selected and the time and speed gear
are set, press the "Start/Pause" button once. The machine will
run according to the set program.
During the operation of the machine, press the "Start/Pause"
(2)
button once. The machine will pause running, and the corre-
sponding function keys will flash. Save the current running
status. Press the "Start/Pause" button again, and the machine
will continue to run.
In the power-on and startup state, press the "Start/Pause"
button for more than 2 seconds continuously. The entire ma-
chine will shut down, and all displays will go out. In the shut-
down state, press the "Start/Pause" button to turn on the
machine and enter the standby mode.
Mixture.
Use Picture Levels
Time
(Min)
Max Operation Method
Dough
hook
1-4 3-5
1000g flour
+
538g water
1 speed run for 30s,
the 2 speed run for
30s, and then the 3-4
speed run for 2min
to 4min to form
a cluster.
Beater 3-9 3-10
660g flour
+
840g water
3 speed run for 20s,
the 9 speed run for
more than 2min40s
Whisk 9-11 3-10
3 egg whites
(min)
Open 9-11 speed to
run 3min above.
SECTION E
Suggestion
POWER ON AND OFF:

7 8
●
1.
After selecting a certain mode, touch the "Time" setting button
once. The time display "0000" will flash. At this point, you can
adjust the setting time by rotating the encoder switch. The time
setting rotates clockwise from 00:00 to 99:59 and counterclockwise
from 99:59 to 00:00. The maximum duration is 99 minutes and 59
seconds. Each rotation adds or subtracts 1 minute from the time.
Note: In the setting state, long-press the "Time" button for more
than 2 seconds, and all time settings will be reset to 0. The digital
tube will display "0000".
once. The speed gear display will flash "000". At this point, you can
adjust the set speed gear by rotating the encoder switch. The
speed gear setting rotates clockwise from 0 to 11 speed gears and
counterclockwise from 11 to 0. The maximum speed gear is 11. Each
rotation increments or decrements the speed gear by 1.
Note: In the setting state, long-press the "Speed" button for more
than 2 seconds, and all speed gear settings will be reset to 0. The
digital tube will display "000".
3.
When the "Fermentation" function is selected, at this time, the set
temperature can be adjusted by rotating the encoder switch.
Clockwise rotation increases the temperature; counterclockwise
rotation decreases the temperature. The temperature setting range
is 77-113°F, with the maximum being 113°F and the minimum being
77°F. Each rotation adds or subtracts 1 degree from the current
temperature.
Note: When in the set mode, long press the "Speed" button for
more than 2 seconds, and all temperature settings will be reset to
zero. The digital display will show "100".
Note: The knob is used to adjust the time or speed gear. After the
adjustment, it will automatically confirm after 5 seconds. During the
adjustment, the peed gear display or the time display will flash.
After the time adjustment is completed, it will automatically switch
to speed gear adjustment (no need to press the speed gear button).
MENU MODE:
ENCODER KNOB FUNCTION SETTING:
1. Self-Setting Mode
The speed gear and time settings can be customized to meet
individual preferences.
2. Kneading Dough Mode
●
Default speed gear: 3
Default time: 5 minutes
●
Program sequence: Starts at speed gear 1 for 30 seconds,
automatically switches to speed gear 2 for another 30 seconds, then
runs at speed gear 3 for 4 minutes before stopping automatically.
●
Adjustable speed gears: 1–4 (can be adjusted after 1 minute of
operation).
●
3. Whisking Mode
●
Default speed gear: 11
Default time: 3 minutes
●
Program sequence: Begins at a low speed gear for about 5 seconds,
●
then switches to speed gear 11 for 2 minutes 55 seconds
before stopping automatically.
●
Adjustable speed gears: 9–11.
4. Stirring Mode
●
Default speed gear: 3
●
Default time: 3 minutes
Program sequence: Starts at a low speed gear for about 5 seconds,
automatically when the time expires.
●
Adjustable range: Time 0–100 minutes; Temperature 77–113°
then switches to speed gear 3 for 2 minutes 55 seconds
before stopping automatically.
●
Adjustable speed gears: 3–9.
5. Fermentation Mode
●
Default time: 60 minutes
●
Default temperature: 100°F
●
Program sequence: Runs for 60 minutes by default and stops
F.
2. After selecting a certain mode, touch the "Speed" setting button

9 10
SECTION G
Recipes
Ingredients:
30g linseed, 40g water, 250g bread flour, 3g dry yeast, 30g sugar, 3g salt,
10g milk powder, 20g butter, 15g egg liquid.
Linseed Bread Rolls
1.
2.
3.
4.
Under standby mode, press the function key once, and the
corresponding function key on the display flashes, and the time
and speed display lights up; press the "Start/Pause" button, and the
machine starts to enter into the corresponding operation mode;
press the "Start/Pause" button again during working, and the
machine stops working, and the corresponding function keys will
be flashing and save the current running status. Press the "start/
pause" button again, and the machine will continue to run the
unfinished program.
Under "Self-setting" mode, "Self-setting" lights up, the time/speed
digital display lights up, and the countdown working time can be
set under this mode.
In custom mode, time settings can be divided into two categories:
time setting and no time setting.
A: No time setting: Twist the gear to position 1, and the sample
machine starts working (the gear position displays the set gear
number, and the time digits start to count up).
B: Time setting: Set the running time, twist the gear to position 1,
and the sample machine starts working (the gear position displays
the set gear number, and the time digits start to count down).
In the menu mode, each menu has recommended settings for
speed/temperature and time.
A: Default initial settings: Press the menu button, select the
corresponding menu function - press to start - start working
B: After selecting the corresponding function mode, you can also
set different speed/temperature and time settings. The setting
method is the same as above.
During the operation of the prototype, you can switch the speed at
will.
The equipment has a head-up memory function. When the
machine head of the prototype is lifted, the machine stops working
and the display screen remains in the previous working state. The
gear position remains unchanged and the time is paused. When
the machine head is lowered and the switch is restored, press the
"Start/Pause" button once, and the machine will continue to
operate in the state before the switch was disconnected.
1.
2.
3.
4.
Soak the 30g linseed into 40g water for 12 hours
Put 250g bread flour, 3g dry yeast, 30g sugar, 3g salt, 10g milk
powder,150g water into the mixing bowl, use dough hook to knead
the ingredients into dough at levels 1-4, and then add 20g butter
and continue to knead the dough until smooth, then add soaked
linseed until the dough is well kneaded. Cover with preservative
film and allow fermenting to double its size in a warm place.
Knead thoroughly once more, remove from the bowl, and divide
into six rolls. After being rounded, cover the rolls and allow them to
ferment at 100°F for 1 hour.
After the fermentation is finished, brush the surface of the bread
with egg liquid, put it on the penultimate layer in the preheated
oven, set the fire up and down at 356°F and bake for 20 minutes,
then remove the mold and put it on the grill to cool down.
FUNCTION KEY MODE:
Process:
Ingredients:
270g high-gluten flour, 30g low-gluten flour, 1 egg, 3g salt, 55g sugar, 4g
yeast, 80g light cream, 10g milk powder, 90g water.
Toast bread
1.
2.
3.
Put all the ingredients into the mixing bowl, and use the dough
hook to knead the ingredients to dough at levels 1-4.
Keep the mixture in a warm place and allow fermenting to double
its size.
Knead thoroughly once more, remove from the bowl and divide it
into 3 portions, cover the dough with preservative film for 15
minutes.
Process:

11 12
Ingredients:
375g high-gluten flour, 180g milk, 35g butter, 30g sugar, 11g milk powder,
4g yeast, 3g salt, 1 egg.
Butter bread
1.
2.
3.
4.
5.
6.
Put all the ingredients into the mixing bowl except the butter,
leaving 10g of egg for the final brushing.
Use a dough hook to mix at levels 1-4, after forming dough, add
softened butter and continue kneading into glove film status.
Cover the mixture with preservative film and allow fermenting to
double its size in a warm place.
Knead thoroughly once more, remove from the bowl and divide it
into 10 portions. Take a portion of the dough and roll it into an oval
shape, then roll it up from top to bottom.
Place the greased paper on the baking tray, then put the rolled
bread dough on the tray, and allow it to ferment to double its size
in a warm place.
Brush the egg liquid on the bread dough surface, preheat the oven
to 320°F, put the bread dough at the middle layer and bake for 20
minutes.
Process:
Ingredients:
250g high-gluten flour, 50g low-gluten flour, 150g water, 10g sugar, 3g
yeast powder, 1g edible salt.
French bread
1.
2.
3.
4.
5.
Put all the ingredients into the mixing bowl, use the dough hook to
mix at levels 1-4, and knead the dough into a dough shape.
Cover the mixture with preservative film and allow fermenting to
double its size in a warm place.
Knead thoroughly once more, remove from the bowl and divide it
into 4 portions. Take a portion of the dough and roll it into an oval
shape, then roll it up from top to bottom.
Then cover with preservative film and allow the fermenting to
double its size.
Brush the surface with sesame oil, preheat the oven to 356°F, put
the bread dough at the middle layer and bake for 20 minutes.
Process:
Ingredients:
100g cake flour, 5 eggs, 50g edible oil, 80g sugar, a small amount of
lemon juice, 55g milk.
Original cake
1.
2.
3.
4.
5.
6.
Separate the egg white and egg yolk, add 20g sugar into the egg
yolk, and mix with an egg beater at level 9-11 until the sugar is
completely melted. Add milk and continue to stir evenly at level
9-11. Pour in edible oil and continue beating until fully emulsified.
Pour the cake flour through a sieve, and stir evenly into a fine egg
yolk paste.
Put a few drops of lemon juice into the egg white, add sugar in
three times and beat with an egg beater until it is cotton-like.
Take 1/3 of the egg whites, put them in the egg yolk paste, and stir
evenly. Pour the paste back into the remaining egg whites and stir
evenly to a fine cake paste.
Brush edible oil on the surface of cake mold, then pour the cake
paste into the mold.
Preheat the oven to 302°F, set the upper and lower pipe heating
mode and baking time to 50 minutes, then bake it till golden in
color.
Process:
4.
5.
Take one portion and roll it into a tongue shape, fold both sides
toward the middle, and roll it up from bottom to top. After all three
are rolled, cover the rolls with preservative film for 15 minutes
After finishing 3 servings, put them into the mold for the 2nd
fermentation, fermenting to 80% of the mold height. Set the fire up
and down at 338°F and bake for 40 minutes, then remove the mold
and put it on the grill to cool down.

13 14
Ingredients:
150g egg liquid, 50g pure milk, 40g cocoa powder, 80g white sugar.
Chocolate cake
1.
2.
3.
4.
5.
Add 150 g of egg liquid, beat with an egg beater at level 9-11 until it
is cotton-like, then take it out and set it aside.
Put 80g white sugar, 50g milk, and 40g cocoa powder into a bowl
and stir into a fine powder with a stirring paddle at level 9-11.
Pour the prepared fine powder into the beaten egg liquid and mix
well.
Pour the mixed raw materials into the oil-brushed baking tray mold
and put it in the oven for baking at 356°F.
After being baked and shaped, take them out from the mold and
wait for them to cool down before eating.
Process:
Ingredients:
140g cream cheese, 140g dark chocolate, 220g milk, 100g powdered
sugar, 240g whipped cream, 2g edible salt.
Chocolate ice cream cake
1.
2.
3.
4.
5.
6.
The outside of the square mold is wrapped with tin foil, and a circle
of baking paper is put inside.
Add powdered sugar and a pinch of salt into cream cheese and mix
it with a stirring paddle.
Chop the dark chocolate and heat it to melt, pour the melted
chocolate into the cheese, then use a stirring paddle to stir evenly.
Take it out and place it on a tray for later use.
Put whipped cream in the pot and then stir until it is almost
cotton-like.
Add the whipped cream 2 times into the chocolate cheese and stir
evenly, then pour the milk into it 2 times and mix it well again.
Finally, pour it into the mold and put it in the refrigerator for
several hours. Take it out and demold it.
Process:
Raw materials:
170g high-gluten flour, 100g water, 1.5g edible salt, 15g white sugar, 2g
yeast, 15g butter, and some stuffing.
Homemade Pizza
1.
2.
3.
4.
5.
6.
7.
Put 170g high-gluten flour, 100g water, 1.5g edible salt, 15g sugar, and
2g yeast into the mixing bowl. Mix with dough hook at levels 9-11.
After kneading into dough, add butter and continue to knead until
it can be pulled out to be a flexible film
Leave the dough fermenting to double its size in a warm place.
During the fermentation, the pizza stuffing can be made and
reserved for future use.
Knead thoroughly once more, take half of the dough to roll it
round and relax for 5 minutes. Then use a rolling pin to gently roll it
to the size of a pizza pan, put it on the pizza pan, and press it
around the pizza pan with your hands. Finally, use a fork to make
small holes.
Set the upper and lower tube heating mode of the oven, and
preheat to 392°F. Brush the pie mold base with olive oil first, then
scoop the pizza sauce and spread it evenly, and then, sprinkle a
little mozzarella cheese and shredded onion, put the 8-inch pizza
pan in the second layer of the preheated oven and bake for 8
minutes.
When the time is up, take out the pizza pan and spread a layer of
bacon. Here you can put your favorite food and prepared stuffing in
order.
Put it in the preheated oven, and set the working time for 15
minutes until the cheese is melted and the crust is golden.
Process:

15 16
SECTION H
Analysis of Common Problems
Phenomenons Causes Solutions
The machine
suddenly stops
working during
use.
It may be that the
machine runs too long, or
the ambient temperature
is too high, resulting in
the machine's motor
temperature being too
high; the machine starts
the overheating
protection program,
automatic shutdown.
Gear reset to "0", unplug
the power, wait for the
machine to return to
room temperature can be
restarted (generally need
15-30 minutes, the room
temperature varies
cooling time).
Excessive noise
when the
machine is
running.
The machine will work
louder in high gear
than in low gear.
The amount of food
stirred is too large,
resulting in overloading
the machine.
Voltage is unstable.
Working time is too
long.
Choose the right gear
to stir food according
to the
recommendations in
the manual
Reduce the amount of
stirring.
If the voltage is
unstable, wait for the
voltage to stabilize
before using.
If the working time is
too long, stop and cool
down for a while
before using.
Turning the gear
knob machine
does not run.
Check if the plug is in
good contact with the
socket.
Verify that the power
plug is plugged into the
outlet.
Check if the rise button
spring back in place.
Make sure the headstock
is stuck in place.
Check if the power is out. Wait for power before
operating.
1.
2.
3.
4.
1.
2.
3.
4.
SolutionsPhenomenons Causes
The machine
speed drops, or
the speed is
unstable.
Whether the room
temperature is low,
causing the lubricant in
the machine to harden.
The ingredients stirred
are too hard and too
much, resulting in too
much load on the
machine.
Whether the voltage
suddenly becomes low.
Remove the mixing
bowl and let the
machine idle for 5
minutes to soften the
lubricant in the
machine and restore
the speed stability.
Reduce the mixing
volume and let the
machine work
according to the
normal workload.
When the voltage is
stable, use the
machine again.
1.
2.
3.
1.
2.
3.
A slight odor may
be detected from
the motor or
wiring during
initial operation.
Normal break-in
process of the motor
and gears.
Minor off-gassing from
insulation materials.
Run the mixer at low
speed without load for
several minutes in a
well-ventilated area.
There is no safety
concern — the odor is
temporary and normal.
1.
2.
1.
2.
Machine swaying
and shaking
when working.
Check if the foot pad
on the base is off.
Whether the machine
is placed on a smooth
and flat countertop for
use.
Check if the foot pad
on the base is off.
Place on a smooth and
flat countertop for use.
The headstock
can't spring back
to reset after
putting on the
anti-splash cover
and mixing bowl.
Check that the
anti-splash cover is in
place and the mixing
bowl is assembled.
Rotate the anti-splash
cover and assemble it in
place, and assemble the
mixing pot in place.
Dough darkening
found after use.
Black powder falls onto
the dough at the mixing
head.
Please check that the
mixing head and hook
are dry and that no water
or dust is present on the
surface before use.
1.
2.
1.
2.

17 18
SECTION K
Warranty
The VIVOHOME warranty program is our commitment to you. We are
committed to providing you with a high-quality product that meets
your needs and expectations. To demonstrate our confidence in the
durability and performance of our products, we offer the following
warranty.
This warranty applies to all orders, purchases, or use of products sold
only by VIVOHOME and is valid for 1 year from the purchase date.
Please note, this warranty only covers the original order. If a
replacement is provided within the warranty period, it does not
extend the warranty.
WARRANTY COVERAGE
SECTION J
Disposal
Dispose of the device through a registered waste disposal
firm or through your communal waste disposal facility.
Observe the currently valid regulations. In case of doubt,
consult your waste disposal facility.
Do not dispose of the device in normal domestic waste.
SECTION I
Cleaning
Body Cleaning
Do not immerse the machine in the water. Do not
use water to shower directly on top of the machine
to prevent the host body from entering the water to
avoid short circuits, electric shock, leakage, rust, and
other failures.
Do not use a dripping wet towel to wipe the
machine.
Do not use detergent/vinegar/salt and other
corrosive, strongly acidic, or strongly alkaline
cleaning products to clean the machine body,
otherwise you will damage the machine's surface.
Do not use sharp and rough tools such as wire balls
to brush the accessories. Otherwise, it is easy to
damage the surface of the accessories.
1.
2.
3.
4.
Accessory
Cleaning
Do not put the cast aluminum parts into the
dishwasher or wash them with corrosive, strongly
acidic, or alkaline cleaning products. Please do
not put them into the dishwasher for cleaning.
(Except for stainless steel parts or surface-treated
Teflon parts and electrophoresis parts)
Do not soak for a long time in detergent,
saltwater, vinegar, and other corrosive liquids;
use in time to clean accessories.
After cleaning, dry the accessories, mainly to
keep the internal parts dry in time.
1.
2.
3.
Special Cleaning
The rotating output shaft will produce a bit of
black trace due to high speed and friction when
the machine is working. After each use, please
clean it promptly and keep the part dry.
Pay attention to the sharp blade and related
sharp-edged parts or accessories.
1.
2.
Preservation
and
maintenance
You can use olive oil to apply on the blade's
surface, knife plate, and mixing pot to ensure the
dry and wet environment to oxidize it.
When not in use, you can cover the machine
with a packaging bag and place it in a dry
environment.
1.
2.

19
This warranty does not cover damages caused by misuse, accidents,
unauthorized modifications, or any factors unrelated to product
manufacturing and design, including but not limited to:
Loss of parts during use.
Normal wear and tear of products or parts.
Incorrect installation (e.g., using the wrong voltage) or improper
assembly.
Overloading the product’s bearing capacity.
Usage in extremely harsh conditions.
Improper cleaning or lack of maintenance.
Damage resulting from unintended use of the product.
Damage resulting from unauthorized modifications or service.
Indirect losses or damages related to the product.
WARRANTY EXCLUSIONS
●
●
●
●
●
●
●
●
●
If you encounter any defects affecting the product’s functionality or if
the product fails and cannot be repaired during the warranty period,
please reach out to our customer service team via email, or our app’s
messaging service at your earliest convenience. To expedite your
claim, kindly include:
VIVOHOME will provide technical support, replacement, refund, or
other solutions based on the issue’s specifics. If you wish to return the
original package for any reason, please contact us for confirmation
before initiating the return. You can expect a response within 48
hours.
Thank you for choosing VIVOHOME. We are dedicated to ensuring
your satisfaction and the quality of your purchase. If you have any
questions or need further assistance, please don’ t hesitate to reach
out to our customer service team.
Order number
Photos and/or videos illustrating the issue
A detailed description of the problem
HOW TO MAKE A WARRANTY CLAIM
●
●
●
Do not dispose of the device in normal domestic waste.