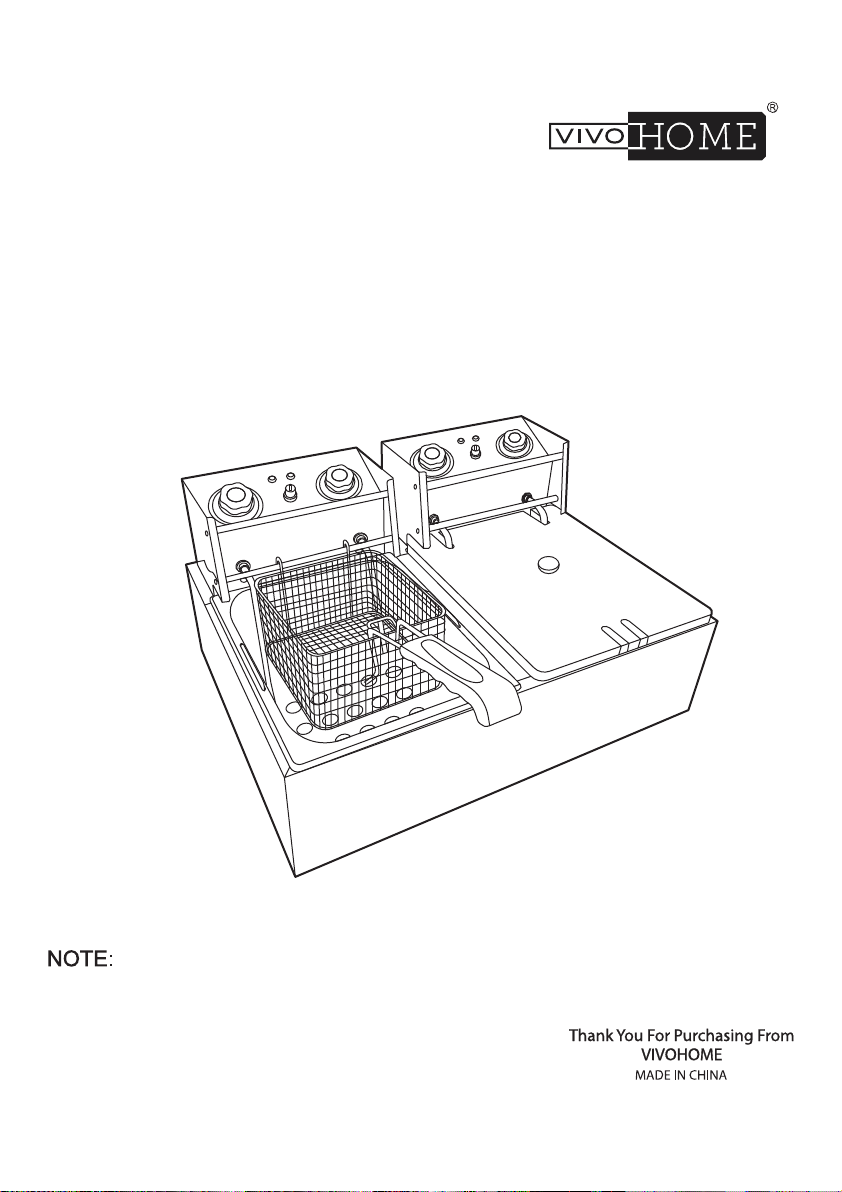
Electric Deep Fryer
Instruction Manual
TROUBLESHOOTING
SAFETY PRECAUTIONS
The voltage used by this machine must be the same as the rated voltage. The machine
should be connected to a 16A socket.
Users must not use extension cables with this machine.
There is a grounding bolt at the back of the machine. A copper core wire of no less than
2.5mm² should be reliably connected to a grounding wire that complies with safety
regulations.
Before using, check if all the wiring is tight, the operating voltage is correct, and the outlet is
reliably grounded. The shell of the machine should be attached properly to ensure safe
operation. Thank you for your cooperation and understanding.
1.
2.
3.
4.
3
Problem
Cause
Solution
1.When connecting the power
cord to the socket, the green
indicator light is not on and the
machine is not working.
1. The machine is not
connected to the power
source.
1. Fasten the power cord and
ensure the socket is powered
on.
2. The fuse of the socket is
blown or the socket is
damaged.
2. Replace the fuse (>16A) of
the socket, or replace the
current socket with a suitable
16A socket.
1. The wiring of the electric
heating tube is loose.
1. Tighten the connecting
screw on the electric heating
tube.
1. The thermostat does not
work.
1. Replace the thermostat.
1. The indicator light
burned out.
1. Replace the indicator light.
1. The temperature limiter
has already been activat-
ed, resulting in overheat-
ing protection.
1. Reset the temperature
limiter. (Refer to Instruction
#10)
2. The timer was not set
up.
2. Set up the timer to ON or a
desired time. (Refer to Page 1,
Instruction #3 to set up the
timer.
2. The electric heating
tube is burnt out.
2. Replace the heating tube.
2. The red and green indicator
lights are on at the same time,
but the oil temperature does
not rise.
3. The red indicator light is
always on, and the oil tempera-
ture cannot be controlled.
4. The temperature can be
controlled normally, but the
red indicator light is not on.
5. The green indicator light is
on, but the red indicator light is
not on and the temperature
does not rise no matter what
temperature it is set to.
To continuously improve its products, VIVOHOME reserves the
right to modify this information without prior notication.
For any questions during assembly, please watch the video in the
product page for reference. Or contact our customer service with
any questions, comments, or concerns. Thank you for using
VIVOHOME products in your home!
BASIC PARAMETERS
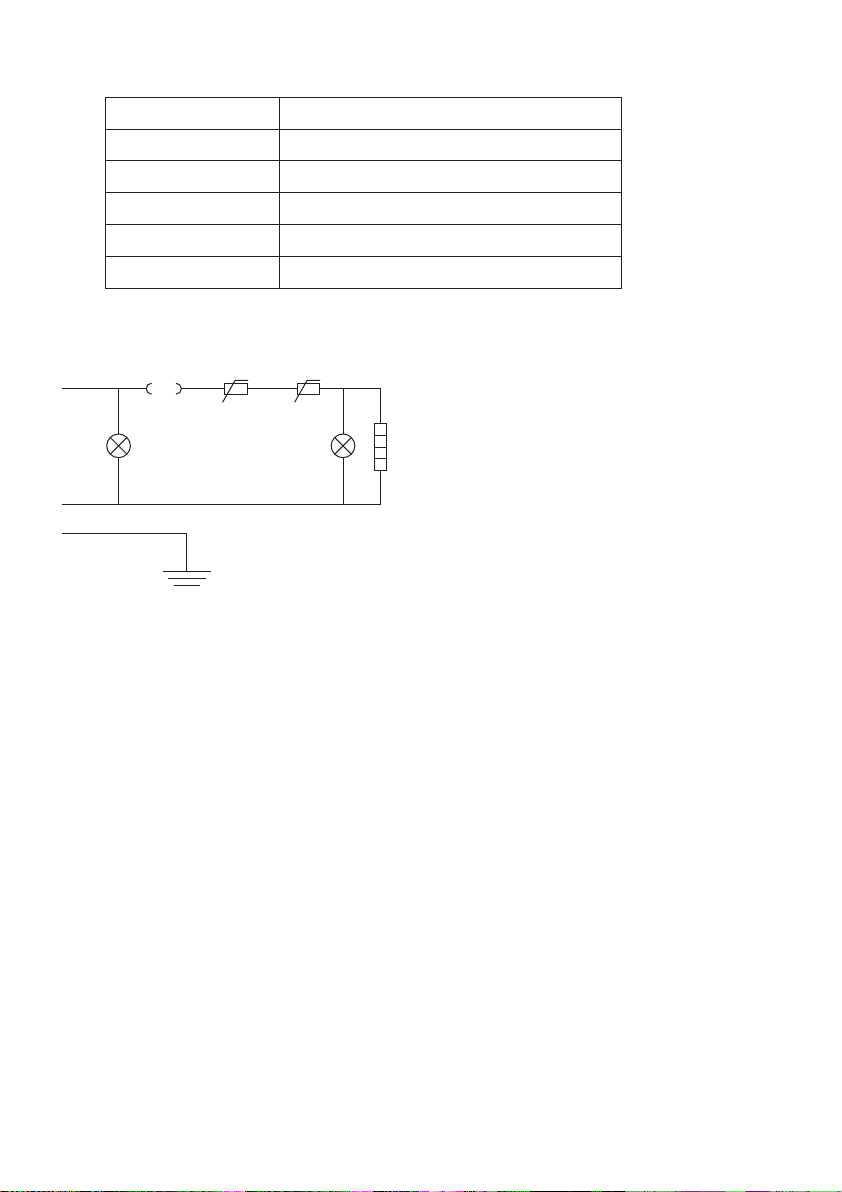
CIRCUIT DIAGRAM
INSTRUCTIONS
Electric Deep Fryer
VH1118
AC110V
50Hz-60Hz
2.5kW+2.5kW
22 x 17.3 x 12.2 in. (56 x 44 x 31cm)
L - Live Wire
N - Neutral Wire
E - Earth Wire
HL1 - Power Indicator
HL2 – Heating Indicator
EE – Heating Tube
W – Temperature Limiter
RT - Thermostat
Item Name
Item Number
Voltage
Frequency
Max Power
Dimensions
Check whether the power supply is reliable and installed correctly.
Keep the oil level over the MIN line and lower than the MAX line of the oil pans during use.
1) Keep the reference point on both knobs aligned with OFF position, and insert the
power cord plug into a suitable socket. The green POWER indicator light will turn on. At
this time, electricity will be supplied to the machine.
2) Turn the TIME knob to the ON position and rotate the temperature knob clockwise to
align the reference point with the required degree. At this time, the red HEATING indicator
light will turn on, which shows that the electric heater is working. The oil will start heat up.
3) To set the timer: Turn the TIME knob to the desired time. The timer will sound and the
knob will reach the OFF position when the desired time is up. Then, the machine will stop
heating.
4) To use the machine in the continuous working mode: Turn the TIME knob to the ON
position. Rotate it to the OFF manually to stop heating when nished frying.
5) During cooking, the thermostat will cut o heating automatically when the oil reaches
the set temperature. At this time, the red HEATING indicator light will turn o, which
shows that the electric heater is no longer heating up.
1.
2.
6) When the temperature drops a little, the thermostat will automatically send a signal to
the heater to start heating again. Then, the red HEATING indicator light will turn on. The oil
temperature will rise.
7) The machine works in this way repeatedly in order to make sure the oil temperature is
within a certain selected range.
The cover is designed for keeping the device warm and clean. When putting on the cover,
the user should make sure there is no water on it in case that water drips into the pot,
which will cause hot oil to splash and hurt people.
The enclosed special basket is used for frying small pieces of food. There is a hanger and a
handle on the basket. Put the basket into the oil while cooking. After frying, lift and hang
the basket on the machine to lter oil. The ltered oil will ow into the pot. If frying a large
piece of food, you can put it directly in the pot.
After cooking, please turn the TIME knob and temperature knob to the OFF position and
pull the plug out for safety.
It the user wants to pour oil out of the pot, the user should do it after the temperature
reaches to room temperature. First, the user should take out the basket and back plate.
Then, cut o the power and turn over the control box (at this moment the electric heating
tube in the pot is upright). Alternatively, the user can take out the control box and put it in
a dry place. Afterwards, the oil pot can be removed for cleaning.
The user should clean the oil, grime, and residue on the electric heating tube regularly.
The back plate is designed for protecting the electric heating tube. The back plate must be
installed properly in the oil pot when frying food.
Every fryer with a temperature range of 140 to 400°F has a RESET protection button for
overheating. When the temperature is higher than the pre-set one (460°F), the tempera-
ture limiter will work to cut o the power and protect the machine. Users may nd the
temperature limiter activates in the following situation: While the power connection is
normal and the green POWER indicator light is on, if the temperature knob is rotated to
any specic temperature but the red HEATING indicator light does not turn on and the
temperature does not rise. At this time, twist the black RESET lid on the panel in a count-
er-clockwise direction and open it manually. If a small black button inside sticks out about
5mm, it means the temperature limiter has already activated. If the user wants to use the
machine again, the user must follow these steps to reset the temperature limiter: (1) Wait
for 10 minutes in case the temperature is still higher than the pre-set one. (2) If the RESET
lid has not been opened yet, twistit in a counter-clockwise direction and open it manually.
(3) Press the small black button inside the RESET lid to reset. (4) Twist the lid back to its
original place and use the machine normally.
3.
4.
5.
6.
7.
8.
9.
1 2
L
N
E
T
W RT
HL1 HL2 EE

BASIC PARAMETERS
CIRCUIT DIAGRAM
INSTRUCTIONS
Electric Deep Fryer
VH1118
AC110V
50Hz-60Hz
2.5kW+2.5kW
22 x 17.3 x 12.2 in. (56 x 44 x 31cm)
L - Live Wire
N - Neutral Wire
E - Earth Wire
HL1 - Power Indicator
HL2 – Heating Indicator
EE – Heating Tube
W – Temperature Limiter
RT - Thermostat
Item Name
Item Number
Voltage
Frequency
Max Power
Dimensions
Check whether the power supply is reliable and installed correctly.
Keep the oil level over the MIN line and lower than the MAX line of the oil pans during use.
1) Keep the reference point on both knobs aligned with OFF position, and insert the
power cord plug into a suitable socket. The green POWER indicator light will turn on. At
this time, electricity will be supplied to the machine.
2) Turn the TIME knob to the ON position and rotate the temperature knob clockwise to
align the reference point with the required degree. At this time, the red HEATING indicator
light will turn on, which shows that the electric heater is working. The oil will start heat up.
3) To set the timer: Turn the TIME knob to the desired time. The timer will sound and the
knob will reach the OFF position when the desired time is up. Then, the machine will stop
heating.
4) To use the machine in the continuous working mode: Turn the TIME knob to the ON
position. Rotate it to the OFF manually to stop heating when nished frying.
5) During cooking, the thermostat will cut o heating automatically when the oil reaches
the set temperature. At this time, the red HEATING indicator light will turn o, which
shows that the electric heater is no longer heating up.
1.
2.
6) When the temperature drops a little, the thermostat will automatically send a signal to
the heater to start heating again. Then, the red HEATING indicator light will turn on. The oil
temperature will rise.
7) The machine works in this way repeatedly in order to make sure the oil temperature is
within a certain selected range.
The cover is designed for keeping the device warm and clean. When putting on the cover,
the user should make sure there is no water on it in case that water drips into the pot,
which will cause hot oil to splash and hurt people.
The enclosed special basket is used for frying small pieces of food. There is a hanger and a
handle on the basket. Put the basket into the oil while cooking. After frying, lift and hang
the basket on the machine to lter oil. The ltered oil will ow into the pot. If frying a large
piece of food, you can put it directly in the pot.
After cooking, please turn the TIME knob and temperature knob to the OFF position and
pull the plug out for safety.
It the user wants to pour oil out of the pot, the user should do it after the temperature
reaches to room temperature. First, the user should take out the basket and back plate.
Then, cut o the power and turn over the control box (at this moment the electric heating
tube in the pot is upright). Alternatively, the user can take out the control box and put it in
a dry place. Afterwards, the oil pot can be removed for cleaning.
The user should clean the oil, grime, and residue on the electric heating tube regularly.
The back plate is designed for protecting the electric heating tube. The back plate must be
installed properly in the oil pot when frying food.
Every fryer with a temperature range of 140 to 400°F has a RESET protection button for
overheating. When the temperature is higher than the pre-set one (460°F), the tempera-
ture limiter will work to cut o the power and protect the machine. Users may nd the
temperature limiter activates in the following situation: While the power connection is
normal and the green POWER indicator light is on, if the temperature knob is rotated to
any specic temperature but the red HEATING indicator light does not turn on and the
temperature does not rise. At this time, twist the black RESET lid on the panel in a count-
er-clockwise direction and open it manually. If a small black button inside sticks out about
5mm, it means the temperature limiter has already activated. If the user wants to use the
machine again, the user must follow these steps to reset the temperature limiter: (1) Wait
for 10 minutes in case the temperature is still higher than the pre-set one. (2) If the RESET
lid has not been opened yet, twistit in a counter-clockwise direction and open it manually.
(3) Press the small black button inside the RESET lid to reset. (4) Twist the lid back to its
original place and use the machine normally.
3.
4.
5.
6.
7.
8.
9.
1 2
L
N
E
T
W RT
HL1 HL2 EE

Electric Deep Fryer
Instruction Manual
TROUBLESHOOTING
SAFETY PRECAUTIONS
The voltage used by this machine must be the same as the rated voltage. The machine
should be connected to a 16A socket.
Users must not use extension cables with this machine.
There is a grounding bolt at the back of the machine. A copper core wire of no less than
2.5mm² should be reliably connected to a grounding wire that complies with safety
regulations.
Before using, check if all the wiring is tight, the operating voltage is correct, and the outlet is
reliably grounded. The shell of the machine should be attached properly to ensure safe
operation. Thank you for your cooperation and understanding.
1.
2.
3.
4.
3
Problem
Cause
Solution
1.When connecting the power
cord to the socket, the green
indicator light is not on and the
machine is not working.
1. The machine is not
connected to the power
source.
1. Fasten the power cord and
ensure the socket is powered
on.
2. The fuse of the socket is
blown or the socket is
damaged.
2. Replace the fuse (>16A) of
the socket, or replace the
current socket with a suitable
16A socket.
1. The wiring of the electric
heating tube is loose.
1. Tighten the connecting
screw on the electric heating
tube.
1. The thermostat does not
work.
1. Replace the thermostat.
1. The indicator light
burned out.
1. Replace the indicator light.
1. The temperature limiter
has already been activat-
ed, resulting in overheat-
ing protection.
1. Reset the temperature
limiter. (Refer to Instruction
#10)
2. The timer was not set
up.
2. Set up the timer to ON or a
desired time. (Refer to Page 1,
Instruction #3 to set up the
timer.
2. The electric heating
tube is burnt out.
2. Replace the heating tube.
2. The red and green indicator
lights are on at the same time,
but the oil temperature does
not rise.
3. The red indicator light is
always on, and the oil tempera-
ture cannot be controlled.
4. The temperature can be
controlled normally, but the
red indicator light is not on.
5. The green indicator light is
on, but the red indicator light is
not on and the temperature
does not rise no matter what
temperature it is set to.
To continuously improve its products, VIVOHOME reserves the
right to modify this information without prior notication.
For any questions during assembly, please watch the video in the
product page for reference. Or contact our customer service with
any questions, comments, or concerns. Thank you for using
VIVOHOME products in your home!