INSTRUCTION

TABLE OF CONTENT
UltraDash Z4...........................................................................................................01
Precautions .............................................................................................................02
Product Specs ........................................................................................................04
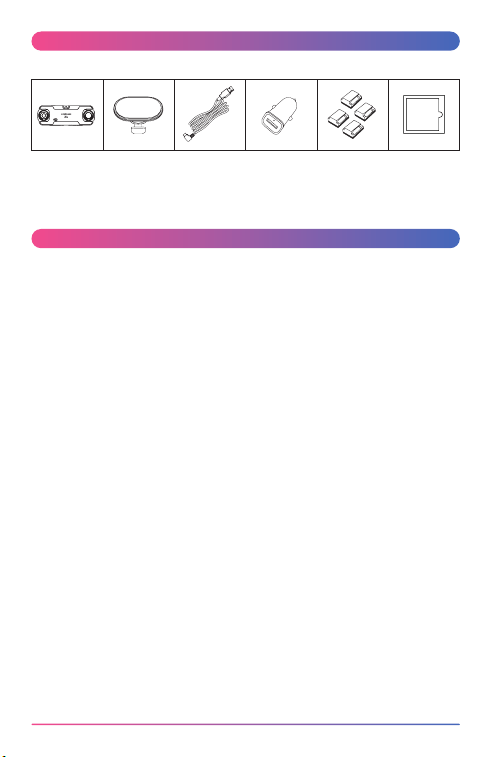
Package Contents .................................................................................................05
Product Features ...................................................................................................05
Camera Parts & Control .......................................................................................07
In-vehicle Installation ............................................................................................10
On Screen Notications ........................................................................................22
Video Mode .............................................................................................................26
Video Menu .............................................................................................................27
Setup Menu .............................................................................................................31
Playback Mode .......................................................................................................33
Wireless Link & iQ Viewer ( iOS & Android ) .....................................................38
iQ Viewer Instruction ( iOS & Android ) ..............................................................44
USB Storage ( Windows & Mac ) ........................................................................50
Firmware Update Instruction................................................................................51
iQ Player (Windows & Mac) ..................................................................................56
Warranty ..................................................................................................................56
Trouble Shooting ....................................................................................................58
Appendix .................................................................................................................61

11
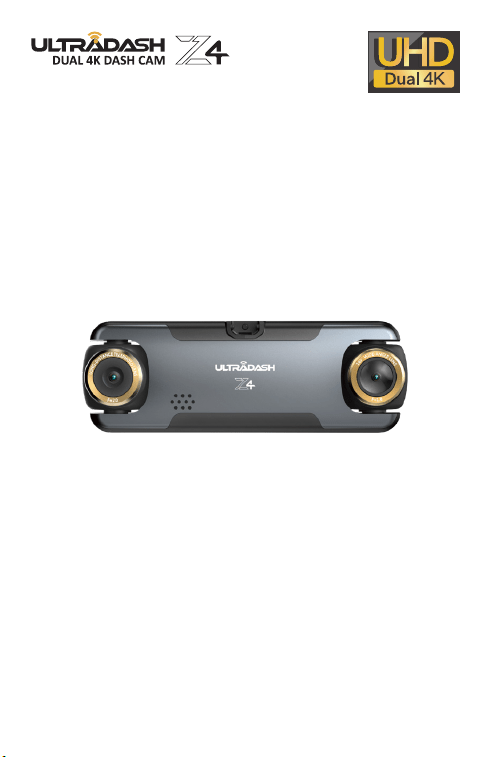
Congratulations on the purchase of your new UltraDash Z4 camera! We’d
like to thank you for your purchase. We strive to bring you the highest quality
products, allowing you to capture every memory. We know you’ll love using
your UltraDash!
The following instructions are written for optimized use of your UltraDash
Z4 camera. Each of the default settings have been designed to achieve the
highest quality video while maintaining peace of mind when the camera is on.
It is not recommended you adjust the default settings.
With new technology readily available, the creators of Cansonic have
developed an easy to use camera for everyday use. UltraDash Z4 allows its
user to record les in 1 minute lengths. These les are easy to download to
your home desktop or personal laptop. In most instances, the video les are
easily played on your mobile device.
While most cameras traditionally use the entire capacity of the Micro SD
card until it is removed, UltraDash automatically deletes the oldest le to
create space for the new video.
UltraDash Z4 oers two modes:
1. Video Mode: Video mode will set to default when the camera is active.
2. Playback Mode: Users can view all previously recorded videos.
F E AT U R E S:
Automatic Start / Stop Technology:
Maintain full focus on the road! The vehicle's ignition will let the camera turn
on while connected to your vehicle's 12V outlet or cigarette lighter socket.
When the vehicle is turned o, the camera will automatically shut down.
UltraDash Z4 lets users adjust camera settings to get the perfect shot. For a
great
video every time, here are a few tips from the designers:
1. Reduce the amount of sky in the picture. By adjusting the camera
towards the road, the automatic exposure compensation will be focused on
the road and not the light from the sky.
2. Position the camera in the center of the dash. If you place the camera
behind the rearview mirror, you will avoid all distractions from the road.
3. Remove any objects that will obstruct your shot such as the protective
lens cover. Clear vision will allow you to record everything in one shot.
Full optimization of memory card:
1. Before removal of the memory card from UltraDash Z4, be sure to turn o
the camera. Leaving the camera on while removing its memory card may lead
to eased or corrupt les.
EASY TO USE
ADDITIONAL TIPS

2
Please read the following instructions carefully. Proper Use of UltraDash Z4
is necessary in order to avoid operational problems that may occur.
WARNING:
DO NOT expose UltraDash Z4 to moisture under any circumstance. The
camera is NOT WATERPROOF and will become defective and may put the
user at risk of electric shock or re exposure.
DO NOT use UltraDash Z4 for any illegal purpose or to infringe on another
individual’s rights. When audio is being recorded, we recommend you allow
any and all persons near UltraDash Z4 know that they are being recorded.
You can disable the microphone on the camera.
C A U T I O N:
Do not perform any activities or services with the device unless you are
qualied to control the object. Misuse of UltraDash Z4 may result in electric
shock or re exposure.
AVOID ANY uses of the camera that are not listed in the manual.
If your UltraDash Z4 needs service repairs, please visit a qualied technician
to perform the necessary repairs:
UltraDash Z4 has had exposure to water (rain, all forms of water, ETC.)
UltraDash Z4 operating system is not functioning properly
UltraDash Z4 does not turn on properly
Liquid Crystal Display (LCD)
UltraDash Z4 is equipped with an LCD screen for easy viewing. The screen
has a multi-layer complex component that contains nearly 960x240 pixels.
The pixels the screen projects may fail as a result of:Defective Problems or
Prolonged Exposure to the sun.
Product life may also be a cause for screen failure. One pixel is equivalent
to 0.0001% of total screen exposure. One-pixel failure per year during the
operational life of UltraDash Z4 is standard and should not be cause for
concern.
Proper Use of UltraDash Z4
The following instructions are listed for exclusive use of UltraDash Z4.
PRECAUTIONS
2. Format memory card by accessing setup menu, then choosing the format
option. You will now be able to fully use all the memory power of your
Micro SD card.
3. By reformatting your memory card every 2-3 weeks, your memory card will
continue to be fully utilized. Only do this AFTER you've downloaded any les
from the card to your computer, as formatting the card will remove all
content.

3
Please read all instructions to prolong camera use and eectiveness.
• Remove packaging and ensure the windshield is clear of dirt and debris
before you install your dash camera mount.
• Avoid any and all distractions in regards to technology, IT’S THE LAW.
Any obstruction of drivers’ view of the road may result in nes. Ensure
UltraDash Z4 is placed clear of your view of the road, as well as out of the
way of airbags in the event of an accident.
• Disconnect UltraDash Z4 adaptor when the vehicle is not in use. By doing
so, you will avoid camera damage as well as hazards such as res and
electrocution.
• Avoid viewing the camera playback feature while operating a vehicle. It is
illegal and may result in a ne or even death.
• Avoid adjusting the camera settings while driving. It is dangerous and illegal.
OBEY THE LAW!
Cleaning
Proper maintenance of UltraDashZ4 is essential to allow for full optimization
of the camera. Maintenance suggestions are:
• Clean the device with a soft dry cloth. For tough dirt, please use a small
quantity of water and a neutral detergent. Clean with a soft cloth.
• Avoid contact with UltraDash Z4 lens as damage may be caused.
• When necessary, clean the lens carefully by using lens cleaning fluid and a
soft cloth.
Google Maps mapping service, Android and Google Play are trademarks of
Google LLC in the United States and other countries.
Samsung is a registered trademarks of Samsung Electronics Co., Ltd.
Windows is a registered trademark of Microsoft Corporation in the United
States and other countries.
iPhone, iPad, Mac and App Store are registered trademarks of Apple Inc. in
the United States and other countries.
IOS is a registered trademark of Cisco in the U.S. and other countries.
MicroSD is a trademark of SD-3C, LLC.
4
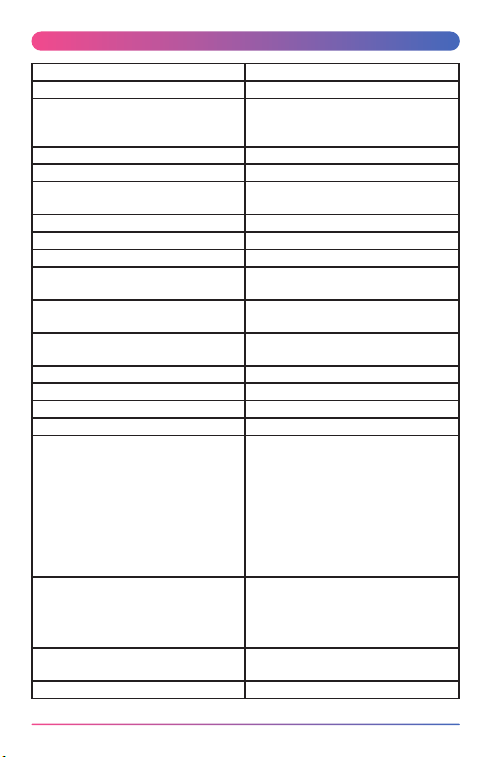
Product Name / Model Number Dash Cam / Z4 /Z4C
Power Requirements 5V / 1.5A; 12-24V DC
Power Supply (Car power cable)
Input:12-24V DC
Output:5V DC
Fuse Type:SDM / 4A
Power Input(Car power cable) Built-in super capacitor
Left/Right Sensor Resolution Sony Starvis, 8M Pixel
Rear Sensor Resolution
(Rear camera is sold separately)
High-end Night Vision, 4M Pixel
Wide-Angle Lens Angle/Aperture 140° / F1.8
Telephoto Lens Distance/Aperture 164ft / F2.0 (Standard)
Cabin Lens Angle/Aperture 140° / F1.8 (Commercial)
Rear Lens Angle/Aperture
(Rear camera is sold separately)
130° / F2.0
Left/Right Recording Resolution
Dual Cam 4K (3840 x 2160 pixel) @ 30fps
Single Cam 4K (3840 x 2160 pixel) @ 60fps
Rear Recording Resolution
(Rear camera is sold separately)
2K (2560 x 1440 pixel) @ 30fps
Screen Size 2.0”
Screen Resolution 320 (W) X 240 (H) pixels x RGB
Screen Ratio 4:3
Card Reader Micro SD, SDHC, up to 512GB
SD Card (Recommended Type)
32-512GB, U3, SDHC. Note: SD card
is not included. We recommend using
Samsung Evo Plus U3 Micro SD Card
for the best result.
Note: Memory card manufacturers
may change components over time,
which could affect quality. Please
check our recommended SD card list
regularly for updates.
SD Card Recorded File Capacity
(Based on Default Settings)
32 GB Micro SD = 67 mins of recording
64 GB Micro SD = 135 mins of recording
128 GB Micro SD = 270 mins of recording
256 GB Micro SD = 540 mins of recording
512 GB Micro SD = 1080 mins of recording
Unit Dimensions
5.67 × 1.93 × 1.14 inches
14.4 x 4.9 x 2.9cm
Unit Weight 5.29 oz (150g)
PRODUCT SPECS
5
UltraDash Z4 3M Adhesive
Mount
Car Power
Cable
USB Car
Charger
Cable Clips Static Side
Film
Please check the contents of your UltraDash product.
* Product appearance may dier slightly to that shown above.
- 2.0” LCD Color Screen
We designed this screen perfectly for you. You can instantly play back and
review your footage right away
- G sensor / File Protection
UltraDash Z4’s built-in sensor detects external impact and automatically
saves the current recording. You can also save footage manually by pressing
the easily accessible button next to the screen.
- Automatic Start / Stop Tech
UltraDash Z4 comes with built-in sensors that automatically turn the
camera on and o with the vehicle.
Note: Z4 has a longer boot-up time. Please wait.
- Built-In Microphone & Speaker
A built-in microphone and speaker come standard. The feature also works
with the camera’s playback feature.
- GPS Data
With its built-in GPS, UltraDash Z4 records your location and speed while
capturing every moment on the road.
- Parking Mode (Optional)
UltraDash Z4 features Parking Mode, which automatically saves footage when
vibration or movement is detected. It also supports Time-lapse Recording
as an optional mode. This feature requires the HW1-E advanced hardwire
kit, connected to the vehicle’s constant/ACC power from the fuse box. (sold
separately, for more details, please visit our ocial website.)
PACKAGE CONTENTS
PRODUCT FEATURES

6
- 2K Rear Camera Recording (Optional)
UltraDash Z4 supports an optional rear camera, enabling three-channel
recording when connected. The front camera records at 4K 30fps, while the
rear camera captures in 2K 30fps. (sold separately, for more details, please
visit our ocial website.)
- Infrared Illumination (Commercial Edition Only)
The commercial edition is equipped with two automatic infrared ll lights
that enhance image clarity captured through the cabin lens in low-light
conditions.
7
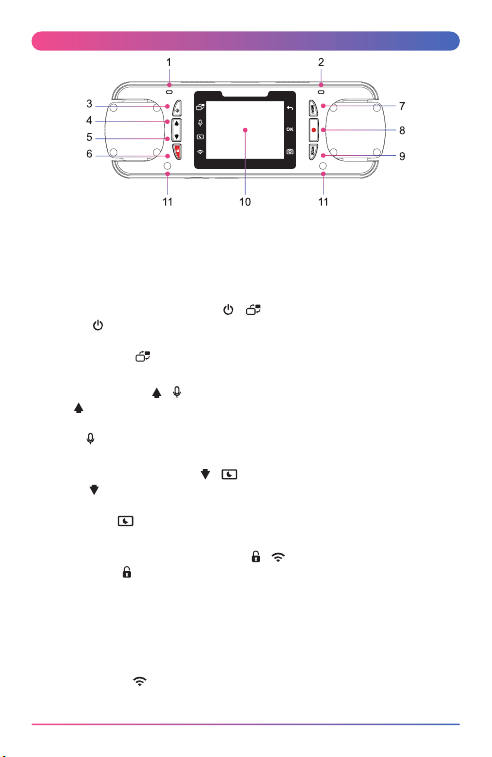
1. Red Status LED Indicator
Constant: Power on.
Flashing: Recording.
2. Blue Status LED Indicator
Constant: Charging.
3. Power / Screen Select Button /
Power:
Press and hold the button for 2 seconds to turn the camera on/o.
Screen Select:
Press to Switch the main camera to display on PIP screen.
4. Up / Mute Button /
Up:
Navigate up within menus or go to the previous le in playback mode.
Mute:
Turn on or o the audio recording function while in video mode.
5. Down / Screen Off Button /
Down:
Navigate down within menus or go to the next le in playback mode.
Screen Off:
Turn on/o the LCD screen.
6. File Protect / Wireless Link Button /
File Protect:
Simply press the button and to protect the current video le from overwriting.
Note:
- If the button is pressed within the rst third of a video clip, the previous
clip will also be protected.
- If the button is pressed within the nal third of a video clip, the next
clip will also be protected (if recording continues).
Wireless Link:
When the camera is in video mode but not actively recording, press this
button to enable the Wireless Link function. (Wireless Link is enabled by
CAMERA PARTS & CONTROL
8
12
13
14
default. The icon appears white when running in the background and gray
when the feature is turned o.)
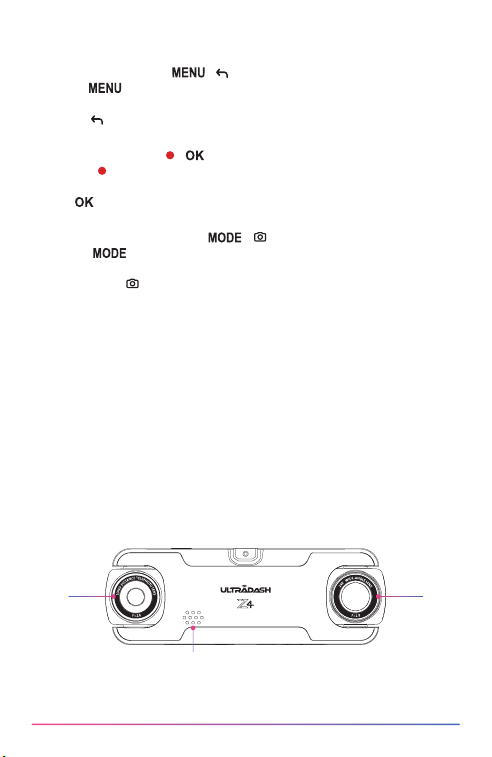
7. Menu / Leave Button /
Menu:
Press this button to open the Video or Setup menu.
Leave:
Press the Leave button to return to the previous page.
8. Record / OK Button /
Record:
In Video mode, press to start or stop recording.
OK:
The OK button used to select options in menus.
9. Mode / Screen Shot Button /
Mode:
This button allows you to navigate between video, and playback modes.
Screen Shot:
While you are recording in video mode, press the button and you will be
able to take a screenshot of the current frame.
10.Screen
UltraDash Z4 is equipped with a standard 2.0” LCD color screen to let you view.
11. Infrared Lights For Vehicle Cabin (Commercial Edition Only)
The commercial edition is equipped with two automatic infrared lights
specically designed for the vehicle cabin. These lights activate when
internal and external lighting is insucient, providing additional
illumination for clearer image capture in low-light conditions. In addition,
the cabin camera will switch to black-and-white mode to capture the
video in dark environments.
12.Right Lens
Standard
Right lens is a telephoto lens designed to capture all the details for you,
or you can record the rear trac by point this lens backward.
Commercial
Right lens is a wide-angle lens designed to record everything through the
front windshield.
9
1516 17
18 19
13.Speaker
System sound and recorded footage sound.
14. Left Lens
Standard
Left lens is a wide-angle lens designed to record everything through the
front windshield.
Commercial
Left lens is another wide-angle cabin lens which is designed for a
professional driver to record driver-passenger interaction.
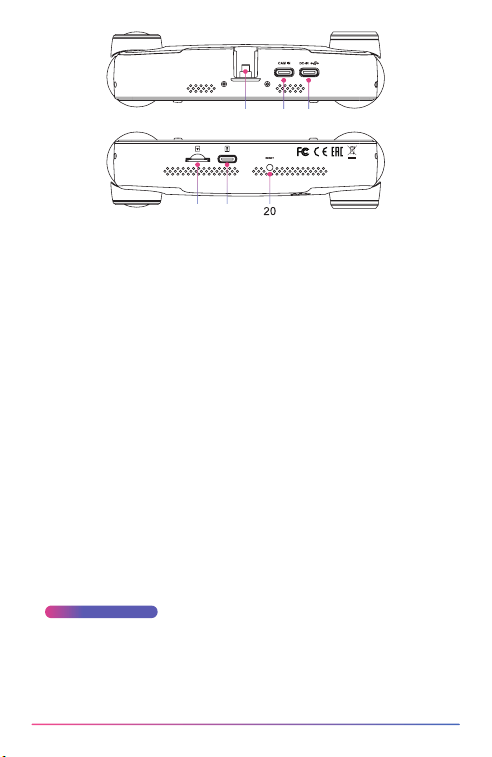
15. Rear Camera Port (Optional)
By connecting UltraDash Z4 rear camera, you are able to record a 2K
resolution video simultaneously for your rearview. (sold separately)
16.Mounting Slot
Quick-release mounting slot.
17. D C - P o r t
By connecting UltraDash Z4 with the supplied car power cable you are
able to charge the camera.
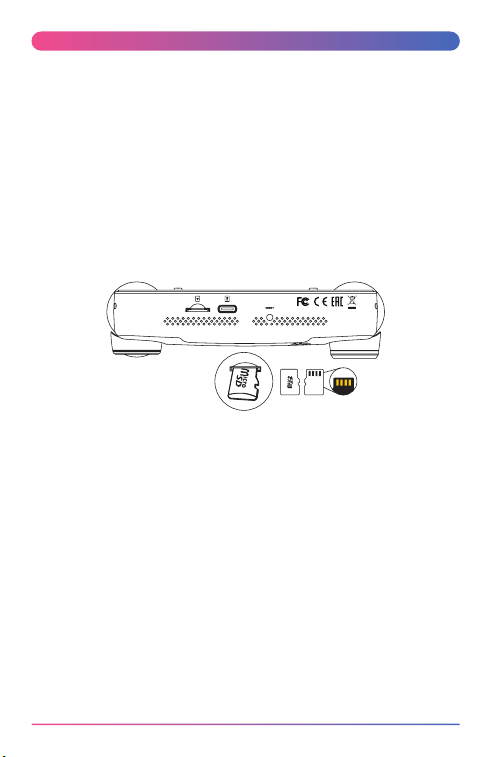
18.Micro SD Card Slot
Insert your micro SD card here. Push your memory card into the slot until
you hear a click.
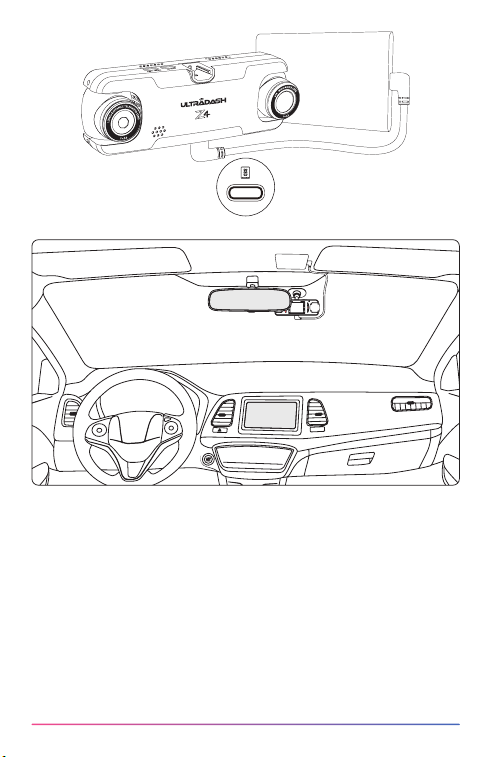
19. External SSD Storage Slot
You can connect the device to an external SSD via a USB cable
for expanded storage capacity. Please purchase our recommended
Samsung T7 SSD
, as it is currently the only supported model.
20.Reset Button
On the rare occasions the camera has a problem, use the reset button to
shut down the camera. Simply press the reset until the camera turn os
and press power button to turn on.
10
IN-VEHICLE INSTALLATION
For the rst installation, follow the instructions below:
1. INSERT YOUR MICRO SD CARD INTO UltraDash Z4
Insert the Micro SD card into the UltraDash Z4. Before installation, ensure
the gold contacts are facing the device’s space-gray metal side. Press the
card fully into the slot until you hear a CLICK.
TIP:
- If you cannot hear the CLICK, take a small coin by the edge and push on
the outside end of the card until the sound is made.
- Remember: DO NOT REMOVE OR INSERT THE MEMORY CARD WHILE
ULTRADASH Z4 IS TURNED ON.
UltraDash Z4 supports SSD storage connection, allowing you to connect an
SSD to the dash cam, with support for SSDs up to 4TB. If you do not need to
use an external SSD, please skip directly to Step 2.
Connect the external SSD to the USB cable and insert it into the SSD port
located at the bottom of the UltraDash Z4. Please ensure the connector is
fully inserted to maintain a stable connection.
Note:
- Please purchase the Samsung T7 SSD, which is the only supported
model at this time.
- Do not plug or unplug the SSD while the UltraDash Z4 is powered on to
avoid disk errors or data corruption.
- When using a high-capacity memory card or SSD, startup time may be
longer. Please wait patiently.
- Do not expose the SSD to direct sunlight, as excessive heat may cause
slowdowns or disconnections.
11
- The external SSD can be mounted on the back of the unit or the
headliner using Velcro or a bracket. Choose a spot with good ventilation,
away from direct sunlight, and without blocking the driver’s view.
12
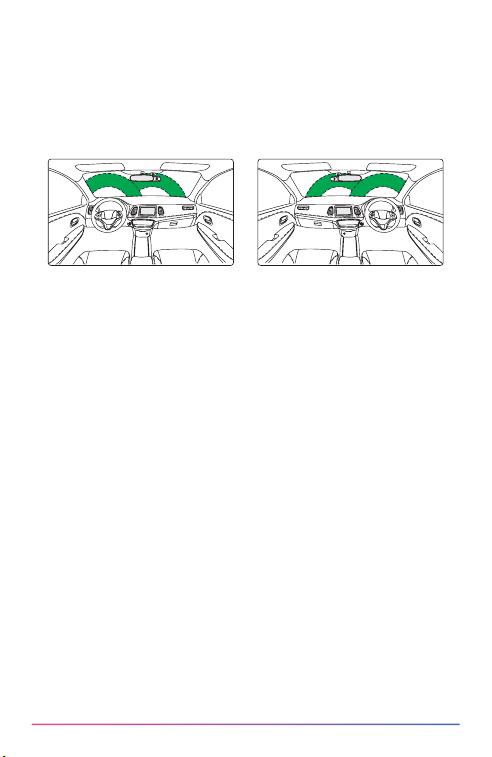
Left-hand Drive Right-hand Drive
DO NOT place the camera in front of the driver's side.
DO NOT place the mount within the airbag deployment area or near any
mirrors.
DO NOT operate UltraDash Z4 while driving. Remember, the camera will
automatically record when the vehicle engine has started.
PLEASE place the camera where the power cable is easily concealed and
will not distract the driver. Avoid areas such as the steering wheel,
pedals, or gear shifter.
PLEASE remember to clean the area where the mount will be placed.
PLEASE adjust your camera settings before you begin driving.
2. INSTALLING THE 3M MOUNT AND ELECTROSTATIC FILM
Install the mount in a location that does not obstruct the driver’s view. We
recommend placing the base behind the passenger-side rearview mirror,
within the windshield wiper coverage area.
Warning:
Always keep your attention on the road. Distracted driving may result in nes,
accidents, or even death. Please drive safely.
13
1
2
3
4
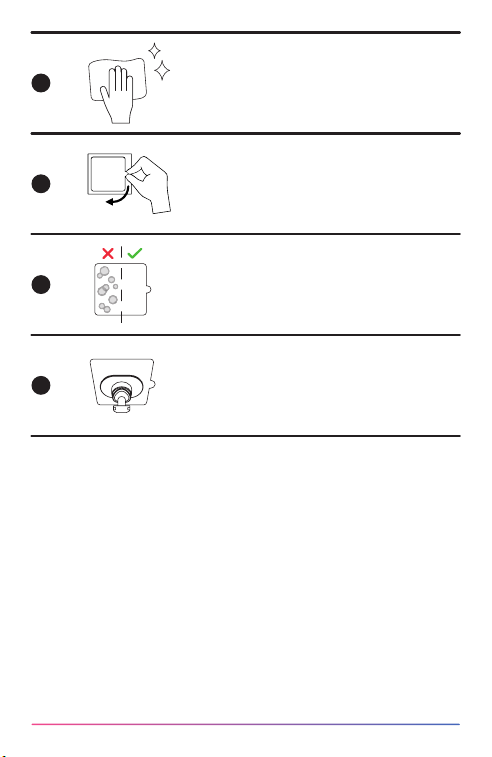
Position lm location and clean windshield
Before applying, clean windshield location,
remove any dust, oil and use any cloth to give
one last polish for best performance.
Remove the protective layer
Before sticking, pull out the actual film
protector. Pull out and remove the protective
layer on one side.
Attach static side lm to the windshield
Adhere the static side to the windshield,
press out and remove excess bubbles using a
squeegee or plastic card.
Make sure to press it fully to adhere on the
windshield.
Install 3M adhesive mount
Mount 3M adhesive mount within the surface of
the lm and avoid the area that spans between
windshield and lm.
TIPS:
- When selecting a location for the 3m mount, make sure it’s on a glass
surface that is smooth and free of paint.
- Before mounting, clean the area with a dry, clean cloth to allow a stronger
bond to form between the glass and the 3M mount.
- Remember to place the mount within the area of the vehicle’s windshield
wipers.
14
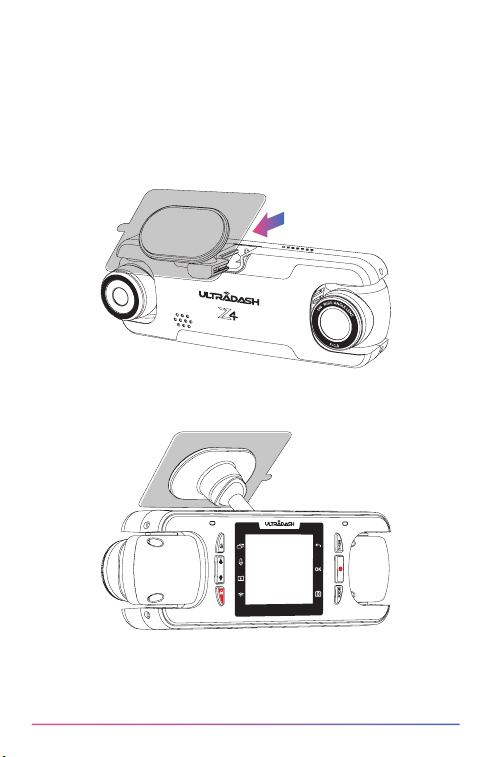
3. MOUNT THE ULTRADASH Z4 ONTO THE 3M ADHESIVE MOUNT
Remove the protective plastic lm and select a location on the windshield
where it won’t distract you. Then, put the mount in place. Press the mount
rmly against the window.
15
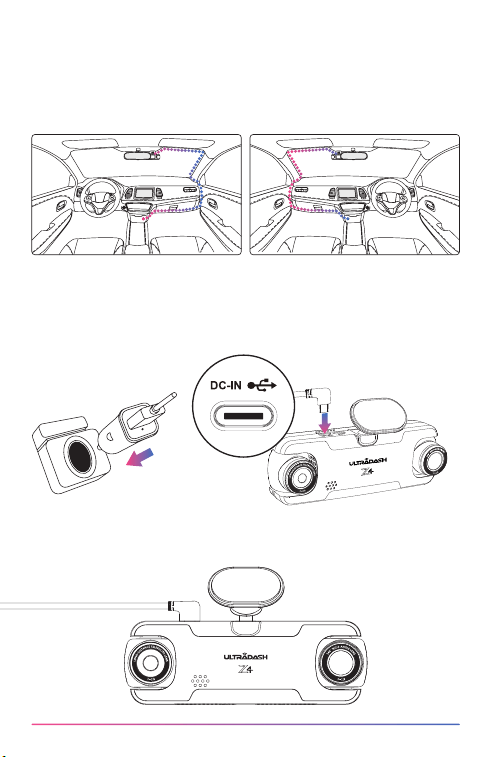
4.CONNECTING TO CAR POWER OUTLET
Connect the power cable that is in the package to your vehicle’s 12V
outlet. The provided cable clips can help you keep the power cable neat.
Note:
- When routing the cable, make sure it does not interfere with any airbag
components to avoid improper airbag deployment.
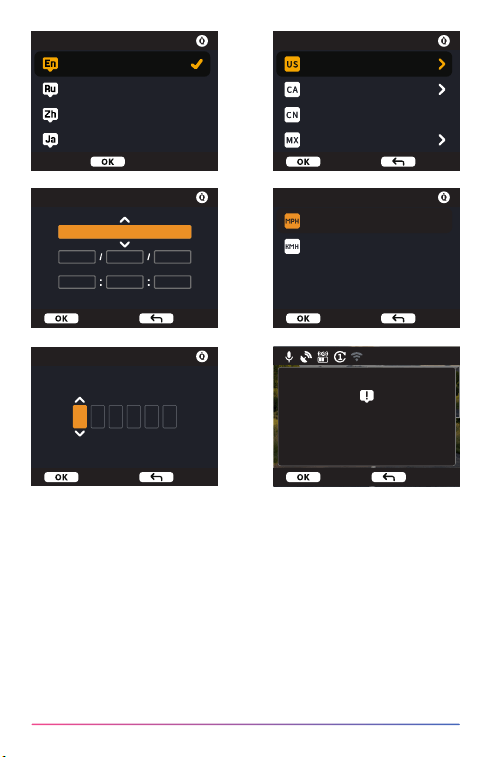
6.THE FIRST-TIME SETUP
When connecting the power, UltraDash Z4 will turn on and display the
rst-time setup guide below.
Left-hand Drive Right-hand Drive
5. CONNECTING TO CAR POWER OUTLET
Plug the power cable into the power socket of the mount or camera. This will
allow the camera to begin charging.
16
TIP:
You can reset the settings either by operating inside of the SETUP MENU, or
by restoring defaults. From now on, UltraDash Z4 will automatically turn on
and start recording once power has been made available from the 12V outlet.
Just start the vehicle and start driving!
- If there is no 12V outlet or cigarette lighter for your vehicle, use the
included USB power cable but please notice that your USB power output
port should provide 2A current to make sure the device work properly.
- DO NOT wire UltraDash Z4 directly to the car cigarette outlet or any
12V outlet. Doing so will result in permanent damage to the camera.
- You can purchase our hardwire kit from the Cansonic ocial website
that will directly connect to your vehicle’s fuse box. This will allow you
to have your 12V outlet available for other use. Please read carefully and
follow the instructions below to help you operate UltraDash Z4 safely.
Language
Speed UnitTime and Date
Set PIN
Country or Region
English
MPH
Pрусский
繁體中文
日本語
KMH
Canada
Mexico
United States
China
YYYY/DD/MM
2025
11
12
17
25
01
6
7 1 5 1 4
Enter Enter Back
Enter Back Enter Back
Enter Back
05:20:01
Enter Cancel
Please format SD card for
the rst time using on this
device
17
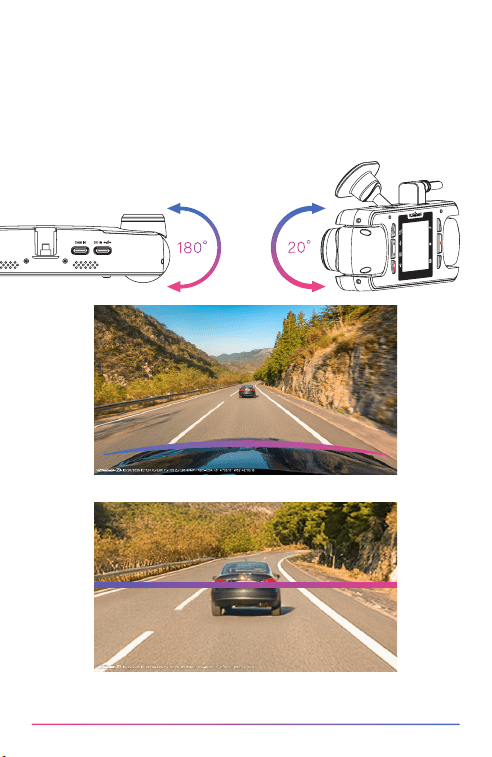
7. ADJUST THE ANGLE
Adjust the lenses to your preferred angle. The dual lenses can rotate 180°
horizontally and 10° vertically.
Wide-angle lens: We recommend keeping the car hood visible in at least
one-fth of the frame.
Telephoto lens: Aim the lens toward the forward horizon to capture distant
license plates and road conditions.
Infrared interior lens: Point the IR lens toward the cabin and adjust it to your
preferred viewing angle.
Congrats! Now you are all set!
180°
20°
Recommended recording angle for the wide-angle lens.
Recommended recording angle for the telephoto lens.
18
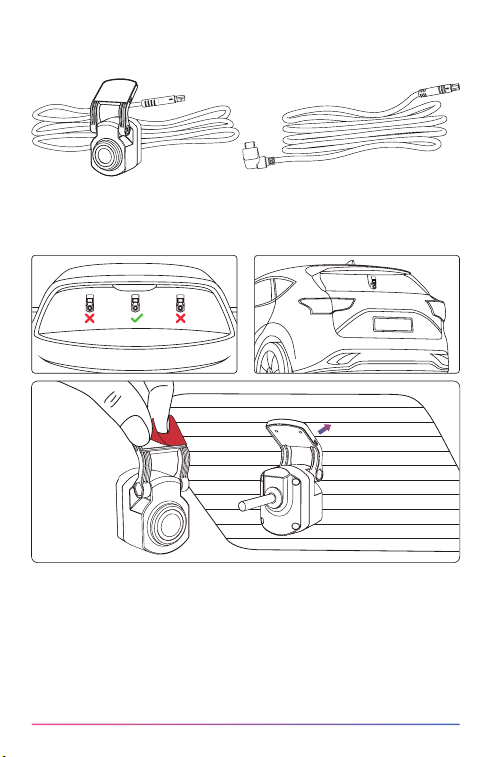
8.REAR CAMERA INSTALLATION (OPTIONAL)
The 2K resolution rear camera AR2 is sold separately on the ocial website.
(1) SELECT A LOCATION ON THE REAR WINDSHIELD
Select a location on the rear windshield, attach the adhesive mount, and
place the rear camera in place. The rear camera mount is designed for
sloping windows or vertical/flat windows.
Note:
- It is recommended to place the rear windshield camera within the
windshield wiping area at the top of the rear windshield to record as
clear an image as possible. Make sure the heating grid lines do not
obstruct the view.
- If you need to apply the electrostatic lm (static cling sticker) to the
rear windshield, you must trim it to the size of the flat surface. Applying
it directly might extend over the defroster lines, which will prevent it
from adhering properly.
19
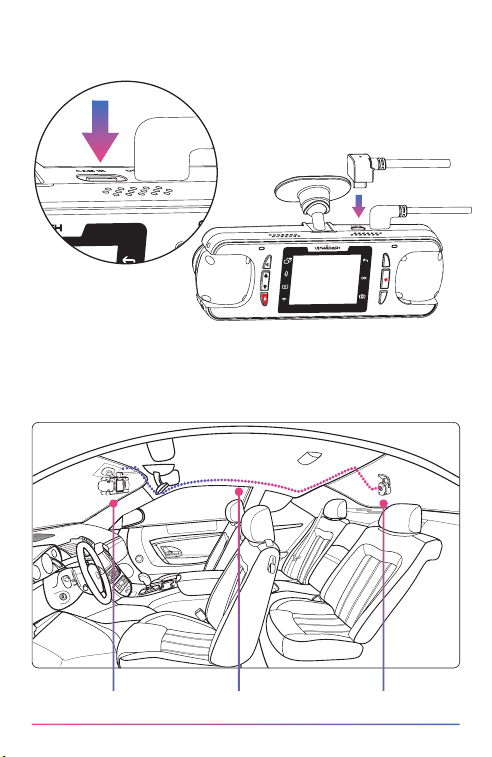
(2) CONNECT THE REAR CAMERA CABLE
Use the CAM IN port on the top of the front dash cam and plug in the rear
camera cable.
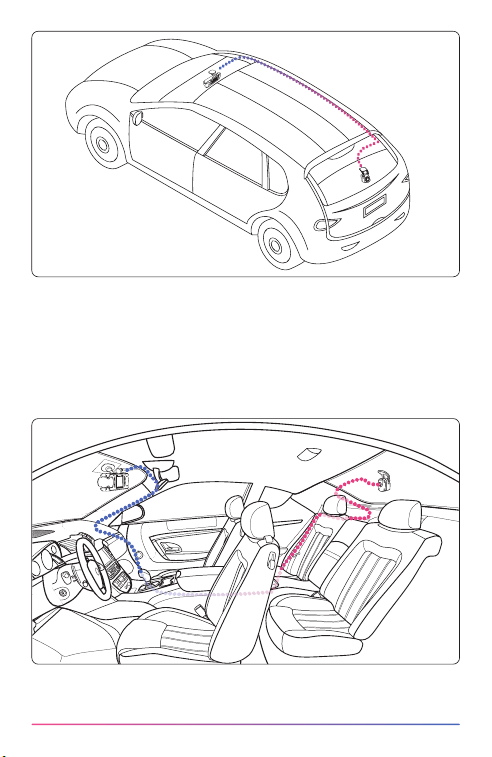
(3) ROUTE THE REAR CAMERA CABLE
Route the rear camera cable through the vehicle to the rear windshield and
tuck the cable away. The end of the cable should run through from the side
of the headliner at the rear of the vehicle for you to connect and mount the
rear camera to your selected position.
Dash Cam Rear Camera Cable Rear Camera
MEN
MODE
MENU
20
- Check all airbags locations on the vehicle owner’s manual. DO NOT
route cable over the airbags to avoid potential interference with airbag
deployment and posing a problem with proper airbag operation.
- For vehicles that have Headliner and curtain airbag, the wire should run
through from the bottom of the passenger side carpet trim, along the
rear seat side, to the rear windshield molding, and to the selected
position.
21
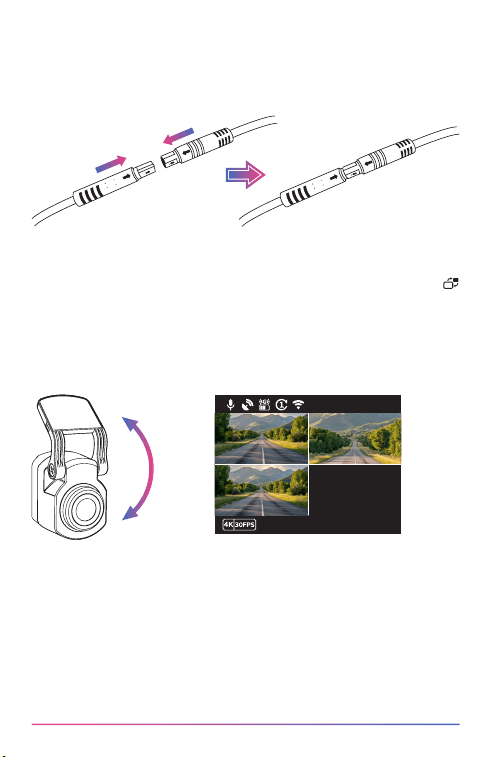
(4) CONNECT THE REAR CAMERA CABLE TO THE REAR CAMERA
When all the cable is in place, connect the rear camera cable to the rear
camera, line up cable pins and turn the locking ring to secure the cable
connection. Check the front dash cam to ensure the rear camera is working
correctly.
Note:
- You can also connect UltraDash Z4 to your mobile device and
download iQ Viewer on App Store / Google Play. Use its Live View
function to adjust the rear camera.
- If you still nd it too much trouble or don't want to do it yourself. It is
recommended to nd your local reliable Auto Dealer Service Department,
Car stereo Installer, and Auto Mechanic shop to ask about dash cam
installation. Fees may vary from one shop to another. Please ask and
check the reputation of the shop before installing it.
Left lens
Rear lens
Right lens
speed
● 00:05
09:00:01 12/25/2025
60
MPH
(5) ADJUST THE REAR CAMERA
Once the mount is set to the rear windshield, ensure the display on the front
dash cam (front and rear views) are level. Press the Screen Select Button
when recording to switch from the rear display to full screen, adjusting the
rear camera accordingly. Ensure the display is in the center, and the vehicle
behind should show at least 1/3 of the display. DO NOT attempt to adjust the
dash cam while driving.
22
ON SCREEN NOTIFICATIONS
The following information will help you better understand the On Screen
Notications when corresponding alert is detected.
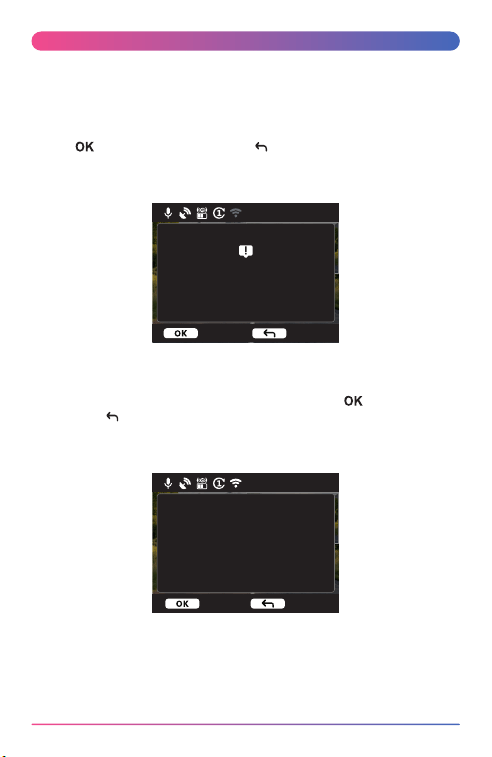
• First Time Use SD Card Format:when the SD card is inserted into the
device for the rst time, the device will ask you to format the card.
Press button to format and LEAVE button to cancel.
Note:Please save the important le before formatting the card.
OPTIONS:Format (Recommended) / Cancel
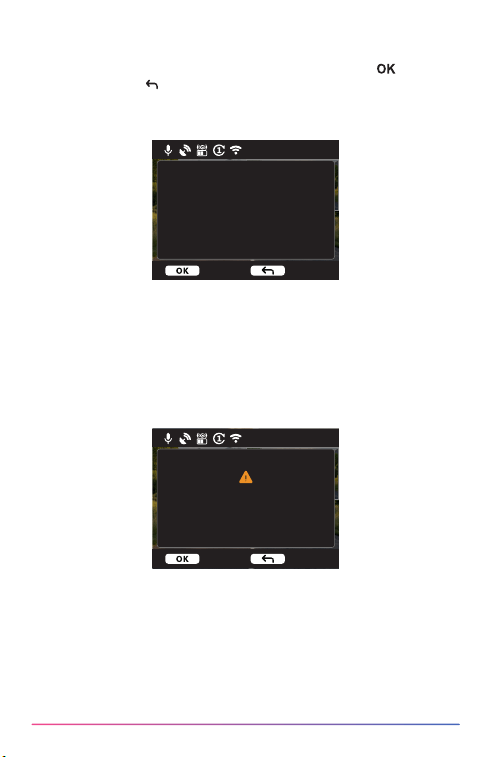
• 30 Days SD Card Reformat:When the SD card has been formatted for 30
days, the device will ask you to reformat the card every 30 days to days to
keep the storage of SD card is working correctly. Press button to format
and LEAVE button to cancel.
Note:Please save the important le before formatting the card.
OPTIONS:Format (Recommended) / Cancel
Remember to reformat
SD card once in a while
05:20:01
05:20:01
Conrm Cancel
Please format SD card for
the rst time using on this
device
Conrm
Cancel
23
05:20:01
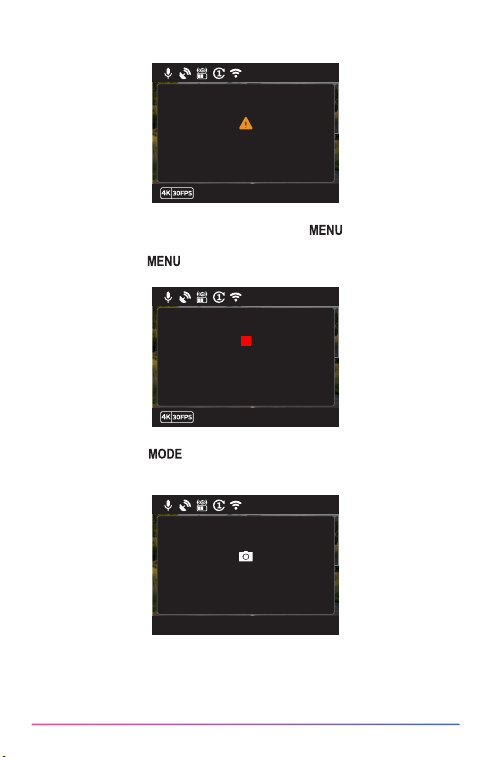
• Protected Files Over Written:When the protected space of SD card is full,
the device will ask you to reformat the card, otherwise the rst protected
le will be overwritten when the protected space is full. Press button to
format and LEAVE button to cancel.
Note:Please save the important le before formatting the card.
OPTIONS:Format (Recommended) / Cancel
• SD Card Error:When there is any writing / reading issue with the SD card,
the device will ask you to replace the card.
Note: Please save the important le before formatting the card.
Note: If the notication keeps showing up, please check if the SD card is
still working. The life of SD cards is limited, it could be from 3 months to a
year or more depends on usage. Check with your SD card manufacturer for
warranty information.
09:00:01
Protected videos are
being over written
Please save important
les and reformat SD card
● 00:05
Conrm Cancel
SD card error
Please format SD card
from time to time
Conrm Cancel
24
• Access Menu During Recording:When pressing button during
recording, you may need to press RECORD ● button to stop recording rst
then you can press button to access Menu.
• Screenshot:Press button during recording to take a snapshot of the
photo. The image will be saved in the photo folder.
● 00:05
Stop recording to
access Menu
09:00:01 12/25/2025
● 00:05
Photo taken
09:00:01 12/25/2025
• Insert SD card:This is a notication to remind you to insert the SD card.
05:20:01
Please insert SD card
09:00:01 12/25/2025
25
• Screen Saver:When screen saver is turned on, the device will automatically
turn o the screen after 30 seconds or 2 minutes of inactivity, and 5 seconds
before the screen is turned o The display will indicate that the machine is
about to turn o the screen.
● 00:05
Screen will be turned
o in 5 seconds
5
09:00:01 12/25/2025
26
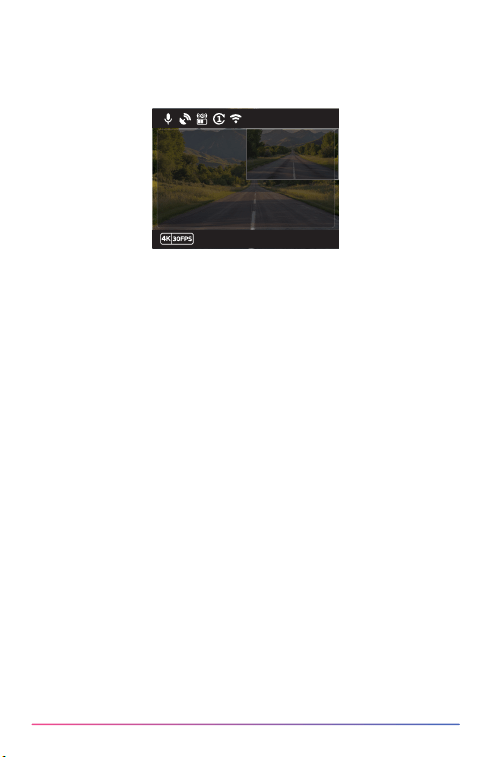
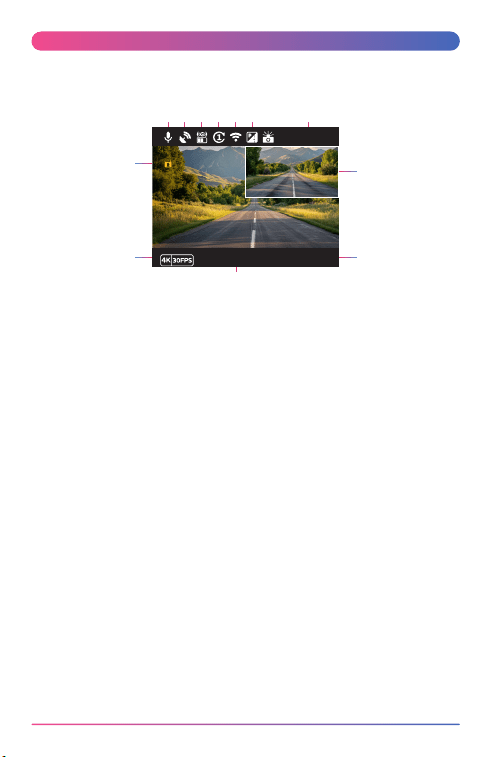
VIDEO MODE
The following information will help you better understand the icons in
VIDEO MODE and their relative functions. Some icons show up only when
corresponding functions are activated.
1. Microphone:When the audio recording function is o, there will be a red
line across the icon.
2 . G P S:If this icon flashes, it indicates UltraDash Z4 is locating GPS
signal. When the GPS signal is found, the icon will stop flashing and
remain stable on the screen.
3. G Sensor:The current sensitivity level of G-Sensor.
4. Video Length:The duration of each video clip.
5. Wireless Link Connection: When the wireless network connection is
enabled, this icon will appear in white. When it is disabled,
the icon will appear in gray.
6. Parking Surveillance Mode:
When parking surveillance mode is enabled, this icon will appear on the screen
(optional feature). After the engine is turned o, the surveillance mode
becomes active and the icon will appear in white. When the engine is started,
the system exits parking surveillance mode and the icon will appear in gray.
8. Recording Duration:This will indicate the length of the current recording.
9 . P I P : UltraDuo Z4 will display the image from both cameras at the same
time. Use screen select hot key to choose the main camera to display on
PIP screen.
1 0 . T i m e : Displays current time.
11. Date:Displays current date.
12. Recording Resolution & Frame Rate: Displays the resolution of the
current video recording.
13. File Protection:Indicates the current video clip is protected.
05:20:01
09:00:01 12/25/2025
1 2 3 4 5 6 8
11
9
12 10
13
27
Video Menu
Video Menu
Setup Menu
VIDEO MENU
UltraDash Z4’s default settings have been set for you to use the camera
without needing to change the settings. If you need to make adjustments to
the settings, the following instructions will help you.
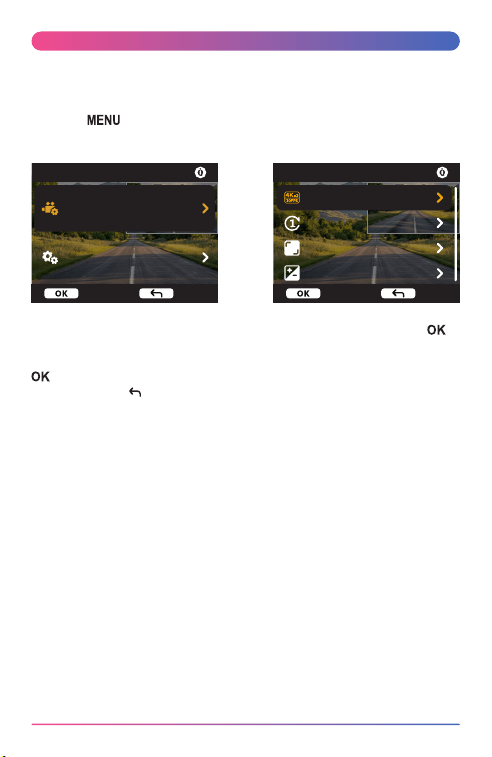
Press the button and select Video Menu while in VIDEO MODE while
UltraDash Z4 is not recording.
Use the UP and DOWN buttons to select setting options and press the
button to enterthe sub-menu.
Once you access the sub-menu, highlight the desired setting and press the
button to conrm your selection and to return to the VIDEO MENU.
Press the LEAVE button twice to return to video mode.
TIP:
- You are not able to access UltraDash Z4 menu while the camera is
recording.
• Resolution:The UltraDash Z4 supports dierent recording resolutions.
Dual recording with both left and right cameras can simultaneously cover a
wide range of near and far areas. Single recording with either the left or right
camera can record at 60 frames per second (fps), allowing clear capture
of details even when there is a signicant speed dierence between front
and rear objects. The settings can be adjusted according to user needs.
OPTIONS:
Dual recording (Left + Right) 4K (3840 x 2160 pixels) @ 30fps HDR
Left camera only 4K (3840 x 2160 pixels) @ 60fps
Right camera only 4K (3840 x 2160 pixels) @ 60fps
• Video Length:Select the duration of each recorded segment. The device will
continuously record and save videos to the memory card. When the
memory card is full, the device will automatically delete the oldest les to
free up space. Please note that protected les will not be deleted.
Video Menu
Resolu tion
Video length
Video Bitrate
Exposure
Enter Back Enter Back

28
OPTIONS: 1 minute (default) / 3 minutes
• Video Bitrate:You can record videos at dierent bitrates, please note that
dierent video quality (bitrate) may aect the le size and the length of time
you can record on the memory card.
OPTIONS:Highest / High (default) / Medium / Low
• Exposure:Adjust exposure levels settings.
OPTIONS:
Left Camera:+2 / +1 / 0 (default) / -1 / -2
Right Camera:+2 / +1 / 0 (default) / -1 / -2
Rear Camera:+2 / +1 / 0 (default) / -1 / -2
• Parking Mode (Optional):Parking Mode oers three functions: Time-
Lapse, Sentry Mode, and ECO Sentry Mode. Only one mode can be enabled
at a time. When Parking Mode is activated, a Parking Surveillance icon will
appear on the screen.
When the vehicle is turned o, the icon will turn white, indicating that
Parking Mode is active. When the vehicle is started, the icon will turn gray,
indicating that the device has exited Parking Mode.
For proper operation, the optional HW1-E hardwire kit must be installed
and connected to the vehicle’s fuse box.
For electric vehicles that cannot connect to the fuse box, please check if
a 12V power supply remains on after the vehicle is turned o. If 12V power
is still available, the device will automatically enter Parking Mode after
5 minutes of inactivity. When the vehicle begins moving above a certain
speed, it will automatically exit Parking Mode.
OPTIONS:
Time-Lapse:Starts recording continuously after the vehicle is turned o at 1
frame per second (1fps), compressing 30 minutes of real time into a 1-minute
le.
Advantages: Energy-ecient and can record for a longer duration.
Disadvantages: Only 1 frame per second, so ne details of events may be
missed. Best suited for users who want a complete overview from engine
o to next start.
OPTIONS:On / O (default)
Sentry Mode:Begins continuous recording after the vehicle is turned o.
Can be set to protect footage when a collision or movement is detected,
capturing moments before and after the event. Non-event footage is

29
automatically deleted.
Advantages: Records both pre- and post-event footage.
Disadvantages: Continuous recording consumes more power. Best for users
who drive almost daily.
OPTIONS:
Motion Detection: On / O (default)
Vibration Detection: On / O (default)
ECO Sentry Mode:
Enters standby after the vehicle is turned o. Begins recording and protecting
les only when a collision or movement is detected.
Advantages: More energy-ecient.
Disadvantages: Cannot record pre-event footage. Best suited for users who
drive infrequently.
OPTIONS:
Motion Detection: On / O (default)
Vibration Detection: On / O (default)
Parking LCD:
Can set whether the screen remains on or o during parking surveillance.
If turned o, the screen will automatically shut down 2 minutes
after entering parking mode. Any operation or starting the vehicle will
automatically turn the screen back on.
OPTIONS:On / O (default)
Parking LED:
Can set whether the LED indicators remain on during parking surveillance.
If turned o, the recording and power indicator LEDs will turn o 2
minutes after entering parking mode. Any operation or starting the vehicle
will automatically turn the LEDs back on.
OPTIONS:On (default) / O
Parking Wireless:
Can set whether Wireless Link is active during parking surveillance. If turned
o, Wireless Link will automatically disconnect upon entering parking mode.
Any operation or starting the vehicle will automatically turn Wireless Link
back on.
OPTIONS:On (default) / O
• G Sensor:G sensor is the sensor that can detect forces. When it senses any
forces, it will protect the current le automatically. Adjust the
sensitivity of G sensor here.
OPTIONS:High / Medium (default) / Low / O
• GPS:Turn the GPS function ON or OFF.

30
OPTIONS:On (default) / O
• Speed Units:Adjust the unit for speed data.
OPTIONS: MPH (default) / KMH
• Screen Saver:UltraDash Z4 has a function to let the screen shut down after
a period of inactivity. Press any button to re-activate the display.
OPTIONS:LCD Always on / LCD Dim after 30 sec (default) / LCD Dim after
2 min / LCD O after 30 sec / LCD O after 2 min / Show Speed after 30
sec / Show Speed after 2 min
• Screen Select
Screen Select: Adjust the display layout between the main and sub-camera
views.
OPTIONS: PIP Display (default) / Split Display (16:9) / Split Display (1:1)
• Stamp
UltraDash Stamp:Turn the UltraDash logo stamp ON or OFF on the
recorded les.
OPTIONS:On (default) / O
Time & Date Stamp:Turn ON or OFF the date stamp mark on the recorded
les.
OPTIONS:On (default) / O
Information Stamp:Turn ON or OFF the information stamp including the,
longitude and latitude data on the recorded les.
OPTIONS:On (default) / O
Speed Stamp:Turn ON or OFF only the speed stamp mark on the
recorded les.
OPTIONS:On (default) / O
License Plate Stamp:Input your license plate number to put your license
plate stamp on the recorded les.
OPTIONS:On (default) / O
N O T E:
- When you are in the SETUP MENU -> Restore Defaults, you will be able
to restore all the settings to the Z4’s default settings.
31
• Wireless Link Info: View connection status, SSID, and PIN code.
Set PIN: Set your connection PIN code.
OPTIONS:Connect / Disconnect
• Format SD Card:Formats the memory card. Warning: All les on the card
will be permanently deleted.
OPTIONS:Yes / No
• Format SSD:Formats the SSD. Warning: All les on the SSD will be
permanently deleted.
OPTIONS:Yes / No
• Format Reminder:Regularly formatting the memory card can help extend its
lifespan. This option will periodically remind you to format the memory card.
Options: Every 30 Days / Every 60 Days / O (default)
• Device Sounds:Adjust the button beep sound, volume, and voice recording.
OPTIONS:
Beep: On (default) / O
Audio Rec:On (default) / O
Setup Menu
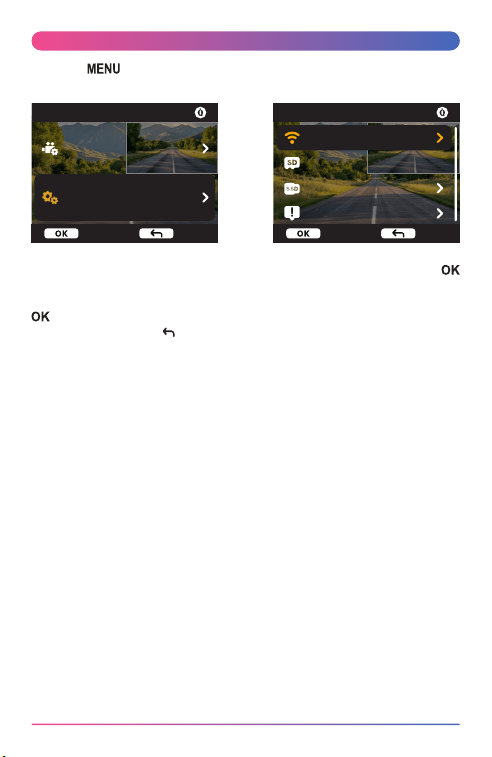
Press the button and select Setup Menu while in VIDEO MODE while
DRV-A610W is not recording.
Use the UP and DOWN buttons to select setting options and press the
button to enter the sub-menu.
Once you access the sub-menu, highlight the desired setting and press the
button to confirm your selection and to return to the SETUP MENU.
Press twice the LEAVE button to return to the video mode.
Note:
- UltraDash Z4 default settings have been selected for great image quality
and ease of operation. Under most circumstances, you don’t need to
change the settings.
- The setup menu cannot be accessed while the camera is recording.
Setup Menu
Video Menu
Setup Menu
Setup Menu
Wireless Link
Format SD Card
Format SSD
Format Reminder
Enter Back Enter Back

32
• Time & Date:Adjust the TIME and DATE as required by using use the UP
and DOWN buttons to set the value. Press the OK button to save the setting
and press the MENU button to return to the SETUP MENU.
• Time Zone / DST:Select the time zone setting.
OPTIONS:-12 / -11 / -10 / -9 / -8 / -7 / -6 / -5 / -4 / -3.5 / -3 / -2.5
/ -2 /-1 / GMT / +1 / +2 / +3 / +4 / +5 / +6 / +7 / +8 / +9 / +10 / +11 / +12
• Language:Select a preferred language.
OPTIONS:English (default) / 日本語 / Pусский / 繁體中文
• Country or Region:Select a country and time zone setting.
OPTIONS:United States / Canada / China / Mexico / Korea / Japan /
Taiwan / Russia / Spain / Norway / Finland / Sweden / Germany / France /
Italy / Netherlands / Belgium / Denmark / Poland / United Kingdom /
Ireland / India / Others
• Display Invert:Rotate the LCD display for upside down footage recording only.
Note: Up and down buttons remain the same as the default conguration.
OPTIONS:
Left Camera: On / O (default)
Right Camera: On / O (default)
Rear Camera:On / O (default)
• Display Mirror:Flip the LCD display horizontally for mirror footage recording
only.
OPTIONS:
Left Camera: On / O (default)
Right Camera: On / O (default)
Rear Camera:On / O (default)
• Restore Defaults:Reset all the settings to UltraDash factory default.
• System Info:Shows rmware version, storage info (microSD / SSD), and
GPS status.
OPTIONS:
Firmware Version:Displays the rmware version.
Card Info:Displays the memory card information.
SSD Info:Displays the SSD information.
Satellite Signal:The count of how many satellite signals Z4 is receiving.
33
PLAYBACK MODE
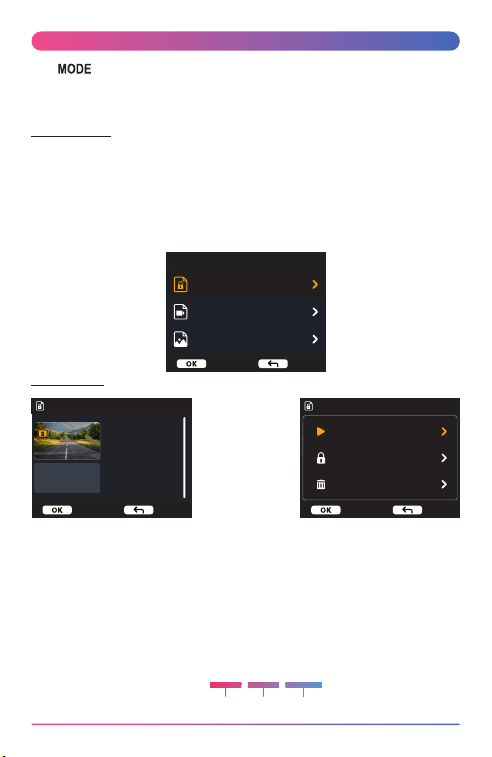
Use button to access PLAYBACK MODE while UltraDash Z4 is not
recording.
In PLAYBACK MODE, you are able to review the videos you have stored.
DIRECTORIES
Press the UP or DOWN buttons to navigate through the menu.
Protected:The directory for all protected videos.
V i d e o:The directory for all unprotected videos.
Note:If the video le is protected under playback mode, the le will
remain in video directory.
P h o t o:The directory for all photos.
VIDEO FILES
Use the UP and DOWN buttons to select the video le and press the OK
button to select play this video.
Video le name : The format of video le name is YYYYMMDD_HHMMSS_
[L/R/B]
For example, 20251225_111701_L mean this le was taken at Dec 25, 2025,
11:17:01, L means left lens, P means Parking Mode le.
Year s Days Time
(Normal Recording File) 2025 1225 111701
L (Left Lens)
(Normal Recording File) 2025 1225 111701 R (Right Lens)
(Parking Mode File) P 2025 1225 111701 B (Rear Lens)
Playback Mode
Protected Video
Video
Photo
Protected Video 1/5
2025/12/25
15:21:31
20251225_15:21:31_L
20251225_15:21:31_R
20251225_15:22:31_L
20251225_15:22:31_R
20251225_15:23:31_L
Protected Video 1/5
2025/12/25
15:21:31
20251225_152131_L
20251225_152131_R
20251225_152231_L
20251225_152231_R
20251225_152331_L
Play this video
Protect this video
Delete this video
Enter Back
Enter Back Enter Back
34
The watermark in the image le is described below.
UltraDash Stamp:Logo, can be turned on / o in VIDEO MENU.
Time & Date Stamp:Date, Time, can be turned on / o in VIDEO MENU.
Information Stamp:Latitude & Longitude, can be turned on / o in VIDEO
MENU.
Speed Stamp:Speed Data, can be turned on / o individually.
License Plate Stamp:License plate number, can be turned on / o in VIDEO
MENU.
1. File Type:Indicates the le type is video.
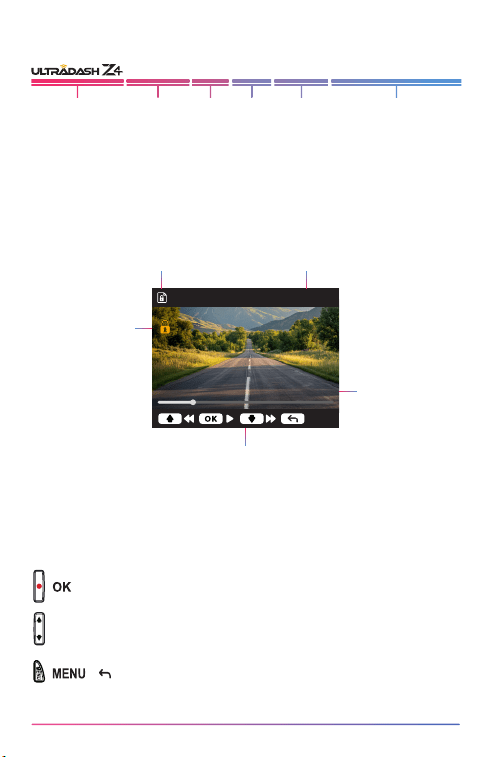
2 . Playback:Displays the current playback time.
3 . Date & Time:Indicates the date and time of the recorded le.
4 . Playback Controls:Use UltraDash Z4 buttons as instructed below.
5. Protected File:Indicates the selected le is protected.
:PL AY/PAUS E .
U P:REWIND.
D O W N:FAST FORWARD.
/ :STOP playing video and go back to Video/Protected directory.
Protected Video 0:00/1:00
2025/12/25
1 2
4
3
5
12/25/2025 11:17:01 30MPH ABC-1234 N24° 59’45” E121”31”35”
Logo Date Time Speed License
Plate
Latitude & Longitude
Back
35
3
PHOTO FILES
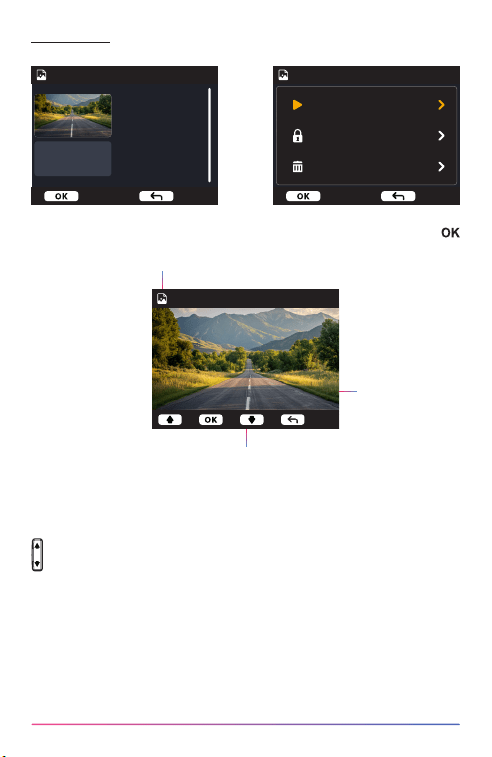
Use the UP and DOWN buttons to select the video le and press the
button to play.
UP:PREVIOUS.
DOWN:NEXT.
1. File Type:Indicates the le type is photo.
2. Date & Time:Indicates the date and time of the photo.
3. Playback Controls:Use UltraDash Z4 buttons as instructed below.
2025/12/25
15:21:31
20251225_15:21:31_L
20251225_15:21:31_R
20251225_15:22:31_L
20251225_15:22:31_R
20251225_15:23:31_L
2025/12/25
15:21:31
20251225_152131_L
20251225_152131_R
20251225_152231_L
20251225_152231_R
20251225_152331_L
Play this photo
Protect this Photo
Delete this Photo
Photo 1/5
2025/12/25
1
2
Photo 1/5 Photo 1/5
Enter Back
Enter Back
Back
36
DELETING FILES
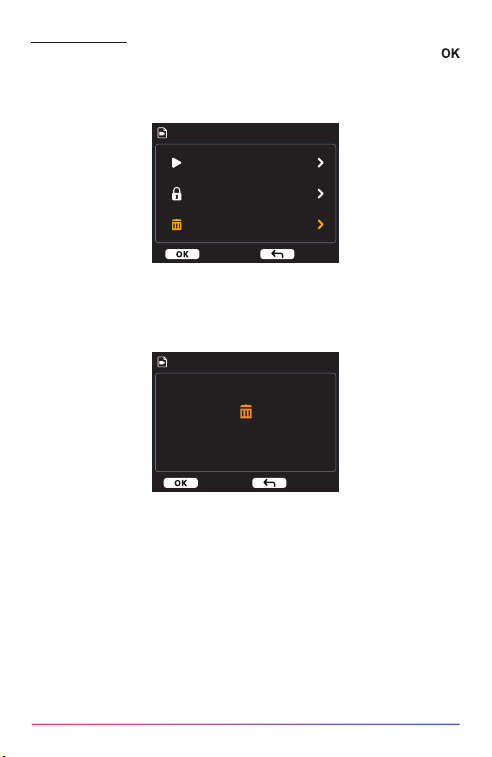
Use the UP and DOWN buttons to select the video le and press the
button to select delete this video.
Note:PROTECTED FILES CANNOT BE DELETED.
You will have the following options:
Once selected, follow the on screen
instructions to delete the current le.
Video 1/5
2025/12/25
15:21:31
20251225_15:21:31_L
20251225_15:21:31_R
20251225_15:22:31_L
20251225_15:22:31_R
20251225_15:23:31_L
Play this video
Protect this video
Delete this video
Video 1/5
2025/12/25
15:21:31
20251225_15:21:31_L
20251225_15:21:31_R
20251225_15:22:31_L
20251225_15:22:31_R
20251225_15:23:31_L
Are you sure you want
to delete this video?
Enter
Back
Conrm Cancel
37
PROTECT / UNPROTECT FILE
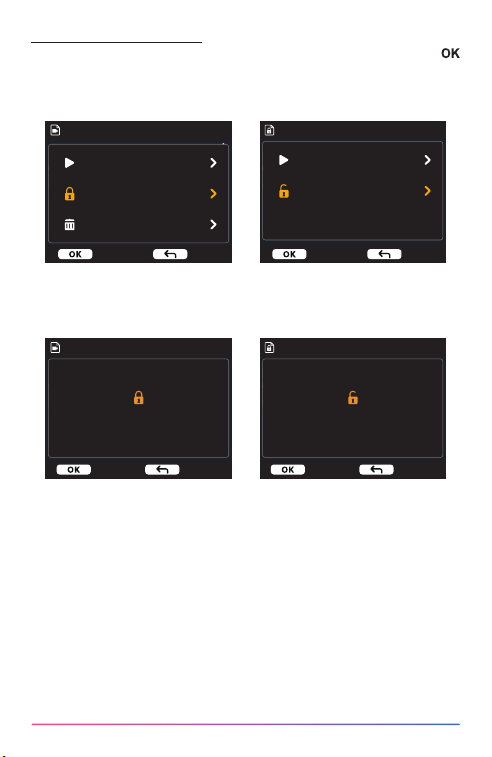
Use the UP and DOWN buttons to select the video le and press the
button to select protect / unprotect this video.
You will have the following options:
Once selected, follow the on screen
instructions to protect the current le.
Protected Video 1/5
2025/12/25
15:21:31
20251225_15:21:31_L
20251225_15:21:31_R
20251225_15:22:31_L
20251225_15:22:31_R
20251225_15:23:31_L
Play this video
Unprotect this video
Video 1/5
2025/12/25
15:21:31
20251225_15:21:31_L
20251225_15:21:31_R
20251225_15:22:31_L
20251225_15:22:31_R
20251225_15:23:31_L
Once selected, follow the on screen
instructions to unprotect the current
le.
Video 1/5
2025/12/25
15:21:31
20251225_15:21:31_L
20251225_15:21:31_R
20251225_15:22:31_L
20251225_15:22:31_R
20251225_15:23:31_L
Are you sure you want
to protect this video?
Protected Video 1/5
2025/12/25
15:21:31
20251225_15:21:31_L
20251225_15:21:31_R
20251225_15:22:31_L
20251225_15:22:31_R
20251225_15:23:31_L
Are you sure you want
to unprotect this video?
Play this video
Protect this video
Delete this vvideo
Enter Back Enter Back
Conrm Cancel Conrm Cancel
38
WIRELESS LINK & iQ VIEWER ( iOS & Android )
Connect UltraDash Z4 with your mobile devices by using wireless link
function.
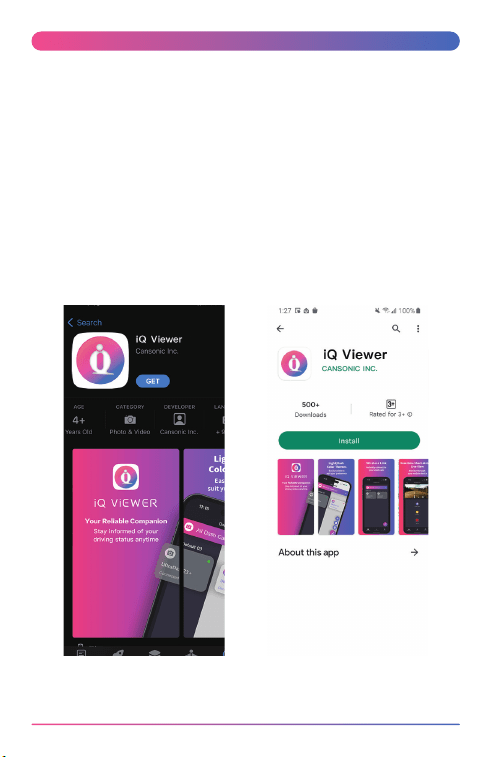
1. DOWNLOAD iQ Viewer
iQ Viewer is a completely free set of video playback application. Which can
be used to remote control and live stream preview in a short distance or
download and review videos from UltraDash Z4. With its mapping function,
users can view the route, speed, latitude, longitude, and direction of the drive
at the time. In addition, users can easily edit the length of the video for quick
upload to share with friends, relatives, and insurance companies.
Please download iQ Viewer from App store / Google Play.
You can choose the theme color of the app through the setting of your
phone.
The following instructions will use the dark theme to introduce the APP.
Operating System Minimum Requirements:iOS 15 and above / Android 10
and above.
39
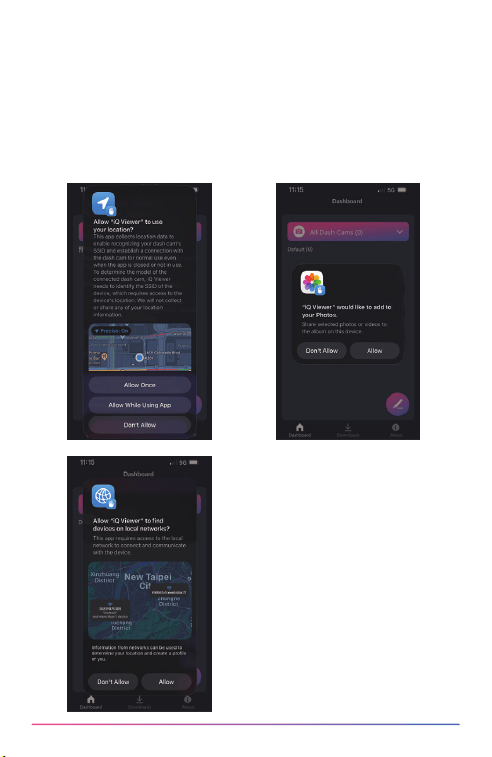
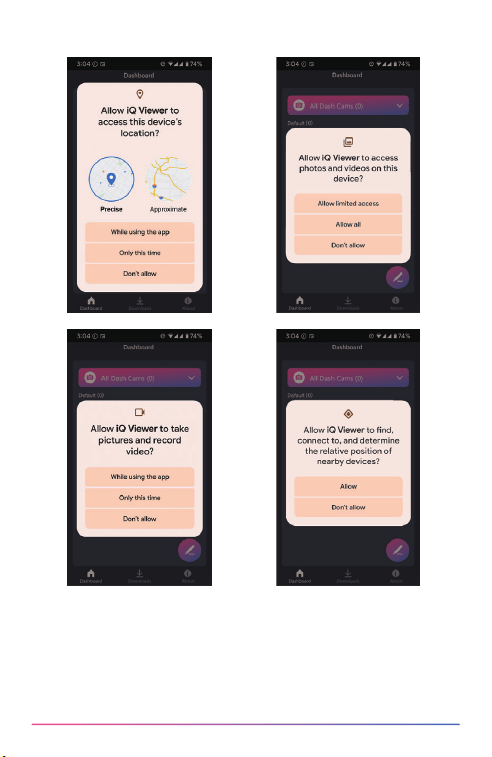
2. OPEN iQ Viewer APP ON YOUR MOBILE DEVICE The
rst time you open the app, two notications will pop up.
1. You will need to allow "iQ Viewer" to take photos and record videos "While
using the app" . (Android users only)
2.You will need to allow "iQ Viewer" to access the location information of this
device "While using the app". (Both Android and iOS users) The following
pictures are provided for reference.
iOS
40
Android
41
5G
5G 5G
Default (0) Default (0)
Dashboard
Dashboard
Downloads
Downloads
About
About
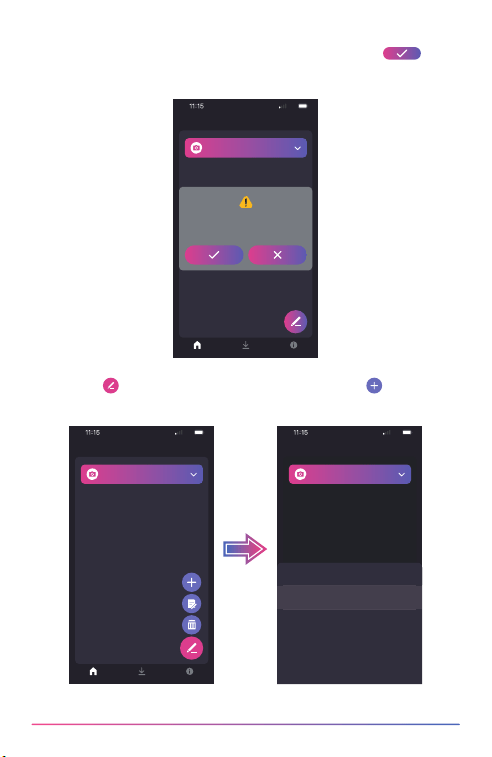
After allowing, the app will pop up a notice to ask you if you want to go
through the rst time use tutorial We highly recommend press when
you haven’t gotten familiar with iQ Viewer. You can always turn it o or on in
ABOUT page.
Press PEN icon on DASHBOARD page and then press + icon to enter
ADD DEVICE page.
Default (0)
Dashboard Downloads About
Do you want to go through the tutorial?
(You can watch it again in About Page.)
Z3S & S3
Z4 & A Series
All Dash Cams (0)
All Dash Cams (0)
All Dash Cams (0)
Dashboard
Dashboard
Dashboard
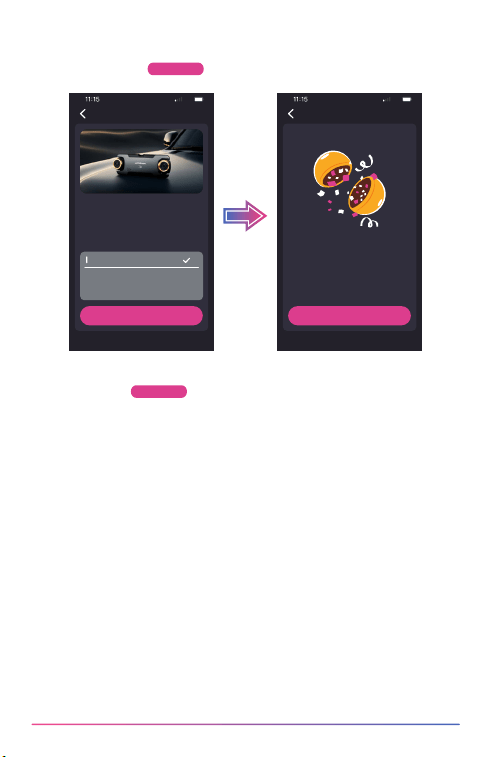
42
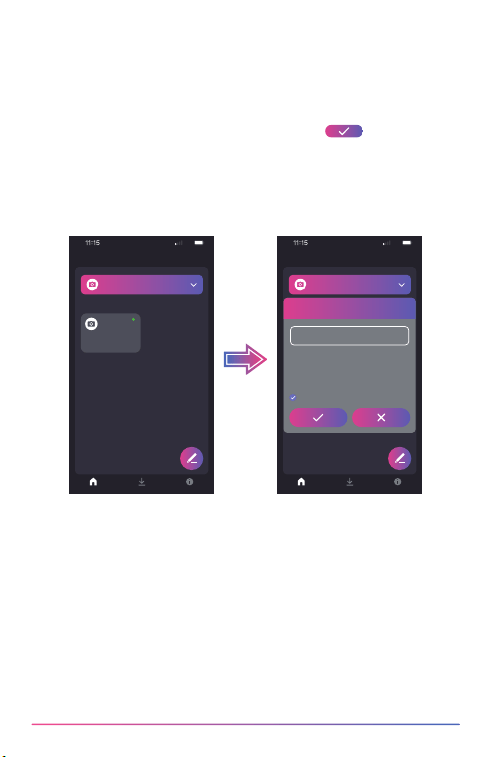
The phone will start scanning for nearby devices. If any are found, they will
be displayed in the list below. Next, please select the device you want to add
and press the ADD
Add
button.
Congratulations on successfully adding and pairing the device. Please press
the COMPLETE
Complete
button to return to the DASHBOARD page.
5G
Add Device
Dash Cam
Please enable the Wireless Link connection
on your phone. Check that the device’s SSID
matches what is shown in the list below. If it
matches, press Add to add the device.
UltraDash Z4 ba7
Add
5G
Add Device
Complete
Pairing completed!
You can now connect to the
dashcam via Wireless Link.
43
5G
Default (1)
Dashboard
Downloads
About
All Dash Cams (1)
UltraDash Z4 ba7
Ready to Connect
6.READY TO GO
After returning to the DASHBOARD page, you can see the device you just
added has appeared. A green light indicates the device is within connection
range. After clicking on the device, a window for entering the App Pairing PIN
will pop up. Please enter the PIN code you set. If you’ve forgotten it, you can
check or change it on your UltraDash Z4 device by going to Setup Menu >
System Info > Wireless Link > Set PIN. Click on the to connect the
device.
NOTE:
- A smartphone can only connect to one dash cam at a time, and you must
connect your device before using it.
5G
Default (1)
Dashboard
Downloads
About
All Dash Cams (1)
Dashboard
UltraDash Z4 ba7
Ready to Connect
App Pairing PIN
Remember PIN
Please enter the PIN code you set. 6/6
If you’ve forgotten it, you can check
or change it on your UltraDash Z4
device by going to Setup Menu >
Wireless Link > Set PIN.
Enter the 6-digit PIN you set.
44
5G
Default (1)
Dashboard
Downloads
About
All Dash Cams (1)
Dashboard
UltraDash Z4 ba7
Ready to Connect
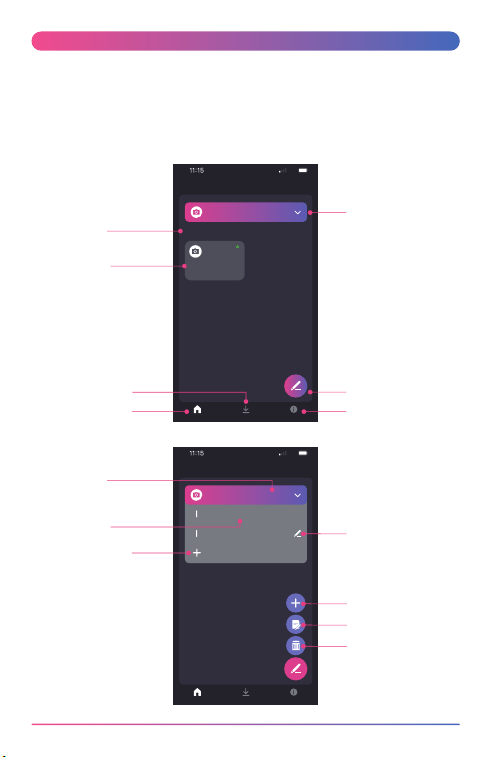
iQ VIEWER INSTRUCTION ( iOS & Android )
MANAGE CONNECTED DEVICES (DASHBOARD PAGE)
ADD / DELETE / RENAME / REGROUP connected devices on your mobile
device. Press the connected device you just added on the DASHBOARD
page. You will see a green light ● next to the device meaning the device is
connecting to your mobile device correctly and then you will enter the DASH
CAM page.
Downloads page
Dashboard page
Group name
Device name
Group setup
Edit devices menu
About page
Group name
5G
Default (1)
Dashboard
Downloads
About
Dashboard
UltraDash Z4 ba7
Ready to Connect
Default (1)
Group1 (0)
Add Group
All Dash Cams (1)
Group setup
Edit devices menu
About page
About page
Downloads page
Device name
45
5G
Dash Cam
Menu
Playback
UltraDash Z4 ba7
Record
Protect
Audio Rec
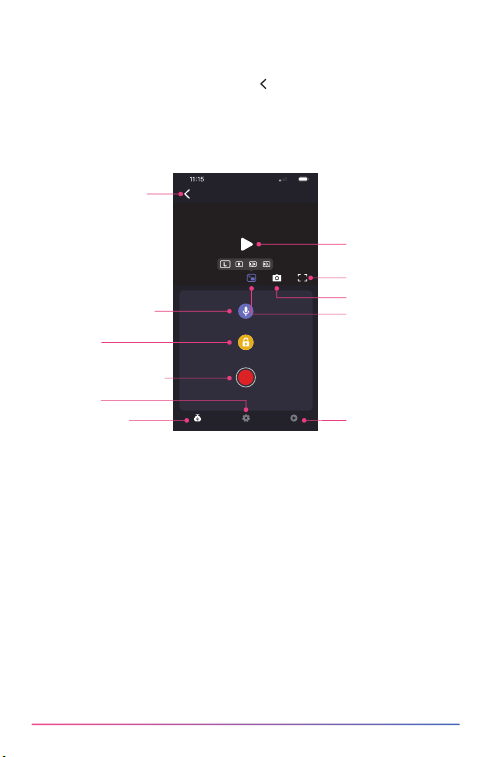
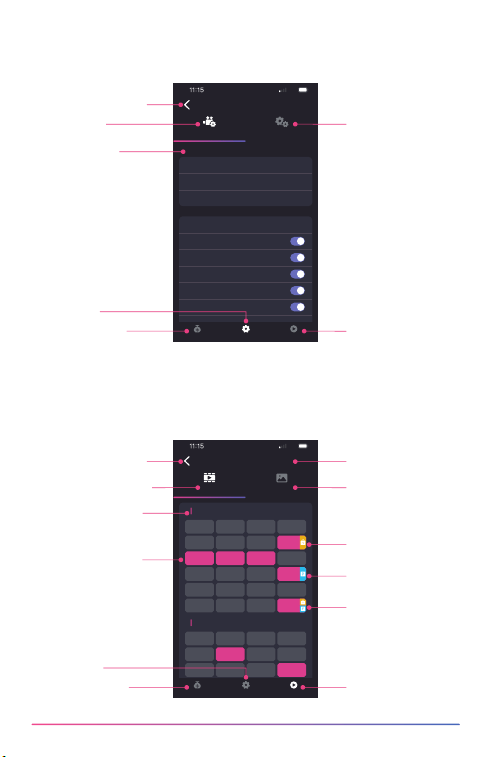
After you enter DASH CAM page, you can nd there will be three pages (DASH
CAM / MENU / PLAYBACK) in the bottom navigation bar. You can always
press it to switch the page. If you want to go back to DASHBOARD page, just
simply press BACK TO PREVIOUS PAGE button.
CONTROL AND OPERATE (DASH CAM PAGE)
Control the LIVE STREAM / VIDEO RECORD / AUDIO RECORD / PROTECT
FILE function on your mobile device.
Start /
Stop live stream
Full screen
Screenshot
Screen Select
Screen Select
Triple cameras display(Optional)
Dual cameras display
Left camera display
Right camera display
Back(Rear)camera display(Optional)
Playback page
Protect le
Start / Stop recording
Menu page
Dash Cam page
Back to Dashboard
page
Audio record / mute
46
5G
Dash Cam
Menu
Playback
UltraDash Z4 ba7 (SD)
Video Photo
01:00 02:00 03:00 04:00
05:00 06:00 07:00 08:00
09:00 10:00 11:00 12:00
13:00 14:00 15:00 16:00
17:00 18:00 19:00 20:00
21:00 22:00 23:00 24:00
01:00 02:00 03:00 04:00
05:00 06:00 07:00 08:00
09:00 10:00 11:00 12:00
12/24/2025
12/25/2025
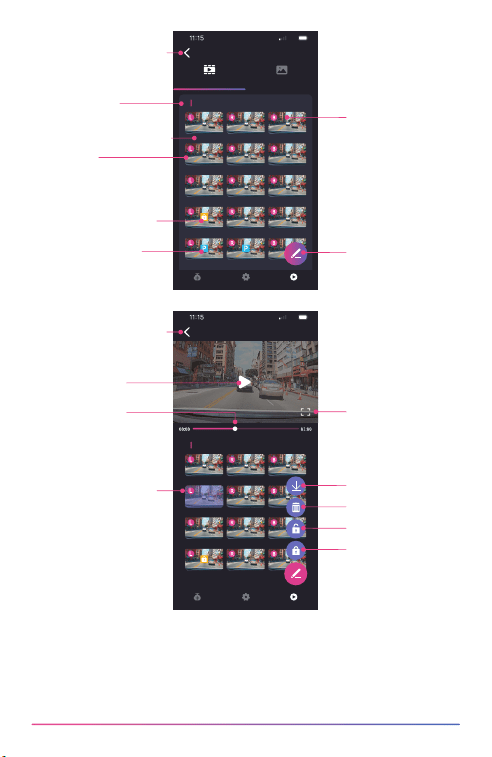
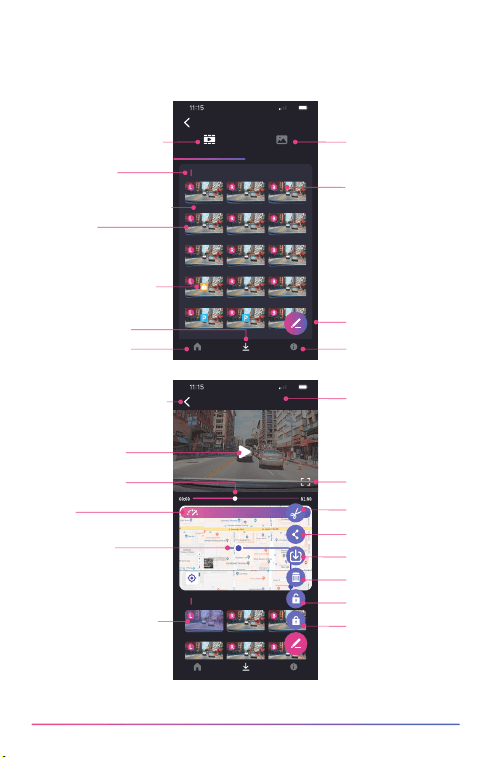
PLAYBACK AND DOWNLOAD FILES (PLAYBACK PAGE)
PLAYBACK (PROTECT / UNPROTECT / DELETE) or DOWNLOAD the videos
from the connected UltraDash Z4 on your mobile device.
5G
Dash Cam
Menu
Playback
UltraDash Z4 ba7
Video Setup
Left Camera
EXPOSURE
PARKING MODE SENSOR
Right Camera
Parking Mode Sensor
Time-Lapse
Sentry Mode Vibration
Sentry Mode Motion
ECO Sentr y Mode Vibration
ECO Sentr y Mode Motion
Rear Camera
0
0
Time-lapse
0
Dash Cam page
The time you have
video les (Highlight)
The date you have
video les
ACCESS VIDEO AND SETUP MENU (MENU PAGE)
ADJUST SETTINGS on your mobile device. These settings will be synced
with the dash cam.
Setup menu
Playback page
Dash Cam page
Menu page
Video menu
Menu settings
Playback photo
les
Displays playback
source (SD or SSD).
The time you have
protected les
The time you have
parking mode les
The time you have
protected & parking
mode les
Playback page
Playback video les
Menu page
Back to Dashboard
page
Back to Dashboard
page
47
5G
Dash Cam
Menu
Playback
UltraDash Z4 ba7 (SD)
Video Photo
12/25/2025
11:17 11:17 11:17
11:18 11:18 11:18
11:19 11:19 11:19
11:20 11:20 11:20
11:21 11:21 11:21
5G
Dash Cam
Menu
Playback
20251225_111701_L
12/25/2025
11:17 11:17 11:17
11:18 11:18 11:18
11:19 11:19 11:19
11:20 11:20 11:20
L: Left camera
R: Right camera
B: Back(Rear)
camera (Optional)
Edit les menu
Full screen
Download les
Delete les
Unprotect les
Protect les
Play / Stop the
selected video
Timeline of the
selected video
The video you select
(Highlight)
Date and time
Exact time of the video
Video les
Protected video les
Protected parking
video les
Back to previous page
Back to previous page
48
5G
20251225_111701_L
12/25/2025
AboutDashboard
Downloads
11:17 11:17 11:17
11:18 11:18 11:18
11:19 11:19 11:19
11:20 11:20 11:20
Speed : 56 MPH
Speed
5G
Downloads
Video Photo
12/25/2025
11:17 11:17 11:17
11:18 11:18 11:18
11:19 11:19 11:19
11:20 11:20 11:20
11:21 11:21 11:21
AboutDashboard
Downloads
Video les
Edit les menu
Playback downloaded
photo les
L: Left camera
R: Right camera
B: Back(Rear)camera
(Optional)
E: Edited video
About page
File name
Edit the selected
le
Share les
Share les to
phone's Photos
Delete les
Unprotect les
Protect les
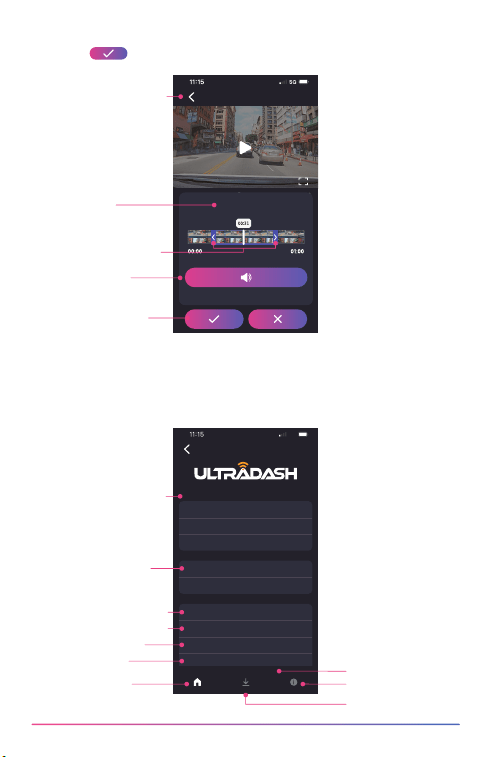
CUT AND SHARE DOWNLOADED FILES (DOWNLOADS PAGE)
Not only PLAYBACK (PROTECT / UNPROTECT / DELETE) the downloaded
les with speed data and Google Maps function but also CUT and SHARE
the les to your friends and relatives on your mobile device.
Play / Stop the
selected video
Timeline of the
selected video
Google Maps
tracking logs
The video you select
(Highlight)
Playback downloaded
video les
Date and time
Exact time of the video
Protected video les
Downloads page
Dashboard page
Back to previous page
Full screen
49
5G
About
Language
APP SE TTING
DASH CAM INFORMATION
Unit
UltraDash Z3+ ba7
Firmware Update
Clear Downloads Cache
First Time Use Tutorial
Instruction Manual
Ocial Website
Date Style
English
Imperial Unit
Z4_1.4_XXXXXX_X
0.00 B
O
MM/DD/YYYY
Dashboard
Downloads
About
Application: V1.0
20251225_111701_L
20251225_111701_L
App universal settings
Cut / edit function is very simple, select the length of the video you want,
and press button to output the edited video.
APP SETTINGS AND HELPFUL INFO (ABOUT PAGE)
Change LANGUAGE / SPEED UNIT / DATE FORMAT settings and check
the FIRMWARE / SOFTWARE VERSION / FIRST TIME USE TUTORIAL /
INSTRUCTION MANUAL / OFFICIAL WEBSITE on your mobile device.
Connected device’s
information
The le name
under editing
Choose the spectrum
you want to keep
You can keep or
remove the audio
Clear Downloads Cache
First Time Use Tutorial
Instruction Manual
Ocial Website
Dashboard page
Press to output the
edited video
Downloads page
About page
app versionversion
Back to previous page
50
Firmware Update Instruction
Team UltraDash will keep update the rmware to improve the better user
experience for our valued customers. Once you register your product on
UltraDash website, we will send you information about our new firmware
update. Or you can visit the link below once for a while to check if there is
any new rmware update:
https://cansonic.com/pages/download
There are two ways to update the device’s rmware:
(A) OTA updates via the iQ Viewer APP on a smartphone.
(B) Download the latest rmware from the internet and updating the device
using a memory card.
Please follow the step by step instruction below:
(A)OTA updates via the iQ Viewer APP on a smartphone
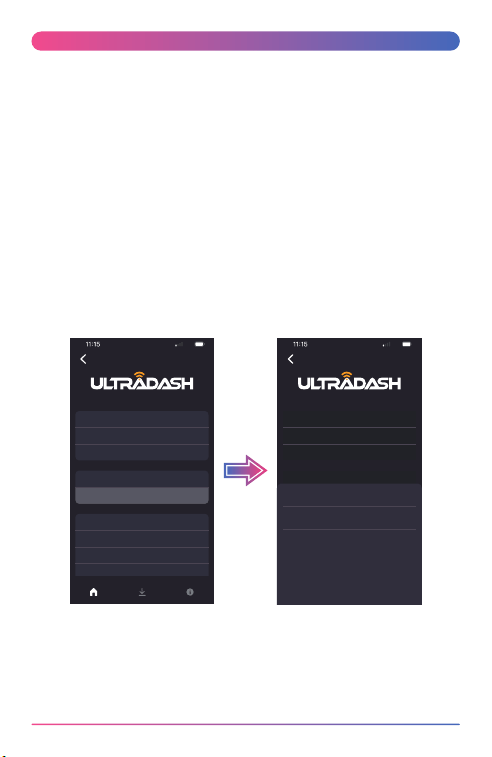
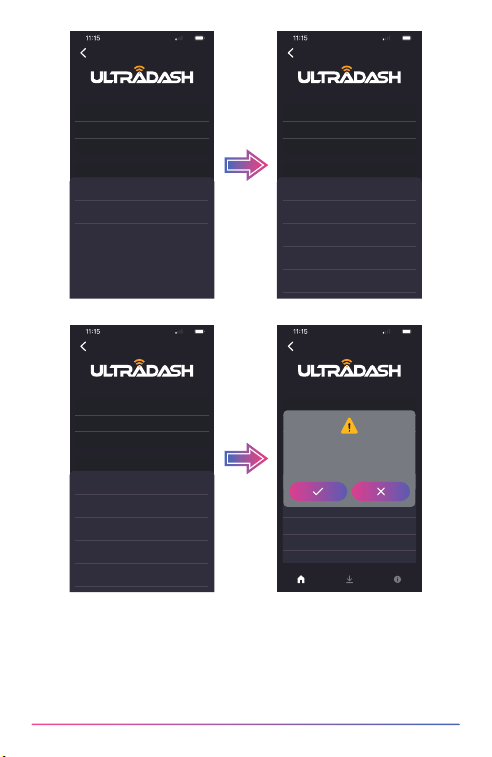
1.Navigate to the ABOUT page, where you will find the Firmware Update.
Click on it, then select the device and language for the update, and confirm
the firmware version to be updated.
Clear Downloads Cache
First Time Use Tutorial
Instruction Manual
Ocial Website
0.00 B
O
Dashboard
Downloads
About
Application: V1.0
5G
About
Language
APP SE TTING
DASH CAM INFORMATION
Unit
UltraDash Z3+ ba7
Firmware Update
Date Style
English
Imperial Unit
Z4_1.4_XXXXXX_X
MM/DD/YYYY
Clear Downloads Cache
First Time Use Tutorial
Instruction Manual
Ocial Website
0.00 B
O
Dashboard
Downloads
About
Application: V1.0
5G
About
Language
APP SE TTING
DASH CAM INFORMATION
Unit
UltraDash Z3+ ba7
Firmware Update
Date Style
English
Imperial Unit
Z4_1.4_XXXXXX_X
Update the latest rmware
MM/DD/YYYY
UltraDash Z4 ba7
51
Clear Downloads Cache
First Time Use Tutorial
Instruction Manual
Ocial Website
0.00 B
O
Dashboard
Downloads
About
Application: V1.0
5G
About
Language
APP SE TTING
DASH CAM INFORMATION
Unit
UltraDash Z3+ ba7
Firmware Update
Date Style
English
Imperial Unit
Z4_1.4_XXXXXX_X
Update the latest rmware
MM/DD/YYYY
UltraDash Z4 ba7
Clear Downloads Cache
First Time Use Tutorial
Instruction Manual
Ocial Website
0.00 B
O
Dashboard
Downloads
About
Application: V1.0
5G
About
Language
APP SE TTING
DASH CAM INFORMATION
Unit
UltraDash Z3+ ba7
Firmware Update
Date Style
English
Imperial Unit
Z4_1.4_XXXXXX_X
Update the latest rmware
MM/DD/YYYY
English(USA)
Pусский
日本語
繁體中文
English(Malaysia)
Clear Downloads Cache
First Time Use Tutorial
Instruction Manual
Ocial Website
0.00 B
O
Dashboard
Downloads
About
Application: V1.0
5G
About
Language
APP SE TTING
DASH CAM INFORMATION
Unit
UltraDash Z3+ ba7
Firmware Update
Date Style
English
Imperial Unit
Z4_1.4_XXXXXX_X
Update the latest rmware
MM/DD/YYYY
English(USA)
Pусский
日本語
繁體中文
English(Malaysia)
Clear Downloads Cache
First Time Use Tutorial
Instruction Manual
Ocial Website
0.00 B
O
Dashboard
Downloads
About
Application: V1.0
5G
About
Language
APP SE TTING
DASH CAM INFORMATION
Unit
UltraDash Z3+ ba7
Firmware Update
Date Style
English
Imperial Unit
Z4_1.4_XXXXXX_X
Update the latest rmware
MM/DD/YYYY
Please conrm whether you
want to update the rmware?
Current dash cam
version::Z4_1.4_XXXXXX_X
Download version::Z3+_4.0_BDZAAF_A
52
2. When the update starts, the screen will turn off. Please wait 2–3 minutes.
DO NOT POWER OFF THE DEVICE OR PRESS ANY BUTTONS DURING
THIS TIME, AS IT MAY CAUSE FIRMWARE UPDATE FAILURE.
3. It may take a while for updating. Once it finishes the update, UltraDash Z4
will turn off the device automatically.
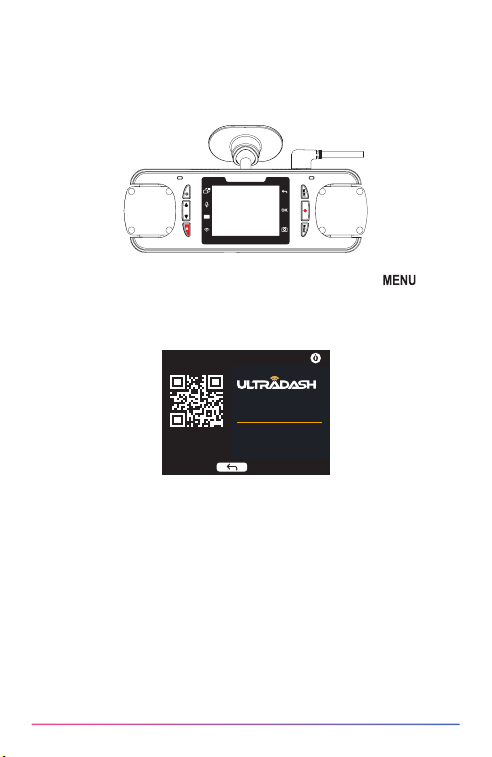
4.Turn on the dash cam and reset the first time settings. Press
button twice to entry SETUP MENU and select the System Info and select
Firmware Version to check if the Version is the latest one [Z4_X.X_XXXXXX_
X] as shown on website, then it is successfully updated.
Firmware Version
Scan QR code
Firmware Version:
Z4_1.4_BBZDAH_A
Check for Updates:
www.cansonic.com/
Back
53
(B)Download the latest firmware online and update the device using a
memory card.
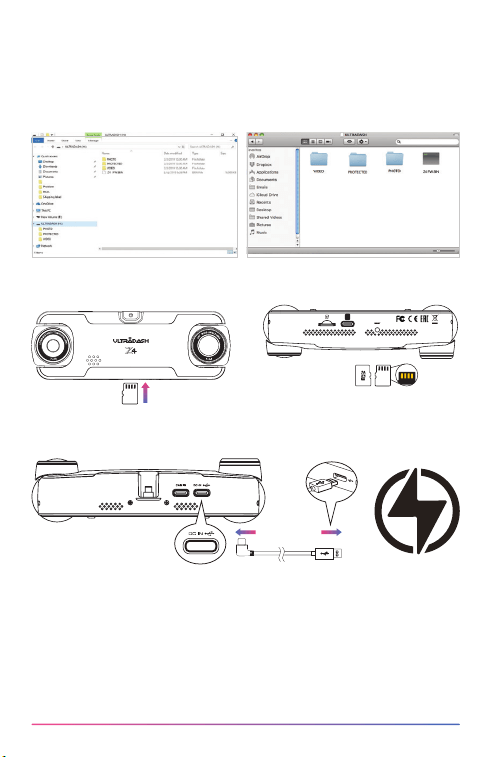
1.Make sure your SD card is formatted and copy the FWZ4.BIN.BIN into the
root directory of the SD card.
Notice:Make sure the file name is FWZ4.BIN.BIN If you see FWZ4.BIN.
BIN(1) or so on, please rename the file name to FWZ4.BIN.BIN
2.Insert the SD card into the dashcam.
3.Connect UltraDash Z4 the power, and make sure the dashcam is charging.
NOTE:
- A smartphone can only connect to one dash cam at a time, and you must
connect your device before using it.
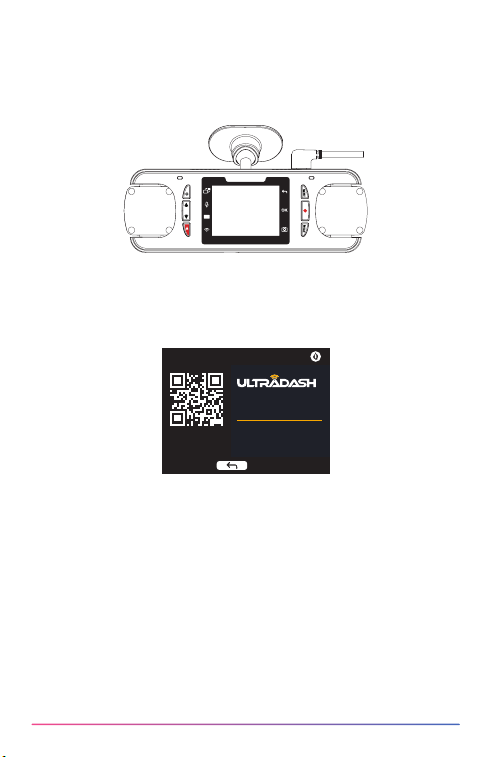
54
6. Turn on the dash cam and reset the first time settings. Press MENU
button twice to entry SETUP MENU and select the System Info and select
Firmware Version to check if the Version is the latest one [Z4_X.X_XXXXXX_
X] as shown on website, then it is successfully updated.
Firmware Version
Scan QR code
Firmware Version:
Z4_1.4_BBZDAH_A
Check for Updates:
www.cansonic.com/
Back
4. When the update starts, the screen will turn off. Please wait 2–3 minutes.
DO NOT POWER OFF THE DEVICE OR PRESS ANY BUTTONS DURING
THIS TIME, AS IT MAY CAUSE FIRMWARE UPDATE FAILURE.
5. It may take a while for updating. Once it finishes the update, UltraDash Z4
will turn off the device automatically.
55
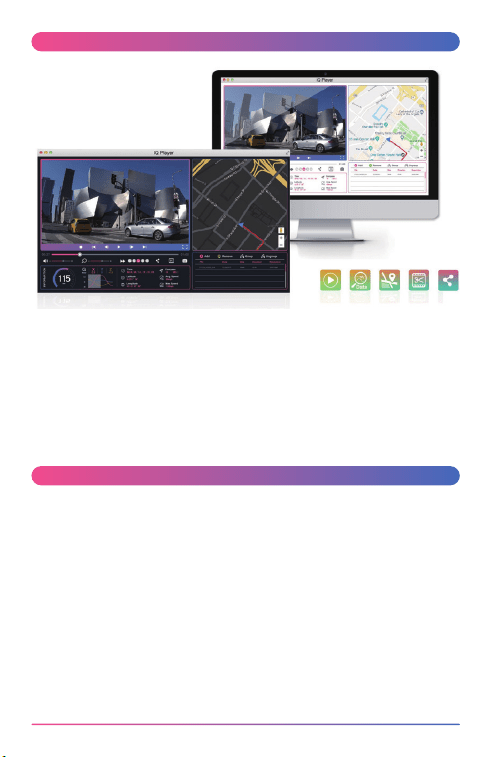
iQ Player is completely free set of video playback software. Which can
be used to review data and videos of the latest UltraDash dash cameras.
With its mapping function, user is able to view the route, speed, latitude,
longitude, direction of the drive and information of the G sensor data at the
time. In addition, users can easily edit the length of video for quick upload to
share with friends, relatives and insurance companies.
Download Link:https://cansonic.com/pages/iq-player
Take a minute to register your new UltraDash product at
https://cansonic.com/pages/registration and save a copy of your receipt or
bill of sales as proof of purchase.
You will enjoy our manufacture warranty coverage, repair / replacement
service and customer support.
ONE (1) YEAR LIMITED WARRANTY
Cansonic warrants UltraDash branded products against defects in materials
and workmanship when used normally in accordance with our official
guidelines https://cansonic.com/pages/warranty for a period of ONE (1)
YEAR from the date of original retail purchase.
WARRANTY
iQ PLAYER (Windows & Mac)
56

57
TROUBLE SHOOTING
Blurred Image (Video)
UltraDash Z4 comes with a protective lens
cover for the camera's lens, be sure to
remove it. Wipe the lens with a soft cloth
until any debris / stains are removed.
Clean your vehicle's windshield where the
camera is placed.
Unable to insert Micro SD Memory Card
Make sure the metal portion of the memory
card faces the device’s space-gray metal
side. Once inserted, push the card until a
CLICK sound is heard.
UltraDash Z4 – Unable to Eject the
microSD Card
Press the microSD card inward until
you hear a “click,” and it will pop out
for removal.
If the card does not eject properly,
use the edge of a small coin to gently
push the card inward until you hear
the “click,” and the card will release
normally.
UltraDash Z4 video les can not be played
UltraDash Z4 video les are recorded in
.MP4 format.Before playing the videos,
please make sure your computer has a
media player installed that supports the
.MP4 le format.
Video les jump when they are being
played
The memory card that we recommends for
best quality is the UHS type 3 Micro SD
Card.
If your PC does not recognize the video
les, try another PC to view the recorded
video.
The total video recording time is only a
few minutes long
You may have a small amount of available
space left for your memory card. Back up
all the les you need from the memory
card. Only AFTER you back up all the les
you need, format the memory card with
UltraDash Z4.
UltraDash Z4 shuts down on its own
Auto power o function will turn o Z4
automatically after it loses its power
supply. Make sure Z4 is connected
properly to the car power cable.
UltraDash Z4 does not charge in my car
If your car power cable is not working
properly with your UltraDash Z4, check
your car’s power fuses. Also check your
power cord and replace it if there is an
issue.

5858
Micro SD Card is not letting me view my
les
Try some dierent card readers and
computers to see if any of them can view
the les. If none of them work, the les
are probably damaged. Use Z4 to format
the memory card. (WARNING: formatting
the memory card will remove all the
les saved), We recommended using the
branded UHS 3 Micro SD Card. Note:
You must format the memory card with
UltraDash Z4 for rst time use.
I cannot delete the le on UltraDash Z4
Be sure the le you are trying to delete is
unprotected.
If the le is protected, please follow the
instruction on page 36 to unprotect the
le rst, and then delete the le.
My screen turns o after I just turned it on
The screen saver function turns o the
screen after a period of inactivity. If you
want to turn o this function, go to VIDEO
menu -> Screen Saver, and turn it o.
The message “Please Format SD Card”
appears on my screen
UltraDash Z4 requires formatting the Micro
SD card if the card is used on Z4 for the
rst time. Please format the SD card in the
SETUP menu.
UltraDash Z4 does not charge
Be sure the power cord is connected
properly. When Z4 is being charged, the
blue LED indicator will illuminate.
A “Card Error” message appears on my
UltraDash Z4
This indicates that the Micro SD card is
not properly formatted to your UltraDash
Z4. Please remove the les you would
like to keep on to your PC, and perform a
“Format SD Card” procedure to allow your
memory card to function properly with Z4.
A “Card Full” message appears on my
UltraDash Z4
When this message appears, your Micro
SD card is at full capacity. Reminder:
When you have protected les, you limit
the use of your memory card. Delete
unnecessary les to allow maximum use
of your memory card.
I press the MENU button but nothing
happens
Reminder: UltraDash Z4 will not let you
access the menu while it is recording. To
access the menu, stop recording and the
MENU feature will be accessible.
When I download les from the Cansonic
website a malicious software message
appears
If this message appears, simply adjust
your browser settings and allow for the
download to proceed. Once complete,
reset your browser security to protect your
PC.

59
Unresolved Issues
If you continue to have problems with your
Cansonic UltraDash Z4, please reset your
camera to default settings in the setup
menu and begin the process over again.
If these problems remain, please describe
your question and send it to service_
[email protected] or call our customer
service number provided on the Cansonic
Website.
60
Appendix
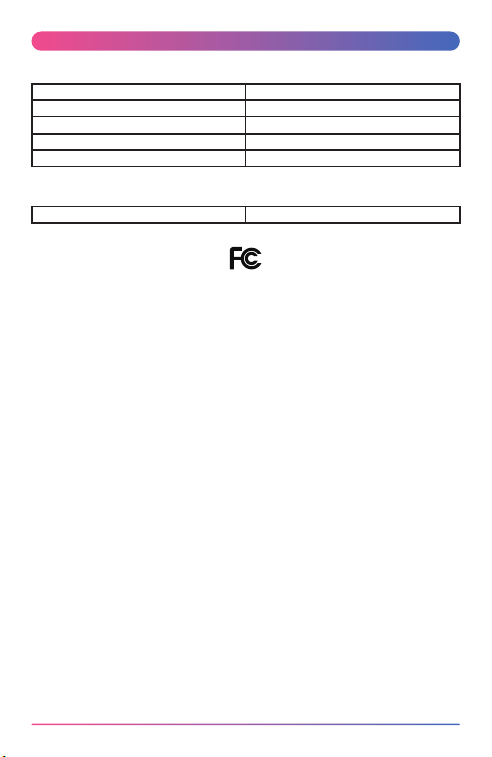
Wireless Link Specication
GPS Specication
FCC Warning
This device complies with part 15 of the FCC rules. Operation is subject
to the following two conditions: (1) this device may not cause harmful
interference, and (2) this device must accept any inte rference received,
including interference that may cause undesired operation.
Changes or modications not expressly approved by the party responsible
for compliance could void the user's authority to operate the equipment.
FCC NOTE
This equipment has been tested and found to comply with the limits for a
Class B digital device, pursuant to part 15 of the FCC Rules. These limits
are designed to provide reasonable protection against harmful interference
in a residential installation. This equipment generates uses and can radiate
radio frequency energy and, if not installed and used in accordance with
the instructions, may cause harmful interference to radio communications.
However, there is no guarantee that interference will not occur in a particular
installation. If this equipment does cause harmful interferenceto radio or
television reception, which can be determined by turning the equipment o
and on, the user is encouraged to try to correct the interference by one or
more of the following measures:
• Reorient or relocate the receiving antenna.
• Increase the separation between the equipment and receiver.
• Connect the equipment into an outlet on a circuit dierent from that to
which the receiver is connected.
• Consult the dealer or an experienced radio/TV technician for help.
Radiation Exposure Statement
This equipment complies with FCC radiation exposure limits set forth for an
uncontrolled environment. This equipment should be installed and operated
with minimum distance 20cm between the radiator and your body.
Standard IEEE802.11n
Security WPA2
Frequency Range
2400-2483MHz ISM band
Transfer Rate 150Mbps (802.11n)
Output Power 9.46dBm±2dB (802.11n)
Frequency Range 1559-1610MHz

61
CE-RED
RED2014/53/EU
Declaration of Conformity
Hereby, CANSONIC INC. declares that this Dash cam product is in
compliance with essential requirements and other relevant provisions of
Directive 2014/53/EU. A copy of the Declaration of conformity can be found
at www.cansonic.com.
Frequency range:
2.4G Frequency range: 2412-2472MHz, Maximum E.I.R.P: 9.95dBm
The device complies with RF specications when the device used at > 20mm
your body.

Instagram:@cansonic_usa
Facebook:cansonicusa
YouTube:Cansonic USA
Ocial:www.cansonic.com