wolox.com
The information in this manual is subject to change without notice.
V1.1
MegaFlow 24
User Manual

Language
English.��.��.��.��.��.��.��.��.��.��.��.��.��.��.��.��.��.��.��.��.��.��.��.��.��.��.��.��.��.��. �
1
Español��.��.��.��.��.��.��.��.��.��.��.��.��.��.��.��.��.��.��.��.��.��.��.��.��.��.��.��.��.��
19

1
Content
Warnings�&�Precautions��� .��.��.��.��.��.��.��.��.��.��.��.��.��.��.��.��.��.��.��. �
2
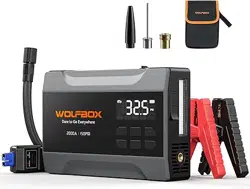
Packing�List��� .��.��.��.��.��.��.��.��.��.��.��.��.��.��.��.��.��.��.��.��.��.��.��.��.��.��. �
4
Pas�and�Functions�Introduction�����.��.��.��.��.��.��.��.��.��.��.��.��.��. �
5
LED�Display�Instructions��� ��.��.��.��.��.��.��.��.��.��.��.��.��.��.��.��.��.��.��. �
8
Technical�Specications����.��.��.��.��.��.��.��.��.��.��.��.��.��.��.��.��.��.��.��
15
Frequently�Asked�Questions�����.��.��.��.��.��.��.��.��.��.��.��.��.��.��.��.��
16
Customer�Seice�Center�����.��.��.��.��.��.��.��.��.��.��.��.��.��.��.��.��.��.��
17

2
Warnings
• This product is not for children to use alone. Children should be
accompanied by adults. Do not inse the air hose into human
or animal mouths, ears, or eyes for ination.
• Do not use this product as a toy.
• Do not use this product near ammable or explosive liquids and
gases, such as at gas stations.
• Do not throw the product into the re or heat it. Do not store
the product in high temperatures.
• Do not impact the product with hard objects.
• Do not disassemble the product randomly, and do not modify
its structure.
• Do not immerse the product in water or other solvents. Keep
the product d.
• The air compressor cannot be used during USB C charging.
Precautions
• This air pump is for small SUVs, electric vehicles, and cars
with tire widths up to 265mm. It can also inate motorcycles,
bicycles, basketballs, and footballs. (Not available for RVs,
pickup trucks, or large SUVs).
• The Tire Pressure Gauge may have a slight delay, please rest
assured, it will not aect the functionality or product experience
(this may be more noticeable for larger vehicles).
• During inating, the top of the device will heat up. Be cautious
when removing the air hose to avoid burns. It is recommended
to allow time for cooling.

3
• After continuous use for about 15 minutes, it is recommended
to wait 5-10 minutes before continuing to use. After charging
is complete, unplug the cable as soon as possible to prevent
overcharging or product damage, and extend the batte's
lifespan.
• The pump has overheat protection, when the internal
temperature exceeds 95° C it will enter cooling mode, during
the cooling mode, the display will show "
HI
" for 5 seconds
eve 1 minute, when the temperature drops below 75° C it will
resume working mode. At an ambient temperature of 25° C, it
takes approximately 15 minutes to cool down.
• When the product is not in use, it is recommended to peorm a
maintenance charge eve 3 months.
• The DC car charger power cord can connect the air pump to
your car's cigarette lighter, allowing the air pump to continue
working when the air pump's batte is low. Please note that the
DC car charger power cord cannot charge the air pump.
• The package does not include a charger. To avoid damaging the
product, be sure to use a standard fast charger for charging.
• Charging and inating simultaneously is not recommended, as
it may damage the batte.
・
Do not inate mattresses.
4
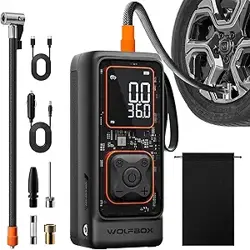
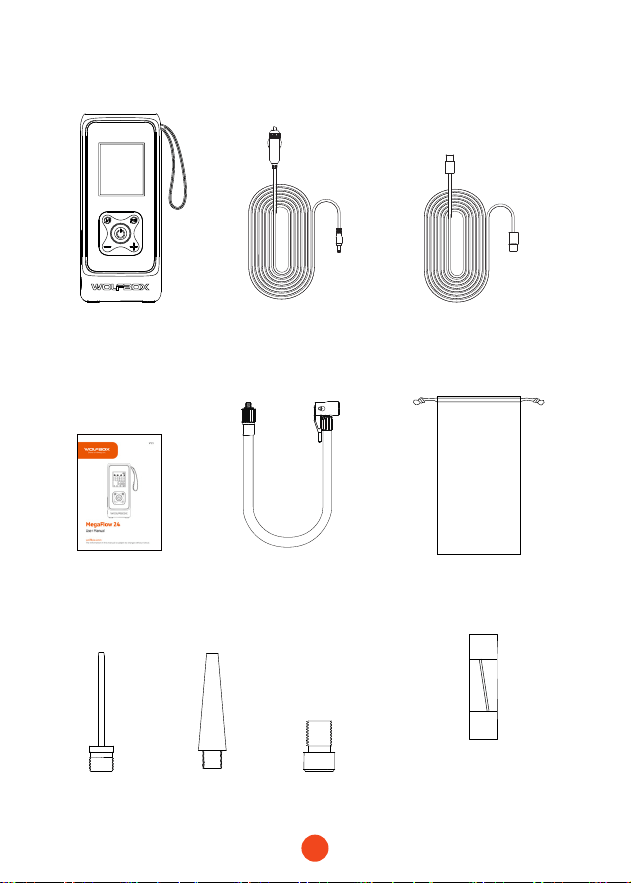
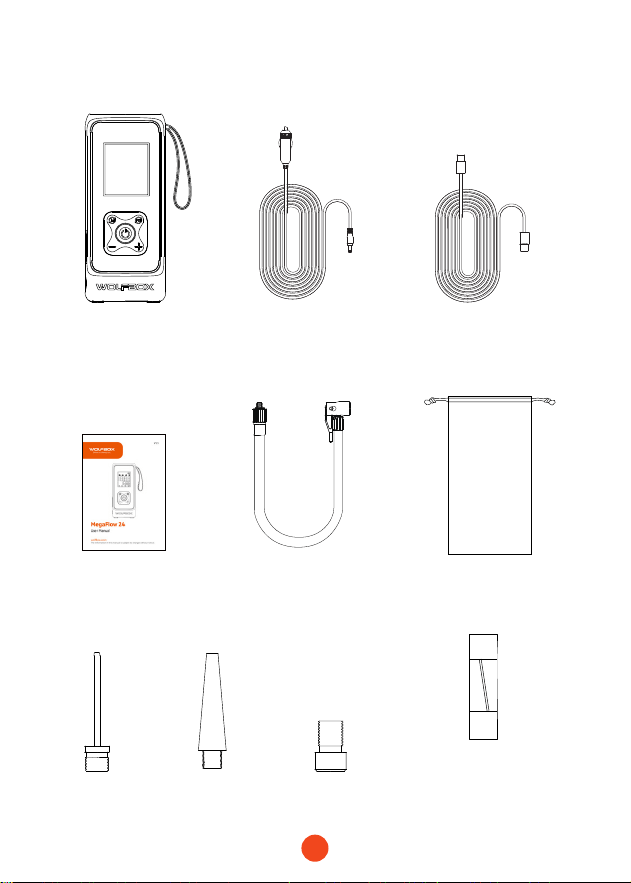
Packing list
・
Tire Inator
・
Inatable Hose
・
C to C Charging
Cable
・
DC 12V Car Charger
・
Cloth Bag
・
User Manual
・
Air Nozzle*3
Basketball
French
Air Nozzle
Balloon
・
Fuse wire
5
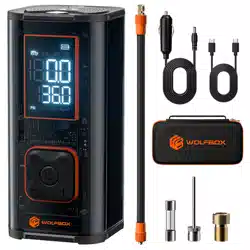
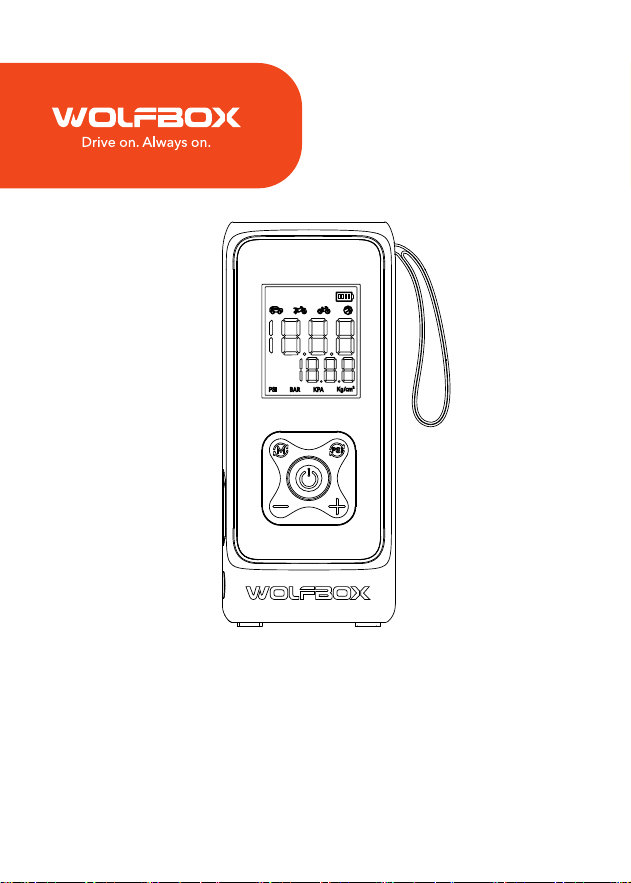
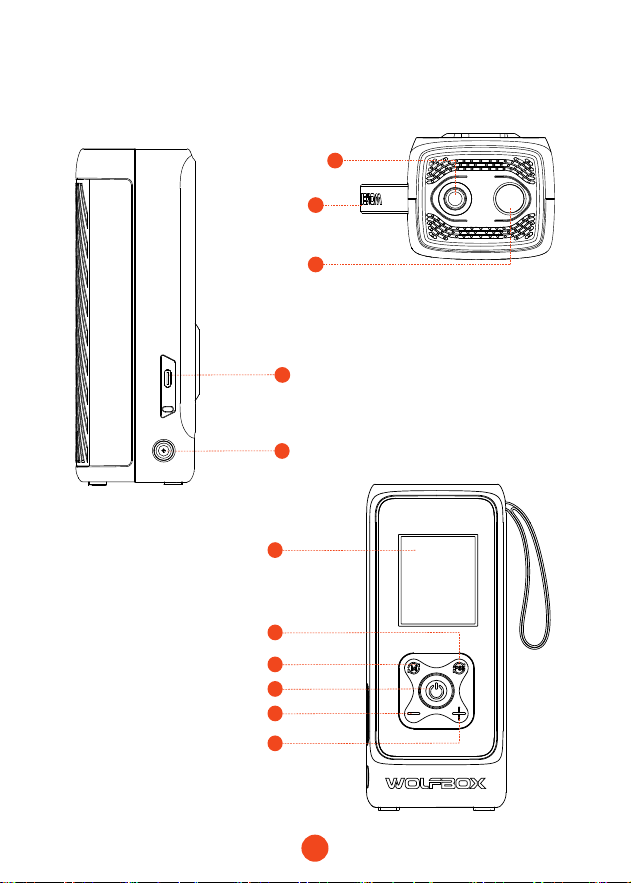
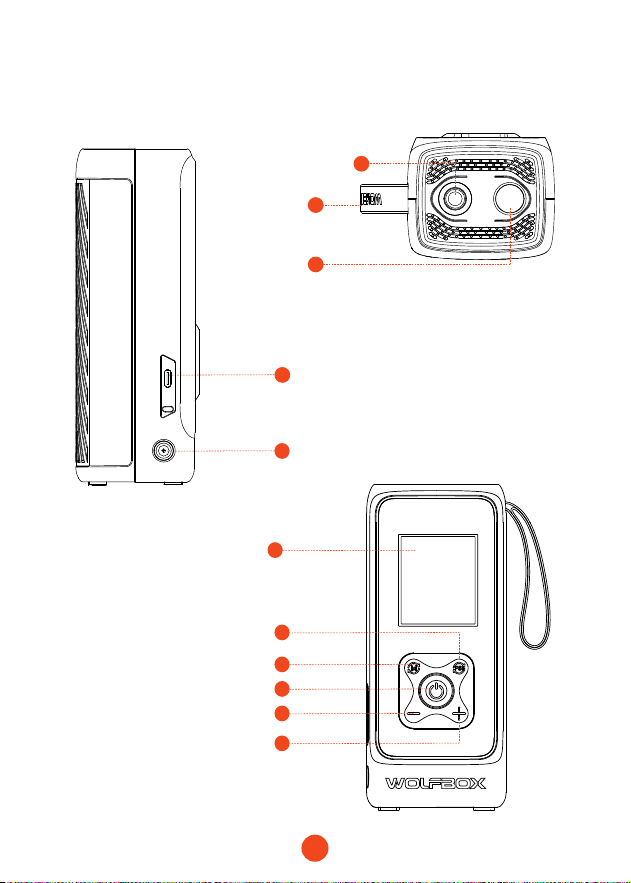
Pas and Functions Introduction
2
1
3
4
5
8
6
7
9
11
10
LED Light
Inatable Tube
Inteace
USB-C Input/Output
Handle
Pressure Adjustment
12V DC Power Inteace
Mode Selection
Display Screen
Unit Switching & LED Light
Power On/O
Pressure Adjustment

6
7
1
3
4
2
6
5
8
Unit Switching & LED Light
LED Light
Inatable Tube Inteace
USB-C Input/Output
Handle
Display Screen
12V DC Power Inteace
Mode Selection
Suppos PD40W (5V3A/9V3A/12V3A/15V2A/20V2A).
For connecting to a car charger.
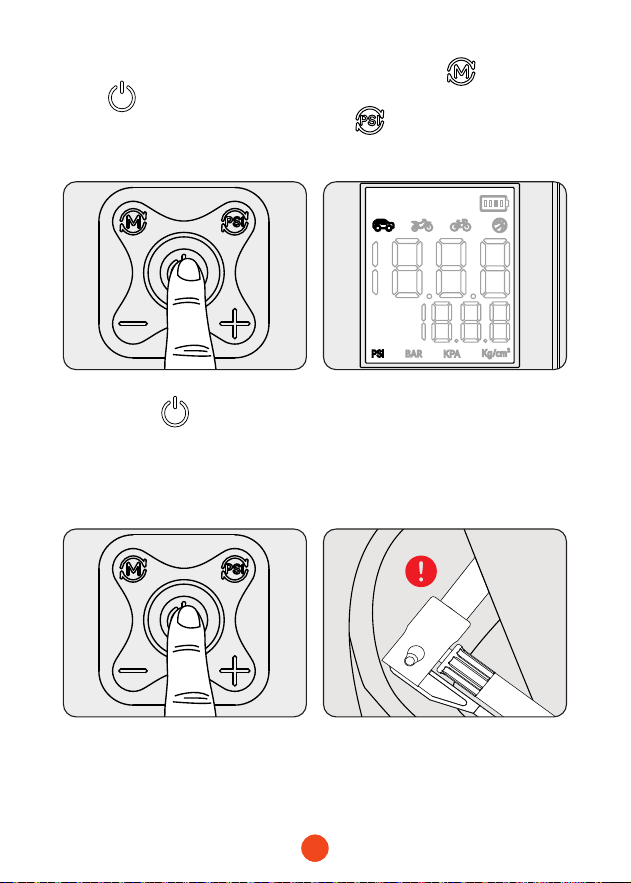
After turning on, press the mode button to select from five
ination modes: Car, Motorcycle, Bicycle, Ball, and Custom. The
default pressure value will automatically change according to the
selected mode.
・Car Mode:
Default 36 PSI; adjustable range 4-65.2 PSI.
・Motorcycle Mode:
Default 34 PSI; adjustable range 26-44 PSI.
・Bicycle Mode:
Default 30 PSI; adjustable range 4-150 PSI.
・Ball Mode:
Default 8 PSI; adjustable range 4-16 PSI.
・Custom Mode:
Default 120 PSI; adjustable range 4-150 PSI.
・Unit Switching:
After selecting the mode, press the unit button
to choose from four pressure units: PSI, BAR, KPA, and Kg/cm².
・Unit conversion:
1BAR=100KPA=14.5PSI=1.0197kg/cm²
・LED Light:
Hold the unit button for 2 seconds to turn on the
LED light. Press it to switch to ash or SOS mode. Hold the unit
button for 2 seconds to turn o the LED light.

7
9
10
11
Power On/O
Pressure Adjustment
Hold the power button for 2 seconds to turn on/off the tire
inflator. Press the power button to start inflation, the tire
inflator will automatically stop when the preset pressure is
reached. The tire inflator will also automatically shut down
after 120 seconds of inactivity.
The product is set with 4 default pressure values, but you can also
use the "+" and "-" buttons to manually adjust the pressure. Sho
presses adjust the pressure by 0.1 PSI, while long presses adjust it
by 1 PSI. After setting the desired pressure, press the power button
to sta ination.
Note:
In Custom Mode, no icon is displayed, and you can
freely set the pressure value up to a maximum of 150
PSI. This mode also features a memo function, which
automatically saves the last set value.
8
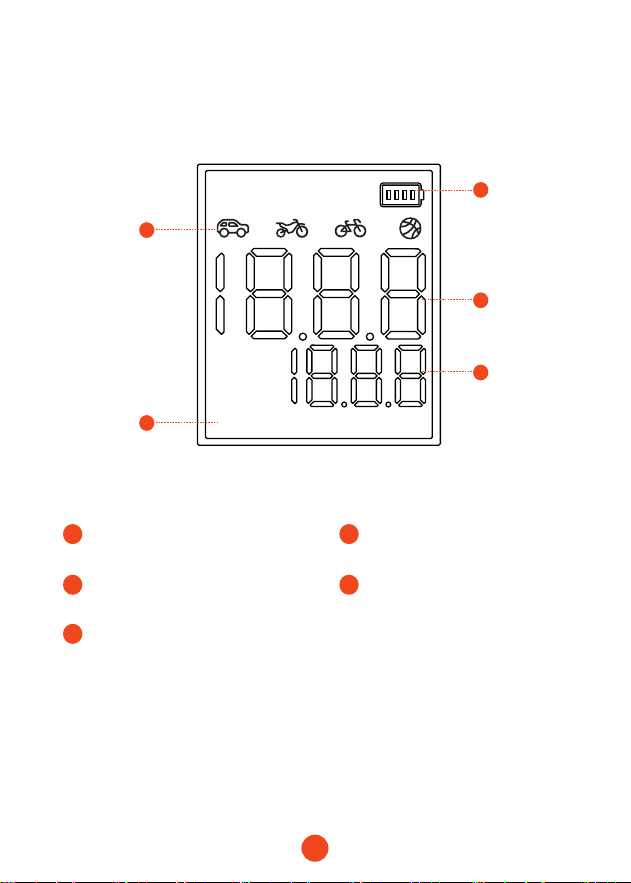
LED Display Instructions
PSI
BAR
KPA
Kg/cm²
Modes
Instantaneous Pressure
Pressure Unit
Preset Pressure
Batte Level Display
1
2
4
5
3
1 2
3 4
5
9
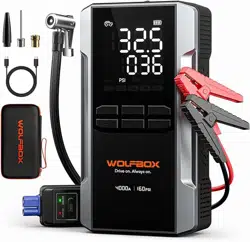
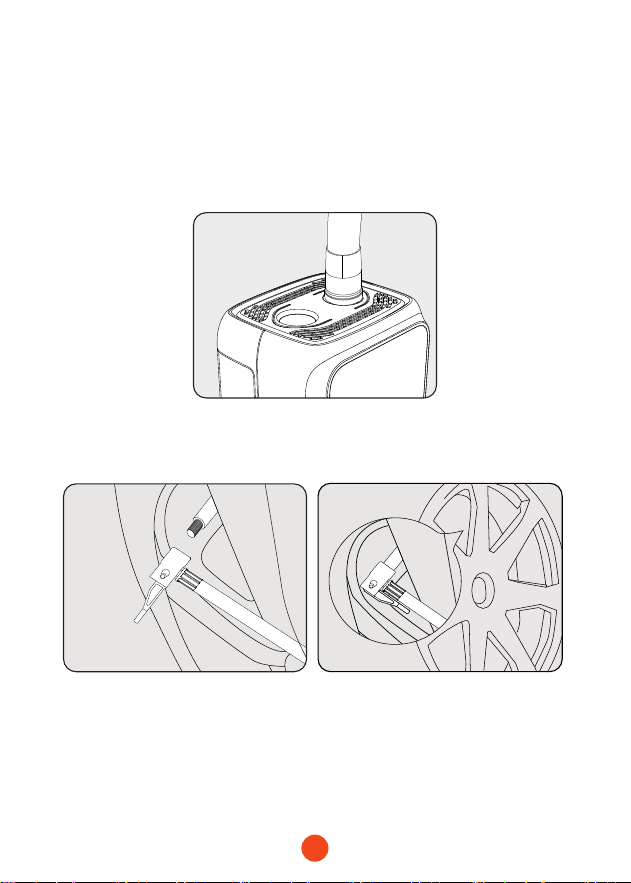
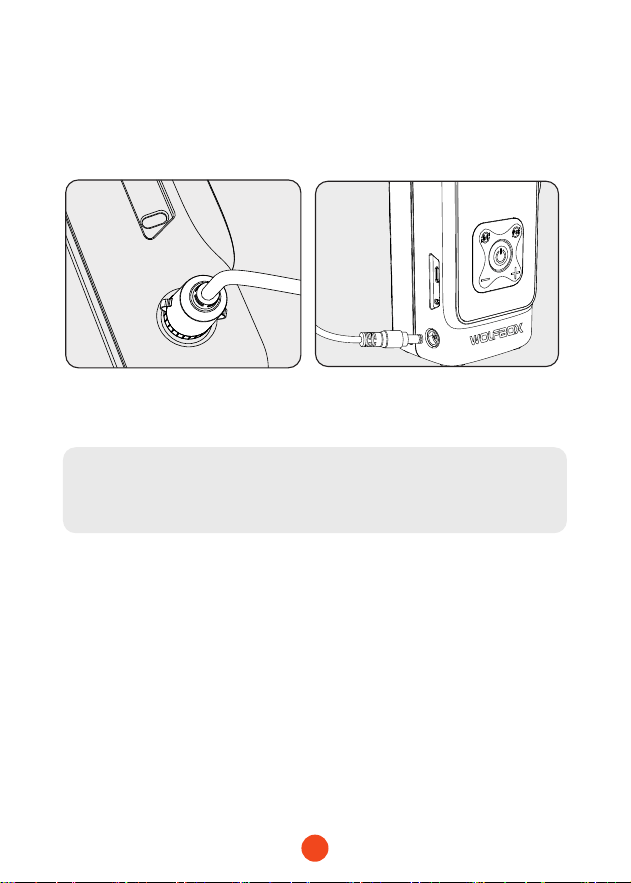
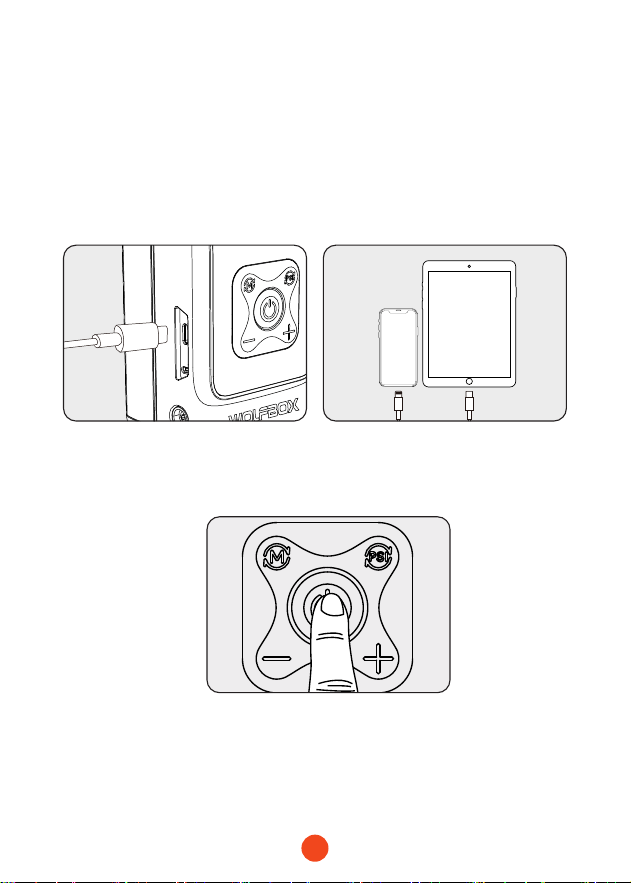
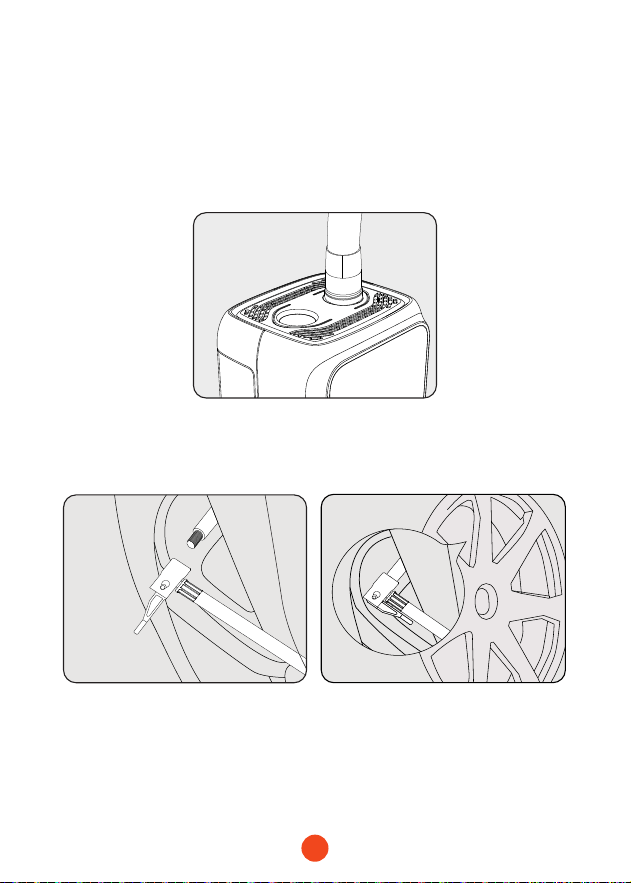
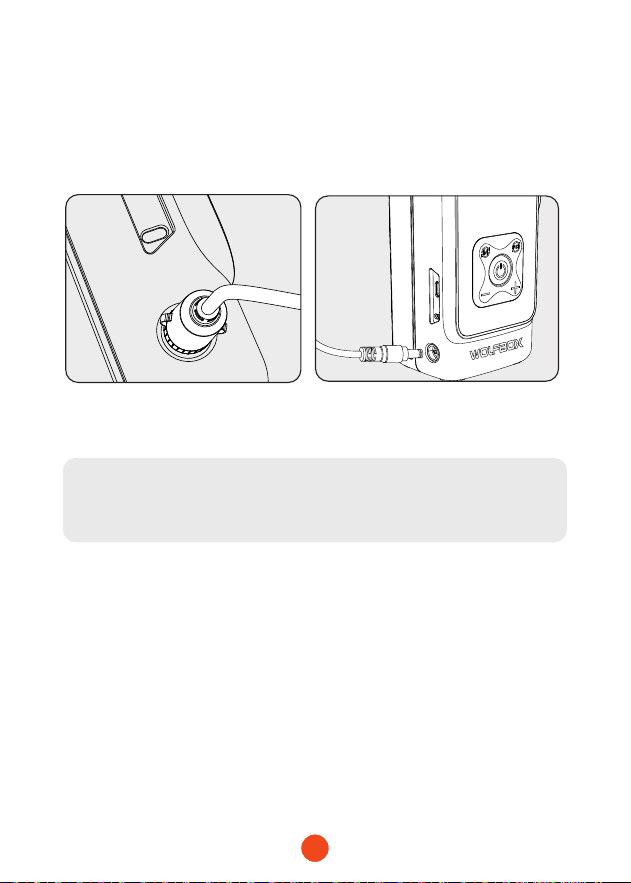
Function 1: How to Inate a Tire
・
Built-in Batte Mode
2.
Connect the air hose to the tire valve and press the nozzle
tightly.
1.
Connect the air hose to the air hose inteace on the tire
inator.
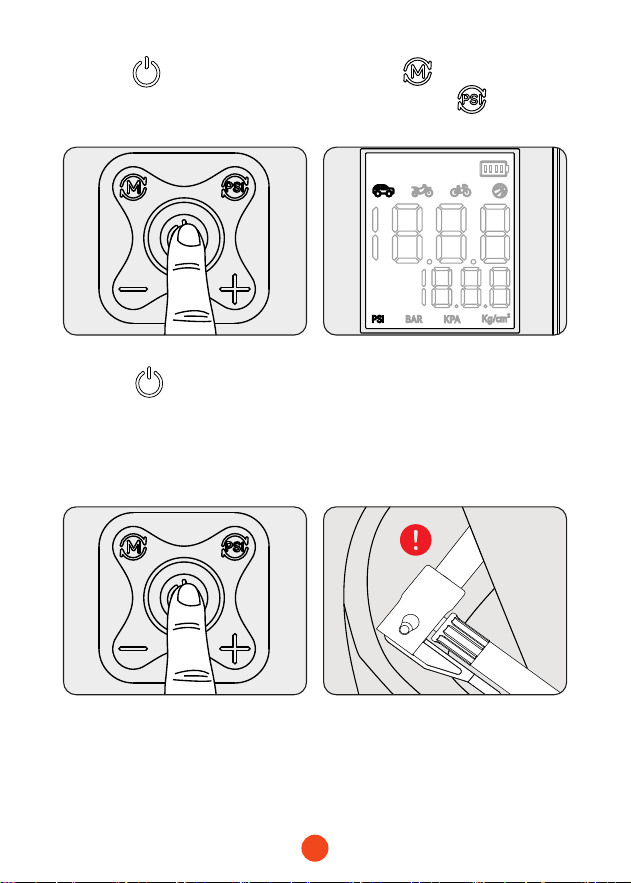
10
5.
Press to sta
ination. The device will
automatically stop when
the preset pressure is
reached.
6.
To prevent burns, wait a few
minutes before removing
the air hose and turning o
the device.
3.
Hold for 2 seconds
to turn on the tire inator.
4.
Press to select the
mode, Press to select
the unit.
11
1.
Plug the car charger into the
car's cigarette lighter socket
in your car.
3.
Use it in the same way as in built-in batte mode
2.
Inse the DC plug into the
product's inteace, and it will
turn on automatically.
・
DC Power Mode
Unit Conversion:
(1BAR=100KPA=14.5PSI=1.0197kg/cm²)
12
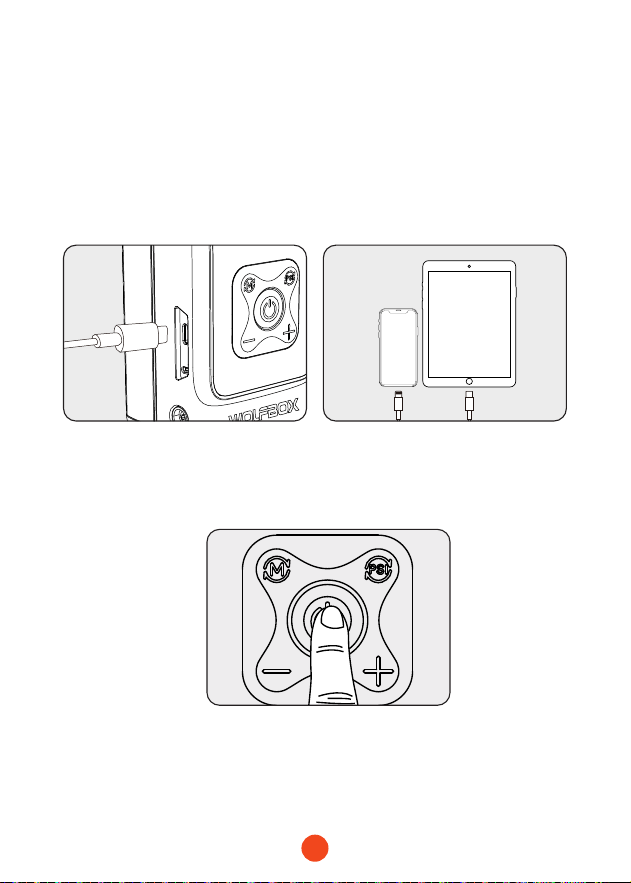
1.
Connect the USB-C plug
of the adapter cable to the
USB-C output po of the tire
inator.
3.
Hold the power button for 2 seconds to turn on the tire
inator and sta charging your mobile phone, tablet, or other
electronic devices.
2.
Connect the charging head
to your mobile phone, tablet,
or other electronic devices.
Function 2: Charging mobile phones,
tablets, or other electronic
devices
13
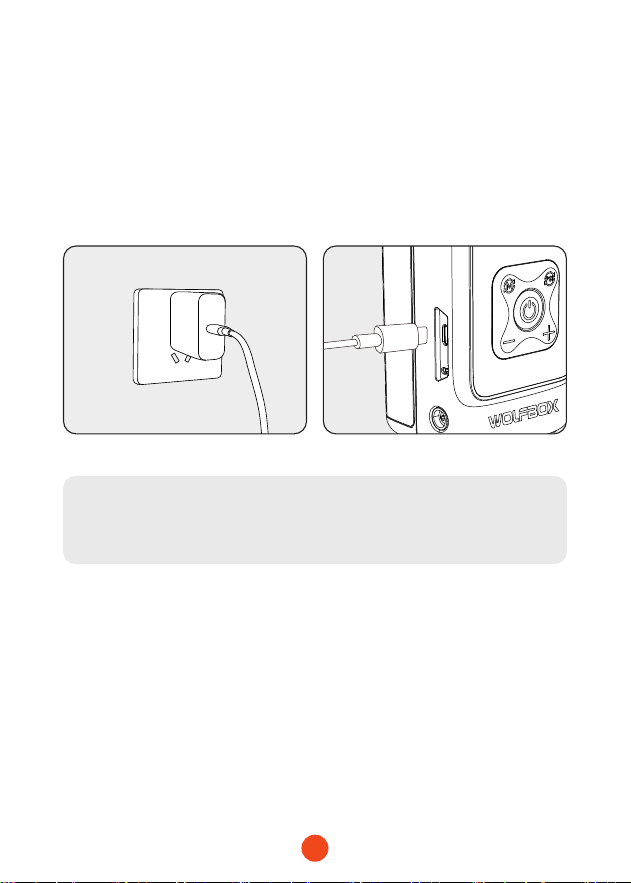
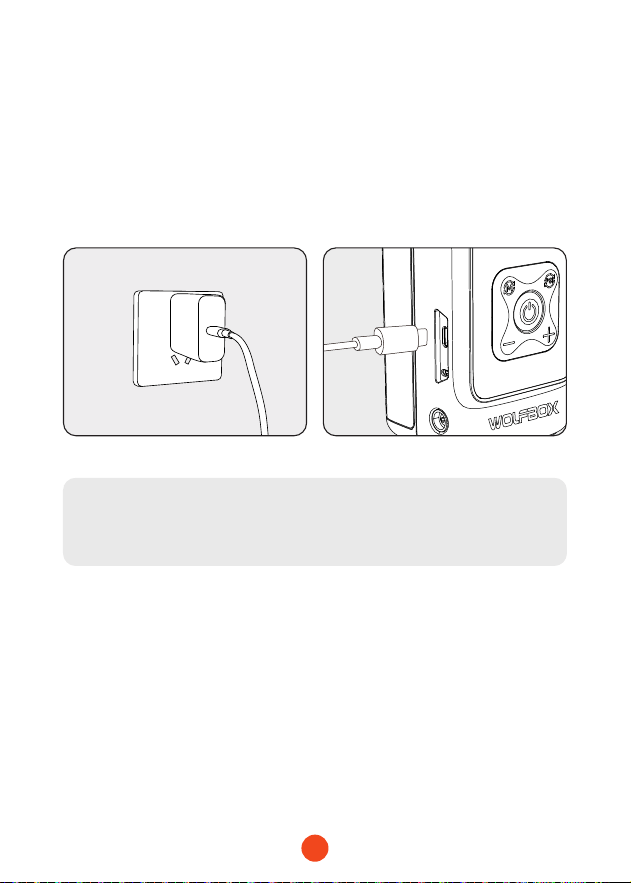
1.
Plug the charger into a power
outlet.
2.
Inse the plug of the fast
charger or household
charger into the USB-C
input po of the MegaFlow
24.
Function 3: Charging the product
Note:
Package does not include an adapter.
14
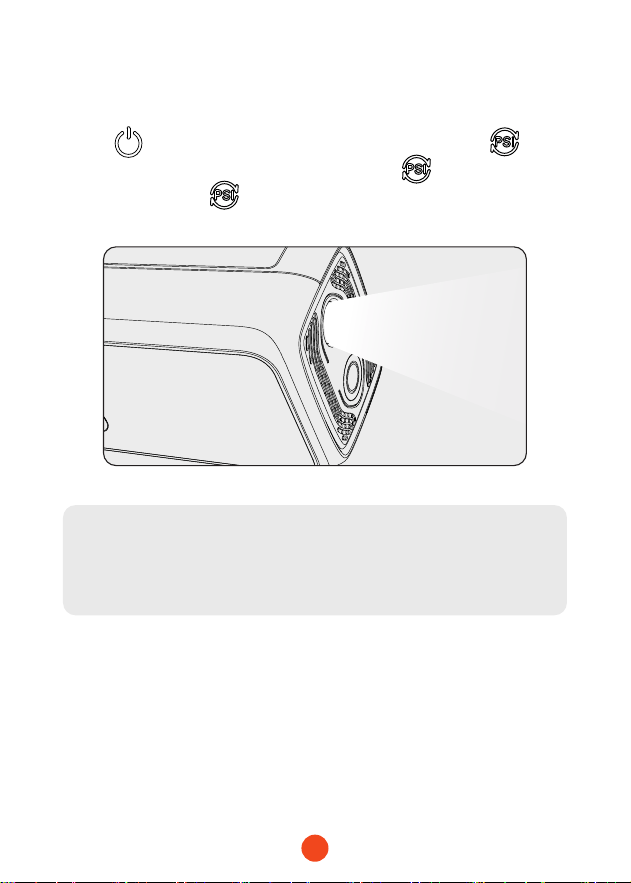
Hold for 2 seconds to turn on the device. Hold for
2 seconds to activate the LED light, press to change light
modes, and hold for 2 seconds again to turn o the LED
light.
Function 4: Switching between dierent
modes of the LED light
Note:
The LED light cannot be used when the tire inator is
turned o.

15
Technical Specications
Model
MegaFlow 24
Batte�
Capacity
44.4Wh/
12000mAh
Pump�Core
24mm Single-
Cylinder Pump
Air�Flow�Rate
35L/Min
USB-C�
Input/Output
PD40W (5V3A/9V3A/12V3A/15V2A/20V2A)
DC�Input
12V/10A
Operating�
Temperature
-20℃ ~50℃ /-4 ℉ ~122 ℉
Full�Charge�Time
Approximately 2
hours (You need to
get your own 40W
charger)
Dimensions
(L*W*H)
6.88*2.97*2.53 inch
Weight
2.4lb
Maximum�
Pressure
150PSI

16
Frequently Asked Questions (FAQ)
・ How do I turn o the device?
Hold the power button for 2 seconds to turn o the device, or
wait for 2 minutes for it to turn o automatically.
・ How long does it take to charge the device?
When charging with a PD 40W input, the charging time is 2
hours. When charging with 5V/2A(10W) input, the charging time
is 4.5 hours.
・ Can it detect air pressure?
This tire inator features a digital barometer, which can be used
to detect air pressure. The ination pressure error is ±0.1 BAR,
while the air pressure detection accuracy is ±0.01 BAR.
・ How many car tires can the device inate at one time?
After testing, for 195/60R15 tire, when the batte of the device
is fully charged, it can charge 4 to 5 times from 0 to 2.5 BAR.
・ Is the device loud when working?
We have increased the thickness of the device housing to
optimize noise during operation.
17
Help�Center WhatsApp
WOLFBOX
For more information:
seice@wolox.com
https://wolox.com/contact-us
www.wolox.com
Customer Seice Center
If you have any problems with the function or installation, please
feel free to reach us.
Extended�Warranty

19
Contenido
Adveencias�y�Precauciones����.��.��.��.��.��.��.��.��.��.��.��.��.��.��.��. �
20
Lista�de�Empaque�����.��.��.��.��.��.��.��.��.��.��.��.��.��.��.��.��.��.��.��.��.��. �
22
Introducción�a�las�Paes�y�Funciones�����.��.��.��.��.��.��.��.��.��.��. �
23
Instrucciones�de�la�Pantalla�LED�����.��.��.��.��.��.��.��.��.��.��.��.��.��.��
26
Especicaciones�Técnicas����.��.��.��.��.��.��.��.��.��.��.��.��.��.��.��.��.��. �
33
Preguntas�Frecuentes�����.��.��.��.��.��.��.��.��.��.��.��.��.��.��.��.��.��.��.��. �
34
Centro�de�Atención�al�Cliente���.��.��.��.��.��.��.��.��.��.��.��.��.��.��.��.��
35

20
Adveencias
• Los niños no deben utilizar solos este producto. Los niños
deben ir acompañados de adultos. No introduzca la manguera
de aire en bocas, oídos u ojos de personas o animales para
inarla.
• No utilice este producto como un juguete.
• No utilice este producto cerca de líquidos y gases inamables o
explosivos, como en las estaciones de seicio.
• No arroje el producto al fuego ni lo caliente. No almacene el
producto a altas temperaturas.
• No golpee el producto con objetos duros.
• No desmonte el producto de forma arbitraria ni modique su
estructura.
• No sumerja el producto en agua ni en otros solventes.
Mantenga el producto seco.
• El compresor de aire no se puede utilizar durante la carga USB C.
Precauciones
• Esta bomba de aire es adecuada para SUV pequeños, vehículos
eléctricos y autos con un ancho de llanta de hasta 265
mm. También puede inar motocicletas, bicicletas, balones
de baloncesto y de fútbol. (No apto para autocaravanas,
camionetas ni SUV grandes)
• El medidor de presión de neumáticos puede tener un ligero
retraso; por favor, no se preocupe, esto no afectará la
funcionalidad ni la experiencia del producto (esto puede ser
más notable en vehículos más grandes).

21
• Durante el inado, la pae superior del dispositivo se
calentará. Tenga cuidado al retirar la manguera de aire para
evitar quemaduras. Se recomienda dejar tiempo para que el
dispositivo se enfríe.
• Después de un uso continuo de aproximadamente 15 minutos,
se recomienda esperar de 5 a 10 minutos antes de continuar
usándolo. Una vez que la carga esté completa, desconecte
el cable lo antes posible para evitar sobrecargas o daños al
producto, y para prolongar la vida útil de la batería.
• La bomba de aire tiene protección contra sobrecalentamiento.
Cuando la temperatura interna supera los 95 ° C, entrará en
un período de enfriamiento. Durante este período, la pantalla
mostrará "
HI
" durante 5 segundos cada 1 minuto. Cuando
la temperatura baje de los 75 ° C, volverá a funcionar. A una
temperatura ambiente de 25 ° C, tarda aproximadamente 15
minutos en enfriarse.
• Cuando el producto no esté en uso, se recomienda realizar una
carga de mantenimiento cada 3 meses.
• El cable de alimentación del cargador de coche de CC puede
conectar la bomba de aire al encendedor de cigarrillos del
coche, lo que permite que la bomba de aire siga funcionando
cuando la batería de la bomba de aire está baja. Tenga en
cuenta que el cable de alimentación del cargador de coche de
CC no puede cargar la bomba de aire.
• El paquete no incluye un cargador. Para evitar dañar el
producto, asegúrese de utilizar un cargador rápido estándar
para la carga.
• No se recomienda cargar e inar simultáneamente, ya que
podría dañar la batería.
・
No ine colchones.
22
Lista de Empaque
・
Inador de
neumáticos
・
Manguera inable
・
C to C Cable de carga
・
DC 12V Cargador
para automóvil
・
Bolsa de tela
・
Manual del
usuario
・
Boquilla de aire*3
Baloncesto Globo
Boquilla de
aire francesa
・
Cable fusible
23
Pas and Functions Introduction
2
1
3
4
5
8
6
7
9
11
10
Luz LED
Inteaz de Tubo
Inable
Entrada/Salida USB-C
Asa
Ajuste de Presión
Inteaz de Alimentación de 12V DC
Selección de Modo
Pantalla de Visualización
Cambio de Unidad & Luz LED
Encendido/Apagado
Ajuste de Presión

24
7
8
1
3
4
2
6
5
Cambio de Unidad & luz LED
Luz LED
Inteaz de tubo inable
Entrada/Salida USB-C
Asa
Pantalla de Visualización
Inteaz de Alimentación de 12V DC
Selección de Modo
Sopoa PD40W (5V3A/9V3A/12V3A/15V2A/20V2A).
Para conectar a un cargador de automóvil.
Después de encender, presione el botón de modo para
seleccionar entre cinco modos de inado: Coche, Moto,
Bicicleta, Balón y Personalizado. El valor de presión
predeterminado cambiará automáticamente de acuerdo con el
modo seleccionado.
・Modo Coche:
Predeterminado 36 PSI; rango ajustable de 4 - 65.2
PSI.
・Modo Moto:
Predeterminado 34 PSI; rango ajustable de 26 -
44 PSI.
・Cambio de Unidad:
Después de seleccionar el modo, presione el
botón de unidad para elegir entre cuatro unidades de presión:
PSI, BAR, KPA, and Kg/cm².
・Conversión de Unidad:
1BAR=100KPA=14.5PSI=1.0197kg/cm²
・Luz LED:
Mantenga presionado el botón de unidad durante
2 segundos para encender la luz LED. Presione el botón para
cambiar entre el modo intermitente o el modo SOS. Mantenga
presionado el botón de unidad durante 2 segundos para apagar
la luz LED.

25
9
10
11
Encendido/Apagado
Ajuste de la presión
Mantenga pulsado el botón de encendido durante 2 segundos
para encender o apagar el inflador de neumáticos. Pulse el
botón de encendido para iniciar el inado. inador se detendrá
automáticamente al alcanzar la presión preseleccionada. El
inador de neumáticos también se apagará automáticamente
después de 120 segundos de inactividad.
El producto está congurado con 4 valores de presión
predeterminados, pero también puede utilizar los botones «+» y
«-» para ajustar manualmente la presión. Pulsando brevemente Las
pulsaciones coas ajustan la presión en 0,1 PSI, mientras que las
pulsaciones largas la ajustan en 1 PSI. Después de ajustar la presión
deseada, pulse el botón de encendido para iniciar el inado.
Nota:
En el Modo Personalizado, no se muestra ningún ícono,
y puede ajustar libremente el valor de presión hasta un
máximo de 150 PSI. Este modo también cuenta con una
función de memoria, que guarda automáticamente el
último valor congurado.
・Modo Bicicleta:
Predeterminado 30 PSI; rango ajustable de
4 - 150 PSI.
・Modo Balón:
Predeterminado 8 PSI; rango ajustable de 4 - 16 PSI.
・Modo Personalizado:
Predeterminado 120 PSI; rango ajustable de
4 - 150 PSI.

26
Instrucciones para la Pantalla LED
PSI
BAR
KPA
Kg/cm²
Modes
Presión Instantánea
Unidad de Presión
Presión Predeterminada
Indicador de Nivel de Batería
1
2
4
5
3
1 2
3 4
5
27
Función 1: Cómo Inar un Neumático
・
Modo de Batería Integrada
2.
Conecte la manguera de aire a la válvula del neumático y
presione la boquilla con fuerza.
1.
Conecte la manguera de aire a la inteaz de manguera de aire
en el inador de neumáticos.
2828
5.
Presione para iniciar
el inado. El dispositivo se
detendrá automáticamente
cuando se alcance la
presión preestablecida.
6.
Para evitar quemaduras,
espere unos minutos antes
de retirar la manguera de
aire y apagar el dispositivo.
3.
Mantenga presionado
el durante 2 segundos
para encender el inador de
neumáticos.
4.
Presione el para
seleccionar el modo, presione
el para seleccionar la
unidad.
2929
1.
Conecte el cargador de
automóvil en la toma del
encendedor de cigarrillos de
su vehículo.
3.
Úselo de la misma manera que en el modo de batería
incorporada.
2.
Insee el enchufe de DC
en la inteaz del producto,
y este se encenderá
automáticamente.
・
Modo de Alimentación DC
Conversión de unidad:
1BAR=100KPA=14.5PSI=1.0197kg/cm²
30
1.
Conecte el enchufe USB-C
del cable adaptador al pueo
de salida USB-C del inador
de neumáticos.
3.
Mantenga presionado el botón de encendido durante
2 segundos para encender el inador de neumáticos
y comenzar a cargar su teléfono móvil, tableta u otros
dispositivos electrónicos.
2.
Conecte el cabezal de
carga a su teléfono móvil,
tableta u otros dispositivos
electrónicos.
Función 2: Cargar teléfonos móviles,
tabletas u otros dispositivos
electrónicos
31
1.
Conecte el cargador a una
toma de corriente.
2.
Insee el enchufe del
cargador rápido o del
cargador doméstico en el
pueo de entrada USB-C
del MegaFlow 24.
Función 3: Cargar el Producto
Nota:
El paquete no incluye un adaptador.
32
Mantenga presionado el durante 2 segundos para
encender el dispositivo. Mantenga presionado el durante
2 segundos para activar la luz LED, presione el para
cambiar entre los modos de luz y mantenga presionado el
durante 2 segundos nuevamente para apagar la luz LED.
Función 4: Cambio entre los diferentes
modos de la luz LED
Nota:
La luz LED no se puede usar cuando el inador de
neumáticos está apagado.

33
Especicaciones Técnicas
Modelo
MegaFlow 24
Capacidad�de�
la�Batería
44.4Wh/
12000mAh
Núcleo�de�la�
Bomba
24mm Bomba de un
solo cilindro
Tasa�de�Flujo�
de�Aire
35L/Min
Entrada/Salida�
USB-C
PD40W
(
5V3A/9V3A/12V3A/15V2A/20V2A)
Entrada�de�CC
12V/10A
Temperatura�de�
Funcionamiento
-20℃ ~50℃ /-4 ℉ ~122 ℉
Tiempo�de�Carga�
Completa
Aproximadamente
2 horas (necesita un
cargador de 40W
propio)
Dimensiones
(L*W*H)
6.88*2.97*2.53 inch
Peso
2.4lb
Presión�
Máxima
150PSI

34
Preguntas Frecuentes
・ ¿Cómo apago el dispositivo?
Mantenga presionado el botón de encendido durante 2
segundos para apagar el dispositivo, o espere 2 minutos para
que se apague automáticamente.
・ ¿Cuánto tiempo se tarda en cargar el dispositivo?
Con una entrada PD de 40W, el tiempo de carga es de 2 horas.
Con una entrada de 5V/2A (10W), el tiempo de carga es de 4.5
horas.
・ ¿Puede detectar la presión de aire?
Este inador de neumáticos cuenta con un barómetro digital
que puede detectar la presión de aire. El error de presión de
inado es ±0.1 BAR, mientras que la precisión de detección de
la presión de aire es ±0.01 BAR.
・ ¿Cuántos neumáticos de coche puede inar el dispositivo a
la vez?
Después de las pruebas, para neumático 195/60R15, cuando
la batería del dispositivo está completamente cargada, puede
inar de 4 a 5 neumáticos desde 0 hasta 2.5 BAR.
・ ¿Es el dispositivo ruidoso cuando está en funcionamiento?
Hemos aumentado el grosor de la carcasa del dispositivo para
optimizar el ruido durante el funcionamiento.
35
Help�Center
Garantía�Extendida
WhatsApp
WOLFBOX
Para más información:
seice@wolox.com
https://wolox.com/contact-us
www.wolox.com
Centro de Atención al Cliente
Si tienes algún problema con el función o la instalación, no dudes
en contactarnos.
Check us out here!
We have professional customer seice!
www.wolox.com
Email:�seice.wolo[email protected]om
Phone:�+1�888�296�8399