wolox.com
The information in this manual is subject to change without notice.
V1.1
Jump Staer with Air
Compressor
MegaVolt 16 Air / MegaVolt 24 Air
User Manual


C
Language MENU
English version .........................
1
Deutschversion.......................
19
Français version .......................
38
Italiano version ........................
58
Spanish version ........................
76


1
Table of Contents
Precautions...........................
2
PackingList ...........................
3
ComponentsandFunctionIntroduction ..........
4
LEDDisplayDescription....................
7
TechnicalParameters ....................
13
FrequentlyAskedQuestions................
14
Troubleshooting .......................
15
Warnings ...........................
16
CustomerSeiceCenter..................
18

2
Thank you for choosing the Wolox jump staer with air
compressor. To ensure a great user experience and your safety,
please read all instructions carefully before using this product
and keep this manual for future reference.
Precautions
Warning
This device is designed for vehicles (equipment) with 12V
batteries. Using it with other types of batteries may be
dangerous. Please read and understand all safety information
before use.
Note
It is recommended to charge the product upon receiving it!
While reading this manual, you can sta charging the device
using the included charging cable. (This product does not
include an adapter)
3
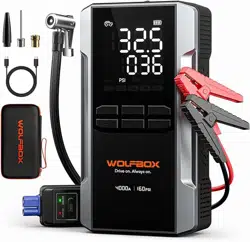
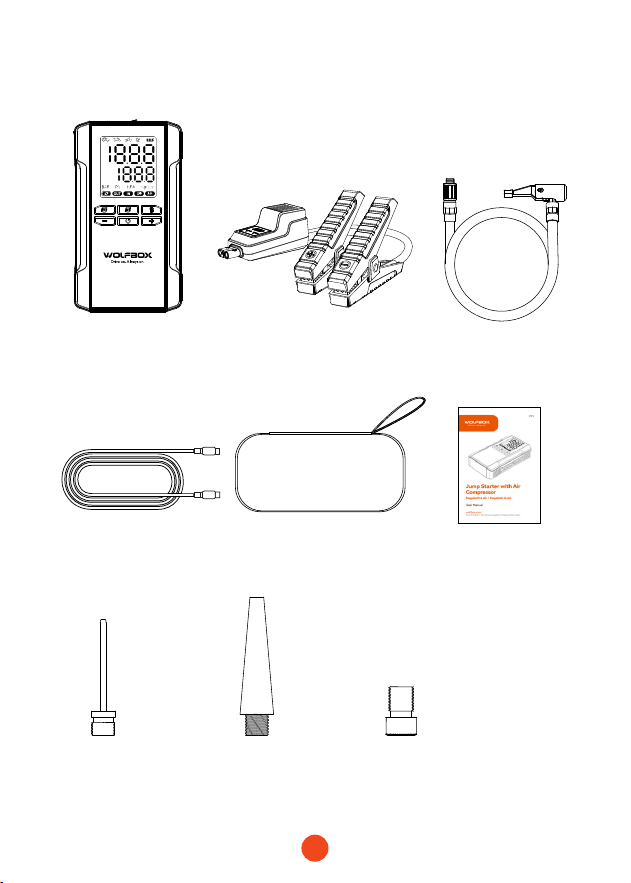
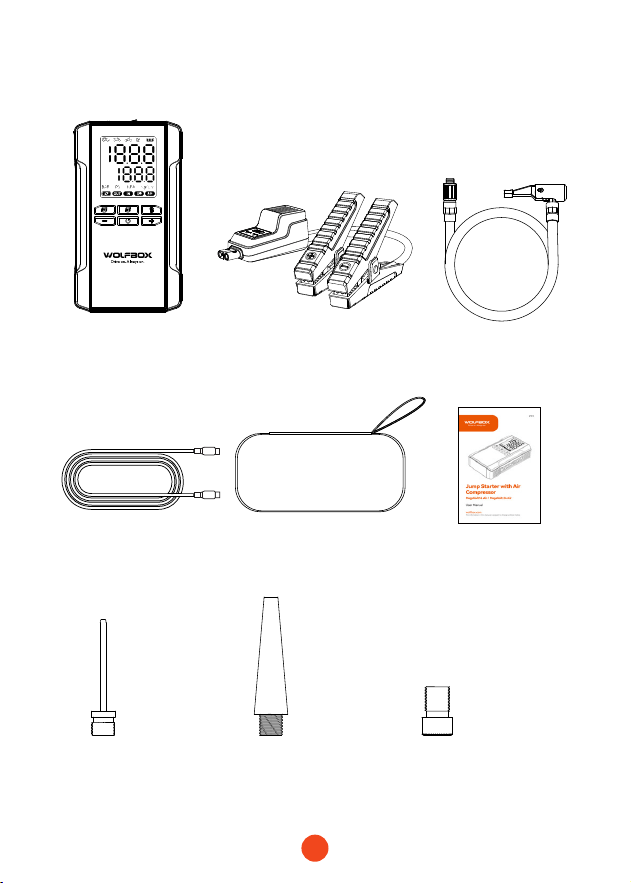
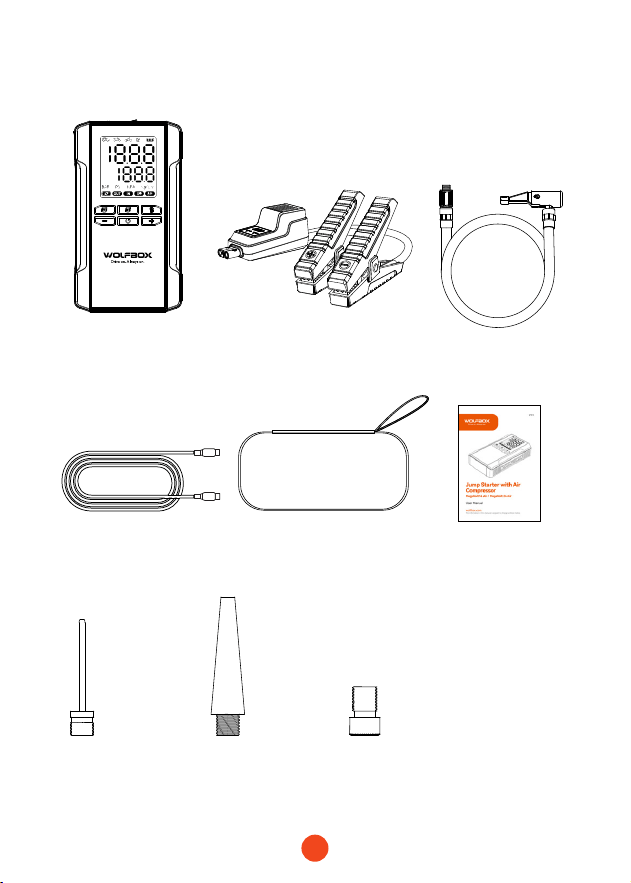
Packing list
・
Device
・
Sma Batte Clamps
・
Usb C to Usb C
Charger Cable
・ Air Hose
・
Air nozzle
French to
American Nozzle
American
Needle Nozzle
Long
American Nozzle
・
EVA Pack
・
User Manual

4
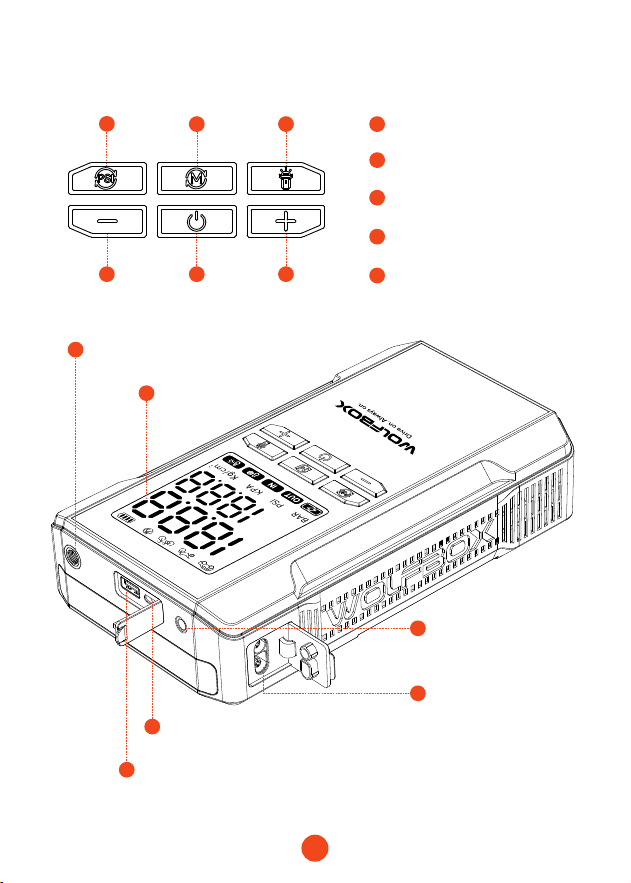
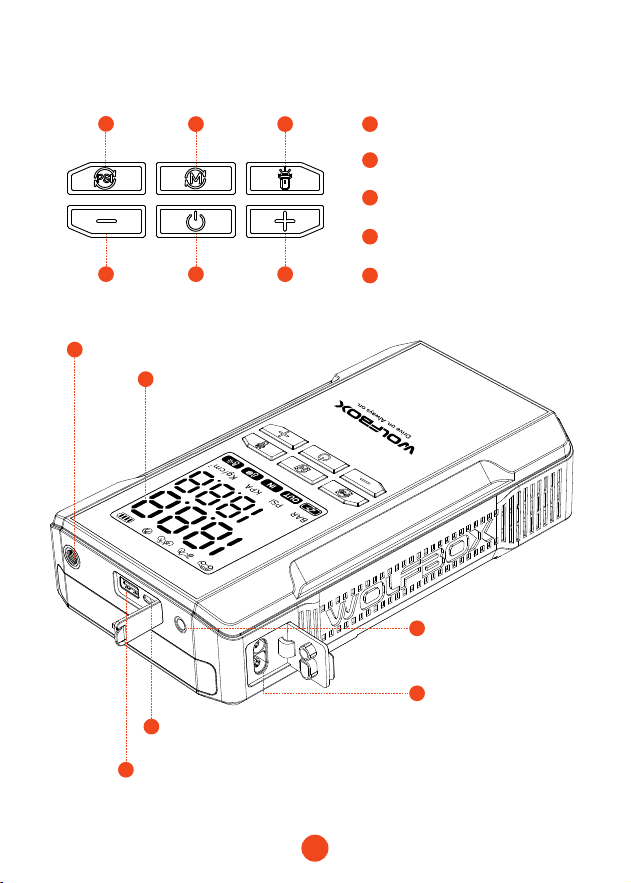
Components and Function Introduction
Display Screen
Ination Po
5
5
4 4
3
4
7
6
8
9
10
11
2 3
2
1
1
Power/Ination
Sta/Stop Button
Pressure Unit Switch
Pressure Increase/
Decrease Buttons
LED Flashlight Switch
USB-A Output Po
(QC3.0 5V/9V/12V)
USB-C Input/Output Po
(Max power: PD65W)
12V Car Sta Po
15V/10A Output Po
Mode Switch

5
Button Descriptions
3
4
5
1
2
Sta Ination
Pressure Unit
Adjust Pressure
Power On
Indications
Press the power button briey to sta ination; press again to
stop.
Press the “PSI” button briefly to switch the pressure unit;
press the “M” button briey to switch modes.
Use the “+” and “-” buttons to adjust the preset pressure value.
1. Units: KPA: ±5; BAR: ±0.1; PSI: ±1; kg/cm²: ±0.1
2. Press and hold for 1 second to quickly adjust the preset value.
If the maximum value is reached, it will return to the minimum
value and vice versa.
Press the power button for 3 seconds to turn on the device.
The screen will display the batte level and current pressure,
along with the preset pressure and corresponding unit and
mode.
Upon powering on, all indicator lights will light up for 1 second,
then display the batte level, mode unit, preset pressure, and
current pressure.
・Initial Unit:
PSI
・Car Mode: Initial value: 36PSI, Min: 26PSI, Max: 50PSI
Motorcycle Mode: Initial value: 31PSI, Min: 26PSI, Max: 43PSI
Bicycle Mode: Initial value: 44PSI, Min: 30PSI, Max: 145PSI
Ball Mode: Initial value: 9PSI, Min: 4PSI, Max: 16PSI
Custom Mode: Initial value: 21PSI, Min: 7PSI, Max: 160PSI

6
6
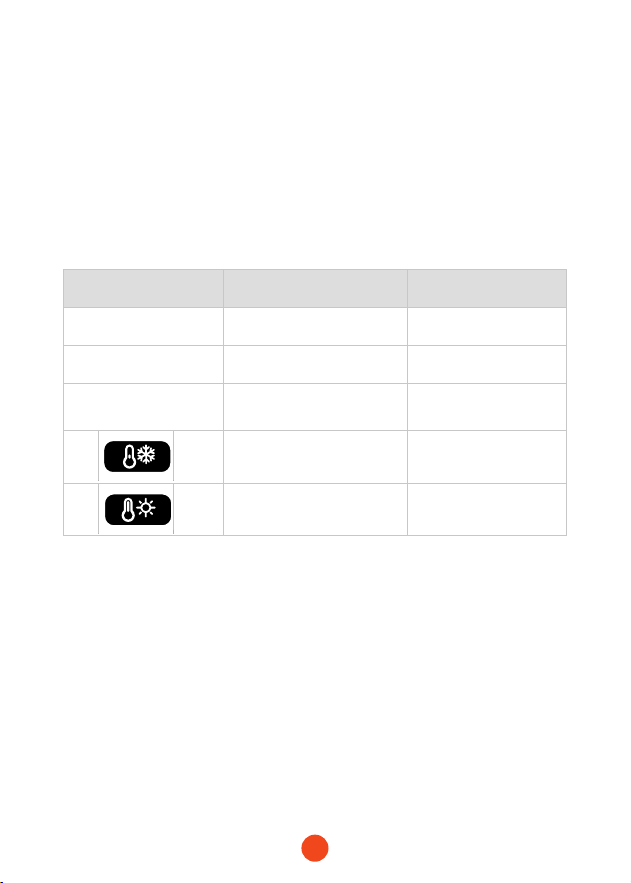
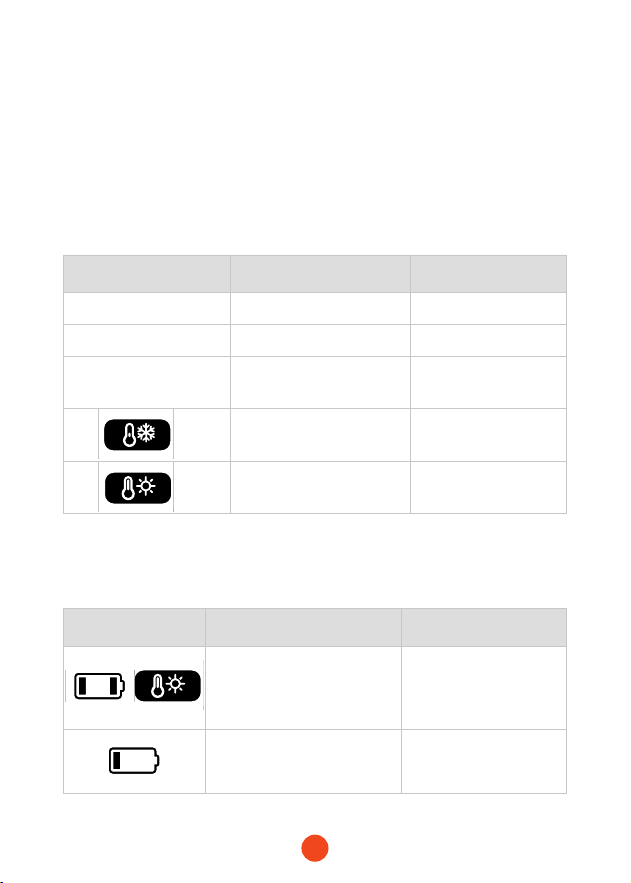
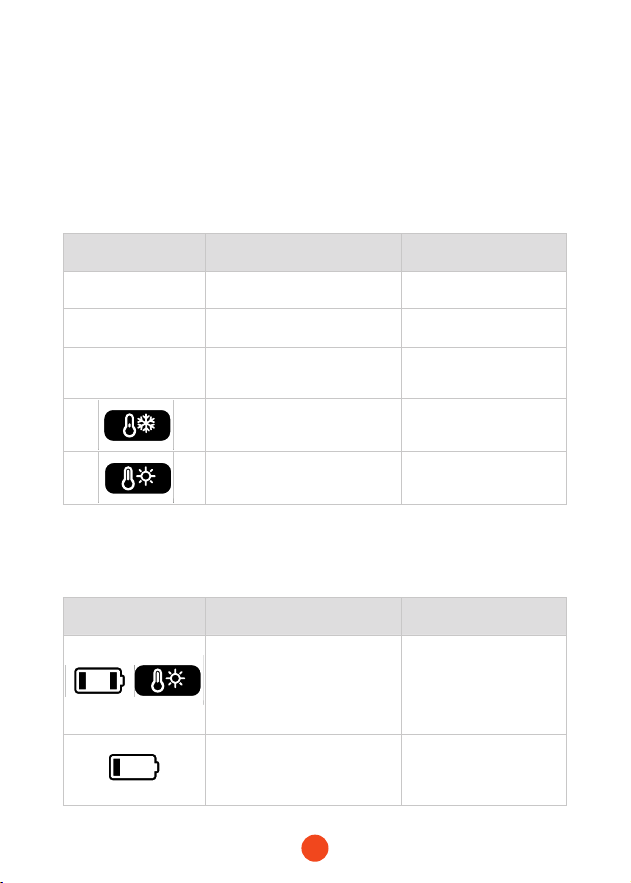
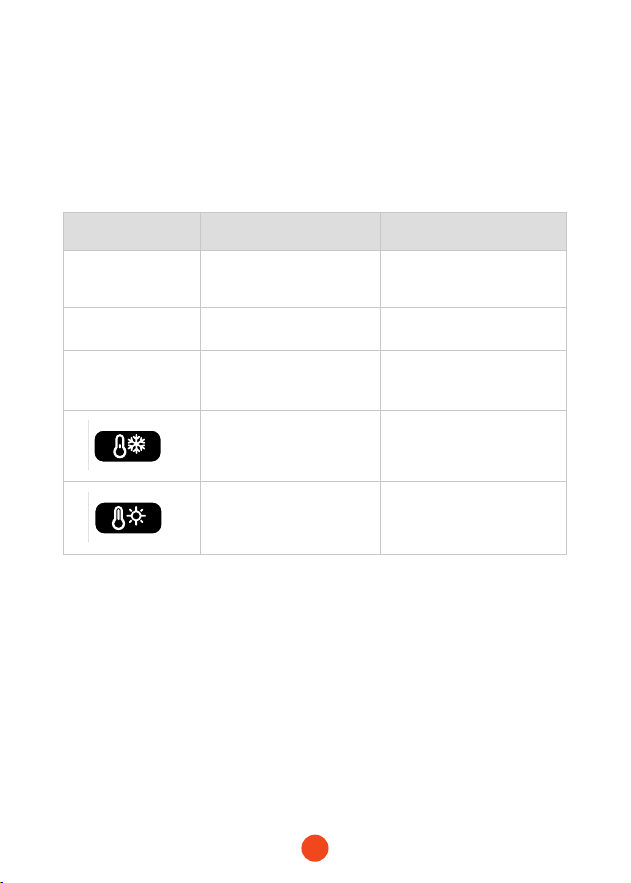
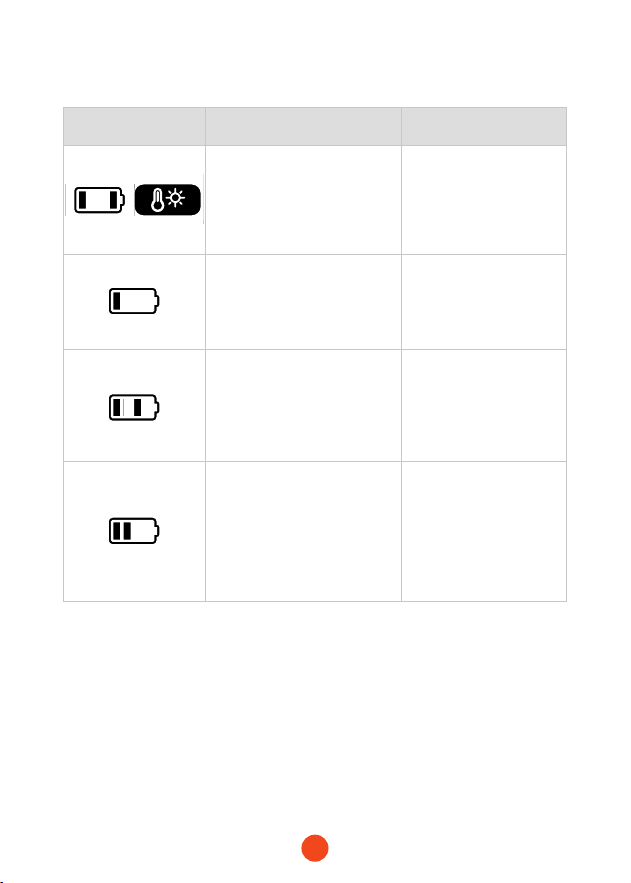
Temperature Protection
・When the batte temperature reaches 55°C, temperature
protection activates. When it drops to 45°C, protection is lifted,
allowing charging. The high-temperature icon is highlighted in
protection mode.
・When the batte temperature drops below 0°C, temperature
protection activates during charging. When it rises above 5°C,
protection is lifted, allowing charging. The low-temperature icon
is highlighted during protection. If the NTC disconnects, low-
temperature protection activates, prohibiting output. When
lifted, output resumes, and the icon is highlighted.
7
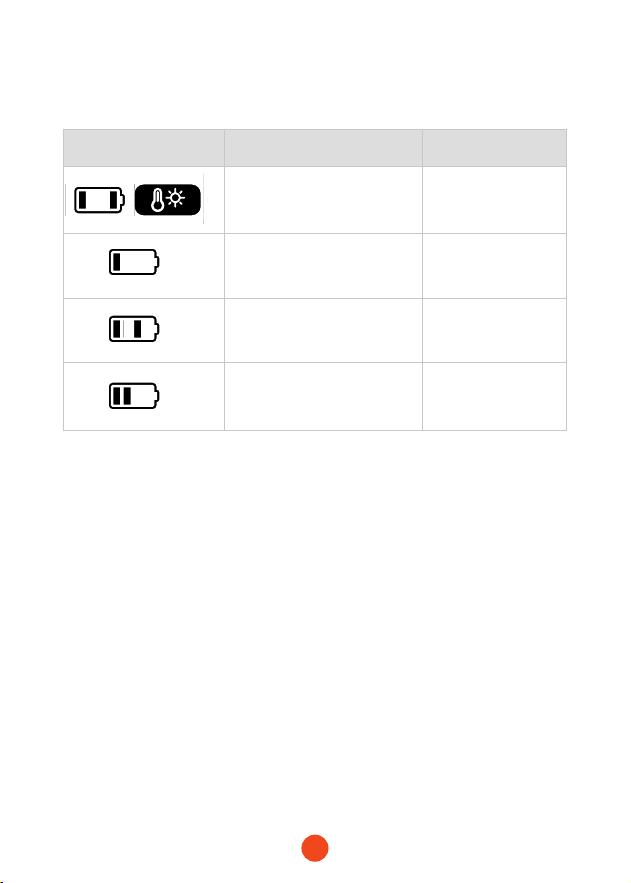
Charging Devices
While the jump staer is powered on, if both USB-C and USB-A
are connected, the device will charge external devices (phone,
tablet, etc.).
・Both pos can work simultaneously. The “OUT” and “Batte
Level” indicators will be on.
・Removing one po will not aect the other.
・If both USB-A and USB-C are removed, the device will auto shut
down after 90 seconds.
・If the device is turned o while charging, it will stop charging the
external device. Upon turning back on, it will resume charging.

7
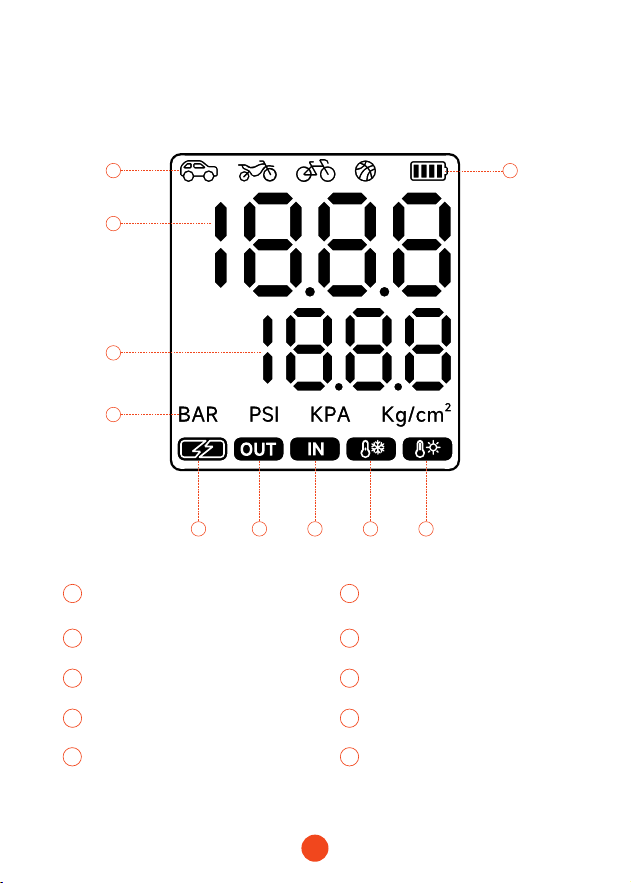
LED Display Instructions
2
5
3
4
1
1 2
8
Batte Level
Modes:
Car/Motorcycle/Bicycle/Ball
Input
3 4
109
Real-Time Value Preset Value
High Temperature AlarmLow Temperature Alarm
5
7
6
Pressure Unit
Output
Fast Charge Indicator
6 9
10
7 8
8
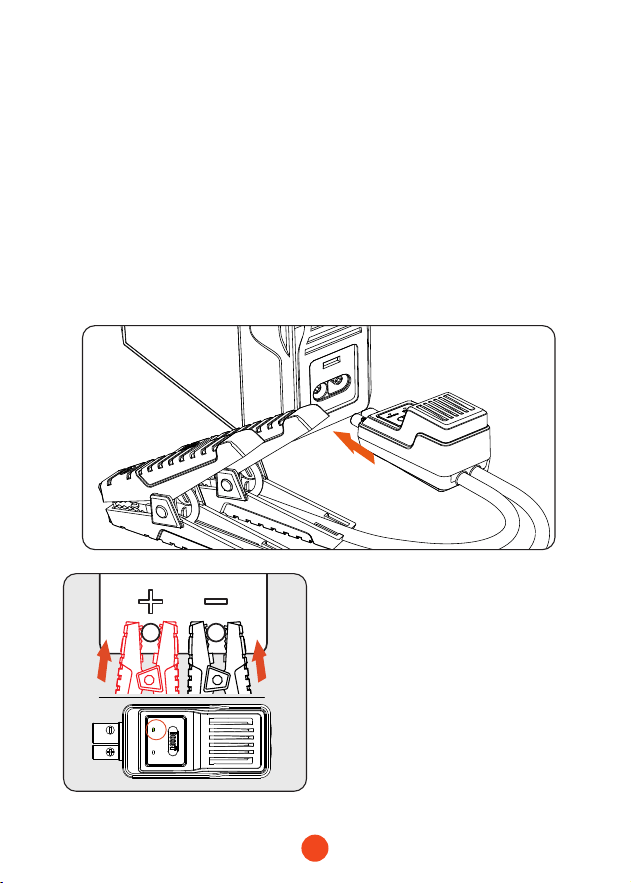
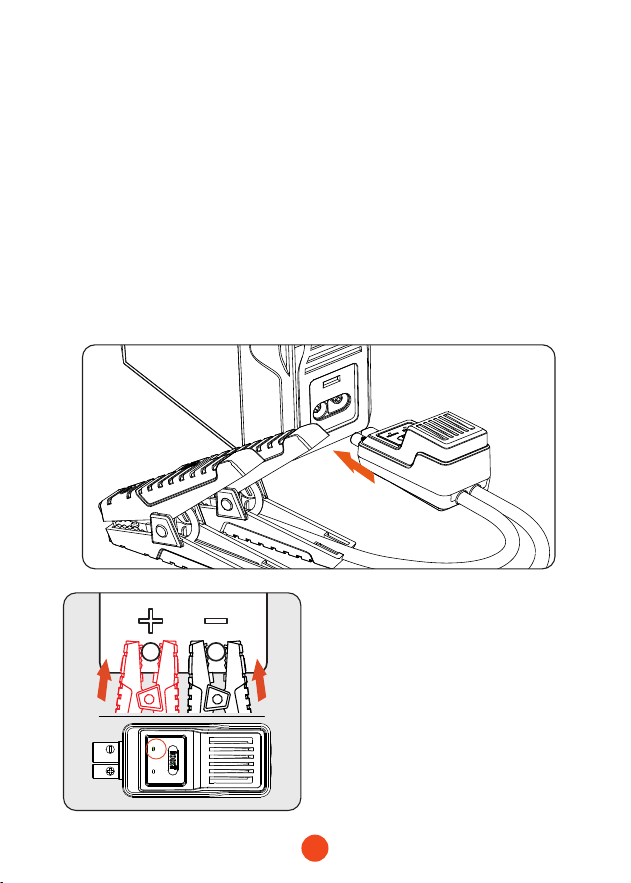
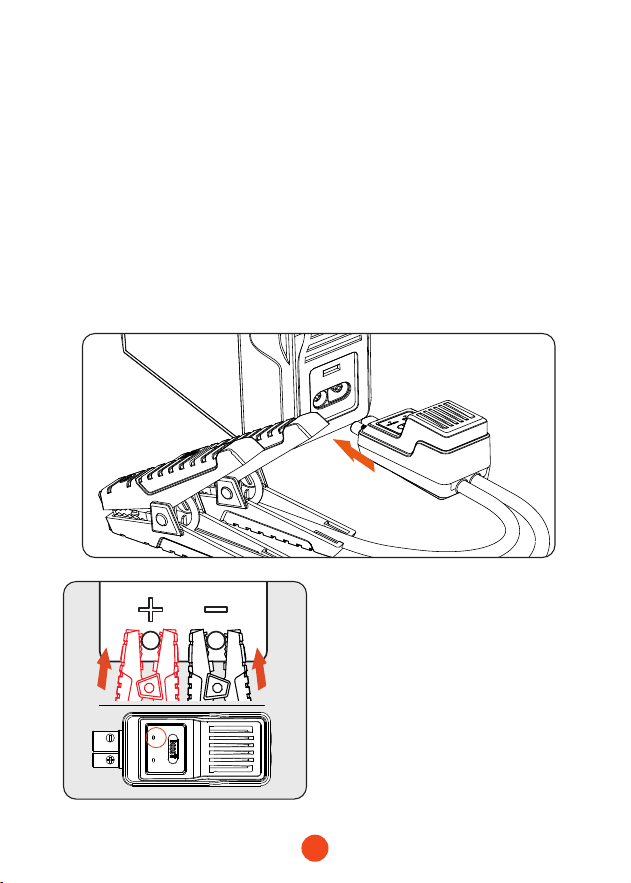
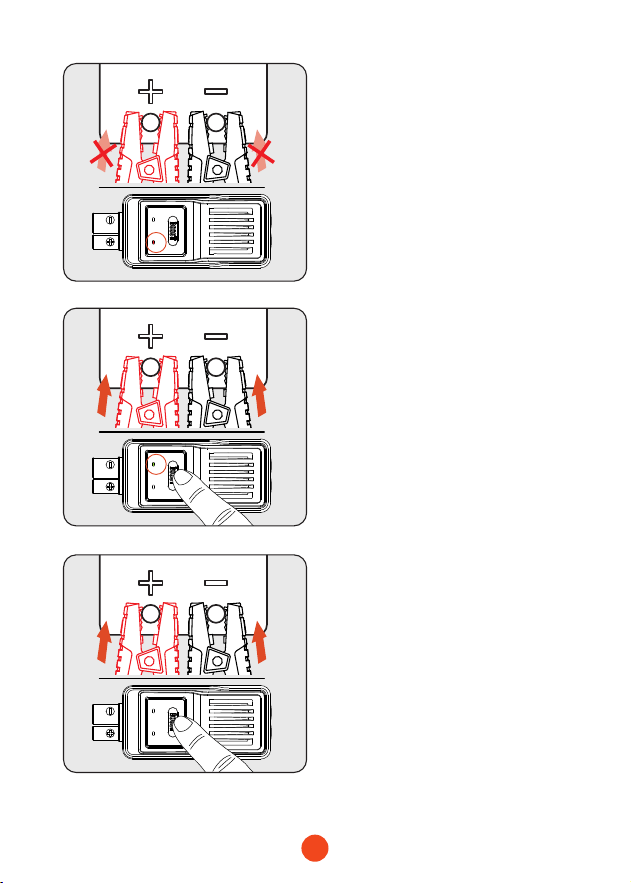
Feature 1: How to Sta a 12V Vehicle
(EnsureBatteLevel>50%)
2. Correctly connect the clamps to the car batte terminals,
red clamp to the positive terminal (+) and black clamp to the
negative terminal (-).
3. Follow the instructions provided by the clamp indicator lights
for the next steps.
correct
reverse
1. Inse the blue connector of the sma batte clamp into the
main unit, ensuring the clamp indicator light is o.
Green light steady on:
Indicates correct connection
and power supply, enabling
emergency staup.
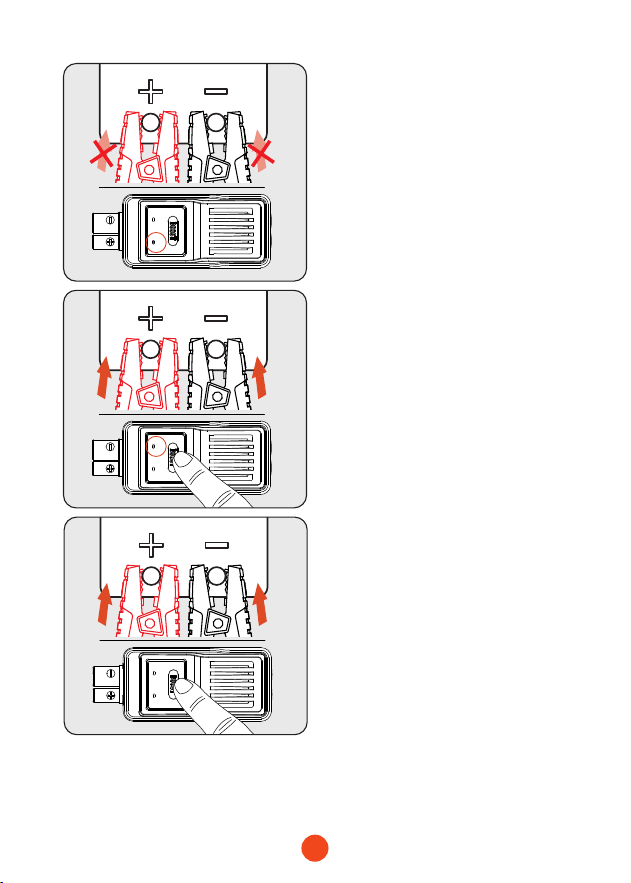
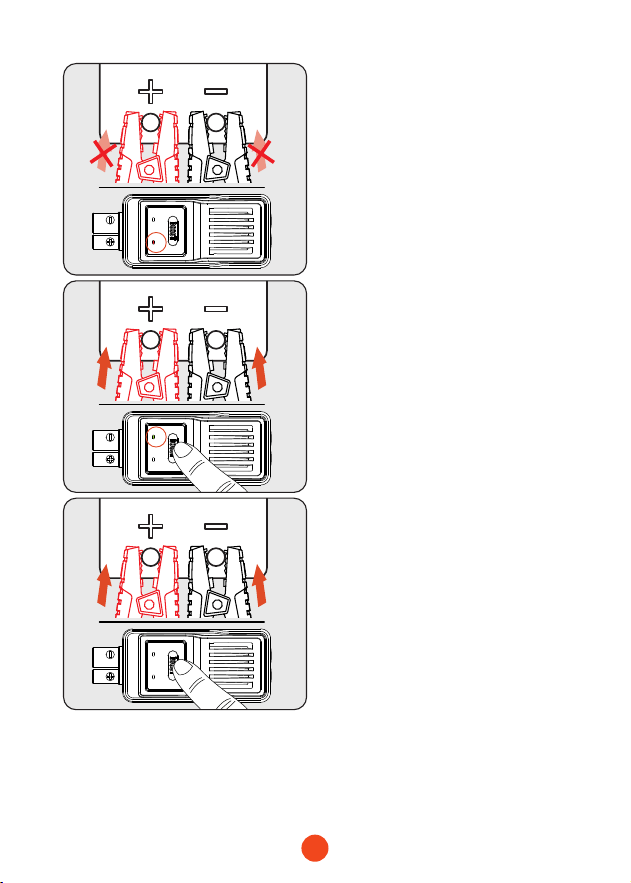
9
correct
reverse
correct
reverse
correct
reverse
4. Turn the car ignition switch to the START position.
5. After the car stas, remove the batte clamps.
Red light steady on:
Indicates incorrect polarity
connection. Please reconnect
correctly. Wait until the green
light is steady on before
peorming emergency
staup.
Green light ashing:
Indicates low batte voltage.
Press the BOOST button and
wait for the green light to
stay on steadily. Complete the
staup procedure within 30
seconds.
Neither red nor green light
is on:
Indicates the batte may be
completely damaged. Ensure
correct polarity connection,
then press the BOOST button.
Wait for the green light to
stay on steadily. Complete the
staup procedure within 30
seconds.
10
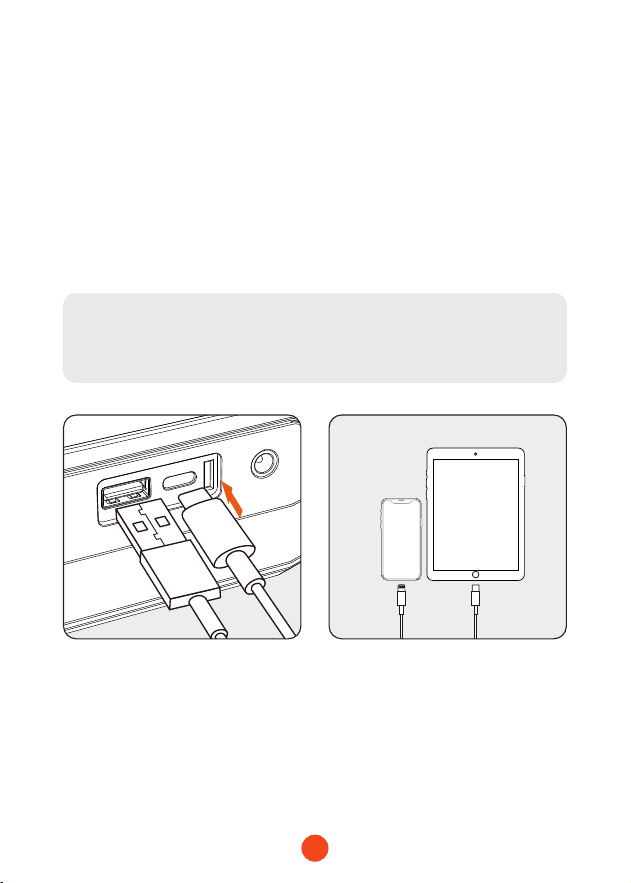
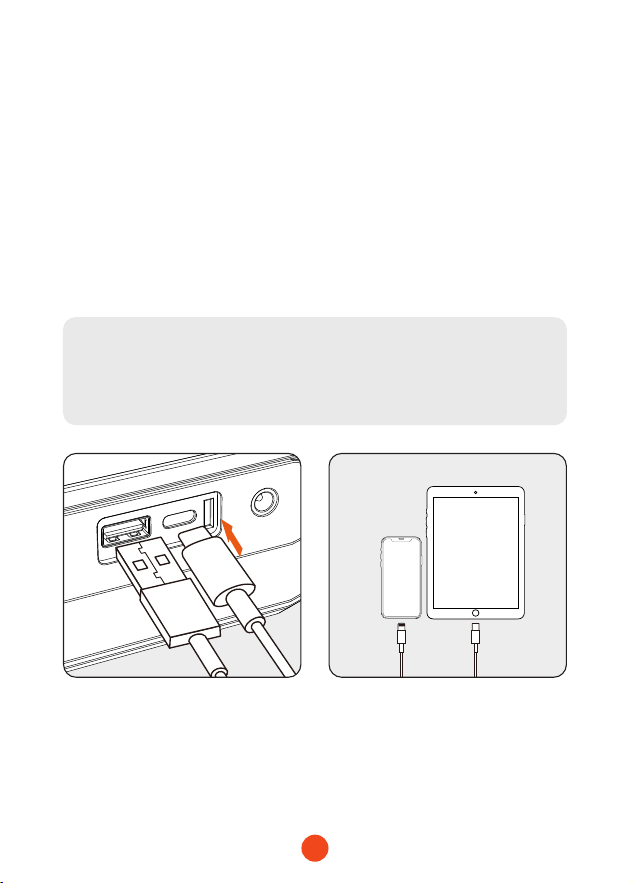
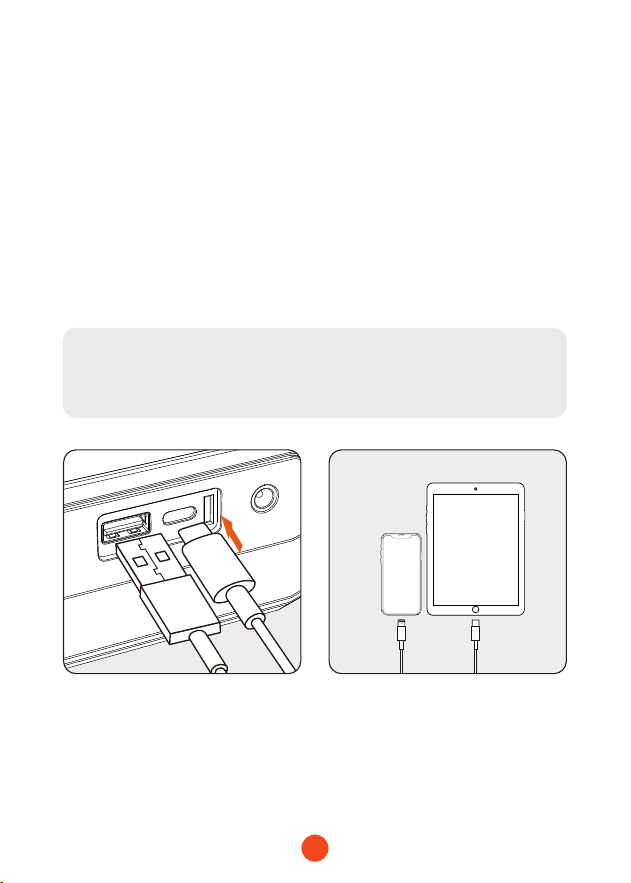
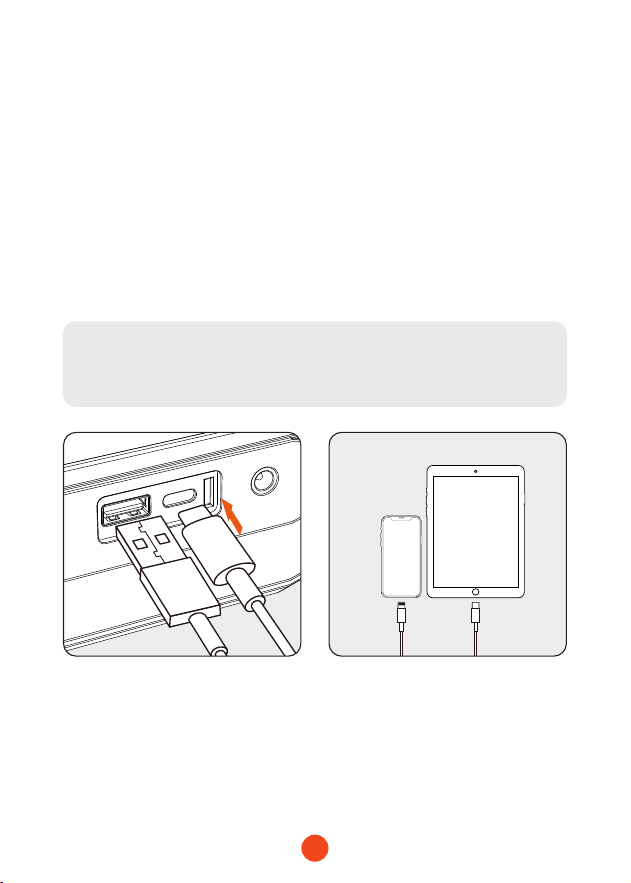
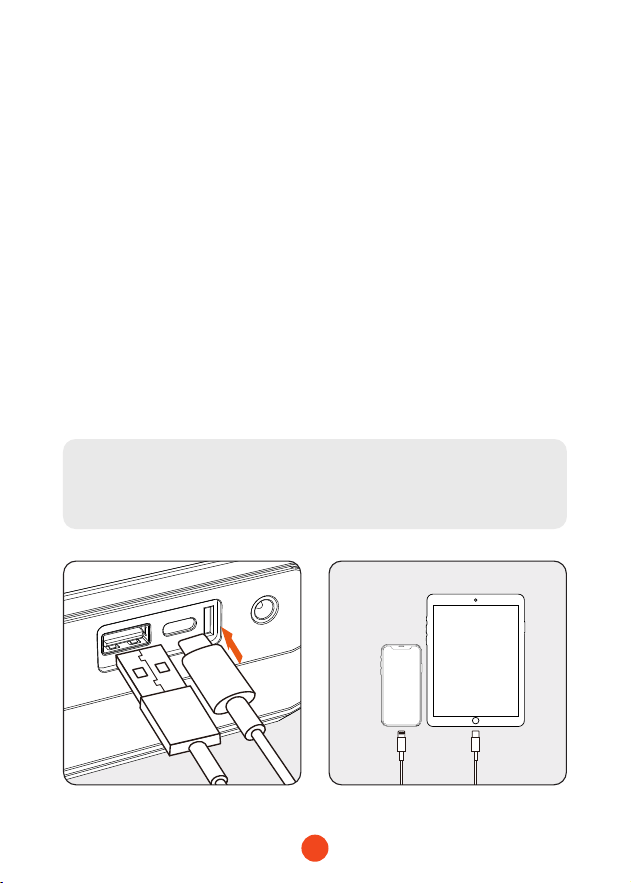
Feature 2: Charging Electronic Devices
such as Phones/Tablets
1. Connect the USB plug of the adapter cable to the USB-C
output po on the main unit.
2. Connect the charging head to the phone/tablet or other
electronic device.
3. Press and hold the power button for 3 seconds to turn on the
device and sta charging the electronic device.
Note:
Charging cannot occur if the device is not powered on.
11
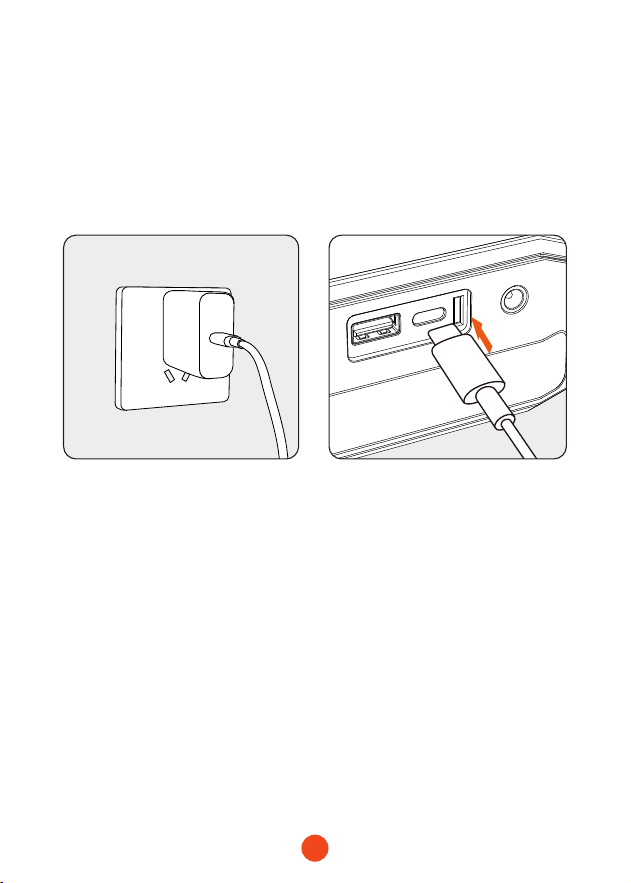
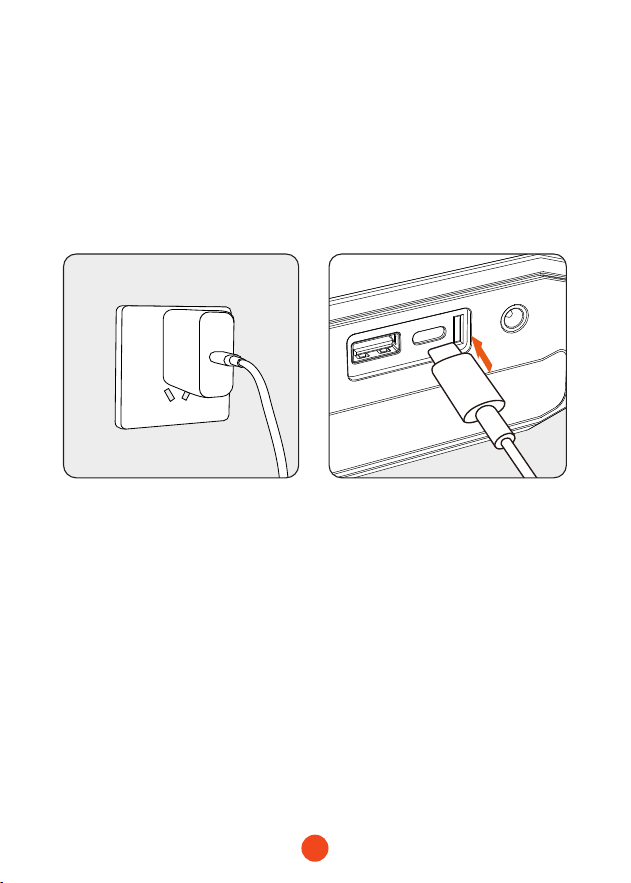
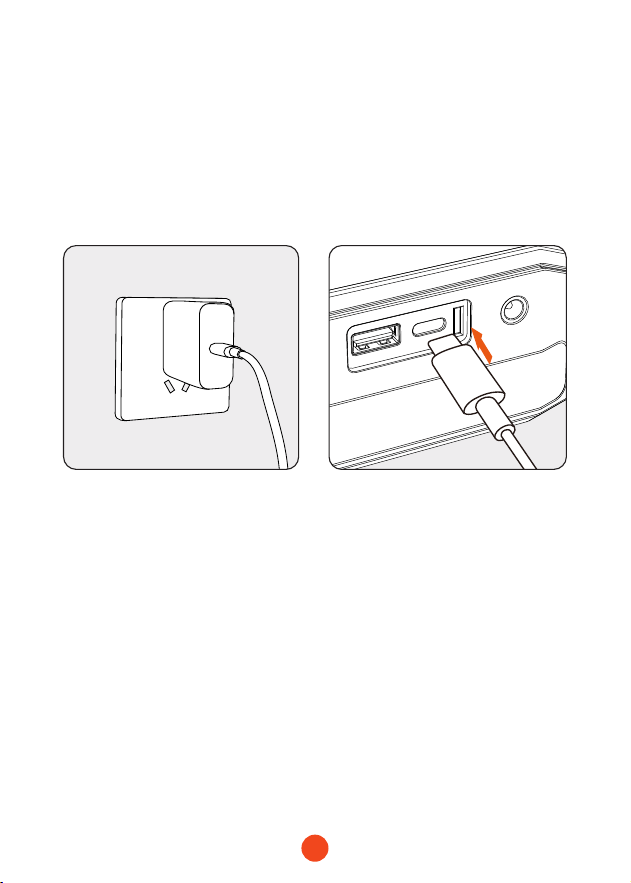
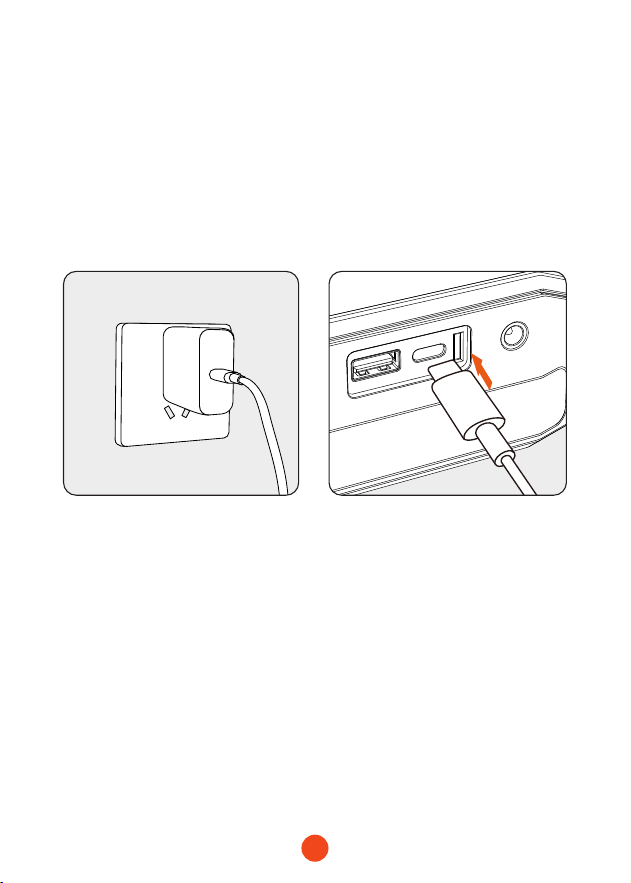
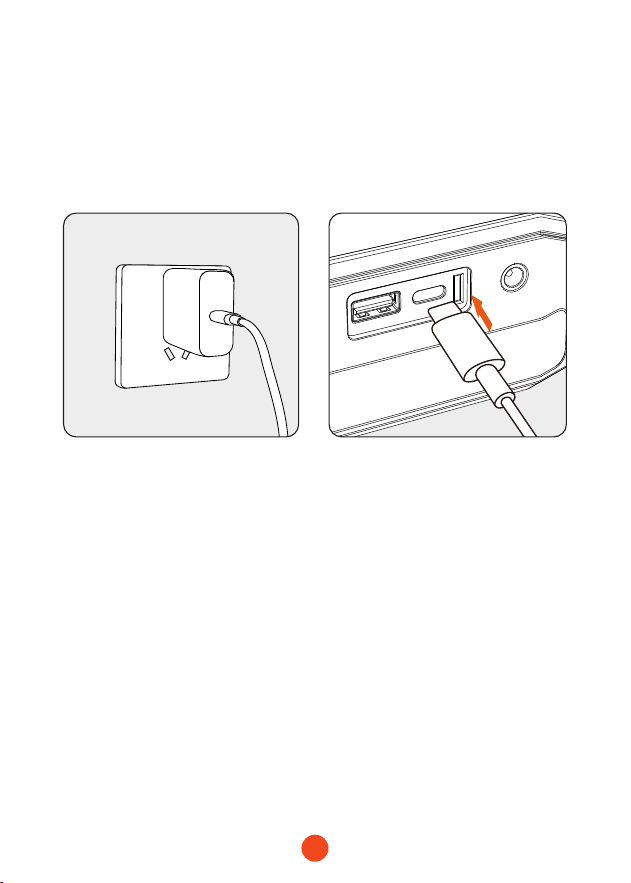
Feature 3: Charging the Main Unit
1. Connect the data cable to a suitable charger, then plug the
home charger into the charging outlet.
2. Inse the plug into the USB-C input po on the main unit.

12
Feature 4: Switching LED Light Modes
Note on Auto Shut-Down Mechanism:
To protect the batte life of the jump staer, we have
designed an automatic shut-down mechanism for
prolonged standby times:
1. If the light is on, the device will automatically shut down
after 4 hours.
2.
If the light is o and in standby mode, the device will
shut down after 2 minutes.
1. Press and hold the power button for 3 seconds, then press
the light button briey to activate the LED light function.
2. Briefly press the button to switch between light modes:
constant light, white ashing light, and SOS.
Note:
The LED ashlight cannot be used if the device is not
powered on.

13
Technical Specications
Model MegaVolt24 Air MegaVolt16 Air
BatteCapacity 88.8Wh/24000mAh 59.2Wh/16000mAh
StaCurrent 1000A 600A
PeakCurrent 4000A 3000A
USB-C
Input/Output
PD65W(5V/3A , 9V/3A , 12V/3A , 15V/3A , 20V/3.25A)
USB-AOutput QC3.0 18W(5V/3A,9V/2A,12V/1.5A)
DC Output 14V-16V
Operating
Temperature
-20℃ ~ 60℃ / -4℉ ~140℉
FullChargeTime 1.5-2 hours approx 1-1.5 hours approx
Dimensions
(L*W*H)
238.5*134*54.8mm
Weight 1550g 1410g

14
Frequently Asked Questions (FAQ)
・ How to turn o the jump staer?
Press the power button for 3 seconds to turn o or it will auto
shut down after 2 minutes of inactivity.
・ How long does it take to charge the MegaVolt24 Air/
MegaVolt16 Air?
--MegaVolt24 Air: Approximately 1.5-2 hours (using a PD65W
or higher charger)
--MegaVolt16 Air: Approximately 1-1.5 hours (using a PD65W
or higher charger)
・ Can I charge my phone or tablet with the main unit?
Yes, the main unit has a USB-A output po and a 65W input/
output fast charge po to charge any electronic device.
・ How many times can the jump staer & air pump combo
sta a car?
--MegaVolt24 Air: Approximately 40 times
--MegaVolt16 Air: Approximately 30 times
・ What is the lifespan of the main unit?
Under normal usage, it can last for 3-5 years.
・ How long can the main unit be stored without use and still
sta a car?
The unit is designed to retain charge for 6-12 months, but for
longer lifespan, it is recommended to charge it eve 3 months.
15
Error Information Cause Solution
Redlightsteady Clamps reversed Correct polarity
Green light
ashing
Low car batte voltage Use boost function
Redlightsteady
for30stheno
8 stas within 10 mins Wait 10 mins
Low temperature
protection below 0°C.
Protection is lifted
above 5°C.
Over-temperature
protection above 55°C.
Protection is lifted
below 45°C.
Error Information Cause Solution
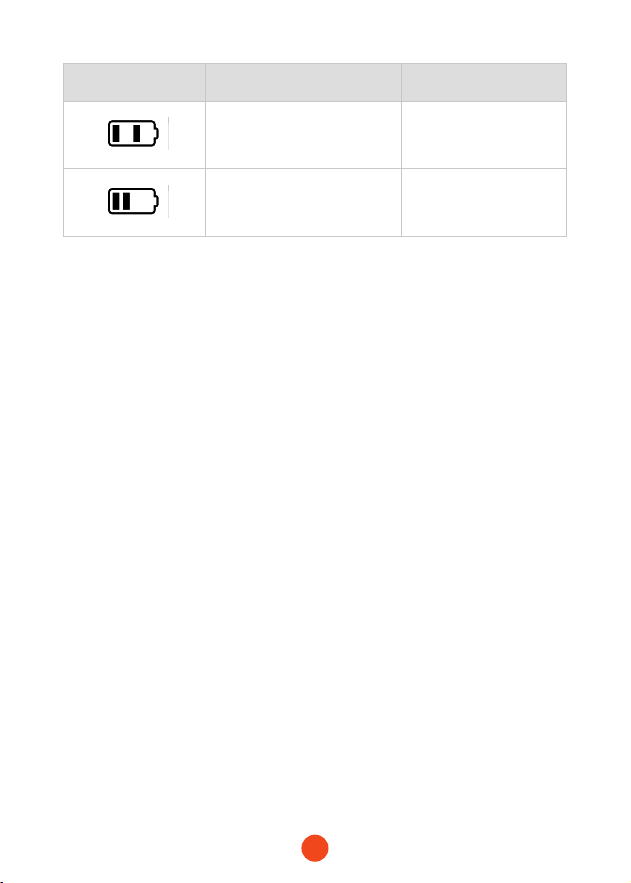
1 or 4 batte bars ashing,
high temp icon on.Suace
temp >120℃
Wait until temp <100℃
1 batte bar ashing.Over-
discharged batte
Charge the device
1 or 3 batte bars ashing.
Over-current or sho
circuit protection
Press power button to
clear
1 or 2 batte bars ashing.
Tire pressure not reaching
20kpa within 50 seconds
Check for leaks
Troubleshooting
If the following operations do not solve your issue, please stop
using the MegaVolt24 Air/MegaVolt16 Air and contact us.
・ Jump Staer Error Information/Causes/Solutions
・ Air Pump Error Information/Causes/Solutions

16
Warning
WOLFBOX Two (2) Year Limited Warranty
・ Read the manual carefully before using this product.
・This product is for 12V vehicle staing only. Using it on other
vehicles may be dangerous.
・Avoid reversing the polarity of the clamps, as it can cause a
sho circuit leading to internal cell overheating or even re.
・Do not use if the batte clamps or cables are damaged.
・Do not use as a replacement for a car batte.
・Do not leave the product connected to the car batte after
staing the vehicle.
・Before staing, ensure all batte terminals are clean and the
clamps are properly connected. Diy or corroded batte
terminals may reduce peormance.
・Do not sta the car more than 3 times in a row. Allow a 2-minute
inteal between stas to prevent overheating.
・After staing, remove the product from the car batte within
30 seconds to avoid damage.
・Do not sho-circuit the batte clamps.
・Keep out of reach of children.
・Do not use as a toy.
・Do not expose the product to water or immerse it in water.
・Do not operate the product in explosive environments, such as
near ammable liquids, gases, or dust.
・Do not modify or disassemble the product. Repairs should only
be peormed by qualied technicians.

17
・Do not expose the product to extreme heat or re.
・Ensure someone is within hearing range or close enough to help
you while using the product.
・Remove metallic accessories like rings, bracelets, and necklaces
before using the product.
・Do not drop the product. If the product suers an impact or
damage, have it inspected by a qualied batte technician.
・Do not store the product in environments with temperatures
exceeding 60°C (140°F).
・Charge the product only within a temperature range of 0°C to
45°C (32°F to 113°F).
・Do not sta the vehicle while charging the main unit.
・If the main unit leaks, dispose of it with appropriate measures.
・In extreme conditions, batte leakage may occur. If liquid leaks
from the product, do not handle it with bare hands. In case
of skin contact, wash immediately with soap and water. If it
contacts the eyes, rinse with cold running water for at least 10
minutes and seek medical attention.
・Dispose of lithium batte products according to local
regulations at the end of their life.
・After using the product to sta a vehicle, do not charge it
immediately.
・Do not use the clamps to power other equipment.

18
HelpCenter WhatsApp
WOLFBOX
For more information:
seice@wolox.com
https://wolox.com/contact-us
www.wolox.com
Customer Seice Center
If you have any problems with the function or installation, please
feel free to reach us.

19
Inhaltsübersicht
Vorsichtsmaßnahmen ....................
20
Packliste............................
21
KomponentenundFunktionEinführung...........
22
Schaltächenbeschreibungen ................
23
LED-AnzeigeBeschreibung ..................
25
TechnischeParameter.....................
31
HäuggestellteFragen...................
32
Fehlersuche ...........................
33
Warnungen...........................
34
Kunden-Seice-Center ....................
37

20
Vielen Dank, dass Sie sich für das Wolfox Sprungtuch mit
Luftkompressor Kompressor entschieden haben. Bitte lesen
Sie alle Anweisungen sorgfältig durch, bevor Sie das Gerät in
Betrieb nehmen und bewahren Sie diese Anleitung zum späteren
Nachschlagen auf, um eine optimale Benutzereahrung und
Ihre Sicherheit zu gewährleisten.
Vorsichtsmaßnahmen
Warmung
Dieses Gerät ist für Fahrzeuge (Geräte) mit 12V Batterien. Die
Verwendung mit anderen Batterietypen kann gefährlich sein.
Bitte lesen und verstehen Sie alle Sicherheitshinweise vor dem
Gebrauch.
Hinweis
Es wird empfohlen, das Produkt sofo nach Erhalt
aufzuladen!während Sie diese Anleitung lesen, können Sie
das Gerät mit dem mitgeliefeen Ladekabel auaden. über
das mitgeliefee Ladekabel auaden. (Dieses Produkt enthält
keinen Adapter)

21
Packliste
・
Gerät
・
Smar Batterieklemmen
・
Usb C zu Usb C
Ladegerät Kabel
・ Luftschlauch
・
Luftdüse
Französischameri-
kanische Düse
Amerikanisch
Nadel-Düse
Lange
amerikanische Düse
・
EVA-Pack
・
Benutzerhandbuch
22
Komponenten und Funktion Einleitung
5
5
4 4
3
4
7
6
8
9
10
11
2 3
2
1
1
Power/Infation Stern/
Stopp-Taste
Druckeinheit Schalter
Tasten zum Erhöhen/
Verringern des Drucks
LED-Taschenlampe
Schalterh
Bildschirm
Informationsanschluss
USB-A-Ausgangsanschluss
(QC3.05V/9V/12V))
USB-C Eingangs-/Ausgangsanschluss
(Maximale Leistung: PD65W)
12V Auto Star Anschluss
15V/10A
Ausgangsanschluss
Modus-Schalter

23
Schaltächenbeschreibungen
3
4
5
1
2
Sta-Information
Druckeinheit
Druck einstellen
Einschalten
Indikationen
Drücken Sie kurz die Einschalttaste, um die Information zu
staen; drücken Sie erneut, um zu beenden.
Drücken Sie kurz die Taste „PSI“, um die Druckeinheit zu wechseln;
Drücken Sie kurz die Taste „M“, um den Modus zu wechseln.
Verwenden Sie die Tasten „+“ und „-“, um den voreingestellten
Druckwe einzustellen.
1. Einheiten: KPA: ±5; BAR: ±0,1; PSI: ±1; kg/cm²: ±0,1
2. Halten Sie die Taste 1 Sekunde lang gedrückt, um den
voreingestellten We schnell einzustellen. Wenn der
Maximalwe erreicht ist, keh er zum Minimalwe zurück und
umgekeh.
Drücken Sie die Einschalttaste für 2 Sekunden, um das Gerät
einzuschalten. Auf dem Bildschirm werden der Batteriestand
und der aktuelle Druck angezeigt, zusammen mit dem
voreingestellten Druck und der entsprechenden Einheit und
Modus.
Nach dem Einschalten leuchten alle Anzeigeleuchten 1 Sekunde
lang auf und zeigen dann den Batteriestand, die Moduseinheit,
den voreingestellten Druck und den aktuellen Druck an.
・ Ursprüngliche Einheit: PSI
・ Auto-Modus: Anfangswe: 36PSI, Min: 26PSI, Max: 50PSI
Motorrad-Modus: Anfangswe: 31PSI, Min: 26PSI, Max: 43PSI
Fahrrad-Modus: Anfangswe: 44PSI, Min: 30PSI, Max: 145PSI
Kugel-Modus: Anfangswe: 9PSI, Min: 4PSI, Max: 16PSI
Benutzerdenieer Modus: Anfangswe: 21PSI, Min: 7PSI, Max: 160PSI

24
6
Temperaturschutz
・ Wenn die Akkutemperatur 55 °C erreicht, wird der
Temperaturschutz aktivie. Wenn die Temperatur auf 45 °C
sinkt, wird der Schutz aufgehoben und der Ladevorgang
kann beginnen. Das Symbol für hohe Temperaturen ist im
Schutzmodus heorgehoben.
・ Wenn die Akkutemperatur unter 0 °C fällt, wird der
Temperaturschutz während des Ladevorgangs aktivie. Steigt
sie über 5°C, wird der Schutzaufgehoben und der Ladevorgang
kann beginnen. Das Symbol für niedrige Temperatur ist während
des Schutzes heorgehoben. Wenn der NTC die Verbindung
unterbricht, wird der Tieftemperaturschutz aktivie und die
Ausgabe verhinde. Nach der Auebung wird die Ausgabe
wieder aufgenommen, und das Symbol ist heorgehoben.
7
Geräte auaden
Wenn der Jump-Staer eingeschaltet ist und sowohl USB-C als
auch USB-A angeschlossen sind, lädt das Gerät externe Geräte
(Telefon, Tablet usw.) auf.
・ Beide Motoren können gleichzeitig arbeiten. Die Anzeigen
„OUT“ und „Batteriestand“ leuchten.
・ Das Entfernen eines Trägers hat keine Auswirkungen auf den
anderen.
・ Wenn sowohl USB-A als auch USB-C entfernt werden, schaltet
sich das Gerät nach 90 Sekunden automatisch ab.
・ Wenn das Gerät während des Ladevorgangs ausgeschaltet
wird, wird der Ladevorgang des externen Geräts
unterbrochen. Beim Wiedereinschalten wird der Ladevorgang
fogesetzt.
25
LED-Anzeige Anweisungen
2
5
3
4
1
1 2
8
Batteriestand
Modi:Auto/Motorrad/
Fahrrad/Ball
Eingabe
3 4
109
We in Echtzeit Voreingestellter We
Alarm bei hoher TemperaturAlarm bei niedriger Temperatur
5
7
6
Druckeinheit
Ausgabe
Schnelllade-Indikator
6 9
10
7 8

26
Merkmal 1: Wie man ein 12V-Fahrzeug
staet
(GarantieerBatteriestand>50%)
correct
reverse
1. Stecken Sie den blauen Stecker der smar-Batterieklemme
in das Hauptgerät und achten Sie darauf, dass die
Kontrollleuchte der Klemme leuchtet.
2. Schließen Sie die Klemmen richtig an die Pole der
Autobatterie an, die rote Klemme an den Pluspol (+) und die
schwarze Klemme an den Minuspol (-).
3. Folgen Sie den Anweisungen der Kontrollleuchten der Klemme
für die nächsten Schritte.
Grünes Licht leuchtet
konstant:
Zeigt den korrekten
Anschluss und die korrekte
Stromversorgung an
und ermöglicht eine
Notinbetriebnahme.

27
correct
reverse
correct
reverse
correct
reverse
4. Drehen Sie den Zündschalter des Fahrzeugs in die START-Stellung.
5. Nachdem das Auto abgekühlt ist, entfernen Sie die Batterieklammern.
Rotes Licht leuchtet konstant:
Zeigt an, dass der Anschluss
falsch gepolt ist. Bitte
schließen Sie es wieder richtig
an. Waen Sie, bis das grüne
Licht konstant leuchtet, bevor
Sie die Notinbetriebnahme
durchführen.
Grünes Licht blinkt:
Zeigt eine niedrige
Batteriespannung an.Drücken
Sie die BOOST-Taste und
waen Sie, bis das grüne Licht
konstant leuchtet. Schließen
Sie den Stavorgang innerhalb
von 30 Sekunden ab.
Weder rotes noch grünes
Licht leuchtet:
Zeigt an, dass der Akku
möglicherweise vollständig
beschädigt ist. Vergewissern Sie
sich, dass der Akku richtig gepolt
ist, und drücken Sie dann die
BOOST-Taste. Waen Sie, bis die
grüne Lampe konstant leuchtet.
Schließen Sie den Stavorgang
innerhalb von 30 Sekunden ab.
28
Funktion 2: Auaden von elektronischen
Geräten wie Handys/Tablets
1. Verbinden Sie den USB-Stecker des Adapterkabels mit dem
USB-C Ausgang am Hauptgerät an.
2. Schließen Sie den Ladekopf an das Telefon/Tablet oder ein
anderes el ektronischen Gerät an.
3. Halten Sie die Einschalttaste 3 Sekunden lang gedrückt,
um das Gerät einzuschalten Gerät einzuschalten und den
Ladevorgang des elektronischen Geräts zu staen.
Anmerkung:
Der Ladevorgang kann nicht eolgen, wenn das Gerät
nicht eingeschaltet ist.
29
Funktion 3: Auaden des Hauptgeräts
1. Schließen Sie das Datenkabel an ein geeignetes Ladeger ät
an und stecken Sie dann das Ladegerät in die Ladestation ein.
2. Stecken Sie den Stecker in die USB-C-Eingangsbuchse am
Hauptgerät.

30
Merkmal 4: Umschaltbare LED-Lichtmodi
Hinweis zum Mechanismus der automatischen
Abschaltung:
Um die Lebensdauer der Batterie des Sprungstaers
zu schützen, haben wir haben wir einen automatischen
Abschaltmechanismus für längeren Standby-Zeiten
entwickelt:
1. Wenn das Licht eingeschaltet ist, schaltet sich das Gerät
nach 4 Stunden automatisch ab.
2. Wenn das Licht aus und im Standby-Modus ist, schaltet
sich das Gerä t nach 2 Minuten ab.
1. Halten Sie die Einschalttaste 3 Sekunden lang gedrückt
und drücken Sie dann die Lichttaste kurz, um die LED-
Lichtfunktion zu aktivieren.
2. Drücken Sie kurz auf die Taste, um zwischen den Lichtmodi
zuwechseln: Dauerlicht, weißes Blinklicht und SOS
Anmerkung:
Das LED-Fashlight kann nicht verwendet werden, wenn
das Gerät nicht eingeschaltet ist.

31
Technische Spezikation
Modell MegaVolt24 Air MegaVolt16 Air
Batteriekapazität 88.8Wh/24000mAh 59.2Wh/16000mAh
StaStrom 1000A 600A
Spitzenstrom 4000A 3000A
USB-C Eingang/
Ausgang
PD65W(5V/3A , 9V/3A , 12V/3A , 15V/3A , 20V/3.25A)
USB-A-Ausgang QC3.0 18W(5V/3A,9V/2A,12V/1.5A)
DC-Ausgang 14V-16V
Betriebstem
peratur
-20℃ ~ 60℃ / -4℉ ~140℉
FullChargeTime 1.5-2 hours approx 1-1.5 hours approx
Abmessung
en(L*B*H)
238.5*134*54.8mm
Gewicht 1550g 1410g

32
Häug gestellte Fragen (FAQ)
・ Wie schaltet man den Jump Starer aus?
Drücken Sie die Einschalttaste 3 Sekunden lang, um das Gerät
auszuschalten, oder es schaltet sich nach 2 Minuten
Inaktivität automatisch ab.
・ Wie lange daue es, den MegaVolt24 Air/MegaVolt16 Air
aufzuladen?
--MegaVolt24 Luft: Ungefähr 1,5-2 Stunden (mit einem PD65W
oder höheres Ladegerät)
--MegaVolt16 Air: Ungefähr 1-1,5 Stunden (bei Verwendung
eines PD65W oder höheres Ladegerät)
・Kann ich mein Handy oder Tablet mit dem Hauptgerät
auaden?
Ja, das Hauptgerät veügt über einen USB-A-Ausgang und
einen 65-W-Eingangs-/Ausgangs-Schnellladeanschluss zum
Auaden aller elektronischen Geräte.
・Wie oft kann die Kombination aus Stahilfe und Luftpumpe
ein Auto staen?
--MegaVolt24 Air: Ungefähr 40-mal
--MegaVolt16 Air: Ungefähr 30-mal
・Wie lange ist die Lebensdauer des Hauptgeräts?
Bei normalem Gebrauch kann es 3-5 Jahre halten.
・Wie lange kann die Haupteinheit ohne Benutzung gelage
werden und trotzdem ein Auto steuern?
Das Gerät ist so konzipie, dass die Ladung für 6-12 Monate
erhalten bleibt, aber für eine längere Lebensdauer wird
empfohlen, es alle 3 Monate aufzuladen.
33
Fehlerinformationen Ursache Lösung
Redlightsteady Klammern umgedreht Richtige Polarität
GrünesLichtblinkt
Niedrige Spannung der
Autobatterie
Boost-Funktion
verwenden
RotesLichtkonstant
für30sdannvon
8 Sterne innerhalb von 10
Min
10 Min. waen
Schutz vor niedrigen
Temperaturen unter 0°C
Der Schutz wird
oberhalb von 5°C
aufgehoben
Übeemperatur schutz
über 55°C
Unter 45°C wird der
Schutz aufgehoben
Fehlersuche
If the following operations do not solve your issue, please
stop Wenn die folgenden Maßnahmen Ihr Problem nicht lösen,
verwenden Sie bitte das MegaVolt24 Air/MegaVolt16 Air nicht
mehr und kontaktieren Sie uns.
・ Jump Starer Fehler Informationen/Ursachen/
Lösungen
34
Warnung
WOLFBOX Zwei (2) Jahre beschränkte Garantie
・ Lesen Sie das Handbuch sorgfältig durch, bevor Sie dieses
Produkt verwenden.
・ Dieses Produkt ist nur für den Betrieb an 12V-Fahrzeugen
geeignet. Die Verwendung für andere Fahrzeuge kann
gefährlich sein.
・ Vermeiden Sie die Verpolung der Klemmen, da dies zu einem
Kurzschluss verursachen, der zu einer Überhitzung der Zelle
oder sogar zu einem Brand führen kann.
・ Nicht verwenden, wenn die Batterieklemmen oder Kabel
beschädigt sind.
・ Nicht als Ersatz für eine Autobatterie verwenden
Fehlerinformationen Ursache Lösung
1 oder 4 Teigbalken blinken,
das Symbol für hohe
Temperatur leuchtet auf.
Surace Temperatur >120
Waen, bis
Temperatur <100
1 Batterieleiste blinkt,
Batterie ist überladen
Das Gerät auaden
1 oder 3 Batterieleisten,
Überstrom- oder
Kurzschlussschutz
Drücken Sie die
Netztaste zum
Löschen
1 oder 2 Rührstäbe brechen
ab, der Reifendruck erreicht
nicht innerhalb von 50
Sekunden 20kpa
Auf undichte Stellen
prüfen
・ Luftpumpenfehler Informationen/Ursachen/
Lösungen

35
・ Lassen Sie das Produkt nach dem Staen des Fahrzeugs nicht
an der Autobatterie nach dem Staen des Fahrzeugs.
・ Vergewissern Sie sich vor dem Sta, dass alle Batteriepole sauber
sind und die Klemmen richtig angeschlossen sind. Verschmutzte
oder korrodiee Batterie Pole können die Leistung verringern.
・ Staen Sie das Fahrzeug nicht öfter als 3 Mal hintereinander.
Lassen Sie zwischen den Stas eine 2-Minuten zwischen den
Stas, um eine Überhitzung zu vermeiden.
・ Trennen Sie das Produkt nach dem Sta innerhalb von 30
Sekunden von der Autobatterie, um Schäden zu vermeiden.
・ Do not sho-circuit the batte clamps.
・ Außerhalb der Reichweite von Kindern auewahren.
・ Nicht als Spielzeug verwenden.
・ Setzen Sie das Produkt nicht dem Wasser aus und tauchen Sie
es nicht in Wasser.
・ Betreiben Sie das Produkt nicht in explosionsgefährdeten.
・ Umgebungen, z. B. in der Nähe von brennbaren Flüssigkeiten,
Gasen oder Staub.
・ Das Produkt da nicht verände oder zerlegt werden.
・ Reparaturen sollten nur nur von qualizieen Technikern
durchgefüh werden.
・ Setzen Sie das Produkt nicht extremer Hitze oder Feuer aus.
・ Vergewissern Sie sich, dass eine Person in Hörweite oder in der
・ Nähe ist, die Ihnen während Sie das Produkt benutzen.
・ Legen Sie metallische Accessoires wie Ringe, Armbänder und
Halsketten ab bevor Sie das Produkt benutzen.
・ Lassen Sie das Produkt nicht fallen. Wenn das Produkt

36
einen Aufprall oder beschädigt wird, lassen Sie es von einem
qualizieen Akkutechniker überprüfen.
・ Lagern Sie das Produkt nicht in Umgebungen mit Temperaturen
die 60°C (140°F) überschreiten.
・ Laden Sie das Produkt nur innerhalb eines Temperaturbereichs
von 0°C bis 45°C (32°F bis 113°F).
・ Staen Sie das Fahrzeug nicht, während Sie das Hauptgerät
auaden.
・ Wenn das Hauptgerät ausläuft, entsorgen Sie es mit geeigneten
Maßnahmen.
・ Unter extremen Bedingungen kann es zum Auslaufen der
Batterie kommen. Wenn Flüssigkeit aus dem Produkt ausläuft,
fassen Sie es nicht mit bloßen Händen an. Bei Hautkontakt
sofo mit Wasser und Seife waschen. Bei Berührung mit den
Augen mindestens 10 Minuten lang mit ießendem kaltem
Wasser ausspülen und einen Minuten ausspülen und einen Arzt
aufsuchen.
・ Dispose of lithium batte products according to local
regulations at the end of their life.
・ Nach der Verwendung des Produkts zum Staen eines
Fahrzeugs da es nicht sofo aufgeladen werden.
・ Verwenden Sie die Klemmen nicht zur Stromversorgung
anderer Geräte.

37
HelpCenter WhatsApp
WOLFBOX
Für weitere Informationen:
seice@wolox.com
https://wolox.com/contact-us
www.wolox.com
Kunden-Seice-Center
Sollten Sie Probleme mit der Funktion oder der Installation haben,
können Sie sich gerne an uns wenden.

38
Table des matières
Précautions..........................
39
Listed'emballage.......................
40
ComposantsetfonctionsIntroduction..........
41
Descriptiondel'achageLED ................
44
Spécicationstechniques ..................
50
Questionsfréquemmentposées..............
51
Dépannage ..........................
52
Aveissements.........................
53
Centredeseiceàlaclientèle...............
56

39
Nous vous remercions d'avoir choisi l'étoile de saut Wolfox
avec compresseur d'air. An d'assurer une bonne expérience
utilisateur et votre sécurité, veuillez lire attentivement toutes les
instructions avant d'utiliser ce produit et conseez ce manuel
pour toute référence ultérieure.
Précautions
Aveissement
Cet appareil est conçu pour les véhicules (équipements)
équipés de batteries de 12V. Son utilisation avec d'autres types
de batteries peut être dangereuse. Veuillez lire et comprendre
toutes les informations relatives à la sécurité avant d'utiliser
l'appareil.
Remarque
Es wird empfohlen, das Produkt sofo nach Erhalt
aufzuladen!während Sie diese Anleitung lesen, können Sie
das Gerät mit dem mitgeliefeen Ladekabel auaden. über
das mitgeliefee Ladekabel auaden. (Dieses Produkt enthält
keinen Adapter)

40
Liste de colisage
・
Device
・
Pinces à batterie intelligentes
・
Câble de chargement
Usb C à Usb C
・ Tuyau d'air
・
Buse d'air
Français à
Buse américaine
Américain
Buse à aiguille
Longues
Buse américaine
・
Pack EVA
・
Manuel de l'utilisateur
41
Composants et fonctions Introduction
5
5
4 4
3
4
7
6
8
9
10
11
2 3
2
1
1
Bouton Marche/ Arrêt
de l' alimentation/Infos
Interrupteur de l'unité de
pression
Augmentation de la pression/
Boutons de réduction
Interrupteur de la
lampe de poche LED
Écran d'achage
Po d'Ination
Po de soie USB-A
(QC3.05V/9V/12V)
Po d'entrée/soie USB-C (Puissance
maximale : PD65W)
Po étoile 12V pour
voiture
15V/10A Po de soie
Commutateur de mode

42
Description des boutons
3
4
5
1
2
Début de l'ination
Unité de pression
Ajuster la pression
Mise sous tension
Indications
Appuyez brièvement sur le bouton d'alimentation pour lancer le
gonage ; appuyez à nouveau pour l'arrêter. pour arrêter.
Appuyez brièvement sur la touche « PSI » pour changer d'unité
de pression ; appuyer brièvement sur la touche « M » pour
changer de mode.
Les boutons « + » et « - » permettent de régler la valeur de la
pression préréglée.
1. Unités : KPA : ±5 ; BAR : ±0,1 ; PSI : ±1 ; kg/cm² : ±0,1
2. Ppuyez sur la touche et maintenez-la enfoncée pendant 1
seconde pour régler rapidement la valeur préréglée.Si la
valeur maximale est atteinte, elle revient à la valeur minimale
et vice versa.
Appuyez sur le bouton d'alimentation pendant 2 secondes
pour allumer l'appareil. L'écran ache le niveau de la batterie
et la pression actuelle, ainsi que la pression préréglée et l'unité
et le mode correspondants.
Lors de la mise sous tension, tous les voyants s'allument
pendant 1 seconde, puis achent le niveau de batterie, l'unité de
mode, la pression préréglée et la pression actuelle.
・ Unité initiale: PSI
・ Mode voiture:Valeur initiale : 36PSI, Min : 26PSI, Max : 50PSI
Mode moto: Valeur initiale : 31PSI, Min : 26PSI, Max : 43PSI
Mode bicyclette: Valeur initiale : 44PSI, Min : 30PSI, Max : 145PSI
Mode Balle : Valeur initiale : 9PSI, Min : 4PSI, Max : 16PSI
Mode personnalisé: Valeur initiale : 21PSI, Min : 7PSI, Max : 160PSI

43
6
Protection de la température
・ Lorsque la température de la batterie atteint 55°C, la protection
thermique s'active. Lorsqu'elle redescend à 45°C, la protection
est levée, ce qui permet la charge. L'icône de température élevée
est mise en évidence en mode de protection.
・ Lorsque la température de la batterie descend en dessous de 0°C,
la protection contre la température s'active pendant la charge.
Lorsqu'elle dépasse 5°C, la protection est levée, ce qui permet
la charge. L'icône de basse température est mise en évidence
pendant la protection. Si le NTC se déconnecte, la protection
contre les basses températures s'active, interdisant la soie.
Lorsqu'elle est levée, la soie reprend et l'icône est mise en
évidence.
7
Dispositifs de chargement
Lorsque le jump starer est sous tension, si les deux pos
USB-C et USB-A sont connectés, l'appareil rechargera les
appareils externes (téléphone, tablette, etc.).
・Les deux pos peuvent fonctionner simultanément. Les
indicateurs « OUT » et « Batte Level » sont allumés.
・La suppression d'un por n'aectera pas l'autre.
・Si l'USB-A et l'USB-C sont retirés, l'appareil s'éteint
automatiquement au bout de 90 secondes.
・Si l'appareil est éteint pendant la charge, il arrêtera de charger
l'appareil externe. l'appareil externe. Lorsqu'il est rallumé, il
reprend la charge.

44
Instructions relatives à l'achage LED
2
5
3
4
1
1 2
8
Niveau de la batterie
Modes:
Voiture/moto/bicyclette/balle
Entrée
3 4
109
Real-Time value Valeur prédénie
Alarme de température élevéeAlarme de basse température
5
7
6
Unité de pression
Soie
Indicateur de charge rapide
6 9
10
7 8
45
Aicle 1 : Comment démarrer un véhicule
12V
(S'assurerqueleniveaudelabatterie>50%)
correct
reverse
1. Insérez le connecteur bleu de la pince à piles smar dans l'unité
principale, en veillant à ce que le voyant de la pince soit
allumé.
2. Connectez correctement les pinces aux bornes de la batterie
de la voiture, la pince rouge à la borne positive (+) et la pince
noire à la borne négative (-).
3. Suivez les instructions fournies par les voyants de la pince
pour les étapes suivantes.
Le voyant ve est allumé en
permanence :
Indique que la connexion et
l'alimentation sont correctes,
ce qui permet un démarrage
d'urgence.

46
correct
reverse
correct
reverse
correct
reverse
4. Mettez le commutateur d'allumage de la voiture en position START.
5. Après le démarrage de la voiture, retirer les colliers de serrage.
Le voyant rouge est allumé
en permanence :
Indique une connexion de
polarité incorrecte. Veuillez
la reconnecter correctement.
Attendez que le voya nt ve
soit allumé en permanence
avant de procéder au
démarrage d'urgence.
Clignotement du feu ve :
Indique que la tension de la
batterie est faible. Appuyez
sur le bouton BOOST et
attendez que le voyant ve
reste allumé en permanence.
Terminez la procédure de
démarrage dans les 30
secondes.
Ni le feu rouge ni le feu ve
n'est allumée :
Indique que la batterie peut être
complètement endommagée.
Veillez à ce que la polarité soit
correcte, puis appuyez sur le
bouton BOOST. Attendez que
le voyant ve reste allumé
en permanence. Terminez la
procédure de procédure de
démarrage dans les 30 secondes.
47
Aicle 2 : Charger les appareils électroniques
tels que les téléphones/tablettes
1. Connectez la che USB du câble adaptateur au po de soie
USB-C de l'unité principale.
2. Connectez la tête de charge au téléphone/tablette ou à un
autre appareil électronique.
3. Appuyez sur le bouton d'alimentation et maintenez-le enfoncé
pendant 3 secondes pour allumer l 'appareil et commencer à
charger l'appareil électronique.
Note:
Charging cannot occur if the device is not powered on.
48
Fonctionnalité 3 : Chargement de l'unité
principale
1. Connectez le câble de données à un chargeur approprié, puis
branchez le chargeur domestique sur la prise de charge.
2. Insérez la che dans le po d'entrée USB-C de l'unité
principale.

49
Fonctionnalité 4 : commutation des modes
d'éclairage LED
Note sur le mécanisme d'arrêt automatique :
Pour protéger la durée de vie de la batterie du jump starer,
nous avons conçu un mécanisme d'arrêt automatique en
cas de en cas de veille prolongée :
1. Si la lumière est allumée, l'appareil s'éteint
automatiquement après 4 heures.
2. Si le voyant est éteint et en mode veille, l' appareil s'
éteint aprè s 2 minutes.
1. Appuyezsurleboutond 'alimentation et maintenez-le enfoncé
pendant 3 secondes, puis appuyez bri èvement sur le bouton
d 'éclairage pour activer la fonction d'éclairage par DEL.
2. Appuyez bri èvement sur le bouton pour passer d'un mode
d'éclairage à l'autre : lumi ère constante, lumi ère blanche
clignotante et SOS.
Remarque:
La lampe de poche LED ne peut pas être utilisée si l'appareil
n'est pas sous tension.

50
Spécications techniques
Modèle MegaVolt24 Air MegaVolt16 Air
Capacitédela
batterie
88.8Wh/24000mAh 59.2Wh/16000mAh
Début Courant 1000A 600A
Courantdepointe 4000A 3000A
Entrée/soie
USB-C
PD65W(5V/3A , 9V/3A , 12V/3A , 15V/3A , 20V/3.25A)
SoieUSB-A QC3.0 18W(5V/3A,9V/2A,12V/1.5A)
SoieDC 14V-16V
Température
d'utilisation
-20℃ ~ 60℃ / -4℉ ~140℉
Tempsdecharge
complet
1.5-2 heures environ 1-1.5 heures environ
Dimensions
(L*W*H)
238.5*134*54.8mm
Poids 1550g 1410g

51
Foire aux questions (FAQ)
・ Comment éteindre le démarreur ?
Appuyez sur le bouton d'alimentation pendant 3 secondes pour
l'éteindre ou il s'éteindra automatiquement après 2 minutes
d'inactivité.
・ Combien de temps faut-il pour charger le MegaVolt24/
MegaVolt16 Air ?
--MegaVolt24 Air : Environ 1.5 à 2 heures (avec un chargeur
PD65W ou supérieur)
--MegaVolt16 Air : Environ 1 à 1.5 heure (avec un chargeur
PD65W ou supérieur)
・ Puis-je charger mon téléphone ou ma tablette avec l'unité
principale ?
Oui, l'unité principale dispose d'un po de soie USB-A et
d'un po de charge rapide d'entrée/soie de 65 W pour
chargern'impoe quel appareil électronique.
・ Combien de fois le combo démarreur et pompe à air peut-il
démarrer une voiture ? démarrer une voiture ?
--MégaVolt24 Air : Environ 40 fois
--MegaVolt16 Air : Environ 30 fois
・ Quelle est la durée de vie de l'unité principale ?
Dans des conditions normales d'utilisation, il peut durer de 3à 5
ans.
・ Pendant combien de temps l'unité principale peut-elle être
stockée sans être utilisée et démarrer une voiture ? démarrer
une voiture ?
L'appareil est conçu pour conseer sa charge pendant 6
à12 mois, mais pour une durée de vie plus longue, il est
recommandé de le recharger tous les 3 mois.
52
Informations sur les
erreurs
Cause Solution
Lumièrerougexe Clamps reversed Correct polarity
Feuveclignotant Low car batte voltage Use boost function
Levoyantrougereste
allumépendant30
secondes,puiss'éteint.
8 stas within 10 mins Wait 10 mins
Low temperature
protection below 0°C.
Protection is lifted
above 5°C.
Over-temperature
protection above 55°C.
Protection is lifted
below 45°C.
Informations sur
les erreurs
Cause Solution
1 ou 4 barres de pâte à frire
clignotent, l'icône de
température élevée est
allumée. température
ambiante >120
Attendre jusqu'à ce
que la température
soit <100
1 barre de batterie
clignotante.batterie trop
déchargée
Charger l'appareil
Dépannage
Si les opérations suivantes ne résolvent pas votre problème,
veuillez cesser d'utiliser le MegaVolt24 Air/MegaVolt16 Air et
nous contacter.
・ Erreurs du démarreurur de démarrage Information/
Causes/Solutions
・ Erreur de la pompe à air Informations/Causes/
Solutions
53
Informations sur
les erreurs
Cause Solution
1 ou 3 barres de batterie
clignotantes Protection
contre les surintensités et
les cous-circuits
Appuyer sur le bouton
d'alimentation pour
eacer
1 ou 2 barres de batterie
clignotent. La pression des
pneus n'atteint pas 20 kpa
dans les 50 secondes.
Vérier l'étanchéité
Aveissement
WOLFBOX Garantie limitée de deux (2) ans
・ Lisez attentivement le manuel avant d'utiliser ce produit.
・ Ce produit est destiné à être xé sur un véhicule de 12 V
uniquement. Son utilisation sur d'autres véhicules peut être
dangereuse.
・ Évitez d'inverser la polarité des pinces, car cela peut provoquer
un cou-circuit entraînant une surchaue interne de la cellule,
voire un incendie. cou-circuit entraînant une surchaue
interne de la cellule, voire un incendie.
・ Ne pas utiliser si les pinces ou les câbles de la batterie sont
endommagés.
・ Ne pas utiliser en remplacement d'une batterie de voiture.
・ Ne laissez pas le produit connecté à la batterie de la voiture
après avoir le démarrage du véhicule.
・ Avant de démarrer, assurez-vous que toutes les bornes de
la batterie sont propres et que les pinces sont correctement
connectées. Des bornes de batterie sales ou corrodées peuvent
réduire les peormances.
・ Ne pas démarrer la voiture plus de 3 fois de suite. Laissez un
intealle de 2 minutes minutes entre les démarrages pour
éviter la surchaue.

54
・ Après le démarrage, retirez le produit de la batterie de la
voiture dans les 30 secondes pour éviter tout dommage. 30
secondes pour éviter tout dommage.
・ Ne pas cou-circuiter les pinces de la batterie.
・ Tenir hors de poée des enfants.
・ Ne pas utiliser comme jouet
・ N'exposez pas le produit à l'eau et ne l'immergez pas dans l'eau.
・ Ne pas utiliser le produit dans des environnements explosifs,
par exemple à proximité de liquides, de gaz ou de poussières
inammables.
・ Ne pas modier ou démonter le produit. Les réparations ne
doivent être être eectuées par des techniciens qualiés.
・ Ne pas exposer le produit à une chaleur extrême ou au feu.
・ Veillez à ce que quelqu'un soit à poée de voix ou susamment
proche pour vous aider pendant l'utilisation du produit. vous
aider pendant l'utilisation du produit.
・ Retirer les accessoires métalliques tels que les bagues, les
bracelets et les colliers avant d'utiliser le produit.
・ Ne pas laisser tomber le produit. Si le produit subit un choc ou
un choc ou un dommage, faites-le inspecter par un technicien
qualié en batteries.
・ Ne pas stocker le produit dans un environnement dont la
température dépasse 60°C (140°F).
・ Chargez le produit uniquement à une température comprise
entre 0°C et 45°C (32°F à 113°F).
・ Ne pas démarrer le véhicule pendant le chargement de l'unité
principale.
・ Si l'unité principale fuit, éliminez-la en prenant les mesures
appropriées.

55
・ Dans des conditions extrêmes, une fuite de la batterie peut se
produire. Si du liquide s'échappe du produit, ne le manipulez
pas à mains nues. En cas de En cas de contact avec la peau,
lavez-la immédiatement avec de l'eau et du savon. En cas de
contact avec les yeux, rincer à l'eau courante froide pendant au
moins 10 minutes et consulter un médecin. minutes et consulter
un médecin.
・ En n de vie, les piles au lithium doivent être mises au rebut
conf ormément à la réglementation locale. locales à la n de
leur durée de vie.
・ Après avoir utilisé le produit pour démarrer un véhicule, ne le
chargez pas immédiatement. immédiatement.
・ Ne pas utiliser les pinces pour alimenter d'autres équipements.

56
Centred'aide WhatsApp
WOLFBOX
Pour plus d'informations :
seice@wolox.com
https://wolox.com/contact-us
www.wolox.com
Centre de seice à la clientèle
Si vous avez des problèmes avec le fonctionnement ou
l'installation, n'hésitez pas à nous contacter.

57
Indice dei contenuti
Precauzioni..........................
58
Elencodegliimballaggi....................
59
ComponentiefunzioniIntroduzione............
60
DescrizionedeldisplayaLED................
61
Parametritecnici .......................
63
Specichetecniche .....................
69
Domandefrequenti.....................
70
Risoluzionedeiproblemi ..................
71
Avveenze...........................
72
Centroassistenzaclienti...................
75

58
Grazie per aver scelto lo staer da salto Wolfox con
compressore d'aria. Per garantire un'ottima esperienza d'uso e
la vostra sicurezza, vi invitiamo a leggere attentamente tutte le
istruzioni prima di utilizzare il prodotto e a conseare questo
manuale per future consultazioni.
Precauzioni
Avveenze
Questo dispositivo è stato progettato per veicoli
(apparecchiature) con batterie a 12 V. L'utilizzo con altri tipi di
batterie può essere pericoloso. Leggere e comprendere tutte le
informazioni sulla sicurezza prima dell'uso.
Nota
Si consiglia di caricare il prodotto al momento della ricezione!
Mentre si legge il presente manuale, è possibile iniziare a
caricare il dispositivo utilizzando il cavo di ricarica in dotazione.
(Questo prodotto non include un adattatore)
59
Elenco degli imballaggi
・
Dispositivo
・
Morsetti per batterie
intelligenti
・
Cavo di ricarica
da Usb C a Usb C
・ Tubo dell'aria
・
Ugello dell'aria
Ugello da francese
ad americano
Americano
Ugello ad ago
Ugello americano
lungo
・
Pacchetto EVA
・
Manuale d'uso
60
Componenti e funzioni introduzione
5
5
4 4
3
4
7
6
8
9
10
11
2 3
2
1
1
Pulsante di accensione/
gonaggio/arresto
Interruttore dell'unità di
pressione
Pulsanti di aumento/
diminuzione della pressione
Interruttore della torcia LED
Schermo di
visualizzazione
Poo di inazione
Poa di uscita USB-A
(QC3.05V/9V/12V)
Poa di ingresso/uscita USB-C (Max
power: PD65W)
Poa a stella per auto
da 12 V
15V/10A Poa di uscita
Interruttore di modalità

61
Descrizioni dei pulsanti
3
4
5
1
2
Avviare l'informazione
Unità di pressione
Regolare la pressione
Accensione
Indicazioni
Premere brevemente il pulsante di accensione per avviare le
informazioni; premere nuovamente per interrompere.
Premere brevemente il pulsante “PSI” per cambiare l'unità di
misura della pressione; premere brevemente il pulsante “M”
per cambiare modalità.
Utilizzare i pulsanti “+” e “-” per regolare il valore di pressione
preimpostato.
1. Unità: KPA: ±5; BAR: ±0,1; PSI: ±1; kg/cm²: ±0,1
2. Tenere premuto per 1 secondo per regolare rapidamente il
valore preimpostato. Se si raggiunge il valore massimo, si
ritorna al valore minimo e viceversa. valore minimo e viceversa.
Premere il pulsante di accensione per 3 secondi per accendere
il dispositivo. Sullo schermo vengono visualizzati il livello della
batteria e la pressione corrente, oltre alla pressione preimpostata
e all'unità e alla modalità corrispondenti. modalità.
All'accensione, tutte le spie si accendono per 1 secondo, quindi
visualizzano il livello della batteria, l'unità di modalità, la
pressione preimpostata e la pressione corrente.
・ U n i t à iniziale: PSI
・ Modalità auto: Valore iniziale: 36PSI, Min: 26PSI, Max: 50PSI
Modalità moto: Valore iniziale: 31PSI, Min: 26PSI, Max: 43PSI
Modalità bicicletta: Initial value: 44PSI, Min: 30PSI, Max 145PSI
Modalità Palla: Valore iniziale: 9PSI, Min: 4PSI, Max: 16PSI
Modalità personalizzata: Valore iniziale: 21PSI, Min: 7PSI, Max: 160PSI

62
6
Protezione della temperatura
・ Quando la temperatura della batteria raggiunge i 55°C, si attiva
la protezione termica. Quando scende a 45°C, la protezione viene
revocata, consentendo la ricarica. L'icona della temperatura
elevata è evidenziata in modalità di protezione.
・ Quando la temperatura della batteria scende al di sotto di 0°C,
la protezione termica si attiva durante la carica. Quando la
temperatura sale al di sopra dei 5°C, la protezione viene revocata,
consentendo la ricarica. L'icona della bassa temperatura è
evidenziata durante la protezione. Se l'NTC si scollega, la
protezione da bassa temperatura si attiva, vietando l'uscita.
Quando viene tolta, l'uscita riprende e l'icona è evidenziata.
7
Dispositivi di ricarica
Mentre l'avviatore è acceso, se sono collegati sia l'USB-C che
l'USB-A, il dispositivo carica i dispositivi esterni (telefono, tablet,
ecc.), tablet, ecc.).
・ Entrambe le poe possono funzionare contemporaneamente.
Gli indicatori “OUT” e “Batte Level” sono accesi.
・ La rimozione di una poa non inuisce sull'altra.
・ Se entrambe le poe USB-A e USB-C vengono rimosse, il
dispositivo si spegne automaticamente dopo 90 secondi.
spegnimento automatico dopo 90 secondi.
・ Se il dispositivo viene spento durante la ricarica, la ricarica
del dispositivo esterno viene interrotta. Alla riaccensione, la
ricarica riprende.

63
Istruzioni per il display a LED
2
5
3
4
1
1 2
8
Livello della batteria
Modalità:
Car/Motorcycle/Bicycle/Ball
Ingresso
3 4
109
Valore in tempo reale Valore preimpostato
Allarme di alta temperaturaAllarme di bassa temperatura
5
7
6
Unità di pressione
Uscita
Indicatore di carica rapida
6 9
10
7 8
64
Funzione 1: Come avviare un veicolo a 12 V
(Assicurarsicheillivellodellabatteriasia>50%)
correct
reverse
1. Inserire il connettore blu del morsetto della batteria
intelligente nell'unità principale. nell'unità principale,
assicurandosi che la spia del morsetto sia spenta.
2. Collegare correttamente i morsetti ai terminali della batteria
dell'auto, il morsetto rosso al terminale positivo (+) e il
morsetto nero al terminale negativo (-). negativo (-).
3. Seguire le istruzioni fornite dalle spie della pinza per le fasi
successive.
Luce verde ssa:
Indica il corretto collegamento
e l'alimentazione, consentendo
l'avvio di emergenza.
65
correct
reverse
correct
reverse
correct
reverse
4. Poare l'interruttore di accensione della vettura in posizione
START.
5. Dopo aver messo in moto la macchina, rimuovere i morsetti
della batteria.
Luce rossa ssa:
Indica un collegamento con
polarità errata. Ricollegare
correttamente. Attendere
che la luce verde sia accesa in
modo sso prima di avviare
l'emergenza. di emergenza.
La luce verde lampeggia:
Indica una bassa tensione
della batteria. Premere il
pulsante BOOST e attendere
che la luce verde rimanga
accesa in modo sso.
Completare la procedura di
avvio entro 30 secondi.
Non sono accese né la luce
rossa né quella verde è
accesa:
Assicurarsi che la polarità del
collegamento sia corretta,
quindi premere il pulsante
BOOST. Attendere che la spia
verde rimanga accesa in modo
sso.Completare la procedura
di avvio entro 30 secondi.
66
Funzione 2: ricarica di dispositivi elettronici
come telefoni/tablet
1. Collegare la spina USB del cavo adattatore alla poa di uscita
USB-C dell 'unità principale. dell 'unità principale.
2. Collegare la testa di ricarica al telefono/tablet o ad un altro
dispositivo elettronico. dispositivo elettroni
3. Tenere premuto il pulsante di accensione per 3 secondi per
accendere il dispositivo e iniziare a caricarlo. e avviare la
ricarica del dispositivo elettronico.
Nota:
La ricarica non può avvenire se il dispositivo non è acceso.
67
Funzione 3: ricarica dell'unità principale
1. Collegare il cavo dati a un caricabatterie adatto, quindi
inserire il caricabatterie domestico nella presa di ricarica.
caricatore domestico alla presa di ricarica.
2. Inserire la spina nella poa di ingresso USB-C dell'unità
principale.

68
Funzione 4: Commutazione delle modalità
di illuminazione a LED
Nota sul meccanismo di spegnimento automatico:
Per proteggere la durata della batteria dell'avviatore,
abbiamo progettato un meccanismo di spegnimento
automatico in caso di tempi di standby prolungati:
1. Se la luce è accesa, il dispositivo si spegne
automaticamente dopo 4 ore. dopo 4 ore.
2. Se la luce è spenta e in modalità standby, il dispositivo
si spegne dopo 2 minuti. si spegne dopo 2 minuti.
1. Tenere premuto il pulsante di accensione per 3 secondi, quindi
premere brevemente il pulsante di illuminazione per attivare
la funzione di illuminazione a LED. brevemente il pulsante di
illuminazione per attivare la funzione di illuminazione a LED.
2. Premere brevemente il pulsante per passare da una
modalità di illuminazione all'altra: luce costante, luce bianca
lampeggiante e SOS.
Note:
La torcia LED non può essere utilizzata se il dispositivo
non è acceso.

69
Speciche tecniche
Modello MegaVolt24 Air MegaVolt16 Air
Capacitàdella
batteria
88.8Wh/24000mAh 59.2Wh/16000mAh
AvvioCorrente 1000A 600A
Correntedipicco 4000A 3000A
Ingresso/
uscitaUSB-C
PD65W(5V/3A , 9V/3A , 12V/3A , 15V/3A , 20V/3.25A)
UscitaUSB-A QC3.0 18W(5V/3A,9V/2A,12V/1.5A)
UscitaCC 14V-16V
Tempodiricarica
completa
-20℃ ~ 60℃ / -4℉ ~140℉
FullChargeTime 1.5-2 ore circa 1-1.5 ore circa
Dimensioni
(L*L*H)
238.5*134*54.8mm
Peso 1550g 1410g

70
Domande frequenti (FAQ)
・ Come disattivare lo starer di salto?
Premere il pulsante di accensione per 3 secondi per accendere
il dispositivo, che si spegne automaticamente dopo 2 minuti di
inattività. spegnimento automatico dopo 2 minuti di inattività.
・ Quanto tempo ci vuole per caricare il MegaVolt24 Air/
MegaVolt16 Air?
--MegaVolt24 Air: Circa 1,5-2 ore (utilizzando un caricatore
PD65W o superiore)
--MegaVolt16 Air: Circa 1-1,5 ore (utilizzando un caricabatterie
PD65W o superiore).
・ Posso caricare il mio telefono o tablet con l'unitàprincipale?
Sì, l'unità principale è dotata di una poa di uscita USB-A e di
una poa di ricarica rapida con ingresso/uscita da 65 W per
caricare qualsiasi dispositivo elettronico.
・ Quante volte può essere utilizzata la combinazione di
avviatore e pompa d'aria avviare un'auto?
--MegaVolt24 Air: Circa 40 volte
--MegaVolt16 Air: Circa 30 volte
・ Qual è la durata di vita dell'unità principale?
In condizioni di utilizzo normale, può durare 3-5 anni.
・ How long can the main unit be stored without use and still
sta a car?
The unit is designed to retain charge for 6-12 months, but for
longer lifespan, it is recommended to charge it eve 3 months.
71
Informazioni di
errore
Causa Soluzione
Lucerossassa Morsetti inveiti Polarità corretta
Luceverde
lampeggiante
Bassa tensione della
batteria dell'auto
Utilizzare la funzione
boost
Lucerossassa
per30secondi,poi
spenta
8 paenze entro 10 minuti Aspetta 10 minuti
Protezione dalle basse
temperature inferiori a 0°C.
La protezione è
aumentata sopra i
5°C.
Protezione da
sovratemperatura oltre i
55°C.
La protezione è
aumentata al di sotto
dei 45°C.
Risoluzione dei problemi
・
Informazioni/cause/soluzioni sugli errori del
Jump Staer
Se le seguenti operazioni non risolvono il problema, interrompere
l'utilizzo di MegaVolt24 Air/MegaVolt16 Air e contattarci.
Informazioni di
errore
Causa Soluzione
1 o 4 barre della batteria
lampeggianti, icona alta
temperatura accesa.
Temperatura supeiciale
>120
Attendere no a
quando la temperatura
non scende sotto i 100
1 barra della batteria
lampeggiante. Batteria
scarica
Caricare il dispositivo
・ Informazioni/Cause/Soluzioni sugli errori della
pompa dell' aria
72
Avveimento
Garanzia limitata di due (2) anni WOLFBOX
・ Leggere attentamente il manuale prima di utilizzare questo
prodotto.
・ Questo prodotto è solo per l'avviamento di veicoli a 12 V. Usarlo
su altri veicoli potrebbe essere pericoloso.
・ Evitare di inveire la polarità dei morsetti, poiché ciò potrebbe
causare un coocircuito con conseguente surriscaldamento
interno della cella o addirittura un incendio.
・ Non utilizzare se i morsetti o i cavi della batteria sono
danneggiati.
・ Non utilizzare come sostituto della batteria dell'auto.
・ Non lasciare il prodotto collegato alla batteria dell'auto dopo
aver avviato il veicolo.
・ Prima di iniziare, assicurarsi che tutti i terminali della batteria
siano puliti e che i morsetti siano correttamente collegati. I
terminali della batteria sporchi o corrosi possono ridurre le
prestazioni.
Informazioni di
errore
Causa Soluzione
1 o 3 barre della batteria
lampeggianti. Protezione
da sovracorrente o
coocircuito
Premere il pulsante
di accensione per
cancellare
1 o 2 barre della batteria
lampeggianti. La pressione
degli pneumatici non
raggiunge i 20 kpa entro 50
secondi
Controllare eventuali
perdite

73
・ Non avviare l'auto più di 3 volte di seguito. Lasciare un
inteallo di 2 minuti tra le stelle per evitare il surriscaldamento.
・ Dopo l'avvio, rimuovere il prodotto dalla batteria dell'auto entro
30 secondi per evitare danni.
・ Non coocircuitare i morsetti della batteria.
・ Tenere fuori dalla poata dei bambini.
・ Non utilizzare come giocattolo.
・ Non esporre il prodotto all'acqua o immergerlo in acqua.
・ Non utilizzare il prodotto in ambienti esplosivi, ad esempio in
prossimità di liquidi, gas o polvere inammabili.
・ Non modicare o smontare il prodotto. Le riparazioni devono
essere eseguite solo da tecnici qualicati.
・ Non esporre il prodotto a calore estremo o al fuoco.
・ Assicuratevi che ci sia qualcuno nel vostro raggio d'azione
o abbastanza vicino da potei aiutare durante l'utilizzo del
prodotto.
・ Prima di utilizzare il prodotto, rimuovere gli accessori metallici
come anelli, bracciali e collane.
・ Non far cadere il prodotto. Se il prodotto subisce un impatto o
subisce danni, farlo ispezionare da un tecnico qualicato.
・ Non conseare il prodotto in ambienti con temperature
superiori a 60°C (140°F).
・ Caricare il prodotto solo a una temperatura compresa tra 0°C e
45°C (tra 32°F e 113°F).
・ Non avviare il veicolo mentre l'unità principale è in carica.
・ Se l'unità principale perde, smaltirla con misure appropriate.

74
・ In condizioni estreme, potrebbe vericarsi una perdita di
batteria. Se il liquido fuoriesce dal prodotto, non maneggiarlo
a mani nude. In caso di contatto con la pelle, lavare
immediatamente con acqua e sapone. In caso di contatto con
gli occhi, sciacquare con acqua corrente fredda per almeno 10
minuti e consultare un medico.
・ Smaltire le batterie al litio giunte a ne vita secondo le
normative locali.
・ Dopo aver utilizzato il prodotto per avviare un veicolo, non
caricarlo immediatamente.
・ Non utilizzare i morsetti per alimentare altre apparecchiature.

75
Centroassistenza WhatsApp
WOLFBOX
Per maggiori informazioni:
seice@wolox.com
https://wolox.com/contact-us
www.wolox.com
Centro di assistenza clienti
Se riscontri problemi con il funzionamento o l'installazione, non
esitare a contattarci.

76
Contenido
Precauciones.........................
77
ListadeEmbalaje .......................
78
IntroduccióndeComponentesyFunciones........
79
DescripcióndelaPantallaLED...............
82
EspecicacionesTécnicas ..................
88
PreguntasFrecuentes....................
89
SolucióndeProblemas ...................
90
Adveencias..........................
92
CentrodeAtenciónalCliente................
94

77
Agradecemos que haya elegido el arrancador con compresor de
aire Wolox. Para garantizar una buena experiencia de usuario,
la seguridad personal y la seguridad de la propiedad, lea todas
las instrucciones antes de usar este producto y consee este
manual para futuras referencias.
Precauciones
Adveencia
Este dispositivo está destinado a vehículos (equipos) con
batería de 12V. Puede ser peligroso usarlo con otros tipos de
baterías. Lea y entienda la información de seguridad antes de
usarlo.
Sugerencia
Mientras lee este manual, puede empezar a cargar el
dispositivo utilizando el cable de carga incluido. (Este producto
no incluye adaptador)
78
Lista de Embalaje
・
Unidad principal
・
Pinzas inteligentes
・
Cable cargador
USB C a USB C
・
Tubo de inado
・
Boquilla de aire
Adaptador de
válvula
Aguja de
inado
Boquilla larga
・
Estuche EVA
・
Manual de
usuario
79
Introducción de Componentes y Funciones
5
5
4 4
3
4
7
6
8
9
10
11
2 3
2
1
1
Botón de encendido/apagado
y inicio/detención de inado
Cambio de unidad de
presión de aire
Teclas de ajuste de presión
de aire
Interruptor de linterna LED
Pantalla
Inteaz de inado
Pueo de salida USB-A
(QC3.0 5V/9V/12V)
Pueo de entrada/salida USB-C
(máx. 65W PD)
Pueo de arranque
para vehículo de 12V
Pueo de salida de
15V/10A
Cambio de modo

80
Instrucciones de Botones
3
4
1
2
Después de encender, presione brevemente el botón de
encendido para comenzar a inar. Durante el inado, presione
brevemente el botón de encendido para detener el inado.
Presione brevemente el botón "PSI" para cambiar la unidad
de inado. Presione brevemente el botón "M" para cambiar el
modo de inado.
Presione brevemente el botón de encendido durante 3
segundos para encender. La pantalla mostrará el nivel de
batería, la presión actual, el valor preestablecido de inado,
las unidades correspondientes y el modo de inado resaltado.
Al encender, todos los indicadores se iluminan durante 1
segundo y luego muestran el indicador de batería y las unidades
del modo de inflado, el valor preestablecido de inflado y la
presión actual.
・Unidades iniciales:
PSI
・Modos
Automóvil: valor inicial: 36PSI, mínimo: 26, máximo: 50PSI
Motocicleta: valor inicial: 31PSI, mínimo: 26, máximo: 43PSI
Bicicleta: valor inicial: 44PSI, mínimo: 30, máximo: 145PSI
Balón: valor inicial: 9PSI, mínimo: 4, máximo: 16PSI
Personalizado: valor inicial: 21PSI, mínimo: 7, máximo: 160PSI
5
Presione brevemente los botones "+" y "-" para ajustar el valor
preestablecido de presión de aire
1. Units: KPA: ±5; BAR: ±0.1; PSI: ±1; kg/cm²: ±0.1
2. Mantenga presionado durante 1 segundo para ajustar
rápidamente el valor preestablecido. Al alcanzar el valor
máximo, volverá al valor mínimo y viceversa.

81
6
・Cuando la temperatura de la celda alcanza los 55°C, el producto
activa la protección térmica. Cuando la temperatura baja a 45°C,
se desactiva la protección y se puede cargar. El ícono de alta
temperatura se iluminará.
・Cuando la temperatura de la celda es inferior a 0°C, el producto
activa la protección térmica durante la carga. Cuando la
temperatura sube a más de 5°C, se desactiva la protección y se
puede cargar. El ícono de baja temperatura se iluminará durante
la carga. La protección de baja temperatura se activa cuando
se desconecta el NTC, prohibiendo la salida. El ícono de baja
temperatura se iluminará cuando se restablezca la protección.
7
En estado de encendido, conecte simultáneamente el USB-C y
el USB-A con cables de datos para cargar dispositivos externos
(teléfonos móviles, tabletas, etc.).
・Pueden funcionar simultáneamente, con "OUT" y el indicador de
batería iluminados.
・Si se desconecta el USB-A o el USB-C individualmente, el
dispositivo no tendrá ninguna respuesta.
・Si se desconectan ambos, USB-A y USB-C, el dispositivo se
apagará automáticamente después de 90 segundos.
・Si se apaga durante la carga, el arrancador dejará de cargar el
dispositivo. Al volver a encender el arrancador, reanudará la
carga del dispositivo externo. Después de que el dispositivo
esté completamente cargado, el arrancador se apagará
automáticamente después de 90 segundos.

82
Descripción de la Pantalla LED
2
5
3
4
1
1 2
8
Nivel de batería
Modos: coche/moto/bicicleta/
balón/personalizado
impoació
3 4
109
Valores en tiempo real Valores preestablecidos
Alea de alta temperaturaalarma de baja temperatura
5
7
6
Unidades de presión
expoaciones
Indicador de carga rápida
6 9
10
7 8

83
Función 1: Cómo arrancar un vehículo de
12V
(asegúresedequelabateríatengamásdel50%decarga)
2. Luego, conecte las pinzas a los terminales positivo y negativo
de la batería del automóvil, la pinza roja al terminal positivo (+)
y la pinza negra al terminal negativo (-)
3. Después, siga las instrucciones del indicador de las pinzas
para realizar la operación correspondiente.
correct
reverse
1. Primero, conecte el conector azul de las pinzas inteligentes a
la unidad principal, asegurándose de que el indicador de las
pinzas esté apagado.
Cuando la luz verde está
encendida de forma continua:
indica que la conexión es
correcta y está alimentada, se
puede utilizar para el arranque
de emergencia.
84
correct
reverse
correct
reverse
correct
reverse
Cuando la luz roja está
encendida de forma continua:
indica que la conexión de los
polos positivo y negativo es
incorrecta, por favor vuelva
a conectarlos correctamente
y, cuando la luz verde esté
encendida de forma continua,
utilice para el arranque de
emergencia.
La luz verde parpadea:
Signica que el voltaje de
la batería es demasiado
bajo, presione el botón
BOOST, cuando la luz verde
esté siempre encendida,
la operación de inicio se
completará en 30 segundos.
Cuando ni la luz roja ni la luz
verde están encendidas:
esto indica que la batería
podría estar completamente
dañada. Asegúrese de que los
polos positivo y negativo estén
conectados correctamente,
luego presione el botón BOOST
y, cuando la luz verde esté
encendida de forma continua,
complete la operación de
arranque dentro de los 30
segundos.
85
Función 2: Cargar dispositivos electrónicos
como teléfonos móviles/tabletas
1. Conecte el enchufe USB del cable adaptador al puerto de
salida USB-C de la unidad principal.
2. Conecte el conector de carga al teléfono móvil/tableta u otro
dispositivo electrónico.
3. Mantenga presionado el botón de encendido durante 2
segundos para encender y comenzar a cargar el dispositivo
electrónico.
Sugerencia:
No se puede cargar si la unidad principal está apagada.
4. Gire el interruptor de encendido del automóvil a la posición
de arranque (START).
5. Después de arrancar el automóvil, retire las pinzas de la
batería.
86
Función 3: Cargar la unidad principal
1. Conecte el cable de datos al cargador adecuado y luego
enchufe el cargador doméstico en la toma de corriente.
2. Insee el conector en el pueo de entrada USB-C de la
unidad principal.

87
Función 4: Cambiar los modos de la luz LED
Nota sobre el mecanismo de apagado automático::
Para proteger la batería del arrancador, hemos diseñado
un mecanismo de apagado automático en espera de largo
tiempo:
1. Con la luz encendida, se apaga automáticamente
después de 4 horas.
2.
En modo de espera sin luz, se apaga después de 2
minutos.
1. Mantenga presionado el botón de encendido durante
3segundos y luego presione brevemente el botón de la luz
para activar la función de iluminación LED.
2. Presione brevemente para cambiar la luz; los modos son: luz
constante, luz blanca intermitente, SOS.
Sugerencia:
No se puede usar la linterna LED si la unidad principal está
apagada

88
Especicaciones Técnicas
Modelo MegaVolt24 Air MegaVolt16 Air
Capacidadde
batería
88.8Wh/24000mAh 59.2Wh/16000mAh
Corrientede
arranque
1000A 600A
Corrientedepico 4000A 3000A
Entrada/salida
USB-C
PD65W(5V/3A , 9V/3A , 12V/3A , 15V/3A , 20V/3.25A)
SalidaUSB-A QC3.0 18W(5V/3A,9V/2A,12V/1.5A)
SalidaDC 14V-16V
Temperaturade
funcionamiento
-20℃ ~ 60℃ / -4℉ ~140℉
Tiempodecarga
completa
1.5-2 horas aprox 1-1.5 horas aprox
Dimensiones
(L*W*H)
238.5*134*54.8mm
Peso 1550g 1410g

89
Preguntas Frecuentes
・¿Cómo apagar la fuente de alimentación móvil?
Mantenga presionado el botón de encendido durante 3
segundos o se apagará automáticamente después de 2 minutos
en modo de espera.
・¿Cuánto tiempo se tarda en cargar la unidad principal
MegaVolt24 Air/MegaVolt16 Air
?
--MegaVolt24 Air: aproximadamente 1.5-2 horas (utilizando un
cargador de 65W o superior)
--MegaVolt16 Air: aproximadamente 1-1.5 horas (utilizando un
cargador de 65W o superior)
・¿Puedo usar la unidad principal para cargar mi teléfono o
tablet?
Sí, la unidad tiene un pueo de salida USB-A y un pueo de
entrada/salida de carga rápida de 65W USB-C, puede cargar
cualquier dispositivo electrónico.
・¿Cuántas veces puede arrancar un coche el arrancador &
compresor de aire?
--MegaVolt24 Air: alrededor de 40 veces
--MegaVolt14 Air: alrededor de 30 veces
・¿Cuál es la vida útil de la unidad principal?
Con un uso normal, puede durar de 3 a 5 años.
・¿Si la unidad principal está completamente cargada pero
no se usa, cuánto tiempo puede almacenar la energía y aún
arrancar un coche?
La unidad puede mantener la carga durante 6-12 meses sin
uso, pero para prolongar la vida útil, se recomienda cargarla
cada 3 meses.
90
Errores Causa Solución
Luzrojaja Pinzas conectadas al revés
Conecte correctamente
según los polos positivo y
negativo
Luzverde
parpadeando
Voltaje de la batería del
coche demasiado bajo
Use la función de impulso
(boost) para salida forzada
Luzrojajapor30
segundosyluego
se apaga
Más de 8 intentos de
arranque en 10 minutos
Espere 10 minutos antes
de volver a intentarlo
Temperatura de la batería
inferior a 0°C,protección
por baja temperatura
activada
Cuando la temperatura
suba por encima de 5°C, la
protección se desactivará
y se podrá cargar
Temperatura de la
batería alcanza los 55°C
,
protección por alta
temperatura activada.
Cuando la temperatura
baje a 45°C, la protección
se desactivará y se podrá
cargar.
Solución de Problemas
Si las siguientes "acciones" no solucionan su problema, deje de
usar el MegaVolt24 Air/MegaVolt16 Air y contáctenos.
・ Errores del arrancador / Causas / Soluciones
91
・ Errores del arrancador / Causas / Soluciones
Errores Causa Solución
Una barra y cuatro barras
de batería parpadeando,
ícono de alta temperatura
encendido,temperatura de
la supeicie del compresor
superior a 120℃
La protección se
desactiva cuando la
temperatura de la
supeicie es inferior a
100℃.
Una barra de batería
parpadeando,
descarga excesiva de la
batería,batería descargada
en exceso.
Cargue el dispositivo.
Una barra y tres barras
de batería parpadeando,
sobrecorriente o
coocircuito del
compresor
,
sobrecorriente o
coocircuito del compresor.
Presione brevemente
el botón de encendido
para borrar la
protección.
Una barra y dos barras
de batería parpadeando,
presión de los neumáticos
inferior a 20 kPa en 50
segundos durante el
inado,presión de los
neumáticos no alcanza 20
kPa en 50 segundos.
Verique si hay fugas.
・ Errores del arrancador / Causas / Soluciones

92
Adveencias
Garantía limitada de dos (2) años de WOLFBOX
・Antes de usar este producto, lea detenidamente el manual de
instrucciones.
・El producto está diseñado para arrancar vehículos de 12V, si se
utiliza para otros nes puede ser peligroso.
・Si los accesorios incluyen pinzas de arranque normales,
asegúrese de no conectar las pinzas a los polos incorrectos
de la batería del automóvil, ya que esto podría causar un
coocircuito y sobrecalentamiento o incluso incendio de las
celdas internas.
・Si las pinzas de la batería o los cables de las pinzas están
dañados, no los use.
・No use el producto como sustituto de la batería del automóvil.
・Después de arrancar con éxito el automóvil, no deje el producto
conectado a la batería del automóvil.
・Antes de arrancar, asegúrese de que todos los terminales de la
batería estén limpios. Asegúrese de que las pinzas de la batería
estén bien conectadas. Si los terminales de la batería del
automóvil están sucios o corroídos, el rendimiento del arranque
del producto se reducirá.
・No intente arrancar más de 3 veces consecutivas. De lo
contrario, el producto podría sobrecalentarse y dañarse. Espere
dos minutos entre cada intento de arranque.
・Después de arrancar, retire el producto de la batería del
automóvil dentro de 30 segundos, de lo contrario, podría
dañarse.
・No permita que las pinzas de la batería entren en contacto entre sí.
・Mantenga el producto fuera del alcance de los niños.
・No use el producto como un juguete.
・No moje el producto.

93
・No sumerja el producto en agua.
・No utilice el producto en ambientes explosivos, como en
presencia de líquidos inamables, gases o polvo.
・No modique ni desmonte el producto. Solo el personal técnico
profesional debe repararlo.
・No exponga el producto a condiciones de calor extremo o al fuego.
・Asegúrese de que cuando esté utilizando el producto, haya
alguien dentro del alcance de su voz o lo sucientemente cerca
como para ayudarle.
・Antes de usar el producto, retire las joyas metálicas que pueda
estar usando, como anillos, pulseras, collares.
・No deje caer el producto. Si el producto sufre un golpe o daño,
un técnico calicado debe inspeccionarlo.
・No coloque el producto en ambientes con temperaturas
superiores a 60°C.
・Cargue el producto en un entorno con una temperatura
ambiente entre 0°C y 45°C.
・No arranque el automóvil mientras el producto está cargando.
・Si el producto tiene una fuga de líquido, recupérelo
inmediatamente con el equipo adecuado.
・En condiciones extremas, la batería puede tener fugas. Si el
líquido sale del producto, no lo toque con las manos. Si entra
en contacto con la piel, lávese inmediatamente con agua y
jabón. Si el líquido entra en contacto con los ojos, enjuáguelos
con agua fría durante al menos 10 minutos y busque atención
médica de inmediato.
・Los productos basados en baterías de litio deben ser desechados
de acuerdo con las regulaciones locales al nal de su vida útil.
・Después de usar este producto para arrancar un automóvil, no
cargue el producto de inmediato.
・No use las pinzas para suministrar energía a otros dispositivos.
94
Centrodeayuda WhatsApp
WOLFBOX
Para más información:
seice@wolox.com
https://wolox.com/contact-us
www.wolox.com
Centro de Atención al Cliente
Si tiene algún problema con el funcionamiento o la instalación, no
dude en ponerse en contacto con nosotros.


Check us out here!
We have professional customer seice!
www.wolox.com
Email:seice.wolox@gmail.com
Phone:+18882968399
