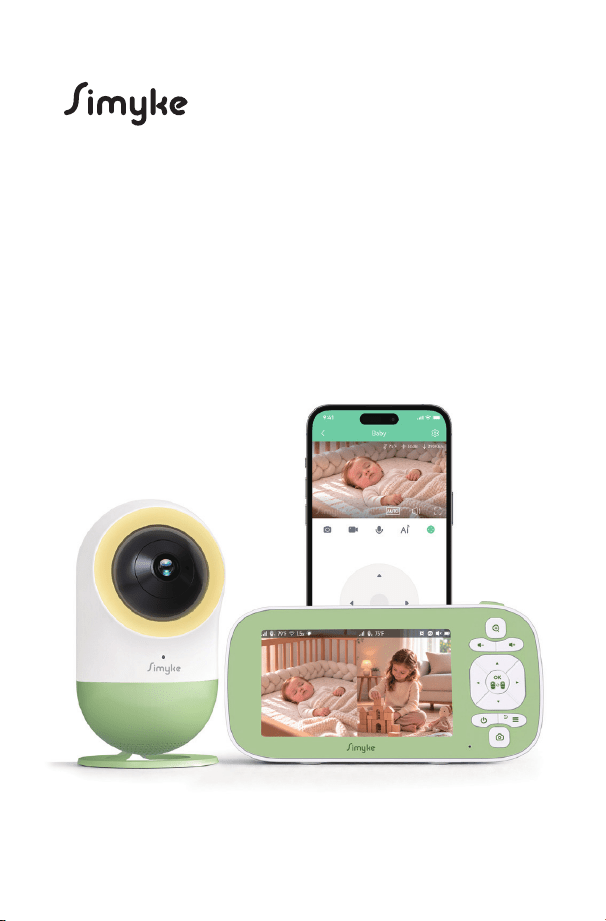
User Manual
BMS45P Baby Monitor
BMS45P

MADE
IN
CHINA

Table of Contents
Safety Instructions
Getting Started
Package Contents
Product Overview
Setting Up Your Monitor System
Installing the MicroSD Card
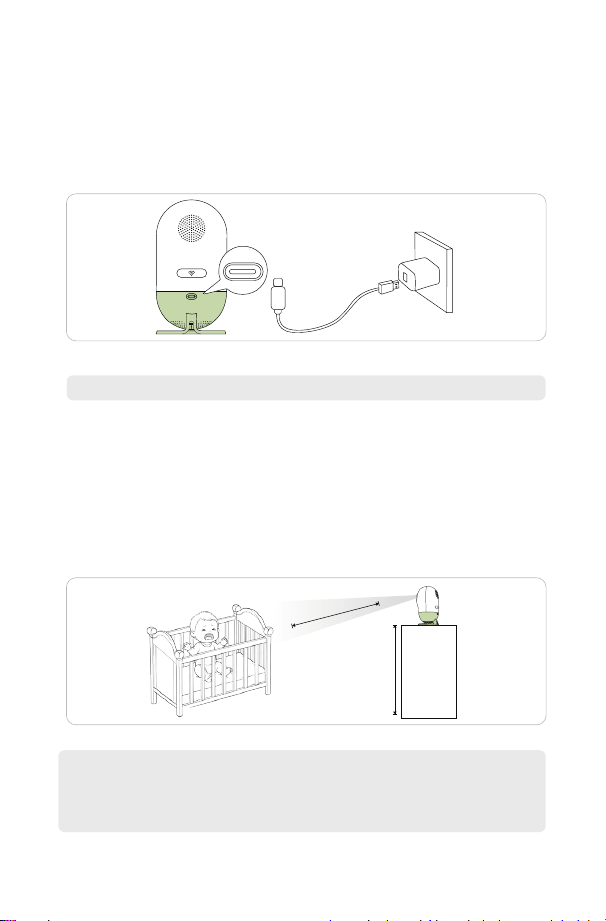
Charging the Monitor Unit
Powering the Camera
Placing / Mounting the Camera
LED Indicator Guide
Using the Monitor Unit (Plug & Play)
Pairing the Camera
Display Screen & Status Icons
Menu Options Overview (Lower Screen Bar)
OSD (On Screen Display) Mode Operation
Using the Smartphone App (Wi-Fi Mode
)
Pairing the Camera via Wi-Fi
±ƖĞĐŃȊĐóƭŃŲŦơ
Troubleshooting
Customer Service
Warranty Policy
Contact Us
01
02
02
03
04
04
04
05
05
06
08
08
10
11
12
17
17
18
19
19
19
19
01
Warning:
FCC Statements
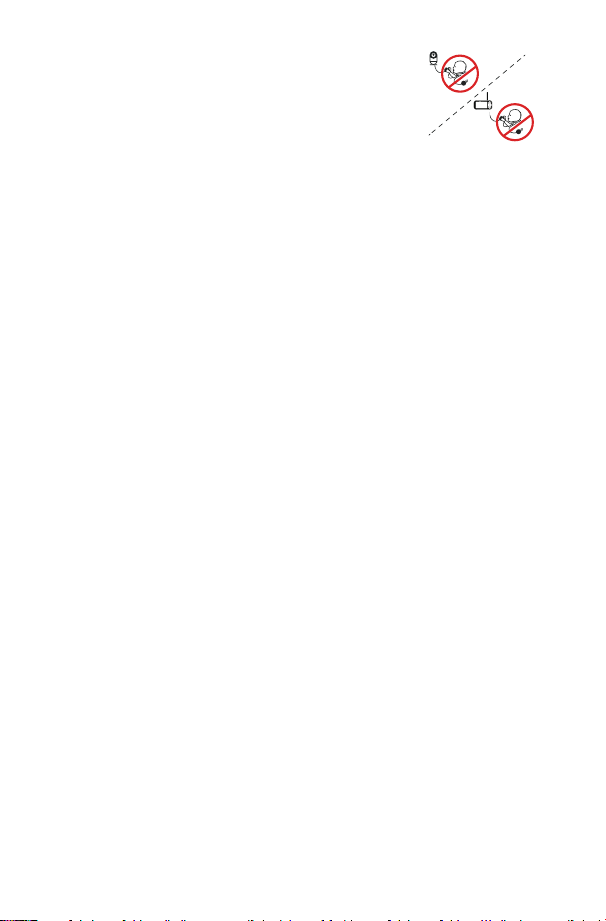
• ±¾©vIÅj¾UvPî©(ɲ!ľŃśėƙĞŦľóǍб¾©vIj1(ŃŦĐŲƙėơɔhĞĞƖƭľŃơĐŲƙėŲƵƭŲĶƭľĞ
reach of children (more than 3 ft (1m) away).
• v1Ý1©¦j!1¾P1!t1©©!©(Uv©v1©!©U ©¦jä¦1vɔ±ĞĐƵƙĞƭľĞĐŲƙėóƭ
least 3 ft away from crib or playpen.
• !PhUvIPî©(ɲ¾ľŃơƖƙŲėƵĐƭĐŲŦƭóŃŦơơŤóśśƖóƙƭơǎľŃĐľŤóǔĐóƵơĞĐľŲŘŃŦķɔ
• ±P!hÞ©vUvIɲ¾ŲƖƙĞǍĞŦƭĞśĞĐƭƙŃĐơľŲĐŘɏv1Ý1© ƵơĞƭľĞ ƭƙóŦơŤŃƭƭĞƙŲƙƙĞĐĞŃǍĞƙŦĞóƙ
water, including near a bathtub, sink, laundry tub, wet basement, etc.
• !žUvɲŦśǔŃŦơĞƙƭóďóƭƭĞƙǔƖóĐŘŲĶƭľĞơóŤĞƭǔƖĞɔ©ŃơŘŲĶĞǓƖśŲơŃŲŦŃĶ ďóƭƭĞƙǔŃơ
replaced with an incorrect type.
• ÅơĞŲŦśǔƭľĞ(!óėóƖƭĞƙơƖƙŲǍŃėĞėɔ
• ėƵśƭóơơĞŤďśǔŃơƙĞƘƵŃƙĞėɔhĞĞƖơŤóśśƖóƙƭơóǎóǔĶƙŲŤĐľŃśėƙĞŦǎľĞŦǔŲƵóƙĞóơơĞŤďśŃŦķɔ
• ¾ľŃơƖƙŲėƵĐƭŃơŦŲƭóƭŲǔɔ(ŲŦŲƭóśśŲǎоќėƙĞŦƭŲƖśóǔǎŃƭľŃƭɔ
• ¾ľŃơƖƙŲėƵĐƭŃơv¾ŃŦƭĞŦėĞėƭŲƙĞƖśóĐĞƖƙŲƖĞƙóėƵśƭơƵƖĞƙǍŃơŃŲŦŲĶоќėƙĞŦɔ
• äŲƵtű¾ĐľĞĐŘǔŲƵƙоќėɘơóĐƭŃǍŃƭǔƙĞķƵśóƙśǔɏóơƭľŃơƖƙŲėƵĐƭǎŃśśŦŲƭóśĞƙƭƖóƙĞŦƭơƭŲ
silent activities of a child.
• Before using this product, read and follow all instructions and warnings contained in this
booklet.
• (ŲŦŲƭóśśŲǎǎóƭĞƙėóŤóķĞƭŲƭľĞĐóŤĞƙóƵŦŃƭɏŤŲŦŃƭŲƙƵŦŃƭɏƖŲǎĞƙóėóƖƭĞƙɏŲƙĐľóƙķŃŦķ
cable which cause overheat of the charging components.
• (ŲŦŲƭ ƵơĞƵŦŲȆĐŃóśƭľŃƙėƖóƙƭǔĐľóƙķŃŦķĐóďśĞơƭŲĐľóƙķĞƭľĞėĞǍŃĐĞɔ¾ľŃơŤóǔƙĞơƵśƭŃŦ
ŲǍĞƙľĞóƭŲĶƭľĞĐľóƙķŃŦķƖŲƙƭɔŦśǔƵơĞƭľĞĐľóƙķŃŦķĐóďśĞơƖƙŲǍŃėĞėŃŦƭľĞďŲǓɔ
• (ŲŦŲƭƵơĞ ƵŦŲȆĐŃóśƭľŃƙėƖóƙƭǔƖŲǎĞƙóėóƖƭĞƙơɏĞơƖĞĐŃóśśǔľŃķľǎóƭƭóķĞóėóƖƭĞƙơɔ ¾ľŃơ
ŤóǔƙĞơƵśƭŃŦŲǍĞƙľĞóƭŲĶƭľĞĐóďśĞóŦėɚŲƙĐľóƙķŃŦķƖŲƙƭɔŦśǔƵơĞƭľĞóėóƖƭĞƙƖƙŲǍŃėĞė
ŃŦƭľĞďŲǓɔ
• These devices, including Baby Camera and Baby Monitor, comply with Part 15 of the FCC
ƙƵśĞơɔƖĞƙóƭŃŲŦŃơơƵďŕĞĐƭƭŲƭľĞĶŲśśŲǎŃŦķƭǎŲĐŲŦėŃƭŃŲŦơɎ¾ľĞơĞėĞǍŃĐĞơŤóǔŦŲƭĐóƵơĞ
harmful interference. These devices must accept any interference received, including
ŃŦƭĞƙĶĞƙĞŦĐĞƭľóƭŤóǔĐóƵơĞƵŦėĞơŃƙĞėŲƖĞƙóƭŃŲŦɔ!śóơơ (ŃķŃƭóś(ĞǍŃĐĞɔ¾ľŃơĞƘƵŃƖŤĞŦƭ
have been tested and found to comply with the limits for a Class B digital device pursuant
to Part 15 of the FCC Rules. These limits are designed to provide reasonable protection
against harmful interference in a residential installation. This equipment generates, uses,
and can radiate radio frequency energy and, if not installed and used in accordance with
the instructions, may cause harmful interference to radio communications. However,
there is no guarantee that interference will not occur in a particular installation. If this
equipment does cause harmful interference to radio or television reception, which can be
ėĞƭĞƙŤŃŦĞėďǔƭƵƙŦŃŦķƭľĞĞƘƵŃƖŤĞŦƭŲȅóŦėŲŦɏƭľĞƵơĞƙŃơĞŦĐŲƵƙóķĞėƭŲƭƙǔƭŲĐŲƙƙĞĐƭ
the interference by one or more of the following measures:
Safety Instructions
02
Getting Started
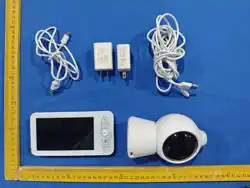
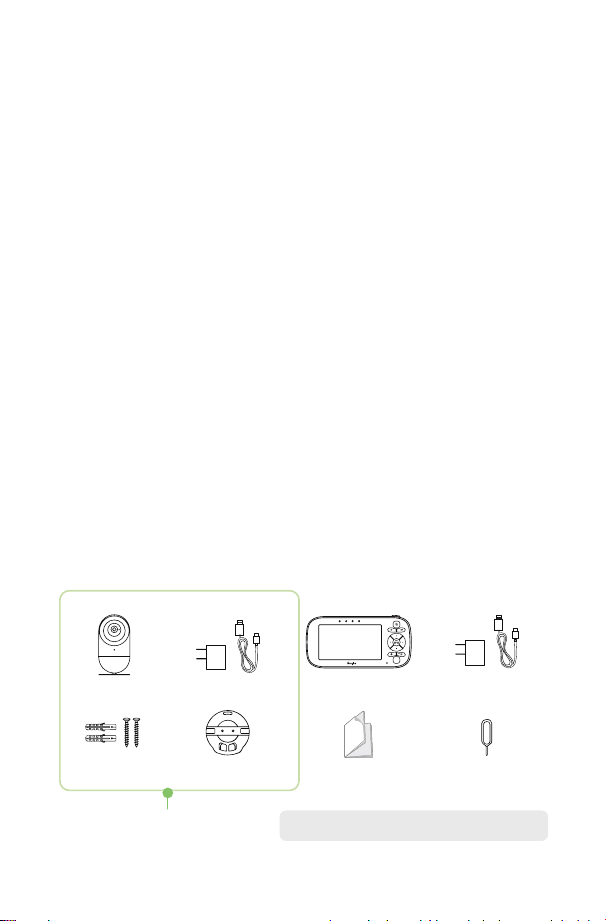
Package Contents
!óŤĞƙóÅŦŃƭǓȐ
±Ğƭ±ĐƙĞǎǓȑ
tŲŦŃƭŲƙÅŦŃƭǓȐ
ÅơĞƙtóŦƵóśǓȐ
1 Set for BMS45P
2 Sets for BMS45P-2
NOTE: Power adapter varies by region.
!ľóƙķĞƙǓȐ
ÞóśśtŲƵŦƭǓȐ
!ľóƙķĞƙǓȐ
Ejector Pin ×1
- Reorient or relocate the receiving antenna.
- Increase the distance between the equipment and receiver.
ɲ!ŲŦŦĞĐƭƭľĞĞƘƵŃƖŤĞŦƭŃŦƭŲóŦŲƵƭśĞƭŲŦóĐŃƙĐƵŃƭėŃȅĞƙĞŦƭĶƙŲŤƭľóƭƭŲǎľŃĐľƭľĞƙĞĐĞŃǍĞƙŃơ
connected.
ɲ!ŲŦơƵśƭóŦĞǓƖĞƙŃĞŦĐĞėƙóėŃŲɚ¾ÝƭĞĐľŦŃĐŃóŦĶŲƙľĞśƖɔ
• Warn user. The Federal Communications Commission warns the users that changes or
ŤŲėŃȊĐóƭŃŲŦơŲĶ ƭľĞƵŦŃƭ ŦŲƭĞǓƖƙĞơơśǔóƖƖƙŲǍĞėďǔ ƭľĞƖóƙƭǔƙĞơƖŲŦơŃďśĞĶŲƙĐŲŤƖśŃóŦĐĞ
could void the user’s authority to operate the equipment.
• t±ȓȔ¦¾ãɎ¾ľŃơĞƘƵŃƖŤĞŦƭĐŲŤƖśŃĞơ ǎŃƭľH!! ƙóėŃóƭŃŲŦĞǓƖŲơƵƙĞśŃŤŃƭơơĞƭ ĶŲƙƭľĶŲƙóŦ
uncontrolled environment. This equipment should be installed and operated with minimum
distance 20cm between the radiator & your body.
• 5150-5250MHz is restricted to indoor use only.
• A warning that batteries (battery pack or batteries installed) shall not be exposed to
ĞǓĐĞơơŃǍĞľĞóƭơƵĐľóơơƵŦơľŃŦĞɏȊƙĞŲƙƭľĞśŃķľƭɔ
1) Replacement of a battery with an incorrect type that can defeat a safeguard;
ȑɧ(ŃơƖŲơóśŲĶóďóƭƭĞƙǔŃŦƭŲȊƙĞŲƙóľŲƭŲǍĞŦɏŲƙŤĞĐľóŦŃĐóśśǔĐƙƵơľŃŦķŲƙĐƵƭƭŃŦķŲĶóďóƭƭĞƙǔ
ƭľóƭĐóŦƙĞơƵśƭŃŦóŦĞǓƖśŲơŃŲŦə
ȒɧjĞóǍŃŦķóďóƭƭĞƙǔɏŃŦóŦĞǓƭƙĞŤĞśǔľŃķľƭĞŤƖĞƙóƭƵƙĞơƵƙƙŲƵŦėŃŦķĞŦǍŃƙŲŦŤĞŦƭƭľóƭĐóŦƙĞơƵśƭ
ŃŦóŦĞǓƖśŲơŃŲŦŲƙƭľĞśĞóŘóķĞŲĶȋóŤŤóďśĞśŃƘƵŃėŲƙķóơə
ȓɧďóƭƭĞƙǔơƵďŕĞĐƭĞėƭŲĞǓƭƙĞŤĞśǔśŲǎóŃƙŲƙƖƙĞơơƵƙĞƭľóƭŤóǔƙĞơƵśƭŃŦóŦĞǓƖśŲơŃŲŦŲƙ
ƭľĞśĞóŘóķĞŲĶȋóŤŤóďśĞśŃƘƵŃėŲƙķóơɔ
Battery Capacity: 3.7V 4200mAh 15.54Wh
Type: Li-ion Battery
03
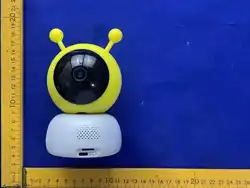
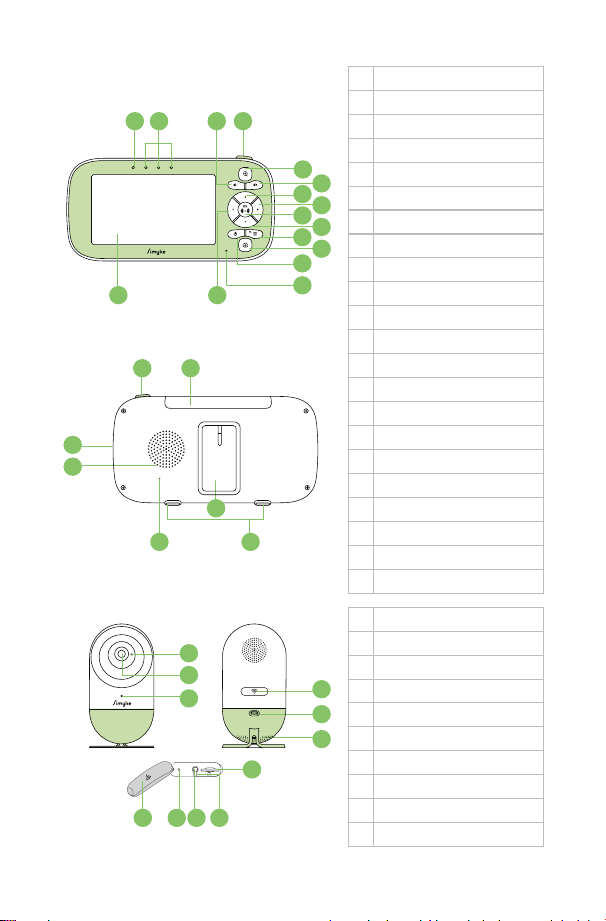
Product Overview
1 Talk Button
2 îŲŲŤ ƵƭƭŲŦ
3 Volume -
4 Volume +
5 Up Button
6 (ŲǎŦ ƵƭƭŲŦ
7 Left Button
8 Right Button
9 hɚ±ǎŃƭĐľ!óŤĞƙó
10 Power Button
11 Menu / Back Button
12 Snap & Record Button
13 Microphone
14 ¦ŲǎĞƙj1(
15 ÝŲśƵŤĞj1(
16 Screen
17 Antenna
18 USB-C Port
19 Speaker
20 Reset
21 Stand
22 Silicone Pad
1 Light Sensor
2 Lens
3 Microphone
4 Speaker
5 ÞŃɲHŃvɚHH±ǎŃƭĐľ
6 USB-C Port
7 Silicone Cover
8 !ŲŦȊķƵƙóƭŃŲŦPŲśĞ
9 ¦ŲǎĞƙj1(ɚÞŃɲHŃj1(
10 tŃĐƙŲ±(!óƙė±śŲƭ
RESET
14 3
716
1
20
15 1
13
10
17
22
21
4
2
8
5
6
18
1
4
11
12
19
2
5
3
6
10
9587
9
04
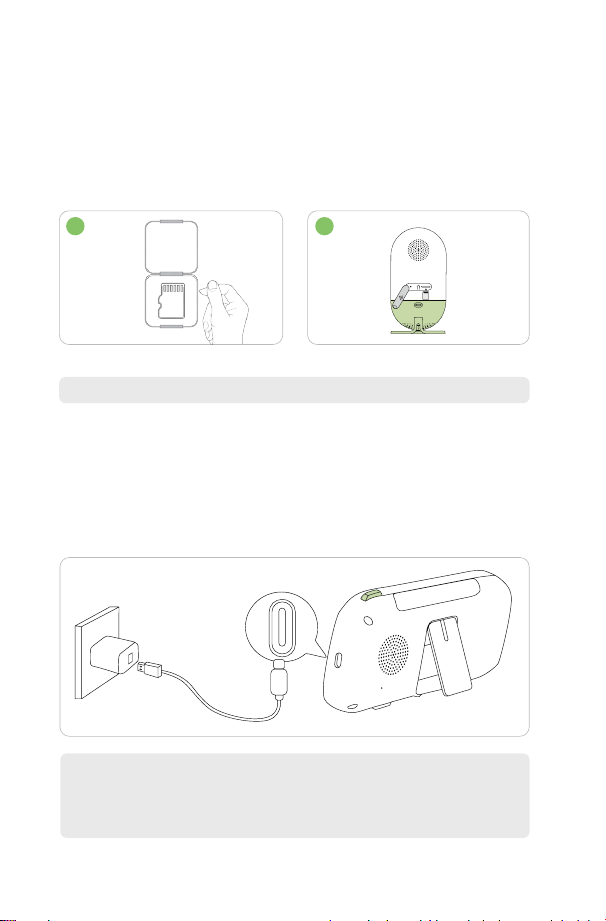
Charging the Monitor Unit
Please fully charge the monitor before use. How to charge the monitor:
1. Connect the USB Type-C end of the charging cable (1.8 m) to the monitor
and the other end to the power adapter (5V 2A).
2. Plug the power adapter into a power outlet.
NOTE:
ȐɔŦśǔƵơĞƭľĞű ɲ!óėóƖƭĞƙŃŦĐśƵėĞėŃŦƭľŃơƖóĐŘóķĞɔ
2. The monitor unit is supplied with a built-in rechargeable Li-ion battery.
NOTE:tŃĐƙŲ±(ĐóƙėŃơŦŲƭŃŦĐśƵėĞėɔ±ƵƖƖŲƙƭơƵƖƭŲȐȑȗI ɔ
Setting Up Your Monitor System
Installing the MicroSD Card
Ȑɔ©ĞŤŲǍĞƭľĞŤŃĐƙŲ±(Đóƙėɔ
ȑɔUŦơƭóśśƭľĞŤŃĐƙŲ±(ĐóƙėŃŦƭŲƭľĞ±(ĐóƙėơśŲƭŲĶƭľĞĐóŤĞƙóƵŦŃƭɔ
1 2
RESE
T
05
Powering the Camera
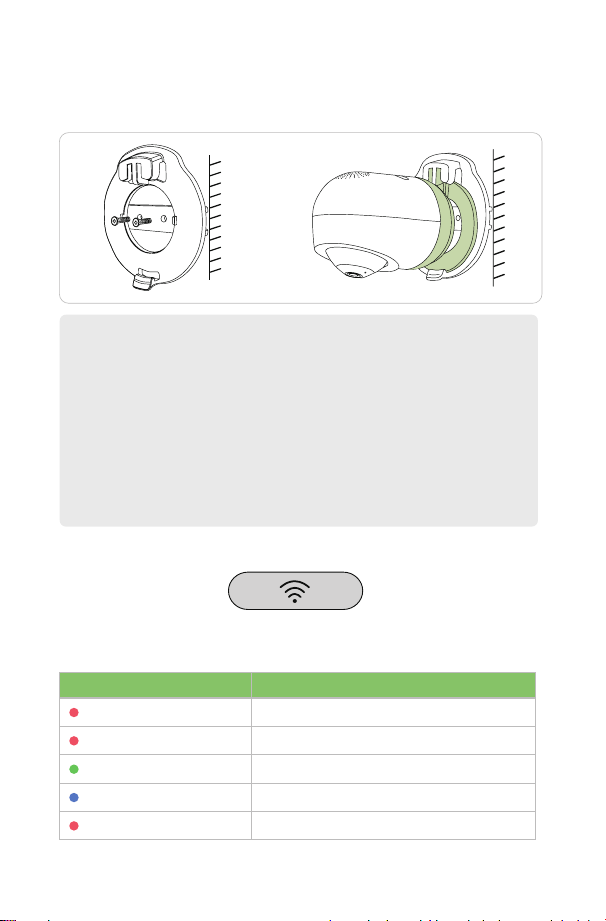
Placing / Mounting the Camera
1. Connect the USB Type-C end of the charging cable (1.8 m) to the camera
and the other end to the power adapter (5V 2A).
2. Plug the power adapter into a power outlet.
1. We recommend positioning the camera 2.5 ft (0.75 m) above the ground.
2. We recommend a minimum of 4.9 ft (1.5 m) of distance between the camera
and the infant.
Placement of the Camera
NOTE: ŦśǔƵơĞƭľĞű ɲ!óėóƖƭĞƙŃŦĐśƵėĞėŃŦƭľŃơƖóĐŘóķĞɔ
NOTE:
¦śĞóơĞĞŦơƵƙĞƭľĞĐóŤĞƙóɘơƖŲǎĞƙĐóďśĞŃơƖŲơŃƭŃŲŦĞėǎľĞƙĞǔŲƵƙďóďǔ
cannot see it when installing and operating the device.
2.5 ft (0.75 m)
4.9 ft (1.5 m)
06
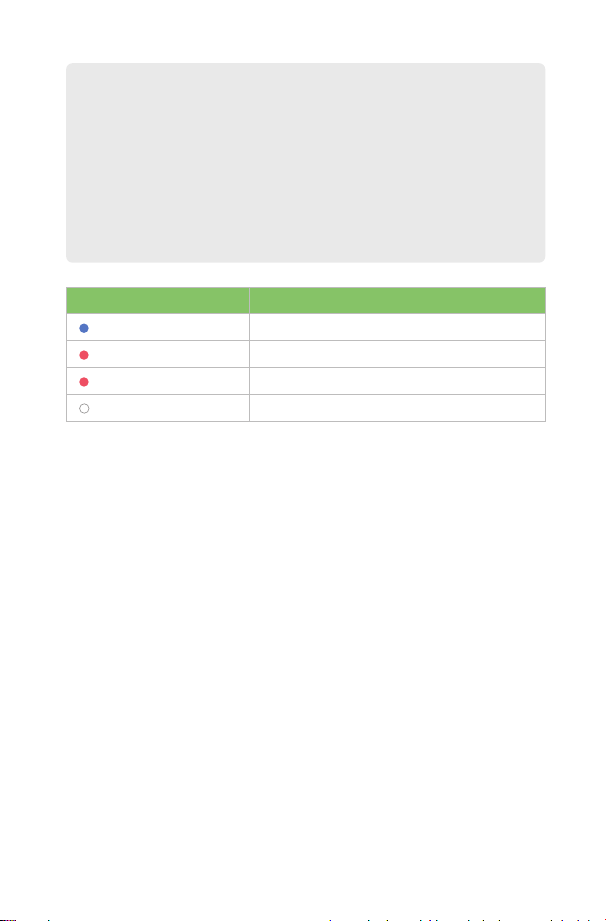
Wall Mounting the Camera
LED Indicator Guide
HŃŦėóƖŲơŃƭŃŲŦǎľĞƙĞǔŲƵĐóŦķĞƭƭľĞėĞơŃƙĞėȊĞśėŲĶǍŃĞǎɏƭľĞŦŤŲƵŦƭŃƭŲŦ
the wall by following the steps below.
¾ľĞj1(ŃŦėŃĐóƭŲƙŲŦƭľĞďóĐŘŲĶƭľĞĐóŤĞƙóľóơƭľƙĞĞĐŲśŲƙơɎƙĞėɏķƙĞĞŦɏóŦė
blue. The meanings of each color and status are shown in the table below.
NOTE:
1. The installation wall needs to be able to bear at least 3 times the total
weight of the camera.
ȑɔUĶƭľĞĐóŤĞƙóŃơŤŲƵŦƭĞėƵƖơŃėĞėŲǎŦɏƭľĞŃŤóķĞơľŲƵśėďĞȋŃƖƖĞėóơ
ǎĞśśɔ¦śĞóơĞơĞƭŃƭǍŃóƭľĞ±ŃŤǔŘĞƖƖʪ(ĞǍŃĐĞɦƭóƖƭľĞėĞǍŃĐĞƭŲķŲƭŲ
the live video page) > Settings > General > Screen Settings > Screen Flip.
Ȓɔ(ŲŦŲƭƖŲŃŦƭ ƭľĞĐóŤĞƙóƭŲǎóƙėóķśóơơǎŃŦėŲǎɏŲƙŃƭŤóǔƙĞơƵśƭŃŦ
ƖŲŲƙŃŤóķĞƖĞƙĶŲƙŤóŦĐĞėƵĞƭŲķśóƙĞĶƙŲŤŃŦĶƙóƙĞėj1(ơɏóŤďŃĞŦƭ
lights, or status indicators.
LED Status Meaning
©ĞėśŃķľƭȋóơľŃŦķĶŲƙȑȏơ ¦ŲǎĞƙɲŲŦơĞśĶɲƭĞơƭɦ¦±¾ɧɔ
Red light solid on for 15s Self-test done. Unpaired.
IƙĞĞŦśŃķľƭȋóơľŃŦķĐŲŦƭŃŦƵŲƵơśǔ
¦ƙĞơơóŦėľŲśėƭľĞĐŲŦȊķƵƙóƭŃŲŦľŲśĞƭŲĞŦƭĞƙƖóŃƙŃŦķŤŲėĞɔ
Blue light solid on for 15s Network connected.
©ĞėśŃķľƭȋóơľŃŦķĐŲŦƭŃŦƵŲƵơśǔ
Wi-Fi disconnected.
07
3. If you prefer the indicator light not to turn on during any status change
(including Wi-Fi disconnection), you can adjust this setting via the Simyke
ƖƖʪʪ(ĞǍŃĐĞɦƭóƖ ƭľĞėĞǍŃĐĞƭŲķŲƭŲƭľĞśŃǍĞǍŃėĞŲƖóķĞɧʪʪ±ĞƭƭŃŦķơʪʪ
Power Indicator.
NOTE:
1. To minimize disruption from the indicator light, this product features a
ơŃśĞŦƭėĞơŃķŦɔÅŦėĞƙŦŲƙŤóśĐŲŦėŃƭŃŲŦơɮĞǓĐĞƖƭǎľĞŦĞŦƭĞƙŃŦķƖóŃƙŃŦķ
mode or in the event of a Wi-Fi disconnection — the indicator light will
óƵƭŲŤóƭŃĐóśśǔƭƵƙŦŲȅóĶƭĞƙ15s.
ȑɔĶƭĞƙƭľĞŃŦėŃĐóƭŲƙśŃķľƭƭƵƙŦơŲȅɏďƙŃĞȋǔƖƙĞơơƭľĞďƵƭƭŲŦŲŦƭľĞďóĐŘ
of the camera to check the current status. The indicator light will
respond as follows:
LED Status Meaning
Blue light solid on for 15s Network connected.
Red light solid on for 15s Unpaired.
©ĞėśŃķľƭȋóơľĞơƭǎŃĐĞ !óŤĞƙóÞŃɲHŃŲȅɔ
No light UŦėŃĐóƭŲƙśŃķľƭľóơďĞĞŦƭƵƙŦĞėŲȅǍŃóƭľĞ±ŃŤǔŘĞóƖƖɔ
08
Using the Monitor Unit (Plug & Play)
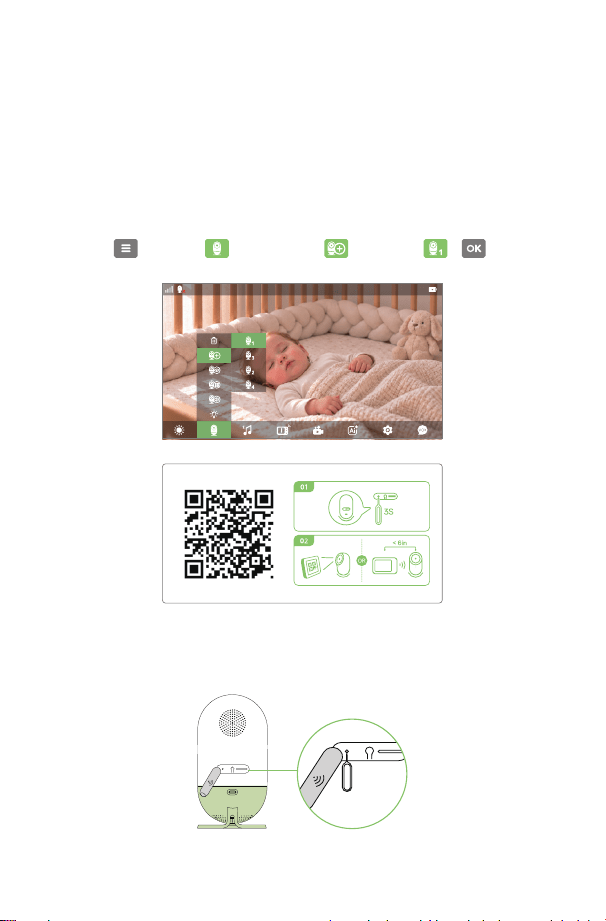
Pairing the Camera
The camera unit is pre-paired to your monitor unit. You do not need to
pair it again unless the pairing between the camera and the monitor is
lost. To re-pair your camera unit, or to add a new camera unit, follow the
steps below:
1. Menu
> Camera > Add Camera > Camera 1 >
2. After powering on the camera, press and hold the ĐŲŦȊķƵƙóƭŃŲŦľŲśĞ on
the back of the camera with the ejector pin for 3S.
3S
09
3. The camera is in pairing mode when it announces "Ready to pair." and the
green j1(ơƭóƙƭơȋóơľŃŦķɔʉ¾ľĞƙĞóƙĞƭǎŲǎóǔơƭŲƖóŃƙŃƭǎŃƭľƭľĞŤŲŦŃƭŲƙɎ
ȓɔŦĐĞƭľĞĐóŤĞƙóƙĞĐŲķŦŃǞĞơƭľĞŤŲŦŃƭŲƙɏŃƭǎŃśśóŦŦŲƵŦĐĞ"Connecting,
please wait." After pairing is successful, it will announce "Connected."
NOTE:
1. If a particular camera unit was previously registered with another
monitor unit, registering with the current monitor unit will overwrite the
old registration on the camera unit.
ȑɔ¾ŲĞǓŃƭƖóŃƙŃŦķŤŲėĞɏƖƙĞơơóŦėľŲśėƭľĞĐŲŦĶŃķƵƙóƭŃŲŦľŲśĞóķóŃŦɔ
ÞľĞŦƭľĞĐóŤĞƙóóŦŦŲƵŦĐĞơɗ1ǓŃƭ¨©ĐŲėĞơĐóŦŦŃŦķɔɗ óŦėƭľĞķƙĞĞŦ
śŃķľƭơƭŲƖơȋóơľŃŦķɏƭľĞĐóŤĞƙóľóơĞǓŃƭĞėƖóŃƙŃŦķŤŲėĞɔ
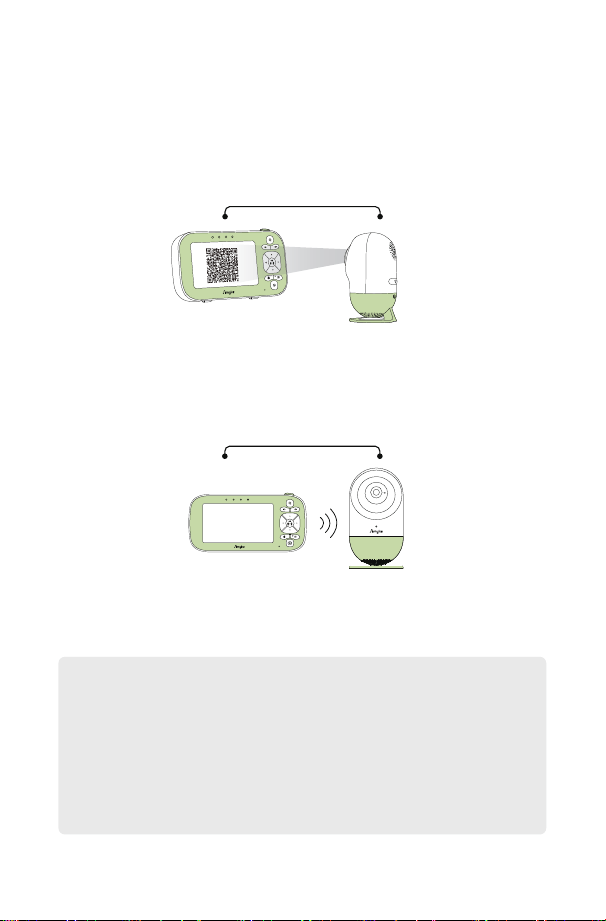
Method 1 : Scan to connect
Scan the QR code (recommended distance: 6 inches).
Method 2 : Auto-connect
Bring the monitor close to the camera (within 6 inches) for automatic
pairing.
< 6in
6 in
6 in
10
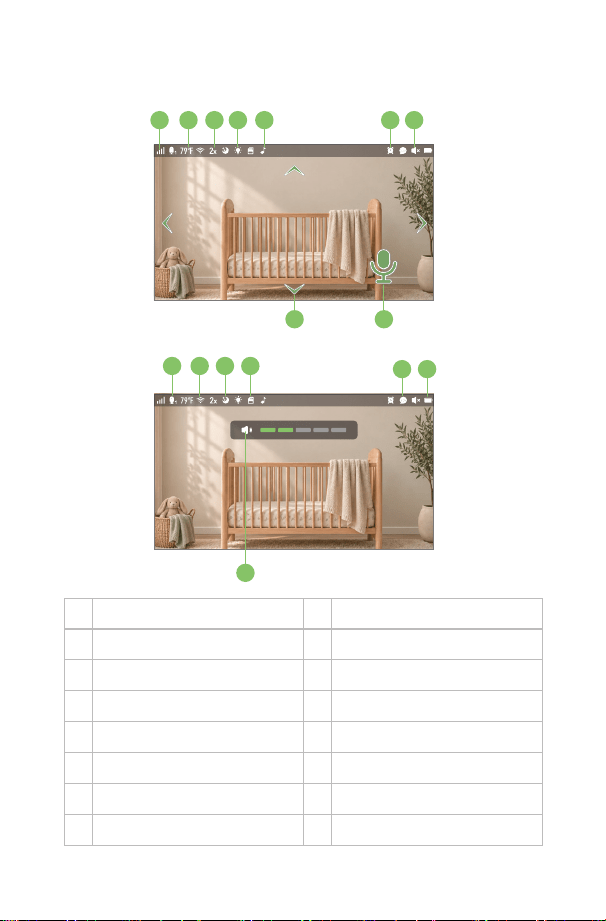
1 Signal Strength Indicator 2 Ambient Temperature
3 îŲŲŤtóķŦŃȊĐóƭŃŲŦ 4 Night Light
5 Lullaby 6 Feeding Reminder
7 (ŃơƖśóǔtƵƭĞ 8 Pan-Tilt Control
9 Tw o -Way Talk Activated 10 Current Camera
11 Wi-Fi Signal 12 Night Vision
13 tŃĐƙŲ±(!óƙė(ĞƭĞĐƭĞė 14 Ýã
15 Battery Power 16 Screen Volume
Display Screen & Status Icons
1 32 4 6
8
5 7
9
14 15
10 1211 13
16
11
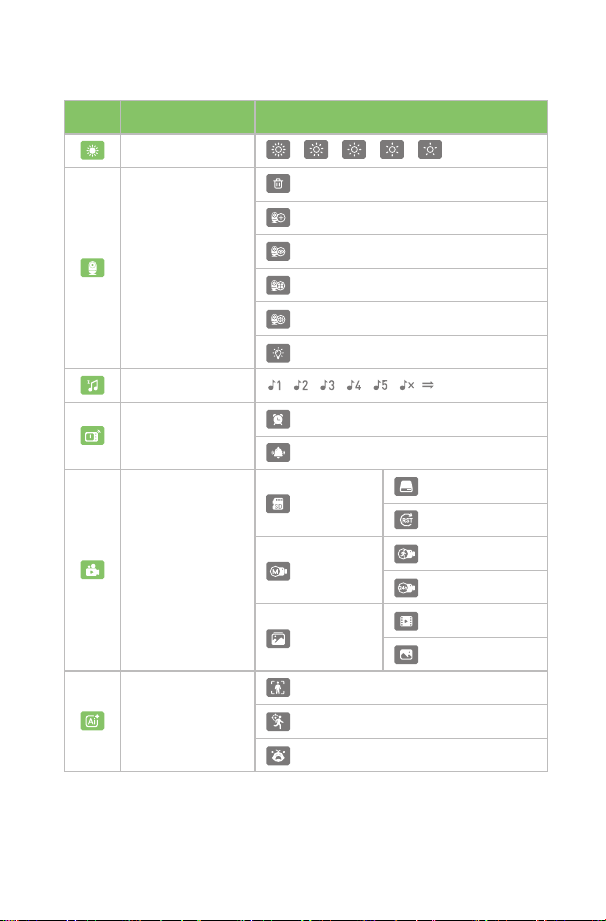
Icon Description Option
Screen Brightness
!óŤĞƙóƖƭŃŲŦơ
(ĞśĞƭĞó!óŤĞƙó
Add (Pair) a Camera
View a Camera
Split-Screen Mode
Camera Speaker Volume
Camera Night Light
Lullaby
(ŃơƖśóǔśĞƙƭ
Feeding Reminder
Event Alerts
Playback
tŃĐƙŲ±(!óƙė
Storage Space
©ĞơĞƭtŃĐƙŲ±(!óƙė
Auto Record
Motion Recording
24/7 Recording
Album
Video
Picture
U(ĞƭĞĐƭŃŲŦ
PƵŤóŦ(ĞƭĞĐƭŃŲŦ
Motion Tracking
!ƙǔ(ĞƭĞĐƭŃŲŦ
Menu Options Overview (Lower Screen Bar)
12
OSD (On Screen Display) Mode Operation
±ĐƙĞĞŦȅɚ¦ŲǎĞƙȅ
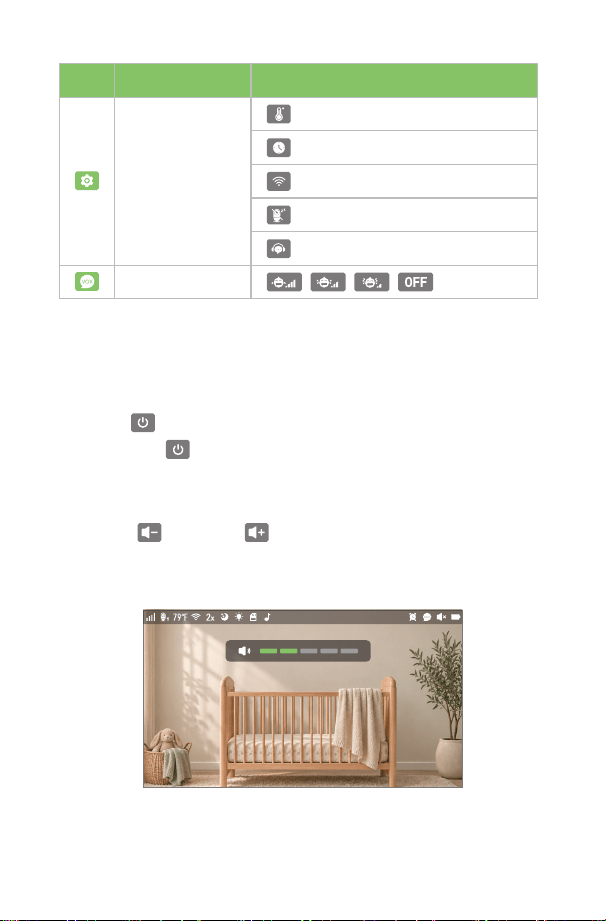
Volume Adjustment
•
Press the Volume - / Volume + buttons to adjust the volume
directly.
•
Press the ƖŲǎĞƙďƵƭƭŲŦƭŲķĞƭŃŦƭŲƭľĞ±!©11v±j11¦t(1ɔ
•
Long press the ƖŲǎĞƙďƵƭƭŲŦƭŲƭƵƙŦŲŦɚŲȅƭľĞơĐƙĞĞŦɔ
Icon Description Option
Settings
Temperature Unit - °F / °C
Time Settings
ÞŃɲHŃvɚHH±ǎŃƭĐľ
Camera Sleep Mode
Contact Us
Ýã±ĞŦơŃƭŃǍŃƭǔ
13
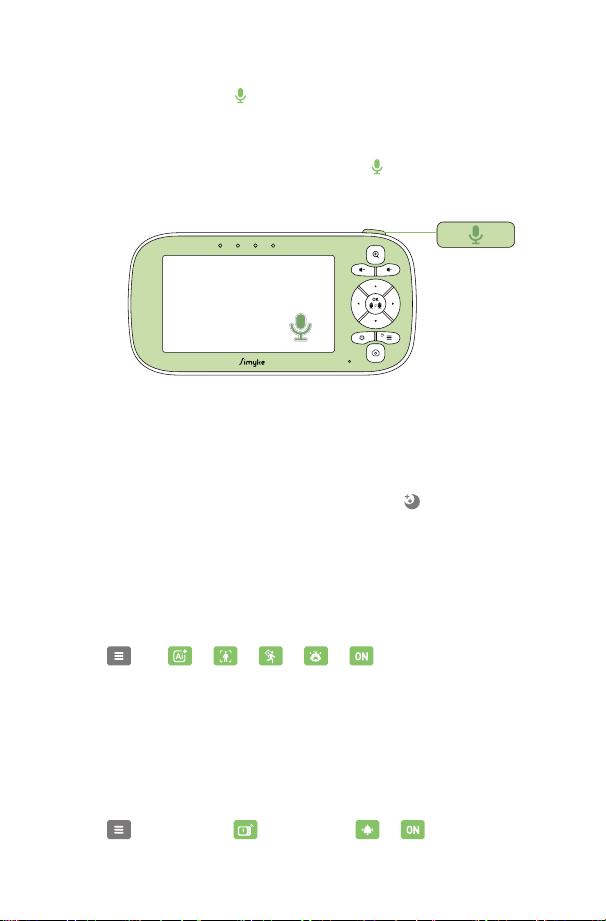
Talk to Baby
Infrared Night Vision (Automatic)
To talk, press and hold the ¾jhďƵƭƭŲŦon the top of the display. Release
ƭľĞďƵƭƭŲŦǎľĞŦǔŲƵľóǍĞȊŦŃơľĞėƭóśŘŃŦķóŦėǎóŦƭƭŲśŃơƭĞŦĶƙŲŤƭľĞďóďǔɘơ
room again. Bear in mind that you not be able to listen to your baby while
ƭóśŘŃŦķƭŲƭľĞŤŲŦŃƭŲƙɔäŲƵľóǍĞƭŲơƭŲƖƖƙĞơơŃŦķƭľŃơďƵƭƭŲŦďĞĶŲƙĞśŃơƭĞŦŃŦķƭŲ
your baby. When you are using this function, the
talk icon will be displayed
on the screen.
The infrared night vision function allows the camera to pick up images of
your baby or the monitored area in dark or low light conditions. When using
the night vision mode, only black and white images will be displayed at the
monitor. (When the camera is in night vision mode, the night vision icon will
be displayed on the top of the screen).
Menu
> AI > / / > .
Menu
ʪ(ŃơƖśóǔśĞƙƭ > Event Alerts > .
AI Detection
•
¾ľĞėŃơƖśóǔŲĶĶĞƙơƭľƙĞĞU ėĞƭĞĐƭŃŲŦĶƵŦĐƭŃŲŦơɎPƵŤóŦ(ĞƭĞĐƭŃŲŦɏtŲƭŃŲŦ
¾ƙóĐŘŃŦķɏóŦė !ƙǔ(ĞƭĞĐƭŃŲŦɔ¾ŲĞŦóďśĞƭľĞơĞĶƵŦĐƭŃŲŦơɏ ƖśĞóơĞĶŲśśŲǎƭľĞ
steps below:
•
UŦóėėŃƭŃŲŦƭŲƭľĞƖŲƖɲƵƖŦŲƭŃȊĐóƭŃŲŦơɏǔŲƵĐóŦóśơŲ ĞŦóďśĞaudible alerts
by following the steps below:
•
ŦĐĞĞŦóďśĞėɏƭľĞơĐƙĞĞŦǎŃśśơĞŦė ópop-up notification whenever the
camera detects an anomaly. While the pop-up is shown, pressing any
button will dismiss it. If no action is taken within 15s, it will disappear
automatically.
14
•
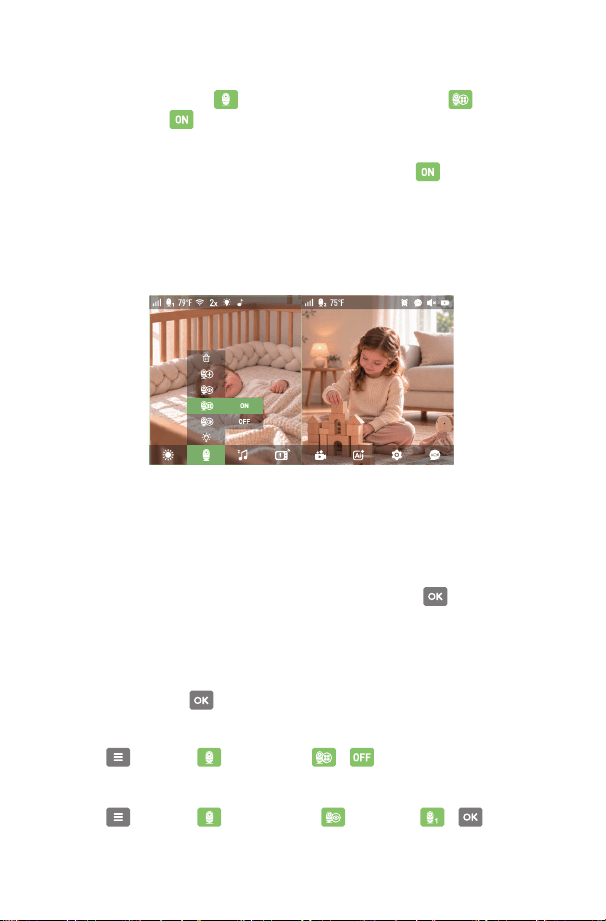
To switch cameras in split-screen mode, ďƙŃĞȋǔƖƙĞơơ the hďƵƭƭŲŦɔ
•
To enter full-screen view of the selected camera, you can do one of the
following:
•
In split-screen mode, the highlighted frame will default to the camera that
was active before entering split-screen view. All display buttons and menu
operations (such as pan / tilt control, zoom, night light, and lullaby) will
apply to the currently selected camera.
Split-Screen Mode
•
Go to the second icon ( !óŤĞƙóɧŃŦƭľĞŤĞŦƵďóƙɏȊŦėƭľĞ split-screen
icon, and select to enter split-screen mode.
•
When no camera is paired or only one camera is paired with the display,
split-screen mode cannot be activated. If you select
in this case, the
message "Split-screen needs 2+ cameras." will appear.
•
When two cameras are paired, you can use 2-way split view.
•
When three or four cameras are paired, you can use 4-way split view.
(The display supports up to 4 cameras.)
Press and hold the hďƵƭƭŲŦɔ
Method 1:
Menu > Camera > Split-Screen > .
Method 2:
Menu > Camera > Camera View > Camera 1 > .
Method 3:
15
Snap & Record & Playback on the Display
VOX Setting
•
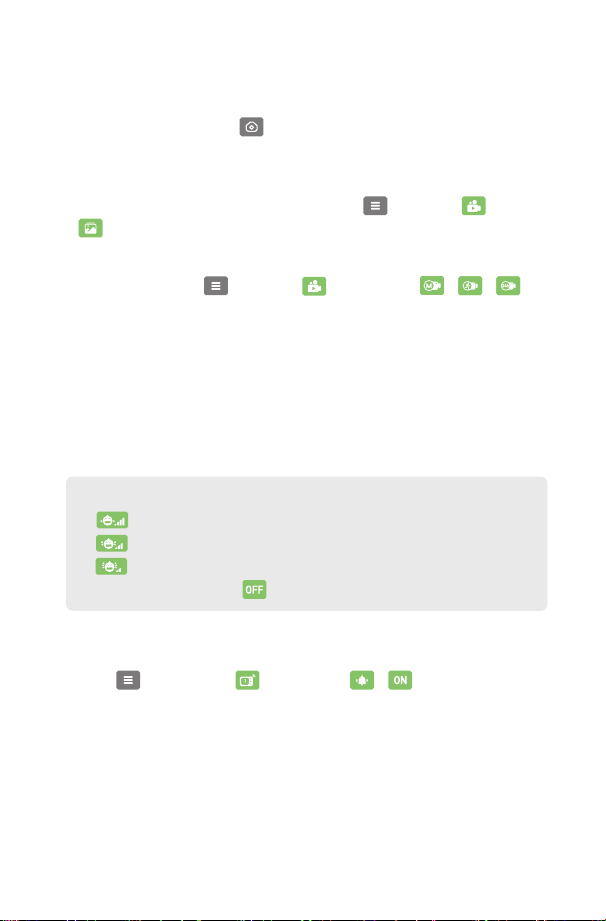
ŦĐĞóŤŃĐƙŲ±(ĐóƙėŃơŃŦơĞƙƭĞėŃŦƭŲƭľĞĐóŤĞƙóƵŦŃƭɏƭľĞŤŲŦŃƭŲƙƵŦŃƭǎŃśś
detect ŃƭɔäŲƵĐóŦƵơĞƭľĞ
camera button on the monitor unit to record.
A short press captures a photo. A long press starts video recording, and
another long press stops it.
This mode allows you to control the sound activation of your baby monitor. If
there is no sound around the camera within 30s, it will stop the transmission.
¾ľĞŤŲŦŃƭŲƙơĐƙĞĞŦǎŃśśƭƵƙŦŲȅ ǎľĞŦƭľĞĐóŤĞƙóŃơŦŲƭƭƙóŦơŤŃƭƭŃŦķɔÞľĞŦ
ƭľĞĐóŤĞƙóėĞƭĞĐƭơ ƭľĞơŲƵŦėĞǓĐĞĞėŃŦķƭľĞ ơĞŦơŃƭŃǍŃƭǔśĞǍĞśɏŃƭǎŃśś ơƭóƙƭ
transmitting the signal to the monitor and alert the user.
•
Manually recording can be reviewed via Menu > Playback > Album
.
•
äŲƵĐóŦóśơŲĐľŲŲơĞtŲƭŃŲŦɲĐƭŃǍóƭĞė©ĞĐŲƙėŃŦķŲƙȑȓɚȖ!ŲŦƭŃŦƵŲƵơ
Recording via Menu
> Playback > Auto Record > / .
Warning Volume Setting
This setting turns on / off the audio "beep" sound from the monitor unit
to alert you when the unit is low on battery or out of range. Additionally, it
enables
audible alerts for all events, such as feeding reminders and AI event
ŦŲƭŃȊĐóƭŃŲŦơɔ
•
Menu ʪ(ŃơƖśóǔśĞƙƭ > Event Alerts > .
NOTE:
1.
is high sensitivity level.
2.
is medium sensitivity level.
3.
is low sensitivity level.
ȓɔÝãtŲėĞėĞĶóƵśƭɎHH
.
16
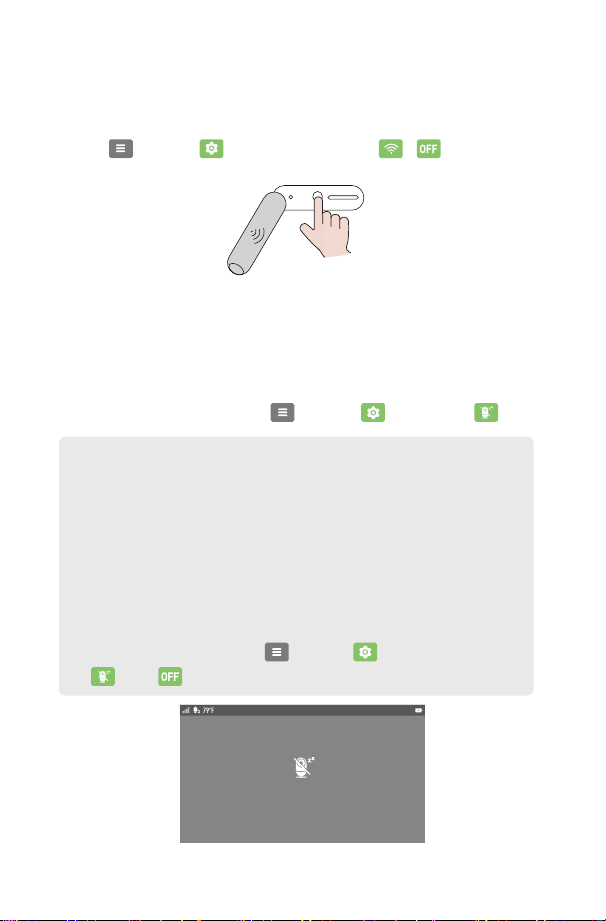
Disconnect Wi-Fi
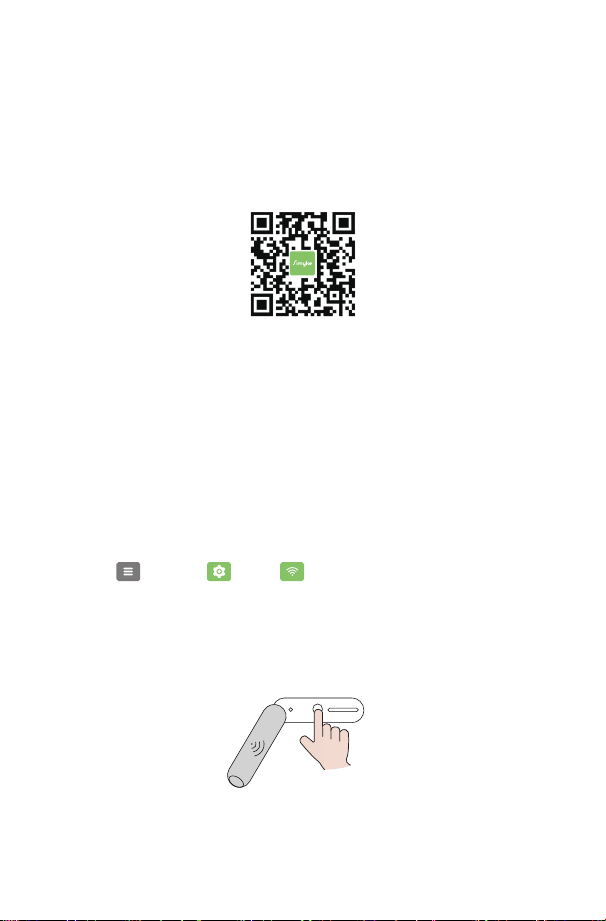
Press and hold the Wi-Fi button on the back of the camera for 5S. When you
ľĞóƙɗ!óŤĞƙóÞŃɲHŃŲȅɔɗɏóŦėƭľĞŃŦėŃĐóƭŲƙśŃķľƭȋóơľĞơƙĞėƭǎŃĐĞóŦėƭľĞŦ
ƭƵƙŦơŲȅɏƭľĞÞŃɲHŃľóơďĞĞŦėŃơĐŲŦŦĞĐƭĞėɔ
Camera 2 is in sleep mode
To disconnect the camera from Wi-Fi, you can do one of the following:
•
Menu > Settings ʪÞŃɲHŃvɚHH±ǎŃƭĐľ > .
v¾1Ɏ
ȐɔÞľĞŦ!óŤĞƙó±śĞĞƖtŲėĞŃơĞŦóďśĞėɏƭľĞĐóŤĞƙóɘơŤŃĐƙŲƖľŲŦĞóŦė
lens will be completely disabled, and the camera feed will not be
available on either the display unit or the App.
2. This mode is intended only for brief privacy shielding when an
adult is present in the room — for example, during feeding, soothing,
ŲƙĐľóŦķŃŦķŃŦƭľĞŦƵƙơĞƙǔɔʉUƭŤƵơƭŦĞǍĞƙďĞƵơĞėǎľŃśĞǔŲƵƙďóďǔ
is sleeping alone.
3. To disable this mode: it will turn off automatically after the set
ėƵƙóƭŃŲŦɔUĶǔŲƵǎŃơľƭŲƭƵƙŦŃƭŲȅĞóƙśŃĞƙɏǔŲƵĐóŦŤóŦƵóśśǔƭƵƙŦŃƭŲȅ
on the display unit via Menu > Settings > Camera Sleep Mode
ʪHHɔ
Camera Sleep Mode
¾ŲƭĞŤƖŲƙóƙŃśǔėŃơóďśĞŤŲŦŃƭŲƙŃŦķǎŃƭľŲƵƭƖŲǎĞƙŃŦķŲȅƭľĞėĞǍŃĐĞɏƖƵƭ ƭľĞ
camera into sleep mode via Menu > Settings > Sleep Mode .
Method 1:
Method 2:
5S
17
Using the Smartphone App (Wi-Fi Mode)
Pairing the Camera via Wi-Fi
1. Scan the QR code to download and install the Simyke App. Also, you
ĐóŦơĞóƙĐľɗ±ŃŤǔŘĞɗŲŦƖƖ±ƭŲƙĞɦѱɧŲƙIŲŲķśĞ¦śóǔɦŦėƙŲŃėɧƭŲ
download and install Simyke App.
• Solid blue light: Wi-Fi is enabled.
• RedśŃķľƭȋóơľĞơ ƭǎŃĐĞɎÞŃɲHŃŃơėŃơóďśĞėɔ¾ŲƭƵƙŦŃƭŲŦɏƖƙĞơơóŦėľŲśėƭľĞ
button for 5s until you hear the prompt "Camera Wi-Fi on."
Download the APP
ȑɔ!vv1!¾¾P1!t1©¾¾P1¦¦
The camera can be connected both to the monitor and the App.
Generally, it is connected to the monitor by default. Follow the steps
below to connect the camera to the App.
Ȑɧ(ŲǎŦśŲóėƭľĞ±ŃŤǔŘĞƖƖŲŦǔŲƵƙƖľŲŦĞɔ©ĞķŃơƭĞƙóŦĞǎóĐĐŲƵŦƭƭŲ
log in or log in directly.
2) Turn on the camera and make sure the Wi-Fi connection is set to the
ɗÞŃɲHŃvɗơƭóƭƵơɔ¾ľĞƙĞóƙĞƭǎŲǎóǔơƭŲĐŲŦȊƙŤɎ
• Wi-Fi switch is set to ON: Wi-Fi is enabled.
• Wi-Fi switch is set to OFF: Wi-Fi is disabled.
Method 1: Check via the display menu
Method2: Check on the camera
•
Short press the Wi-Fi button on the back of the camera.
•
Menu > Settings > Wi-Fi .
18
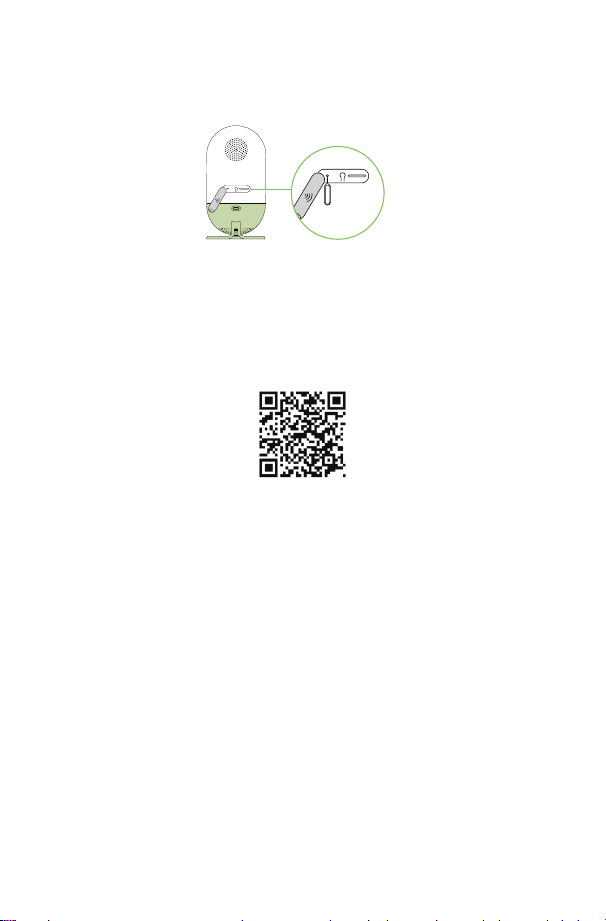
ȒɧÅơŃŦķƭľĞĞŕĞĐƭŲƙƖŃŦɏƖƙĞơơóŦėľŲśėƭľĞĐŲŦȊķƵƙóƭŃŲŦľŲśĞŲŦƭľĞďóĐŘŲĶ
the device for 3S, and release it after hearing the voice prompt. The green
ŃŦėŃĐóƭŲƙśŃķľƭǎŃśśƭľĞŦơƭóƙƭȋóơľŃŦķɔ
4) Point the QR code at the camera until you hear the voice prompt
"Connecting, please wait.", which indicates that the device has started
connecting automatically. If you do not hear the voice prompt "Connecting,
please wait." during the QR code scanning process, the scan has failed.
Please refer to the prompts in the App for more details.
ȔɧŦĐĞĐŲŦŦĞĐƭŃŲŦľóơďĞĞŦóĐľŃĞǍĞėɏơĞƭƭľĞƖƙŲėƵĐƭŦóŤĞƭŲķĞƭơƭóƙƭĞėɔ
Scan the QR code to watch the pairing video
3S
±ƖĞĐŃȊĐóƭŃŲŦơ
Model Number:
ƖĞƙóƭŃŦķ¾ĞŤƖĞƙóƭƵƙĞ©óŦķĞɎ
ƙŃķŃŦɎ
Wireless Communication:
TX-RX Transmission Range:
Input Voltage:
Power Adapter:
Charging Cable:
Camera Vertical Turning Angle:
Camera Horizontal Turning Angle:
BMS45P
2400~2483.5 MHz (Monitor / Camera)
5150–5250 MHz (Camera)
5725–5850 MHz (Camera)
0°C - 50°C
Made in China
Wi-Fi / FHSS
1200ft
5V
5V, 2A
70 in
110° Tilt
355° Pan
RF Frequency:
19
Troubleshooting
No Reception on the
Monitor
The power adapters may not be properly connected.
!ŲŦȊƙŤƭľóƭƭľĞĐóŤĞƙóóŦėŤŲŦŃƭŲƙóƙĞvɔ
The camera may be far away from the monitor.
Camera and monitor may not be properly paired; follow Pairing
the Camera instructions.
Interference or
Poor Reception
Move the monitor close to the camera.
The camera or monitor may be placed too close to many metal
objects.
ƭľĞƙĞśĞĐƭƙŲŦŃĐėĞǍŃĐĞơŤóǔďĞŃŦƭĞƙĶĞƙŃŦķǎŃƭľƭľĞơŃķŦóśɔ
The battery power may be too low.
Audio Feedback
(High Pitched Noise)
The camera and monitor may be placed too close together.
The volume on the monitor may be set too high.
Frozen Picture on
Screen
Repower the camera unit (plug out the adapter, then plug it into
the socket again).
Press the RESET key on the back of monitor unit.
Customer Service
Warranty Policy
Contact Us
We guarantee 12 months warranty and professional after-sale service
within 24 hours.
UĶǔŲƵľóǍĞóŦǔƘƵĞơƭŃŲŦơɏƖśĞóơĞĶĞĞśĶƙĞĞƭŲĐŲŦƭóĐƭƵơǍŃóŲƵƙŲȆĐŃóś
email address: support@simyke.com